External Web Authentication Using a RADIUS Server
Available Languages
Contents
Introduction
This document explains how to perform external web authentication using an external RADIUS Server.
Prerequisites
Requirements
Ensure that you meet these requirements before you attempt this configuration:
-
Basic knowledge of the configuration of Lightweight Access Points (LAPs) and Cisco WLCs
-
Knowledge of how to set up and configure an external web server
-
Knowledge of how to configure Cisco Secure ACS
Components Used
The information in this document is based on these software and hardware versions:
-
Wireless LAN Controller that runs Firmware version 5.0.148.0
-
Cisco 1232 series LAP
-
Cisco 802.11a/b/g Wireless Client Adapter 3.6.0.61
-
External web server that hosts the web authentication login page
-
Cisco Secure ACS version that runs firmware version 4.1.1.24
The information in this document was created from the devices in a specific lab environment. All of the devices used in this document started with a cleared (default) configuration. If your network is live, make sure that you understand the potential impact of any command.
Network Diagram
This document uses this network setup:
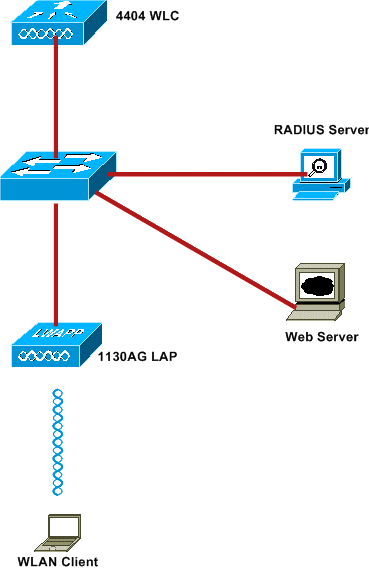
These are the IP addresses used in this document:
-
WLC uses the IP address 10.77.244.206
-
LAP is registered to WLC with IP address 10.77.244.199
-
Web Server uses the IP address 10.77.244.210
-
Cisco ACS server uses the IP address 10.77.244.196
-
Client receives an IP address from the Management Interface that is mapped to the WLAN - 10.77.244.208
Conventions
Refer to the Cisco Technical Tips Conventions for more information on document conventions.
External Web Authentication
Web Authentication is a Layer 3 authentication mechanism used to authenticate guest users for internet access. Users authenticated using this process will not be able to access the Internet until they successfully complete the authentication process. For complete information on the external web authentication process, read the section External Web Authentication Process of the document External Web Authentication with Wireless LAN Controllers Configuration Example.
In this document, we look at a configuration example, in which the external web authentication is performed using an external RADIUS server.
Configure the WLC
In this document, we assume that the WLC is already configured and has a LAP registered to the WLC. This document further assumes that the WLC is configured for basic operation and that the LAPs are registered to the WLC. If you are a new user trying to set up the WLC for basic operation with LAPs, refer to Lightweight AP (LAP) Registration to a Wireless LAN Controller (WLC). To view the LAPs that are registered to the WLC, navigate to Wireless > All APs.
Once the WLC is configured for basic operation and has one or more LAPs registered to it, you can configure the WLC for external web authentication using an external web server. In our example, we are using a Cisco Secure ACS version 4.1.1.24 as the RADIUS server. First, we will configure the WLC for this RADIUS server, and then we will look the configuration required on the Cisco Secure ACS for this setup.
Configure the WLC for Cisco Secure ACS
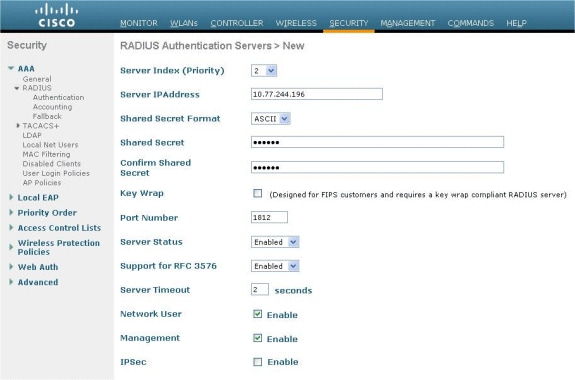
Perform these steps in order to add the RADIUS server on the WLC:
-
From the WLC GUI, click the SECURITY menu.
-
Under AAA menu, navigate to the Radius > Authentication submenu.
-
Click New, and enter the IP address of the RADIUS server. In this example, the IP address of the server is 10.77.244.196.
-
Enter the Shared Secret in the WLC. The Shared Secret should be configured the same on the WLC.
-
Choose either ASCII or Hex for Shared Secret Format. The same format needs to be chosen on the WLC.
-
1812 is the Port Number used for RADIUS authentication.
-
Ensure that the Server Status option is set to Enabled.
-
Check the Network User Enable box to authenticate the network users.
-
Click Apply.
Configure the WLAN on WLC for Web Authentication
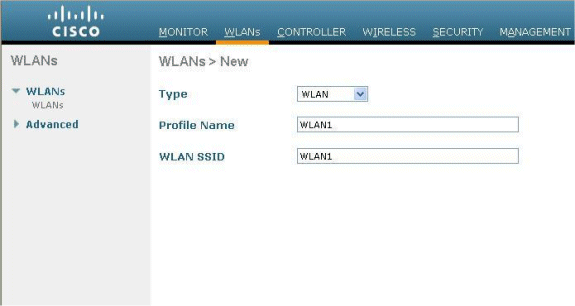
The next step is to configure the WLAN for web authentication on WLC. Perform these steps in order to configure the WLAN on WLC:
-
Click the WLANs menu from the controller GUI, and choose New.
-
Choose WLAN for Type.
-
Enter a Profile Name and a WLAN SSID of your choice, and click Apply.
Note: The WLAN SSID is case sensitive.
-
Under the General tab, make sure that the Enabled option is checked for both Status and Broadcast SSID.
WLAN Configuration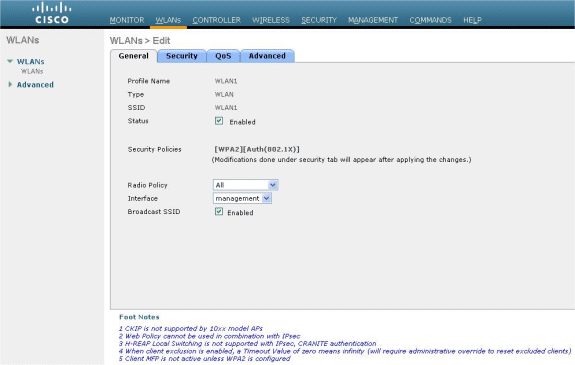
-
Choose an interface for the WLAN. Typically, an interface configured in a unique VLAN is mapped to the WLAN so that the client receives an IP address in that VLAN. In this example, we use management for Interface.
-
Choose the Security tab.
-
Under the Layer 2 menu, choose None for Layer 2 Security.
-
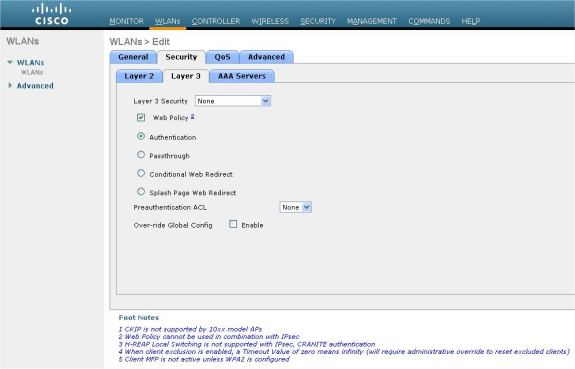
Under the Layer 3 menu, choose None for Layer 3 Security. Check the Web Policy checkbox, and choose Authentication.
-
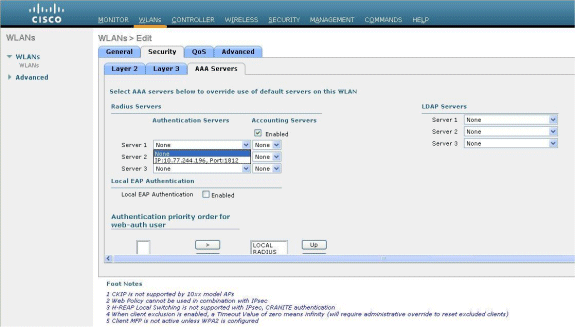
Under the AAA servers menu, for Authentication Server, choose the RADIUS server that was configured on this WLC. Other Menus should remain at default values.
Configure the Web Server Information on WLC
The web server that hosts the Web Authentication page should be configured on the WLC. Perform these steps to configure the web server:
-
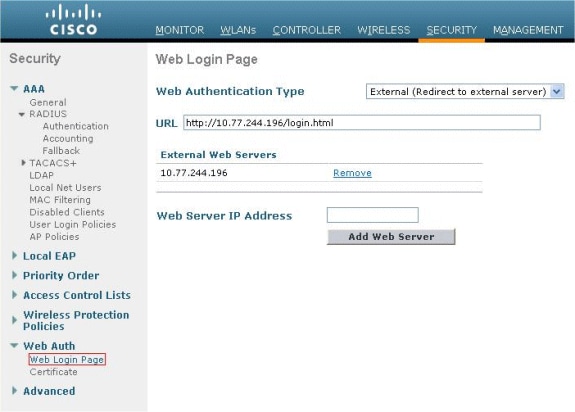
Click the Security tab. Go to Web Auth > Web Login Page.
-
Set the web Authentication Type as External.
-
In the Web Server IP Address field, enter the IP address of the server that hosts the Web Authentication page, and click Add Web Server. In this example, the IP address is 10.77.244.196, which appears under External Web Servers.
-
Enter the URL for the Web Authentication page (in this example, http://10.77.244.196/login.html) in the URL field.
Configure the Cisco Secure ACS
In this document we assume that Cisco Secure ACS Server is already installed and running on a machine. For more information how to setup Cisco Secure ACS refer to the Configuration Guide for Cisco Secure ACS 4.2.
Configure the User Information on Cisco Secure ACS
Perform these steps in order to configure users on the Cisco Secure ACS:
-
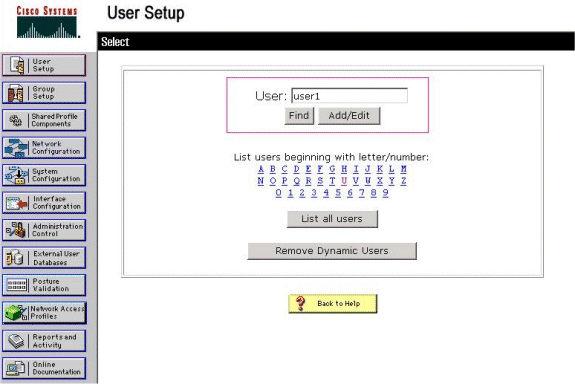
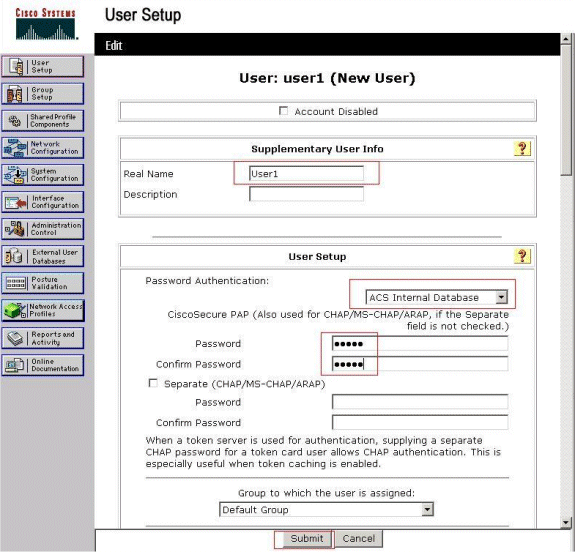
Choose User Setup from the Cisco Secure ACS GUI, enter a username, and click Add/Edit. In this example, the user is user1.
-
By default, PAP is used for authenticating clients. The password for the user is entered under User Setup > Password Authentication > Cisco Secure PAP. Make sure you choose ACS Internal Database for Password Authentication.
-
The user needs to be assigned a group to which the user belongs. Choose the Default Group.
-
Click Submit.
Configure the WLC Information on Cisco Secure ACS
Perform these steps in order to configure WLC information on Cisco Secure ACS:
-
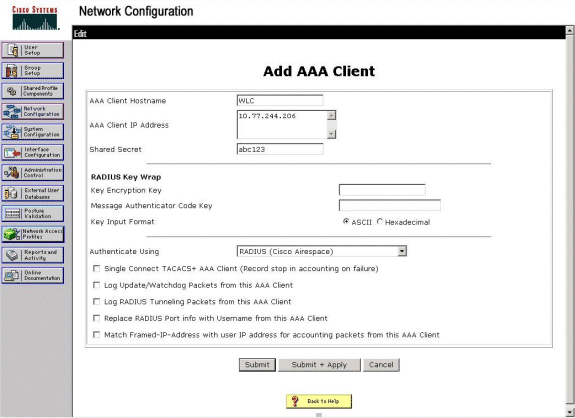
In the ACS GUI, click the Network Configuration tab, and click Add Entry.
-
The Add AAA client screen appears.
-
Enter the name of the client. In this example, we use WLC.
-
Enter the IP address of the client. The WLC's IP address is 10.77.244.206.
-
Enter the Shared Secret key and the key format. This should match the entry made in the WLC's Security menu.
-
Choose ASCII for the Key Input Format, which should be the same on the WLC.
-
Choose RADIUS (Cisco Airespace) for Authenticate Using in order to set the protocol used between the WLC and the RADIUS Server.
-
Click Submit + Apply.
Client Authentication Process
Client Configuration
In this example, we use Cisco Aironet Desktop Utility to perform web authentication. Perform these steps in order to configure the Aironet Desktop Utility.
-
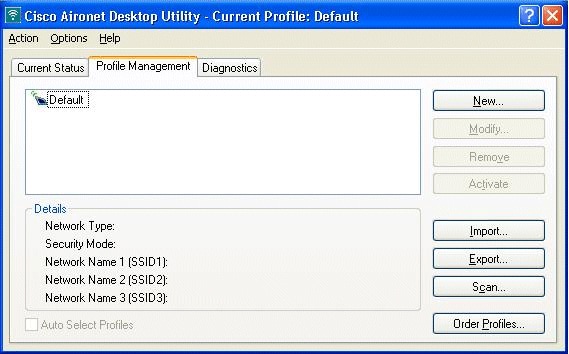
Open the Aironet Desktop Utility from Start > Cisco Aironet > Aironet Desktop Utility.
-
Click on the Profile Management tab.
-
Choose the Default profile, and click Modify.
-
Click the General tab.
-
Configure a Profile Name. In this example, Default is used.
-
Configure the SSID under Network Names. In this example, WLAN1 is used.
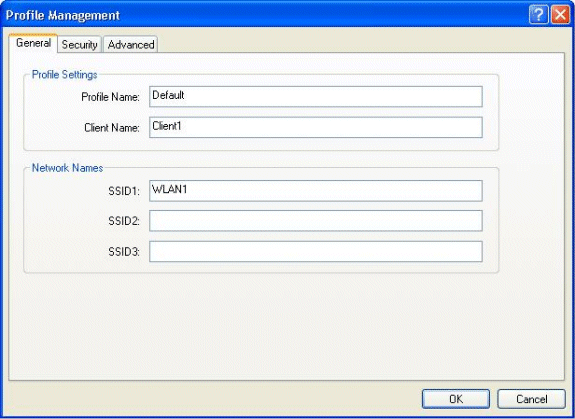
Note: The SSID is case sensitive and it should match the WLAN configured on the WLC.
-
-
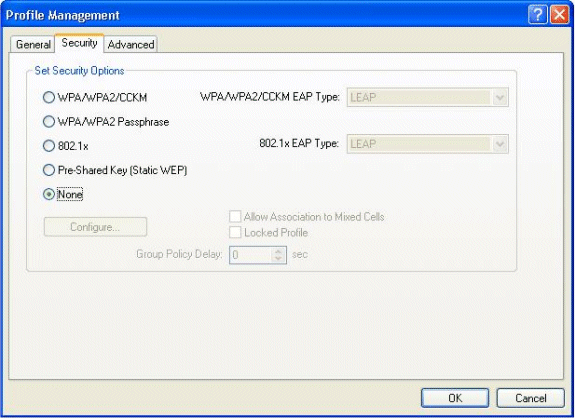
Click the Security tab.
Choose None as Security for web authentication.
-
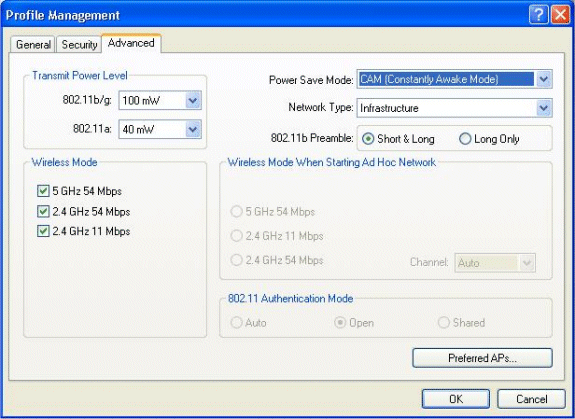
Click the Advanced tab.
-
Under the Wireless Mode menu, choose the frequency at which the wireless client communicates with the LAP.
-
Under the Transmit Power Level, choose the Power that is configured on the WLC.
-
Leave the default value for Power Save Mode.
-
Choose Infrastructure as the Network Type.
-
Set the 802.11b Preamble as Short & Long for better compatibility.
-
Click OK.
-
-
-
Once the Profile is configured on the client software, the client is associated successfully and receives an IP address from the VLAN pool configured for management interface.
Client Login Process
This section explains how client login occurs.
-
Open a browser window and enter any URL or IP Address. This brings the web authentication page to the client. If the controller is running any release earlier than 3.0, the user must enter https://1.1.1.1/login.html to bring up the web authentication page. A security alert window displays.
-
Click Yes in order to proceed.
-
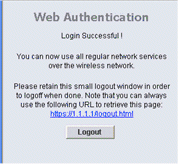
When the Login window appears, enter the username and password that is configured on the RADIUS Server. If your login is successful, you will see two browser windows. The larger window indicates successful login, and you can this window to browse the Internet. Use the smaller window in order to log out when your use of the guest network is complete.
Verify
For a successful web authentication, you need to check if the devices are configured in an appropriate manner. This section explains how to verify the devices used in the process.
Verify ACS
-
Click User Setup, and then click List All Users on the ACS GUI.
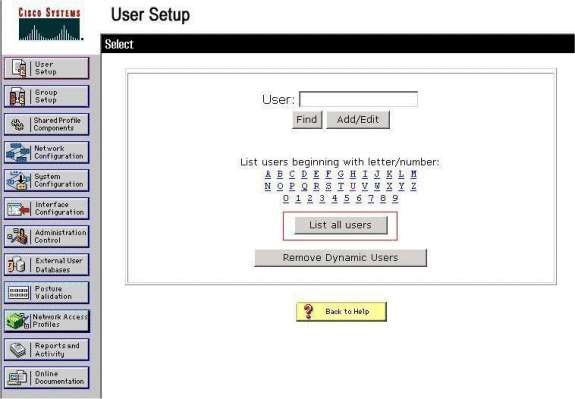
Make sure the Status of the User is Enabled and that the Default group is mapped to the user.

-
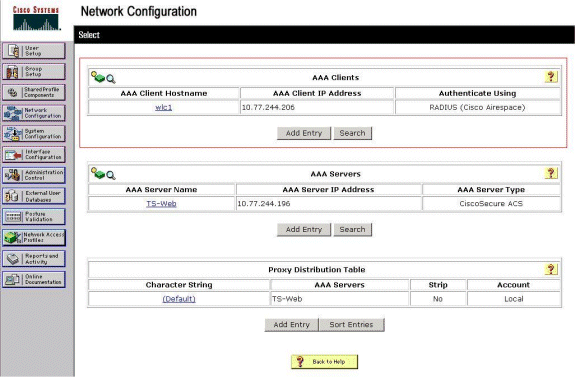
Click the Network Configuration tab, and look in the AAA Clients table in order to verify that the WLC is configured as an AAA client.
Verify WLC
-
Click the WLANs menu from the WLC GUI.
-
Make sure the WLAN used for web authentication is listed on the page.
-
Make sure Admin Status for the WLAN is Enabled.
-
Make sure the Security Policy for the WLAN shows Web-Auth.

-
-
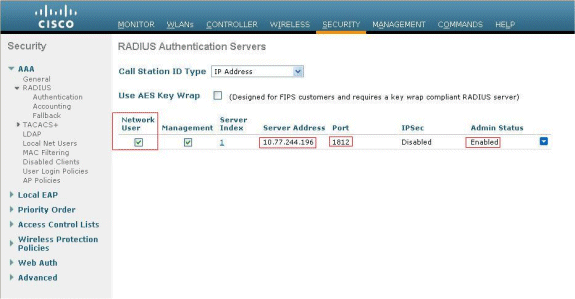
Click the SECURITY menu from the WLC GUI.
-
Make sure Cisco Secure ACS (10.77.244.196) is listed on the page.
-
Make sure the Network User box is checked.
-
Make sure the Port is 1812 and that the Admin Status is Enabled.
-
Troubleshoot
There are many reasons why a web authentication is not successful. The document Troubleshooting Web Authentication on a Wireless LAN Controller (WLC) clearly explains those reasons in detail.
Troubleshooting Commands
Note: Refer to Important Information on Debug Commands before you use these debug commands.
Telnet into the WLC and issue these commands to troubleshoot authentication:
-
debug aaa all enable
Fri Sep 24 13:59:52 2010: 00:40:96:ac:dd:05 Successful transmission of Authentic ation Packet (id 1) to 10.77.244.196:1812, proxy state 00:40:96:ac:dd:05-00:01 Fri Sep 24 13:59:52 2010: 00000000: 01 01 00 73 00 00 00 00 00 00 00 00 00 00 0 0 00 ...s............ Fri Sep 24 13:59:52 2010: 00000010: 00 00 00 00 01 07 75 73 65 72 31 02 12 93 c 3 66 ......user1....f Fri Sep 24 13:59:52 2010: 00000030: 75 73 65 72 31 user1 Fri Sep 24 13:59:52 2010: ****Enter processIncomingMessages: response code=2 Fri Sep 24 13:59:52 2010: ****Enter processRadiusResponse: response code=2 Fri Sep 24 13:59:52 2010: 00:40:96:ac:dd:05 Access-Accept received from RADIUS s erver 10.77.244.196 for mobile 00:40:96:ac:dd:05 receiveId = 0 Fri Sep 24 13:59:52 2010: AuthorizationResponse: 0x12238db0 Fri Sep 24 13:59:52 2010: structureSize................................89 Fri Sep 24 13:59:52 2010: resultCode...................................0 Fri Sep 24 13:59:52 2010: protocolUsed.................................0x0 0000001 Fri Sep 24 13:59:52 2010: proxyState...................................00: 40:96:AC:DD:05-00:00 Fri Sep 24 13:59:52 2010: Packet contains 2 AVPs: Fri Sep 24 13:59:52 2010: AVP[01] Framed-IP-Address................... .....0xffffffff (-1) (4 bytes) Fri Sep 24 13:59:52 2010: AVP[02] Class............................... .....CACS:0/5183/a4df4ce/user1 (25 bytes) Fri Sep 24 13:59:52 2010: Authentication failed for user1, Service Type: 0 Fri Sep 24 13:59:52 2010: 00:40:96:ac:dd:05 Applying new AAA override for statio n 00:40:96:ac:dd:05 Fri Sep 24 13:59:52 2010: 00:40:96:ac:dd:05 Override values for station 00:40:96 :ac:dd:05 source: 48, valid bits: 0x1 qosLevel: -1, dscp: 0xffffffff, dot1pTag: 0xffffffff, sessionTimeout: -1 dataAvgC: -1, rTAvgC: -1, dataBurstC: -1, rTimeBurstC: -1 vlanIfName: '', aclName: Fri Sep 24 13:59:52 2010: 00:40:96:ac:dd:05 Unable to apply override policy for station 00:40:96:ac:dd:05 - VapAllowRadiusOverride is FALSE Fri Sep 24 13:59:52 2010: 00:40:96:ac:dd:05 Sending Accounting request (0) for s tation 00:40:96:ac:dd:05 Fri Sep 24 13:59:52 2010: AccountingMessage Accounting Start: 0x1500501c Fri Sep 24 13:59:52 2010: Packet contains 12 AVPs: Fri Sep 24 13:59:52 2010: AVP[01] User-Name........................... .....user1 (5 bytes) Fri Sep 24 13:59:52 2010: AVP[02] Nas-Port............................ .....0x00000002 (2) (4 bytes) Fri Sep 24 13:59:52 2010: AVP[03] Nas-Ip-Address...................... .....0x0a4df4ce (172881102) (4 bytes) Fri Sep 24 13:59:52 2010: AVP[04] Framed-IP-Address................... .....0x0a4df4c7 (172881095) (4 bytes) -
debug aaa detail enable
Failed Authentication attempts are listed in the menu located at Reports and Activity > Failed Attempts.
Related Information
- Wireless LAN Controller Web Authentication Configuration Example
- Troubleshooting Web Authentication on a Wireless LAN Controller (WLC)
- External Web Authentication with Wireless LAN Controllers Configuration Example
- Web Authentication Using LDAP on Wireless LAN Controllers (WLCs) Configuration Example
- Technical Support & Documentation - Cisco Systems
Revision History
| Revision | Publish Date | Comments |
|---|---|---|
1.0 |
13-Sep-2010 |
Initial Release |
Contact Cisco
- Open a Support Case

- (Requires a Cisco Service Contract)


 Feedback