Configure ACS 5.2 for Port-based Authentication with a LAP
Available Languages
Contents
Introduction
This document describes how to configure a Lightweight Access Point (LAP) as an 802.1x supplicant in order to authenticate against a RADIUS Server such as an Access Control Server (ACS) 5.2.
Prerequisites
Requirements
Make sure that you meet these requirements before you attempt this configuration:
-
Have basic knowledge of the Wireless LAN Controller (WLC) and LAPs.
-
Have functional knowledge of the AAA server.
-
Have thorough knowledge of wireless networks and wireless security issues.
Components Used
The information in this document is based on these software and hardware versions:
-
Cisco 5508 WLC that runs firmware release 7.0.220.0
-
Cisco 3502 Series LAP
-
Cisco Secure ACS that runs version 5.2
-
Cisco 3560 Series Switch
The information in this document was created from the devices in a specific lab environment. All of the devices used in this document started with a cleared (default) configuration. If your network is live, make sure that you understand the potential impact of any command.
Conventions
Refer to the Cisco Technical Tips Conventions for more information on document conventions.
Background Information
LAPs have factory installed X.509 certificates - signed by a private key - that are burned into the device at the time of manufacture. LAPs use this certificate in order to authenticate with the WLC at the join process. This method describes another way to authenticate LAPs. With WLC software, you can configure the 802.1x authentication between a Cisco Aironet access point (AP) and a Cisco switch. In this instance, the AP acts as the 802.1x supplicant and is authenticated by the switch against a RADIUS Server (ACS) that uses EAP-FAST with anonymous PAC provisioning. Once it is configured for 802.1x authentication, the switch does not allow any traffic other than 802.1x traffic to pass through the port until the device connected to the port authenticates successfully. An AP can be authenticated either before it joins a WLC or after it has joined a WLC, in which case you configure 802.1x on the switch after the LAP joins the WLC.
Configure
In this section, you are presented with the information to configure the features described in this document.
Network Diagram
This document uses this network setup:
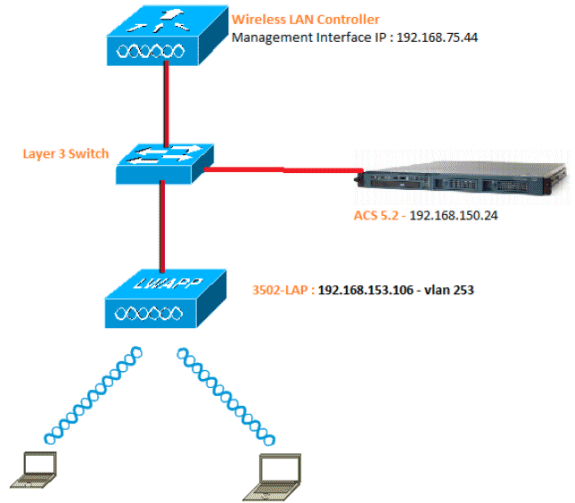
These are the configuration details of the components used in this diagram:
-
The IP address of the ACS (RADIUS) server is 192.168.150.24.
-
The Management and AP-manager Interface address of the WLC is 192.168.75.44.
-
The DHCP servers address 192.168.150.25.
-
LAP is placed in VLAN 253.
-
VLAN 253: 192.168.153.x/24. Gateway: 192.168.153.10
-
VLAN 75: 192.168.75.x/24. Gateway: 192.168.75.1
Assumptions
-
Switches are configured for all Layer 3 VLANs.
-
The DHCP server is assigned a DHCP scope.
-
Layer 3 connectivity exists between all devices in the network.
-
The LAP is already joined to the WLC.
-
Each VLAN has a /24 mask.
-
ACS 5.2 has a Self Signed Certificate installed.
Configuration Steps
This configuration is separated into three categories:
Configure LAP
Assumptions:
LAP is already registered to the WLC using either option 43, DNS, or statically configured WLC management Interface IP.
Complete these steps:
-
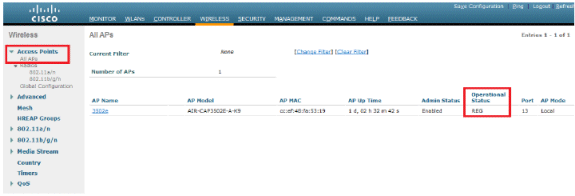
Go to Wireless > Access Points > All APs in order to verify LAP registration on the WLC.
-
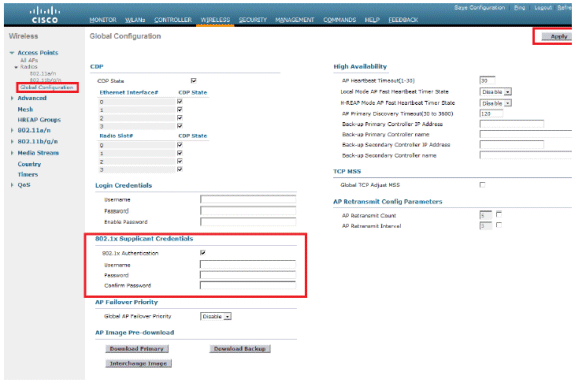
You can configure the 802.1x credentials (that is, username/password) for all LAPs in two ways:
-
Globally
For an already joined LAP, you can set the credentials globally so every LAP joining the WLC will inherit those credentials.
-
Individually
Configure 802.1 x profiles per AP. In our example, we will configure credentials per AP.
-
Go to Wireless > All APs, and select the concerned AP.
-
Add the username and password in the 802.1x Supplicant Credentials fields.
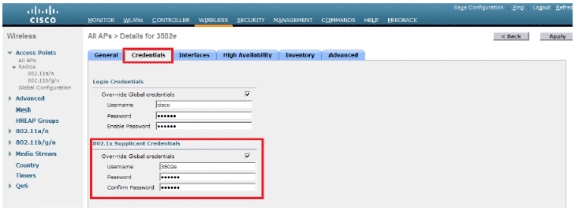
Note: Log-in credentials are used to Telnet, SSH, or console in to the AP.
-
-
-
Configure the High Availability section, and click Apply.
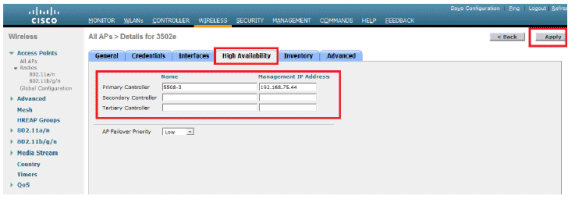
Note: Once saved, these credentials are retained across the WLC and the AP reboots. The credentials change only when the LAP joins a new WLC. The LAP assumes the username and password that were configured on the new WLC.
If the AP has not joined a WLC yet, you must console in to the LAP in order to set the credentials. Issue this CLI command in enable mode:
LAP#lwapp ap dot1x username <username> password <password>or
LAP#capwap ap dot1x username <username> password <password>Note: This command is available only for APs that run the recovery image.
The default username and password for the LAP is cisco and Cisco respectively.
Configure Switch
The switch acts as an authenticator for the LAP and authenticates the LAP against a RADIUS server. If the switch does not have the compliant software, upgrade the switch. In the switch CLI, issue these commands in order to enable the 802.1x authentication on a switch port:
switch#configure terminal
switch(config)#dot1x system-auth-control
switch(config)#aaa new-model

!--- Enables 802.1x on the Switch.

switch(config)#aaa authentication dot1x default group radius
switch(config)#radius server host 192.168.150.24 key cisco

!--- Configures the RADIUS server with shared secret and enables switch to send !--- 802.1x information to the RADIUS server for authentication.

switch(config)#ip radius source-interface vlan 253

!--- We are sourcing RADIUS packets from VLAN 253 with NAS IP: 192.168.153.10.

switch(config)interface gigabitEthernet 0/11
switch(config-if)switchport mode access
switch(config-if)switchport access vlan 253
switch(config-if)mls qos trust dscp
switch(config-if)spanning-tree portfast

!--- gig0/11 is the port number on which the AP is connected.

switch(config-if)dot1x pae authenticator

!--- Configures dot1x authentication.

switch(config-if)dot1x port-control auto

!--- With this command, the switch initiates the 802.1x authentication.
Note: If you have other APs on the same switch and you do not want them to use 802.1x, you can either leave the port un-configured for 802.1x or issue this command:
switch(config-if)authentication port-control force-authorized
Configure RADIUS Server
LAP is authenticated with EAP-FAST. Make sure that the RADIUS server you use supports this EAP method if you are not using Cisco ACS 5.2.
RADIUS server configuration is divided into four steps:
ACS 5.x is a policy-based ACS. In other words, ACS 5.x uses a rule-based policy model instead of the group-based model used in the 4.x versions.
The ACS 5.x rule-based policy model provides more powerful and flexible access control compared to the older group-based approach.
In the older group-based model, a group defines policy because it contains and ties together three types of information:
-
Identity information - This information can be based on membership in AD or LDAP groups or a static assignment for internal ACS users.
-
Other restrictions or conditions - Time restrictions, device restrictions, and so on.
-
Permissions - VLANs or Cisco IOS® privilege levels.
The ACS 5.x policy model is based on rules of the form:
If condition then result
For example, we use the information described for the group-based model:
If identity-condition, restriction-condition then authorization-profile.
As a result, this gives us flexibility to limit the conditions under which the user is allowed to access the network and also what authorization level is allowed when specific conditions are met.
Configure Network Resources
In this section, we configure the AAA client for the switch on the RADIUS server.
This procedure explains how to add the switch as a AAA client on the RADIUS server so that the switch can pass the user credentials of the LAP to the RADIUS server.
Complete these steps:
-
From the ACS GUI, click Network Resources.
-
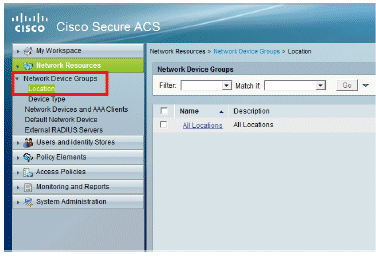
Click Network Device Groups.
-
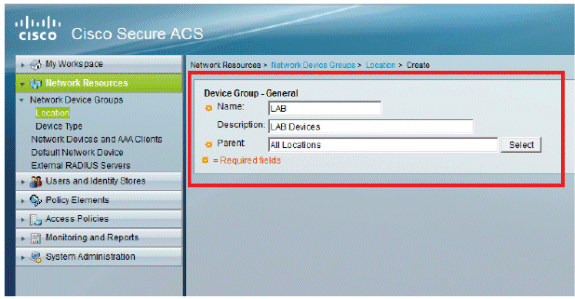
Go to Location > Create (at the bottom ).
-
Add the required fields and click Submit.
-
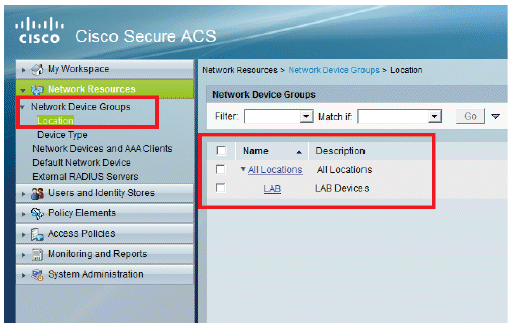
The window refreshes:
-
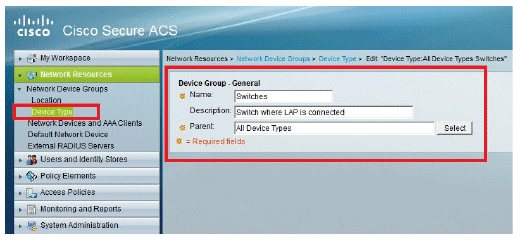
Click Device Type > Create.
-
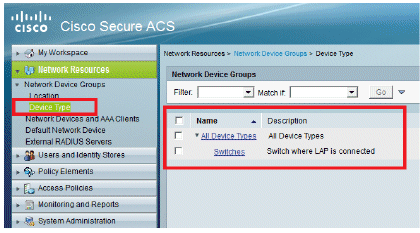
Click Submit. Once completed, the window refreshes:
-
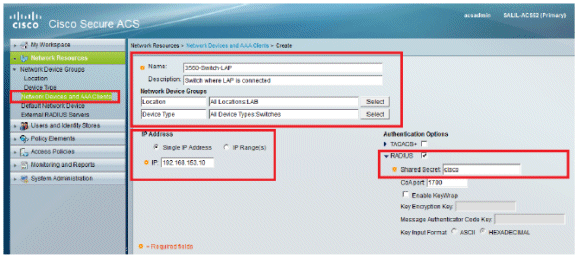
Go to Network Resources > Network Devices and AAA Clients.
-
Click Create, and fill in the details as depicted here:
-
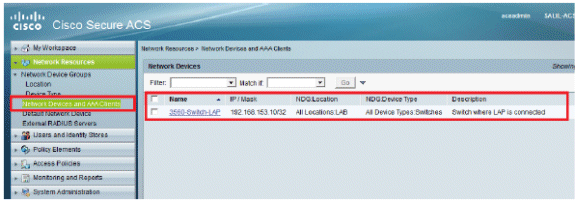
Click Submit. The window refreshes:
Configure Users
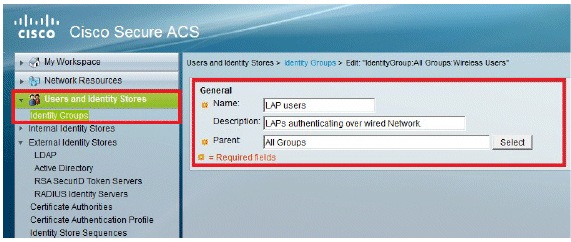
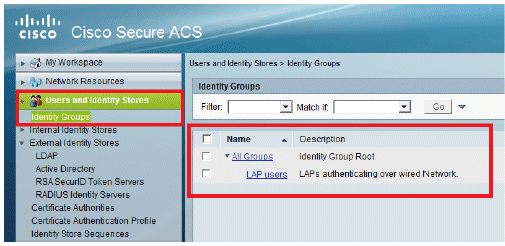
In this section, you will see how to create a user on the ACS configured previously. You will assign the user to a group called "LAP users".
Complete these steps:
-
Go to Users and Identity Stores > Identity Groups > Create.
-
Click Submit.
-
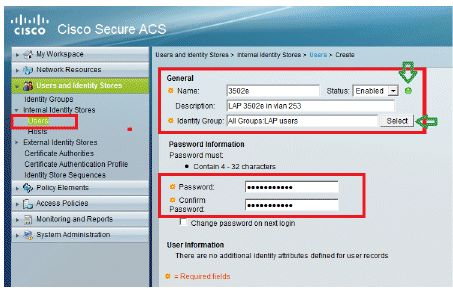
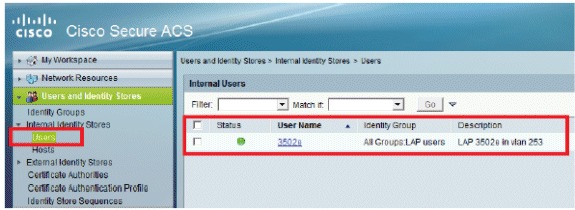
Create 3502e and assign it to group "LAP users".
-
Go to Users and Identity Stores > Identity Groups > Users > Create.
-
You will see the updated information:
Define Policy Elements
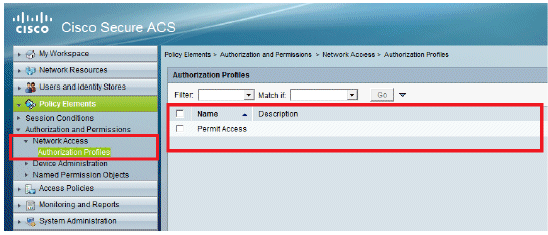
Verify that Permit Access is set.
Apply Access Policies
In this section, you will select EAP-FAST as the Authentication method used for LAPs in order to authenticate. You will then create rules based on the previous steps.
Complete these steps:
-
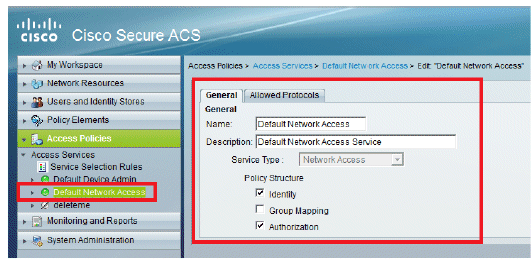
Go to Access Policies > Access Services > Default Network Access > Edit: "Default Network Access".
-
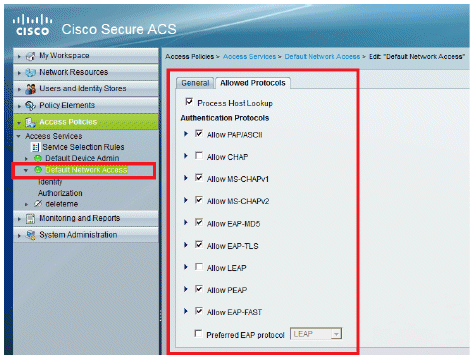
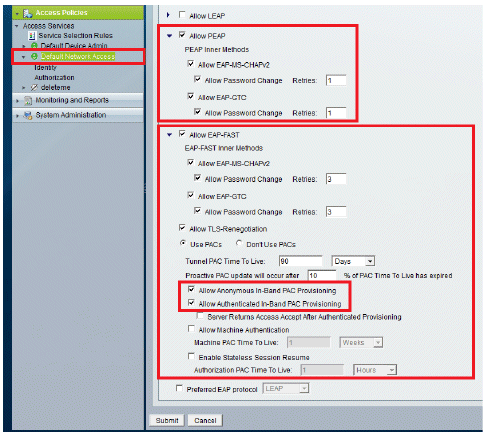
Make sure you have enabled EAP-FAST and Anonymous In-Band PAC Provisioning.
-
Click Submit.
-
Verify the Identity group that you have selected. In this example, use Internal Users (which was created on the ACS) and save the changes.
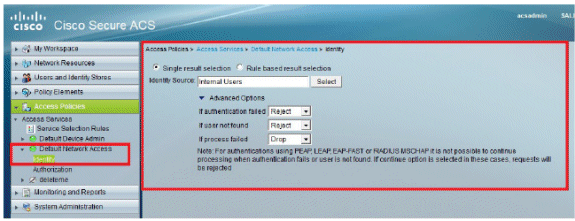
-
Go to Access Policies > Access Services > Default Network Access > Authorization in order to verify the Authorization Profile.
You can customize under what conditions you will allow a user access to the network and what authorization profile (attributes) you will pass once authenticated. This granularity is only available in ACS 5.x. In this example, Location, Device Type, Protocol, Identity Group, and EAP Authentication Method are selected.
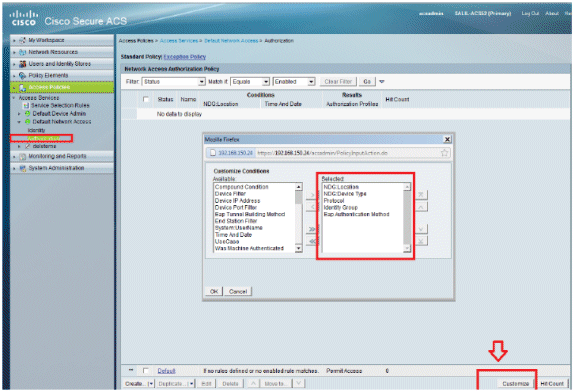
-
Click OK, and Save Changes.
-
The next step is to create a Rule. If no Rules are defined, LAP is allowed access without any conditions.
-
Click Create > Rule-1. This Rule is for users in group "LAP users".
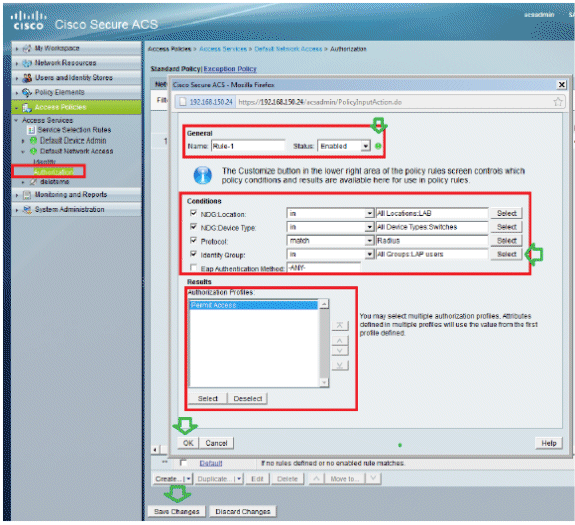
-
Click Save Changes. If you want users not matching the conditions to be denied, edit the default rule to say "Deny Access".
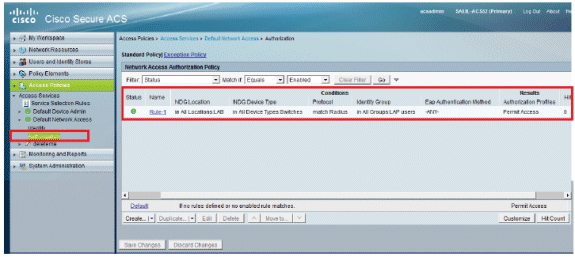
-
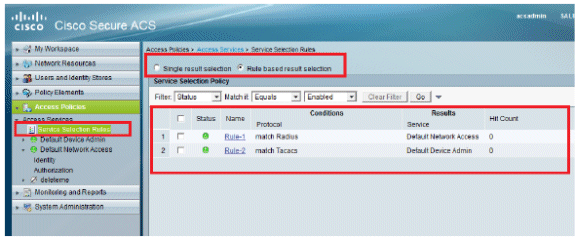
The last step is to define Service Selection Rules. Use this page to configure a simple or rule-based policy in order to determine which service to apply to incoming requests. For example:
Verify
Once 802.1x is enabled on the switch port, all the traffic except the 802.1x traffic is blocked through the port. The LAP, which is already registered to the WLC, gets disassociated. Only after a successful 802.1x authentication is other traffic allowed to pass through. Successful registration of the LAP to the WLC after the 802.1x is enabled on the switch indicates that the LAP authentication is successful.
AP console:
*Jan 29 09:10:24.048: %DTLS-5-SEND_ALERT: Send FATAL : Close notify Alert to
   192.168.75.44:5246
*Jan 29 09:10:27.049: %DTLS-5-SEND_ALERT: Send FATAL : Close notify Alert to
   192.168.75.44:5247

!--- AP disconnects upon adding dot1x information in the gig0/11.

*Jan 29 09:10:30.104: %WIDS-5-DISABLED: IDS Signature is removed and disabled.
*Jan 29 09:10:30.107: %CAPWAP-5-CHANGED: CAPWAP changed state to DISCOVERY
*Jan 29 09:10:30.107: %CAPWAP-5-CHANGED: CAPWAP changed state to DISCOVERY
*Jan 29 09:10:30.176: %LINK-5-CHANGED: Interface Dot11Radio0, changed state to
   administratively down
*Jan 29 09:10:30.176: %LINK-5-CHANGED: Interface Dot11Radio1, changed state to
   administratively down
*Jan 29 09:10:30.186: %LINK-5-CHANGED: Interface Dot11Radio0, changed state to
   reset
*Jan 29 09:10:30.201: %LINK-3-UPDOWN: Interface Dot11Radio1, changed state to up
*Jan 29 09:10:30.211: %LINK-3-UPDOWN: Interface Dot11Radio0, changed state to up
*Jan 29 09:10:30.220: %LINK-5-CHANGED: Interface Dot11Radio1, changed state to
   reset
Translating "CISCO-CAPWAP-CONTROLLER"...domain server (192.168.150.25)
*Jan 29 09:10:36.203: status of voice_diag_test from WLC is false

*Jan 29 09:11:05.927: %DOT1X_SHIM-6-AUTH_OK: Interface GigabitEthernet0 authenticated [EAP-FAST] *Jan 29 09:11:08.947: %DHCP-6-ADDRESS_ASSIGN: Interface GigabitEthernet0 assigned DHCP address 192.168.153.106, mask 255.255.255.0, hostname 3502e


!--- Authentication is successful and the AP gets an IP.

Translating "CISCO-CAPWAP-CONTROLLER.Wlab"...domain server (192.168.150.25)
*Jan 29 09:11:37.000: %CAPWAP-5-DTLSREQSEND: DTLS connection request sent
   peer_ip: 192.168.75.44 peer_port: 5246
*Jan 29 09:11:37.000: %CAPWAP-5-CHANGED: CAPWAP changed state to
*Jan 29 09:11:37.575: %CAPWAP-5-DTLSREQSUCC: DTLS connection created
   successfully peer_ip: 192.168.75.44 peer_port: 5246
*Jan 29 09:11:37.578: %CAPWAP-5-SENDJOIN: sending Join Request to 192.168.75.44

*Jan 29 09:11:37.578: %CAPWAP-5-CHANGED: CAPWAP changed state to JOIN

*Jan 29 09:11:37.748: %CAPWAP-5-CHANGED: CAPWAP chan
wmmAC status is FALSEged state to CFG
*Jan 29 09:11:38.890: %LINK-3-UPDOWN: Interface Dot11Radio0, changed state to
   down
*Jan 29 09:11:38.900: %LINK-5-CHANGED: Interface Dot11Radio0, changed state to
   reset
*Jan 29 09:11:38.900: %CAPWAP-5-CHANGED: CAPWAP changed state to UP
*Jan 29 09:11:38.956: %CAPWAP-5-JOINEDCONTROLLER: AP has joined controller
   5508-3
*Jan 29 09:11:39.013: %CAPWAP-5-DATA_DTLS_START: Starting Data DTLS handshake.
   Wireless client traffic will be blocked until DTLS tunnel is established.
*Jan 29 09:11:39.013: %LINK-3-UPDOWN: Interface Dot11Radio0, changed state to up
*Jan 29 09:11:39.016: %LWAPP-3-CLIENTEVENTLOG: SSID goa added to the slot[0]
*Jan 29 09:11:39.028: %LINK-3-UPDOWN: Interface Dot11Radio1, changed state to
   down
*Jan 29 09:11:39.038: %LINK-5-CHANGED: Interface Dot11Radio1, changed state to
   reset
*Jan 29 09:11:39.054: %LINK-3-UPDOWN: Interface Dot11Radio1, changed state to up
*Jan 29 09:11:39.060: %LINK-3-UPDOWN: Interface Dot11Radio0, changed state to
   down
*Jan 29 09:11:39.069: %LINK-5-CHANGED: Interface Dot11Radio0, changed state to
   reset
*Jan 29 09:11:39.085: %LINK-3-UPDOWN: Interface Dot11Radio0, changed state to up
*Jan 29 09:11:39.135: %LWAPP-3-CLIENTEVENTLOG: SSID goa added to the slot[1]DTLS
   keys are plumbed successfully.
*Jan 29 09:11:39.151: %CAPWAP-5-DATA_DTLS_ESTABLISHED: Data DTLS tunnel
   established.
*Jan 29 09:11:39.161: %WIDS-5-ENABLED: IDS Signature is loaded and enabled

!--- AP joins the 5508-3 WLC.
ACS logs:
-
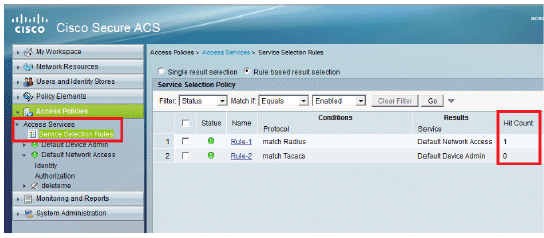
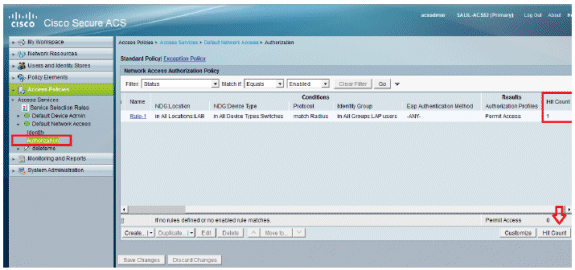
View the Hit counts:
If you are checking logs within 15 minutes of authentication, make sure you refresh the Hit Count. On the same page, at the bottom you have a Hit Count tab.
-
Click Monitoring and Reports and a new pop-up window appears. Click Authentications –RADIUS –Today. You can also click Details in order to verify which Service selection rule was applied.

Troubleshoot
There is currently no specific troubleshooting information available for this configuration.
Related Information
Revision History
| Revision | Publish Date | Comments |
|---|---|---|
1.0 |
30-May-2012 |
Initial Release |
Contact Cisco
- Open a Support Case

- (Requires a Cisco Service Contract)


 Feedback