Configure PEAP and EAP-FAST with ACS 5.2 and WLC
Available Languages
Contents
Introduction
This document explains how to configure the Wireless LAN controller (WLC) for Extensible Authentication Protocol (EAP) authentication with the use of an external RADIUS server such as Access Control Server (ACS) 5.2.
Prerequisites
Requirements
Make sure that you meet these requirements before you attempt this configuration:
-
Have a basic knowledge of the WLC and Lightweight Access Points (LAPs)
-
Have a functional knowledge of the AAA server
-
Have a thorough knowledge of wireless networks and wireless security issues
Components Used
The information in this document is based on these software and hardware versions:
-
Cisco 5508 WLC that runs firmware release 7.0.220.0
-
Cisco 3502 Series LAP
-
Microsoft Windows 7 Native Supplicant with Intel 6300-N Driver version 14.3
-
Cisco Secure ACS that runs version 5.2
-
Cisco 3560 Series Switch
The information in this document was created from the devices in a specific lab environment. All of the devices used in this document started with a cleared (default) configuration. If your network is live, make sure that you understand the potential impact of any command.
Conventions
Refer to the Cisco Technical Tips Conventions for more information on document conventions.
Configure
In this section, you are presented with the information to configure the features described in this document.
Note: Use the Command Lookup Tool (registered customers only) to obtain more information on the commands used in this section.
Network Diagram
This document uses this network setup:
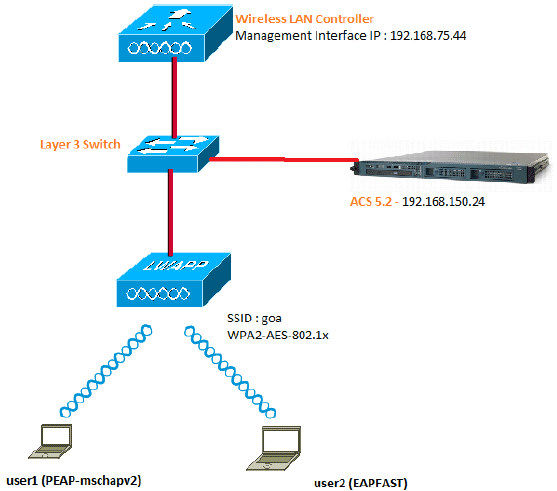
These are the configuration details of the components used in this diagram:
-
The IP address of the ACS (RADIUS) server is 192.168.150.24.
-
The Management and AP-manager Interface address of the WLC is 192.168.75.44.
-
The DHCP servers address 192.168.150.25.
-
VLAN 253 is used throughout this configuration. Both users connect to the same SSID "goa". However, user1 is configured to authenticate using PEAP-MSCHAPv2 and user2 using EAP-FAST.
-
Users will be assigned in VLAN 253:
-
VLAN 253: 192.168.153.x/24. Gateway: 192.168.153.1
-
VLAN 75: 192.168.75.x/24. Gateway: 192.168.75.1
-
Assumptions
-
Switches are configured for all Layer 3 VLANs.
-
The DHCP server is assigned a DHCP scope.
-
Layer 3 connectivity exists between all devices in the network.
-
The LAP is already joined to the WLC.
-
Each VLAN has /24 mask.
-
ACS 5.2 has a Self-Signed Certificate installed.
Configuration Steps
This configuration is separated into three high-level steps:
Configure the RADIUS Server
The RADIUS server configuration is divided into four steps:
ACS 5.x is a policy-based access control system. That is, ACS 5.x uses a rule-based policy model instead of the group-based model used in the 4.x versions.
The ACS 5.x rule-based policy model provides more powerful and flexible access control compared to the older group-based approach.
In the older group-based model, a group defines policy because it contains and ties together three types of information:
-
Identity information - This information can be based on membership in AD or LDAP groups or a static assignment for internal ACS users.
-
Other restrictions or conditions - Time restrictions, device restrictions, and so on.
-
Permissions - VLANs or Cisco IOS® privilege levels.
The ACS 5.x policy model is based on rules of the form:
-
If condition then result
For example, we use the information described for the group-based model:
-
If identity-condition, restriction-condition then authorization-profile.
As a result, this gives us the flexibility to limit under what conditions the user is allowed to access the network as well as what authorization level is allowed when specific conditions are met.
Configure Network Resources
In this section, we configure the AAA Client for the WLC on the RADIUS Server.
This procedure explains how to add the WLC as a AAA client on the RADIUS server so that the WLC can pass the user credentials to the RADIUS server.
Complete these steps:
-
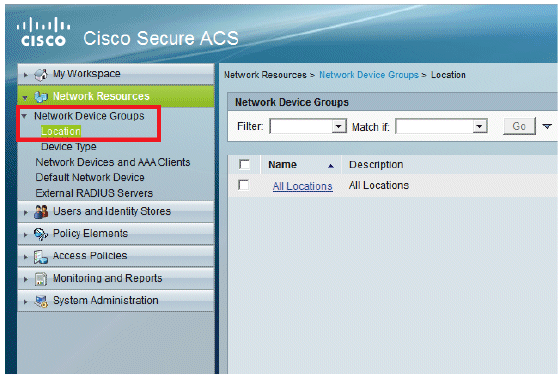
From the ACS GUI, go to Network Resources > Network Device Groups > Location, and click Create (at the bottom ).
-
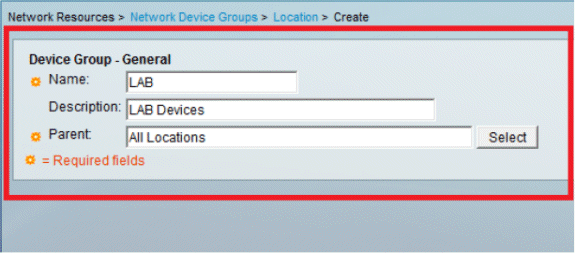
Add the required fields, and click Submit.
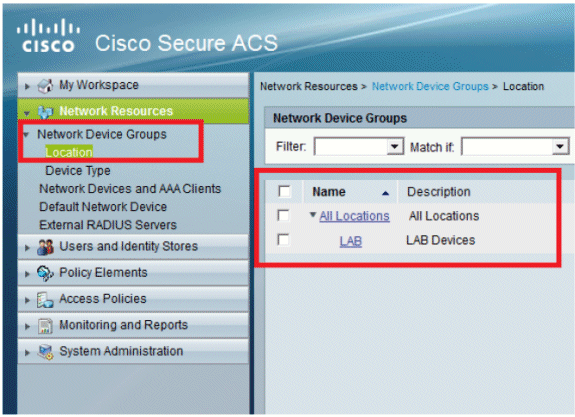
You will now see this screen:
-
Click Device Type > Create.
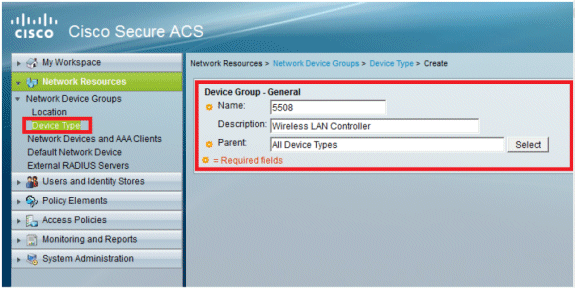
-
Click Submit. You will now see this screen:
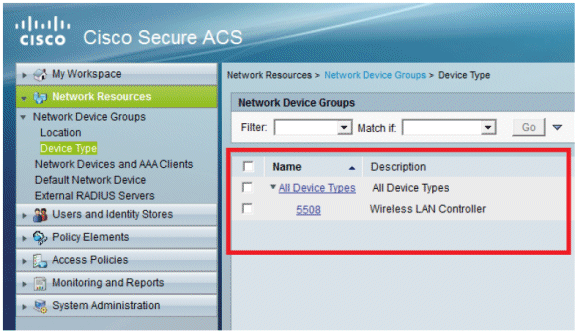
-
Go to Network Resources > Network Devices and AAA Clients.
-
Click Create, and fill in the details as shown here:
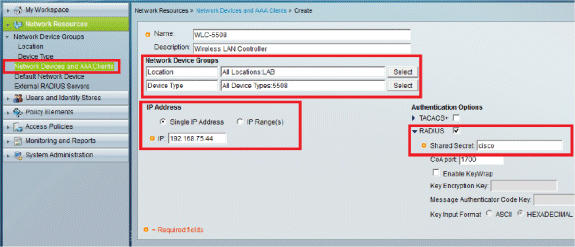
-
Click Submit. You will now see this screen:

Configure Users
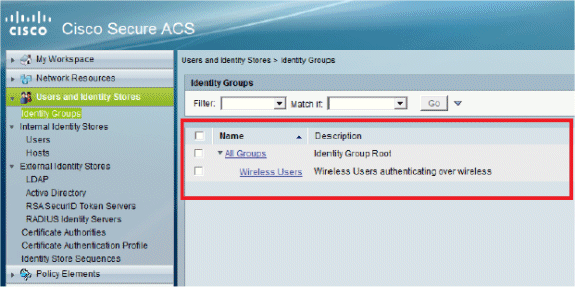
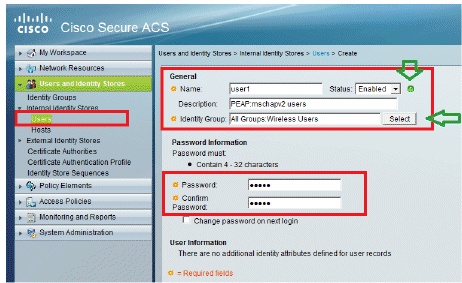
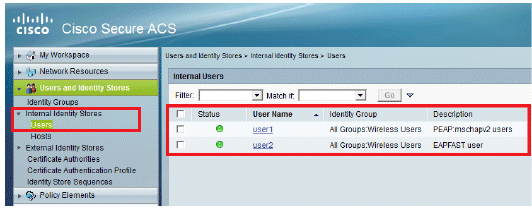
In this section, we will create local users on ACS. Both users (user1 and user2) are assigned in group called "Wireless Users".
-
Go to Users and Identity Stores > Identity Groups > Create.
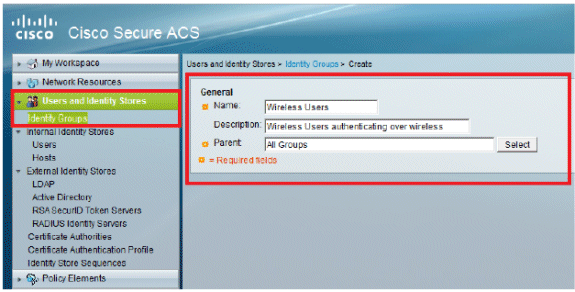
-
Once you click Submit, the page will look like this:
-
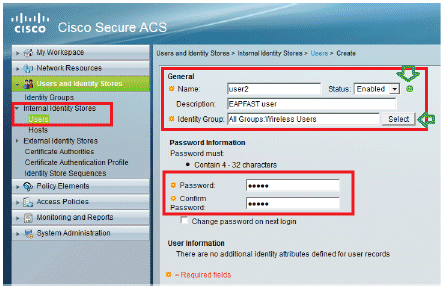
Create users user1 and user2, and assign them to the "Wireless Users" group.
-
Click Users and Identity Stores > Identity Groups > Users > Create.
-
Similarly, create user2.
The screen will look like this:
-
Define Policy Elements
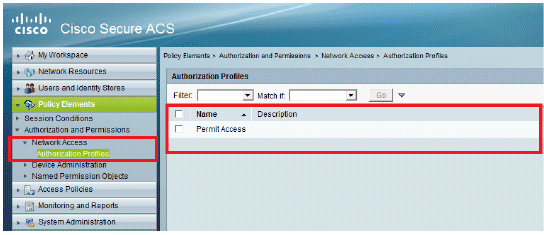
Verify that Permit Access is set.
Apply Access Policies
In this section, we will select which Authentication methods are to be used and how the rules are to be configured. We will create rules based the previous steps.
Complete these steps:
-
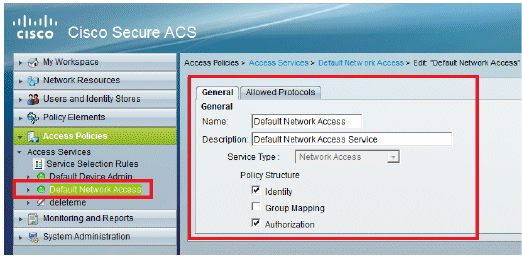
Go to Access Policies > Access Services > Default Network Access > Edit: "Default Network Access".
-
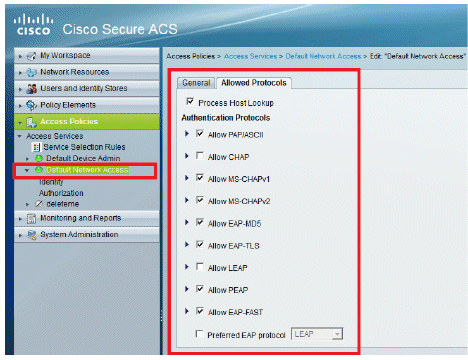
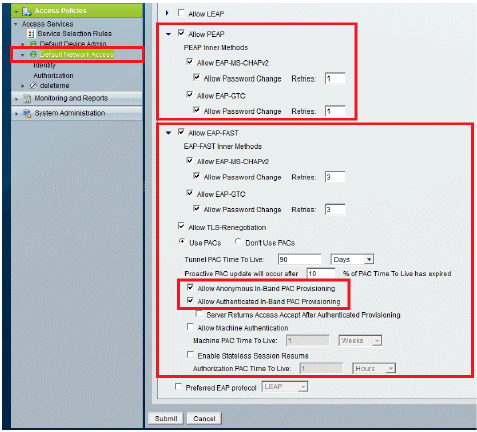
Select which EAP method you would like the wireless Clients to authenticate. In this example, we use PEAP- MSCHAPv2 and EAP-FAST.
-
Click Submit.
-
Verify the Identity group you have selected. In this example, we use Internal Users, which we created on ACS. Save the changes.
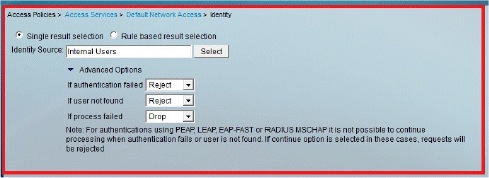
-
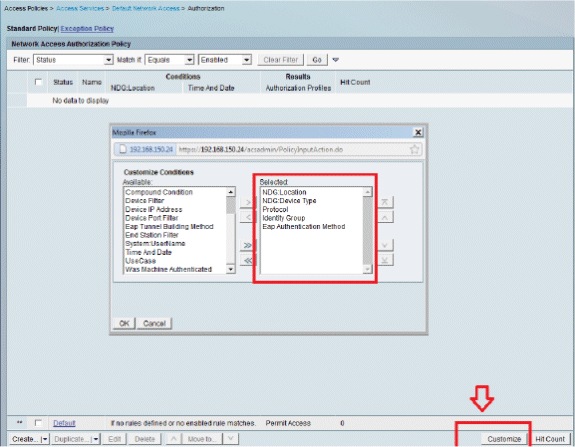
In order to verify the Authorization Profile, go to Access Policies > Access Services > Default Network Access > Authorization.
You can customize under what conditions you will allow user access to the network and what authorization profile (attributes) you will pass once authenticated. This granularity is only available in ACS 5.x. In this example, we selected Location, Device Type, Protocol, Identity Group, and EAP Authentication Method.
-
Click OK, and Save Changes.
-
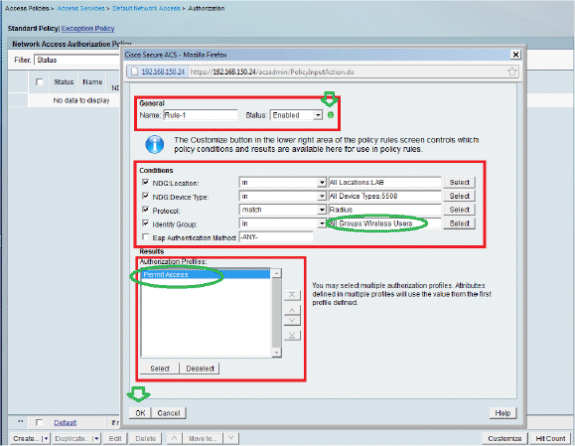
The next step is to create a Rule. If no Rules are defined, the Client is allowed access without any conditions.
Click Create > Rule-1. This Rule is for users in group "Wireless Users".
-
Save the changes. The screen will look like this:
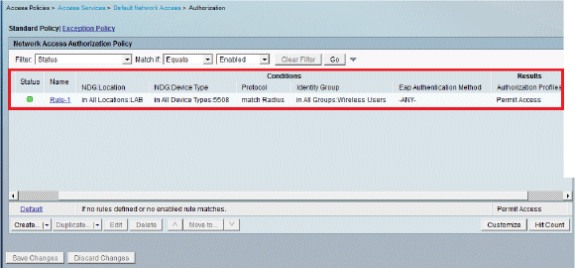
If you want users not matching the conditions to be denied then edit the default rule to say "deny access".
-
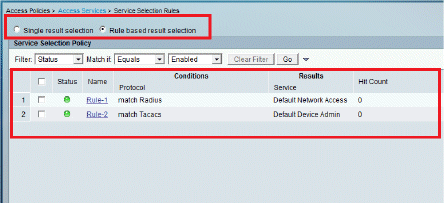
We will now define Service Selection Rules. Use this page in order to configure a simple or rule-based policy to determine which service to apply to incoming requests. In this example, a rule-based policy is used.
Configure the WLC
This configuration requires these steps:
Configure the WLC with the Details of the Authentication Server
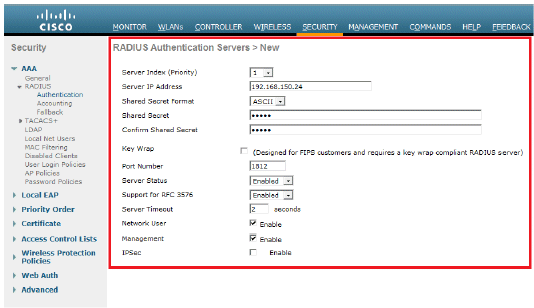
It is necessary to configure the WLC so it can communicate with the RADIUS server in order to authenticate the clients, and also for any other transactions.
Complete these steps:
-
From the controller GUI, click Security.
-
Enter the IP address of the RADIUS server and the Shared Secret key used between the RADIUS server and the WLC.
This Shared Secret key should be the same as the one configured in the RADIUS server.
Configure the Dynamic Interfaces (VLANs)
This procedure describes how to configure dynamic interfaces on the WLC.
Complete these steps:
-
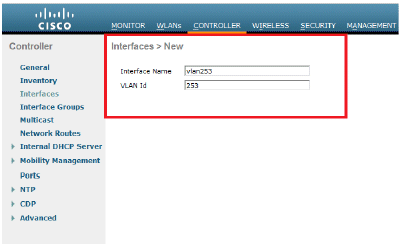
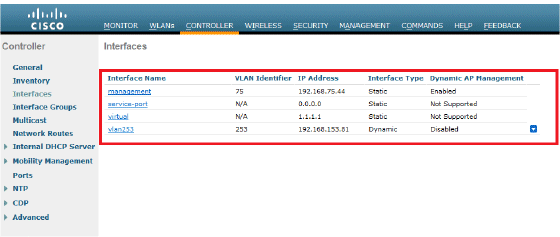
The dynamic interface is configured from the controller GUI, in the Controller > Interfaces window.
-
Click Apply.
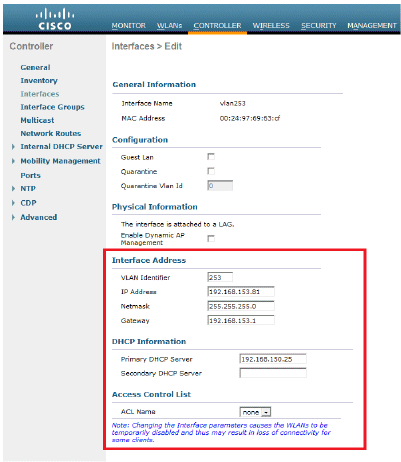
This takes you to the Edit window of this dynamic interface (VLAN 253 here).
-
Enter the IP Address and default Gateway of this dynamic interface.
-
Click Apply.
-
The interfaces configured will look like this:
Configure the WLANs (SSID)
This procedure explains how to configure the WLANs in the WLC.
Complete these steps:
-
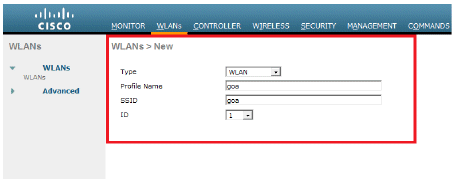
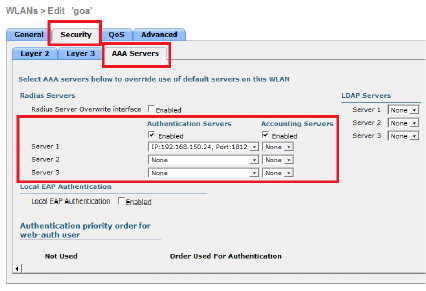
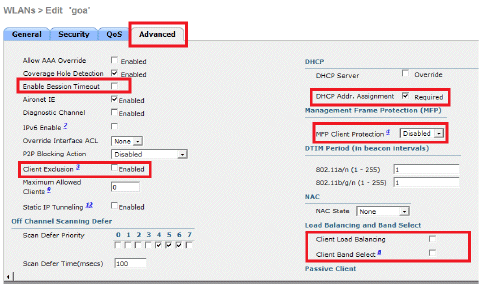
From the controller GUI, go to WLANs > Create New in order to create a new WLAN. The New WLANs window is displayed.
-
Enter the WLAN ID and WLAN SSID information.
You can enter any name as the WLAN SSID. This example uses goa as the WLAN SSID.
-
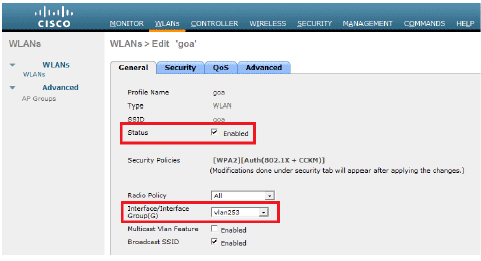
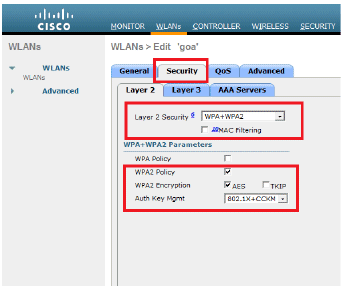
Click Apply in order to go to the Edit window of the WLAN goa.
Configure the Wireless Client Utility
PEAP-MSCHAPv2 (user1)
In our test client, we are using Windows 7 Native supplicant with an Intel 6300-N card running 14.3 driver version. It is recommended to test using the latest drivers from vendors.
Complete these steps in order to create a Profile in Windows Zero Config (WZC):
-
Go to Control Panel > Network and Internet > Manage Wireless Networks.
-
Click the Add tab.
-
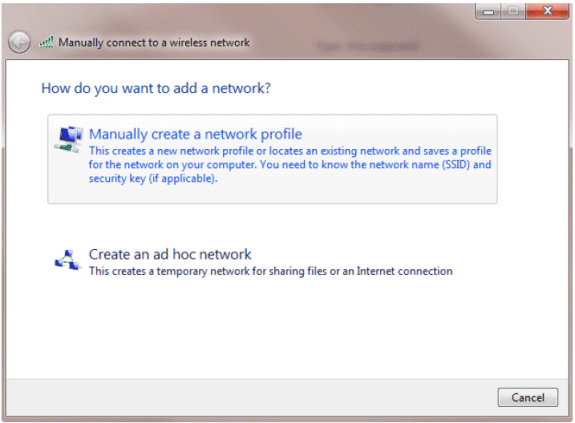
Click Manually create a network profile.
-
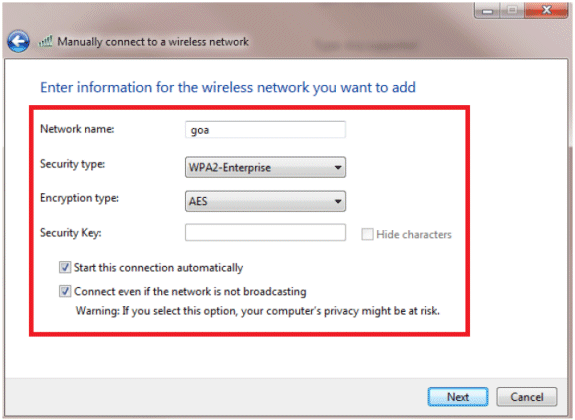
Add the details as configured on the WLC.
Note: The SSID is case sensitive.
-
Click Next.
-
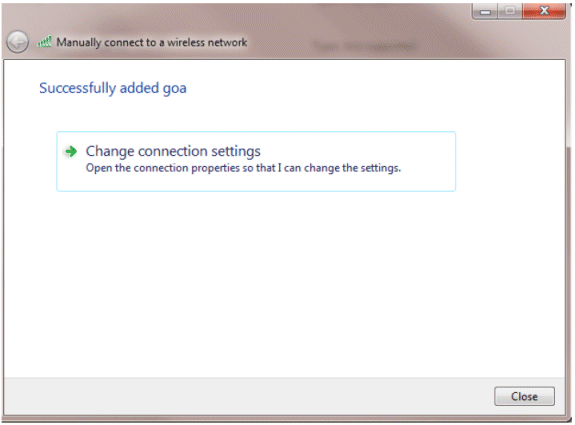
Click Change connection settings in order to double-check the settings.
-
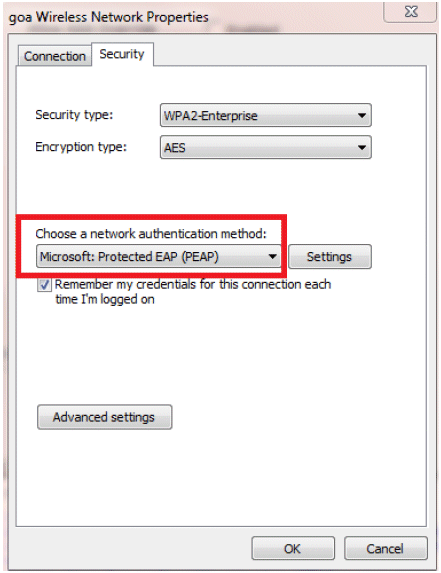
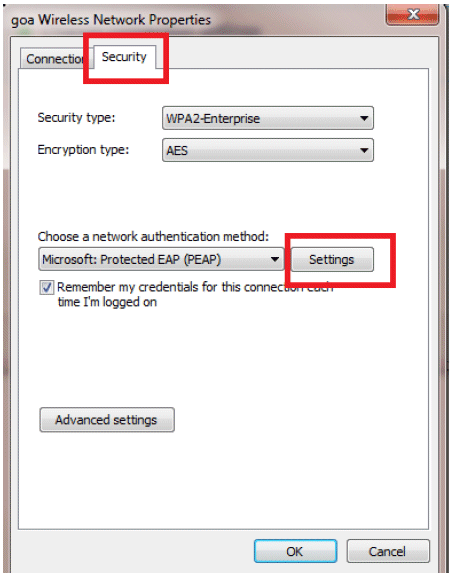
Make sure you have PEAP enabled.
-
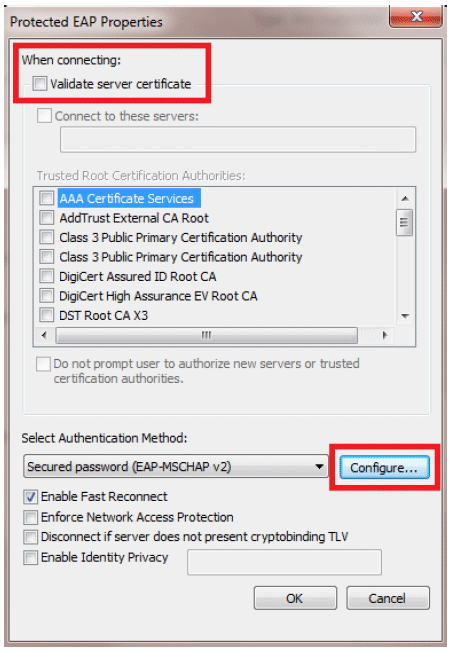
In this example, we are not validating the server certificate. If you check this box and are not able to connect, try disabling the feature and test again.
-
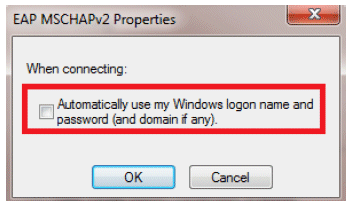
Alternatively, you can use your Windows credentials in order to log in. However, in this example we are not going to use that. Click OK.
-
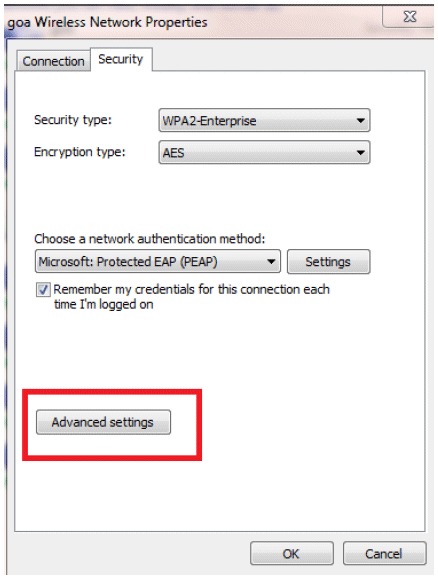
Click Advanced settings in order to configure Username and Password.
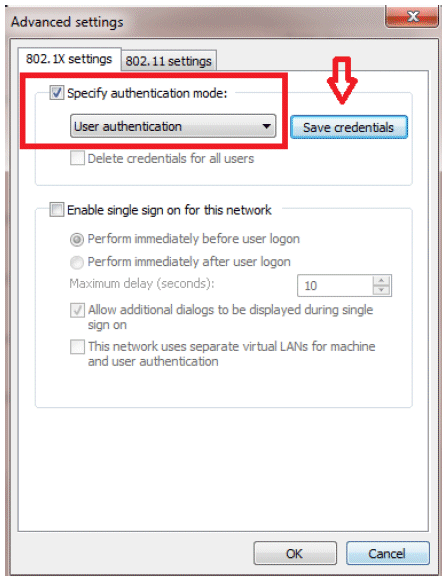
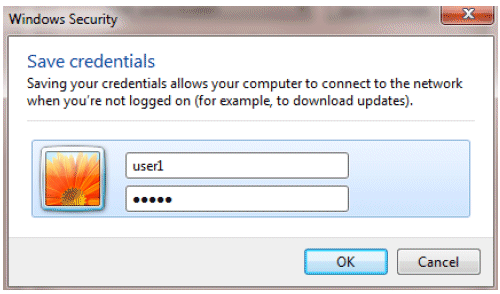
Your Client utility is now ready to connect.
EAP-FAST (user2)
In our test client, we are using Windows 7 Native supplicant with an Intel 6300-N card running 14.3 driver version. It is recommended to test using the latest drivers from vendors.
Complete these steps in order to create a Profile in WZC:
-
Go to Control Panel > Network and Internet > Manage Wireless Networks.
-
Click the Add tab.
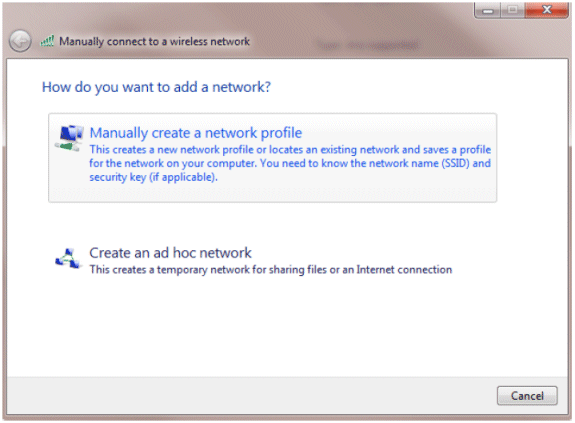
-
Click Manually create a network profile.
-
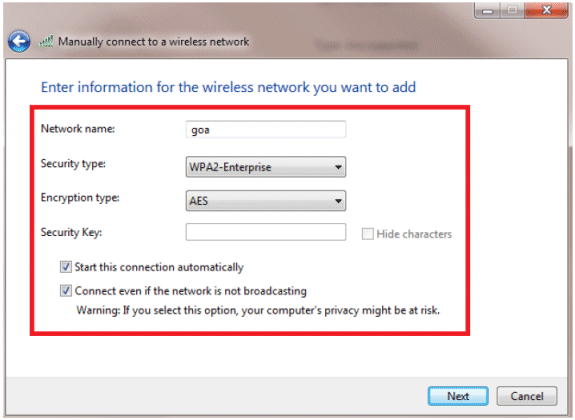
Add the details as configured on the WLC.
Note: The SSID is case sensitive.
-
Click Next.
-
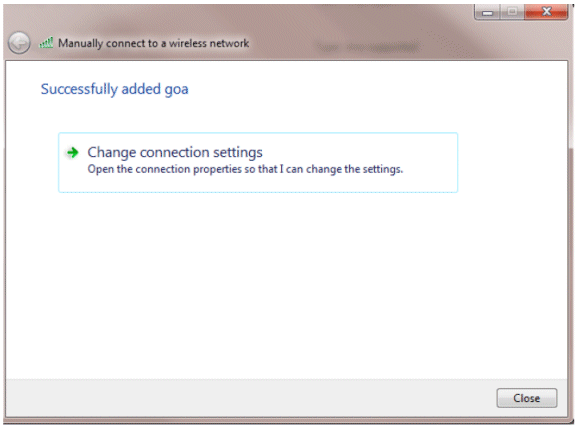
Click Change connection settings in order to double-check the settings.
-
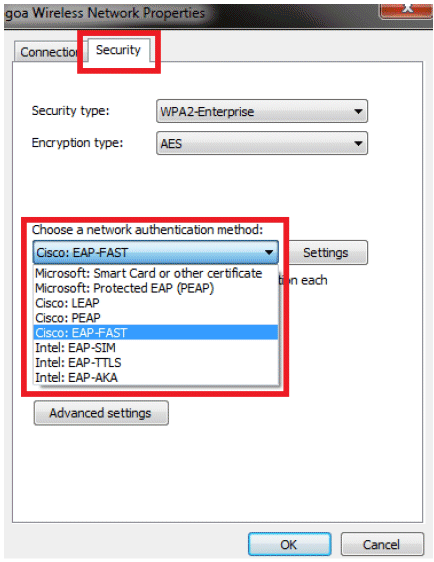
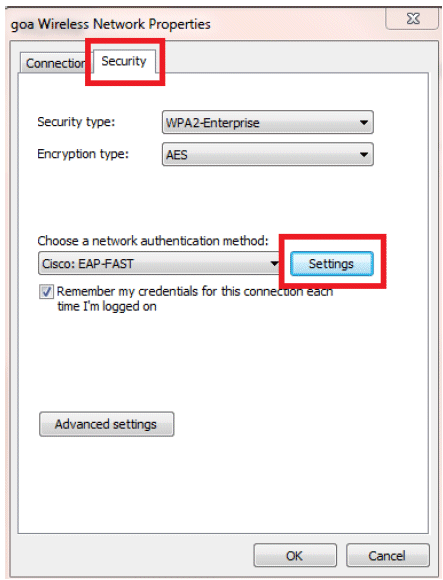
Make sure you have EAP-FAST enabled.
Note: By default, WZC does not have EAP-FAST as an authentication method. You have to download the utility from a third-party vendor. In this example, since it is an Intel card, we have Intel PROSet installed on the system.
-
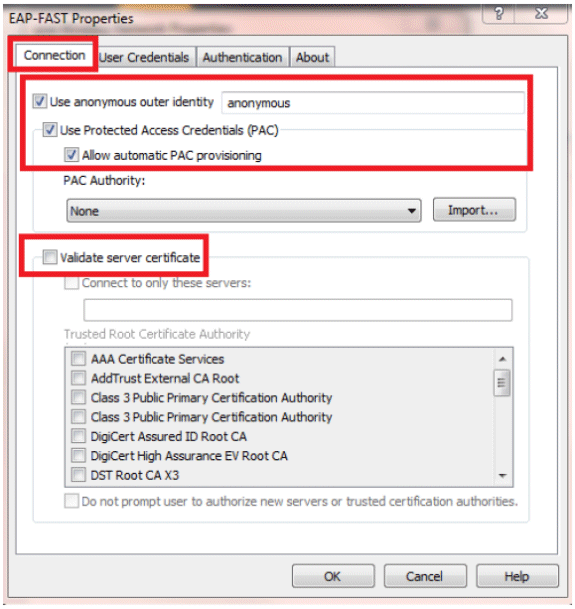
Enable Allow automatic PAC provisioning and make sure Validate server certificate is unchecked.
-
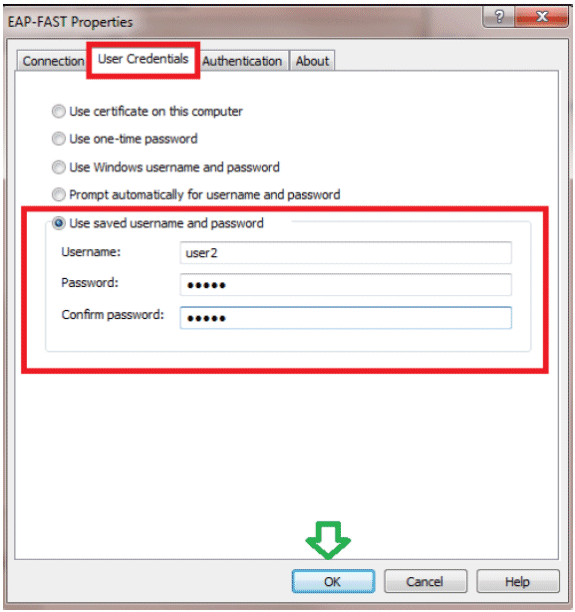
Click the User Credentials tab, and enter the credentials of user2. Alternatively, you can use your Windows credentials in order to log in. However, in this example we are not going to use that.
-
Click OK.
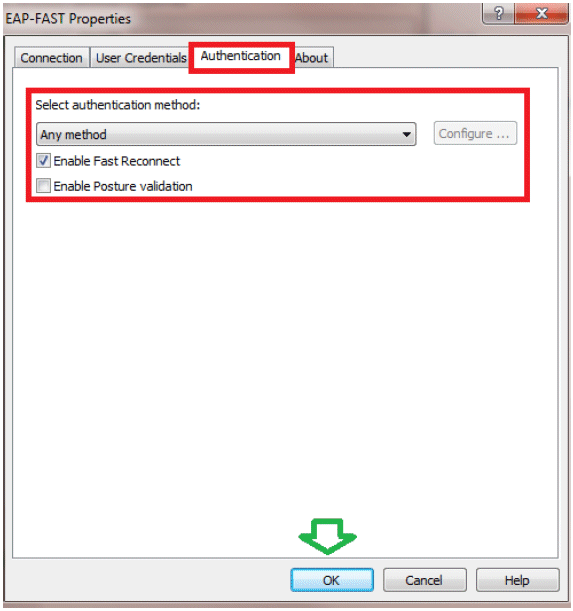
Your Client utility is now ready to connect for user2.
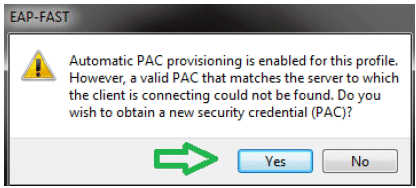
Note: When user2 is trying to authenticate, the RADIUS server is going to send a PAC. Accept the PAC in order to complete the authentication.
Verify
Use this section in order to confirm that your configuration works properly.
The Output Interpreter Tool (registered customers only) (OIT) supports certain show commands. Use the OIT to view an analysis of show command output.
Verify user1 (PEAP-MSCHAPv2)
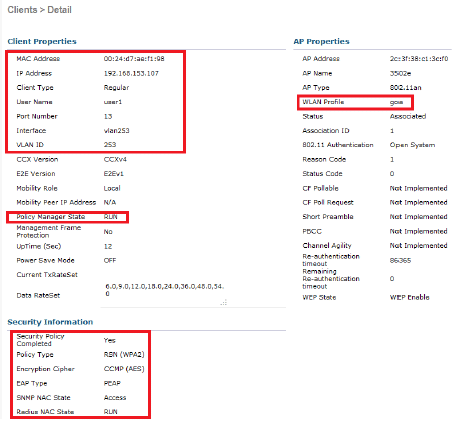
From the WLC GUI, go to Monitor > Clients, and select the MAC address.
WLC RADIUS Stats:
(Cisco Controller) >show radius auth statistics
Authentication Servers:
Server Index..................................... 1
Server Address................................... 192.168.150.24
Msg Round Trip Time.............................. 1 (msec)
First Requests................................... 8
Retry Requests................................... 0
Accept Responses................................. 1
Reject Responses................................. 0
Challenge Responses.............................. 7
Malformed Msgs................................... 0
Bad Authenticator Msgs........................... 0
Pending Requests................................. 0
Timeout Requests................................. 0
Unknowntype Msgs................................. 0
Other Drops...................................... 0
ACS Logs:
-
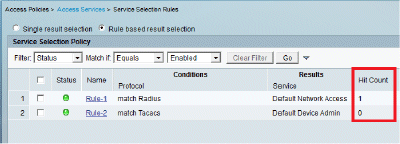
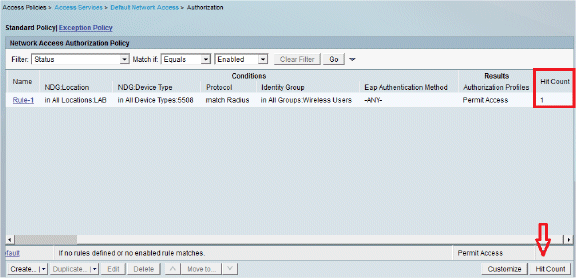
Complete these steps in order to view the Hit counts:
-
If you check the logs within 15 minutes of authentication, make sure you refresh the Hit count.
-
You have a tab for Hit Count at the bottom of the same page.
-
-
Click Monitoring and Reports and a New pop-up window appears. Go to Authentications –Radius –Today. You can also click Details in order to verify which Service selection rule was applied.

Verify user2 (EAP-FAST)
From the WLC GUI, go to Monitor > Clients, and select the MAC address.
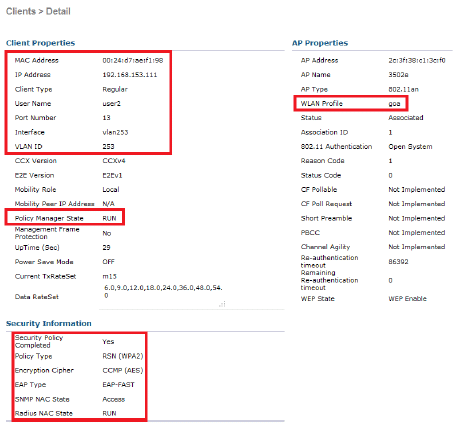
ACS Logs:
-
Complete these steps in order to view the Hit counts:
-
If you check the logs within 15 minutes of authentication, make sure you refresh the HIT count.
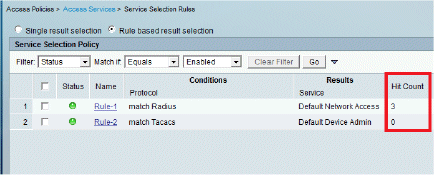
-
You have a tab for Hit Count at the bottom of the same page.
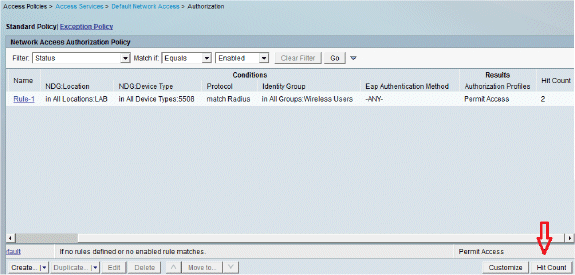
-
-
Click Monitoring and Reports and a New pop-up window appears. Go to Authentications –Radius –Today. You can also click Details in order to verify which Service selection rule was applied.

Troubleshoot
This section provides information you can use to troubleshoot your configuration.
Troubleshooting Commands
The Output Interpreter Tool (registered customers only) (OIT) supports certain show commands. Use the OIT to view an analysis of show command output.
Note: Refer to Important Information on Debug Commands before you use debug commands.
-
If you experience any problems, issue these commands on the WLC:
-
debug client <mac add of the client>
-
debug aaa all enable
-
show client detail <mac addr> - Verify the policy manager state.
-
show radius auth statistics - Verify the failure reason.
-
debug disable-all - Turn off debugs.
-
clear stats radius auth all - Clear radius statistics on the WLC.
-
-
Verify the logs in the ACS and note the failure reason.
Related Information
Revision History
| Revision | Publish Date | Comments |
|---|---|---|
1.0 |
21-Aug-2012 |
Initial Release |
Contact Cisco
- Open a Support Case

- (Requires a Cisco Service Contract)


 Feedback