Configure NPS, Wireless LAN Controllers, and Wireless Networks
Available Languages
Download Options
Bias-Free Language
The documentation set for this product strives to use bias-free language. For the purposes of this documentation set, bias-free is defined as language that does not imply discrimination based on age, disability, gender, racial identity, ethnic identity, sexual orientation, socioeconomic status, and intersectionality. Exceptions may be present in the documentation due to language that is hardcoded in the user interfaces of the product software, language used based on RFP documentation, or language that is used by a referenced third-party product. Learn more about how Cisco is using Inclusive Language.
Contents
Introduction
This document describes how to configure the PEAP with MS-CHAP authentication with the Microsoft NPS as the RADIUS server.
Prerequisites
Requirements
Cisco recommends that you have knowledge of these topics:
- Knowledge of basic Windows 2008 installation
- Knowledge of Cisco controller installation
Ensure that these requirements have been met before you attempt this configuration:
- Install the Microsoft Windows Server 2008 on each of the servers in the test lab.
- Update all service packs.
- Install the controllers and lightweight access points (LAPs).
- Configure the latest software updates.
For initial installation and configuration information for the Cisco 5508 Series Wireless Controllers, refer to the Cisco 5500 Series Wireless Controller Installation Guide.

Note: This document is intended to give the readers an example on the configuration required on a Microsoft server for PEAP-MS-CHAP authentication. The Microsoft Windows server configuration presented in this document has been tested in the lab and found to work as expected. If you have trouble with the configuration, contact Microsoft for help. The Cisco Technical Assistance Center (TAC) does not support Microsoft Windows server configuration.
Microsoft Windows 2008 installation and configuration guides can be found on Microsoft Tech Net.
Components Used
The information in this document is based on these software and hardware versions:
- Cisco 5508 Wireless Controller that runs firmware Version 7.4
- Cisco Aironet 3602 Access Point (AP) with Lightweight Access Point Protocol (LWAPP)
- Windows 2008 Enterprise Server with NPS, Certificate Authority (CA), dynamic host control protocol (DHCP), and Domain Name System (DNS) services installed
- Microsoft Windows 7 client PC
- Cisco Catalyst 3560 Series Switch
The information in this document was created from the devices in a specific lab environment. All of the devices used in this document started with a cleared (default) configuration. If your network is live, ensure that you understand the potential impact of any command.
Conventions
Refer to the Cisco Technical Tips Conventions for more information on document conventions.
Background Information
This document provides a sample configuration for the Protected Extensible Authentication Protocol (PEAP) with Microsoft Challenge Handshake Authentication Protocol (MS-CHAP) version 2 authentication in a Cisco Unified Wireless network with the Microsoft Network Policy Server (NPS) as the RADIUS server.
PEAP Overview
PEAP uses Transport Level Security (TLS) to create an encrypted channel between an authenticated PEAP client, such as a wireless laptop, and a PEAP authenticator, such as Microsoft NPS or any RADIUS server. PEAP does not specify an authentication method, but provides additional security for other Extensible Authentication Protocols (EAPs), such as EAP-MS-CHAP v2, that can operate through the TLS-encrypted channel provided by PEAP. The PEAP authentication process consists of two main phases.
PEAP Phase One: TLS-Encrypted Channel
The wireless client associates with the AP. An IEEE 802.11-based association provides an open system or shared key authentication before a secure association is created between the client and the access point. After the IEEE 802.11-based association is successfully established between the client and the access point, the TLS session is negotiated with the AP. After authentication is successfully completed between the wireless client and NPS, the TLS session is negotiated between the client and NPS. The key that is derived within this negotiation is used to encrypt all subsequent communication.
PEAP Phase Two: EAP-Authenticated Communication
EAP communication, which includes EAP negotiation, occurs inside the TLS channel created by PEAP within the first stage of the PEAP authentication process. The NPS authenticates the wireless client with EAP-MS-CHAP v2. The LAP and the controller only forward messages between the wireless client and RADIUS server. The Wireless LAN Controller (WLC) and the LAP cannot decrypt these messages because it is not the TLS end point.
The RADIUS message sequence for a successful authentication attempt (where the user has supplied valid password-based credentials with PEAP-MS-CHAP v2) is:
- The NPS sends an identity request message to the client: EAP-Request/Identity.
- The client responds with an identity response message: EAP-Response/Identity.
- The NPS sends an MS-CHAP v2 challenge message: EAP-Request/EAP-Type=EAP MS-CHAP-V2 (Challenge).
- The client responds with an MS-CHAP v2 challenge and response: EAP-Response/EAP-Type=EAP-MS-CHAP-V2 (Response).
- The NPS sends back an MS-CHAP v2 success packet when the server has successfully authenticated the client: EAP-Request/EAP-Type=EAP-MS-CHAP-V2 (Success).
- The client responds with an MS-CHAP v2 success packet when the client has successfully authenticated the server: EAP-Response/EAP-Type=EAP-MS-CHAP-V2 (Success).
- The NPS sends an EAP-type-length-value (TLV) that indicates successful authentication.
- The client responds with an EAP-TLV status success message.
- The server completes authentication and sends an EAP-Success message in plain text. If VLANs are deployed for client isolation, the VLAN attributes are included in this message.
Configure
In this section, you are presented with the information to configure PEAP-MS-CHAP v2.

Note: Use the Command Lookup Tool to obtain more information on the commands used in this section. Only registered Cisco users can access internal Cisco tools and information.
Network Diagram
This configuration uses this network setup:
 Network Diagram
In this setup, a Microsoft Windows 2008 server performs these roles:
- Domain controller for the domain
- DHCP/DNS server
- CA server
- NPS – to authenticate the wireless users
- Active Directory – to maintain the user database
The server connects to the wired network through a Layer 2 switch as shown. The WLC and the registered LAP also connect to the network through the Layer 2 switch.
The wireless clients use Wi-Fi Protected Access 2 (WPA2) - PEAP-MS-CHAP v2 authentication to connect to the wireless network.
Configurations
The objective of this example is to configure the Microsoft 2008 server, Wireless LAN Controller, and Light Weight AP to authenticate the wireless clients with PEAP-MS-CHAP v2 authentication. There are three major steps in this process:
- Configure the Microsoft Windows 2008 Server.
- Configure the WLC and the Light Weight APs.
- Configure the wireless clients.
Configure the Microsoft Windows 2008 Server
In this example, a complete configuration of the Microsoft Windows 2008 server includes these steps:
- Configure the server as a domain controller.
- Install and configure DHCP services.
- install and configure the server as a CA server.
- Connect clients to the domain.
- Install the NPS.
- Install a certificate.
- Configure the NPS for PEAP authentication.
- Add users to the Active Directory.
Configure the Microsoft Windows 2008 Server as a Domain Controller
Complete these steps in order to configure the Microsoft Windows 2008 server as a domain controller:
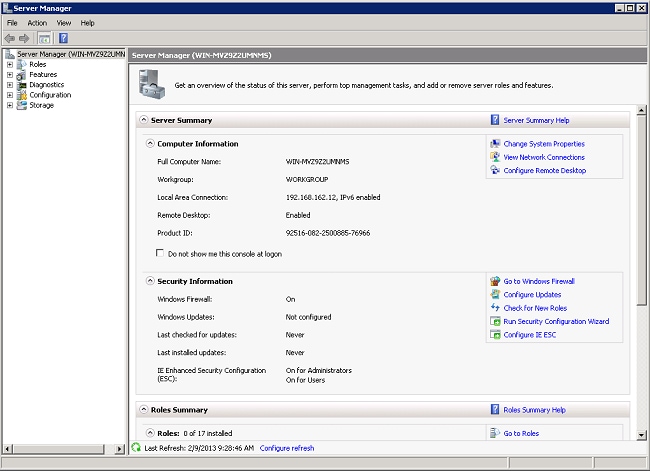
- Click Start > Server Manager.
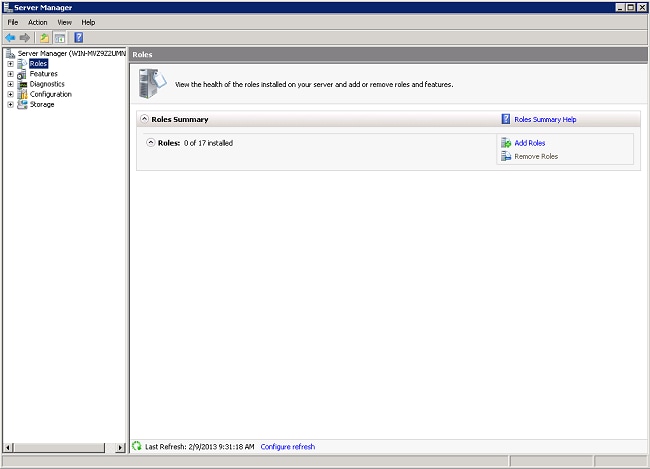
- Click Roles > Add Roles.
- Click Next.

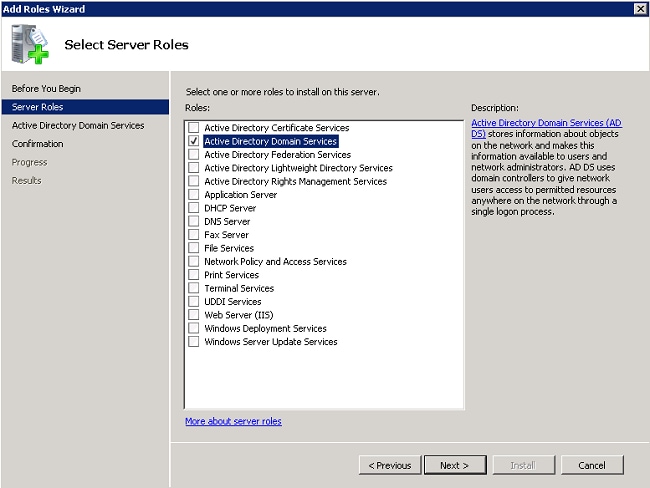
- Select the service Active Directory Domain Services, and click Next.
- Review the Introduction to Active Directory Domain Services, and click Next.

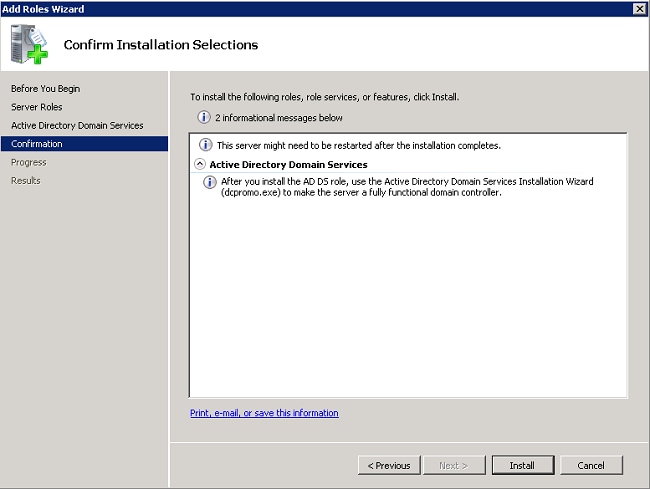
- Click Install to begin the installation process.
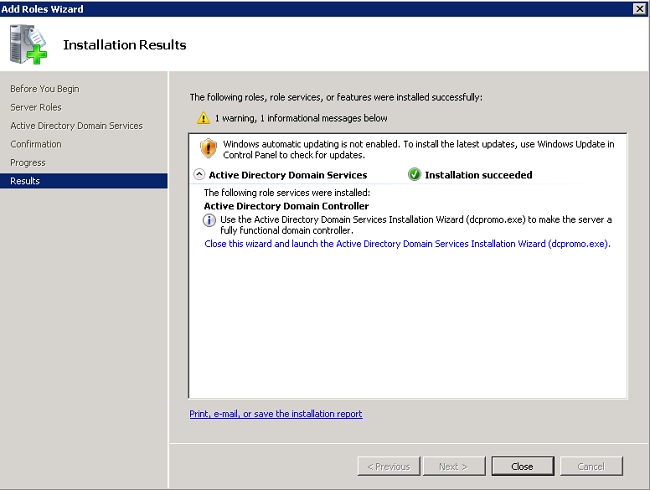
The installation proceeds and completes. - Click Close this wizard and launch the Active Directory Domain Services Installation Wizard (dcpromo.exe) to continue installation and configuration of the Active Directory.
- Click Next to run the Active Directory Domain Services Installation Wizard.

- Review the information on Operating System Compatibility, and click Next.

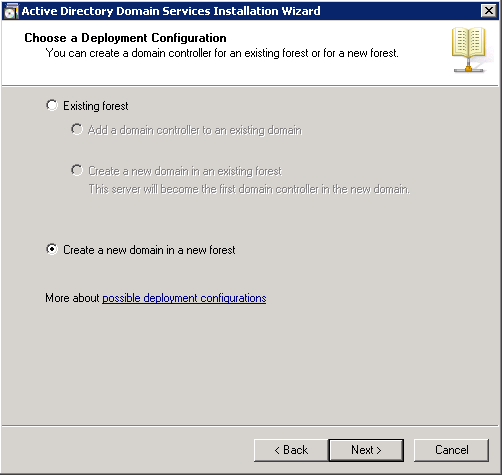
- Click Create a new domain in a new forest > Next in order to create a new domain.
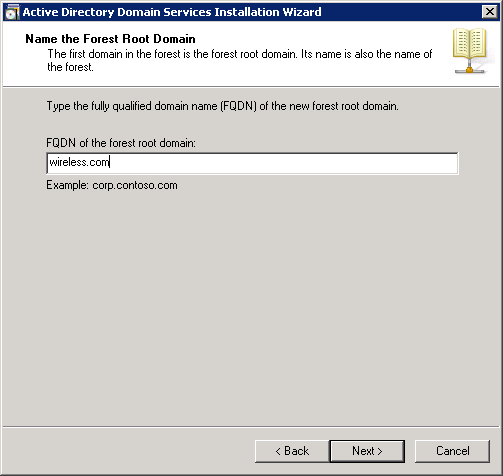
- Enter the full DNS name for the new domain, and click Next.
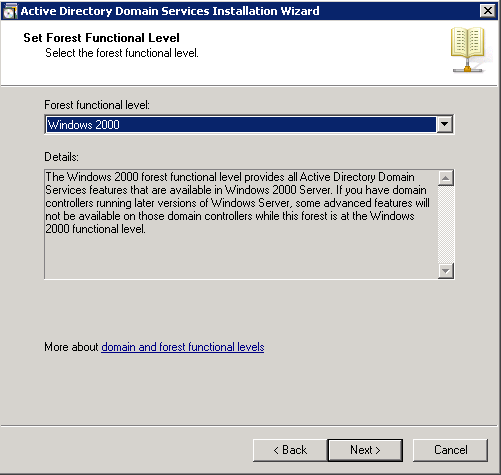
- Select the forest functional level for your domain, and click Next.
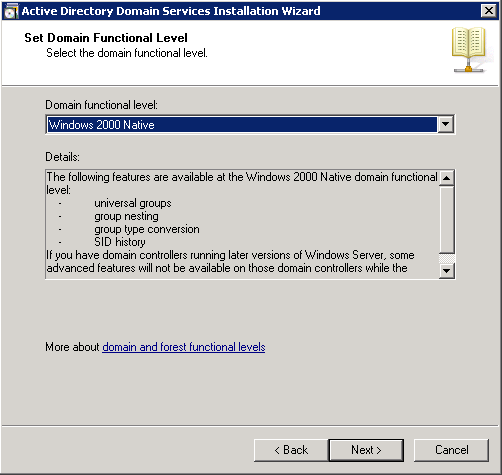
- Select the domain functional level for your domain, and click Next.
- Ensure DNS server is selected, and click Next.

- Click Yes for the installation wizard to create a new zone in DNS for the domain.

- Select the folders Active Directory must use for its files, and click Next.

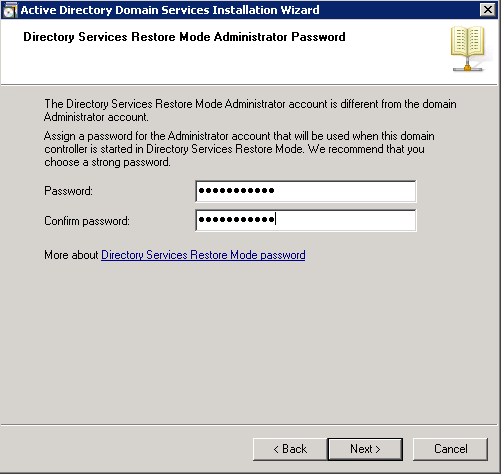
- Enter the Administrator Password, and click Next.
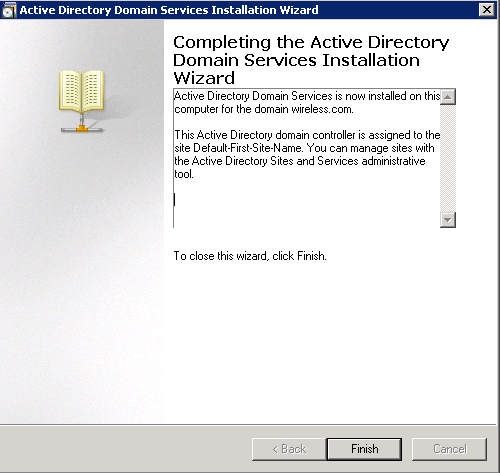
- Review your selections, and click Next.

The installation proceeds. - Click Finish to close the wizard.
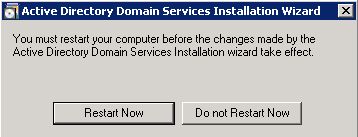
- Restart the server for the changes to take effect.
Install and Configure DHCP Services on the Microsoft Windows 2008 Server
The DHCP service on the Microsoft 2008 server is used to provide IP addresses to the wireless clients. Complete these steps in order to install and configure DHCP services:
- Click Start > Server Manager.
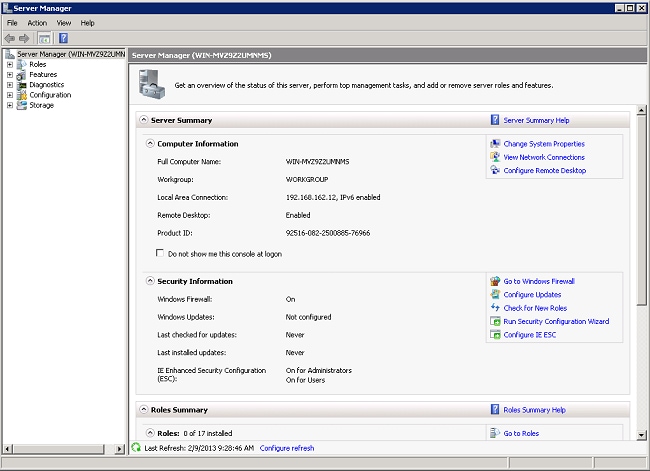
- Click Roles > Add Roles.
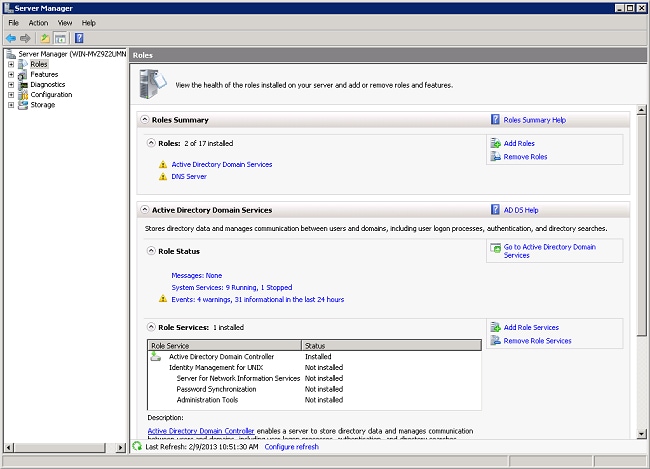
- Click Next.
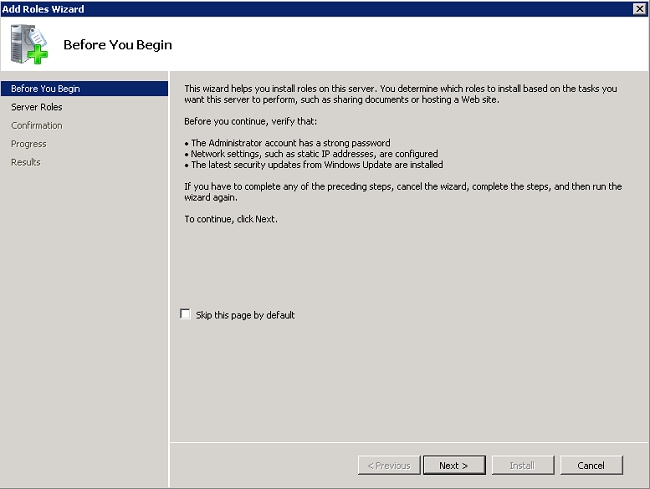
- Select the service DHCP Server, and click Next.

- Review the Introduction to DHCP Server, and click Next.
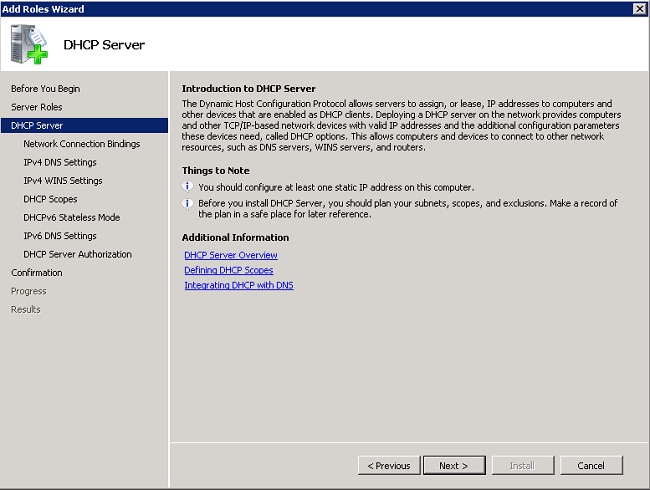
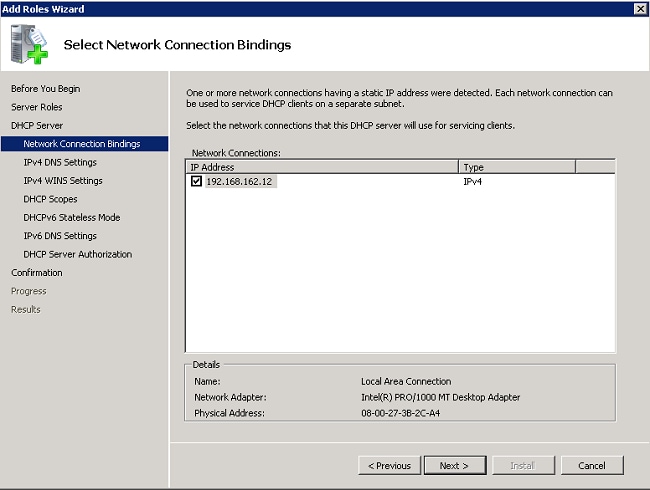
- Select the interface that the DHCP server must monitor for requests, and click Next.
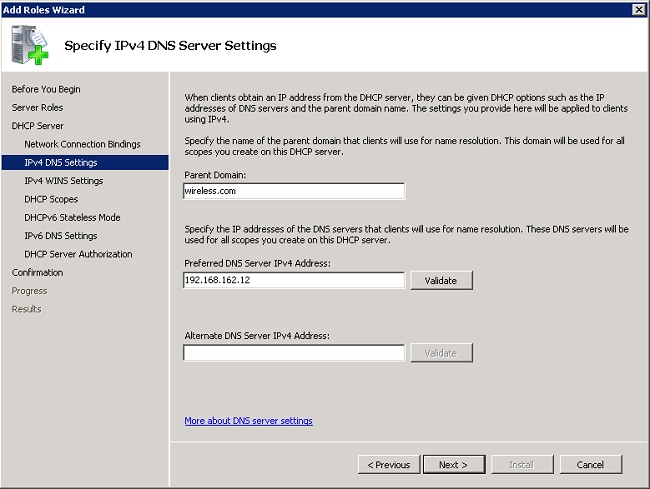
- Configure the default DNS settings the DHCP server must provide to clients, and click Next.
- Configure WINS if the network supports WINS.

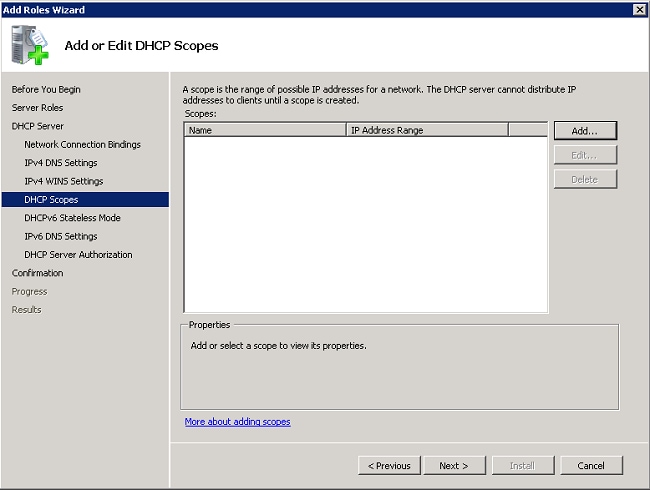
- Click Add to use the wizard to create a DHCP Scope or click Next to create a DHCP scope later. Click Next to continue.
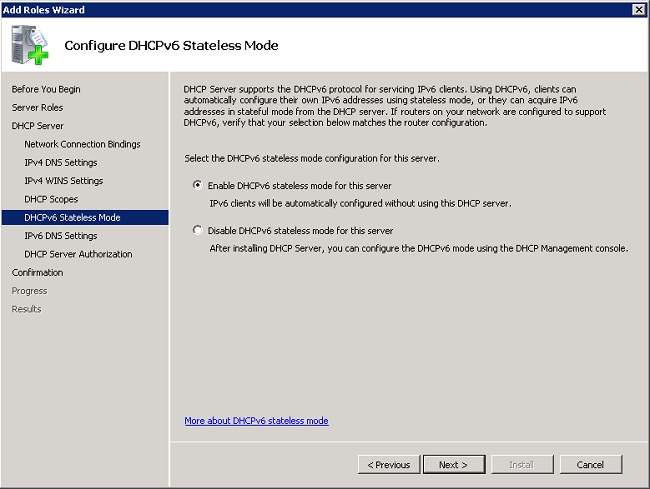
- Enable or disable DHCPv6 support on the server, and click Next.
- Configure IPv6 DNS settings if DHCPv6 was enabled in the preceding step. Click Next to continue.

- Provide domain administrator credentials to authorize the DHCP server in Active Directory, and click Next.

- Review the configuration on the confirmation page, and click Install to complete the install.

The installation proceeds. - Click Close to close the wizard.
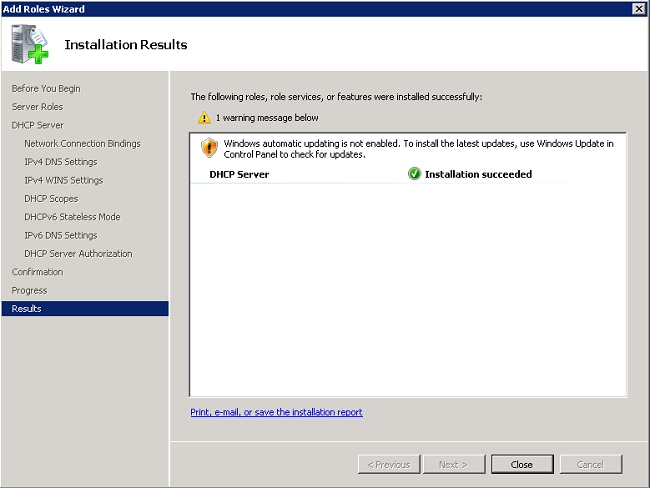
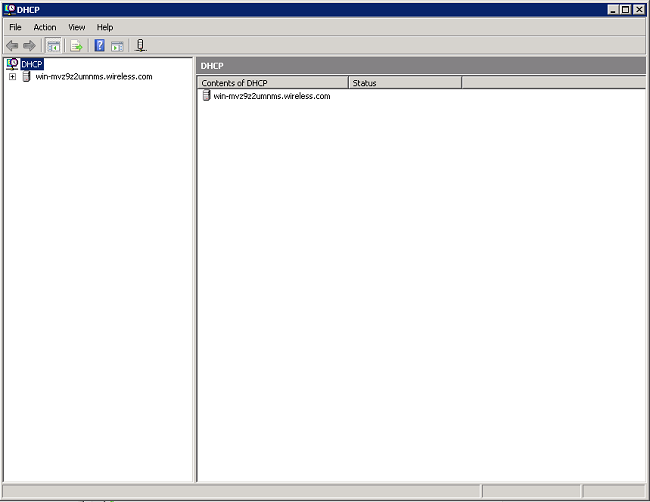
The DHCP Server is now installed. - Click Start > Administrative Tools> DHCP to configure DHCP service.
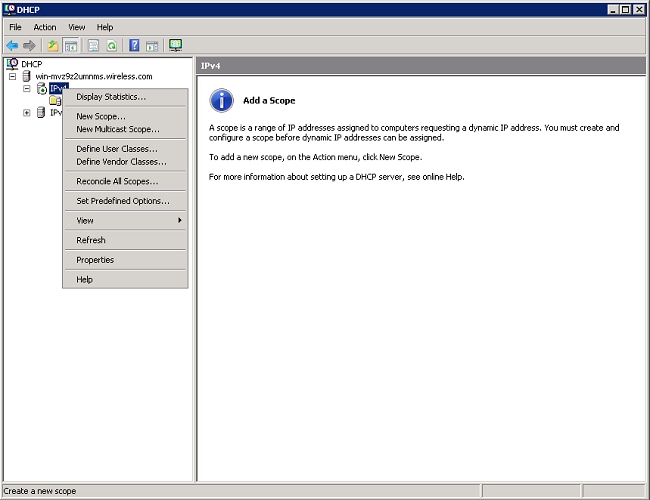
- Expand the DHCP server (shown in the previous image for this example), right-click IPv4, and choose New Scope to create a DHCP Scope.
- Click Next to configure the new scope via the New Scope Wizard.

- Provide a name for the new scope (Wireless Clients in this example), and click Next.
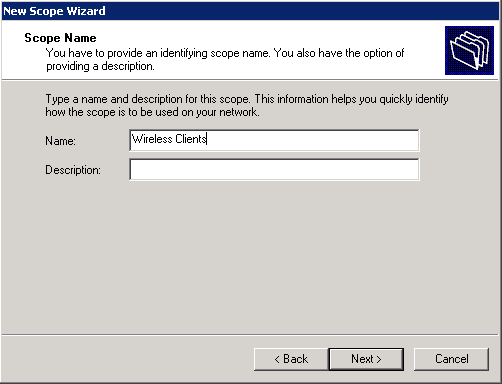
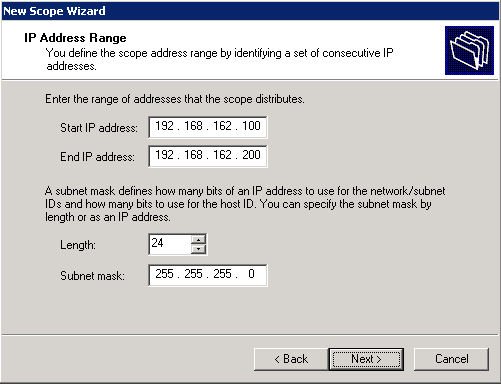
- Enter the range of available IP addresses that can be used for DHCP leases. Click Next to continue.
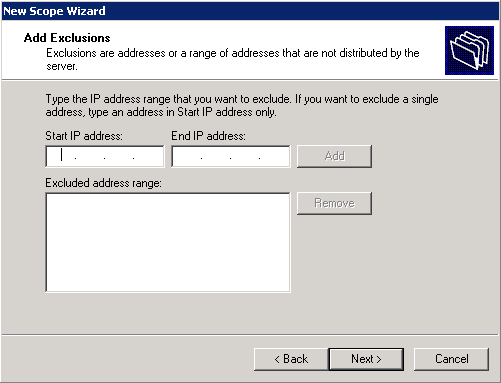
- Create an optional list of excluded addresses. Click Next to continue.
- Configure the lease time, and click Next.

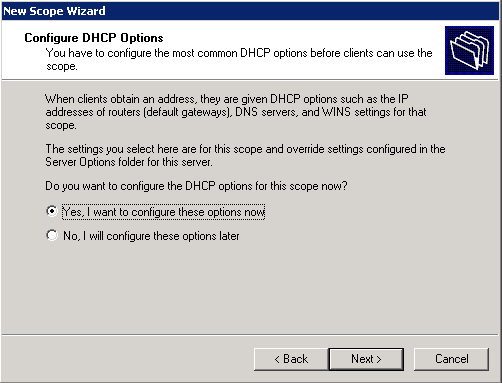
- Click Yes, I want to configure these options now, and click Next.
- Enter the IP address of the default gateway for this scope, click Add > Next.

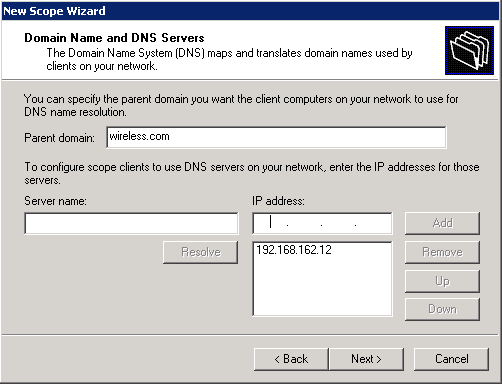
- Configure the DNS domain name and DNS server to be used by the clients. Click Next to continue.
- Enter WINS information for this scope if the network supports WINS. Click Next to continue.
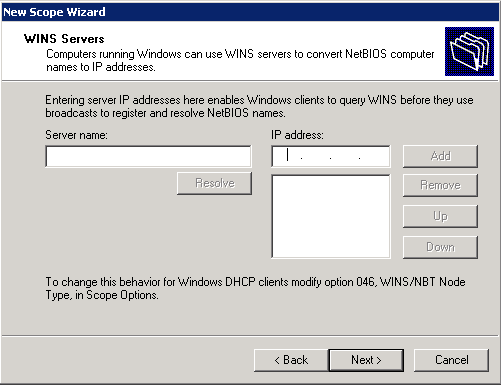
- To activate this scope, click Yes, I want to activate this scope now > Next.

- Click Finish to complete and close the wizard.

Install and Configure the Microsoft Windows 2008 Server as a CA Server
PEAP with EAP-MS-CHAP v2 validates the RADIUS server based on the certificate present on the server. Additionally, the server certificate must be issued by a public CA that is trusted by the client computer (that is, the public CA certificate already exists in the Trusted Root Certification Authority folder on the client computer certificate store).
Complete these steps in order to configure the Microsoft Windows 2008 server as a CA server that issues the certificate to the NPS:
- Click Start > Server Manager.

- Click Roles > Add Roles.
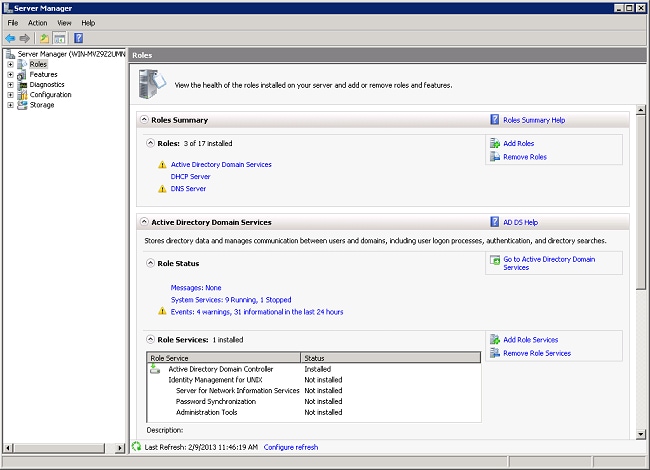
- Click Next.

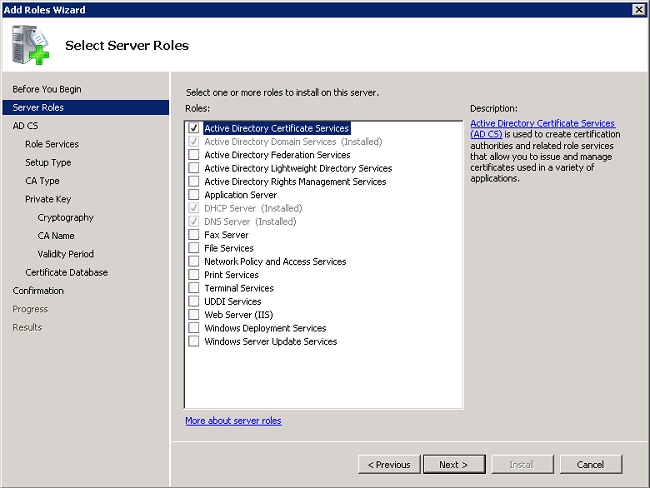
- Select the service Active Directory Certificate Services, and click Next.
- Review the Introduction to Active Directory Certificate Services, and click Next.
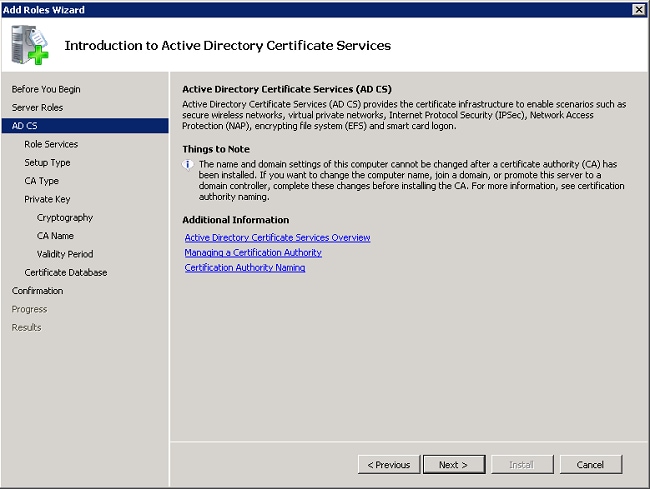
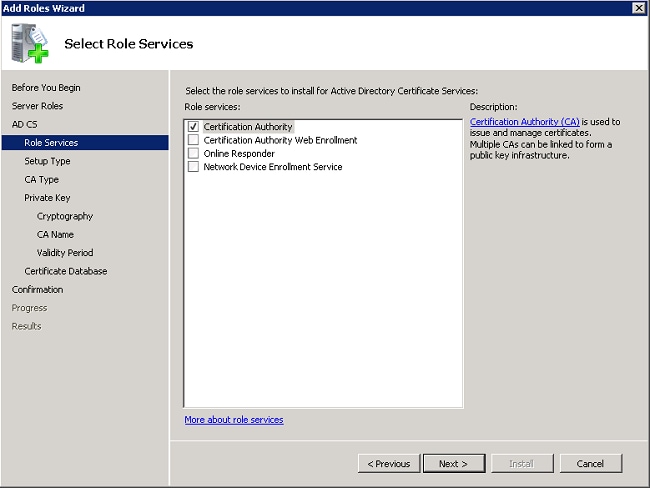
- Select the Certificate Authority, and click Next.
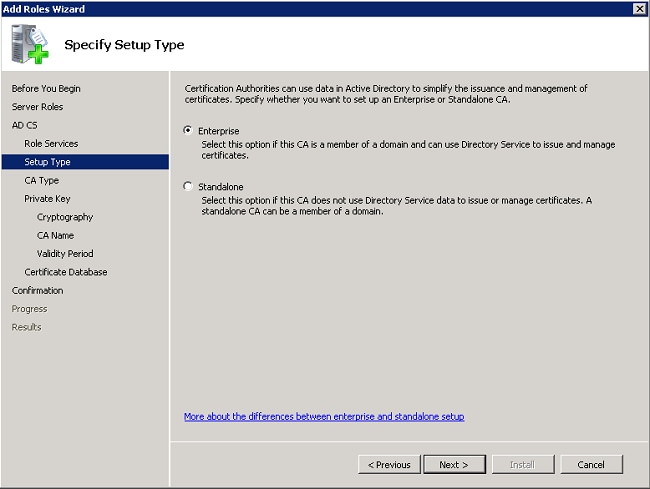
- Select Enterprise, and click Next.
- Select Root CA, and click Next.

- Select Create a new private key,and click Next.

- Click Next on Configure Cryptography for CA.

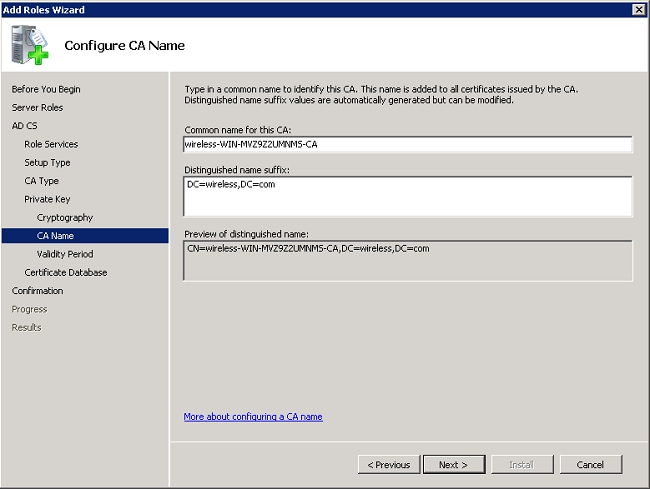
- Click Next to accept the default Common name for this CA.
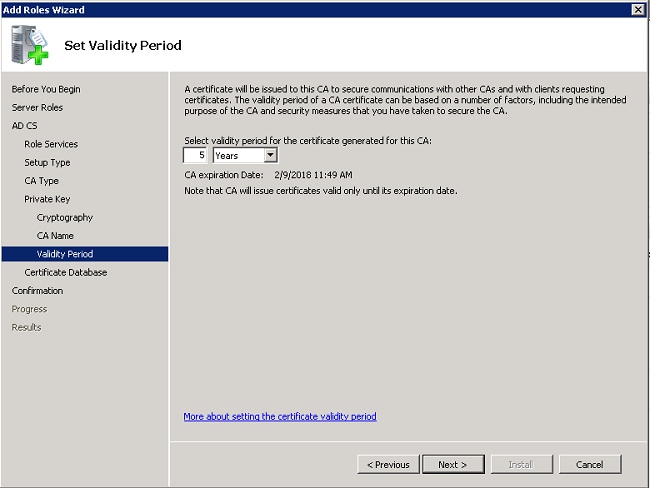
- Select the length of time this CA certificate is valid, and click Next.
- Click Next to accept the default Certificate database location.

- Review the configuration, and click Install to start the Active Directory Certificate Services.

- After the install is completed, click Close.
Connect Clients to the Domain
Complete these steps in order to connect the clients to the wired network and to download the domain specific information from the new domain:
- Connect the clients to the wired network with a straight through Ethernet cable.
- Boot up the client, and log in with the client username and password.
- Click Start > Run, enter cmd, and click OK.
- At the command prompt, enter ipconfig, and click Enter to verify that DHCP works correctly and that the client received an IP address from the DHCP server.
- In order to join the client to the domain, click Start,right-click Computer, choose Properties, and choose Change Settings at the bottom right.
- Click Change.
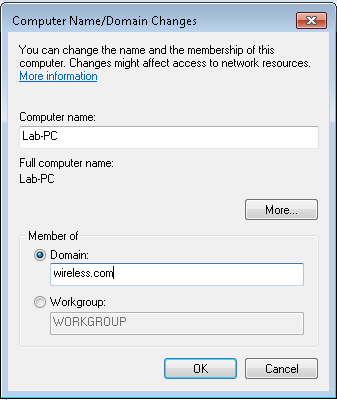
- Click Domain, enter the domain name, wireless, for this example, and click OK.
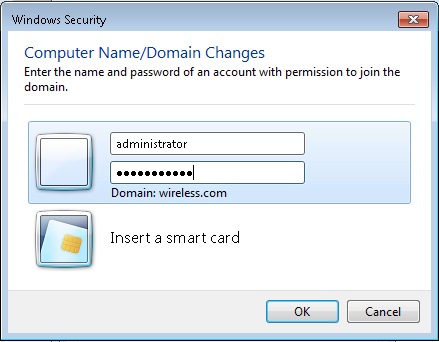
- Enter username administrator and the password specific to the domain to which the client joins. This is the administrator account in the Active Directory on the server.
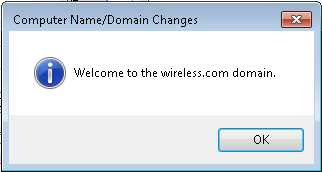
- Click OK, and click OK again.
- Click Close > Restart Now to restart the computer.
- Once the computer restarts, log in with: Username = Administrator; Password = <domain password>; Domain = wireless.
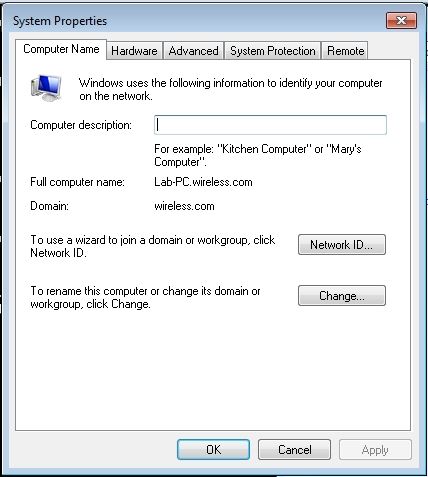
- Click Start, right-click Computer, choose Properties, and choose Change Settings at the bottom right to verify that you are on the wireless domain.
- The next step is to verify that the client received the CA certificate (trust) from the server.
- Click Start, enter mmc, and press Enter.
- Click File, and click Add/Remove snap-in.
- Choose Certificates, and click Add.

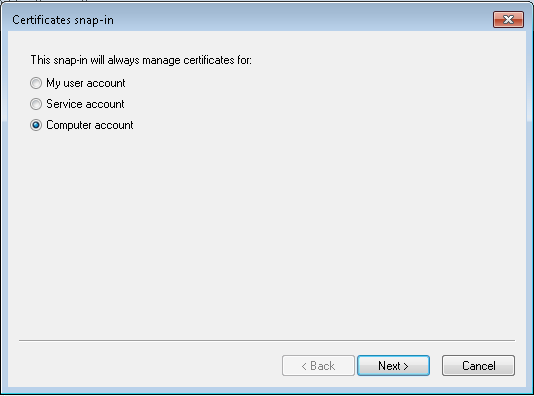
- Click Computer account, and click Next.
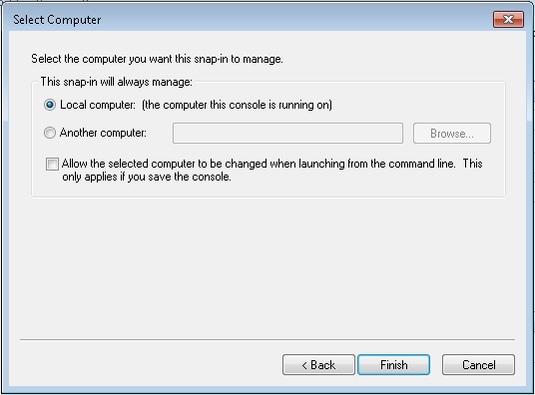
- Click Local computer,and click Next.
- Click OK.
- Expand the Certificates (Local Computer) and Trusted Root Certification Authorities folders, and click Certificates. Find wireless domain CA cert in the list. In this example, the CA cert is called wireless-WIN-MVZ9Z2UMNMS-CA.

- Repeat this procedure to add more clients to the domain.
Install the Network Policy Server on the Microsoft Windows 2008 Server
In this setup, the NPS is used as a RADIUS server to authenticate wireless clients with PEAP authentication. Complete these steps in order to install and configure NPS on the Microsoft WIndows 2008 server:
- Click Start > Server Manager.

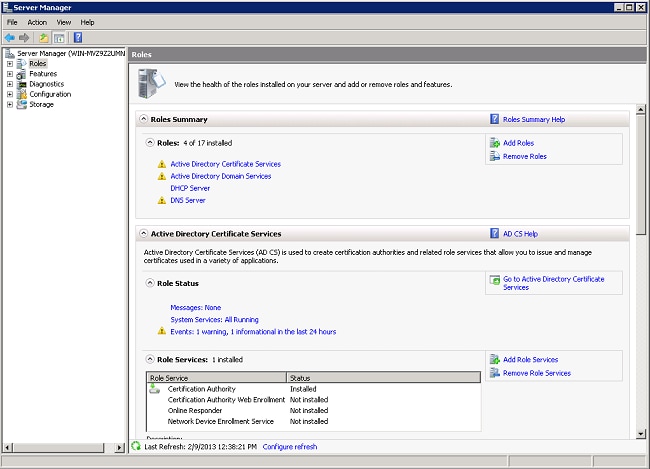
- Click Roles > Add Roles.
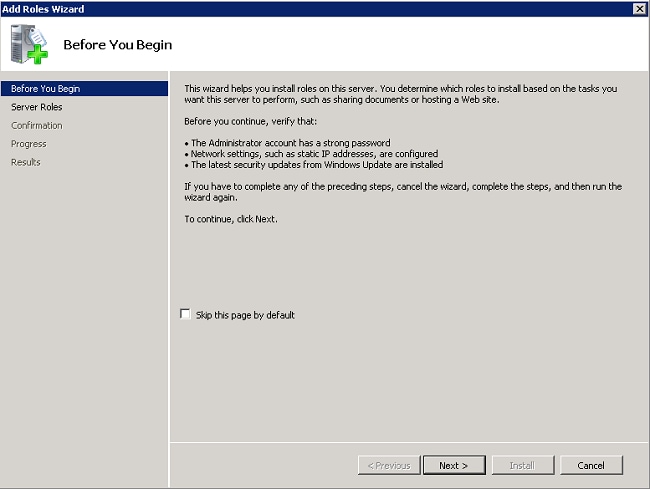
- Click Next.
- Select the service Network Policy and Access Services, and click Next.

- Review the Introduction to Network Policy and Access Services, and click Next.

- Select Network Policy Server,and click Next.
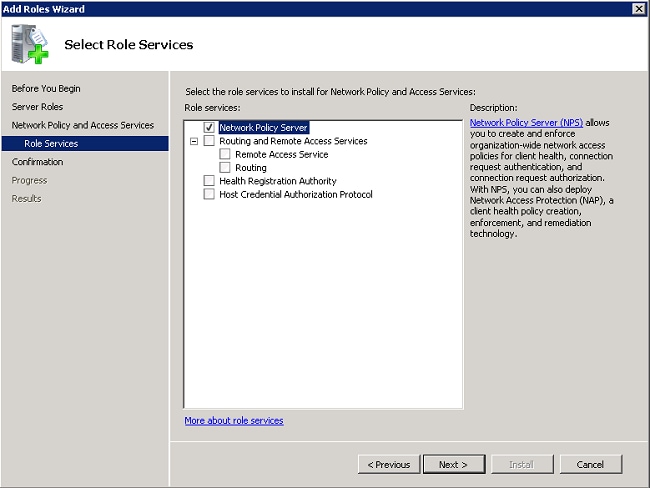
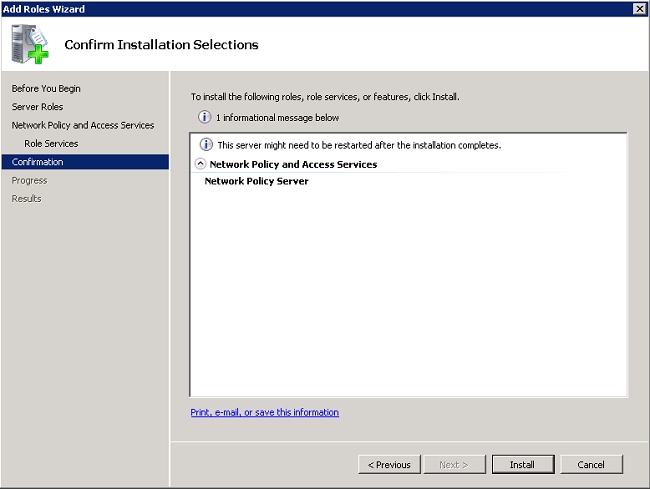
- Review the confirmation, and click Install.
After the install is completed, a screen similar to this one is displayed.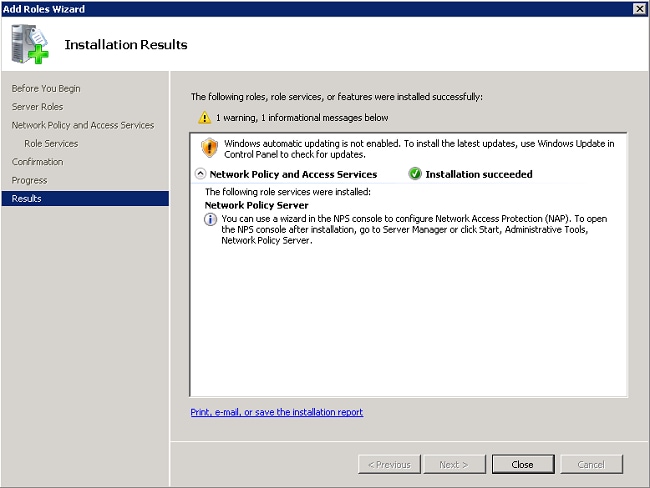
- Click Close.
Install a Certificate
Complete these steps in order to install the computer certificate for the NPS:
- Click Start, enter mmc, and press Enter.
- Click File > Add/Remove Snap-in.
- Choose Certificates, and click Add.
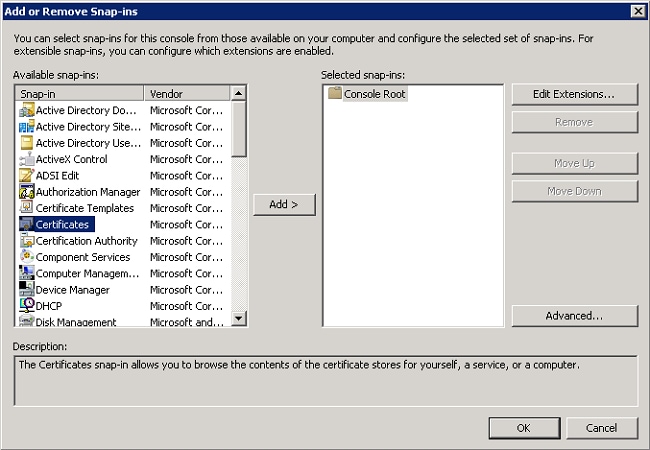
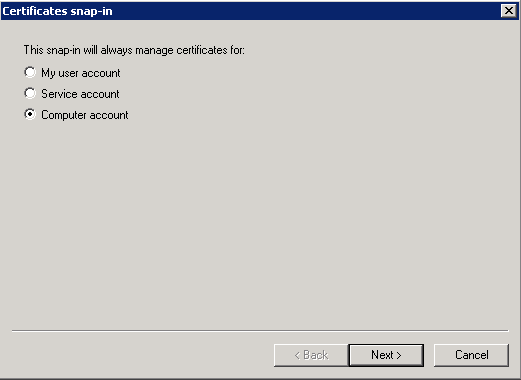
- Choose Computer account, and click Next.
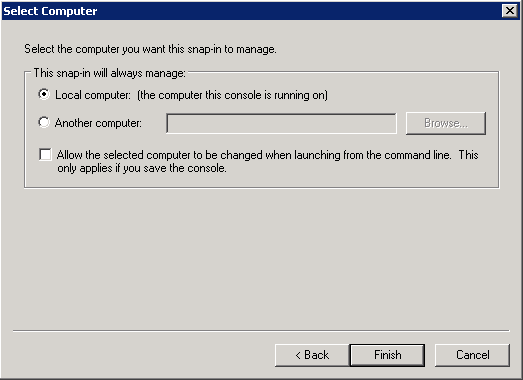
- Select Local Computer,and click Finish.
- Click OK to return to the Microsoft Management Console (MMC).
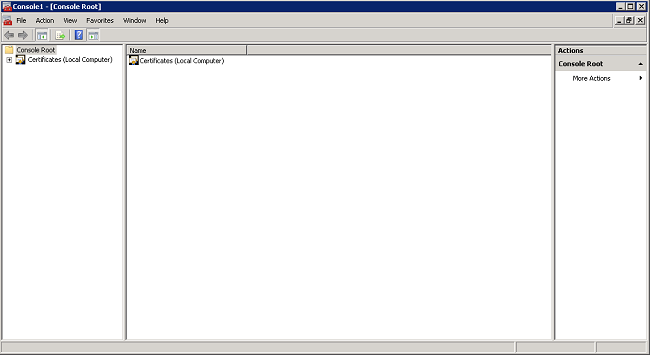
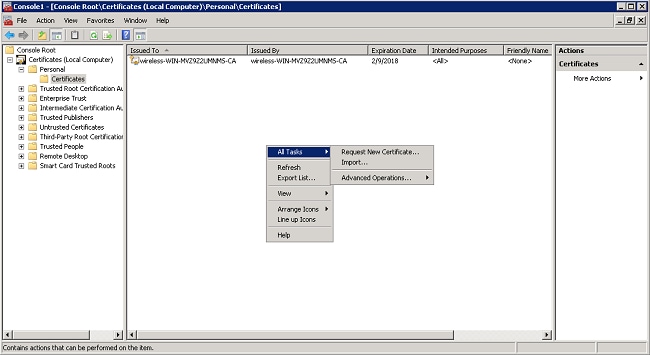
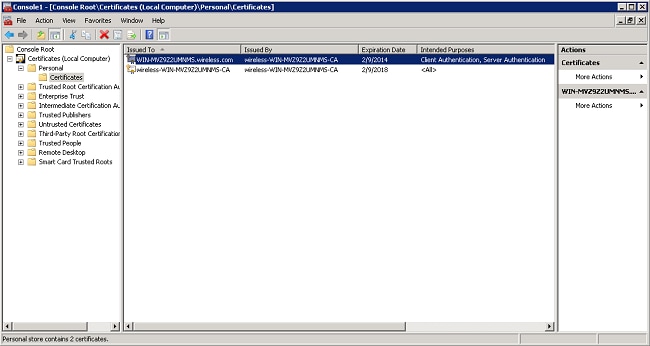
- Expand the Certificates (Local Computer) and Personal folders, and click Certificates.

- Right-click in the white space beneath the CA certificate, and choose All Tasks > Request New Certificate.
- Click Next.
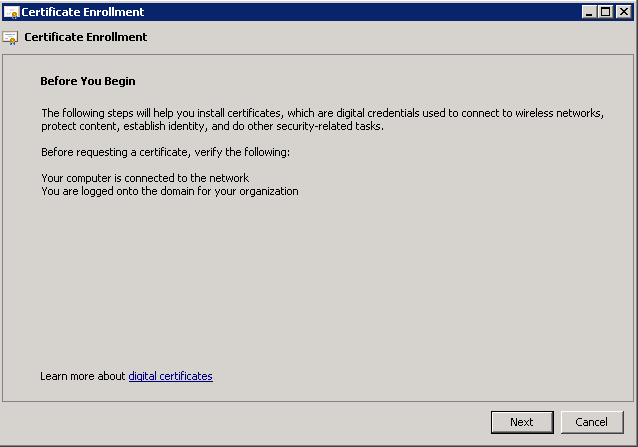
- Select Domain Controller, and click Enroll.

- Click Finish once the certificate is installed.
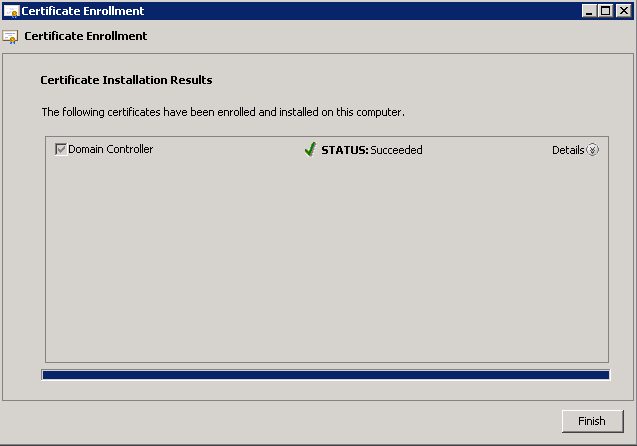
The NPS certificate is now installed. - Ensure that the Intended Purpose of the certificate reads Client Authentication, Server Authentication.
Configure the Network Policy Server Service for PEAP-MS-CHAP v2 Authentication
Complete these steps in order to configure the NPS for authentication:
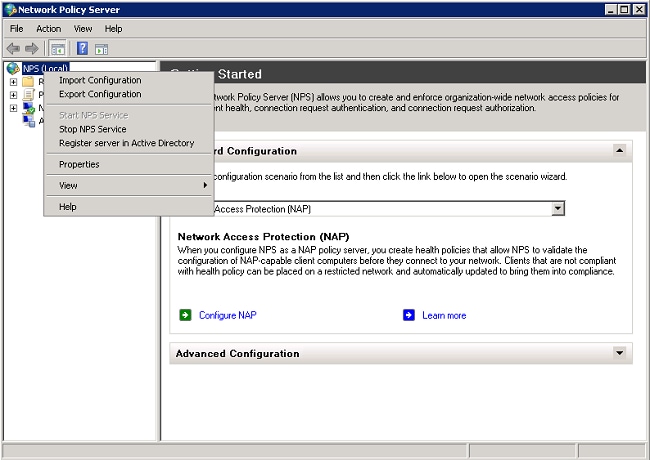
- Click Start > Administrative Tools > Network Policy Server.
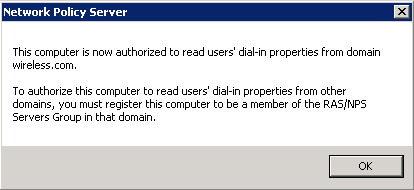
- Right-click NPS (Local),and choose Register server in Active Directory.
- Click OK.

- Click OK.
- Add the Wireless LAN Controller as an authentication, authorization, and accounting (AAA) client on the NPS.
- Expand RADIUS Clients and Servers. Right-click RADIUS Clients, and choose New RADIUS Client.

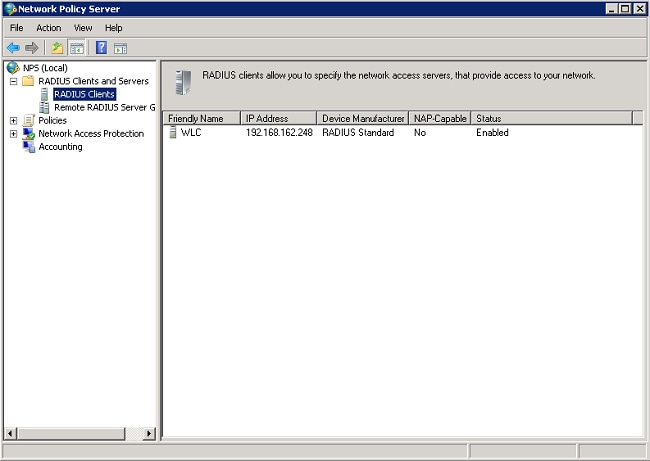
- Enter a Friendly name (WLC in this example), the management IP address of the WLC (192.168.162.248 in this example) and a shared secret. The same shared secret is used to configure the WLC.
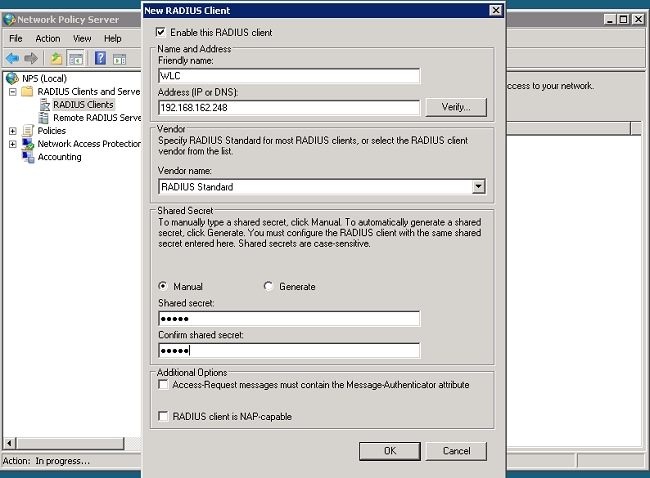
- Click OK to return to the previous screen.
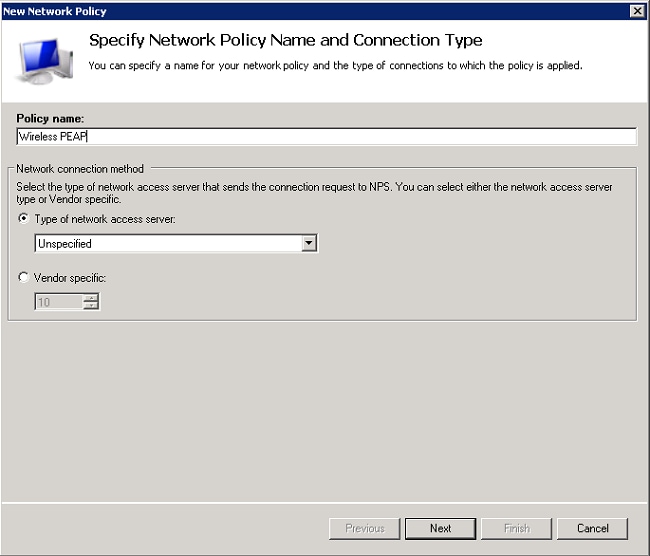
- Create a new Network Policy for wireless users. Expand Policies, right-click Network Policies,and choose New.

- Enter a policy name for this rule (Wireless PEAP, in this example), and click Next.
- To have this policy allow only wireless domain users, add these three conditions, and click Next:
- Windows Groups - Domain Users
- NAS Port Type - Wireless - IEEE 802.11
- Authentication Type - EAP
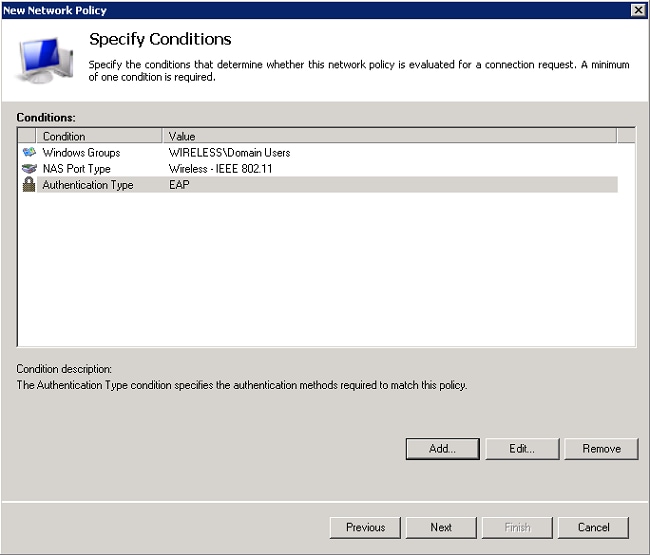
- Click Access granted to grant connection attempts that match this policy, and click Next.

- Disable all the authentication methods under Less secure authentication methods.
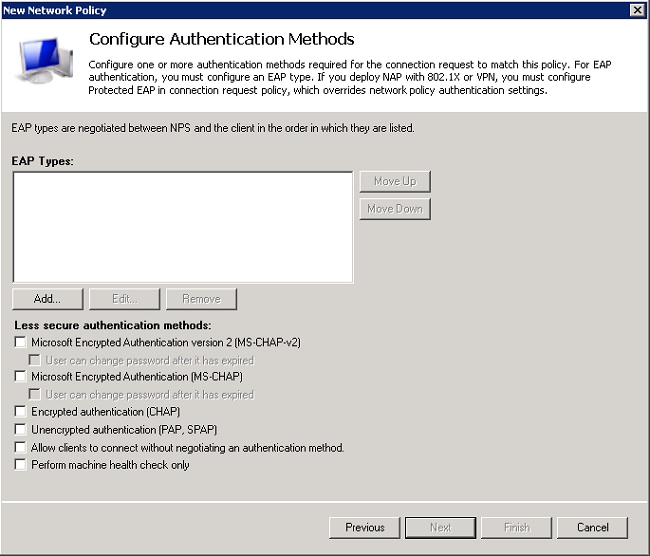
- Click Add, select PEAP, and click OK to enable PEAP.
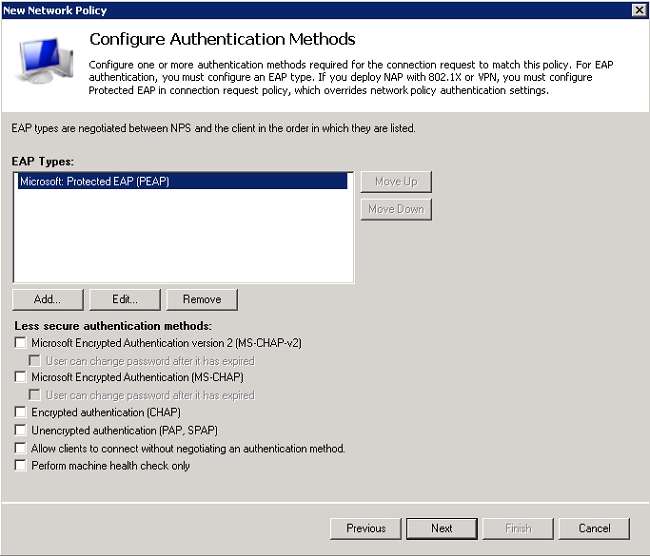
- Select Microsoft: Protected EAP (PEAP), and click Edit. Ensure the previously created domain controller certificate is selected in the Certificate issued drop-down list, and click OK.
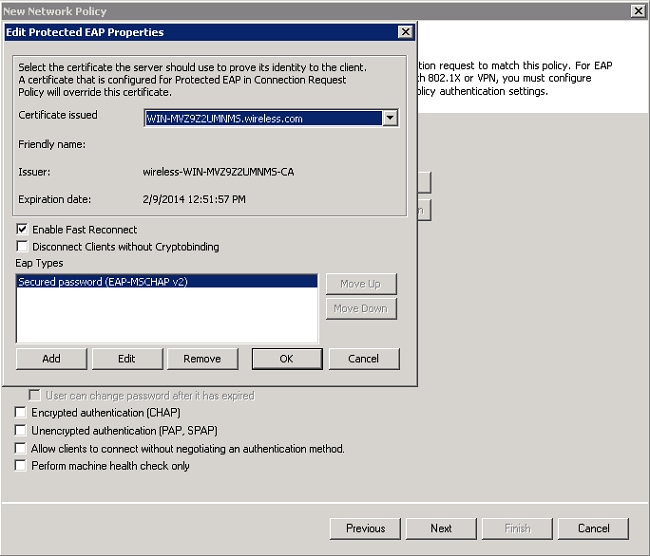
- Click Next.

- Click Next.
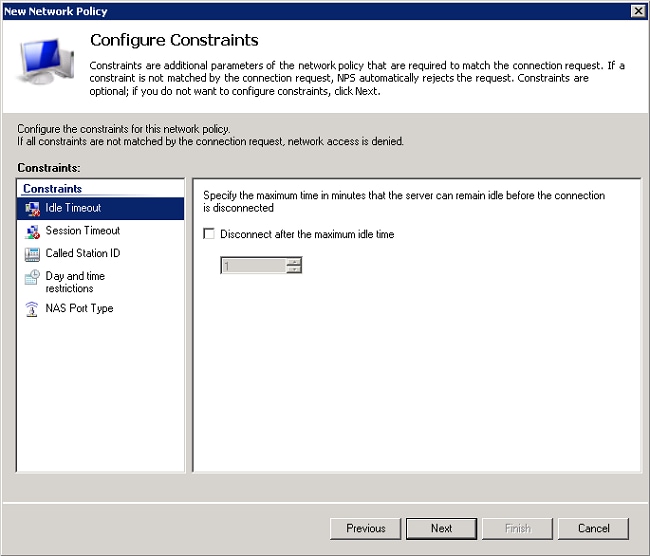
- Click Next.
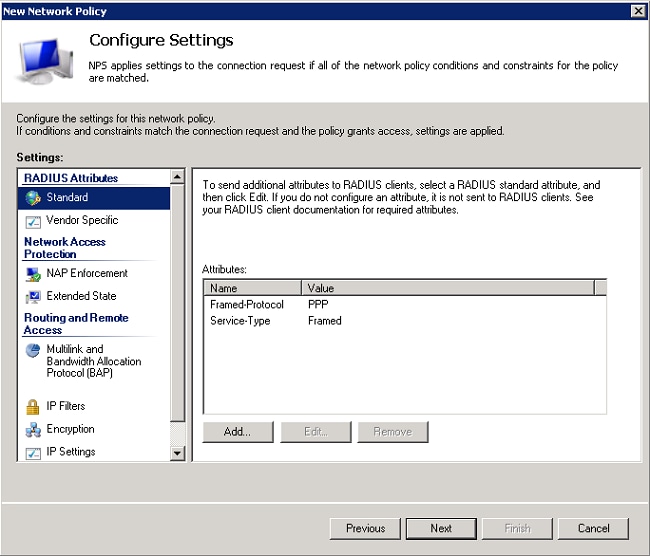
- Click Finish.

Add Users to the Active Directory
In this example, the user database is maintained on the Active Directory. Complete these steps in order to add users to the Active Directory database:
- Open Active Directory Users and Computers. Click Start > Administrative Tools > Active Directory Users and Computers.
- In the Active Directory Users and Computers console tree, expand the domain, right-click Users > New, and choose User.
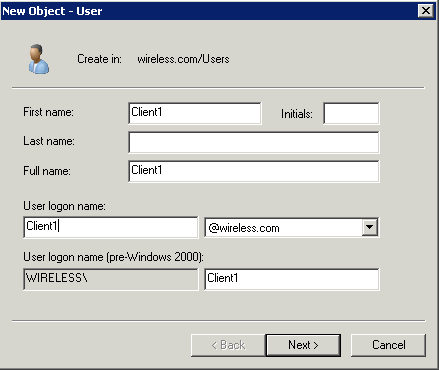
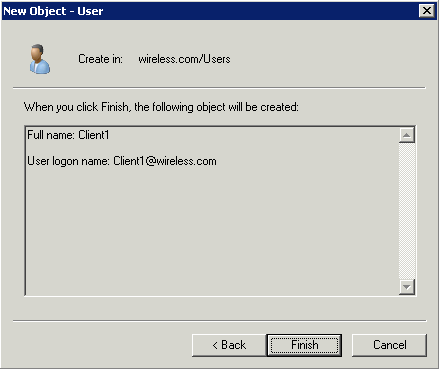
- In the New Object – User dialog box, enter the name of the wireless user. This example uses the name Client1 in the First name field and Client1 in the User logon name field. Click Next.
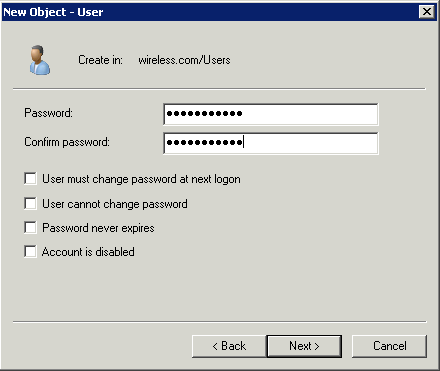
- In the New Object – User dialog box, enter a password of your choice in the Password and Confirm password fields. Ensure that the User must change password at next logon check box is not checked, and click Next.
- In the New Object – User dialog box, click Finish.
- Repeat steps 2 through 4 in order to create additional user accounts.
Configure the Wireless LAN Controller and LAPs
Configure the wireless devices (the Wireless LAN Controllers and LAPs) for this setup.
Configure the WLC for RADIUS Authentication
Configure the WLC to use the NPS as the authentication server. The WLC must be configured in order to forward the user credentials to an external RADIUS server. The external RADIUS server then validates the user credentials and provides access to the wireless clients.
Complete these steps in order to add the NPS as a RADIUS server in the Security > RADIUS Authentication page:
- Choose Security > RADIUS > Authentication from the controller interface to display the RADIUS Authentication Servers page. Click New in order to define a RADIUS server.

- Define the RADIUS server parameters. These parameters include the RADIUS Server IP Address, Shared Secret, Port Number, and Server Status. The Network User and Management check boxes determine if RADIUS-based authentication applies to management and network (wireless) users. This example uses the NPS as the RADIUS server with an IP address of 192.168.162.12. Click Apply.

Configure a WLAN for the Clients
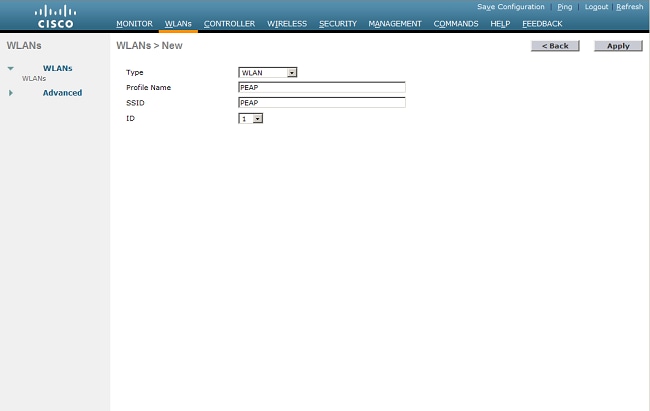
Configure the service set identifier (SSID) (WLAN) to which the wireless clients connects. In this example, create the SSID, and name it PEAP.
Define the Layer 2 Authentication as WPA2 so that the clients perform EAP-based authentication (PEAP-MS-CHAP v2 in this example) and use the advanced encryption standard (AES) as the encryption mechanism. Leave all other values at their defaults.

Note: This document binds the WLAN with the management interfaces. When you have multiple VLANs in your network, you can create a separate VLAN and bind it to the SSID. For information on how to configure VLANs on WLCs, refer to VLANs on Wireless LAN Controllers Configuration Example.
Complete these steps in order to configure a WLAN on the WLC:
- Click WLANs from the controller interface in order to display the WLANs page. This page lists the WLANs that exist on the controller.
- Choose New in order to create a new WLAN. Enter the WLAN ID and the WLAN SSID for the WLAN, and click Apply.
- To configure the SSID for 802.1x, complete these steps:
- Click the General tab and enable the WLAN.

- Click the Security > Layer 2 tabs, set Layer 2 security to WPA + WPA2, check the WPA+WPA2 Parameters (for example, WPA2 AES) check boxesas needed, and click 802.1x as the Authentication Key Management.

- Click the Security > AAA Servers tabs, choose the IP address of the NPS from the Server 1 drop-down list, and click Apply.

- Click the General tab and enable the WLAN.
Configure the Wireless Clients for PEAP-MS-CHAP v2 Authentication
Complete these steps to configure the wireless client with the Windows Zero Config Tool to connect to the PEAP WLAN.
- Click the Network icon in the task bar. Click the PEAP SSID, and click Connect.

- The client must now be connected to the network.
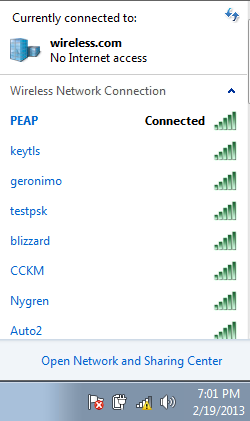
- If the connection fails, try to reconnect to the WLAN. If the issue persists, refer to the Troubleshoot section.
Verify
There is currently no verification procedure available for this configuration.
Troubleshoot
If your client did not connect to the WLAN, this section provides information you can use to troubleshoot the configuration.
There are two tools that can be used to diagnose 802.1x authentication failures: the debug client command and the Event Viewer in Windows.
If you perform a client debug from the WLC it is not resource intensive and does not impact service. To start a debug session, open the command-line interface (CLI) of the WLC, and enter debug client mac address, where the mac address is the wireless mac address of the wireless client that is unable to connect. While this debug runs, try to connect the client; there must be output on the CLI of the WLC that looks similar to this example:

This is an example of an issue that could occur with a misconfiguration. Here, the WLC debug shows the WLC has moved into the authentication state, which means the WLC waits for a response from the NPS. This is usually due to an incorrect shared secret on either the WLC or the NPS. You can confirm this via the Windows Server Event Viewer. If you do not find a log, the request never made it to the NPS.
Another example that is found from the WLC debug is an access-reject. An access-reject shows that the NPS received and rejected the client credentials. This is an example of a client that receives an access-reject:
When you see an access-reject, check the logs on the Windows Server Event logs to determine why the NPS responded to the client with an access-reject.
A successful authentication has an access-accept in the client debug, as seen in this example:
If you want to troubleshoot access-rejects and response timeouts it requires access to the RADIUS server. The WLC acts as an authenticator that passes EAP messages between the client and the RADIUS server. A RADIUS server that responds with an access-reject or response timeout must be examined and diagnosed by the manufacturer of the RADIUS service.

Note: TAC does not provide technical support for third-party RADIUS servers; however, the logs on the RADIUS server generally explain why a client request was rejected or ignored.
In order to troubleshoot access-rejects and response timeouts from the NPS, examine the NPS logs in the Windows Event Viewer on the server.
- Click Start > Administrator Tools > Event Viewer to start the Event Viewer and review the NPS logs.
- Expand Custom Views > Server Roles > Network Policy and Access.
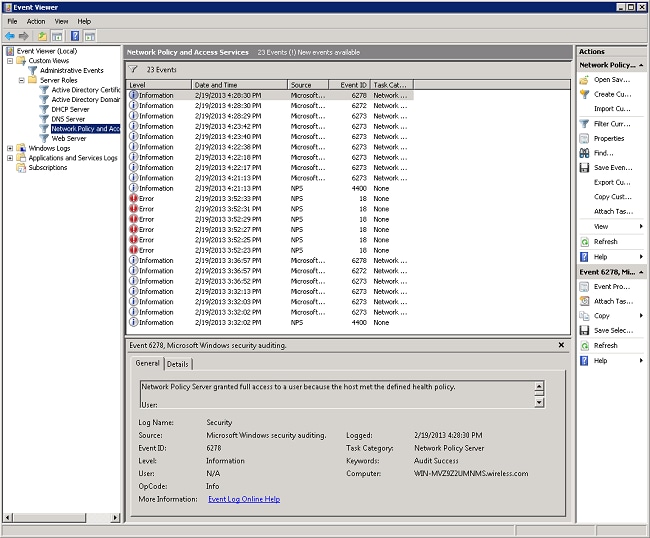
In this section of the Event View, there are logs of passed and failed authentications. Examine these logs to troubleshoot why a client is not passing authentication. Both passed and failed authentications show up as Informational. Scroll through the logs to find the username that has failed authentication and received an access-reject based on the WLC debugs.
This is an example of the NPS when it denies a user access: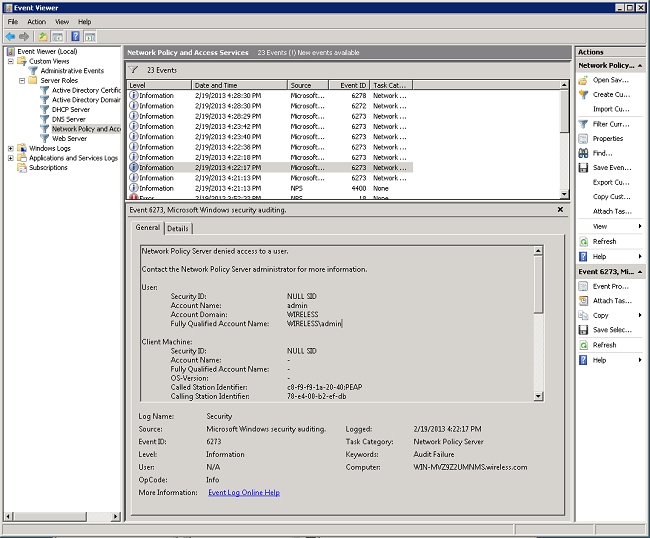
When you review a deny statement in the Event Viewer, examine the Authentication Details section. In this example, you can see that the NPS denied the user access due to an incorrect username:
The Event View on the NPS also assists when you need to troubleshoot if the WLC does not receive a response back from the NPS. This is usually caused by an incorrect shared secret between the NPS and the WLC.
In this example, the NPS discards the request from the WLC due to an incorrect shared secret:

Related Information
Revision History
| Revision | Publish Date | Comments |
|---|---|---|
3.0 |
14-Mar-2023 |
Updated. Corrected. Recertification. |
1.0 |
24-Feb-2013 |
Initial Release |
Contributed by Cisco Engineers
- Nick TateCisco Customer Delivery Architect
Contact Cisco
- Open a Support Case

- (Requires a Cisco Service Contract)
 Feedback