Upgrading the 340 Aironet Bridge Using FTP
Available Languages
Contents
Introduction
This document describes how to use FTP to upgrade firmware that runs on the Cisco 340 Series Ethernet Bridge and 340 Series Workgroup Bridge.
Prerequisites
Requirements
In order to perform the upgrade, you need an FTP server on which to place the image that you load.
Components Used
The information in this document is based on the Cisco 340 Series Ethernet Bridge and 340 Series Workgroup Bridge.
The information in this document was created from the devices in a specific lab environment. All of the devices used in this document started with a cleared (default) configuration. If your network is live, make sure that you understand the potential impact of any command.
Conventions
Refer to Cisco Technical Tips Conventions for more information on document conventions.
Upgrade Procedures
There are three methods used to upgrade the Cisco 340 Bridge and 340 Workgroup Bridge firmware. These methods are:
-
Xmodem
-
Cyclic redundancy check (CRC) Xmodem
-
FTP
The first two methods have these disadvantages:
-
Because the speed over an Xmodem is slow compared to the 10 Mbps network connection over a LAN port or 11 Mbps connection over a radio port of a bridge, the time that the Xmodem takes to complete the image upgrade is excessive.
-
These methods require access to the console port of the bridge. Therefore, the user cannot perform a remote upgrade.
For these reasons, the method typically recommended to upgrade the firmware of a Cisco 340 Series Bridge is by FTP.
Step-by-Step Instructions
Complete these steps in order to perform the upgrade by FTP:
-
Download the desired firmware image from the Cisco Wireless Software Center.
-
Run the executable file (for example, BR340v8652.exe) to uncompress the image contained in the file.
-
Copy the uncompressed image (BR340V865_2.450 in this example) into the directory of your FTP server. You retrieve this image later in this procedure. For example, use your user directory, typically /home/username in a UNIX directory.
-
Make a Telnet connection to the IP address of the Cisco Aironet 340 Bridge that you wish to upgrade. Make sure that you have IP connectivity to the FTP server on which you placed the image. Complete these steps in order to check the connectivity:
-
Go to the main menu.
-
Choose 5 - Diagnostics.
-
Choose 1 - Network.
-
Choose 3 - Ping.
-
Enter the IP address of your FTP server.
-
-
Press the = key to return to the main menu.
-
Choose 5 - Diagnostics.
-
Choose 7 - Load.
-
Choose 3 - Ftp.
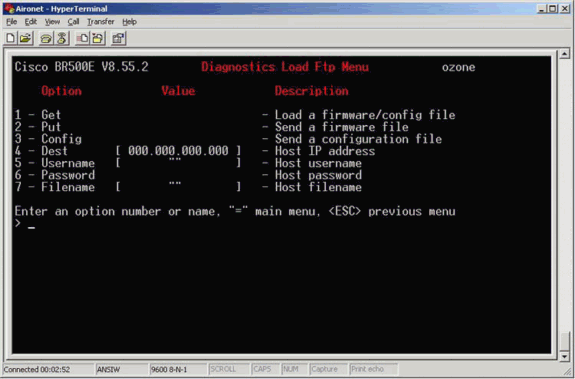
The Telnet window appears, as shown here:
Figure 1
-
-
Configure these parameters:
-
IP address of the FTP server
-
Your username on the FTP server
-
Your password on the FTP server (if needed)
-
New image filename as stored on the FTP server
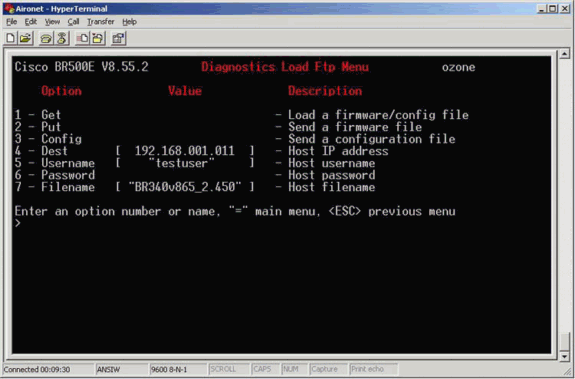
In the example in Figure 2, the parameters are:
-
IP address of the FTP server is 192.168.1.11.
-
FTP username is testuser.
-
New image filename is BR340v865_2.450. This is the expanded executable that you downloaded.
Note: Make sure that you use the correct uppercase and lowercase letters in the filename of the image, because some FTP servers are case sensitive.
After you configure the FTP settings, this window appears:
Figure 2
-
-
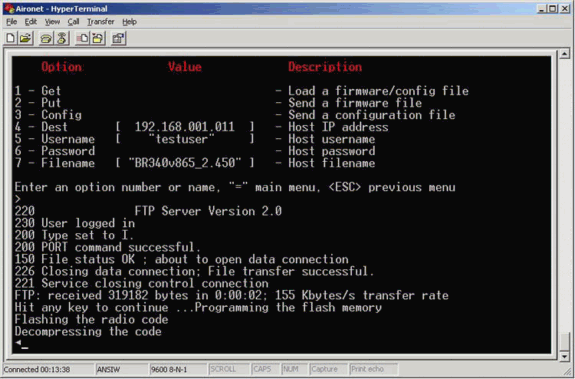
In order to initiate the FTP transfer, choose the 1 - Get option from the menu. The image is automatically upgraded (as shown in Figure 3). The unit reloads with the new image and keeps its previous configuration.
Figure 3
Alternate Upgrade Method
Another similar upgrade method for the Cisco 340 Series Bridges is to distribute the software from a unit that already runs the software version and has it already stored in its flash memory.
In order to achieve this, complete the Step-by-Step Instructions, with these differences:
-
The IP address must be the IP address of the remote bridge that you wish to update.
-
You must use any username (do not leave the field empty).
-
You must use any filename (do not leave the field empty).
-
Instead of the 1 - Get option from the menu, use the 2 - Put option.
The remote Cisco Aironet 340 Series Bridge flashes the new code and begins to run it immediately.
Verify
There is currently no verification procedure available for this configuration.
Troubleshoot
There is currently no specific troubleshooting information available for this configuration.
Contact Cisco
- Open a Support Case

- (Requires a Cisco Service Contract)


 Feedback