Cisco Aironet Client Adapter Installation Tips for Windows NT v4.0
Available Languages
Contents
Introduction
The Cisco Aironet Client Adapter Installation Wizard for Windows automates the installation of the Aironet Client Utility (ACU) and related drivers, and adjusts the system resources so the hardware can interact appropriately with Windows. In legacy installations where that wizard is not used, you must use an alternative installation method. The procedure to install the Cisco Aironet Client Adapter card on a Windows NT platform is different from the installation process on other Windows platforms. This document describes the method to set the IRQ and I/O port numbers used by the Client Adapter card.
Prerequisites
Requirements
The reader should be familiar with the Windows GUI and the Control Panel.
Components Used
This document is applicable to any platform that runs Windows NT version 4.0.
The information in this document was created from the devices in a specific lab environment. All of the devices used in this document started with a cleared (default) configuration. If your network is live, make sure that you understand the potential impact of any command.
Conventions
For more information on document conventions, refer to the Cisco Technical Tips Conventions.
Determine Which Interrupts Are Used
Since Windows NT v4.0 does not support Plug-and-Play, you must determine the available IRQ and I/O port numbers. To do this in Windows NT, use these steps:
-
Go to Start—>Programs—>Administrative tools—>NT Diagnostics:
-
In the Windows NT Diagnostics window, click the Resource tab.
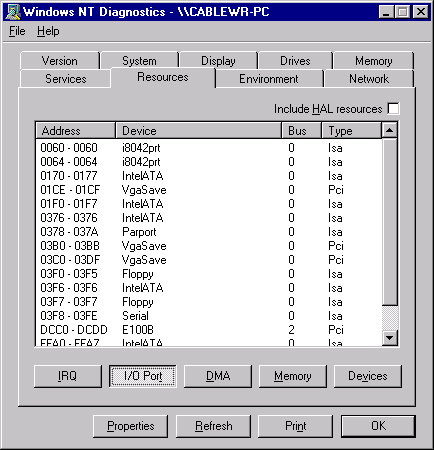
You can examine IRQ and I/O port numbers with the buttons at the bottom of the display.
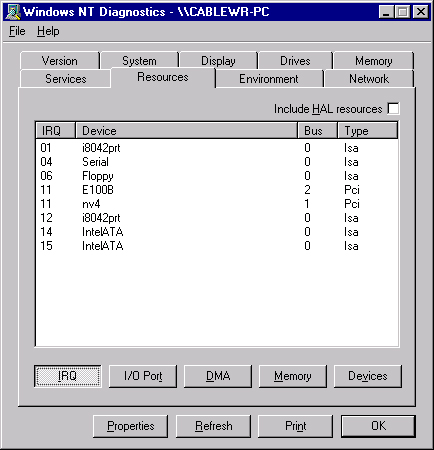
Note: These are the numbers that Windows NT reports; they are not set in the registry.
Install the Drivers
Once you know which IRQ and I/O port numbers are already in use, you can choose available IRQ and I/O port numbers to used with the Cisco Aironet Client Adapter card. For example, for the displays shown, you can use IRQ 10 and I/O port 100.
If you have not already done so, download Cisco Aironet software from the Cisco Software Center - Wireless page, or go directly to the Windows Driver & Utility page. Once you have downloaded the driver self-extracting archive, extract it to a diskette or to a folder on the hard drive.
Note: When you install the drivers, Windows NT does not prompt you to browse for the files. You must type in the full path to the location of the files. Therefore, if you do not have the files on diskette, it is best to extract the downloaded files to an easy-to-remember location, such as c:\temp.
Complete these steps in order to install the drivers:
-
Select Start.
-
Select Settings.
-
Select Control Panel.
-
Select Network properties.
-
Click the Adapter tab.
-
Click Add.
-
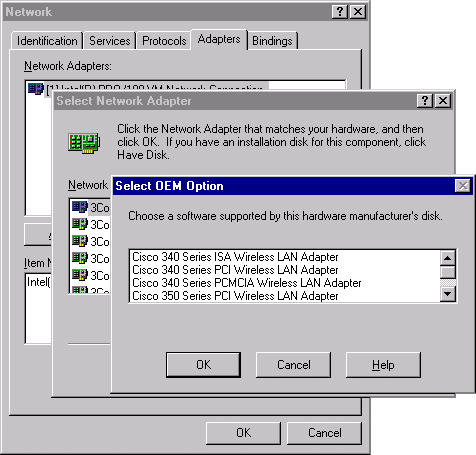
You are prompted to select the appropriate network adapter or to select a driver from disk. Click Have Disk.
-
Type in the path to the location of the files.
-
In the Select OEM Option box that appears, select the adapter that matches your client card.
-
Click OK.
-
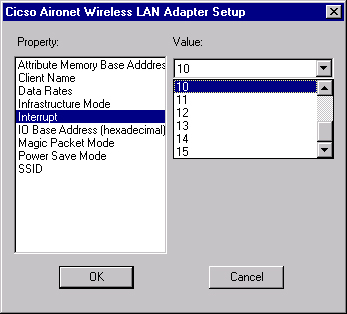
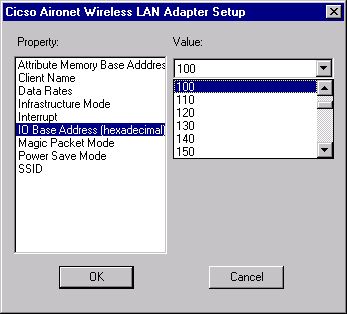
In the Adapter Setup window, select Client Name and type the unique client name of your computer in the Value dialog box.
-
Select SSID. In the Value dialog box, type the case-sensitive SSID of your RF network, which you can obtain from your system administrator.
-
Select Interrupt and select a value that you previously determined is available.
-
Select IO Base Address (hexadecimal) and select a value that you previously determined is available.
-
Click OK and Close.
-
The Microsoft TCP/IP Properties window opens. If it does not open, go to
-
My Computer—> Control Panel—>Network—>Protocols—>TCP/IP—>Properties.
-
-
Perform one of these:
-
If your computer gets its IP address from a DHCP server—select Obtain an IP address from a DHCP server.
When asked if you want to enable DHCP, click Yes and OK.
-
If your computer does not get its IP address from a DHCP server—select Specify an IP address and enter this information that you can get from your system administrator:
-
IP address
-
subnet mask
-
default gateway address of your computer
-
-
Click OK.
-
-
When prompted to restart your computer, remove any CDs or floppy disks and click Yes.
The driver installation is complete.
Related Information
Contact Cisco
- Open a Support Case

- (Requires a Cisco Service Contract)


 Feedback