Understand Catalyst 9800 Wireless Controllers Configuration Model
Available Languages
Download Options
Bias-Free Language
The documentation set for this product strives to use bias-free language. For the purposes of this documentation set, bias-free is defined as language that does not imply discrimination based on age, disability, gender, racial identity, ethnic identity, sexual orientation, socioeconomic status, and intersectionality. Exceptions may be present in the documentation due to language that is hardcoded in the user interfaces of the product software, language used based on RFP documentation, or language that is used by a referenced third-party product. Learn more about how Cisco is using Inclusive Language.
Contents
Introduction
This document describes the new configuration model of tags and profiles that is available on Catalyst 9800 Series Wireless Controllers.
Background information
This document provides a walk through the various GUI options - wizard and menu-based that are available to design and deploy your 9800 WLC to service SSIDs at multiple sites.
If you are familiar with AireOS Wireless LAN Controllers (WLCs), you are aware of Access Points (APs) and FlexConnect Groups.
Those groups allow you to control what capabilities (Ex: which Wireless Local Area Networks [WLANs] or Radio Frequency [RF] profiles) are available for each AP, based on their AP group association.
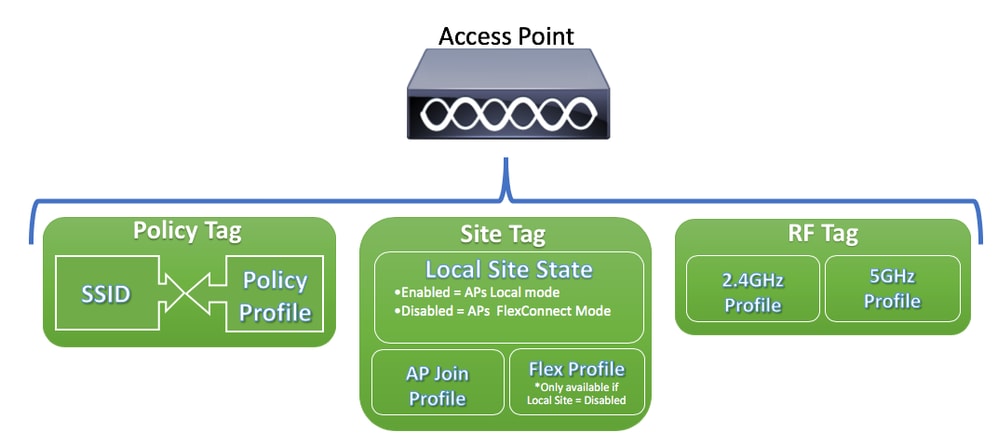
On 9800 WLCs, tags are used to control the features that are available for each AP. Tags are assigned to every AP and inside every tag, you can find all the settings that were applied to the AP.
There are three tags:
- Policy Tag
- Site Tag
- RF Tag
Visual scheme of an AP configuration:
Policy Tag
Policy Tag is the link between a WLAN Profile [Service Set Identifier (SSID)] and a Policy Profile.

- Policy Profile
Inside a Policy Profile, you can specify Virtual Local Area Network (VLAN) ID, If traffic is central or local switching, Mobiliy Anchors, Quality of Service (QoS), timers, among other settings.
- SSID
Inside a SSID, you can specify the WLAN name, Security type for the WLAN, advanced protocols like 802.11k among other settings.
Site Tag
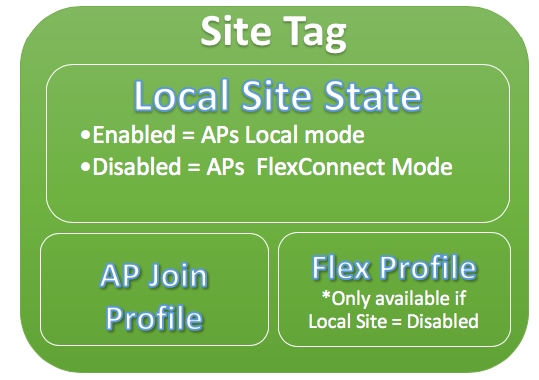
Site Tag defines if the APs are in Local Mode or Flexconnect mode. Other AP modes like Sniffer, Sensor, Monitor, Bridge can be configured directly on the AP.
The Site Tag also contains the AP Join Profile and Flex Profile that are applied to the AP.

Note: Flex Profile Setting only becomes available if the Local Site setting is disabled.
- AP Join Profile
Inside an AP Join Profile, you can specify settings such as Control and Provisioning of Wireless Access Points (CAPWAP) timers, remote access to APs (Telnet/Secure Shell [SSH]), backup controller configuration and others.
- Flex Profile
On a Flex Profile, you have settings such as Address Resolution Protocol (ARP) caching, VLAN/ACL mapping and so on.
RF Tag
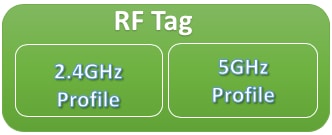
Inside an RF tag, you can either select any RF profile or select to use the Global RF configuration.
- 2.4 GHz Profile
Allows you to define specific data rates to be used, Transmit Power Control (TPC) settings, Dynamic Channel Assignment (DCA) and some other Radio Resource Management (RRM) settings for the 2.4GHz band.
- 5GHz Profile
Allows you to define specific data rates to be used, Transmit Power Control (TPC) settings, Dynamic Channel Assignment (DCA) and some other Radio Resource Management (RRM) settings for the 5GHz band.
By default, the APs get assigned the default Tags (Default Policy Tag, Default Site Tag, Default RF Tag) and the default Tags gets assigned the default profiles (Default Policy Profile, Default AP Join Profile, Default Flex Profile).

Note: You can modify all the default settings except for the Default Policy Tag. The Default Policy Tag automatically links any SSID with a WLAN ID from 1 to 16 to the default policy profile and those links cannot be modified.
List of Settings per Profile
If you are familiar with AireOS, you are used to configure all characteristics for an SSID under WLAN configuration. On 9800 WLCs, these settings are split between WLAN Profile and Policy Profile. Also, some of the configuration seen under the Global AP Configuration Page on AireOS GUI has been moved to the AP Join Profile. Here you can find the list of all the settings that you can configure under each profile.
WLAN Profile
- 802.11k
- Band select
- Broadcast SSID
- 802.11v (BSS, DMS, TFS, WNM)
- CCX
- Off Channel Scan Deferral
- Coverage Hole Detection (CHD)
- Client Association Limit
- Diagnostic Channel Capability
- Delivery Traffic Indication Message (DTIM)
- Access Control List (ACLs)
- Load Balance
- Local Authentication Settings
- Security Settings (PSK, 802.1x, WebAuth)
- Media-stream settings
- Management Frame Protection (MFP)
- 802.11ac settings per WLAN
- Peer-to-peer blocking
- Radio Policy
- Roamed Voice Clients re-anchor
- Static IP Clients Support
- Unscheduled automatic power save delivery (U-APSD) for WLAN
- Work Group Bridge (WGB) Support
- Universal AP
- Wifi Direct
- Wi-Fi Multimedia (WMM)
- Authentication List (Remote Authentication Dial-In User Service [RADIUS] servers)
Policy Profile
- Authentication, Authorization, and Accounting (AAA) override
- AAA Policy
- Accounting List
- Auto QoS
- Call Snooping
- Central/Local Switching
- CiscoTrustSec (CTS) Security group access control lists (SGACLs)
- Datalink ACL
- Description
- Type-Length-Value (TLV) Caching (Dynamic Host Configuration Protocol [DHCP], Hypertext Transfer Protocol [HTTP])
- Idle Timeout
- Idle Threshold
- Fabric Profile
- Flex Network Address Translation / Port Address Translation (NAT/PAT)
- Flex Split MAC ACL
- Flex VLAN Based Central Switching
- IP Network-based Application Recognition (NBAR) Protocol Discovery
- IPv4/v6 ACL
- IPv4 DHCP
- IPv4/IPv6 Flexible Netflow Monitor
- Mobility Anchor
- Multicast VLAN
- Network Access Control (NAC)
- Passive Client
- RADIUS Profiling
- Reanchor
- Service Policy
- Session Timeout
- Session Initiation Protocol (SIP) Call Admission Control (CAC)
- Static IP Mobility
- Subscriber Policy Name
- Umbrella Parameter Map
- Uniform Resource Locator (URL) filter
- VLAN
- WGB VLAN
- WGB Broadcast Tagging
AP Join Profile
- CAPWAP Backup
- CAPWAP Fallback
- CAPWAP Retransmit
- CAPWAP Timers
- CAPWAP Window
- Cisco Discovery Protocol (CDP) for APs
- Core Dump Trivial File Transfer Protocol (TFTP)
- Country Code
- Description
- 2.4GHz / 5GHz Client Reporting interval
- 802.1x Credentials for APs which act as supplicants
- Extended Module support
- Hyperlocation
- Internet Content Adaptation Protocol (ICAP)
- Jumbo Maximum Transmission Unit (MTU) status
- Link Aggregation (LAG) for APs
- Lawful Interception
- Light-Emitting Diode (LED) status
- Link Encryption
- Link Latency
- Mesh Profile
- AP Management user
- Network Time Protocol (NTP)
- Packet Capture Profile
- Power over Ethernet (PoE)
- AP Preferred Mode (IPv4/IPv6)
- Rogue Detection Settings (Containment, min Received Signal Strength Indicator [RSSI], min transient time, report interval)
- SSH/Telnet
- Persisten SSID
- Statistics Timer
- Syslog
- Transmission Control Protocol - Maximum Segment Size (TCP MSS) Adjust
- TFTP Downgrade
- AP Trace Profile
- Universal Serial Bus (USB) enable
Flex Profile
- ACL Policy
- ARP Caching
- CTS
- Description
- Fallback Radio Interface Shutdown
- HTTP Client Proxy
- Min Latency Join for Flex AP
- Local Authentication parameters
- Multicast Parameters for Flex APs
- Native VLAN ID
- OfficeExtended AP mode
- Predownload
- Resilient (For Flex+Bridge APs)
- VLAN name mapping
RF Profile
- Airtime Fairness
- Band Select settings (Only on 2.4GHz profile)
- Channel
- Client Network Preference
- Coverage Hole Detection (CHD) settings
- Description
- 802.11n only mode
- High Density automatic settings
- High-Speed Roam (HSR)
- Load Balance Settings
- Rates
- Traps
- TX Power Levels
Prerequisites
Requirements
There are no specific requirements for this document.
Components Used
The information in this document is based on these software and hardware versions:
- Cisco Catalyst 9800 Wireless Controllers running Cisco IOS® XE, Gilbraltar v16.10
The information in this document was created from the devices in a specific lab environment. All of the devices used in this document started with a cleared (default) configuration. If your network is live, ensure that you understand the potential impact of any command.
Network Diagram
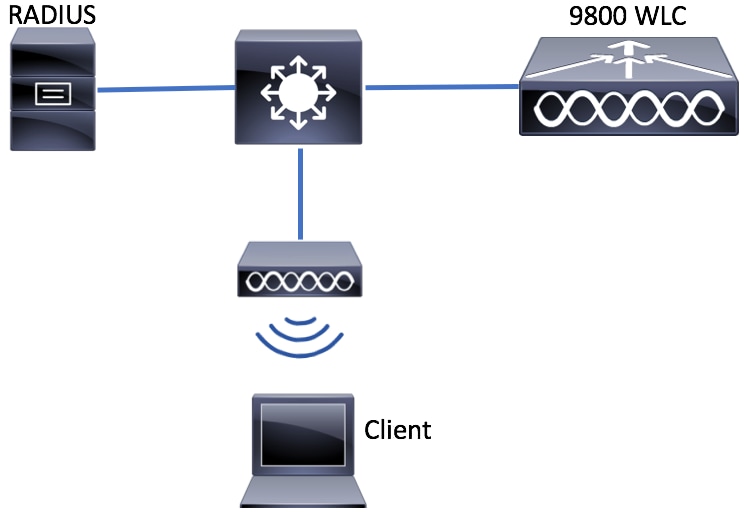
This document is based on this topology:
Configurations
Declare Client VLANs
Before you start any configuration, you need to add the needed VLANs (VLANs where the wireless clients are assigned).
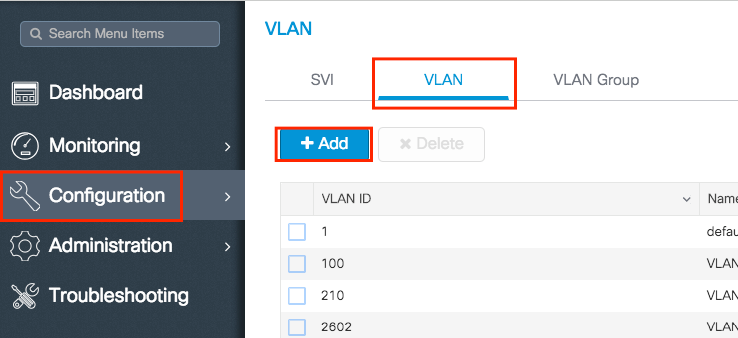
Step 1. Navigate to Configuration > Layer2 > VLAN > VLAN > + Add.
Step 2. Enter the needed information.
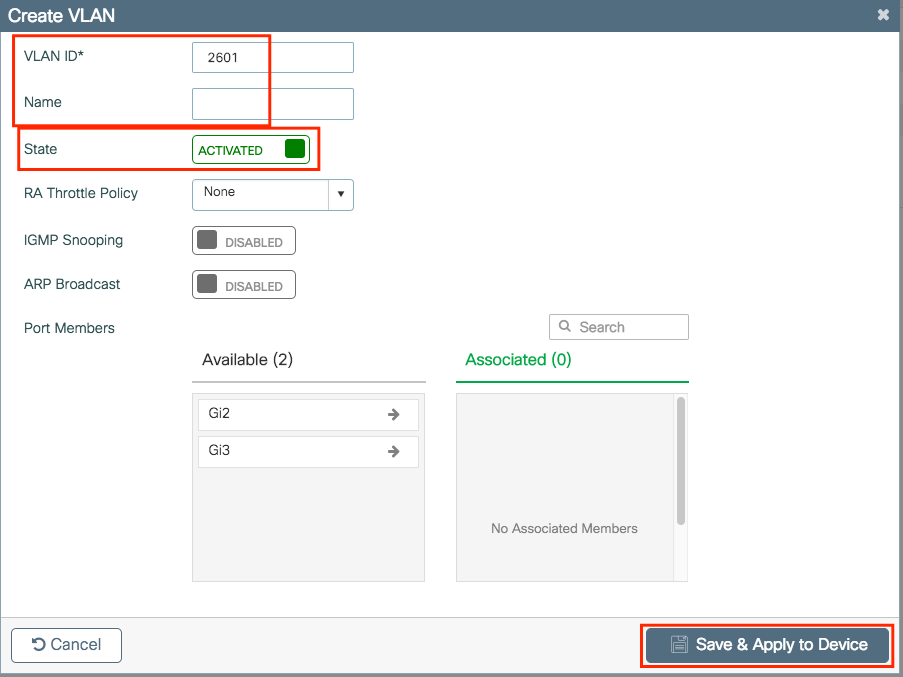

Note: If you do not specify a Name, the VLAN automatically gets assigned the name of VLANXXXX, where XXXX is its VLAN id.
Repeat steps 1 and 2 for all the needed VLANs. Once done, you can continue to step 3.
Step 3. Verify the VLANs are allowed in your data interfaces.
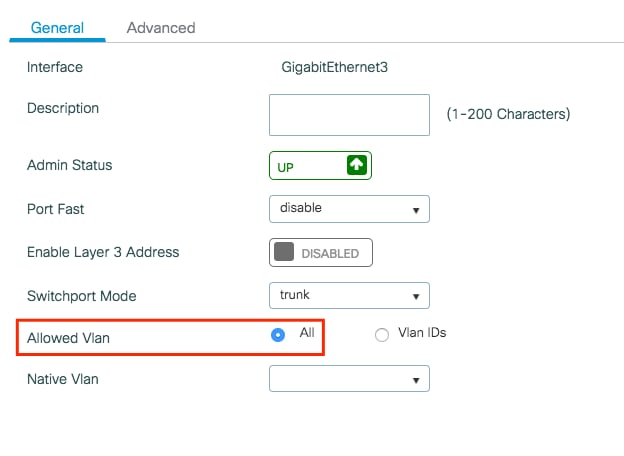
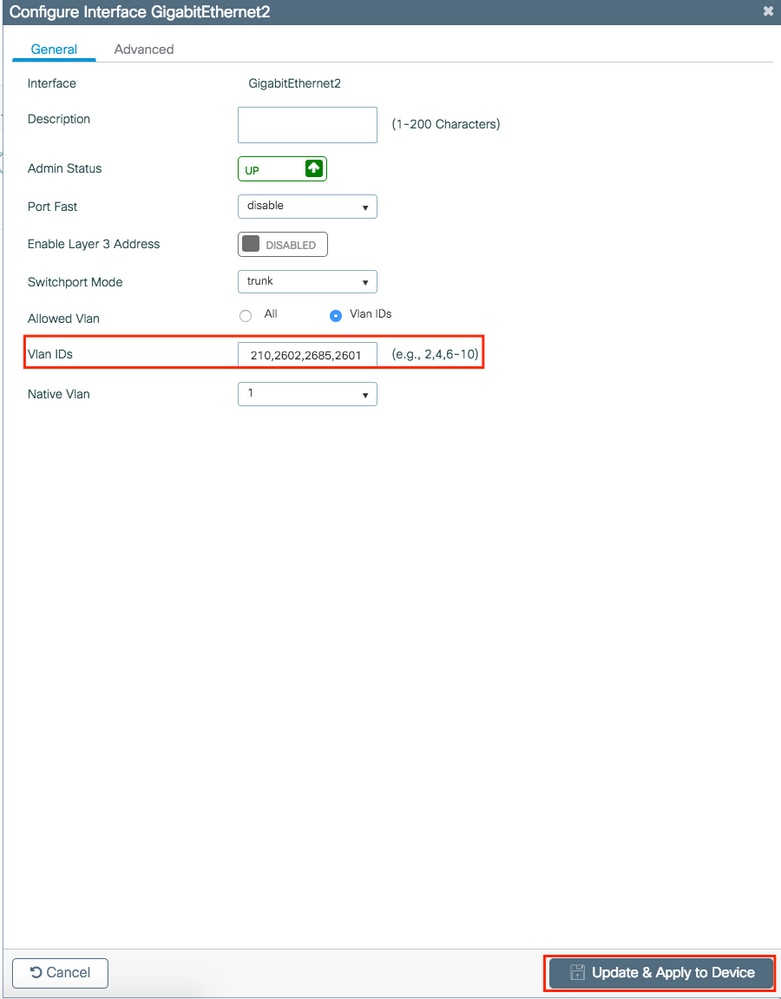
If you are using port channels, navigate to Configuration > Interface > Logical > PortChannel name > General. If you see it configured as Allowed Vlan = All, you are done with the configuration. If you see Allowed VLAN = Vlans IDs, add the needed VLANs and after that click Update & Apply to Device.
If you are not using port channels, navigate to Configuration > Interface > Ethernet > Interface Name > General. If you see it configured as Allowed Vlan = All, you are done with the configuration. If you see Allowed VLAN = Vlans IDs, add the needed VLANs and after that click Update & Apply to Device.
No changes needed:
VLAN Id needs to be added:
CLI:
# config t
# vlan <vlan-id>
# exit

# interface <interface-id>
# switchport trunk allowed vlan add <vlan-id>
# end
Wizard Based Configuration - Recommended for New 9800 WLC Deployments
For Catalyst 9800 WLCs installation, you can use configuration wizards made available to guide you through the configuration process.
If you need to use RADIUS servers on your deployment, you can use the AAA Wizard first and then choose between the Basic or Advanced Wireless Setup.
If you do not use RADIUS servers on your deployment, you can go directly to either Basic or Advanced Wireless Setup.
AAA Wizard
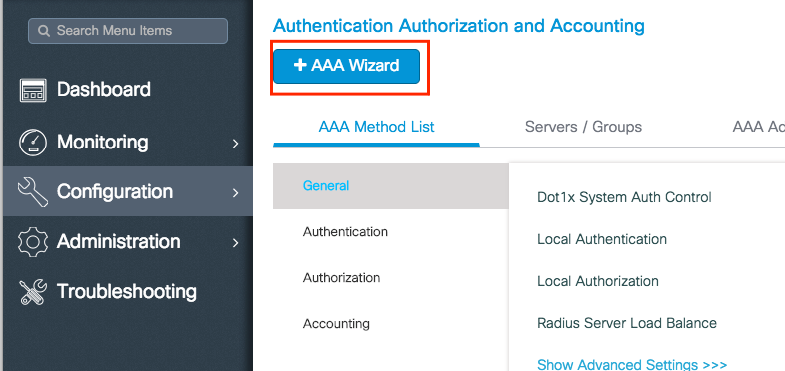
Step 1. Navigate to Configuration > Security > AAA > + AAA Wizard.
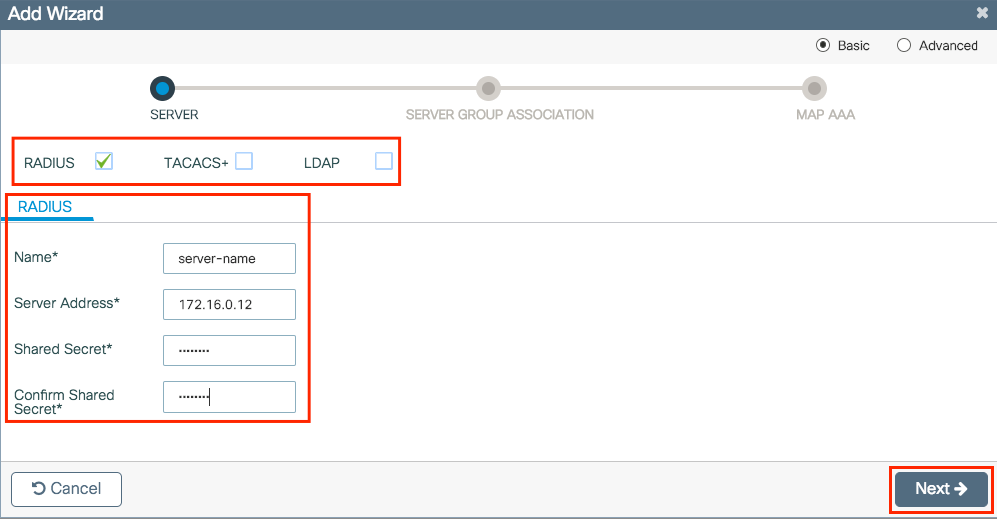
Step 2. Enable the needed kind of servers and enter a server name (It can be the IP address or any other string), the server IP and the shared secret. After that, click Next.
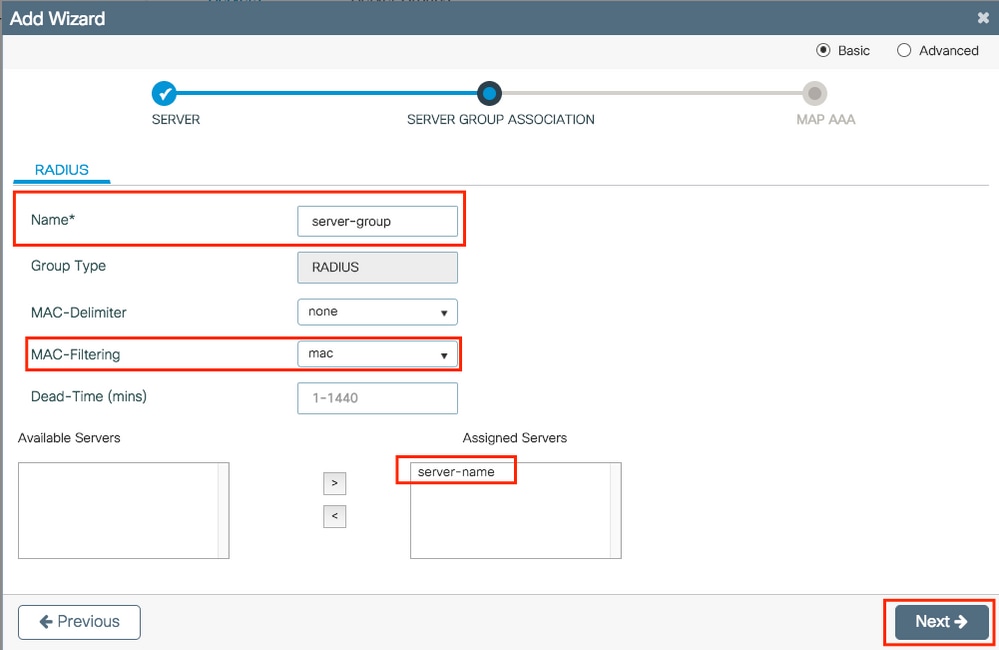
Step 3. Enter the information to create a server group. Ensure you add the server specified in previous step to the Assigned Servers.
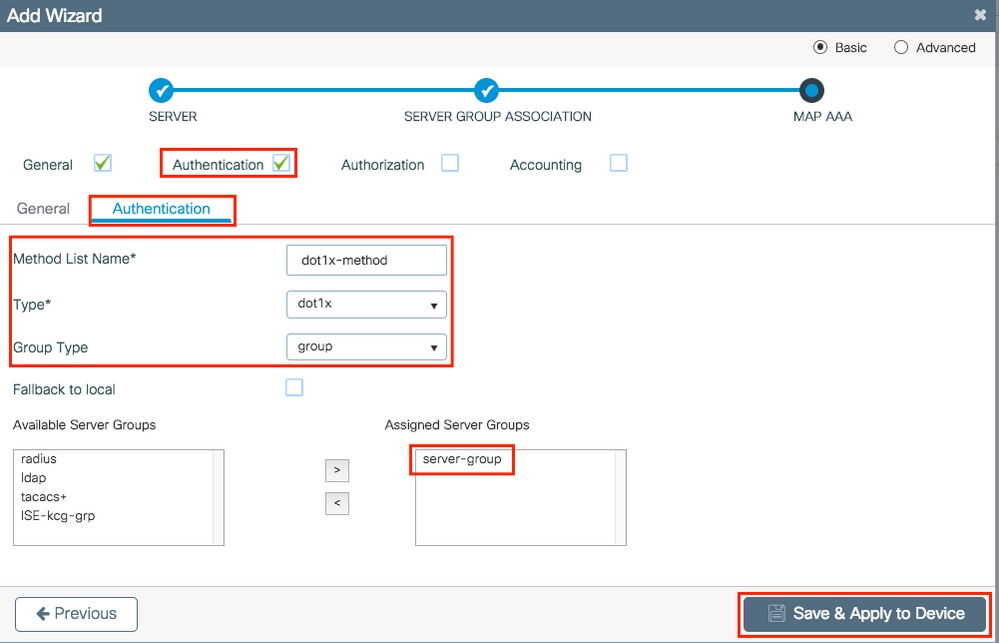
Step 4. Enable Authentication and create an Authentication method.
Navigate to the Authentication tab and enter the needed information. Once done, click Save & Apply to Device.
Basic Wireless Setup
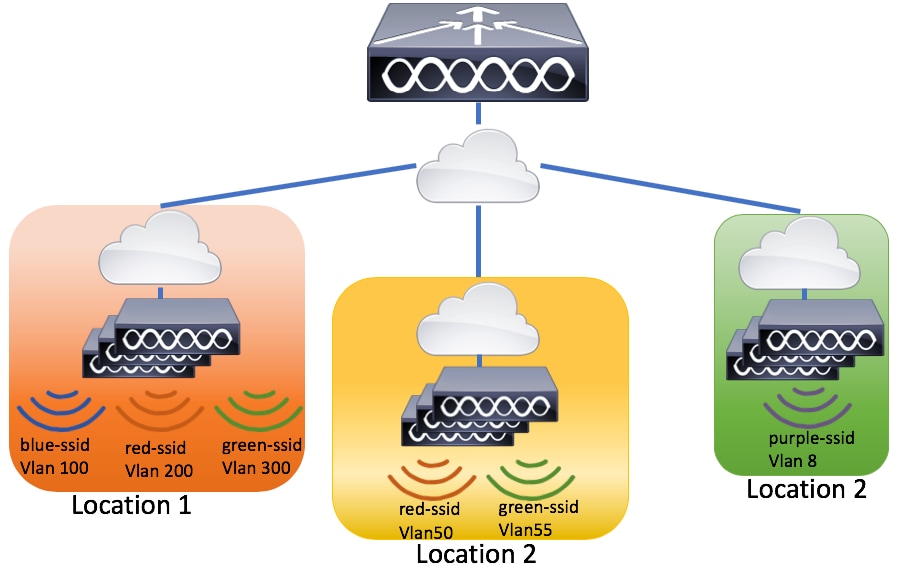
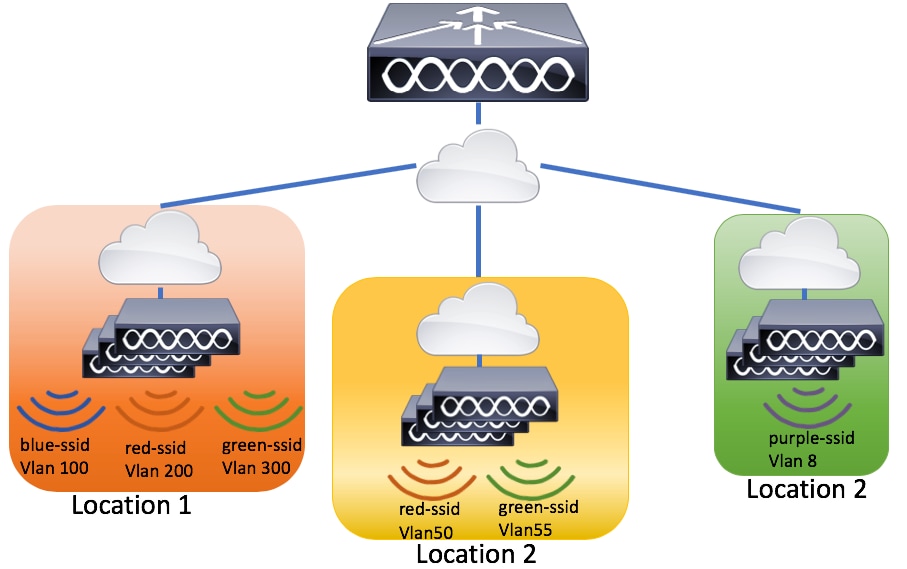
This wizard guides you through a basic wireless setup. It allows you to segment the APs funcion with little effort.
Example of a deployment with the basic wireless setup wizard.
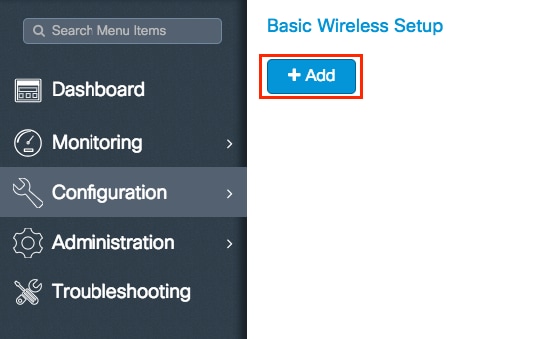
Step 1. Create a new location.
Navigate to Configuration > Wireless Setup > Basic > +Add.
Step 2. Enter the needed information on the General tab.
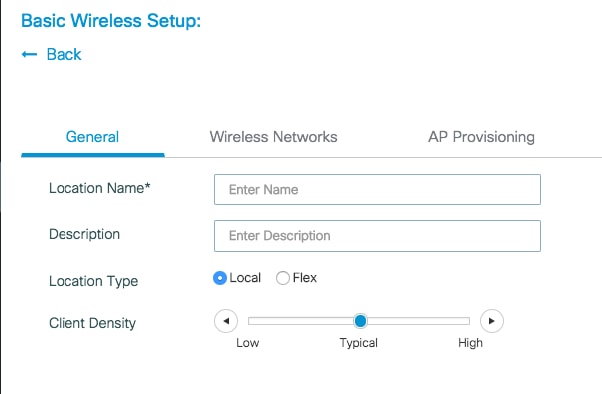
Location Name = Name of the new location
Description = Optional description of the location
Location Type = Local (Local mode APs), Flex (FlexConnect Mode APs)
Client Density = Adjusts RF configuration for the specified Client Density.
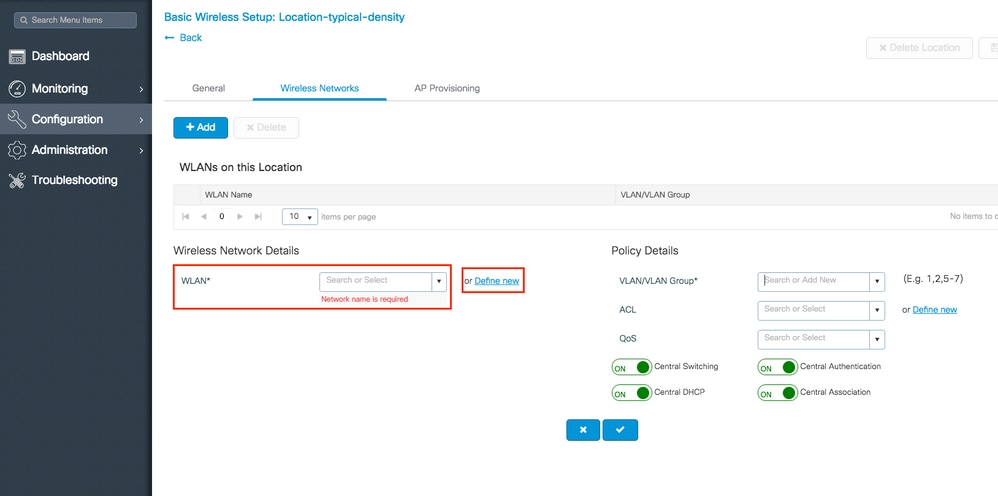
Step 3. Add the needed WLANs.
Navigate to the Wireless Networks tab and click +Add.
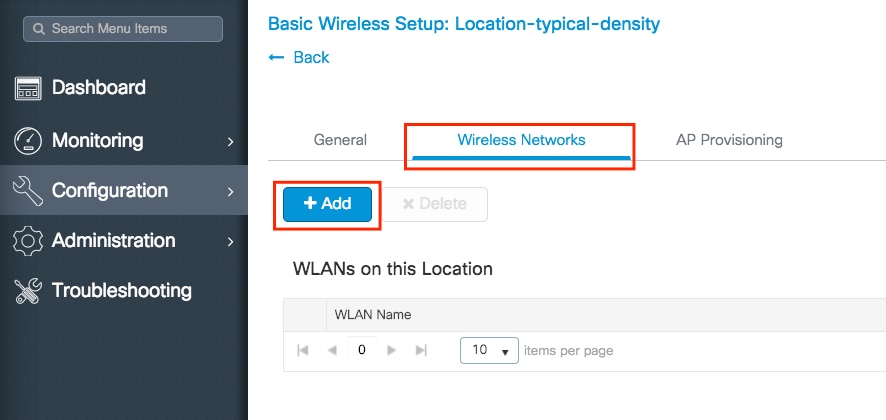
You can either select Define new to create a new WLAN from scratch or select an established one from the WLAN* drop down list.
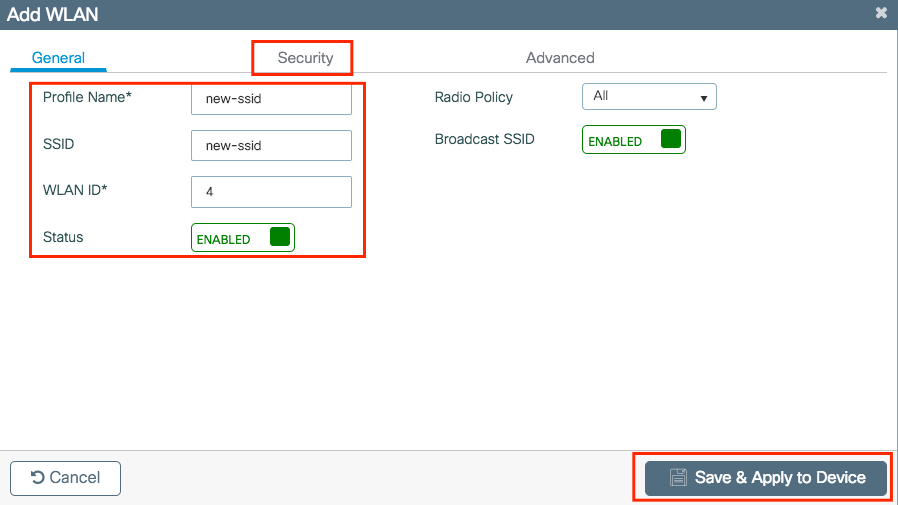
If you select Define new, a menu like this appears, where you can choose an SSID name, type of security and other SSID related settings. Once you complete the configuration of the new SSID, click Save & Apply to Device.
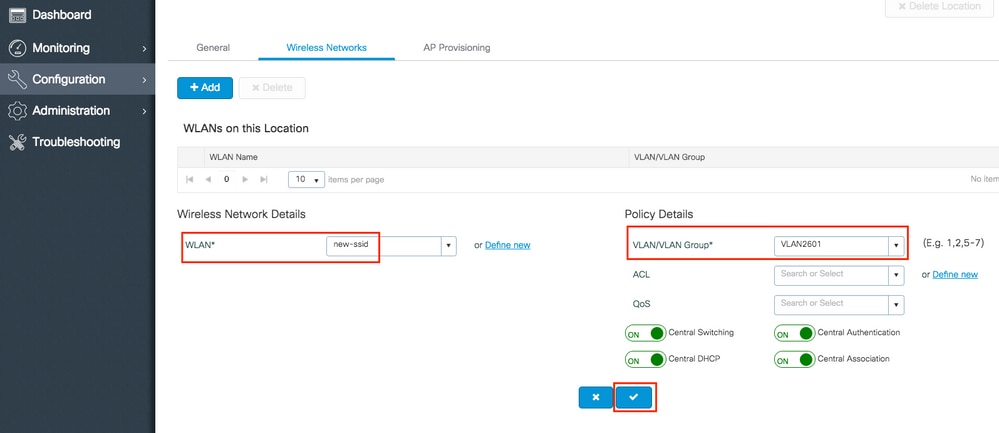
Step 4. Select the VLAN (and any other configuration) that you want to apply to that SSID. Once done, click on the checkmark.
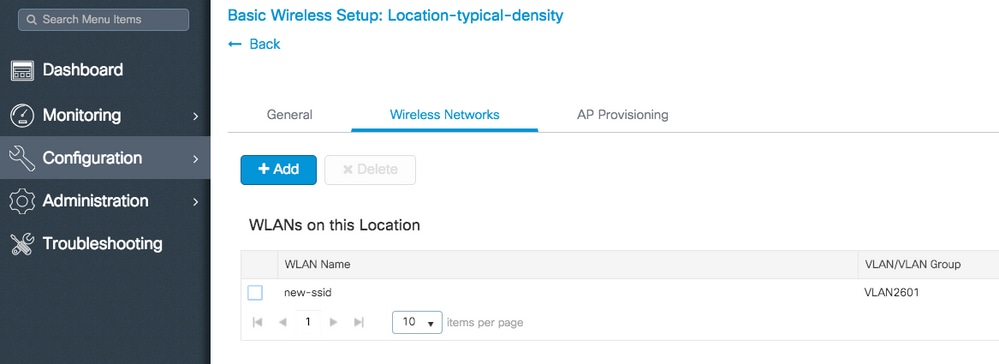
Repeat steps 3 and 4 for all the needed WLANs.
Step 5. Assign the configuration to the needed APs.
Navigate to AP Provisioning tab and select the APs to which you want to apply the current configuration. Once selected, move them from Add/Select APs to APs on this Location.
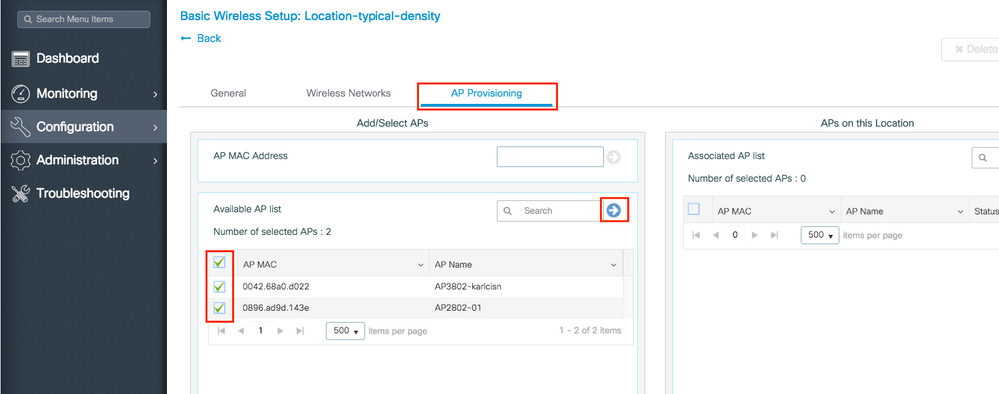
Step 6. To apply the configuration to the APs, click Apply.

Once you click Apply, you can see the new Location created. At the begining, you see 0 Joined APs because when the configuration was applied to the APs they restart its association to the controller (they restart the CAPWAP tunnel).
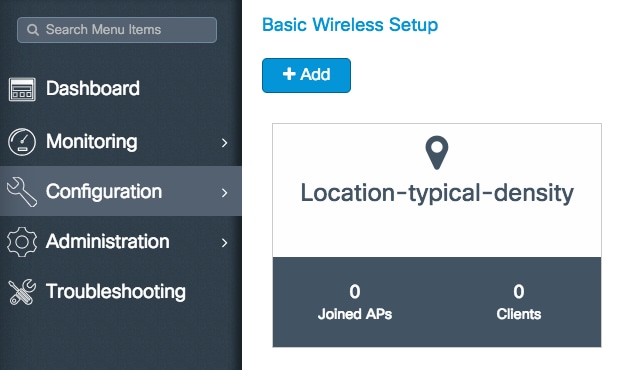
Repeat all the steps described so far for all the locations that are serviced by this 9800 WLC.
If you need to add more APs or WLANs to an established location, you can click on the location and navigate to the relevant tab to make the desired changes.
Advanced Wireless Setup
This wizard guides you through an advanced wireless setup. It allows you to segment the APs functions with more detail.
Step 1. Start the Advanced Wireless Setup.
Navigate to Configuration > Wireless Setup > Advanced > Start Now.
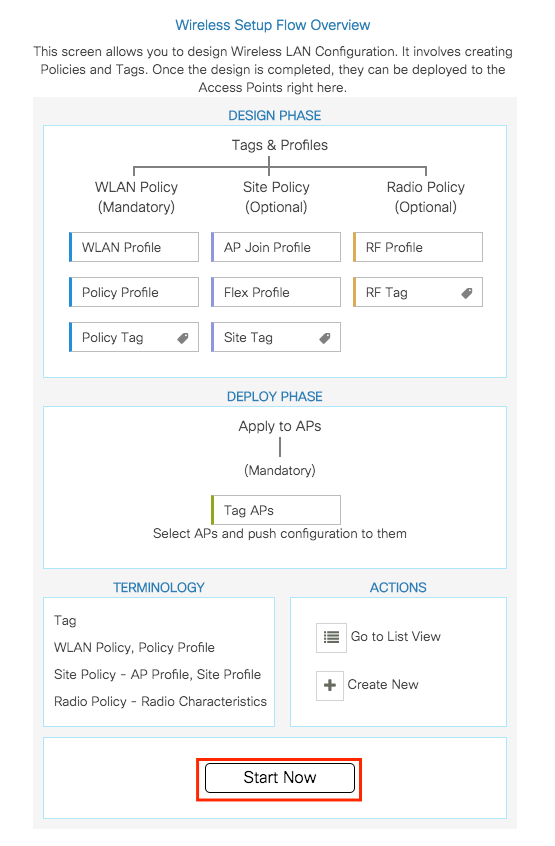
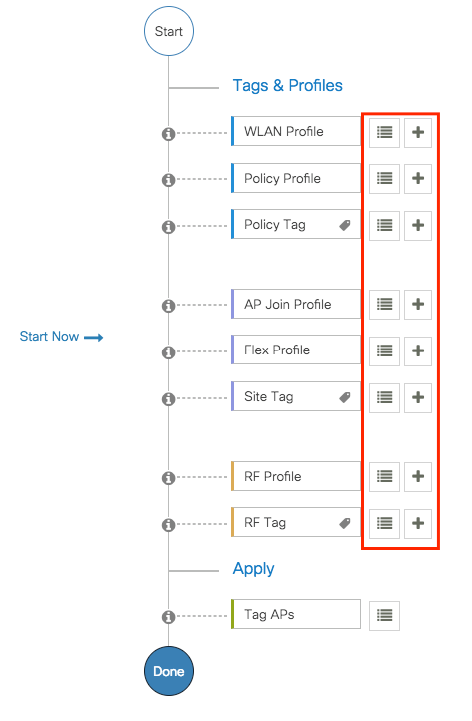
Step 2. Decide which profiles and tags you want to create.
To create any Profile or Tag, click on the + icon.
To view or edit the established tags and profiles, click on the := icon to go to List View.
Step 3. AP tags assignation.
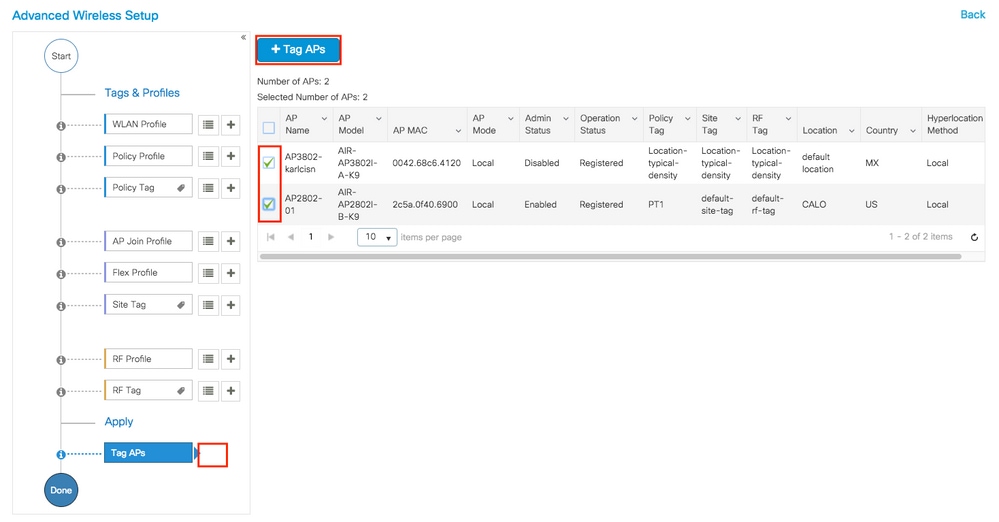
Once you have created all the necessary profiles and tags per your network design, assign the tags to the desired APs. Click on Tag APs := icon, after that select the list of APs that you want to assign the tags to.
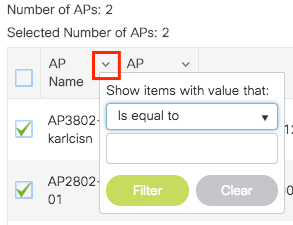
Click on the point down arrow next to AP name [or any other field] to filter the list of APs.
Once you have selected the desired APs, click on + Tag APs.
Select the tags that you want to assign to the APs and click Save & Apply to Device.
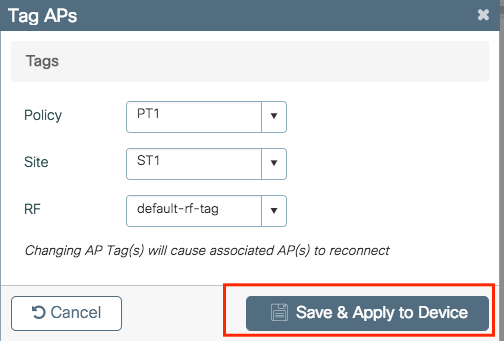

Note: Be aware that after change the policy tag on an AP, it loses its association to the 9800 WLCs and join back within about 1 minute.
Menu Based Configuration - Recommended for Established 9800 WLCs Deployment
Instead of a wizard, select which specific elements need to be created or modified.
Visual representation of configuration elements.
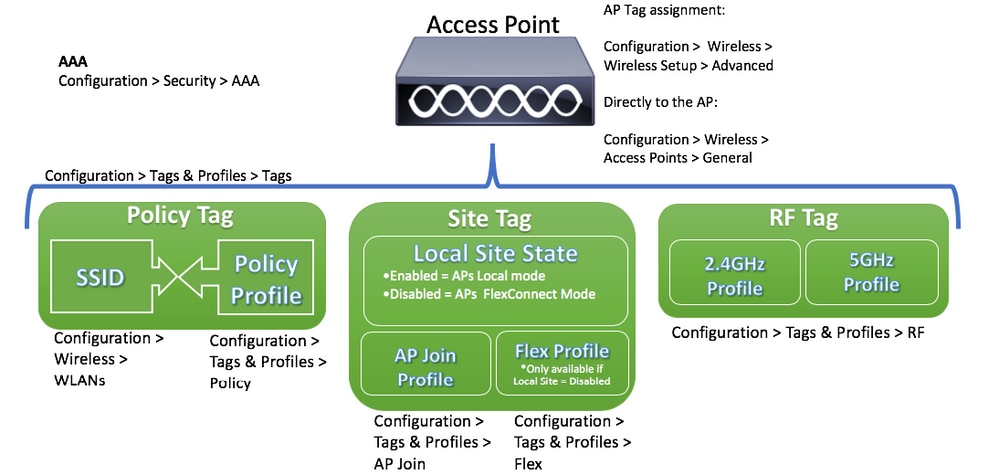
AAA on 9800 WLCs
Recommended flow of configuration:
- Add the RADIUS server
- Create a RADIUS group
- Create the AAA methods
Add the RADIUS server
Step 1. Navigate to Configuration > Security > AAA > Servers/Groups > Servers > RADIUS > + Add.
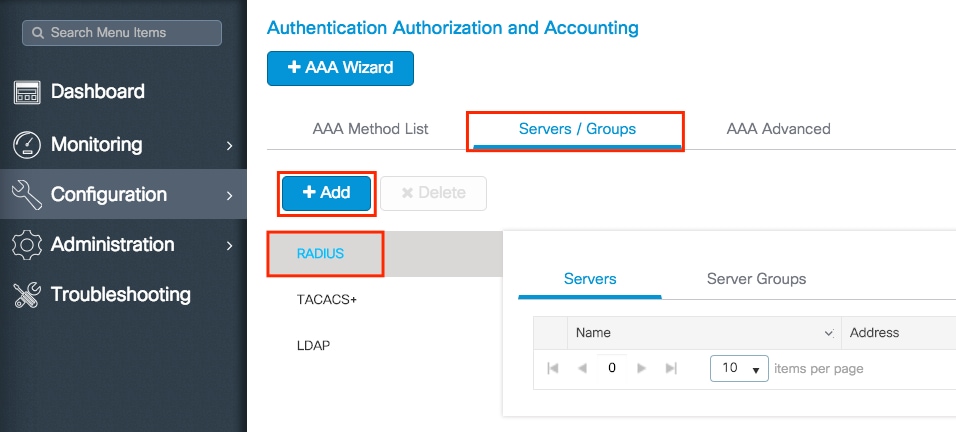
Step 2. Enter all the needed information. Once done, click Save & Apply to Device.
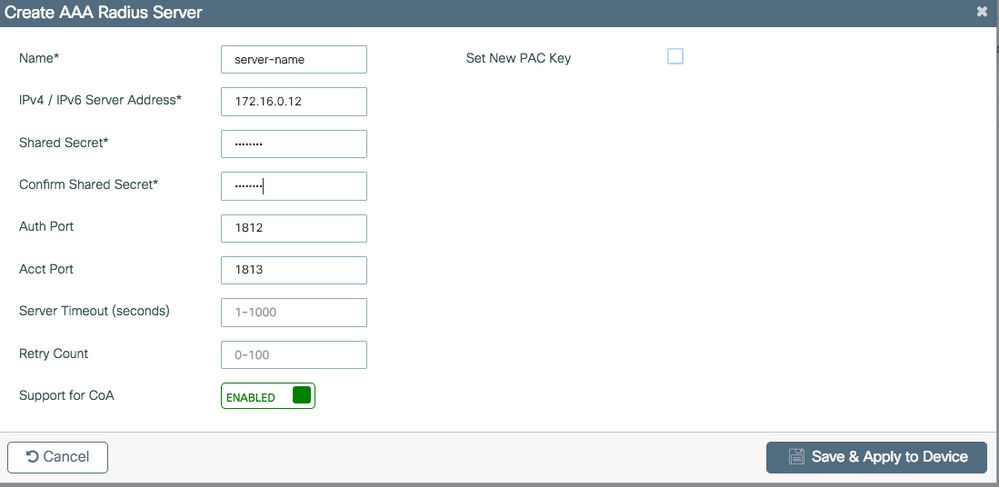

CLI:
# config t
# radius server server-name
# address ipv4 172.16.0.12 auth-port 1812 acct-port 1813
# key <shared-key>
# exit

# aaa server radius dynamic-author
# client 172.16.0.12 server-key cisco123
# end
Create a RADIUS group
Step 1. Navigate to Configuration > Security > AAA > Servers/Groups > Servers > RADIUS > + Add.
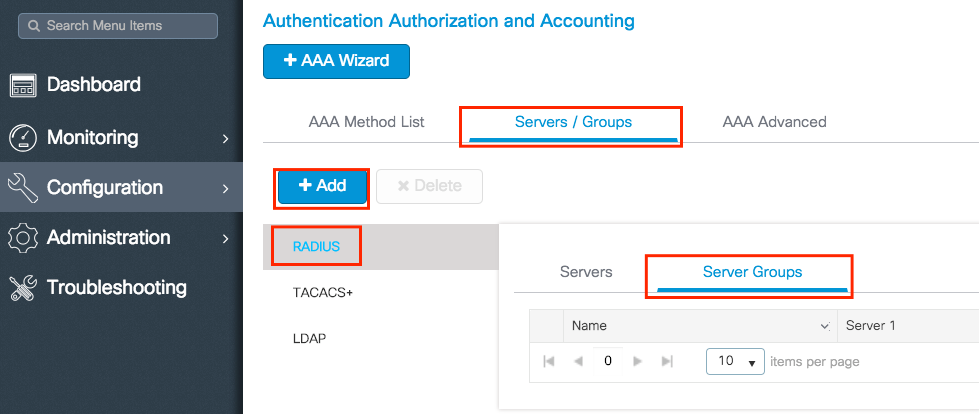
Step 2. Enter the needed information and ensure you move the server recently created to the Assigned Servers section.
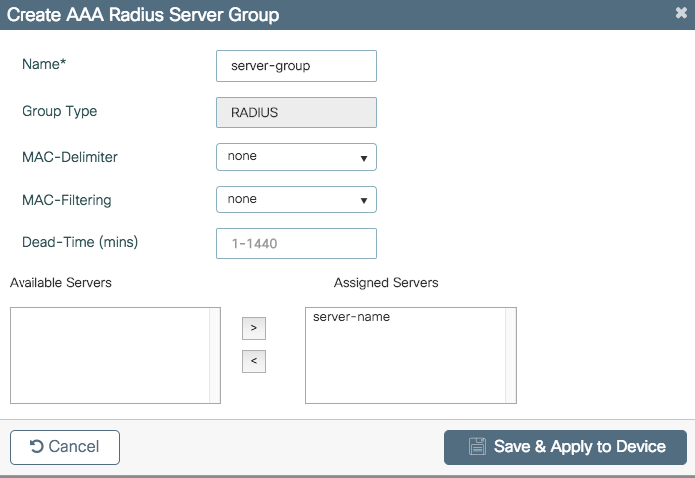
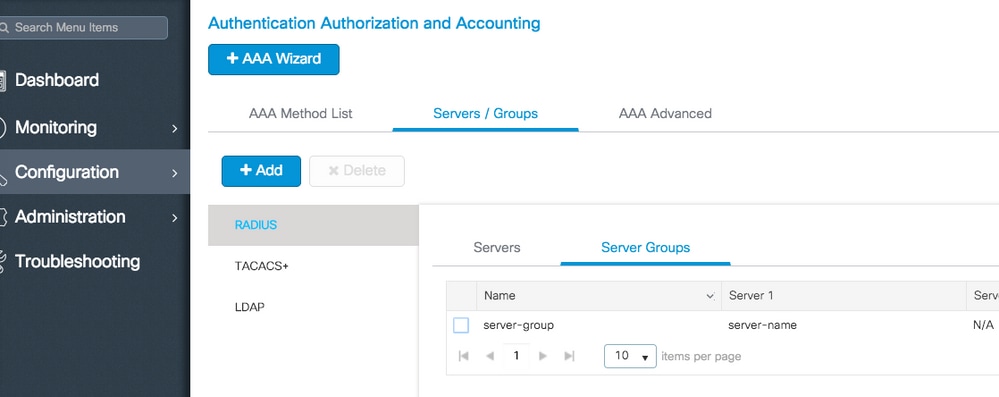
CLI:
# config t
# aaa group server radius server-group
# server name server-name
# end
Create the AAA methods
Step 1. Navigate to Configuration > Security > AAA > AAA Method List > Authentication > + Add.
Based on the kind of security needed on your SSIDs is the type of of authentication you can choose.
- Type dot1x = Used on 802.1x SSIDs
- Type login = Used on WebAuth SSIDs
Group Type setting allows you to choose if the authentication must be sent to the external RADIUS server that was created or local.
- Group Type group = External RADIUS server
- Group Type local = Local authentication
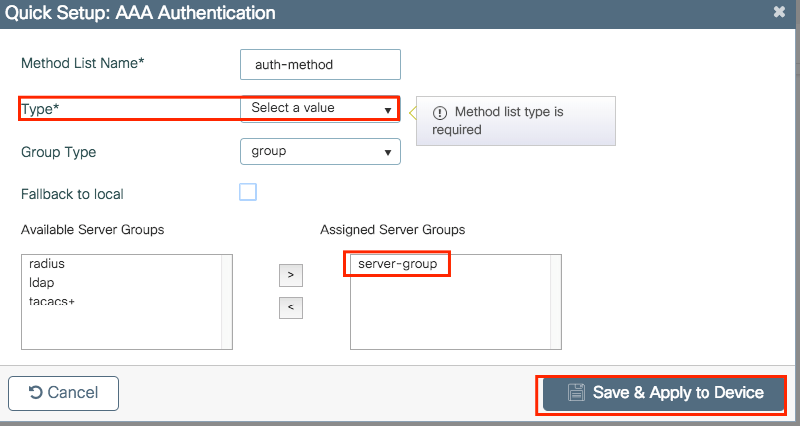
Step 2. (optional) Create Authorization/Accounting methods as needed.
# config t
# aaa authentication login <login-method-name> group server-group
# aaa authentication dot1x <dot1x-method-name> group server-group
WLANs on 9800 WLCs
Recommended flow of configuration:
- Create your SSID
- Create/Modify a Policy Profile
- Create/Modify a Policy Tag (Link the SSID to the desired Policy Profile)
- If needed, assign the Policy Tag to the AP
Create your SSID
Step 1. Navigate to Configuration > Wireless > WLANs > + Add.

Step 2. Enter all the needed information (SSID name, security type and so on) and once done, click Save & Apply to Device.
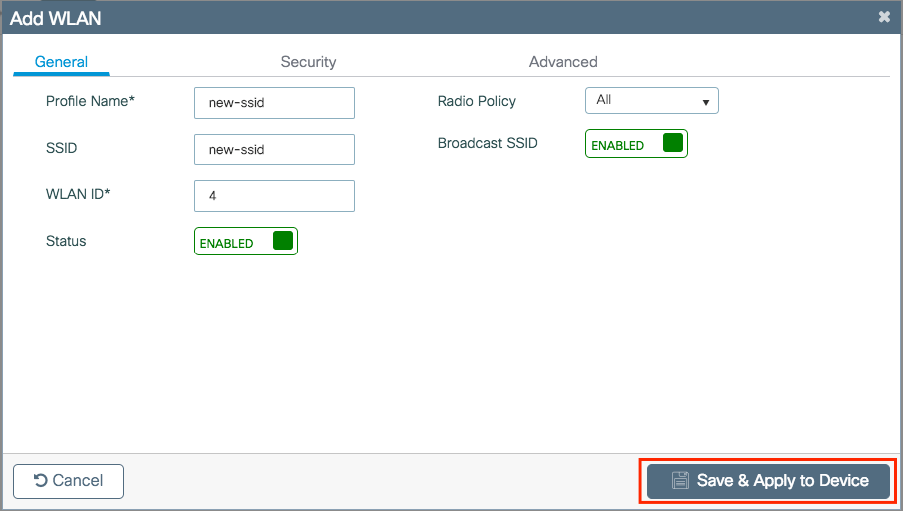
CLI:
# config t
# wlan <profile-name> <wlan-id> <ssid-name>
# ----desired settings----
# no shutdown
Create/Modify a Policy Profile
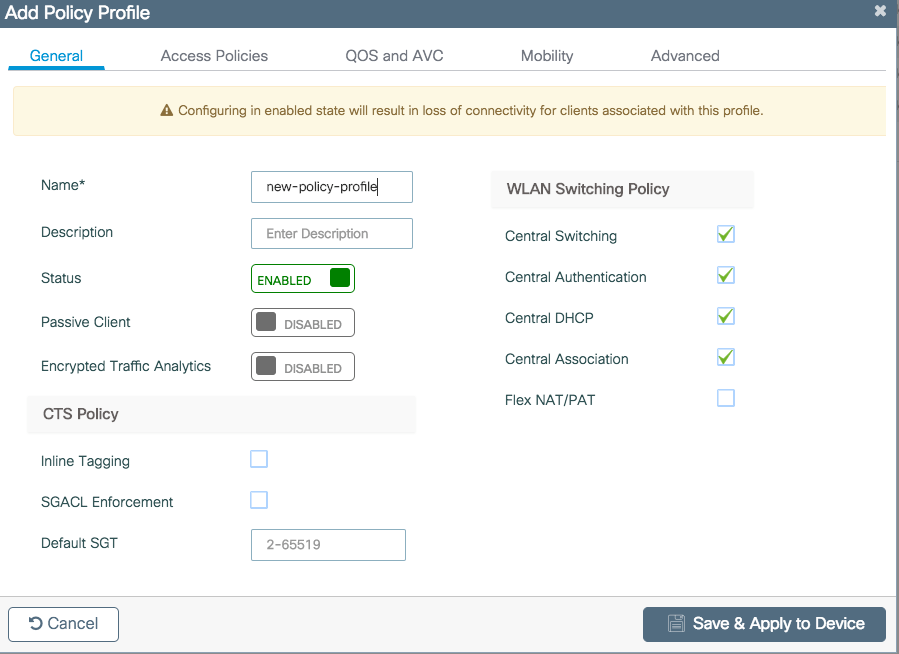
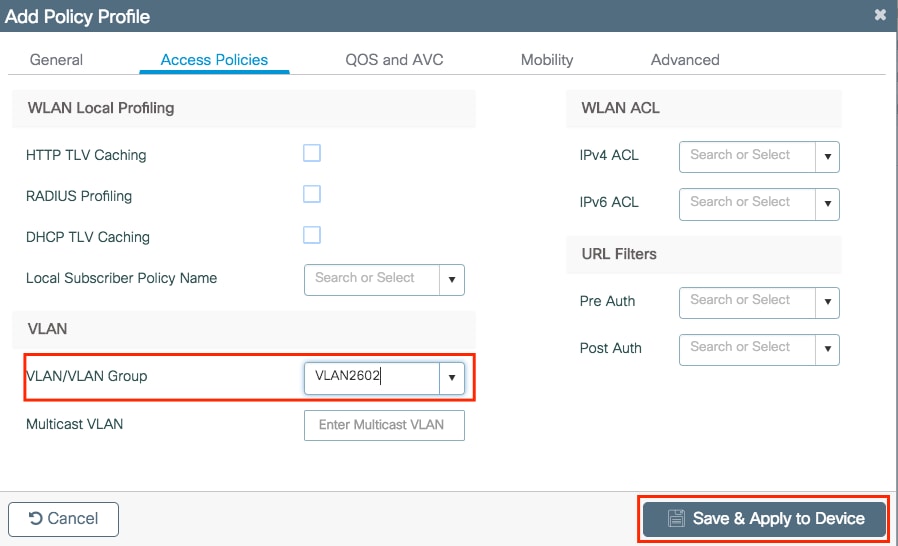
Step 1. Navigate to Configuration > Tags & Profiles > Policy. Either select the name of an established one or click + Add to add a new one. Ensure it is enabled, set the needed VLAN and any other parameter you want to customize.
Step 2. Once done, click Save & Apply to Device.
CLI:
# wireless profile policy new-policy-profile
# vlan <vlan-id_or_vlan-name>
# ------any other desired setting------
# no shutdown
Create/Modify a Policy Tag
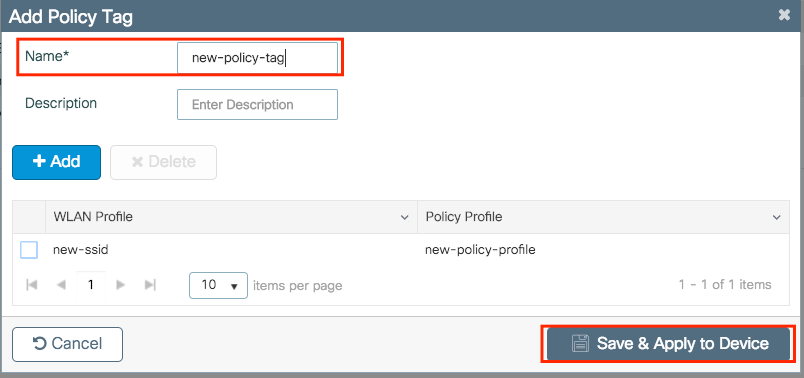
The Policy tag is the setting that allows you to specify which SSID is linked to which Policy Profile.
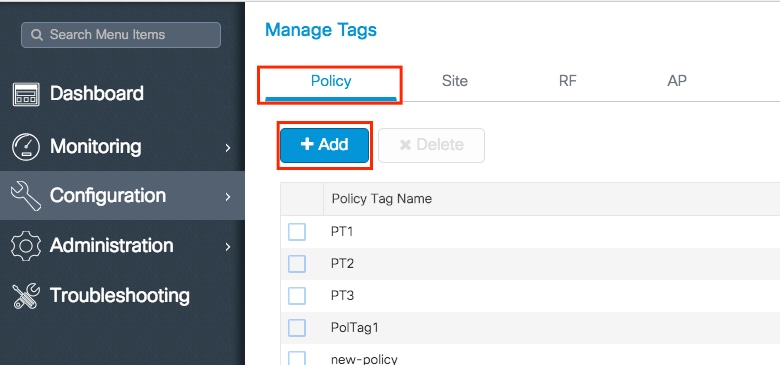
Step 1. Navigate to Configuration > Tags & Profiles > Tags > Policy. Either select the name of an established one or click + Add to add a new one.
Step 2. Inside the Policy Tag, click +Add, from the drop down list select the WLAN Profile name you want to add to the Policy Tag and Policy Profile to which you want to link. After that, click the checkmark.
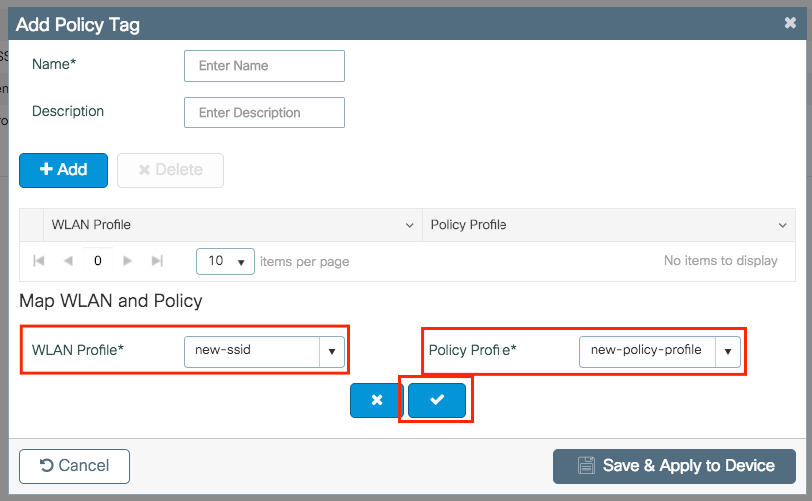
Step 3. Repeat step 2 for all the WLANs that you want to add. Once done, click Save & Apply to Device. Do not forget to assign a name to the new Policy Tag.
CLI:
# config t
# wireless tag policy <policy-tag-name>
# wlan <ssid-name> policy <policy-profile-name>
# end
Policy Tag Assignation
You can assign a Policy Tag directly to an AP or assign the same Policy Tag to a group of APs at the same time. Choose the one that fits you.
Policy Tag Assignation per AP
Navigate to Configuration > Wireless > Access Points > AP name > General > Tags. From the Policy dropdown list, select the desired Policy Tag and click Update & Apply to Device.
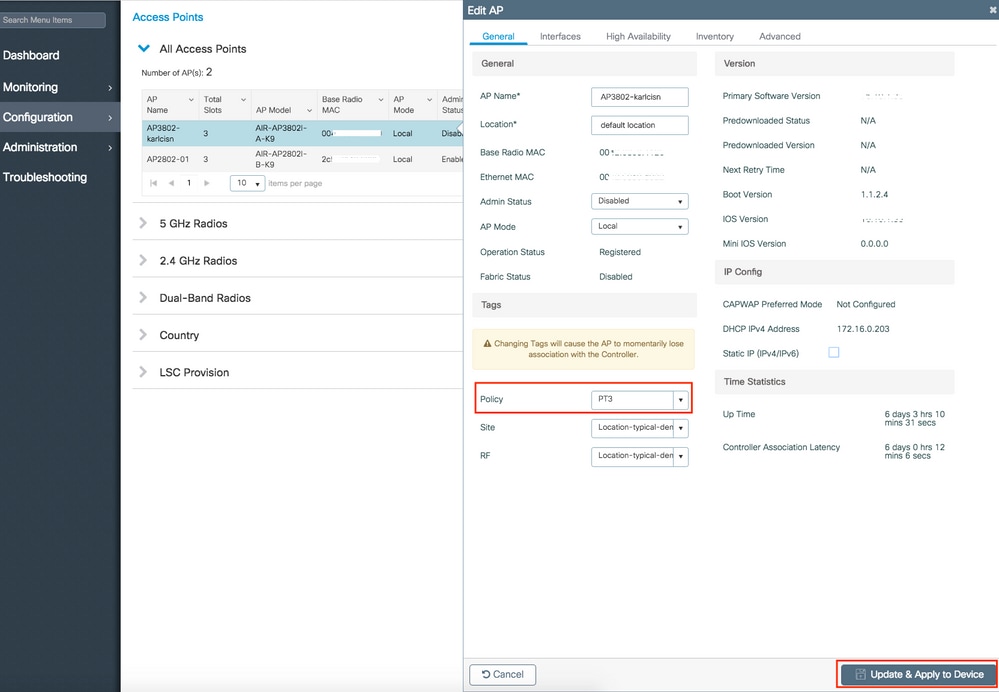

Note: Be aware that after change the policy tag on an AP, it loses its association to the 9800 WLCs and join back within about 1 minute.
CLI:
# config t
# ap <ethernet-mac-addr>
# policy-tag <policy-tag-name>
# end
Policy Tag Assignation for Multiple APs
Navigate to Configuration > Wireless Setup > Advanced > Start Now.
Click on Tag APs := icon. Select the list of APs that you want to assign the tags to (You can click on the point down arrow next to AP name [or any other field] to filter the list of APs).
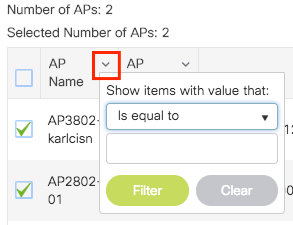
Once you have selected the desired APs, click on + Tag APs.
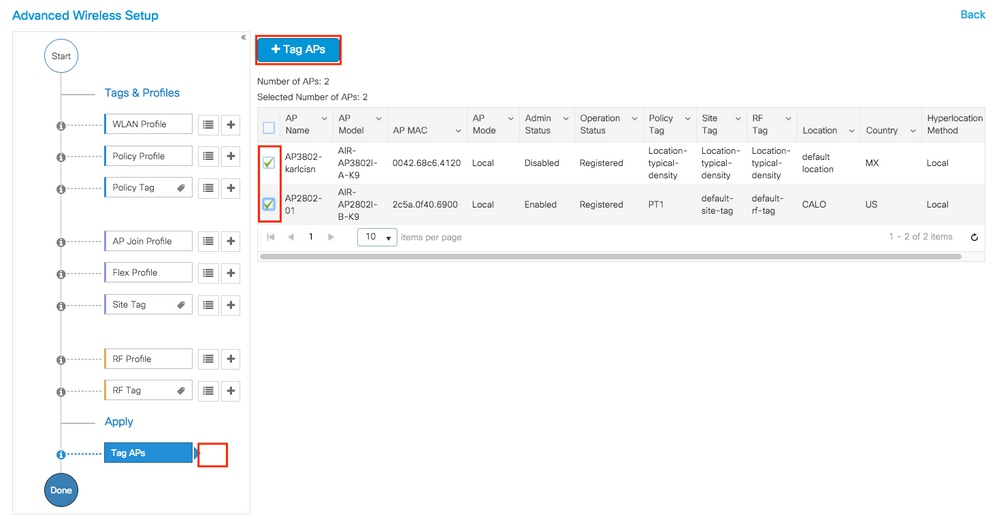
Select the tags that you want to assign to the APs and click Save & Apply to Device.
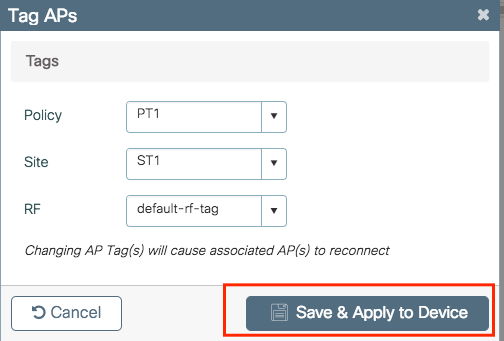

Note: Be aware that when policy tag on an AP is chnaged, it loses its association to the 9800 WLCs and joins back within about one (1) minute.
CLI:
There is no CLI option to assign the same Tag to multiple APs.
AP Join Settings on 9800 WLCs
Recommended flow of configuration:
- Create/Modify an AP Join Profile
- (Optional) Create/Modify a Flex Profile (If AP in Flex Mode)
- Create/Modify a Site Tag
- If needed, assign the Site Tag to the AP
Create/Modify an AP Join Profile
Step 1. Navigate to Configuration > Tags & Profiles > AP Join.
Select either the name of an established one or click + Add to add a new one.
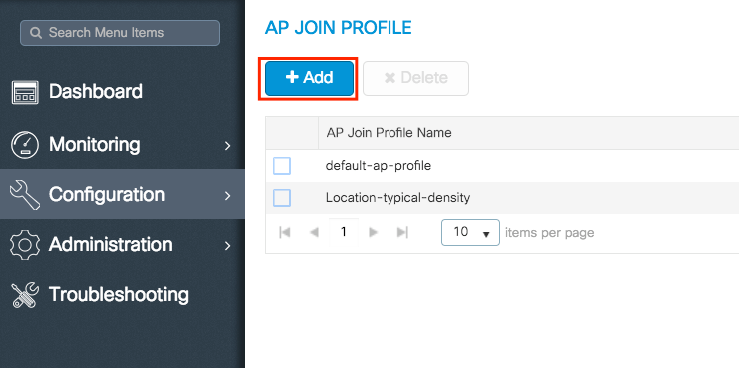
Step 2. Modify the profile as desired. Once done, click Save & Apply to Device.
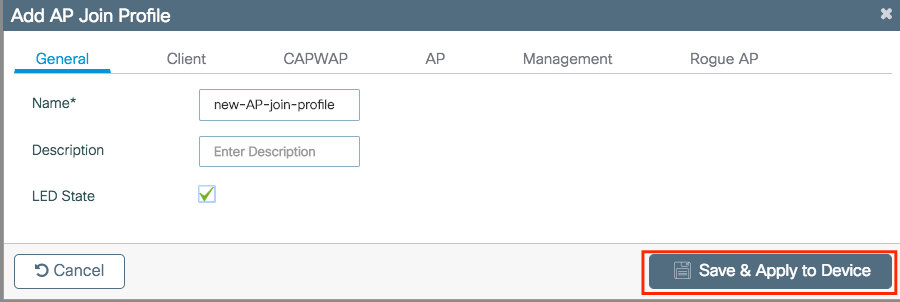
CLI:
# config t
# ap profile <ap-join-profile-name>
# -------desired settings------
# end
Create/Modify a Flex Profile (If AP in Flex Mode)
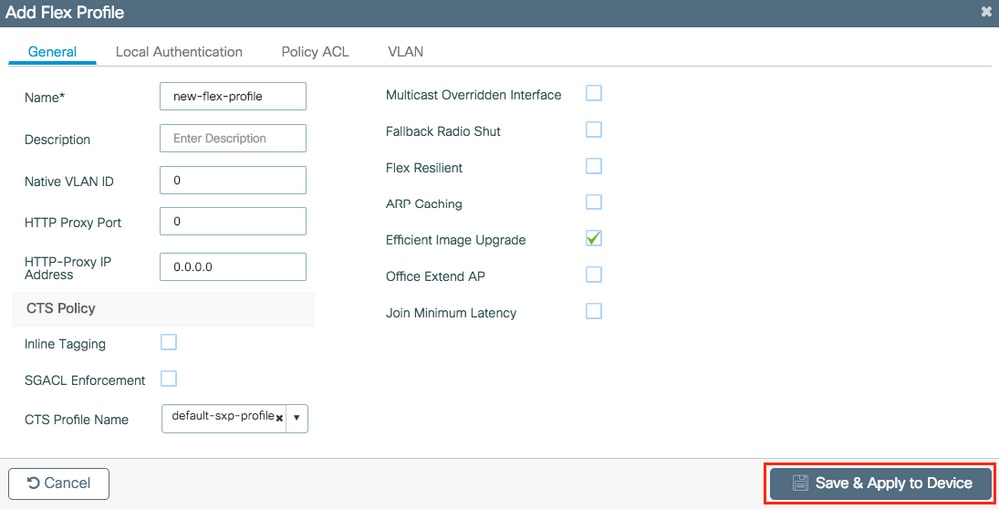
Step 1. Navigate to Configuration > Tags & Profiles > Flex.
Either select the name of an established one or click + Add to add a new one.
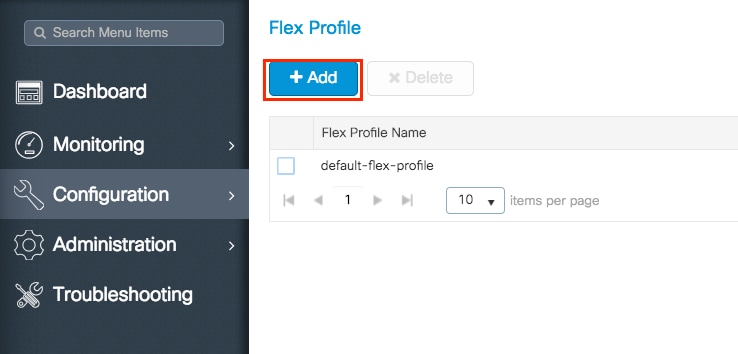
Step 2. Modify the profile as desired. Once done, click Save & Apply to Device.
CLI:
# config t
# wireless profile flex <name-flex-profile>
# ------desired settings------
# end
Create/Modify a Site Tag
The Site tag is the setting that allows you to specify which AP join and/or Flex Profile is assigned to the APs.
Step 1. Navigate to Configuration > Tags & Profiles > Tags > Site. Either select the name of an established one or click + Add to add a new one.

Step 2. Inside the Site Tag, select the AP Join Profile that you want to add to the Site Tag.
If you whish to convert the APs the receive this tag into flexconnect mode disable Enable Local Site option.
Once it is disabled, you can also select a Flex Profile. After that, click Save & Apply to Device.
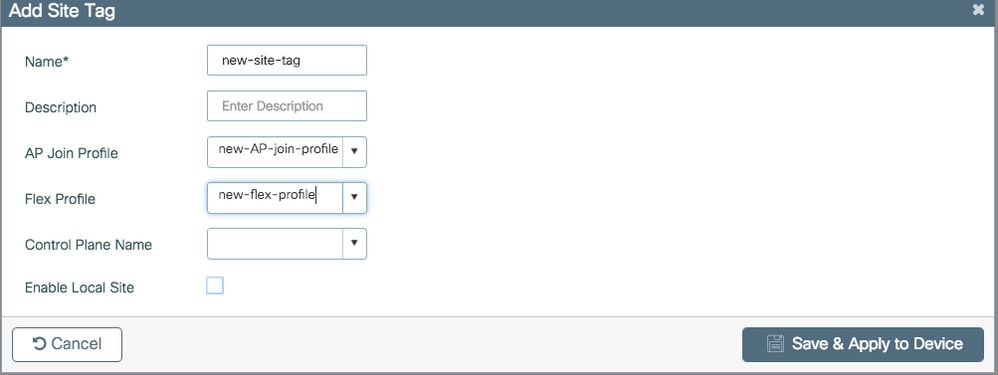
Remeber to keep Enable Local Site enabled if the APs are planned to be used in local mode.
CLI:
# config t
# wireless tag site <site-tag-name>
# ap-profile <AP-join-profile-name>
# flex-profile <flex-profile-name>
# [no] local-site
# end
Policy Tag Assignation
You can assign a Policy Tag directly to an AP or assign the same Policy Tag to a group of APs at the same time. Choose the one that fits you.
Policy Tag Assignation per AP
Navigate to Configuration > Wireless > Access Points > AP name > General > Tags. From the Site dropdown list, select the desired Site Tag and click Update & Apply to Device.
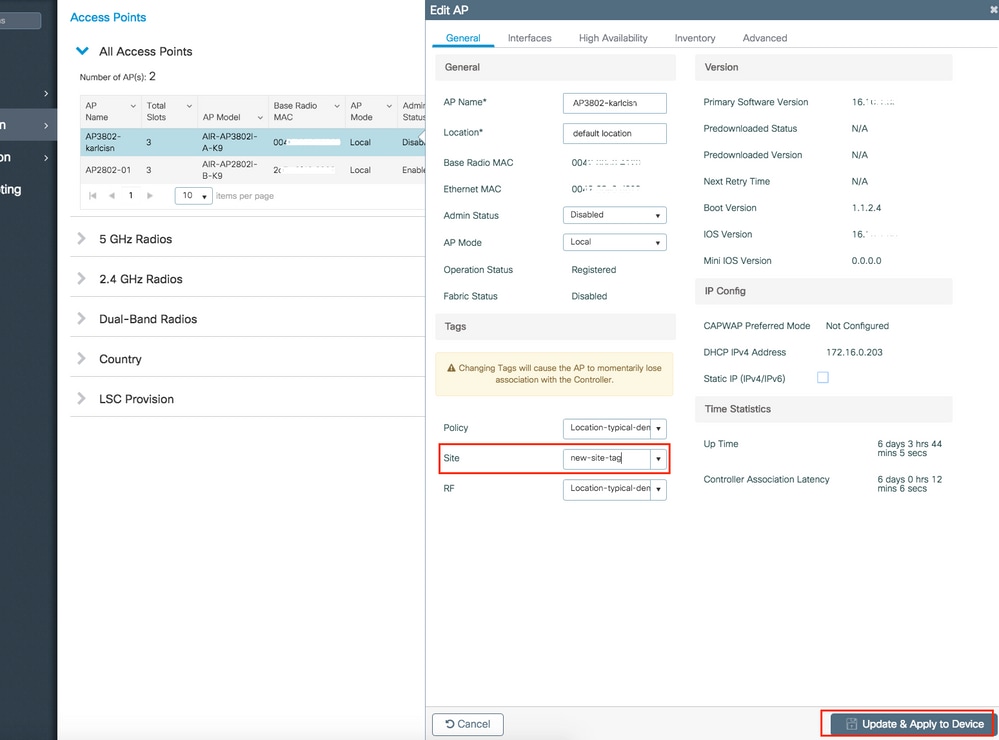

Note: Be aware that after change the policy tag on an AP, it loses its association to the 9800 WLCs and join back within about 1 minute.
CLI:
# config t
# ap <ethernet-mac-addr>
# site-tag <site-tag-name>
# end
Policy Tag Assignation for Multiple APs
Navigate to Configuration > Wireless Setup > Advanced > Start Now.
Click on Tag APs := icon. Select the list of APs that you want to assign the tags to (You can click on the point down arrow next to AP name [or any other field] to filter the list of APs).
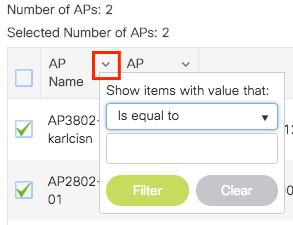
Once you have selected the desired APs, click on + Tag APs.
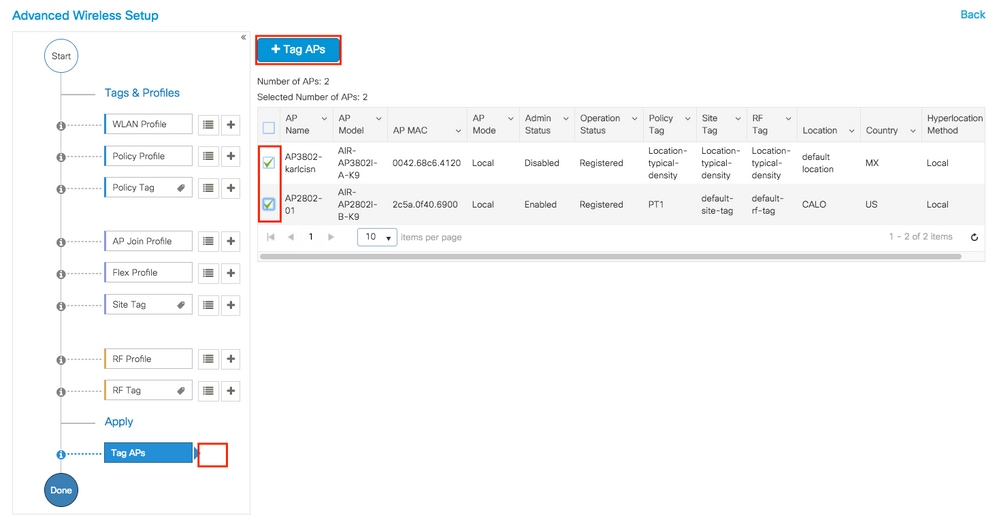
Select the tags that you want to assign to the APs and click Save & Apply to Device.
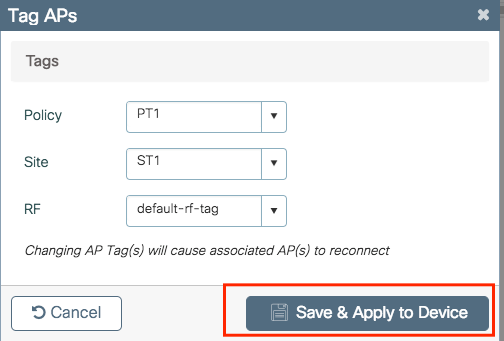

Note: Be aware that after change the policy tag on an AP, it loses its association to the 9800 WLCs and join back within about 1 minute.
CLI:
There is no CLI option to assign the same Tag to multiple APs.
RF Profiles on 9800 WLCs
Recommended flow of configuration:
- Create/Modify the RF profiles for 2.4GHz / 5GHz
- Create/Modify a RF Tag
- If needed, assign the RF Tag to the AP
Create/Modify the RF profiles for 2.4GHz / 5GHz
Step 1. Navigate to Configuration > Tags & Profiles > RF.
Either select the name of an established one or click + Add to add a new one.
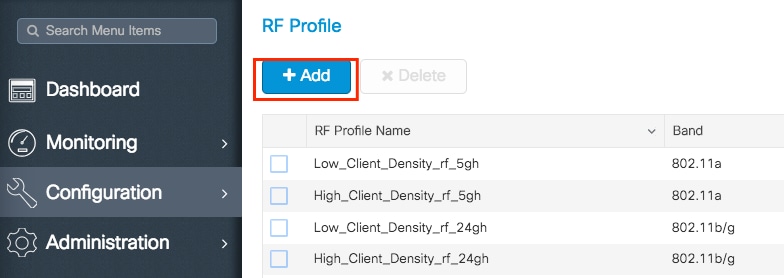
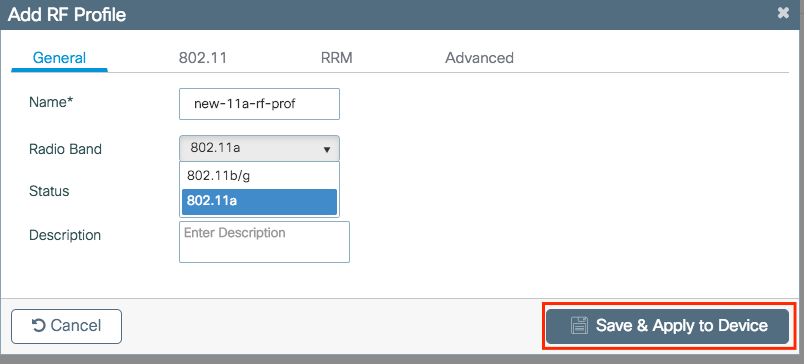
Step 2. Modify the profile as desired, one per band (802.11a/802.11b). Once done, click Save & Apply to Device.
# config t
# ap dot11 { 5ghz | 24ghz} rf-profile <rf-profile-name>
# ------desired settings-----
# end
Create/Modify a RF Tag
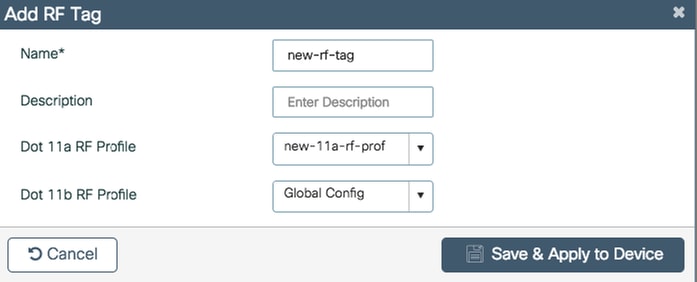
The RF tag is the setting that allows you to specify which RF Profiles are assigned to the APs.
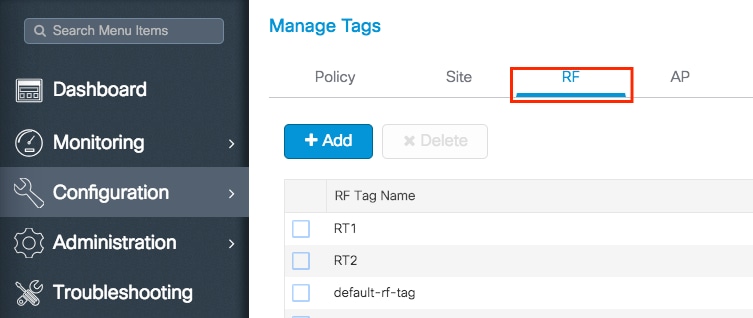
Step 1. Navigate to Configuration > Tags & Profiles > Tags > RF. Either select the name of an established one or click + Add to add a new one.
Step 2. Inside the RF Tag, select the RF Profile that you want to add. Click Save & Apply to Device.
CLI:
# config t
# wireless tag rf <rf-tag-name>
# 5ghz-rf-policy <11a-rf-prof>
# 24ghz-rf-policy <11b-rf-prof>
# end
Policy Tag Assignation
You can assign a RF Tag directly to an AP or assign the same RF Tag to a group of APs at the same time. Choose the one that fits you.
Policy Tag Assignation per AP
Navigate to Configuration > Wireless > Access Points > AP name > General > Tags. From the Site dropdown list, select the desired RF Tag and click Update & Apply to Device.
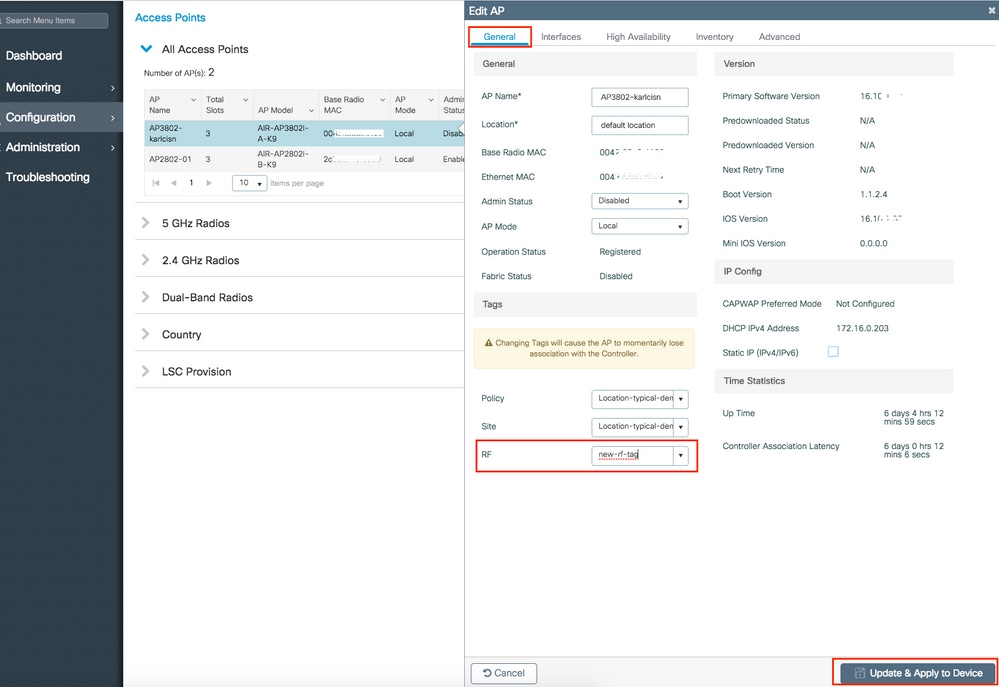

Note: Be aware that after change the policy tag on an AP, it loses its association to the 9800 WLCs and join back within about 1 minute.
CLI:
# config t
# ap <ethernet-mac-addr>
# rf-tag <rf-tag-name>
# end
Policy Tag Assignation for Multiple APs
Navigate to Configuration > Wireless Setup > Advanced > Start Now.
Click on Tag APs := icon. Select the list of APs that you want to assign the tags to (You can click on the point down arrow next to AP name [or any other field] to filter the list of APs).
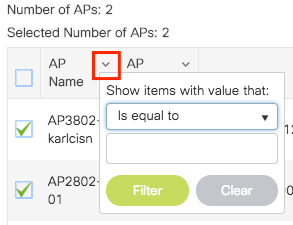
Once you have selected the desired APs, click on + Tag APs.
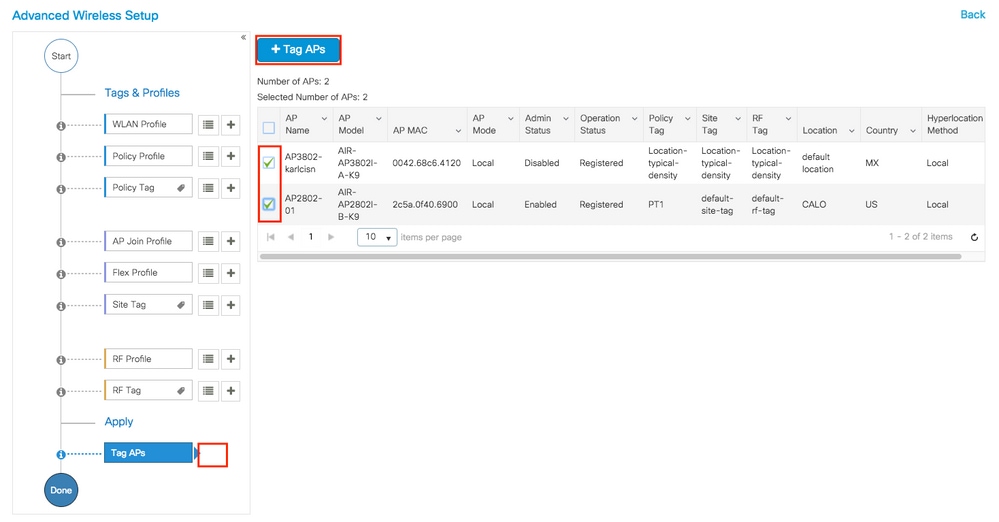
Select the tags that you want to assign to the APs and click Save & Apply to Device.
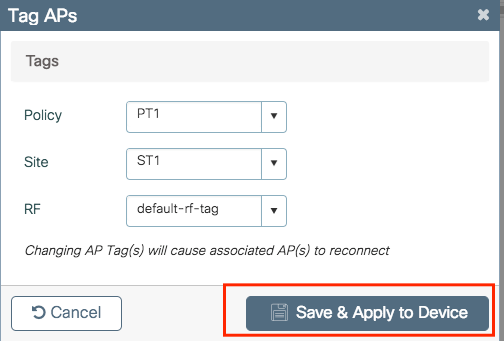

Note: Be aware that after change the policy tag on an AP, it loses its association to the 9800 WLCs and join back within about 1 minute.
CLI:
There is no CLI option to assign the same Tag to multiple APs.
Verification
You can use these commands to verify the configuration.
VLANs/Interfaces Configuration
# show vlan brief
# show interfaces trunk
# show run interface <interface-id>
AAA Configuration
# show run aaa
# show aaa servers
WLAN Configuration
# show wlan summary
# show run wlan [wlan-name]
# show wlan { id <wlan-id> | name <wlan-name> | all }
AP Configuration
# show ap summary
# show ap tag summary
# show ap name <ap-name> tag { info | detail }
# show ap name <ap-name> tag detail
AP Name : AP2802-01 AP Mac : 0896.ad9d.143e Tag Type Tag Name ----------------------------- Policy Tag PT1 RF Tag default-rf-tag Site Tag default-site-tag Policy tag mapping ------------------ WLAN Profile Name Policy Name VLAN Central Switching IPv4 ACL IPv6 ACL ----------------------------------------------------------------------------------------------------------------------------------------------------------------------------------------------------- psk-pbl-ewlc ctrl-vl2602 VLAN0210 ENABLED Not Configured Not Configured Site tag mapping ---------------- Flex Profile : default-flex-profile AP Profile : default-ap-profile Local-site : Yes RF tag mapping -------------- 5ghz RF Policy : Global Config 2.4ghz RF Policy : Global Config
Tag Configuration
# show wireless tag { policy | rf | site } summary
# show wireless tag { policy | rf | site } detailed <tag-name>
Profile Configuration
# show wireless profile { flex | policy } summary
# show wireless profile { flex | policy } detailed <profile-name>
# show ap profile <AP-join-profile-name> detailed
FAQs
1. Can I use the same Policy Profile for different SSIDs?
R= Yes
2. Can I use the same SSID on different Policy Tags?
R= Yes
3. Can I use the same Policy Profile on different Policy Tags?
R= Yes
4. What is maximum number of SSIDs that can be inside a Policy Tag?
R= 16
5. Do I need to modify the three tags on the AP?
R= No, you could create one new tag and assign it to the AP(s) and use the default tags for the rest of the settings, or leave the other two Tags unchanged.
Revision History
| Revision | Publish Date | Comments |
|---|---|---|
3.0 |
04-Jun-2024 |
Fixed 'notes.' Bolded navigation and GUI. Added commas to introductory clauses. Added periods to sentences without them. |
2.0 |
13-May-2024 |
Recertification |
1.0 |
20-Nov-2018 |
Initial Release |
Contributed by Cisco Engineers
- Karla Cisneros GalvanCisco TAC Engineer
Contact Cisco
- Open a Support Case

- (Requires a Cisco Service Contract)
 Feedback