Introduction
This document describes the steps to get Catalyst 9800 Wireless LAN Controller added to Connected Mobile Experiences (CMX).
Prerequisites
The document is also helpful when using Cisco Spaces through the connector or CMX on-prem tethering.
Requirements
This document assumes that you have done basic setup and network connectivity of both the 9800 WLC and CMX and only covers adding the WLC to CMX.
You need port TCP 22 (SSH) and 16113 (NMSP) opened between the 9800 WLC and CMX.
Components Used
Cat9800 running 16.12
CMX running 10.6.x
The information in this document was created from the devices in a specific lab environment. All of the devices used in this document started with a cleared (default) configuration. If your network is live, ensure that you understand the potential impact of any command.
Configure
Network Diagram
 Network Diagram
Configurations
Step 1. Note the Wireless Management ip address and the privilege 15 username and password along with enable password or enable secret, if applicable.
CLI:
# show run | inc username
# show run | inc enable
# show wireless interface summar
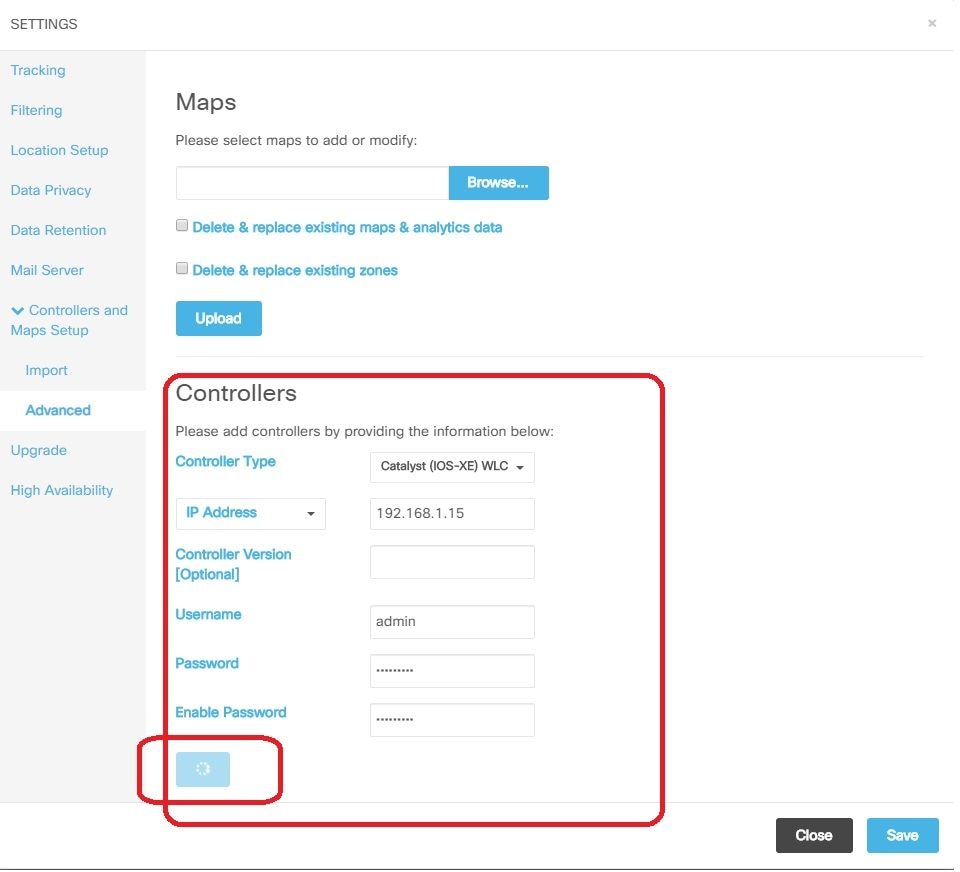
Step 2. On CMX, in order to add Wireless LAN Controller, navigate to System > Settings > Controllers and Maps Setup, click on Advanced.
You either get a pop up wizard (if you did not complete it yet at that point) or the actual settings page. Both are illustrated here:

Step 3. From the drop-down for Controller Type, select Catalyt (IOS-XE) WLC (on 10.6.1 the dropdown box shows Unified WLC for Cat9800 WLCs).

Step 4. Provide Cat9800 WLC IP Address, Priv 15 username, password and Enable Password to allow CMX configuration access to Cat9800 WLC. CMX uses SSH connectivity (and therefore needs SSH port opened between the two devices) to reach out to the 9800 and configure the NMSP tunnel. Select Add Controller and then Close the pop-up window.

CMX automatically pushes out these configurations to Cat9800 WLC and establish an NMSP tunnel
# nmsp enable
# aaa new-model
# aaa session-id common
# aaa authorization credential-download wcm_loc_serv_cert local
# aaa attribute list cmx<mac>
# username <CMX mac address> mac aaa attribute list cmx_<mac>
# attribute type password <CMX key hash>
# netconf-yang
Verify
Verify that the NMSP tunnel is active and transmitting data from the 9800 perspective :
9800#show nmsp status
NMSP Status
-----------

CMX IP Address                          Active    Tx Echo Resp  Rx Echo Req   Tx Data     Rx Data     Transport
----------------------------------------------------------------------------------------------------------------
10.48.71.119                            Active    16279         16279         7           80          TLS
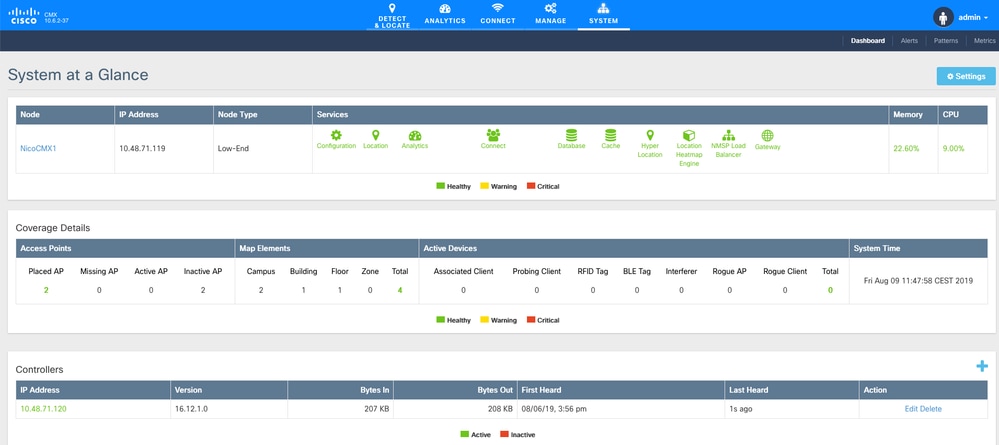
Verify the same tunnel status from the CMX perspective at the bottom of the System page :

Verify time synchronization
The best practice is to point both CMX and the WLC to same Network Time Protocol (NTP) server.
In the 9800 CLI, run the command:
(config)#ntp server <IP address of NTP>
In order to change the IP address of NTP server in CMX:
Step 1. Log into the command line as cmxadmin
Step 2. Check the NTP synchronization with cmxos health ntp
Step 3. If you want to reconfigure the NTP server, you can use cmxos ntp clear and then cmxos ntp type.
Step 4. Once the NTP server is synchronized with CMX, run the command cmxctl restart to restart the CMX services and switch back to cmxadmin user.
Verify the Key hash
This process happens automatically when you add the WLC to CMX, then CMX adds its key hash in the WLC configuration. However you can verify this or add it manually in case of problems.
The commands entered by CMX are:
(config)#username <CMX mac> mac aaa attribute list cmx_<CMX MAC>
(config)# attribute type password <CMX key hash>
To find out what the SHA2 key on the CMX is, use:
cmxctl config authinfo get
Verify the interface
NMSP only is sent from the interface set as "wireless management interface" (Gig2 by default on 9800-CL). Interfaces used as service-port (gig0/0 for appliance or Gig1 for 9800-CL) dol not send NMSP traffic.
Show commands
You can validate which services were subscribed to at the NSMP level on the 9800 WLC
9800#show nmsp subscription detail
CMX IP address: 10.48.71.119
Service            Subservice
-----------------------------
RSSI               Tags, Mobile Station,
Spectrum
Info               Mobile Station,
Statistics         Tags, Mobile Station,
AP Info            Subscription
You can get NMSP tunnel statistics
9800#show nmsp statistics summary
NMSP Global Counters
--------------------
Number of restarts                 : 0

SSL Statistics
--------------------
Total amount of verifications      : 0
Verification failures              : 0
Verification success               : 0
Amount of connections created      : 1
Amount of connections closed       : 0
Total amount of accept attempts    : 1
Failures in accept                 : 0
Amount of successful accepts       : 1
Amount of failed registrations     : 0

AAA Statistics
--------------------
Total amount of AAA requests       : 1
Failed to send requests            : 0
Requests sent to AAA               : 1
Responses from AAA                 : 1
Responses from AAA to validate     : 1
Responses validate error           : 0
Responses validate success         : 1


9800#show nmsp statistics connection
NMSP Connection Counters
------------------------

CMX IP Address: 10.48.71.119, Status: Active
  State:
    Connections          : 1
    Disconnections       : 0
    Rx Data Frames       : 81
    Tx Data Frames       : 7
    Unsupported messages : 0
  Rx Message Counters:
     ID  Name                               Count
    ----------------------------------------------
      1  Echo Request                       16316
      7  Capability Notification            2
     13  Measurement Request                2
     16  Information Request                69
     20  Statistics Request                 2
     30  Service Subscribe Request          2
     74  BLE Floor Beacon Scan Request      4
  Tx Message Counters:
     ID  Name                               Count
    ----------------------------------------------
      2  Echo Response                      16316
      7  Capability Notification            1
     14  Measurement Response               2
     21  Statistics Response                2
     31  Service Subscribe Response         2
Troubleshoot
Debug
Getting debugging logs for NMSP tunnel establishmenbt can be done with Radioactive Tracing starting 16.12 and later releases.
#debug wireless ip <CMX ip> monitor-time x
This command enable debugging for x minutes for the CMX ip address mentioned. The file is created in bootflash:/ and follows the prefix "ra_trace_IP_x.x.x.x_....". It wil contain all the collated logs pertaining to the NMSP debugging.
To see real time debugs on terminal of eWLC enter the command:
#monitor log process nmspd level debug
To stop real time debugs enter CTRL+C.
Packet Capture
Collect packet capture at eWLC using an ACL to filter only traffic between eWLC and CMX ip. Example with eWLC ip 192.168.1.15 and CMX ip 192.168.1.19:
eWLC-9800-01#conf t
Enter configuration commands, one per line. End with CNTL/Z.
eWLC-9800-01(config)#ip access-list extended CMX
eWLC-9800-01(config-ext-nacl)#permit ip host 192.168.1.15 host 192.168.1.19
eWLC-9800-01(config-ext-nacl)#permit ip host 192.168.1.19 host 192.168.1.15
eWLC-9800-01(config-ext-nacl)#end
eWLC-9800-01#monitor capture CMX access-list CMX interface gigabitEthernet 2 both start
eWLC-9800-01#
Jan 30 11:53:22.535: %BUFCAP-6-ENABLE: Capture Point CMX enabled.
...
eWLC-9800-01#monitor capture CMX stop
Stopped capture point : CMX
eWLC-9800-01#
Jan 30 11:59:04.949: %BUFCAP-6-DISABLE: Capture Point CMX disabled.

eWLC-9800-01#monitor capture CMX export bootflash:/cmxCapture.pcap
You can then download the capture via CLI or from GUI in Troubleshooting > Packet Capture > Export. Or via Administration > Management > File manager > bootflash:.
Reference
Wireless debugging and log collection on 9800


 Feedback