Configure a WLAN for Voice with the 8821 on Catalyst 9800 WLC
Available Languages
Download Options
Bias-Free Language
The documentation set for this product strives to use bias-free language. For the purposes of this documentation set, bias-free is defined as language that does not imply discrimination based on age, disability, gender, racial identity, ethnic identity, sexual orientation, socioeconomic status, and intersectionality. Exceptions may be present in the documentation due to language that is hardcoded in the user interfaces of the product software, language used based on RFP documentation, or language that is used by a referenced third-party product. Learn more about how Cisco is using Inclusive Language.
Contents
Introduction
This document describes how to configure a 9800 Wireless LAN Controller (WLC) for a voice deployment using Cisco 8821 handsets.
Prerequisites
Requirements
Cisco recommends that you have knowledge of these topics:
- Catalyst Wireless 9800 configuration model
- FlexConnect
- 802.11r
- Call Admission Control (CAC)
Components Used
The information in this document is based on a 9800L v17.6.1
The information in this document was created from the devices in a specific lab environment. All of the devices used in this document started with a cleared (default) configuration. If your network is live, ensure that you understand the potential impact of any command.
The document does not cover SIP CAC as it is not supported on the 9800 after version 17.3.1
Configure an SSID
Option a : Central Switching
Central Switching Network Diagram
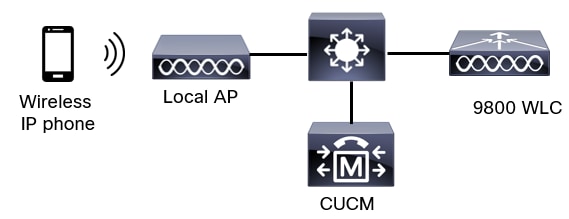
Central Switching : Tags and Profiles
In this document, the configuration of all tags and profiles is done with the use of the Advanced Wireless Setup as all tags and profiles can be configured on the same menu.
Step 1. Navigate to Configuration > Wireless Setup > Advanced > Start Now > WLAN Profile and click +Add in order to create a new WLAN. Configure the SSID, Profile Name, WLAN ID, and the status of the WLAN. Then, navigate to Security > Layer 2 and configure the settings. This example uses simple PSK and therefore does not require configuring FT. If you configure 802.1X, enable FT.
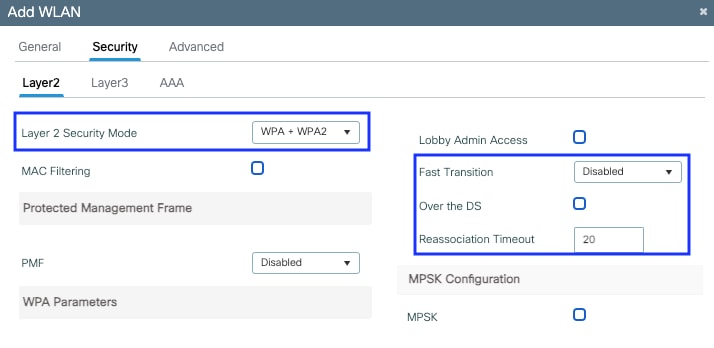 Voice SSID security settings part 1
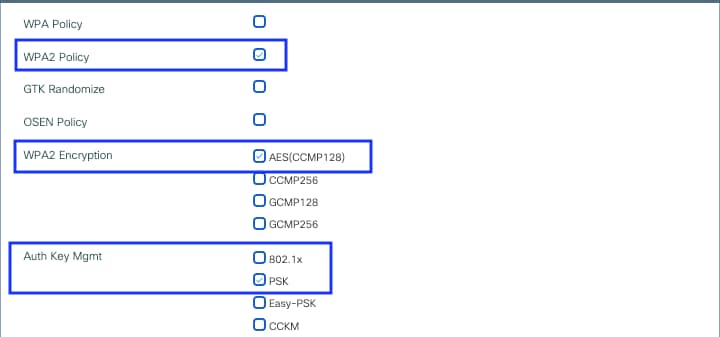 Voice SSID security settings part 2
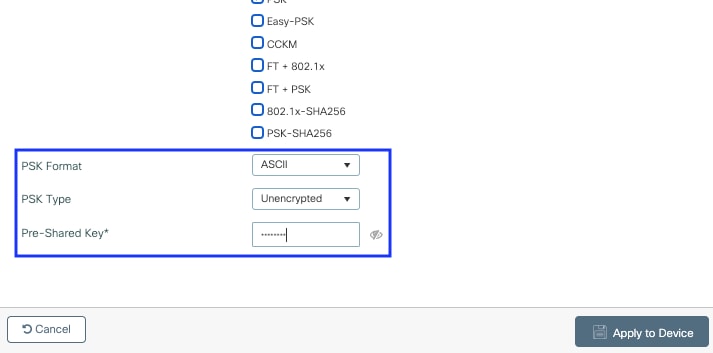 Voice SSID security settings part 3
Note: With a PSK SSID it is not necessary to enable FT as the handshake during roaming is short. When configuring 802.1X WPA Enteprise, it is advised to enable FT+802.1X as AKM and enable Fast Transition but keep "Over the DS" as disabled. You can also configure FT+PSK but this examples uses regular PSK for simplicity's sake.
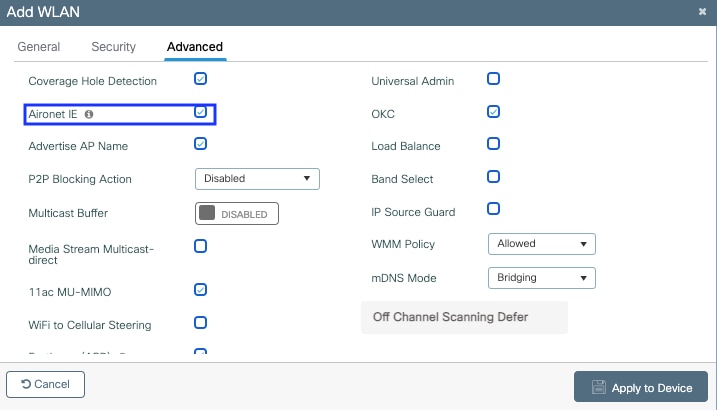
Step 2. Navigate to the Advanced tab and enable Aironet IE. Make sure Load balance and band select are disabled:
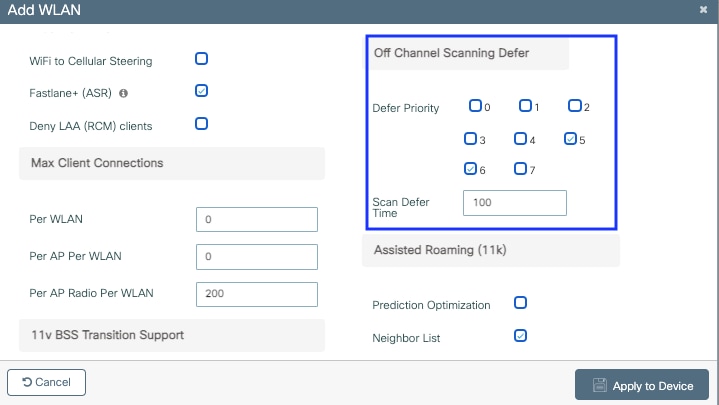
In the same page, make sure the off channel scan defer is enabled for priorities 5,6 and 7. This prevents the AP from going off-channel for 100ms after a frame with those UP priorities (basically a voice frame) was received.
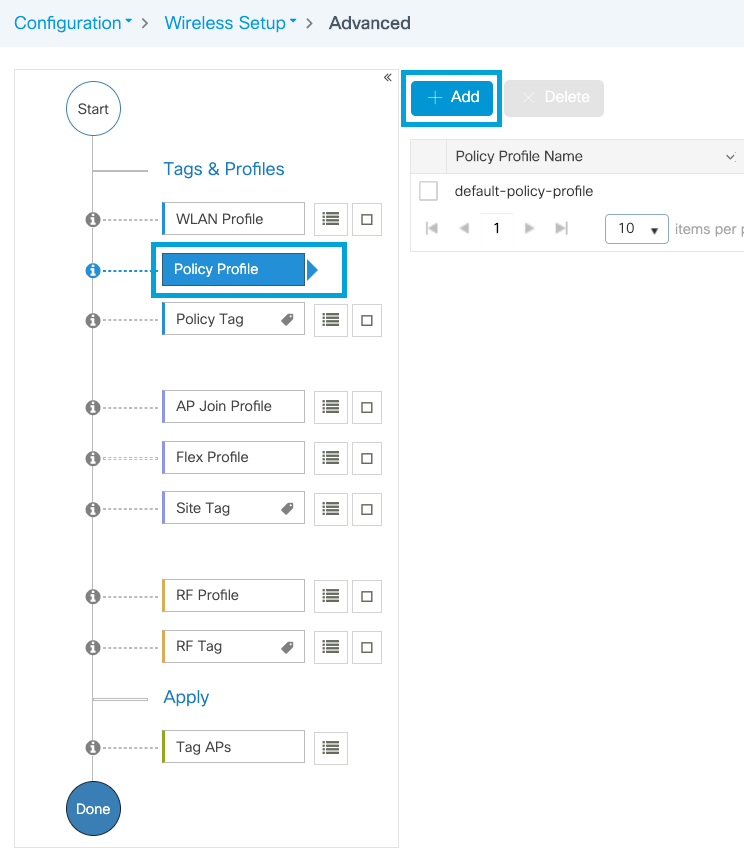
Step 3. Select Policy Profile and click Add:
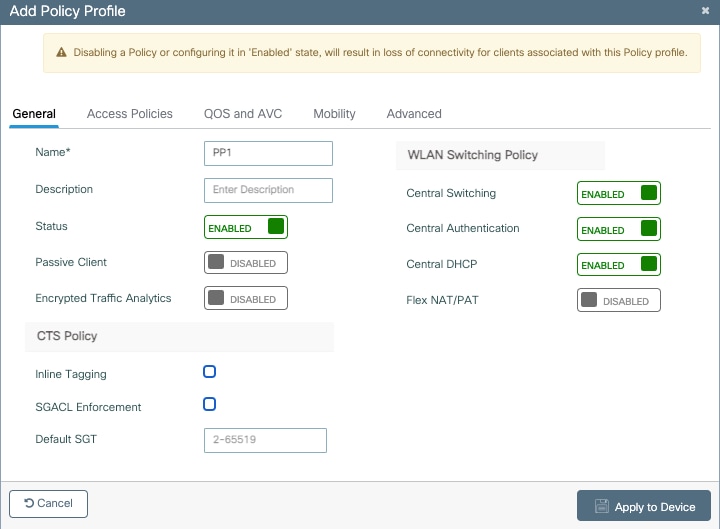
Configure the Policy Profile name, set the Status as Enabled, and keep Central Switching, Authentication, DHCP and association (after 17.6, the central association checkbox disappears) enabled:
Click on Access Policies and configure the VLAN the wireless client will be assigned to when connecting to the SSID Voice:
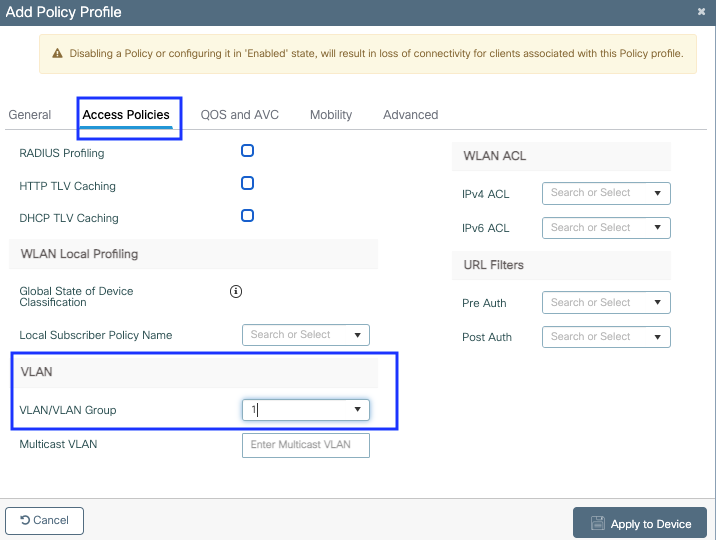 Policy profile access policies settings page
Click on QoS and AVC, and configure the Auto QoS parameter as Voice. Click Save & Apply to Device.
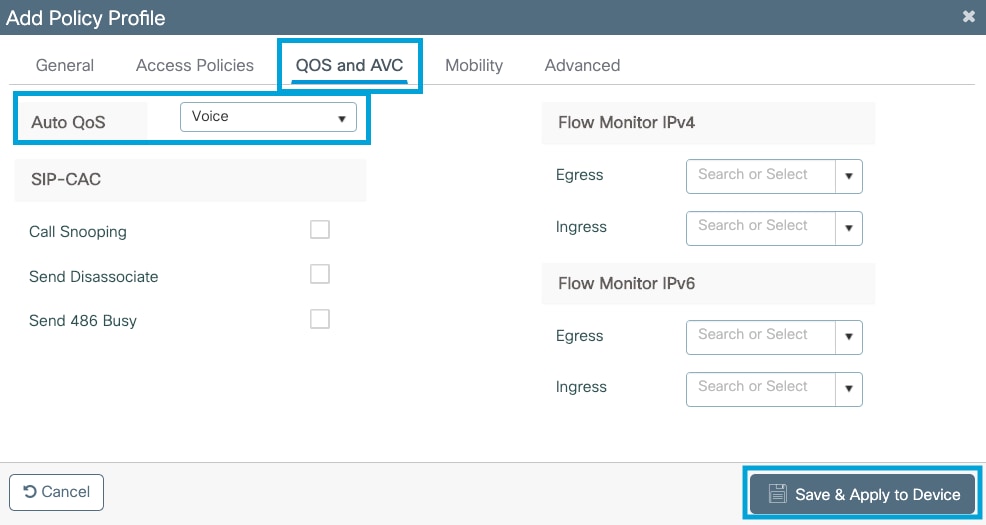
Click on Advanced, set the session timeout to 84000, make sure that IPv4 DHCP required is disabled and enable ARP proxy.
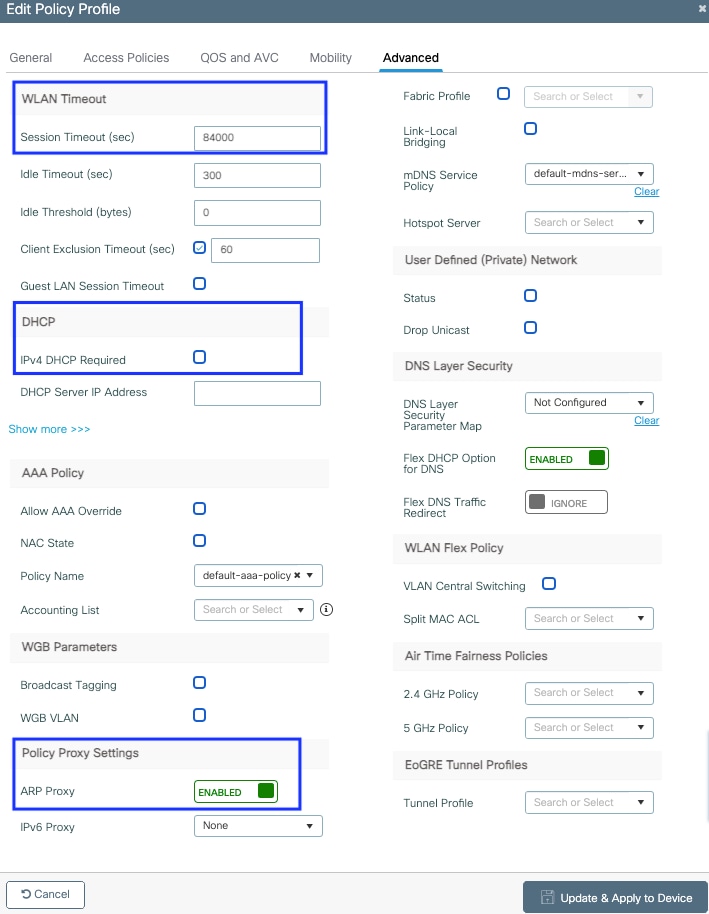 Policy profile advanced settings page
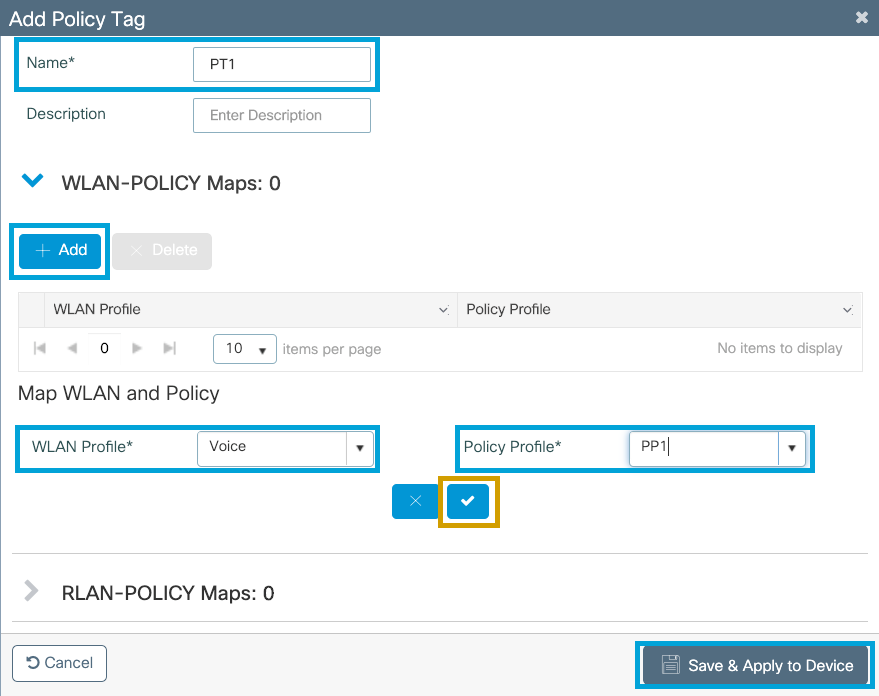
Step 4. Select Policy Tag and click Add. Configure the Policy Tag name. Under WLAN-Policy Maps click on +Add. Select the WLAN Profile and Policy Profile from the drop-down menus, click the check for the map to be configured. Then, click Save & Apply to Device.
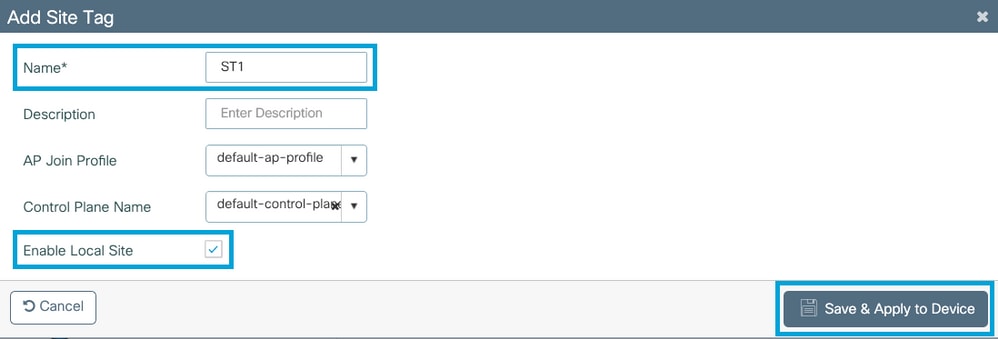
Step 5. Select Site Tag and click Add. Check the Enable Local Site box for the APs to operate in Local Mode. Then, click Save & Apply to Device:
Step 6. Select RF Profile and click Add. Configure an RF Profile per band.
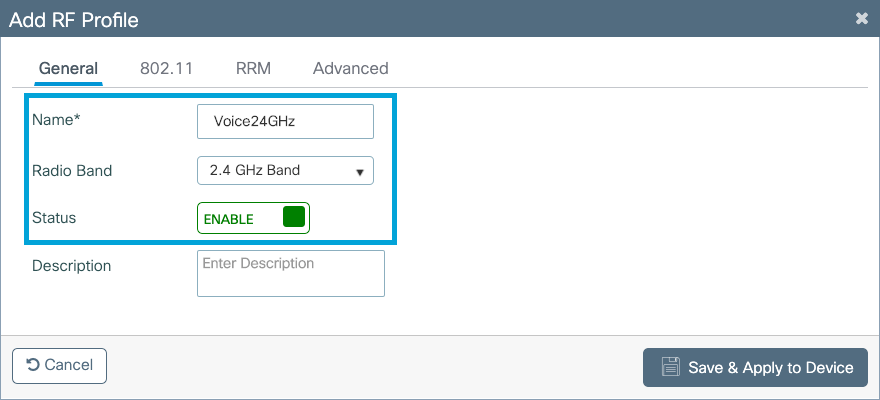
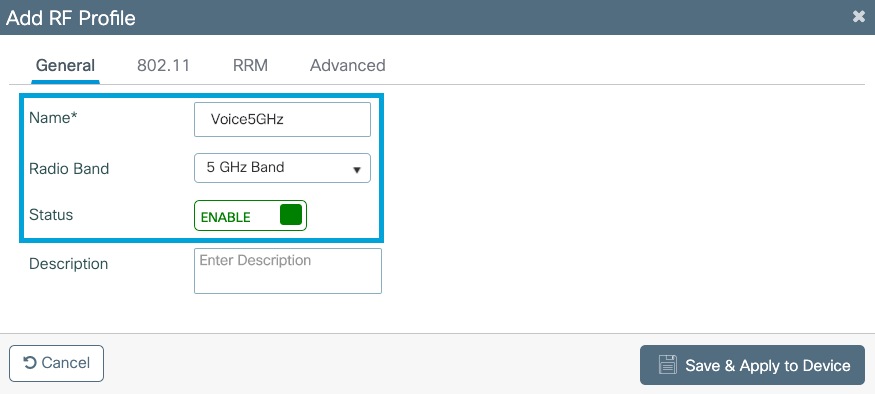
Navigate to the 802.11 menu. Disable all rates under 12Mbps, set 12Mbps as the mandatory rate, and 18 Mbps and higher as supported on both bands.
2.4 GHz data rates:
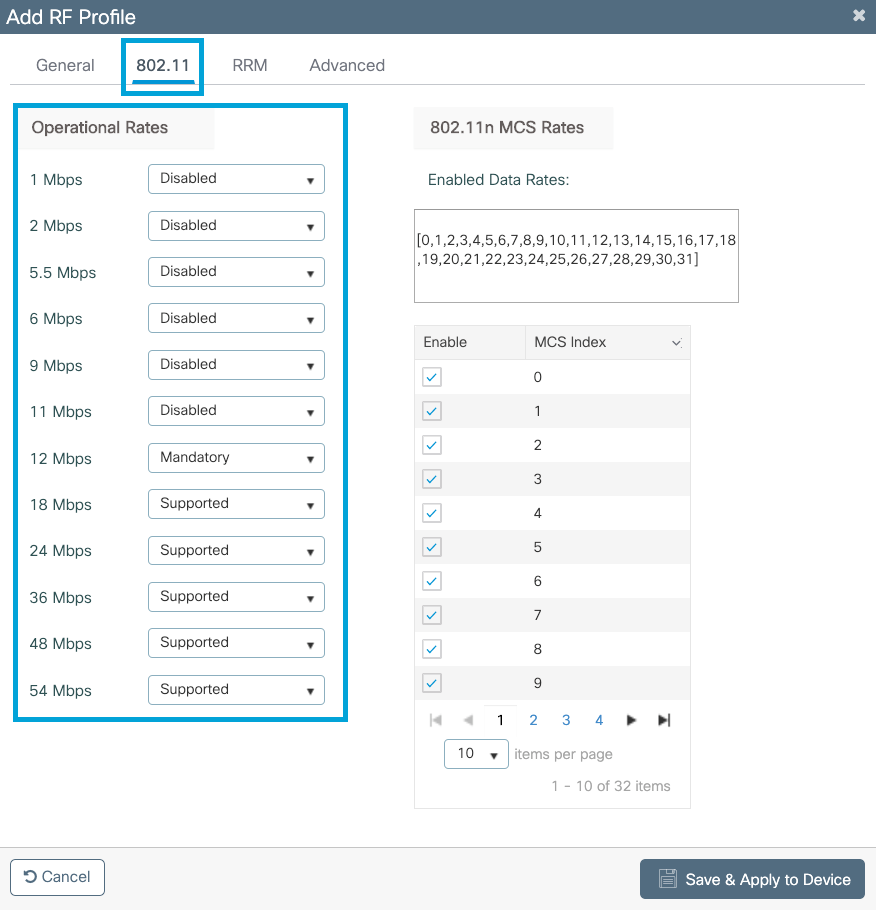
5 GHz data rates:
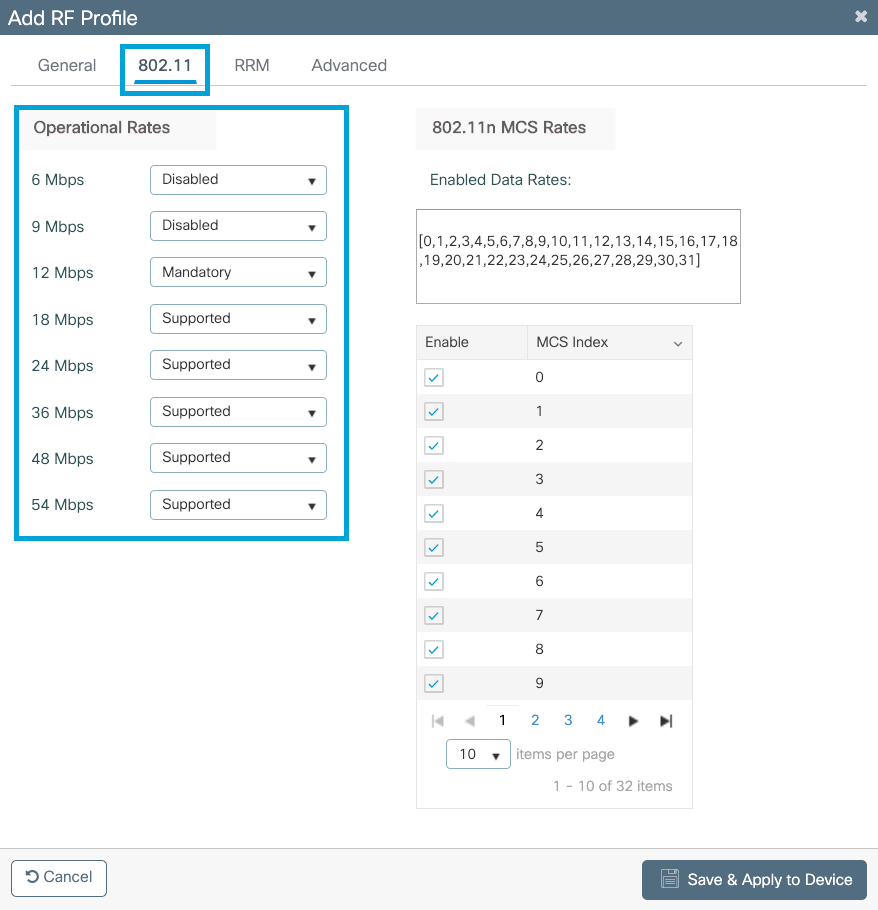
Step 7. Select RF Tag and click Add. Select the RF Profiles created in step 5 of this section. Then, click Save & Apply to Device.
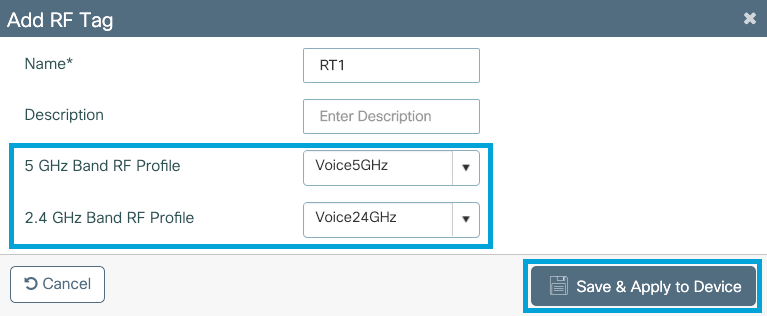
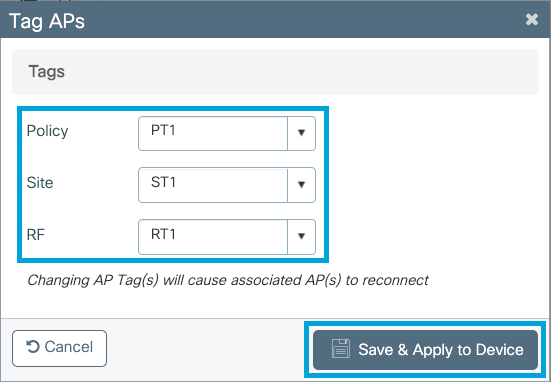
Step 8. Select Tag APs, choose the APs and add the Policy, Site and RF tag previously created. Then, click Save & Apply to Device.
Central Switching : Command Line Interface (CLI)
From the CLI run these commands:
//////// WLAN Configuration
wlan Voice 1 Voice
 ccx aironet-iesupport
 no security ft adaptive
 security wpa psk set-key ascii 0 Cisco123
 no security wpa akm dot1x
 security wpa akm psk
 no shutdown

//////// Policy Profile Configuration
wireless profile policy PP1
 autoqos mode voice
 ipv4 arp-proxy
 service-policy input platinum-up
 service-policy output platinum
 session-timeout 84000
 vlan 1
 no shutdown

//////// Policy Tag Configuration
wireless tag policy PT1
 wlan Voice policy PP1

//////// Site Tag Configuration
wireless tag site ST1
 local-site

//////// 2.4 GHz RF Profile Configuration
ap dot11 24ghz rf-profile Voice24GHz
 rate RATE_11M disable
 rate RATE_12M mandatory
 rate RATE_1M disable
 rate RATE_2M disable
 rate RATE_5_5M disable
 rate RATE_6M disable
 rate RATE_9M disable
 no shutdown

//////// 5 GHz RF Profile Configuration
ap dot11 5ghz rf-profile Voice5GHz
 rate RATE_24M supported
 rate RATE_6M disable
 rate RATE_9M disable
 no shutdown

//////// RF Tag Configuration
wireless tag rf RT1
 24ghz-rf-policy Voice24GHz
 5ghz-rf-policy Voice5GHz

//////// AP Configuration
ap a023.9f86.52c0
 policy-tag PT1
 rf-tag RT1
 site-tag ST1
Option b: FlexConnect Local Switching
Flexconnect Local Switching Network Diagram
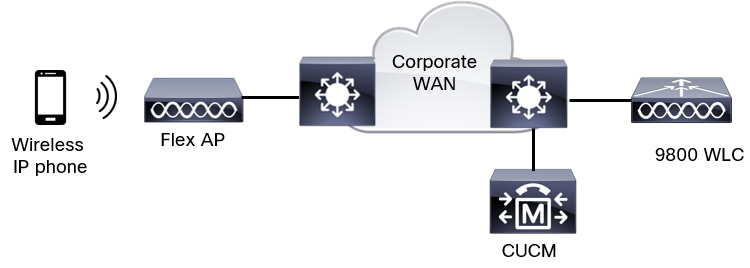
Flexconnect Local Switching Tags and Profiles
Step 1. Navigate to Configuration > Wireless Setup > Advanced > Start Now > WLAN Profile and click +Add in order to create a new WLAN. Configure the SSID, Profile Name, WLAN ID, and the status of the WLAN. Then, navigate to Security > Layer 2 and configure the settings:
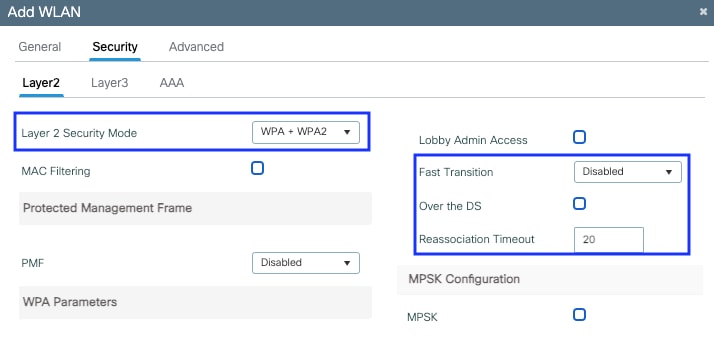 Voice SSID security settings part 1
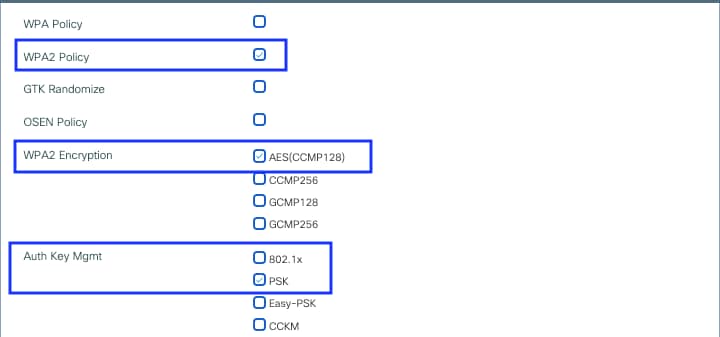 Voice SSID security settings part 2
 Voice SSID security settings part 3
Note: With a PSK SSID it is not necessary to enable FT as the handshake during roaming is short. When configuring 802.1X WPA Enteprise, it is advised to enable FT+802.1X as AKM and enable Fast Transition but keep "Over the DS" as disabled. You can also configure FT+PSK but this examples uses regular PSK for simplicity sake.
Step 2. Navigate to the Advanced tab and enable Aironet IE. Make sure Load balance and band select are disabled:
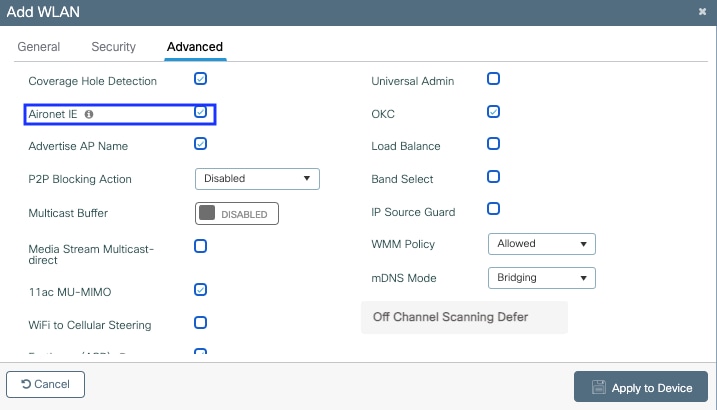
In the same page, make sure the off channel scan defer is enabled for priorities 5,6 and 7. This prevents the AP from going off-channel for 100ms after a frame with those UP priorities (basically a voice frame) was received.
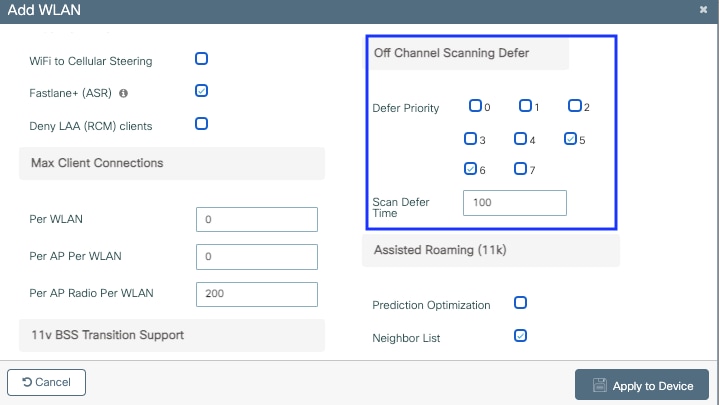
Step 3. Select Policy Profile and click Add:
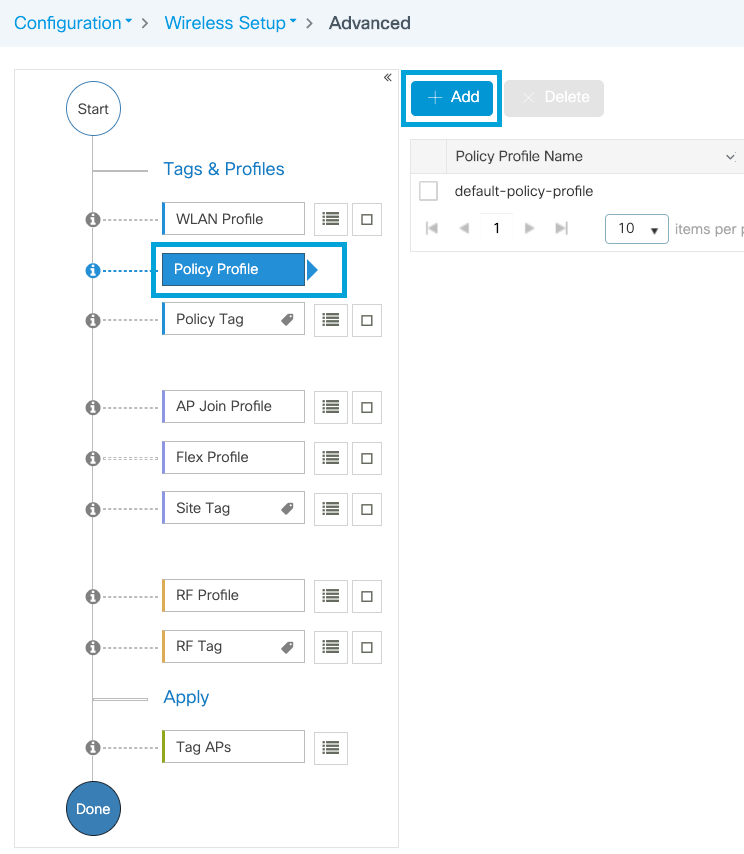
Configure the Policy Profile name, set the Status as Enabled, disable Central Switching and Central DHCP. For a PSK SSID, the authentication could be moved to local to give the access point the role of verifying the PSK. In case of 802.1X, you typically want the WLC to keep performing the 802.1X authentications.
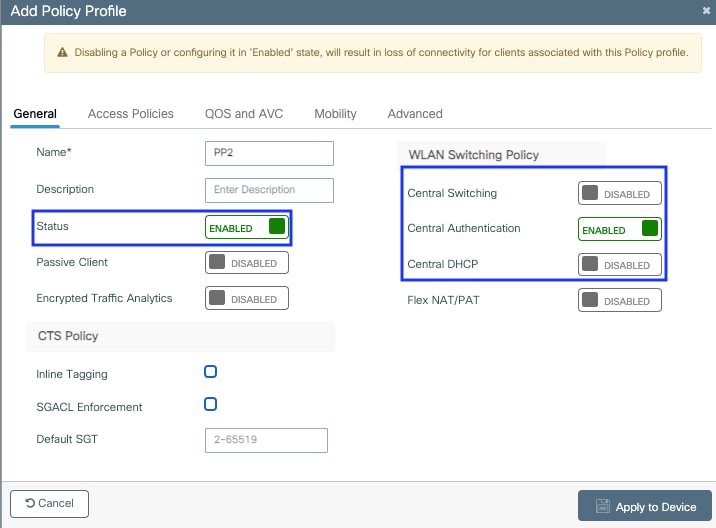 Flex Local switching policy profile configuration
Navigate to the Access Policies tab to assign the VLAN to which the wireless clients are assigned when they connect to this WLAN by default. You can either select one VLAN name from the drop-down or manually type a VLAN ID.
Click on QoS and AVC, and configure the Auto QoS parameter as Voice. Click Save & Apply to Device.
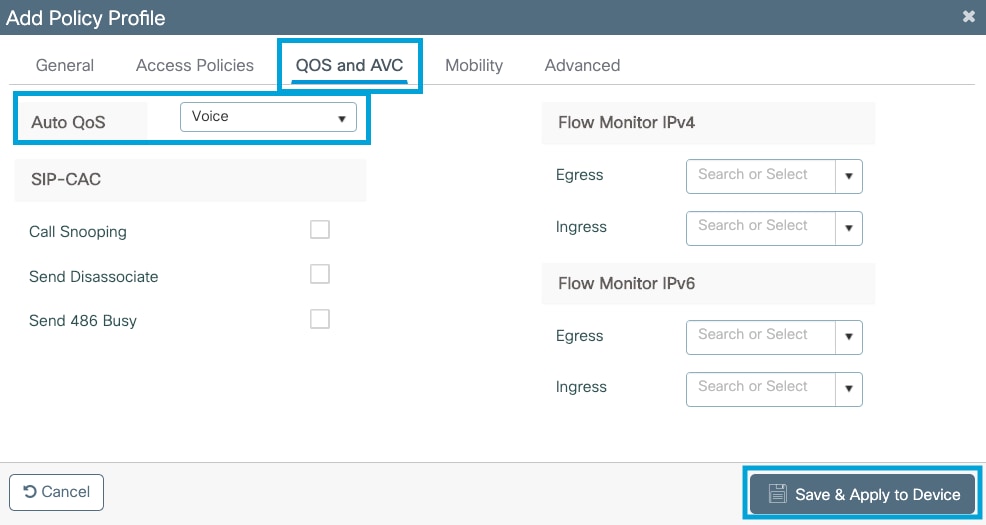
Click on Advanced, set the session timeout to 84000, make sure that IPv4 DHCP required is disabled and disable ARP proxy.
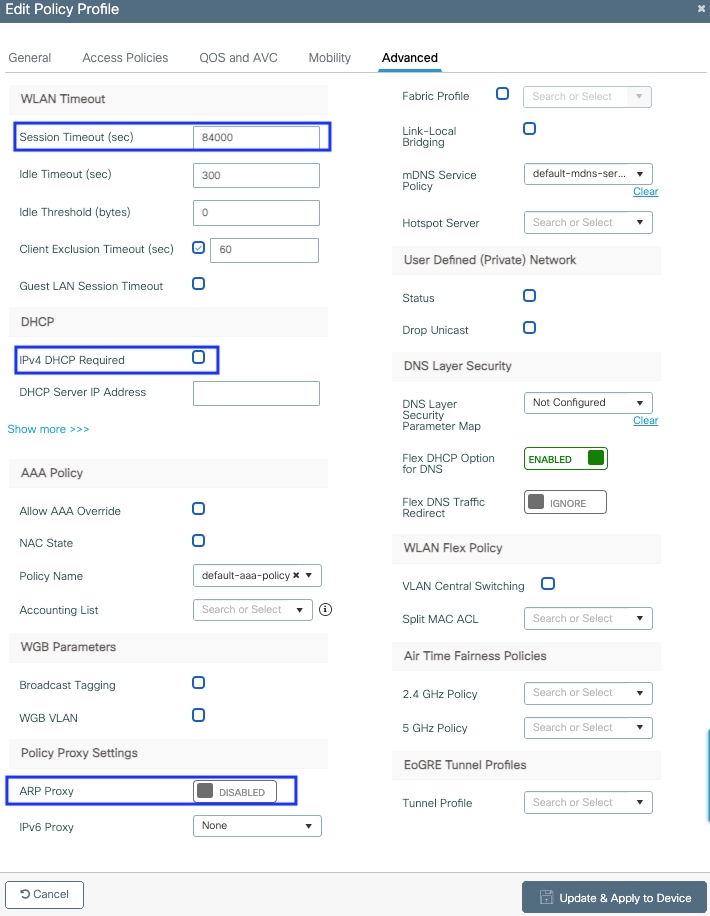 Advanced settings of the flex policy profile
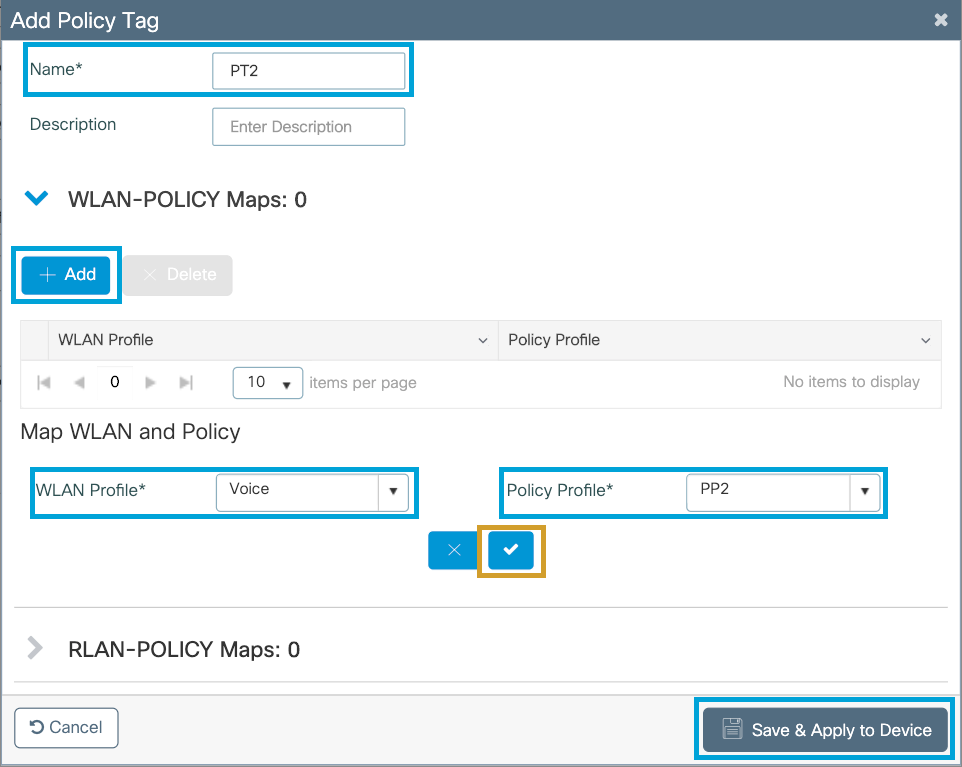
Step 4. Select Policy Tag and click Add. Configure the Policy Tag name. Under WLAN-Policy Maps click on +Add. Select the WLAN Profile and Policy Profile from the drop-down menus, and click the check for the map to be configured. Then, click Save & Apply to Device.
Step 5. Click on Flex Profile and click Add. Configure the Flex Profile name, the Native VLAN ID and Enable ARP Caching:
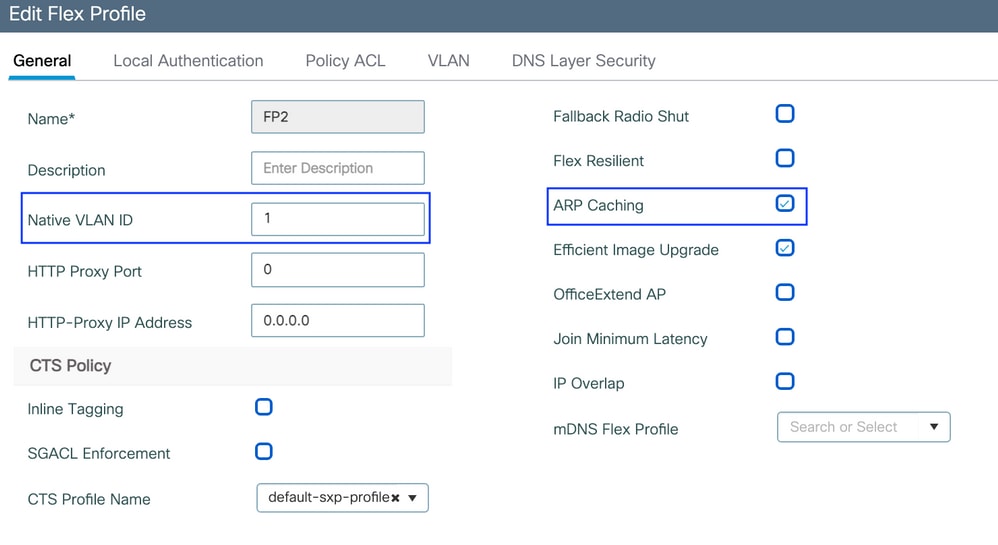 Flex profile policy settings
Note: Native VLAN ID refers to the Native VLAN configured in the switchiport the APs, associated with this Flex Profile, is connected to.
Step 6. Select Site Tag and click Add. Configure the Site Tag name, uncheck the Enable Local Site option and add the Flex Profile. Then, click Save & Apply to Device.
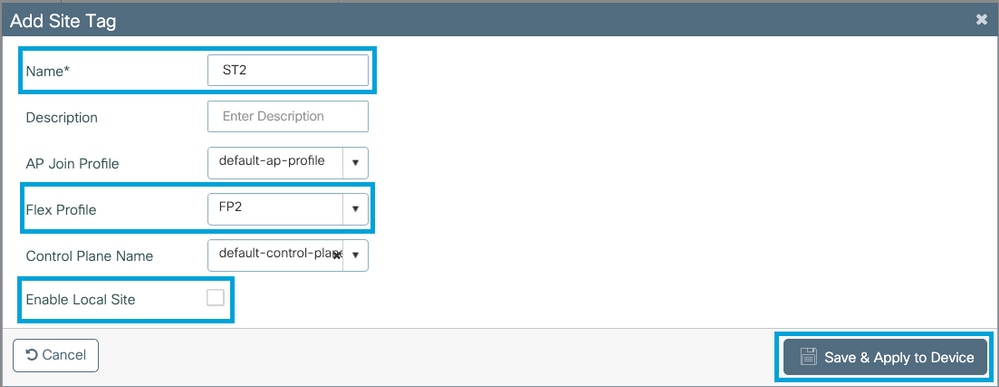
Note: As Enable Local Site is disabled, the APs assigned to this Site Tag will be automatically configured as FlexConnect APs.
Step 7. Select RF Profile and click Add. Configure an RF Profile per band.
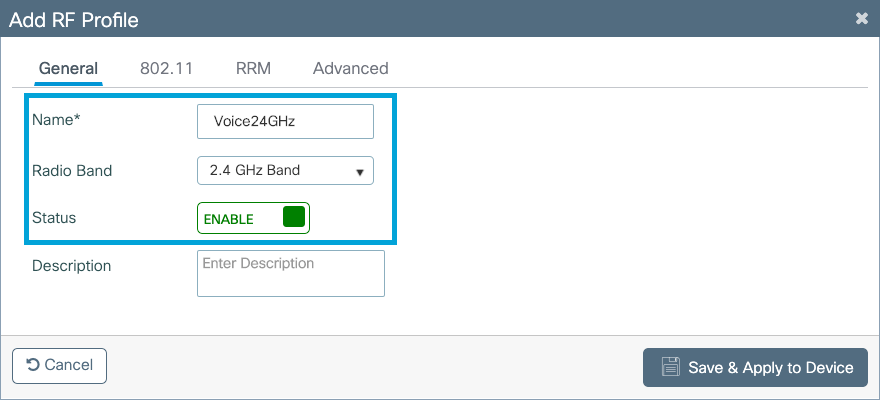
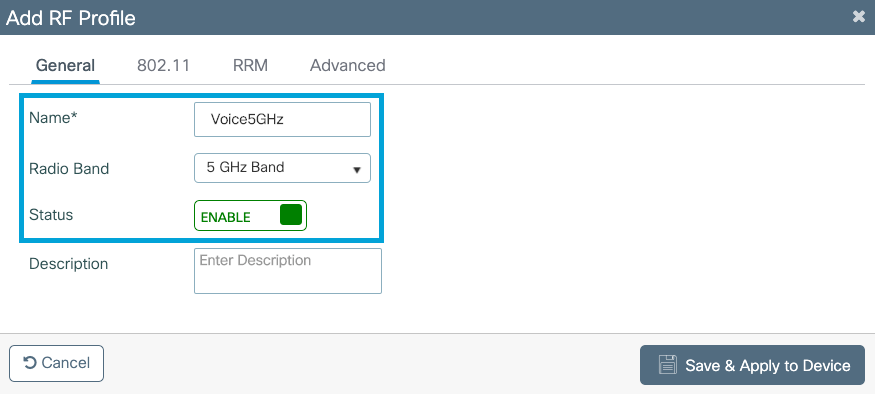
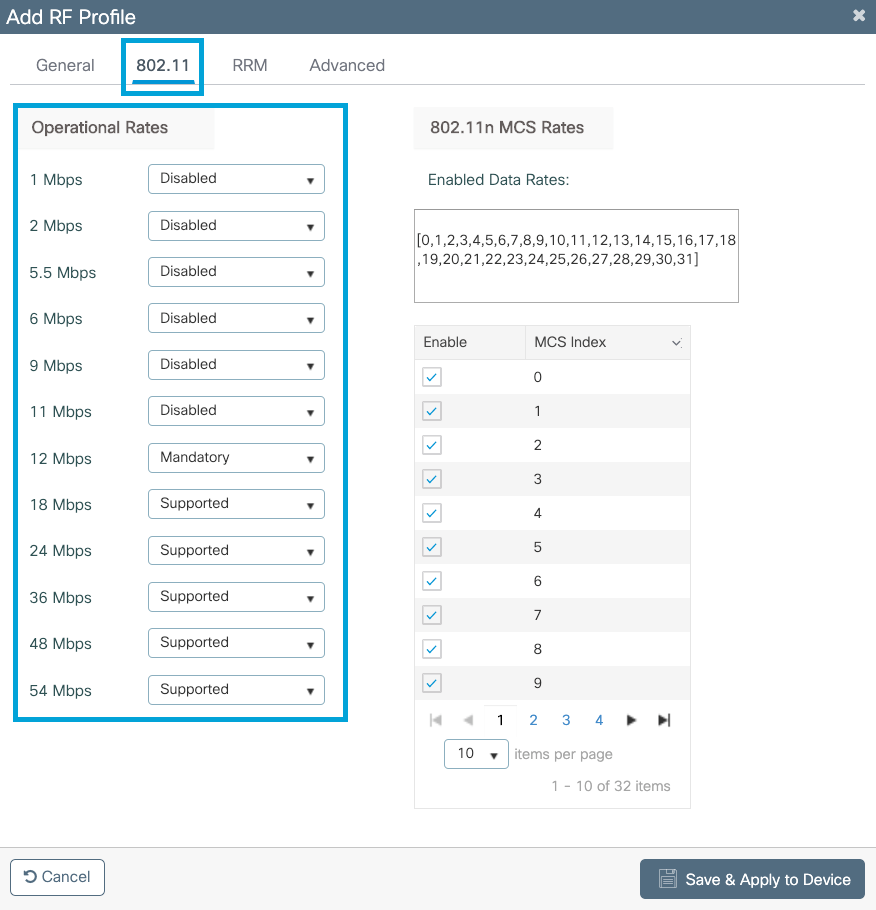
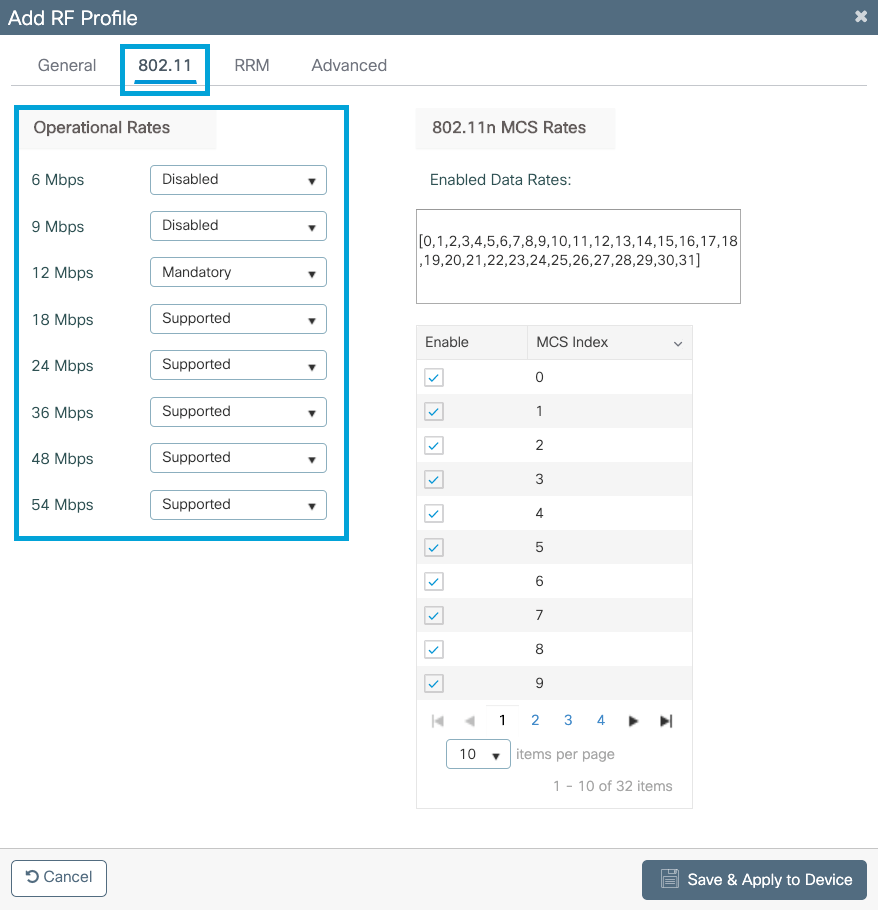
Navigate to the 802.11 menu. Disable all rates under 12Mbps, set 12Mbps as the mandatory rate and 18 Mbps and higher as supported on both bands.
2.4 GHz data rates:
5 GHz data rates:
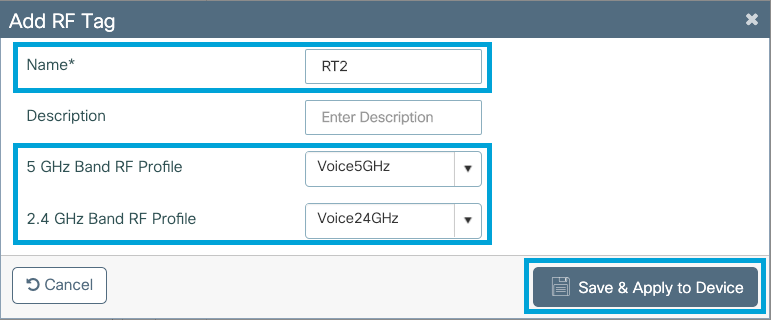
Step 8. Select RF Tag and click Add. Configure the RF Profiles created in Step 6. of this section. Then, click Save & Apply to Device.
Step 9. Select Tag APs, choose the APs and add the Policy, Site and RF tag previously created. Then, click Save & Apply to Device.
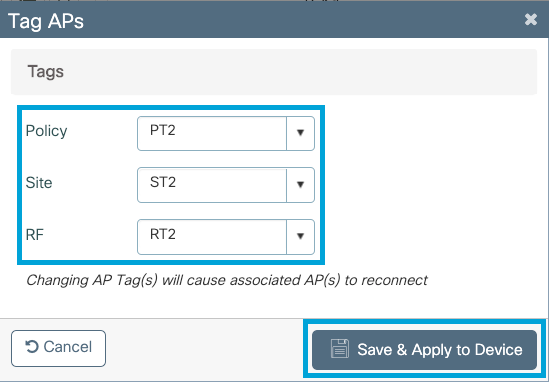
The AP will restart its CAPWAP tunnel and join back the 9800 WLC. Navigate to Configuration > Wireless > Access Points and confirm the AP mode is Flex:

Flexconnect Local Switching Command Line Interface (CLI)
From the CLI run these commands:
//////// WLAN Configuration
wlan Voice 1 Voice
 ccx aironet-iesupport
 no security ft adaptive
 security wpa psk set-key ascii 0 Cisco123
 no security wpa akm dot1x
 security wpa akm psk
 no shutdown

//////// Policy Profile Configuration
wireless profile policy PP2
 do wireless autoqos policy-profile PP2 mode voice
 service-policy input platinum-up
 service-policy output platinum
 vlan 2672
 no shutdown

//////// Policy Tag Configuration
wireless tag policy PT2
 wlan Voice policy PP2

//////// Flex Profile Configuration
wireless profile flex FP2
 arp-caching
 vlan-name 1
 native-vlan-id 1

//////// Site Tag Configuration
wireless tag site ST2
 no local-site
 flex-profie FP2

//////// 2.4 GHz RF Profile Configuration
ap dot11 24ghz rf-profile Voice24GHz
 rate RATE_11M disable
 rate RATE_12M mandatory
 rate RATE_1M disable
 rate RATE_2M disable
 rate RATE_5_5M disable
 rate RATE_6M disable
 rate RATE_9M disable
 no shutdown

//////// 5 GHz RF Profile Configuration
ap dot11 5ghz rf-profile Voice5GHz
 rate RATE_24M supported
 rate RATE_6M disable
 rate RATE_9M disable
 no shutdown

//////// RF Tag Configuration
wireless tag rf RT2
 24ghz-rf-policy Voice24GHz
 5ghz-rf-policy Voice5GHz

//////// AP Configuration
ap a023.9f86.52c0
 policy-tag PT2
 rf-tag RT2
 site-tag ST2
Configure Media Parameters
GUI Configuration
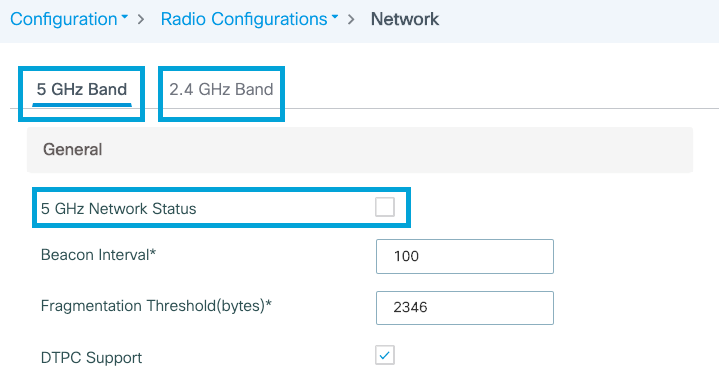
Step 1. Navigate to Configuration > Radio Configuration > Network. Disable both 5 GHz and 2.4 Ghz band, and click Apply.
Pay attention that this will temporarily disable all your 5ghz wifi networks ! Only run this when you are in a maintenance window
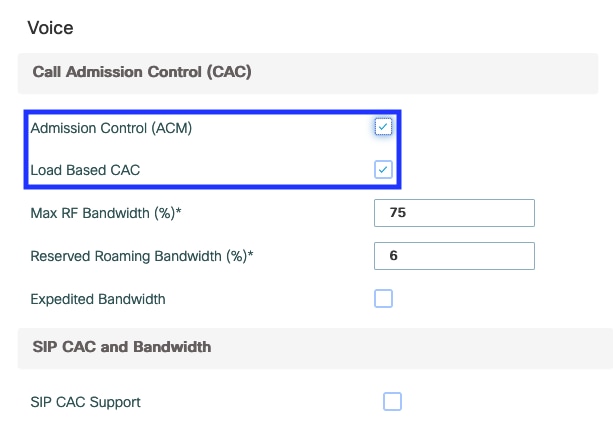
Step 2. Navigate to Configuration > Radio Configuration > Media Parameters. Enable Admission Control and Load Based Call Admission Control (CAC) on both 2.4 GHz and 5 GHz band, and click Apply:
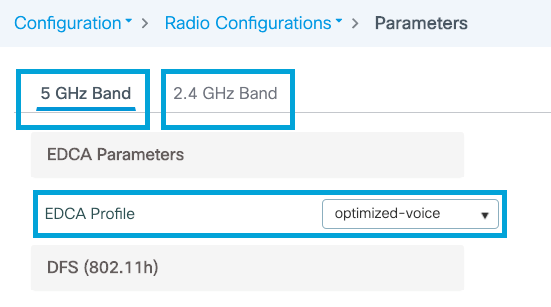
Step 3. Navigate to Configuration > Radio Configurations > Parameters. Configure the EDCA Profile as optimized-voice on both bands, and click Apply.
Step 4. Navigate to Configuration > Radio Configuration > Network. Enable both 5 GHz and 2.4 Ghz band, and click Apply.
Command Line Interface (CLI)
From CLI run these commands:
Andressi_9800(config)#ap dot11 24ghz shutdown
Andressi_9800(config)#ap dot11 5ghz shutdown

Andressi_9800(config)#dot11 24ghz cac voice acm

Andressi_9800(config)#dot11 5ghz cac voice acm

Andressi_9800(config)#ap dot11 24ghz edca-parameters optimized-voice
Andressi_9800(config)#ap dot11 5ghz edca-parameters optimized-voice

Andressi_9800(config)#no ap dot11 24ghz shutdown
Andressi_9800(config)#no ap dot11 5ghz shutdown
Verify
You can use these commands to verify the current configuration:
# show wlan { summary | id | name | all }
# show run wlan
# show run aaa
# show aaa servers
# show ap config general
# show ap name <ap-name> config general
# show ap tag summary
# show ap name <AP-name> tag detail
# show wlan { summary | id | name | all }
# show wireless tag policy detailed <policy-tag-name>
# show wireless profile policy detailed <policy-profile-name>
To review the CAC statistics and call-controll metrics, run these commands:
#show ap name AP2802I-21 dot11 5ghz voice stats
#show ap name <ap-name> dot11 5ghz call-control metrics
Troubleshoot
Conditional Debugging and Radio Active Tracing
The Radio Active (RA) trace provides debug level traces for all processes that interact with the specified condition (client mac address in this case). In order to enable conditional debugging, execute these steps. We focus on the output that the 9800 WLC provides during a call.
Step 1. Ensure there are no debug conditions are enabled.
# clear platform condition all
Step 2. Enable the debug condition for the wireless client mac address that you want to monitor. This command start to monitor the provided mac address for 30 minutes (1800 seconds). You can optionally increase this time to up to 2085978494 seconds.
# debug wireless mac <8821-MAC-address> {monitor-time <seconds>}
Note: In order to monitor more than one client at a time, run debug wireless mac <aaaa.bbbb.cccc> command per mac address.
Note: You do not see the output of the client activity on terminal session, as everything is buffered internally to be viewed later.
Step 3. Establish a call from the 8821 Cisco IP phone.
Step 4. Stop the debugs when the call is completed or if the issue is reproduced before the default or configured monitor time is up.
# no debug wireless mac <8821-MAC-address>
Once the monitor-time has elapsed or the debug wireless has been stopped, the 9800 WLC generates a local file with the name:
ra_trace_MAC_aaaabbbbcccc_HHMMSS.XXX_timezone_DayWeek_Month_Day_year.log
Step 5. Collect the file of the mac address activity. You can either copy the ra trace .log to an external server or display the output directly on the screen. Check the name of the RA traces file
# dir bootflash: | inc ra_trace
Copy the file to an external server:
# copy bootflash:ra_trace_MAC_aaaabbbbcccc_HHMMSS.XXX_timezone_DayWeek_Month_Day_year.log tftp://a.b.c.d/ra-FILENAME.txtDisplay the content:
# more bootflash:ra_trace_MAC_aaaabbbbcccc_HHMMSS.XXX_timezone_DayWeek_Month_Day_year.logStep 6. Remove the debug conditions.
# clear platform condition all
Note: Ensure that you always remove the debug conditions after a troubleshooting session.
In the output of the RA trace, the Traffic Specification (TSPEC) negotiation takes place, this will determine if the 8821 is allowed mark its traffic with a User Pririty of 6 and if the call can be established or not. To negotiate the use of queue 6, the 8821 sends and Action Packet requesting for permission.
2019/08/25 18:53:54.510 {wncd_x_R0-0}{1}: [ewlc-qos-voice] [18106]: (info): MAC: 0027.902a.ab24 Got action frame from this client.
2019/08/25 18:53:54.510 {wncd_x_R0-0}{1}: [ewlc-qos-voice] [18106]: (info): MAC: 0027.902a.ab24 Received Action frame with code 0: ADDTS request
2019/08/25 18:53:54.510 {wncd_x_R0-0}{1}: [ewlc-qos-voice] [18106]: (info): MAC: 0027.902a.ab24 Got LBCAC Metrics IE:
2019/08/25 18:53:54.510 {wncd_x_R0-0}{1}: [ewlc-qos-voice] [18106]: (info): MAC: 0027.902a.ab24 ADD TS from mobile slot_id 1 direction = 3
up = 6, tid = 6, upsd = 1, medium_time = 653, TSRSIE: No
2019/08/25 18:53:54.510 {wncd_x_R0-0}{1}: [ewlc-qos-voice] [18106]: (info): MAC: 0027.902a.ab24 U-APSD Power save
In a packet capture:
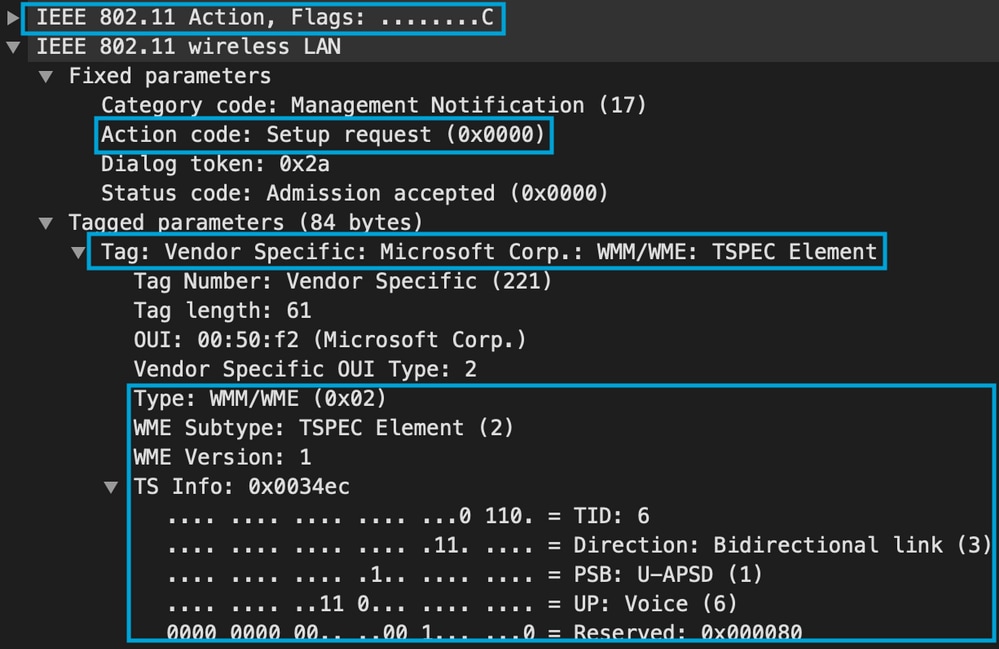
The WLC determines if there is enough bandwidth to allocate the call or not, and if so, it sends an Action Frame accepting the TSPEC negotiation:
2019/08/25 18:53:54.510 {wncd_x_R0-0}{1}: [auth-mgr] [18106]: (info): [0000.0000.0000:unknown] Session info 0x559e2019/08/25 18:53:54.510 {wncd_x_R0-0}{1}: [ewlc-qos-voice] [18106]: (info): MAC: 0027.902a.ab24 LBCAC checks for tspec PASSED for ms slot_id 1 bw_req = 653, tot_available MT for tspecs = 22031 tx_queue_req = 20, current tx queue util = 0
2019/08/25 18:53:54.510 {wncd_x_R0-0}{1}: [ewlc-qos-voice] [18106]: (info): Calls in progress incremented to 1
2019/08/25 18:53:54.510 {wncd_x_R0-0}{1}: [ewlc-qos-voice] [18106]: (info): allocating voice bw for client: maxBW = 23437, BW requested = 653, total voice bw alloc = 653
2019/08/25 18:53:54.511 {wncd_x_R0-0}{1}: [ewlc-qos-client] [18106]: (info): MAC: 0027.902a.ab24
Call Accepted for tspec client
2019/08/25 18:53:54.511 {wncd_x_R0-0}{1}: [ewlc-qos-voice] [18106]: (ERR): MAC: 0027.902a.ab24 TCLAS Set Not used for TCLAS of tid=6
2019/08/25 18:53:54.511 {wncd_x_R0-0}{1}: [ewlc-qos-voice] [18106]: (info): Recommended rate 6500kbps:MCS 0 is not operational for radio: 6
2019/08/25 18:53:54.511 {wncd_x_R0-0}{1}: [ewlc-qos-voice] [18106]: (info): Recommended rate 13000kbps:MCS 1 is not operational for radio: 6
2019/08/25 18:53:54.511 {wncd_x_R0-0}{1}: [ewlc-qos-voice] [18106]: (info): Recommended rate 26000kbps:MCS 3 is not operational for radio: 6
2019/08/25 18:53:54.511 {wncd_x_R0-0}{1}: [ewlc-qos-voice] [18106]: (info): MAC: 0027.902a.ab24 Sending Successful ADD TS resp to mobile slot_id 1
2019/08/25 18:53:54.511 {wncd_x_R0-0}{1}: [ewlc-qos-voice] [18106]: (info): MAC: 0027.902a.ab24 Build ADD TS slot:1, tid:6, user_priority:6, upsd_enable:1, dir:3,bandwidth:653, avail_bw:0, inactive_timer:0, tsm_req_id:0
2019/08/25 18:53:54.511 {wncd_x_R0-0}{1}: [ewlc-qos-voice] [18106]: (info): MAC: a023.9f86.52c0 send qos ADD TS payload to AP
In a packet capture:
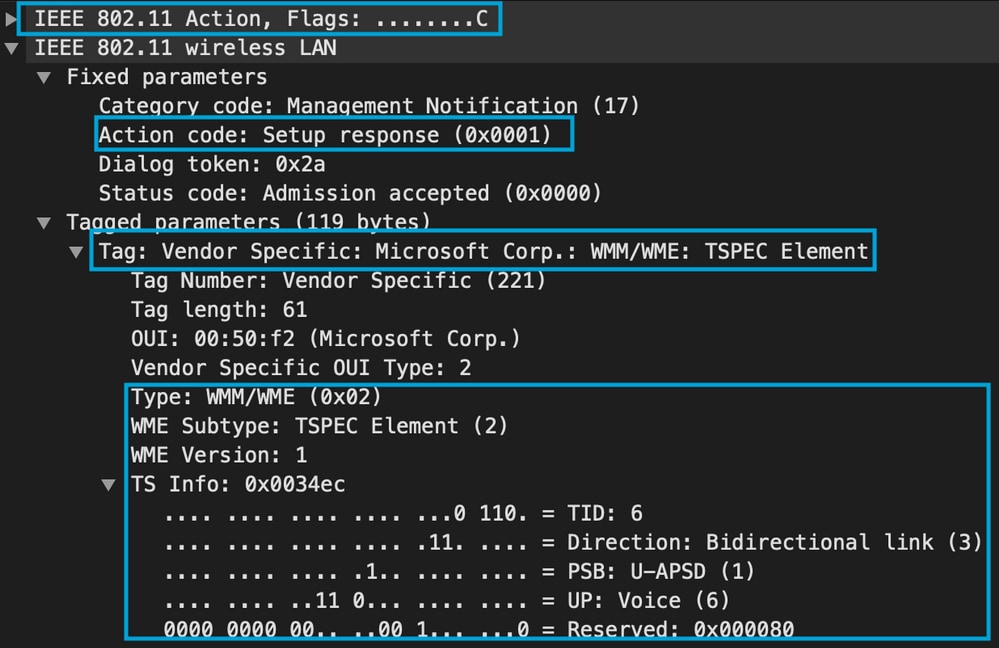
After that, the call is established through SIP with the call manager and RTP traffic is forwarded.

RTP packets:

Then, the 8821 informs the call manager that the call is terminated, and it notifies the WLC that is no longer using queue 6 by sending another Action Frame:
2019/08/25 18:54:08.510 {wncd_x_R0-0}{1}: [ewlc-qos-voice] [18106]: (info): MAC: 0027.902a.ab24 Got action frame from this client.
2019/08/25 18:54:08.510 {wncd_x_R0-0}{1}: [ewlc-qos-voice] [18106]: (info): MAC: 0027.902a.ab24 Received Action frame with code 2: DELTS request
2019/08/25 18:54:08.510 {wncd_x_R0-0}{1}: [ewlc-qos-voice] [18106]: (info): MAC: 0027.902a.ab24 DEL TS from mobile slot_id 1up = 6, tid = 6, bw deleted = 653
2019/08/25 18:54:08.510 {wncd_x_R0-0}{1}: [ewlc-qos-voice] [18106]: (info): MAC: 0027.902a.ab24 Call Terminated for tspec client
2019/08/25 18:54:08.510 {wncd_x_R0-0}{1}: [ewlc-qos-voice] [18106]: (info): MAC: 0027.902a.ab24 Calls in progress - 1, Roam calls in progress - 0
2019/08/25 18:54:08.510 {wncd_x_R0-0}{1}: [ewlc-qos-voice] [18106]: (info): MAC: 0027.902a.ab24 Build DELETE TS slot:1 tid:6 up:6 upsd_enable:1 avail_bw: 0
2019/08/25 18:54:08.510 {wncd_x_R0-0}{1}: [ewlc-qos-voice] [18106]: (info): MAC: a023.9f86.52c0 send qos DELETE TS payload to AP
SIP termination and Action Frame:

Revision History
| Revision | Publish Date | Comments |
|---|---|---|
3.0 |
24-Sep-2024 |
Added a note about SIP CAC |
2.0 |
08-Nov-2021 |
Removed the mention of Traffic Stream Metrics which are not supported |
1.0 |
08-Sep-2021 |
Initial Release |
Contributed by Cisco Engineers
- Andres SilvaCisco TAC
- Nicolas DarchisCisco TAC
Contact Cisco
- Open a Support Case

- (Requires a Cisco Service Contract)
 Feedback