Introduction
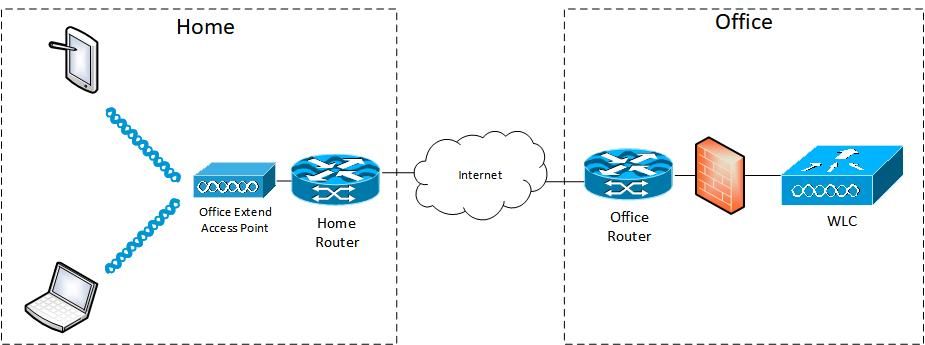
This document describes how to configure an indoor access point (AP) as a FlexConnect Office Extend (OEAP) and how to enable split tunneling so that you can define what traffic could be switched locally at the home office and what traffic must be switched centrally at the WLC.
Prerequisites
Requirements
The configuration on this document assumes that the WLC is already configured in a DMZ with NAT enabled and that the AP is able to join the WLC from the home office.
Components Used
The information in this document is based on these software and hardware versions:
- Wireless LAN Controllers 9800 running Cisco IOS-XE 17.3.1 Software.
- Wave1 APs: 1700/2700/3700.
- Wave2 APs: 1800/2800/3800/4800, and Catalyst 9100 series.
The information in this document was created from the devices in a specific lab environment. All of the devices used in this document started with a cleared (default) configuration. If your network is live, ensure that you understand the potential impact of any command.
Overview
A Cisco OfficeExtend Access Point (Cisco OEAP) provides secure communications from a Cisco WLC to a Cisco AP at a remote location, seamlessly extending the corporate WLAN over the Internet to an employee’s residence. The user’s experience at the home office is exactly the same as it would be at the corporate office. Datagram Transport Layer Security (DTLS) encryption between the access point and the controller ensures that all communications have the highest level of security. Any indoor AP in FlexConnect mode can act as an OEAP.
Background Information
FlexConnect refers to the capability of an Access Point (AP) to handle wireless clients while operating on remote locations, for example, over a WAN. They can also decide whether the traffic from the wireless clients is put directly on the network at the AP level (Local switching) or if the traffic is centralized to the 9800 controller (Central Switching) and sent back over the WAN, on a per WLAN basis.
Please check this document Understand FlexConnect on Catalyst 9800 Wireless Controller for detailed information about FlexConnect.
OEAP mode is an option available in a FlexConnect AP, to allow additional functionality, for example, a personal local SSID for home access, and also can provide split tunneling feature, for a greater granulatiry to define what traffic must be switched locally at the home office and what traffic must be switched centrally at the WLC, over a single WLAN
Configure
Network Diagram
Configurations
Defining an Access Control List for Split Tunneling
Step 1. Choose Configuration > Security > ACL. Select Add.
Step 2. In the Add ACL Setup dialog box, enter the ACL Name, choose the ACL type from the ACL Type drop-down list and under the Rules settings, enter the Sequence number. Then choose the Action as either permit or deny.
Step 3. Choose the required source type from the Source Type drop-down list.
If you choose the source type as Host, then you must enter the Host Name/IP.
If you choose the source type as Network, then you must specify the Source IP address and Source Wildcard mask.
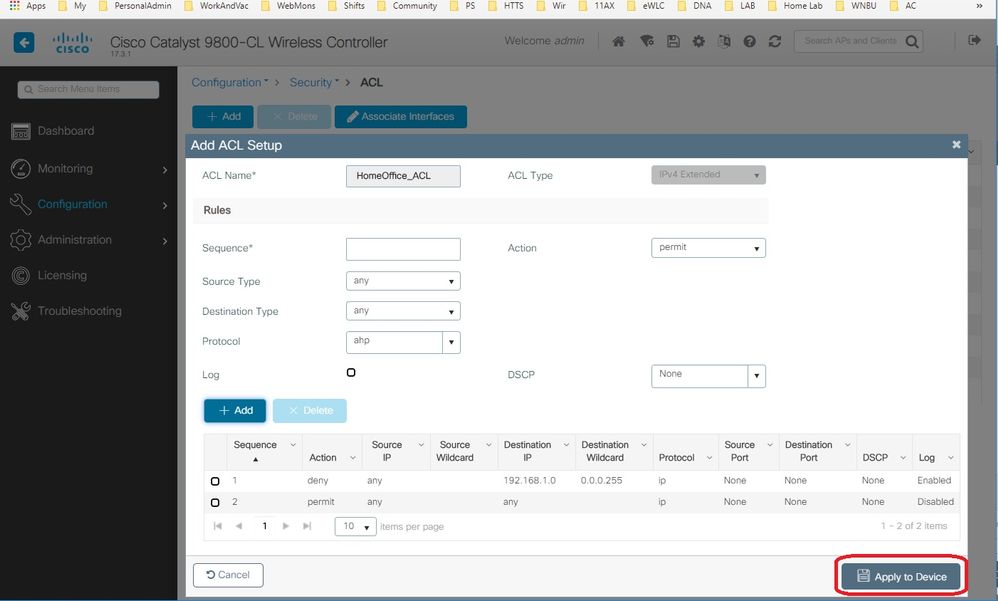
In this example, all traffic from any host to subnet 192.168.1.0/24 is centrally switched (deny) and all the rest of the traffic is locally switched (permit).
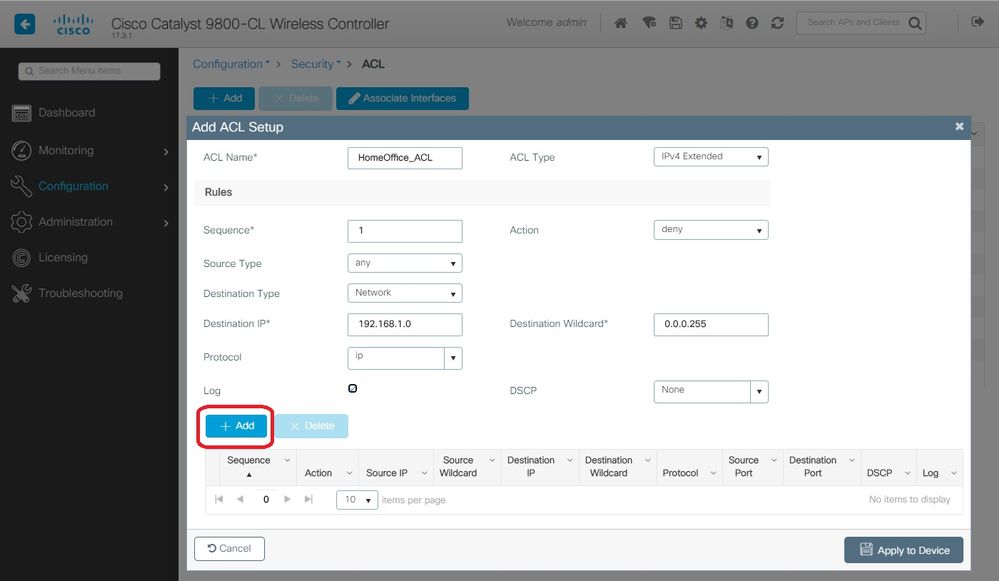
Step 4. Check the Log check box if you want the logs, and select Add.
Step 5. Add the rest of the rules and select Apply to Device.
Linking an ACL Policy to the Defined ACL
Step 1. Create a new Flex Profile. Go to Configuration > Tags & Profiles > Flex. select Add.
Step 2. Enter a Name and enable OEAP. Also, make sure the native VLAN ID is the one in the AP switchport.
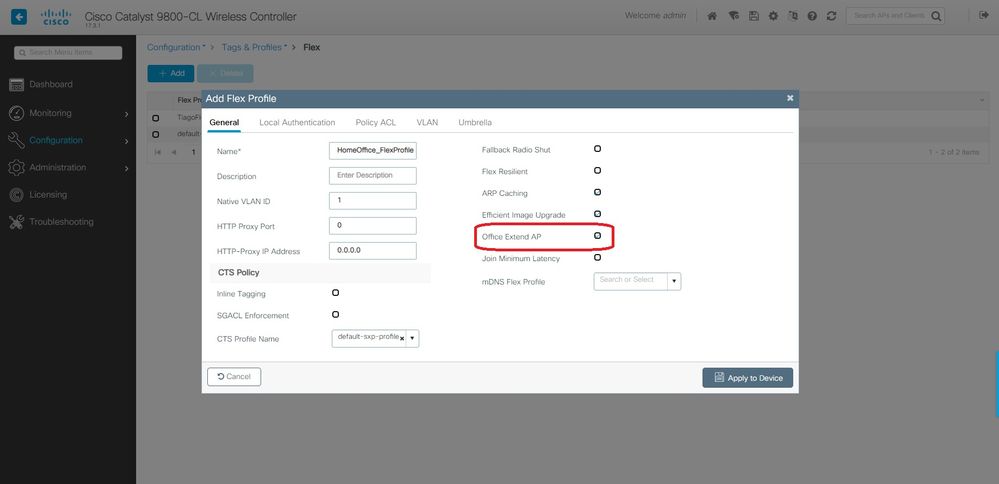
Note: When you enable Office-Extend Mode, the Link-Encryption is also enabled by default and cannot be changed even if you disable Link Encryption in the AP Join Profile.
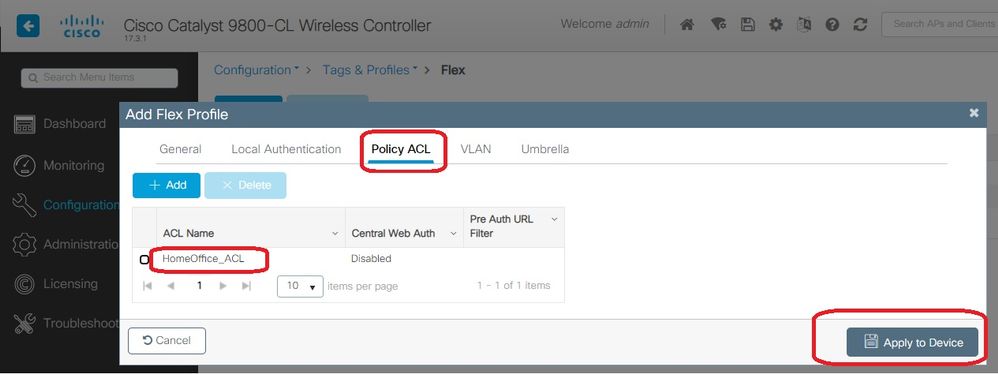
Step 3. Move to the Policy ACL tab and select Add. Here add the ACL to the Profile and Apply to Device.
Configuring a Wireless Profile Policy and a Split MAC ACL Name
Step 1. Create a WLAN Profile. In this example, its used an SSID named HomeOffice with WPA2-PSK security.
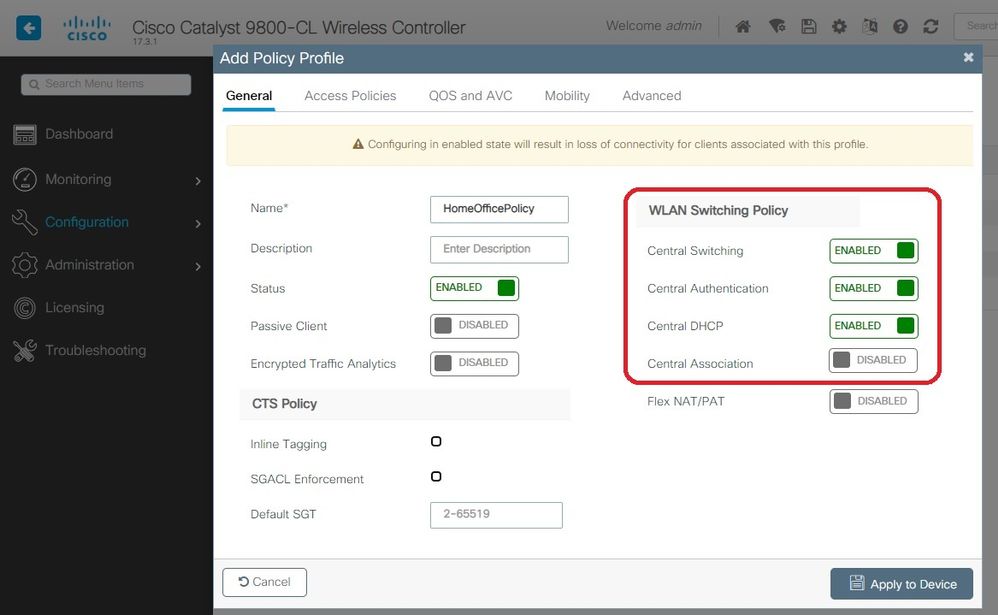
Step 2. Create a Policy Profile. Go to Configuration > Tags > Policy and select Add. Under General, make sure this profile is centrally switched policies as shown in this example:
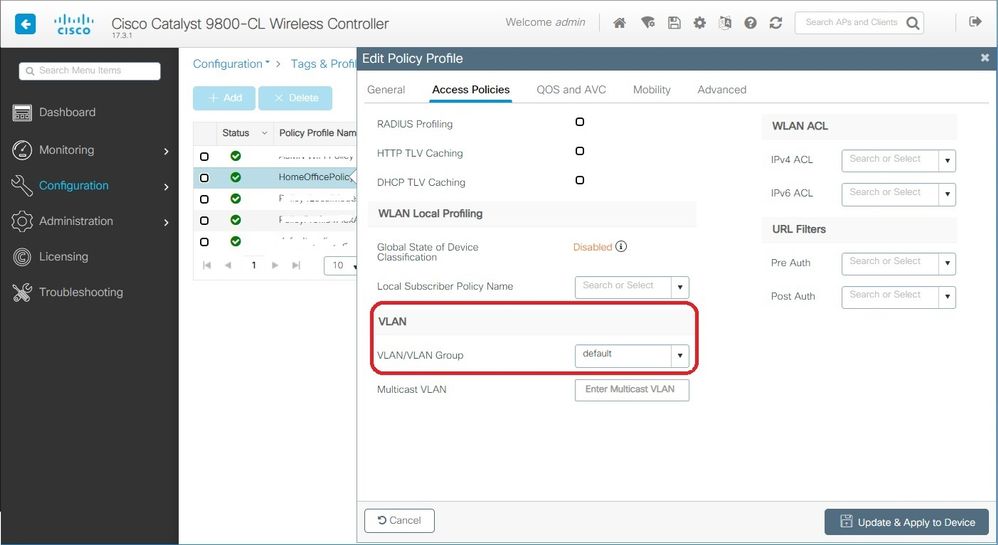
Step 3. Inside the Policy Profile, go to Access Policies and define the VLAN for the traffic to be centrally switched. The clients get an IP address in the subnet assigned to this VLAN.
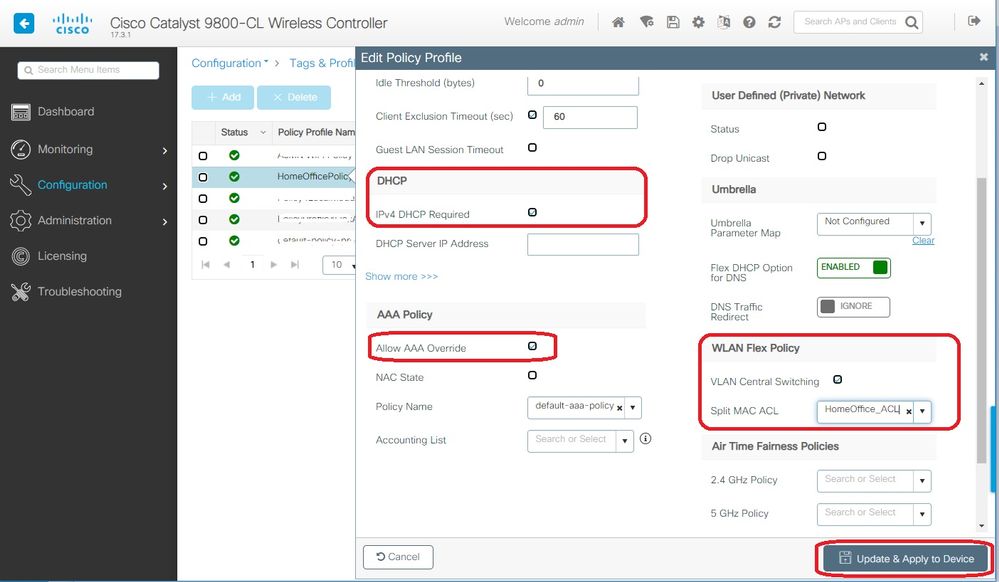
Step 4. To configure local split tunneling on an AP, you need to ensure that you have enabled DCHP Required on the WLAN. This ensures that the client that is associating with the split WLAN does DHCP. You can enable this option in the Policy Profile under Advanced tab. Enable the check box IPv4 DHCP Required. Under the WLAN Flex Policy setttings, choose the split MAC ACL created before, from the Split MAC ACL drop-down list. Select Apply to Device:
Note: Apple iOS clients need option 6 (DNS) to be set in DHCP offer for split tunneling to work.
Mapping a WLAN to a Policy Profile
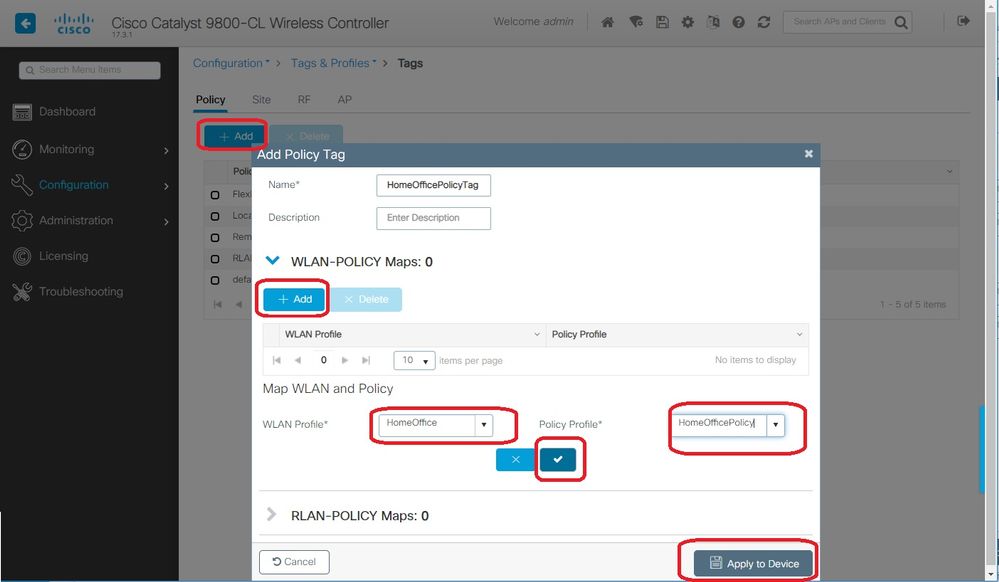
Step 1. Choose Configuration > Tags & Profiles > Tags. In the Policy tab select Add.
Step 2. Enter the Name of the Tag Policy and under WLAN-POLICY Maps tab, select Add.
Step 3. Choose the WLAN profile from the WLAN Profile drop-down list and choose the Policy profile from the Policy Profile drop-down list. Select the Tick Icon and then Apply to Device.
Configuring an AP Join Profile and association with Site Tag
Step 1. Navigate to Configuration > Tags & Profiles > AP Join and select Add. Enter a Name. Optionally you can enable SSH to allow for troubleshooting and later on disable it if not needed.
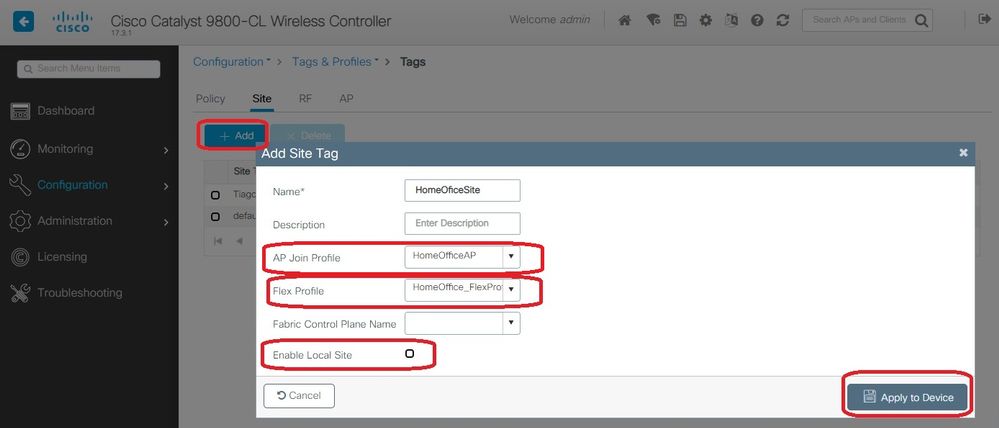
Step 2. Choose Configuration > Tags & Profiles > Tags. In the Site tab select Add.
Step 3. Enter the Name of the site tag, uncheck Enable Local Site, and then select the AP Join Profile and Flex Profile (created before) from the drop-down lists. Then Apply to Device.
Attaching a Policy Tag and Site Tag to an Access Point
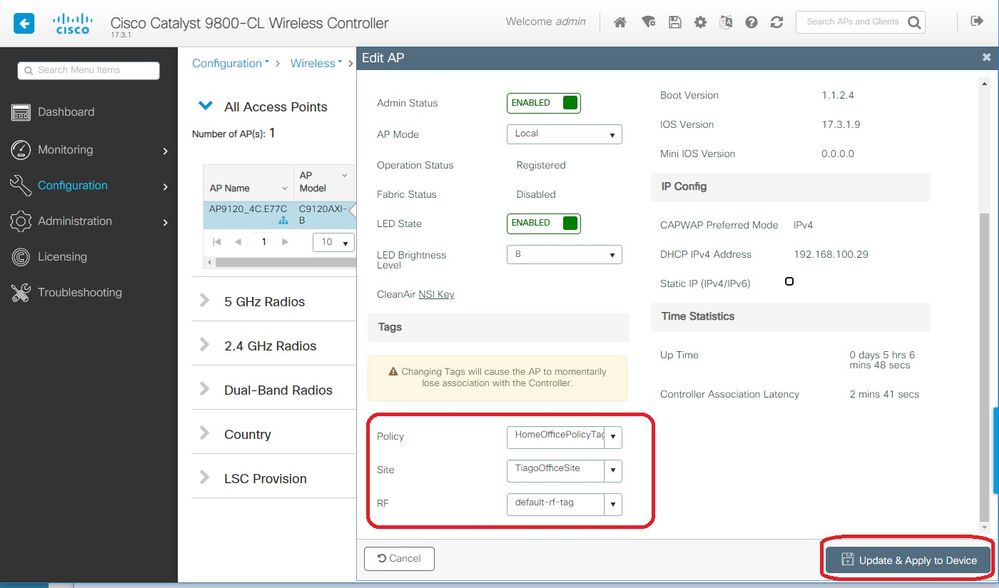
Option 1. This option requires you to configure 1 AP at a time. Go to Configuration > Wireless > Access Points. Select the AP you want to move to the Home Office and then select the Home Office Tags. Select Update and Apply to Device:
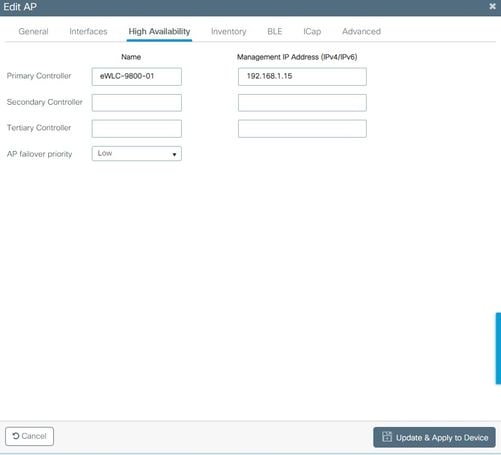
It's also recomended to configure a Primary Controller so that the AP knows the IP/Name of the WLC to reach once it is deployed in the Home Office. You can do this editing the AP directly going to High Availability tab:
Option 2. This option allows you to configure multiple APs simultaneously. Navigate to Configuration > Wireless Setup > Advanced > Tag APs. Select the Tags created previously and select Apply to Device.

The APs reboot and rejoin the WLC with the new settings.
Verify
You can verify the configuration via GUI or CLI. This is the resulting configuration in CLI:
!
ip access-list extended HomeOffice_ACL
1 deny ip any 192.168.1.0 0.0.0.255 log
2 permit ip any any log
!
wireless profile flex HomeOffice_FlexProfile
acl-policy HomeOffice_ACL
office-extend
!
wireless profile policy HomeOfficePolicy
no central association
aaa-override
flex split-mac-acl HomeOffice_ACL
flex vlan-central-switching
ipv4 dhcp required
vlan default
no shutdown
!
wireless tag site HomeOficeSite
flex-profile HomeOffice_FlexProfile
no local-site
!
wireless tag policy HomeOfficePolicyTag
wlan HomeOffice policy HomeOfficePolicy
!
wlan HomeOffice 5 HomeOffice
security wpa psk set-key ascii 0 xxxxxxx
no security wpa akm dot1x
security wpa akm psk
no shutdown
!
ap 70db.98e1.3eb8
policy-tag HomeOfficePolicyTag
site-tag HomeOficeSite
!
ap c4f7.d54c.e77c
policy-tag HomeOfficePolicyTag
site-tag HomeOficeSite
!
Checking AP configuration:
eWLC-9800-01#show ap name AP3800_E1.3EB8 config general

Cisco AP Name : AP3800_E1.3EB8
=================================================

Cisco AP Identifier : 0027.e336.5a60
...
MAC Address : 70db.98e1.3eb8
IP Address Configuration : DHCP
IP Address : 192.168.1.99
IP Netmask : 255.255.255.0
Gateway IP Address : 192.168.1.254
...
SSH State : Enabled
Cisco AP Location : default location
Site Tag Name : HomeOficeSite
RF Tag Name : default-rf-tag
Policy Tag Name : HomeOfficePolicyTag
AP join Profile : HomeOfficeAP
Flex Profile : HomeOffice_FlexProfile
Primary Cisco Controller Name : eWLC-9800-01
Primary Cisco Controller IP Address : 192.168.1.15
...
AP Mode : FlexConnect
AP VLAN tagging state : Disabled
AP VLAN tag : 0
CAPWAP Preferred mode : IPv4
CAPWAP UDP-Lite : Not Configured
AP Submode : Not Configured
Office Extend Mode : Enabled
...
You can connect to the AP directly and also verify the configuration:
AP3800_E1.3EB8#show ip access-lists
Extended IP access list HomeOffice_ACL
1 deny ip any 192.168.1.0 0.0.0.255
2 permit ip any any
AP3800_E1.3EB8#show capwap client detailrcb
SLOT 0 Config

SSID : HomeOffice
Vlan Id : 0
Status : Enabled
...
otherFlags : DHCP_REQUIRED VLAN_CENTRAL_SW
...
Profile Name : HomeOffice
...
AP3800_E1.3EB8#show capwap client config
AdminState : ADMIN_ENABLED(1)
Name : AP3800_E1.3EB8
Location : default location
Primary controller name : eWLC-9800-01
Primary controller IP : 192.168.1.15
Secondary controller name : c3504-01
Secondary controller IP : 192.168.1.14
Tertiary controller name :
ssh status : Enabled
ApMode : FlexConnect
ApSubMode : Not Configured
Link-Encryption : Enabled
OfficeExtend AP : Enabled
Discovery Timer : 10
Heartbeat Timer : 30
...
Here is an example of packet captures showing traffic beeing switched locally. Here the test done was a "ping" from a client with IP 192.168.1.98 to the Google DNS server and then to 192.168.1.254. You can see the ICMP sourced with the IP of the AP IP address 192.168.1.99 sent to the Google DNS due to the AP NATing the traffic locally. There is no icmp to 192.168.1.254 because the traffic goes encrypted in the DTLS tunnel and only Application Data Frames are seen.
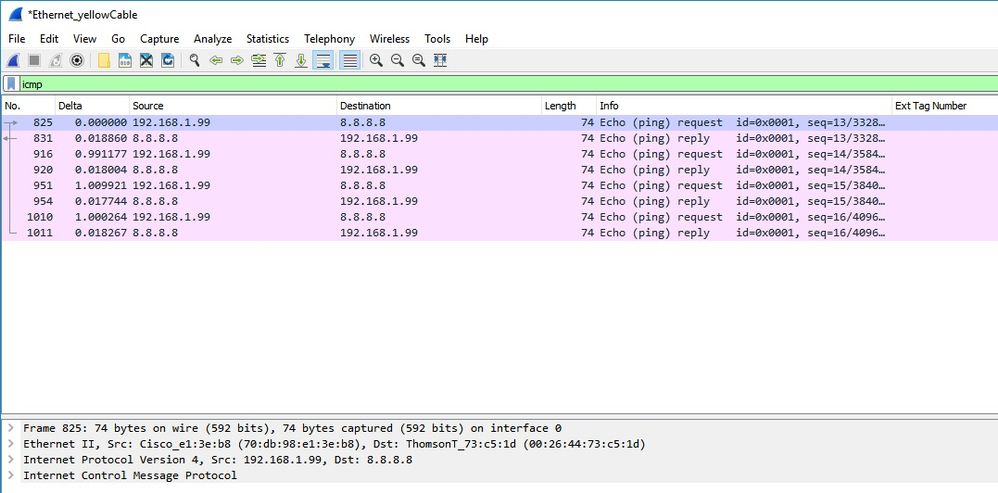
Note: The traffic that is locally switched is NATed by the AP because in normal scenarios, the client subnet belongs to the Office network and the local devices at home office do not know how to reach the client subnet. The AP translates the client traffic using the AP ip address that is in the local home office subnet.
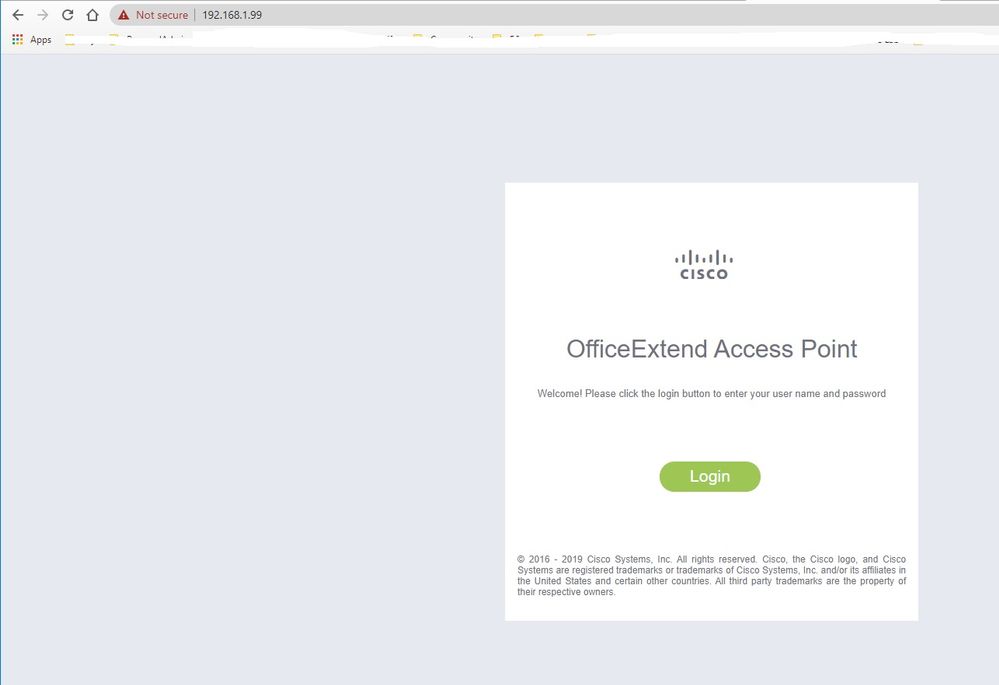
You can access the OEAP GUI opening a browser and typing in the URL the AP ip address. The default credentials are admin/admin and you must change them at initial login.
Once you login, you have access to the GUI:
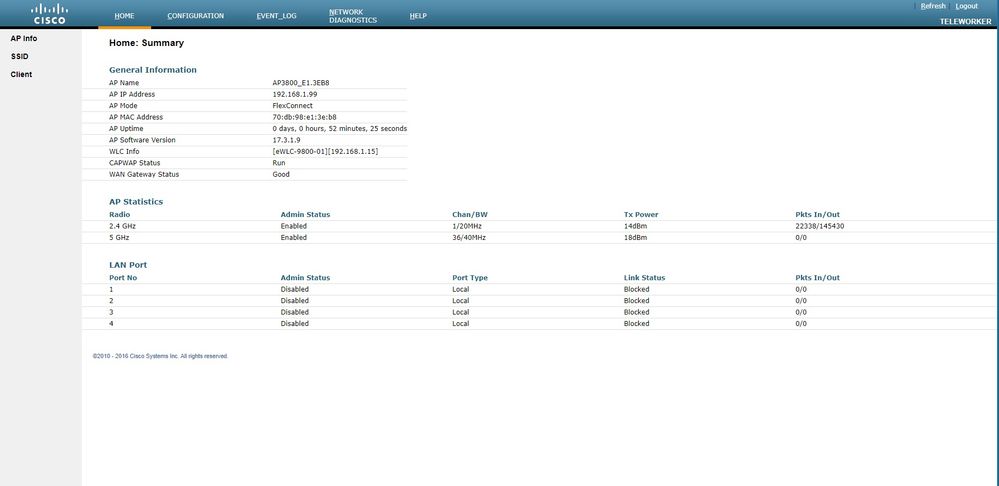
You have access to typical info in an OEAP, like AP info, SSIDs and Clients connected:

Related Documentation
Understand FlexConnect on Catalyst 9800 Wireless Controller
Split Tunneling for FlexConnect
Configure OEAP and RLAN on Catalyst 9800 WLC


 Feedback