Introduction
This document describes how to create a custom web authentication portal for the Catalyst 9800 Wireless Controller (9800 WLC).
Prerequisites
The source code is easy to edit and has a responsive WEB design, compatible with modern web browsers on computers and mobile devices.
Requirements
Cisco recommends that you have knowledge of these topics:
- HTML and CSS
- 9800 WLC configuration guide
Components Used
The information in this document is based on this software and hardware version:
- Cisco Catalyst 9800 Wireless Controller series, Cisco IOS® XE Gibraltar v16.12.1s
The information in this document was created from the devices in a specific lab environment. All of the devices used in this document started with a cleared (default) configuration. If your network is live, ensure that you understand the potential impact of any command.
Customize the Web Portal Files
The files that compose the custom web authentication portal are:
- log in.html
- bootstrap.min.css
- Jquery.min.js
- style.css
- animate.css
- web_auth_logo.png
Only these files would need edit:
- log in.html
- style.css
- web_auth_logo.png
This is the source code for the web authentication portal (log in.html)
Note: Read the code carefully, it has HTML comments that explain the structure of the web authentication portal.
<!DOCTYPE html>
<html lang="en">
<head>
	<meta charset="utf-8">
	<meta name="viewport" content="width=device-width, initial-scale=1">
	<title>YOUR COMPANY TITLE HERE</title>
	<script src="jquery.min.js"></script>
        <link rel="stylesheet" href="bootstrap.min.css">
        <link rel="stylesheet" href="animate.css">
<link rel="stylesheet" href="style.css" >
	<script>
		function submitAction(){
		      var link = document.location.href;
		      var searchString = "redirect=";
		      var equalIndex = link.indexOf(searchString);
		      var redirectUrl = "";

		      if (document.forms[0].action == "") {
		      var url = window.location.href;
		      var args = new Object();
		      var query = location.search.substring(1);
		      var pairs = query.split("&");
		          for(var i=0;i<pairs.length;i++){
		              var pos = pairs[i].indexOf('=');
		              if(pos == -1) continue;
		              var argname = pairs[i].substring(0,pos);
		              var value = pairs[i].substring(pos+1);
		              args[argname] = unescape(value);
		          }
		          document.forms[0].action = args.switch_url;
		      }
		      if(equalIndex >= 0) {
		            equalIndex += searchString.length;
		            redirectUrl = "";
		            redirectUrl += link.substring(equalIndex);
		      }
		      if(redirectUrl.length > 255)
		      redirectUrl = redirectUrl.substring(0,255);
		      document.forms[0].redirect_url.value = redirectUrl;
		      document.forms[0].buttonClicked.value = 4;
		      document.forms[0].submit();
		}

		function loadAction(){
		     var url = window.location.href;
		     var args = new Object();
		     var query = location.search.substring(1);
		     var pairs = query.split("&");
		     for(var i=0;i<pairs.length;i++){
		          var pos = pairs[i].indexOf('=');
		          if(pos == -1) continue;
		          var argname = pairs[i].substring(0,pos);
		          var value = pairs[i].substring(pos+1);
		          args[argname] = unescape(value);
		     }


		     document.forms[0].action = args.switch_url;

		     // This is the status code returned from webauth log in action
		     // Any value of status code from 1 to 5 is error condition and user
		     // should be shown error as below or modify the message as it suits
		     // the customer

		     if(args.statusCode == 1){
		        alert("You are already logged in. No further action is required on your part.");
		     }
		     else if(args.statusCode == 2){
		        alert("You are not configured to authenticate against web portal. No further action is required on your part.");
		     }
		     else if(args.statusCode == 3){
		        alert("The username specified cannot be used at this time. Perhaps the user is already logged into the system?");
		     }
		     else if(args.statusCode == 4){
		        alert("Wrong username and password. Please try again.");
		     }
		     else if(args.statusCode == 5){
		        alert("The User Name and Password combination you have entered is invalid.  Please try again.");
		     }
		}

		</script>
</head>
<body class="animated fadeInUp">

<!-- TOP BAR -->
<nav class="navbar navbar-expand-md sticky-top navbar-light bg-dark ">
	<img src="web_auth_logo.png" style="width: 70px; height: 70px;">
<div class="container">
	<h4 class="align-middle text-white">Your Company Name Here</h4>
</div>
</nav>
<!-- END TOP BAR -->

<div class="bg"> <!---Background color -->

<div class="container-fluid padding "><!--- page content -->
	<div class="row padding">
		<div class="col-md-12 col-lg-6">
                <br>
                <h5>Accessing Company Public Network From Your Wireless Device</h5>
		<p class="text-justify">The Company provides Internet access points at no charge in selected areas for guests with portable
                computers or devices capable of receiving wireless signals.
                You can access the Internet from your wireless device when sitting within range of an access point.
                Guests are expected to use the wireless access in a legal and responsible manner. By using this wireless access network, the
                user  acknowledges that he/she is subject to, and agrees to abide by all laws, and all state and federal rules and regulations
                applicable to Internet use.
                </p>
                <br>
		<h5>Terms and Conditions of Use</h5>
		<p class="text-justify">Guests need a notebook/laptop computer or other device equipped with a wireless card that supports the WiFi standard.
		The Company assumes no responsibility for the safety of equipment.</p>
                <br>
                <br>
                <div class="card mx-auto" style="width: 350px;"> <!--Form container-->
		    <h5 class="card-header info-color white-text text-center py-4">
			<strong>Sign in</strong>
		    </h5>
		    <div class="card-body px-lg-5 pt-0"><!--Form content-->
		    <!-- Form -->
		    <form class="text-center" style="color: #757575;" method="post">
		        <input TYPE="hidden" NAME="buttonClicked" SIZE="16" MAXLENGTH="15" value="0">
                        <input TYPE="hidden" NAME="redirect_url" SIZE="255" MAXLENGTH="255" VALUE="">
                        <input TYPE="hidden" NAME="err_flag" SIZE="16" MAXLENGTH="15" value="0">
			<!-- Username input -->
			<div class="md-form"><br>
			    <label for="materiallog inFormEmail">Username</label>
			    <input type="TEXT" name="username" SIZE="25" MAXLENGTH="63" VALUE="" class="form-control" required>
		       </div><br><!-- End Username input -->
                       <!-- Password input-->
		       <div class="md-form">
		           <label for="materiallog inFormPassword">Password</label>
			   <input type="password" name="password" SIZE="25" MAXLENGTH="63" VALUE="" class="form-control" required>
                       </div><br><!-- End password input -->
		       <!-- Sign in button -->
		          <button class="btn btn-outline-info btn-rounded btn-block my-4 waves-effect z-depth-0" type="button" onclick="submitAction();">Sign in</button>
		    </form> <!-- End FORM -->
                    </div><!-- End Form content-->
                    </div><!--Form container-->
        </div>
	</div>
</div><!--- End page content -->
</div><!---End background color -->

</body>
</html>
In order to change the page, title edit this section:
...
  <title>YOUR COMPANY TITLE HERE</title>
...
In order to change the company logo, edit the img tag, use a .png or .svg image. To adjust the size of your logo, change the width and height parameters.
Note: .svg images with transparent background are recommended for a better look and feel.
<!-- TOP BAR -->
<nav class="navbar navbar-expand-md sticky-top navbar-light bg-dark ">
	<img src="web_auth_logo.png" style="width: 70px; height: 70px;">
<div class="container">
	<h4 class="align-middle text-white">Your Company Name Here</h4>
</div>
</nav>
<!-- END TOP BAR -->
In order to change page title background color, create your own class on the style.css file and replace bg-dark with your custom class:
<!-- TOP BAR -->
<nav class="navbar navbar-expand-md sticky-top navbar-light my-custom-bg-class">
<img src="web_auth_logo.png" style="width: 70px; height: 70px;">
<div class="container">
<h4 class="align-middle text-white animated fadeInLeft slow">Your Company Name Here</h4>
</div>
</nav>
<!-- END TOP BAR -->
In order to change the background and text color of the page, change the bg class:
<div class="bg"> <!---Background color -->
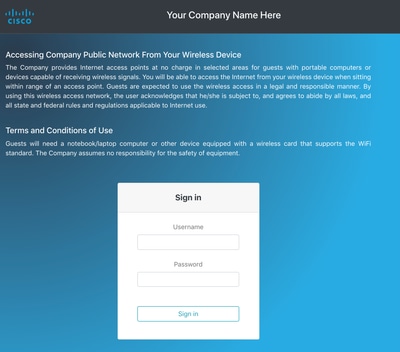
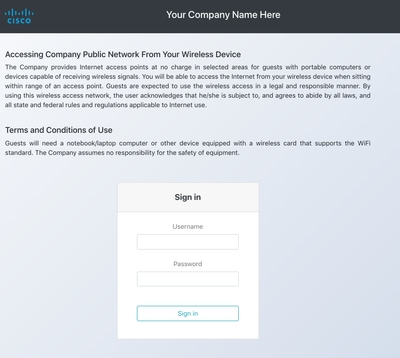
Here are the available classes, note that the background and text color change accordingly:
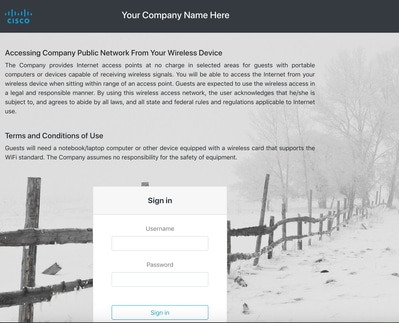
If you want to use an image as background or a different color on the style.css file, edit the CSS class bg-img and use it.
Caution: The background image cannot look properly on mobile devices because of its size, and the text can be difficult to read due to the image colors.
.bg-img{
   background-image: url("winter.jpg");
   height: 100%;
   background-position: center;
   background-repeat: no-repeat;
   background-size: cover;
}
The use of an image as the background looks like the next image:
The class bg5 looks like the next image:
The class bg6 looks like the next image:
In order to change the page content with your own terms and conditions, edit this section:
    <h5>Accessing Company Public Network From Your Wireless Device</h5>
    <p class="text-justify">The Company provides Internet access points at no charge in selected areas for guests with portable
    computers or devices capable of receiving wireless signals.
    You are able to access the Internet from your wireless device when sitting within range of an access point.
    Guests are expected to use the wireless access in a legal and responsible manner. By using this wireless access network, the
    user  acknowledges that he/she is subject to, and agrees to abide by all laws, and all state and federal rules and regulations
    applicable to Internet use.
    </p>
    <br>
    <h5>Terms and Conditions of Use</h5>
    <p class="text-justify">Guests need a notebook/laptop computer or other device equipped with a wireless card that supports the WiFi standard.
    The Company assumes no responsibility for the safety of equipment.</p>
    <br>
In order to level up the authentication portal, you can add animations without complexity. Edit the animation-name after the animated class. For this example, it used two animations. In order to see the available animations, visit animate.css:
...
<body class="animated fadeInUp">
...
<h4 class="align-middle text-white animated fadeInLeft slow">Your Company Name Here</h4>
...
This is the final look of the custom web authentication portal with animations. Choose the Result tab in order to see a live example.
Tip: You can easily edit the background colors and fonts as you want. Create a new class on the style.css file and use it.
Upload The Custom Web Authentication Portal to the 9800 WLC and Configure It
This section covers a step-by-step process on how to install and configure Custom WebAuth Bundle in Cat 9800.
1. Download the Wireless LAN Controller Web Authentication Bundle (WLC_WEBAUTH_BUNDLE_1.0.zip) from Cisco.com:
https://software.cisco.com/download/home/286316412/type/282791507/release/16.10.1
Note: The bundle is the same for all 9800 controllers. For example, you can download the file from the 9800-40 and use it for 9800-L or virtual 9800-CL
2. In order to customize the bundle, unzip the bundle to a folder. Open each HTML file that needs to be edited as explained previously, and you can upload the logo along with it. The file names are not important, you can call them anything you want.
After this step, delete the log in.tar file because you would need to generate a new one.
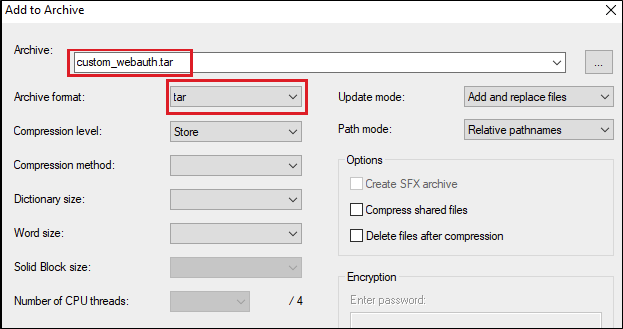
Choose all the files and right click, and choose 7-Zip (or any similar program you have installed) and choose to Add to archive…
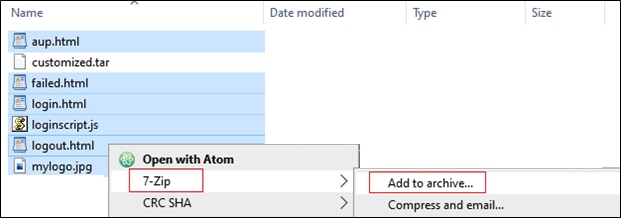
Give it any name and choose tar as the Archive format:
3. Then navigate to the 9800 WLC
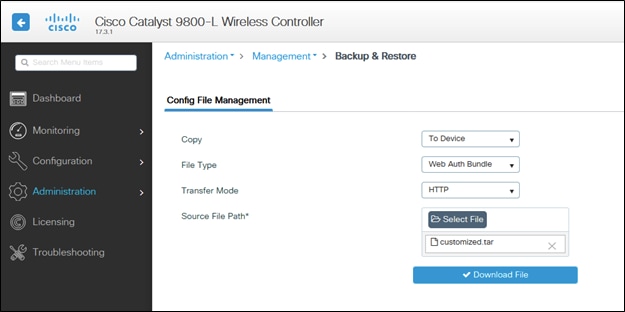
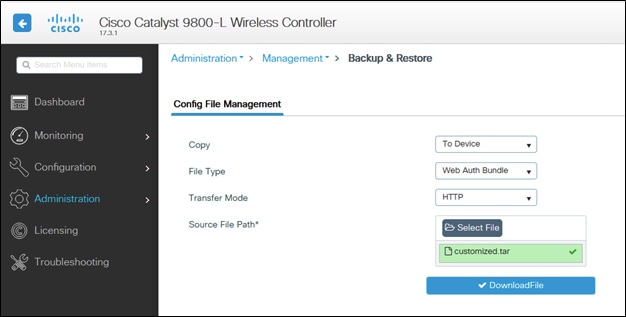
Administration > Management > Backup & Restore change the file type to Web Auth Bundle, and upload just the customized .tar file.
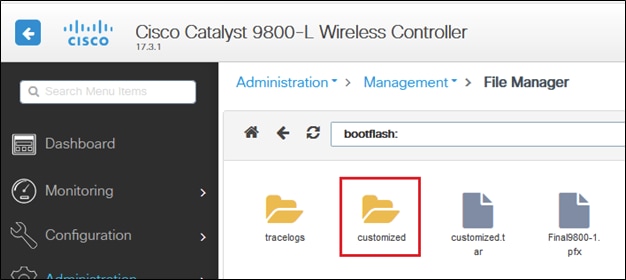
By default, the 9800 can create a folder inside the bootflash: call it whatever you called your .tar file, and all the files can be in that folder:
If you have HA setup, then you need to run 17.3 code (or future releases) because of this enhancement bug:
Cisco bug ID CSCvr05309 : copy webauth tar bundle to standby bootflash. Also, in case of HA setup.
To check on both HA (Active and Standby), if a file called customized.tar was uploaded.
9800-1#show bootflash: | s customized
9800-1#show stby-bootflash: | s customized
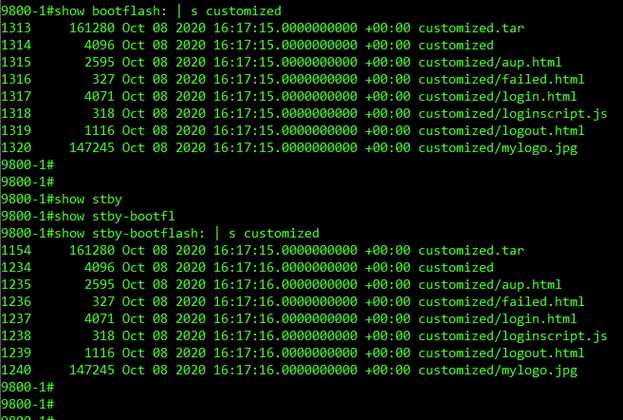
Note: The files that have been uploaded manually are not synced to the HA Standby.
Note: You do not need the success.html file to make custom webauth work. If you need that, you can simply create one and add it to the .tar file, and upload that tar file to the 9800 WLC.
4. Edit the WebAuth Global Parameter Map and set a virtual IP address. The omission of the virtual IP address can cause images not to display properly at the portal page.
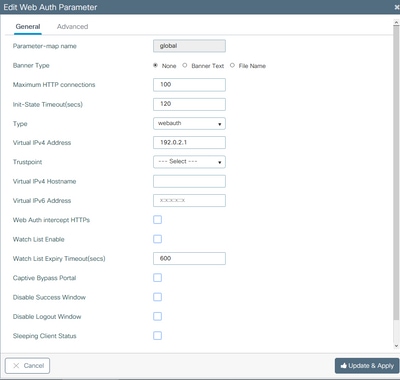
Note: Once the virtual IP address is set, wireless clients display the website warning on the browser because the controller virtual interface sends the URL via HTTPS. It is not trusted due to the absence of a signed certificate attached to it. In such case, use the procedure to generate a CSR and install a valid certificate.
Only if HTTPS is not required, these two commands can be run in order for the URL to be sent via HTTP only (these commands only exist in 17.3.1 and later):
#configure terminal
(config)#parameter-map type webauth global
(config-params-parameter-map)#secure-webauth-disable
(config-params-parameter-map)#webauth-http-enable
(config-params-parameter-map)#end
#write
5. Next step is to create a new Parameter Map. Navigate from 9800 GUI > Security > Web-Auth > Add.
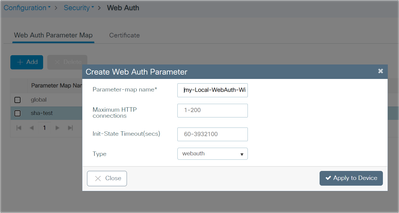
Once created, click the parameter map name to edit:
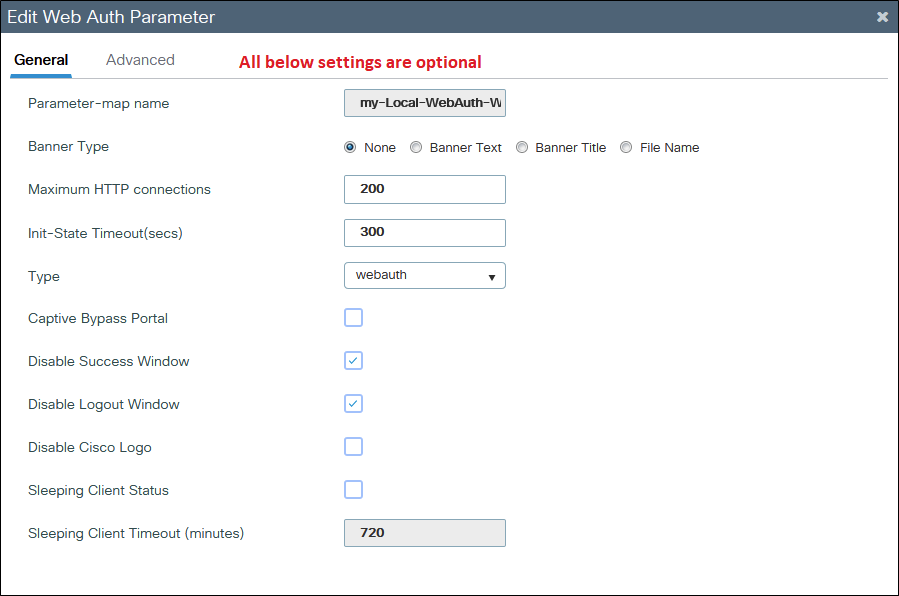
Check Disable Success Window to disable the 9800 default success page and not the success.html. If using both, the guest sees dual success pages, one from the 9800 default success page, and the other from the custom success.html.
Even if you disable all success pages (Disable Success Window and no success.html used), the mobile devices see the success page illustrated, while PCs see it for a second and then it goes away.
Example from iPhone:
 Web Auth Login
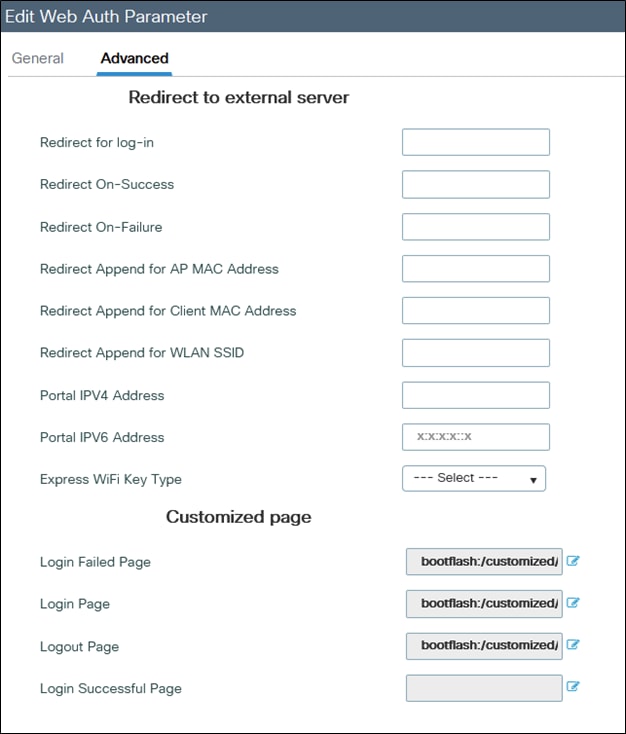
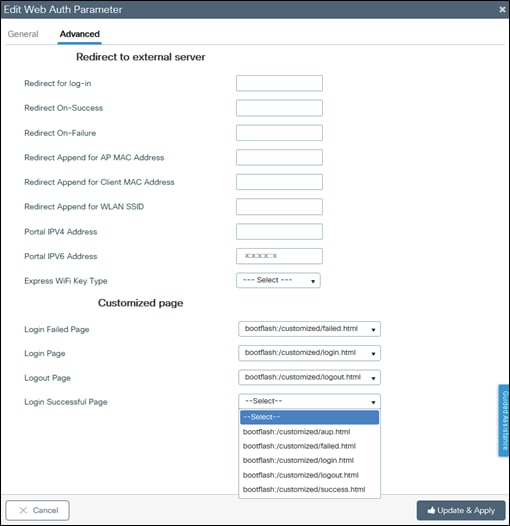
If you click on the blue icon beside any page, the 9800 tries to load that, and you can choose the pages as illustrated.
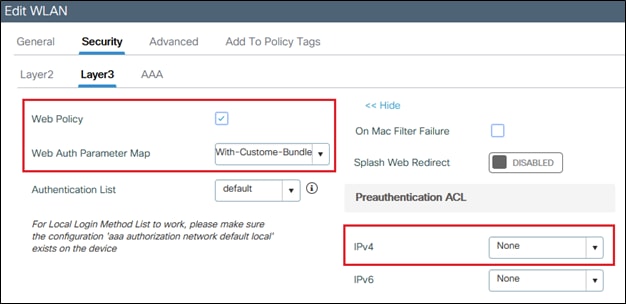
6. Next step is to tag the parameter map to the WLAN (Cat9800 GUI > Tags and Profiles > WLAN). In this example, the WLAN authenticates the guests from local 9800 guest accounts first, and then from ISE (RADIUS Server).
Note: AAA and pre-auth ACL configurations can be added in this step (optional).
Sample config for ISE or any RADIUS Server:
radius server ISE
address ipv4 x.x.x.x auth-port 1812 acct-port 1813
timeout 5
retransmit 3
automate-tester username dummy probe-on
key XXXXXXXXXXX
exit
aaa group server radius RADIUS-GROUP
server name ISE
exit
aaa authentication dot1x ISE-Method group RADIUS-GROUP
aaa authorization network ISE-Method group RADIUS-GROUP
aaa accounting identity default start-stop group RADIUS-GROUP
aaa authentication webauth default local group RADIUS-GROUP
end
Note: As evident from the last CLI command, local user authentication check happens first, then ISE/RADIUS. You can limit the authentication to local only, or to ISE/RADIUS only, or leave it as both. For example, the user is checked locally first, then, if it is not there, it is checked against RADIUS.
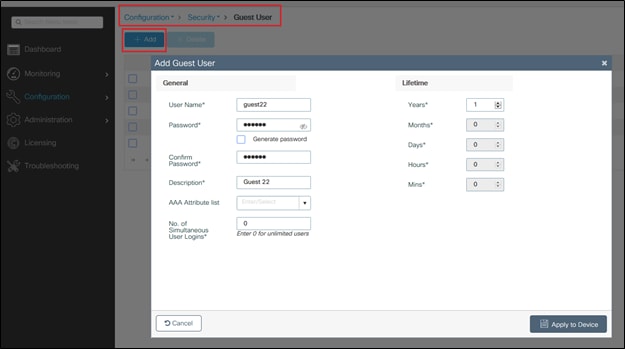
To add local guest users, navigate to Configuration > Security > Guest User.
Verify
On your computer, open the log in.html file with a web browser, and confirm that the animations and content are correct.
Troubleshoot
Ensure that all the files are not on subfolders when you upload them on the 9800 WLC, and that they do not have a different name.


 Feedback