Introduction
This document describes the configuration of an iPSK secured WLAN on a Cisco 9800 Wireless LAN Controller with Cisco ISE as a RADIUS server.
Prerequisites
Requirements
- Familiarity with the basic configuration of a WLAN on 9800
- Ablity to adapt the configuration to your deployment
Components Used
- Cisco 9800-CL WLC that runs 17.6.3
- Cisco ISE 3.0
The information in this document was created from the devices in a specific lab environment. All of the devices used in this document started with a cleared (default) configuration. If your network is live, ensure that you understand the potential impact of any command.
Understand what iPSK is and which scenarios it fits
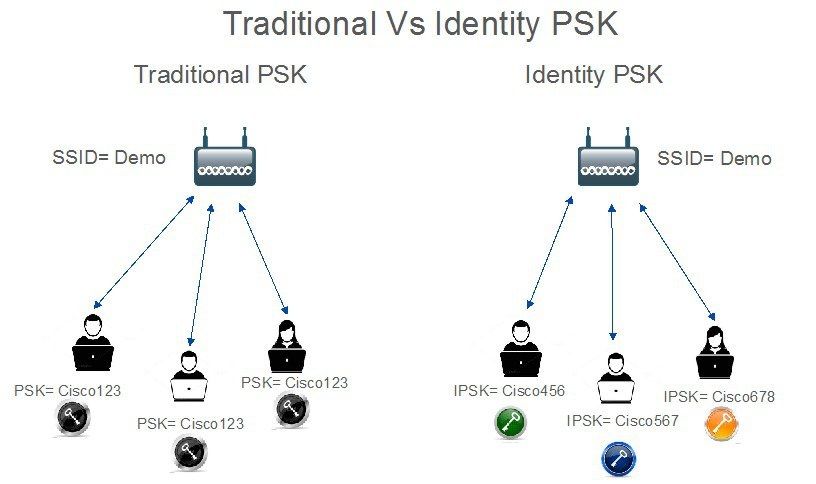
Traditional Pre-Shared Key (PSK) secured networks use the same password for all the connected clients. This can result in the key shared with unauthorized users causing a security breach and unauthorized access to the network. The most common mitigation of this breach is the change of the PSK itself. This impacts all users because many end devices need to be updated with the new key in order to access the network again.
With Identity PSK (iPSK), unique pre-shared keys are created for individuals or a group of users on the same SSID with the help of a RADIUS server. This kind of setup is extremely useful in networks where end-client devices do not support dot1x authentication, but a more secure and granular authentication scheme is needed. From a client perspective, this WLAN looks identical to the traditional PSK network. In the event of one of the PSKs is compromised, only the affected individual or group need to have their PSK updated. The rest of the devices connected to the WLAN are unaffected.
Configure 9800 WLC
Under Configuration > Security > AAA > Servers/Groups > Servers, add the ISE as RADIUS server:

Under Configuration > Security > AAA > Servers/Groups > Server Groups, create a RADIUS server group and add the previously created ISE server to it:

In the AAA Method List tab, create an Authorization list with Type “network” and the Group Type “group” pointing to the previously made RADIUS server group:

Setting up Accounting is optional, but can be done by configuring the Type to “identity” and pointing it to the same RADIUS server group:

This can also be performed through the command line using:
radius server <server_name>
 address ipv4 <ip_addr> auth-port 1812 acct-port 1813
 key 0 <shared_secret_key>

aaa group server radius <server_group_name>
 server name <server_name>

aaa authorization network <authz_method_name> group <server_group_name>
aaa accounting identity <acct_method_name> start-stop group <server_group_name>
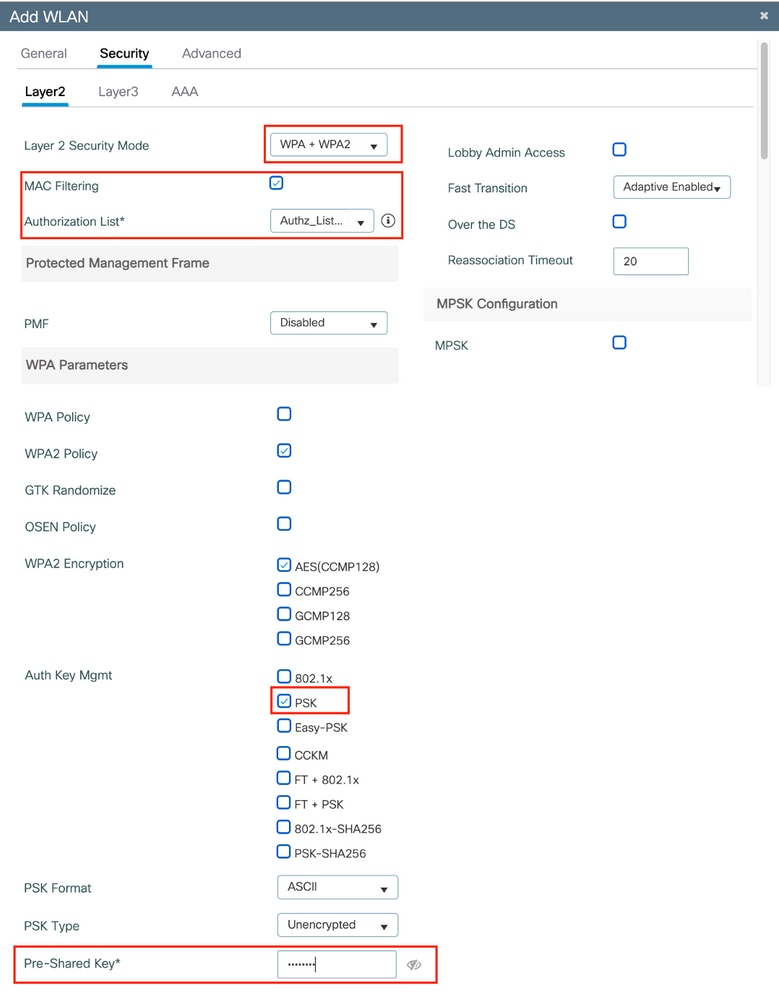
Under Configuration > Tags & Profiles > WLANs, create a new WLAN. Under Layer 2 configuration:
- Enable MAC filtering and set the Authorization List to the one previously created
- Under Auth Key Mgmt enable PSK
- The pre-shared key field can be filled with any value. This is done only to satisfy the requirement of the web interface design. No user is able to authenticate using this key. In this case the pre-shared key was set to “12345678”.
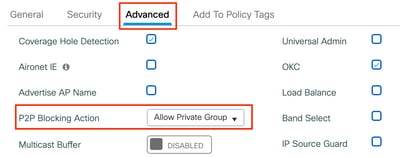
User segregation can be achieved under the Advanced tab. Setting it to Allow Private Group allows the users using the same PSK to communicate between each other, while the users using a different PSK are blocked off:
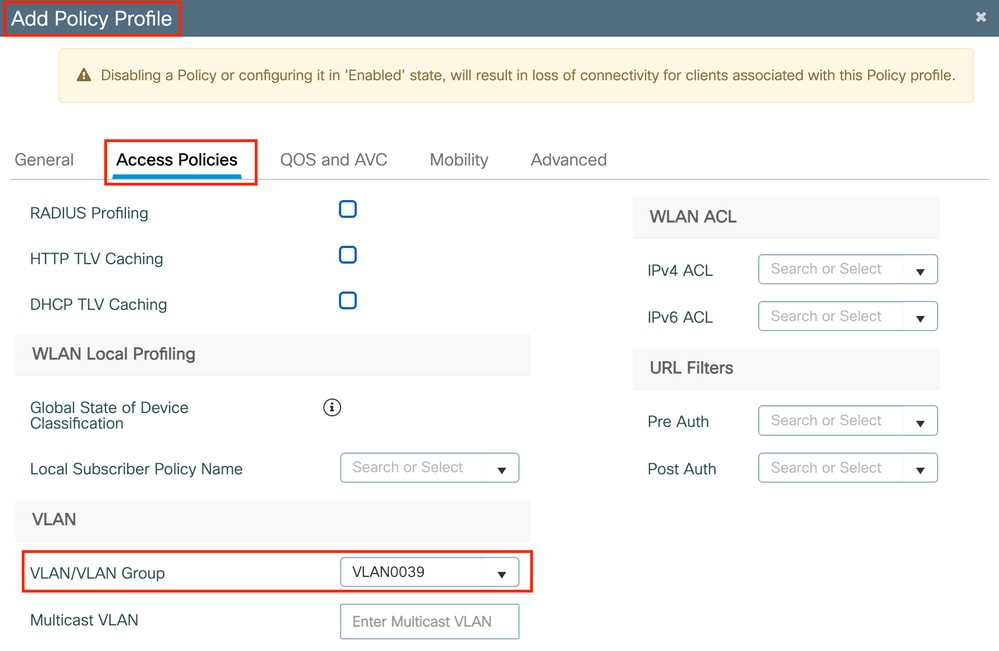
Under Configuration > Tags & Profiles > Policy, create a new Policy Profile. In the Access Policies tab, set the VLAN or VLAN group this WLAN is using:
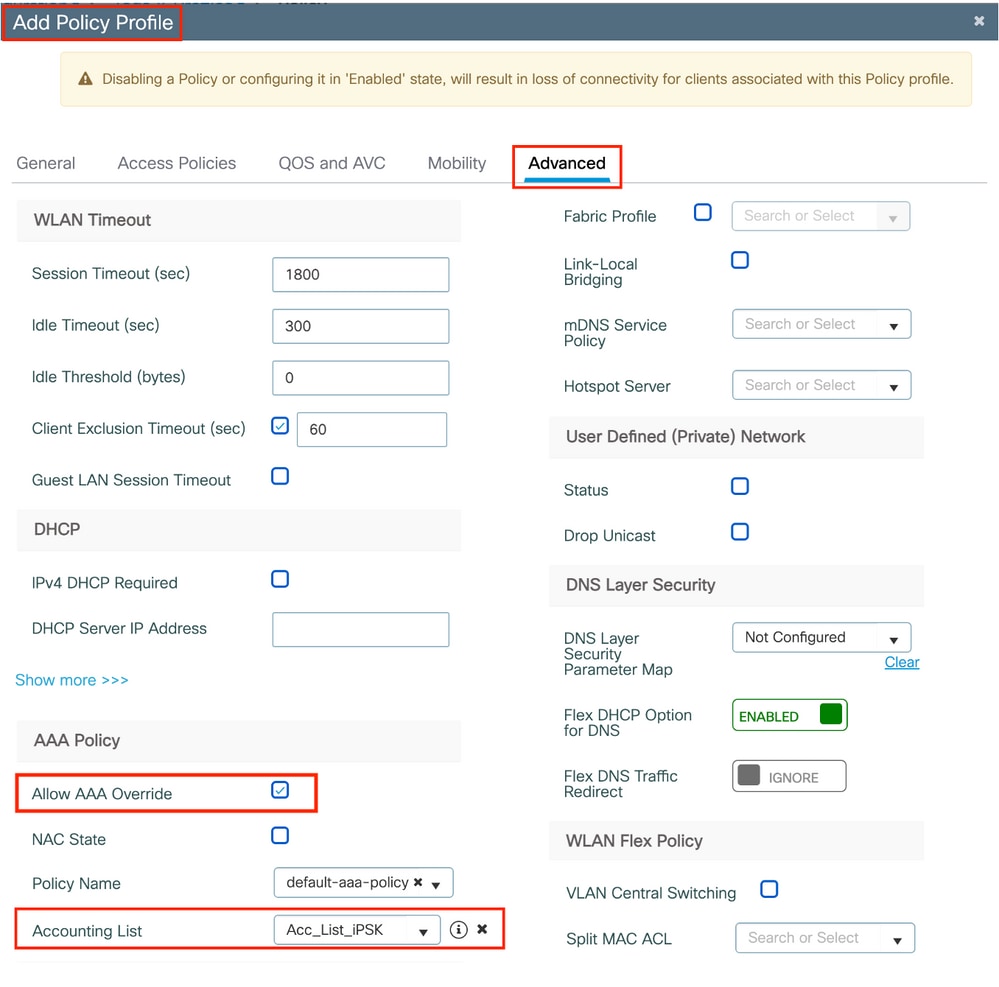
In the Advanced tab, enable AAA Override and add Accounting list if previously created:
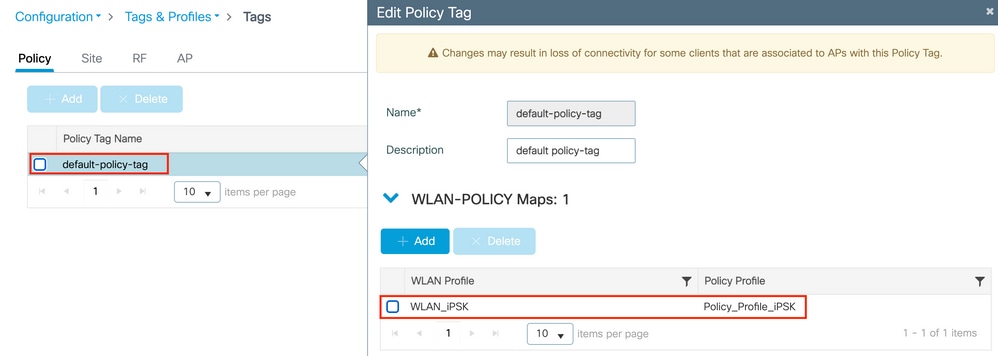
Under Configuration > Tags & Profiles > Tags > Policy, make sure that the WLAN is mapped to the Policy profile you created:
This can also be performed through the command line using:
wlan <wlan_name> <wlan_ID> <ssid_name>
 mac-filtering <authz_method_name>
 security wpa psk set-key ascii 0 <default_psk>
 no security wpa akm dot1x
 security wpa akm psk
 peer-blocking allow-private-group
 no shutdown

wireless profile policy <policy_name>
 aaa-override
 accounting-list <acct_method_name>
 vlan <vlan_name>
 no shutdown

wireless tag policy <policy_tag_name>
 wlan <wlan_name> policy <policy_name>
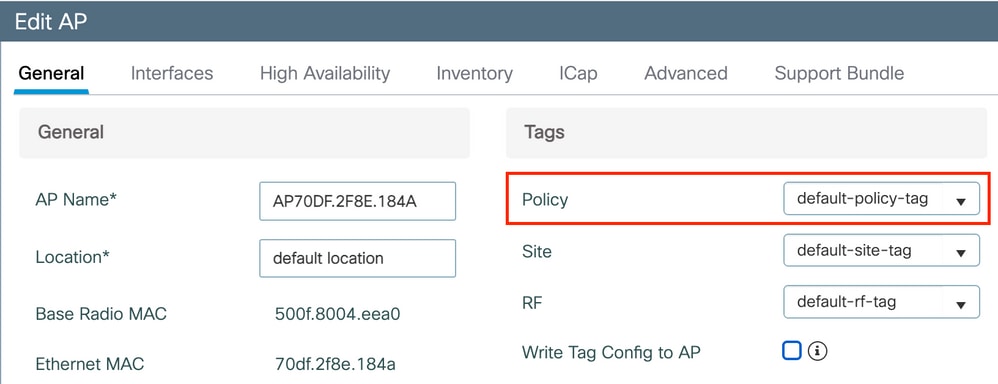
Under Configuration > Wireless > Access Points, make sure that this tag has been applied on the Access Points on which the WLAN has to be broadcasted:
ISE Configuration
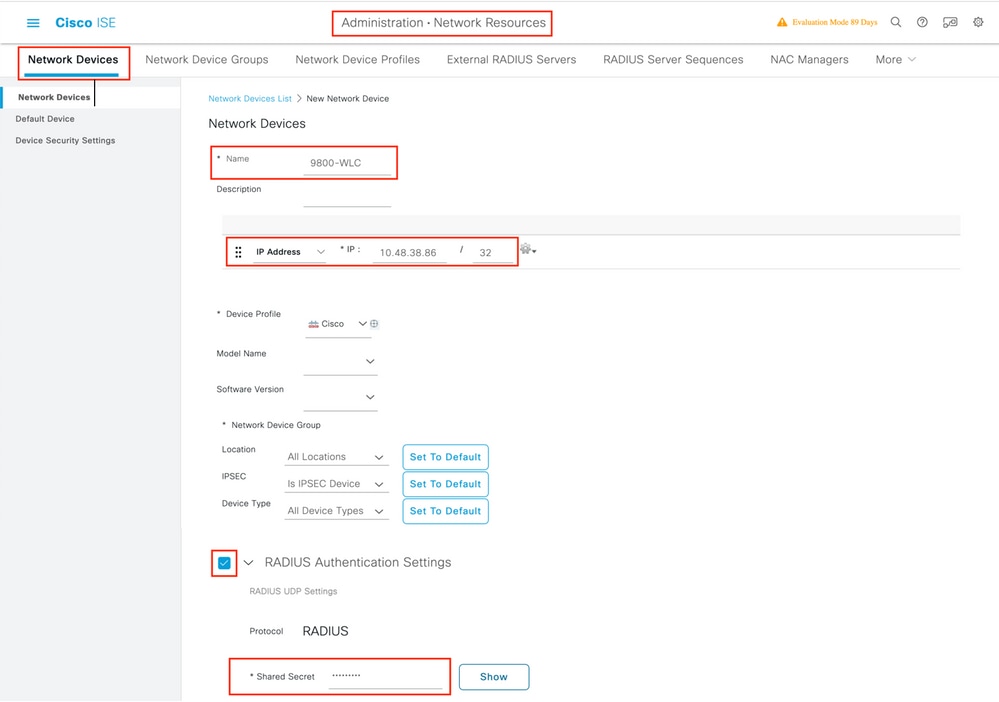
This config guide covers a scenario where the PSK of the device is determined based on the client MAC address. Under Administration > Network Resources > Network Devices, add a new device, specify the IP address, enable the RADIUS Authentication Settings and specify a RADIUS Shared Secret:
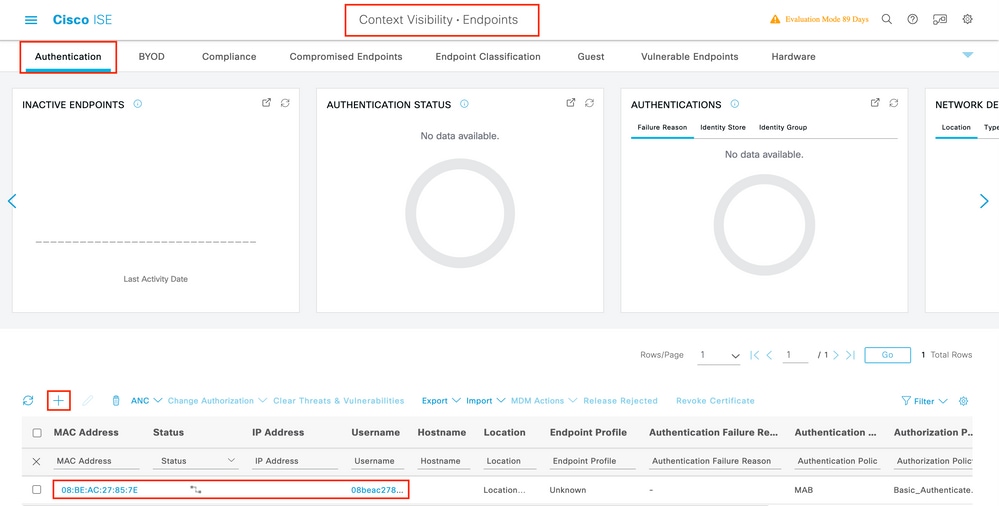
Under Context Visibility > Endpoints > Authentication, add the MAC addresses of all the devices (clients) that are connecting to the iPSK network:
Under Administration > Identity Management > Groups >Endpoint Identity Groups, create one or more groups and assign users to them. Each group can later be configured to use a different PSK to connect to the network.

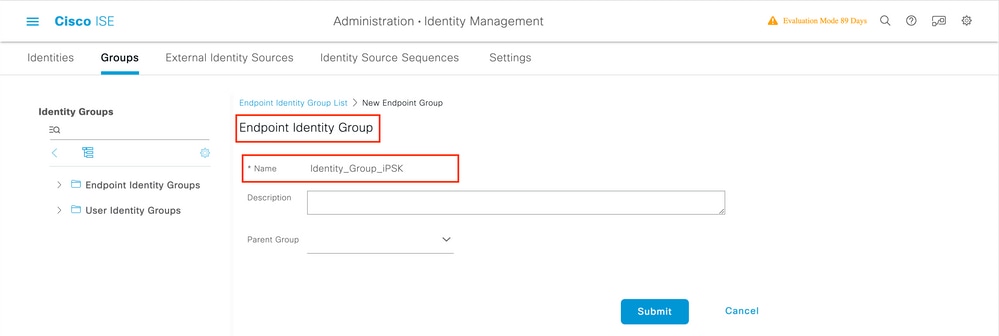
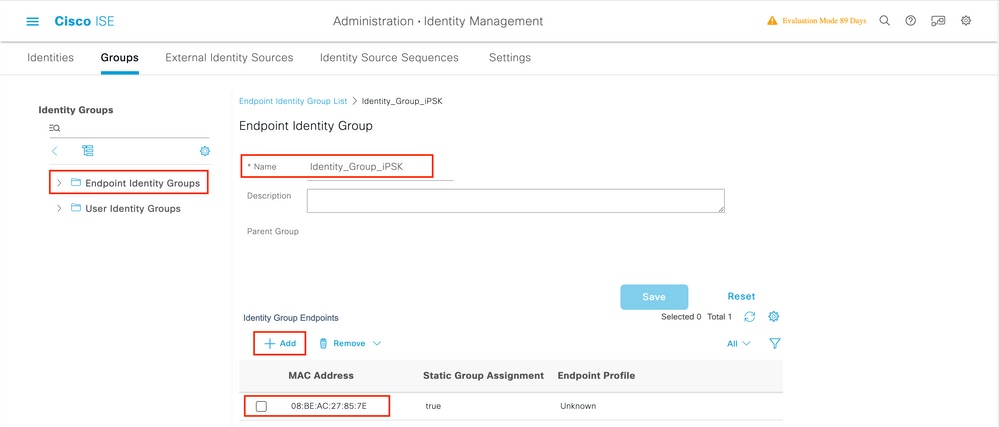
Once the group is created, you can now assign users to them. Select the group you created, and click Edit:

In the group configuration, add the MAC address of the client(s) you want to assign to this group by clicking the "Add" button:
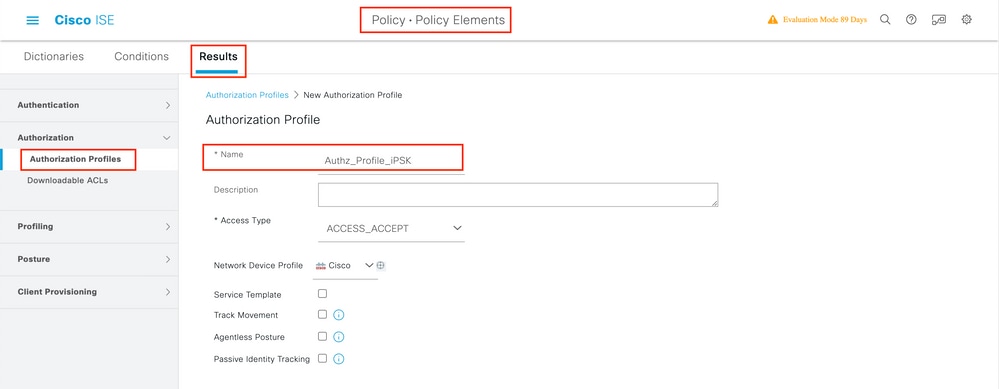
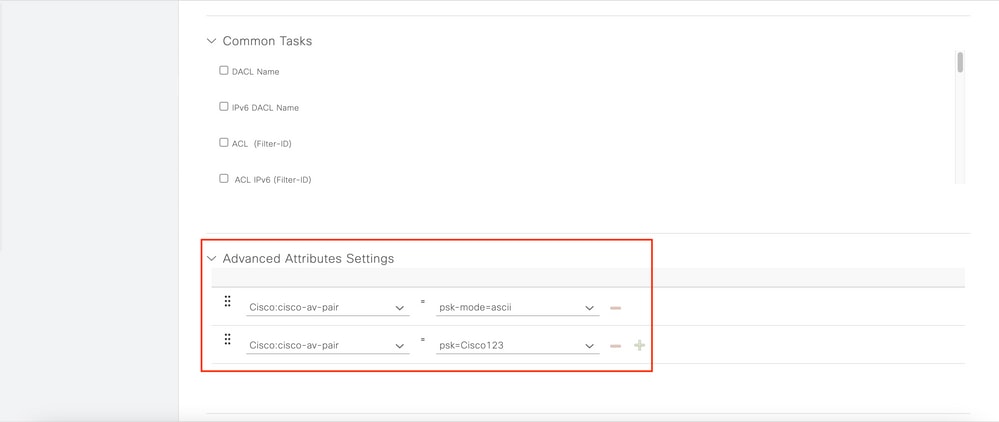
Under Policy > Policy Elements > Results > Authorization > Authorization Profiles, create a new authorization profile. Set attributes to be:
access Type = ACCESS_ACCEPT
cisco-av-pair = psk-mode=ascii
cisco-av-pair = psk=<PSK to be used>            // This is the psk that the user group is using
For each user group that must be using a different PSK, create an additional result with a different psk av-pair. Additional parameters like ACL and VLAN override can also be configured here.

Under Policy > Policy Sets, create a new one. To make sure that the client matches the policy set, this condition is used:
Cisco:cisco-av-pair EQUALS cisco-wlan-ssid=WLAN_iPSK // "WLAN_iPSK" is WLAN name
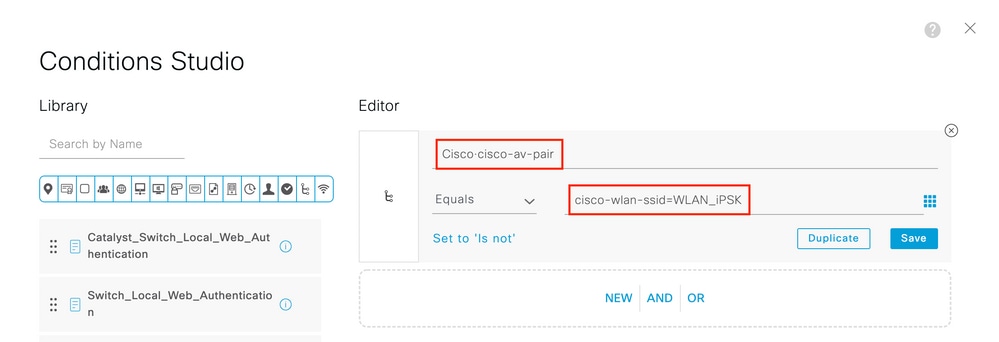
Additional conditions can be added to make policy matching more secure.

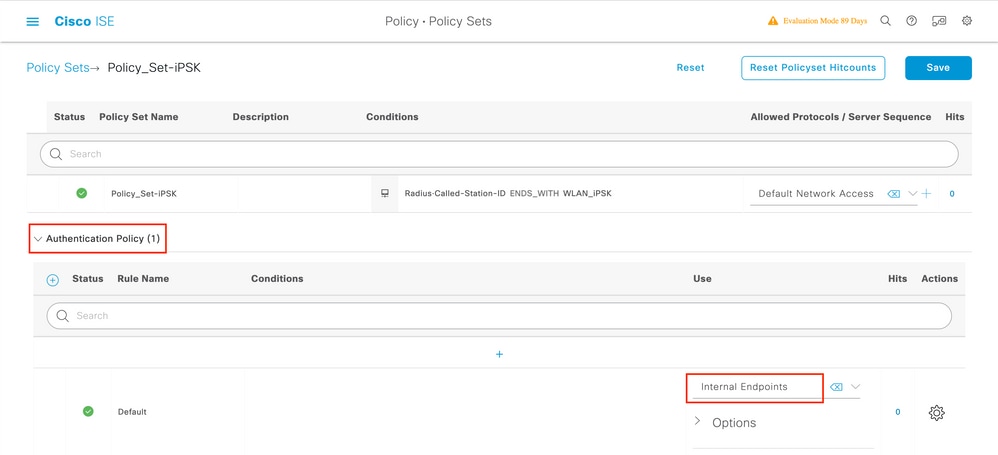
Go the the newly created iPSK Policy Set configuration by clicking the blue arrow on the right of the Policy Set line:

Make sure that Authentication Policy is set to "Internal Endpoints":
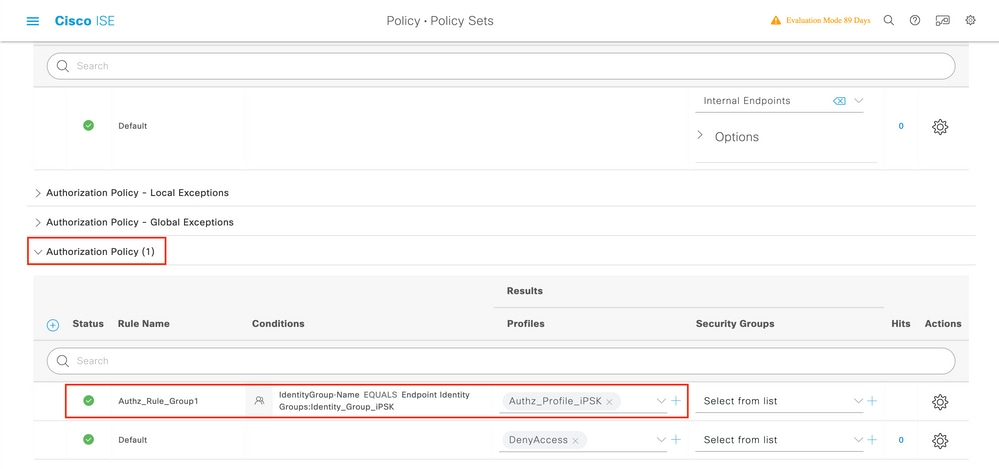
Under Authorization Policy, create a new rule for each of the user groups. As a condition, use:
IdentityGroup-Name EQUALS Endpoint Identity Group:Identity_Group_iPSK // "Identity_Group_iPSK" is name of the created endpoint group
with the Result being the Authorization Profile that was previously created. Make sure that the Default Rule stays at the bottom and points to DenyAccess.
If every user is going to have a different password, instead of creating Endpoint groups and rules matching that endpoint group, a rule with this condition can be made:
Radius-Calling-Station-ID EQUALS <client_mac_addr>
Note: MAC address delimiter can be configured on the WLC under AAA >AAA Advanced > Global Config > Advanced Settings. In this example, the character "-" was used.
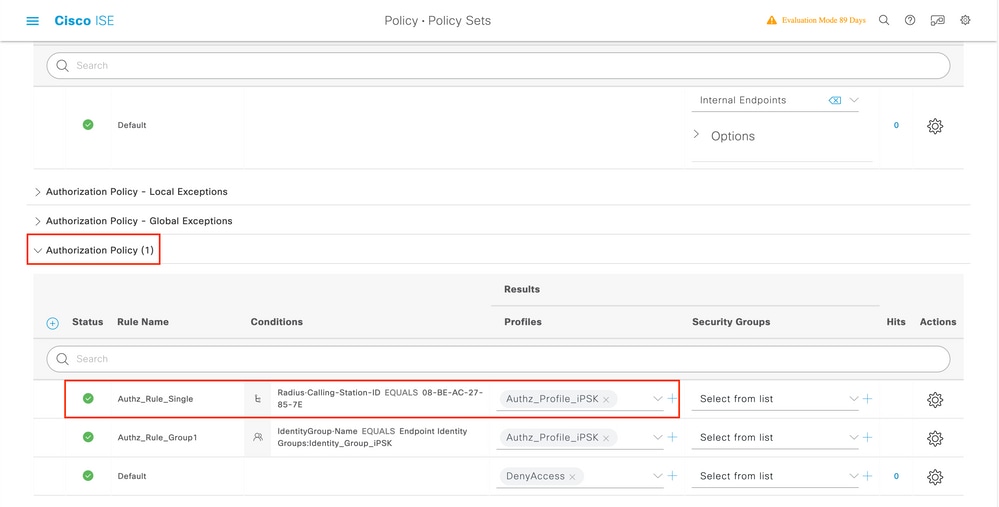
Rules on the authorization policy allow many other parameters to be used in order to specify the password the user is utilizing.
Some of the most commonly used rules are:
- Matching based on the user location
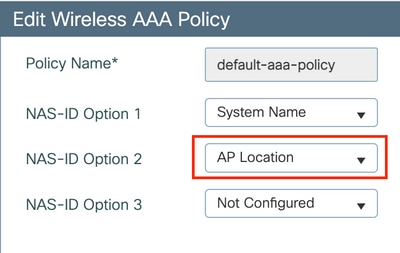
In this scenario, the WLC needs to send AP Location information to the ISE. This allows users in one location to use one password, while the users on another location is using a different one. This can be configured under the Configuration > Security > Wireless AAA Policy:
- Matching based on the device profiling
In this scenario, the WLC needs to be configured to profile devices globally. This allows an administrator to configure different password for laptop and phone devices. Global device classification can be enabled under Configuration > Wireless > Wireless Global. For device profiling configuration on ISE, consult the ISE Profiling Design Guide.
On top of returning the encryption key, since this authorization happens at the 802.11 association phase, it is entirely possible to return other AAA attriburtes from ISE such as ACL or VLAN id.
Troubleshoot
Troubleshoot on the 9800 WLC
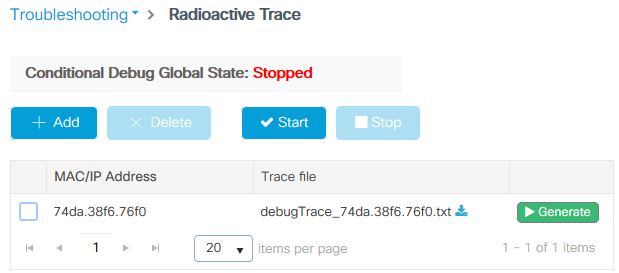
On the WLC, collecting radioactive traces must be more than enough to identify a majority of issues. This can be done in the WLC web interface under Troubleshooting > Radioactive Trace. Add the client MAC address, press Start and try to reproduce the issue. Click on Generate to create the file and download it:
Important: iPhones on IOS 14 and Android 10 smartphones use randomised mac address when associating to the network. This functionality can completely break the iPSK configuration. Make sure that this feature is disabled!
If Radioactive Traces are not enough to identify the problem, packet captures can be collected directly on the WLC. Under Troubleshooting > Packet Capture, add a capture point. By default, WLC uses Wireless Management interface for all RADIUS AAA communication. Increase the buffer size to 100 MB if the WLC has high number of clients:
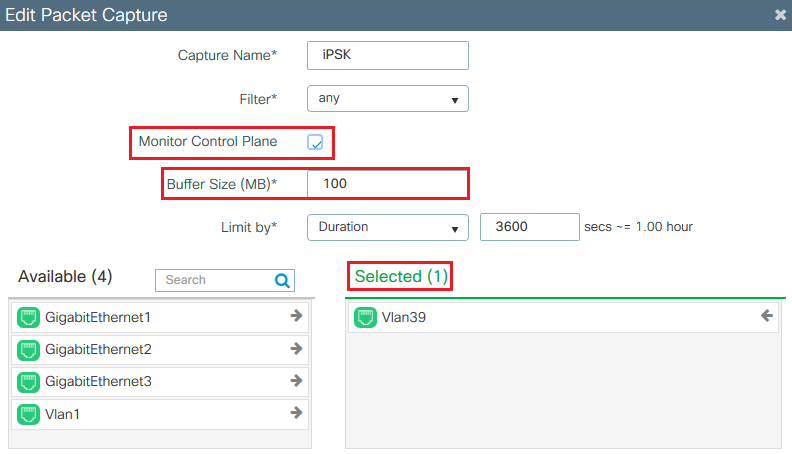
A packet capture of a successful authentication and accounting attempt is shown in the picture below. Use this Wireshark filter to filter out all the relevant packets for this client:
ip.addr==<ISE_IP_ADDR> || eapol || bootp

Troubleshoot ISE
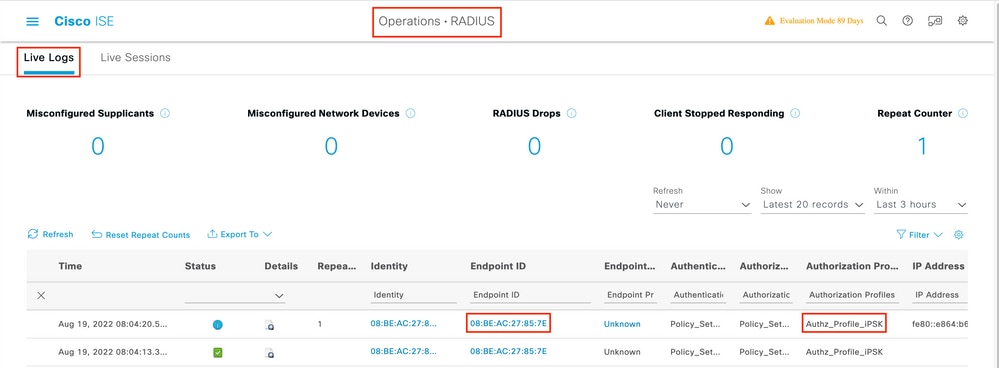
The main troubleshooting technique on Cisco ISE is the Live Logs page, found under Operations > RADIUS > Live Logs. They can be filtered by putting the MAC address of the client in the Endpoint ID field. Opening a full ISE report gives more details about the failure reason. Make sure that the client is hitting the correct ISE policy:


 Feedback