Configure Central Web Authentication with Anchor on Catalyst 9800
Available Languages
Download Options
Bias-Free Language
The documentation set for this product strives to use bias-free language. For the purposes of this documentation set, bias-free is defined as language that does not imply discrimination based on age, disability, gender, racial identity, ethnic identity, sexual orientation, socioeconomic status, and intersectionality. Exceptions may be present in the documentation due to language that is hardcoded in the user interfaces of the product software, language used based on RFP documentation, or language that is used by a referenced third-party product. Learn more about how Cisco is using Inclusive Language.
Contents
Introduction
This document describes how to configure and troubleshoot a CWA on the Catalyst 9800 pointing to another WLC as a mobility anchor.
Prerequisites
Requirements
Cisco recommends that you have knowledge of these topics:
- Central Web Authentication (CWA)
- Wireless LAN Controller (WLC)
- 9800 WLC
- AireOS WLC
- Cisco ISE
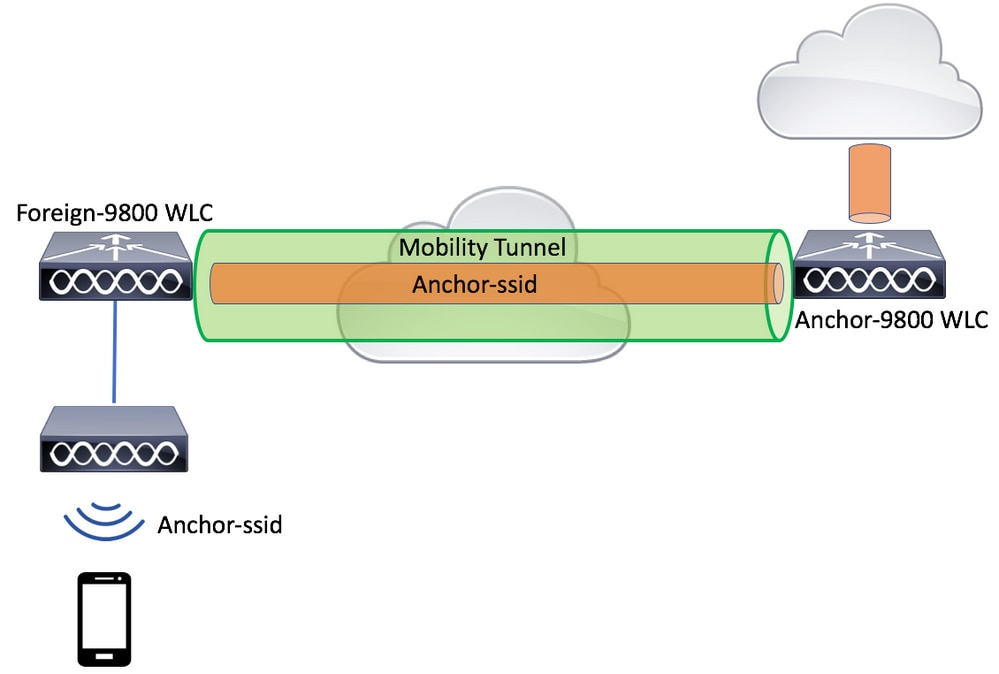
It is assumed that before you start the CWA anchor config you have already brought up the mobility tunnel between the two WLCs. This is outside of the scope of this config example. If you need help with this, consult the document titled Configuring Mobility Topologies on 9800
Components Used
The information in this document is based on these software and hardware versions:
- 9800 17.2.1
- 5520 8.5.164 IRCM image
- ISE 2.4
The information in this document was created from the devices in a specific lab environment. All of the devices used in this document started with a cleared (default) configuration. If your network is live, ensure that you understand the potential impact of any command.
Configure a Catalyst 9800 anchored to another Catalyst 9800
Network Diagram
Configure AAA on both 9800s
On both the anchor and the foreign you need to first add the RADIUS server and make sure that CoA is enabled. To do so, navigate to the menu Configuration > Security > AAA > Servers/Groups > Servers. Then, click on the Add button.

You now need to create a Server group and place the server you just configured into that group. To do so, navigate to Configuration > Security > AAA > Servers/Groups > Server Groups > +Add.

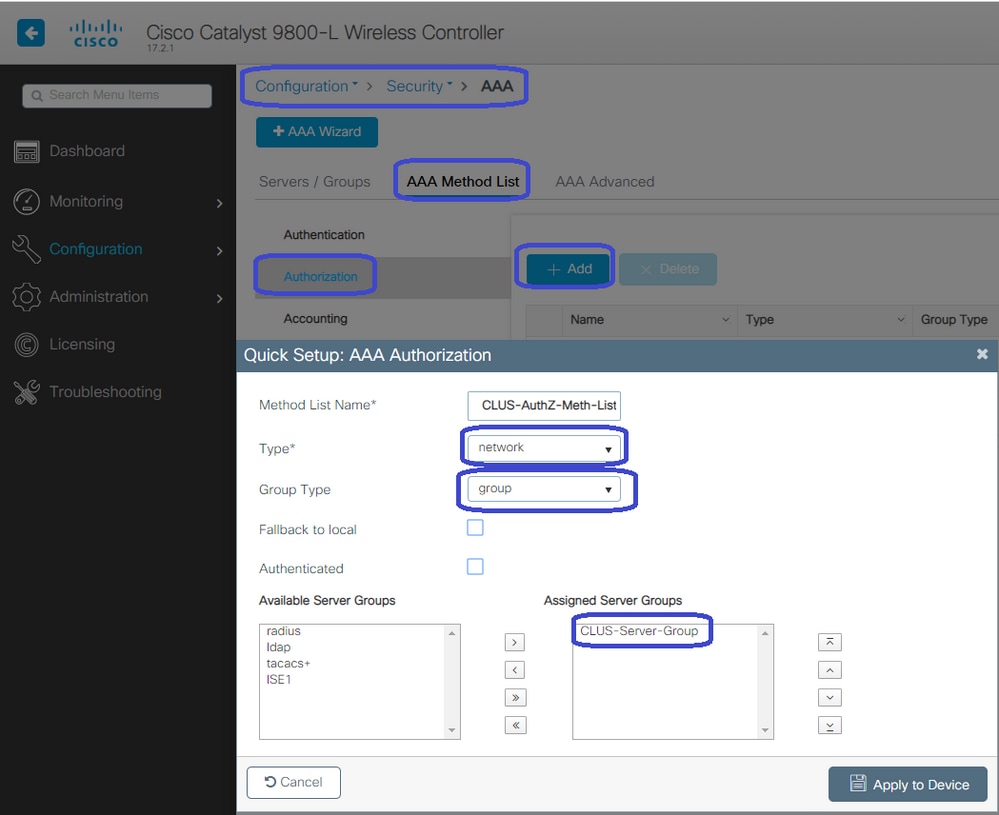
Now, create an authorization method list (an authentication method list is not required for CWA) where the type is network and the group type is group. Add the server group from the previous action to this method list.
To do so, navigate to Configuration > Security > AAA > Servers/AAA Method List > Authorization > +Add.
(Optional) Create an accounting method list using the same server group as the authorization method list. To create the accounting list, navigate to Configuration > Security > AAA > Servers/AAA Method List > Accounting > +Add.

Configure the WLANs on the WLCs
Create and configure the WLANs on both the WLCs. The WLANs must match on both. The security type must be mac filtering and the authorization method list from the previous step must be applied. To configure this, navigate to Configuration > Tags & Profiles > WLANs > +Add.


Create the Policy Profile and Policy Tag on the Foreign WLC
Navigate to the foreign WLC web UI. To create the policy profile navigate to Configuration > Tags & Profiles > Policy > +Add. When anchoring you have to use central switching.

On the Advanced tab, the AAA override and RADIUS NAC are mandatory for CWA. Here you can also apply the accounting method list if you chose to make one.

On the Mobility tab DO NOT check the Export Anchor checkbox but rather add the anchor WLC to the anchor list. Make sure to enter Apply to Device. As reminder, this assumes you already have a mobility tunnel setup between the two controllers

In order for the APs to use this policy profile, you need to create a policy tag and apply it to the APs you wish to use.
To create the policy tag, navigate to Configuration > Tags & Profiles > Tags?Policy > +Add.

To add this to multiple APs at the same time, navigate to Configuration > Wireless Setup > Advanced > Start Now. Click on the bullet bars next to Tag APs and add the tag to the APs you choose.

Create the Policy Profile on the Anchor WLC
Navigate to the anchor WLC web UI. Add the Policy Profile on the anchor 9800 under Configuration > Tags & Profiles > Tags > Policy > +Add. Make sure this matches the Policy Profile made on the foreign except for the mobility tab and the accounting list.
Here you do not add an anchor but you do check the Export Anchor checkbox. Do not add the accounting list here. This assumes you already have a mobility tunnel setup between the two controllers.

Note: There is no reason to associate this profile to a WLAN in a policy tag. This creates problems if you do. If you want to use the same WLAN for APs on this WLC create another policy profile for it.

Redirect ACL Config on both 9800s
Next, you need to create the redirect ACL config on both 9800s. The entries on the foreign does not matter because it is the anchor WLC applying the ACL to the traffic. The only requirement is that it is there and has some entry. The entries on the anchor have to deny access to ISE on port 8443 and permit everything else. This ACL is only applied to traffic coming in from the client so rules for the return traffic are not needed. DHCP and DNS pass through without entries in the ACL.

Configure ISE
The last step is to configure ISE for CWA. There are a ton of options for this but this example sticks to the basics and use the default self-registered guest portal.
On ISE, you need to create an authorization profile, a policy set with an authentication policy and an authorization policy that uses the authorization profile, add the 9800(foreign) to ISE as a network device, and create a username and password to log into the network.
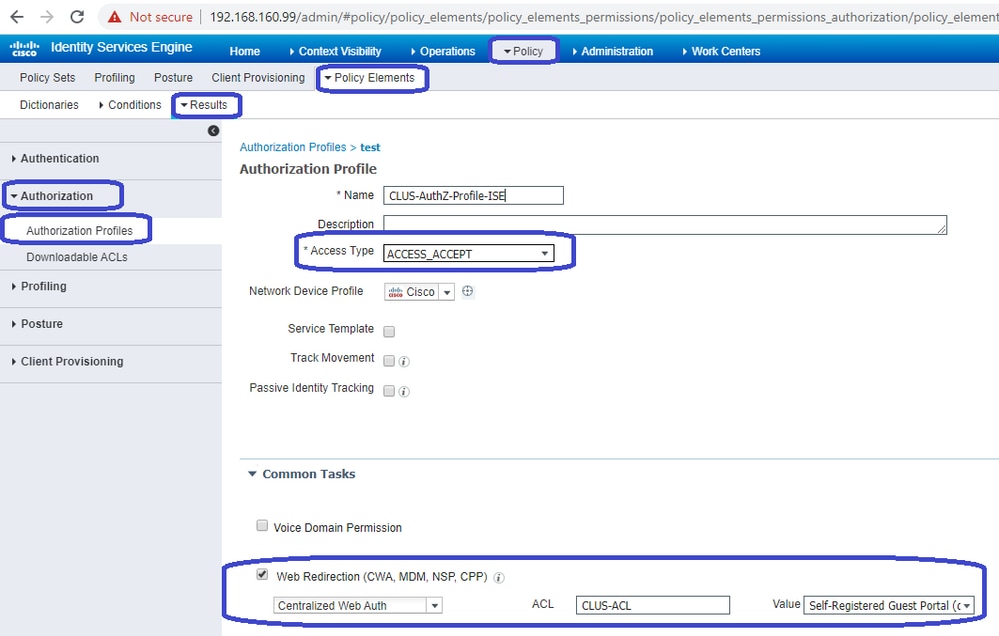
To create the authorization profile, navigate to Policy > Policy Elements > Authorization > Results > Authorization Profiles, then click Add. Ensure the access type returned is ACCESS_ACCEPT, and then set the attribute-value pairs (AVPs) that you want to send back. For CWA the redirect ACL and redirect URL are mandatory but you can also send back things like VLAN ID and session timeout. It is important that the ACL name matches the name of the redirect ACL on both the foreign and the anchor 9800.
You then need to configure a way to apply the authorization profile you just created to the clients that go through CWA. To achieve this, one way is to create a policy set that bypasses authentication when using MAB and apply the authorization profile when using the SSID sent in the called station ID. Again, there are a lot of ways to accomplish this so if you need something more specific or more secure, that fine, this is just the most simple way of doing it.
To create the policy set go to Policy > Policy Sets and click the + button on the left side of the screen. Name the new policy set and make sure it is set to Default Network Access or any allowed protocol list that allows Process Host Lookup for MAB (to check the allowed protocol list go to Policy > Policy Elements > Results > Authentication > Allowed Protocols). Now, click the + sign in the middle of the new policy set you created.

For this policy set every time MAB is used in ISE it goes through this policy set. Later you can make authorization policies that match on the called station ID so that different results can be applied depending on the WLAN that is being used. This process is very customizable with a lot of things you can match on.

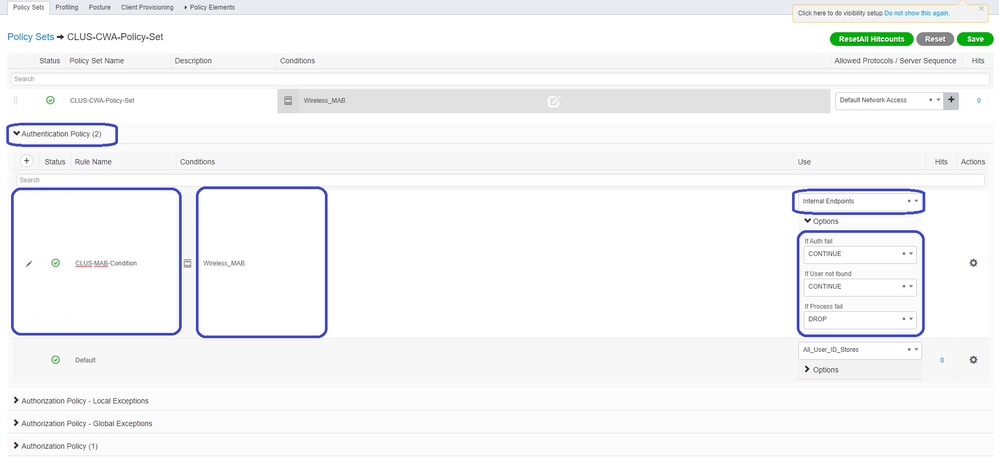
Inside the policy set, create the policies. The authentication policy can again match on MAB but you need to change the ID store to use internal endpoints and need to change the options to continue for Auth Fail and User Not Found.
Once the authentication policy is set, you need to create two rules in the authorization policy. This policy reads like an ACL so the order needs to have the Post-Auth rule on top and the Pre-Auth rule on the bottom. The Post-Auth rule matches users that have already gone through guest-flow. This is to say, if they already signed in they can reach the rule and must stop there. If they have not signed in, they continue down the list and reach the Pre-Auth rule and then are redirected. It is a good idea to match the authorization policy rules with the called station ID ending with the SSID so that it only reaches the WLANs that are configured to do so.

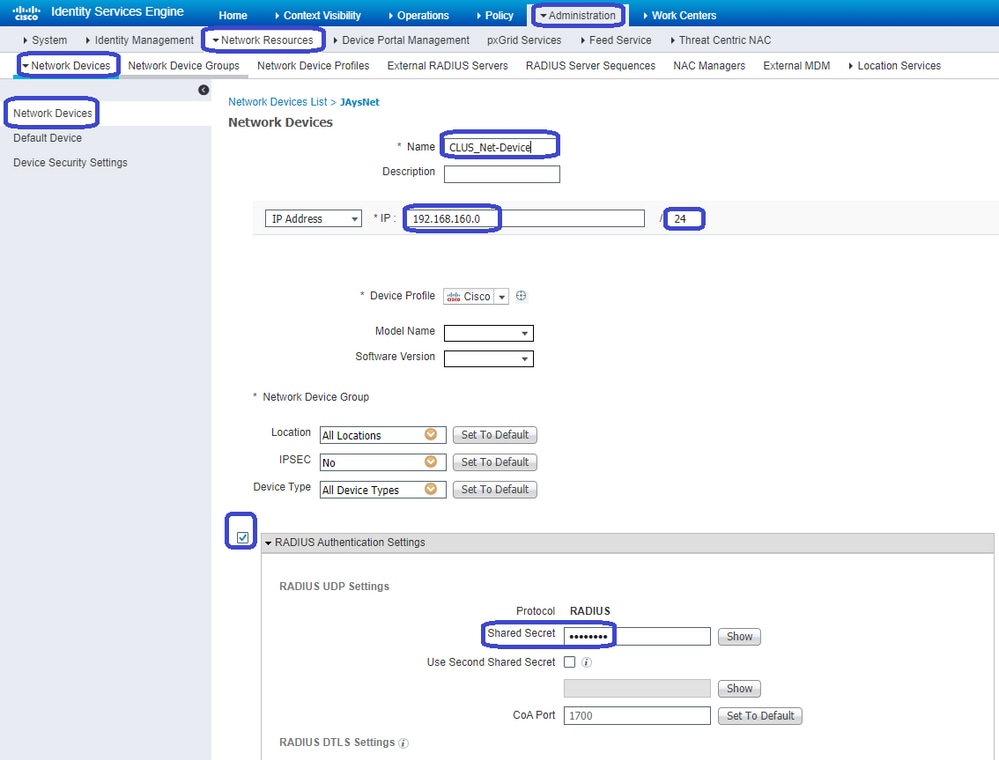
Now that the policy set is configured, you need to inform ISE about the 9800 (foreign) in order for ISE to trust it as an authenticator. This can be done by navigating to Admin > Network Resources > Network Device > +. You need to name it, set the IP address (or in this case the whole admin subnet), enable RADIUS, and set the shared secret. The shared secret on ISE has to match the shared secret on the 9800 or this process fails. After the config is added click the Submit button to save it.
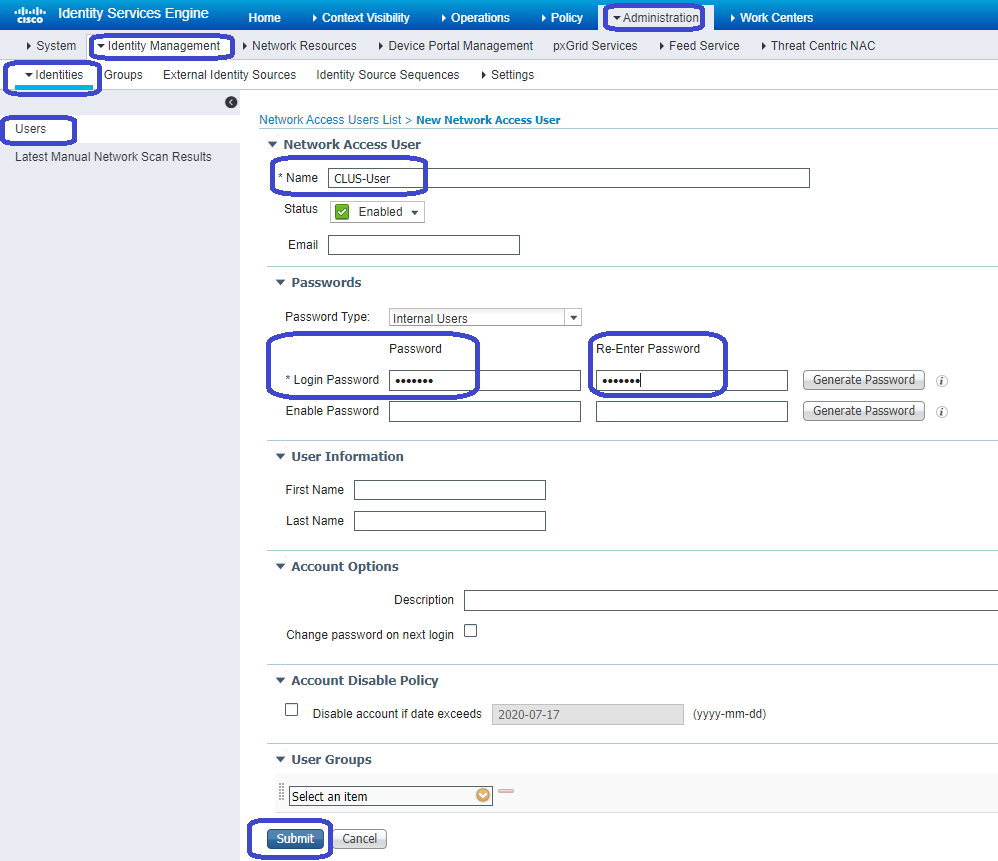
Finally, you need to add the username and password that the client is going to enter into the log in page in order to validate that they must have access to the network. To do this, navigate to Admin > Identity Management > Identity > Users > +Add and click Submit after you add it. Like everything else with ISE, this is customizable and does not have to be a user stored locally but again, it is the easiest config.
Configure a Catalyst 9800 Anchored to an AireOS WLC

Catalyst 9800 Foreign Configuration
Do the same, previous steps, skipping the Create the policy profile on the anchor WLC section.
AAA Configs on the Anchor AireOS WLC
Add the server to the WLC by going to Security > AAA > RADIUS > Authentication > New. Add the server IP address, shared secret, and support for CoA.


WLAN Config on the AireOS WLC
To create the WLAN navigate to WLANs > Create New > Go.
Configure the Profile Name, WLAN ID, and SSID then click Apply.


This must take you to the WLAN configuration. On the General tab, you can add the interface you want the clients to use if you are not going to configure ISE to send it in the AVPs. Next navigate to the Security > Layer2 tab and match the Layer 2 Security config you used on the 9800 and enable MAC Filtering.

Now move over to the Security > AAA Servers tab and set the ISE server as the Authentication Servers. Do Not set anything for the Accounting Servers. Uncheck the Enable box for accounting.

While still in the WLAN configs, move over to the Advanced tab and enable Allow AAA Override as well as change the NAC State to ISE NAC.

The last thing is to anchor it to itself. For this, navigate back to WLANs page and hover over the blue box on the right of the WLAN > Mobility Anchors. Set Switch IP Address (Anchor) to local and click the Mobility Anchor Create button. It must then show up with priority 0 anchored local.


Redirect ACL on the AireOS WLC
This is the final config needed on the AireOS WLC. To create the redirect ACL navigate to Security > Access Control Lists > Access Control Lists > New. Enter the ACL name (this must match what is sent in the AVPs) and click Apply.

Now click the name of the ACL you just created. The click the Add New Rule button. Unlike the 9800 controller, on the AireOS WLC, you configure a permit statement for traffic that is allowed to reach ISE without being redirected. DHCP and DNS are allowed by default.

Configure ISE
The last step is to configure ISE for CWA. There are several options for this but this example uses the basics and the default self-registered guest portal.
On ISE, you need to create an authorization profile, a policy set with an authentication policy and an authorization policy that uses the authorization profile. Add the 9800(foreign) to ISE as a network device and create a username and password to log into the network.
To create the authorization profile go toPolicy > Policy Elements > Authorization > Results > Authorization Profiles > +Add. Make sure the access type returned is ACCESS_ACCEPT, and then set the AVPs that you want to send back. For CWA the redirect ACL and redirect URL are mandatory but you can also send back like VLAN ID, for example, and session timeout. It is important that the ACL name matches the name of the redirect ACL on both the foreign and the anchor WLC.

You then need to configure a way to apply the authorization profile you just created to the clients that go through CWA. To achieve this, one way is to create a policy set that bypasses authentication when using MAB and apply the authorization profile when using the SSID sent in the called station ID. Again, there are a lot of ways to accomplish this so if you need something more specific or more secure, that fine, this is just the most simple way of doing it.
To create the policy set go toPolicy > Policy Setsand click the + button on the left side of the screen. Name the new policy set and make sure it is set to Default Network Access or any allowed protocol list that allows Process Host Lookup for MAB (to check the allowed protocol list go to Policy > Policy Elements > Results > Authentication > Allowed Protocols). Now click the + sign in the middle of the new policy set you created.

For this policy set every time MAB is used in ISE it can go through this policy set. Later you can make authorization policies that match on the called station ID so that different results can be applied depending on the WLAN that is being used. This process is very customizable with a lot of things you can match on
Inside the policy set, create the policies. The authentication policy can again match on MAB but you need to change the ID store to use Internal Endpoints and you need to change the options to continue for Auth Fail and User Not Found.
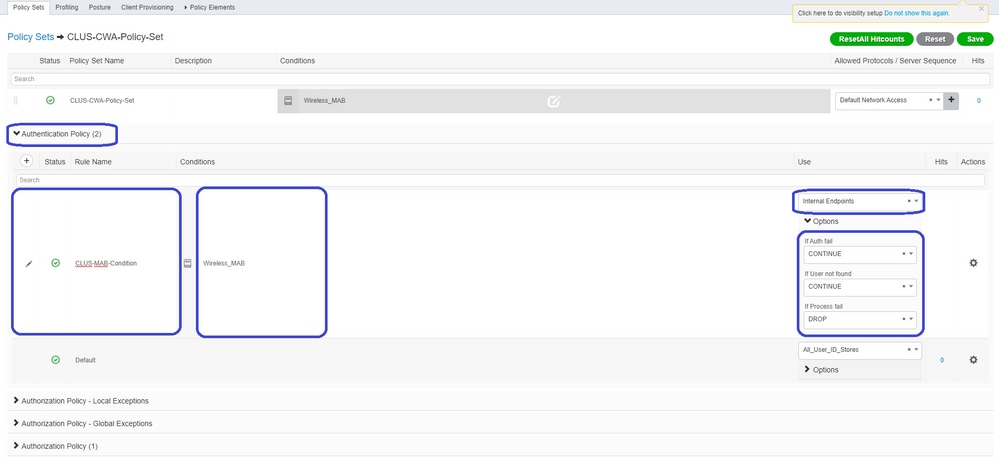
Once the authentication policy is set, you need to create two rules in the authorization policy. This policy reads like an ACL so the order needs to have the Post-Auth rule on top and the Pre-Auth rule on the bottom. The Post-Auth rule matches users that have already gone through guest-flow. This is to say if they already signed in they reacg that rule and stop there. If they have not signed in they continue down the list and hit the Pre-Auth rule getting the redirect. It is a good idea to match the authorization policy rules with the called station ID ending with the SSID so that it only hits for WLANs that are configured to do so.

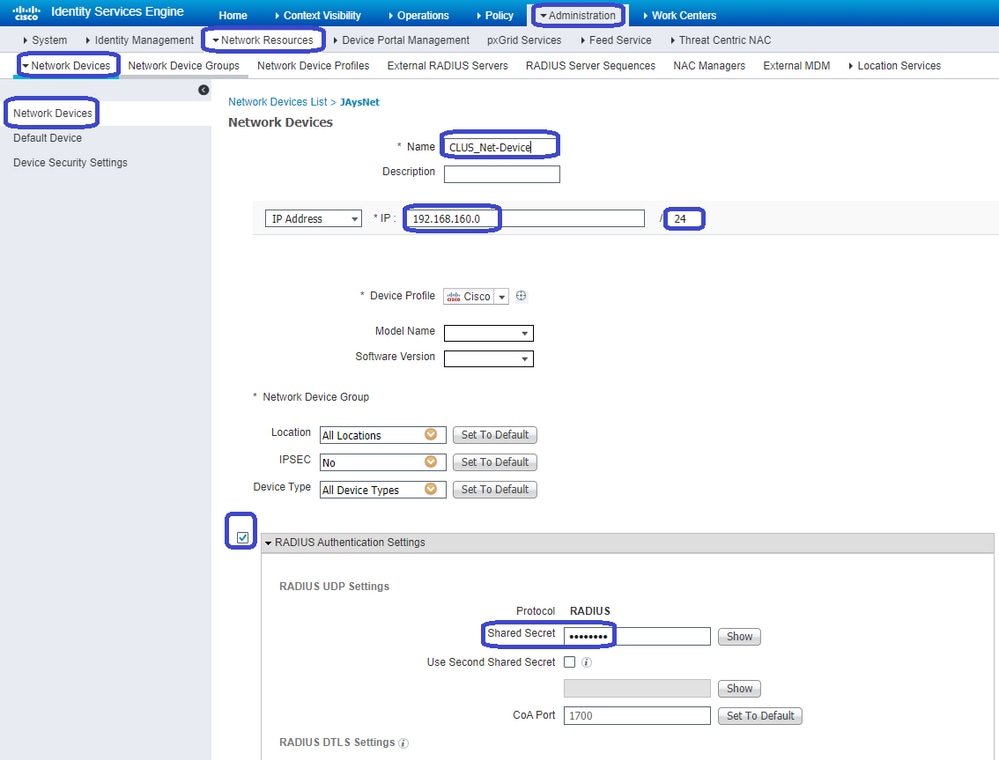
Now that the policy set is configured, you need to inform ISE about the 9800 (foreign) in order for ISE to trust it as an authenticator. This can be done atAdmin > Network Resources > Network Device > +. You need to name it, set the IP address (or in this case the whole admin subnet), enable RADIUS, and set the shared secret. The shared secret on ISE has to match the shared secret on the 9800 or this process fails. After the config is added hit the submit button to save it.
Finally, you need to add the username and password that the client is going to enter into the log in page in order to validate that they must have access to the network. This is done underAdmin > Identity Management > Identity > Users > +Addand make sure to click Submit after you add it. Like everything else with ISE, this is customizable and does not have to be user stored locally but again, it is the easiest config.

Differences in Config when the AireOS WLC is the Foreign and the Catalyst 9800 is the Anchor
If you want the AireOs WLC to be the foreign controller the config is the same as previously described with a few differences.
- AAA accounting is never done on the anchor so the 9800 would not have an accounting method list and the AireOS WLC would have accounting enabled and pointing to ISE.
- The AireOS would need to anchor to the 9800 instead of itself. In the Policy Profile, the 9800 would not have an anchor selected but would have the Export Anchor box checked.
- It is important to note that when AireOS WLCs export the client to the 9800 there is no concept of policy profiles. It only sends the WLAN Profile Name. Therefore, the 9800 applies the WLAN Profile Name sent from AireOS to both the WLAN Profile Name and the Policy Profile Name. When anchoring from an AireOS WLC to a 9800 WLC the WLAN Profile Name on both WLCs, and Policy Profile Name on the 9800, must match.
Verify
To verify the configs on the 9800 WLC run these commands:
- AAA:
Show Run | section aaa|radius
- WLAN:
Show wlan id <wlan id>
- Policy Profile:
Show wireless profile policy detailed <profile name>
- Policy Tag:
Show wireless tag policy detailed <policy tag name>
- ACL:
Show IP access-list <ACL name>
- Verify mobility is up with the anchor:
Show wireless mobility summary
To verify the configs on the AireOS WLC run the commands.
- AAA:
Show radius summary

Note: RFC3576 is the CoA config.
- WLAN:
Show WLAN <wlan id>
- ACL:
Show acl detailed <acl name>
- Verify mobility is up with the foreign:
Show mobility summary
Troubleshoot
Troubleshooting looks different depending on what point in the process the client stops. For example, if the WLC never gets a response from ISE on MAB, the client would be stuck in the Policy Manager State: Associating and would not be exported to the anchor. In this situation, you would only troubleshoot on the foreign and you would need to collect an RA trace and a packet capture for traffic between the WLC and ISE. Another example would be that MAB has passed successfully but the client does not receive the redirect. In this case, you need to make sure the foreign received the redirect in the AVPs and applied it to the client. You also need to check the anchor to make sure the client is there with the correct ACL. This scope of troubleshooting is outside of the design of this article (check the Related Information for a generic client troubleshooting guidelines).
For more help with troubleshooting CWA on the 9800 WLC please see the Cisco Live! presentation DGTL-TSCENT-404.

Note: Only registered Cisco users have access to internal Cisco tools and information.
Catalyst 9800 troubleshooting information
Client Details
show wireless client mac-address <client mac> detail
Here you must look at the Policy Manager State, Session Manager > Auth Method, Mobility Role.
You can also find this information in the GUI under Monitoring > Clients.
Embedded Packet Capture
From the CLI the command starts #monitor capture <capture name> then the options come after that.
From the GUI go to Troubleshoot > Packet Capture > +Add.
RadioActive Traces
From the CLI:
debug wireless mac|ip <client mac|ip>
Use the no form of the command to stop it. This is logged to a file in bootflash named ra_trace then the client MAC or IP address and the date and time.
From the GUI navigate to Troubleshoot > Radioactive Trace > +Add. Add the client mac or ip address, click Apply, then hit start. After you have gone through the process a few times stop the trace, generate the log, and download it to your device.
AireOS Troubleshooting information
Client Details
From the CLI, show client details <client mac>.
From the GUI, Monitor > Clients.
Debugs from the CLI
Debug client <client mac>

Debug mobility handoff

Debug mobility config
Related Information
Revision History
| Revision | Publish Date | Comments |
|---|---|---|
3.0 |
28-Mar-2024 |
Recertification |
2.0 |
20-Sep-2021 |
minor formatting changes |
1.0 |
17-Sep-2021 |
Initial Release |
Contributed by Cisco Engineers
- Jay VivasCisco TAC
Contact Cisco
- Open a Support Case

- (Requires a Cisco Service Contract)
 Feedback