Introduction
This document describes how to configure a Cisco Access Point (AP) as a 802.1x supplicant to be authorized on a switchport against a RADIUS server.
Prerequisites
Requirements
Cisco recommends that you have knowledge of these topics:
- Wireless Lan Controller (WLC) and LAP (lightweight Access Point).
- 802.1x on Cisco switches and ISE
- Extensible Authentication Protocol (EAP)
- Remote Authentication Dial-In User Service (RADIUS)
Components Used
The information in this document is based on these software and hardware versions:
- WS-C3560CX, Cisco IOS® XE,15.2(3r)E2
- C9800-CL-K9, Cisco IOS® XE,17.6.5
- ISE 3.0
- AIR-CAP3702
- AIR-AP3802
The information in this document was created from the devices in a specific lab environment. All of the devices used in this document started with a cleared (default) configuration. If your network is live, ensure that you understand the potential impact of any command.
Background Information
In this setup, the access point (AP) acts as the 802.1x supplicant and is authenticated by the switch against the ISE with the EAP method EAP-FAST.
Once the port is configured for 802.1X authentication, the switch does not allow any traffic other than 802.1X traffic to pass through the port until the device connected to the port authenticates successfully.
An AP can be authenticated either before it joins a WLC or after it has joined a WLC, in which case, configure 802.1X on the switch after the LAP joins the WLC.
Configure
In this section, you are presented with the information to configure the features described in this document.
Network Diagram
This document uses this network setup:
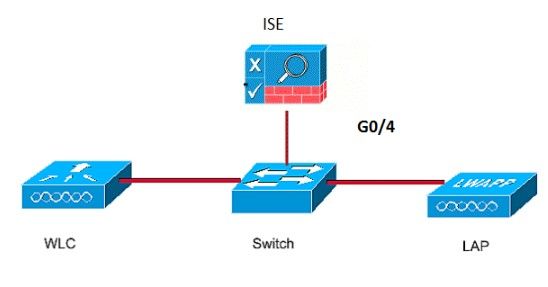
Configure the LAP As An 802.1x Supplicant
If The AP Is Already Joined To The WLC:
Configure 802.1x Authentication Type and Locally Significant Certificate (LSC) AP Authentication Type:
Step 1. Navigate to Configuration > Tags & Profiles > AP Join > On the AP Join Profile page, click Add to add a new join profile or edit an AP join profile when you click its name.
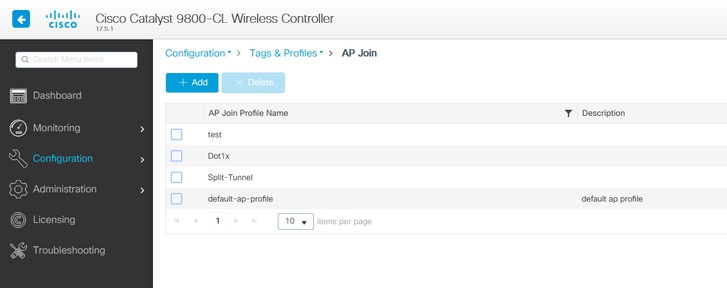
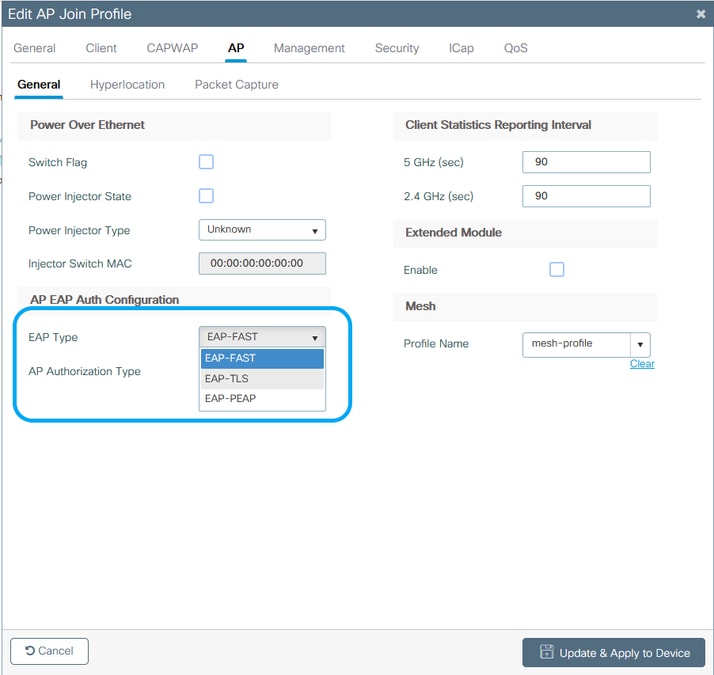
Step 2. In the AP Join Profile page, from AP > General, navigate to the AP EAP Auth Configuration section. From the EAP Type drop-down list, choose the EAP type as EAP-FAST, EAP-TLS, or EAP-PEAP to configure the dot1x authentication type. EAP-FAST is the only authentication type that uses username and passwords only and is the easiest to setup. PEAP and EAP-TLS require you to provision certificates on the access points through the LSC workflow (see the references section).
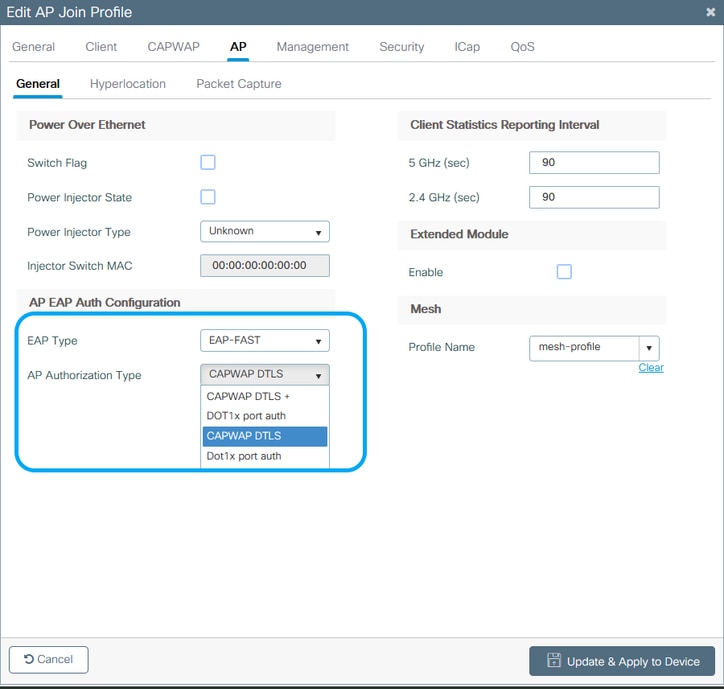
Step 3. From the AP Authorization Type drop-down list, choose the type as either CAPWAP DTLS + or CAPWAP DTLS > Click Update & Apply to Device.
Configure the 802.1x Username and Password:
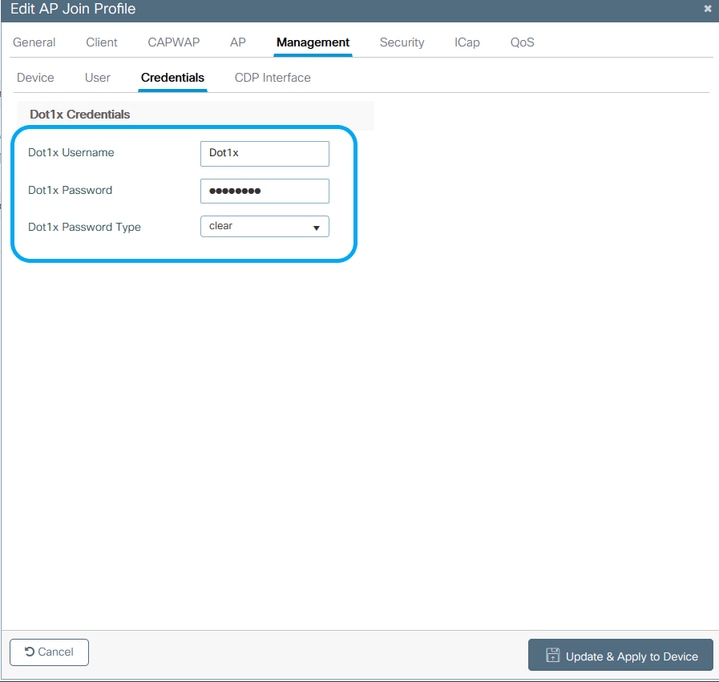
Step 1. From Management > Credentials > Enter Dot1x username and password details > Choose the appropriate 802.1x password type > Click Update & Apply to Device
If The AP Has Not Joined To A WLC Yet:
Console into the LAP in order to set the credentials and use these CLI commands: (for Cheetah OS & Cisco IOS® APs)
CLI:
LAP# debug capwap console cli
LAP# capwap ap dot1x username <username> password <password>
To Clear The Dot1x Credentials On The AP (If Needed)
For Cisco IOS® APs, after that reload the AP:
CLI:
LAP# clear capwap ap dot1x
For Cisco COS APs, after that reload the AP:
CLI:
LAP# capwap ap dot1x disable
Configure the Switch
Enable dot1x on the switch globally and add the ISE server to the switch.
CLI:
Enable
Configure terminal
aaa new-model
aaa authentication dot1x default group radius
aaa authorization network default group radius
dot1x system-auth-control
Radius-server host <ISE IP address> auth-port <port> acct-port <port>
  key 7 <server key>
Configure the AP switch port.
CLI:
configure terminal
interface GigabitEthernet</>
switchport access vlan <>
switchport mode access
authentication order dot1x
authentication port-control auto
dot1x pae authenticator
spanning-tree portfast edge
end
If the AP is in Flex Connect mode, local switching, then an additional configuration has to be made on the switch interface to allow multiple MAC addresses on the port, since the client traffic is released at the AP level :
authentication host-mode multi-host
Note: Multi-host mode-authenticates the first MAC address and then allows an unlimited number of other MAC addresses. Enable the host mode on the switch ports if connected AP has been configured with local switching mode. It allows the client’s traffic pass the switch port. If you want a secured traffic path, then enable dot1x on the WLAN to protect the client data
Configure the ISE Server
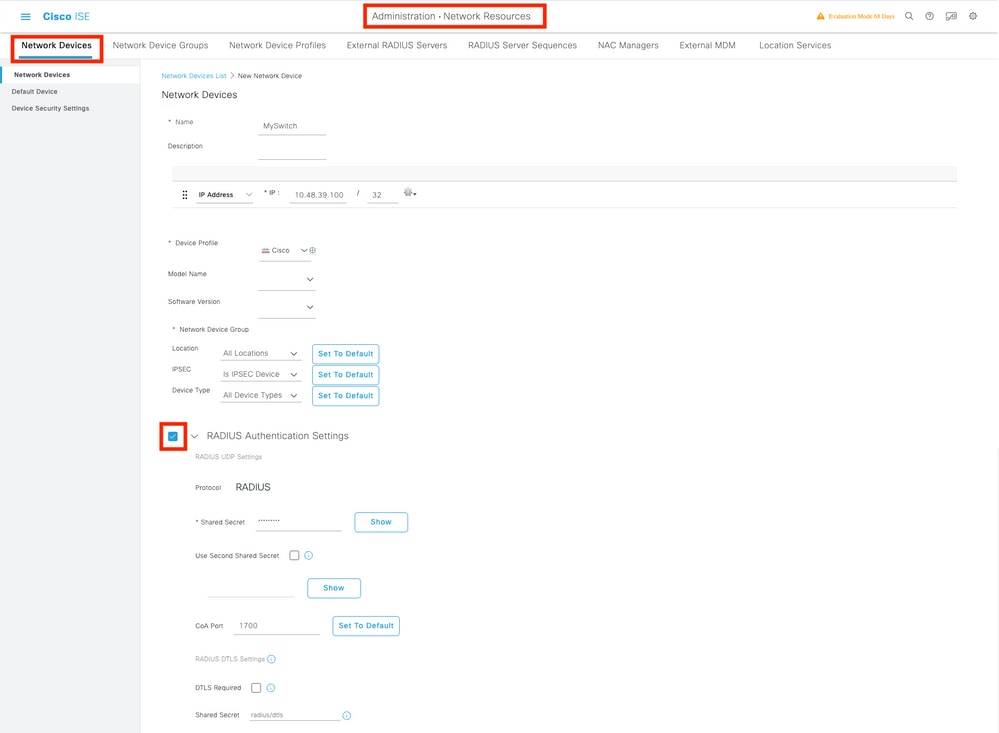
Step 1. Add the switch as a network device on the ISE server. Navigate to Administration > Network Resources > Network Devices > Click Add > Enter Device name, IP address, enable RADIUS Authentication Settings, Specify Shared Secret Value, COA port (or leave it as default) > Submit.
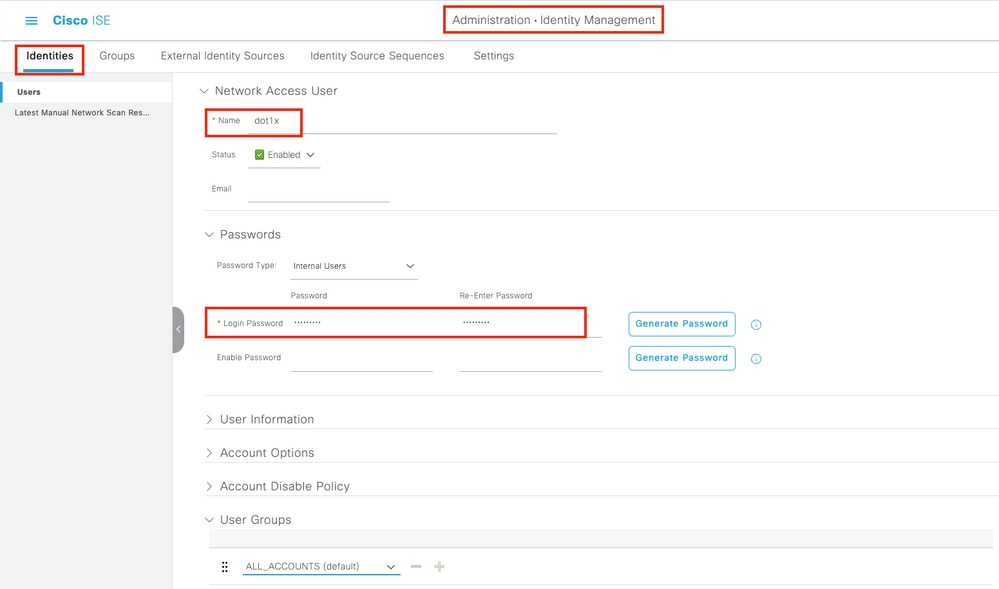
Step 2. Add the AP credentials to ISE. Navigate to Administration > Identity Management > Identities > Users and click the Add button to add an user. Enter the credentials you configured on your AP Join Profile on your WLC. Note that the user is put in the default group here, but this can be adjusted as per your requirements.
Step 3. On ISE, configure the Authentication policy and Authorization policy. Go to Policy > Policy Sets and select the policy set to configure and the blue arrow on the right. In this case, the default policy set is used but one can customize it as per the requirement.

Then configure the Authentication Policy and the Authorization Policy. The policies shown here are the default policies created on the ISE server but can be adapted and customized as per your requirement.
In this example, the configuration can be translated into : "If wired 802.1X is used and the user is known on the ISE server, then we permit access to the users for which the authentication was successfull". The AP is then be authorized against the ISE server.


Step 4. Ensure that in the allowed protocols that Default Network Access, EAP-FAST is allowed. Navigate to Policy > Policy Elements > Authentication > Results > Allowed Protocols > Default Network Access > Enable Allow EAP-TLS > Save.
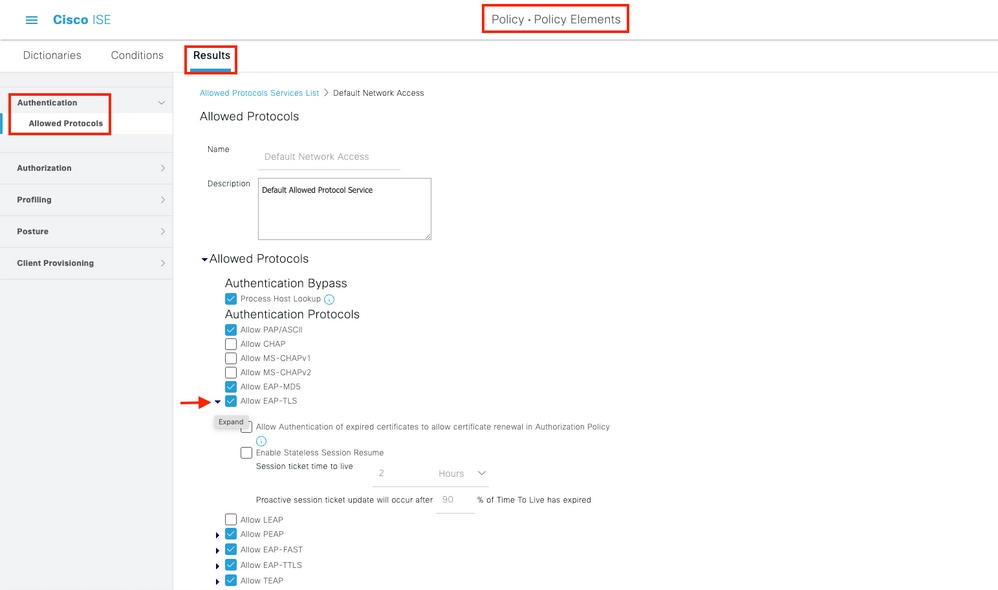

Warning: You need to enable anonymous in-band PAC provisioning on ISE. It is not possible to manually import/export a PAC on the access point.
Verify
Use this section to confirm that your configuration works properly.
Verify the Authentication Type
The show command displays the authentication information of an AP profile:
CLI:
9800WLC#show ap profile name <profile-name> detailed
Example:
9800WLC#show ap profile name default-ap-profile detailed
  AP Profile Name        : Dot1x
  …
  Dot1x EAP Method       : [EAP-FAST/EAP-TLS/EAP-PEAP/Not-Configured]
  LSC AP AUTH STATE      : [CAPWAP DTLS / DOT1x port auth / CAPWAP DTLS + DOT1x port auth]
Verify 802.1x on the Switch Port
The show command displays the authentication state of 802.1x on the switch port:
CLI:
Switch# show dot1x all
Output example:
Sysauthcontrol              Enabled
Dot1x Protocol Version            3

Dot1x Info for GigabitEthernet0/8
-----------------------------------
PAE                       = AUTHENTICATOR
QuietPeriod               = 60
ServerTimeout             = 0
SuppTimeout               = 30
ReAuthMax                 = 2
MaxReq                    = 2
TxPeriod                  = 30
Verify if the port has been authenticated or not
CLI:
Switch#show dot1x interface <AP switch port number> details
Output example:
Dot1x Info for GigabitEthernet0/8
-----------------------------------
PAE                       = AUTHENTICATOR
QuietPeriod               = 60
ServerTimeout             = 0
SuppTimeout               = 30
ReAuthMax                 = 2
MaxReq                    = 2
TxPeriod                  = 30

Dot1x Authenticator Client List
-------------------------------
EAP Method                = FAST
Supplicant                = f4db.e67e.dd16
Session ID                = 0A30279E00000BB7411A6BC4
    Auth SM State         = AUTHENTICATED
    Auth BEND SM State    = IDLE
ED
Auth BEND SM State = IDLE
From CLI:
Switch#show authentication sessions
Output example:
Interface    MAC Address    Method  Domain  Status Fg Session ID
Gi0/8        f4db.e67e.dd16 dot1x   DATA    Auth      0A30279E00000BB7411A6BC4
In ISE, choose Operations > Radius Livelogs and confirm that the authentication is successful and the correct Authorization profile is pushed.

Troubleshoot
This section provides information you can use in order to troubleshoot your configuration.
- Enter the ping command in order to check if the ISE server is reachable from the switch.
- Make sure that the switch is configured as an AAA client on the ISE server.
- Ensure that the shared secret is the same between the switch and the ISE server.
- Check if EAP-FAST is enabled on the ISE server.
- Check if the 802.1x credentials are configured for the LAP and are the same on the ISE server.

Note: The username and password are case sensitive.
- If authentication fails, enter these commands on the switch: debug dot1x and debug authentication.
Note that Cisco IOS based access points (802.11ac wave 1) do not support TLS version 1.1 and 1.2. This can cause an issue if your ISE or RADIUS server is configured to only allow TLS 1.2 inside 802.1X authentication.
References
Configuring 802.1X on APs with PEAP and EAP-TLS


 Feedback