Configure Radius DTLS on ISE and 9800 WLC
Available Languages
Download Options
Bias-Free Language
The documentation set for this product strives to use bias-free language. For the purposes of this documentation set, bias-free is defined as language that does not imply discrimination based on age, disability, gender, racial identity, ethnic identity, sexual orientation, socioeconomic status, and intersectionality. Exceptions may be present in the documentation due to language that is hardcoded in the user interfaces of the product software, language used based on RFP documentation, or language that is used by a referenced third-party product. Learn more about how Cisco is using Inclusive Language.
Contents
Introduction
This document describes a method to create the necessary certificates to configure RADIUS DTLS between ISE and the 9800 WLC.
Background
RADIUS DTLS is a secure form of the RADIUS protocol where the RADIUS messages are sent over a data Transport Layer Security (DTLS) Tunnel. To create this tunnel between the authentication server and the authenticator, a set of certificates is needed. This set of certificates require the certain Extended Key Usage (EKU) certificate extensions to be set, specifically, client authentication on the WLC certificate and both server authentication as well as client authentication for the ISE certificate.
Prerequisites
Requirements
Cisco recommends that you have knowledge of these topics:
- How to configure the 9800 WLC, the Access Point (AP) for basic operation
- How to use the OpenSSL application
- Public Key Infrastructure (PKI) and digital certificates
Components Used
The information in this document is based on these software and hardware versions:
- OpenSSL application (version 3.0.2).
- ISE ( version 3.1.0.518)
- 9800 WLC (version 17.12.3)
The information in this document was created from the devices in a specific lab environment. All of the devices used in this document started with a cleared (default) configuration. If your network is live, ensure that you understand the potential impact of any command.
Configure
Overview
The purpose is to create a two-level certificate authority with a Root CA and an Intermediate CA to sign endpoint certificates. Once the certificates are signed, they are imported to the WLC and ISE. Finally, the devices are configured to perform RADIUS DTLS authentication with those certificates.

Note: This document uses Linux specific commands to create and arrange files. The commands are explained so you can perform the same action on other operating systems where OpenSSL is available.
Optional - Create WLC and ISE RADIUS DTLS Device Certificate
The RADIUS DTLS protocol needs to exchange certificates between ISE and WLC to create the DTLS tunnel. If you do not have valid certificates yet, you can create a local CA to generate the certificates, refer to Configure a Multi-level Certificate Authority on OpenSSL to Generate CIsco IOS® XE Compatible Certificates and perform the steps outlined on the document from the start until the end of step Create Intermediate CA certificate.
Add Configuration Sections on openssl.cnf File
Open your openssl.cnf configuration file and, at the bottom of it, copy and paste the WLC and ISE sections used to generate a valid Certificate Sign Request (CSR).
Both ISE_device_req_ext and WLC_device_req_ext sections each point to a list of SANs to be included on the CSR:
#Section used for CSR generation, it points to the list of subject alternative names to add them to CSR
[ ISE_device_req_ext ]
subjectAltName = @ISE_alt_names

[ WLC_device_req_ext ]
subjectAltName = @WLC_alt_names

#DEFINE HERE SANS/IPs NEEDED for **ISE** device certificates
[ISE_alt_names]
DNS.1   = ISE.example.com
DNS.2   = ISE2.example.com

#DEFINE HERE SANS/IPs NEEDED for **WLC** device certificates
[WLC_alt_names]
DNS.1   = WLC.example.com
DNS.2   = WLC2.example.com
As a security measure, the CA overrides any SANs present on a CSR in order to sign it so unauthorized devices cannot receive a valid certificate for a name they are not allowed to use. In order to add the SANs back onto the signed certificate, use the subjectAltName parameter to point to the same list SANs as the ones used for CSR generation.
ISE requires both serverAuth and clientAuth EKUs present on the certificate while the WLC only needs clientAuth. They are added to the signed certificate with the extendedKeyUsage parameter.
Copy and paste the sections used for certificate sign at the bottom of the openssl.cnf file:
#This section contains the extensions used for the device certificate sign
[ ISE_cert ]
basicConstraints=CA:FALSE
subjectKeyIdentifier=hash
authorityKeyIdentifier=keyid,issuer:always
#EKU client and server is needed for RADIUS DTLS on ISE
extendedKeyUsage = serverAuth, clientAuth
subjectAltName = @ISE_alt_names

[ WLC_cert ]
basicConstraints=CA:FALSE
subjectKeyIdentifier=hash
authorityKeyIdentifier=keyid,issuer:always
#EKU client is needed for RADIUS DTLS on WLC
extendedKeyUsage = clientAuth
subjectAltName = @WLC_alt_names
Create WLC Device Certificate
Create new folder to store WLC certs on the machine which has OpenSSL installed inside the Intermediate CA cert folder called IntermCA.db.certs. The new folder is called WLC:
mkdir ./IntermCA/IntermCA.db.certs/WLCModify the DNS parameters on the [WLC_alt_names] section of the openssl.cnf file. Change the example names provided for your desired values. These values populate the SANs field of the WLC certificate:
[WLC_alt_names]
DNS.1   = WLC.example.com    <-----Change the values after the equals sign
DNS.2   = WLC2.example.com   <-----Change the values after the equals sign
Create the WLC private key and WLC CSR with information from section WLC_device_req_ext for SANs:
openssl req -newkey rsa:4096 -keyout ./IntermCA/IntermCA.db.certs/WLC/WLC.key -nodes -config openssl.cnf -out ./IntermCA/IntermCA.db.certs/WLC/WLC.csr -reqexts WLC_device_req_extOpenSSL opens an interactive prompt for you to enter Distinguished Name (DN) details:
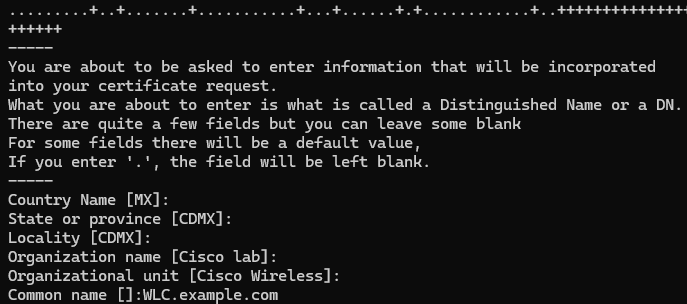 WLC Certificate Distinguished Name Interactive Prompt

Caution: The Common Name (CN) you provide on the interactive prompt must be identical to one of the Names on the [WLC_alt_names] section of the openssl.cnf file.
Use the CA named IntermCA to sign the WLC CSR named WLC.csr with the extensions defined under [WLC_cert] and store the signed certificate inside ./IntermCA/IntermCA.db.certs/WLC. The WLC device certificate is called WLC.crt:
openssl ca -config openssl.cnf -extensions WLC_cert -name IntermCA -out ./IntermCA/IntermCA.db.certs/WLC/WLC.crt -infiles ./IntermCA/IntermCA.db.certs/WLC/WLC.csr9800 WLC needs the certificate to be in pfx format to import it. Create new file which contains the chain of CAs who signed the WLC certificate, this is called a certfile:
cat ./RootCA/RootCA.crt ./IntermCA/IntermCA.crt > ./IntermCA/IntermCA.db.certs/WLC/certfile.crt
To create your .pfx file run one of these commands according to the WLC version.
For versions older than 17.12.1:
openssl pkcs12 -export -macalg sha1 -legacy -descert -out ./IntermCA/IntermCA.db.certs/WLC/WLC.pfx -inkey ./IntermCA/IntermCA.db.certs/WLC/WLC.key -in ./IntermCA/IntermCA.db.certs/WLC/WLC.crt -certfile ./IntermCA/IntermCA.db.certs/WLC/certfile.crt
For version 17.12.1 or later:
openssl pkcs12 -export -out ./IntermCA/IntermCA.db.certs/WLC/WLC.pfx -inkey ./IntermCA/IntermCA.db.certs/WLC/WLC.key -in ./IntermCA/IntermCA.db.certs/WLC/WLC.crt -certfile ./IntermCA/IntermCA.db.certs/WLC/certfile.crtCreate ISE Device Certificate
Create a new folder to store ISE certs on the machine which has OpenSSL installed inside the Intermediate CA cert folder called IntermCA.db.certs. The new folder is called ISE:
mkdir ./IntermCA/IntermCA.db.certs/ISEModify the DNS parameters on the [ISE_alt_names] section of the openssl.cnf file. Change the example names provided for your desired values, these values populate the SANs field of the WLC certificate:
[ISE_alt_names]
DNS.1   = ISE.example.com   <-----Change the values after the equals sign
DNS.2   = ISE2.example.com  <-----Change the values after the equals sign
Create the ISE private key and ISE CSR with information from section ISE_device_req_ext for SANs:
openssl req -newkey rsa:2048 -sha256 -keyout ./IntermCA/IntermCA.db.certs/ISE/ISE.key -nodes -config openssl.cnf -out ./IntermCA/IntermCA.db.certs/ISE/ISE.csr -reqexts ISE_device_req_extOpenSSL opens an interactive prompt for you to enter Distinguished Name (DN) details:
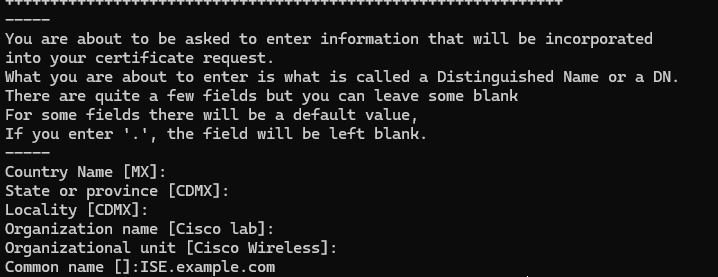 ISE Certificate Distinguished Name Interactive Prompt

Caution: The CN you provide on the interactive prompt must be exactly the same as one of the Names on the [ISE_alt_names] section of the openssl.cnf file.
Use the CA named IntermCA to sign the ISE CSR named ISE.csr with the extensions defined under [ISE_cert] and store the signed certificate inside ./IntermCA/IntermCA.db.certs/WLC. The ISE device certificate is called ISE.crt:
openssl ca -config openssl.cnf -extensions ISE_cert -name IntermCA -out ./IntermCA/IntermCA.db.certs/ISE/ISE.crt -infiles ./IntermCA/IntermCA.db.certs/ISE/ISE.csrImport Certificates to Devices
Import Certificates to ISE
1. Import the Root CA certificate from the ISE certificate chain to the trusted certificates store.
2. Navigate to Administration>System>Certificates>Trusted certificates.
3. Click on Browse and select the Root.crt file.
4. Check the Trust for authentication within ISE as well as Trust for client authentication and Syslog checkboxes then click Submit:
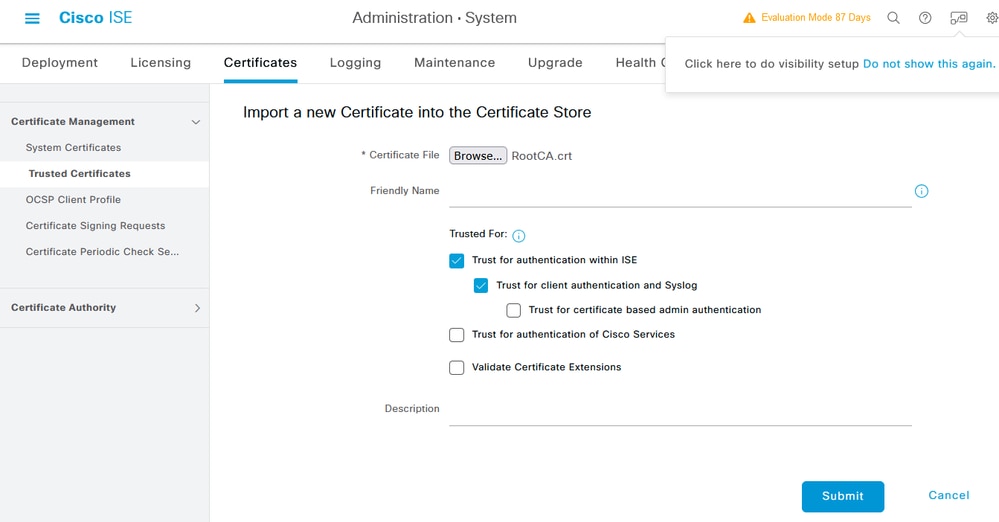 ISE Root CA Certificate Import Dialog
Do the same for the intermediate certificate if it exists.

Note: Repeat the steps for any CA certificate which is part of the ISE certificate validation chain. Always start with the Root CA certificate and finish with the lowest Intermediate CA certificate of the chain.
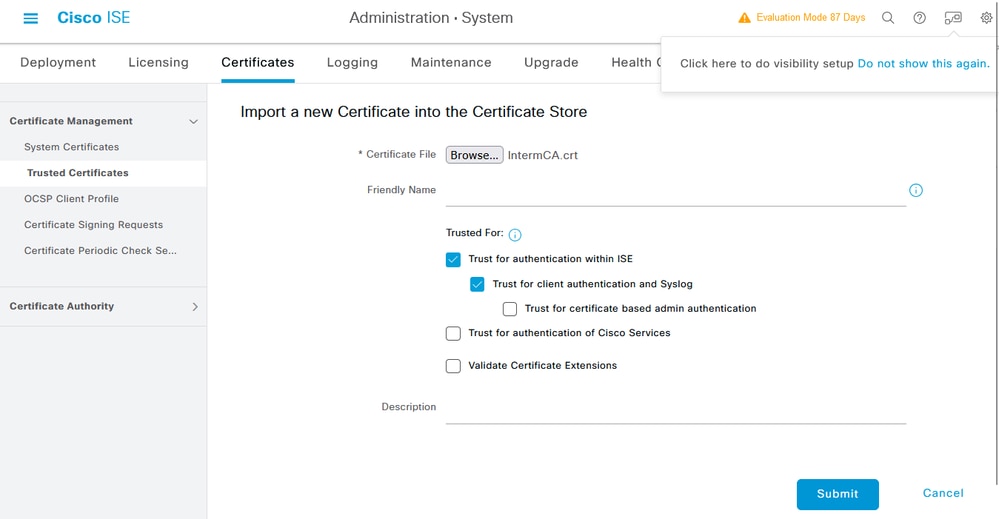 ISE Intermediate CA Certificate Import Dialog

Caution: If the ISE certificate and the WLC certificate are issued by different CAs you must import all the CA certificates that belong to the WLC certificate chain as well. ISE does not accept the WLC certificate on the DTLS certificate exchange until you import those CA certificates.
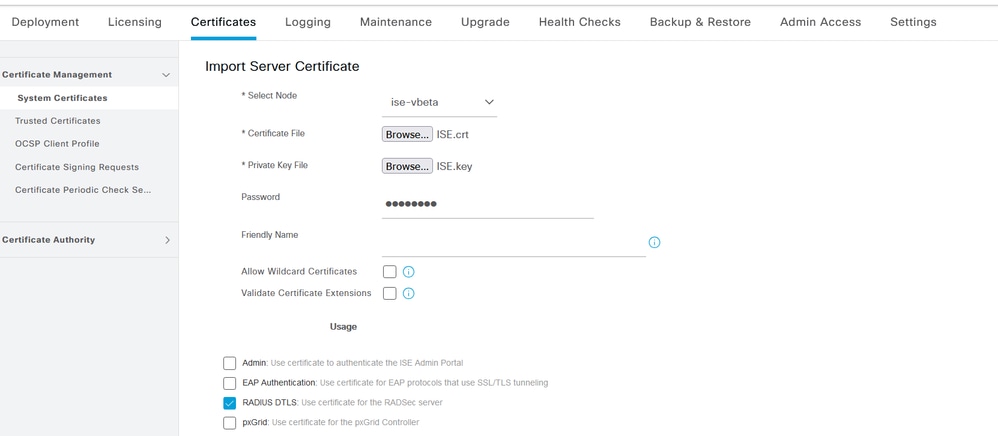 ISE Device Certificate Import Menu

Tip: You only need to import the ISE device certificate on this step. This certificate is the one ISE exchanges to establish the DTLS tunnel. It is not necessary to import the WLC device certificate and private key as the WLC certificate is verified with the use of the CA certificates imported previously.
Import Certificates to WLC
- Navigate to Configuration > Security > PKI Management on the WLC and go to the Add Certificate tab.
- Click on the Import PKCS12 Certificate dropdown and set the transport type as Desktop (HTTPS).
- Click on the Select File button and select the .pfx file you prepared earlier.
- Type the import password and finally click on Import.
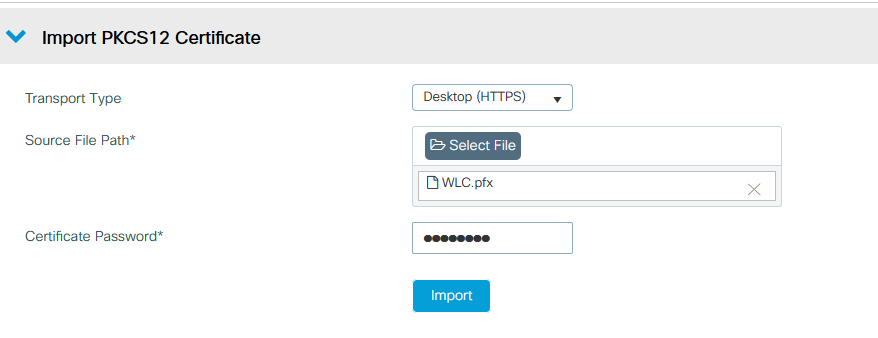 WLC Certificate Import Dialog
For detailed information on the import process refer to Generate and Download CSR Certificates on Catalyst 9800 WLCs.
Disable revocation check inside each automatically created trustpoint if the WLC has no Certificate Revocation List that it can check through the network:
9800#configure terminal

9800(config)#crypto pki trustpoint WLC.pfx
9800(config)#revocation-check none
9800(config)#exit

9800(config)#crypto pki trustpoint WLC.pfx-rrr1
9800(config)#revocation-check none
9800(config)#exit
Note: If you created a Multi-Level CA on OpenSSL with the Configure Multi-level CA on OpenSSL to Generate Cisco IOS XE Certificates document, you must disable revocation check as no CRL server is created.
The automated import creates the necessary trustpoints to contain the WLC certificate and its CA certificates.

Tip: If the WLC certificates were issued by the same CA as the ISE certificates, you can use the same trustpoints created automatically form the WLC certificate import. There is no need to import the ISE certificates separately.
If the WLC certificate is issued by a different CA than the ISE certificate you also need to import the ISE CA certificates to the WLC for the WLC to trust the ISE device certificate.
Create a new trustpoint for the Root CA and Import the ISE Root CA:
9800(config)#crypto pki trustpoint ISEroot
9800(ca-trustpoint)#revocation-check none
9800(ca-trustpoint)#enrollment terminal
9800(ca-trustpoint)#chain-validation stop
9800(ca-trustpoint)#exit
9800(config)#crypto pki authenticate ISEroot

Enter the base 64 encoded CA certificate.
End with a blank line or the word "quit" on a line by itself

------Paste the ISE root CA-----
Import the next intermediate CA certificate on the ISE CA chain, in other words, the CA certificate Issued by the Root CA:
hamariomed1(config)#crypto pki trustpoint ISEintermediate
hamariomed1(ca-trustpoint)#revocation-check none
hamariomed1(ca-trustpoint)#chain-validation continue ISErootCA
hamariomed1(ca-trustpoint)#enrollment terminal
hamariomed1(ca-trustpoint)#exit

hamariomed1(config)#crypto pki authenticate ISEintermediate

Enter the base 64 encoded CA certificate.
End with a blank line or the word "quit" on a line by itself

------Paste the ISE intermediate CA-------
Each additional CA on the chain requires a separate trustpoint. Each trustpoint in the chain must reference the trustpoint which contains the issuer certificate of the certificate you want to import with the command chain-validation continue <Issuer trustpoint name>.
Import as many CA certificates as your CA chain contains. You are finished after you import the issuer CA of the ISE device certificate, take a note of the name of this trustpoint.
You do not need to import the ISE device certificate on the WLC for RADIUS DTLS to work.
Configure RADIUS DTLS
ISE Configuration
Add the WLC as a network device into ISE, to do this, navigate to Administration>Network Resources>Network devices>Add
Input the name of the device and the IP of the WLC interface which sources the RADIUS traffic. Typically the Wireless Management Interface IP. Scroll down and check RADIUS Authentication Settings as well as DTLS Required and click Submit:
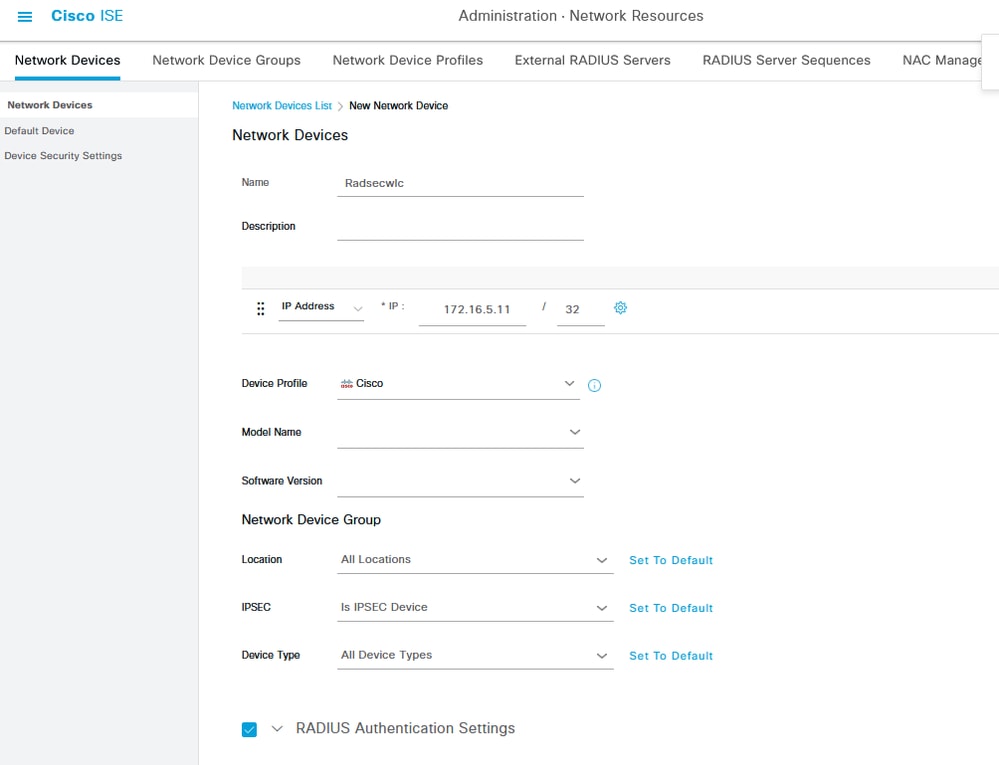 New Network Device Configuration
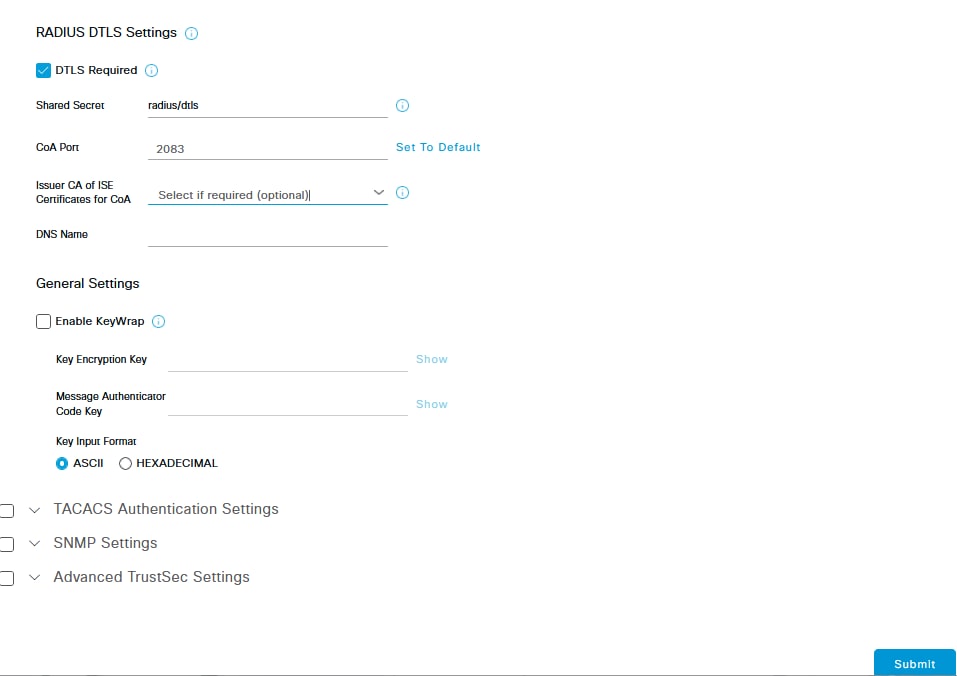 Radius DTLS Settings for the Network Device on ISE
WLC Configuration
Define a new Radius server along with the ISE IP address and default port for Radius DTLS. This configuration is available on the CLI only:
9800#configure terminal
9800(config)#radius server ISE
9800(config-radius-server)#address ipv4 <ISE Policy Service Node ip>
9800(config-radius-server)#dtls port 2083
Radius DTLS must use the shared secret radius/dtls, the 9800 WLC ignores any configured key other than this one:
9800(config-radius-server)#key radius/dtls
Use the dtls trustpoint client <trustpoint> command to configure the trustpoint which contains the WLC device certificate to exchange for the DTLS tunnel.
Use the dtls trustpoint server <trustpoint> command to configure the trustpoint which contains the issuer CA for the ISE device certificate.
Both the client and server trustpoint names are the same only if the WLC and ISE certificates are issued by the same CA:
9800(config-radius-server)#dtls trustpoint client WLC.pfx
9800(config-radius-server)#dtls trustpoint server WLC.pfx
Configure the WLC to check for one of the Subject Alternative Names (SANs) that is present on the ISE certificate. This configuration must match exactly one of the SANs present in the SANs field of the certificate.
The 9800 WLC does not perform a regular expression-based match for the SAN field. This means, for example, that the command dtls match-server-identity hostname *.example.com for a wildcard certificate which has *.example.com on its SAN field is correct but the same command for a certificate which contains www.example.com on the SAN field is not.
The WLC does not check this name against any name server:
9800(config-radius-server)#dtls match-server-identity hostname ISE.example.com
9800(config-radius-server)#exit
Create a new server group to use the new Radius DTLS for authentication:
9800(config)#aaa group server radius Radsec
9800(config-sg-radius)#server name ISE
9800(config-sg-radius)#exit
From this point onwards you can use this server group as you use any other server group on the WLC. Refer to Configure 802.1X Authentication on Catalyst 9800 Wireless Controller Series to use this server for wireless client authentication.
Verify
Verify Certificate Information
To verify the certificate information for the created certificates, on the Linux terminal run the command:
openssl x509 -in <path to cert> -text -nooutIt shows the full certificate information. This is useful to determine the issuer CA of a given certificate or if the certificates contain the required EKUs and SANs:
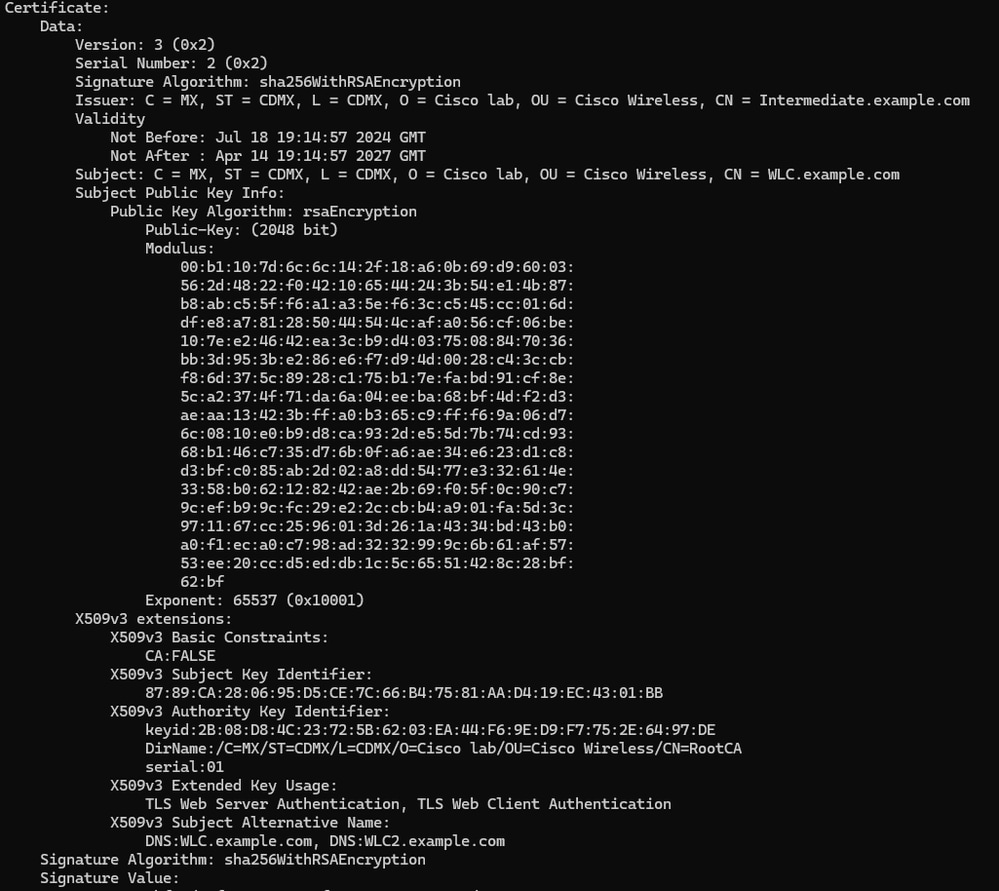 Cisco IOS XE Device Certificate Information as Shown by OpenSSL
Perform Test Authentication
From the WLC you can test the Radius DTLS functionality with command test aaa group <radis dtls group> <username> <userpassword > new-code
9800#test aaa group Radsec testuser Cisco123 new-code
User successfully authenticated

USER ATTRIBUTES

username             0   "testuser"

Note: An access reject output on the test command means the WLC received an Access-Reject RADIUS message in which case RADIUS DTLS is working. However it can also indicate of a failure to establish the DTLS tunnel. The test command does not differentiate both scenarios, see the troubleshooting section to identify if there is an issue.
Troubleshoot
To review the cause of a failed authentication you can enable these commands before performing a test authentication.
9800#debug radius
9800#debug radius radsec
9800#terminal monitor
This is the output of a successful authentication with debugs enabled:
9800#test aaa group Radsec testuser Cisco123 new-code
User successfully authenticated

USER ATTRIBUTES

username             0   "testuser"
9800#
Jul 18 21:24:38.301: %PARSER-5-HIDDEN: Warning!!! ' test platform-aaa group server-group Radsec user-name testuser Cisco123 new-code blocked count delay level profile rate users ' is a hidden command. Use of this command is not recommended/supported and will be removed in future.
Jul 18 21:24:38.313: RADIUS/ENCODE(00000000):Orig. component type = Invalid
Jul 18 21:24:38.313: RADIUS/ENCODE(00000000): dropping service type, "radius-server attribute 6 on-for-login-auth" is off
Jul 18 21:24:38.313: RADIUS(00000000): Config NAS IP: 0.0.0.0
Jul 18 21:24:38.313: vrfid: [65535]  ipv6 tableid : [0]
Jul 18 21:24:38.313: idb is NULL
Jul 18 21:24:38.313: RADIUS(00000000): Config NAS IPv6: ::
Jul 18 21:24:38.313: RADIUS(00000000): sending
Jul 18 21:24:38.313: RADIUS/DECODE(00000000): There is no General DB. Want server details may not be specified
Jul 18 21:24:38.313: RADSEC: DTLS default secret
Jul 18 21:24:38.313: RADIUS/ENCODE: Best Local IP-Address 172.16.5.11 for Radius-Server 172.16.18.123
Jul 18 21:24:38.313: RADSEC: DTLS default secret
Jul 18 21:24:38.313: RADIUS(00000000): Send Access-Request to 172.16.18.123:2083 id 53808/10, len 54
RADIUS:  authenticator C3 4E 34 0A 91 EF 42 53 - 7E C8 BB 50 F3 98 B3 14
Jul 18 21:24:38.313: RADIUS:  User-Password       [2]   18  *
Jul 18 21:24:38.313: RADIUS:  User-Name           [1]   10  "testuser"
Jul 18 21:24:38.313: RADIUS:  NAS-IP-Address      [4]   6   172.16.5.11
Jul 18 21:24:38.313: RADIUS_RADSEC_ENQ_WAIT_Q: Success Server(172.16.18.123)/Id(10)
Jul 18 21:24:38.313: RADIUS_RADSEC_CLIENT_PROCESS: Got DATA SEND MSG
Jul 18 21:24:38.313: RADIUS_RADSEC_SOCK_SET:  0 Success
Jul 18 21:24:38.313: RADIUS_RADSEC_GENERATE_HASHKEY: hash key(0) generated for sock(0)
Jul 18 21:24:38.313: RADIUS_RADSEC_GENERATE_HASHBUCKET: hash bucket(0) generated for sock(0)
Jul 18 21:24:38.313: RADIUS_RADSEC_HASH_KEY_ADD_CTX: add [radius_radsec ctx(0x7522CE91BAC0)] succeedd for sock_no(0)
Jul 18 21:24:38.313: RADIUS_RADSEC_GET_SOURCE_ADDR: Success
Jul 18 21:24:38.313: RADIUS_RADSEC_GET_SOCK_ADDR: Success
Jul 18 21:24:38.313: RADIUS_RADSEC_SET_LOCAL_SOCK: Success
Jul 18 21:24:38.313: RADIUS_RADSEC_SOCK_SET: Success
Jul 18 21:24:38.314: RADIUS_RADSEC_BIND_SOCKET: Success
Jul 18 21:24:38.314: RADIUS_RADSEC_CONN_SET_LPORT: Success
Jul 18 21:24:38.314: RADIUS_RADSEC_CONN_SET_SERVER_PORT: Success
Jul 18 21:24:38.314: RADIUS_RADSEC_CLIENT_HS_START: local port = 54509
Jul 18 21:24:38.314: RADIUS_RADSEC_SOCKET_CONNECT: Success
Jul 18 21:24:38.315: RADIUS_RADSEC_UPDATE_SVR_REF_CNT: Got radsec_data
Jul 18 21:24:38.315: RADIUS_RADSEC_UPDATE_SVR_REF_CNT: Got valid rctx, with server_handle B0000019
Jul 18 21:24:38.316: RADIUS_RADSEC_CLIENT_HS_START: TLS handshake in progress...(172.16.18.123/2083)
Jul 18 21:24:38.316: RADIUS_RADSEC_START_CONN_TIMER: Started (172.16.18.123/2083) for 5 secs
Jul 18 21:24:38.316: RADIUS_RADSEC_CONN_STATE_UPDATE: Success - State = 2
Jul 18 21:24:38.318: RADIUS_RADSEC_CLIENT_PROCESS: Got Socket Event
Jul 18 21:24:38.318: RADIUS_RADSEC_GENERATE_HASHBUCKET: hash bucket(0) generated for sock(0)
Jul 18 21:24:38.318: RADIUS_RADSEC_GENERATE_HASHKEY: hash key(0) generated for sock(0)
Jul 18 21:24:38.318: RADIUS_RADSEC_HASH_KEY_MATCH: hashkey1(0) matches hashkey2(0) TRUE
Jul 18 21:24:38.318: RADIUS_RADSEC_HASH_KEY_GET_CTX: radius radsec  sock_ctx(0x7522CE91BAC0:0) get for key sock_no(0) succeeded
Jul 18 21:24:38.318: RADIUS_RADSEC_PROCESS_SOCK_EVENT: Handle socket event for TLS handshake(172.16.18.123/2083)
Jul 18 21:24:38.318: RADIUS_RADSEC_STOP_TIMER: Stopped (172.16.18.123/2083)
Jul 18 21:24:38.318: RADIUS_RADSEC_START_CONN_TIMER: Started (172.16.18.123/2083) for 5 secs
Jul 18 21:24:38.318: RADIUS_RADSEC_HS_CONTINUE: TLS handshake in progress...(172.16.18.123/2083)
Jul 18 21:24:38.318: RADIUS_RADSEC_SOCK_TLS_EVENT_HANDLE: Success
Jul 18 21:24:38.318: RADIUS_RADSEC_CLIENT_PROCESS: Got Socket Event
Jul 18 21:24:38.327: RADIUS_RADSEC_CLIENT_PROCESS: Got Socket Event
Jul 18 21:24:38.327: RADIUS_RADSEC_GENERATE_HASHBUCKET: hash bucket(0) generated for sock(0)
Jul 18 21:24:38.327: RADIUS_RADSEC_GENERATE_HASHKEY: hash key(0) generated for sock(0)
Jul 18 21:24:38.327: RADIUS_RADSEC_HASH_KEY_MATCH: hashkey1(0) matches hashkey2(0) TRUE
Jul 18 21:24:38.327: RADIUS_RADSEC_HASH_KEY_GET_CTX: radius radsec  sock_ctx(0x7522CE91BAC0:0) get for key sock_no(0) succeeded
Jul 18 21:24:38.327: RADIUS_RADSEC_PROCESS_SOCK_EVENT: Handle socket event for TLS handshake(172.16.18.123/2083)
Jul 18 21:24:38.327: RADIUS_RADSEC_STOP_TIMER: Stopped (172.16.18.123/2083)
Jul 18 21:24:38.391: RADIUS_RADSEC_START_CONN_TIMER: Started (172.16.18.123/2083) for 5 secs
Jul 18 21:24:38.391: RADIUS_RADSEC_HS_CONTINUE: TLS handshake in progress...(172.16.18.123/2083)
Jul 18 21:24:38.391: RADIUS_RADSEC_SOCK_TLS_EVENT_HANDLE: Success
Jul 18 21:24:38.391: RADIUS_RADSEC_CLIENT_PROCESS: Got Socket Event
Jul 18 21:24:38.397: RADIUS_RADSEC_CLIENT_PROCESS: Got Socket Event
Jul 18 21:24:38.397: RADIUS_RADSEC_GENERATE_HASHBUCKET: hash bucket(0) generated for sock(0)
Jul 18 21:24:38.397: RADIUS_RADSEC_GENERATE_HASHKEY: hash key(0) generated for sock(0)
Jul 18 21:24:38.397: RADIUS_RADSEC_HASH_KEY_MATCH: hashkey1(0) matches hashkey2(0) TRUE
Jul 18 21:24:38.397: RADIUS_RADSEC_HASH_KEY_GET_CTX: radius radsec  sock_ctx(0x7522CE91BAC0:0) get for key sock_no(0) succeeded
Jul 18 21:24:38.397: RADIUS_RADSEC_PROCESS_SOCK_EVENT: Handle socket event for TLS handshake(172.16.18.123/2083)
Jul 18 21:24:38.397: RADIUS_RADSEC_STOP_TIMER: Stopped (172.16.18.123/2083)
Jul 18 21:24:38.397: RADIUS_RADSEC_HS_CONTINUE: TLS handshake success!(172.16.18.123/2083) <-------- TLS tunnel establishes succesfully
Jul 18 21:24:38.397: RADIUS_RADSEC_CONN_STATE_UPDATE: Success - State = 3
Jul 18 21:24:38.397: RADIUS_RADSEC_UPDATE_SVR_REF_CNT: Got radsec_data
Jul 18 21:24:38.397: RADIUS_RADSEC_UPDATE_SVR_REF_CNT: Got valid rctx, with server_handle B0000019
Jul 18 21:24:38.397: RADIUS-RADSEC-HS-SUCCESS: Negotiated Cipher is ECDHE-RSA-AES256-GCM-SHA384
Jul 18 21:24:38.397: RADIUS_RADSEC_START_DATA_SEND: RADSEC HS Done, Start data send (172.16.18.123/2083)
Jul 18 21:24:38.397: RADIUS_RADSEC_UNQUEUE_WAIT_Q: Success Server(172.16.18.123)/Id(10)
Jul 18 21:24:38.397: RADIUS_RADSEC_MSG_SEND: RADSEC Write SUCCESS(id=10)
Jul 18 21:24:38.397: RADIUS(00000000): Started 5 sec timeout
Jul 18 21:24:38.397: RADIUS_RADSEC_UNQUEUE_WAIT_Q: Empty Server(172.16.18.123)/Id(-1)
Jul 18 21:24:38.397: RADIUS_RADSEC_START_DATA_SEND: no more data available
Jul 18 21:24:38.397: RADIUS_RADSEC_IDLE_TIMER: Started (172.16.18.123/2083)
Jul 18 21:24:38.397: RADIUS-RADSEC-HS-SUCCESS: Success
Jul 18 21:24:38.397: RADIUS_RADSEC_SOCK_TLS_EVENT_HANDLE: Success
Jul 18 21:24:38.397: RADIUS_RADSEC_CLIENT_PROCESS: Got Socket Event
Jul 18 21:24:38.453: RADIUS_RADSEC_CLIENT_PROCESS: Got Socket Event
Jul 18 21:24:38.453: RADIUS_RADSEC_GENERATE_HASHBUCKET: hash bucket(0) generated for sock(0)
Jul 18 21:24:38.453: RADIUS_RADSEC_GENERATE_HASHKEY: hash key(0) generated for sock(0)
Jul 18 21:24:38.453: RADIUS_RADSEC_HASH_KEY_MATCH: hashkey1(0) matches hashkey2(0) TRUE
Jul 18 21:24:38.453: RADIUS_RADSEC_HASH_KEY_GET_CTX: radius radsec  sock_ctx(0x7522CE91BAC0:0) get for key sock_no(0) succeeded
Jul 18 21:24:38.453: RADIUS_RADSEC_MSG_RECV: RADSEC Bytes read= 20, Err= 0
Jul 18 21:24:38.453: RADIUS_RADSEC_SOCK_READ_EVENT_HANDLE: Radius length is 113
Jul 18 21:24:38.453: RADIUS_RADSEC_SOCK_READ_EVENT_HANDLE: Going to read rest 93 bytes
Jul 18 21:24:38.453: RADIUS_RADSEC_MSG_RECV: RADSEC Bytes read= 93, Err= 0
Jul 18 21:24:38.453: RADIUS_RADSEC_SOCK_READ_EVENT_HANDLE: linktype = 7 - src port = 2083 - dest port = 54509 - udp len = 121 - datagram size = 141
Jul 18 21:24:38.453: RADIUS: Received from id 54509/10 172.16.18.123:2083, Access-Accept, len 113 <----------Radius response from ISE
RADIUS:  authenticator 4E CE 96 63 41 4B 43 04 - C7 A2 B5 05 C2 78 A7 0D
Jul 18 21:24:38.453: RADIUS:  User-Name           [1]   10  "testuser"
Jul 18 21:24:38.453: RADIUS:  Class               [25]  83
RADIUS:   43 41 43 53 3A 61 63 31 30 31 32 37 62 64 38 74  [CACS:ac10127bd8t]
RADIUS:   47 58 50 47 4E 63 6C 57 76 2F 39 67 44 66 51 67  [GXPGNclWv/9gDfQg]
RADIUS:   63 4A 76 6C 35 47 72 33 71 71 47 36 4C 66 35 59  [cJvl5Gr3qqG6Lf5Y]
RADIUS:   52 42 2F 7A 57 55 39 59 3A 69 73 65 2D 76 62 65  [RB/zWU9Y:ise-vbe]
RADIUS:   74 61 6E 63 6F 2F 35 31 30 34 33 39 38 32 36 2F  [tanco/510439826/]
RADIUS:   39                 [ 9]
Jul 18 21:24:38.453: RADSEC: DTLS default secret
Jul 18 21:24:38.453: RADIUS/DECODE(00000000): There is no General DB. Reply server details may not be recorded
Jul 18 21:24:38.453: RADIUS(00000000): Received from id 54509/10
Unknown CA Reported by WLC
When the WLC cannot validate certificates provided by ISE, it fails to create the DTLS tunnel and authentications fail.
This is a sample of the debug messages presented when this is the case:
9800#test aaa group Radsec testuser Cisco123 new-code

Jul 19 00:59:09.695: %PARSER-5-HIDDEN: Warning!!! ' test platform-aaa group server-group Radsec user-name testuser Cisco123 new-code blocked count delay level profile rate users ' is a hidden command. Use of this command is not recommended/supported and will be removed in future.
Jul 19 00:59:09.706: RADIUS/ENCODE(00000000):Orig. component type = Invalid
Jul 19 00:59:09.707: RADIUS/ENCODE(00000000): dropping service type, "radius-server attribute 6 on-for-login-auth" is off
Jul 19 00:59:09.707: RADIUS(00000000): Config NAS IP: 0.0.0.0
Jul 19 00:59:09.707: vrfid: [65535]  ipv6 tableid : [0]
Jul 19 00:59:09.707: idb is NULL
Jul 19 00:59:09.707: RADIUS(00000000): Config NAS IPv6: ::
Jul 19 00:59:09.707: RADIUS(00000000): sending
Jul 19 00:59:09.707: RADIUS/DECODE(00000000): There is no General DB. Want server details may not be specified
Jul 19 00:59:09.707: RADSEC: DTLS default secret
Jul 19 00:59:09.707: RADIUS/ENCODE: Best Local IP-Address 172.16.5.11 for Radius-Server 172.16.18.123
Jul 19 00:59:09.707: RADSEC: DTLS default secret
Jul 19 00:59:09.707: RADIUS(00000000): Send Access-Request to 172.16.18.123:2083 id 52764/13, len 54
RADIUS:  authenticator E8 09 1D B0 72 50 17 E6 - B4 27 F6 E3 18 25 16 64
Jul 19 00:59:09.707: RADIUS:  User-Password       [2]   18  *
Jul 19 00:59:09.707: RADIUS:  User-Name           [1]   10  "testuser"
Jul 19 00:59:09.707: RADIUS:  NAS-IP-Address      [4]   6   172.16.5.11
Jul 19 00:59:09.707: RADIUS_RADSEC_ENQ_WAIT_Q: Success Server(172.16.18.123)/Id(13)
Jul 19 00:59:09.707: RADIUS_RADSEC_CLIENT_PROCESS: Got DATA SEND MSG
Jul 19 00:59:09.707: RADIUS_RADSEC_SOCK_SET:  0 Success
Jul 19 00:59:09.707: RADIUS_RADSEC_GENERATE_HASHKEY: hash key(0) generated for sock(0)
Jul 19 00:59:09.707: RADIUS_RADSEC_GENERATE_HASHBUCKET: hash bucket(0) generated for sock(0)
Jul 19 00:59:09.707: RADIUS_RADSEC_HASH_KEY_ADD_CTX: add [radius_radsec ctx(0x7522CE91BAC0)] succeedd for sock_no(0)
Jul 19 00:59:09.707: RADIUS_RADSEC_GET_SOURCE_ADDR: Success
Jul 19 00:59:09.707: RADIUS_RADSEC_GET_SOCK_ADDR: Success
Jul 19 00:59:09.707: RADIUS_RADSEC_SET_LOCAL_SOCK: Success
Jul 19 00:59:09.707: RADIUS_RADSEC_SOCK_SET: Success
Jul 19 00:59:09.707: RADIUS_RADSEC_BIND_SOCKET: Success
Jul 19 00:59:09.707: RADIUS_RADSEC_CONN_SET_LPORT: Success
Jul 19 00:59:09.707: RADIUS_RADSEC_CONN_SET_SERVER_PORT: Success
Jul 19 00:59:09.707: RADIUS_RADSEC_CLIENT_HS_START: local port = 49556
Jul 19 00:59:09.707: RADIUS_RADSEC_SOCKET_CONNECT: Success
Jul 19 00:59:09.709: RADIUS_RADSEC_UPDATE_SVR_REF_CNT: Got radsec_data
Jul 19 00:59:09.709: RADIUS_RADSEC_UPDATE_SVR_REF_CNT: Got valid rctx, with server_handle B0000019
Jul 19 00:59:09.709: RADIUS_RADSEC_CLIENT_HS_START: TLS handshake in progress...(172.16.18.123/2083)
Jul 19 00:59:09.709: RADIUS_RADSEC_START_CONN_TIMER: Started (172.16.18.123/2083) for 5 secsUser rejected

uwu-9800#
Jul 19 00:59:09.709: RADIUS_RADSEC_CONN_STATE_UPDATE: Success - State = 2
Jul 19 00:59:09.711: RADIUS_RADSEC_CLIENT_PROCESS: Got Socket Event
Jul 19 00:59:09.711: RADIUS_RADSEC_GENERATE_HASHBUCKET: hash bucket(0) generated for sock(0)
Jul 19 00:59:09.711: RADIUS_RADSEC_GENERATE_HASHKEY: hash key(0) generated for sock(0)
Jul 19 00:59:09.711: RADIUS_RADSEC_HASH_KEY_MATCH: hashkey1(0) matches hashkey2(0) TRUE
Jul 19 00:59:09.711: RADIUS_RADSEC_HASH_KEY_GET_CTX: radius radsec  sock_ctx(0x7522CE91BAC0:0) get for key sock_no(0) succeeded
Jul 19 00:59:09.711: RADIUS_RADSEC_PROCESS_SOCK_EVENT: Handle socket event for TLS handshake(172.16.18.123/2083)
Jul 19 00:59:09.711: RADIUS_RADSEC_STOP_TIMER: Stopped (172.16.18.123/2083)
Jul 19 00:59:09.711: RADIUS_RADSEC_START_CONN_TIMER: Started (172.16.18.123/2083) for 5 secs
Jul 19 00:59:09.711: RADIUS_RADSEC_HS_CONTINUE: TLS handshake in progress...(172.16.18.123/2083)
Jul 19 00:59:09.711: RADIUS_RADSEC_SOCK_TLS_EVENT_HANDLE: Success
Jul 19 00:59:09.713: RADIUS_RADSEC_CLIENT_PROCESS: Got Socket Event
Jul 19 00:59:09.720: RADIUS_RADSEC_CLIENT_PROCESS: Got Socket Event
Jul 19 00:59:09.720: RADIUS_RADSEC_GENERATE_HASHBUCKET: hash bucket(0) generated for sock(0)
Jul 19 00:59:09.720: RADIUS_RADSEC_GENERATE_HASHKEY: hash key(0) generated for sock(0)
Jul 19 00:59:09.720: RADIUS_RADSEC_HASH_KEY_MATCH: hashkey1(0) matches hashkey2(0) TRUE
Jul 19 00:59:09.720: RADIUS_RADSEC_HASH_KEY_GET_CTX: radius radsec  sock_ctx(0x7522CE91BAC0:0) get for key sock_no(0) succeeded
Jul 19 00:59:09.720: RADIUS_RADSEC_PROCESS_SOCK_EVENT: Handle socket event for TLS handshake(172.16.18.123/2083)
Jul 19 00:59:09.720: RADIUS_RADSEC_STOP_TIMER: Stopped (172.16.18.123/2083)
Jul 19 00:59:09.722: RADIUS_RADSEC_HS_CONTINUE: TLS handshake failed!
Jul 19 00:59:09.722: RADIUS_RADSEC_UNQUEUE_WAIT_Q: Success Server(172.16.18.123)/Id(13)
Jul 19 00:59:09.722: RADIUS_RADSEC_FAILOVER_HANDLER:Failng-over to new server = 0x0
Jul 19 00:59:09.722: RADIUS_RADSEC_UNQUEUE_WAIT_Q: Empty Server(172.16.18.123)/Id(-1)
Jul 19 00:59:09.722: RADIUS_RADSEC_FAILOVER_HANDLER: no more data available
Jul 19 00:59:09.722: RADIUS_RADSEC_STOP_TIMER: Stopped (172.16.18.123/2083)
Jul 19 00:59:09.722: RADIUS_RADSEC_CONN_CLOSE: Cleaned up timers for Radius RADSEC ctx
Jul 19 00:59:09.722: RADIUS_RADSEC_GENERATE_HASHKEY: hash key(0) generated for sock(0)
Jul 19 00:59:09.722: RADIUS_RADSEC_GENERATE_HASHBUCKET: hash bucket(0) generated for sock(0)
Jul 19 00:59:09.722: RADIUS_RADSEC_HASH_KEY_DEL_CTX: remove [radius_radsec  ctx(0x7522CE91BAC0)] succeeded for sock_no(0)
Jul 19 00:59:09.722: RADIUS_RADSEC_CONN_CLOSE: Hash table entry removed for RADSEC sock ctx
Jul 19 00:59:09.723: RADIUS_RADSEC_CONN_CLOSE: Success
Jul 19 00:59:09.723: RADIUS_RADSEC_SOCK_TLS_EVENT_HANDLE: Failed to complete TLS handshake <----------DTLS tunnel failed to negociate
Jul 19 00:59:09.723: RADIUS_RADSEC_STOP_TIMER: Stopped (172.16.18.123/2083)
Jul 19 00:59:09.723: RADIUS_RADSEC_CONN_CLOSE: Cleaned up timers for Radius RADSEC ctx
Jul 19 00:59:09.723: RADIUS_RADSEC_GENERATE_HASHKEY: hash key(-1) generated for sock(-1)
Jul 19 00:59:09.723: RADIUS_RADSEC_GENERATE_HASHBUCKET: hash bucket(-1) generated for sock(-1)
uwu-9800#
Jul 19 00:59:09.723: RADIUS_RADSEC_HASH_KEY_DEL_CTX: remove [radius_radsec  ctx(0x7522CE91BAC0)] succeeded for sock_no(-1)
Jul 19 00:59:09.723: RADIUS_RADSEC_CONN_CLOSE: Hash table entry removed for RADSEC sock ctx
Jul 19 00:59:09.723: RADIUS_RADSEC_CONN_CLOSE: Success
Jul 19 00:59:09.723: RADIUS_RADSEC_SOCK_TLS_EVENT_HANDLE: Error
Jul 19 00:59:09.723: RADIUS_RADSEC_PROCESS_SOCK_EVENT: failed to hanlde radsec hs event
Jul 19 00:59:09.723: RADIUS/DECODE: No response from radius-server; parse response; FAIL
Jul 19 00:59:09.723: RADIUS/DECODE: Case error(no response/ bad packet/ op decode);parse response; FAIL
Jul 19 00:59:09.723: RADIUS_RADSEC_CLIENT_PROCESS: Got Socket Event
Jul 19 00:59:10.718: %RADSEC_AUDIT_MESSAGE-3-FIPS_AUDIT_FCS_RADSEC_SERVER_CERTIFICATE_VALIDATION_FAILURE: Chassis 1 R0/0: sessmgrd: RADSEC server certificate validation failed with server 172.16.18.123
Jul 19 00:59:10.718: %RADSEC_AUDIT_MESSAGE-3-FIPS_AUDIT_FCS_RADSEC_SERVER_IDENTITY_CHECK_FAILURE: Chassis 1 R0/0: sessmgrd: RADSEC server identity check failed with server 172.16.18.123 <-----WLC fails to validate the identity on the certificate
Jul 19 00:59:10.718: %RADSEC_AUDIT_MESSAGE-6-FIPS_AUDIT_FCS_DTLSC_DTLS_SESSION_CLOSED: Chassis 1 R0/0: sessmgrd: RADSEC DTLS connection closed with peer 172.16.18.123
To correct it, ensure the identity configured on the WLC exactly matches one of the SANs included on the ISE certificate:
9800(config)#radius server <server name>
9800(config)#dtls match-server-identity hostname <SAN>
Make sure that the CA certificate chain is correctly imported on the controller and that the dtls trustpoint server <trustpoint> configuration uses the Issuer CA trustpoint.
Unknown CA Reported by ISE
When ISE cannot validate certificates provided by the WLC, it fails to create the DTLS tunnel and authentications fail. This shows up as an error in the RADIUS Live Logs. Navigate to Operations>Radius>Live logs to verify.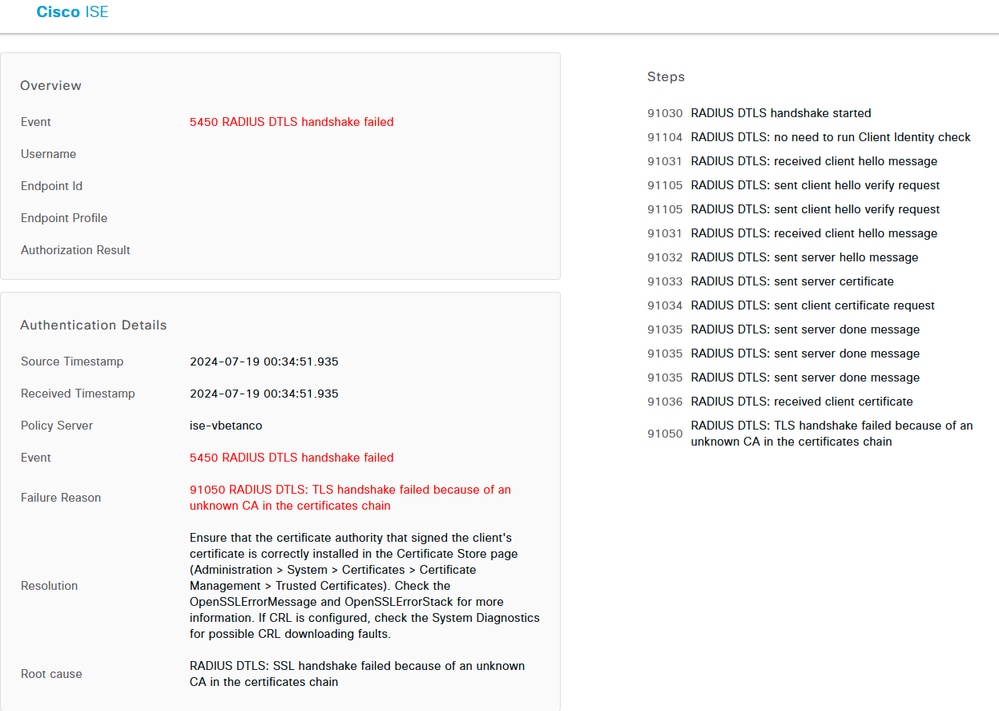 ISE Live Log Reports DTLS Handshake Failure due to Unknown CA
To correct it, ensure both Intermediate and Root Certificates, select the Trust for client authentication and Syslog checkboxes under Administration>System>Certificates>Trusted certificates.
Revocation Check is in Place
When the certificates are imported to the WLC, the newly created trustpoints have revocation check enabled. This makes the WLC try to search for a Certificate Revocation List which is not available or reachable and fails the certificate verification.
Ensure the each trustpoint in the verification path for the certificates contains the command revocation-check none .
Jul 17 21:50:39.064: RADIUS_RADSEC_HASH_KEY_MATCH: hashkey1(0) matches hashkey2(0) TRUE
Jul 17 21:50:39.064: RADIUS_RADSEC_HASH_KEY_GET_CTX: radius radsec  sock_ctx(0x780FB0715978:0) get for key sock_no(0) succeeded
Jul 17 21:50:39.064: RADIUS_RADSEC_PROCESS_SOCK_EVENT: Handle socket event for TLS handshake(172.16.18.123/2083)
Jul 17 21:50:39.064: RADIUS_RADSEC_STOP_TIMER: Stopped (172.16.18.123/2083)
Jul 17 21:50:39.068: %PKI-3-CRL_FETCH_FAIL: CRL fetch for trustpoint WLC1.pfx failed
                      Reason : Enrollment URL not configured. <------ WLC tries to perform revocation check
Jul 17 21:50:39.070: RADIUS_RADSEC_HS_CONTINUE: TLS handshake failed!
Jul 17 21:50:39.070: RADIUS_RADSEC_UNQUEUE_WAIT_Q: Success Server(172.16.18.123)/Id(2)
Jul 17 21:50:39.070: RADIUS_RADSEC_FAILOVER_HANDLER:Failng-over to new server = 0x0
Jul 17 21:50:39.070: RADIUS_RADSEC_UNQUEUE_WAIT_Q: Empty Server(172.16.18.123)/Id(-1)
Jul 17 21:50:39.070: RADIUS_RADSEC_FAILOVER_HANDLER: no more data available
Jul 17 21:50:39.070: RADIUS_RADSEC_STOP_TIMER: Stopped (172.16.18.123/2083)
Jul 17 21:50:39.070: RADIUS_RADSEC_CONN_CLOSE: Cleaned up timers for Radius RADSEC ctx
Jul 17 21:50:39.070: RADIUS_RADSEC_GENERATE_HASHKEY: hash key(0) generated for sock(0)
Jul 17 21:50:39.070: RADIUS_RADSEC_GENERATE_HASHBUCKET: hash bucket(0) generated for sock(0)
Jul 17 21:50:39.070: RADIUS_RADSEC_HASH_KEY_DEL_CTX: remove [radius_radsec  ctx(0x780FB0715978)] succeeded for sock_no(0)
Jul 17 21:50:39.070: RADIUS_RADSEC_CONN_CLOSE: Hash table entry removed for RADSEC sock ctx
Jul 17 21:50:39.070: RADIUS_RADSEC_CONN_CLOSE: Success
Jul 17 21:50:39.070: RADIUS_RADSEC_SOCK_TLS_EVENT_HANDLE: Failed to complete TLS handshake
Jul 17 21:50:39.070: RADIUS_RADSEC_STOP_TIMER: Stopped (172.16.18.123/2083)
Jul 17 21:50:39.070: RADIUS_RADSEC_CONN_CLOSE: Cleaned up timers for Radius RADSEC ctx
Jul 17 21:50:39.070: RADIUS_RADSEC_GENERATE_HASHKEY: hash key(-1) generated for sock(-1)
Jul 17 21:50:39.070: RADIUS_RADSEC_GENERATE_HASHBUCKET: hash bucket(-1) generated for sock(-1)
Jul 17 21:50:39.070: RADIUS_RADSEC_HASH_KEY_DEL_CTX: remove [radius_radsec  ctx(0x780FB0715978)] succeeded for sock_no(-1)
Jul 17 21:50:39.070: RADIUS_RADSEC_CONN_CLOSE: Hash table entry removed for RADSEC sock ctx
Jul 17 21:50:39.070: RADIUS_RADSEC_CONN_CLOSE: Success
Jul 17 21:50:39.070: RADIUS_RADSEC_SOCK_TLS_EVENT_HANDLE: Error
Jul 17 21:50:39.070: RADIUS_RADSEC_PROCESS_SOCK_EVENT: failed to hanlde radsec hs event
Jul 17 21:50:39.070: RADIUS_RADSEC_CLIENT_PROCESS: Got Socket Event
Troubleshoot DTLS Tunnel Establishment on Packet Capture
The 9800 WLC offers the Embedded Packet Capture (EPC) feature which allows you to capture the all the sent and received traffic for a given interface. ISE offers a similar feature called TCP dump to monitor incoming and outgoing traffic. When used at the same time, they allow you to analyze the DTLS session establishment traffic from the perspective of both devices.
Please refer to the Cisco Identity Services Engine Administrator Guide for detailed steps to configure TCP dump on ISE. Also refer to the Troubleshoot Catalyst 9800 Wireless LAN Controllers for information to configure the EPC feature on the WLC.
This is an example of a successful DTLS tunnel establishment.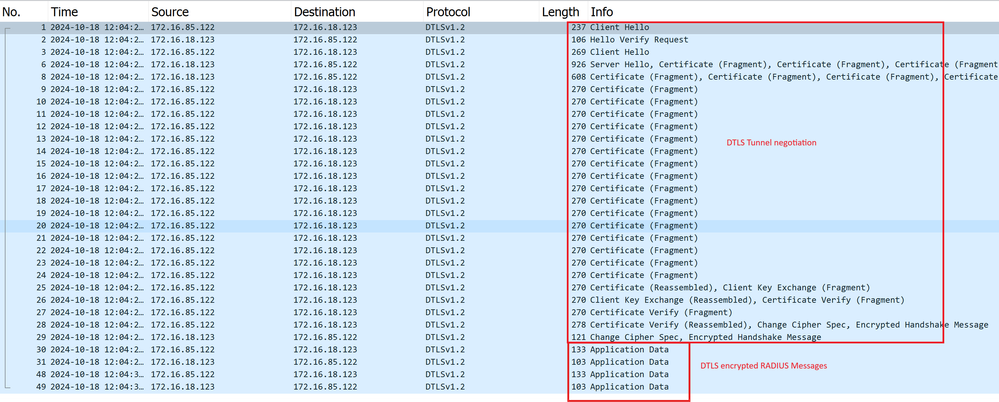 Packet Capture of a RADIUS DTLS Tunnel Negotiation and Encrypted Messages
Packet captures show how the DTLS tunnel establishment happens. If there is an issue with the negotiation, from lost traffic between devices or DTLS encrypted alert packets, the packet capture helps you identify the problem.
Revision History
| Revision | Publish Date | Comments |
|---|---|---|
1.0 |
24-Oct-2024 |
Initial Release |
Contributed by Cisco Engineers
- Mario MedinaTechnical Consulting Engineer
Contact Cisco
- Open a Support Case

- (Requires a Cisco Service Contract)
 Feedback