Introduction
This document describes how to configure Cisco DNA Spaces with Cisco Connected Mobile Experience (CMX) On-Prem.
Prerequisites
Requirements
Cisco recommends that you have knowledge of these topics:
- Command Line Interface (CLI) or Graphical User Interface (GUI) access to the AireOS wireless controllers
- Cisco DNA Spaces
- Cisco CMX
Components Used
The information in this document is based on these software and hardware versions:
- 5520 Wireless LAN Controller (WLC) version 8.8.120.0
- Cisco CMX 10.6.1-47
Configure
Network Diagram
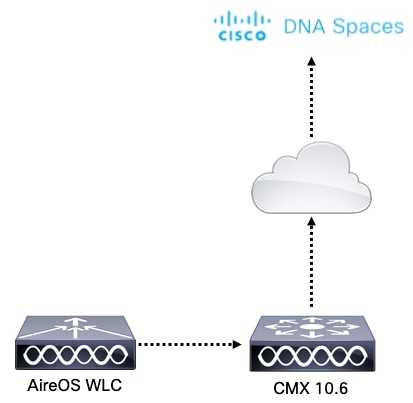
Configurations
To connect CMX to Cisco DNA Spaces, CMX must be able to reach Cisco DNA Spaces cloud over HTTPS.
Outbound Proxy Setup
This configuration is required if CMX is behind a proxy.
Step 1. Connect to the CMX CLI and run the following commands:
[cmxadmin@CMX-andressi ~]$ cmxos sysproxy http_proxy http://<proxy-server-address>:80/
[cmxadmin@CMX-andressi ~]$ cmxos sysproxy https_proxy https://<proxy-server-address>:443/
[cmxadmin@CMX-andressi ~]$ cmxos sysproxy no_proxy 127.0.0.1,localhost
[cmxadmin@CMX-andressi ~]$ cmxctl stop -a
[cmxadmin@CMX-andressi ~]$ cmxctl agent start
[cmxadmin@CMX-andressi ~]$ cmxctl start
Generate the Token on Cisco DNA Spaces
Step 1. Generate the token on DNA spaces.
Log in to Cisco DNA spaces and navigate to Setup > Wireless Setup > Add New

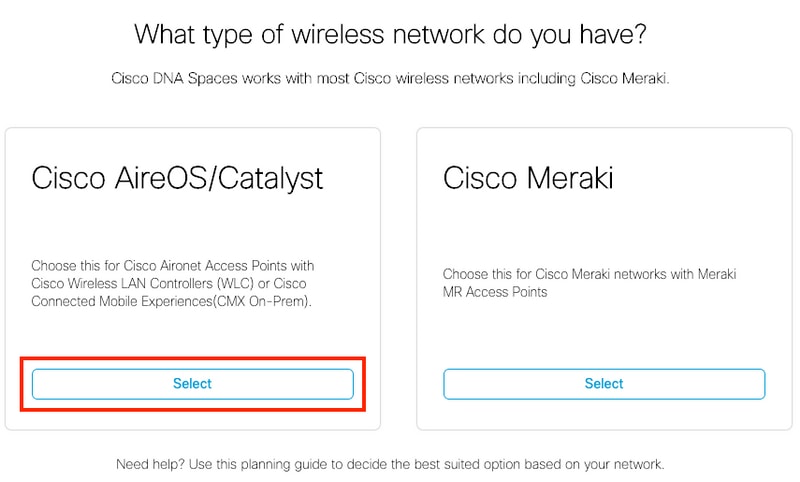
Step 2. Select Cisco AireOS/Catayst:
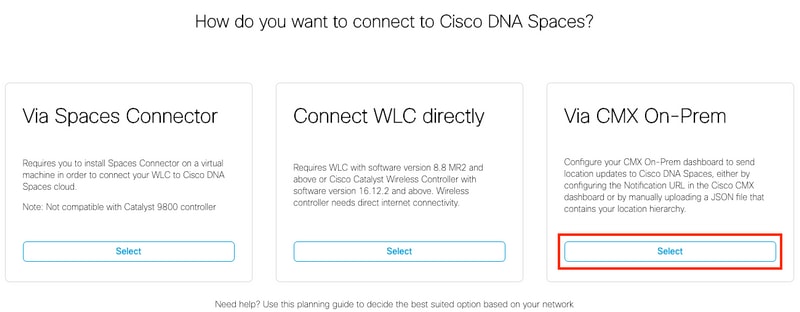
Step 3. Choose Via CMX On-Prem, then select the version of CMX.
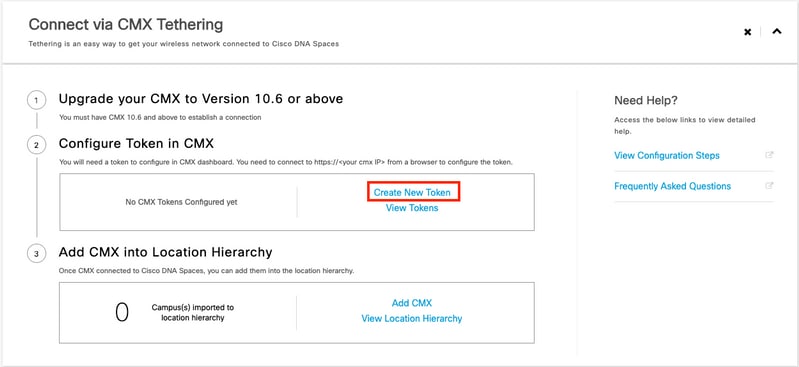
Step 4. Click on Customize Setup

Step 5. Click on Create New Token.
Step 6. Enter the name and description for the Token and click Save.
Step 7. In the new "Customize Setup" page, under the section Configure Token in CMX, click on View Tokens. Hover the mouse on the recently created token and click on the key icon:

Step 8. Enter your Cisco DNA Spaces credentials to view and copy the token that appears in the following screen.
Configure the Token on CMX
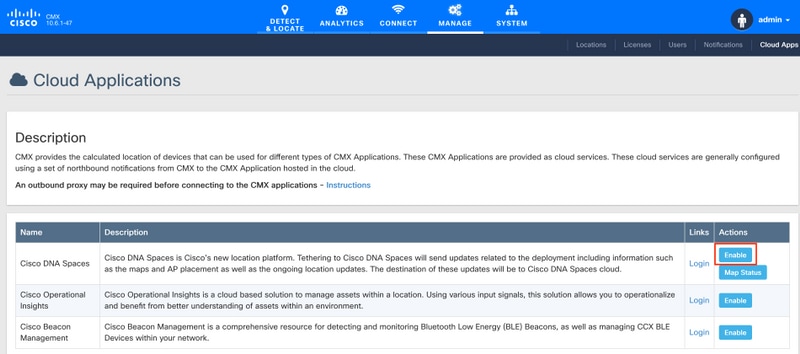
Step 1. Log in to Cisco CMX, navigate to Manage > Cloud Apps. Click on Enable, paste the Token and click Save.
Add CMX to the Location Hierarchy Cisco DNA Spaces
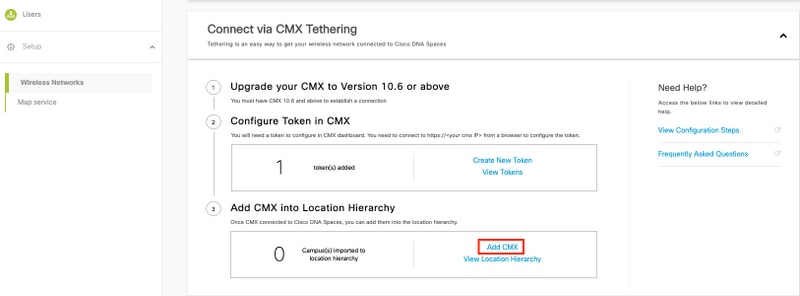
Step 1. Navigate to Setup > Wireless Networks on DNA spaces and click on Add CMX:
Step 2. Choose the location where you want to import CMX and click Next. If this is the first time you are importing a CMX, you may see the default location i.e. your Cisco DNA Spaces account Name.

Note: Cisco DNA Spaces will not allow you to add two CMX nodes with the same access point.
Step 3. Configure the Display Name, and select the Campus, Building and Floors that you want to add from CMX to the Location Hierarchy. Then, Click on Import.
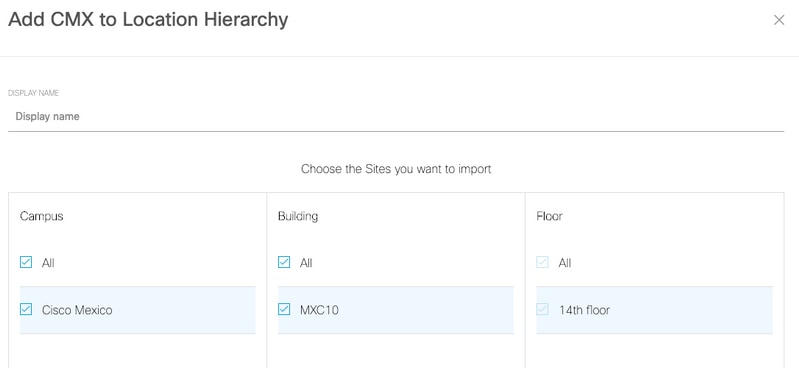
Cisco DNA Spaces organizes the Location Hierarchy based on the sites selected and it includes the APs associated to each site.
Step 4. Configure the timezone per-Campus/Building/Floor based on the location. Navigate to Location Hierarchy on Cisco DNA Spaces. Hover the mouse on the Campus, Building or Floor required, and click on Location Info. Enter the values and click Update.
Note: The timezone defined affects the Cisco DNA Spaces rules and reports.
Verify
To confirm that the Outbound Proxy is configured on CMX run this command:
[cmxadmin@CMX-andressi ~]$ cmxos sysproxy show
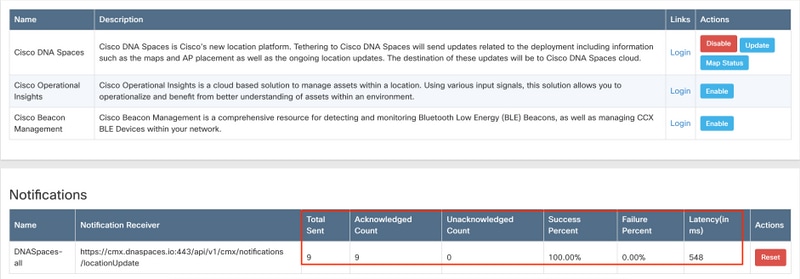
To confirm that CMX is communicating with Cisco DNA Spaces navigate to Manage > Cloud Apps on CMX and see the statistics of the northbound notification:
To confirm that the Location Hierarchy is configured as it is on CMX, navigate to Location Hierarchy on DNA Spaces and click on the CMX name:

Troubleshoot
There is currently no specific troubleshooting information available for this configuration.
