Configure Spaces Captive Portal with Catalyst 9800 WLC
Available Languages
Download Options
Bias-Free Language
The documentation set for this product strives to use bias-free language. For the purposes of this documentation set, bias-free is defined as language that does not imply discrimination based on age, disability, gender, racial identity, ethnic identity, sexual orientation, socioeconomic status, and intersectionality. Exceptions may be present in the documentation due to language that is hardcoded in the user interfaces of the product software, language used based on RFP documentation, or language that is used by a referenced third-party product. Learn more about how Cisco is using Inclusive Language.
Contents
Introduction
This document describes how to configure captive portals on Cisco Spaces.
Prerequisites
This document allows clients on the Catalyst 9800 Wireless LAN Controller (C9800 WLC) to use Spaces as an external web authentication log in page.
Requirements
Cisco recommends that you have knowledge of these topics:
- Command Line Interface (CLI) or Graphic User Interface (GUI) access to the 9800 wireless controllers
- Cisco Spaces
Components Used
The information in this document is based on these software and hardware versions:
- 9800-L controller version 16.12.2s
The information in this document was created from the devices in a specific lab environment. All of the devices used in this document started with a cleared (default) configuration. If your network is live, ensure that you understand the potential impact of any command.
Background Information
Web Authentication is a simple Layer 3 authentication method without the need for a supplicant or client utility. This can be done
a) With the Internal Page on C9800 WLC either as is or post modifications.
b) With customized log in bundle uploaded to C9800 WLC.
c) Custom log in page hosted on an external server.
To leverage the captive portal provided by Spaces is essentially a way to implement external web authentication for clients on C9800 WLC.
External webauth process is described in detail at: Web-Based Authentication on Cisco Catalyst 9800 Series Controllers
On C9800 WLC, the virtual-ip address is defined the global parameter-map and is typically 192.0.2.1
Configure
Network Diagram

Connect the 9800 Controller to Cisco Spaces
The controller needs to be connected to Spaces with any of these options - Direct Connect, via Spaces Connector, or with CMX Tethering.
In this example, the Direct Connect option is in use, although captive portals are configured the same way for all the setups.
To connect the controller to Cisco Spaces, it must be able to reach Cisco Spaces Cloud over HTTPS. For more information on how to connect the 9800 controller to Spaces refer to this link: Spaces - 9800 Controller Direct Connect
Create the SSID on Spaces
Step 1. Click Captive Portals in the dashboard of Spaces:

Step 2. Open the captive portal specific menu, click the three lines icon in the upper left corner of the page and click SSIDs:

Step 3. Click Import/Configure SSID, select CUWN (CMX/WLC) as the Wireless Network type, and enter the SSID name:

ACL and URL Filter Configuration on the 9800 Controller
Traffic from a wireless client is not allowed on the network until it has completed authentication. In case of web authentication, in order to complete it, a wireless client connects to this SSID, receives an IP address and then the client policy manager state is moved to Webauth_reqd state. Since the client is not authenticated yet, all traffic sourcing from the client IP address is dropped except for DHCP, DNS and HTTP (which is intercepted and redirected).
By default, the 9800 creates hardcoded pre-auth ACLs when you setup a web-auth WLAN. These hardcoded ACLs allow DHCP, DNS, and traffic to the external web auth server. All the rest is redirected like any http traffic.
However, if you need to allow specific non-HTTP traffic type through, you can configure a pre-auth ACL. You would then need to imitate the content of the existing hardcoded pre-auth ACL (from step 1 of this section) and augment it to your needs.
Step 1. Verify current hardcoded ACLs.
CLI configuration:
Andressi-9800L#show ip access list

Extended IP access list WA-sec-10.235.248.212
10 permit tcp any host 10.235.248.212 eq www
20 permit tcp any host 10.235.248.212 eq 443
30 permit tcp host 10.235.248.212 eq www any
40 permit tcp host 10.235.248.212 eq 443 any
50 permit tcp any any eq domain
60 permit udp any any eq domain
70 permit udp any any eq bootpc
80 permit udp any any eq bootps
90 deny ip any any

Extended IP access list WA-v4-int-10.235.248.212
10 deny tcp any host 10.235.248.212 eq www
20 deny tcp any host 10.235.248.212 eq 443
30 permit tcp any any eq www
40 permit tcp any host 192.0.2.1 eq 443
WA-sec-10.235.248.212 is called as such because it is an automatic Web auth (WA) security (sec) ACL or portal ip 10.235.248.212. Security ACLs defined what is allowed (on permit) or dropped (on deny). Wa-v4-int is an intercept ACL, that is a punt ACL or redirect ACL, and defines what is sent to CPU for redirection (on permit) or what is sent to dataplane (on deny).
WA-v4-int10.235.248.212 is applied first on traffic coming from the client and keeps HTTP(s) traffic towards Spaces portal IP 10.235.248.212 on the dataplane (not drop or forward action yet, just hand over to dataplane). It sends to CPU (for redirection except virtual IP traffic which is serviced by the web server) all HTTP(s) traffic. Other types of traffic are given to the dataplane.
WA-sec-10.235.248.212 permits HTTP and HTTPS traffic to the Cisco DNA space IP 10.235.248.212 that you configured in the web authentication parameter map and it also allows DNS and DHCP traffic and drops the rest. HTTP traffic to be intercepted was already intercepted before it hits this ACL and therefore does not need to be covered by this ACL.
Note: To get the IP addresses of Spaces to be allowed in the ACL, click the Configure Manually option from the SSID created in step 3 of section Create the SSID on Spaces under the ACL configuration section. An example is located in the section, What are the IP addresses that Spaces use, at the end of the document.
Spaces uses 2 IP addresses and the mechanism in step 1 only allows for one portal IP to be allowed. To allow pre-authentication access to more HTTP resources, you need to use URL filters which dynamically makes holes in the intercept (redirect) and security (preauth) ACLs for the IPs related to the website whose URL you enter in the URL filter. DNS requests are dynamically snooped for the 9800 to learn the IP address of those URLs and add it to the ACLs dynamically.
Step 2. Configure the URL filter to allow the Spaces domain.
Navigate to Configuration > Security > URL Filters. Click +Add and configure the list name. Select PRE-AUTH as the type, PERMIT as the action, and the URL splash.dnaspaces.io (or .eu if you use the EMEA portal):

CLI configuration:
Andressi-9800L(config)#urlfilter list <url-filter name>
Andressi-9800L(config-urlfilter-params)#action permit
Andressi-9800L(config-urlfilter-params)#url splash.dnaspaces.io
The SSID can be configured to use a RADIUS Server or without it. If that Session Duration, Bandwidth Limit, or Seamlessly Provision Internet is configured in the Actions section of the Captive Portal Rule configuration, the SSID needs to be configured with a RADIUS Server, otherwise, there is no need to use the RADIUS Server. All kinds of portals on Spaces are supported on both configurations.
Captive Portal without RADIUS Server on Spaces
Web Auth Parameter Map Configuration on the 9800 Controller
Step 1. Navigate to Configuration > Security > Web Auth. Click +Add to create a new parameter map. In the window that pops-up, configure the parameter map name, and select Consent as the type:

Step 2. Click the parameter map configured in the previous step, navigate to the Advanced tab and enter the Redirect for log-in URL, Append for AP MAC Address, Append for Client MAC Address, Append for WLAN SSID and portal IPv4 Address as illustrated. Click Update & Apply:
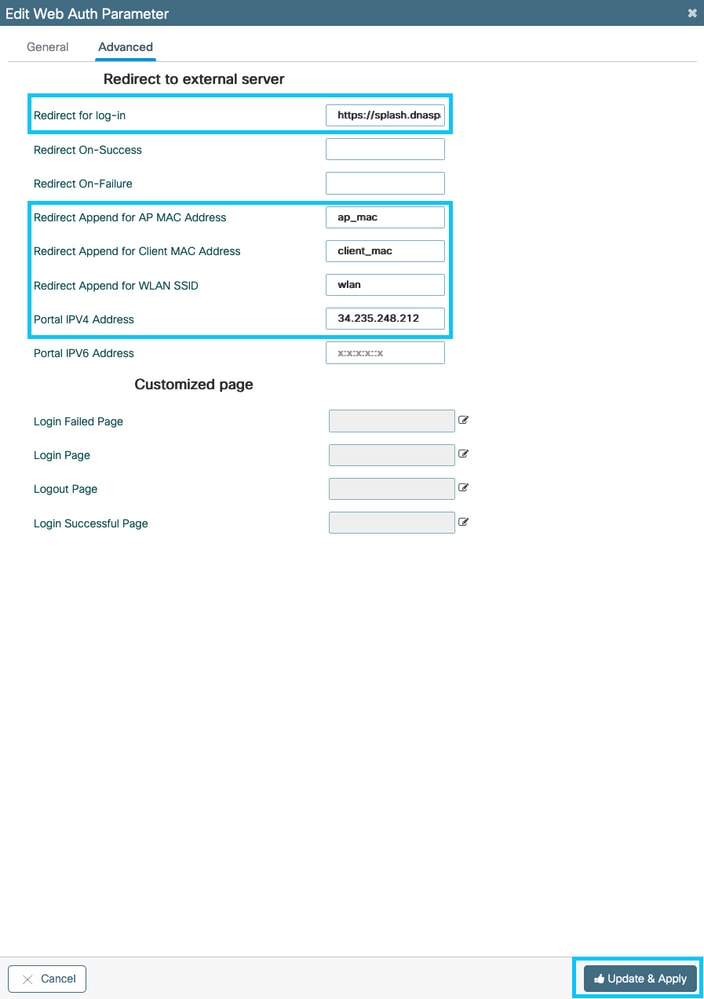

Note: To get the splash page URL and the IPv4 redirect address, click the Configure Manually option in the SSID page of Spaces. This is illustrated in the, What is the URL that Spaces portal use, at the end of the document.

Note: Cisco Spaces portal can resolve to two IP addresses, but the 9800 controller allows only one IP address to be configured. Choose any of those IP addresses and configure it on the parameter map as the Portal IPv4 Address.

Note: Ensure that both Virtual IPv4 and IPv6 addresses are configured in the global web auth parameter map. If the Virtual IPv6 is not configured, the clients are sometimes redirected to the internal portal instead of the configured Spaces portal. This is why a Virtual IP must always be configured. 192.0.2.1 can be configured as Virtual IPv4 and FE80:0:0:0:903A::11E4 as Virtual IPV6. There are little to no reasons to use other IPs than those.
CLI Configuration:
Andressi-9800L(config)#parameter-map type webauth <map name>
Andressi-9800L(config-params-parameter-map)#type consent
Andressi-9800L(config-params-parameter-map)#timeout init-state sec 600
Andressi-9800L(config-params-parameter-map)#redirect for-login <splashpage URL>
Andressi-9800L(config-params-parameter-map)#redirect append ap-mac tag ap_mac
Andressi-9800L(config-params-parameter-map)#redirect append wlan-ssid tag wlan
Andressi-9800L(config-params-parameter-map)#redirect append client-mac tag client_mac
Andressi-9800L(config-params-parameter-map)#redirect portal ipv4 <IP Address>
Andressi-9800L(config-params-parameter-map)#logout-window-disabled
Andressi-9800L(config-params-parameter-map)#success-window-disabled
Create the SSID on the 9800 Controller
Step 1. Navigate to Configuration > Tags & Profiles > WLANs. Click +Add. Configure the Profile Name, SSID, and enable the WLAN. Make sure the SSID name is the same name as the configured in step 3 of section Create the SSID on Spaces.

Step 2. Navigate to Security > Layer2. Set the Layer 2 Security Mode to None. Make sure MAC Filtering is disabled.

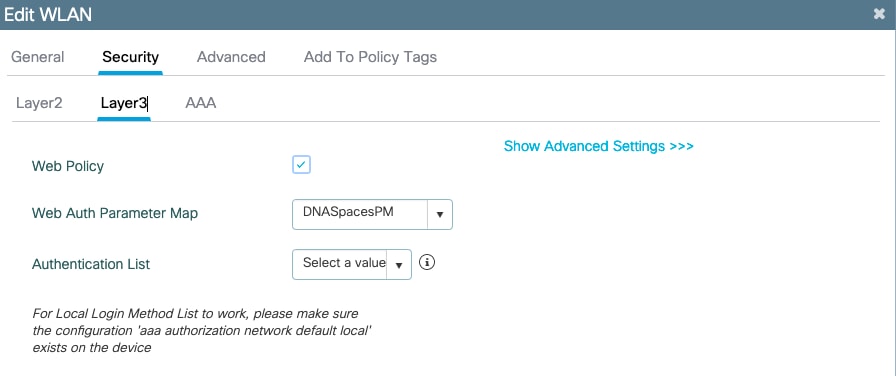
Step 3. Navigate to Security > Layer3. Enable Web Policy, and configure the web auth parameter map. Click Apply to Device.
Configure Policy Profile on the 9800 Controller
Step 1. Navigate to Configuration > Tags & Profiles > Policy and create a new Policy Profile or use the default Policy Profile. In the access Policies tab, configure the client VLAN and add the URL filter.

Configure Policy Tag on the 9800 Controller
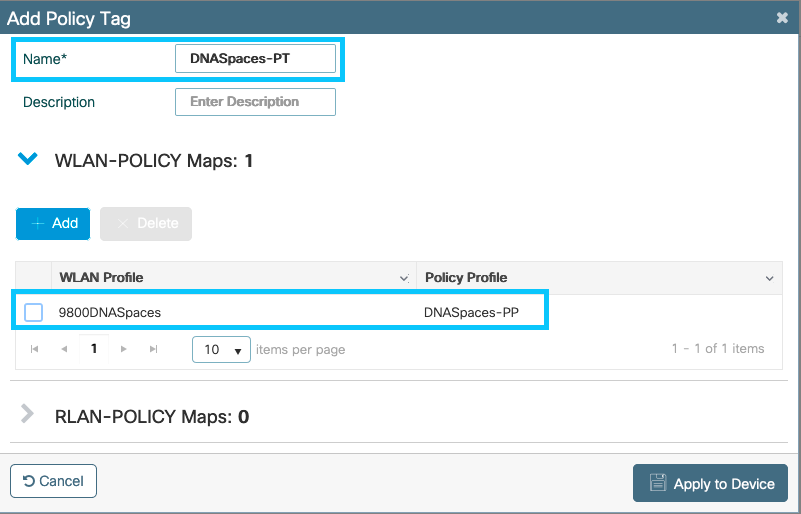
Step 1. Navigate to Configuration > Tags & Profiles > Policy. Create a new Policy Tag or use the default policy tag. Map the WLAN to the Policy Profile in the Policy Tag.
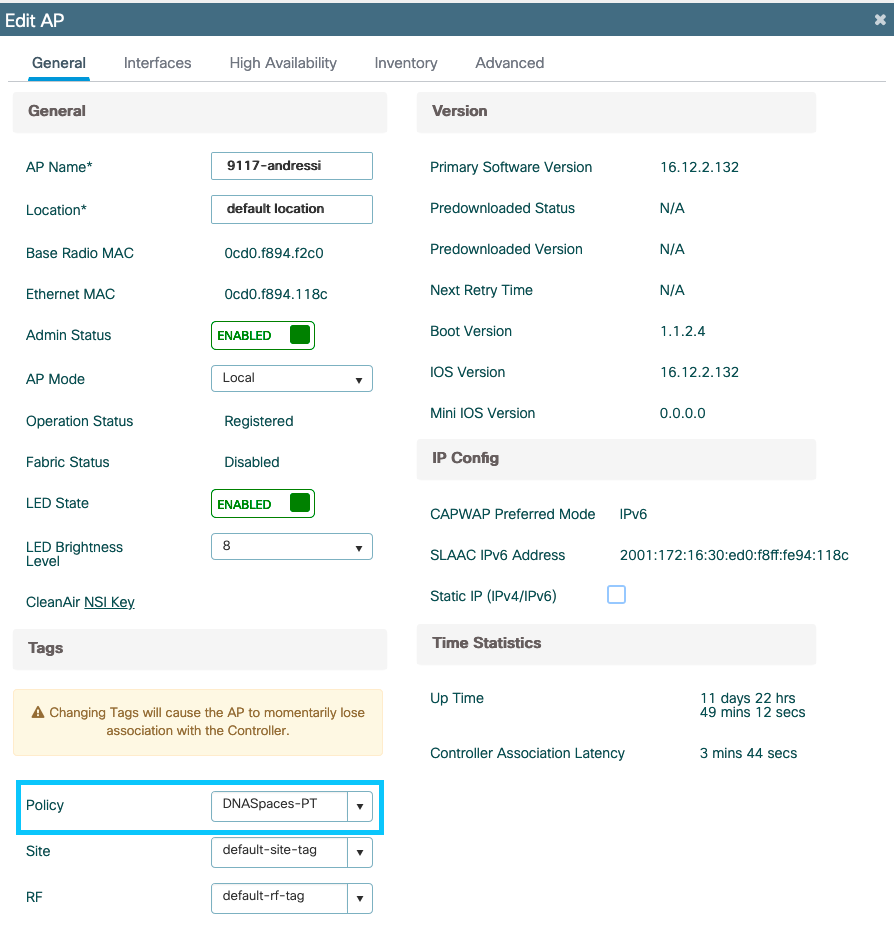
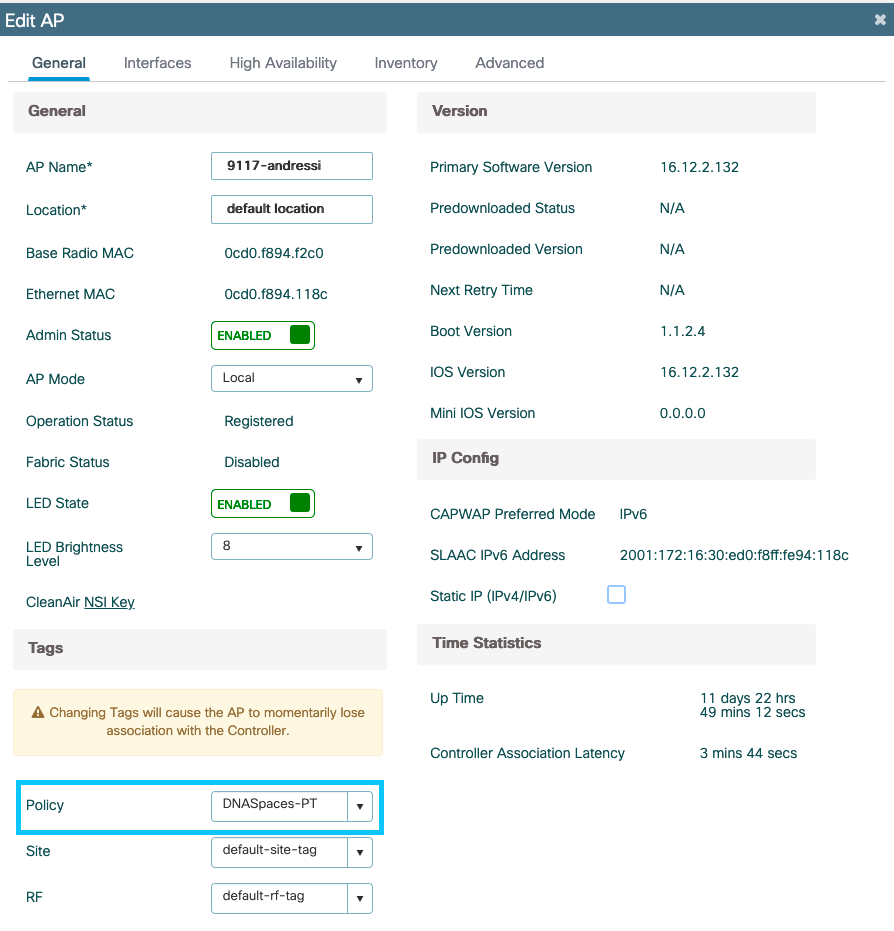
Step 2. Apply the Policy Tag to the AP to broadcast the SSID. Navigate to Configuration > Wireless > Access Points. Select the AP in question and add the Policy Tag. This causes the AP to restart its CAPWAP tunnel and join back to the 9800 controller:
CLI Configuration:
Andressi-9800L(config)#wlan <Profile name> <WLAN ID> <SSID Name>
Andressi-9800L(config-wlan)#no security wpa
Andressi-9800L(config-wlan)#no security wpa akm dot1x
Andressi-9800L(config-wlan)#no security wpa wpa2 ciphers aes
Andressi-9800L(config-wlan)#security web-auth
Andressi-9800L(config-wlan)#security web-auth parameter-map <map name>
Andressi-9800L(config-wlan)#no shutdown

Andressi-9800L(config)#wireless profile policy <policy-profile-name>
Andressi-9800L(config-wireless-policy)#vlan <id>
Andressi-9800L(config-wireless-policy)#urlfilter list pre-auth-filter <url-filter name>
Andressi-9800L(config-wireless-policy)#no shutdown

Andressi-9800L(config)#wireless tag policy <policy-tag-name>
Andressi-9800L(config-policy-tag)#wlan <Profile name> policy <policy-profile-name>
Captive Portal with RADIUS Server on Spaces
Note: Spaces RADIUS server only supports PAP authentication coming from the controller.
Web Auth Parameter Map Configuration on the 9800 Controller
Step 1. Create a web auth parameter map. Navigate to Configuration > Security > Web Auth. Click +Add, and configure the parameter map name, and select webauth as the type:

Step 2. Click the parameter map configured in step 1. Click Advanced and enter the Redirect for log-in, Append for AP MAC Address, Append for Client MAC Address, Append for WLAN SSID and portal IPv4 Address. Click Update & Apply:

Note: To get the splash page URL and the IPv4 redirect address, click the Configure Manually option from the SSID created in step 3 of section Create the SSID on Spaces under the Creating the SSIDs in WLC Direct Connect section Creating the Access Control List configuration section respectively.

Note: Cisco Spaces portal can resolve to two IP addresses, but the 9800 controller allows only one IP address to be configured, one case choose any of those IP addresses to be configured on the parameter map as the Portal IPv4 Address.

Note: Make sure both Virtual IPv4 and IPv6 addresses are configured in the global web auth parameter map. If the Virtual IPv6 is not configured, the clients are sometimes redirected to the internal portal instead of the configured Spaces portal. This is why a Virtual IP must always be configured 192.0.2.1 and can be configured as Virtual IPv4 and FE80:0:0:0:903A::11E4 as Virtual IPV6. There are little to no reasons to use other IPs than those.
CLI Configuration:
Andressi-9800L(config)#parameter-map type webauth <map name>
Andressi-9800L(config-params-parameter-map)#type webauth
Andressi-9800L(config-params-parameter-map)#timeout init-state sec 600
Andressi-9800L(config-params-parameter-map)#redirect for-login <splashpage URL>
Andressi-9800L(config-params-parameter-map)#redirect append ap-mac tag ap_mac
Andressi-9800L(config-params-parameter-map)#redirect append wlan-ssid tag wlan
Andressi-9800L(config-params-parameter-map)#redirect append client-mac tag client_mac
Andressi-9800L(config-params-parameter-map)#redirect portal ipv4 <IP Address>
Andressi-9800L(config-params-parameter-map)#logout-window-disabled
Andressi-9800L(config-params-parameter-map)#success-window-disabled
RADIUS Servers Configuration on the 9800 Controller
Step 1. Configure the RADIUS servers. Cisco Spaces acts as the RADIUS server for user authentication and it can respond to two IP addresses. Navigate to Configuration > Security > AAA. Click +Add and configure both RADIUS servers:

Note: To get RADIUS IP address and secret key for both primary and secondary servers, click the Configure Manually option from the SSID created in step 3 of section Create the SSID on Spaces and navigate to the RADIUS Server Configuration section.
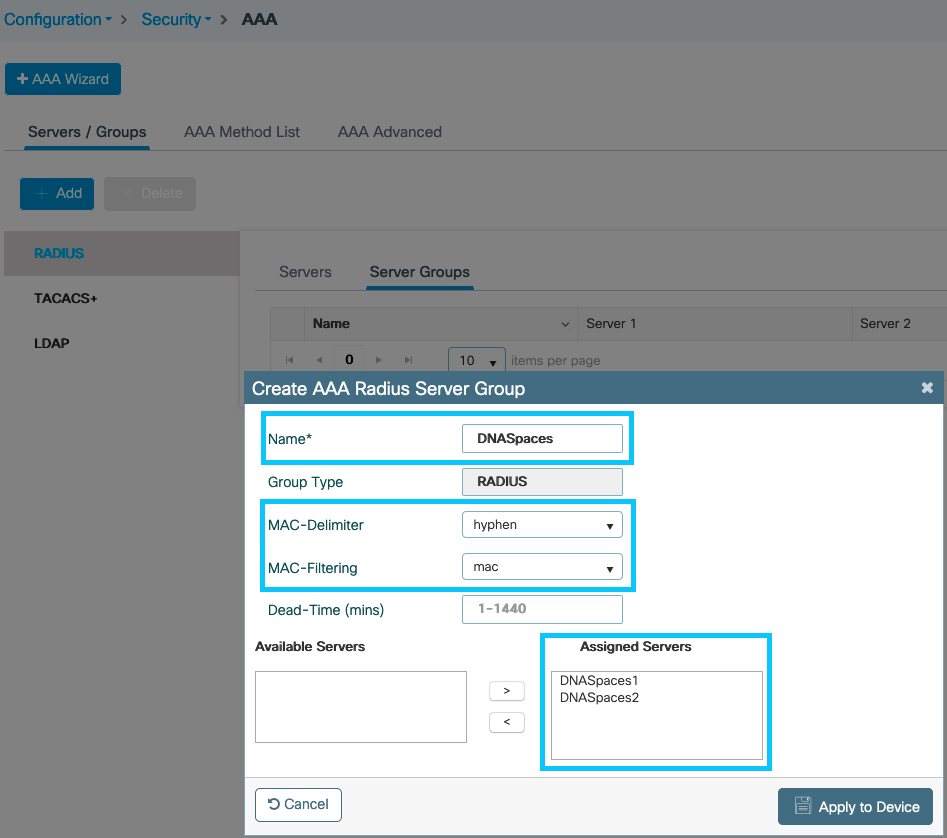
Step 2. Configure the RADIUS Server Group and add both RADIUS servers. Navigate to Configuration > Security > AAA > Servers / Groups > RADIUS > Server Groups, click +add, configure the Server Group name, MAC-Delimiter as Hyphen, MAC-Filtering as MAC, and assign the two RADIUS servers:
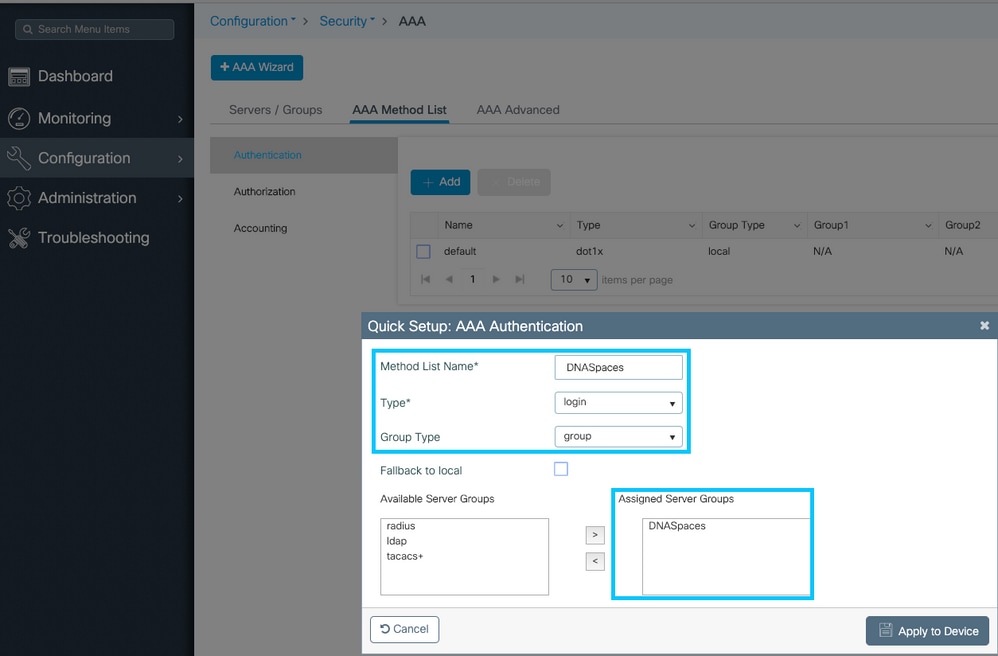
Step 3. Configure an Authentication Method list. Navigate to Configuration > Security > AAA > AAA Method List > Authentication. Click +add. Configure the Method List name, select login as the type and assign the Server Group:
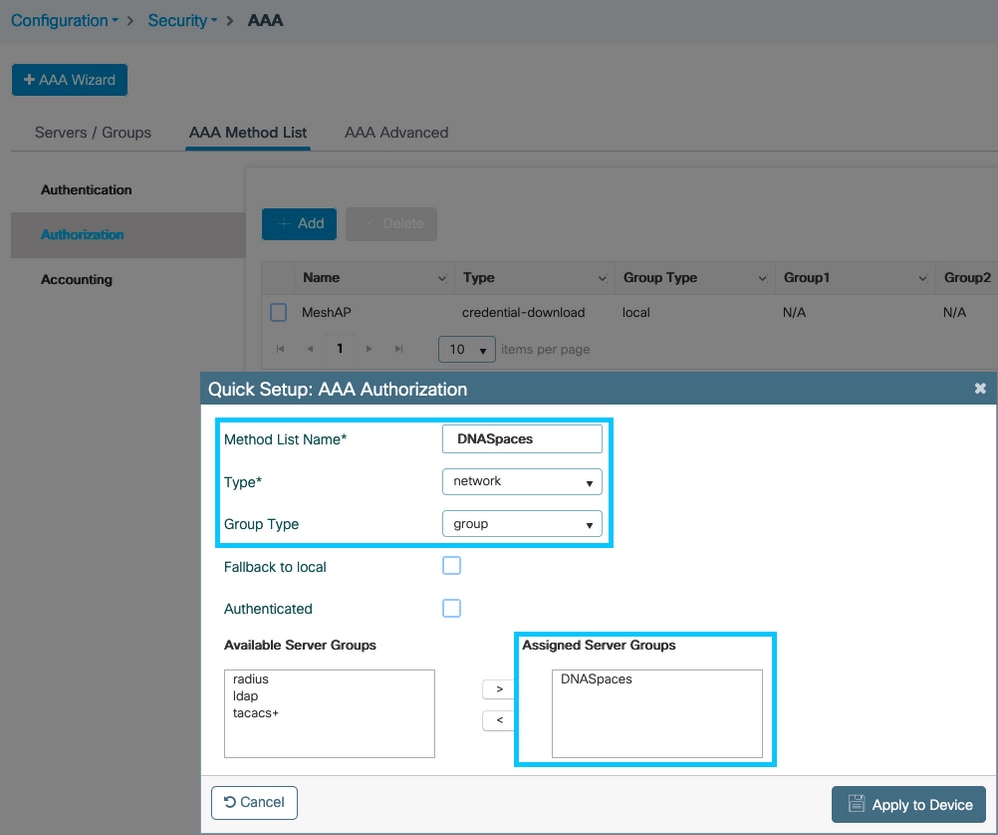
Step 4. Configure an Authorization Method list. Navigate to Configuration > Security > AAA > AAA Method List > Authorization, click +add. Configure the Method List name, select network as the type and assign the Server Group:
Create the SSID on the 9800 Controller
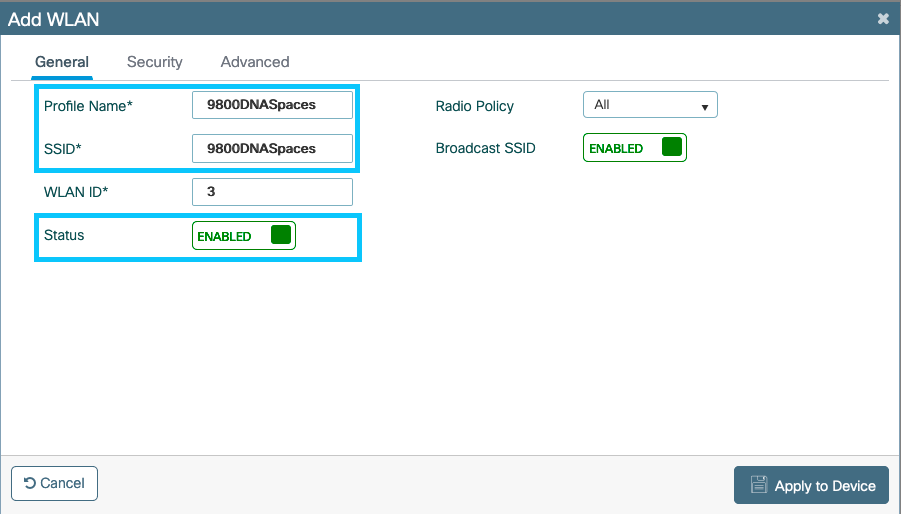
Step 1. Navigate to Configuration > Tags & Profiles > WLANs, click +Add. Configure the Profile Name, SSID and enable the WLAN. Make sure the SSID name is the same name as the configured in step 3 of section Create the SSID on Spaces.
Step 2. Navigate to Security > Layer2. Set the Layer 2 Security Mode to None, enable MAC Filtering and add the Authorization List:

Step 3. Navigate to Security > Layer3. Enable Web Policy, configure the web auth parameter map and the Authentication List. Enable On Mac Filter Failure and add the Preauthentication ACL. Click Apply to Device.

Configure Policy Profile on the 9800 Controller
Step 1. Navigate to Configuration > Tags & Profiles > Policy and create a new Policy Profile or use the default Policy Profile. In the access Policies tab, configure the client VLAN and add the URL filter.

Step 2. In the Advanced tab, enable AAA Override and optionally configure the accounting method list:

Configure Policy Tag on the 9800 Controller
Step 1. Navigate to Configuration > Tags & Profiles > Policy. Create a new Policy Tag or use the default policy tag. Map the WLAN to the Policy Profile in the Policy Tag.

Step 2. Apply the Policy Tag to the AP to broadcast the SSID. Navigate to Configuration > Wireless > Access Points, select the AP in question, and add the Policy Tag. This causes the AP to restart its CAPWAP tunnel and join back to the 9800 controller:
CLI Configuration:
Andressi-9800L(config)#wlan <Profile name> <WLAN ID> <SSID Name>
Andressi-9800L(config-wlan)#ip access-group web <ACL Name>
Andressi-9800L(config-wlan)#no security wpa
Andressi-9800L(config-wlan)#no security wpa akm dot1x
Andressi-9800L(config-wlan)#no security wpa wpa2 ciphers aes
Andressi-9800L(config-wlan)#mac-filtering <authz name>
Andressi-9800L(config-wlan)#security web-auth
Andressi-9800L(config-wlan)#security web-auth authentication-list <auth name>
Andressi-9800L(config-wlan)#security web-auth on-macfilter-failure
Andressi-9800L(config-wlan)#security web-auth parameter-map <map name>
Andressi-9800L(config-wlan)#no shutdown

Andressi-9800L(config)#wireless profile policy <policy-profile-name>
Andressi-9800L(config-wireless-policy)#aaa-override
Andressi-9800L(config-wireless-policy)#accounting-list <acct name>
Andressi-9800L(config-wireless-policy)#vlan <id>
Andressi-9800L(config-wireless-policy)#urlfilter list pre-auth-filter <url-filter name>
Andressi-9800L(config-wireless-policy)#no shutdown

Andressi-9800L(config)#wireless tag policy <policy-tag-name>
Andressi-9800L(config-policy-tag)#wlan <Profile name> policy <policy-profile-name>
Configure the Global Parameter Map
Unrecommended step : Run these commands to allow HTTPS redirection but note that redirecting in client HTTPS traffic is not needed if client operating system does captive portal detection and causes heavier CPU utilization, and always throws a certificate warning. It is recommended to avoid to configure it unless needed for a very specific use case.
Andressi-9800L(config)#parameter-map type webauth global
Andressi-9800L(config-params-parameter-map)#intercept-https-enable
Note: You must have a valid SSL certificate for the virtual IP installed in Cisco Catalyst 9800 Series Wireless Controller.
Step 1. Copy signed certificate file with extension.p12 to a TFTP server and run this command to transfer and install the certificate into the 9800 controller:
Andressi-9800L(config)#crypto pki import <name> pkcs12 tftp://<tftp server ip>:/ password <certificate password>
Step 2. To map the installed certificate to the web auth parameter map, run these commands:
Andressi-9800L(config)#parameter-map type webauth global
Andressi-9800L(config-params-parameter-map)#trustpoint <installed trustpool name>
Create the Portal on Spaces
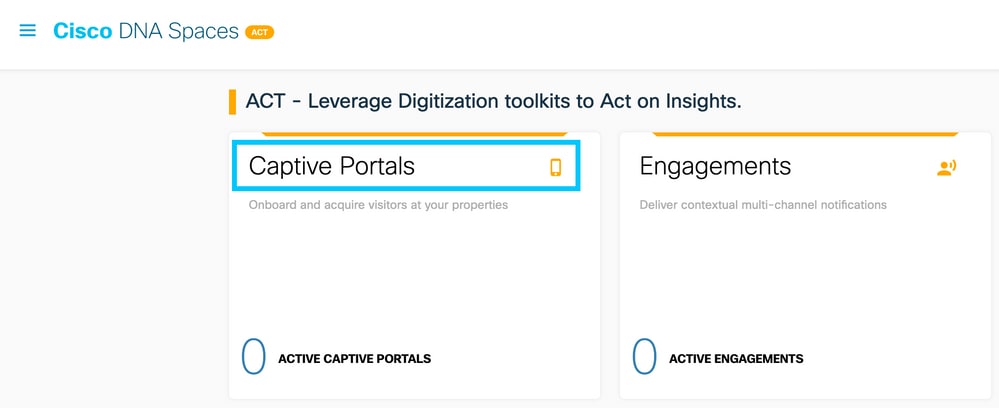
Step 1. Click Captive Portals in the dashboard of Spaces:

Step 2. Click Create New, enter the portal name, and select the locations that can use the portal:

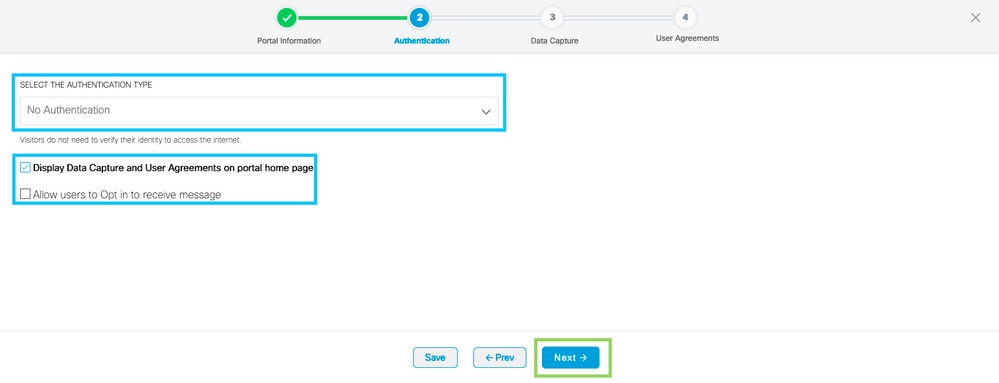
Step 3. Select the authentication type, choose if you want to display data capture and user agreements on the portal home page, and if users are allowed to Opt-in to receive a message. Click Next:
Step 4. Configure Data capture elements. If you want to capture data from the users, check the Enable Data Capture box and click +Add Field Element to add the desired fields. Click Next:

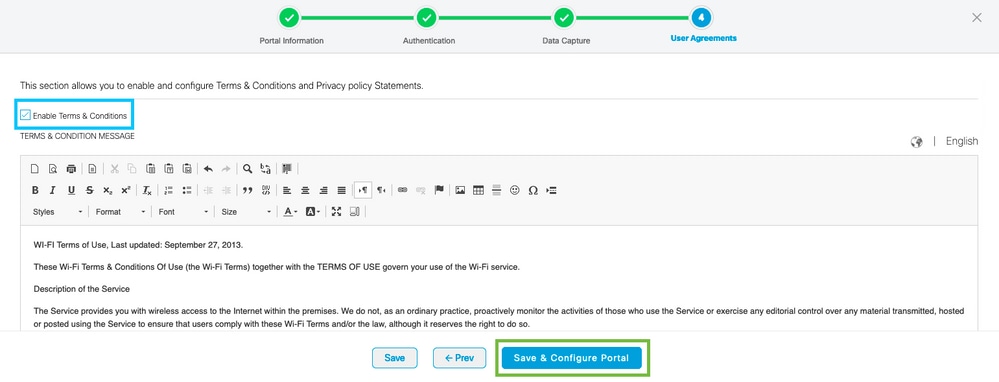
Step 5. Check the Enable Terms & Conditions and click Save & Configure Portal:
Step 6. Edit the portal as needed. Click Save:

Configure the Captive Portal Rules on Spaces
Step 1. Click Captive Portals in the dashboard of Spaces:
Step 2. Open the captive portal menu and click Captive Portal Rules:

Step 3. Click + Create New Rule. Enter the rule name, and choose the SSID previously configured.

Step 4. Select the locations in which the portal is available. Click + Add Locations in the LOCATIONS section. Choose the desired one from the Location Hierarchy.

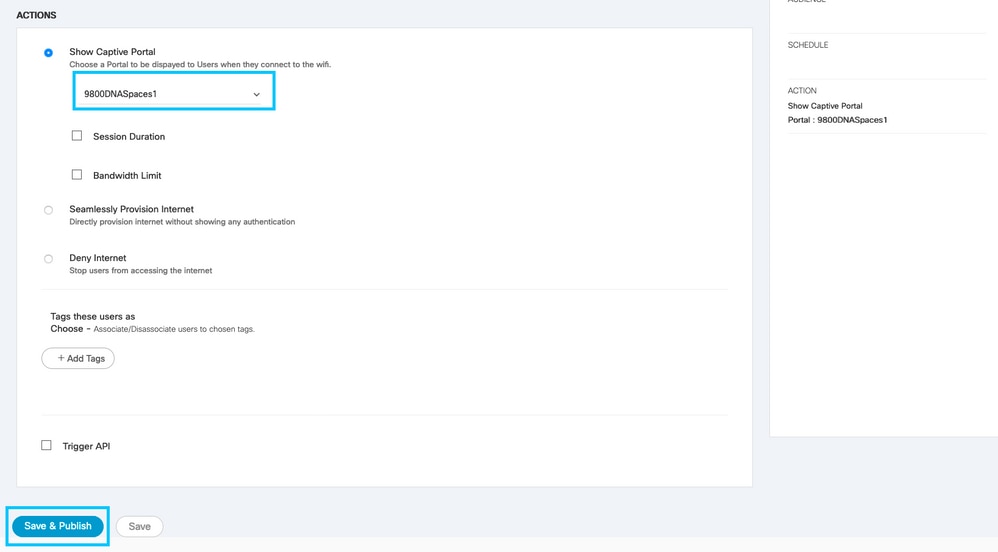
Step 5. Choose the action of the captive portal. In this case, when the rule is hit, the portal is shown. Click Save & Publish.
Get Specific information from Spaces
What are the IP Addresses that Spaces Use
In order to verify what IP addresses Spaces use for the portal in your region, navigate to the Captival Portal page on the Cisco DNA Space home. Click SSID in the left menu and then click Configure manually under your SSID. The IP addresses are mentioned in the ACL example. Those are the IP addresses of the portal for use in ACLs and webauth parameter map. Spaces use other IP address for the overall NMSP/cloud connectivity of the control plane.

In the first section of the pop up that appears, step 7 shows you the IP addresses mentioned in the ACL definition. You do not need to do those instructions and create any ACL, just take note of the IP addresses. Those are the IPs used by the portal in your area

What is the URL that the Spaces Log In Portal Uses
In order to verify what log in portal URL Spaces use for the portal in your region, navigate to the Captival Portal page on the Cisco DNA Space home. Click SSID in the left menu and then click Configure manually under your SSID.

Scroll down to the pop up that appears and in the second section, step 7 shows you the URL that you have to configure in your parameter map on the 9800.

What are the RADIUS Server Details for Spaces
In order to find out what the RADIUS server IP addresses are that you need to use, as well as the shared secret, navigate to the Captival Portal page on the Cisco DNA Space home. Click SSID in the left menu and then click Configure manually under your SSID.

In the pop up that appears, scroll down in the 3rd section (RADIUS), and step 7 gives you the IP/port and shared secret for radius authentication. Accounting is optional and is covered in step 12.

Verify
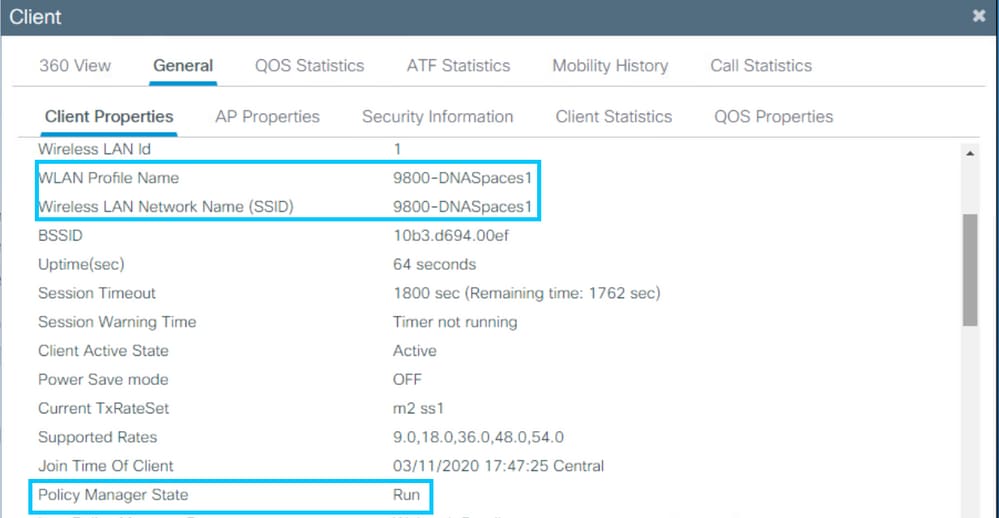
To confirm the status of a client connected to the SSID navigate to Monitoring > Clients. Click the MAC address of the device and look for Policy Manager State:
Troubleshoot
Common Issues
1. If the virtual interface on the controller has no IP address configured, the clients are redirected to the internal portal instead of the redirect portal configured in the parameter map.
2. If clients are receiving a 503 error while redirected to the portal on Spaces, make sure the controller is configured in the Location Hierarchy on Spaces.
Always-ON Tracing
WLC 9800 provides ALWAYS-ON tracing capabilities. This ensures all client connectivity related errors, warning, and notice level messages are constantly logged and you can view logs for an incident or failure condition after it has occurred.
Note: Depending on the volume of logs being generated, you can go back a few hours to several days.
In order to view the traces that 9800 WLC collected by default, you can connect via SSH/Telnet to the 9800 WLC and do these steps. Ensure you are logging the session to a text file.
Step 1. Check the controller current time so you can track the logs in the time back to when the issue happened.
# show clock
Step 2. Collect syslogs from the controller buffer or the external syslog as dictated by the system configuration. This provides a quick view of the system health and errors if any.
# show logging
Step 3. Verify if any debug conditions are enabled.
# show debugging
Cisco IOS XE Conditional Debug Configs:

Conditional Debug Global State: Stop

Cisco IOS XE Packet Tracing Configs:


Packet Infra debugs:

Ip Address                                               Port
------------------------------------------------------|----------
Note: If you see any condition listed, it means the traces are being logged up to debug level for all the processes that encounter the enabled conditions (mac address, IP address, and soon). This would increase the volume of logs. Therefore, it is recommended to clear all conditions when not actively debugging
Step 4. If the mac address under test was not listed as a condition in Step 3, collect the always-on notice level traces for the specific mac address.
# show logging profile wireless filter { mac | ip } { <aaaa.bbbb.cccc> | <a.b.c.d> } to-file always-on-<FILENAME.txt>
You can either display the content on the session or you can copy the file to an external TFTP server.
# more bootflash:always-on-<FILENAME.txt>
or
# copy bootflash:always-on-<FILENAME.txt> tftp://a.b.c.d/path/always-on-<FILENAME.txt>
Conditional Debugging and Radio Active Tracing
If the always-on traces do not give you enough information to determine the trigger for the problem under investigation, you can enable conditional debugging and capture Radio Active (RA) trace, which provides debug level traces for all processes that interact with the specified condition (client mac address in this case). In order to enable conditional debugging, do these steps.
Step 1. Ensure there are no debug conditions are enabled.
# clear platform condition all
Step 2. Enable the debug condition for the wireless client mac address that you want to monitor.
These commands start to monitor the provided mac address for 30 minutes (1800 seconds). You can optionally increase this time to up to 2,085,978,494 seconds.
# debug wireless mac <aaaa.bbbb.cccc> {monitor-time <seconds>}
Note: In order to monitor more than one client at a time, run debug wireless mac <aaaa.bbbb.cccc> command per mac address.
Note: You do not see the output of the client activity on the terminal session, as everything is buffered internally to be viewed later.
Step 3. Reproduce the issue or behavior that you want to monitor.
Step 4. Stop the debugs if the issue is reproduced before the default, or configured monitor time is up.
# no debug wireless mac <aaaa.bbbb.cccc>
Once the monitor-time has elapsed, or the debug wireless has been stopped, the 9800 WLC generates a local file with the name:
ra_trace_MAC_aaaabbbbcccc_HHMMSS.XXX_timezone_DayWeek_Month_Day_year.log
Step 5. Collect the file of the mac address activity. You can either copy the ra trace.log to an external server, or display the output directly on the screen.
Check the name of the RA traces file
# dir bootflash: | inc ra_trace
Copy the file to an external server:
# copy bootflash:ra_trace_MAC_aaaabbbbcccc_HHMMSS.XXX_timezone_DayWeek_Month_Day_year.log tftp://a.b.c.d/ra-FILENAME.txtDisplay the content:
# more bootflash:ra_trace_MAC_aaaabbbbcccc_HHMMSS.XXX_timezone_DayWeek_Month_Day_year.logStep 6. If the root cause is still not obvious, collect the internal logs which are a more verbose view of debug level logs. You do not need to debug the client again as you only take a further detailed look at debug logs that have been already collected and internally stored.
# show logging profile wireless internal filter { mac | ip } { <aaaa.bbbb.cccc> | <a.b.c.d> } to-file ra-internal-<FILENAME>.txt
Note: This command output returns traces for all logging levels for all processes and is quite voluminous. Please engage Cisco TAC to help parse through these traces.
You can either copy the ra-internal-FILENAME.txt to an external server or display the output directly on the screen.
Copy the file to an external server:
# copy bootflash:ra-internal-<FILENAME>.txt tftp://a.b.c.d/ra-internal-<FILENAME>.txt
Display the content:
# more bootflash:ra-internal-<FILENAME>.txt
Step 7. Remove the debug conditions.
# clear platform condition all
Note: Ensure that you always remove the debug conditions after a troubleshooting session.
Example of a Successful Attempt
This is the output from the RA_traces for a successful attempt to identify each of the phases during the association/authentication process while connecting to an SSID with no RADIUS server.
802.11 association/authentication:
Association received. BSSID 10b3.d694.00ee, WLAN 9800DNASpaces, Slot 1 AP 10b3.d694.00e0, 2802AP-9800L
Received Dot11 association request. Processing started,SSID: 9800DNASpaces1, Policy profile: DNASpaces-PP, AP Name: 2802AP-9800L, Ap Mac Address: 10b3.d694.00e0 BSSID MAC0000.0000.0000 wlan ID: 1RSSI: 0, SNR: 32
Client state transition: S_CO_INIT -> S_CO_ASSOCIATING
dot11 send association response. Sending association response with resp_status_code: 0
dot11 send association response. Sending assoc response of length: 144 with resp_status_code: 0, DOT11_STATUS: DOT11_STATUS_SUCCESS
Association success. AID 1, Roaming = False, WGB = False, 11r = False, 11w = False
DOT11 state transition: S_DOT11_INIT -> S_DOT11_ASSOCIATED
Station Dot11 association is successful
IP Learn process:
IP-learn state transition: S_IPLEARN_INIT -> S_IPLEARN_IN_PROGRESS
Client IP learn successful. Method: ARP IP: 10.10.30.42
IP-learn state transition: S_IPLEARN_IN_PROGRESS -> S_IPLEARN_COMPLETE
Received ip learn response. method: IPLEARN_METHOD_AR
Layer 3 authentication:
Triggered L3 authentication. status = 0x0, Success
Client state transition: S_CO_IP_LEARN_IN_PROGRESS -> S_CO_L3_AUTH_IN_PROGRESS
L3 Authentication initiated. LWA
Client auth-interface state transition: S_AUTHIF_L2_WEBAUTH_DONE -> S_AUTHIF_WEBAUTH_PENDING


Client auth-interface state transition: S_AUTHIF_L2_WEBAUTH_DONE -> S_AUTHIF_WEBAUTH_PENDING
[webauth-httpd] [17798]: (info): capwap_90000005[34e1.2d23.a668][10.10.30.42]GET rcvd when in INIT state
[webauth-httpd] [17798]: (info): capwap_90000005[34e1.2d23.a668][10.10.30.42]HTTP GET request
[webauth-httpd] [17798]: (info): capwap_90000005[34e1.2d23.a668][10.10.30.42]Parse GET, src [10.10.30.42] dst [10.107.4.52] url [http://www.msftconnecttest.com/connecttest.txt]
[webauth-httpd] [17798]: (info): capwap_90000005[34e1.2d23.a668][10.10.30.42]Retrieved user-agent = Microsoft NCSI
[webauth-httpd] [17798]: (info): capwap_90000005[34e1.2d23.a668][10.10.30.42]GET rcvd when in LOGIN state
[webauth-httpd] [17798]: (info): capwap_90000005[34e1.2d23.a668][10.10.30.42]HTTP GET request
[webauth-httpd] [17798]: (info): capwap_90000005[34e1.2d23.a668][10.10.30.42]Parse GET, src [10.10.30.42] dst [10.101.24.81] url [http://www.bbc.com/]
[webauth-httpd] [17798]: (info): capwap_90000005[34e1.2d23.a668][10.10.30.42]Retrieved user-agent = Mozilla/5.0 (Windows NT 10.0; WOW64; Trident/7.0; rv:11.0) like Gecko
[webauth-httpd] [17798]: (info): capwap_90000005[34e1.2d23.a668][10.10.30.42]POST rcvd when in LOGIN state
Layer 3 authentication successful. Move the client to the RUN state:
[34e1.2d23.a668:capwap_90000005] Received User-Name 34E1.2D23.A668 for client 34e1.2d23.a668
L3 Authentication Successful. ACL:[]
Client auth-interface state transition: S_AUTHIF_WEBAUTH_PENDING -> S_AUTHIF_WEBAUTH_DONE
%CLIENT_ORCH_LOG-6-CLIENT_ADDED_TO_RUN_STATE: Username entry (34E1.2D23.A668) joined with ssid (9800DNASpaces) for device with MAC: 34e1.2d23.a668
Managed client RUN state notification: 34e1.2d23.a668
Client state transition: S_CO_L3_AUTH_IN_PROGRESS -> S_CO_RU
Revision History
| Revision | Publish Date | Comments |
|---|---|---|
6.0 |
18-Mar-2024 |
Removed PII.
Updated Branding Requirements, Alt Text, Spelling and Formatting. |
5.0 |
06-Feb-2023 |
Minor rewording of the https redirect section |
4.0 |
29-Mar-2022 |
Improved pictures visibility |
3.0 |
15-Mar-2022 |
Clarified virtual IPs |
2.0 |
21-Sep-2021 |
formatting changes |
1.0 |
19-Aug-2021 |
Initial Release |
Contributed by Cisco Engineers
- Andres SilvaCisco TAC Engineer
- Nicolas DarchisCustomer Delivery Engineering Technical Leader
Contact Cisco
- Open a Support Case

- (Requires a Cisco Service Contract)
 Feedback