Introduction
This document describes how to enable internal Dynamic Host Configuration Protocol (DHCP) server on Mobility Express (ME) on an Access Point (AP) 3802.
Prerequisites
Requirements
Cisco recommends to have basic knowledge on DHCP protocol and Mobility Express.

Note: Internal dhcp on ME is very limited and considered as convenience that is often used simple demonstration or proof-of-concept, for example in a lab environment. The best practice is NOT to use this feature in an enterprise production network.
Components Used
The information in this document is based on AP 3802 Software Version 8.3.102.0.
The information in this document was created from the devices in a specific lab environment. All of the devices used in this document started with a cleared (default) configuration. If your network is live, ensure that you understand the potential impact of any command.
Configure
Note: In order to use internal DHCP for any Virtual Local Area Network (VLAN) is mandatory to have a DHCP pool on the management network in order to start DHCP server process on ME. This can be a dummy scope but must be enabled.
GUI Configuration
Configure DHCP Scope for Management Network
This scope provides IP address on Management VLAN. If this was already created on the initial configuration wizard these steps can be skipped.
Note: Be aware that if there is a client (wired or wireless) on the AP VLAN (Management Network VLAN) it can receive an IP address from the ME DHCP pool even if there is already another DHCP scope in the network.
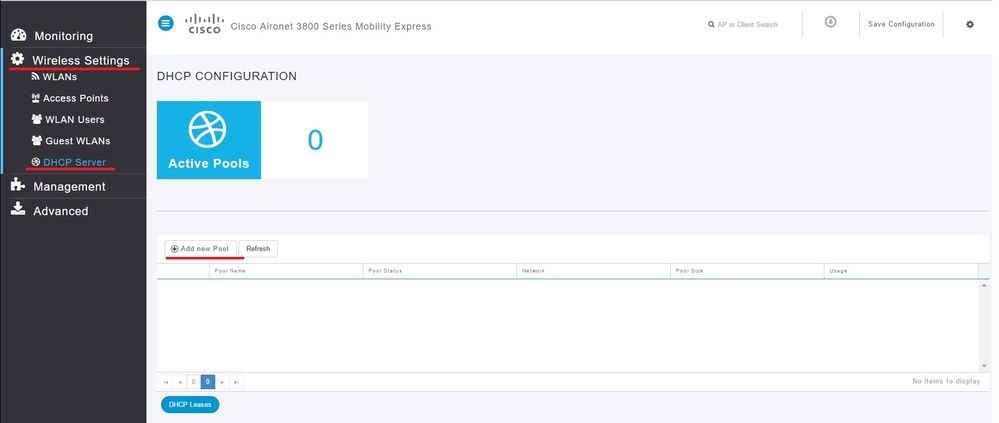
Step 1. Navigate to Wireless Settings > DHCP Server > Add new Pool.

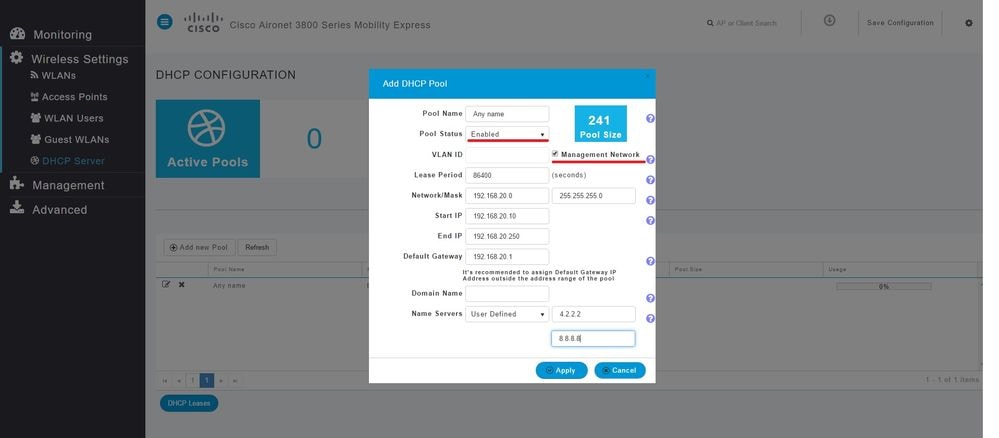
Step 2. Enter the information.

These fields are mandatory:
- Pool Name: Name which serves only as Identifier for this specific scope.
- VLAN ID when Management Network is enabled, the DHCP scope is automatically assigned to the native VLAN.
- Network/Mask: Enter the network ID from where the IP address are assigned. On the second field type the mask for that network in decimal format.
- Start IP: First IP that is handed to a client.
- End IP: Last IP address from this pool to be assigned to clients.
- Default Gateway: Default gateway IP address.
In this example, the AP assigns IP address on native VLAN (Management Network) from 192.168.20.10 to 192.168.20.250.
Ensure to enable Management Network checkbox, and click Apply.
Note: Within the Start and End IP range be sure to not include the broadcast IP address and default gateway of that network.
Configure DHCP Scope for WLAN
An internal DHCP pool for clients must be bind to the VLAN assigned to the Service Set Identifier (SSID).
Step 1. Verify the VLAN ID of the SSID for which the DHCP scope.
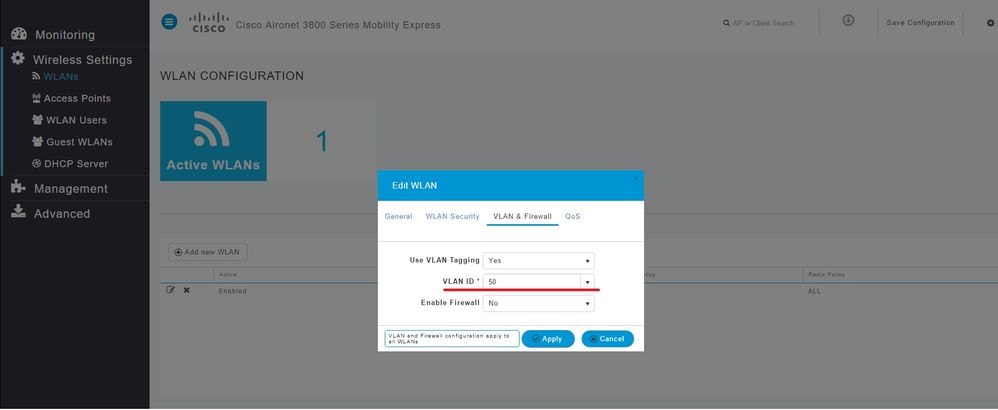
Navigate to Wireless Settings > WLANs. If the SSID already exists select Edit or to create a new one, click Add new WLAN. Navigate to VLAN & Firewall. This VLAN ID must match the VLAN ID used in the DHCP pool.
In this example the SSID is assigned to VLAN 50, therefore the DHCP scope must be assigned to the same VLAN ID 50.

Step 2. Create the DHCP Pool.
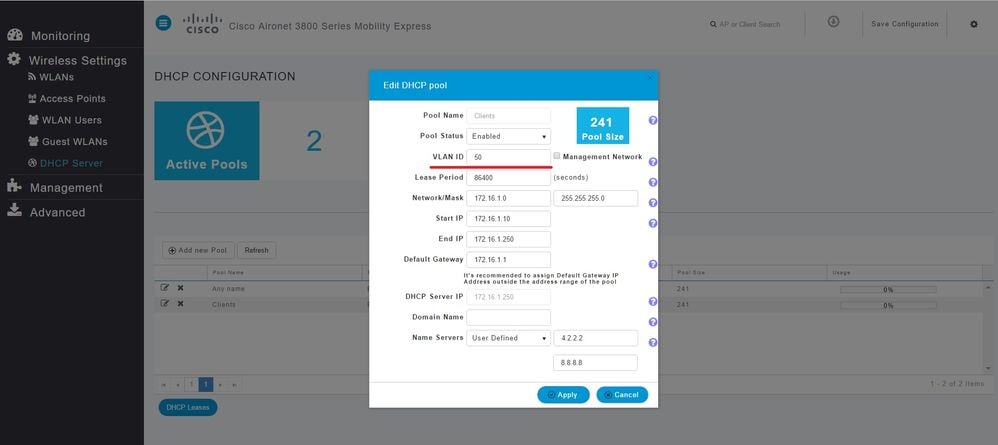
Navigate to Wireless Settings > DHCP Server > Add new Pool and enter the information.
The same mandatory fields are needed, with the difference that this time the checkbox for Management Network is not be checked. Type the VLAN ID that corresponds to the VLAN used by the Wireless Local Area Network (WLAN).

CLI Configuration
These commands are used to:
- Create a DHCP pool
- Define network and mask
- Define address pool range
- Define the VLAN ID
- Define default router
- Define DNS servers
- Enable the DHCP pool
Note: Through CLI it is possible to define up to 3 DNS Servers.
Configure DHCP Scope for Management Network
In order to create a DHCP pool in management run these commands:
config dhcp create-scope <scope name>
config dhcp network <scope name> <network ip> <mask>
config dhcp address-pool <scope name> <start ip from pool> <last ip from pool>
config dhcp vlan native <scope name> enable
config dhcp default-router <scope name> <default router ip>
config dhcp dns-servers <scope name> <DNS server 1> <DNS server 2> <DNS server 3>
config dhcp enable <scope name>
Configure DHCP Scope for WLAN
To create a DHCP for clients the same steps are needed but change he VLAN ID to match the VLAN ID from the WLAN.
config dhcp create-scope <scope name>
config dhcp network <scope name> <network ip> <mask>
config dhcp address-pool <scope name> <start ip from pool> <last ip from pool>
config dhcp vlan id <scope name> <vlan id>
config dhcp default-router <scope name> <default router ip>
config dhcp dns-servers <scope name> <DNS server 1> <DNS server 2> <DNS server 3>
config dhcp enable <scope name>
Verify
Use this section in order to confirm that your configuration works properly.
show dhcp summary
show dhcp detailed <scope name>
Troubleshoot
This section provides information you can use in order to troubleshoot your configuration.
In order to troubleshoot clients these debugs commands. Debugs output shows the state of the client and the DHCP process.
debug client <mac address>
debug dhcp packet enable
For an easy way to read debug client outputs, use the Wireless debug analyzer tool: Wireless Debug Analyzer.


 Feedback