Configure and Deploy MSE Software Release 7.2 HA
Available Languages
Bias-Free Language
The documentation set for this product strives to use bias-free language. For the purposes of this documentation set, bias-free is defined as language that does not imply discrimination based on age, disability, gender, racial identity, ethnic identity, sexual orientation, socioeconomic status, and intersectionality. Exceptions may be present in the documentation due to language that is hardcoded in the user interfaces of the product software, language used based on RFP documentation, or language that is used by a referenced third-party product. Learn more about how Cisco is using Inclusive Language.
Contents
Introduction
Cisco Mobility Services Engine (MSE) Software Release 7.2 adds High Availability (HA) support to physical and virtual appliances. This document provides configuration and deployment guidelines, as well as troubleshooting tips for those that add the MSE High Availability and run Context Aware Services and/or Adaptive wIPS to a Cisco Unified WLAN. The purpose of this document is to explain the guidelines for MSE High Availability and to provide HA deployment scenarios for MSE.
Note: This document does not provide configuration details for the MSE and associated components that do not pertain to MSE HA. This information is provided in other documents, and references are provided. See the Related Information section for a list of documents about the configuration and design of Context Aware Mobility Services. Adaptive wIPS configuration is also not covered in this document.
Prerequisites
Requirements
There are no specific requirements for this document.
Components Used
This document is not restricted to specific software and hardware versions.
Conventions
Refer to Cisco Technical Tips Conventions for more information on document conventions.
Background Information
The MSE is a platform that is capable of running multiple related services. These services provide high-level service functionality. Therefore, consideration for HA is critical in maintaining the highest service confidence.
With HA enabled, every active MSE is backed up by another inactive instance. MSE HA introduces the health monitor in which it configures, manages, and monitors the high availability setup. A heartbeat is maintained between the primary and secondary MSE. The health monitor is responsible for setting up database, file replication, and monitoring the application. When the primary MSE fails and the secondary takes over, the virtual address of the primary MSE is switched transparently.
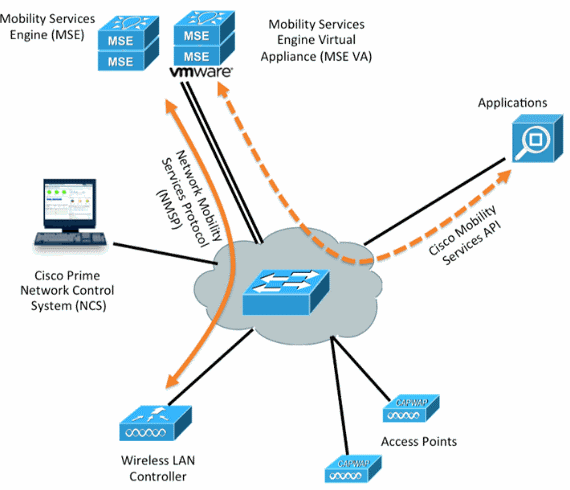
This setup (see figure 1) demonstrates a typical Cisco WLAN deployment that includes Cisco Mobility Services Engine (MSE) enabled for High Availability. HA support is available on MSE-3310, MSE-3350/3355, and Virtual Appliance on ESXi.
Figure 1. Deploying MSE in High Availability
Guidelines and Limitations
Here is information about the MSE HA architecture:
-
MSE Virtual Appliance supports only 1:1 HA.
-
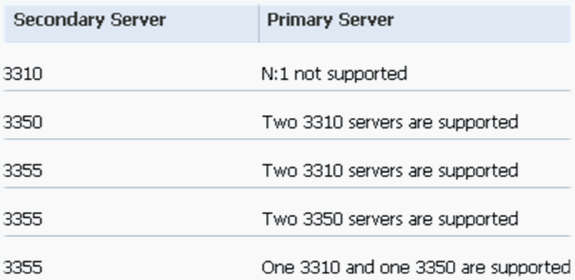
One secondary MSE can support up to two primary MSEs. See the HA pairing matrix (figures 2 and 3).
-
HA supports Network Connected and Direct Connected.
-
Only MSE Layer-2 redundancy is supported. Both the health monitor IP and virtual IP must be on the same subnet and accessible from the Network Control System (NCS). Layer-3 redundancy is not supported.
-
Health monitor IP and virtual IP must be be different.
-
You can use either manual or automatic failover.
-
You can use either manual or automatic failback.
-
Both the primary and secondary MSE should be on the same software version.
-
Every active primary MSE is backed up by another inactive instance. The secondary MSE becomes active only after the failover procedure is initiated.
-
The failover procedure can be manual or automatic.
-
There is one software and database instance for each registered primary MSE.

HA Configuration Scenario for MSE Virtual Appliance (Network Connected)
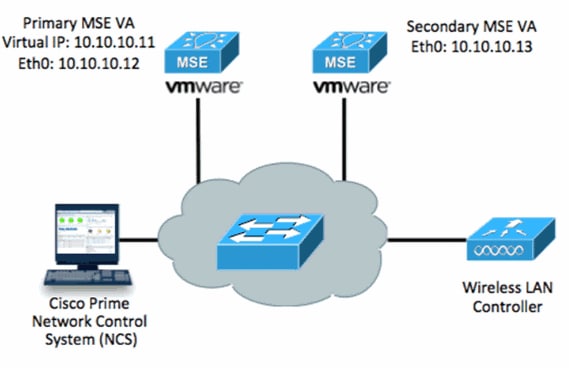
This example shows the HA configuration for the MSE Virtual Appliance (VA) (see figure 4). For this scenario, these settings are configured:
-
Primary MSE VA:
-
Virtual IP – [10.10.10.11]
-
Health Monitor interface (Eth0) – [10.10.10.12]
-
-
Secondary MSE VA:
-
Virtual IP – [None]
-
Health Monitor interface (Eth0) – [10.10.10.13]
-
Note: An activation license (L-MSE-7.0-K9) is required per VA. This is required for HA configuration of the VA.
Figure 4. MSE Virtual Appliance in HA
Refer to Cisco documentation on MSE Virtual Appliance for more information.
Here are the general steps:
-
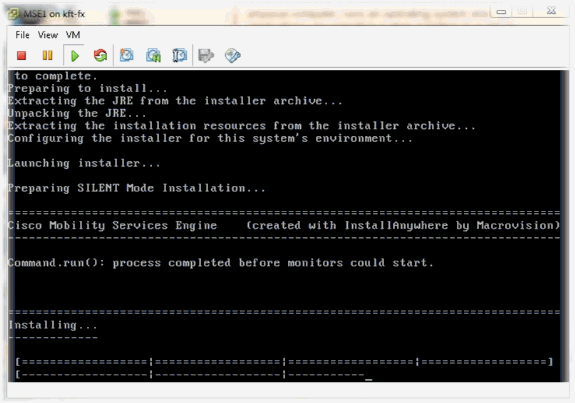
Complete the VA installation for MSE and verify that all network settings are met.
-
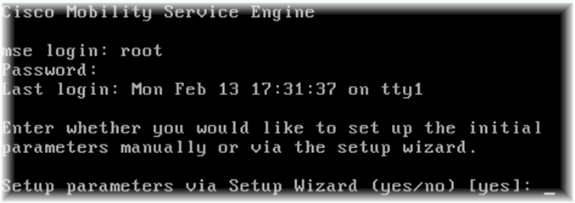
Initial the Setup Wizard at first login.
-
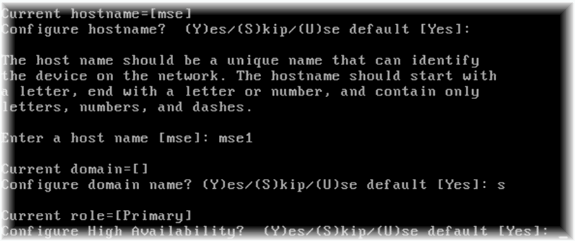
Enter the required entries (host name, domain, etc.). Enter YES at the step to Configure High Availability.
-
Enter the following:
-
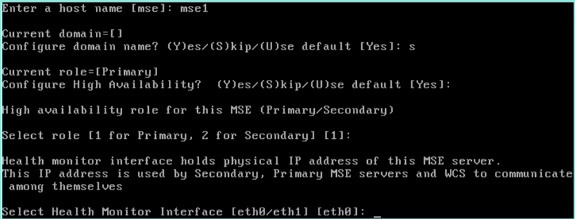
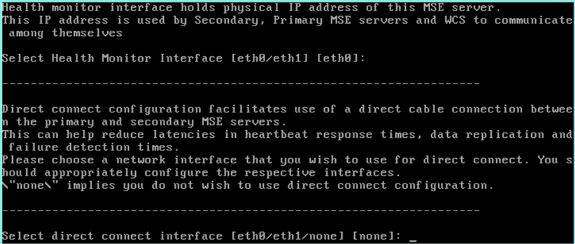
Select Role – [1 for Primary].
-
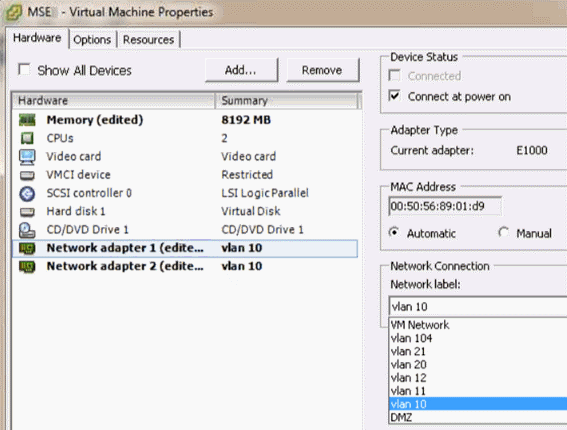
Health Monitor interface – [eth0]*
*Network settings mapped to Network Adapter 1 (see sample screenshot)
-
-
Select direct connect interface - [none].
-
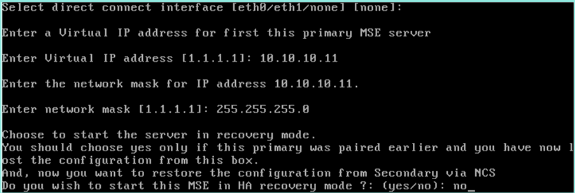
Enter the following:
-
Virtual IP address – [10.10.10.11]
-
Network Mask – [255.255.255.0]
-
Start MSE in recovery mode – [No]
-
-
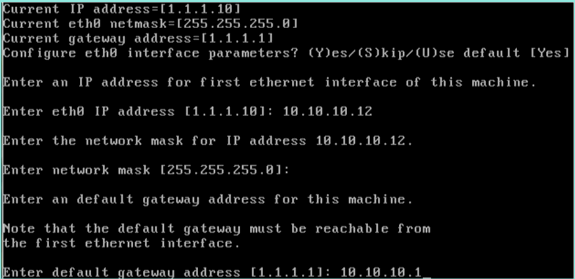
Enter the following:
-
Configure Eth0 - [Yes]
-
Enter Eth0 IP address– [10.10.10.12]
-
Network Mask – [255.255.255.0]
-
Default Gateway – [10.10.10.1]
-
-
The second Ethernet interface (Eth1) is not used.
Configure eth1 interface - [skip]

-
Continue through the Setup Wizard.
-
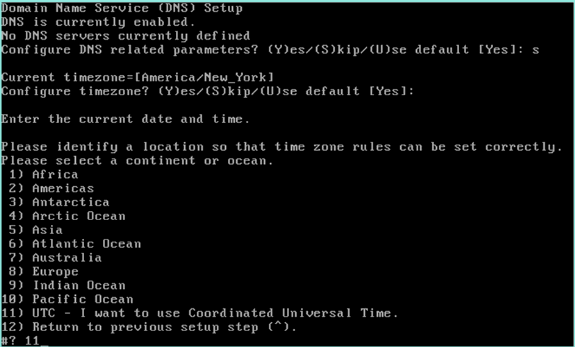
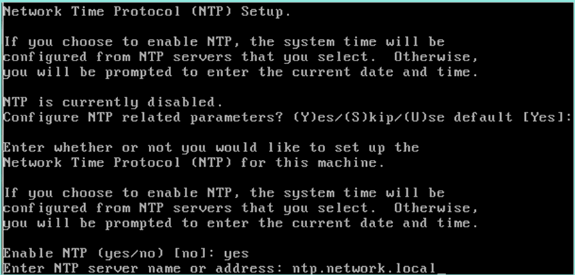
It is critical to enable the NTP server in order to synchronize the clock.
-
The preferred time zone is UTC.
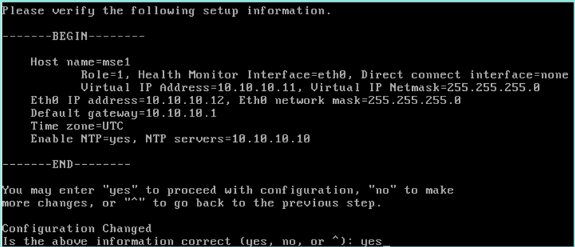
This summarizes the MSE Virtual Appliance Primary setup:
-------BEGIN--------
Role=1, Health Monitor Interface=eth0, Direct connect interface=none
Virtual IP Address=10.10.10.11, Virtual IP Netmask=255.255.255.0
Eth0 IP address=10.10.10.12, Eth0 network mask=255.0.0.0
Default Gateway=10.10.10.1
-------END--------
-
-
Enter [YES] to confirm that all setup information is correct.
-
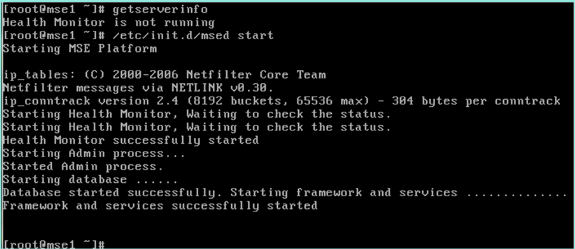
A reboot is recommended after set up.

-
After a reboot, start the MSE services with the /etc/init.d/msed start or the service msed startcommands.
-
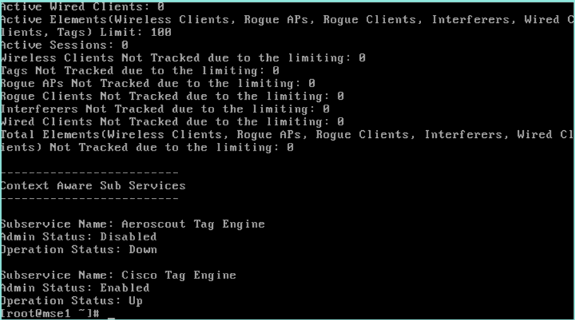
After all services have started, confirm MSE services are working properly with the getserverinfo command.
Operation status must show Up.
These steps are part of the setup for the secondary MSE VA:
-
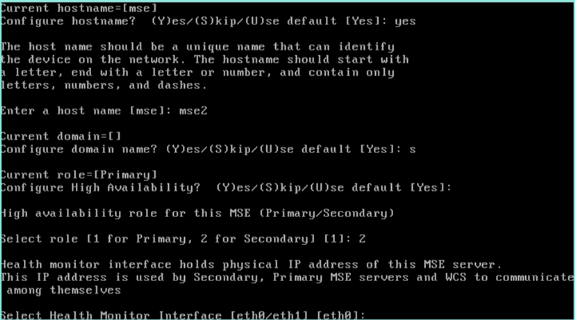
After new install, the initial login starts the Setup Wizard. Enter the following:
-
Configure High Availability – [Yes]
-
Select role – [2] which indicates Secondary
-
Health Monitor Interface – [eth0] same as Primary
-
-
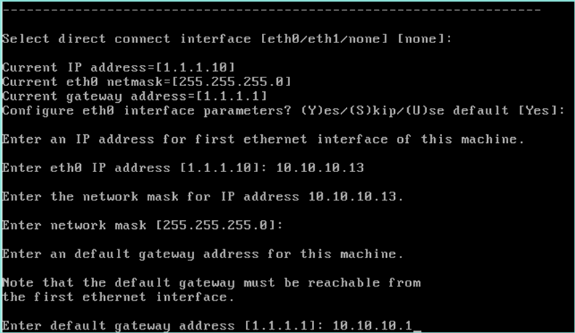
Enter the following:
-
Direct Connection – [None]
-
IP address eth0 – [10.10.10.13]
-
Network mask – [255.255.255.0]
-
Default Gateway – [10.10.10.1]
-
-
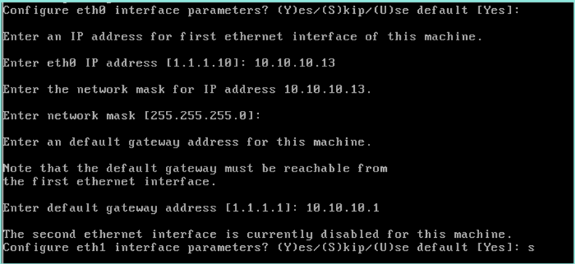
Configure eth1 interface – [Skip]
-
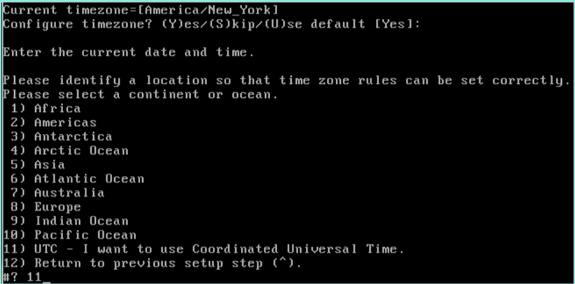
Set the Time Zone - [UTC]
-
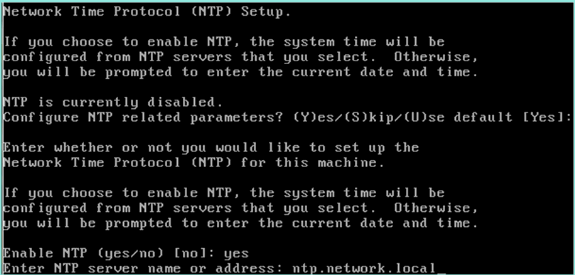
Enable NTP server.
-
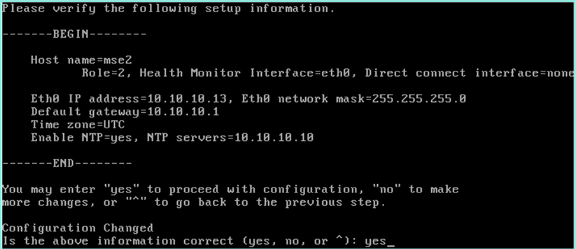
Complete the remaining steps of the Setup Wizard and confirm the setup information in order to save the configuration.
-
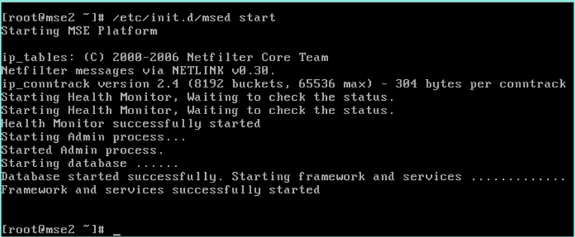
Reboot and start the services the same as the previous steps for the Primary MSE.
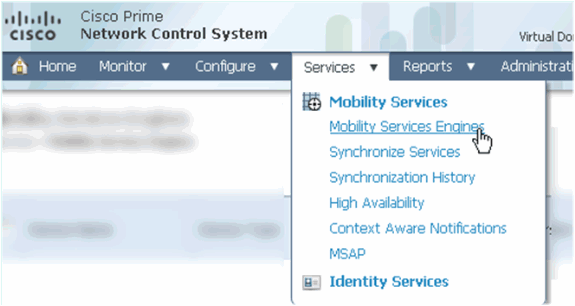
The next steps show how to add the Primary and Secondary MSE VA to the NCS. Perform the normal process of adding an MSE to the NCS. See the configuration guide for help.
-
From the NCS, go to Systems > Mobility Services and choose Mobility Services Engines.
-
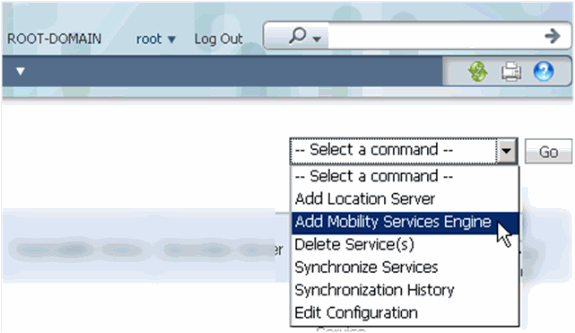
From the pull-down, choose Add Mobility Services Engine. Then, click Go.
-
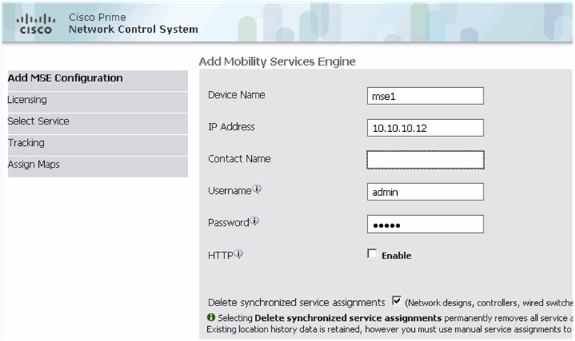
Follow the NCS configuration wizard for MSE. In this document's scenario, the values are:
-
Enter Device Name – e.g. [MSE1]
-
IP address – [10.10.10.12}
-
Username and Password (per initial setup)
-
Click Next.
-
-
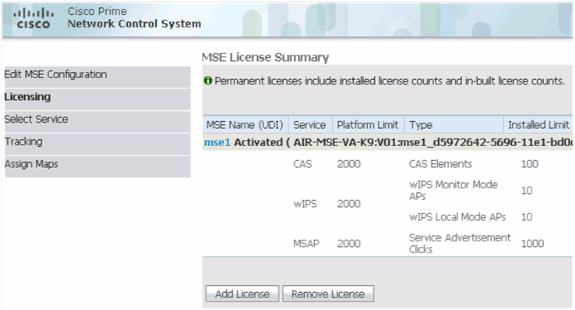
Add all available licenses, then click Next.
-
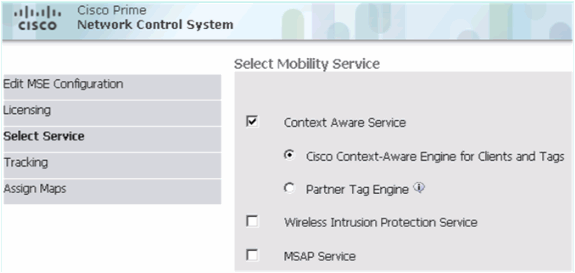
Select MSE services, then click Next.
-
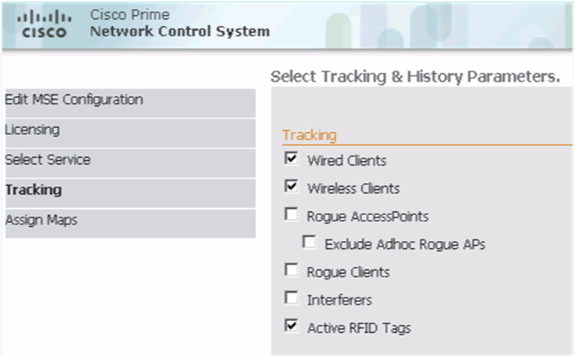
Enable tracking parameters, then click Next.
-
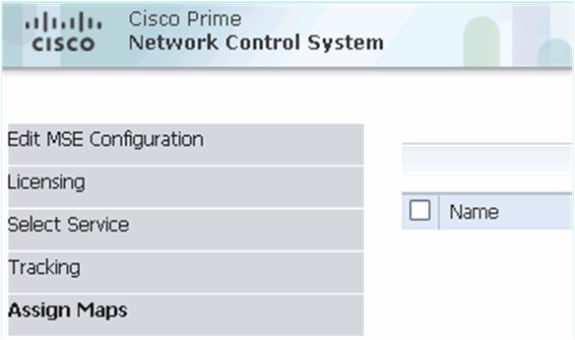
It is optional to assign maps and synchronize MSE services. Click Done to complete adding the MSE to the NCS.

The next screenshot shows that the Primary MSE VA has been added. Now, complete these steps in order to add the Secondary MSE VA:
-
Locate the Secondary Server column, and click the link to configure.

-
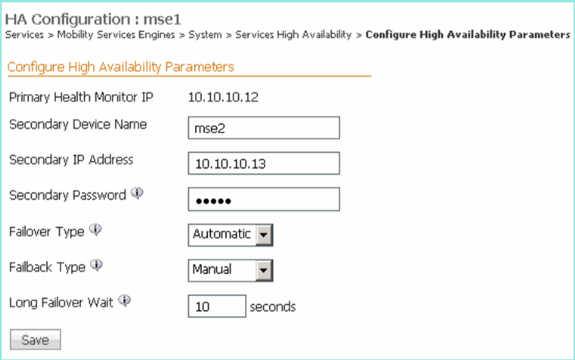
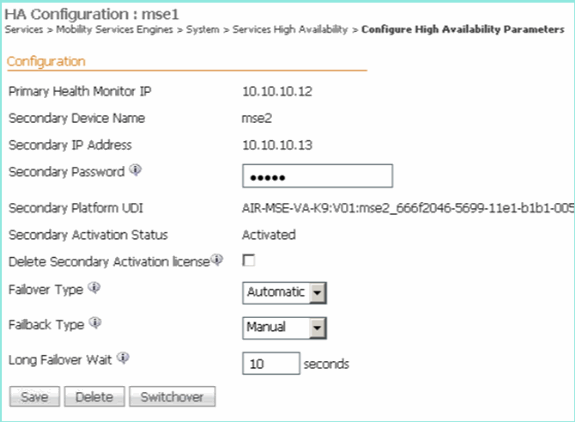
Add the Secondary MSE VA using the configuration in this scenario:
-
Secondary Device Name – [mse2]
-
Secondary IP Address – [10.10.10.13]
-
Secondary Password* – [default or from setup script]
-
Failover Type* – [Automatic, or Manual]
-
Fallback Type*
-
Long Failover Wait*
-
Click Save.
*Click the information icon or refer to MSE documentation if required.
-
-
Click OK when the NCS prompts to pair up the two MSEs.

The NCS takes a few seconds to create the configuration.

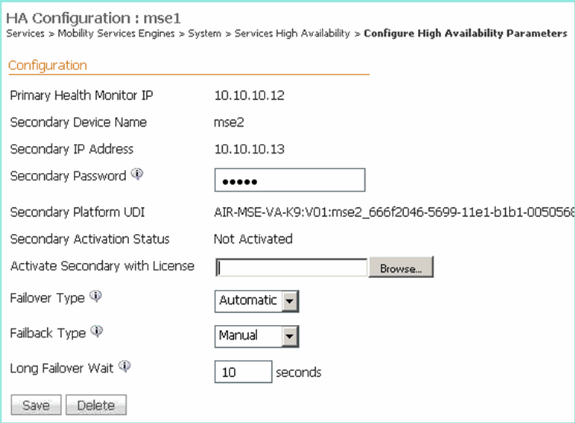
The NCS will prompt if the Secondary MSE VA requires an activation license (L-MSE-7.0-K9).

-
Click OK and locate the License File to activate Secondary.
-
Once the Secondary MSE VA has been activated, click Save to complete the configuration.
-
Navigate to NCS > Mobility Services > Mobility Services Engine.
The NCS displays this screen where the Secondary MSE appears in the column for Secondary Server:

-
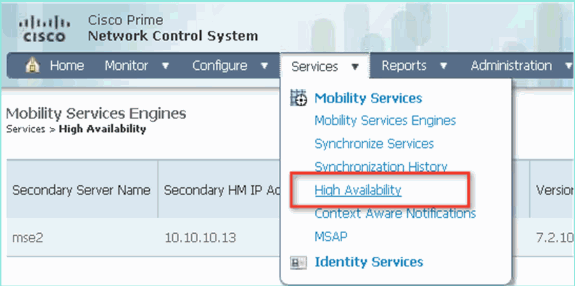
In order to view the High Availability status, navigate to NCS > Services > High Availability.
In the HA status, you can see the current status and events by the MSE pair.
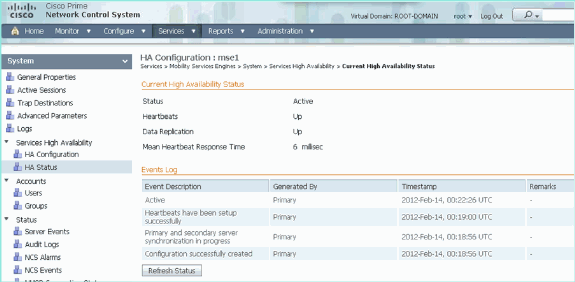
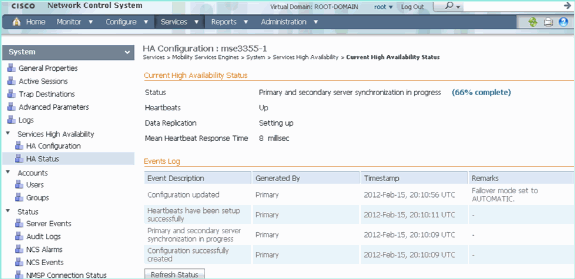
It can take a few minutes for the initial synchronization and data replication to be set up. The NCS provides the progress % indication until the HA pair is fully active as shown above.

A new command introduced with MSE software release 7.2 relating to HA is gethainfo. This output shows the Primary and Secondary:
[root@mse1 ~]#gethainfo

Health Monitor is running. Retrieving HA related information

----------------------------------------------------
Base high availability configuration for this server
----------------------------------------------------

Server role: Primary
Health Monitor IP Address: 10.10.10.12
Virtual IP Address: 10.10.10.11
Version: 7.2.103.0
UDI: AIR-MSE-VA-K9:V01:mse1
Number of paired peers: 1

----------------------------
Peer configuration#: 1
----------------------------

Health Monitor IP Address 10.10.10.13
Virtual IP Address: 10.10.10.11
Version: 7.2.103.0
UDI: AIR-MSE-VA-K9:V01:mse2_666f2046-5699-11e1-b1b1-0050568901d9
Failover type: Manual
Failback type: Manual
Failover wait time (seconds): 10
Instance database name: mseos3s
Instance database port: 1624
Dataguard configuration name: dg_mse3
Primary database alias: mseop3s
Direct connect used: No
Heartbeat status: Up
Current state: PRIMARY_ACTIVE


[root@mse2 ~]#gethainfo

Health Monitor is running. Retrieving HA related information

----------------------------------------------------
Base high availability configuration for this server
----------------------------------------------------

Server role: Secondary
Health Monitor IP Address: 10.10.10.13
Virtual IP Address: Not Applicable for a secondary
Version: 7.2.103.0
UDI: AIR-MSE-VA-K9:V01:mse2
Number of paired peers: 1

----------------------------
Peer configuration#: 1
----------------------------

Health Monitor IP Address 10.10.10.12
Virtual IP Address: 10.10.10.11
Version: 7.2.103.0
UDI: AIR-MSE-VA-K9:V01:mse1_d5972642-5696-11e1-bd0c-0050568901d6
Failover type: Manual
Failback type: Manual
Failover wait time (seconds): 10
Instance database name: mseos3
Instance database port: 1524
Dataguard configuration name: dg_mse3
Primary database alias: mseop3s
Direct connect used: No
Heartbeat status: Up
Current state: SECONDARY_ACTIVE
HA Configuration with Direct Connected
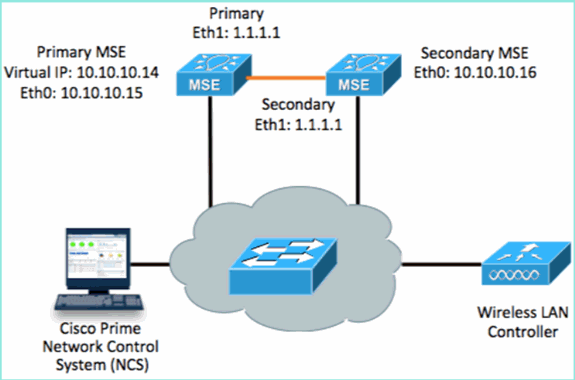
Network Connected MSE HA uses the network, whereas the Direct Connect configuration facilitates use of a direct cable connection between the Primary and Secondary MSE servers. This can help reduce latencies in heartbeat response times, data replication and failure detection times. For this scenario, a primary physical MSE connects to a secondary MSE on interface eth1, as seen in figure 5. Note that Eth1 is used for the direct connect. An IP address for each interface is required.
Figure 5: MSE HA with direct connect
-
Set up the Primary MSE.
Summary of configuration from setup script:
-------BEGIN--------
Host name=mse3355-1
Role=1 [Primary]
Health Monitor Interface=eth0
Direct connect interface=eth1
Virtual IP Address=10.10.10.14
Virtual IP Netmask=255.255.255.0
Eth1 IP address=1.1.1.1
Eth1 network mask=255.0.0.0
Default Gateway =10.10.10.1
-------END--------
-
Set up the Secondary MSE.
Summary of configuration from setup script:
-------BEGIN--------
Host name=mse3355-2
Role=2 [Secondary]
Health Monitor Interface=eth0
Direct connect interface=eth1
Eth0 IP Address 10.10.10.16
Eth0 network mask=255.255.255.0
Default Gateway=10.10.10.1
Eth1 IP address=1.1.1.2,
Eth1 network mask=255.0.0.0
-------END--------
-
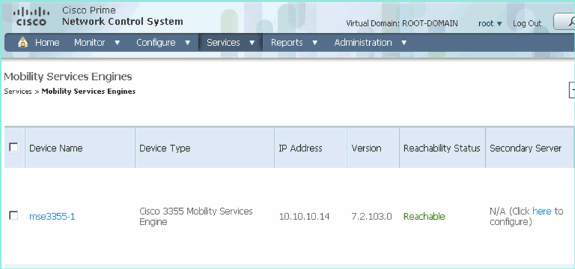
Add the Primary MSE to the NCS (see previous examples, or refer to configuration guide).
-
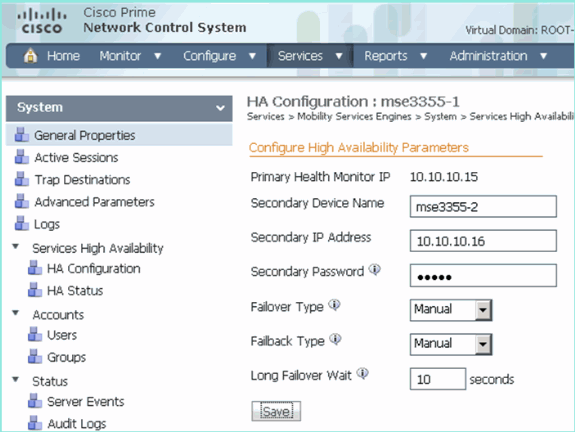
Set up the Secondary MSE from NCS > configure Secondary Server.
-
Enter Secondary Device Name - [mse3355-2]
-
Secondary IP address – [10.10.10.16]
-
Complete remaining parameters and click Save.
-
-
Click OK to confirm pairing up the two MSEs.

The NCS takes a moment to add the Secondary Server configuration.

-
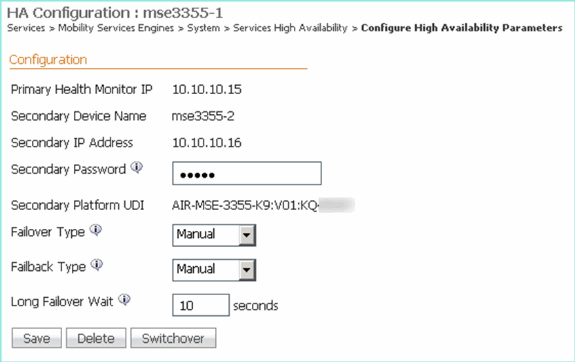
When completed, make any changes to the HA parameters. Click Save.
-
View the HA status for real-time progress of the new MSE HA pair.
-
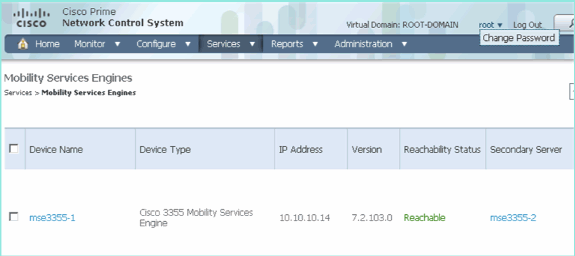
From NCS > Services > Mobility Services > Mobility Services Engines, confirm that the MSE (direct connect) HA is added to the NCS.
-
From the console, confirmation can also be seen with the gethainfo command.
Here is the Primary and Secondary output:
[root@mse3355-1 ~]#gethainfo

Health Monitor is running. Retrieving HA related information

----------------------------------------------------
Base high availability configuration for this server
----------------------------------------------------

Server role: Primary
Health Monitor IP Address: 10.10.10.15
Virtual IP Address: 10.10.10.14
Version: 7.2.103.0
UDI: AIR-MSE-3355-K9:V01:KQ37xx
Number of paired peers: 1

----------------------------
Peer configuration#: 1
----------------------------

Health Monitor IP Address 10.10.10.16
Virtual IP Address: 10.10.10.14
Version: 7.2.103.0
UDI: AIR-MSE-3355-K9:V01:KQ45xx
Failover type: Automatic
Failback type: Manual
Failover wait time (seconds): 10
Instance database name: mseos3s
Instance database port: 1624
Dataguard configuration name: dg_mse3
Primary database alias: mseop3s
Direct connect used: Yes
Heartbeat status: Up
Current state: PRIMARY_ACTIVE

[root@mse3355-2 ~]#gethainfo

Health Monitor is running. Retrieving HA related information

----------------------------------------------------
Base high availability configuration for this server
----------------------------------------------------

Server role: Secondary
Health Monitor IP Address: 10.10.10.16
Virtual IP Address: Not Applicable for a secondary
Version: 7.2.103.0
UDI: AIR-MSE-3355-K9:V01:KQ45xx
Number of paired peers: 1

----------------------------
Peer configuration#: 1
----------------------------

Health Monitor IP Address 10.10.10.15
Virtual IP Address: 10.10.10.14
Version: 7.2.103.0
UDI: AIR-MSE-3355-K9:V01:KQ37xx
Failover type: Automatic
Failback type: Manual
Failover wait time (seconds): 10
Instance database name: mseos3
Instance database port: 1524
Dataguard configuration name: dg_mse3
Primary database alias: mseop3s
Direct connect used: Yes
Heartbeat status: Up
Current state: SECONDARY_ACTIVE
HA Configuration Scenario for MSE Physical Appliance
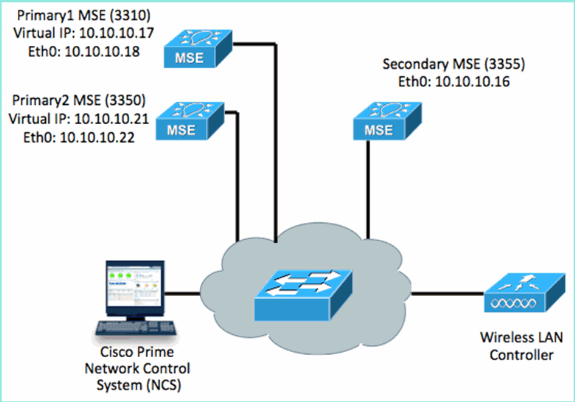
Based on the pairing matrix, the maximum in the HA configuration is 2:1. This is reserved for the MSE-3355, which in secondary mode, can support a MSE-3310 and MSE-3350. Direct connect is not applicable in this scenario.
-
Configure each of these MSEs to demonstrate 2:1 HA scenario:
MSE-3310 (Primary1)
Server role: Primary
Health Monitor IP Address (Eth0): 10.10.10.17
Virtual IP Address: 10.10.10.18
Eth1 – Not Applicable

MSE-3350 (Primary2)
Server role: Primary
Health Monitor IP Address: 10.10.10.22
Virtual IP Address: 10.10.10.21
Eth1 – Not Applicable

MSE-3355 (Secondary)
Server role: Secondary
Health Monitor IP Address: 10.10.10.16
Virtual IP Address: Not Applicable for a secondary
-
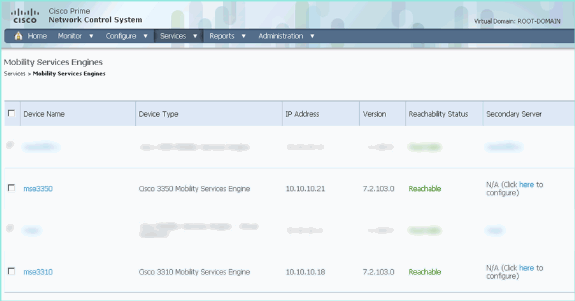
After all MSEs are configured, add Primary1 and Primary2 to the NCS.
-
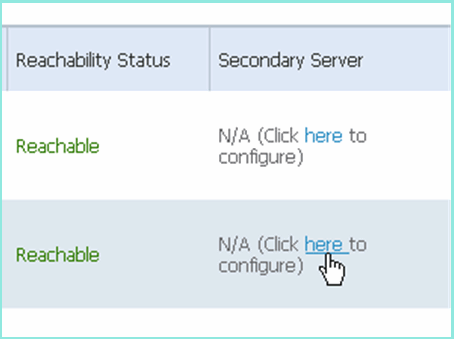
Click to configure Secondary Server (as shown in previous examples). Start with either one of the Primary MSEs.
-
Enter the parameters for the Secondary MSE:
-
Secondary Device Name: for example, [mse-3355-2}
-
Secondary IP address – [10.10.10.16]
-
Complete the remaining parameters.
-
Click Save.
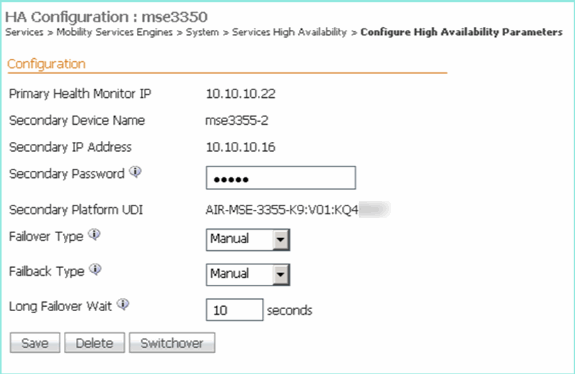
-
-
Wait a brief moment for the first secondary entry to be configured.

-
Confirm that the Secondary Server is added for the first Primary MSE.

-
Repeat steps 3 to 6 for the second Primary MSE.
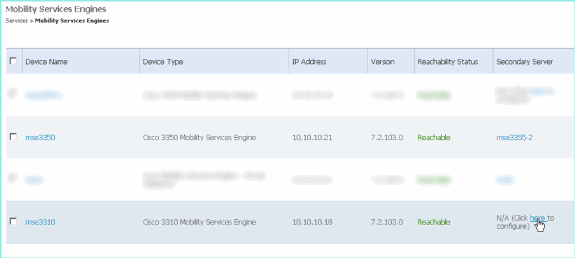
-
Finalize with HA parameters for the second Primary MSE.
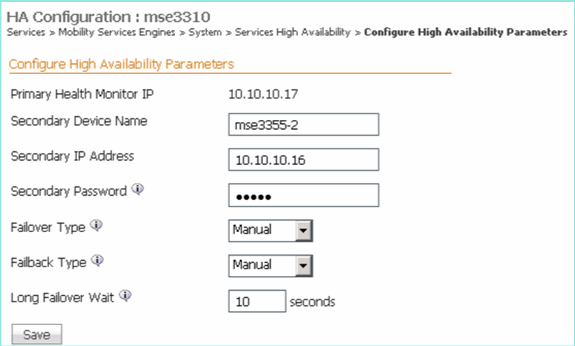
-
Save the settings.
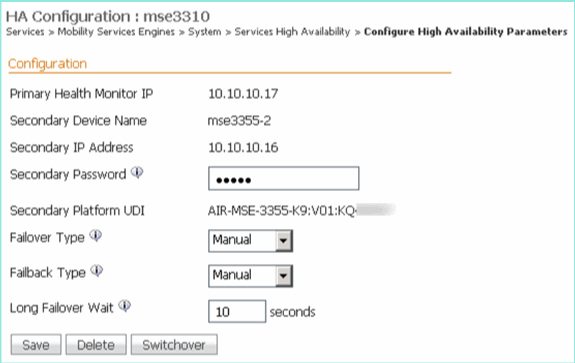
-
Check the status for progress for each of the Primary MSEs.
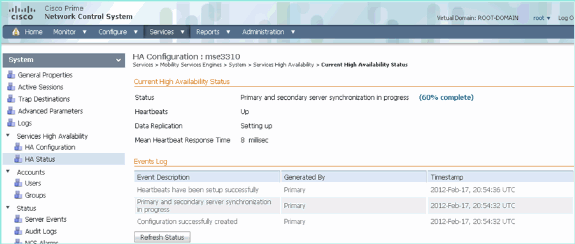
-
Confirm that both Primary1 and Primary2 MSEs are set up with a Secondary MSE.
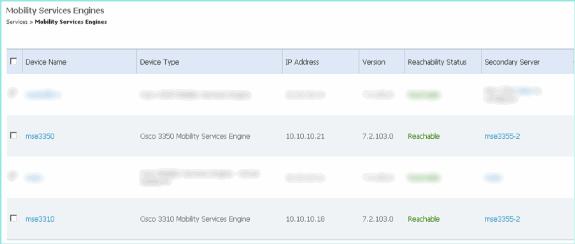
-
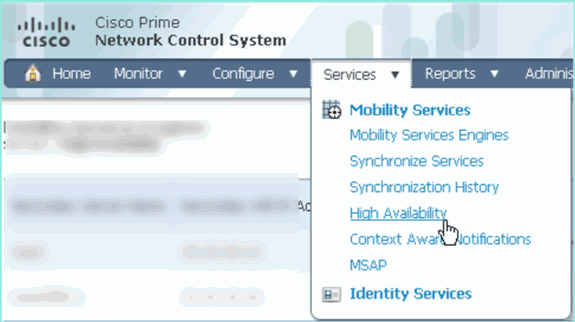
From NCS > Services > Mobility Services, choose High Availability.
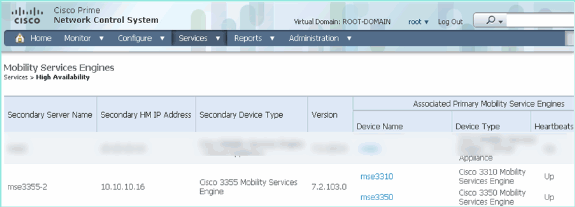
Note that 2:1 is confirmed for the MSE-3355 as a secondary for MSE-3310 and MSE-3350.
Here is a sample output of the HA setup from the console of all three MSEs when the gethainfo command is used:
[root@mse3355-2 ~]#gethainfo

Health Monitor is running. Retrieving HA related information

----------------------------------------------------
Base high availability configuration for this server
----------------------------------------------------

Server role: Secondary
Health Monitor IP Address: 10.10.10.16
Virtual IP Address: Not Applicable for a secondary
Version: 7.2.103.0
UDI: AIR-MSE-3355-K9:V01:KQ45xx
Number of paired peers: 2

----------------------------
Peer configuration#: 1
----------------------------

Health Monitor IP Address 10.10.10.22
Virtual IP Address: 10.10.10.21
Version: 7.2.103.0
UDI: AIR-MSE-3350-K9:V01:MXQ839xx
Failover type: Manual
Failback type: Manual
Failover wait time (seconds): 10
Instance database name: mseos3
Instance database port: 1524
Dataguard configuration name: dg_mse3
Primary database alias: mseop3s
Direct connect used: No
Heartbeat status: Up
Current state: SECONDARY_ACTIVE


----------------------------
Peer configuration#: 2
----------------------------

Health Monitor IP Address 10.10.10.17
Virtual IP Address: 10.10.10.18
Version: 7.2.103.0
UDI: AIR-MSE-3310-K9:V01:FTX140xx
Failover type: Manual
Failback type: Manual
Failover wait time (seconds): 10
Instance database name: mseos4
Instance database port: 1525
Dataguard configuration name: dg_mse4
Primary database alias: mseop4s
Direct connect used: No
Heartbeat status: Up
Current state: SECONDARY_ACTIVE
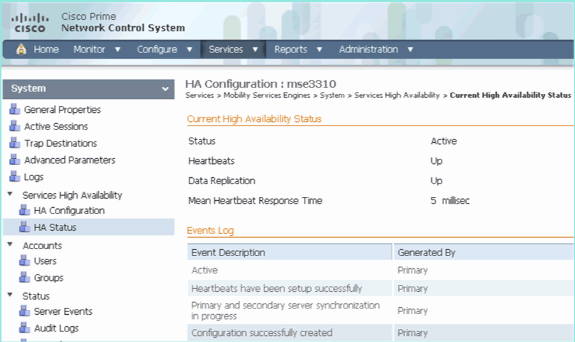
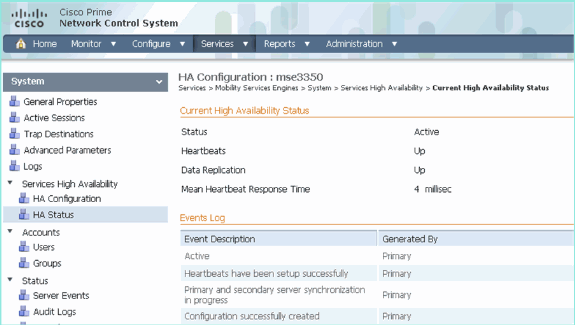
Final validation for HA in the NCS shows the status as fully Active for both the MSE-3310 and MSE-3350.
Basic Troubleshooting of MSE HA
When adding the Secondary MSE, you can see a prompt such as this:
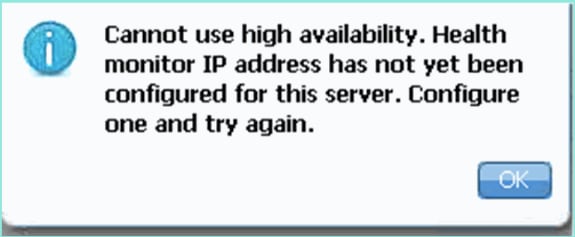
It is possible there was an issue during the setup script.
-
Run the getserverinfo command to check for proper network settings.
-
It is also possible that the services have not started. Run the /init.d/msed start command.
-
Run through the setup script again if required (/mse/setup/setup.sh) and save at the end.
The Virtual Appliance for MSE also requires an activation license (L-MSE-7.0-K9). Otherwise, the NCS prompts when adding the Secondary MSE VA. Obtain and add the activation license for the MSE VA.

If switching HA role on the MSE, make sure that the services are fully stopped. Therefore, stop services with the /init.d/msed stop command, then run the setup script again (/mse/setup/setup.sh).

Use the gethainfo command to Get High Availability Information on the MSE. This provides useful information in troubleshooting or monitoring HA status and changes.
[root@mse3355-2 ~]#gethainfo

Health Monitor is running. Retrieving HA related information

----------------------------------------------------
Base high availability configuration for this server
----------------------------------------------------

Server role: Secondary
Health Monitor IP Address: 10.10.10.16
Virtual IP Address: Not Applicable for a secondary
Version: 7.2.103.0
UDI: AIR-MSE-3355-K9:V01:KQ45xx
Number of paired peers: 2

----------------------------
Peer configuration#: 1
----------------------------

Health Monitor IP Address 10.10.10.22
Virtual IP Address: 10.10.10.21
Version: 7.2.103.0
UDI: AIR-MSE-3350-K9:V01:MXQ839xx
Failover type: Manual
Failback type: Manual
Failover wait time (seconds): 10
Instance database name: mseos3
Instance database port: 1524
Dataguard configuration name: dg_mse3
Primary database alias: mseop3s
Direct connect used: No
Heartbeat status: Up
Current state: SECONDARY_ACTIVE


----------------------------
Peer configuration#: 2
----------------------------

Health Monitor IP Address 10.10.10.17
Virtual IP Address: 10.10.10.18
Version: 7.2.103.0
UDI: AIR-MSE-3310-K9:V01:FTX140xx
Failover type: Manual
Failback type: Manual
Failover wait time (seconds): 10
Instance database name: mseos4
Instance database port: 1525
Dataguard configuration name: dg_mse4
Primary database alias: mseop4s
Direct connect used: No
Heartbeat status: Up
Current state: SECONDARY_ACTIVE
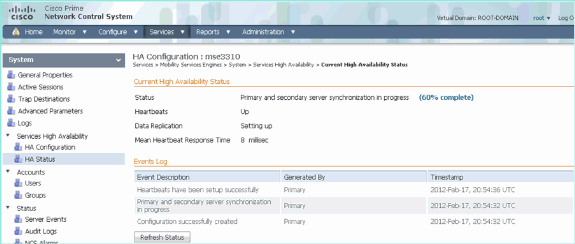
In addition, the NCS High Availability View is a great management tool in order to get visibility to the HA setup for MSE.
Related Information
Revision History
| Revision | Publish Date | Comments |
|---|---|---|
1.0 |
01-Dec-2013 |
Initial Release |
Contact Cisco
- Open a Support Case

- (Requires a Cisco Service Contract)
 Feedback