Understanding LEDs on the Location Appliance
Available Languages
Contents
Introduction
This document explains how to interpret the LEDs on the Cisco 2700 Location Appliance and view the events that caused the LEDs to change colors.
Prerequisites
Requirements
Cisco recommends that you have knowledge of these topics:
-
Knowledge of how to configure a basic Cisco Unified Wireless Network
-
Basic knowledge of the Lightweight Access Point Protocol (LWAPP)
-
Basic understanding of the Cisco 2700 Wireless Location Appliance
Components Used
The information in this document is based on these software and hardware versions:
-
Cisco 2700 Series Location Appliance that runs firmware 5.2
The information in this document was created from the devices in a specific lab environment. All of the devices used in this document started with a cleared (default) configuration. If your network is live, make sure that you understand the potential impact of any command.
Conventions
Refer to Cisco Technical Tips Conventions for more information on document conventions.
Understand LEDs on the Location Appliance
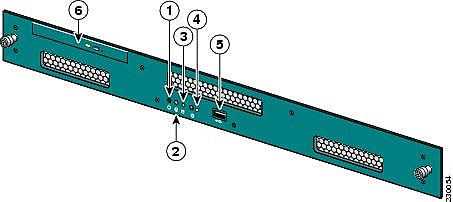
Find the LEDs on the Front Panel of the Cisco Location Appliance.

| Item No | Description |
|---|---|
| 1 | Power switch |
| 2 | Reserved |
| 3 | Hard drive indicator |
| 4 | System LED |
| 5 | USB port |
| 6 | DVD tray |
Under normal operational conditions, the status of the LED on the Location Appliance is solid blue. When a status altering event occurs, the LED blinks amber. Press the button on the front of the chassis to make the LED turn blue, which makes the identity of the affected server easier to locate in a full server rack. The altered status remains the same; only the status indicator changes.
| Color | System Status |
|---|---|
| Solid Blue | Normal operating status |
| Blinking Amber | The System LED blinks amber on the front panel when a status altering event occurs. |
| Blinking Blue | The System LED blinks blue on the front and rear panel when a status altering event occurs and a user presses the (I) button. The intention of the blinking blue LED is to make the affected server easier to find. |
Note: The (I) button on the front of the unit is used for the Identify feature of the hardware off or on. Press the (I) button to turn on the Identify feature, which causes the I LED on the front of the unit and the I LED on the back of the unit to blink. Press the (I) button again to turn off the Identify feature.
A list of status altering events follows:
-
Powering on the unit with the cover open
-
Voltage fluctuations
-
Improper power down (switching off without instructions to software to shut it down or simply unplugging it)
-
Incorrect fan speed
-
Temperature or power supply tolerance exceeded
Notice that most of these status altering events are minor, but they trigger the System LED to blink amber. In order to see exactly what status altering event occurred, reboot the unit, enter the BIOS, and check the logs. In the log menu, there is an option to clear the event, which returns the System LED to solid blue.
In order to clear the event on the Location Appliance, complete these steps:
-
Connect a monitor to the VGA port on the back of the Location Appliance and a USB keyboard to the USB port on the front.
-
Press Enter several times. The Location Appliance returns a login prompt.
-
Once logged in, reboot the unit with this command:
/sbin/shutdown -r now
-
When the unit reboots, the BIOS splash screen appears as on any PC; press F2 to enter setup.
-
Navigate the menu to Advanced > Event Log Config. The options are to View Event Log and Clear All Event Logs.
-
Once the logs are reviewed and cleared, navigate toExit > Save Changes and exit. The unit reboots, and the LED status returns to normal.
Note: In order to shutdown the unit from the CLI, use this command:
/sbin/shutdown now
Related Information
Contact Cisco
- Open a Support Case

- (Requires a Cisco Service Contract)
 Feedback