The documentation set for this product strives to use bias-free language. For the purposes of this documentation set, bias-free is defined as language that does not imply discrimination based on age, disability, gender, racial identity, ethnic identity, sexual orientation, socioeconomic status, and intersectionality. Exceptions may be present in the documentation due to language that is hardcoded in the user interfaces of the product software, language used based on RFP documentation, or language that is used by a referenced third-party product. Learn more about how Cisco is using Inclusive Language.
You can manage the
Cisco APIC-EM
using its GUI. The following controller management functions are available
using the GUI:
Application
separation (enable and disable supported applications on the controller)
Backup and restore
Software update
Cisco APIC-EM
Application Separation
With
this release, the Cisco APIC-EM treats individual applications as separate from
the core infrastructure. Specifically, individual applications can now be
enabled to run on the controller or disabled using either the GUI or the CLI.
The following applications are supported for this release:
PnP—Application that provides Network PnP services
and functionality on the controller.
IWAN—Application that provides IWAN services and
functionality on the controller.
Note
Each
Cisco APIC-EM
application consists of service bundles, meta data files, and scripts; although
for this specific release, application bundles are only provided as part of the
ISO image.
Enabling and
Disabling Applications
With this release, the Cisco APIC-EM treats individual applications as
separate from the core infrastructure. Specifically, individual applications
can now be enabled to run on the controller or disabled. For this release,
Cisco APIC-EM
only supports enabling or disabling the IWAN and PnP applications. Future
releases will support additional applications with this functionality.
You can perform the
application management procedures from the
Applications
tab in the
Cisco APIC-EM
GUI.
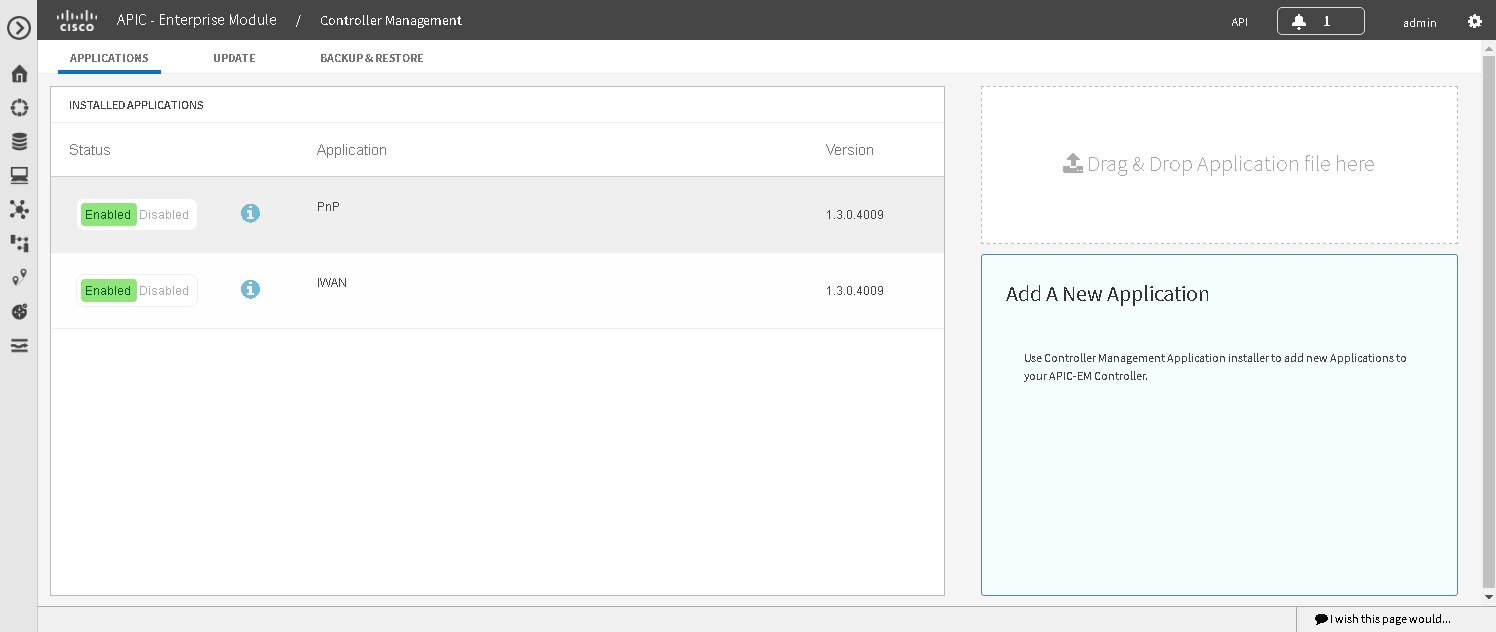
Figure 1. Applications
Window
Before you begin
You must have
successfully deployed the
Cisco APIC-EM
and it must be operational.
You must have administrator
(ROLE_ADMIN) permissions and either access to all resources (RBAC scope set to
ALL) or an RBAC scope that contains all of the resources that you want to
group. For example, to create a group containing a specific set of resources,
you must have access to those resources (custom RBAC scope set to all of the
resources that you want to group).
For information about user permissions and RBAC scopes required to perform tasks using the Cisco APIC-EM, see the chapter,
"Managing Users".
Important
Enabling and
disabling applications for the
Cisco APIC-EM
may involve controller downtime for a period of time. For this reason, we
recommend that you schedule performing these procedures during your network
off-peak hours or a maintenance time period.
Procedure
Step 1
In the
Home window, click either
admin or the
Settings icon (gear) at the top right corner of the
screen.
Step 2
Click the
App
Management link from the drop-down menu.
Step 3
Review the
Applications
tab that now appears.
The
Applications tab consists of the following fields:
Installed
Applications—Field that displays current applications installed on
the controller, status (enabled or disabled), and version.
Drag &
Drop—Field where you can drop in an application file to download
and install it.
Step 4
In the Installed
Applications field, review the applications currently installed on
the controller, status (enabled or disabled) and versions.
Click on the
information icon ("i" symbol within a blue circle) for additional application
information.
General
information
Provides general information about the application including a
definition, its version, whether it can be enabled by default, and whether or
not it can be disabled for this release.
Requires
Displays the other applications that it is dependent upon.
Proper operation of the application is contingent upon those other applications
being installed, enabled, and running.
Services
Provided
Provides a list of services and the service version that the
application will install.
Step 5
Drag and drop
your updated application to the
Drag
& Drop field on the controller GUI.
Important
For this
specific controller release, application bundles are only provided as part of
the ISO image. For this reason, this step in the procedure is not currently
available.
Step 6
Review the
status bar for the application upload.
The time
required for the application upload will vary depending upon the size of the
file. After the upload, the new application appears in the
Installed Applications field.
Note
A warning
message will appear if the following conditions are not met:
A
prerequisite application bundle is not enabled on the controller.
The system
requirements of memory, CPU, and/or storage are not met.
Important
For this
specific controller release, the application bundles are only provided as part
of the ISO image. For this reason, this step in the procedure is not currently
available.
Step 7
Enable the new
application by clicking its
Enable button.
When prompted to
confirm, click
Ok.
Note
A warning
message will appear if the following conditions are not met:
A
prerequisite application bundle is not enabled on the controller.
The system
requirements of memory, CPU, and/or storage are not met
What to do next
Check the
Installed
Applications field. When the status for the application changes to
Enable, then proceed to access and work with the
application in the controller.
Information about
Backing Up and Restoring the
Cisco APIC-EM
The back up and restore procedure for the
Cisco APIC-EM
can be used for the following purposes:
To create a
single backup file to support disaster recovery on the controller
To create a
single backup file on one controller to restore to a different controller (if
required for your network configuration)
When you perform a
back up using the controller's GUI, you copy and export the controller's
database and files as a single file to a specific location on the controller.
When you perform a restore, you copy over the existing database and files on
the controller using this single backup file.
Note
The
Cisco APIC-EM
uses PostgreSQL as the preferred database engine for all network data.
PostgreSQL is an open source object-relational database system.
The following files
and data are copied and restored when performing a back up and restore:
Cisco APIC-EM
database
Cisco APIC-EM
file system and files
X.509 certificates
and trustpools
Usernames and
passwords
Any user
uploaded files (for example, any Network Plug and Play image files)
The database and files
are compressed into a single
.backup file
when performing the back up and restore.
The maximum size of the .backup file is 30GB.
This number consists of a permitted 20GB maximum size for a file service back
up and a 10GB permitted maximum size for the database back up.
Note
The .backup file
should not be modified by the user.
Only
a single back up can be performed at a time. Performing multiple back ups at
once are not permitted. Additionally, only a full back up is supported. Other
types of back ups (for example, incremental back ups) are not supported.
Note
After saving the
backup file, you can also download it to another location in your network. You
can restore the backup file from its default location in the controller or drag
and drop the backup file from its location in your network to restore.
When performing a
backup and restore, we recommend the following:
Perform a back
up everyday to maintain a current version of your database and files.
Perform a back
up and restore after making any changes to your configuration. For example,
when changing or creating a new policy on a device.
Only perform a
back up and restore during a low impact or maintenance time period.
When a back up is
being performed, you will be unable to delete any files that have been uploaded
to the file service and any changes you make to any files may not be captured
by the back up process. When a restore is being performed, the controller is
unavailable.
Note
You cannot schedule nor automate a back up and restore at this time.
Additionally, once started you cannot manually cancel either the back up or
restore process.
Multi-Host Cluster
Back Up and Restore
In a multi-host
cluster, the database and files are replicated and shared across three hosts.
When backing up and restoring in a multi-host cluster, you need to first back
up on one of the three hosts in the cluster. You can then use that backup file
to restore all three hosts in the cluster. However, you need not perform the
restore operation on each of the hosts. You simply restore one of the hosts in
the cluster. The controller replicates the restored data to the other hosts
automatically.
Note
The back up and
restore process in a multi-host cluster requires that the
Cisco APIC-EM
software and version must be the same for all three hosts.
Backing Up the
Cisco APIC-EM
You can back up your controller using the
Backup
& Restore
window.
Figure 2. Backup &
Restore Window
Before you begin
You must have
successfully deployed the
Cisco APIC-EM
and it must be operational.
You must have administrator
(ROLE_ADMIN) permissions and either access to all resources (RBAC scope set to
ALL) or an RBAC scope that contains all of the resources that you want to
group. For example, to create a group containing a specific set of resources,
you must have access to those resources (custom RBAC scope set to all of the
resources that you want to group).
For information about user permissions and RBAC scopes required to perform tasks using the Cisco APIC-EM, see the chapter,
"Managing Users".
Procedure
Step 1
In the
Home window, click either
admin or the
Settings icon (gear) at the top right corner of the
screen.
Step 2
Click the
App
Management link from the drop-down menu.
Note
In previous
versions of the controller software, the
Backup and Restore functionality was directly
accessible from the
Settings navigation pane. Although, the
Backup and Restore option is still visible from the
Settings navigation pane, with this release you
cannot access this functionality from that GUI location.
Step 3
Click the
Backup
and Restore tab at the top of the window.
Step 4
In the
Backup
& Restore window, create a backup file by clicking on the
Create
New Backup button.
After clicking
the
Create New Backup button, a
Backup in Progress window appears in the GUI.
During this
process, the
Cisco APIC-EM
creates a compressed
.backup
file of the controller database and files. This backup file is also given a
time and date stamp that is reflected in its file name. The following file
naming convention is used:
yyyy-mm-dd-hh-min-seconds (year-month-day-hour-seconds).
For example:
backup_2015_08_14-08-35-10
Note
If
necessary, you can rename the backup file instead of using the default time and
date stamp naming convention.
This backup
file is then saved to a default location within the controller. You will
receive a
Backup Done! notification, once the back up process
is finished. Only a single backup file at a time is stored within the
controller.
Note
If the back up process fails for any reason, there is no impact
to the controller and its database. Additionally, you will receive an error
message stating the cause of the back up failure. The most common reason for a
failed back up is insufficient disk space. If your back up process fails, you
should check to ensure that there is sufficient disk space on the controller
and attempt another back up.
Step 5
(Optional)
Create a copy of the backup file to another location.
After a
successful back up, a
Download link appears in the GUI. Click the link to
download and save a copy of the backup file to a location on your laptop or
network.
What to do next
When necessary and
at an appropriate time, proceed to restore the backup file to the
Cisco APIC-EM.
Restoring the
Cisco APIC-EM
You can restore your controller using the
Backup
& Restore
window.
The following
restore options are available:
You can restore
from the last know backup file on the controller.
You can also
restore from an archived backup file that was saved and moved to another
location on your network.
Caution
The
Cisco APIC-EM
restore process restores the controller's database and files. The restore
process does not restore your network state and any changes made by the
controller since the last backup, including any new network policies that have
been created, any new or updated passwords, or any new or updated
certificates/trustpool bundles.
Figure 3. Backup &
Restore Window
Note
You can only
restore a backup from a controller that is the same software version as the
controller where the backup was originally taken from.
Before you begin
You must have successfully deployed the
Cisco APIC-EM
and it must be operational.
You must have administrator
(ROLE_ADMIN) permissions and either access to all resources (RBAC scope set to
ALL) or an RBAC scope that contains all of the resources that you want to
group. For example, to create a group containing a specific set of resources,
you must have access to those resources (custom RBAC scope set to all of the
resources that you want to group).
For information about user permissions and RBAC scopes required to perform tasks using the Cisco APIC-EM, see the chapter,
"Managing Users".
You must have
successfully performed a back up of the
Cisco APIC-EM
database and files following the steps in the previous procedure.
Procedure
Step 1
In the
Home window, click either
admin or the
Settings icon (gear) at the top right corner of the
screen.
Step 2
Click the
App
Management link from the drop-down menu.
Note
In previous
versions of the controller software, the
Backup and Restore functionaliy was directly
accessible from the
Settings navigation pane. Although, the
Backup and Restore option is still visible from the
Settings navigation pane, with this release you
cannot access this functionality from that GUI location.
Step 3
Click the
Backup
and Restore tab at the top of the window.
Step 4
To restore the
backup file, click on the
Restore
from last Backup button.
You can also
drag and drop the backup file from its location in your network onto the
Drag
and Drop a backup file field in this window.
During a
restore, the backup file copies over the current database.
Note
When a restore
is in progress, you are not be able to open and access any windows in the GUI.
Step 5
After the
restore process completes, log back into the controller's GUI.
If the restore
process was successful, you will be logged out of the controller and its GUI.
You will need to log back in.
Note
The
Cisco APIC-EM
restore process restores the controller's database and files. The restore
process does not restore your network state and any changes made by the
controller since the last backup, including any new network policies that have
been created, any new or updated passwords, or any new or updated
certificates/trustpool bundles.
To check whether the restore process was successful, you can either
review the
Backup History field of the
Backup & Restore window or access the Grapevine
root and to run the
grape backup display command.
If the restore
process was unsuccessful, you will receive an unsuccessful restore
notification. Since the database may be in an inconsistent state, we recommend
that you do not use the database and contact technical support for additional
actions to take.
Step 6
(Optional) Using
a Secure Shell (SSH) client, log into the host (physical or virtual) with the
IP address that you specified using the configuration wizard.
Note
The IP address
to enter for the SSH client is the IP address that you configured for the
network adapter. This IP address connects the appliance to the external
network.
Step 7
(Optional) When
prompted, enter your Linux username ('grapevine') and password for SSH access.
Step 8
(Optional) Enter
the
grape
backup display command at the prompt to confirm that the restore
process was completed and successful.
$ grape backup display
Check the
command output to ensure that the restore process was completed and successful.
Look for the property operation marked "restore" in the command output, with
the latest start_time and ensure that the status is marked as a "success".
Step 9
(Optional) Using
the Secure Shell (SSH) client, log out of the appliance.
Step 10
Return to the
controller's GUI and review the
Backup
History field of the
Backup
& Restore window.
After the
restore, information about it appears in the
Backup History field of the
Backup & Restore window. The following update
data is displayed in this field:
Date—Local date
and time of the restore
ID—Controller
generated identification number of the backup file
Operation—Type
of operation, either backup or restore
Update
Status—Success or failure status of the operation.
Note
If you
place your cursor over (mouseover) a failure status in this field, then
additional details about the failure is displayed.
Updating the
Cisco APIC-EM
Software
You can update the
Cisco APIC-EM
to the latest version using the controller's software update procedure. This
procedure requires that you perform the following tasks:
Download the
release upgrade pack from the secure Cisco cloud.
Run a checksum
against the release upgrade pack.
Upload the
release upgrade pack to the controller using the GUI.
Update the
controller's software with the release upgrade pack.
Important
This procedure
should be read in conjunction with the latest version of the
Cisco APIC-EM
release notes, as there may be specific additional requirements for that
release's upgrade. You should first review the
Release
Notes for Cisco Application Policy Infrastructure Controller Enterprise
Module, before beginning this procedure.
Note
In a multi-host
cluster, you only need to update a single host. After updating that single
host, the other two hosts are automatically updated with the release upgrade
pack.
The
release upgrade pack is available for download as a tar file that is also
compressed, so the release upgrade pack has a .tar.gz extension. The release
upgrade pack itself may consist of any or all of the following update files:
Service files
Grapevine files
Linux files
Note
Each release
upgrade pack contains an encrypted Cisco signature for security purposes, as
well as release version metadata that validates the package.
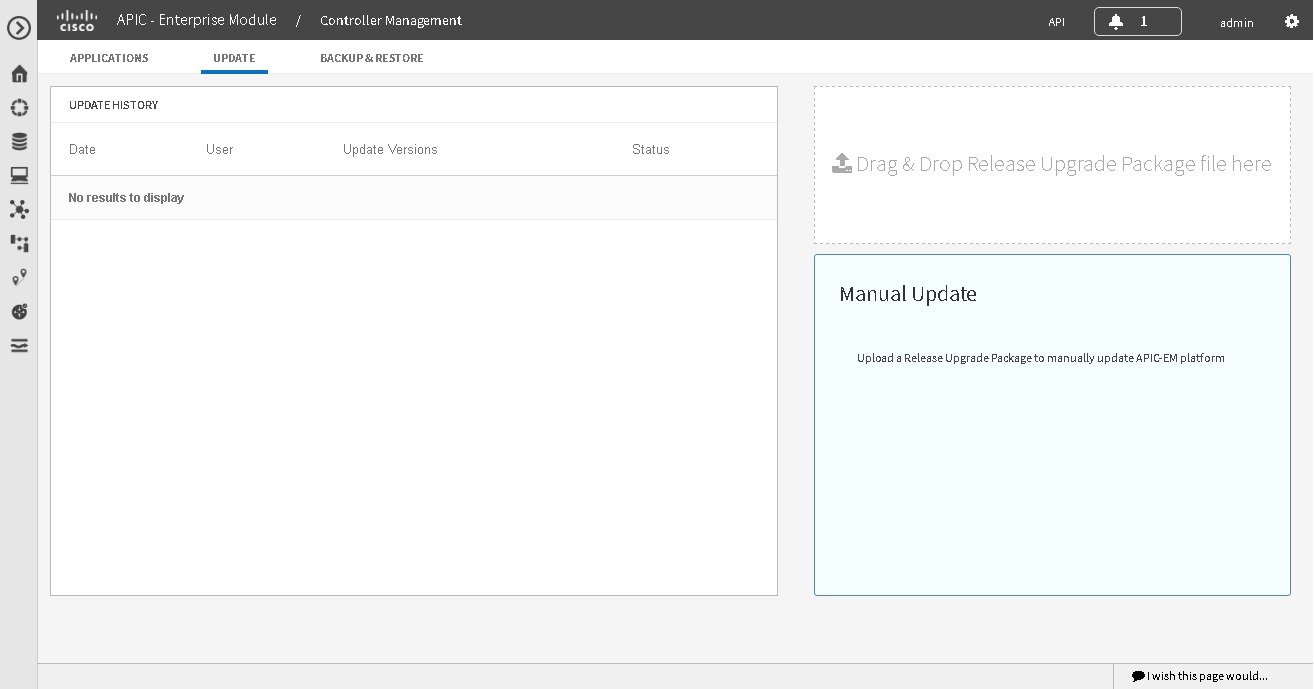
You perform the
upload and update procedure using the
Update window in the
Cisco APIC-EM
GUI.
Figure 4. Update
Window
Note
After a
successful upload and software update, you are not permitted to rollback to an
earlier
Cisco APIC-EM
version.
Before you begin
You must have
successfully deployed the
Cisco APIC-EM
and it must be operational.
You must have administrator
(ROLE_ADMIN) permissions and either access to all resources (RBAC scope set to
ALL) or an RBAC scope that contains all of the resources that you want to
group. For example, to create a group containing a specific set of resources,
you must have access to those resources (custom RBAC scope set to all of the
resources that you want to group).
For information about user permissions and RBAC scopes required to perform tasks using the Cisco APIC-EM, see the chapter,
"Managing Users".
Note
When updating or
upgrading the
Cisco APIC-EM
in a virtual machine within a VMware vSphere environment, you must ensure that
the time settings on the ESXi host are also synchronized to the NTP server.
Failure to ensure synchronization will cause the upgrade to fail.
You must have
received notification from Cisco that the
Cisco APIC-EM
software update is available for you to download from the secure Cisco website.
You can be notified
about the availability of a
Cisco APIC-EM
software update in the following ways:
Email
notification from Cisco support and/or updated release notes.
System
notification through the controller GUI.
Note
Notification
about available release upgrade packs can be viewed by clicking the
System Notifications icon on the menu bar.
Procedure
Step 1
Review the
information in the Cisco notification about the
Cisco APIC-EM
update file and checksum.
The Cisco
notification specifies the location of the release upgrade pack and
verification values for either a Message Digest 5 (MD5) or Secure Hash
Algorithm (SHA) 512 bits (SHA512) checksum.
Note
The
Cisco APIC-EM
release upgrade pack is a bit file that varies in size based upon the
requirements of the specific update. The release upgrade pack can be as large
as several Gigabits.
Step 2
Download the
release upgrade pack from the secure Cisco website to your laptop or to a
location within your network.
Step 3
Run a checksum
against the release upgrade pack using your own checksum verification tool or
utility (either MD5 or SHA512).
Step 4
Review the
displayed checksum verification value from your checksum verification tool or
utility.
If the output
from your checksum verification tool or utility matches the appropriate
checksum value in the Cisco notification or from the Cisco secure website, then
proceed to the next step. If the output does not match the checksum value, then
download the release upgrade pack and perform another checksum. If checksum
verification issues persist, contact Cisco support.
Step 5
In the
Home window, click either
admin or the
Settings icon (gear) at the top right corner of the
screen.
Step 6
Click the
App
Management link from the drop-down menu.
Note
In previous
versions of the controller software, the
Update functionality was directly accessible from
the
Settings navigation pane. Although, the
Update option is still visible from the
Settings navigation pane, with this release you
cannot access this functionality from that GUI location.
Step 7
Click the
Update tab at the top of the window.
Step 8
If the release
upgrade pack is acceptable to use for updating the controller (checksum value
match in step 4), then drag and drop the release upgrade pack from the download
location on your laptop or in your network onto the
Manual
Update field in the
Update window.
After dropping
the release upgrade pack onto the
Manual Update field, the upload process begins.
The upload
process may take several minutes depending upon the size of the release upgrade
pack and your network connection. During the upload process, you can continue
to work with the controller. Once the upload process ends and the update
process begins, you will not be able to work with the controller.
Note
If you
close the
Update window for any reason, then the upload process
stops. To start the upload process again, open the
Update window and drag and drop the release upgrade
pack onto the
Manual Update field again. The upload process starts
where it previously stopped. To avoid any interruptions to the upload process
while working with the controller, open additional windows in the GUI for any
other tasks. Keep the
Update window open during the upload process.
Step 9
Once the
upload process finishes, the update process automatically begins. A message
appears in the GUI stating that the update process has started and is in
progress.
You should
refrain from working with the controller during the update process. During the
update process, the controller may shut down and restart. The shut down process
may last for several minutes.
Note
At the
beginning of the update process, the controller performs a second verification
test on the release upgrade pack. The release upgrade pack itself contains an
encrypted security value (signature) that will be decrypted and reviewed by the
controller. This second verification test ensures that the release upgrade pack
that has been uploaded is from Cisco. The release upgrade pack must pass this
second verification test before the update process can continue.
Step 10
Once the
update process finishes, you will receive a success or failure notification.
If the update
was successful, you will receive a successful update notification and can then
proceed working with the controller. If the update was unsuccessful, you will
receive an unsuccessful update notification with suggested remedial actions to
take.
After the
update (or attempted update), information about it will also appear in the
Update History field of the
Update window. The following update data is displayed
in this field:
Date—Local date
and time of the update
User—Username
of the person initiating the update
Update
Version—Update path of release upgrade pack version represented
with an arrow.
Update
Status—Success or failure status of the update.
Note
If you
place your cursor over (mouseover) a failure status in this field, then
additional details about the failure is displayed.


 Feedback