Cisco Crosswork Situation Manager 8.0.x Implementer Guide
Available Languages
Cisco Crosswork Situation Manager 8.0.x Implementer Guide
(Powered by Moogsoft AIOps 8.0)
The Implementer Guide contains instructions to help you plan, install, configure, and maintain Cisco Crosswork Situation Manager.

Planning and Installation
System Requirements lists operating systems, browsers and third-party software required to run Cisco Crosswork Situation Manager. It also provides sizing recommendations for small, medium and large Cisco Crosswork Situation Manager systems.
Install Cisco Crosswork Situation Manager tells you how to install Cisco Crosswork Situation Manager using the various deployment options, how to install Add-ons and provides information on troubleshooting an installation.
Secure Your Installation tells you how to apply various security measures to your Cisco Crosswork Situation Manager system, including SSL certificates, external authentication, single sign-on with LDAP and SAML, and how to encrypt database communications. It also tells you how to manage users, roles and teams in Cisco Crosswork Situation Manager.
Data Ingestion and Event Processing
Before Ingesting Data outlines the steps to take before your Cisco Crosswork Situation Manager system can begin to ingest data. These include configuring logging, changing passwords for default users, analyzing your data and performing a business analysis to determine your Situation design goals.
Ingest Event Data from Monitoring Tools tells you how to prepare your data for ingestion, including how to select, clean, format, integrate and construct the data. It tells you how to map, parse and normalize data and describes the types of Link Access Module (LAM) and LAMbots you will use to achieve this.
Alert Creation and Enrichment
Configure Alert Creation tells you how to configure the Alert Builder, which creates alerts by processing event data from the Message Bus.
Process Alerts describes the components responsible for adding information to alerts and reducing noise. It tells you how to use enrichment processes to add supplemental data to alerts and Situations, and how to use topologies to view alerts and Situations according to the relationships that are important to your users.
Alert Clustering and Ticketing
Situation Design tells you how to use Cisco Crosswork Situation Manager features to create insightful, informative Situations for your users and teams. These features include Cookbook, Tempus, Merge groups, and topologies.
Process Situations tells you how to create a Situation action Workflow engine to trigger workflows based on Situation actions. For example, when a Situation is created, updated, or closed.
Integrate with Ticketing Services tells you how to integrate with ticketing services including ServiceNow.
Operational Administration
Configure Operator Experience tells you how to configure the UI to best suit your operators, including the landing page, hotkeys, alert and Situation columns, and ChatOps. It also tells you how to configure and retrain Probable Root Cause (PRC).
Reporting and Dashboards tells you how to use Insights to analyze trends in operational performance. You can use the default dashboard or you can use Grafana to create a custom dashboard.
Customize Cisco Crosswork Situation Manager Further tells you how to use customization options in Cisco Crosswork Situation Manager including server and client tools. It also contains information on how to troubleshoot problems in Cisco Crosswork Situation Manager and how to run diagnostic tools.
Housekeeping Tasks provides instructions on maintaining your Cisco Crosswork Situation Manager system, including upgrading the software, maintaining Situation design, configuring historic data retention, archiving Situations and alerts, and scheduling system downtime.
Planning and Installation

System Requirements lists operating systems, browsers and third-party software required to run Cisco Crosswork Situation Manager. It also provides sizing recommendations for small, medium and large Cisco Crosswork Situation Manager systems.
Install Cisco Crosswork Situation Manager tells you how to install Cisco Crosswork Situation Manager using the various deployment options, how to install Add-ons and provides information on troubleshooting an installation.
Secure Your Installation tells you how to apply various security measures to your Cisco Crosswork Situation Manager system, including SSL certificates, external authentication, single sign-on with LDAP and SAML, and how to encrypt database communications. It also tells you how to manage users, roles and teams in Cisco Crosswork Situation Manager.
System Architecture Overview
You can think of the Cisco Crosswork Situation Manager architecture in different ways:
1. The data processing modules that handle the various processing tasks like data ingestion and core data processing. To learn about data processing, see Data Processing Flow.
2. The individual software components that comprise and support data processing and the User Interface, like the Percona database, RabbitMQ, Apache Tomcat, Ngnix, etc. To learn about the software components and their relationship to data processing, see Server Roles.
Data Processing Flow
Before you configure or customize data processing in Cisco Crosswork Situation Manager, take some time to learn the components that comprise the basic flow for processing event, alert, and Situation data.
Except for the Link Access Modules (LAMs) that perform data ingestion, the rest of the data processing components are individual Moolets that run as part of the Moogfarmd. For more information, see Configure Data Processing.
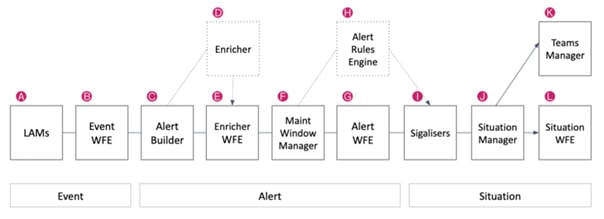
A) LAMs / Data Ingestion
The LAMs or Integrations ingest raw event data from your monitoring sources. LAMs do one of the following with the event data:
1. Map raw events into Cisco Crosswork Situation Manager events.
2. Discard events based upon system configuration. For example a blacklisting rule.
3. See Introduction to Integrations for more information.
B) Event Workflow Engine
See Workflow Engine for an overview of how the Workflow Engine UI works. See Workflow Engine Moolets for information on the Moolet.
C) Alert Builder
The Alert Builder deduplicates events into alerts and calculates the entropy value for alerts. Deduplicated events are visible in the UI after passing through the Alert Builder.
See Configure Event De-duplication in the Alert Builder for more information.
D) Enricher
The Enricher is an optional moolet that you can use to enrich alert data from external data sources such as a CMDB. See Enrichment Overview for information about the enrichment process.
See Enricher Moolet for information on the Moolet.
E) Enrichment Workflow Engine
The Enrichment Workflow Engine listens for alerts on the message bus and processes them based upon any active workflows. See Workflow Engine for an overview of how the Workflow Engine UI works. See Workflow Engine Moolets for information on the Moolet.
See Workflow Engine for an overview of how the Workflow Engine UI works. See Workflow Engine Moolets for information on the Moolet.
F) Maintenance Window Manager
To learn how to create a maintenance window, see Maintenance Window Manager for information on the Moolet.
G) Alert Workflow Engine
See Workflow Engine works for an overview of how the. See Workflow Engine Moolets for information on the Moolet.
H) Alert Rules Engine
If you upgraded from a previous version, you may have data processing configurations that use the Alert Rules Engine. The Alert Rules Engine lets you define criteria to process alerts according to different Transitions to move these alerts to different Action States. Before you start an implementation with the Alert Rules Engine, see if the Workflow Engine meets your needs.
See Alert Rules Engine for more information.
I) Clustering Algorithms
See the Clustering Algorithm Guide for an overview of the algorithms. To configure a clustering algorithm, see Configure Clustering Algorithms.
J) Situation Manager
The Situation Manager listens for Situation creation, update, and closure actions and lets you automate processes like data enrichment, assignment, or notification to a ticketing system.
The Labeler is part of the Situation Manager. See Situation Manager for more information.
K) Teams Manager
The Teams Manager Moolet listens for new Situation creation, update, and closure actions. It handles the team assignments you create in the Settings UI. See Manage Teams.
See Teams Manager Moolet for information on the Moolet.
L) Situation Workflow Engine
See Workflow Engine for an overview of how the Workflow Engine UI works. See Workflow Engine Moolets for information on the Moolet.
The following video further explains the data processing flow:
Server Roles
In order to plan your Cisco Crosswork Situation Manager deployment, it helps to understand the different components of Cisco Crosswork Situation Manager and the options for distributing them among multiple physical or virtual machines.
A server role within an Cisco Crosswork Situation Manager installation is a functional entity containing components that must be installed on the same machine. You can distribute different roles to different machines.
The following diagram illustrates the typical deployment strategy for the components of Cisco Crosswork Situation Manager in an Highly Available configuration:
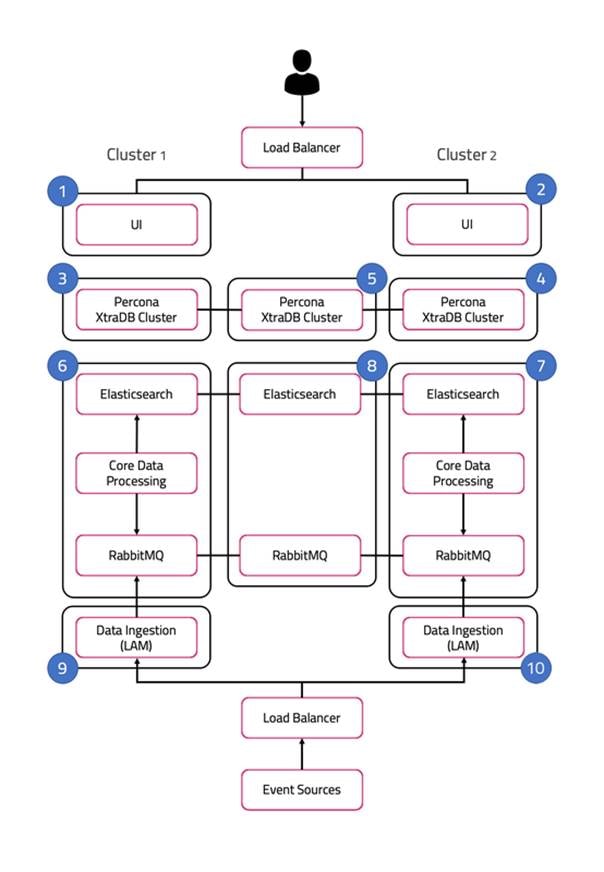
The architecture is built upon two clusters with software components that serve several roles. See also HA Reference Architecture.
In the case of a single-server installation, you install all the roles on one machine.
UI role
The UI role comprises Nginx and Apache Tomcat, represented in the diagram as numbers 1 and 2. The Cisco Crosswork Situation Manager servlets groups run in active / active configuration.
Ngnix is the proxy for the web application server and for integrations.
Tomcat is the web application server. It reads and writes to the Message Bus and the database.
Database role
Percona XtraDB Cluster serves the database role, represented in the diagram as numbers 3, 4, and 5. The cluster runs in active / active standby / active standby mode.
Percona Xtra Db Cluster is the system datastore that handles transactional data from other parts of the system: LAMs (integrations), data processing, and the web application server.
HA Proxy handles database query routing and load balancing.
Core role
The Core role, represented by numbers 6 and 7 in the diagram comprises the following:
1. Moogfarmd, the Cisco Crosswork Situation Manager data processing component. Moogfarmd consumes messages from the Message Bus. It processes event data in a series of servlet-like modules called Moolets. Moogfarmd reads and writes to the database and publishes messages to the bus.
2. RabbitMQ which provides the message queue. It receives published messages from integrations. It publishes messages destined for data processing (Moogfarmd) and the web application server.
3. Elasticsearch which provides the UI search capability. It indexes documents from the indexer Moolet in the data processing series. It returns search results to Tomcat.
In HA deployments, Moogfarmd automatically runs in active / passive mode. See High Availability Overview for more information.
In concert with the the Redundancy Role server, RabbitMQ and Elasticsearch run in active / active / active mode.
Redundancy role
The redundancy role, represented by number 8 in the diagram, provides the third node required for true HA for RabbitMQ and Elasticsearch.
Data ingestion role
Link Access Modules (LAMs) make up the data ingestion role represented by numbers 9 and 10 in the diagram. Receiving LAMs listen for events from monitoring sources and Polling LAMs poll monitoring sources for events. Both parse and encode raw events into discrete events, and then write the discrete events to the Message Bus.
In HA deployments, receiving LAMs run in active / active mode, but polling LAMs run in active / passive mode.
Load balancers
The load balancers in front of the UI server role and the data ingestion server role are the customer's responsibility.
Scale Your Cisco Crosswork Situation Manager Implementation
Cisco Crosswork Situation Manager supports several options to help you scale your implementation to meet your performance needs. Monitor and Troubleshoot Cisco Crosswork Situation Manager to monitor your system for signs that it is time to scale.
For information on the performance tuning capabilities of individual Cisco Crosswork Situation Manager components, see Monitor Component Performance.
Horizontal Scaling
Cisco Crosswork Situation Manager currently supports horizontal scaling at the integration (LAM) and visualization (Ngnix + Tomcat) layers.
1. You can add more LAMs, either on additional servers or on the same server, to achieve higher event rates. In this case, you have the option to configure event sources to send to the parallel LAMs separately or to implement a load balancer in front of the LAMs.
2. You can add Nginx/Tomcat UI "stacks" behind a load balancer to increase performance for UI users. Adding UI stacks does not always provide better performance. It can degrade performance by adding more connection pressure to the database.
The following are typical horizontal scaling scenarios:
1. You can add an additional LAM to process incoming events if you see that, despite attempts to tune the number of threads for an individual LAM, its event rate hits a plateau. This is a sign that the LAM is the bottleneck, so adding other instances of the LAM behind a load balancer will allow a higher event processing rate.
2. You can add an additional UI stack if database pool diagnostics for Tomcat suggest that all or most of the database connections are constantly busy with long running connections, but the database itself is performing fine.
The data processing layer (moogfarmd) is not currently well suited to horizontal scaling. Moolets of the same type cannot currently share processing. Adding more Moolets like the AlertBuilder in an attempt to increase the event processing rate is likely to lead to database problems.
Vertical Scaling
All Cisco Crosswork Situation Manager components ultimately benefit from being run on the best available hardware, but the data processing layer (moogfrarmd) benefits most from this approach. Depending on the number and complexity of Moolets in your configuration, you will see performance benefits in data processing on servers having the fastest CPUs with numerous cores and a large amount of memory. This enables you to increase the number of threads for moogfarmd to improve processing speed. You should also locate the database on the most feasibly powerful server (clock speed, number of cores and memory) with the biggest/fastest disk.
Distributed Installations
In some cases you distribute Cisco Crosswork Situation Manager components among different hosts to gain performance because it reduces resource contention on a single server: The most common distribution is to install the database on a separate server, ideally within the same fast network to minimize risk of latency. An additional benefit of this move is that it allows you to run a clustered or master/slave database for redundancy.
Another common distribution is to install the UI stack (Nnginx) on a separate server within the same fast network.
Some integrations (LAMs) benefit in being closer to the source so are a candidates for distribution.
See Server Roles and HA Installation for more information.
System Requirements
Cisco Crosswork Situation Manager 8.0 Supported Environments
The following operation systems, browsers and third-party software are either supported or are required in order to run Cisco Crosswork Situation Manager.
Any operating systems and browsers not listed in the sections below are not officially recommended or supported.
Operating systems
You can run Cisco Crosswork Situation Manager on the following versions of Red Hat Enterprise Linux®(RHEL) and CentOS Linux:
| OS |
Version |
| CentOS |
v7 |
| RHEL |
v7 |
Note
No other Linux distributions are currently supported
Browsers
You can use the following browsers for the Cisco Crosswork Situation Manager UI:
| Browser |
Version |
| Chrome |
Latest |
| Firefox |
Latest |
| Safari |
Latest |
| Edge |
Latest |
Note
Due to a known issue in the Safari web browser, you must take additional steps if you've enabled the enhanced Content Security Policy in v8.0 and you want to access the UI with Safari. For more information, see RPM - Upgrade UI components or Tarball - Upgrade UI components depending on your implementation type.
After upgrading macOS to Catalina, the UI is inaccessible in Chrome, Safari and Edge browsers because self-signed certificates are no longer trusted. For workaround instructions see Catalina Browser Certificate Workaround.
Supported Third Party software
Cisco Crosswork Situation Manager v8.0 ships with the following third-party applications:
| Application |
Version |
| Apache Tomcat® |
v9.0.35 |
| Elasticsearch |
v6.8.1 (LTS version) |
| Nginx |
v1.14.0 or above |
| RabbitMQ |
v3.7.4 |
| Percona XtraDb Cluster |
v5.7.28 |
| Percona XtraBackup |
v2.4.20 |
| HA Proxy |
v1.5.18-9.el7.x86_64 |
Other supported application packages include:
| Application |
Version |
| Erlang |
v20.1.7 |
| JDK |
java-11-openjdk-devel >= 1:11.0.5 |
| Apache Tomcat® Native |
v1.2.23 or above |
| MySQL |
v5.7.28 |
You can do a minor upgrade of the JDK (for example, from 11.0.4 to 11.0.5) without having to also update the Cisco Crosswork Situation Manager RPM files.
Note
MySQL is supported for upgrading customers only. New Cisco Crosswork Situation Manager installations use Percona XtraDB Cluster for database management.
Integration support
The following table outlines the vendor supported integrations for the current version of Cisco Crosswork Situation Manager alongside the corresponding supported software versions.
Integrations support IPv6 connectivity.
| Integration Version |
Supported Software / Version |
| Ansible Tower Integration v1.11 |
Ansible Tower v3.0, 3.1 |
| Apache Kafka Integration v1.14 |
Apache Kafka v0.9, 1.1, 2.2 |
| AppDynamics Integration v2.2 |
AppDynamics v4.0, 4.1 |
| AWS CloudWatch Integration v2.1 |
aws-java-sdk v1.11 |
| AWS SNS Integration v1.3 |
Runtime Node.js 8.10, Node.js 10.x, and Node.js 12.x |
| BMC Remedy Integration v1.9 |
Remedy v9.1 |
| CA UIM Integration v1.8 |
CA Nimsoft UIM v8.4 |
| CA Spectrum Integration v2.3 |
CA Spectrum v10.2 |
| Catchpoint Integration v1.1 |
Catchpoint v2019 |
| Cherwell Service Management Integration v1.6 |
Cherwell v9.3 |
| Datadog Polling Integration v1.4 |
Datadog v2018 |
| Datadog Webhook Integration v1.12 |
Datadog v5.21 |
| Dynatrace APM Plugin Integration v1.9 |
Dynatrace v6.5, 7.0 |
| Dynatrace APM Polling Integration v2.4 |
Dynatrace v7.2.0.1697 |
| Dynatrace Notification Integration v1.6 |
Dynatrace v1.187.132.20200224-165652 |
| Email Integration v2.6 |
IMAP, IMAPS, POP3, POP3S |
| EMC Smarts Integration v1.5 |
RabbitMQ v3.7.4 and Smarts v9.5 |
| ExtraHop Integration v1.2 |
ExtraHop v2018 |
| AWS FireLens v1.01 |
AWS FireLens (New in 8.0) |
| FluentD Integration v1.11 |
FluentD v0.12 |
| Grafana Integration v1.2 |
Grafana v5.2.4 |
| HP NNMi Integration v2.6 |
HP NNMi v10.30 |
| HP OMi Plugin Integration v1.9 |
HP OMi v10.1 |
| HP OMi Polling Integration v2.6 |
HP OMi v10.1 |
| JIRA Service Desk Integration v1.12 |
JIRA Service Desk v. 4.7.1 and JIRA Cloud Rest API v. 2 |
| JIRA Software Integration v1.12 |
JIRA Software v. 7, v. 8.7.1 and JIRA Cloud Rest API v. 2 |
| JMS Integration v1.12 |
ActiveMQ v5.14, JBoss v10, WebLogic v12.0 |
| Moogsoft Express Polling Integration v1.0 |
Moogsoft Express (new in 8.0) |
| Moogsoft Express Webhook Integration v1.0 |
Moogsoft Express (new in 8.0) |
| Microsoft Azure Integration v1.2 |
Microsoft Azure Monitor v2018 |
| Microsoft Azure Classic Integration v1.2 |
Microsoft Azure Classic v2018 |
| Microsoft SCOM Integration v2.7 |
Microsoft SCOM v2012, 2016 and 2019 |
| Microsoft Teams Integration v1.1 |
Microsoft Teams v1.2.00.3961 |
| Nagios Integration v2.10 |
Nagios vXI |
| New Relic Integration v1.10 |
New Relic v2016 |
| New Relic Polling Integration v2.1 |
New Relic v2.3 |
| New Relic Insights Polling Integration v1.1 |
New Relic v2.3 |
| Node.js Integration v1.10 |
Node.js v1.6 |
| NodeRED Integration v1.10 |
Nagios Red v016, 017 |
| OEM Integration v2.3 |
Oracle Enterprise Manager v12c, 13c |
| Office 365 Email Integration v1.0 |
|
| OpsGenie v1.0 |
Opsgenie's Alerts v2 REST API (new in 8.0) |
| PagerDuty v1.0 |
PagerDuty SaaS (new in 8.0) |
| Pingdom Integration v1.9 |
Pingdom v2017 |
| Sensu Integration v1.0 |
Sensu Core v1.8 |
| ServiceNow Integration v4.5 |
ServiceNow vNew York, Madrid, London, Kingston |
| SevOne Integration v1.5 |
SevOne v5.7.2.0 |
| Site24x7 Integration v1.1 |
Site24x7 June-2019 |
| Slack Integration v1.7 |
Slack v3.1 |
| SolarWinds Integration v3.3 |
SolarWinds v. 11.5, v. 12.2, v. 12.3, v. 2019.4 |
| Splunk Integration v2.6 |
Splunk v. 6.5, v. 6 6, v. 7.0, v. 7.1, v. 7.2, v. 7.3, v. 8.0 |
| Splunk Streaming Integration v1.1 |
Splunk v. 7.1, v. 7.2, v. 7.3, v. 8.0 |
| Sumo Logic Integration v1.2 |
Sumo Logic v2018 |
| VMware vCenter Integration v2.4 |
VMware vCenter v. 6.0, v. 6.5, v. 6.7 |
| VMware vROps Integration v2.4 |
VMware vROps v6.6, v7.5.0 |
| VMware vSphere Integration v2.5 |
VMware vSphere v. 6.0, v. 6.5, v. 6.7 |
| VMware vRealize Log Insight Integration v2.5 |
VMware vRealize Log Insight v4.3 |
| WebSphere MQ Integration v1.13 |
WebSphere MQ v8 |
| xMatters Integration v2.0 |
xMatters v5.5 |
| Zabbix Integration v1.0 |
Zabbix v3.4 |
| Zabbix Polling Integration v3.5 |
Zabbix v3.2, v4.0, v4.4 |
| Zenoss Integration v2.6 |
Zenoss v4.2, v6.3.2 |
Add-ons
Cisco Crosswork Situation Manager v8.x supports Cisco Add-ons v2.0 and later. See Add-ons.
Sizing Recommendations
The sizing recommendations below are guidelines for small, medium and large Cisco Crosswork Situation Manager systems based on input data rate and volume. Event calculations depend on the number of events sent to the Alert Builder.
In the context of this guide, Managed Devices (MDs) are all of the components in the network infrastructure that generate and emit events:
Small
| Environment |
CPU |
File System |
| 1000 to 5000 Managed Devices (MDs) Less than 20 users Up to 5 integrations Less than 20 events per second to Alert Builder |
8 Cores 32GB RAM 2 x 1GB Ethernet Physical or Virtual Server |
1 TB Local or SAN See Retention policy below. |
Medium
| Environment |
CPU |
File System |
| 5000 to 20,000 MDs Between 20 and 40 users Between 6 and 10 integrations Between 20 and 100 events per second to Alert Builder |
16 Cores 64GB RAM 2 x 1GB Ethernet Physical or Virtual Server |
1 TB Local or SAN See Retention policy below. |
Large
| Environment |
CPU |
File System |
| More than 20,000 MDs More than 40 users More than 10 integrations More than 100 events per second to Alert Builder |
24+ Cores 128GB RAM 2 x 1GB Ethernet Physical or Virtual Server |
1 TB Local or SAN See Retention policy below. |
Virtualization restrictions
Consider the following restrictions for virtual environments:
· Ideally all Cisco Crosswork Situation Manager servers (guests) should be on the same compute node (host) sharing a hypervisor or virtual machine monitor. This minimizes latency between Cisco Crosswork Situation Manager guests.
· If servers are liable to automated resource balancing (for example vMotion) and liable to move compute nodes, then all Cisco Crosswork Situation Manager servers should be moved at the same time. If this is not possible, then Cisco Crosswork Situation Manager servers should be constrained to movements that minimize the resulting network distance.
· If Cisco Crosswork Situation Manager servers are distributed amongst compute nodes then the network “distance” (logical hops) between the nodes should be minimized.
· Network latency between components may affect event processing throughput. This is especially true of the core to db servers.
Shared storage
On any shared compute platform Cisco makes the following recommendations:
The minimum resource requirements are multiplied by at least 33% to account for shared resource usage and allocation.
Storage latency will reduce effective throughput at the core processing layer and should be minimised within the available constraints of a SAN.
Cisco Crosswork Situation Manager should be treated as a highly transactional system and not placed on the same compute node as other highly transactional applications that may cause SAN resource contention.
SAN port and array port contention should be minimized.
Storage medium should be as fast as possible to minimize the transaction times to the database.
Retention policy
You can determine the amount of disk space in GB required for the database server using the following calculation:
(es x eps x d x 86,400) x 1.2 / 1,000,000
For this calculation: es = average event size in KB, eps = average events per second, d = number of days of retention and 86,400 represents the number of seconds per day.
For the majority of event sources, you can reasonably estimate a 2KB event size. However, some sources have larger than average events. For example, Microsoft SCOM. A 2KB base takes account of the other event and alert based storage such as an alert's Situation membership and Situation room thread sizes.
The average event rate is across all LAMs and integrations.
Note
If you do not enable the Archiver tool, the historic database will grow indefinitely. See Archive Situations and Alerts for more information.
For example, the following calculation represents a 400 day retention period with an average event size of 2KB at 300 events per second:
(2 x 300 x 400 x 86,400) x 1.2 / 1,000,000 = 24,883.2 GB.
Install Cisco Crosswork Situation Manager
Use this guide to learn how to install Cisco Crosswork Situation Manager:
If you are installing another version, see Welcome to the Cisco Docs! for more information. Refer to the following topics to help choose the right environment for your Cisco Crosswork Situation Manager deployment:
1. The Cisco Crosswork Situation Manager Cisco Crosswork Situation Manager 8.0 Supported Environments topic details supported operating systems and system requirements.
2. The Sizing Recommendations topic will help you make sure you select hardware to support your data ingestion and user requirements.
If you are upgrading Cisco Crosswork Situation Manager, see Upgrade Cisco Crosswork Situation Manager.
Deployment options
You have the option to install all Cisco Crosswork Situation Manager packages on a single machine. However, the modular approach of the Cisco Crosswork Situation Manager distribution means fewer dependencies between individual packages. This means you have the flexibility to install different components to different machines. See Server Roles for a description of how you can distribute the different components amongst multiple machines.
1. For smaller deployments, you can run all the components in on a single machine.
— If you have root access to the machine and want to use Yum to install, see RPM Installation.
1. For most production deployments, you may install different components to different machines in order to distribute the workload. See High Availability Overview for more information.
Install Cisco Add-Ons
Cisco periodically releases add-ons to extend and enhance the core Cisco Crosswork Situation Manager functionality. For example, new Workflow Engine functions, new Workflow Engines, or Integrations tiles. All add-ons releases are cumulative and include the fixes from previous releases.
Once you have finished upgrading or installing Cisco Crosswork Situation Manager, you should install the Cisco Crosswork Situation Manager add-ons to ensure you have the latest version.
See Install Cisco Add-ons for more information on how to install the Cisco Crosswork Situation Manager add-ons.
Troubleshoot the installation
You may encounter issues when installing or upgrading Cisco Crosswork Situation Manager.
See Troubleshoot Installation and Upgrade for more information on how to resolve these issues.
For more information on message bus or Elasticsearch configuration, see Configure the Message Bus or Configure Search and Indexing.
Prepare to Install Cisco Crosswork Situation Manager
Before you start to install Cisco Crosswork Situation Manager v8.0.x, you must perform certain pre-installation tasks.
The instructions to follow depends on your preferred mode of deployment:
1. RPM: Use this method if you have root access to your Cisco Crosswork Situation Manager server(s) and you do not want to change the default installation locations.
2. Use the offline instructions if your Cisco Crosswork Situation Manager server(s) do not have access to the internet.
For pre-installation instructions, refer to one of the following topics:
1. Online RPM pre-installation
2. Cisco Crosswork Situation Manager - Offline RPM pre-installation
Cisco Crosswork Situation Manager - Offline RPM pre-installation
You must perform certain preparatory tasks before you install Cisco Crosswork Situation Manager v8.0.x.
Follow these steps if you have root access to the machine or machines on which you will install or upgrade Cisco Crosswork Situation Manager, but you cannot connect to Yum repositories outside your network from those machines.
If you are performing another type of installation, see:
a. Online RPM pre-installation: #.
b. Online Tarball pre-installation: #.
c. Offline Tarball pre-installation: #.
Before you begin
Before you begin to prepare for the installation, verify the following:
1. You have root access to the system where you plan to install Cisco Crosswork Situation Manager.
2. You are familiar with the supported versions of third party software, as outlined in Cisco Crosswork Situation Manager 8.0 Supported Environments.
Download the installation files
Complete the following steps before you perform an offline RPM installation of Cisco Crosswork Situation Manager v8.0.x:
· Download the Percona and dependency packages using cURL on an internet-connected host:
curl -L -O http://repo.percona.com/percona/yum/release/7/RPMS/x86_64/Percona-XtraDB-Cluster-shared-57-5.7.28-31.41.1.el7.x86_64.rpm
curl -L -O http://repo.percona.com/percona/yum/release/7/RPMS/x86_64/Percona-XtraDB-Cluster-client-57-5.7.28-31.41.1.el7.x86_64.rpm
curl -L -O http://repo.percona.com/percona/yum/release/7/RPMS/x86_64/Percona-XtraDB-Cluster-server-57-5.7.28-31.41.1.el7.x86_64.rpm
curl -L -O http://repo.percona.com/percona/yum/release/7/RPMS/x86_64/Percona-XtraDB-Cluster-shared-compat-57-5.7.28-31.41.1.el7.x86_64.rpm
curl -L -O http://repo.percona.com/percona/yum/release/7/RPMS/x86_64/percona-xtrabackup-24-2.4.19-1.el7.x86_64.rpm
· Copy the Percona install_percona_nodes.sh install script and RPM install files to all servers that will house a database node.
· Copy the tar.gz files to all servers that will run Cisco Crosswork Situation Manager components.
· Download the HA Proxy RPM on an internet-connected host (requires root permissions):
yum install --downloadonly --downloaddir ./ haproxy
Copy the HA Proxy RPM to the servers that will have the Core, UI and LAM server roles.
See Server Roles for more information on the Core, UI and LAM server roles.
Prepare the local Yum repositories
Follow these steps to create local Yum repositories to house the installation packages. If you are running a distributed installation, perform these steps on each machine that will run Cisco Crosswork Situation Manager components.
· Create two directories to house the repositories. For example:
sudo mkdir -p /media/localRPM/BASE/
sudo mkdir -p /media/localRPM/ESR/
· Extract the two Tarball files into separate directories and move the HA Proxy RPM to /media/localRPM/BASE/. For example:
tar xzf *-MoogsoftBASE7_offline_repo.tar.gz -C /media/localRPM/BASE/
tar xzf *-MoogsoftESR_8.0.0.1_offline_repo.tar.gz -C /media/localRPM/ESR/
mv haproxy*rpm /media/localRPM/BASE/
Back up the existing /etc/yum.repos.d directory. For example:
mv /etc/yum.repos.d /etc/yum.repos.d-backup
· Create an empty /etc/yum.repos.d directory. For example:
mkdir /etc/yum.repos.d
· Create a local.repo file ready to contain the local repository details:
vi /etc/yum.repos.d/local.repo
· Edit local.repo and configure the baseurl paths for BASE and ESR to point to the your directories. For example:
[BASE]
name=MoogCentOS-$releasever - MoogRPM
baseurl=file:///media/localRPM/BASE/RHEL
gpgcheck=0
enabled=1
[ESR]
name=MoogCentOS-$releasever - MoogRPM
baseurl=file:///media/localRPM/ESR/RHEL
gpgcheck=0
enabled=1
· Clean the Yum cache:
yum clean all
Verify that Yum can detect the newly created repositories. For example:
yum info "moogsoft-*"
Available Packages
Arch : x86_64
Version : 8.0.0.1
Release : XYZ
Size : 76 M
Repo : ESR
Summary : Algorithmic Intelligence for IT Operations
URL : https://www.moogsoft.com
License : Proprietary
Description : Moogsoft AIOps (8.0.0.1) - Build: XYZ - (Revision: XYZ)
The results should include the following packages:
Name : moogsoft-db
Name : moogsoft-integrations
Name : moogsoft-integrations-ui
Name : moogsoft-mooms
Name : moogsoft-search
Name : moogsoft-server
Name : moogsoft-ui
Name : moogsoft-utils
Name : moogsoft-common
Name : moogsoft-ccsm
· Install the downloaded Percona RPMs on all servers that will house a database node:
yum -y install Percona-XtraDB-Cluster-*.rpm percona-xtrabackup-24-2.4.19-1.el7.x86_64.rpm
· Install Java 11:
VERSION=11.0.7.10; yum -y install java-11-openjdk-headless-${VERSION} java-11-openjdk-${VERSION} java-11-openjdk-devel-${VERSION}
· Set SELinux to permissive mode or disable it completely. For example, to set SELinux to permissive mode:
setenforce 0
If you want to disable SELinux at boot time, edit the file /etc/sysconfig/selinux.
· Ensure the current user, or the user that will be running the Moogsoft processes, has sufficient resource limits by running the following commands as that user:
ulimit -n
ulimit -u
If either of the values returned are less than 65536, add the following to the /etc/security/limits.conf file as root:
moogsoft soft nofile 65536
moogsoft hard nofile 65536
moogsoft soft nproc 65535
moogsoft hard nproc 65535
Optional: GPG key validation of the RPMs
To validate the RPMs before installation:
· Download the key. For 8.0.0.1 and prior:
https://keys.openpgp.org/vks/v1/by-fingerprint/2529C94A49E42429EDAAADAEC7A2253BFC50512A
· Copy the key to the server onto which the RPMs or tarball will be installed (it will be an .asc file)
· Import the key. For example, for 8.0.0.1 and prior:
gpg --import 2529C94A49E42429EDAAADAEC7A2253BFC50512A.asc
· You can download the CCSM RPMs from Cisco eDelivery.
· Move the RPMs and .sig files into the same folder. For example, /tmp, as used in the example below.
· Copy the following code into a bash terminal and run it to perform the validation:
while read RPM
do
echo "Current RPM: $RPM"
gpg --verify ${RPM}.sig ${RPM} 2>&1
done < <(find /media/localRPM/ESR/RHEL/ -name '*.rpm');
· Confirm that all the commands for each RPM report:
Good signature from "Moogsoft Information Security Team "<security@moogsoft.com>"
Your local Yum repositories are now ready. Proceed with your offline installation or upgrade. See the upgrade instructions relevant to your deployment.
RPM Installation
This topic describes how to install Cisco Crosswork Situation Manager v8.0.x on a single host.
Follow these steps if you have root access to the machine or machines on which you will install Cisco Crosswork Situation Manager, and you can connect to Yum repositories outside your network from those machines.
To install Cisco Crosswork Situation Manager in a highly available distributed environment, see HA Installation.
Before you begin
Before you start to install Cisco Crosswork Situation Manager, complete all steps in one of the following documents:
· Online RPM pre-installation: If you have root access to the machine or machines on which you will install Cisco Crosswork Situation Manager, and you can connect to Yum repositories outside your network from those machines.
· Cisco Crosswork Situation Manager - Offline RPM pre-installation: If you have root access to the machine or machines on which you will install or upgrade Cisco Crosswork Situation Manager, but you cannot connect to Yum repositories outside your network from those machines.
Install Cisco Crosswork Situation Manager
To complete an RPM installation of Cisco Crosswork Situation Manager v8.0.x, perform the following steps:
· Download and install the Cisco Crosswork Situation Manager RPM packages, using one of the following methods according to your deployment type:
· If you are performing an RPM installation:
VERSION=8.0.0.1; yum -y install moogsoft-server-${VERSION} \
moogsoft-db-${VERSION} \
moogsoft-utils-${VERSION} \
moogsoft-search-${VERSION} \
moogsoft-ui-${VERSION} \
moogsoft-ccsm-${VERSION} \
moogsoft-common-${VERSION} \
moogsoft-mooms-${VERSION} \
moogsoft-integrations-${VERSION} \
moogsoft-integrations-ui-${VERSION}
· If you are performing an offline RPM installation, navigate to the location where you copied the RPM files and install them:
yum install *.rpm
· Edit your ~/.bashrc file to contain the following lines:
export MOOGSOFT_HOME=/usr/share/moogsoft
export APPSERVER_HOME=/usr/share/apache-tomcat
export JAVA_HOME=/usr/java/latest
export PATH=$PATH:$MOOGSOFT_HOME/bin:$MOOGSOFT_HOME/bin/utils
· Source the ~/.bashrc file:
source ~/.bashrc
· Run the Percona install script:
bash install_percona_nodes.sh;
The script guides you through the installation process. To configure a single database node on the same server as Cisco Crosswork Situation Manager, use these settings:
— Configure Percona as "Primary".
— Do not set the server to "DB only".
— Set the first database node IP address to the server IP address.
— When prompted to enter the IP addresses of the second and third nodes, press Enter to skip these settings.
Initialize Cisco Crosswork Situation Manager
When the installation process is complete, initialize Cisco Crosswork Situation Manager as follows:
· Run the initialization script moog_init, replacing <zone name> with your desired RabbitMQ VHOST:
$MOOGSOFT_HOME/bin/utils/moog_init.sh -I <zone_name> -u root
The script prompts you to accept the End User License Agreement (EULA) and guides you through the initialization process.
When asked if you want to change the configuration hostname, say yes and enter the public URL for the server. The public URL is the URL the instance will be connected to through a browser.
Note
When prompted for a password, enter the password for the root database user (not the UNIX system user). If you are installing Percona on this machine for the first time, leave the password blank and press Enter to continue.
The zone_name sets up a virtual host for the Message Bus. If you have multiple systems sharing the same bus, set a different zone name for each.
If you are deploying more than one database, configure HA Proxy to load-balance the database nodes. The following script requires root privileges. Run this script on any host running any Cisco Crosswork Situation Manager components after you have installed the RPMs:
$MOOGSOFT_HOME/bin/utils/haproxy_installer.sh
· Restart Moogfarmd:
service moogfarmd restart
Configure Elasticsearch heap size
The minimum and maximum JVM heap sizes must be large enough to ensure that Elasticsearch starts.
See Finalize and Validate the Upgrade for more information.
Enable the enhanced Content Security Policy (optional)
Cisco has provided an optional enhanced Content Security Policy (CSP) as part of this release. CSP is a security standard introduced to prevent Cross Site Scripting (XSS) and other data injection attacks. For more information, see the Mozilla document on Content Security Policy.
The CSP is controlled by Nginx and is disabled by default. To enable it:
· Edit the following file:
/etc/nginx/conf.d/moog-ui-headers.conf
· Uncomment the line that starts with add_header Content-Security-Policy and save the file.
· Restart Nginx:
service nginx reload
Note
If you enable the enhanced CSP you must follow the steps below to allow access to external domains. If you want to access the UI with the Safari web browser, you must follow the steps below to configure Cisco Crosswork Situation Manager for use with Safari.
Allow access to external domains
If you enable the enhanced CSP, the following features require additional configuration to allow access to external domains:
1. Situation Room plugins to external domains
2. Situation client tools to external URLs
To allow access to required external domains:
· Edit the following file:
/etc/nginx/conf.d/moog-ui-headers.conf
· Add a frame-src directive to the Content-Security-Policy header for the required domain. For example, run the following command to allow Google domains:
sed -i "s/add_header Content-Security-Policy\(.*\)\" always/add_header Content-Security-Policy\1; frame-src 'self' *.google.com\" always/" /etc/nginx/conf.d/moog-ui-headers.conf
· Restart Nginx:
service nginx reload
Note
Cisco Crosswork Situation Manager allows access to Pendo and WalkMe domains by default.
Configure Cisco Crosswork Situation Manager for use with Safari
Due to a known issue in the Safari web browser, you must take additional steps if you've enabled the enhanced CSP and you want to access the UI with Safari:
· Edit the following file:
/etc/nginx/conf.d/moog-ui-headers.conf
· Add the following websocket URLs to the Content-Security-Policy section of the file. Substitute your hostname for <webhost>:
wss://<webhost>/moogpoller/ws
wss://<webhost>/integrations/ws/v1
You can update the configuration using a command similar to the following. Substitute your hostname for <webhost>:
sed -i.bak "s;connect-src 'self' app;connect-src 'self' wss://<webhost>/moogpoller/ws wss://<webhost>/integrations/ws/v1 app;g" /etc/nginx/conf.d/moog-ui-headers.conf
· Restart Nginx:
service nginx reload
Confirm system ulimits
Ensure the 'moogsoft' system user has sufficient limits by running the following command as root:
runuser -l moogsoft -c 'ulimit -n; ulimit -u;'
If either of the values returned are less than 65536, add the following to the /etc/security/limits.conf file as root:
moogsoft soft nofile 65536
moogsoft hard nofile 65536
moogsoft soft nproc 65535
moogsoft hard nproc 65535
Verify the installation
To verify that the installation has completed successfully, follow the steps outlined in Validate the Installation.
Change passwords for default users
When the installation is complete, it is critical that you change the passwords for the default users created during the installation process. See Change passwords for default users for more information.
Install Cisco Add-Ons
Cisco periodically releases add-ons to extend and enhance the core Cisco Crosswork Situation Manager functionality. For example, new Workflow Engine functions, new Workflow Engines, or Integrations tiles. All add-ons releases are cumulative and include the fixes from previous releases.
Once you have finished upgrading or installing Cisco Crosswork Situation Manager, you should install the Cisco Crosswork Situation Manager add-ons to ensure you have the latest version.
See Install Cisco Add-ons for more information on how to install the Cisco Crosswork Situation Manager add-ons.
High Availability Overview
Cisco Crosswork Situation Manager supports high availability (HA) architectures to improve the fault tolerance of Cisco Crosswork Situation Manager. Each component supports a multi-node architecture to enable redundancy, failover, or both to minimize the risk of data loss, for example, in the case of a hardware failure
This topic covers the architectures you can use to achieve HA with Cisco Crosswork Situation Manager. For an example of how to set up a single site HA system, see HA Installation. See HA Reference Architecture for a detailed diagram of the components in a single site HA configuration.
Distributed HA architectures
Cisco Crosswork Situation Manager supports high availability in distributed architectures where different machines host a subset of the stack. You can run one or more of the server roles on its own machine.
See Server Roles for details of the HA architecture server roles in Cisco Crosswork Situation Manager.
If you run more than one server role on a machine, choose a primary role for the server. The primary role dictates which additional roles are supported on the machine as follows:
| Primary Role |
Supported Secondary Roles |
| Core |
UI, Data ingestion and Database |
| UI |
Data ingestion |
| Data Ingestion |
UI |
| Database |
Redundancy |
| Redundancy |
Database |
See Scale Your Cisco Crosswork Situation Manager Implementation for information on how to increase capacity within the HA architecture, you can.
Contact your Cisco technical representative to discuss scaling your deployment.
See Sizing Recommendations for more information on hardware sizes and capacity.
After you decide on the best HA architecture for your environment, you can plan your implementation.
Resilience and failover
Cisco Crosswork Situation Manager provides support for automatic failover between the two nodes within an HA pair. For example from one instance of Moogfarmd to another, or from one instance of a LAM to another. When an active instance in an HA pair fails, Cisco Crosswork Situation Manager persists any affected messages. The passive instance of the HA pair automatically takes over, and processes those messages without any interruption or loss of data. See Message Persistence for more information.Configure the Message Bus
There is no automatic failover between multiple HA pairs. For example, there is no failover from a primary site to a second site, such as a disaster recovery replica.
Cisco Crosswork Situation Manager does not support automated fail-back for any architecture. For example, consider an HA pair of Moogfarmd instances. When the instance of Moogfarmd in cluster 1 becomes unavailable, the instance in cluster 2 enters an active state. When the instance from cluster 1 recovers and becomes available, the instance in cluster 2 remains active.
High Availability Configuration Hierarchy
Cisco Crosswork Situation Manager deployments use a tiered hierarchy of clusters, groups, instances and roles to achieve High Availability.
A cluster is a collection of Cisco Crosswork Situation Manager components that can deliver an uninterrupted processing workflow. To achieve HA you need at least two clusters that include all the Cisco Crosswork Situation Manager components. You need an additional, third machine, for message queue and search components.
A group comprises a single component or two identical components that provide resilience over two or more clusters. Cisco Crosswork Situation Manager automatically controls the active or passive behaviour and failover of the instances within a group.
An example of a group is a Socket LAM configured for the same source in two separate clusters. Other groups include the following;
· Servlets for the UI.
· Moogfarmd for data processing.
· Individual LAMs for data ingestion. For example the REST LAM.
An instance is an individual component running within a group. Each instance in a group provides resilience for the other instance. For example the primary instance of a Socket LAM pairs with a secondary instance in the second cluster to make a group.
A role within a Cisco Crosswork Situation Manager installation is a functional entity containing components that must be installed on the same machine. You can distribute different roles to different machines. For example, the Core role.
HA Reference Architecture
The diagram in this topic represents a Cisco Crosswork Situation Manager High Availability deployment to a single site: one datacenter, LAN, or availability zone. To support this architecture, all servers must have sufficient connection speed amongst themselves so that latency between hosts does not exceed 5 ms.

A) Load balancers / VIPs
All Cisco Crosswork Situation Manager components have their own HA mechanism that provides failover capabilities , but it is also a best practice to use a load balancer or load balancers. You can use either software or hardware load balancers with the following requirements and recommendations:
· Load balancers must use TCP.
· You must implement health checks using your preferred approach to remove unhealthy servers from the cluster.
· The load balancer should provide load balancing capabilities and a VIP for each server role. For example: one UI VIP per site, one LAM VIP per site.
· Sticky sessions are recommended.
· You can choose your preferred load balancing approach. For example, round robin or least-connection.
B) User interface
The Cisco Crosswork Situation Manager UI comprises the following components:
1. Nginx: The web server that provides static UI content and acts as a proxy for the application server. For HA deployments, install a minimum of two Nginx instances on separate servers and optionally cluster the Nginx instances.
2. Apache Tomcat: The web server that provides servlet and API support. For HA deployments, install a minimum of two Tomcat instances on separate servers and optionally cluster the instances.
The UI components run in active/active configuration, so configure servlet instances to run in separate groups.
Required Ports: 80, 443
C) Database
Cisco Crosswork Situation Manager uses Percona XtraDB as the system database. HA requires a minimum of three server nodes configured in each cluster with latency between them not exceeding 5 ms.
Required Ports: 3306
D) Search and indexing
Cisco Crosswork Situation Manager uses Elasticsearch to store active alert and Situation data to provide search functionality within the product. For HA deployments install a cluster of a minimum of three data servers with one active master server.
Required Ports: 9200, 9300
E) Core data processing
Moogfarmd is the core data processing application that controls all other services in Cisco Crosswork Situation Manager. It manages the clustering algorithms and other applets (Moolets) that run as part of the system. For HA deployments, install a minimum of two Moogfarmd services on separate servers. Moogfarmd can only run as a two-instance group in an active/passive mode.
Required Ports: 5701, 8901 for Hazelcast: the in-memory data grid that provides fault tolerance.
F) Message Bus
Cisco Crosswork Situation Manager uses RabbitMQ as the system Message Bus. It requires a minimum of three servers for HA. RabbitMQ relies on its native clustering functionality and mirrored queues to handle failover; it does not use the Cisco Crosswork Situation Manager load balancing feature.
Required Ports: 5672, 4369, 15672, 25672
G) Data ingestion
Cisco Crosswork Situation Manager uses the following types of Link Access Modules (LAMs) to ingest data:
· Polling LAMs that periodically connect to a data source using an integration API to collect event data.
· Receiving LAMs that provide an endpoint for data sources to post event data.
For HA deployments:
1. Install two instances of each LAM. When both instances are in the same group, they run in active/passive mode.
2. For LAMs deployed over an unreliable link such as a WAN, or across data centers, you should deploy a caching LAM strategy that includes a database and message queue on the LAM Servers.
3. You can load balance receiving LAMs and configure them as active/active to increase capacity.
HA Architecture for LAMs
The Cisco Crosswork Situation Manager HA architecture provides increased resilience against LAM and server restarts by caching ingested data to the disk. It requires installing a local RabbitMQ cluster which is used by LAMs for publishing.
A remote caching LAM, located next to the Core role, connects to the local RabbitMQ cluster, picks the events from the queue and publishes them to the central RabbitMQ cluster for Moogfarmd to process.
If no caching LAM is available to consume the events from the local RabbitMQ cluster, the data is cached to disk until the server runs out of memory.
HA architecture
This architecture is recommended for hybrid installations, where the core processing is located in the cloud and LAMs are on-premise, or for a full on-premise configuration where LAMs are housed remotely to the core components.

Polling LAMs run in an active / passive mode and must connect to a local database in order to negotiate their state. This requires a local MySQL instance that runs with master / master replication.

Installation steps
If you are installing the LAMs in a non-SaaS version of Cisco Crosswork Situation Manager, see Install LAMs (non-SaaS).
If you are installing the LAMs in a SaaS version of Cisco Crosswork Situation Manager, see Install LAMs (SaaS).
High Availability for Third Party Component Dependencies
You can configure Cisco Crosswork Situation Manager dependencies such as Percona XTraDB Cluster, Elasticsearch, RabbitMQ, and Grafana to work effectively in highly available deployments.
See High Availability for details on high availability deployments of Cisco Crosswork Situation Manager and deployment scenarios.
Configure Percona XtraDB Cluster for HA
For an example Percona XtraDB Cluster configuration, see Set Up the Database for HA. For further information, refer to the documentation about Percona XtraDB Cluster.
Configure RabbitMQ for HA
You can improve the performance and reliability of your Cisco Crosswork Situation Manager deployment by:
1. Distributing your RabbitMQ brokers on different hosts.
2. Clustering your multiple RabbitMQ brokers.
3. Mirroring your message queues across multiple nodes.
See Set Up the Core Role for HA and Set Up the Redundancy Server Role for an example configuration. For more information see See Message System Deployment. Refer to the RabbitMQ documentation on Clustering and Mirrored Queues for more information.Message System Deployment
Configure Elasticsearch for HA
There are different ways to configure Elasticsearch for distributed installations. See Set Up the Core Role for HA and Set Up the Redundancy Server Role for an example configuration.
Refer to the Elasticsearch documentation on Clustering for more details.
Configure Grafana for HA
To set up Grafana for distributed installations, you should configure each Grafana instance to connect to a Cisco Crosswork Situation Manager UI load balancer such as HA Proxy rather than the Cisco Crosswork Situation Manager UI stack.
Alternatively you can point it at the Apache Tomcat server or Nginx server. Refer to the Grafana documention on Setting Up Grafana for High Availability.
HA Control Utility Command Reference
The Cisco Crosswork Situation Manager HA Control Utility ha_cntl is a command line utility to:
1. Control instance, process group, or cluster failover. For example, to switch from passive to active mode.
2. View the current status of all clusters, process groups, and instances. See High Availability Configuration Hierarchy for more information.
Normally you should configure groups in HA to use automatic failover in production. Use the HA Control utility to check the status of the HA system or to initiate failover in non-production scenarios.
Usage
ha_cntl [ --activate cluster[.group[.instance]] | --deactivate cluster[.group[.instance]] | --diagnostics cluster[.group[.instance]] [ --assumeyes ] | --view ] [ --loglevel (INFO|WARN|ALL) ] [ --time_out <seconds> ] | --help
| Argument |
Input |
Description |
| -a, --activate |
String <cluster[.group[.instance_name]]> |
Activate all groups within a cluster, a specific group within a cluster, or a single instance. |
| -d, --deactivate |
String <cluster[.group[.instance_name]]> |
Deactivate all groups within a cluster, a specific group within a cluster or a single instance. |
| -i, --diagnostics |
String <arg> |
Print additional diagnostics where available to process log file. |
| -l,--loglevel |
String, one of INFO | WARN | ALL |
Log level controlling the amount of information logged by the utility. |
| -t,--time_out |
String <number of seconds> |
Amount of time in seconds to wait for the last answer. Defaults to 2. |
| -v,--view |
- |
View the current status of all instances, process groups, and clusters. |
| -y,--assumeyes |
- |
Answer "yes" for all prompts. |
Example
$MOOGSOFT_HOME/bin/ha_cntl -v
Getting system status
Cluster: [SECONDARY] passive
Process Group: [UI] Passive (no leader - all can be active)
Instance: [servlets] Passive
Component: moogpoller - not running
Component: moogsvr - not running
Component: toolrunner - not running
Process Group: [moog_farmd] Passive (only leader should be active)
Instance: FARM Passive Leader
Moolet: AlertBuilder - not running (will run on activation)
Moolet: AlertRulesEngine - not running (will run on activation)
Moolet: Cookbook - not running (will run on activation)
Moolet: Speedbird - not running (will run on activation)
Moolet: TemplateMatcher - not running
Process Group: [rest_lam] Passive (no leader - all can be active)
Instance: REST2 Passive
Process Group: [socket_lam] Passive (only leader should be active)
Instance: SOCK2 Passive Leader
Cluster: [PRIMARY] active
Process Group: [UI] Active (no leader - all can be active)
Instance: [servlets] Active
Component: moogpoller - running
Component: moogsvr - running
Component: toolrunner - running
Process Group: [moog_farmd] Active (only leader should be active)
Instance: FARM Active Leader
Moolet: AlertBuilder - running
Moolet: AlertRulesEngine - running
Moolet: Cookbook - running
Moolet: Default Cookbook - running
Moolet: Speedbird - running
Moolet: TemplateMatcher - not running
Process Group: [rest_lam] Active (no leader - all can be active)
Instance: REST1 Active
Process Group: [socket_lam] Active (only leader should be active)
Instance: SOCK1 Active Leader
HA Installation
This topic summarises the different types of high availability (HA) installation available. There are three type of HA installation:
1. Basic.
2. Minimally distributed.
3. Fully distributed.
Before you begin
Before you start an HA installation:
1. Read the High Availability Overview section to familiarise yourself with HA concepts.
2. Complete the appropriate Prepare to Install Cisco Crosswork Situation Manager.
Basic HA installation
This installation configuration has three servers on a single machine; two for the primary and secondary clusters, and a redundancy server.
You can do a basic HA installation using either RPM or tarball.
See Basic HA (RPM) Install and Basic HA Installation - Tarball for more information.
Minimally distributed HA installation
For a minimally distributed HA installation, follow the fully distributed installation steps.
The instructions list the steps for a specific role installation. If you need to collocate multiple roles on the same server according to a minimally distributed installation of your choice, you may need to run multiple sets of instructions on the same server for the corresponding collocated roles. There might be an overlap in terms of steps and if this is the case you only need to perform those steps once. For instance, if you collocate Core 1 and UI 1 roles, you only need to configure HA Proxy once.
Fully distributed HA installation
This installation splits the different roles across different servers or virtual machines. To perform a fully distributed HA install:
· Set up Percona XtraDB Cluster. See Set Up the Database for HA for more information.
· Set up Core 1 and 2 roles. See Set Up the Core Role for HA for more information.
· Set up HAProxy on the Core, UI and LAM nodes. See Set Up HA Proxy for the Database Role for more information.
· Set up UI 1 and 2 roles. See Set Up the User Interface Role for HA for more information.
· Set up the Redundancy server role. See Set Up the Redundancy Server Role for more information.
· Set up the LAM 1 and 2 roles for an on-premise version of Cisco Crosswork Situation Manager. See Install LAMs (on-premise) for more information.
Set up the LAM 1 and 2 roles for a SaaS version of Cisco Crosswork Situation Manager. See Install LAMs (SaaS) for more information.
Install Cisco Add-Ons
Cisco periodically releases add-ons to extend and enhance the core Cisco Crosswork Situation Manager functionality. For example, new Workflow Engine functions, new Workflow Engines, or Integrations tiles. All add-ons releases are cumulative and include the fixes from previous releases.
Once you have finished upgrading or installing Cisco Crosswork Situation Manager, you should install the Cisco Crosswork Situation Manager add-ons to ensure you have the latest version.
See Install Cisco Add-ons for more information on how to install the Cisco Crosswork Situation Manager add-ons.
Basic HA Installation
The basic HA installation configuration has three servers on a single machine; two for the primary and secondary clusters, and a redundancy server.
You can do a basic HA install using either RPM or tarball.
Before you start, you must complete the appropriate Prepare to Install Cisco Crosswork Situation Manager process.
See Basic HA Installation - Tarball and Basic HA (RPM) Install for instructions on how to complete the basic HA install.
Basic HA Installation - RPM
This topic describes the basic High Availability (HA) installation for Cisco Crosswork Situation Manager using RPM. This installation configuration has three servers; two for the primary and secondary clusters, and a redundancy server. A three-server installation is good for user acceptance testing (UAT) or pre-production. For production installations Ciscorecommends five, seven, or nine servers.

This topic describes how to perform the following tasks for the core Cisco Crosswork Situation Manager components:
1. Install the Cisco Crosswork Situation Manager packages and set the environment variables.
2. Set up the Percona XtraDB database and HA Proxy.
3. Configure the RabbitMQ message broker and Elasticsearch search service.
4. Configure high availability for the Cisco Crosswork Situation Manager core processing components.
5. Initialize the user interface (UI).
6. Configure high availability for data ingestion.
Before you begin
Before you start to configure your highly available deployment of Cisco Crosswork Situation Manager:
1. Familiarize yourself with the single-server deployment process: Install Cisco Crosswork Situation Manager and Upgrade Cisco Crosswork Situation Manager.
2. Read the High Availability Overview and review the HA Reference Architecture.
3. Verify that the hosts can access the required ports on the other hosts in the group. See HA Reference Architecture for more information.
4. Verify that you have root access to all three servers. You must perform this installation as the root user.
5. Complete either the Online RPM pre-installation or Cisco Crosswork Situation Manager - Offline RPM pre-installation instructions.
Prepare to install Cisco Crosswork Situation Manager
Before you install the Cisco Crosswork Situation Manager packages, perform the pre-installation tasks on all three servers.
Install Cisco Crosswork Situation Manager packages
Install the Cisco Crosswork Situation Manager packages on all three servers. Make sure you install the version you want by changing the VERSION number (8.0.0.1 in the following example):
Primary, Secondary and Redundancy servers:
VERSION=8.0.0.1; yum -y install moogsoft-server-${VERSION} \
moogsoft-db-${VERSION} \
moogsoft-ccsm-${VERSION} \
moogsoft-utils-${VERSION} \
moogsoft-search-${VERSION} \
moogsoft-ui-${VERSION} \
moogsoft-common-${VERSION} \
moogsoft-mooms-${VERSION} \
moogsoft-integrations-${VERSION} \
moogsoft-integrations-ui-${VERSION}
Edit the ~/.bashrc file to contain the following lines:
export MOOGSOFT_HOME=/usr/share/moogsoft
export APPSERVER_HOME=/usr/share/apache-tomcat
export JAVA_HOME=/usr/java/latest
export PATH=$PATH:$MOOGSOFT_HOME/bin:$MOOGSOFT_HOME/bin/utils
Source the .bashrc file:
source ~/.bashrc
Initialize the database
Install the Percona nodes and initialize the database on the primary server. Substitute the IP addresses of your servers and choose the password for the sstuser. Press <Enter> at the password prompt during initialization.
Primary server:
bash install_percona_nodes.sh -p -i <PRIMARY_IP>,<SECONDARY_IP>,<REDUNDANCY_IP> -u sstuser -w <SSTPASSWORD>
moog_init_db.sh -qIu root
Install the Percona nodes on the secondary and redundancy servers. Substitute the IP addresses of your servers and use the same sstuser password as the primary server. Do not initialize the database on these servers.
Secondary and Redundancy servers:
bash install_percona_nodes.sh -i <PRIMARY_IP>,<SECONDARY_IP>,<REDUNDANCY_IP> -u sstuser -w <SSTPASSWORD>
To verify that the Percona initialization was successful, run the following command on all three servers. Substitute the IP address of your primary server:
curl http://<PRIMARY_IP>:9198
If successful, you see the following message:
Percona XtraDB Cluster Node is synced
Set up HA Proxy
Install HA Proxy on the primary and secondary servers. Substitute the IP addresses of your servers.
Primary and Secondary servers:
$MOOGSOFT_HOME/bin/utils/haproxy_installer.sh -l 3309 -c -i <PRIMARY_IP>:3306,<SECONDARY_IP>:3306,<REDUNDANCY_IP>:3306
Run the following script to confirm successful installation:
$MOOGSOFT_HOME/bin/utils/check_haproxy_connections.sh
If successful, you see a script output similar to the following example:
HAProxy Connection Counts
Frontend:
0.0.0.0:3309 : 27
Backend:
mysql_node_1 172.31.82.211:3306 : 27
mysql_node_2 172.31.82.133:3306 : 0
mysql_node_3 172.31.85.42:3306 : 0
Set up RabbitMQ
Initialize and configure RabbitMQ on all three servers.
Primary, Secondary and Redundancy servers:
Substitute a name for your zone.
moog_init_mooms.sh -pz <MY_ZONE>
The primary erlang cookie is located at /var/lib/rabbitmq/.erlang.cookie. The erlang cookie must be the same for all RabbitMQ nodes. Replace the erlang cookie on the secondary and redundancy servers with the erlang cookie from the primary server. Make the cookies on the secondary and redundancy servers read-only:
chmod 400 /var/lib/rabbitmq/.erlang.cookie
You may need to change the file permissions on the secondary and redundancy erlang cookies first to allow those files to be overwritten. For example:
chmod 406 /var/lib/rabbitmq/.erlang.cookie
Restart RabbitMQ on the secondary and redundancy servers and join the cluster. Substitute the short hostname of your primary server and the name of your zone.
The short hostname is the full hostname excluding the DNS domain name. For example, if the hostname is ip-172-31-82-78.ec2.internal, the short hostname is ip-172-31-82-78. To find out the short hostname, run rabbitmqctl cluster_status on the primary server.
Secondary and Redundancy servers:
systemctl restart rabbitmq-server
rabbitmqctl stop_app
rabbitmqctl join_cluster rabbit@<PRIMARY_SHORT_HOSTNAME>
rabbitmqctl start_app
rabbitmqctl set_policy -p <MY_ZONE> ha-all ".+\.HA" '{"ha-mode":"all"}'
Run rabbitmqctl cluster_status to get the cluster status. Example output is as follows:
Cluster status of node rabbit@ip-172-31-93-201 ...
[{nodes,[{disc,['rabbit@ip-172-31-82-211','rabbit@ip-172-31-85-42','rabbit@ip-172-31-93-201']}]},
{running_nodes,['rabbit@ip-172-31-85-42','rabbit@ip-172-31-82-211','rabbit@ip-172-31-93-201']},
{cluster_name,<<"rabbit@ip-172-31-93-201.ec2.internal">>},
{partitions,[]},
{alarms,[{'rabbit@ip-172-31-85-42',[]},{'rabbit@ip-172-31-82-211',[]},{'rabbit@ip-172-31-93-201',[]}]}]
Set up Elasticsearch
Initialize and configure Elasticsearch on all three servers.
Primary, Secondary and Redundancy servers:
moog_init_search.sh
Uncomment and edit the properties in the Elasticsearch YAML file /etc/elasticsearch/elasticsearch.yml on all three servers as follows:
cluster.name: aiops
node.name: <SERVER_HOSTNAME>
...
network.host: 0.0.0.0
http.port: 9200
discovery.zen.ping.unicast.hosts: ["<PRIMARY_HOSTNAME>","<SECONDARY_HOSTNAME>","<REDUNDANCY_HOSTNAME>"]
discovery.zen.minimum_master_nodes: 1
gateway.recover_after_nodes: 1
node.master: true
Restart Elasticsearch:
systemctl restart elasticsearch
Get the health status of the cluster.
Primary server:
curl -X GET "localhost:9200/_cat/health?v&pretty"
Example cluster health status:
epoch timestamp cluster status
node.total node.data shards pri relo init
unassign pending_tasks
max_task_wait_time
active_shards_percent
1580490422 17:07:02 aiops green 3 3 0 0 0 0 0 0 - 100.0%
The minimum and maximum JVM heap sizes must be large enough to ensure that Elasticsearch starts.
See Finalize and Validate the Install for more information.
Elasticsearch Encryption
You can enable password authentication on Elasticsearch by editing the $MOOGSOFT_HOME/config/system.conf configuration file. You can use either an unencrypted password or an encrypted password, but you cannot use both.
You should use an encrypted password in the configuration file if you do not want users with configuration access to be able to access integrated systems.
Enable password authentication
To enable unencrypted password authentication on Elasticsearch, set the following properties in the system.conf file:
"search":
{
...
“username” : <username>,
“password” : <password>,
...
}
To enable encrypted password authentication on Elasticsearch, set the following properties in the system.conf file:
"search":
{
...
“username” : <username>,
“encrypted_password” : <encrypted password>
...
}
Initialize Elasticsearch
To initialize Elasticsearch with password authentication, run:
moog_init_search.sh -a username:password
or:
moog_init_search.sh --auth username:password
If you run moog_init_search without the -a/--auth parameters, you will not enable password authentication in Elasticsearch.
See Moog Encryptor for more information on how to encrypt passwords stored in the system.conf file.
You can also manually add authentication to the Elasticsearch configuration. You should do this if you have your own local Elasticsearch installation. See the Elasticsearch documentation on configuring security for more information.
Configure Cisco Crosswork Situation Manager
Configure Cisco Crosswork Situation Manager by editing the Moogfarmd and system configuration files.
Primary and Secondary servers:
Edit $MOOGSOFT_HOME/config/system.conf and set the following properties. Substitute the name of your RabbitMQ zone, the server hostnames, and the cluster names.
"mooms" :
{
...
"zone" : "<MY_ZONE>",
"brokers" : [
{"host" : "<PRIMARY_HOSTNAME>", "port" : 5672},
{"host" : "<SECONDARY_HOSTNAME>", "port" : 5672},
{"host" : "<REDUNDANCY_HOSTNAME>", "port" : 5672}
],
...
"cache_on_failure" : true,
...
"search" :
{
...
"nodes" : [
{"host" : "<PRIMARY_HOSTNAME>", "port" : 9200},
{"host" : "<SECONDARY_HOSTNAME>", "port" : 9200},
{"host" : "<REDUNDANCY_HOSTNAME>", "port" : 9200}
]
...
"failover" :
{
"persist_state" : true,
"hazelcast" :
{
"hosts" : ["<PRIMARY_HOSTNAME>","<SECONDARY_HOSTNAME>"],
"cluster_per_group" : true
}
"automatic_failover" : true,
}
...
"ha":
{ "cluster": "<CLUSTER_NAME, PRIMARY or SECONDARY>" }
Uncomment and edit the following properties in $MOOGSOFT_HOME/config/moog_farmd.conf. Note the importance of the initial comma. Delete the cluster line in this section of the file.
Primary server
,
ha:
{
group: "moog_farmd",
instance: "moog_farmd",
default_leader: true,
start_as_passive: false
}
Secondary server
,
ha:
{
group: "moog_farmd",
instance: "moog_farmd",
default_leader: false,
start_as_passive: false
}
Start Moogfarmd on the primary and secondary servers:
systemctl start moogfarmd
After starting Moogfarmd on the primary and secondary servers, run the HA Control command line utility ha_cntl -v to check the status of Moogfarmd. Example output is as follows:
Moogsoft AIOps Version 8.0.0.1
(C) Copyright 2012-2020 Moogsoft, Inc.
All rights reserved.
Executing: ha_cntl
Getting system status
Cluster: [PRIMARY] active
Process Group: [moog_farmd] Active (only leader should be active)
Instance: [primary] Active Leader
Component: Alert Workflows - running
Component: AlertBuilder - running
Component: AlertMgr - not running
Component: AlertRulesEngine - not running
Component: Default Cookbook - running
Component: Enricher - not running
Component: Enrichment Workflows - running
Component: Event Workflows - running
Component: Feedback - not running
Component: Housekeeper - running
Component: Indexer - running
Component: MaintenanceWindowManager - running
Component: Notifier - not running
Component: Scheduler - not running
Component: Situation Workflows - running
Component: SituationMgr - running
Component: SituationRootCause - running
Component: TeamsMgr - running
Cluster: [SECONDARY] partially active
Process Group: [moog_farmd] Passive (only leader should be active)
Instance: [secondary] Passive Leader
Component: Alert Workflows - not running (will run on activation)
Component: AlertBuilder - not running (will run on activation)
Component: AlertMgr - not running
Component: AlertRulesEngine - not running
Component: Enricher - not running
Component: Enrichment Workflows - not running (will run on activation)
Component: Event Workflows - not running (will run on activation)
Component: Feedback - not running
Component: Housekeeper - not running (will run on activation)
Component: Indexer - not running (will run on activation)
Component: MaintenanceWindowManager - not running (will run on activation)
Component: Notifier - not running
Component: Scheduler - not running
Component: Situation Workflows - not running (will run on activation)
Component: SituationMgr - not running (will run on activation)
Component: SituationRootCause - not running (will run on activation)
Component: TeamsMgr - not running (will run on activation)
For more information, see the HA Control Utility Command Reference.
Initialize the User Interface
Run the initialization script moog_init_ui.sh on the primary server. Substitute the name of your RabbitMQ zone and primary hostname.
When asked if you want to change the configuration hostname, say yes and enter the public URL for the server.
Primary server:
moog_init_ui.sh -twfz <MY_ZONE> -c <PRIMARY_HOSTNAME>:15672 -m <PRIMARY_HOSTNAME>:5672 -s <PRIMARY_HOSTNAME>:9200 -d <PRIMARY_HOSTNAME>:3309 -n
Edit the servlets settings on the primary server in the file $MOOGSOFT_HOME/config/servlets.conf. Note the importance of the initial comma.
,ha :
{
cluster: "primary",
instance: "servlets",
group: "servlets_primary",
start_as_passive: false
}
Start Apache Tomcat on the primary server:
systemctl start apache-tomcat
Restart Moogfarmd:
systemctl restart moogfarmd
Run the initialization script moog_init_ui.sh on the secondary server. Substitute the name of your RabbitMQ zone.
When asked if you want to change the configuration hostname, say yes and enter the public URL for the server.
Secondary server:
moog_init_ui.sh -twfz MY_ZONE -c <SECONDARY_HOSTNAME>:15672 -m <SECONDARY_HOSTNAME>:5672 -s <SECONDARY_HOSTNAME>:9200 -d <SECONDARY_HOSTNAME>:3309 -n
Edit the servlets settings in the secondary server $MOOGSOFT_HOME/config/servlets.conf file. Note the importance of the initial comma.
,ha :
{
cluster: "secondary",
instance: "servlets",
group: "servlets_secondary",
start_as_passive: false
}
Start Apache Tomcat on the secondary server:
systemctl start apache-tomcat
Restart Moogfarmd:
systemctl restart moogfarmd
Run the HA Control command line utility ha_cntl -v to check the status of the UI:
Moogsoft AIOps Version 8.0.0.1
(C) Copyright 2012-2020 Moogsoft, Inc.
All rights reserved.
Executing: ha_cntl
Getting system status
Cluster: [PRIMARY] active
...
Process Group: [servlets_primary] Active (no leader - all can be active)
Instance: [servlets] Active
Component: moogpoller - running
Component: moogsvr - running
Component: situation_similarity - running
Component: toolrunner - running
Cluster: [SECONDARY] partially active
...
Process Group: [servlets_secondary] Active (no leader - all can be active)
Instance: [servlets] Active
Component: moogpoller - running
Component: moogsvr - running
Component: situation_similarity - running
Component: toolrunner - running
For more information, see the HA Control Utility Command Reference.
Enable HA for LAMs
There are two types of HA configuration for LAMs; Active/Active and Active/Passive:
1. Receiving LAMs that listen for events are configured as Active/Active. For example, the REST LAM.
2. Polling LAMs are configured as Active/Passive. For example, the SolarWinds LAM.
Every LAM has its own configuration file under $MOOGSOFT_HOME/config/. This example references rest_lam.conf and solarwinds_lam.conf.
Primary and Secondary servers
Edit the HA properties in the primary and secondary servers' LAM configuration files. Cisco Crosswork Situation Manager automatically manages the active and passive role for the LAMs in a single process group:
# Receiving LAM (Active / Active)
# Configuration on Primary
ha:
{
group : "rest_lam_primary",
instance : "rest_lam",
duplicate_source : false
},
...
# Configuration on Secondary
ha:
{
group : "rest_lam_secondary",
instance : "rest_lam",
duplicate_source : false
},
# Polling LAM (Active / Passive)
# Configuration on Primary
ha:
{
group : "solarwinds_lam",
instance : "solarwinds_lam",
only_leader_active : true,
default_leader : true,
accept_conn_when_passive : false,
duplicate_source : false
},
...
# Configuration on Secondary
ha:
{
group : "solarwinds_lam",
instance : "solarwinds_lam",
only_leader_active : true,
default_leader : false,
accept_conn_when_passive : false,
duplicate_source : false
},
Start the LAMs:
systemctl start restlamd
systemctl start solarwindslamd
Run the HA Control command line utility ha_cntl -v to check the status of the LAMS:
Moogsoft AIOps Version 8.0.0.1
(C) Copyright 2012-2020 Moogsoft, Inc.
All rights reserved.
Executing: ha_cntl
Getting system status
Cluster: [PRIMARY] active
...
Process Group: [rest_lam_primary] Active (no leader - all can be active)
Instance: [rest_lam] Active
...
Process Group: [solarwinds_lam] Active (only leader should be active)
Instance: [solarwinds_lam] Active Leader
Cluster: [SECONDARY] partially active
...
Process Group: [rest_lam_secondary] Passive (no leader - all can be active)
Instance: [rest_lam] Active
...
Process Group: [solarwinds_lam] Passive (only leader should be active)
Instance: [solarwinds_lam] Passive
For more information, see the HA Control Utility Command Reference.
Basic HA Installation - Tarball
This topic describes the basic High Availability (HA) installation for Cisco Crosswork Situation Manager using tarball. This installation configuration has three servers; two for the primary and secondary clusters, and a redundancy server.

This topic describes how to perform the following tasks for the core Cisco Crosswork Situation Manager components:
· Stage the installation files on all servers.
· Install the Cisco Crosswork Situation Manager packages and set the environment variables.
· Set up the Percona XtraDB database and HA Proxy.
· Configure the RabbitMQ message broker and Elasticsearch search service.
· Configure high availability for the Cisco Crosswork Situation Manager core processing components.
· Initialize the user interface (UI).
· Configure high availability for data ingestion.
Before you begin
Before you start the tarball basic HA installation of Cisco Crosswork Situation Manager:
· Familiarize yourself with the single-server deployment process: Install Cisco Crosswork Situation Manager and Upgrade Cisco Crosswork Situation Manager.
· Read the High Availability Overview and the HA Reference Architecture.
· Verify that the hosts can access the required ports on the other hosts in the group. See HA Reference Architecture for more information.
· Complete either the # or # instructions.
Install files
· Log in as the Linux user for the primary, secondary and redundancy servers. If you have not yet done so, create a working directory in the overall installation directory, and move the pre-install files to this directory.
Refer to the # or # instructions for information on how big the working directory should be.
For the following example, /opt/moogsoft is the installation directory and /opt/moogsoft/v800wd is the working directory.
mkdir /opt/moogsoft/{VERSION} (recommend making the Linux user the owner of /opt/moogsoft)
cd /opt/moogsoft/{VERSION}
mv /tmp/preinstall_files{VERSION}.tgz /opt/moogsoft/{VERSION}
tar xzf preinstall_files{VERSION}.tgz
· Install Kernel Asynchronous I/O (AIO) Support for Linux. For example:
mkdir -p ~/install/libraries/
mv ./libaio-0.3.109-13.el7.x86_64.rpm ~/install/libraries
cd ~/install/libraries
rpm2cpio ./libaio-0.3.109-13.el7.x86_64.rpm | cpio -idmv && \
rm -f ./libaio-0.3.109-13.el7.x86_64.rpm && \
rm -f ~/install/libraries/lib64/libaio.so.1 && \
ln -s ~/install/libraries/lib64/libaio.so.1.0.1 ~/install/libraries/lib64/libaio.so.1 && \
echo "export LD_LIBRARY_PATH=`pwd`/lib64:\$LD_LIBRARY_PATH" >> ~/.bashrc && \
source ~/.bashrc
cd -
· Install libgfortran. For example:
mv ./libquadmath-4.8.5-39.el7.x86_64.rpm ./libgfortran-4.8.5-39.el7.x86_64.rpm ~/install/libraries/
cd ~/install/libraries/
for PACKAGE in libquadmath-4.8.5-39.el7.x86_64.rpm libgfortran-4.8.5-39.el7.x86_64.rpm; do
rpm2cpio $PACKAGE | cpio -idmv && \
rm -f $PACKAGE
done
echo "export LD_LIBRARY_PATH=$(pwd)/usr/lib64:\$LD_LIBRARY_PATH" >> ~/.bashrc
source ~/.bashrc
cd –
· Install Percona dependencies on all servers that will house a database node (requires root permissions):
yum install *.rpm
Prepare to install
Before you install Cisco Crosswork Situation Manager:
· Log in as the Linux user on the primary, secondary and redundancy servers and go to the working directory on each server.
· Make sure that the directories where you will install Cisco Crosswork Situation Manager meet the size requirements stated in the # or # instructions. Some files such as the Percona database and Elasticsearch files will be installed into the Linux user's HOME/install directory.
· Remove existing environment variables such as $MOOGSOFT_HOME from previous installations.
Install database and Cisco Crosswork Situation Manager files on the primary server
· Run the following commands on the primary, secondary and redundancy servers that will house a database node:
cp percona-xtrabackup-2.4.14-Linux-x86_64.libgcrypt153.tar.gz ~/install
cp Percona-XtraDB-Cluster-5.7.26-rel29-31.37.1.Linux.x86_64.ssl102.tar.gz ~/install
cp socat-1.7.3.2-2.el7.x86_64.rpm ~/install
· Run the Percona install script on the primary database server. Substitute the IP addresses of your servers and choose the password for the sstuser.
bash install_percona_nodes_tarball.sh -p -i <primary_ip>,<secondary_ip>,<redundancy_ip> -u sstuser -w <sstpassword>
· To verify that the Percona install was successful, run the following command on the primary server. Substitute the IP address of your primary server:
curl http://<primary_ip>:9198
If successful, you see the following message:
Percona XtraDB Cluster Node is synced.
· Now that you've installed the Percona database, you can install Cisco Crosswork Situation Manager. Go to your working directory on the primary server, and extract the Cisco Crosswork Situation Manager distribution archive:
source ~/.bashrc
cd /opt/moogsoft/v{VERSION}
tar -xf moogsoft-aiops-{VERSION}.tgz
· Run the installation script in your primary server working directory to install Cisco Crosswork Situation Manager:
bash moogsoft-aiops-install-{VERSION}.sh
· When prompted, enter the working directory to install Cisco Crosswork Situation Manager on the primary server. For example, /opt/moogsoft/aiops. The script guides you through the installation process. You can modify the default installation directory displayed for your environment.
Set the $MOOGSOFT_HOME environment variable to point to your primary server installation directory. In this example, /opt/moogsoft/aiops is the $MOOGSOFT_HOME directory.
echo "export MOOGSOFT_HOME=/opt/moogsoft/aiops" >> ~/.bashrc
Add the preceding directories to the following code after PATH= in ~/.bashrc and source the file:
.:/opt/moogsoft/aiops/bin:/opt/moogsoft/aiops/bin/utils:/opt/moogsoft/aiops/cots/erlang/bin:/opt/moogsoft/aiops/cots/rabbitmq-server/sbin:
source ~/.bashrc
· Configure the Tool Runner to execute locally:
sed -i 's/# execute_locally: false,/,execute_locally: true/1' $MOOGSOFT_HOME/config/servlets.conf
Initialize Cisco Crosswork Situation Manager on the primary server
Initialize the database on the primary server:
moog_init_db.sh -qIu root
When prompted for a password, enter the password for the root database user instead of the Linux user. If you are installing Percona on this machine for the first time, leave the password blank and press Enter to continue. The script prompts you to accept the End User License Agreement (EULA) and guides you through the initialization process.
Install Cisco Crosswork Situation Manager files on the secondary and redundancy servers
· Run the Percona install script on the secondary and redundancy servers. Substitute the IP addresses of your servers and use the same password as for the primary server.
bash install_percona_nodes_tarball.sh -i <primary IP address>,<secondary IP address>,<redundancy IP address> -u sstuser -w <sstpassword>
· To verify that the Percona install was successful, run the following command on the secondary and redundancy servers. Substitute the IP address of your primary server:
curl http://<primary IP address>:9198
If successful, you see the following message:
Percona XtraDB Cluster Node is synced
It takes a moment for the secondary and redundancy servers to sync. If you do not get this message, wait for a few moments and then try again.
· Now that you've installed the Percona database, you can install Cisco Crosswork Situation Manager.Go to your working directory in the secondary and redundancy servers, and extract the Cisco Crosswork Situation Manager distribution archive:
source ~/.bashrc
cd /opt/moogsoft/v{VERSION}
tar -xf moogsoft-aiops-{VERSION}.tgz
· Run the installation script in your working directory in both servers to install Moogsoft AIOps:
bash moogsoft-aiops-install-{VERSION}.sh
· When prompted, enter the directory to install AIOps. For example, /opt/moogsoft/aiops. The script guides you through the installation process. You can modify the default installation directory displayed for your environment.
· Set the $MOOGSOFT_HOME environment variable to point to your installation directory, and add $MOOGSOFT_HOME/bin/utils to the path. For example:
echo "export MOOGSOFT_HOME=/opt/moogsoft/aiops" >> ~/.bashrc
· Insert the following code after PATH= in ~/.bashrc:
.:/opt/moogsoft/aiops/bin:/opt/moogsoft/aiops/bin/utils:/opt/moogsoft/aiops/cots/erlang/bin:/opt/moogsoft/aiops/cots/rabbitmq-server/sbin:
· Source the ~/.bashrc file:
source ~/.bashrc
· Configure the Tool Runner to execute locally:
sed -i 's/# execute_locally: false,/,execute_locally: true/1' $MOOGSOFT_HOME/config/servlets
Install HA Proxy on primary and secondary servers
Install HA Proxy on the primary and secondary servers (root permission required).
1. Run the following command, using your chosen value for MOOGSOFT_HOME. Substitute the IP addresses of your servers.
export MOOGSOFT_HOME=/opt/moogsoft/aiops
$MOOGSOFT_HOME/bin/utils/haproxy_installer.sh -l 3309 -c -i <primary_ip>:3306,<secondary_ip>:3306,<redundancy_ip>:3306
2. Restart Apache Tomcat and Moogfarmd to start using HA Proxy:
process_cntl --process_name apache-tomcat restart
process_cntl --process_name moog_farmd restart
3. Run the following script to confirm successful installation:
$MOOGSOFT_HOME/bin/utils/check_haproxy_connections.sh
If successful, you see a script output similar to the following example:
HAProxy Connection Counts
Frontend:
0.0.0.0:3309 : 27
Backend:
mysql_node_1 172.31.82.211:3306 : 27
mysql_node_2 172.31.82.133:3306 : 0
mysql_node_3 172.31.85.42:3306 : 0
Set up RabbitMQ on all servers
Initialize and configure RabbitMQ on all three servers.
Primary, Secondary and Redundancy servers:
1. Run the following command. Substitute a name for your zone. You must use the same zone name for all servers.
moog_init_mooms.sh -pz <my_zone>
2. Stop RabbitMQ on the secondary and redundancy servers:
process_cntl --process_name rabbitmq stop
3. The primary server erlang cookie is located in the Linux user's HOME directory: ~/.erlang.cookie. The erlang cookie must be the same for all RabbitMQ nodes.
Replace the erlang cookie on the secondary and redundancy servers with the erlang cookie from the primary server. You may need to change the file permissions on the secondary and redundancy erlang cookies first to allow those files to be overwritten.
After copying the cookie, as the Linux user, make the cookies on the secondary and redundancy servers read-only. For example:
cd ~
chmod 406 ~/.erlang.cookie
mv .erlang.cookie .erlang.cookie.orig
scp moogsoft@<PRIMARY_IP>:.erlang.cookie .
chmod 400 .erlang.cookie
Secondary and Redundancy servers:
· Restart RabbitMQ on the secondary and redundancy servers and join those servers to the cluster. Substitute the short hostname of your primary server and the name of your zone.
The short hostname is the full hostname excluding the DNS domain name. For example, if the hostname is ip-172-31-82-78.ec2.internal, the short hostname is ip-172-31-82-78. To find out the short hostname, run rabbitmqctl cluster_status on the primary server.
The restart command differs depending on whether you are a root or a non-root user:
1. Root: systemctl restart rabbitmq-server
2. Non-root: process_cntl --process_name rabbitmq restart
<restart command>
rabbitmqctl stop_app
rabbitmqctl join_cluster rabbit@<primary_short_hostname>
rabbitmqctl start_app
rabbitmqctl set_policy -p <my_zone> ha-all ".+\.HA" '{"ha-mode":"all"}'
1. Run rabbitmqctl cluster_status to get the cluster status. Example output is as follows:
Cluster status of node rabbit@secondary ...
[{nodes,[{disc,[rabbit@primary,rabbit@secondary]}]},
{running_nodes,[rabbit@primary,rabbit@secondary]},
{cluster_name,<<"rabbit@secondary">>},
{partitions,[]},
{alarms,[{rabbit@primary,[]},{rabbit@secondary,[]}]}]
Set up Elasticsearch on all servers
You must start Elasticsearch with specific memory parameters to support HA. The process_cntl utility starts Elasticsearch.
· Run the following on the primary, secondary and redundancy servers to adjust the process_cntl utility:
cp –p $MOOGSOFT_HOME/bin/utils/process_cntl $MOOGSOFT_HOME/bin/utils/process_cntl.orig
sed -i 's/-Xms256m/-Xms2g/' $MOOGSOFT_HOME/bin/utils/process_cntl
· Initialize and configure Elasticsearch on all three servers:
· Uncomment and edit the properties in $MOOGSOFT_HOME/cots/elasticsearch/config/elasticsearch.ymlon all three servers as follows
cluster.name: aiops
node.name: <server_hostname>
...
network.host: 0.0.0.0
http.port: 9200
discovery.zen.ping.unicast.hosts: ["<PRIMARY_HOSTNAME>","<SECONDARY_HOSTNAME>","<REDUNDANCY_HOSTNAME>"]
discovery.zen.minimum_master_nodes: 2
gateway.recover_after_nodes: 1
node.master: true
· Restart Elasticsearch on all three servers:
process_cntl --process_name elasticsearch restart
· Get the health status of the cluster by running the following on the primary server:
curl -X GET "localhost:9200/_cat/health?v&pretty"
Example cluster health status:
epoch timestamp cluster status
node.total node.data shards pri relo init unassign pending_tasks max_task_wait_time active_shards_percent 1580490422 17:07:02 aiops green 3 3 0 0 0 0 0 0 - 100.0%
If you've configured all three servers, the node.total will be 3.
Configure Cisco Crosswork Situation Manager
Configure Cisco Crosswork Situation Manager by editing the Moogfarmd and system configuration files on the primary and secondary servers.
Primary and Secondary servers:
1. Make a copy of the $MOOGSOFT_HOME/config/system.conf file:
cp -p $MOOGSOFT_HOME/config/system.conf $MOOGSOFT_HOME/config/system.conf.orig
2. Edit $MOOGSOFT_HOME/config/system.conf and set the following properties. Substitute the name of your RabbitMQ zone, the server hostnames, and the cluster names:
"mooms" :
{
...
"zone" : "<my_zone>",
"brokers" : [
{"host" : "<primary_hostname>", "port" : 5672},
{"host" : "<secondary_hostname>", "port" : 5672},
{"host" : "<redundancy_hostname>", "port" : 5672}
],
...
"cache_on_failure" : true,
...
"search" :
{
...
"nodes" : [
{"host" : "<primary_hostname>", "port" : 9200},
{"host" : "<secondary_hostname>", "port" : 9200},
{"host" : "<redundancy_hostname>", "port" : 9200}
]
...
"failover" :
{
"persist_state" : true,
"hazelcast" :
{
"hosts" : ["<primary_hostname>","<secondary_hostname>"],
"cluster_per_group" : true
}
"automatic_failover" : true,
}
...
"ha":
{ "cluster": "<cluster_name, primary or secondary>" }
3. Make a copy of the $MOOGSOFT_HOME/config/moog_farmd.conf file:
cp -p $MOOGSOFT_HOME/config/moog_farmd.conf $MOOGSOFT_HOME/config/moog_farmd.conf.orig
4. Uncomment and edit the following properties in $MOOGSOFT_HOME/config/moog_farmd.conf. Note the importance of the initial comma. Delete the cluster line in this section of the file:
Primary server
,
ha:
{
group: "moog_farmd",
instance: "moog_farmd",
default_leader: true,
start_as_passive: false
}
Secondary server
,
ha:
{
group: "moog_farmd",
instance: "moog_farmd",
default_leader: true,
start_as_passive: false
}
5. Start Moogfarmd on the primary and secondary servers:
process_cntl --process_name moog_farmd start
Initialize the user interface
Run the initialization script moog_init_ui.sh on the primary server. Substitute the name of your RabbitMQ zone and primary hostname.
When asked if you want to change the configuration hostname, say yes and enter the public hostname/domain name used in the URL to access AIOps via browser. If the URL uses a different hostname/domain name (e.g., an alias) the system will reject your login.
Primary server:
moog_init_ui.sh -twfz <MY_ZONE> -c <primary_hostname>:15672 -m <primary_hostname>:5672 -s <primary_hostname>:9200 -d <primary_hostname>:3309 -n
Edit the servlets settings on the primary server in the file $MOOGSOFT_HOME/config/servlets.conf. Note the importance of the initial comma.
,ha :
{
instance: "servlets",
group: "servlets_primary",
start_as_passive: false
}
Restart Apache Tomcat and Moogfarmd on the primary server:
process_cntl --process_name apache-tomcat restart
process_cntl --process_name moog_farmd restart
Run the initialization script moog_init_ui.sh on the secondary server. Substitute the name of your RabbitMQ zone.
When asked if you want to change the configuration hostname, say yes and enter the public hostname/domain name used in the URL to access AIOps via browser.
Secondary server:
moog_init_ui.sh -twfz MY_ZONE -c <SECONDARY_HOSTNAME>:15672 -m <SECONDARY_HOSTNAME>:5672 -s <SECONDARY_HOSTNAME>:9200 -d <SECONDARY_HOSTNAME>:3309 -n
Edit the servlets settings in the secondary server $MOOGSOFT_HOME/config/servlets.conf file. Note the importance of the initial comma.
,ha :
{
instance: "servlets",
group: "servlets_secondary",
start_as_passive: false
}
Restart Apache Tomcat and Moogfarmd on the primary server secondary server:
process_cntl --process_name apache-tomcat restart
process_cntl --process_name moog_farmd restart
Enable HA for LAMs
There are two types of HA configuration for LAMs; Active/Active and Active/Passive:
· Receiving LAMs that listen for events are configured as Active/Active. For example, the REST LAM.
· Polling LAMs are configured as Active/Passive. For example, the SolarWinds LAM.
Every LAM has its own configuration file under $MOOGSOFT_HOME/config/. This example references rest_lam.conf and solarwinds_lam.conf.
Primary and Secondary servers
Edit the HA properties in the primary and secondary servers' LAM configuration files. Cisco Crosswork Situation Manager automatically manages the active and passive role for the LAMs in a single process group:
# Receiving LAM (Active / Active)
# Configuration on Primary
ha:
{
group : "rest_lam_primary",
instance : "rest_lam",
duplicate_source : false
},
...
# Configuration on Secondary
ha:
{
group : "rest_lam_secondary",
instance : "rest_lam",
duplicate_source : false
},
# Polling LAM (Active / Passive)
# Configuration on Primary
ha:
{
group : "solarwinds_lam",
instance : "solarwinds_lam",
only_leader_active : true,
default_leader : true,
accept_conn_when_passive : false,
duplicate_source : false
},
...
# Configuration on Secondary
ha:
{
group : "solarwinds_lam",
instance : "solarwinds_lam",
only_leader_active : true,
default_leader : false,
accept_conn_when_passive : false,
duplicate_source : false
},
Start the LAMs:
process_cntl --process_name restlamd restart
process_cntl --process_name solarwindslamd restlamd restart
Run the HA Control command line utility ha_cntl -v to check the status of the LAMS:
Moogsoft AIOps Version{VERSION}
(C) Copyright 2012-2020 Moogsoft, Inc.
All rights reserved.
Executing: ha_cntl
Getting system status
Cluster: [PRIMARY] active
...
Process Group: [rest_lam_primary] Active (no leader - all can be active)
Instance: [rest_lam] Active
...
Process Group: [solarwinds_lam] Active (only leader should be active)
Instance: [solarwinds_lam] Active Leader
Cluster: [SECONDARY] partially active
...
Process Group: [rest_lam_secondary] Passive (no leader - all can be active)
Instance: [rest_lam] Active
...
Process Group: [solarwinds_lam] Passive (only leader should be active)
Instance: [solarwinds_lam] Passive
For more information, see the HA Control Utility Command Reference.
Validate the installation
To verify that the installation has completed successfully, follow the steps outlined in Validate the Installation.
Fully Distributed HA Installation
This topic summarises the installation steps for a fully distributed system running with HA. This installation is shown in the following diagram.

The installation assumes a HA configuration across 2 clusters called Cluster1 and Cluster2.
Note that both Core instances and polling LAMs are part of the same respective Cisco Crosswork Situation Manager process group since they run in an active / passive configuration with auto-failover enabled.
UI stacks, as well as receiving LAMs, should run as part of two distinct Cisco Crosswork Situation Manager process groups as both instances in the HA pair are active.
Percona XtraDB Cluster is the database product provided with Cisco Crosswork Situation Manager. HAProxy supports features such as query routing to available database targets and load balancing.
If you use the MySQL database, Cisco strongly recommends you migrate from MySQL to Percona XtraDB Cluster and HAProxy. See Post-upgrade steps for more information.
To perform a fully distributed HA installation:
· Set up Percona XtraDB Cluster. See Set Up the Database for HA for more information.
· Set up Core 1 and 2 roles. See Set Up the Core Role for HA for more information.
· Set up HAProxy on the Core, UI and LAM nodes. See Set Up HA Proxy for the Database Role for more information.
· Set up UI 1 and 2 roles. See Set Up the User Interface Role for HA for more information.
· Set up the Redundancy server role. See Set Up the Redundancy Server Role for more information.
· Set up the LAM 1 and 2 roles for an on-premise version of Cisco Crosswork Situation Manager. See Install LAMs (non-SaaS) for more information.
Set up LAM 1 and 2 roles for a SaaS version of Cisco Crosswork Situation Manager. See Install LAMs (SaaS) for more information.
To view a list of connectivity ports for a fully distributed HA architecture see Distributed HA system Firewall.
Distributed HA system Firewall
Connectivity within a fully distributed HA architecture:
| Source |
Destination |
Ports |
Bi-directional |
| UI 1, UI 2 |
Core 1, Core 2 |
3309, 5672, 9200 |
- |
| UI 1, UI 2 |
RedServ |
5672, 9200 |
- |
| UI 1, UI 2 |
DB 1, DB 2, DB 3 |
3306, 3309, 9198 |
- |
| Core 1 |
Core 2 |
5701, 9300, 4369, 5672 |
Yes |
| Core 1, Core 2 |
RedServ |
9300, 4369, 5672 |
Yes |
| Core 1 |
Core 2, RedServ |
25672 |
|
| Core 1 |
Core 1, RedServ |
25672 |
|
| RedServ |
Core 1, Core 2 |
25672 |
|
| Core 1, Core 2 |
DB 1, DB 2, DB 3 |
3306, 9198 |
- |
| LAM 1, LAM 2 |
Core 1, Core 2, RedServ |
5672 |
- |
| LAM 1, LAM 2 |
DB 1, DB 2, DB 3 |
3306, 9198 |
- |
| DB 1 |
DB 2, DB 3 |
3306, 4567, 4444, 5468 |
Yes |
If any of the default ports are changed then substitute it in the tables above. The ports are responsible for the following:
| 9200 |
Used for inbound Elastic Search REST API |
| 9300 |
Used for Elastic nodes communication within a cluster |
| 5672 |
Access to mooms bus (RabbitMQ) |
| 15672 |
Access to mooms (RabbitMQ) console |
| 4369 |
Required for mooms (RabbitMQ) cluster |
| 5701 |
Required for Hazelcast cluster |
| 8091 |
Access the Hazelcast cluster info via Hazelcast's |
| 3309 |
Used for initializing UI servers |
| 3306 |
Regular MySQL port |
| 4567 |
For group communication in Percona XtraDB Cluster |
| 4444 |
For State Snapshot Transfer in Percona XtraDB Cluster |
| 4568 |
For Incremental State Transfer in Percona XtraDB Cluster |
| 9198 |
Allows HAProxy to check the node's Percona XtraDB Cluster status via http |
| 25672 |
Used for inter-node and CLI tools communication |
See HA Installation for the full installation steps for a fully distributed system running with HA.
Set Up the Database for HA
The database layer Cisco Crosswork Situation Manager for HA uses the Percona XtraDB Cluster mechanism.
HA architecture
In our distributed HA installation, the database components are installed on servers DB 1, DB 2, and DB 3:

Refer to the Distributed HA system Firewall for more information on connectivity within a fully distributed HA architecture.
Build a Percona cluster
The sections below detail how to build a Percona XtraDB cluster.
Install Cisco Crosswork Situation Manager components on DB 1, 2 and 3
On servers DB 1, 2 and 3, install the following Cisco Crosswork Situation Manager components:
VERSION=8.0.0; yum -y install moogsoft-utils-${VERSION} moogsoft-ccsm-${VERSION} moogsoft-db-${VERSION};
Edit the ~/.bashrc file to contain the following lines:
export MOOGSOFT_HOME=/usr/share/moogsoft
export APPSERVER_HOME=/usr/share/apache-tomcat
export JAVA_HOME=/usr/java/latest
export PATH=$PATH:$MOOGSOFT_HOME/bin:$MOOGSOFT_HOME/bin/utils
Source the .bashrc file:
source ~/.bashrc
Set up Percona on DB 1
On DB 1, run install_percona_nodes.sh to install, configure and start Percona Cluster node 1. Substitute the IP addresses of your servers and choose the password for the sstuser. Press <Enter> at the password prompt during initialization.
install_percona_nodes.sh -p -i <DB 1 server ip address>,<DB 2 server ip address>,<DB 3 server ip address> -u sstuser -w <sstpassword>
Cisco advises that you provide the IP addresses instead of hostnames for servers running the Percona Cluster in order to reduce network latency. The “sstuser“, in the command above, is the user that will be used by the Percona nodes to communicate with each other. The script performs the following tasks:
· Disables SELinux and sets the vm.swappiness property to 1.
· Installs the Percona Yum repository.
· Installs the Percona compatibility package.
· Installs Percona XtraDB cluster.
· Installs the Extended Internet Service Daemon (xinetd).
· Creates a my.cnf configuration file based on the server's hardware.
· Configures a mysqlchk service on port 9198 and restarts the xinetd service.
· Starts the first Percona node in bootstrap mode.
· Reconfigures my.cnf to ensure the node will restart in non-bootstrap mode.
Initialize the Cisco Crosswork Situation Manager database
On DB 1, run the following commands to create the Cisco Crosswork Situation Manager databases (moogdb, moog_reference, historic_moogdb, moog_intdb), and populate them with the required schema:
$MOOGSOFT_HOME/bin/utils/moog_init_db.sh -qIu root --accept-eula <<-EOF
EOF
Note
You do not need to run this command on any of the other nodes. The new schema is replicated automatically around the cluster.
Set up Percona on DB 2
On DB 2, run install_percona_nodes.sh. Substitute the IP addresses of your servers and use the same sstuser password as DB 1. The script will perform the same actions, only this time starting the second Percona node to join the first node as a cluster.
install_percona_nodes.sh -d -i <DB 1 server IP address>,<DB 2 server IP address>,<DB 3 server IP address> -u sstuser -w <sstpassword>
Set up Percona on DB 3
On DB 3, run install_percona_nodes.sh as you did for DB 1 and DB 2. Substitute the IP addresses of your servers and use the same sstuser password as DB 1. The script will perform the same actions, only this time starting the third Percona node to join the first and second nodes as a cluster.
install_percona_nodes.sh -d -i <DB 1 server IP address>,<DB 2 server IP address>,<DB 3 server IP address> -u sstuser -w passw0rd
Verify Percona cluster status
To verify the replication status of each node, run the following commands from a remote server:
curl http://<DB 1 server IP address/hostname>:9198
curl http://<DB 2 server IP address/hostname>:9198
curl http://<DB 3 server IP address/hostname>:9198
If successful, you see the following message:
Percona XtraDB Cluster Node is synced.
Set Up the Core Role for HA
In Cisco Crosswork Situation Manager HA architecture, Core 1 and Core 2 run in an active / passive HA pair.
HA architecture
In our distributed HA installation, the Core components are installed on Core 1, Core 2, and Redundancy servers:

Core 1: Core Data Processing 1 (Moogfarmd), Elastic Node 1, RabbitMQ Node 1.
Core 2: Core Data Processing 2 (Moogfarmd), Elastic Node 2, RabbitMQ Node 2.
Redundancy: Elastic Node 3, RabbitMQ Node 3.
Refer to the Distributed HA system Firewall for more information on connectivity within a fully distributed HA architecture.
Install Core 1
1. Install the required Cisco Crosswork Situation Manager packages:
VERSION=8.0.0.1; yum -y install moogsoft-server-${VERSION} \
moogsoft-search-${VERSION} \
moogsoft-common-${VERSION} \
moogsoft-mooms-${VERSION} \
moogsoft-integrations-${VERSION} \
moogsoft-integrations-ui-${VERSION}
· Edit your ~/.bashrc file to contain the following lines:
export MOOGSOFT_HOME=/usr/share/moogsoft
export APPSERVER_HOME=/usr/share/apache-tomcat
export JAVA_HOME=/usr/java/latest
export PATH=$PATH:$MOOGSOFT_HOME/bin:$MOOGSOFT_HOME/bin/utils
· Source the ~/.bashrc file:
source ~/.bashrc
· Initialize RabbitMQ Cluster Node 1 on the Core 1 server. Substitute a name for your zone.
moog_init_mooms.sh -pz <zone>
· Initialize, configure and start Elasticsearch Cluster Node 1 on the Core 1 server.
1. Initialize Elasticsearch on Core 1:
moog_init_search.sh
2. Uncomment and edit the properties in the /etc/elasticsearch/elasticsearch.yml file on Core 1 as follows:
cluster.name: aiops
node.name: <Core 1 server hostname>
...
network.host: 0.0.0.0
http.port: 9200
discovery.zen.ping.unicast.hosts: [ "<Core 1 server hostname>","<Core 2 server hostname>","<Redundancy server hostname>"]
discovery.zen.minimum_master_nodes: 1
gateway.recover_after_nodes: 1
node.master: true
The minimum and maximum JVM heap sizes must be large enough to ensure that Elasticsearch starts.
See Finalize and Validate the Install for more information.
You can enable password authentication on Elasticsearch. See Elasticsearch Encryption for more information.
· On Core 1, edit $MOOGSOFT_HOME/config/system.conf and set the following properties. Substitute the name of your RabbitMQ zone, the server hostnames, and the cluster names.
"mooms" :
{
...
"zone" : "<zone>",
"brokers" : [
{"host" : "<Core 1 server hostname>", "port" : 5672},
{"host" : "<Core 2 server hostname>", "port" : 5672},
{"host" : "<Redundancy server hostname>", "port" : 5672}
],
...
"cache_on_failure" : true,
...
"search" :
{
...
"nodes" : [
{"host" : "<Core 1 server hostname>", "port" : 9200},
{"host" : "<Core 2 server hostname>", "port" : 9200},
{"host" : "<Redundancy server hostname>", "port" : 9200}
]
...
"failover" :
{
"persist_state" : true,
"hazelcast" :
{
"hosts" : ["<Core 1 server hostname>","<Core 2 server hostname>"],
"cluster_per_group" : true
}
"automatic_failover" : true,
}
...
"ha":
{ "cluster": "PRIMARY" }
Restart Elasticsearch:
systemctl restart elasticsearch
· Uncomment and edit the following properties in $MOOGSOFT_HOME/config/moog_farmd.conf. Note the importance of the initial comma. Delete the cluster line in this section of the file.
,
ha:
{
group: "moog_farmd",
instance: "moog_farmd",
default_leader: true,
start_as_passive: false
}
Start moog_farmd.conf:
systemctl start moogfarmd
· Install, configure and start HA Proxy on the Core 1 server to connect to Percona XtraDB Cluster.
Install Core 2
· Install Cisco Crosswork Situation Manager components on the Core 2 server.
On Core 2 install the following Cisco Crosswork Situation Manager components:
VERSION=8.0.0.1; yum -y install moogsoft-server-${VERSION} \
moogsoft-search-${VERSION} \
moogsoft-common-${VERSION} \
moogsoft-mooms-${VERSION} \
moogsoft-integrations-${VERSION}
· Edit your ~/.bashrc file to contain the following lines:
export MOOGSOFT_HOME=/usr/share/moogsoft
export APPSERVER_HOME=/usr/share/apache-tomcat
export JAVA_HOME=/usr/java/latest
export PATH=$PATH:$MOOGSOFT_HOME/bin:$MOOGSOFT_HOME/bin/utils
· Source the ~/.bashrc file:
source ~/.bashrc
· On Core 2 initialize RabbitMQ. Use the same zone name as Core 1:
moog_init_mooms.sh -pz <zone>
· Initialize, configure and start Elasticsearch Cluster Node 2 on the Core 2 server.
— Initialize Elasticsearch on Core 2:
moog_init_search.sh
— Uncomment and edit the properties of the /etc/elasticsearch/elasticsearch.yml file on Core 2 as follows:
cluster.name: aiops
node.name: <Core 2 server hostname>
...
network.host: 0.0.0.0
http.port: 9200
discovery.zen.ping.unicast.hosts: [ "<Core 1 server hostname>","<Core 2 server hostname>","<Redundancy server hostname>"]
discovery.zen.minimum_master_nodes: 1
gateway.recover_after_nodes: 1
node.master: true
The minimum and maximum JVM heap sizes must be large enough to ensure that Elasticsearch starts.
See Finalize and Validate the Install for more information.
You can enable password authentication on Elasticsearch. See Elasticsearch Encryption for more information.
1. On Core 2, edit $MOOGSOFT_HOME/config/system.conf and set the following properties. Substitute the name of your RabbitMQ zone, the server hostnames, and the cluster names.
"mooms" :
{
...
"zone" : "<zone>",
"brokers" : [
{"host" : "<Core 1 server hostname>", "port" : 5672},
{"host" : "<Core 2 server hostname>", "port" : 5672},
{"host" : "<Redundancy server hostname>", "port" : 5672}
],
...
"cache_on_failure" : true,
...
"search" :
{
...
"nodes" : [
{"host" : "<Core 1 server hostname>", "port" : 9200},
{"host" : "<Core 2 server hostname>", "port" : 9200},
{"host" : "<Redundancy server hostname>", "port" : 9200}
]
...
"failover" :
{
"persist_state" : true,
"hazelcast" :
{
"hosts" : ["<Core 1 server hostname>","<Core 2 server hostname>"],
"cluster_per_group" : true
}
"automatic_failover" : true,
}
...
"ha":
{ "cluster": "SECONDARY" }
Restart Elasticsearch:
systemctl restart elasticsearch
2. Uncomment and edit the following properties in $MOOGSOFT_HOME/config/moog_farmd.conf. Note the importance of the initial comma. Delete the cluster line in this section of the file.
,
ha:
{
group: "moog_farmd",
instance: "moog_farmd",
default_leader: false,
start_as_passive: false
}
Start moog_farmd.conf:
systemctl start moogfarmd
3. The erlang cookies must be the same for all RabbitMQ nodes. Replace the erlang cookie on Core 2 with the Core 1 erlang cookie located at /var/lib/rabbitmq/.erlang.cookie. Make the Core 2 cookie read-only:
chmod 400 /var/lib/rabbitmq/.erlang.cookie
You may need to change the file permissions on the Core 2 erlang cookie first to allow this file to be overwritten. For example:
chmod 406 /var/lib/rabbitmq/.erlang.cookie
4. Restart the rabbitmq-server service and join the cluster. Substitute the Core 1 short hostname and zone:
systemctl restart rabbitmq-server
rabbitmqctl stop_app
rabbitmqctl join_cluster rabbit@<Core 1 server short hostname>
rabbitmqctl start_app
The short hostname is the full hostname excluding the DNS domain name. For example, if the hostname is ip-172-31-82-78.ec2.internal, the short hostname is ip-172-31-82-78. To find out the short hostname, run rabbitmqctl cluster_status on Core 1.
5. Apply HA mirrored queues policy. Use the same zone name as Core 1.
rabbitmqctl set_policy -p <zone> ha-all ".+\.HA" '{"ha-mode":"all"}'
6. Run rabbitmqctl cluster_status to verify the cluster status and queue policy. Example output is as follows:
Cluster status of node rabbit@ip-172-31-93-201 ...
[{nodes,[{disc,['rabbit@ip-172-31-82-211','rabbit@ip-172-31-85-42','rabbit@ip-172-31-93-201']}]},
{running_nodes,['rabbit@ip-172-31-85-42','rabbit@ip-172-31-82-211','rabbit@ip-172-31-93-201']},
{cluster_name,<<"rabbit@ip-172-31-93-201.ec2.internal">>},
{partitions,[]},
{alarms,[{'rabbit@ip-172-31-85-42',[]},{'rabbit@ip-172-31-82-211',[]},{'rabbit@ip-172-31-93-201',[]}]}]
7. Install, configure and start HA Proxy on the Core 2 server to connect to Percona XtraDB Cluster
You can enable password authentication on Elasticsearch by editing the $MOOGSOFT_HOME/config/system.conf configuration file. You can use either an unencrypted password or an encrypted password, but you cannot use both.
You should use an encrypted password in the configuration file if you do not want users with configuration access to be able to access integrated systems.
Enable password authentication
To enable unencrypted password authentication on Elasticsearch, set the following properties in the system.conf file:
"search":
{
...
“username” : <username>,
“password” : <password>,
...
}
To enable encrypted password authentication on Elasticsearch, set the following properties in the system.conf file:
"search":
{
...
“username” : <username>,
“encrypted_password” : <encrypted password>
...
}
Initialize Elasticsearch
To initialize Elasticsearch with password authentication, run:
moog_init_search.sh -a username:password
or:
moog_init_search.sh --auth username:password
If you run moog_init_search without the -a/--auth parameters, you will not enable password authentication in Elasticsearch.
See Moog Encryptor for more information on how to encrypt passwords stored in the system.conf file.
You can also manually add authentication to the Elasticsearch configuration. You should do this if you have your own local Elasticsearch installation. See the Elasticsearch documentation on configuring security for more information.
Validate that failover is working
On Core 1, confirm the moog_farmd process is active on Core 1:
ha_cntl -v
You should see output indicating that the moog_farmd process is active on Core 1. If moog_farmd process is active on Core 2, stop moog_farmd on the Core 2 and restart it on Core 1.
On Core 1, deactivate moog_farmd on the primary cluster:
ha_cntl --deactivate primary.moog_farmd
Enter "y" when prompted.
Run ha_cntl -v to monitor the moog_farmd process. You will see this process stop on Core 1 and start on Core 2.
To fail the cluster back to its default state, run the following command on Core 2 to deactivate moog_farmd on the secondary cluster:
ha_cntl --deactivate secondary.moog_farmd
On Core 1, activate moog_farmd on the primary cluster:
ha_cntl --activate primary.moog_farmd
Run ha_cntl -v to confirm that moog_farmd is active on the primary cluster.
Set Up the User Interface Role for HA
The UI role includes the Nginx and Apache Tomcat components. There are also a number of Cisco Crosswork Situation Manager webapps (servlets) installed and running within Tomcat, responsible for the following processes:
1. graze: Graze API
2. moogpoller: Dynamic updates to UI
3. moogsvr: Services HTTP requests
4. situation_similarity: Calculates the situation similarity and pushes to UI
5. toolrunner: Services Server Tools
HA architecture
In our distributed HA installation, the UI components are installed on the UI 1 and UI 2 servers.

Refer to the Distributed HA system Firewall for more information on connectivity within a fully distributed HA architecture.
Install UI primary
· Install Cisco Crosswork Situation Manager components on the UI primary server.
On UI 1 install the following Cisco Crosswork Situation Manager components:
VERSION=8.0.0.1; yum -y install moogsoft-common-${VERSION} \
moogsoft-integrations-ui-${VERSION} \
moogsoft-ui-${VERSION} \
moogsoft-utils-${VERSION}
Edit the ~/.bashrc file to contain the following lines:
export MOOGSOFT_HOME=/usr/share/moogsoft
export APPSERVER_HOME=/usr/share/apache-tomcat
export JAVA_HOME=/usr/java/latest
export PATH=$PATH:$MOOGSOFT_HOME/bin:$MOOGSOFT_HOME/bin/utils
Source the .bashrc file
source ~/.bashrc
· Run the initialization script moog_init_ui.sh on UI 1 to initialize the UI stack. Substitute the name of your RabbitMQ zone and the Core 1 server hostname:
moog_init_ui.sh -twfz <zone> -c <Core 1 server hostname>:15672 -m <Core 1 server hostname>:5672 -s <Core 1 server hostname>:9200 -d <Core 1 server hostname>:3309 -n
· Uncomment and edit the servlets settings on UI 1 in the file $MOOGSOFT_HOME/config/servlets.conf. Note the importance of the initial comma.
,ha :
{
cluster: "primary",
instance: "servlets",
group: "servlets_primary",
start_as_passive: false
}
· On UI 1, edit $MOOGSOFT_HOME/config/system.conf and set the following properties. Substitute the name of your RabbitMQ zone, the server hostnames, and the cluster names.
"mooms" :
{
...
"zone" : "<zone>",
"brokers" : [
{"host" : "<UI 1 server hostname>", "port" : 5672},
{"host" : "<UI 2 server hostname>", "port" : 5672},
{"host" : "<Redundancy server hostname>", "port" : 5672}
],
...
"cache_on_failure" : true,
...
"search" :
{
...
"nodes" : [
{"host" : "<UI 1 server hostname>", "port" : 9200},
{"host" : "<UI 2 server hostname>", "port" : 9200},
{"host" : "<Redundancy server hostname>", "port" : 9200}
]
...
"failover" :
{
"persist_state" : true,
"hazelcast" :
{
"hosts" : ["<UI 1 server hostname>","<UI 2 server hostname>"],
"cluster_per_group" : true
}
"automatic_failover" : true,
}
...
"ha":
{ "cluster": "PRIMARY" }
· On UI 1, restart the Apache Tomcat service:
systemctl restart apache-tomcat
· Install, configure and start HA Proxy on UI 1 to connect to the Percona XtraDB Cluster.
Install UI secondary
1. Install Cisco Crosswork Situation Manager components on the UI secondary server.
On UI 2 install the following Cisco Crosswork Situation Manager components:
VERSION=8.0.0.1; yum -y install moogsoft-common-${VERSION} \
moogsoft-integrations-ui-${VERSION} \
moogsoft-ui-${VERSION} \
moogsoft-utils-${VERSION}
Edit the ~/.bashrc file to contain the following lines:
export MOOGSOFT_HOME=/usr/share/moogsoft
export APPSERVER_HOME=/usr/share/apache-tomcat
export JAVA_HOME=/usr/java/latest
export PATH=$PATH:$MOOGSOFT_HOME/bin:$MOOGSOFT_HOME/bin/utils
Source the .bashrc file
source ~/.bashrc
1. Initialize the UI stack. Run the initialization script moog_init_ui.sh on UI 2 to initialize the UI stack. Substitute the name of your RabbitMQ zone and the Core 2 server hostname:
moog_init_ui.sh -twfz <zone> -c <Core 2 server hostname>:15672 -m <Core 2 server hostname>:5672 -s <Core 2 server hostname>:9200 -d <Core 2 server hostname>:3309 -n
2. Uncomment and edit the servlets settings on UI 2 in the file $MOOGSOFT_HOME/config/servlets.conf. Note the importance of the initial comma.
Caution
The secondary server group must be different to the primary server group.
,ha :
{
cluster: "secondary",
instance: "servlets",
group: "servlets_secondary",
start_as_passive: false
}
3. On UI 2, edit $MOOGSOFT_HOME/config/system.conf and set the following properties. Substitute the name of your RabbitMQ zone, the server hostnames, and the cluster names.
"mooms" :
{
...
"zone" : "<zone>",
"brokers" : [
{"host" : "<Core 1 server hostname>", "port" : 5672},
{"host" : "<Core 2 server hostname>", "port" : 5672},
{"host" : "<Redundancy server hostname>", "port" : 5672}
],
...
"cache_on_failure" : true,
...
"search" :
{
...
"nodes" : [
{"host" : "<Core 1 server hostname>", "port" : 9200},
{"host" : "<Core 2 server hostname>", "port" : 9200},
{"host" : "<Redundancy server hostname>", "port" : 9200}
]
...
"failover" :
{
"persist_state" : true,
"hazelcast" :
{
"hosts" : ["<Core 1 server hostname>","<Core 2 server hostname>"],
"cluster_per_group" : true
}
"automatic_failover" : true,
}
...
"ha":
{ "cluster": "SECONDARY" }
4. On UI 2, restart the Apache Tomcat service:
systemctl restart apache-tomcat
5. Install, configure and start HA Proxy on UI 2 to connect to the Percona XtraDB Cluster .
Configure the UI load balancer
A user session needs to be served from the same UI stack, ie. they need to stay connected to the same UI server for the duration of their session, or until that UI server becomes unavailable (in which case the load balancer will redirect the user to the secondary). This is because requests are routed via moogsvr and data is received from moogpoller (web sockets).
Configure the UI load balancer with the following attributes:
1. Since both UI stacks are active you can choose to implement the round robin or least connection balancing method.
2. Route web traffic only to the Nginx behind which there is an active UI. The decision for this is based on a moogsvr servlet check via the ‘hastatus’ Tomcat endpoint. It will return a 204 if the UI stack is UP. It does not however report on the health of other roles, ie. Core (Moogfarmd, RabbitMQ and Elasticsearch clusters), Database (Percona Cluster), LAMs.
3. Sticky sessions are preferred. Traffic needs to be routed to the same backend server based on the same MOOGSESS cookie.
You can send the following example cURL command from the command line to check moogsvr servlet status:
curl -k https://server1/moogsvr/hastatus -v
Set Up HA Proxy for the Database Role
This topic tells you how to install and configure HA Proxy on a Cisco Crosswork Situation Manager server to connect to a remote Percona XtraDB cluster.
Percona XtraDB Cluster must be run as a 3-node (minimum) cluster distributed across the database roles.
Before you begin
Before you install and configure HA Proxy, you must configure Percona XtraDB as described in Set Up the Database for HA.
You must also set up the Core and UI nodes before installing and configuring HA Proxy on these nodes. See the following documentation for more information:
· Set Up the Core Role for HA.
· Set Up the User Interface Role for HA.
Once you have set up the Core and UI nodes, you install and configure HA Proxy on these nodes:

Refer to the Distributed HA system Firewall for more information on connectivity within a fully distributed HA architecture.
Install and configure HA Proxy
You install and configure HA Proxy on the following Core and UI nodes:
1. Core 1 and Core 2: Core primary and secondary.
2. UI 1 and UI 2: UI primary and secondary.
Complete the following steps for the Core and UI primary and secondary servers:
1. Install and configure HA Proxy to listen on 0.0.0.0:3309 and route connections to one of three Percona XtraDB nodes. Use the Percona XtraDB server IP addresses instead of hostnames to reduce network latency.
$MOOGSOFT_HOME/bin/utils/haproxy_installer.sh -l 3309 -c -i <DB 1 server IP address>:3306,<DB 2 server IP address >:3306,<DB 3 server IP address>:3306
See Set up the database for HA for more information.
2. Restart the running services that use Percona XtraDB on the primary and secondary servers to allow those services to connect on 3309:
a. Moogfarmd on the Core servers.
b. Apache Tomcat on the UI servers.
c. Run the following script to confirm successful installation:
$MOOGSOFT_HOME/bin/utils/check_haproxy_connections.sh
If successful, you see a script output similar to the following example:
HAProxy Connection Counts
Frontend:
0.0.0.0:3309 : 27
Backend:
mysql_node_1 172.31.82.211:3306 : 27
mysql_node_2 172.31.82.133:3306 : 0
mysql_node_3 172.31.85.42:3306 : 0
Set Up the Redundancy Server Role
In Cisco Crosswork Situation Manager HA architecture, both RabbitMQ and ElasticSearch run as three-node clusters. The three-node clusters prevent issues with ambiguous data state, such as a "split-brain".
RabbitMQ is the Message Bus used by Cisco Crosswork Situation Manager. Elasticsearch delivers the search functionality.
The three nodes are distributed across the two Core roles and the redundancy server.
HA architecture
In our distributed HA installation, the RabbitMQ and Elasticsearch components are installed on the Core 1, Core 2 and Redundancy servers.

1. Core 1: RabbitMQ Node 1, Elasticsearch Node 1
2. Core 2: RabbitMQ Node 2, Elasticsearch Node 2
3. Redundancy server: RabbitMQ Node 3, Elasticsearch Node 3
Refer to the Distributed HA system Firewall for more information on connectivity within a fully distributed HA architecture.
Install Redundancy server
1. Install the Cisco Crosswork Situation Manager components on the Redundancy server.
On the Redundancy server install the following Cisco Crosswork Situation Manager components:
VERSION=8.0.0.1; yum -y install moogsoft-common-${VERSION} \
moogsoft-mooms-${VERSION} \
moogsoft-search-${VERSION} \
moogsoft-utils-${VERSION}
Edit the ~/.bashrc file to contain the following lines:
export MOOGSOFT_HOME=/usr/share/moogsoft
export APPSERVER_HOME=/usr/share/apache-tomcat
export JAVA_HOME=/usr/java/latest
export PATH=$PATH:$MOOGSOFT_HOME/bin:$MOOGSOFT_HOME/bin/utils
Source the .bashrc file:
source ~/.bashrc
1. Initialize RabbitMQ cluster node 3 on the Redundancy server and join the cluster.
— On the Redundancy server initialise RabbitMQ. Use the same zone name as Core 1 and Core 2:
moog_init_mooms.sh -pz <zone>
— The erlang cookies must be the same for all RabbitMQ nodes. Replace the erlang cookie on the Redundancy server with the Core 1 erlang cookie located at /var/lib/rabbitmq/.erlang.cookie. Make the Redundancy server cookie read-only:
chmod 400 /var/lib/rabbitmq/.erlang.cookie
You may need to change the file permissions on the Redundancy server erlang cookie first to allow this file to be overwritten. For example:
chmod 406 /var/lib/rabbitmq/.erlang.cookie
— Restart the rabbitmq-server service and join the cluster. Substitute the Core 1 server short hostname:
systemctl restart rabbitmq-server
rabbitmqctl stop_app
rabbitmqctl join_cluster rabbit@<Core 1 server short hostname>
rabbitmqctl start_app
The short hostname is the full hostname excluding the DNS domain name. For example, if the hostname is ip-172-31-82-78.ec2.internal, the short hostname is ip-172-31-82-78. To find out the short hostname, run rabbitmqctl cluster_status on Core 1.
— Apply the HA mirrored queues policy. Use the same zone name as Core 1:
rabbitmqctl set_policy -p <zone> ha-all ".+\.HA" '{"ha-mode":"all"}'
— Run rabbitmqctl cluster_status to verify the cluster status and queue policy. Example output is as follows
Cluster status of node rabbit@ldev02 ...
[{nodes,[{disc,[rabbit@ldev01,rabbit@ldev02]}]},
{running_nodes,[rabbit@ldev01,rabbit@ldev02]},
{cluster_name,<<"rabbit@ldev02">>},
{partitions,[]},
{alarms,[{rabbit@ldev01,[]},{rabbit@ldev02,[]}]}]
[root@ldev02 rabbitmq]# rabbitmqctl -p MOOG list_policies
Listing policies for vhost "MOOG" ...
MOOG ha-all .+\.HA all {"ha-mode":"all"} 0
2. Initialise, configure and start Elasticsearch cluster node 3 on the Redundancy server.
a. Initialize Elasticsearch on the Redundancy server:
moog_init_search.sh
b. Uncomment and edit the properties of the /etc/elasticsearch/elasticsearch.yml file on the Redundancy server as follows:
cluster.name: aiops
node.name: <Redundancy server hostname>
...
network.host: 0.0.0.0
http.port: 9200
discovery.zen.ping.unicast.hosts: [ "<Core 1 hostname>","<Core 2 hostname>","<Redundancy server hostname>"]
discovery.zen.minimum_master_nodes: 1
gateway.recover_after_nodes: 1
node.master: true
c. Restart Elasticsearch on the Core 1, Core 2 and Redundancy servers:
systemctl restart elasticsearch
3. Verify that the Elasticsearch nodes are working correctly:
curl -X GET "localhost:9200/_cat/health?v&pretty"
Example cluster health status:
epoch timestamp cluster status
node.total node.data shards pri relo init
unassign pending_tasks
max_task_wait_time
active_shards_percent
1580490422 17:07:02 aiops green 3 3 0 0 0 0 0 0 - 100.0%
Elasticsearch Encryption
You can enable password authentication on Elasticsearch by editing the $MOOGSOFT_HOME/config/system.conf configuration file. You can use either an unencrypted password or an encrypted password, but you cannot use both.
You should use an encrypted password in the configuration file if you do not want users with configuration access to be able to access integrated systems.
Enable password authentication
To enable unencrypted password authentication on Elasticsearch, set the following properties in the system.conf file:
"search":
{
...
“username” : <username>,
“password” : <password>,
...
}
To enable encrypted password authentication on Elasticsearch, set the following properties in the system.conf file:
"search":
{
...
“username” : <username>,
“encrypted_password” : <encrypted password>
...
}
Initialize Elasticsearch
To initialize Elasticsearch with password authentication, run:
moog_init_search.sh -a username:password
or:
moog_init_search.sh --auth username:password
If you run moog_init_search without the -a/--auth parameters, you will not enable password authentication in Elasticsearch.
See Moog Encryptor for more information on how to encrypt passwords stored in the system.conf file.
You can also manually add authentication to the Elasticsearch configuration. You should do this if you have your own local Elasticsearch installation. See the Elasticsearch documentation on configuring security for more information.
Install LAMS (On-premise)
This topic describes how to install LAMs in a distributed HA system where all components in the HA architecture are on-premise.
In HA architecture, LAM 1 and LAM 2 run in an active / passive mode for a HA polling pair, and in active / active mode for a HA receiving pair.
HA architecture
In our distributed HA installation, the LAM components are installed on the LAM 1 and LAM 2 servers:

Refer to the Distributed HA system Firewall for more information on connectivity within a fully distributed HA architecture.
Install LAM 1
Follow these instructions to install Cisco Crosswork Situation Manager on the LAM 1 server.
1. On LAM 1 install the following Cisco Crosswork Situation Manager components:
yum -y install moogsoft-common-${VERSION}* \
moogsoft-integrations-${VERSION}* \
moogsoft-utils-${VERSION}*
Edit your ~/.bashrc file to contain the following lines:
export MOOGSOFT_HOME=/usr/share/moogsoft
export APPSERVER_HOME=/usr/share/apache-tomcat
export JAVA_HOME=/usr/java/latest
export PATH=$PATH:$MOOGSOFT_HOME/bin:$MOOGSOFT_HOME/bin/utils
Source the ~/.bashrc file:
source ~/.bashrc
2. On LAM 1, edit $MOOGSOFT_HOME/config/system.conf and set the following properties. Substitute the name of your RabbitMQ zone, the server hostnames, and the cluster names:
"mooms" :
{
...
"zone" : "<zone>",
"brokers" : [
{"host" : "<Core 1 server hostname>", "port" : 5672},
{"host" : "<Core 2 server hostname>", "port" : 5672},
{"host" : "<Redundancy server hostname>", "port" : 5672}
],
...
"cache_on_failure" : true,
...
"search" :
{
...
"nodes" : [
{"host" : "<Core 1 server hostname>", "port" : 9200},
{"host" : "<Core 2 server hostname>", "port" : 9200},
{"host" : "<Redundancy server hostname>", "port" : 9200}
]
...
"failover" :
{
"persist_state" : true,
"hazelcast" :
{
"hosts" : ["<Core 1 server hostname>","<Core 2 server hostname>"],
"cluster_per_group" : true
}
"automatic_failover" : true,
}
...
"ha":
{ "cluster": "PRIMARY" }
Install LAM 2
Follow these instructions to install Cisco Crosswork Situation Manager on the LAM 2 server.
· On LAM 2 install the following Cisco Crosswork Situation Manager components:
yum -y install moogsoft-common-7.3* \
moogsoft-integrations-7.3* \
moogsoft-utils-7.3*
Add the following code to the ~/.bashrc file:
export MOOGSOFT_HOME=/usr/share/moogsoft
export APPSERVER_HOME=/usr/share/apache-tomcat
export JAVA_HOME=/usr/java/latest
export PATH=$PATH:$MOOGSOFT_HOME/bin:$MOOGSOFT_HOME/bin/utils
Source the ~/.bashrc file:
source ~/.bashrc
· On LAM 2, edit $MOOGSOFT_HOME/config/system.conf and set the following properties. Substitute the name of your RabbitMQ zone, the server hostnames, and the cluster names:
"mooms" :
{
...
"zone" : "<zone>",
"brokers" : [
{"host" : "<Core 2 server hostname>", "port" : 5672},
{"host" : "<Core 1 server hostname>", "port" : 5672},
{"host" : "<Redundancy server hostname>", "port" : 5672}
],
...
"cache_on_failure" : true,
...
"search" :
{
...
"nodes" : [
{"host" : "<Core 2 server hostname>", "port" : 9200},
{"host" : "<Core 1 server hostname>", "port" : 9200},
{"host" : "<Redundancy server hostname>", "port" : 9200}
]
...
"failover" :
{
"persist_state" : true,
"hazelcast" :
{
"hosts" : ["<Core 2 server hostname>","<Core 1 server hostname>"],
"cluster_per_group" : true
}
"automatic_failover" : true,
}
...
"ha":
{ "cluster": "SECONDARY" }
Configure a new backend LAM integration as HA on LAM 1 and LAM 2
Follow the instructions in Set Up LAMs for HA.
Install LAMs (SaaS)
This topic describes how to install LAMs in a distributed HA system in a SaaS version of Cisco Crosswork Situation Manager. This is a hybrid installation. The core processing is located in the cloud, and the LAMs and event sources are on-premise.
You must enable either Cisco Bridge or Enable WebSockets LAMs before you can use the LAMs to enable event delivery:
· Cisco Bridge uses a store and forward architecture to push events and other messages from a local RabbitMQ cluster to the Message Bus. Cisco recommends that you use Cisco Bridge in production environments.
· WebSockets LAMs enables LAMs to communicate with Cisco Crosswork Situation Manager using WebSockets instead of RabbitMQ or Cisco Crosswork Situation Manager Bridge. Cisco recommends that you use WebSockets LAMs in non-production environments only.
In HA architecture, LAM 1 and LAM 2 run in an active / passive mode for a HA polling pair, and in active / active mode for a HA receiving pair.
HA architecture
In our distributed HA installation, the LAM components are installed on the LAM 1 and LAM 2 servers:

Refer to the Distributed HA system Firewall for more information on connectivity within a fully distributed HA architecture.
Install LAM 1
Follow these instructions to install Cisco Crosswork Situation Manager on the LAM 1 server.
· Install Cisco Crosswork Situation Manager components on the LAM 1 server.
On LAM 1 install the following Cisco Crosswork Situation Manager components:
yum -y install moogsoft-common-${VERSION}* \
moogsoft-db-${VERSION}* \
moogsoft-mooms-${VERSION}*
moogsoft-integrations-${VERSION}* \
moogsoft-utils-${VERSION}*
Edit your ~/.bashrc file to contain the following lines:
export MOOGSOFT_HOME=/usr/share/moogsoft
export APPSERVER_HOME=/usr/share/apache-tomcat
export JAVA_HOME=/usr/java/latest
export PATH=$PATH:$MOOGSOFT_HOME/bin:$MOOGSOFT_HOME/bin/utils
Source the ~/.bashrc file:
source ~/.bashrc
· Initialize the local Cisco Crosswork Situation Manager RabbitMQ cluster node on the LAM 1 server. Substitute a value into <zone> that is different from the value chosen for the main RabbitMQ cluster.
moog_init_mooms.sh -pz <zone>
· On LAM 1, edit $MOOGSOFT_HOME/config/system.conf and set the following properties. Substitute the name of your RabbitMQ zone and the LAM 1 server hostname. Set automatic failover to true and the cluster name to PRIMARY:
"mooms" :
{
...
"zone" : "<zone>",
"brokers" : [
{"host" : "<LAM 1 server hostname>", "port" : 5672},
],
...
"failover" :
...
"automatic_failover" : true,
}
...
"ha":
{ "cluster": "PRIMARY" }
Install LAM 2
Follow these instructions to install Cisco Crosswork Situation Manager on the LAM 1 server.
· On LAM 2 install the following Cisco Crosswork Situation Manager components:
yum -y install moogsoft-common-${VERSION}* \
moogsoft-mooms-${VERSION}*
moogsoft-integrations-${VERSION}* \
moogsoft-utils-${VERSION}*
Edit your ~/.bashrc file to contain the following lines:
export MOOGSOFT_HOME=/usr/share/moogsoft
export APPSERVER_HOME=/usr/share/apache-tomcat
export JAVA_HOME=/usr/java/latest
export PATH=$PATH:$MOOGSOFT_HOME/bin:$MOOGSOFT_HOME/bin/utils
Source the ~/.bashrc file:
source ~/.bashrc
· Initialize the local Cisco Crosswork Situation Manager RabbitMQ cluster node on the LAM 2 server. Use the same zone that you specified for LAM 1.
moog_init_mooms.sh -pz <zone>
· On LAM 2, edit $MOOGSOFT_HOME/config/system.conf and set the following properties. Substitute the name of your RabbitMQ zone and the LAM 2 server hostname. Set automatic failover to true and the cluster name to SECONDARY:
"mooms" :
{
...
"zone" : "<zone>",
"brokers" : [
{"host" : "<LAM 2 server hostname>", "port" : 5672},
],
...
"failover" :
...
"automatic_failover" : true,
}
...
"ha":
{ "cluster": "SECONDARY" }
Enable event delivery
You must set up either Cisco Bridge or WebSockets LAMs to enable event delivery:
· See Cisco Bridge for information on how to enable Cisco Bridge.
· See Enable WebSockets LAMs for information on how to enable WebSockets LAM.
Set up a backend LAM HA configuration on LAM 1 and LAM 2
See Set Up LAMs for HA for instructions.
Cisco Bridge
Cisco Bridge uses a store and forward architecture to push events and other messages from a local RabbitMQ cluster to the Message Bus.
The connection to the Message Bus is through a WebSocket connection to the Integrations Controller. The Integrations Controller publishes the events directly to the Message Bus. The following diagram shows this process.

Cisco Bridge offers the following advantages:
· You do not have to open a port for local RabbitMQ clusters or the Message Bus.
· You do not need a database.
· You will have an outbound HTTP connection with optional proxy support.
· Events will persist in local RabbitMQ clusters even if the connection to the Message Bus is disrupted.
· If you enable Cisco Bridge wherever a server has access to a local RabbitMQ cluster, this increases redundancy if a bridge is killed or loses connection to the local RabbitMQ cluster.
· Connection between RabbitMQ and the Message Bus is bi-directional. This means that in a HA installation:
— You can send ha_cntl messages to your LAMs on a remote LAM server. This means that using the UI stack, you can query your remote LAMs’ status, and activate or deactivate your remote LAMs.
— Your remote LAMs follow automatic failover across different LAM servers within the same group. You must enable automatic failover in each LAM server's system.conf for this to take effect.
Before you begin
Before you enable Cisco Bridge, verify the following:
· You are a SaaS user that needs on-premise data ingestion using LAMs instead of a UI integration.
· You have a SaaS production environment that requires event delivery guarantee.
Create a WebSockets authentication toke
You create a WebSockets authentication token to use when enabling either WebSockets LAM or Moogsoft Bridge.
You must have the grazer_login and manage_integrations permissions to create a WebSocket authentication token. The Grazer role has these permissions with a new install of Cisco Crosswork Situation Manager v8.x.
To create a WebSockets authentication token, run the following:
curl -u <username:password> -X POST 'https://<instance>/integrations/api/v1/auth/integrations'
Substitute the username and password of the user with the Grazer role and manage_integrations permission.
See Role Permissions for more information.
Install the Cisco Crosswork Situation Manager RPM or TGZ files on the on-premise LAM server that has access to the local RabbitMQ cluster:
VERSION=8.0.0; yum -y install moogsoft-integrations-${VERSION}* \
moogsoft-common-${VERSION}* \
moogsoft-utils-${VERSION}* \
moogsoft-mooms-${VERSION}*
Edit the Cisco Bridge configuration file
Edit the Cisco Bridge configuration file located at $MOOGSOFT_HOME/config/moogsoft_bridge.conf:
{
"group": <group>,
"webhost": <base URL>,
"websocket_token": <WebSockets token>,
"proxy": {
"host" : <Proxy host>,
"port" : <Proxy port>,
"username": <Username of proxy for basic authentication>,
"password": <Password for the proxy for basic authentication>
}
}
Substitute in the group, webhost, websocket_token and proxy values:
· group: A unique identifier for a local RabbitMQ cluster.
You should set up multiple bridges for each local RabbitMQ cluster. This ensures that the cronjob will be able to automatically replace disconnected bridges.
If Cisco Crosswork Situation Manager detects a missing bridge, then Cisco Crosswork Situation Manager will raise a critical event. If the bridge reappears, Cisco Crosswork Situation Manager clears the critical event.
· webhost: Your base URL.
· websocket_token: Your WebSocket token.
· proxy: An optional object for HTTP communication. The proxy object contains the following parameters:
— host: Host of the proxy (mandatory).
— port: Port of the proxy (mandatory).
— username: Username of proxy for basic authentication (optional).
— password: Password for the proxy (mandatory if username is used).
Start the Cisco Bridge process
Run the LAMs initialization utility moog_init_lams.sh --bridge to start the Cisco Bridge as a background process.
Running this command also creates a crontab to restart the bridge if it stops.
If all bridges in a group stop, Cisco Crosswork Situation Manager creates an event.
Cisco Bridge outputs logs to:
1. /var/log/moogsoft/moogsoft_bridge.log for root users.
2. $MOOGSOFT_HOME/log/moogsoft_bridge.log for non-root users.
See Configure Logging for more information on logging.
You can configure LAMs to communicate with Cisco Crosswork Situation Manager using WebSockets instead of RabbitMQ or Cisco Crosswork Situation Manager Bridge.
If you are a SaaS customer and cannot use the UI for integrations with an on-premise data source, you should use WebSockets LAMs.
Cisco recommends that you use WebSockets LAMs in non-production environments only, and use Cisco Bridge in production environments.
If you use WebSockets LAMs:
· You do not have to open a port for local RabbitMQ clusters.
· You have an outbound HTTP connection with optional proxy support.
You can enable WebSockets LAMs in any of your environments where you have installed the Cisco Crosswork Situation Manager RPM or tarball files.
If you enable WebSockets LAMs in an environment, all LAMs in that environment use WebSockets. You cannot enable multiple communication methods in a single environment.
Before you enable WebSockets LAMs, you must create a WebSockets authentication token.
Create a WebSockets authentication token
You create a WebSockets authentication token to use when enabling either WebSockets LAM or Moogsoft Bridge.
You must have the grazer_login and manage_integrations permissions to create a WebSocket authentication token. The Grazer role has these permissions with a new install of Cisco Crosswork Situation Manager v8.x.
To create a WebSockets authentication token, run the following:
curl -u <username:password> -X POST 'https://<instance>/integrations/api/v1/auth/integrations'
Substitute the username and password of the user with the Grazer role and manage_integrations permission.
See Role Permissions for more information.
To enable WebSockets LAMs, edit the integrations configuration file located at $MOOGSOFT_HOME/config/integrations.conf.
Substitute in your base URL and WebSockets authentication token.
{
"controller_url":<Base URL>,
"Websocket_token":<WebSockets authentication token>
}
You can optionally configure a proxy object for LAM HTTP communication. The proxy object contains the following parameters:
· host: Host of the proxy (mandatory).
· port: Port of the proxy (mandatory).
· username: Username of proxy for basic authentication (optional).
· password: Password for the proxy (mandatory if username is used).
The following example $MOOGSOFT_HOME/config/integrations.conf file contains a proxy object:
{
"controller_url":"https://example.moogsoft.com"
"Websocket_token":"awkdnawdnawidawk123",
"proxy": {
"host" :"host",
"port" :8080,
"username":"user",
"password":"password"
}
}
Restart or start the LAMs to finish enabling the WebSockets LAMs.
Set Up LAMs for HA
To configure a new backend LAM integration for HA on LAM 1 and LAM 2:
· Make a copy of the corresponding LAM configuration file and rename it accordingly.
· Make a copy of the corresponding LAMbot LAM file and rename it accordingly.
· If applicable, amend the LAM configuration file to point to the LAMBot file (under the Presend section).
· Create the service script pointing to the configuration file.
· Configure the ha section of the configuration file according to the type of LAM and its corresponding HA setup.
Configure a Polling LAM for HA
To configure a polling LAM for HA, you must set the LAMs as active / passive, and therefore in the same Cisco Crosswork Situation Manager process group. If the system detects an issue with the active LAM, the passive instance will automatically take over.

To enable automatic failover:
· On LAM 1 and LAM 2, edit the $MOOGSOFT_HOME/config/system.conf file and set the automatic_failover property to true:
# Allow a passive process to automatically become active if
# no other active processes are detected in the same process group
"automatic_failover" : true,
· Restart the polling LAMs to finish enabling automatic failover.
Configure a Receiving LAM for HA
For a HA configuration, the receiving LAMs must always run as active / active, meaning a load balancer (of your choice) places them in different Cisco Crosswork Situation Manager process groups.

There are two methods you can use to implement your load balancer: chained failover or multiplexing (which sends to both active receiving LAMs.
If you choose to implement using multiplexing, ensure the following:
· The duplicate_event_source parameter in the LAM config is set to true. The parameter lets Moogfarmd know to silently drop any event duplicates arriving within a configurable period.
· The configuration files for both active Receiving LAMs, running as an HA pair, are identical, apart from their ha sections. This ensures that Moogfarmd is able to detect the event duplicates correctly.
The following example cURL command is a call from the command line to check on the status of the LAM instance:
[root@server1 moogsoft]# curl -X GET "http://server9:8888"
{"success":true,"message":"Instance is active","statusCode":0}
Validate the Installation
Follow the steps below to validate that the installation was successful.
Elasticsearch requires Java11. Java 11 is included with the installation of the RPM packages as a dependency.
If Elasticsearch fails to start due to an incorrect Java/JDK version, follow these steps.
· Run the following command to configure the system to use the new Java version:
alternatives --config java
This command prompts you to select which 'java' should be in the system PATH. At the prompt, type the number which corresponds with the Java 11 installation. For example, if the prompt includes:
Selection Command
-----------------------------------------------
*+ 1 java-8-openjdk.x86_64 (/usr/lib/jvm/java-8-openjdk-8.1.0.7-0.el7_6.x86_64/bin/java)
+ 2 java-11-openjdk.x86_64 (/usr/lib/jvm/java-11-openjdk-11.0.5.10-0.el7_7.x86_64/bin/java
Press 2 and hit Enter. To confirm the change has taken effect, run the following command:
java -version
The output should show the latest version of openjdk. This version will be at least 11.0.5.
· Restart Elasticsearch:
service elasticsearch restart
Perform the following steps to ensure that Cisco Crosswork Situation Manager v7.3 has been successfully installed or upgraded:
· Check that the UI login page displays "Version 8.x" at the bottom.
· Log into the UI with username "admin" and password "admin". You should change the default username and password when you have logged in for the first time.
· Select the Help icon (question mark) > Support Information. Check that the System Information shows "Version 8.x" and the correct schema upgrade history if you have performed an upgrade.
Note
If you have already completed this step previously (as part of this upgrade process) on the current host, you can skip this step.
Run the Install Validator utility to ensure that all Cisco Crosswork Situation Manager files were deployed correctly in $MOOGSOFT_HOME:
$MOOGSOFT_HOME/bin/utils/moog_install_validator.sh
Run this utility to confirm that all Apache Tomcat files were deployed correctly in $MOOGSOFT_HOME:
$MOOGSOFT_HOME/bin/utils/tomcat_install_validator.sh
If there are webapp differences, run the following command to extract the webapps with the correct files:
$MOOGSOFT_HOME/bin/utils/moog_init_ui.sh -w
Note
If you have already completed this step previously (as part of this upgrade process) on the current host, you can skip this step.
Run the Database Validator utility to validate the database schema:
$MOOGSOFT_HOME/bin/utils/moog_db_validator.sh
Note
Some schema differences are valid, for example those related to custom_info (new columns added etc).
An additional schema upgrade step is required if you are upgrading from v7.0.x, v7.1.x, or v7.2.x.
This additional step is documented on the Post-upgrade steps page.
Until you have complete this step, you should expect to see the following differences in the output of the Database Validator utility:
Differences found in 'historic_moogdb' tables:
41,49c41,43
< primary key (`alert_id`),
< unique key `idx_signature` (`signature`),
< key `idx_first_event_time` (`first_event_time`),
< key `idx_state_last` (`state`,`last_state_change`),
< key `idx_severity` (`severity`,`state`),
< key `idx_agent` (`agent`(12)),
< key `idx_source` (`source`(12)),
< key `idx_type` (`type`(12)),
< key `idx_manager` (`manager`(12))
---
> primary key (`signature`),
> key `alert_id` (`alert_id`),
> key `first_event_time` (`first_event_time`,`alert_id`)
93,94c87
< key `timestamp` (`timestamp`,`type`),
< key `idx_type_time` (`type`,`timestamp`)
---
> key `timestamp` (`timestamp`,`type`)
241,242c234
< key `sig_id` (`sig_id`,`action_code`,`timestamp`),
< key `idx_action_sig` (`action_code`,`sig_id`)
---
> key `sig_id` (`sig_id`,`action_code`,`timestamp`)
The differences above will not have any functional impact, but you must complete the rest of the upgrade to ensure the system is performant and the schema is ready for future upgrades.
If you have performed an upgrade and you see errors similar to the following:
Differences found in 'moogdb' tables:
57a58
> key 'filter_id' ('filter_id'),
194a196
> key 'enrichment_static_mappings_ibfk_1' ('eid'),
1196a1199
> key 'sig_id' ('sig_id'),
1325a1329
> key 'filter_id' ('filter_id'),
Run the following commands to resolve these index-related problems:
mysql moogdb -u root -e "alter table alert_filters_access drop key filter_id"
mysql moogdb -u root -e "alter table situation_filters_access drop key filter_id"
mysql moogdb -u root -e "alter table enrichment_static_mappings drop key enrichment_static_mappings_ibfk_1"
mysql moogdb -u root -e "alter table sig_stats_cache drop key sig_id"
Validate a high availability installation
Follow these instructions to validate a high availability (HA) installation:
· Run the Apache Tomcat install validator utility on any UI server where apache-tomcat is installed and running. In a standard HA installation, apache-tomcat is running on the UI 1 and UI 2 servers.
See Set Up the User Interface Role for HA for more information.
· For a non-root deployment of Cisco Crosswork Situation Manager, run the database validator utility once on any server.
For an RPM deployment, run the utility on the server with the moogsoft-db package installed.
See Set Up the Database for HA for more information.
· Run the install validator utility on any server that has a running Cisco Crosswork Situation Manager component.
· Run the ha_cntl utility on all HA servers before data is ingested into the system to make sure all expected HA components are running successfully.
Validate the database settings
When you have finished installing Cisco Crosswork Situation Manager, you should tune and validate your database settings. The appropriate settings for your database will vary depending on your system, deployment, database type and other factors. This topic provides general guidance on the following scenarios:
· Scenario 1: You are setting up a production environment with a Percona XtraDB Cluster and have used the install_percona_nodes script to create the cluster.
· Scenario 2: You are setting up a production environment with a Percona XtraDB Cluster, but have not used the install_percona_nodes script to create the cluster.
· Scenario 3: You are setting up a non-production or QA environment with MySQL Community.
Scenario 1
In the install_percona_nodes script, the Percona nodes are deployed with the following my.cnf file:
[mysqld]
# GENERAL #
basedir = /usr/
user = mysql
default-storage-engine = InnoDB
socket = /var/run/mysqld/mysqld.sock
pid-file = /var/run/mysqld/mysqld.pid
port = 3306
# MyISAM #
key-buffer-size = 32M
myisam-recover-options = FORCE,BACKUP
# SAFETY #
max-allowed-packet = 128M
max-connect-errors = 1000000
# DATA STORAGE #
datadir = /var/lib/mysql/
# CACHES AND LIMITS #
tmp-table-size = 32M
max-heap-table-size = 32M
query-cache-type = 0
query-cache-size = 0
max-connections = 500
thread-cache-size = 128
open-files-limit = 65535
table-definition-cache = 1024
table-open-cache = 8000
max_prepared_stmt_count = 1048576
group_concat_max_len = 1048576
# INNODB #
innodb-flush-method = O_DIRECT
innodb-log-files-in-group = 2
innodb-log-file-size = <VARIABLE>
innodb-flush-log-at-trx-commit = 2
innodb-file-per-table = 1
innodb-buffer-pool-size = <VARIABLE>
innodb_buffer_pool_instances = <VARIABLE>
innodb_autoinc_lock_mode = 2
# LOGGING #
log-timestamps = SYSTEM
log-error = /var/log/mysql-error.log
log-queries-not-using-indexes = 0
slow-query-log-file = /var/log/mysql-slow.log
slow-query-log = 0
# REPLICATION #
binlog_format = ROW
sync_binlog = 0
# PERF #
performance_schema = ON
# Moogsoft MySQL 5.6 optimizations
default_tmp_storage_engine = MyISAM
# wsrep settings
wsrep_provider = /usr/lib64/galera3/libgalera_smm.so
wsrep_cluster_address = gcomm://
wsrep_log_conflicts
wsrep_cluster_name = pxc-cluster
wsrep_node_name = pxc-node-$(hostname)
pxc_strict_mode = ENFORCING
wsrep_sst_method = xtrabackup-v2
wsrep_sst_auth = "<VARIABLE>:<VARIABLE>"
wsrep_slave_threads = <VARIABLE>
wsrep_sync_wait = 0
wsrep_provider_options = "gcache.size=4G"
wsrep_retry_autocommit = 10
[mysqldump]
quick
quote-names
max_allowed_packet = 16M
[client]
default-character-set=utf8
port = 3306
socket = /var/run/mysqld/mysqld.sock
[mysqld_safe]
log-error=/var/log/mysqld.log
pid-file=/var/run/mysqld/mysqld.pid
socket = /var/run/mysqld/mysqld.sock
nice = 0
[mysql]
[isamchk]
If you have used the install_percona_nodes script to create the cluster, you should not need to tune your database settings.
If you do want to tune your settings, Cisco recommends that you set the following variables based on system resources:
1. innodb-buffer-pool-size: Set this to 80% of system RAM if you set the -d (dedicated) flag. Otherwise, set this to 50% of system RAM.
2. innodb_buffer_pool_instances:
a. If the buffer pool size is greater than 16 GB, set this to a number between "2" and "64" to divide the buffer pool size into chunks of approximately 8 GB in size.
b. If the buffer pool size is less than 16 GB, set this to "8".
3. innodb-log-file-size: Set this to the larger of the following two values:
a. Approximately 2% of the buffer pool size.
b. 1 GB.
4. wsrep_slave_threads = If the number of processor cores is greater than or equal to 32, set this to the number of processor cores divided by four. Otherwise, set this to "8".
Scenario 2
If you have set up a production environment with a Percona XtraDB Cluster, but have not used the install_percona_nodes script to create the cluster, you should tune your database settings in line with Scenario 1.
Scenario 3
If you have set up a non-production or QA environment with MySQL Community, you should tune your database settings by following the guidance in the default my.cnf.
The default moog_init_db script does not attempt to automatically set any of these variables. You must manually set these variables post-install.
# INNODB #
# Important: innodb-buffer-pool performance tuning
# On servers with >= 16GB RAM that run MySQL and Moog applications, consider setting
# innodb-buffer-pool-size to 50% of system RAM.
# On servers where only MySQL is running, consider setting innodb-buffer-pool-size
# to 80% of system RAM.
innodb-buffer-pool-size = 2G
# If innodb-buffer-pool-size >= 16G, then uncomment and set innodb_buffer_pool_instances
# to divide buffer pool into ~8G chunks. Otherwise leave commented to use default of 8
# e.g: innodb-buffer-pool-size=32G innodb_buffer_pool_instances=4
# e.g: innodb-buffer-pool-size=80G innodb_buffer_pool_instances=10
#innodb_buffer_pool_instances = 8
# Set innodb-log-file-size to 1G or ~2% of buffer pool size, whichever is the larger
# e.g: innodb-buffer-pool-size=64G innodb_log_file_size=1280M
innodb-log-file-size = 1G
# Set innodb-flush-log-at-trx-commit to 0 on systems where throughput is valued
# over risk of data loss in the event of a mysql crash
innodb-flush-log-at-trx-commit = 1
Install Cisco Add-ons
Cisco periodically provides updates to Cisco Crosswork Situation Manager as add-ons. Add-ons may comprise updates to the Workflow Engine, new Workflow Engine functions, integrations tiles, and other features.
This topic tells you how to install the latest version of the Cisco Add-ons. For information on the latest add-ons, see Add-ons.
If you haven't already, you need to create the Enrichment API data store to use the Enrichment API Integration. See Create the Enrichment API Data Store for instructions. If you upgraded from Cisco Crosswork Situation Manager v.7.3.0 and were using the Integrations API with Cisco Add-ons v.1.4.0 or later, you do not need to create the Enrichment API data store.
Before you begin
Before you install Cisco Add-ons:
· Verify you have SSH access to to your Cisco Crosswork Situation Manager machines. For distributed or Highly Available installations, update the add-ons on all core role machines where you run Moogfarmd and on the machines where you run the UI. See Server Roles.
· Download the latest add-ons bundle and transfer it to the machines where you are performing the update.
· Verify the credentials for the operating system user that runs Moogfarmd or the UI and perform all steps as that same user.
Download Cisco Add-ons
You can download the current add-ons (Crosswork-Situation-Manager-Addons-2.1.0.tar.gz) from Cisco eDelivery.
Install add-ons
To install add-ons, you add them to machines running Moogfarmd and the UI components. This procedure replaces existing components.
1. Create a backup of the moobots, integrations, and other add-on files on the instance. For example:
tar -czf $MOOGSOFT_HOME/addons_backup.tar.gz -C $MOOGSOFT_HOME \
bots/moobots \
config \
contrib \
etc/integrations
2. Make a copy of SimilarSigConfig.conf:
cp $MOOGSOFT_HOME/config/SimilarSigConfig.conf $MOOGSOFT_HOME
3. Extract the add-ons to $MOOGSOFT_HOME:
tar -xzhf Crosswork-Situation-Manager-Addons-2.1.0.tar.gz -C $MOOGSOFT_HOME
4. Move SimilarSigConfig.conf back into place:
mv $MOOGSOFT_HOME/SimilarSigConfig.conf $MOOGSOFT_HOME/config
5. On core role machines, restart Moogfarmd:
service moogfarmd restart
You do not need to restart Nginx or Apache Tomcat on UI machines.
Create the Enrichment API Data Store
Before you install the Enrichment API Integration for Cisco Crosswork Situation Manager, set up the data store for the API.
The add-ons includes the Enrichment API Integration that lets you store enrichment data in a database for use with the Enrichment Workflow Engine. Before you can use the integration, create the data store from one machine with access to the database as follows:
1. Extract the utilities. For example:
unzip -x $MOOGSOFT_HOME/contrib/moog_enrichment_utils.zip -d $MOOGSOFT_HOME/contrib/
2. Run the script to create the database and the enrichment user:
$MOOGSOFT_HOME/contrib/moog_enrichment_utils/bin/moog_init_enrichmentdb.sh \
-u <database root user> \
-p <optional database root user password> \
-d <database host>:<database port> \
-e <enrichment user password>
For example to initialize the moog_enrichment database on a database host named my_database_host with an enrichment user password of 'password123':
$MOOGSOFT_HOME/contrib/moog_enrichment_utils/bin/moog_init_enrichmentdb.sh \
-u root \
-d my_database_host:3306 \
-e password123
In this case, when prompted for the password, enter the root database user password.
In addition to the database script, the Add-ons include the following utilities to help you load and test enrichment data:
· moog_send_event is a node.js script that sends test events to the Enrichment API after you set up the integration. For usage information run: ./moog_send_event -h .
· moog_enrichment_util is a node.js script that loads data into the Enrichment API after you set up the integration. You can supply enrchment data in JSON, CSV, or TSV format. For usage information, run ./moog_enrichment_util -h.
· moog_enrichment_util.sh is a Bash version of the data loader. It is slower than the node.js scripts, but works on systems where you can't install node.js. For usage information, run ./moog_enrichment_util.sh -h.
After you have installed the latest add-ons and created the data store for the Enrichment API, you can install the Enrichment API Integration.
Apply Valid SSL Certificates
Cisco Crosswork Situation Manager includes a self-signed certificate by default. If you want to add your own certificates to Nginx, follow the instructions below.
A valid SSL certificate is required if you want to use Cisco Crosswork Situation Manager for Mobile on an iPhone. This is because WebSockets do not work on iOS with self-signed certificates. If a valid root CA certificate is not added, a 'Connection Error' appears at login and Cisco Crosswork Situation Manager for Mobile does not work.
For more information, see the Nginx documentation.
Add a Valid Certificate
To apply a valid certificate to Nginx, edit $MOOGSOFT_HOME/etc/cots/nginx/conf.d/moog-ssl.conf :
vi $MOOGSOFT_HOME/etc/cots/nginx/conf.d/moog-ssl.conf
Change the default self-signed certificate and key locations to point to the valid root certificate and key:
#ssl_certificate /etc/nginx/ssl/certificate.pem;
#ssl_certificate_key /etc/nginx/ssl/certificate.key;
ssl_certificate /etc/certificates/your_company_certificate.crt;
ssl_certificate_key /etc/certificates/your_company_certificate.key;
Reload Nginx with the command:
systemctl reload nginx
Configure Services to Restart
You can use Service Manager to control process startup for Cisco Crosswork Situation Manager.
The utility can keep processes associated with Cisco Crosswork Situation Manager services alive if your system fails or restarts. For every new install of Cisco Crosswork Situation Manager, a cronjob entry deployed by the Moogsoft initialization script (moog_init.sh) runs the process manager script (process_keepalive.sh) every minute. This script attempts to restart the processes of any services listed in the process manager configuration file at $MOOGSOFT_HOME/config/keep_procs_alive.conf. By default, the following services are set to restart:
1. RabbitMQ
2. MySQL
3. Nginx
4. Elasticsearch
5. Apache-Tomcat
6. Moogfarmd.
You can either use the new service_manager utility to edit the configuration file, or edit the file manually (and enter a '1' for all services you want to restart and enter a '0' for those that you want left alone). If you have a custom LAM, you can add this to the configuration file with the flag to determine the restart behavior. For example:
Customlamd=1
If your system fails or restarts, the Service Manager utility automatically starts after one minute and attempts to restart the configured processes/services up to three times. If the service does not start after three attempts, the utility disables the service restart attempts in future.
Service Manager is useful for ensuring non-core processes start and run if Cisco Crosswork Situation Manager fails or restarts. For example, you might want to ensure specific LAMs remain alive so no events are missed if your system reboots.
Configure Service Manager
You can configure Service Manager to control which services and their associated processes to start up when Cisco Crosswork Situation Manager reboots:
· Run the Service Manager:
$MOOGSOFT_HOME/bin/utils/service_manager
The default utility settings are shown as follows:
------------------------------------------------ Page [1/3] ---
# Service Manager #
---------------------------------------------------------------
Check the services that will be started and kept alive...
[x] rabbitmq
[x] mysql
[x] nginx
[x] elasticsearch
[x] apache-tomcat
[x] moog_farmd
[ ] ansibletower_lam
[ ] appdynamics_lam
[ ] aws_lam
[ ] azure_classic_lam
[ ] azure_lam
[ ] ca_spectrum_lam
[ ] datadog_client_lam
[ ] datadog_lam
[ ] dynatrace_apm_lam
[ ] dynatrace_apm_plugin_lam
[ ] dynatrace_notification_lam
[ ] dynatrace_synthetic_lam
[ ] email_lam
[ ] emc_smarts_lam
[ ] extrahop_lam
[ ] fluentd_lam
[ ] hp_nnmi_lam
[ ] hp_omi_lam
Use arrows, page up/down and ENTER to navigate
· Navigate through the list of available services using the directional arrows. There are multiple pages to scroll through.
· Press Space or Enter to add or remove services you want to restart or do not want to restart. An [ x ] appears next to any services you select.
· You can enable or disable Service Manager from restarting all services on the last page.
· Select 'Apply Changes' and press Enter to make the changes.
After you exit, the process_keepalive.sh script keeps selected services alive if Cisco Crosswork Situation Manager fails or restarts.
Service Manager Command Line Reference
You can also configure the Service Manager using command line arguments. The utility uses the following syntax:
service_manager --service=<service_name> --command=<action>
The Service Manager resides at $MOOGSOFT_HOME/bin/utils/service_manager. You can configure the utility using the following arguments:
| Argument |
Input |
Description |
| -h,--help |
- |
Displays the syntax and arguments available in Service Manager. |
| -s,--service= |
service name |
Name of the service you want to execute the Service Manager command on. Apart from the core services, these include all of the LAMs. For example: email_lam, rest_lam, trapd_lam etc. |
| -c, --command= |
enable | disable | enable_start | disable_stop |
Commands the Service Manager can execute against the specified service: enable - Enables the service auto start option. disable - Disables the service auto start option. enable_start - Starts and enables the service. disable_stop - Stops and disables the service. |
| -a, --autostart-all= |
enable | disable |
Disables or enables the auto start option for all services. |
You can only run a command against a single service at a time using the command line arguments. For example, if you wanted to enable the Service Manager to restart the Email LAM in the event of a failover:
service_manager --service=email_lam --command=enable
Disable Service Restart
There are two ways to disable the default service restart functionality.
Disable theprocess_keepalive.shcronjob by removing it from the cron table, the commands scheduled to run on your system. To edit the cron table:
crontab -e
Delete or comment out/usr/share/moogsoft/bin/utils/process_keepalive.sh 2>&1 from the file.
Alternatively, disable the Service Manager utility:
$MOOGSOFT_HOME/bin/utils/service_manager -a disable
Service Manager Logging
To check the Service Manager logs you can view:
/var/log/moogsoft/process/keepalive.log
This contains all logs relating to the Service Manager utility (service_manager) and to the process that attempts to keep the services alive (process_keepalive).
Encrypt Database Communications
You can enable SSL to encrypt communications between all Cisco Crosswork Situation Manager components and the MySQL database.
For information on creating SSL keys and certificates for MySQL, see Creating SSL and RSA Certificates and Keys using MySQL.
Establish Trust for the MySQL Certificate
To establish trust for the MySQL database certificate, create a truststore to house the root certificate for the Certificate Authority that signed the MySQL Server certificate.
1. If you upgraded from a previous version of Cisco Crosswork Situation Manager, run the following command to extract the certificate for the root CA for MySQL:
mysql_ssl_rsa_setup
The command generates new keys and writes them to the /var/lib/mysql directory.
2. Run the java keytool command to create a trust store containing the certificate for the root CA for MySQL.
keytool -import -alias mysqlServerCACert -file /var/lib/mysql/ca.pem -keystore $MOOGSOFT_HOME/etc/truststore
a. When keytool prompts you, enter a password for the keystore. You will need this password to configure Cisco Crosswork Situation Manager.
b. Answer 'yes' to "Trust this certificate."
Keytool creates a truststore at the path $MOOGSOFT_HOME/etc/truststore.
Configure Cisco Crosswork Situation Manager to use SSL for Database Communications
After you have created the truststore, edit the Cisco Crosswork Situation Manager configuration to enable SSL.
· Edit $MOOGSOFT_HOME/config/system.conf.
· Inside the MySQL property, uncomment the SSL property and the properties that comprise it. Make sure to uncomment the opening "{" and closing braces "}". For example:
,“ssl” :
{
# # The location of the SSL truststore.
# #
# # Relative pathing can be used, i.e. ‘.’ to mean current directory,
# # ‘../truststore’ or ‘../../truststore’ etc. If neither relative
# # nor absolute (using ‘/’) path is used then $MOOGSOFT_HOME is
# # prepended to it.
# # i.e. “config/truststore” becomes “$MOOGSOFT_HOME/config/truststore”
# #
# #
# # Specify the server certificate.
# #
“trustStorePath” : “etc/truststore”,
# “trustStoreEncryptedPassword” : “vQj7/yom7e5ensSEb10v2Rb/pgkaPK/4OcUlEjYNtQU=“,
“trustStorePassword” : “moogsoft”
}
· Provide the path to the truststore you created. For example:
"trustStorePath" : "etc/truststore",
· Edit the password for the truststore. For example:
"trustStorePassword" : "moogsoft"
See Moog Encryptor if you want to use an encrypted password. Uncomment trustStoreEncryptedPassword and provide the encrypted password for the value. For example:
“trustStoreEncryptedPassword” : “vQj7/yom7e5ensSEb10v2Rb/pgkaPK/4OcUlEjYNtQU=“
· Save your changes and restart the following components:
— Moogfarmd
— Apache Tomcat
— All LAMs
After you restart, all Cisco Crosswork Situation Manager components encrypt communications with the MySQL database.
Control Cisco Crosswork Situation Manager Processes
This topic describes the commands for starting, stopping or restarting individual Cisco Crosswork Situation Manager processes.
To configure process startup when Cisco Crosswork Situation Manager fails or restarts see Configure Services to Restart.
Note
When restarting all nodes in a distributed system, the node to start first is the last one that you stopped.
Dependencies
LAMs, Moogfarmd, and Apache Tomcat depend on the following system processes: MySQL RabbitMQ, Nginx, and Elasticsearch. When starting Cisco Crosswork Situation Manager processes, follow these steps:
1. Start or verify the following are started:
— MySQL
— RabbitMQ
— Nginx
— Elasticsearch
2. Start or restart LAMs, Moogfarmd, and/or Apache Tomcat.
Similarly, if you plan to stop any one of MySQL, RabbitMQ, Nginx, or Elasticsearch, stop LAMs, Moogfarmd, and Apache Tomcat first.
Init scripts for RPM installations
If you performed an RPM installation as root, use the service init script to start and stop Cisco Crosswork Situation Manager processes:
service <service-name> start|stop|restart
The service names are as follows:
· MySQL: mysql
· RabbitMQ: rabbitmq
· Nginx: nginx
· Elasticsearch: elasticsearch
· Tomcat: apache-tomcat
· Moogfarmd: moog_farmd
· For LAMs , refer to the individual LAM references for the service names.
For more information, see the documentation on managing system services for your operating system.
System Configuration
You can configure the various components of Cisco Crosswork Situation Manager using the system configuration file.
Configure your system
Edit the configuration file to control the behavior of the different components in your Cisco Crosswork Situation Manager system. You can find the file at $MOOGSOFT_HOME/config/system.conf.
See the System Configuration Reference for a full description of all properties. Some properties in the file are commented out by default. Uncomment properties to configure and enable them.
Message Bus
You can edit your Message Bus and RabbitMQ configuration in the mooms section of the file. It allows you to:
· Configure your Message Bus zones and brokers.
· Control and minimize message loss during a failure.
· Control how senders handle Message Bus failures.
· Control what happens during periods of extended Message Bus unavailability.
· Configure the SSL protocol you want to use.
· Specify the number of connections to use for each message sender pool.
For more information see the Message Bus documentation.Configure the Message Bus
Database
You can edit your database configuration in the mysql section of the file:
1. Configure your host name, database names and database credentials:
a. host: Name of your host.
b. moogdb_database_name: Name of the Moogdb database.
c. referencedb_database_name: Name of the Cisco Crosswork Situation Manager reference database.
d. intdb_database_name: Name of the Cisco Crosswork Situation Manager integrations database.
e. username:Username for the MySQL user that accesses the database.
f. encrypted_password: Encrypted password for the MySQL user.
g. password: Password for the MySQL user.
h. port: Default port that Cisco Crosswork Situation Manager uses to connect to MySQL.
2. Configure the port, deadlock retry attempts and multi-host connections:
a. maxRetries: Maximum number of retries in the event of a MySQL deadlock.
b. retryWait: Number of milliseconds to wait between each retry attempt.
c. failover_connections: Hosts and ports for the different servers that are connected to the main host.
3. Configure the SSL connections to the MySQL database:
a. trustStorePath: Path to location that stores the server certificate.
b. trustStoreEncryptedPassword: Path to location that stores your encrypted trustStore password.
c. trustStorePassword: Path to location that stores your trustStore password.
Elasticsearch
You can edit your search configuration in the search section of the file:
· Configure the Elasticsearch connection timeouts:
— connection_timeout: Length of time in milliseconds before the connection times out.
— request_timeout: Length of time in milliseconds before the request times out.
· Configure the Elasticsearch limit and nodes:
— refresh_interval: Defines how often an Elasticsearch index refreshes. A newly indexed document is not visible in search results until the next time the index refreshes. Default is 30 seconds.
— limit: Maximum number of search results that Elasticsearch returns from a search query.
— nodes: Hosts and ports for the Elasticsearch servers connected in a cluster.
Failover
You can edit failover configuration in the failover section of the file:
1. Configure persistence in the event of a failover:
— persist_state: Enable or disable the persistence of the state of all Moolets in the event of a failover.
2. Configure the Hazelcast cluster, this is Cisco Crosswork Situation Manager implementation of persistence:
— network_port: Port to connect to on each specified host.
— auto_increment: Enable for Hazelcast to attempt to the next incremental available port number if the configured port is unavailable.
— hosts: List of hosts that can participate in the cluster.
— man_center: Configures the cluster information that you can view in the Hazelcast Management Center UI.
— cluster_per_group: Enable the stateful information from each process group to persist in a dedicated Hazelcast cluster.
3. Configure failover options that apply to Moogfarmd and the LAMs:
— keepalive_interval: Time interval in seconds at which processes report their active/passive status and check statuses of other processes.
— margin: Amount of time in seconds after keepalive_intervalbefore Cisco Crosswork Situation Manager considers processes that do not report their status to be dead.
— failover_timeout: Number of seconds to wait for previously active process to become passive during a manual failover.
— automatic_failover: Allow a passive process to automatically become active if no other active processes are detected in the same process group.
— heartbeat_failover_after: Number of consecutive heartbeats that a process fails to send before Moogfarmd considers it inactive.
Process Monitor
You can edit the process monitor configuration in the process_monitor section of the file:
· Configure the heartbeat interval and delay:
— heartbeat: Interval in milliseconds between heartbeats sent by processes.
— max_heartbeat_delay: Number of milliseconds to wait before declaring heartbeat as missing.
· Configure the Moogfarmd and which processes you can control from the UI:
— group: Name of the group of processes and subcomponent processes that you want to control from the UI.
— instance: Name of the instance of Cisco Crosswork Situation Manager you want to configure.
— service_name: Name of the service you want to control.
— process_type: Type of process you want to control.
— reserved: Determines if Cisco Crosswork Situation Manager considers the process as critical in process monitoring.
Encryption
You can edit the encryption configuration in the encryption section of the file:
· encryption_key_file: Default location of the encryption key file.
High Availability
You can edit the high availability configuration in the ha section of the file.
· cluster: Default HA cluster name
Port ranges
You can edit the port range that Cisco Crosswork Situation Manager services use when they look for open ports.
port_range_min: Minimum port number in the range.
port_range_max: Maximum port number in the range.
Example
The following example shows system.conf with the default configuration and all available properties enabled:
{
"mooms": {
"zone": "",
"brokers": [{
"host": "localhost",
"port": 5672
}],
"username": "moogsoft",
"password": "m00gs0ft",
"encrypted_password": "e5uO0LY3HQJZCltG/caUnVbxVN4hImm4gIOpb4rwpF4=",
"threads": 10,
"message_persistence": false,
"message_prefetch": 100,
"max_retries": 100,
"retry_interval": 200,
"cache_on_failure": false,
"cache_ttl": 900,
"connections_per_producer_pool": 2,
"confirmation_timeout": 2000,
"ssl": {
"ssl_protocol": "TLSv1.2",
"server_cert_file": "server.pem",
"client_cert_file": "client.pem",
"client_key_file": "client.key"
}
},
"mysql": {
"host": "localhost",
"moogdb_database_name": "moogdb",
"referencedb_database_name": "moog_reference",
"intdb_database_name": "moog_intdb",
"username": "ermintrude",
"encrypted_password": "vQj7/yom7e5ensSEb10v2Rb/pgkaPK/4OcUlEjYNtQU=",
"password": "m00",
"port": 3306,
"maxRetries": 10,
"retryWait": 50,
"failover_connections": [
{
"host": "193.221.20.24",
"port": 3306
},
{
"host": "143.47.254.88",
"port": 3306
},
{
"host": "234.118.117.132",
"port": 3306
}
],
"ssl": {
"trustStorePath": "etc/truststore",
"trustStoreEncryptedPassword": "vQj7/yom7e5ensSEb10v2Rb/pgkaPK/4OcUlEjYNtQU=",
"trustStorePassword": "moogsoft"
}
},
"search": {
"connection_timeout": 1000,
"request_timeout": 10000,
"refresh_interval": 30,
"limit": 1000,
"nodes": [{
"host": "localhost",
"port": 9200
}]
},
"failover": {
"persist_state": false,
"hazelcast": {
"network_port": 5701,
"auto_increment": true,
"hosts": ["localhost"],
"man_center":
{
"enabled": false,
"host": "localhost",
"port": 8091
},
"cluster_per_group": false
},
"keepalive_interval": 5,
"margin": 10,
"failover_timeout": 10,
"automatic_failover": false,
"heartbeat_failover_after": 2
},
"process_monitor": {
"heartbeat": 10000,
"max_heartbeat_delay": 1000,
"processes": [{
"group": "moog_farmd",
"instance": "",
"service_name": "moogfarmd",
"process_type": "moog_farmd",
"reserved": true,
"subcomponents": [
"AlertBuilder",
"Default Cookbook",
"TeamsMgr",
"Housekeeper",
"AlertRulesEngine",
"SituationMgr",
"Notifier"
]},
{
"group": "servlets",
"instance": "",
"service_name": "apache-tomcat",
"process_type": "servlets",
"reserved": true,
"subcomponents": [
"moogsvr",
"moogpoller",
"toolrunner",
"situation_similarity"
]},
{
"group": "logfile_lam",
"instance": "",
"service_name": "logfilelamd",
"process_type": "LAM",
"reserved": false
},
{
"group": "rest_lam",
"instance": "",
"service_name": "restlamd",
"process_type": "LAM",
"reserved": false
},
{
"group": "socket_lam",
"instance": "",
"service_name": "socketlamd",
"process_type": "LAM",
"reserved": false
},
{
"group": "trapd_lam",
"instance": "",
"service_name": "trapdlamd",
"process_type": "LAM",
"reserved": false
},
{
"group": "rest_client_lam",
"instance": "",
"service_name": "restclientlamd",
"process_type": "LAM",
"reserved": false
}
]
},
"encryption": {
"encryption_key_file": "/location/of/.key"
},
"ha": {
"cluster": "MOO"
},
"port_range_min": 50000,
"port_range_max": 51000
}
Start and stop Moogfarmd
Restart the Moogfarmd service to activate any changes you make to the system configuration file.
The service name is moogfarmd.
See Control Moogsoft AIOps Processes for further details.
System Configuration Reference
This is a reference for the system configuration file located at $MOOGSOFT_HOME/config/system.conf. It contains the following sections and properties:
Message Bus (MooMs)
The number of connections to use for each message sender pool. For example, if a message sender pool has 20 channels and this property is set to 2, the channels are split across both connections so that each has 10 channels. To configure this property, you must manually add it to the mooms section.
| Type |
Integer |
| Required |
No |
| Default |
2 |
Name of the zone.
| Type |
String |
| Required |
No |
| Default |
N/A |
Hostname and port number of the RabbitMQ broker.
| Type |
Array |
| Required |
No |
| Default |
"host" : "localhost", "port" : 5672 |
Username of the RabbitMQ user. This needs to match the RabbitMQ broker configuration. If commented out, it uses the default "guest" user.
| Type |
String |
| Required |
No |
| Default |
guest |
Password for the RabbitMQ user. You can choose to either have a password or an encrypted password, you cannot use both.
| Type |
String |
| Required |
Yes. If you are not using encrypted password. |
| Default |
guest |
Encrypted password for the RabbitMQ user. You can choose to either have a password or an encrypted password, you cannot use both. See Moog Encryptor if you want to encrypt your password.
| Type |
String |
| Required |
Yes. If you are not using password. |
| Default |
N/A |
Number of threads a process can create in order to consume the messages from the Message Bus. If not specified, the thread limit = (Number of processors x 2) + 1. Altering this limit affects the performance of Cisco Crosswork Situation Manager processes such as Moogfarmd and Moogpoller.
If your logs indicate an issue in creating threads, Cisco advises that you increase the ulimit, the maximum number of file descriptors each process can use, for the Cisco Crosswork Situation Manager user. You can set this limit in /etc/security/limits.conf.
| Type |
Integer |
| Required |
No |
| Default |
10 |
Controls whether RabbitMQ persists important messages. Message queues are durable by default and data is replicated between nodes in High Availability mode. Setting this value to false means that replicated data is not stored to disk.
| Type |
Boolean |
| Required |
No |
| Default |
true |
Controls how many messages a process can take from the Message Bus and store in memory as a buffer for processing. This configuration allows processes to regulate message consumption which can ease backlog and memory consumption issues. The higher the number, the more messages held in the process's memory. Set to 0 for unlimited processing. To achieve high availability of messages and ensure messages are processed, the value of this should be higher than 0.
| Type |
Integer |
| Required |
No |
| Default |
0 |
Maximum number of attempts to resend a message that failed to send. Cisco Crosswork Situation Manager only attempts a retry when there is a network outage or if cache_on_failure is enabled.
You can use this in conjunction with the retry_interval property. For example, a combination of 100 maximum retries and 200 milliseconds for retry interval leads to a total of 20 seconds. The combined default value for these properties was chosen to handle the typical time for a broker failover in a clustered environment.
| Type |
Integer |
| Required |
No |
| Default |
100 |
Maximum length of time to wait in milliseconds between each attempt to retry and send a message that failed to send.
You can use this in conjunction with the max_retries property. The combined value for these properties was chosen to handle the typical time for broker failover in a clustered environment.
| Type |
Integer |
| Required |
No |
| Default |
200 |
Controls whether Cisco Crosswork Situation Manager caches the message internally and resends it if there is an initial retry failure. The system attempts to resend any cached messages in the order they were cached until the time-to-live value, defined by the cache_ttl property, is reached.
| Type |
Boolean |
| Required |
No |
| Default |
false |
Length of time in seconds that Cisco Crosswork Situation Manager keeps cached messages in the cache list before discarding them. If a message is not successfully resent within this timeframe it is still discarded.
This defaults to 900 seconds (15 minutes). Increasing this value has a direct impact on sender process memory.
| Type |
Integer |
| Required |
No |
| Default |
900 |
Length of time in milliseconds to wait for the Message Bus to confirm that a broker has received a message. Cisco does not advise changing this value.
| Type |
Integer |
| Required |
No |
| Default |
2000 |
Message Bus SSL
SSL protocol you want to use. JRE 8 supports "TLSv1.2", "TLSv1.1", "TLSv1" or "SSLv3".
| Type |
String |
| Required |
No |
| Default |
TLSv1.2 |
Path to the directory that contains the SSL certificates. You can use a relative path based upon the $MOOGSOFT_HOME directory. For example, config indicates $MOOGSOFT_HOME/config.
| Type |
String |
| Required |
No |
| Default |
server.pem |
Enables client authentication if you provide a client certificate and key file.
| Type |
String |
| Required |
No |
| Default |
client.pem |
Enables client authentication if you provide a client key file. The file must be in PKCS#8 format.
| Type |
String |
| Required |
No |
| Default |
client.key |
MySQL
Host name or server name of the server that is running MySQL.
| Type |
String |
| Required |
No |
| Default |
localhost |
Name of the primary Cisco Crosswork Situation Manager database.
| Type |
String |
| Required |
No |
| Default |
moogdb |
Name of the Cisco Crosswork Situation Manager reference database.
| Type |
String |
| Required |
No |
| Default |
moog_reference |
Name of the integrations database.
| Type |
String |
| Required |
No |
| Default |
moog_intdb |
Username of the MySQL user.
| Type |
String |
| Required |
No |
| Default |
ermintrude |
Password for the MySQL user. You can choose to either have a password or an encrypted password, you cannot use both.
| Type |
String |
| Required |
Yes, if you are not using encrypted password. |
| Default |
m00 |
Encrypted password for the MySQL user. You can choose to either have a password or an encrypted password, you cannot use both. See Moog Encryptor if you want to encrypt your password.
| Type |
String |
| Required |
Yes, if you are not using password. |
| Default |
N/A |
Port that MySQL uses.
| Type |
Integer |
| Required |
No |
| Default |
3306 |
Maximum number of MySQL query retries to attempt in the event of a deadlock.
| Type |
Integer |
| Required |
No |
| Default |
10 |
Length of time in milliseconds to wait between retry attempts.
| Type |
Integer |
| Required |
No |
| Default |
50 |
Hosts and ports for the different servers that are connected to the main host. For example, master-master, master-slave. In the event of connection failover, the connection cannot be read-only (slave).
| Type |
List |
| Required |
No |
| Default |
N/A |
MySQL SSL
Path to tNohe directory that contains the trustStore you want to use for SSL connections to your MySQL database. You can use a relative path based upon the $MOOGSOFT_HOME directory. For example, config indicates $MOOGSOFT_HOME/config/truststore.
| Type |
String |
| Required |
No |
| Default |
etc/truststore |
Your encrypted trustStore password. You can choose to either have a password or an encrypted password, you cannot use both. See Moog Encryptor if you want to encrypt your password.
| Type |
String |
| Required |
Yes, if you are not using trustStorePassword. |
| Default |
N/A |
Your trustStore password. You can choose to either have a password or an encrypted password, you cannot use both.
| Type |
String |
| Required |
No, if you are not using trustStoreEncryptedPassword. |
| Default |
moogsoft |
Length of time in milliseconds before the connection to the Elasticsearch server times out.
| Type |
Integer |
| Required |
No |
| Default |
1000 |
Hosts and ports for the different Elasticsearch servers connected in a cluster.
| Type |
Array |
| Required |
No |
| Default |
"host" : "localhost", "port" : 9200 |
Failover
Enable or disable the persistence of the state of all Moolets in the event of a failover.
| Type |
Boolean |
| Required |
No |
| Default |
false |
Port to connect to on each specified host in your Hazelcast cluster.
| Type |
Integer |
| Required |
No |
| Default |
5701 |
Enable for Hazelcast to attempt to connect to the next incremental available port number if the configured port is unavailable.
| Type |
Boolean |
| Required |
No |
| Default |
true |
List of hosts that can participate in the cluster.
| Type |
Array |
| Required |
No |
| Default |
localhost |
Specifies the cluster information that you can view in the Hazelcast Management Center UI.
| Type |
List |
| Required |
No |
| Default |
"enabled" : false, "host" : "localhost", "port" : 8091 |
Enable the stateful information from each process group to persist in a dedicated Hazelcast cluster.
| Type |
Boolean |
| Required |
No |
| Default |
false |
Moogfarmd Failover
Time interval in seconds at which processes report their active or passive status and check statuses of other processes.
| Type |
Integer |
| Required |
No |
| Default |
5 |
Amount of time in seconds after keepalive_interval before Cisco Crosswork Situation Manager considers processes that do not re_port their status to be dead.
| Type |
Integer |
| Required |
No |
| Default |
10 |
Amount of time in seconds to wait for previously active process to become passive during manual failover.
| Type |
Integer |
| Required |
No |
| Default |
10 |
Allow a passive process to automatically become active if no other active processes are detected in the same process group.
| Type |
Boolean |
| Required |
No |
| Default |
false |
Process Monitor
Interval in milliseconds between heartbeats sent by processes.
| Type |
Integer |
| Required |
Yes |
| Default |
10000 |
Number of milliseconds to wait before declaring heartbeat as missing. Defaults to 10% of the heartbeat.
| Type |
Integer |
| Required |
No |
| Default |
1000 |
Processes
Groups of processes that you want to be able to stop, start and restart from Self Monitoring in the Cisco Crosswork Situation Manager UI. For each group you can configure the following options:
Name of the process group that Cisco Crosswork Situation Manager uses when it starts and stops the service.
| Type |
String |
| Required |
Yes |
| Default |
N/A |
Name of the instance for the process.
| Type |
String |
| Required |
Yes |
| Default |
N/A |
Additional identification label that appears in the UI.
| Type |
String |
| Required |
No |
| Default |
N/A |
Name of the process's cluster. This overrides the default cluster for a process. If left empty, the Cisco Crosswork Situation Manager uses the process's default cluster.
| Type |
String |
| Required |
No |
| Default |
N/A |
Name of the service script that Cisco Crosswork Situation Manager uses to control the process. If you do not configure a service name, Cisco Crosswork Situation Manager uses the group name, removing underscores and appending a 'd'. For example, "traplam" becomes "traplamd".
| Type |
String |
| Required |
No |
| Default |
N/A |
Type of process. If left empty, Cisco Crosswork Situation Manager calculates the type based on the group name.
| Type |
String |
| Required |
No |
| Default |
N/A |
| Valid Values |
moog_farmd, servlet, LAM |
Determines if the process produces a warning in the UI when it is running. Processes that are unreserved do not produce a warning.
| Type |
Boolean |
| Required |
No |
| Default |
true |
Specifies which Moolets are reserved for the Moogfarmd process. If left empty, no Moolets are reserved for the Moogfarmd process.
| Type |
Array |
| Required |
No |
| Default |
N/A |
Encryption
Default location of the encryption key file.
| Type |
String |
| Required |
No |
| Default |
/location/of/.key |
High Availability (HA)
Default HA cluster name.
| Type |
String |
| Required |
No |
| Default |
MOO |
Port Range
Minimum port number in the range that the Cisco Crosswork Situation Manager services use when they look for open ports.
| Type |
String |
| Required |
No |
| Default |
50000 |
Maximum port number in the range that the Cisco Crosswork Situation Manager services use when they look for open ports.
| Type |
String |
| Required |
No |
| Default |
51000 |
Secure Your Installation
Apply Valid SSL Certificates
Cisco Crosswork Situation Manager includes a self-signed certificate by default. If you want to add your own certificates to Nginx, follow the instructions below.
A valid SSL certificate is required if you want to use Cisco Crosswork Situation Manager for Mobile on an iPhone. This is because WebSockets do not work on iOS with self-signed certificates. If a valid root CA certificate is not added, a 'Connection Error' appears at login and Cisco Crosswork Situation Manager for Mobile does not work.
For more information, see the Nginx documentation.
Add a Valid Certificate
To apply a valid certificate to Nginx, edit $MOOGSOFT_HOME/etc/cots/nginx/conf.d/moog-ssl.conf :
vi $MOOGSOFT_HOME/etc/cots/nginx/conf.d/moog-ssl.conf
Change the default self-signed certificate and key locations to point to the valid root certificate and key:
#ssl_certificate /etc/nginx/ssl/certificate.pem;
#ssl_certificate_key /etc/nginx/ssl/certificate.key;
ssl_certificate /etc/certificates/your_company_certificate.crt;
ssl_certificate_key /etc/certificates/your_company_certificate.key;
Reload Nginx with the command:
systemctl reload nginx
Encrypt Database Communications
You can enable SSL to encrypt communications between all Cisco Crosswork Situation Manager components and the MySQL database.
For information on creating SSL keys and certificates for MySQL, see Creating SSL and RSA Certificates and Keys using MySQL.
Establish Trust for the MySQL Certificate
To establish trust for the MySQL database certificate, create a truststore to house the root certificate for the Certificate Authority that signed the MySQL Server certificate.
1. If you upgraded from a previous version of Cisco Crosswork Situation Manager, run the following command to extract the certificate for the root CA for MySQL:
mysql_ssl_rsa_setup
The command generates new keys and writes them to the /var/lib/mysql directory.
2. Run the java keytool command to create a trust store containing the certificate for the root CA for MySQL.
keytool -import -alias mysqlServerCACert -file /var/lib/mysql/ca.pem -keystore $MOOGSOFT_HOME/etc/truststore
— When keytool prompts you, enter a password for the keystore. You will need this password to configure Cisco Crosswork Situation Manager.
— Answer 'yes' to "Trust this certificate."
Keytool creates a truststore at the path $MOOGSOFT_HOME/etc/truststore.
Configure Cisco Crosswork Situation Manager to use SSL for Database Communications
After you have created the truststore, edit the Cisco Crosswork Situation Manager configuration to enable SSL.
· Edit $MOOGSOFT_HOME/config/system.conf.
· Inside the MySQL property, uncomment the SSL property and the properties that comprise it. Make sure to uncomment the opening "{" and closing braces "}". For example:
,“ssl” :
{
# # The location of the SSL truststore.
# #
# # Relative pathing can be used, i.e. ‘.’ to mean current directory,
# # ‘../truststore’ or ‘../../truststore’ etc. If neither relative
# # nor absolute (using ‘/’) path is used then $MOOGSOFT_HOME is
# # prepended to it.
# # i.e. “config/truststore” becomes “$MOOGSOFT_HOME/config/truststore”
# #
# #
# # Specify the server certificate.
# #
“trustStorePath” : “etc/truststore”,
# “trustStoreEncryptedPassword” : “vQj7/yom7e5ensSEb10v2Rb/pgkaPK/4OcUlEjYNtQU=“,
“trustStorePassword” : “moogsoft”
}
· Provide the path to the truststore you created. For example:
"trustStorePath" : "etc/truststore",
· Edit the password for the truststore. For example:
"trustStorePassword" : "moogsoft"
See Moog Encryptor if you want to use an encrypted password. Uncomment trustStoreEncryptedPassword and provide the encrypted password for the value. For example:
“trustStoreEncryptedPassword” : “vQj7/yom7e5ensSEb10v2Rb/pgkaPK/4OcUlEjYNtQU=“
· Save your changes and restart the following components:
— Moogfarmd
— Apache Tomcat
— All LAMs
After you restart, all Cisco Crosswork Situation Manager components encrypt communications with the MySQL database.
Moog Encryptor
Cisco Crosswork Situation Manager includes an encryptor utility so you can encrypt passwords stored in the system.conf configuration file. Encrypted passwords in configuration files are more secure because someone with access to the configuration cannot necessarily gain access to integrated systems.
If you run in a distributed environment, run the encryptor utility on one host to create an encryption key (.key). Then copy the key to the $MOOGSOFT_HOME/etc/ directory on the remaining hosts.
Encrypt a password
To encrypt a password, execute the moog_encryptor command as follows:
$MOOGSOFT_HOME/bin/moog_encryptor -p <password>
For example, to encrypt the password "Abacus":
/usr/share/moogsoft/bin/moog_encryptor -p Abacus
The moog_encryptor displays the encrypted password:
The encrypted password is:
KfFJGilmGGJP/qTrJV6SBs0HTTy3NpCqvGaYKviDbLQ=
When using within Javascript code or JSON file, use:
{"encrypted_password":"KfFJGilmGGJP/qTrJV6SBs0HTTy3NpCqvGaYKviDbLQ="}
Note
Each time you run moog_encryptor, it generates a different encrypted password.
Configure Cisco Crosswork Situation Manager to use encrypted passwords
You can use passwords encrypted with moog_encryptor in the system.conf file as follows:
1. Edit $MOOGSOFT_HOME/config/system.conf.
2. Identify the password you want to replace and uncomment the encrypted_password property. Comment out the password property. For example:
"username" : "moogsoft",
#"password" : "Abacus",
"encrypted_password" : "e5uO0LY3HQJZCltG/caUnVbxVN4hImm4gIOpb4rwpF4=",
3. Set the value of the encrypted_password property to the value returned from the moog_encryptor. For example:
"encrypted_password":"KfFJGilmGGJP/qTrJV6SBs0HTTy3NpCqvGaYKviDbLQ=",
4. Change the value of the password property so that it does not match the unencrypted value of the password.
Change the location of the encryption key
By default, the encryptor utility uses a key at the following location:
$MOOGSOFT_HOME/etc/.key
The encryptor utility creates a new key if one does not already exist.
If you want to use a different location for the key, uncomment the encryption section in system.conf. Set the value of the encryption_key_file property to a new path for the key. For example:
# Uncomment the encryption section if you want to specify the location
# for the encryption key file.
,
"encryption" :
{
# Use this to change the default location of the encryption key file
"encryption_key_file" : "/usr/share/example/.key"
}
Note
You must configure Cisco Crosswork Situation Manager to use the same .key file you used to encrypt passwords. If you encrypt a password using one key and then change the configuration to use another key, decryption fails.
Configure External Authentication
You can configure different login authentication and security methods with Cisco Crosswork Situation Manager. For more information see:
1. Configure Single Sign-On with LDAP
2. Configure Single Sign-On with SAML
3. Security Configuration ReferenceSecurity Configuration Reference
Configure Single Sign-On with SAML
You can configure Cisco Crosswork Situation Manager so users from an external directory can log in by Single Sign-On (SSO) using Security Assertion Markup Language (SAML).
When you enable the SAML integration, your SAML identity provider (IdP) can exchange authorization and authentication data securely with your service provider (SP), Cisco Crosswork Situation Manager. The integration redirects you from the standard Cisco Crosswork Situation Manager login page to the IdP's login page. You can log in to Cisco Crosswork Situation Manager if you provide the IdP with valid authentication details.
See SAML Strategies and Tips for strategies to help you decide how to configure the SAML integration.
Cisco Crosswork Situation Manager implements SAML 2.0 using the SAML v3 Open Library. See SAML 2.0 for information on supported bindings and Open SAML v3 for information on the library.
Before you begin
Before you start to set up SAML, ensure you have met the following requirements:
· You have an active SAML IdP account with administrator privileges.
· The webhost URL is the same as your Cisco Crosswork Situation Manager instance URL. For example:
webhost: "https://example.com"
Configure your SAML IdP
Configure your IdP to integrate with Cisco Crosswork Situation Manager and enable SSO. Refer to your IdP's documentation for instructions.
Configuration differs for each IdP but common settings include:
· SSO URL: The URL that sends a SAML login request to the IdP. For example:
https://example.com/moogsvr/mooms?request=samlRequest
· Assertion Consumer Service URL: The Cisco Crosswork Situation Manager URL that receives the IdP response to each SAML assertion:
https://example.com/moogsvr/mooms?request=samlResponse
· Entity ID: A unique identifier for the SP SAML entity. For example:
https://example.com/moogsvr/mooms
Generate the IdP metadata
After you configure your SAML IdP configuration, it generates an IdP metadata file in .xml format. Some IdPs also allow you to generate an X509 self-signed certificate.
Save the certificate and add it to your SP metadata file if you want your IdP to encrypt SAML assertions.
Copy the IdP metadata file
The .xml metadata file generated by the IdP provides Cisco Crosswork Situation Manager with a security certificate, endpoints and other processing requirements.
To add this file to your SAML configuration:
· Save the IdP metadata file to your local machine.
· Copy the file to the location $MOOGSOFT_HOME/etc/saml.
· Grant the Apache Tomcat user read permissions to the file. For example:
chmod 644 my_idp_metadata.xml
Configure the SAML realm
You enable SAML authentication in Cisco Crosswork Situation Manager by creating and configuring a SAML realm. You can only configure and use one SAML realm at a time. See Security Configuration Reference for a full description of the available properties.Security Configuration Reference
To configure your SAML realm:
· Edit the file $MOOGSOFT_HOME/config/security.conf and uncomment the "my_saml_realm" section. Rename the realm to meet your requirements.
· Configure the locations of your metadata files:
— idpMetadataFile: Location of the IdP's metadata file.
— spMetadataFile: Location of the service provider's metadata file. When the metadata file is generated in step 10, it is saved in this location.
· Configure the roles, teams and primary group mappings for new users that log in to Cisco Crosswork Situation Manager using SAML. These are all required:
— defaultRoles: Default roles that Cisco Crosswork Situation Manager assigns to new users at first login.
— defaultTeams: Default teams that Cisco Crosswork Situation Manager assigns to new users at first login.
— defaultGroup: Default primary group that Cisco Crosswork Situation Manager assigns to new users at first login.
· Configure the mappings for existing users that log in to Cisco Crosswork Situation Manager using SAML. You can choose either username or email:
— existingUserMappingField: Defines the field that Cisco Crosswork Situation Manager uses to map existing users to your IdP users.
· Configure the mapping of the IdP's provided attributes. These are all required:
— username: Defines the IdP user attribute that maps to username in Cisco Crosswork Situation Manager.
— email: Defines the IdP user attribute that maps to email in Cisco Crosswork Situation Manager.
— fullname: Defines the IdP user attribute that maps to full name in Cisco Crosswork Situation Manager.
· Optionally configure additional IdP attribute mappings:
— contactNumber: Defines the IdP attribute that maps to contact number in Cisco Crosswork Situation Manager.
— department: Defines the IdP attribute that maps to department in Cisco Crosswork Situation Manager.
— primaryGroup: Defines the IdP attribute that maps to primary group in Cisco Crosswork Situation Manager.
— timezone: Defines the IdP attribute that maps to timezone in Cisco Crosswork Situation Manager.
— teamAttribute: Defines the IdP attribute that maps to teams in Cisco Crosswork Situation Manager.
— teamMap: Defines the IdP attribute or custom attribute that maps to team names in Cisco Crosswork Situation Manager.
— createNewTeams: Creates a team or teams if they did not exist in Cisco Crosswork Situation Manager.
— roleAttribute: Defines the IdP attribute containing role information.
— roleMap: Defines the IdP attribute that maps to Cisco Crosswork Situation Manager roles.
· Optionally configure your keystore and private key passwords if you want to use encryption with SAML. You can have either an unencrypted keystore password or an encrypted keystore password, but you cannot use both.
a. keystorePassword: Your unencrypted keystore password.
b. encryptedKeystorePassword: Your encrypted keystore password.
c. privateKeyPassword: Your private key password.
See Moog Encryptor for more information on encrypting passwords.
· Optionally configure the lifetime of each SAML assertion:
— maximumAuthenticationLifeTime: Maximum time in seconds for Cisco Crosswork Situation Manager to receive an IdP's SAML assertion before it becomes invalid.
· Optionally configure the Service Provider Entity ID:
— serviceProviderEntityId: Service Provider Entity ID assertion number.
· Restart the Apache Tomcat service:
service apache-tomcat restart
When Apache Tomcat restarts it generates the Service Provider metadata file. The file is saved to the location specified in the spMetadataFile property.
Additional SAML configuration
You can configure the following additional properties when setting up SAML for Cisco Crosswork Situation Manager. Restart Apache Tomcat after you make any of these changes.
To enable encrypted assertion for SAML with Cisco Crosswork Situation Manager, log in to your SAML IdP and enable encrypted assertions. Refer to your IdP's documentation for information.
Once enabled, the IdP encrypts all SAML assertions made with Cisco Crosswork Situation Manager.
The assertion time limit is the period of time between the IdP providing the SAML assertion and Cisco Crosswork Situation Manager accepting it.
Cisco Crosswork Situation Manager accepts a delay of up to one hour by default. You can specify a different period of time in minutes using the maximumAuthenticationLifetime property in the security configuration file for your SAML realm. For example:
"maximumAuthenticationLifetime": 3600
You can enable entity ID assertion, also known as audience restriction, to restrict SAML assertions to Cisco Crosswork Situation Manager.
To do this, specify the serviceProviderEntityID property in $MOOGSOFT_HOME/config/security.conf. You must also configure this in your IdP. The values must match for successful SAML authorization. For example:
"serviceProviderEntityId": "MySystemName"
When you create your SAML realm, you can configure the attributes your IdP passes to Cisco Crosswork Situation Manager at SAML authentication.
By default, the IdP email attribute maps to both the Cisco Crosswork Situation Manager username and email. The Cisco Crosswork Situation Manager full name maps to First Name and Last Name from the IdP. For example:
"username": "$Email",
"email": "$Email",
"fullname": "$FirstName.$LastName",
You may see errors indicating failure to configure an attribute mapping or the IdP's failure to provide a configured attribute if something goes wrong at login.
You can map other IdP user attributes such contact number, department, primary group and time zone. For example:
"contactNumber": "phone",
"department": "department",
"primaryGroup": "primaryGroup",
"timezone": "timezone",
If you already have users in Cisco Crosswork Situation Manager, you can map the user attributes to the IdP using the existingUserMappingField property. For example:
"existingUserMappingField": "username",
When a user logs in via the IdP for the first time but does not map to an existing user entry, Cisco Crosswork Situation Manager creates a new user.
You can define which primary group, roles and teams to assign to users using the following properties in the SAML realm configuration:
· defaultRoles: Default roles to assign to users.
· defaultTeams: Default teams to assign to users.
· defaultGroup: Default group to assign to users.
· teamAttribute: The IdP's attribute for team names.
· teamMap: Map IdP team names to Cisco Crosswork Situation Manager teams.
· roleAttribute: The IdP's attribute for roles.
· roleMap: Map IdP role names to Cisco Crosswork Situation Manager roles.
For example:
"assignTeams":
{
"teamAttribute": "groups",
"teamMap":
{
"IdP Team": "Networks",
"Another IdP Team": "Application Support"
}
}
"assignRoles":
{
"roleAttribute": "groups",
"roleMap":
{
"IdP Standard User": "Operator",
"IdP Manager User": "Manager"
}
}
Note
You must map both roles and teams through IdP to prevent users being assigned to the default role and team.
Enable the createNewTeams property to create new teams and assign newly created users to these teams as part of the SAML login process, instead of assigning new users to the default teams.
"createNewTeams": true
Note
Enable this property with caution. If a user logs in to Cisco Crosswork Situation Manager and createNewTeams is set to true, a new team is defined in Cisco Crosswork Situation Manager for every value found in the teamAttribute property in the user's profile. If you are using the "groups" attribute to determine team membership, this could result in the creation of hundreds of teams that are not referenced by Cisco Crosswork Situation Manager.
Cisco recommends that you enable createNewTeams with a custom profile attribute that you specifically use to determine Cisco Crosswork Situation Manager team membership and contains a very limited set of values.
After you enable SAML, you can configure a different logout page to display when a Cisco Crosswork Situation Manager user ends their session.
To configure the logout URL:
· Edit the configuration file: $MOOGSOFT_HOME/ui/web.conf.
· Configure the logout property to meet your requirements and save the changes.
An example web configuration file is as follows:
"authentication":
{
"pages":
{
"login": "/login/",
"logout": "/logout/",
"failedLogin": "/login/?error=true",
"sessionTimeout": "/logout/?error=session",
"dbFailure": "/login/?error=dbfailure"
},
"paramNames":
{
"userId": "userid",
"password": "password"
}
}
Example SAML realm
An example SAML realm in $MOOGSOFT_HOME/config/security.conf is as follows:
"my_saml_realm":
{
"realmType": "SAML2",
"idpMetadataFile": "/usr/share/moogsoft/etc/saml/my_idp_metadata.xml",
"spMetadataFile": "/usr/share/moogsoft/etc/saml/my_sp_metadata.xml",
"defaultRoles": [ "Operator" ],
"defaultTeams": [ "Cloud DevOps" ],
"defaultGroup": "End-User",
"existingUserMappingField": "username",
"username": "$Email",
"email": "$Email",
"fullname": "$FirstName $LastName",
"contactNumber": "phoneNumber",
"department": "dept",
"primaryGroup": "group",
"timezone": "timezone",
"assignTeams":
{
"teamAttribute": "groups",
"createNewTeams": true,
"teamMap":
{
"Cloud Team": "Cloud DevOps",
"Database Team": "Database DevOps"
}
},
"assignRoles" :
{
"roleAttribute": "groups",
"roleMap":
{
"Standard User": "Operator",
"Manager User": "Manager"
}
},
"keystorePassword": "my_realm_secret",
"privateKeyPassword": "my_realm_secret",
"maximumAuthenticationLifetime": 60,
"serviceProviderEntityId": "MySystemName"
}
Send the SP metadata file
When you have configured the SAML realm, copy your SP metadata file and send it to the administrator of your IdP. For example:
$MOOGSOFT_HOME/etc/saml/my_idp_metadata.xml
Your IdP must import the metadata file. Note that all certificates are self-signed.
See Troubleshoot SAML for ideas to help you debug SAML connection and configuration problems.
Build a Service Provider Metadata File
You must build a Service Provider (SP) metadata file in order to configure SAML-based Single Sign-On with Cisco Crosswork Situation Manager.
The SP metadata .xml file contains all of the keys, services and URLs defining the SAML endpoints. You can use your IdP's SP metadata file generator if it has one. If not you can create the file manually.
To manually create your SP metadata file:
1. Copy the .xml template from the code block:
<md:EntityDescriptor xmlns:md="urn:oasis:names:tc:SAML:2.0:metadata"
entityID="https://localhost/moogsvr/mooms">
<md:SPSSODescriptor AuthnRequestsSigned="true" WantAssertionsSigned="true"
protocolSupportEnumeration="urn:oasis:names:tc:SAML:2.0:protocol">
<md:KeyDescriptor>
<ds:KeyInfo xmlns:ds="http://www.w3.org/2000/09/xmldsig#">
<ds:X509Data>
<ds:X509Certificate> MIIC/jCCAeagAwIBAgIQCGehfcnv6r5My/fnrbfDejANBgkqhkiG9w0BAQsFADAVMRMwEQYDVQQDEwp3d3cuc3AuY29tMB4XDTEzMTEyMjA4MjMyMVoXDTQ5MTIzMTE0MDAwMFowFTETMBEGA1UEAxMKd3d3LnNwLmNvbTCCASIwDQYJKoZIhvcNAQEBBQADggEPADCCAQoCggEBAMPm/ew9jaGWpQS1C7KtpvgzV4nSOIFPgRt/nlRYR+pUWdDEfSKmyjK28nkQ1KKujRJTnvnmZydmUrmEFpVv+giBiUkvCJY3PxZ/EDSsF3R/OzWhkUv5nfAXPnqkX9x22b6+vUof6WiLGyAW6lOYMCVADjTSl9pSaUtIaANdx9maERcT9eQbGSnjim0WurFRYs9ZE8ttErrMH9+Su4246YDqOPAkz6La4cHHMPQdcFQT5p/cuXBfU1vl1tWdBEgAY3xHYZE8u5TTJ/vp9UxyU1MwfeO2g9VDRcokLQHrj6wFxtvufA+WtUKYJGUu2p/qSuaw7eS6UFjUn49aVqg9OacCAwEAAaNKMEgwRgYDVR0BBD8wPYAQ1/S0ibdvfdFkJ9T9oIPluKEXMBUxEzARBgNVBAMTCnd3dy5zcC5jb22CEAhnoX3J7+q+TMv35623w3owDQYJKoZIhvcNAQELBQADggEBAAHlmVoAZUt6paeFvtQbc/iaJe/Fhd+JG1U0jyjlFDcCn8erLihEbhb3mFBBMF25oO67gfA1JJXZrmHry3NlOZuovqRqm8v7wg8n0nQa1HUWkUC2TBgfg1HE8/2rmSF2PngiEi18VOxRDxx0WXMNZX6JebJ1kCOCpT/x7aupS7T1GrIPmDLxjnC9Bet7pRynfomjP/6iU21/xOIF6xB9Yf1a/kQbYdAVt2haYKIfvaF3xsq1X5tCXc9ijhBMgyaoqA+bQJD/l3S8+yCmMxEYZjAVLEkyGlU4Uwo01cKEYbXIG/YVq+4CaIRxIfMvV+j8gzTLHTXI+pHEMfMhyYa0pzM=
</ds:X509Certificate>
</ds:X509Data>
</ds:KeyInfo>
</md:KeyDescriptor>
<md:SingleLogoutService Binding="urn:oasis:names:tc:SAML:2.0:bindings:HTTP-Redirect"
Location="https://localhost:44360/SAML/SingleLogoutService"/>
<md:AssertionConsumerService index="0" isDefault="true"
Binding="urn:oasis:names:tc:SAML:2.0:bindings:HTTP-POST"
Location="https://localhost/moogsvr/mooms?request=samlResponse"/>
</md:SPSSODescriptor>
</md:EntityDescriptor>
2. Configure the mandatory elements in the metadata file:
a. entityID: Unique identifier or name for the SP. This should be a URL or a URN.
b. AssertionConsumerService: URL or endpoint that receives SAML responses from the IdP.
3. Add the X509 self-signed certificate you create when you configure your IdP.
4. Configure the other elements to meet your requirements. See Service Provider Metadata Reference for full descriptions of the available elements.Service Provider Metadata Reference
5. Save the SP metadata file to a path on your local machine.
After you have created the metadata file, you must copy it to your Cisco Crosswork Situation Manager machine to continue with the SAML configuration. See Configure Single Sign-On with SAML.
SAML Strategies and Tips
You can configure Cisco Crosswork Situation Manager so that users from an external directory can log in by Single Sign-On (SSO) using Security Assertion Markup Language (SAML). This topic covers some strategies to help you decide how to configure the SAML integration.
See Configure Single Sign-On with SAML for instructions on configuring the SAML integration and Troubleshoot SAML for information on how to address configuration and connection problems.
Map user profile attributes to Cisco Crosswork Situation Manager
You can employ a number of strategies to map your SAML identity provider (IdP) attribute values to Cisco Crosswork Situation Manager teams and roles. The strategy you choose depends on a number of factors, including:
· Whether your IdP contains identifiers that can equate to roles and teams in Cisco Crosswork Situation Manager.
For example, you have an IdP group attribute value that identifies the "Automation" team for which there is a corresponding team in Cisco Crosswork Situation Manager. This team has administrative authority over Cisco Crosswork Situation Manager. In this situation you could use the "groups" attribute, map the Automation team to a Cisco Crosswork Situation Manager team and assign the Administrator role to members of that team in the roles mapping.
· Whether you would prefer to create new identifiers for the Cisco Crosswork Situation Manager teams and roles.
· Whether you want to use an existing attribute name, for example "groups", in your user profiles, or you would prefer to create new attributes for Cisco Crosswork Situation Manager.
The following use cases show examples of these scenarios.
Use existing "groups" attribute values
You already have a granular set of IdP "groups" that you use to assign permissions to your users. The values in each user's "groups" attribute identify the teams the user is associated with, and the role they play in each team.
One group, "Monitoring Tools", has complete administrative authority over the Cisco Crosswork Situation Manager platform.
In this case, you could use the pre-existing "groups" attribute as the source for both the teams mapping and the roles mapping within Cisco Crosswork Situation Manager.
An example configuration file is as follows:
"assignTeams":
{
"teamAttribute": "groups",
"teamMap":
{
"Monitoring_Tools": "Monitoring Tools",
"Application_A_Support": "Application A",
"Application_B_Support": "Application B",
"Network_Support": "Network"
},
"createNewTeams": false
},
"assignRoles":
{
"roleAttribute": "groups",
"roleMap":
{
"Monitoring": "Super User"
}
}
Create new "groups" attribute values
You have reviewed the "groups" assigned to your IdP user profiles, and are unable to identify values that you could use to assign team and role membership to users in Cisco Crosswork Situation Manager.
You want to continue to use the "groups" attribute as a single location to hold permissions information for your users, and therefore you do not want to create another attribute within your user profiles.
In this case, you could add values to the "groups" attribute to identify the team and role to assign to the user in Cisco Crosswork Situation Manager.
In the configuration file for this example shown below, the "EnterpriseSuperUser", "EnterpriseTestUser", and "EnterpriseAdmin" IdP roles in the "groups" attribute map to the "Super User", "Test" and "Administrator" roles in Cisco Crosswork Situation Manager.
"assignTeams":
{
"teamAttribute": "groups",
"teamMap":
{
"Monitoring_Tools": "Monitoring Tools",
"Application_A_Support": "Application A",
"Application_B_Support": "Application B",
"Network_Support": "Network"
},
"createNewTeams": false
},
"assignRoles":
{
"roleAttribute": "groups",
"roleMap":
{
"EnterpriseSuperUser": "Super User",
"EnterpriseTestUser": "Test",
"EnterpriseAdmin": "Administrator"
}
}
You do not have appropriate teams and roles defined within your IdP user profiles, and would like to hold this information for Cisco Crosswork Situation Manager in a unique user profile attribute.
In this case, you could define the attributes in the user profile structure and use the values from these attributes as the source for team and role mappings.
In the configuration file for this example shown below, the new attribute "EnterpriseTeam" contains the IdP teams to map to Cisco Crosswork Situation Manager teams. The new attribute "EnterpriseRole" contains the IdP roles to map to Cisco Crosswork Situation Manager roles.
"assignTeams":
{
"teamAttribute": "EnterpriseTeam",
"teamMap":
{
"Monitoring_Tools": "Monitoring Tools",
"Application_A_Support": "Application A",
"Application_B_Support": "Application B",
"Network_Support": "Network"
},
"createNewTeams": false
},
"assignRoles":
{
"roleAttribute": "EnterpriseRole",
"roleMap":
{
"EnterpriseSuperUser": "Super User",
"EnterpriseTestUser": "Test",
"EnterpriseAdmin": "Administrator"
}
}
Map a single value to many teams or roles
You would like to use a single value in the "groups" attribute of your IdP user profiles to add the user to multiple Cisco Crosswork Situation Manager teams or roles.
All mappings are one to one, so to achieve this you must re-map the value from the user profile's "groups" membership multiple times. Each instance maps to an individual Cisco Crosswork Situation Manager team or role.
Troubleshoot SAML
You can configure Cisco Crosswork Situation Manager so that so users from an external directory can log in by Single Sign-On (SSO) using Security Assertion Markup Language (SAML). This topic contains ideas to help you debug SAML connection and configuration problems. See SAML Strategies and Tips for strategies to help you decide how to configure the SAML integration.
Most SAML integration issues occur as a result of misconfiguration. If checking your configuration using the instructions in Configure Single Sign-On with SAML does not solve the problem, there are two methods you can use to obtain the diagnostic data you require to debug SAML issues.
SAML debugging tool
View the available add-ons for your browser to choose and install a SAML debugging tool. These tools typically show the outgoing request and the response received by Cisco Crosswork Situation Manager. If the payloads are not encrypted, you will be able to see the claims returned in the response from the SAML identity provider (IdP).
Trace logging
Enable "trace" logging for the moogsvr UI component. Once enabled, the $APPSERVER_HOME/logs/catalina.out log file shows the returned claim data as it is processed. Your system administrator can use this data to validate the claim data being returned by the IdP and ensure it is mapped correctly in $MOOGSOFT_HOME/config/security.conf.
See Configure Logging for information on log levels.
Configure Single Sign-On with LDAP
You can configure Cisco Crosswork Situation Manager so users from an external directory can log in by Single Sign-On (SSO) using Lightweight Directory Access Protocol (LDAP).
See LDAP version 3 for more information.
Before you begin
Before you start to set up LDAP, ensure you have met the following requirements:
· You have the URL for your LDAP server.
· If you want to use a "lookup" DN (Distinguished Name) resolution method, you have the credentials for the LDAP user who has rights to look up other users and determine their roles.
· If you want to use SSL encryption, you have a valid SSL certificate.
Configure LDAP for Cisco Crosswork Situation Manager
Edit the configuration file to configure and enable LDAP for Cisco Crosswork Situation Manager. You can find the file at $MOOGSOFT_HOME/config/security.conf.
See the Security Configuration Reference for a full description of all properties. Some properties in the file are commented out by default. Uncomment properties to enable them.Security Configuration Reference
· Configure the properties for the LDAP connection:
— url: URL of your LDAP server. This is required.
— connectionTimeout: Connection timeout in milliseconds.
— readTimeout: Read timeout in milliseconds.
— predefinedUser: Determines if user must exist in the local database or not.
· Configure the user resolution and attribute search section:
— resolutionType: Type of DN resolution method. Valid options are "direct" and "lookup".
— attributeSearchFilter: Defines an optional attribute filter to retrieve all user attributes.
— attributeMap: Defines an attribute map between the LDAP user attributes and the user attributes in the Cisco Crosswork Situation Manager database.
· Configure the LDAP group search section:
— systemUser: Username of the system user to bind and search for user group information.
— systemPassword: Password of the system user to bind and search for user group information.
— groupBaseDn: Defines a group base DN to search for LDAP groups.
— memberAttribute: Attribute used look for group members. Defaults to "member".
— groupNameAttribute: Attribute used to look for group name.
— roleMap: Defines the role mappings between the user directory and Cisco Crosswork Situation Manager.
— assignTeams: Sychronizes team assignment between the user directory and the teams in Cisco Crosswork Situation Manager.
· Optionally configure SSL if you want to enable TLS authentication:
— ssl_protocol: Defines the SSL protocol you want to use. Defaults to TLSv1.2.
— server_cert_file: SSL server certificate.
— client_cert_file: Client certificate file.
— client_key _file: Client key file.
· Restart Apache Tomcat to activate the changes:
service apache-tomcat restart
See Control Moogsoft AIOps Processes for further details.
Example
An example LDAP configuration that uses direct DN resolution and SSL without client authentication:
"example_ldap":
{
"realmType": "LDAP",
"url": "ldap://mysaml:389",
"userDnResolution":
{
"resolutionType": "direct",
"direct":{
"usernameAttribute": "uid",
"userDnPostfix": "ou=People,dc=moogsoft,dc=com"
}
},
"attributeMap":{
"fullname": "cn",
"email": "mail"
},
"groupBaseDn": "ou=Group,dc=moogsoft,dc=com",
"memberAttribute": "member",
"groupNameAttribute": "cn",
"roleMap":{
"role-admin": "Super User",
"OperatorRole": "Operator"
},
assignTeams:{
teamMap:{
CloudDevOps: "Cloud DevOps team",
DBDevOps: "Database DevOps team"
},
useGroupName: true,
createNewTeams: true
},
"ssl":
{
"server_cert_file": "/usr/share/moogsoft/config/example.crt"
}
}
Manage User Access
As an Administrator, you control user access to functions in the Cisco Crosswork Situation Manager UI. This ensures that authorized users can perform required functions and prevents unauthorised users from accessing the system and sensitive operations within it.
Functions you can restrict include the ability to assign alerts, assign Situation owners, mark alerts with Probable Root Cause (PRC) feedback, and access Integrations.
Follow these steps to manage user access:
· Create roles for specific job functions.
· Assign the permissions to perform operations to roles.
· Enable user authentication via SAML or LDAP, or manually create users.
· Specify a role for authenticating users, or manually assign roles to users.
· Set up teams (optional).
Manage Roles
Roles group the permissions that users need to perform a set of tasks within Cisco Crosswork Situation Manager. You can create roles for specific job functions and assign them the permissions to perform certain operations. For example, you could create a role named Situation Manager and assign it the permissions to perform certain operations, such as managing alerts and Situations.
You must assign at least one role to every user. You can do this manually when you create the user or you can map roles to users if you use SAML.
Cisco Crosswork Situation Manager contains a set of predefined roles with a predefined set of permissions. See Role Permissions for details.
Create, edit and delete roles
To view a list of roles, navigate to Settings > Roles. You can use the search box on the left to filter the list.
Select a role to view and edit its configuration. You can edit the following:
· Selected permissions: See Role Permissions for a description of each permission.
· Session timeout: You can use the system timeout of 60 minutes or define a custom timeout period.
· Landing page: You can choose to inherit the landing page from the system configuration or select an alternative page.
You can also perform the following operations:
· Click + to create a new role.
· Click a role name and then - to delete a role.
You cannot delete a role that is assigned to users. Remove the role from all users first.
Role Permissions
Cisco Crosswork Situation Manager contains the following predefined roles: Super User, Administrator, Manager, Operator, Customer, and Grazer. The REST LAM Sender role is designed for use with REST LAM integrations. The role restricts UI functionality, so you should not assign it to UI users. The default permissions selected for these roles are as follows:
| Permission |
Description |
Super User |
Administrator |
Manager |
Operator |
Customer |
Grazer |
| add_media |
Attach files to the collaborate tab in Situations and Team Room. Upload a photo to a user avatar. |
✔︎ |
✔︎ |
✔︎ |
✔︎ |
✔︎ |
✔︎ |
| alert_assign |
Assign alerts. |
✔︎ |
✔︎ |
✔︎ |
✔︎ |
|
✔︎ |
| alert_close |
Close alerts. |
✔︎ |
✔︎ |
✔︎ |
✔︎ |
|
✔︎ |
| alert_modify |
Manage alerts including changes to significance and severity. |
✔︎ |
✔︎ |
✔︎ |
✔︎ |
|
✔︎ |
| all_data |
View all data. Users without this permission can only view Situation and alert data related to their teams. |
✔︎ |
✔︎ |
✔︎ |
✔︎ |
✔︎ |
✔︎ |
| collab_read |
View content, such as files and comments, added by other users, on the Collaborate tab within Team and Situation Rooms. |
✔︎ |
✔︎ |
✔︎ |
✔︎ |
✔︎ |
✔︎ |
| collab_write |
Add content, such as files and comments, on the Collaborate tab within Team and Situation Rooms. |
✔︎ |
✔︎ |
✔︎ |
✔︎ |
|
✔︎ |
| collect_insights |
Collect statistics for users with this role for Insights dashboards. |
|
|
|
✔︎ |
|
|
| filters |
Create and edit the user's own personal Situation and alert filters. |
✔︎ |
✔︎ |
✔︎ |
✔︎ |
✔︎ |
✔︎ |
| graze_login |
Log into the Graze API. |
|
|
|
|
|
✔︎ |
| manage_integrations |
Access the Integrations tab. |
✔︎ |
|
|
|
|
|
| manage_maint |
Manage maintenance windows. |
✔︎ |
✔︎ |
✔︎ |
✔︎ |
|
✔︎ |
| mobile |
Access the Cisco Crosswork Situation Manager application on a mobile device. |
|
|
|
|
|
|
| moderator_assign |
Assign a Situation owner. |
✔︎ |
✔︎ |
|
✔︎ |
|
✔︎ |
| moolet_informs |
Send a Moolet Inform message using Situation and alert tools or the API. |
✔︎ |
✔︎ |
✔︎ |
✔︎ |
|
✔︎ |
| prc_feedback |
Mark alerts with Probable Root Cause feedback. |
✔︎ |
✔︎ |
✔︎ |
✔︎ |
|
✔︎ |
| share_filters_public |
Share filters publicly with all Cisco Crosswork Situation Manager users. |
✔︎ |
✔︎ |
|
|
|
|
| share_filters_teams |
Share filters with teams. |
✔︎ |
✔︎ |
|
|
|
|
| sig_close |
Close Situations. |
✔︎ |
✔︎ |
✔︎ |
✔︎ |
|
✔︎ |
| sig_create |
Create Situations manually and from alerts. |
✔︎ |
✔︎ |
✔︎ |
✔︎ |
|
✔︎ |
| sig_modify |
Manage Situations including changes to descriptions, queues and alerts. |
✔︎ |
✔︎ |
✔︎ |
✔︎ |
|
✔︎ |
| sig_resolve |
Resolve a Situation. |
✔︎ |
✔︎ |
✔︎ |
✔︎ |
|
✔︎ |
| sig_visualize |
Access information on what created a Situation. |
✔︎ |
✔︎ |
|
|
|
✔︎ |
| super_privileges |
Super user privileges. Enables access to all system settings and the ability to manage dashboards, alert and Situation filters, templates, users, and roles. |
✔︎ |
|
|
|
|
✔︎ |
| thread_create |
Deprecated permission |
✔︎ |
✔︎ |
✔︎ |
✔︎ |
✔︎ |
✔︎ |
| view_summary |
View the Summary screen. If you remove this permission, the user can no longer access the Summary screen that appears on the system's default landing page. If you remove this permission and the user's landing page is the Summary screen, Cisco Crosswork Situation Manager redirects the user to the Open Situations screen instead. |
✔︎ |
✔︎ |
✔︎ |
✔︎ |
✔︎ |
✔︎ |
Manage Users
As with most software systems, you use user credentials to provide secure access to Cisco Crosswork Situation Manager for your personnel. You can use the System Settings UI to manage the various attributes that define users and the actions they are allowed to perform inside Cisco Crosswork Situation Manager.
As an alternative to managing users in the UI, you can configure the system to allow Single Sign-On (SSO) via the Security Assertion Markup Language (SAML) protocol. If you have a large number of users, enabling SSO saves you from setting them up individually. It also improves security by requiring users to remember a single complex password instead of multiple credentials for multiple systems.
Within the SAML configuration you can specify a role, primary group and team to assign to users when they authenticate for the first time. See Configure Single Sign-On with SAML for more information. You can also authenticate users with Lightweight Directory Access Protocol (LDAP). See Configure Single Sign-On with LDAP for more information.
Manually Create and Edit Users
To view a list of users, navigate to Settings > Users. Use the search box on the left to filter the list. You can click the person icon to toggle the display of inactive users. Click + to create a new user or select a user to view and edit their attributes.
You cannot delete users. The system retains a history of all user activity, including collaboration posts and ownership of alerts and Situations. You can set obsolete users to inactive in the Personal tab. Cisco Crosswork Situation Manager includes the following predefined users:
· Administrator: Super user role. For information on creating and editing roles, see Manage Roles.
· Graze API user. Grazer role. This user is intended for system integration purposes, it is not a UI user.
· System Owner: Super user role.
· Moog: An anonymous system account used for unassigned alerts and Situations.
We recommend that you change the default password for each predefined user. Once you have set up your own users or enabled user authentication you may wish to deactivate the predefined users.
Edit User Details
Navigate to the Personal tab to view or edit the following user details:
· Username with 32 characters maximum. Mandatory.
· Full name.
· Password. If you do not enter a password the user is created as an LDAP user.
· Primary group. Mandatory.
· Department.
· Time zone if different to the system time zone.
· Active status. Inactive users cannot log into the UI. New users are active by default.
· Timeout. You can use the role timeout of 60 minutes or define a custom timeout period between 60 and 720 minutes (12 hours).
You can view or edit the user's email address or telephone number on the Contact tab.
Manage a User's Roles
Roles group the permissions users need to perform a set of tasks within Cisco Crosswork Situation Manager. See Manage Roles for information on creating and editing roles. You must assign at least one role to each user.
Assign a User to Teams
You can optionally group users into teams, to ensure that users working together view the Situations that are relevant to them. You can configure Cisco Crosswork Situation Manager to assign Situations to a particular team if they impact selected services or meet other criteria. See Manage Teams for further information.
Use Graze and MoogDb v2 APIs to manage users
See Graze API Endpoint Reference for the Graze API endpoints you can use to create and update users, and to return a list of all users in Cisco Crosswork Situation Manager.
See MoogDb V2 Method Reference for the MoogDb v2 methods you can use to manage users.
Manage Teams
You can use the optional Teams feature in Cisco Crosswork Situation Manager to allow users working together to view the Situations that are relevant to them. You can configure the system to automatically create teams based on certain Situation data, or you can manually create teams.
Create, Edit and Delete Teams
To view a list of teams, navigate to Settings > Teams. Use the search box on the left to filter the list. You can click the people icon to toggle the display of inactive teams.
· Click + to create a new team.
· Click a team name and then the copy icon to duplicate a team.
To create a team, you must assign the team a name with a maximum of 64 characters. You can optionally provide a description of the team.
By default, teams are active. Deselect the Active checkbox to deactivate a team. Inactive teams don't appear in team rooms and cannot have Situations assigned to them.
Navigate to the Users tab to select the users that belong to this team. You can define an alternative landing page for the team members on the Settings tab.
To delete a team, select it and click -. When you delete a team Cisco Crosswork Situation Manager removes it from any alerts, Situations, services and notifications that it was assigned to or associated with. The system retains a record of all team activity. When you view a Situation assigned to a deleted team, the team name is shown with an "inactive" label.
If a deleted team is recreated by SAML/LDAP, it is assigned a status of inactive.
Create Automatic Teams
You can configure Cisco Crosswork Situation Manager to create teams based on current Situation data.
Note
Creating automatic teams sets all existing teams to inactive.
You can create teams based on any of the following Situation fields:
· Description
· Services Impacted
· Process Impacted
· Queue
After Cisco Crosswork Situation Manager creates a team, you can view and edit the team settings and membership.
Configure Team Permissions
You can filter data visible to team members according to services, Situations or alerts:
· Create a Service Filter in General to select services for which the team views affected Situations. Adding more than 200 services may affect system performance and stability.
· Create a Situation Filter in General to select the Situations that you can assign to members of the team. If you only want team members to be able to see these Situations, ensure they do not have the 'all_data' permission. See Role Permissions for details.
· Create an Alert Filter in Settings to select the alerts outside the team's Situation Filter that you want the team members to see.
Permissions are additive. Therefore, if you set several filters, Situations and alerts that meet any one of them are included. For example, you could set up a team's permissions so that the team views critical Situations affecting a database service, a messaging service, and a web service.
The all_data permission in a user role overrides the filters in team settings. Users with the 'all_data' permission can view all Situations and alerts.
If you want users to see only the alerts and Situations that are assigned to their team, configure roles and users as follows:
1. Create a role without the all_data permission.
2. Assign the role to the users.
3. Add the users to the team.
See Manage Roles and Manage Users for more information.
Use Graze and MoogDb v2 APIs to manage teams
See Graze API Endpoint Reference for the Graze API endpoints you can use to create and update users, to return a list of all users in Cisco Crosswork Situation Manager, and other team-related requests.
See MoogDb V2 Method Reference for the MoogDb v2 methods you can use to manage teams.
Data Ingestion and Event Processing

Before Ingesting Data outlines the steps to take before your Cisco Crosswork Situation Manager system can begin to ingest data. These include configuring logging, changing passwords for default users, analyzing your data and performing a business analysis to determine your Situation design goals.
Ingest Event Data from Monitoring Tools tells you how to prepare your data for ingestion, including how to select, clean, format, integrate and construct the data. It tells you how to map, parse and normalize data and describes the types of Link Access Module (LAM) and LAMbots you will use to achieve this.
Before Ingesting Data
Configure Logging
Cisco Crosswork Situation Manager components generate log files to report their activity. As a Cisco Crosswork Situation Manager administrator, you can refer to the logs to audit system usage or diagnose issues. In certain cases you may want to change logging levels based upon your specific environment or needs. See the Log Levels Reference for details.Log Levels Reference
Cisco Crosswork Situation Manageruses Apache Log4j for logging. See the Log4j configuration documentation for more information.
Configure your log files
You can edit the log configuration files at $MOOGSOFT_HOME/config/logging/
There is a configuration file for every component or servlet in Cisco Crosswork Situation Manager. These files can be found in $MOOGSOFT_HOME/config/logging/servlets/ and follow the naming convention <servlet_name>.log.json. These configuration files control the logs for the following:
1. events.log.json: Logs for the proxy LAM.
2. graze.log.json: Graze request logs.
3. moogpoller.log.json: Moogpoller logs.
4. moogsvr.log.json: Logs relating to SAML/LDAP authentication and internal API calls.
5. situation_similarity.log.json: Situation Similarity servlet logs.
6. toolrunner.log.json: Toolrunner servlet logs.
The other default configuration files include:
1. moog_farmd.log.json: Configures logs for Moogfarmd process.
2. moogsoft.log.json: Configures logs for all of the utilities.
3. integrations.log.json: Configures logs for LAMs and integrations.
You can change log levels and make other configuration changes to components while they are running. Cisco Crosswork Situation Manager reads any changes and applies them every two seconds.
You can configure these files to meet your requirements. Refer to the Log4j documentation to see the available properties or see Log Configuration File Examples.
Log files by component
The following reference provides information about the log files for the various Cisco Crosswork Situation Manager components.
Apache Tomcat
Log location: /usr/share/apache-tomcat/logs
· RPM: /usr/share/apache-tomcat/logs/catalina.out
· Tarball: $MOOGSOFT_HOME/cots/apache-tomcat/logs/catalina.out
Primary log file: catalina.out
To change the logging level for the Cisco Crosswork Situation Manager servlets which run in Tomcat, edit the relevant files in $MOOGSOFT_HOME/config/logging/servlets.
vi $MOOGSOFT_HOME/config/logging/servlets/moogsvr.log.json
...
"loggers": {
"Logger": {
"name": "com.moogsoft",
"additivity": false,
"AppenderRef": [{
"ref": "STDOUT"
}],
"level": "info"
}
}
...
Nginx
Log location: /var/log/nginx
Primary log file: error.log
To change the logging level for Nginx:
1. Edit /etc/nginx/nginx.conf.
2. Set the LogLevel property. For example to enable debug logging:
LogLevel debug
3. Restart Ngnix.
Moogfarmd
By default Moogfarmd and Ticketing integrations write logs into a log file stored in /var/log/moogsoft if you have write permissions for this directory. Otherwise, the logs are written to $MOOGSOFT_HOME/log. By default the log file takes the name of the HA address of the process. For example, MOO.moog_farmd.farmd_instance1.log.
MOO is the default HA cluster name in $MOOGSOFT_HOME/config/system.conf. If you change it the Moogfarmd log file path changes accordingly.
Restart Moogfarmd after making any of the following configuration changes.
To use a custom log configuration file for Moogfarmd:
1. Make a copy of the default Moogfarmd log configuration file and rename it, for example:
cd $MOOGSOFT_HOME/config/logging
cp moog_farmd.log.json mymoog_farmd.log.json
2. Edit the new file according to your Moogfarmd logging requirements.
3. Edit the configuration_file property in the log_config section of moog_farmd.conf to point to the new file. For example:
log_config:
{
configuration_file: "mymoogfarmd.log.json"
}
To change the logging level for Moogfarmd, edit the file $MOOGSOFT_HOME/config/logging/moog_farmd.log.json. For example:
"configuration":
{
"ThresholdFilter":
{
"level": "trace"
},
}
You can also modify the log level using moog_farmd --loglevel. There are two options:
· Use farmd_cntl --loglevel <level>
Runtime change, restarting farmd resets log level to match logger config
· Adjust logger configuration
Adjusting moogfarmd log level (moog_farmd.log.json):
vi $MOOGSOFT_HOME/config/logging/moog_farmd.log.json
...
"Logger": [
{
"name": "com.moogsoft",
"additivity": false,
"AppenderRef": [{
"ref":"${sys:MoogsoftLogAppender}"
}],
"level": "info"
}
...
See Moogfarmd Reference for more information.
To save Moogfarmd logs to a different location and/or filename, edit the Moogfarmd log configuration file located at $MOOGSOFT_HOME/config/logging/moog_farmd.log.json. For example:
"RollingFile":
{
"name" : "FILE",
"fileName" : "/var/log/moogsoft/Moogfarmd_test.log"
}
LAMs and integrations
LAMs and monitoring integrations log their processing and data ingestion to two types of log files, process and capture. Ticketing integrations do not have dedicated log files, and instead log their processing and data to var/log/moogsoft/MOO.moog_farmd.log. For more information, refer to the preceding section on Moogfarmd.
Process logs
LAMs and integrations record their activities as they ingest raw data. By default these process logs are written to a log file stored in /var/log/moogsoft if the user running the LAM has write permissions for this directory. Otherwise, the logs are written to $MOOGSOFT_HOME/log. By default the log file takes the name of the LAM or integration. For example, MOO.solarwinds_lam.log.
The configuration of LAM process logs is specified in a file located at $MOOGSOFT_HOME/config/logging/integrations.log.json.
To specify the log configuration for a particular LAM:
· Make a copy of the default LAM log configuration file and rename it with the name of the LAM, for example:
cd $MOOGSOFT_HOME/config/logging
cp integrations.log.json solarwinds_lam.log.json
· Edit the file according to your LAM logging requirements.
· Edit the configuration_file property in the log_config section of the LAM configuration file to point to the new file. For example:
log_config:
{
configuration_file: "$MOOGSOFT_HOME/config/logging/solarwinds_lam.log.json"
}
If a polling integration or LAM fails to connect to the target system using the connection details in the UI or configuration file, Cisco Crosswork Situation Manager creates an alert with critical severity and writes the details to the process log. The following example shows a log file entry for a failed Zabbix Polling integration with an invalid URL:
WARN : [target1][20190117 13:03:33.942 +0000] [CZabbixPollingTask.java:129] +|40001: An error response received
from Zabbix REST server: [Invalid URL provided [http://zabbixserver1/zabbix/api_jsonrpc.php] for User Login request]|+
The following error code raises a Cisco Crosswork Situation Manager alert. The alert details are listed below:
| External ID |
Type |
Class |
Severity |
Example Alert Description |
| 40001 |
Internal Integrations Error |
Failed Connection Attempt |
Critical |
Failed Connection Attempt for target [target1] and destination [http://zabbixserver1/zabbix/api_jsonrpc.php]. This is attempt [1] out of [infinite]. |
| 40002 |
Internal Integrations Error |
Failed Connection Error |
Critical |
Failed Connection Error [rabbitmq-host.com: nodename nor servname provided, or not known]. This is attempt [2] out of [infinite]. |
If the integration or LAM polls successfully on the next attempt, the alert is cleared. If the integration or LAM is restarted to resolve the connection issue the alert is not cleared and must be handled manually.
Capture logs
In addition to process logs, all LAMs except the Logfile LAM allow you to capture the raw data they receive. This feature is disabled by default. To enable it, edit the LAM's configuration file and uncomment the capture_log property in the agent section. The default path to the capture log files is $MOOGSOFT_HOME/log/data-capture/<lam_name>.log.
An example agent section in a LAM configuration file is as follows:
agent:
{
name : "SolarWinds",
capture_log : "$MOOGSOFT_HOME/log/data-capture/solarwinds_lam.log"
}
MySQL
Log location: /var/log/mysqld.log
MySQL logging defaults to the highest level. To remove warnings from the MySQL log:
· Edit /etc/my.cnf .
· Add the following line:
log_warnings = 0
· Restart the MySQL service.
RabbitMQ
Log location: /var/log/rabbitmq
Refer to the RabbitMQ documentation for information on how to configure RabbitMQ.
Elasticsearch
Log location: /var/log/elasticsearch/elasticsearch.log.
Refer to the Elasticsearch documentation for information on how to configure Elasticsearch.
Hazelcast and Kryo
Cisco Crosswork Situation Manager uses two libraries for persistence: Hazelcast and Kryo. You can configure the logging for these components in the file $MOOGSOFT_HOME/config/logging/moog_farmd.log.json.
The logging level is set to WARN by default. Logs are written to the process log file.
Topologies
When you create, update and delete topologies and their nodes and links, Apache Tomcat logs the details in its primary log file catalina.out. An example log entry at INFO level is as follows:
INFO : [Topologies Reporter Thread][20200225 16:48:25.105 +0000] [CReporterThread.java:142] +|Topologies server handled [200] topologies requests in the last [60] seconds.|+
Example errors at WARN level:
“Unable to replace topology as topology to be replaced is not valid: [physical]" (WARN)
"Unable to replace topology [physical] as replacing topology is not valid: [network] (WARN)
"Unable to replace topology [%s] - topology [%s] has not been updated" (WARN)
"Failed to get all nodes for topology [physical] as it does not exist" (WARN)
Vertex Entropy
The Graph Analyser process runs automatically as part of the Housekeeper Moolet, to calculate Vertex Entropy for your topological nodes. The Graph Analyser process logs details of its processing to the Moogfarmd log file. Example log entries:
Starts processing for a topology named "physical":
Starting graph analysis of topology [physical]
...
Setting topology state from [OUTDATED] -> [PROCESSING] for [physical]
Processes nodes in the "physical" topology:
Performing analysis on 15023 nodes in topology [physical]
Example errors:
"Skipping topology [physical] as it has no nodes." (INFO)
"Failed to update vertex entropy values for topology [physical]" (WARN)
"Topology with name [physical] does not exist" (WARN)
"Topology [physical] state is [OUTDATED], skipping pending re-analysis" (INFO)
Completes processing:
Completed graph analysis of topology [physical], time elapsed 10s
Log rotation
Moogfarmd, LAMs and integrations use a Java-based logging utility that automatically runs at startup to prevent log files from becoming unmanageably large. The utility also prevents the loss of log data when you restart Cisco Crosswork Situation Manager.
The logging utility rotates the logs when the file size reaches 500MB by default. It rotates up to 40 files by default. This is controlled in by two properties under RollingFile and Policies in $MOOGSOFT_HOME/config/logging/<component_log_file_name>.log.json.
size
The size limit of the log file in megabytes that triggers a log rotation.
Type: Integer
Default: 500M
max
The maximum number of files that Cisco Crosswork Situation Manager can rotate.
Type: Integer
Default: 40
The default logger configuration appears in $MOOGSOFT_HOME/config/logging/<component_log_file_name>.log.json as follows:
"Policies":
{
"SizeBasedTriggeringPolicy":
{
"size": "500M"
}
},
"DefaultRolloverStrategy":
{
"max": "40"
}
Cisco Bridge
Cisco Bridge uses a store and forward architecture to push events and other messages from a local RabbitMQ cluster to the Message Bus.
Cisco Bridge outputs logs to:
/var/log/moogsoft/moogsoft_bridge.log for root users
$MOOGSOFT_HOME/log/moogsoft_bridge.log for non-root users
See Cisco Bridge for more information.
Log Configuration File Examples
You can customize each configuration log file to control the behaviour of the logging for the different components in Cisco Crosswork Situation Manager.
See Configure Logging for more information on logging.
Default Configuration Files
The default log configuration file for servlets and utilities is as follows:
{
"configuration": {
"packages": "com.moogsoft",
"monitorInterval": 2,
"ThresholdFilter": {
"level": "info"
},
"appenders": {
"Console": {
"name": "STDOUT",
"PatternLayout": {
"pattern": "%-5level: [%thread][%date{yyyMMdd HH:mm:ss.SSS Z}] [%file:%line] +|%message|+%n"
}
}
},
"loggers": {
"Logger": {
"name": "com.moogsoft",
"additivity": false,
"AppenderRef": [{
"ref": "STDOUT"
}],
"level": "info"
}
}
}
}
The default log configuration file for Moogfarmd is:
{
"configuration": {
"packages": "com.moogsoft",
"monitorInterval": 2,
"ThresholdFilter": {
"level": "trace"
},
"appenders": {
"Console": {
"name": "STDOUT",
"PatternLayout": {
"pattern": "%-5level: [%thread][%date{yyyMMdd HH:mm:ss.SSS Z}] [%file:%line] +|%message|+%n"
}
},
"RollingFile": {
"name": "FILE",
"fileName": "${sys:MoogsoftLogFilename}",
"filePattern": "${sys:MoogsoftLogFilename}-%d{MM-dd-yy}-%i.gz",
"PatternLayout": {
"header": "${sys:MoogsoftLogHeader}",
"pattern": "%-5level: [%thread][%date{yyyMMdd HH:mm:ss.SSS Z}] [%file:%line] +|%message|+%n"
},
"Policies": {
"SizeBasedTriggeringPolicy": {
"size": "500M"
}
},
"DefaultRolloverStrategy": {
"max": "40"
}
}
},
"filters" : {
"MarkerFilter" : {
"marker": "MOOG_ESSENTIAL_INFO",
"onMatch": "ACCEPT",
"onMismatch": "NEUTRAL"
}
},
"loggers": {
"root": {
"additivity": false,
"AppenderRef": [{
"ref": "${sys:MoogsoftLogAppender}"
}],
"level": "warn"
},
"Logger": [
{
"name": "com.moogsoft",
"additivity": false,
"AppenderRef": [{
"ref": "${sys:MoogsoftLogAppender}"
}],
"level": "warn"
},
{
"name": "com.moogsoft.persistence.serialization.CMiniLogToSlf4jLogger",
"additivity": false,
"AppenderRef": [{
"ref": "${sys:MoogsoftLogAppender}"
}],
"level": "error"
}
]
}
}
Asynchronous Appender
You can configure a log file to use an asynchronous appender. This allows you to log event asynchronously. See AsyncAppender for details.
{
"configuration": {
"packages": "com.moogsoft",
"monitorInterval": 2,
"ThresholdFilter": {
"level": "info"
},
"appenders": {
"Console": {
"name": "STDOUT",
"PatternLayout": {
"pattern": "%-5level: [%thread][%date{yyyMMdd HH:mm:ss.SSS Z}] [%file:%line] +|%message|+%n"
}
},
"RollingFile": {
"name": "FILE",
"fileName": "${sys:MoogsoftLogFilename}",
"filePattern": "${sys:MoogsoftLogFilename}-%d{MM-dd-yy}-%i.gz",
"PatternLayout": {
"header": "${sys:MoogsoftLogHeader}",
"pattern": "%-5level: [%thread][%date{yyyMMdd HH:mm:ss.SSS Z}] [%c]: %message%n"
},
"Policies": {
"SizeBasedTriggeringPolicy": {
"size": "500M"
}
},
"DefaultRolloverStrategy": {
"max": "40"
}
},
"Async" : {
"name": "Async",
"AppenderRef": {"ref": "FILE"}
}
},
"loggers": {
"Logger": {
"name": "com.moogsoft",
"additivity": false,
"AppenderRef": [{
"ref": "Async"
}],
"level": "info"
}
}
}
}
Post Logs to Elasticsearch
You can configure logs to be posted to Elasticsearch using the "Http" section and the 'url' property direct them to an Elasticsearch server:
{
"configuration": {
"packages": "com.moogsoft",
"monitorInterval": 2,
"ThresholdFilter": {
"level": "info"
},
"appenders": {
"Console": {
"name": "STDOUT",
"PatternLayout": {
"pattern": "%-5level: [%thread][%date{yyyMMdd HH:mm:ss.SSS Z}] [%file:%line] +|%message|+%n"
}
},
"RollingFile": {
"name": "FILE",
"fileName": "${sys:MoogsoftLogFilename}",
"filePattern": "${sys:MoogsoftLogFilename}-%d{MM-dd-yy}-%i.gz",
"PatternLayout": {
"header": "${sys:MoogsoftLogHeader}",
"pattern": "%-5level: [%thread][%date{yyyMMdd HH:mm:ss.SSS Z}] [%file:%line] +|%message|+%n"
},
"Policies": {
"SizeBasedTriggeringPolicy": {
"size": "500M"
}
},
"DefaultRolloverStrategy": {
"max": "40"
}
},
"Http": {
"name": "Elastic",
"url": "http://localhost:9200/logs/farmdlogs/",
"JsonLayout": {
"compact": true,
"eventEol": true,
"locationInfo": true,
"properties": true
}
}
},
"loggers": {
"Logger": {
"name": "com.moogsoft",
"additivity": false,
"AppenderRef": [{
"ref": "${sys:MoogsoftLogAppender}"
}, {
"ref": "Elastic"
}],
"level": "info"
}
}
}
}
Save Logs to the Database
You can configure your logs to be saved to the database with a configuration similar to the following:
/*
To create the table for the logs to use:
CREATE TABLE IF NOT EXISTS logs(time TIMESTAMP, message TEXT, level TEXT, logger TEXT, exception TEXT);
*/
{
"configuration": {
"packages": "com.moogsoft",
"monitorInterval": 2,
"ThresholdFilter": {
"level": "info"
},
"appenders": {
"Console": {
"name": "STDOUT",
"PatternLayout": {
"pattern": "%-5level: [%thread][%date{yyyMMdd HH:mm:ss.SSS Z}] [%file:%line] +|%message|+%n"
}
},
"RollingFile": {
"name": "FILE",
"fileName": "${sys:MoogsoftLogFilename}",
"filePattern": "${sys:MoogsoftLogFilename}-%d{MM-dd-yy}-%i.gz",
"PatternLayout": {
"header": "${sys:MoogsoftLogHeader}",
"pattern": "%-5level: [%thread][%date{yyyMMdd HH:mm:ss.SSS Z}] [%file:%line] +|%message|+%n"
},
"Policies": {
"SizeBasedTriggeringPolicy": {
"size": "500M"
}
},
"DefaultRolloverStrategy": {
"max": "40"
}
},
"JDBC" : {
"name": "DB",
"tableName": "logs",
"DriverManager": {
"connectionString": "jdbc:mysql://localhost:3306/moogdb??useUnicode=true&characterEncoding=UTF-8&characterSetResults=UTF-8&connectTimeout=5000&rewriteBatchedStatements=true&cacheCallableStmts=true&cachePrepStmts=true&callableStatementCacheSize=1000&prepStmtCacheSize=1000&prepStmtCacheSqlLimit=100000&useCursorFetch=true&useSSL=false",
"userName": "ermintrude",
"password": "m00"
},
"Column": [{
"name": "time",
"isEventTimestamp": true
}, {
"name": "message",
"pattern": "%message"
}, {
"name": "level",
"pattern": "%level"
}, {
"name": "logger",
"pattern": "%logger"
}, {
"name": "exception",
"pattern": "%ex{full}"
}
]
}
},
"loggers": {
"Logger": {
"name": "com.moogsoft",
"additivity": false,
"AppenderRef": [{
"ref": "${sys:MoogsoftLogAppender}"
}, {"ref": "DB"}],
"level": "info"
}
}
}
}
Change passwords for default users
Cisco Crosswork Situation Manager creates users for Linux, RabbitMQ, the Cisco Crosswork Situation Manager UI and Graze API during the installation process. As a security measure, you must change the default passwords for these users. After you change the passwords you may need to update the Cisco Crosswork Situation Manager configuration to use the new passwords.
If you run in a distributed environment, you can set unique passwords for all components on each host.
Cisco recommends you encrypt passwords for use in Cisco Crosswork Situation Manager configuration files. See Moog Encryptor for more information. In distributed or high availability environments, encrypt passwords on each machine.
Linux users
The Cisco Crosswork Situation Manager installation package creates the following Linux users with login privileges:
· moogsoft
· moogadmin
· moogtoolrunner
Execute the passwd command to change the password of these Linux users. For example, to change the password for the moogtoolrunner user:
passwd moogtoolrunner
The Cisco Crosswork Situation Manager installation package creates the following Linux users without login privileges:
· Elasticsearch
· Nginx
Update Cisco Crosswork Situation Manager Configuration
After you change the password for moogtoolrunner, update its password in $MOOGSOFT_HOME/config/servlets.conf. You can use either the toolrunnerpassword or encrypted_toolrunnerpassword property. For example:
#toolrunnerpassword: "MyNewPassword",
encrypted_toolrunnerpassword: "rmW2daCwMyI8JGZygfEJj0MZdbIkUqX3tT/OIVfMGyI=",
Restart Apache Tomcat to apply the configuration change:
service apache-tomcat restart
Note
You do not need to update the Cisco Crosswork Situation Manager configuration after you change the password for other Linux users with login privileges.
RabbitMQ user
The Cisco Crosswork Situation Manager installation process creates a RabbitMQ user called moogsoft. Execute the rabbitmqctl change_password command to change the moogsoft user password. For example:
rabbitmqctl change_password moogsoft <new-password>
Update Cisco Crosswork Situation Manager configuration
After you change the moogsoft user password, update the password in $MOOGSOFT_HOME/config/system.conf. You can use either the password or encrypted_password property. For example:
"username" : "moogsoft",
#"password" : "MyNewPassword",
"encrypted_password" : "e5uO0LY3HQJZCltG/caUnVbxVN4hImm4gIOpb4rwpF4=",
If you are running in a distributed environment, update the password configuration on every host.
Graze API and UI users
The installation process creates the following default users for the UI:
1. admin
2. graze
3. super
You can also use the graze user to log into the Graze API.
To change the default passwords for these users, log into the UI and go to Settings > Users.
Configuration Steps Overview
Architecting a solution in Cisco Crosswork Situation Manager is in a way a "backward" design process. You need to ingest data to start the assessment and building strategies, but the resulting Situation design defines the further requirements for data ingestion.
Throughout the deployment process, you will be coming back to the ingestion step multiple times. When you determine your clustering strategy and design Situations you'd identify additional need to extract certain information from the source event payload.
For example, you may need to bundle alerts by the floor where the server is located, and that information is available as part of the server name. In that case, you'll be coming back to the ingestion step, and perform data parsing for the field.
Remember your solution design process is a cyclical, iterative one.
Design Your Situation
Situation design is the practice of identifying the alert clustering strategy to achieve the business objectives for using Cisco Crosswork Situation Manager.
Situation design is not just about identifying how you want to cluster your alerts. It dictates data ingestion, alert creation, and processing requirements.
Also, it is not a linear process. Rather, you will repeat the iterative process to incrementally improve configuration until you achieve your goal.
Perform Business Analysis and Information Inventory
The business analysis stage breaks down into 4 steps.

Analyze Data
The data analysis phase takes 4 steps.

Ingest Event Data from Monitoring Tools
Integrations enable you to connect applications and other tools to Cisco Crosswork Situation Manager.
You can integrate with applications such as ticketing, monitoring and collaboration tools. You can also create your own custom webhook integrations.
Monitoring
You can integrate with the following monitoring applications:
2. Apache Kafka
3. AppDynamics
4. Amazon Web Services (AWS) AWS
5. CA Technologies
6. Catchpoint
7. DataDog
8. Dynatrace
9. Email
10. EMC Smarts
11. ExtraHop
12. Fluentd
13. HP
14. JMS
15. Microsoft Azure
16. Microsoft SCOM
17. Moogsoft Express
18. Nagios
19. New Relic
20. Node.js
21. Node-RED
22. Office 365 Email
23. Oracle Enterprise Manager
24. Pingdom
25. RabbitMQ
26. REST LAM
27. Sensu
28. SevOne
29. Site24x7
30. SolarWinds
31. Splunk Integrations
32. Sumo Logic
33. Tivoli EIF LAM
34. SNMP Trapd LAM
35. VMware
36. Webhook
37. WebSphere MQ
38. Lenovo XClarity LAM
39. Zabbix
40. Zenoss
Ingest Source Event Data
Data ingestion is the process that inputs ("raw") event data from your infrastructure and converts the relevant data fields to ("processed") Cisco events. Cisco Crosswork Situation Manager can ingest a wide variety of formats: plain-text status messages, binary SNMP data, JSON-formatted strings.
As part of your data ingestion setup, you will examine your incoming data stream, identify data fields that do not correspond to standard Cisco Crosswork Situation Manager events and decide which of these fields you want to preserve. Some data might be useful further downstream: for clustering alerts into Situations or providing Operators with diagnostic information.
As a best practice, do not try to get your data ingestion settings right on the first try. You are dealing with a bit of paradox - you need to ingest data in order to uncover the data processing requirements. By ingesting the real data you can conduct discovery sessions effectively, which leads to identifying the data ingestion requirements. So expect to update the data ingestion settings throughout the deployment process.
Data ingestion takes 4 steps.

Watch the video to learn these steps in detail.
There are two types of LAMS:
· Generic LAMs – Based on a specific protocol or communication type, but not specific to a particular product.
· Vendor-specific LAMs – Configured or customized versions of the generic LAMs that are set up to work with a specific product
In the following section, we will step through the LAM configuration process using the REST LAM example. Consult the developer guide for other types of LAMs, but the points of considerations discussed in the following pages will apply to them.
Types of LAM
LAM and LAMbot
In Cisco Crosswork Situation Manager, event ingestion settings are configured in two places.
· LAM (lam.conf configuration file) - handles data acquisition, tokenization, and mapping. In some cases, it can also perform some normalization.
· LAMbot - optional JavaScript to handle additional normalization processes.
First, we will take a look at the LAMs.
Which Type of LAM Should I Use?
In some cases, you could ingest the same data using separate mechanisms. In such cases, typically receiving LAMs are the preferred option over polling type.
Also, when given a choice of multiple options you should consider the following list in the following order of preference:
· REST LAM or webhook
a. Implemented as a direct forward from the underlying monitoring tool or via a messaging bus such as RabbitMQ, Kafka, JMS.
b. Provide a more reliable delivery mechanism, as well as has no dependency on a polling cycle in case of a polling LAM in Cisco Crosswork Situation Manager.
· REST Client LAM
· SNMP LAM if MIB conversion already exists.
· Socket LAM if event raw payload is structured to allow tokenization.
· Syslog LAM if messages are structured and invariable and require little or no ongoing maintenance via email
UDP Socket and SNMP protocols do not offer guaranteed delivery of forwarded events as opposed to webhook or messaging bus mechanisms.
Tip
If you decide to swap the ingestion mechanisms - for example, swap webhook with a RabbitMQ LAM - for a monitoring system, make sure to use a consistent approach to the data parsing in the lambot so that there is no impact to the downstream processing in Cisco Crosswork Situation Manager.
LAM Types - Generic, Aggregation, and Vendor-Specific

There are three types of LAMs shipped with Cisco Crosswork Situation Manager and each requires a different degree of configuration:
Generic LAMs
The generic adapters have no specific default configuration - i.e. they can be customized to any suitable single data source that sends events on the supported protocol. The associated config and lambot files provide only a framework for acquiring, tokenizing, and mapping the raw data, and require that you configure the logic for the normalization part including deriving an appropriate signature.
There are three types of generic LAMs:
· Socket: accepts data over TCP or UDP network socket, and lets you specify how to parse the incoming data stream.
· Rest/webhook: listens for data in JSON format over a REST protocol.
· Rest client: polls a REST server and accepts JSON data.
Aggregation LAMs
The aggregation LAMs are specific to a protocol or vendor platform and have a configuration and a lambot for generically consuming events from these sources, but do little or no processing of the event contents themselves. Same as generic LAMs you will be required to configure the normalization part.
Since these are often aggregated event sources, there may be multiple event formats within the single ingestion source. For example, a customer may send all of their event data - events from both Netcool and Nagios - to a Kafka bus. When we consume these using the Kafka LAM they still remain Netcool and Nagios events, containing the different attributes and lifecycle behavior associated with those underlying event sources. They will need the appropriate mapping, routing, processing, and normalization associated with these event sources. Without normalization at the aggregation layer, this work has to be done in the LAMbot.
Another example of aggregated ingestion is consuming the syslog data arriving from the Splunk platform. In this case the out of the box Splunk LAM would have to be enhanced to construct an appropriate signature and syslog string parsing into attributes such as hostname and severity unless this has already been done at the aggregation layer.
The biggest effort of setting up an aggregation LAM lies in identifying the number of separate event formats arriving via the adapter and assessing the normalization workload needed for each. You may be required to add routing logic for separate format handling. Use centrally administered modules to overcome and compensate for complexity within the LAMbot.
The aggregation LAMs are:
· Logfile
· Kafka
· JDBC
· Splunk
· Syslog (UDP or TCP socket)
· Trapd (UDP)
· RabbitMQ
· WebSphere MQ
Vendor-Specific LAMs
Vendor-specific LAMs are the most complete, because they are product specific with the data in a known format, and can be handled in a consistent manner regardless of customer. We would expect only light customization to the configuration and - only needed if the customer has any specifics - to the LAMbot.
Consult the Integrations section of the documentation for the complete list of vendor-specific LAMs.
Types of Data to Ingest
Before you configure data ingestion, explore the format and quality of the incoming data from each source. The following are the recommended practices around data ingestion.
Tip 1: Don't Feed Time Series Data

Cisco Crosswork Situation Manager is designed to deal with fault data. That means you should ingest events that may be worthy of operator attention. Do not forward continuous metrics (time series data) should into Cisco Crosswork Situation Manager. Instead, set up those data sources to send events when performance metrics reach a specific threshold of interest to your operations team.
Tip 2: Feed Only the Complete Set of Data

Don't send events with critical data missing from the event payload. For example fault description or hostname. Here's an obvious example: if the source event data is missing value for the description field, you won't be able to cluster by the "Events with similar descriptions" cookbook.
Tip 3: Pay Attention to Consistency
Make sure to populate data consistently across fields that will be used in any downstream processes. For example, attributes you plan to use for clustering or for maintenance windows filters clearly need to be consistent. Cookbooks are remarkably flexible clustering tools, but always be mindful to feed consistent data for maximum accuracy.
Also, given that Cisco Crosswork Situation Manager provides event deduplication based on the same context between alerts, make sure that any subsequent event updates to the original occurrence have the fields consistently populated. Otherwise, you will need a mechanism to backfill subsequent updates based on the initial event occurrence. Additional data processing introduces overhead and can slow down the event processing rate.
Tip 4: Have a Strategy to Identify Missing Data
Define your strategy for capturing alerts with missing data. For example, highlight any alerts with missing data and cluster them into specific situations. Later, an administrator can review and refine the ingestion configuration as needed.
Tokenize Source Event Data
Cisco Crosswork Situation Manager tokenizes incoming data. After it has divided the data into tokens Cisco Crosswork Situation Manager assembles the tokens into an event. This topic covers the tokenizing options so you can control how tokenising works.
Start and end characters
The first two are a start and end character. The square brackets [] are the JSON notation for a list. You can have multiple start and end characters. The system considers an event as all of the tokens between any start and end character.
start: [],
end: ["\n"],
The above example specifies:
· There is nothing defined in start; however, a carriage return (new line) is defined as the end character
In the example above, the LAM is expecting an entire line to be written followed by a return, and it will process the entire line as one event.
Carefully set up, you can accept multi-line events.
Regular expressions
Regular expressions can be used to extract relevant data from the input data. Here's an example definition:
parsing:
{
type: "regexp",
regexp:
{
pattern : "(?m)^START: (.*?)$",
capture_group: 1,
tokeniser_type: "delimiters",
delimiters:
{
ignoreQuotes: true,
stripQuotes: true,
ignores: "",
delimiter: ["||","\r"]
}
}
}
Delimiters
Delimiters define how string are split into tokens for processing. To process a comma-separated file, where a comma separates each value, define the comma as a delimiter.
Token are referenced from the start position starting at one (not zero).
For example, for the input string “the,cat,sat,on,the,mat” where the delimiter is a comma, token 1 is “the”, token 2 “cat” and so on.
Combining tokenization and parsing can be complex. For example, if you use a comma delimiter and the token contains a comma, the token is split into two. To avoid this you can quote strings. You can then define whether to strip or ignore quotes.
An example delimiters section in a configuration file is as follows:
delimiters:
{
ignoreQuotes: true,
stripQuotes: false,
ignores: "",
delimiter: [",","\r"]
}
When ignoreQuotes is set to true, all quotes are ignored and inputs are tokenised on the delimiters only.
When ignoreQuotes is false, delimiting does not occur until the matching end quote is found. This allows tokens to include delimiters. For example, given the following input when the delimiter is a comma:
hello world, "goodbye, cruel world".
Found tokens when ignoreQuotes is true: [hello world, goodbye, cruel world] (3).
Found tokens when ignoreQuotes is false: [hello world, "goodbye, cruel world"] (2).
Set stripQuotes to true to remove start and end quotes from tokens. For example, "hello world" results in a single token: [hello world].
Ignores is a list of characters to ignore. Ignored characters are never included in tokens.
Delimiter is the list of valid delimiters used to split strings into tokens.
Mapping
For each event in the file, there is a positioned collection of tokens. Cisco Crosswork Situation Manager enables you to name these positions so if you have a large number of tokens in a line, of which you are interested in only five or six, instead of remembering it is token number 32, you can call token 32 something meaningful.
variables:
[
{ name: "Identifier", position: 1 },
{ name: "Node", position: 4 },
{ name: "Serial", position: 3 },
{ name: "Manager", position: 6 },
{ name: "AlertGroup", position: 7 },
{ name: "Class", position: 8 },
{ name: "Agent", position: 9 },
{ name: "Severity", position: 5 },
{ name: "Summary", position: 10 },
{ name: "LastOccurrence",position: 1 }
]
The above example specifies:
· position 1 is assigned to Identifier; position 4 is assigned to node and so on
· Positions start at 1, and go up rather than array index style counting from 0
This is important because at the bottom of the file, socket_lam.conf there is a mapping object that configures how Cisco Crosswork Situation Manager assigns to the attributes of the event that is sent to the message bus, values from the tokens that are parsed. For example, in mapping there is a value called rules, which is a list of assignments.
mapping:
{
catchAll: "overflow",
rules:
[
{ name: "signature", rule: "$Node:$Serial" },
{ name: "source_id", rule: "$Node" },
{ name: "external_id", rule: "$Serial" },
{ name: "manager", rule: "$Manager" },
{ name: "source", rule: "$Node" },
{ name: "class", rule: "$Class" },
{ name: "agent", rule: "$LamInstanceName" },
{ name: "agent_location", rule: "$Node" },
{ name: "type", rule: "$AlertGroup" },
{ name: "severity", rule: "$Severity", conversion: "sevConverter" },
{ name: "description", rule: "$Summary" },
{ name: "first_occurred", rule: "$LastOccurrence" ,conversion: "stringToInt"},
{ name: "agent_time", rule: "$LastOccurrence",conversion: "stringToInt"}
]
}
In the example above, the first assignment name: "signature",rule:"$Node:$Serial" ( "$Node:$Serial is a string with $ syntax) means for signature take the tokens called Node and Serial and form a string with the value of Node followed by a colon followed by the value of Serial and call that signature in the event that is sent to the Cisco Crosswork Situation Manager.
You define a number of these rules covering the base attributes of an event. For reference, Cisco Crosswork Situation Manager expects a minimum set of attributes in an event that are shown in this particular section.
Using braces within mapping definitions allows you to include URLs and special characters. For example:
mapping:
{
[
{ name: "type", rule: "${https://url}" },
{ name: "type", rule: "${https://url} customText" },
{ name: "type", rule: "${https://url}${keyA\\b\\c}" }
]
}
Escape backslashes (\\) and note that you cannot embed variables.
If you have an attribute that is never referenced in a rule, for example “enterprise trap number” which is never mapped into the attribute of an event, they are collected and placed as a JSON object in a variable defined in catchAll and passed as part of the event.
Custom info mapping
You can define custom_info mapping in LAM configuration files. This allows you to configure a hierarchical structure. An example mapping configuration is:
mapping:
{
rules:
[
{ name: "custom_info.eventDetails.branch", rule: "$branch" },
{ name: "custom_info.eventDetails.location", rule: "$location" },
{ name: "custom_info.ticketing.id", rule: "$incident_id" }
]
}
This produces the following custom_info structure:
"custom_info": {
"eventDetails":
{
"branch":"Kingston",
"location":"KT1 1LF"
},
"ticketing":
{
"id":94111
}
}
You can use braces within mapping definitions. This allows you to include URLs and special characters. For example:
{ name: "type", rule: "${https://url}" },
{ name: "type", rule: "${https://url} customText" },
{ name: "type", rule: "${https://url}${keyA.b.c}" }
Note that you must escape backslashes and you cannot embed variables.
Polling LAMs with multiple target support
See Configure Polling LAMs to Poll More Than One Target Data Source.
Filtering
The filter defines whether a LAM uses a LAMbot. A LAMbot moves overflow properties to custom info and performs any actions that are configured in its LAMbot file. The LAMbot processing is defined in the presend property in the filter section of the LAM configuration file.
For example, the SolarWinds LAM configuration file contains this filter section:
filter:
{
modules : ["CommonUtils.js"],
presend : "SolarWindsLam.js"
}
This indicates that SolarWindsLam.js processes the events and then sends them to the Message Bus.
If you don’t want to map overflow properties, you can comment out the presend property to bypass the LAMbot and send events straight to the Message Bus. This speeds up processing if you have a high volume of incoming alerts. Alternatively, you can define a custom stream to receive events. See Alert Builder for details.
See LAMbot Configuration for more information on the presend function.LAMbot Configuration
The optional modules property can be used to provide a list of JavaScript files that are loaded into the context of the LAMbot and executed. It allows LAMs to share modules. For example, you can write a generic Syslog processing module that is used in both the Socket LAM and the Logfile LAM. This reduces the need for duplicated code in each LAMbot.
Conversion rules
Conversion rules are used by Cisco Crosswork Situation Manager to convert received data into a usable format, including severity levels and timestamps.
Severity
The following example looks up the value of severity and returns the mapped integer.
conversions:
{
sevConverter:
{
lookup: "severity",
input: "STRING",
output: "INTEGER"
},
},
constants:
{
severity:
{
"CLEAR": 0,
"INDETERMINATE": 1,
"WARNING": 2,
"MINOR": 3,
"MAJOR": 4,
"CRITICAL": 5,
moog_lookup_default: 3
}
}
In the above example:
1. conversions receives a text value for severity.
2. sevConverter uses a lookup table "severity" to reference a table named severity defined in the constants section.
3. The integer value matching the text value is returned.
4. moog_lookup_default is used to specify a default value when a received event does not map to a listed value.
For example, the text value "MINOR" is received and the integer value 3 is returned.
If moog_lookup_default is not used and a received event severity does not map to a specifically listed value, the event is not processed.
See Severity Reference for more information about the severity levels in Cisco Crosswork Situation Manager.Severity Reference
Time
Time conversion in Cisco Crosswork Situation Manager supports the Java platform standard API specification. See Simple Date Format for more information.
Some Unix time formats are indirectly supported and LAM logging indicates any automatic conversion that occurred at startup.
The only PCRE/Perl modifier automatically converted is the lone 'U' ungreedy modifier, PCRE's '-U' is not supported. If the pattern contains a -U it should be removed manually.
You can specify a time zone configuration so the LAM parses the incoming timestamps with the expected time zone. For example:
conversions:
{
timeUnitConverter:
{
timeUnit: "MILLISECONDS",
input: "STRING",
output: "INTEGER"
},
timeConverter:
{
timeFormat: "%Y-%m-%dT%H:%M:%S",
timeZone: "UTC",
input: "STRING",
output: "INTEGER"
}
}
You can specify the timezone name or abbreviation. See List of TZ Database Time Zones for the full list.
JSON events
The other capability of all LAMs is the native ability to consume JSON events. You must have a start and end carriage return as it is expecting a whole JSON object following the carriage return.
Under parsing you have:
end: ["\n"]
For the delimiter you have:
delimiter: ["\r"]
JSON is a sequence of attribute/value, and the attribute is used as a name. Under mapping, you must define the following attribute builtInMapper: "CJsonDecoder". It automatically populates, prior to the rules being run, all of the values contained in the JSON object.
For example if the JSON object to be parsed was:
{"Node" : "acmeSvr01","Severity":"Major"...}\n
The attributes available to the rules in the mapping section would be xNode="acmeSvr01", $Severity="Major" and so on.
Map Raw Event Data to Cisco Crosswork Situation Manager Events
This topic is about how to map event data in a Link Access Module (LAM) configuration file.
Configure the mapping in lam.conf
Mapping options vary based on the tokenization method you used.
· For JSON formatted raw events you can map the incoming keys directly to Cisco Crosswork Situation Manager event fields under the mapping section.
· For data parsed using start_and_end or regex, the resulted tokens need to be first given a variable name depending on the position of the token. For example, if the incoming event is parsed into 4 tokens then you need 4 variables defined. You can then use these variable names in the 'mapping section'. If you don't use the variables in the mapping section then everything ends up in the "overflow" field.
variables:
[
#
# Note that positions start at 1, and go up
# rather than array index style counting from zero
#
# Names of fields in input data can be substituted here, which is
# useful for removing illegal characters when building rules.
#
{ name: "Signature", position: 1 },
{ name: "SourceId", position: 2 },
{ name: "ExternalId", position: 3 },
{ name: "Manager", position: 4 },
{ name: "Class", position: 5 },
{ name: "Agent", position: 6 },
{ name: "AgentLocation", position: 7 },
{ name: "Type", position: 8 },
{ name: "Severity", position: 9 },
{ name: "Description", position: 10 },
{ name: "LastOccurrence", position: 11 },
{ name: "AgentTime", position: 12 },
{ name: "Trigger Node", substitute: "TriggerNode" }
],
During the mapping stage, LAM places any unmapped raw event data into a catchall "overflow" field. You can then choose to access the "overflow" field in a LAMBot, perform further parsing and retain certain variables from it in the custom_info object. An example of how this can be implemented is explained in the next section.
What happens data in unmapped fields?
After the source data is tokenized, converted, and parsed as needed, then mapped to the Cisco Crosswork Situation Manager fields, you will have leftover. LAM places any unmapped raw event data into a catchall "overflow" field.
You can then choose to access the "overflow" field in a LAMBot, perform further parsing and retain certain variables from it in the custom_info object.
As you have read a few times by this point already, implementation of Cisco Crosswork Situation Manager takes a cyclical, iterative process. You will be visiting this overflow field to extract some data to use to respond to more requirements as you uncover them. Begin by mapping the minimum number of custom info fields and add more processes as you identify the needs by the downstream activities.
What Is a Custom_info Field
What Is a Custom Info Object?
In Cisco Crosswork Situation Manager, there isn't always a corresponding field for everything you want to keep from the source system. Custom Info is a field that allows you to extend the Cisco Crosswork Situation Manager alert schema. You can store additional information that has not been mapped to any standard Alert field attributes. Store data in the custom_info field as a JSON-formatted tree.
Custom Info Field Best Practices
You need to be strategic and selective about adding custom_info. Keep the following points in mind as you create custom info fields.
Do NOT Add Unnecessary Information
Do NOT Overload the event Custom Info object with unnecessary information. When you are just beginning the ingestion stage, it is likely that you do not know all the fields you need. Do NOT create custom fields for everything at this stage. Consult your operators who will be addressing these alerts. Ask them what additional information they need in the alert payload in order to diagnose issues and only keep those values. Also when you get to the alert clustering process you will identify the custom information needs (if any) for clustering.
Mind the Event Size Limit
The maximum allowed size of an event is 64KB. If an event exceeds the limit, it does not get created in the system. Be mindful of the limit and truncate some of the field values as needed. For example, if you decide to add a list of values such as impacted applications, add a length limit to not risk exceeding the event size limit
Mind the Performance Impact
The size of the event directly impacts the amount of disk space required for the database server. Each time an event is deduplicated, or the alert is updated in the system, a complete copy of it I saved in the database. This includes the custom_info object. Suppose you have a 20KB alert, and it gets updated and actioned 100 times. The database footprint of it will be about 2MB. See Retention Policy under Sizing Recommendations.
Use the Same Base Model
It is best practice to enforce the same custom_info base model across all of your ingestions. Use the example model below. You can expand it as you see fit, but always add defaults.
var baseCustomInfo = {
enrichment : {},
mooghandling : {
isEnriched : false,
archiveOnly : false,
toolFlags : {},
},
services : [],
location : {},
eventDetails : {},
ticketing : {
ticketNumber : null,
ticketStatus : null
}
}
Learn More
For information on Workflow Engine Functions you can use to modify custom_info, see Workflow Engine Functions Reference.
Normalize Data
For complex processing of event data you can use a LAMbot.
LAMbot processing
Some event fields may have embedded information that can be used later as enrichment and alert correlation. For example, a hostname may include regional information that can be used to cluster alerts based on physical location. As a best practice, parse incoming data fields which include this type of information. A number of utilities, for example, the Bot utility, are available to simplify data parsing in the LAMbot.
Any event field can potentially be used in correlation. It is important to identify early on which fields will be used and assign them accordingly. As a rule, any fields identified for correlation should have reliable data. Avoid unreliable event fields.
Assume a simple incoming raw event of the following format:
{
"ip_address":"10.42.63.74",
"event_id":"e3562",
"manager":"MAN",
"host":"lon35sql04",
"eventID":"e4268",
"check":
{
"name": "database",
"type": "availability"},
"region":"EMEA",
"datacenter":"London",
"priority":"crit",
"message":"Database is down",
"app" : ["App A", "App B"]
}
}
The following example shows a mapping to support the incoming event. Note the new severityConverter transformation. In the LAM configuration file:
constants:
{
custom_severity:
{
"crit": 5,
"ok": 0,
"warn": 2,
"minor": 3,
"error": 4,
moog_lookup_default: 1
}
},
conversions:
{
severityConverter:
{
lookup: "custom_severity",
input: "STRING",
output: "INTEGER"
}
},
mapping:
{
catchAll: "overflow",
rules:
[
{ name: "signature", rule: "$host::$check.name::$check.type" },
{ name: "source_id", rule: "$ip_address" },
{ name: "external_id", rule: "$external_id" },
{ name: "manager", rule: "$manager" },
{ name: "source", rule: "$host" },
{ name: "class", rule: "$check.name" },
{ name: "agent", rule: "$LamInstanceName" },
{ name: "agent_location", rule: "$region" },
{ name: "type", rule: "$check.type" },
{ name: "severity", rule: "$priority", conversion: "severityConverter" },
{ name: "description", rule: "$message" },
{ name: "agent_time", rule: "$moog_now" }
]
}
filter:
{
presend: "lambot.js"
}
Nested fields are supported. If the incoming field does not exist, the actual string "$incomingField" is used.
Any unmapped data from the raw event ends up in the catchAll field which by default is called "overflow". An overflow is a JSON object that maps the remaining event fields to indexes accessible using the standard Javascript object functions. If you need to access this data to perform further parsing you can do it as shown below in the LAMbot. Cisco advises using the Bot utility to achieve this.
Here is an excerpt from a LAMbot that further parses the event payload from above. Note the usage of Bot utility methods to build a custom info base and add fields to it.
Always use botUtil.setCustomInfo to set your custom_info in a LAMbot. The logic behind the method also nullifies the overflow before the event despatches to the Message Bus. This reduces the event size and therefore minimizes any size-related issues on the bus.
Also note botUtil.checkEvent.validateEvent method to validate the consistency of the event. In the LAMbot Javascript file:
function presend(event)
{
// Create a base model for custom_info, consistent across all ingestions
var custom_info = botUtil.createBaseCustomInfo();
// Default value to be used in case the mapped field does not exist
var default_value = "unknown";
// Get the overflow object
var overflow = botUtil.getOverflow(event);
// Print the overflow object in the logs at the Info level.
// Useful during initial setup.
botUtil.printOverflow(overflow);
// Check overflow for a list of expected mandatory attributes
var attributeList = ["app", "datacenter"];
var boolean_flag = botUtil.checkOverflow(overflow,attributeList);
// If the mandatory fields are present that tag event as complete.
// Otherwise set it to false so that we can filter on the list of alerts with incomplete set of data
if (boolean_flag)
{
custom_info.eventDetails.complete = true;
}
else
{
custom_info.eventDetails.complete = false;
}
// Retain app and region from overflow as these will be used during clustering.
// Use a default value in case the field is missing.
custom_info.eventDetails.app = overflow.app ? overflow.app : default_value;
custom_info.eventDetails.region = overflow.region ? overflow.region : default_value;
// Set custom info
botUtil.setCustomInfo(event,custom_info);
// It will check the event for any invalid fields and also print out in logs the entire payload
botUtil.checkEvent.validateEvent(event,botUtil);
botUtil.printCEvent(event);
return true;
}
Post normalization
After the LAMbot completes data normalization it exits with one of the following options:
· Return true: Event is sent to the Message Bus on the default events stream
· Return { stream: "stream_name", passed: true }: Event is sent to the message bus on a separate stream to the main one. You will need to specifically configure an AlertBuilder to listen to the stream_name:
· Return false: Event is dropped and not sent to the Message Bus (usually implemented when you want to blacklist certain events such as audit events from being processed by Cisco Crosswork Situation Manager at all).
Sending data on a separate stream is useful if you need to set up separate functionality to the main AlertBuilder. If you choose to do so, remember that you need to explicitly configure an AlertBuilder to accept the data on the configured stream.
{
name : "AlertBuilder_Stream_",
classname : "CAlertBuilder",
run_on_startup : true,
moobot : "AlertBuilder._Stream_.js",
process_output_of : "Event Workflows",
# metric_path_moolet - a Moolet included in the
# calculation of the time taken for events to complete
# their path through the system from initial ingestion
# through to complete processing.
#
metric_path_moolet : true,
# Specify a list of streams to create alerts for. Reference the
# streams set in the filter section of the LAM configuration.
# Defaults to the generic event stream.
# If you are using the Event Workflow Moolet, configure the
# process_output_of property instead.
event_streams : [ "stream_name" ],
threads : 4,
events_analyser_config : "events_analyser.conf",
priming_stream_name : null,
priming_stream_from_topic : false,
moolet_queue_size_limit: 0
}
Map Event Severity Levels
Severity is a measure of the seriousness of an event and indicates how urgently it requires corrective action.
Cisco Crosswork Situation Manager LAMs and integrations use six industry-standard severity levels as follows:
· 0: Clear - One or more events have been reported but then subsequently cleared, either manually or automatically.
· 1: Indeterminate - The severity level could not be determined.
· 2: Warning - A number of faults with the potential to affect services have been detected.
· 3: Minor - A fault that is not affecting services has been detected. Action may be required to prevent it from becoming a more serious issue.
· 4: Major - A fault is affecting services and corrective action is required urgently.
· 5: Critical - A serious fault is affecting services and corrective action is required immediately.
The severity mapping is set in each LAM configuration file:
severity:
{
"CLEAR" : 0,
"INDETERMINATE" : 1,
"WARNING" : 2,
"MINOR" : 3,
"MAJOR" : 4,
"CRITICAL" : 5,
}
The LAM takes the severity string in a received event and translates it into one of the above integer values using the mapping in its configuration file:
sevConverter:
{
lookup : "severity",
input : "STRING",
output : "INTEGER"
},
mapping:
rules:
[
{ name: "severity", rule: "$severity",conversion:"sevConverter"},
]
You can customize the severity section of the LAM configuration file according to the severities used in the system sending events to Cisco Crosswork Situation Manager. In the following example, events sent to the LAM with non-standard severities 'info' and 'Information' are mapped to 'INDETERMINATE' in Cisco Crosswork Situation Manager:
severity:
{
"info" : 1,
"Information" : 1,
"user" : 1,
"warning" : 2,
"Warning" : 2,
"error" : 5,
moog_lookup_default : 1
}
The moog_lookup_default property specifies a default value to use when the severity does not match any of the defined strings. If you do not set a default, events with an unmapped severity are not processed. For more information on mapping see "Conversion Rules" in Data Parsing.
Cisco Crosswork Situation Manager determines a Situation's severity from the member alert with the highest severity level.
Tip
It is good practice to use moog_lookup_default in all of the configured lookups as it prevents the event from being dropped when it encounters a conversion error.
Configure de-duplication key using Signature
Signature is the value Moogsoft AIOps uses to deduplicate source events with the same context. Moogsoft AIOps assigns a signature value to each event it ingests, constructed from a subset of the event fields. If Moogsoft AIOps finds an event signature to be unique, it creates a new alert. Otherwise, it adds the event to an existing alert with a matching signature.
After Moogsoft AIOps deduplicates events into alerts, you can still access the individual event information from the alert timeline.
Most LAMs and integrations include a default signature mapping. If you are building a custom data ingestion or tweaking the default, you can use the fields of your choice to define the signature.
Why is Signature Important?
The composition of the signature is very important because it has a significant impact on what you see in the alert list.
The first time Moogsoft AIOps ingests an event with a specific signature it creates a unique alert. If it ingests another event with a matching signature it deduplicates it into the same alert. Moogsoft AIOps updates the alert timestamp and increments the alert count. This is very useful in reducing the number of alerts in the system.
Default Signatures
To view and edit default signatures for integrations configured in the Moogsoft AIOps UI:
· Go to Integrations and click the name of your installed integration in the left panel.
· Click the Alert Noise Reduction tab and scroll down to the Signature Editor section.
This section displays the fields that can be used to create a baseline signature for this integration. You can edit the signature here to select different or additional fields. Click Use Recommended Fields to restore the recommended default.
You can view and edit default LAM signatures in LAM configuration files. For example, the SevOne configuration file $MOOGSOFT_HOME/config/sevone_lam.conf contains the following signature definition in the mapping rules:
{ name: "signature", rule: "$origin::$deviceId::$objectId" }
Signature Composition
A signature is made up of a subset of event properties. Different types of events require different signatures.
In general, fields to consider using in the signature are:
· Source, such as hostname
· Event type or class
· Static unique IDs
· Error code
· Impacted entities
Do not include fields in the signature that may change between events with the same context. For example:
· Timestamp
· State changes such as up or down
· Event count
· Variable unique IDs
· Severity
· Descriptions with changing content such as metrics
For example, every event has a different timestamp so including it in the signature effectively disables deduplication.
A perfect signature contains just enough information to identify the context of an event.
Signature Length and Concatenation
There is no restriction imposed on the length of signatures in raw events. Signatures longer than 746 characters are hashed at the alert level. This improves the manageability of signatures in the database but does not affect deduplication. The hashed signature length is 40 characters.
If you edit the signature in a LAM configuration file, concatenate multiple fields with two colons "::" to prevent misleading results. For example, if you concatenate source "Node A" and unique ID "1234" as "NodeA1234" this could potentially also match Node A1 and unique ID 234.
Example
The Email LAM uses the following default signature mapping:
$hostname::$subject
The Email LAM retrieves the following email messages in this order and sends them to Moogsoft AIOps:
Event 1:
ip-172-22-97-140.ec2.internal::TDM 18 Remote Loss of Signal
Event 2:
ip-172-22-97-140.ec2.internal::TDM 18 Remote Loss of Signal
Event 3:
ip-172-22-99-144.ec3.internal::TDM 18 Remote Loss of Signal
Events 1 and 2 have an identical signature. Moogsoft AIOps creates an alert for event 1 and deduplicates event 2 into the same alert. It creates a separate alert for event 3 which has the same subject but a different hostname.
How Do I Select Appropriate Signature Values?
Signature is the context to be shared by events that belong to the same alert. For example, the shared context might be the same fault, on the same hardware or software asset, in the same network location.
Consider an example of events where only the timestamp or severity varies from event to event. All these events should have the same signature and be deduplicated into a single alert.
If in another case, events involve different equipment or different problems, they should have different signatures and become separate alerts. This way database replication failures with differing severities will have the same signature value, but a database replication failure and a database query failure will have different signatures.
Data Granularity and Deduplication

Configure Polling LAMs to Poll More Than One Target Data Source
Polling LAMs that support multiple target data sources contain the targets property in the configuration file. The following Polling LAMs have multiple target support:
· CA Spectrum
· DataDog Client
· Dynatrace APM
· HP NNMi
· HP OMi
· JDBC
· New Relic
· New Relic Insight
· Rest Client
· SevOne
· SolarWinds
· VMware vCenter
· VMware vRealize Log Insight
· VMware vSphere
· Zabbix
· Zenoss
For these LAMs, the event payload includes the target name and target URL. These are written to custom_info.eventDetails.moog_target_name and custom_info.eventDetails.moog_target_url:
var overflow = commonUtils.getOverflow(event);
event.set("overflow", null);
var eventDetails = {
"moog_target_name": overflow.moog_target_name,
"moog_target_url": overflow.moog_target_url
};
event.setCustomInfoValue("eventDetails", eventDetails);
These may be available in the LAMbot functions, and can be enabled or disabled if required.
Hold a Discovery Session with Operators
The first step of Situation design is to identify the operators' needs. Identify the teams that will be onboarded to Cisco Crosswork Situation Manager, and audit the operators within the teams about the information they need to see in Situations and the corresponding operational workflow.
Your goal for the discovery session is to identify the content and context, as well as primary and secondary data required to produce the result. Also, by investing your time in understanding exactly what information is required to respond to incoming events, you will be able to perform with clear purposes, which in turn reduces the likelihood of impairing system performance with unnecessary enrichment queries.
Who Should I audit?
DO
Speak to the operators or SMEs who understand the alert content and will be directly involved in working on Situations in Cisco Crosswork Situation Manager.
DO NOT
Don't interview system administrators. This is a typical mistake at this stage. The team members responsible for maintaining Cisco Crosswork Situation Manager typically can't articulate the information operators will need to resolve Situations.
Tip
The operators you audit at this stage are not likely to understand Cisco Crosswork Situation Manager yet. This is perfectly fine. As long as they understand the high-level concepts of what an alert and a Situation are in Cisco Crosswork Situation Manager, they will be able to provide the input you need.
Goal: Discover the Content and Context Required
The goal of the discovery session is ultimately to identify the content and context necessary to design Situations.
A Situation has associated content and context. The content is the list of alerts shown in a Situation, while the context is the interpretation of that list of alerts. For the example below, the content of the Situation is the 11 alerts of the same severity. The Situation was assembled in response to the contextual need of the organization. They want to bundle the alerts with a similar description, with a Major severity level and assign them to the Cloud DevOps team.

Step 1: Identify the Organizational Context
Start with identifying the organizational context. What teams will use Cisco Crosswork Situation Manager? And how should alerts be routed to different teams? Answers to these questions can provide you with the big picture requirements.
For example, where are their servers located? How distributed are they? Do they have edge locations?
What is the scope Cisco Crosswork Situation Manager is expected to handle? If they want to feed the monitoring data from both dev and production, then it is likely that you want to cluster alerts separately for each environment. In this way, by learning the organizational context you learn the clustering requirements.
Also, learning where the organization is on the journey to transform its ITOps practices should inform you what level of implementation will be most successful. For example, an organization may want to keep their existing workflow and only introduce Cisco Crosswork Situation Manager as a system for noise reduction. In that case you can focus your discovery sessions on identifying which alerts matter and which ones the operators consider to be noise.
Consult this video to learn about the adoption stages and identify the proper context Cisco Crosswork Situation Manager can fit in at a given organization.
Step 2: Identify Team and Individual Needs
After identifying the overarching context, move on to the teams' and operators' needs. What will help the operators perform their tasks better? What are they hoping to achieve with Cisco Crosswork Situation Manager? Do they want to view items that go wrong simultaneously at the same location? Or would they rather receive notifications when the infrastructure components underlying a specific business service fail? Answers to these inquiries lead you to identify the context you want to use to cluster alerts.
For example, if your operations teams are organized around applications, they are interested in seeing alerts clustered on the intersections of an impacted application. In this case, the context of a Situation is "alerts that are affecting the same application". A Situation that says "here are the list of broken items that are impacting the application you are responsible for" nicely aligns with this workflow.
But what if applications are not granular enough for your organization? If you need to organize the alerts around the impacted services, Situations need a different context: "here is the list of broken items that are impacting the service you are responsible for". So learning the specific context your organization's needs is critical for successful Situation design.
Along with interviewing, it often helps to sit down with your operators and observe how they work. Ask them questions on specific ways they handled the event at hand. Even if they struggle to articulate their needs in an abstract sense, they can often explain what is going on and what they need to resolve the case at hand. Your observation will provide a blueprint for the higher-level clustering pattern.
Tip
While Situations are organized around one context, an alert can have multiple contexts. As a result, it can belong to multiple Situations. For example, an alert can be grouped together with other alerts that are impacting the same network, but also the same alert can belong to a Situation that is organized by the floor location of the rack. An alert can be represented within both the microscopic view like an application failure and the macroscopic view like a datacenter failure.
Consider the Situation Labelling Strategy
Situation descriptions are one of the primary means that operators use to find and identify relevant Situations. For this reason, you should carefully consider the alert content to include in your descriptions. For example, imagine you have multiple separate Situations that impact separate environments occurring at the same time. How does an operator prioritize and distinguish these if the description does not include the environment, such as Test, Production, or UAT, where the Situation occurred?
Good descriptions can also help operators diagnose and assign Situations. Suppose a team assignment depends on the physical location where the Situation occurred. If the description includes the location, an operator can quickly assign a Situation to the correct team.
Consider how you might label the Situations and ask clarifying questions during the discovery sessions. The criteria for defining "good" descriptions, like the criteria for "good" data and "good" Situation design, is highly dependent on the specific needs of your organization and operators. Always consult with your operators and users when planning and maintaining your deployments.
Identify Primary and Secondary Data
Along with content and context, use operator audits to identify primary and secondary data requirements.
Primary workflow data is the information required to correlate alerts and label Situations. Identifying primary data helps you design Situations. Secondary workflow data is the information that supports diagnostic activities such as ticketing and team assignment. Identifying secondary workflow data helps you identify the enrichment requirements, which in turn helps Situation design.
Ask operators what context they want to see presented within Situations. They may want to see items that go wrong together at the same location, or they may want to be notified when things that enable a business service to fail.
To help, look into past incidents and identify what manual correlation the operator had to do in order to relate the events describing the incident. Is that information available within the event payload itself or available somewhere externally? If externally, you want to know if the data is accessible so you can use it to enrich the events in Cisco Crosswork Situation Manager.
Example Questions for Discovery Sessions
The operators may not be able to readily spell out all of the content and context requirements for you. Here are some examples of questions to ask the operator to guide their thinking:
· What sort of incidents have you seen previously and what sort of correlation did you have to do to figure out the impact? If the correlation is manual, you can see if it can be done programmatically via enrichment. This question also highlights potential external enrichment sources.
· Any site-specific issues you would like to highlight? This exposes their current pain points.
· What kind of manual correlation did you have to do in your head in the past few months? Can you show it to me and elaborate? The answer to this question will help you identify the enrichment requirements.
· If you would like to identify issues by their location - is there a way to know the location from the alert payload? Does the hostname naming convention allow me to infer it? Can I look up a device's network address in an inventory and get the location from that? The answer to this question can help you determine whether you need to parse the incoming information or you need to look up a CMDB to source the information.
· Can we use a relationship lookup to aid clustering? For example a job or application dependency relationship or device type or some other parent-child relationship. You might know whether you want to use topology information for clustering. Also, you will identify the enrichment requirements.
· How do you prioritize alerts apart from their severity? Are there any areas carrying higher importance? Perhaps SLA bound? Or by the customer or particular locations?
· How many environments do you have? For example UAT, DEV, Production. How would you like them to be prioritized? This will help you identify the clustering requirements. If they have a production environment and DEV environment, most likely the alerts with the same attributes should still be clustered separately if one is from the production environment and one is from the DEV environment.
· What alerts would you route to your team? How do you identify these alerts and what is the common element within? Common elements can include; services, region, application, data center, etc... Knowing the answer helps you determine the clustering and routing strategy.
· What specific cause-effect type of incidents would you like Moogsoft AIOps to identify? Some events on their own do not represent much interest to the operators, but in combination with a separate occurrence, these can perhaps be an indication of a more critical issue.
· If, for example, the context of a situation is the impacted business server, would you also want to break the clusters further into the impacted technological stack? If the answer is yes, you need to figure out how to source that information. Can you parse the source data to extract this? Or do you need to perform a lookup?
· Would you like to cluster alerts across the technological stack as well?
· Situations are evolving entities so it is acceptable for a situation to change its context throughout its lifecycle. What contexts should be merged together based on the alert overlap?
· Should you be notified only when multiple things fail or even a single alert is of concern? This helps you identify the alert threshold.
· How long after the initial candidate cluster creation should alerts be considered in the scope of the cluster? The answer to this question directly impacts the choice of cook_for time and its extension.
Process Events with the Workflow Engine
By default, the first component in Cisco Crosswork Situation Manager that listens for new events arriving at the message bus is the Event Workflows moolet. The Event Workflow Engine is part of the Workflow Engine framework. It listens for all new events on the standard event stream where LAMs/LAMBots will send events.
You can create alternate event streams, but, if so, you must write a new Event Workflows component to process these events differently. This is better than writing conditional logic into every component when you need different processing. Configure the event streams an Event Workflow moolet listens for in the in the event_streams property of its configuration file. See Create a WFE Moolet for more information on creating a new Workflow Engine moolet.
For all Workflow Engines, the ones delivered with the product and new ones you add, you configure the programmatic data processing in the Cisco Crosswork Situation Manager UI. See Workflow Engine for more information.
Learn More
See the following topics for more detail on the Workflow Engine:
· For a list of Workflow Engine functions, see Workflow Engine Functions Reference.
· For general information on the Workflow Engine, see Workflow Engine.
Alert Creation and Enrichment

Configure Alert Creation tells you how to configure the Alert Builder, which creates alerts by processing event data from the Message Bus.
Process Alerts describes the components responsible for adding information to alerts and reducing noise. It tells you how to use enrichment processes to add supplemental data to alerts and Situations, and how to use topologies to view alerts and Situations according to the relationships that are important to your users.
Configure Alert Creation
The Cisco Crosswork Situation Manager Alert Builder creates alerts by processing event data from the Message Bus. It does the following
· Deduplicates events into alerts.
· Calculates the entropy of alerts.
The following diagram illustrates where the Alert Builder operates within the overall data processing flow for Cisco Crosswork Situation Manager:

The Alert Builder is a Moolet that you can configure in the alert_builder.conf file. See Configure Event De-duplication in the Alert Builder.
Learn More
See the following topics to learn more about the Alert Builder:
· Configure Event De-duplication in the Alert Builder.
· Alert Builder Reference.
To learn more about alert data processing, see:
Configure Event De-duplication in the Alert Builder
The Alert Builder Moolet assembles alerts from incoming events, sent by the LAMs across the Message Bus. These alerts are visible through the Alert View in the User Interface (UI). The Alert Builder Moolet is also responsible for:
· Updating all the necessary data structures.
· Ensuring copies of the old alert state are stored in the snapshot table in MoogDb, relevant events are created and the old alert record is updated to reflect the new events arriving into Cisco Crosswork Situation Manager.
Configure Alert Builder
Edit the configuration file at $MOOGSOFT_HOME/config/moolets/alert_builder.conf.
See Alert Builder Reference for a full description of all properties. Some properties in the file are commented out by default.Alert Builder Reference
Example Configuration
The following example demonstrates a simple Alert Builder configuration:
{
name : "AlertBuilder",
classname : "CAlertBuilder",
run_on_startup : true,
moobot : "AlertBuilder.js",
event_streams : [ "AppA" ],
threads : 4,
metric_path_moolet : true,
events_analyser_config : "events_analyser.conf",
priming_stream_name : null,
priming_stream_from_topic : false
}
Alert Builder Moobot
The Moobot, AlertBuilder.js, is associated with the Alert Builder Moolet. It undertakes most of the activity of the Alert Builder. When the Alert Builder Moolet processes an event, it calls the JavaScript function, newEvent:
events.onEvent ( "newEvent" , constants.eventType( "Event" )).listen();
The function newEvent contains a call to create an alert. The newly created alert is broadcast on the Message Bus.
Learn More
See the following topics for more information:
· Alert Builder Reference for all Alert Builder properties.Alert Builder Reference
· Moobot Modules for further information about Moobots.Moobot Modules
Process Alerts
Cisco Crosswork Situation Manager processes alerts using the following backend components. For alert processing capabilities using Workflow Engine in the Cisco Crosswork Situation Manager UI, see Workflow Engine and its related topics.
These components are responsible for performing analysis, adding information to alerts, and noise reduction techniques.
· Alert Analyzer: A standalone process that analyses tokens in events and assigns each token an entropy value. The Alert Analyzer can use any text field in an event but, by default, it uses the event's description. This process runs periodically and does not form a part of the alert processing workflow. See Configure Entropy to Reduce Operational Noise for more information on setting entropy thresholds to remove noisy alerts.
· Enricher: Enriches alerts with additional information.
· Maintenance Window Manager: Marks alerts as 'In maintenance' if they match a scheduled maintenance window filter. You can set up maintenance windows for planned maintenance, such as scheduling a fix or regular maintenance of a system.
· Alert Rules Engine: Allows conditional processing of alerts, such as managing link up/link down processing. Before you configure the Alert Rules Engine, read about the Alert Rules Engine which is a powerful and flexible tool for data processing available in the Cisco Crosswork Situation Manager UI.
· Empty Moolet: An optional component that enables further processing of alerts or Situations. It usually runs as a standalone process but it can also be embedded in the processing chain. Cisco Crosswork Situation Manager provides an example Empty Moolet in the form of an Alert Manager.Empty MooletAlert Manager
The following diagram shows the alert processing components in a typical implementation of a workflow chain in Cisco Crosswork Situation Manager:
Each component comprises a Moolet supplemented by Moobots.
Set Up Optional Alert Processing
Based upon your business requirements and your situation design, you may need to set up optional alert processing for Cisco Crosswork Situation Manager. For example:
· You may need to add data to alerts using one of the various processes for enrichment. See Enrichment Overview.
· If you want to use alert data to create and manage topologoy data, see #.
· Refer to the Alert Rules Engine documentation for a Link Up-Link Down Example and a Heartbeat Monitor.
If you need to customize data processing for alerts, you should first try the Workflow Engine. See Process Alerts with the Workflow Engine.
If you cannot address your alert processing needs with the Workflow Engine, use one of the following:
1. Alert Rules Engine.
2. Empty Moolet.
Process Alerts with the Workflow Engine
The Alert Workflow Engine in Cisco Crosswork Situation Manager through Maintenance Window Manager, and before they are sent to a clustering algorithm for clustering. In the data processing flow, it is the last opportunity to perform actions on alerts before clustering. Typical use cases include:
Typical use cases include:
· Handling time-based or delay-based alert processing.
· Heartbeat monitoring.
· Handling "flapping" behavior and metric-based failures.
· Correlation for alerts where de-duplication failed.
For all Workflow Engines, the ones delivered with the product and new ones you add, you configure the programmatic data processing in the Cisco Crosswork Situation Manager UI. See Workflow Engine for more information.
Learn More
See the following topics for more detail on the Workflow Engine:
· For a list of Workflow Engine functions, see Workflow Engine Functions Reference.
· For general information on the Workflow Engine, see Workflow Engine.
Enrichment Overview
Situations in Cisco Crosswork Situation Manager are built from data ingested from your monitoring systems. You may have use cases for your Situations that require more information than is contained in the raw data. If this is the case, you can use a process called enrichment to add supplemental data to alerts or Situations. Enrichment can:
· Improve accuracy for clustering alerts into Situations.
· Improve readability of alerts for operators.
· Aid operators in investigating Situations.
· Provide critical reporting data.
The first step is to identify whether your existing data is sufficient. If it is lacking, identify the type of enrichment data that meets your requirements and the data source that can provide it. You can then choose the most effective and efficient method of enrichment for your specific needs.
Do you need to enrich?
The need to enrich depends on whether the data from your data source or monitoring system fulfils your requirements. Examine the use cases for your data to identify any omissions.
For example, an organization sets up Cisco Crosswork Situation Manager to ingest the following event data:
"node_name": "U0039-router01"
"description": "Router down"
The data must fulfil these use cases:
· Operators need the site name to understand where they need to take action to fix the problem.
· Management needs the region for reporting requirements.
For this company, the node names are all based on the site name <site>-<component> so "U0039" reflects the site. There is no need to enrich for this use case.
The site name is not enough to determine the region, and the event data does not include region data. To satisfy the second use case, the company needs to enrich the event data.
Identify the enrichment purpose
The purpose of the enrichment indicates whether to enrich at alert or Situation level. Enrichment is expensive in terms of processing time and resource use. Inefficient enrichment can slow the processing of alerts, so it is important to enrich at the appropriate level.
Enrichment data can be broadly categorized to fulfil one of the following purposes:
· Operational: Functionally modifies behavior within Cisco Crosswork Situation Manager to drive processes such as clustering. Ideally performed on alert creation.
· Informational: Assists a consumer (operator or external system) to differentiate between Situations. Typically performed at Situation level. Includes updates to Situation description, services and processes.
· Diagnostic: Assists operators to investigate Situations and can be performed at either alert or Situation level. Examples include updates to alert and Situation custom_info and updates to Situation discussion threads.
The region data in our example is informational.
Identify the enrichment source
If the required data exists externally, identify its type:
· Static: Data that changes infrequently, for example a country code lookup to a country name.
· Dynamic: Data that may be subject to change, for example a database query to match a hostname to a service.
In our example, the company database stores the site number and relates it to the site address and region. The data is static:
site address city state region
U0039 1265 Battery St San Francisco CA US-WEST
Dynamic enrichment on every de-duplication has a greater performance impact than enrichment on alert creation. If the enrichment data is unlikely to change during the lifetime of an alert, enrich once on alert creation. See Enrich on Alert Creation for more details.
You can enrich from a static file in a LAMbot. All other enrichment is performed in a Moobot.
Processing for multiple enrichment sources
Enrichment should be limited and only used when necessary due to its consumption of processing time and resources. Parallel processing involves processing alerts in two or more enrichers simultaneously while serial processing hands the alert to one enricher at a time. The alert is passed onto the next enricher once it has been processed. If two enrichment sources are required for a single alert, serial processing should be used. Parallel processing could cause one enricher to disrupt the other enricher while processing the alert.
Select an enrichment method
Some enrichment methods are available in the UI:
· Situation Room Plugins.Enable Situation Room Plugins
· UI Enrichment
· using a static data file.
Other methods are manually configured or accessed via the command line. The most common are:
· REST.V2 module to retrieve data through HTTP.
· ExternalDb module to retrieve data from supported SQL databases.
· Graze API to update Situations and alerts statically.
· Situation Manager Labeler to update Situations and alerts dynamically.
In our example, depending on the database specification, the company might use JDBC to add the region data into alert custom_info and the Situation Manager Labeler to add the region data to Situations.
Enrich on Alert Creation
If your enrichment data is unlikely to change during the lifetime of an alert, enrich once on alert creation.
To enrich on alert creation:
1. Create a custom alert enricher Moolet.
2. Configure your alert enricher to use caching.
3. Configure the Alert Builder to send data to your custom Moolet on alert creation.
4. Define your custom Moolet in Moogfarmd.
See Enrichment Overview for more information on enrichment methods and processes.
Create an Alert Enricher Moobot
Create an Alert Enricher Moobot to obtain enrichment data from your external source, for example via JDBC.JDBC LAM
Use Caching
The Bot utility is included with the Situation Manager Labeler.
You can configure your Alert Enricher Moobot to use the caching facilities in the Bot utility. This is optional but good practice if the data is relatively static. It reduces the time required to repeatedly process data from a third party system. For example:
var USE_CACHE = false;
var CMDB_CACHE_RETENTION = 3600;
if (USE_CACHE && cmdb_cache_exists && cmdb_cache_exists.enrichment)
{
customInfo.enrichment = cmdb_cache_exists.enrichment;
}
else
{
botUtil.addObject(customInfo, "enrichment", ci_enrichment, false);
var cmdb_cache = {};
cmdb_cache.enrichment = customInfo.enrichment;
botUtil.setCacheValue(botModules.constants, "CMDB"+host, cmdb_cache, CMDB_CACHE_RETENTION);
}
Configure the Alert Builder
In the following example the Alert Builder sends newly created alerts to the Alert Enricher Moolet and updated alerts to the Maintenance Window Manager:
if(alert)
{
var alertAction=alert.payload().getAction() === "Alert Created" ? "create" : "update";
if ( alertAction === "create" ) {
logger.info("createAlert: Created Alert Id: " + alert.value("alert_id"));
alert.forward("AlertEnricher");
}
else {
logger.info("createAlert: Updated Alert Id: " + alert.value("alert_id"));
alert.forward("MaintenanceWindowManager");
}
}
Configure Moogfarmd
Define the Alert Enricher Moobot in Moogfarmd. For example:
{
name : "AlertEnricher",
classname : "CEmptyMoolet",
run_on_startup : true,
persist_state : true,
metric_path_moolet : false,
moobot : "AlertEnricher.js",
standalone_moolet : true,
threads : 5
}
Topology Overview
A topology is a set of connected entities. For example, nodes in a network for a hardware topology or connected microservices in an application topology.
Topologies let you view alerts and Situations according to the relationships that are important to you. Cisco Crosswork Situation Manager supports multiple named topologies, so different teams can have their own topological view. Network teams can use the topology to relate impacted nodes for a service outage, whereas DevOps engineers can see the impact of one service outage on other services in the topology. You could also base a topology on customers, applications, alert types, or physical locations.
Cisco Crosswork Situation Manager can cluster alerts into Situations based on the relationships between the alerts. For example, a Managed Service Provider may want to cluster alerts related to customers or a network support team may want alerts clustered by location.
You can represent alert attributes using points in the topology called nodes. Connections between the nodes are represented as links. Links in Cisco Crosswork Situation Manager are bidirectional. This means that if node A is connected to node B, B is also connected to A without the need to explicitly define that connection.
Existing topology
If you configured a topology in a previous Cisco Crosswork Situation Manager version the topology no longer exists once you upgrade to v8.0. You can recreate a topology using the Topologies API endpoints. You can also use the Topology Loader utility to load a large topology from a .csv file.Topologies API
If you configured a large topology in a previous Cisco Crosswork Situation Manager version, consider breaking it up. Smaller topologies are more manageable and enable more effective alert clustering.
Further information
See the following links for further information on topologies in Cisco Crosswork Situation Manager:
· Create and manage topologies
· Topologies APITopologies API
· Graph TopologyGraph Topology
Create and Manage Topologies
This topic outlines how to create and manage topologies in Cisco Crosswork Situation Manager. Topologies let you view alerts and Situations according to the relationships that are important to you. See Topology Overview for more information.
If you configured a topology in a previous Cisco Crosswork Situation Manager version the topology no longer exists once you upgrade to v8.0. You can recreate a topology using the Topologies API endpoints. You can also use the Topology Loader utility to load a large topology from a .csv file.Topologies API
Before you begin
Before you begin to create and configure topologies in Cisco Crosswork Situation Manager, ensure you have met the following requirements:
· You know the details of the topologies, nodes and links you want to create.
· If you want to use the Topologies API or the Topology Loader utility to create topologies, your Cisco Crosswork Situation Manager user has the super_privileges role permission. See Role Permissions for more information.
· If you want to load one or more large topologies, you have generated maps of the connected nodes in .csv files. See Load a Topology for more information.
Create topologies
You can use the Topologies API to create and manage small topologies, but this is impractical for large topologies. If your topology .csv file is larger than 40 MB Cisco recommends using the Topology Loader utility.
Each topology has a status:
1. Active: You can use the Topology as a source in a Recipe's topology filter.
2. Inactive: You cannot use the Topology to filter a Recipe. You can set a topology to inactive while you are creating it or when you are updating it. See Maintain topologies.
See Topologies API and Graph Topology for a full description of the API endpoints and Moobot module methods.
See Load a Topology for more information about the Topology Loader utility.
Maintain topologies
Cisco Crosswork Situation Manager includes mechanisms for keeping topologies current and up-to-date.
You can use the clone and replace endpoints in the Topologies API to clone an active topology, make changes to the inactive clone, and then replace the active topology with the updated version. This optional feature means that you do not need to take your topologies offline in order to update them.
Cluster alerts by topology
To cluster alerts in a single topology, filter on a named topology.
If you want to cluster alerts in several topologies from a single Recipe, perform the following steps. Note that alerts in separate topologies are clustered into separate Situations.
You may find this useful if you have split a single large topology into several smaller topologies, and you do not want to create a Recipe for each one.
· Configure a workflow to set the corresponding name of the topology in the custom_info.moog_topology attribute of your alerts. See populateNamedTopology for more information.
· Configure a Recipe to filter on an inferred topology. The Recipe obtains the topology name from custom_info.moog_topology.
· Set the Recipe's Node Field to the alert field that contains the topology node. The Recipe checks whether the node exists in the topology named in custom_info.moog_topology. If it does, the alert is included in the filter.
· Set the Recipe's Match property as follows:
— Any node: The Recipe checks whether the alert is from any node in the same topology as the node represented by the reference alert in the Situation.
— Nodes within: The Recipe checks whether the alert is from a node within a specified hop limit of the node represented by the reference alert in the Situation.
Note
To cluster all alerts from the same node, add a clustering attribute at 100% similarity. Use the same attribute that you are using for your Topology Node Field.
See Configure a Cookbook Recipe for more information on the Recipe topology filter.
Vertex Entropy
Vertex Entropy is a Cisco Crosswork Situation Manager algorithm that indicates the critical nodes within your topologies and their tendency to produce important events.
The Graph Analyser process calculates the Vertex Entropy for all nodes in your topologies. It processes topology changes every 30 seconds as part of Housekeeper.
For more information on configuring Vertex Entropy, see Configure Topology-based Clustering with Vertex Entropy.
If you do not want to use the Vertex Entropy feature, you can turn off the Graph Analyser process in Housekeeper to reduce load on your Cisco Crosswork Situation Manager system. To do this, go to Settings > Vertex Entropy in the Cisco Crosswork Situation Manager UI.
View Situation topology
When a Situation affects more than one topological node, Cisco Crosswork Situation Manager presents a visual representation of the topologies impacted by the Situation. See View Situation Topology for more details.
Load a Topology
This topic outlines how to load topologies in Cisco Crosswork Situation Manager. Topologies let you view alerts and Situations according to the relationships that are important to you. See Topology Overview for more information.
You can use the Topologies API to create and manage small topologies, but this is impractical for large topologies. If your topology .csv file is larger than 40 MB Cisco recommends using the Topology Loader utility.
To use the topology loader, you create a comma-separated value (.csv) file of the node-to-node links. The utility builds and caches the topology in the topologies, topo_nodes and topo_links tables in the moogdb database. You can also add an optional description for each link in the topology.
Before you begin
Before you load your topology data into Cisco Crosswork Situation Manager, ensure you have met the following requirements:
1. You have created each topology for which you want to load nodes and links, using the Topologies API or the Graph Topology Moobot module.Topologies APIGraph Topology
2. You have generated a map of the connected nodes in a .csv file. Create a separate file for each topology.
3. Your .csv file contains all of the nodes that are expected to send events.
4. The lines in your .csv file follow the format: <node1>,<node2>,<optional description>. For example:
host_a3,host_a1,Link description
host_a3,host_a2,Link description
host_a4,host_a1,Link description
Note
If you use a .csv file with the format required by the deprecated Topology Builder utility, the optional <weight> data will be saved as link descriptions.
If a node name includes a comma, you must enclose the name in double quotes.
Ensure there are no extra spaces in the file, around the fields and at the beginning and end of each line.
The topology loader ignores any lines in your file that are not in the correct format. It also ignores any loops such as 'host_x, host_x'. The string node names are case insensitive.
5. You have access to the Cisco Crosswork Situation Manager server that runs Nginx. The utility matches the hostname you provide against the name on the SSL certification in the Nginx configuration.
Load a topology
Load your topology into Cisco Crosswork Situation Manager as follows:
· Log into the Cisco Crosswork Situation Manager server that runs Nginx.
· Load the .csv topology file into the database using the topology loader found at $MOOGSOFT_HOME/bin:
./topology_loader -t=host -f=host_topology.csv --hostname=example.com --credentials=phil:password123
The -t option is the name of the topology. You must create the topology before you run the utility.
The -f option specifies the file that contains the topology data.
The --hostname option specifies the Cisco Crosswork Situation Manager host running Nginx.
The --credentials option specifies the Graze username and password, if you are not using the defaults.
For a description of all available options see Topology Loader Utility Command Reference.
· The topology loader utility uses the source data to add nodes and links to the specified topology. The utility records the topological information in the topologies, topo_nodes and topo_links databases. The utility logs any errors to the console.
After you have loaded your topological data, the graph analyser task calculates the Vertex Entropy of the nodes. See Topology Overview for more information.
Modify a topology
You cannot use the Topology Loader utility to modify or delete existing links.
To modify a topology, use the endpoints in the Topologies API or the methods in the Graph Topology Moobot module.
Alert Clustering and Ticketing

Situation Design tells you how to use Cisco Crosswork Situation Manager features to create insightful, informative Situations for your users and teams. These features include Cookbook, Tempus, Merge groups, and topologies.
Process Situations tells you how to create a Situation action Workflow engine to trigger workflows based on Situation actions. For example, when a Situation is created, updated, or closed.
Integrate with Ticketing Services tells you how to integrate with ticketing services including ServiceNow.
Situation Design
Configure Clustering Algorithms
Clustering algorithms in Cisco Crosswork Situation Manager group alerts based on factors such as time, language, similarity and proximity. See the Clustering Algorithm Guide for more information.
You can configure the following Cisco Crosswork Situation Manager clustering algorithms:
1. Cookbook: A powerful clustering algorithm that creates clusters defined by the relationships between alerts and their attributes. To configure Cookbook and Recipes, see Configure Cookbooks and Recipes.Cookbook
2. Tempus: A time-based algorithm that clusters alerts into Situations based on the similarity of their timestamps. To configure Tempus, see Configure Tempus.
3. Merge Groups: Enables you to set a similarity threshold so that Cisco Crosswork Situation Manager merges Situations created by different clustering algorithms that meet this threshold. To configure merge groups, see Merge Groups.
You can also configure Cookbooks and Recipes, Tempus, and Merge Groups via the Graze API.
The Settings > Import/Export option in the Cisco Crosswork Situation Manager UI enables you to export clustering algorithm configurations from one Cisco Crosswork Situation Manager system and import them into another. For example, from a test environment to your production environment. Go to
Configure Deterministic Alert Clustering with Cookbook
Cookbook is a deterministic clustering algorithm in Cisco Crosswork Situation Manager that creates Situations defined by the relationships between alerts.
You can configure Cookbook to cluster alerts into Situations if they have specific characteristics such as temporal or topological proximity. Cookbook filters can include characteristics such as the following:
· Class or type
· Description
· Server priority
· Geographical location
· Environment classification
Each Cookbook is a collection of Recipes: sets of configurable filters, triggers, and other calculations such as priority ordering and entropy threshold. A Cookbook can run multiple Recipes concurrently to process the incoming event stream and produce a variety of Situations. A Cisco Crosswork Situation Manager deployment may include multiple instances of Moogfarmd, each of which can run multiple Cookbooks.
Configure Cookbooks and Recipes
Use the following steps to configure a Cookbook and its Recipes via the Cisco Crosswork Situation Manager UI:
· First, you must configure the Recipes that you want to use in a Cookbook. See Configure a Cookbook Recipe for details.Configure a Cookbook Recipe
· Then, you must create the Cookbook that will contain those Recipes. See Configure a Cookbook for details.Configure a Cookbook
· Finally, you must activate the Cookbook so that it starts to cluster alerts into Situations. See Configure a Cookbook for details.Configure a Cookbook
You can also configure a Cookbook and its Recipes via the Graze API.
If you change a Cookbook, see Cookbook Configuration Changes for information on how these changes affect the clusters that Cookbook creates.
Cookbooks configured in the UI and the Graze API can run concurrently.
Learn More
To learn about how you can use macro language for Situation descriptions, see Situation Manager Labeler.
Configure a Cookbook
Cookbook is a deterministic clustering algorithm in Cisco Crosswork Situation Manager that creates Situations defined by the relationships between alerts.
Cookbook requires at least one active Recipe to function and cluster alerts into Situations. See Configure a Cookbook Recipe for more details.Configure a Cookbook Recipe
Before you begin
Before you set up your Cookbook via the UI, ensure you have met the following requirements:
· You have set up the Recipes you want your Cookbook to use. See Configure a Cookbook Recipe for details.Configure a Cookbook Recipe
· Your LAMs or integrations are running and Cisco Crosswork Situation Manager is receiving events.
Create a Cookbook
To create a new Cookbook:
· Go to Settings > Cookbooks.
· Click the + icon to create a new Cookbook.
· Fill in the properties to name and describe the Cookbook:
Name: Name of the Cookbook.
Description: Text description of the Cookbook.
· Configure the Cookbook's input and clustering behaviour:
Process Output Of: Defines the source of the alerts for the Cookbook.
Cluster By: Determines Cookbook's clustering behavior. You can select one of the following:
· First Matching Cluster: Cookbook adds alerts to the first cluster in a Recipe over the similarity threshold value. This is the default behavior for Cookbook.
· Closest Matching Cluster: Cookbook adds alerts to the cluster with the highest similarity greater than the similarity threshold value. This option may be less efficient because Cookbook needs to compare alerts against each cluster in a Recipe.
Entropy Threshold: Select the type of entropy threshold that you want Cookbook to use:
· Use the Global Entropy Threshold: This is a single entropy threshold that Cookbook applies to all alerts to eliminate noisy alerts with a lower entropy value.
· Use the Manager-Specific Entropy Thresholds: Use entropy thresholds set up for individual managers. If the manager for an alert has an entropy threshold set, Cookbook uses this value to eliminate noisy alerts with a lower entropy value. If an alert's manager does not have an entropy threshold, Cookbook uses the global entropy threshold to filter out alerts.
· Use a Specific Entropy Threshold: Set a specific entropy threshold value that you want Cookbook to use to eliminate noisy alerts with a lower entropy value. Enter the value you want to use. Unlike the other two dynamic thresholds that react to changes in the distribution of events, this threshold is static and you should periodically revise it.
· Do Not Use an Entropy Threshold: Select this option if you do not want Cookbook to filter out any alerts based on their entropy value.
See Configure Entropy Thresholds with Alert Analyzer for more information on setting global and manager-specific entropy thresholds.
Cook For: Maximum time period that Cookbook clusters alerts for before the Recipe resets and starts a new cluster. See Cookbook and Recipe Examples for more information.
If you set a different Cook For time for a Recipe, it overrides the Cookbook value. Recipes without a Cook For time inherit the value from the Cookbook.
Cook For Extension: Time period that Cookbook can extend clustering alerts for before the Recipe resets and starts a new cluster. Setting this value enables the cook for auto-extension feature for this Cookbook. As Cookbook receives related alerts, it continues to extend the total clustering time until the Max Cook For period is reached. You can use this time period in conjunction with the Max Cook For value to ensure that Cookbook continues to cluster alerts together that are related to the same failure. It only applies to new related alerts, not to existing alerts that are updated with new events. See Cookbook and Recipe Examples for more information.
If you set a different Cook For Extension time for a Recipe, it overrides the Cookbook value. Recipes without a Cook For Extension time inherit the value from the Cookbook.
Max Cook For: Maximum time period that Cookbook clusters alerts for before the Recipe resets and starts a new cluster. It works in conjunction with the Cook For Extension time to help ensure that Cookbook continues to cluster alerts together that are related to the same failure. If Cook For Extension is set and this value is not set, it defaults to three times the Cook For value. See Cookbook and Recipe Examples for more information.
If you set a different Max Cook For time for a Recipe, it overrides the Cookbook value. Recipes without a Max Cook For value inherit the value from the Cookbook.
Scale By Severity: If checked, Cookbook ignores alerts with a severity of 0 (Clear).
· Configure which Recipes the Cookbook uses and how it uses them:
a. Single Recipe Matching: Enables you to set a priority order for Recipes in the Cookbook. If you select this check box, Cookbook assigns each alert to the highest priority Recipe where it satisfies the clustering criteria. If unselected, Cookbook assigns an alert to all Recipes where the alert satisfies the clustering criteria.
b. Selected Recipes: Move the Recipes from the Available column to the Selected column to to include them in the Cookbook. If you have selected First Recipe Match Only, put the Recipes in the correct order so that Cookbook can determine which Recipe an alert should be assigned to. You should place the highest priority Recipe at the top of the list.
· Click Save Changes to create the Cookbook.
Activate the Cookbook
After completing the configuration, activate the new Cookbook to run alongside any existing active Cookbooks:
· Go to Settings > Cookbook Selection.
· Move the new Cookbook from the Available Cookbooks column to the Active Cookbooks column to make it active.
· Click the Advanced tab if you want to configure Cisco Crosswork Situation Manager to remove closed and superseded Situations from Moogfarmd. Define how often you want the removal to occur in hours and minutes.
· Click Save Changes to activate the Cookbook.
Cisco Crosswork Situation Manager applies the changes to the Cookbook as soon as you save the configuration.
If you change a Cookbook, see Cookbook Configuration Changes for information on how these changes affect the clusters that Cookbook creates.
Configure a Cookbook Recipe
A Cookbook Recipe is a set of configurable filters, triggers, and calculations that defines the type of alerts and the alert relationships that Cookbook detects and clusters into Situations.
Cookbook requires at least one active Recipe in order to function and cluster alerts into Situations.
You can configure the following two Recipe types from the UI:
· Value Recipe v2: Default Recipe that extracts and analyzes groups of consecutive characters, called shingles, to measure text similarity between alerts.
· Value Recipe: First version of the Value Recipe that uses a string comparison mechanism to determine text similarity between alerts.
See Recipe Types for more details on the different types of Recipes available in Cookbook. If you want to implement a Bot Recipe that allows you to call Moobot functions, you can use the Graze API.
Before you begin
Before you set up your Recipe via the UI, ensure you have met the following requirements:
· Your LAMs or integrations are running and Cisco Crosswork Situation Manager is receiving events.
· If you want to cluster on topology information or use Vertex Entropy in your Recipes, you have created one or more topologies. See Topology Overview.
Create a Cookbook Recipe
To create a new Cookbook Recipe from the Cisco Crosswork Situation Manager UI:
· Navigate to Settings > Cookbook Recipes.
· Click the + icon to create a new Recipe.
· On the Recipe tab, enter the properties to name and describe the Recipe:
— Name: Name of the Recipe. Use a unique and descriptive name.
— Situation Description: Description that appears in Situations that the Recipe creates.
— Recipe Type: Type of Recipe. The options are Value Recipe and Value Recipe v2. See Recipe Types for more information.
Configure the Recipe behavior and filters that define the alert relationships:
— Trigger Filter: Determines the alerts that Cookbook considers for Situation creation. Cookbook includes alerts that match the trigger filter. For details on creating a filter, see Filter Search Data. To set a Vertex Entropy trigger filter, see Configure Topology-based Clustering with Vertex Entropy for more information.
— Exclusion Filter: Determines the alerts to exclude from Situation creation. Cookbook ignores alerts that match the exclusion filter. For details on creating a filter, see Filter Search Data. To set a Vertex Entropy exclusion filter, see Configure Topology-based Clustering with Vertex Entropy for more information.
— Seed Alert Filter: Determines whether to create a Situation from a seed alert. The seed alert must meet both the Trigger Filter, Exclusion Filter and Seed Alert Filter criteria to create a Situation. Cookbook considers subsequent alerts for clustering if they meet the trigger and exclusion filter criteria. Alerts that arrive prior to the seed alert that met the trigger and exclusion filter criteria do not form Situations. For details on creating a filter, see Filter Search Data. To set a Vertex Entropy seed alert filter, see Configure Topology-based Clustering with Vertex Entropy for more information.
The seed alert filter is a mechanism to ensure that only specific events create Situations. For example, if you create a seed alert filter where the description matches 'Switch failure', alerts are eligible for clustering into a Situation only after a seed alert with the matching description arrives.
— Rate Filter: Determines whether Cookbook clusters alerts into Situations based on the rate the alerts arrive and the minimum and maximum sample size. To add a rate filter, check the checkbox and complete the following fields:
· Rate: Rate, in number of alerts per second. Cookbook clusters alerts if they arrive at the rate specified here or higher.
· Min Sample Size: Number of alerts that must arrive before the Cookbook starts to calculate the alert rate.
· Max Sample Size: Maximum number of alerts that are considered in the alert rate calculation. When more than this number of alerts have arrived, Cookbook discards the oldest alerts and calculates the alert rate based on the number of alerts in the Max Sample Size.
— Topology Filter: Determines whether Cookbook clusters alerts into Situations based on topology information. This section is only enabled if you have one or more topologies in your system. To add a topology filter, check the checkbox and complete the following fields:
— Source: The source of the topology information on which to cluster. Choices are:
· Infer topology from alert: The Recipe obtains the topology name from custom_info.moog_topology. You can use this option to cluster alerts related to several topologies, without needing to create an individual Recipe for each named topology. For more information, see Create and Manage Topologies.
· Named topology: The name of the topology from which to obtain topology information.
· Node Field: The alert field that contains the topology node information. You must define a node field for both named and inferred topologies.
· Match: Maximum number of hops between the alert source nodes in order for the alerts to qualify for clustering. Cisco Crosswork Situation Manager measures hop limit from the first alert that formed the Situation and always follows the shortest possible route. A hop is the distance between two directly connected nodes. For more information on Vertex Entropy and hops, see Vertex Entropy and Configure Topology-based Clustering with Vertex Entropy. To change the default of 2, select the Nodes within checkbox and then set a different limit:
· Any node: The Recipe checks whether the alert is from any node in the same topology as the node represented by the reference alert in the Situation.
· Nodes within: The Recipe checks whether the alert is from a node within a specified hop limit of the node represented by the reference alert in the Situation.
Note
To cluster all alerts from the same node, add a clustering attribute at 100% similarity. Use the same attribute that you are using for your Topology Node Field.
For more information on topologies see Topology Overview.
— Alert Threshold: Minimum number of alerts in a candidate cluster required before Cookbook creates a Situation. If left as '1', a single alert can generate a new Situation.
To determines the number of alerts required to create a Situation, Cookbook compares the alert threshold values in the Cookbook Recipe to those of the merge group that the Cookbook Recipe belongs to. It uses the higher value.
If you are using the default merge group which has an alert threshold of 2, Cookbook will never create a Situation containing a single alert. If you want Cisco Crosswork Situation Manager to create Situations with a single alert, change the alert threshold in the default merge group to 1 or create a custom merge group. See Merge Groups for more information on updating the default merge group and setting up custom merge groups.
— Cook For: Minimum time period, in seconds, that Cookbook clusters alerts for before the Recipe resets and starts a new cluster. See Cookbook and Recipe Examples for more information.
If you set a different Cook For time for a Recipe, it overrides the Cookbook value. Recipes without a Cook For time inherit the value from the Cookbook.
— Cook For Extension: Time period that Cookbook can extend clustering alerts for before the Recipe resets and starts a new cluster. Setting this value enables the cook for auto-extension feature for this Recipe. As Cookbook receives related alerts, it continues to extend the total clustering time until the Max Cook For period is reached. Used in conjunction with the Max Cook For value, the Cook For Extension period helps to ensure that Cookbook continues to cluster alerts together that are related to the same failure. The Cook For Extension period only applies to new related alerts; it does not apply to existing alerts that are updated with new events. See Cookbook and Recipe Examples for more information.
If you set a different Cook For Extension time for a Recipe, it overrides the Cookbook value. Recipes without a Cook For Extension time inherit the value from the Cookbook.
— Max Cook For: Maximum time period that Cookbook clusters alerts for before the Recipe resets and starts a new cluster. It works in conjunction with the Cook For Extension time to help to ensure that Cookbook continues to cluster alerts together that are related to the same failure. If Cook For Extension is set and this value is not set, it defaults to three times the Cook For value. See Cookbook and Recipe Examples for more information.
If you set a different Max Cook For time for a Recipe, it overrides the Cookbook value. Recipes without a Max Cook For value inherit the value from the Cookbook.
a. Configure the alert matching property for the Recipe:
— Cluster By: Defines how Cookbook matches alerts to clusters. You can select the default option to cluster alerts based on Cookbook's First Recipe Match Only setting. The First Matching Cluster option adds alerts to the first cluster above the similarity threshold value. The alternative is Closest Matching Cluster to add alerts to the cluster with the highest similarity greater than the similarity threshold value. The second option may be less efficient because it needs to compare alerts against each cluster in a Recipe.
· On the Clustering tab, add the fields that you want Cookbook to factor in when clustering alerts:
· Click the + icon and select a field in the drop-down list.
· Use the slider to set the similarity threshold for each field. The value determines the required percentage similarity for Cookbook to cluster a set of alerts.
· If you want to use custom info fields, configure the Match List Items option. See Match List Items in Recipes for details.
· If you are configuring a Value Recipe, check Case Sensitive if you want the text similarity calculation to factor in case sensitivity. See Recipe Types for more information.
· If you are configuring a Value Recipe V2, select whether you want Cookbook to calculate text similarity using shingles or words. You can select Shingles from the drop-down list in the Language Processing field and enter a Shingle Size. The default value is the optimal shingle size for that field. Alternatively, you can select Words. See Recipe Types for more information.
· Click Save Changes.
When you have completed the configuration, Cisco Crosswork Situation Manager applies the changes to any active Cookbooks that use the Recipe as soon as you save the changes. If the Recipe has not been added to an active Cookbook, go to Settings > Cookbook and move the Recipe under Selected Recipes for that Cookbook.
If you change a Cookbook Recipe, see Cookbook Configuration Changes for information on how these changes affect the clusters that Cookbook creates.
Configure Cookbooks and Recipes
Use the following steps to configure a Cookbook and its Recipes via the Cisco Crosswork Situation Manager UI:
a. First, you must configure the Recipes that you want to use in a Cookbook. See Configure a Cookbook Recipe for details.Configure a Cookbook Recipe
b. Then, you must create the Cookbook that will contain those Recipes. See Configure a Cookbook for details.Configure a Cookbook
c. Finally, you must activate the Cookbook so that it starts to cluster alerts into Situations. See Configure a Cookbook for details.Configure a Cookbook
You can also configure a Cookbook and its Recipes via the Graze API.
If you change a Cookbook, see Cookbook Configuration Changes for information on how these changes affect the clusters that Cookbook creates.
Cookbooks configured in the UI and the Graze API can run concurrently.
Cookbook Configuration Changes
If you change the configuration of a Cookbook or Cookbook Recipe, Cisco Crosswork Situation Manager may re-evaluate any Cookbook clusters, depending on your persistence setting and the severity of the configuration change. This applies to clusters of alerts that Cisco Crosswork Situation Manager holds in memory and has not yet formed into Situations. It does not affect clusters that have already become Situations that users can see and have been saved in the database.
Your persistence setting affects whether Cookbook re-evaluates clusters as follows:
· If persistence is turned off, Cookbook resets every cluster and all new incoming alerts will form new Situations.
· If persistence is turned on, Cookbook updates existing clusters depending on the configuration parameters that have been changed, as described below. Cookbook may remove clusters or create new Situations or it may persist the clusters so that new alerts are added after you have changed the configuration.
Configuration categories
Cisco Crosswork Situation Manager groups Cookbook and Recipe configuration changes into three categories:
· Cosmetic changes: These configuration properties are non-functional and do not affect how Cookbook creates and maintains clusters. When you change these properties, there are no functional changes to existing clusters.
· Property changes: These configuration properties affect how Cookbook maintains clusters and generates Situations.
· Core changes: These configuration properties fundamentally govern how Cookbook creates clusters and groups alerts into Situations.
Cookbook and Recipe configuration properties are grouped into the following categories:
| Category |
Cookbook Property |
Recipe Property |
| Cosmetic changes |
Name |
Name |
| Description |
Situation Description |
|
| Property changes |
|
Alert Threshold |
| Cook For |
Cook For |
|
| Cook For Extension |
Cook For Extension |
|
| Max Cook For |
Max Cook For |
|
| Core changes |
|
Trigger Filter |
|
|
Exclusion Filter |
|
|
|
Seed Alert Filter |
|
|
|
Rate Filter |
|
|
|
Topology Filter |
|
| Cluster By |
Cluster By |
|
| Entropy Threshold |
|
|
| Scale by Severity |
|
|
| Recipe Matching |
Recipe Matching |
|
|
|
Clustering |
|
Cosmetic changes
Cosmetic changes to Cookbook and Recipe properties have the following effects on clusters:
If you change the name of a Cookbook or a Recipe, Cookbook makes no operational changes to clustering.
If you change the Situation Description for a Recipe, Cookbook applies the new description to all Situations created after the change. Cookbook maintains the old description for all Situations created before the change, regardless of whether new alerts are added to the Situation.
Property changes
Property changes to Cookbook and Recipe properties have the following effects on clusters:
Changes to the Alert Threshold
For changes to the Alert Threshold, the main behavioral difference occurs when the Alert Threshold is reduced. In the example below, before the configuration change, the Alert Threshold was set to 3 and two alerts had arrived and formed a cluster in memory. If you change the Alert Threshold configuration from 3 to 1, the cluster satisfies the new configuration so Cookbook automatically creates a Situation in the database containing the these two alerts. New alerts coming into the system can continue to be added to this cluster.
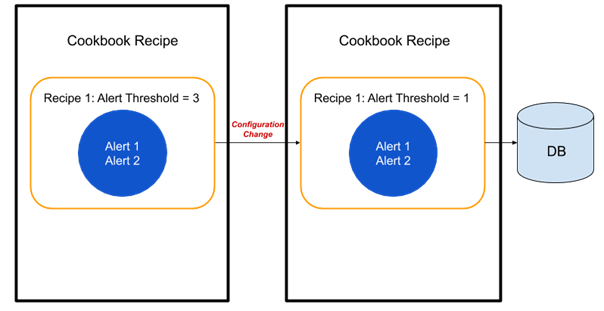
Increasing the Alert Threshold
If you increase the Alert Threshold configuration, the cluster will persist in memory until the higher Alert Threshold is reached.
Cook For/Cook For Extension/Max Cook For
Cookbook adopts a similar logic for changes to all three of these attributes because they all affect the cluster's expiry time.
Extending Cook For/Cook For Extension/Max Cook For
If you extend any of these properties, the cluster expiry time is extended from the first event time. In the example below, before the configuration change, the Cook For time is 30 seconds and alerts 1 and 2 arrive at 0 and 25 seconds, respectively. After the Cook For time changes from 30 seconds to 40 seconds, alert 3 arrives at 35 seconds. Cookbook clusters this alert with the persisted cluster from the previous configuration. When alert 4 arrives at 45 seconds, Cookbook creates a new cluster because it satisfies the newly defined Cook For time. Cookbook behaves similarly if Cook For Extension or Max Cook For properties are extended.

Reducing Cook For/Cook For Extension/Max Cook For
If you reduce any of these properties, Cookbook relies on the first event time to establish whether clusters are still valid. In the example below, before the configuration change, the Cook For time is 30 seconds and alerts 1 and 2 arrive at 0 and 25 seconds, respectively. If you reduce the Cook For time from 30 seconds to 20 seconds, the arrival time of the most recent (second) alert exceeds the new Cook For time so Cookbook expires and removes the cluster.

In the second example below, before the configuration change, the Cook For time is 60 seconds and alerts 1 and 2 arrive at 0 seconds and 25 seconds, respectively. If you reduce the Cook For time from 60 seconds to 40 seconds, the cluster still persists because it is still within the new Cook For time so that, when alert 3 arrives at 35 seconds, it joins the existing cluster. Alert 4 arrives at 45 seconds which exceeds the new Cook For time so Cookbook places it in a new cluster.

In the same example, if alerts 3 and 4 had arrived (at 35 and 45 seconds) and the configuration change occurred at 50 seconds, Cookbook would close the cluster immediately with the four alerts in it, as shown below.

Core changes
For all properties that are in the core changes group, any changes cause Cookbook to remove the associated clusters. This is because the fundamental rules on which Cookbook clusters alerts have changed, and it is no longer meaningful to cluster new alerts with old ones.
As an example, consider the example below in which you change the similarity of a Recipe. Initially, the recipe uses a 50% similarity on source ID. Alerts 1 and 2 arrive and Cookbook clusters them together. If you increase the similarity from 50% to 100%, Cookbook removes the cluster from memory. The diagram below shows how confusing it would be if the cluster persisted, visibly seeing a cluster containing alerts which clearly contradict a 100% match on source ID.

This behavior, to remove any old clusters and start new clusters when new alerts arrive, is consistent across all core configuration changes.
Restore a Cookbook or Recipe
You can restore an earlier version of a Cookbook or a Recipe.
You must have the super_privileges permission to restore earlier versions of Cookbooks and Recipes.
Restore an earlier version of a Cookbook or Recipe
· Go to Settings > System > Change History.
The left hand panel is a Cookbook and Recipe version timeline. Each version in the timeline has the creation date and time, the user who created that version, and the category (recipe or cookbook).
The right hand panel shows the changes made to the Cookbook or Recipe for that version. For example, Recipe type, Situation description or alert threshold.
See Configure a Cookbook Recipe and Recipe Types for more information on these settings.
· Select a Cookbook or Recipe version.
· Select Restore to restore the selected version of the Cookbook or Recipe.
In the Restore Saved Configuration box, select Yes.
In the Restore Successful box, select OK.
Warning
When you restore an earlier Cookbook or Recipe version, Cisco Crosswork Situation Manager deletes all later versions of that Cookbook or Recipe.
The version timeline automatically updates, and the version you restored will be at the top of the timeline.
If you restore a version of a Recipe attached to a Cookbook instead of restoring the entire Cookbook, Cisco Crosswork Situation Manager detaches the Recipe from the Cookbook before restoring the earlier version. You must then re-attach the restored version of the Recipe to the Cookbook.
See Configure a Cookbook and Configure a Cookbook Recipe for more information.
Another user changes or restores a Cookbook or Recipe
If you are looking at a Recipe or Cookbook in the Change History page and another user changes that Cookbook or Recipe, you will see the following warning message:
There are new changes available. Refresh this page to see the changes.
Refresh the page to remove the message and see the updated version timeline.
If you’re configuring a Recipe or Cookbook and another user restores an earlier version of that Recipe or Cookbook, that Recipe or Cookbook configuration automatically updates to the restored version. You will see the following warning message:
System is restored by the other user. Updated the current list of changes.
Restore a Cookbook that is part of a merge group
Merge groups always use the latest version of a Cookbook. If you restore an earlier version of a Cookbook that a merge group uses, that merge group automatically updates to use the restored Cookbook as this version is now the latest version.
If restoring an earlier Cookbook version means that a merge group is empty, Cisco Crosswork Situation Manager automatically deletes that merge group.
If you delete a Cookbook that is part of a merge group, Cisco Crosswork Situation Manager removes that Cookbook from the merge group. If you then restore the deleted Cookbook, Cisco Crosswork Situation Manager does not automatically add that Cookbook back into the merge group.
See Configure Merge Groups for more information.
Restore a Recipe with an associated topology
In order to restore a Recipe that filters on a named topology, the topology must still exist in Cisco Crosswork Situation Manager.
Cookbook and Recipe Examples
The following examples provide further explanation of the functionality within your Cookbook and Recipe configurations. See Configure a Cookbook and Configure a Cookbook Recipe for further details.Configure a CookbookConfigure a Cookbook Recipe
Cook For auto-extension example
The Cook For auto-extension functionality uses the Cook For, Cook For Extension and Max Cook For properties in the Cookbook and Recipe configurations. These configuration properties help to ensure that Cookbook continues to cluster alerts together that are related to the same failure.
Consider the following example:

· Cook For is set to 1 hour.
· Cook For Extension is set to 30 minutes.
· Max Cook For is set to 2 hours.
Cisco Crosswork Situation Manager receives an alert which meets the Cookbook and Recipe criteria so Cookbook starts a cluster. If Cisco Crosswork Situation Manager receives a new related alert 40 minutes after Cookbook started clustering alerts, Cookbook extends the total clustering time by 30 minutes from that time to 1 hour and 10 minutes, then:
1. If Cisco Crosswork Situation Manager receives another alert 1 hour and 5 minutes after Cookbook started clustering, because Cisco Crosswork Situation Manager received it within the extended time of 1 hour and 10 minutes, Cookbook further extends the total clustering time to 1 hour and 35 minutes. Cookbook continually extends the total clustering time as it receives more related alerts, provided that they are received within the extended time. Cookbook can extend the total clustering time until the Max Cook For time is reached. If Cookbook receives further related alerts after the Max Cook For time of 2 hours has elapsed, the Recipe resets and Cookbook adds them to a new cluster.
2. If Cisco Crosswork Situation Manager does not receive any further alerts, Cookbook stops clustering alerts after the extended time of 1 hour and 10 minutes elapses. If Cisco Crosswork Situation Manager then receives another alert after this time has elapsed, Cookbook starts a new cluster.
Recipe Types
The Cookbook clustering algorithm uses the following Recipe types to define alert relationships and control how it clusters alerts:
The Value Recipe V2 and CValueRecipe use different methods to calculate the textual similarity between alerts. The CBotRecipe is a customizable recipe that allows you to call specific functions from a Moobot.
Value Recipe v2
Value Recipe v2 extracts and analyzes groups of consecutive characters to measure text similarity between alerts. It is the default Recipe in Cookbook for new Cisco Crosswork Situation Manager v7 installations and for any new Cookbooks you create.
This recipe uses the bag-of-words model and shingling natural language processing methods to calculate the text similarity between alerts. Shingling is the process in which Cookbook extracts groups of consecutive characters called shingles from a source string. Potential sources include the alert source ID or description. To measure similarity, Cookbook calculates the number of identical shingles. You can control the calculation using the shingle size property.
In the Clustering tab in the Cookbook Recipes window in Settings, you select whether Cookbook treats string values as shingles or words for each field you use to cluster alerts. If you select shingles, you can choose what you want the shingle size to be. The default shingle size settings in the Value Recipe v2 are optimal for most use cases.
For example, if you set the shingle size for source IDs to 2 and Cookbook receives two alerts with the source IDs:
webserver0100
webserver0200
Cookbook extracts the following shingles from the source ID strings:
we eb bs se er rv ve er r0 01 10 00
we eb bs se er rv ve er r0 02 20 00
Ten out of the 12 shingles are identical which indicates a high similarity.
If you set the shingle size to 0 or less, Cookbook treats the string values as words in its text similarity calculation.
For example, if Cookbook receives two alerts with the source IDs: "database01" and "database02", it treats them as:
database01
database02
These two words are not identical so the two alerts would be given a low similarity.
Value Recipe
The first version of the Value Recipe uses a string comparison mechanism to cluster alerts by textual similarity.
Value Recipe uses string metric algorithms to calculate similarity. The calculation breaks strings up into partitions and performs a character-by-character comparison of each partition to measure similarity.
For example, if you set a Cookbook Recipe to cluster alerts with source IDs and descriptions with a Similarity Threshold of 100%, in a scenario where Cookbook receives the following alerts:
| Alert |
source_id |
description |
| A |
001 |
database |
| B |
001 |
webserver |
| C |
002 |
database |
| D |
002 |
database |
Cookbook creates three clusters: one containing alert A, one containing alert B and one containing alerts C and D which have identical source IDs and descriptions. The string may contain non-alphabetical characters. Value Recipe can also convert numeric values to strings for comparison.
The Value Recipe uses the case sensitive property to enable or disable case sensitivity as a factor in text similarity matching. For example, you can enable the Case Sensitivity property for source ID so Cookbook only matches if the case is identical but you can disable it for descriptions if you do not want descriptions to be case sensitive.
If you enable case sensitivity, then an alert from a source called "WebServer1" and an alert from a source called "webserver1" would have a lower similarity.
To make Cookbook match each value in a list individually in custom info fields, check the Match List Items check box in the Cookbook Recipe Clustering tab. See Match List Items in Recipes for details.
Bot Recipe
Bot Recipe is a customizable Cookbook Recipe that allows you to call certain functions from the Cookbook.js Moobot. You can configure the Bot Recipe using the Cookbook Graze API. Bot Recipes are not available in the UI.Graze API
You can configure the Bot Recipe to call functions defined in the Cookbook.js Moolet. The Cookbook Moolet defines two functions, an initialization function called initialize_function and a member_function.
You can call the initialize_function once to set up any necessary initialization of the algorithms you want to write in the Moobot.
You can call the member_function once for every event that passes the trigger. Cookbook considers each of these events for matching and for every candidate cluster in the system. For example, Cookbook calls the member_function 100 times if there are 100 candidate clusters for each alert that comes through the system. Cookbook compares the alert to candidate clusters that are potential Situations. If the alert's similarity matches or exceeds the matcher value, Cookbook adds the alert to the candidate cluster.
Match List Items in Recipes
You can create Cookbook Recipes and configure clustering around the use of list-based fields in alert custom info. You can also set whether list-based clustering of a custom field is applied. If not, the field is treated as a string.
A list in custom info is a properly formed JavaScript array. To see if a custom info item is a list, examine the custom info details in the UI. If the list can be expanded and has a value of x items at the top level, then it is a list. For example:

A text field containing comma separated values is not considered a list.
Configure Match List Items for a Custom Info Field
To match list items for a custom_info field:
· On the Settings tab, select Cookbook Recipes from the Algorithms section, select the Recipe you want to configure, and click on the Clustering tab.
· In the Cluster By field, select the custom_info attribute from the drop-down list. Enter the custom_info field name in the box below.
· Check the Match List Items check box to match individual items in custom_info lists and use the slider to select the similarity threshold for this custom_info field.

Comparison of Match List Items
The Cookbook Recipe applies the similarity threshold that you set to compare each individual item in the list, not all the items in the list.
For example, you have the following lists in two alerts and the similarity threshold is 100%:
Alert 1: [ ABC , DEF ]
Alert 2: [ ABC123, DEF123, ABC, DEF ]
This results in similarity comparisons between:
· ABC and ABC123
· ABC and DEF123
· ABC and ABC
· ABC and DEF
· DEF and ABC123
· DEF and DEF123
· DEF and ABC
· DEF and DEF
Since there are two identical matches, [ ABC and ABC ] and [ DEF and DEF ], the Cookbook Recipe clusters these alerts together.
If you want to calculate the total similarity of list items, that is, how many items in list 1 appear in list 2, you should not select Match List Items and set Language Processor to Words so that the Cookbook Recipe treats the list as a string. In the above example, there is a 50% match of items in both lists, [ ABC and DEF ], so if the similarity threshold is 100%, the Cookbook Recipe does not cluster these alerts together.
Example
You configure your Recipe to treat the custom_info field 'cities' as a list and set the similarity threshold to 100%, as shown above.
After configuring the Recipe, Cisco Crosswork Situation Manager receives the following four alerts:
Alert 1: custom_info.cities = ["London"]
Alert 2: custom_info.cities = ["London", "San Francisco", "Venice", "Bangalore"]
Alert 3: custom_info.cities = ["Venice", "Bangalore"]
Alert 4: custom_info.cities = ["Bangalore"]
This configuration would produce four candidate clusters:
· Cluster A: Alert 1 and alert 2 match on "London".
· Cluster B: Alert 2 matches on "San Francisco".
· Cluster C: Alert 2 and alert 3 match on "Venice".
· Cluster D: Alerts 2, 3 and 4 match on "Bangalore".
Cookbook creates two Situations because cluster D contains all the alerts in clusters B and C:
1. Cluster A (alerts 1 and 2) becomes Situation X.
2. Clusters B, C, and D (alerts 2, 3, and 4) become Situation Y.
You must be careful when setting the similarity threshold if you are using list-based clustering. If the similarity threshold is low enough, you may end up with Situations containing blended list similarity. In the above example, alert 2 is common to both Situation X (London) and Situation Y (Bangalore). If the similarity were set to 25%, these two Situations would merge.
If the Recipe does not see 'custom_info.cities' field as a list, it treats the field as a single string. This means that, in this example, all four alerts would end up in separate Situations with no clustering.
Load a Topology
This topic outlines how to load topologies in Cisco Crosswork Situation Manager. Topologies let you view alerts and Situations according to the relationships that are important to you. See Topology Overview for more information.
You can use the Topologies API to create and manage small topologies, but this is impractical for large topologies. If your topology .csv file is larger than 40 MB Cisco recommends using the Topology Loader utility.
To use the topology loader, you create a comma-separated value (.csv) file of the node-to-node links. The utility builds and caches the topology in the topologies, topo_nodes and topo_links tables in the moogdb database. You can also add an optional description for each link in the topology.
Before you begin
Before you load your topology data into Cisco Crosswork Situation Manager, ensure you have met the following requirements:
1. You have created each topology for which you want to load nodes and links, using the Topologies API or the Graph Topology Moobot module.Topologies APIGraph Topology
2. You have generated a map of the connected nodes in a .csv file. Create a separate file for each topology.
3. Your .csv file contains all of the nodes that are expected to send events.
4. The lines in your .csv file follow the format: <node1>,<node2>,<optional description>. For example:
host_a3,host_a1,Link description
host_a3,host_a2,Link description
host_a4,host_a1,Link description
Note
If you use a .csv file with the format required by the deprecated Topology Builder utility, the optional <weight> data will be saved as link descriptions.
If a node name includes a comma, you must enclose the name in double quotes.
Ensure there are no extra spaces in the file, around the fields and at the beginning and end of each line.
The topology loader ignores any lines in your file that are not in the correct format. It also ignores any loops such as 'host_x, host_x'. The string node names are case insensitive.
1. You have access to the Cisco Crosswork Situation Manager server that runs Nginx. The utility matches the hostname you provide against the name on the SSL certification in the Nginx configuration.
Load a topology
Load your topology into Cisco Crosswork Situation Manager as follows:
· Log into the Cisco Crosswork Situation Manager server that runs Nginx.
· Load the .csv topology file into the database using the topology loader found at $MOOGSOFT_HOME/bin:
./topology_loader -t=host -f=host_topology.csv --hostname=example.com --credentials=phil:password123
The -t option is the name of the topology. You must create the topology before you run the utility.
The -f option specifies the file that contains the topology data.
The --hostname option specifies the Cisco Crosswork Situation Manager host running Nginx.
The --credentials option specifies the Graze username and password, if you are not using the defaults.
For a description of all available options see Topology Loader Utility Command Reference.
· The topology loader utility uses the source data to add nodes and links to the specified topology. The utility records the topological information in the topologies, topo_nodes and topo_links databases. The utility logs any errors to the console.
After you have loaded your topological data, the graph analyser task calculates the Vertex Entropy of the nodes. See Topology Overview for more information.
Modify a topology
You cannot use the Topology Loader utility to modify or delete existing links.
To modify a topology, use the endpoints in the Topologies API or the methods in the Graph Topology Moobot module.
Consider the Situation Labeling Strategy
Situation descriptions are one of the primary means that operators use to find and identify relevant Situations. For this reason, you should carefully consider the alert content to include in your descriptions. For example, imagine you have multiple separate Situations that impact separate environments occurring at the same time. How does an operator prioritize and distinguish these if the description does not include the environment, such as Test, Production, or UAT, where the Situation occurred?
Good descriptions can also help operators diagnose and assign Situations. Suppose a team assignment depends on the physical location where the Situation occurred. If the description includes the location, an operator can quickly assign a Situation to the correct team.
Consider how you might label the Situations and ask clarifying questions during the discovery sessions. The criteria for defining "good" descriptions, like the criteria for "good" data and "good" Situation design, is highly dependent on the specific needs of your organization and operators. Always consult with your operators and users when planning and maintaining your deployments.
Learn more
See Situation Manager Labeler.
Cluster by other algorithms
Time-based Clustering with Tempus
Tempus is a time-based algorithm in Cisco Crosswork Situation Manager which clusters alerts into Situations based on the similarity of their timestamps.
The underlying premise of Tempus is that when things go wrong, they go wrong together. For example, if a core element of your network infrastructure such as a switch fails and disconnects then it affects a lot of other interconnected elements which send events at a similar time.
Tempus uses the Jaccard index to calculate the similarity of different alerts. It also uses community detection methods to identify which alerts with similar arrival patterns it should cluster into Situations.
As Tempus is time-based, you should not use it to detect events relating to the slow or gradual degradation of a service from disks filling up or CPU usage.
One advantage of Tempus is it only uses event timestamps for clustering so no alert enrichment is required.
Time-based clustering
Cisco Crosswork Situation Manager applies Tempus incrementally to alerts as it ingests them so that it can create Situations in real-time.
The diagrams below show how Tempus sorts and then groups alerts with similar timestamps into Situations.
Raw alerts from the Moolet chain, for example, the Alert Builder or Alert Workflows, arrive over a period of time. These are shown as gray dots in the diagram below:

Tempus identifies and sorts which alerts have similar arrival patterns:

Tempus clusters alerts with similar arrival patterns into Situations:

Configure Tempus
To configure Tempus via the Cisco Crosswork Situation Manager UI, see Configure Tempus.
You can also configure Tempus using the Graze API.
Configure Tempus
Tempus is an algorithm in Cisco Crosswork Situation Manager that clusters alerts based on the similarity of their arrival, occurrence and events patterns. See Time-based Clustering with Tempus for more information on how the clustering algorithm works.
Before you begin
Before you set up Tempus via the UI, ensure that your LAMS or integrations are running and Cisco Crosswork Situation Manager is receiving events.
Configure a basic Tempus algorithm
To configure a basic Tempus algorithm from the UI, using the default settings:
· Go to Settings > Tempus.
· Click the Active switch to turn on the Tempus algorithm that uses the default settings.
· Accept the default description or enter your own description of the Tempus algorithm.
Configure an advanced Tempus algorithm
To configure an advanced Tempus algorithm from the UI, using your own settings:
· Go to Settings > Tempus.
· Accept the default description or enter your own description of the Tempus algorithm.
· Click Show Advanced to display the Tempus settings.
· Configure the entropy settings for Tempus:
— Entropy Threshold: Select the type of entropy threshold that you want Tempus to use:
· Use Global Entropy Threshold: This is a single entropy threshold that Tempus applies to all alerts to eliminate noisy alerts with a lower entropy value.
· Use Manager-Specific Entropy Thresholds: Use entropy thresholds set up for individual managers. If the manager for an alert has an entropy threshold set, Tempus uses this value to eliminate noisy alerts with a lower entropy value. If an alert's manager does not have an entropy threshold, Tempus uses the global entropy threshold to filter out alerts.
· Use an Ad Hoc Explicit Entropy Threshold: Set an actual entropy threshold value that you want Tempus to use to eliminate noisy alerts with a lower entropy value. Enter the value you want to use.
· Do Not Use an Entropy Threshold: Select this option if you do not want Tempus to filter out any alerts based on their entropy value.
See Configure Entropy Thresholds with Alert Analyzer for more information on setting global and manager-specific entropy thresholds.
· Configure the trigger settings for Tempus:
— Execution Interval: Executes the Tempus algorithm after a defined number of seconds.
a. Configure the correlation time period settings for Tempus:
— Time Period: Determines the length of time when Tempus analyzes alerts and clusters them into a Situation each time it runs. Default time period is 1200 seconds (20 minutes). The default time period and bucket size provides 240 buckets per time period.
— Bucket Size: Determines the time span of each bucket in which alerts are captured. Default bucket size is 5 seconds. The default time period and bucket size provides 240 buckets per time period.
Note
Cisco does not recommend you change the bucket size. If you do want to change it, then change with caution because Tempus is designed to use small bucket sizes.
— Arrival Spread: Sets the acceptable latency or arrival window for each alert, in seconds. Use this to minimise or reduce the impact of multiple alerts arriving over a small amount of time and landing in separate buckets. A larger value means a wider distribution to multiple time buckets, and hence more tolerance on arrival time. Too large a spread can result in the loss of algorithmic precision.
· Click the Active switch to turn on the Tempus algorithm that uses these settings.
· If you want to configure other settings for Tempus, such as the alert threshold, use the Graze API endpoint updateTempus.
Reset to default settings
Click Show Advanced and then click Reset to Defaults to override any changes you have made to the settings and return to the default values.
Vertex Entropy
Vertex Entropy is a Cisco Crosswork Situation Manager algorithm that indicates the critical nodes within your topology and their tendency to produce important events. Vertex Entropy pertains to typologies, see Topology Overview. Do not confuse it with event entropy.
You can use Vertex Entropy if you want to cluster alerts into Situations based on their topological importance. Once the calculation is run against a topological map of the connected nodes in your network, it applies a Vertex Entropy value for each node or "vertex".

This diagram shows the Vertex Entropy values for a network of 12 connected nodes. A Vertex Entropy value of 1.0 indicates a node of highest topological importance.
Note
Node: A device or base unit that forms part of a larger network. This is known as a 'vertex' in graph theory.
Link: A connection between two directly connected nodes. This is known as an 'edge' in graph theory.
Hop: The distance between two directly connected nodes.
Set up Vertex Entropy
To set up Vertex Entropy within Cookbook Recipes, see Configure Topology-based Clustering with Vertex Entropy
Configure Topology-based Clustering with Vertex Entropy
Vertex Entropy is a Cisco Crosswork Situation Manager algorithm that indicates the critical nodes within your topologies and their tendency to produce important events. See Vertex Entropy for more information.
Before you begin
Before you can use the Vertex Entropy feature, you must create one or more topologies in Cisco Crosswork Situation Manager.
You can create topologies in a number of ways. If your topologies are small you can use:
· Topologies APITopologies API
· Graph Topology Moobot moduleGraph Topology
You can load large topologies into Cisco Crosswork Situation Manager from a .csv file using the Topology Loader utility. For more information see Load a Topology.
Calculate Vertex Entropy
The Graph Analyser process calculates the Vertex Entropy for all nodes in your topologies. It processes topology changes every 30 seconds as part of Housekeeper.
See Create and Manage Topologies for more information.
Add a Vertex Entropy filter
If you have created one or more topologies in Cisco Crosswork Situation Manager you can use Vertex Entropy as a trigger or an exclusion filter in a Cookbook Recipe. These filters include or exclude alerts with similar topological importance. For example, you can set a trigger so Cookbook considers alerts with a Vertex Entropy value of over 0.5 for Situation creation.
To add a trigger filter:
In your Cookbook Recipe, enter the following in the Trigger Filter:
'vertex_entropy' > 0.5
Alternatively, you can create an exclusion filter to prevent alerts with a Vertex Entropy value of less than 0.3 from creating a Situation:
'vertex_entropy' < 0.3
Add a seed alert
You can add a seed alert filter to a Recipe to ensure Cookbook only creates a new Situation if an alert matches the provided filter value.
For example, if you only want to create Situations when there is an issue with the most critical nodes in your network, you can set the seed alert filter to only create Situations from alerts with a Vertex Entropy value of 1.0:
In your Cookbook Recipe, enter the following in the Seed Alert Filter:
'vertex_entropy' = 1
If enabled, the initial seed alert must meet both the trigger and seed alert conditions. For more information, see Configure a Cookbook Recipe.Configure a Cookbook Recipe
The seed alert filter is not specific to Vertex Entropy and can be used for other conditions such as severity.
Add a hop limit
You can add a hop limit so that Cookbook clusters alerts from nodes within a certain number of hops from each other. You can use this alongside Vertex Entropy trigger or exclusion filters.

In this diagram, a hop limit of '3' means Cookbook includes alerts from all nodes between node A and node D.
To add a hop limit:
· In your Cookbook Recipe, check the Match > Nodes Within checkbox in the Topology Filter section.
· Enter '3' in the Hops field.
The hop limit ensures that Cookbook only clusters alerts that originated from nodes that are close together. For more information, see Configure a Cookbook Recipe.Configure a Cookbook Recipe
Situation Merge - How It Works
Two types of merging occur when Cisco Crosswork Situation Manager clusters alerts into Situations. The following video explains the clustering stages and how Cisco Crosswork Situation Manager handles automatic merging.
Clustering Is Done at the Event Level
Clustering is done at the event level. The event is associated with an alert and this drives the alert’s situation membership. Each time an event passes through a Sigaliser it can potentially end up in a candidate cluster that will produce a new situation. As a result of this, if configured in a certain manner, an alert that has 10 deduplicated events can potentially become a member in 10 distinct Situations. This is because each time the individual event was evaluated by the system, it had the opportunity to be added to a new or existing Situation. Obviously this case is less likely to happen unless you specifically design for it; however, in order to avoid having multiple duplicate situations, the system has been designed to catch similarities through the Merge and Resolve process.
Clustering Stages

There are a number of stages the initial cluster, as produced by Sigaliser, goes through until it emerges as a Situation. On a high level the stages are as following:
· Candidate Cluster
— Generated by a Sigaliser such as Tempus or a Cookbook Recipe.
— Must be triggered by the seed alert if configured by the Recipe.
— Remains active in moogfarmd memory - regardless whether it has been promoted to a Candidate Situation or not - until its cook_for time expiry.
· Candidate Situation
— A candidate cluster becomes a candidate situation when its Alert Threshold has been breached.
— A candidate situation goes through a Merge and Resolve phase: the candidate situation is evaluated against all still opened Situations and identifies if the candidate Situation can be promoted into a new Situation or should be merged into an existing one.
— Do not confuse the Merge and Resolve phase with the operational workflow action consisting in resolving the Situation once the incident has been addressed.
· Created or automatically merged Situation as a result of Merge and Resolve.
Merge Types
Merging can be one of the following types:
· Automatic
— Similarity
— Superseding
· Manual
The following diagram illustrates the merging logic:

Superseding Merge

Superseding merge happens if all the alerts in a candidate situation are a complete set, a subset or a superset of alerts contained in an already existing open situation. The result of this is that a reoccurring incident does not trigger a new situation if it can associate itself with a still-active one.
As another example, below is an excerpt from the Moogfarmd log describing the stage when the Candidate Cluster is created and its corresponding Candidate Situation is merged into an existing Situation. Note that the Candidate Situation contains 3 alerts while the already Created Situation has 2 alerts. Although the logs at first may seem confusing here is how they should be interpreted. The Candidate Situation (in the log as SIG 1) is actually a superset of the already existing situation (in the log as SIG 20). In the UI this will be seen as the additional alert from the candidate situation - in this case, it is the alert with id [61] and signature [SIGNATURE::3] - added into already existing Situation. This could sometimes explain for example why an alert is added into an already existing Situation beyond its cook_for time expiry.
DEBUG: [8:Default Cookbook][20190503 16:34:59.895 +0100] [CAbstractRecipe.java:574] +|An event for alert is a NEW cluster [59]:[SIGNATURE::1]|+
DEBUG: [9:Default Cookbook][20190503 16:35:00.022 +0100] [CAbstractRecipe.java:609] +|An event for alert JOINS existing cluster [60]:[SIGNATURE::2]|+
DEBUG: [0:Default Cookbook][20190503 16:35:00.045 +0100] [CAbstractRecipe.java:609] +|An event for alert JOINS existing cluster [61]:[SIGNATURE::3]|+
DEBUG: [Default Cookbook-SituationProcessing][20190503 16:35:00.054 +0100] [CDetectedSitnDb.java:1256] +|SIG 20 is a superset of SIG 1: 2 vs 3|+
DEBUG: [Default Cookbook-SituationProcessing][20190503 16:35:00.054 +0100] [CDetectedSitnDb.java:1294] +|Completed Merge of new & active SIGs...|+
DEBUG: [Default Cookbook-SituationProcessing][20190503 16:35:00.054 +0100] [CDetectedSitnDb.java:650] +|Starting self-resolution of active SIGs... |+
DEBUG: [Default Cookbook-SituationProcessing][20190503 16:35:00.054 +0100] [CDetectedSitnDb.java:929] +|Self Resoltion updated 0 SIGs|+
Note that you might hear this type of merging interchangeably referred to as Superset, Subset or Superseding merge. Under the Visualize Tab in the UI the merge type will be set to Superseding Merge. Also not to be confused with the Superseded Category which all situations take - regardless of the type of merge - when they get merged into the parent situation.This type of merging cannot be disabled.
Similarity Merge
Similarity - also knows as Overlap - merge between two or more situations occurs when they share a number of alerts that satisfy the configured similarity level. This type of merge is configurable via merge groups. Only Situations produced by the Sigalisers listed within the same group can merge into each other. To note that same is applicable for Situations produced by the same Cookbook regardless of the merge_groups configured, i.e. all situations created by Recipes within the same cookbook are eligible for merging into each other.

Change the Situation Merge Settings
Adjusting the Merge Settings
Situation merge works differently for the sigalizers configured in the file system and in the UI. Learn the difference as well as how to make a change to the default settings.
File-Based
By default all back end configured, Sigalisers are part of the default merge group which has a situation similarity limit set to 0.7. This means that any situations produced by sigalisers that have not been listed in a separate merge group are candidates for a similarity merge if they share a similarity score of 0.7.
....
# Expanded sig_resolution section containing merge_groups configuration.sig_resolution :
{
# The default section is mandatory and must contain both
# "alert_threshold" and "sig_similarity_limit" values. Any moolet
# not defined as a member of a merge group will belong to the
# default group.
default:
{
alert_threshold : 1,
sig_similarity_limit : 0.7
},
....
During similarity merge, it is difficult to predict which situation will become the parent and incorporate the rest of the merge situations. You might consider lowering the default situation similarity value however this might result in unrelated alerts being part of the same situation.
During the situation design, you should consider carefully what situation contexts you might need to be merged together given a minimum amount of alert overlap. Here is an example of how you might configure a specific group to merge Location and Application-centered, context-wise, situations while leaving the default similarity limit for situations produced by any other Sigalisers.
....
sig_resolution :
{
default:
{ alert_threshold : 1,
sig_similarity_limit : 0.7
},
merge_groups:
[
{
name: "LocationApplicationOverlap",
moolets: ["LocationCookbook", "ApplicationCookbook"],
sig_similarity_limit : 0.5
}
]
....
UI Based
You can enable the similarity merge between situations produced by any of the UI enabled Cookbooks as below. Unlike with the Sigalisers in the file system, you cannot set up merge_groups in the UI. The similarity value from the slider works for all enabled cookbooks.
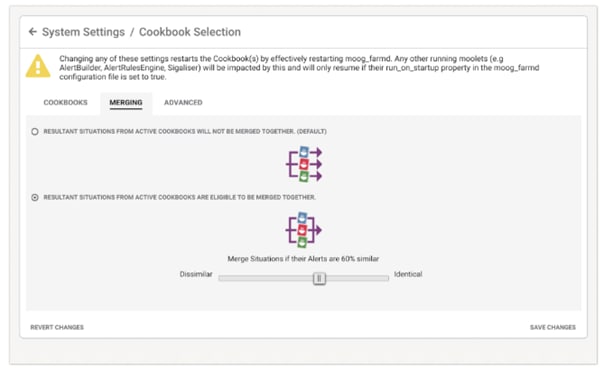
Note
You cannot combine UI based Cookbooks and the config file Sigalisers into the same merge group. A single Sigaliser can also only exist in one merge group.
Disabling Similarity Merge
When To Disable Similarity Merge
If you want the resultant situations of two or more recipes to never merge you can put them into separate Cookbooks and have these cookbooks in separate merge groups. For example, you might have two recipes with separate contexts, one indicating technology incident, the other clustering around the same location. Even if the situations produced by the two recipes share the same alerts, you never want the results to merge.
How To Disable Similarity Merge
Here is an example of how you could configure to disallow inter recipe merging. LocationCookbook and TechnologyCookbook each contain the corresponding recipe and then are placed in separate merge groups. The below indicates that any situations produced by the LocationCookbook can merge with each other if they have a similarity of 0.65. The Tech merge_group though allows situations produced by the TechnologyCookbook only to merge if they are exact matches.
....
merge_groups:
[
{
name: "Location",
moolets: ["LocationCookbook"],
sig_similarity_limit : 0.65
},
{
name: "Tech",
moolets: ["TechnologyCookbook"],
sig_similarity_limit : 1.0
}
]
....
Similarly, to disable the merging of situations produced by separate UI based Cookbooks, configure as below. Note that this doesn't stop situations produced by the same Cookbook to be merged based on the situation similarity value taken from the masked out slider (default value is set to 80). The setup below reads as: only merge situations as produced by the same Cookbook based on a 100% match.

Note that any time you change the value on the similarity slider, you need to save changes first, even if you then need to click back to the resulting situation NOT to be merged. Otherwise, the changes will not be applied.
Accessing Merge History
A merge between multiple already existing situations will result in a parent situation which will incorporate all the alerts from the merged situations. The type of merge will be indicated under the Visualize Tab in the parent Situation room. The rest of the already existing situations that have been merged into the parent will have their status set to Dormant and category to Superseded.
The merged situations will share the same story ID which is set to Situation ID of the parent Situation. Note that unless happening within a single recipe match enabled Cookbook, the Superseding merge might not even be apparent or noticeable much in the UI. To access the merge tree click on the merge icon by the Situation ID. Here is an example of a merge whereby Situation ID 108 incorporated Situations 109 and 110. The story ID across all three situations will be 108.

Merge Groups
Cisco Crosswork Situation Manager uses merge groups to control the minimum number of alerts in a Situation and the merge behavior of Situations from different clustering algorithms.
Use merge groups to control:
· How Cisco Crosswork Situation Manager merges similar Situations together.
· The minimum number of alerts to cluster into a Situation.
· The percentage of alerts two Situations must share to be merged.
You can use the default merge group or you can create custom merge groups. If you use the default merge group, Cisco Crosswork Situation Manager merges Situations from all your clustering algorithms if they meet the alert and Situation similarity threshold criteria.
You can create custom merge groups to override the behavior of the default merge group. Custom merge groups are useful when you want to adjust the alert threshold and the Situation similarity threshold. They also enable you to control which clustering algorithms you want to be merged together. For example, the default merge group combines Situations that meet the alert and Situation similarity threshold criteria, regardless of which clustering algorithm created them. If you have three Cookbooks and Tempus, you might want to have a custom merge group that combines Situations from two Cookbooks together, another custom merge group that combines Situations from the third Cookbook and Tempus together.
In addition to the alert threshold in a merge group, you can also set an alert threshold in Tempus (via the Graze API) and in Cookbook Recipes (using the Cisco Crosswork Situation Manager UI or the Graze API). When a clustering algorithm considers whether or not to cluster alerts into a Situation, it compares the alert threshold in the merge group and the clustering algorithm. The higher value determines how many alerts are required to create a Situation.addTempusConfigure a Cookbook RecipeaddValueRecipe
See Configure Merge Groups for information on how to configure default and custom merge groups.
See Field Behavior in Merged Situations for details of the behavior of individual fields in Situations which are merged.
Default merge group
If you do not create any custom merge groups, all of the clustering algorithms use the default merge group settings.
The default merge group has a Situation similarity threshold of 0.7. This means that Cisco Crosswork Situation Manager merges two Situations if they have at least 70% of the same alerts. The default merge group has an alert threshold of 1, meaning that the clustering algorithms will create Situations containing a single alert. You must use the Graze API endpoint updateDefaultMergeGroup if you want to change these values.
Custom merge groups
Custom merge groups only affect Situations created by the specified clustering algorithms. They do not merge Situations created by clustering algorithms outside their own merge group.
You can configure custom merge groups in the Cisco Crosswork Situation Manager UI or using the Graze API.
Cisco Crosswork Situation Manager provides a Cookbook called "Default Cookbook" and a custom merge group also called "Default Cookbook". This merge group has a similarity threshold of 0.8 and an alert threshold of 1. You can change the similarity threshold in the Cisco Crosswork Situation Manager UI. You must use the Graze API if you want to change the alert threshold for this custom merge group. You can also delete this custom merge group using the Graze API if you do not want to use it.
Example
You have defined the following clustering algorithms:
· Tempus algorithm that clusters alerts that arrive in Cisco Crosswork Situation Manager at a similar time.
· Cookbook 1 with three Recipes; one Recipe clusters alerts on 'Description', another Recipe clusters alerts on 'Host', and the third Recipe clusters alerts with a 'Severity' of Critical (5).
· Cookbook 2 with a single Recipe that clusters alerts on 'Impacted Services'.
· Cookbook 3 with a single Recipe that creates Situations containing a single alert with a high entropy value.
If you use the default merge group only, all the Situations created by all these clustering algorithms are merged if they meet the alert threshold and Situation similarity threshold criteria. If you want more granular control of the merge behavior, you can create the following custom merge groups:
· Custom merge group 1 - Cookbooks 1 and 2: Merges clusters created by Cookbook 1 and Cookbook 2 if they meet the following criteria:
— Alert threshold = null, so it uses the default merge group value of 1. If you create a custom merge group in the UI, the alert threshold is set to null so it automatically uses the default merge group value.
— Situation similarity threshold = 80%, so it will only merge clusters from Cookbook 1 and Cookbook 2 if they have 80% or more of the same alerts.
· Custom merge group 2 - Cookbook 3: You want to keep these Situations with a single alert separate so you configure this merge group as follows:
· Alert threshold = 1, so a single alert clusters into a Situation. Use the Graze API endpoint updateMergeGroup to change this value.
· Situation similarity threshold = 100%, so unless the alerts in two Situations are identical, the Situations will not be merged.
· You do not create a custom merge group for Tempus so it will use the default merge group values of:
— Alert threshold = 1.
— Situation similarity threshold = 70%.
Configure Merge Groups
You can update the default merge group and you can create custom merge groups.
Update the default merge group
You must use the Graze API to update the default merge group. You cannot update it using the UI. See the following topics for instructions on updating or viewing the details of the default merge group:
a. getDefaultMergeGroup: Returns details of the default merge group in Cisco Crosswork Situation Manager.
b. updateDefaultMergeGroup: Updates the default merge group in Cisco Crosswork Situation Manager.
Configure custom merge groups
You can configure a custom merge group in the Cisco Crosswork Situation Manager UI or using the Graze API.
Before you create a custom merge group, ensure you have met the following requirements:
· You have configured at least two different clustering algorithms, for example, Cookbook and Tempus.
· Your LAMs or integrations are running and Cisco Crosswork Situation Manager is receiving events.
Configure a custom merge group in the Cisco Crosswork Situation Manager UI
To configure a custom merge group in the Cisco Crosswork Situation Manager UI:
· Navigate to the Settings tab.
· Click Merge Groups in the Algorithms section.
· Select an existing custom merge group and click Edit, or click Add Merge Group to add a new one.
· Configure the custom merge group settings:
· Name: Enter a name for the custom merge group.
· Sigaliser: Select the clustering algorithms to include in the custom merge group. To include additional clustering algorithms, click Add Sigaliser.
· Similarity Threshold: The percentage of alerts two Situations must share before they are merged. Enter a value between 0 and 100. The default similarity threshold in the default merge group is 70%. Set a lower value if you want Cisco Crosswork Situation Manager to merge Situations with a lower percentage of alerts shared between them, which is likely to increase the number of Situations that will merge. Set a higher value if you want to decrease the number of Situations that Cisco Crosswork Situation Manager will merge. If you set this value to 0, Cisco Crosswork Situation Manager uses the default merge group value.
· Click Save to finish configuring the custom merge group.
· If you want to change the alert threshold for this custom merge group, use the Graze API endpoint updateMergeGroup.
After you configure a custom merge group, Moogfarmd automatically restarts and begins using it.
Configure a custom merge group using the Graze API
Use the following Graze API endpoints to configure custom merge groups:
a. addMergeGroup: Adds a new custom merge group.
b. deleteMergeGroup: Deletes an existing custom merge group.
c. getMergeGroups: Returns details of all the custom merge groups in Cisco Crosswork Situation Manager.
d. updateMergeGroup: Updates a custom merge group.
Adjust Shingle Size to Define Similarity Across Multiple Attributes
What Is the Benefit Of Attribute Similarity?
Attribute similarity allows you to dictate the context of the Situation. You can combine multiple attributes that alerts should have in common to join a cluster together, and each attribute can have its own configured similarity. For some attributes you will need to do a full match. For others, you will implement fuzzy matching which allows you to configure the extent of the similarity of the unifying attribute between separate alerts.
When To Use It
As an example, consider an organization that has multiple sites, currently located in Paris and London, that are functionally separate. They want to be able to see the alerts and situations sorted by site so teams can focus on issues specific to their site. This means that they do not want to have alerts from one location clustered with alerts from the other location. In the future they intend to set up additional sites but still retain this separation.
Cisco Crosswork Situation Manager can get the site from the CMDB, however the entries are inconsistent. For example, London may be labeled "LONDON" or "LON". Some of the data was manually entered so there are some misspellings like "LonDDon". And Paris can be "Par" or "PARIS". You might think you need to normalize the data, but you can rely on a Cookbook to handle these data variances.
You can use shingle size similarity to differentiate the sites as this helps account for variances in data entry.
You can use the Moogfarmd log to establish what similarity you should set. In the current example, the Moogfarmd log snippet below shows the output from a Cookbook that evaluates the similarity between the three variants - 'LOND' and 'LONdres' are evaluated against the 'LON' value from the reference alert. From this you can extrapolate that you need at least a similarity of 0.5 to allow the three variants to drive the clustering between the corresponding alerts.
DEBUG: [7:Default Cookbook][20190326 14:44:10.476 +0000] [CValueRecipe.java:262] +|Text [LOND] matches [LON], similarity [0.8]|+
DEBUG: [9:Default Cookbook][20190326 14:45:41.621 +0000] [CValueRecipe.java:262] +|Text [LONdres] matches [LON], similarity [0.5]|+
You may need to run a number of tests to discover the optimal similarity value. You will need to set your similarity very low in order to allow different values to be clustered together in order to identify the similarity cutoff. For the example above initially we tried a shingle size of 2 with a similarity of 0.0.
The smaller the shingle size the more granular you allow the similarity to be performed. Use ‘Shingles’ when you have to perform comparison between single values or very short strings. If you want to perform comparison between long descriptions it is better to use ‘Words’ as Language Processing.
Configure Single Recipe Matching to Prioritize Recipes in a Cookbook

What Is Single Recipe Matching?
When you enable single Recipe matching in a Cookbook, the set of Recipes has a priority order. When an event enters a Cookbook, the Cookbook first evaluates it against the top Recipe in the list. If the Recipe is not able to produce a Situation, the Cookbook evaluates the event against the next Recipe in the list. Once the event satisfies the criteria of a Recipe and becomes part of a Situation, there is no subsequent evaluation.
If an event deduplicates into an existing alert which has already been used by a Recipe and is part of an existing Situation, the new event is only evaluated by higher priority Recipes, if any, than the Recipe that initially created the Situation, unless that alert is closed. Basically, this means the alert can only exist in one Situation or subsequently in a Situation generated by a Recipe of higher priority.
Here is an example:
The Network team wants to group alerts by the level of impact. We can set up multiple Recipes to handle this.
For the "by Server" Recipe, you can set a low alert threshold so that we catch every alert and add the details to the Situation description. We have additional recipes for "by Rack" and "by Floor". Any alert added to a "by Server" cluster, is also added to candidate clusters for the "by Rack" and "by Floor" Recipes. If within the cook for time, another alert arrives with matching rack values, then the Cookbook creates a Situation from the "by Rack" candidate cluster and merges it with the "by Server" Situation. Similarly, if three more alerts arrive with matching floor values, Cisco Crosswork Situation Manager promotes the candidate cluster for "by Floor" to a Situation that supersedes any of the "by Rack" or "by Server" Situations.
Events can be processed concurrently by one or more different instances of Cookbook depending on operational requirements. Within each Cookbook an inbound event passes to each Recipe in turn, in priority order, starting with the highest priority Recipe. A Recipe may return 0, 1, or more matching clusters, so-called “Candidate Clusters”. When single Recipe matching is enabled, the Cookbook transforms only the highest scoring candidate cluster into an actionable Situation. Otherwise, if single Recipe matching is disabled, all candidate clusters become Situations.
When To Use Single Recipe Matching
You should only use single Recipe matching if:
· Recipes target very different types of alerts that do not need to be shared between separate Recipe contexts. In this case, Recipes should be unrelated. Otherwise, you might end up with a scenario when unrelated alerts merge into the same situation.
· The contexts in individual Recipes are supersets of each other in the direction of merging, which is upwards. For example: Application→Site→Country or Server→Rack→Datacenter.
This is demonstrated in the following diagram:

The animation below presents an example of clustering flow within a Cookbook with single Recipe matching enabled.
To understand this example, assume the following:
1. There are two recipes configured within the same Cookbook with the following priority order:
— Recipe A
— Recipe B
1. All of the arriving alerts are in the scope of both Recipes.
2. Recipe A has an alert threshold set to 4 while Recipe B has it set to 1.
3. A typical scenario that would fit this configuration is the Server→Datacenter context. In this example, the operators want to be notified about problems on individual servers however if there is an underlying wider impacting problem they would like to be alerted as well. So the Recipes could be set up as follows:
— Recipe A clusters alert based on the same datacenter. Given that this is wider impacting clustering and we expect more alerts if it is truly a datacenter issue - we need to set the alert threshold high enough.
— Recipe B clusters alerts based on the same server name and datacenter. Even a single alert might be an indication of a developing problem so we set the alert threshold to 1.
— Recipe B - with clustering by same server name and datacenter - has a more granular context; however, anything produced by this Recipe is a subset of the context in Recipe A - where clustering is done by the same datacenter.
The clustering flow is as follows:
· Alert_1 reaches the Cookbook which evaluates it against the top Recipe_A. Cookbook creates a candidate cluster containing Alert_1, but because it has not reached the alert threshold of 4 (AT: 4) the candidate cluster is not promoted to a Situation. However, the candidate cluster still remains in memory.
· Cookbook then evaluates Alert_1 against Recipe_B. Cookbook creates a candidate cluster which is promoted to Situation_1 because it has reached the alert threshold of 1 (AT: 1).
· Alert_2 enters the Cookbook and again Cookbook first evaluates it against Recipe_A. Alert_2 joins the existing candidate cluster according to the attribute similarity configured in Recipe_A. The candidate cluster only contains two alerts so it is still unable to produce a Situation.
· Cookbook then evaluates Alert_2 against Recipe_B. There is already a candidate cluster against which the alert is being evaluated. It matches whatever the attribute similarity is configured (note the same color) and is added to the candidate cluster and subsequently to the already existing Situation_1.
· Alert_3 enters the Cookbook and Cookbook evaluates it against Recipe_A. Alert_3 joins the existing candidate cluster according to the attribute similarity configured in Recipe_A. The candidate cluster only contains three alerts so it is still unable to produce a Situation.
· Alert_3 reaches Recipe_B and Cookbook evaluates it against the existing candidate cluster. The alert, however, is not similar enough to join the existing candidate cluster so it creates a separate one on its own. Because it reaches the alert threshold of 1, it creates a corresponding Situation_2.
· Alert_4 enters the Cookbook and is evaluated against Recipe_A. It joins the candidate cluster and creates Situation_3 as it reaches the alert threshold of 4. Because Alert_4 is now part of a Situation, Cookbook stops evaluating against any lower priority Recipes.
· Because Situation_1 and Situation_2 are complete subsets they become dormant and merge into Situation_3.
In the context of the real-life Server→Datacenter scenario, the initial contexts of Situation_1 and Situation_2 have morphed from "here are the alerts that indicate a problem with this particular server" into "here are the alerts that indicate a wider datacenter problem" in Situation_3.
See below the Cookbook configuration to match the example above.
In the Server > Datacenter Cookbook file-based example configuration:
{
name : "Datacenter",
classname : "CCookbook",
run_on_startup : true,
metric_path_moolet : true,
moobot : "Cookbook.js",
process_output_of : "MaintenanceWindowManager",
membership_limit : 1,
scale_by_severity : false,
entropy_threshold : 0.0,
single_recipe_matching : true,
recipes :[
{
chef : "CValueRecipeV2",
name : "by Datacenter",
description : "Multiple issues impacted in $UNIQUE(custom_info.eventDetails.datacenter) datacenter. $CLASS(network_datacenter)",
recipe_alert_threshold : 4,
exclusion : null,
trigger : null,
seed_alert : null,
rate : 0, # Given in events per minute
min_sample_size : 5,
max_sample_size : 10,
cluster_match_type : "first_match",
matcher : {
components: [
{ name: "custom_info.eventDetails.datacenter", similarity: 1.0}
]
}
},
{
chef : "CValueRecipeV2",
name : "by Server",
description : "Issue impacting server $UNIQUE(source) housed in $UNIQUE(custom_info.eventDetails.datacenter) datacenter. $CLASS(network_source)",
recipe_alert_threshold : 1,
exclusion : null,
trigger : null,
seed_alert : null,
rate : 0, # Given in events per minute
min_sample_size : 5,
max_sample_size : 10,
cluster_match_type : "first_match",
matcher : {
components: [
{ name: "source", similarity: 1.0 },
{ name: "custom_info.eventDetails.datacenter", similarity: 1.0}
]
}
}
],
cook_for : 20000
}
How To Enable Single Recipe Matching
To enable the feature in a UI cookbook - tick the 'First Recipe Match Only' parameter in the Cookbook configuration tab.

If you set up your Cookbook via backend file-based configuration, set the single_recipe_matching parameter to true.
In cookbook.conf:
{
# Moolet
name : " DatacenterCookbook",
.......
# Setting single_recipe_matching to true causes the
# cookbook to treat the recipes as being in an order of
# priority, based on the order of configuration in this
# file, highest priority first. # # Individual alerts may only:
#
# a) appear in a single situation generated by a
# particular recipe, and
# b) subsequently may only appear in a situation
# generated by a higher priority recipe.
#
# An alert is treated as being a new alert after it has
# been closed (and reappeared) and is once again
# available for inclusion in situations generated by any
# recipe.
single_recipe_matching : true,
.......
Identify a Seed Alert to Trigger Situation Creation
What Is It?
You can use a seed alert in a Recipe as a technique to disregard certain alerts until the associated key alert happens.
A seed alert is useful to create Situations for cause and effect scenarios. You can ignore the symptomatic alerts except in cases where they arrive after a much more important and potential causal alert. In this case, you want to surface them as a Situation requiring operator attention. You may need to implement alert classification in order to identify what alerts qualify as seed alerts.
A seed alert filter allows you to restrict what event can start a candidate cluster and become a reference event within it. Any subsequent events that match the in scope filters can then join the cluster based on the attribute similarities. Only events arriving after the seed alert can join the same candidate cluster. If you require to do look back and catch any symptomatic events happening prior to seed alert then you may need to look at other options such as using the Alert Rules Engine.
When To Use It
An example of when you may want to use a seed alert is if you have really chatty syslog data. You want to ignore it in general but, when your monitoring system observes an alert from the same device, you want to bundle it with associated syslog information and create a Situation. In this case, if you set the alert from your monitoring system as the seed alert, until Cisco Crosswork Situation Manager observes the seed alert, it will ignore the peripheral syslog alerts.
Extend the Cook_for Time with the Cook For Auto-Extension
What Is It?
As illustrated in the Merging section, cook_for can be described as the lifespan of a candidate cluster. It does not control how alerts are being clustered but dictates how long should alerts be considered in scope of the candidate cluster after its initial creation.
When deciding on a Cook For time, think about how long it takes for events relating to the same incident to occur. For example, when an underlying database fails supporting an application, how long does it take for monitoring to report on the failed database as well as the symptomatic application-related alerts? If it is roughly 30 minutes then you should set your Cook For time to this value.
When To Use Auto-Extension
There are use cases when a longer Cook For time would make sense but you are still unsure by exactly how long you need to extend it. For instance, in the example above until the database gets fixed, the system will continue to report application and transaction failures until the underlying issue is fixed, and that can take hours or even days. Ideally, you would like all these alerts clustered together. But remember that given the Cook For time of only 30 minutes, any alerts beyond this period, even if they are in scope of the original cluster, which has now already expired, will have to form a new cluster. This produces two or more Situations that actually relate to the same incident.
To address this you can enable the Cook For auto-extension feature.
If you add an extension time of 1 hour and an alert arrives during the extension time, Cookbook adds it to the existing Situation and extends the time by another hour in case further alerts come in. The Max Cook For time lets you cap the total length of time that Cookbook will continue to add alerts to the existing Situation.
This feature is available at Cookbook and Recipe level. See Configure a Cookbook Recipe and Configure a Cookbook for more information on setting up this feature. See Cookbook and Recipe Examples for an example of the Cook For Auto-Extension feature.Configure a Cookbook RecipeConfigure a Cookbook
Here is the feedback from the application team: when we see a business service like the "Customer Portal" going down, it generates a lot of “failed transactions” alerts until we get the portal back up again. We want to make sure that we arrest the flood of failed transaction alerts and prevent them. We don't always know how to set the Cook For time because we don't know how long it will take to fix the issue. For example, if two business services fail at the same time and we can only address one, it may take longer than the Cook For time.
We've tried a Cook For time of 1 hour 2 hours. Sometimes it may take longer than the cook for time to fix, so we need an extension. If we add an extension time of 1 hour and an alert arrives during the extension time, Cookbook adds it to the existing Situation and extends the time by another hour in case further alerts come in. The Max Cook For time lets you cap the total length of time that the cookbook will continue to add alerts to the existing Situation.
Cluster by Shared List Items (Match Lists)

What Is It?
It's a technique used to cluster alerts on the intersection of a list attribute.
When To Use It
For example, you would like to create Situations clustered around the same impacted business services because they relate directly to your teams' organization. The common factor in a Situation is business services. However, a server can impact multiple business services so you need to cluster on the intersection of these. Since an alert is attached to multiple services, it can appear in multiple Situations. But this is still acceptable behavior for you and it is easy to see which other Situations an alert is part of, and perhaps worth consulting the knowledge base of the parallel Situation as well.
The type of attribute used in list matching must be an array.
Additional Resources
· See Match List Items in Recipes for how to configure list-based matching.
Choose the Best Matching Option: First Match or Closest Match
What is the difference?
First Matching Cluster:

Closest Matching Cluster:
In Cookbook, you can specify the cluster match type. Typical Cookbook contains multiple Recipes, and alerts are evaluated against the recipes in the prioritization you defined. If you select closest_match, the alerts are evaluated against all recipes in the Cookbook, and processed by the best matching recipe.
If you choose first_match, an alert is added to a candidate cluster as soon as it as it meets the criteria of one recipe. At that point the evaluation of that alert stops even though there may be other recipe that matches the alert better.
When To Use Which Type?
If a Recipe has all of the attribute similarities set to 100% match, then when an alert matches a candidate cluster, there is no need to keep checking it against other clusters. In this case, you can set Cluster By as First Matching Cluster. Otherwise, choose Closest Matching Cluster to evaluate an alert against all the candidate clusters to determine the best match.
Review the initial clustering result with the operators
Ask the operators if the content and context of the presented Situation are correct. If not what exactly does not make sense? Is it that the content of the situations is correct - ie the alerts have been clustered meaningfully - but the context is wrong - ie. the situation description is wrong and does not match the content of the situation? Or vice versa.
· Are the content and context of the presented Situation are correct? Does this situation contain the alerts that you recognize?
· Does this situation contain the alerts that you action today? Are there any alerts you could drop from clustering altogether? For example in AlertRulesEngine or Workflow Engine.
· Does this situation give you enough information - including situation description and additional situation custom_info?
· Should you look into increase the cook_for period to extend the scope of Situations? But be mindful of it since increasing the cook_for time will decrease the number of situations but potentially will cause unrelated alerts to be clustered together.
· What is the percentage of outliers in Situations? Having a few outliers in it does not necessarily make it a bad Situation as long as the content and context match.
· UseCisco Crosswork Situation Manager Operator Training to onboard operators. Not all operators participating at this stage may have been part of the POV. As they validate your alert clustering they may be logging into Cisco Crosswork Situation Manager for the first time. The operator training is self-paced and a quick way to onboard them to the product.
· Interview users to identify more specific use cases missed in the initial design. Test and refine further.
Add Specific Use Cases
Once you confirm the result generally captures what the teams are interested in seeing, move on to the specific cases missed in the initial design.
Going through the audit -> design -> implementation once never completes the Situation design. Expect to perform the discovery of the implementation process multiple times.
Calibrate Your Clustering Configuration
As you keep using Cisco Crosswork Situation Manager, it makes sense to calibrate, adjust, or fine tune your clustering settings to make sure that you see the expected behavior for alerts and Situations.
For Cookbooks and recipes, you can use the Review and Adjust Clustering Settings with Situation Visualization feature to see the way clustering algorithms influenced a Situation. You can update a recipe based upon any changes you want to make.
You can also use the Alert Analyzer to view and adjust the global default etropy threshold settings and settings for specific manager. See Configure Entropy to Reduce Operational Noise.
Review and Adjust Clustering Settings with Situation Visualization
The Visualize tab in Situation Rooms allows administrators and implementers to see:
· The Cookbook and Recipe used to create the Situation.
· A visual representation of the similarity of the alerts within the Situation to the reference alert. The reference alert is either the seed alert, if a Cookbook Recipe is configured this way, or it is the first alert that the clustering algorithm assigned to the Situation. For more information on seed alerts see Configure Topology-based Clustering with Vertex Entropy.
· A list of all the associated alerts in the Situation.
You can use this information to adjust your Cisco Crosswork Situation Manager configuration to improve the relevance of the Situations it creates.
The Visualize tab automatically updates when new alerts are added to a Situation.
To view the Visualize feature, go to a Situation Room and click the Visualize tab.
Note
Currently, Cisco Crosswork Situation Manager does not fully handle alerts that a user has manually added to a Situation. For example, manually added alerts do not display in a similarity diagram if their similarity to the reference alert is below the threshold for a component but they will appear in another diagram if their similarity is above the threshold for that component.
Similarity diagrams
The Visualize tab shows diagrams of the alerts in the Situation according to how the Cookbook Recipe has clustered them. In the example below, this Situation has ten alerts that are clustered by two components: Description and Host. The Cookbook Recipe clusters alerts whose description is at least 50% similar to the reference alert and whose host is also at least 50% similar to the reference alert. The reference alert may be a seed alert or the first alert that the Cookbook Recipe added to the cluster.
Each diagram shows the similarity of the alert to the reference alert for one of the components. Each alert displays as a dot on the diagram on a spoke representing the sequence it was clustered into the Situation. The reference alert has a similarity of 100% and displays at the center of the circle. Alerts with a high similarity display closer to the center of the circle and alerts with a low similarity display nearer the edge of the circle. In the example below, alerts that are only 20% similar would display at the edge of the circle.

Representation of the alert in the center of each diagram is as follows:
· Yellow dot: Single reference alert, with no other alerts having 100% similarity.
· Blue dot with a single concentric blue circle: Reference alert plus one alert which has a 100% similarity match to the reference alert.
· Blue dot with two concentric blue circles: Reference alert plus two or more alerts which have a 100% similarity match to reference alert.
You can perform the following actions on the similarity diagrams:
· Hover over an alert in a diagram to display the similarity of that alert to the reference alert for that field.
· Click on an alert in a diagram to display the details of that alert in a pane on the right hand side of the window.
· Use the sliders below each diagram, or click and drag the concentric rings in the diagrams, to increase the similarity value. Alerts that are outside the selected similarity appear gray. This feature enables you to determine whether a higher similarity would improve the Situation. In the example above, the Cookbook Recipe clusters alerts into a Situation if the Host has more than 50% similarity to the reference alert. You may find that alerts with a similarity of less than 80% are not really relevant to the Situation. In this case, you could consider changing the Host similarity to 80%.
· Step to the next highest or lowest alert similarity value using the quick jump arrows at either end of the sliders.
Updating the Recipe
Once you adjust the slider values you can save the changes to the Cookbook Recipe that generated the Situation by clicking Update Recipe.
When you are using the sliders to move the threshold around, a vertical line appears to indicate the saved similarity value. If you update the recipe, the line relocates to the newly saved similarity value.
Alert list
The Visualize tab displays a list of all the alerts in the Situation. The reference alert is pinned to the top of the alert list and highlighted with an orange marker. Alert fields used for Situation clustering are pinned to the left side of the list.
Any alerts that are grayed out when you adjust the similarity threshold are also filtered out of the alert list. Alerts are filtered out when they are grayed out in any of the diagrams.
You can enter a filter in the Filter field to display alerts in the Situation that match it. See Filter Search Data for information on creating filters.
What is entropy in Cisco Crosswork Situation Manager?
You can use entropy to control clustering in Cookbooks.
What Is Entropy? How Does It Help Me?
Entropy is a measure of how unexpected or unpredictable an alert is.
Cisco Crosswork Situation Manager assigns every alert an entropy score that is a value between 0 and 1. An event that re-occurs frequently receives a low entropy score and is deemed operationally insignificant. Meanwhile, a more rare event receives a high score and is considered to be operationally significant.
Entropy is a key noise reduction feature. By filtering out the alerts with low entropy score, you can keep the important alerts from getting buried under the flood of common alerts.
How Does Entropy Work?
The default entropy calculation uses the description field to determine the similarity between alerts, but you can choose different alert attributes.
Cisco Crosswork Situation Manager analyzes the textual aspects of the incoming event by tokenizing the value of the description field. Items such as numbers and timestamps are masked and therefore excluded from the entropy calculation, and the score is derived based on the aggregation of token entropies from within the string. The entropy score is calculated up to 16 decimal places. However, note that in the Cookbook UI, you can configure the entropy threshold value only up to 2 decimal places.

The resulting score becomes just another attribute for the alert, and you can use the score to filter out the alerts below a certain entropy value. By removing the common, insignificant alerts, your operators to focus on more significant events. Entropy is language-agnostic, which means it works with English as well as any other UTF-8 based language.
Entropy Distribution - It's Different from Environment to Environment
Using entropy to filter out the noise events can be an impactful differentiator, so there is a responsibility to set it up correctly for a given environment.
There is no formula to tell you what your threshold number should be. Entropy distribution varies from organization to organization, or even between two sub-environments within the same organization.
Each environment will have its own specific entropy profile which is usually non-transferable as no two environments are identical. Noise for one organization might actually be deemed as important and actionable events by another. Consider failed authentication alerts when attempting network discovery, which is business as usual, versus failed logins during hacking attempts.
So, in short, there is no specific entropy score by which you can set the entropy threshold. Always check the distribution of the scores, and fine-tune until you strike a balance.
Safeguard Measures
Just because you set up this filter, you do not need to miss all the lower entropy alerts completely. You can direct them to a separate clustering algorithm that will group them together as a low priority Situation.
For example, if you group a queue of low entropy alerts coming from the same source within an hour, operators can review the queue periodically to decide if they require action.
Also, if you find a specific kind of alert with a low entropy score that is actually important, you can increase the entropy of such alerts based on a configurable list of keywords that always receive an entropy value of 1.
Configure Entropy to Reduce Operational Noise
Entropy is a measure of how unexpected or unpredictable an event or an alert is. The guiding principle of entropy in Cisco Crosswork Situation Manager is that a more unpredictable alert with a higher entropy value is of more interest because it probably indicates unexpected behavior from your environment.
The Alert Analyzer utiitiy assigns each alert a numeric entropy value between 0 and 1 to indicate how common or unusual the words in certain attributes are. Cisco enables you to visualize and understand the benefits of using entropy to reduce operational noise. See Entropy for an overview of entropy in Cisco Crosswork Situation Manager and Alert Analyzer for more information on how it calculates entropy values.
You can use entropy thresholds to reduce operational noise in Cisco Crosswork Situation Manager. The interactive entropy threshold graphs in the Alert Analyzer show a summary of the distribution of alerts in the system by entropy value. Adjust the slider for the entropy threshold to visualize how the threshold will reduce operational noise without omitting alerts of interest.
Entropy thresholds can be a value or a percentage. You can set a global default entropy threshold and you can set specific entropy thresholds for specific managers. The graphs display how many alerts exist with a given entropy value and how many exist below a given entropy value. You can select an entropy value and review it to ensure you are including and excluding the appropriate alerts. See Configure Entropy Thresholds with Alert Analyzer for details.
You can configure the information that you want to include in your entropy generation calculations. See Configure Entropy Generation for more information.
Entropy
Entropy is defined as the degree of disorder or randomness in a system. In Cisco Crosswork Situation Manager, entropy is a measure of how unexpected or unpredictable an event or an alert is. According to information theory, the more unpredictable or unexpected an event is, the more information it is deemed to carry. Therefore, entropy is a measure of the amount of information contained in an event.
The Alert Analyzer utility is a standalone process that assigns an entropy value to an event token based on its uniqueness. The Configure Event De-duplication in the Alert Builder assigns an entropy value to each alert based on the token entropies. The entropy value is a numeric value between 0 and 1 (accurate to 16 decimal places). It provides an indication of how important an alert is. An entropy value of 0 means that the alert is just ‘noise’ and a value of 1 means that the alert is significant. You can configure the clustering algorithms to ignore common alerts with a low entropy value; this reduces ‘noise’ in Cisco Crosswork Situation Manager. See the Clustering Algorithm Guide for more information.
How Cisco Crosswork Situation Manager evaluates entropy
The Alert Analyzer analyzes the text attributes of events to assign a semantic entropy value. In the default Cisco Crosswork Situation Manager implementation, the Alert Analyzer uses the description field but you can configure it to use other text fields. The Alert Analyzer divides the text in between spaces into tokens. For example, the following description has five tokens:
Link down on port 2/32
The Alert Analyzer calculates the entropy of each token and stores the token in the Cisco Crosswork Situation Manager reference database with its associated entropy value. Initially, a new token has a value of 1. The Alert Analyzer reduces this entropy value as more events occur which contain the same token.
You can configure the Alert Analyzer to mask volatile token types, such as dates, times, numbers, URLs or IP addresses, so that they are not included in the tokens. See the Alert Analyzer for further details of the analysis it performs.
The Alert Builder uses the entropy value of the tokens within an alert to calculate the entropy of that alert.
The Alert Analyzer calculates entropy values in real-time based on any tokens it has encountered before. The Alert Builder assigns the entropy of an alert based on the entropy value of the tokens within the alert rather than the entire database. Tokens within an alert which occur frequently contribute negatively to the entropy of an alert, indicating that the alert may not be as significant as an alert with tokens that are seen less frequently.
If the Alert Builder receives an event with a token that it has encountered before, from a previous run of the Alert Analyzer, it sets the alert entropy to match the value saved in the reference database. If the Alert Builder receives an event with a token that it has not encountered before, it calculates the entropy value in real-time and applies this value to the alert. The Alert Builder also saves the entropy value in the reference database for future retrieval.
Setting entropy thresholds
You can set a global entropy threshold that Cisco Crosswork Situation Manager uses for all alerts, or you can set entropy thresholds for different managers within Cisco Crosswork Situation Manager. You can set these entropy thresholds using the Cisco Crosswork Situation Manager UI or the Graze API.
See Configure Entropy Thresholds with Alert Analyzer for more information.
Configuring and running the Alert Analyzer
You can configure the Alert Analyzer to include or exclude information in the entropy calculations. See Configure Entropy Generation Details for more information.
The Alert Analyzer is preset to perform an incremental run of the Alert Analyzer at 3 am every day, with a keep age of two weeks. Cisco recommends this as the optimum entropy generation schedule. However, if you want to change this schedule, see Configure Entropy Generation Schedule.
Vertex Entropy
Vertex Entropy uses a different form of entropy, topological entropy, to establish how critical the nodes are in your network topology. You can use Vertex Entropy calculations within Cookbook to create Situations which cluster alerts from important nodes. See Vertex Entropy for more information.
Configure Entropy Thresholds with Alert Analyzer
The Cisco Crosswork Situation Manager Alert Analyzer provides an interactive graph that shows the impact of various entropy thresholds to reduce noise in your system. By experimenting with the impact of various threshold values, you can make an informed decision about the number of alerts included or excluded from Situations based upon entropy threshold. For a general overview of entropy, see Entropy.
The entropy threshold is a value that you can use in a Cookbook or in Tempus to qualify an alert for inclusion in a Situation. The types of entropy threshold you can set are as follows:
· Global Default Threshold: Applies to all alerts from all managers in the system. If an alert exceeds the threshold, it is a candidate for inclusion in a Situation cluster according to the clustering algorithm definition.
· Manager-specific Thresholds: Applies to alerts from a single manager. If a manager threshold exists, the clustering algorithm prevents alerts from clustering if they do not surpass the manager-specific threshold. If no manager exists for an alert's manager, the clustering algorithm applies the global default threshold.
· Specific Threshold: Use this option to set a specific threshold value.
· Do not use a Threshold: Select this option if you do not want to apply a threshold.
You can set either type of threshold as one of the following:
· Percentage of System Excluded: Controls the entropy threshold dynamically using a percentage value of the number of alerts to eliminate from Situation clustering. Normally it is a good idea to use a percentage value because it accounts for expected changes to entropy values over time.
· Threshold Entropy Value: A static entropy value to qualify alerts for inclusion in Situation clustering. If you set a static value for an entropy threshold. it is a good idea to regularly review the value and its impact on excluded alerts every few weeks.
When you use Alert Analyzer, you can toggle between the two settings. The UI displays a locked padlock for the active threshold configuration. For example 26.5% Percentge of System Excluded. The unused configuration shows as unlocked because the unused configuration varies based upon the fixed value of the active configuration.
View and configure entropy thresholds
After you have about two weeks worth of data, you can use the Alert Analyzer to view the alert distribution in the Alert Analyzer and see how to best reduce noise for your system. The Alert Analyzer displays alert model data based on your entropy generation configuration, by default two weeks. See Configure Entropy Generation Schedule for more information.
The following figure highlights the primary features of the Threshold Statistics graph for the Global Default Entropy Threshold:

A. Alert Count: The left axis shows the alert count for the histogram line, which represents the number of alerts at each entropy level. For example there are about 100 alerts with an entropy value just above 0.34.
B. Entropy: The bottom axis of the graph shows the calculated entropy value, which ranges from 0 to 1. When you use Threshold Entropy Value, the slider sets the value according to placement on this axis. You can also enter the value using the boxes in the threshold statistics bar above the graph.
C. Cumulative Alert Count: The right axis of the graph shows the percentage of total alerts in the model, represented by the line graph. It shows the cumulative percentage of alerts below each entropy level. For example about 26.5% of all alerts in the model have an entropy value of .34 or lower. When you use Percentage of System Excluded, the slider sets the value according to placement on this axis.
D. Shaded Area: The shaded area to the left of the slider represents alerts that would be excluded by the current entropy threshold setting.
E. Histogram: The histogram shows the number of alerts at a given entropy level. For example there are about 100 alerts with an entropy value just above 0.34.
F. Line Graph: The line graph shows the percentage of total alerts in the model for each entropy level. For example about 26.5% of all alerts in the model have an entropy value of 0.34 or lower.
G. Slider Bar: The slider bar lets you visualize the impact of various entropy threshold settings on noise reduction. Alerts that fall into the shaded area and are excluded from clustering based upon the Percentage of System Excluded or the Threshold Entropy Value. For example, the slider in the figure shows 26.5% alerts excluded. When you set the slider, the UI updates the total values for Excluded Alerts and Included Alerts. It also updates the alerts for review in the Review Window.
The UI to configure manager-specific subset thresholds is similar to the Global Default Entropy Threshold, with a few modifications:
· The Subset Definition lets you pick the manager to which the threshold applies.
· There are two statistic bars: Global Statistics that show how the manager threshold affects the overall system alerts and Subset Statistics that show how the manager threshold affects alerts from the manager subset.
· The chart displays graphs for both the global statistics and the statistics for the manager subset. Un-check the All Alerts checkbox to hide the global statistics.
Review affected alert details in the Review Window
When you set an entropy threshold, either in the Global Default Threshold or a Subset Threshold, the UI displays a list of affected alerts in the Review Window. This way you can drill-down to identify the impact of your entropy threshold selection on specific types of alerts.
By default the window displays excluded alerts from the reference model. You can toggle between reference data and the potential impact on live data. You can also toggle to view included alerts instead of excluded alerts. Use the filter to drill into a specific set of alerts affected by the threshold without changing the threshold itself.
Learn more
See the following topics to learn more about entropy in Cisco Crosswork Situation Manager:
· Entropy
· Configure Entropy Generation
· Alert Analyzer Configure Entropy Generation
You can configure:
1. Entropy Generation Schedule: How often you want the Alert Analyzer to run. The default schedule is appropriate for most environments and Cisco recommends that you do not change it.
2. Entropy Generation Details: What information you want to include in your entropy generation calculations.
Configure Entropy Generation Schedule
Cisco recommends that you perform an incremental run of the Alert Analyzer at 3 am every day, with a keep age of two weeks. This is the preset entropy generation schedule.
However, you can configure the Alert Analyzer to run as frequently as you want. If you want to change the entropy generation schedule, you have the following options:
Disable Entropy Generation
Clear the Enable Entropy Generation check box if you do not want to use entropy calculations at all. If you do this, Cisco Crosswork Situation Manager will no longer remove any noisy alerts.
Change the preset entropy generation schedule
You can change to a custom entropy generation schedule. Cisco recommends that you do not change the preset entropy generation schedule.
1. Change the Preset Schedule Period if you want to change to an hourly or weekly run.
2. Clear the Use Schedule Preset check box if you want to set up a different, more complex, entropy generation schedule.
Add or update an Alert Analyzer run
To add an Alert Analyzer run, follow these steps:
1. Click Add Item at the bottom of the Configuration Events Analyser Execution Schedule. A new Entropy Generation Run window opens.
2. The Incremental Run check box is automatically selected. If you want to add a full run, clear this check box.
3. If you have selected an incremental run, the Keep Age Value and Keep Age Unit are set to 2 weeks. Cisco recommends that this is the optimum length of time for keeping entropy calculation data. All older data is deleted.
You can enter different values to keep more or less entropy calculation data. For example, if you select a Keep Age Value of "3" and selected the Keep Age Unit. as "Weeks", the Alert Analyzer keeps the last five weeks of entropy calculation data.
· If you have selected a full run, the Read Age Value and the Read Age Unit are set to 2 weeks. Cisco recommends that this is the optimum amount of event data that you want to use in your entropy calculations.
You can enter different values to read more or less event data. For example, if you select a Read Age Value of "5" and selected the Read Age Unit. as "Weeks", the Alert Analyzer analyzes the last five weeks of alerts.
· Select the Repeat This Run Every unit. The default is every day. If you select "Week", the Alert Analyzer runs every week.
· Enter the time that you want to run the Alert Analyzer in the Run At Time field. If you have selected "Week" above, select the day of the week. If you have selected "Month", enter the day of the month.
Configure Entropy Generation Details
See Entropy for an overview of the concept of entropy in Cisco Crosswork Situation Manager. See Alert Analyzer for more information on how Cisco Crosswork Situation Manager calculates entropy values.
Configure entropy generation details in the UI
To configure the Alert Analyzer generation details, follow these steps:
Before you begin
Ensure that entropy generation is enabled. See Configure Entropy Generation Schedule for more information.
Entropy Generation Details
Priority and Stop Words
Stop Words
The Alert Analyzer ignores stop words in its entropy calculation. To use stop words:
· Cisco Crosswork Situation Manager enables stop words by default. If you want to disable stop words, clear the Use Stop Words check box.
· Enter an integer in the Stop Word Minimum Length field to ignore all words of that length or less from entropy calculation. For example, if you enter 2, the Alert Analyzer automatically ignores words like 'in', 'at', and 'to' in its entropy calculations.
· Cisco Crosswork Situation Manager provides a list of stop words. You can add words to this list, or remove them, by editing the list using the comma-separated format.
Priority Words
The Alert Analyzer gives any events containing a priority word a maximum entropy value of 1 in its calculation to ensure that they are included in a Situation. To use priority words:
· Cisco Crosswork Situation Manager disables priority words by default. If you want to use priority words, select the Use Priority Words check box.
· Enter a list of priority words using a comma-separated format. You can add words to an existing list, or remove them, by editing the list using the comma-separated format.
Masking
Addresses
You can exclude certain types of addresses from the entropy calculation. Select the check boxes for the addresses that you want to exclude:
· File Paths: The Alert Analyzer excludes file paths from its entropy calculation. For example: $MOOGSOFT_HOME/config/system.conf.
· IP Addresses: The Alert Analyzer excludes IP addresses from its entropy calculation. For example: 77.131.131.77.
· MAC Addresses: The Alert Analyzer excludes MAC addresses from its entropy calculation. For example: e0:2b:13:es:89:43.
· URLs: The Alert Analyzer excludes URLs from its entropy calculation. For example: https://www.moogsoft.com/.
· Emails: The Alert Analyzer excludes email addresses from its entropy calculation. For example: david.bowie@blackstar.com.
Date/Time Values
If you want to exclude date and time values from the entropy calculation, select the Dates and Times check box.
Numbers
You can exclude numbers from the entropy calculation. Select the check boxes for the addresses that you want to exclude:
· Numbers: The Alert Analyzer excludes ordinary numbers, such as 12345, from its entropy calculation.
· Hex-Formatted Numbers: The Alert Analyzer excludes hex numbers, such as 3ADE68B1, from its entropy calculation.
IDs
You can exclude certain IDs from the entropy calculation. Select the check boxes for the IDs that you want to exclude:
· OIDs: The Alert Analyzer excludes object identifiers (OIDs) from its entropy calculation. See here for more information on OIDs.
· GUIDs: The Alert Analyzer excludes globally unique identifiers (GUIDs), also know as universally unique identifiers (UUIDs), from its entropy calculation. See here for more information.
Configure entropy generation details using the Graze API
Use the following Graze API endpoints to configure the Alert Analyzer:
· getEventsAnalyserConfig: Returns the list of priority words or stop words used by the Alert Analyzer.
· updateEventsAnalyserConfig: Updates the Alert Analyzer configuration.
If you want to set up priority word or stop word lists in the Alert Analyzer, use the following Graze API endpoints:
1. addEventsAnalyserWord: Adds a single word to a list of priority words or stop words in the Alert Analyzer configuration.
2. getEventsAnalyserWords: Returns the list of priority words or stop words used by the Alert Analyzer.
3. removeEventsAnalyserWord: Removes a single word from the list of priority words or stop words in the Alert Analyzer configuration.
4. updateEventsAnalyserWords: Updates an existing list of priority words or stop words in the Alert Analyzer configuration.
Configure Alert Analyzer partitions
If you want to set up partitions in the Alert Analyzer, use the following Graze API endpoints:
1. getEventsAnalyserPartitionOverrides: Returns the partition override details in the Alert Analyzer configuration.
2. removeEventsAnalyserPartitionOverrides: Removes all the partition overrides from the Alert Analyzer configuration.
3. updateEventsAnalyserPartitionOverrides: Updates the partition overrides in the Alert Analyzer configuration.
See Alert Analyzer for more information on partitions in the Alert Analyzer.
Situation Design Learning Resources
Import/Export Algorithm Configurations
The Import/Export option enables you to migrate your algorithm configurations from one Cisco Crosswork Situation Manager instance to another. For example, from a test system to your production environment. This option exports Cookbooks and their Recipes, Tempus, the default merge group and all custom merge groups, from one Cisco Crosswork Situation Manager instance and imports them into another.
Export your algorithm configurations
In the Cisco Crosswork Situation Manager instance that you want to export the algorithm configurations from:
· Click Import/Export in the Algorithms section of the Settings tab in Cisco Crosswork Situation Manager and select the Export tab.
· Click Download to download the file containing all the configurations into a file.
The file name format is systemconfig_<date><time>.export.
Import your algorithm configurations
In the Cisco Crosswork Situation Manager instance that you want to import the algorithm configurations into:
· Click Import/Export in the Algorithms section of the Settings tab in Cisco Crosswork Situation Manager to display the Import tab.
· Click Select File ... and find the export file that you want to use.
A list of configuration items that will be imported displays.
· Select whether you want to overwrite existing configurations or leave them unaltered. The import function uses the name of the configuration to determine whether it already exists. For example, if it imports Cookbook1 and Cookbook1 already exists, if you have selected Overwrite duplicates, the imported Cookbook1 overwrites the existing one. If you have selected Skip duplicates, the imported Cookbook1 is ignored. If an imported Cookbook has a different name but identical properties to an existing one, the new one will be imported.
· Click Import to import your algorithm configurations.
Note
If you have customized your process_output_of value for any Cookbook or Tempus algorithm so that it processes the output of non-default Moolets, it is best practice to ensure that your imported configuration matches your data flow in Moogfarmd.
Process Situations
Situation Enrichment
Enrichment for Situations in Cisco Crosswork Situation Manager is for adding contextual data to Situations. This can include the following types of information:
· Operational data to modify the behavior within Cisco Crosswork Situation Manager such as ownership or geographic info to drive automatic assignment.
· Diagnostic data to help investigation efforts. For example appending the results of a runbook automation to a Situation discussion thread.
· Informational data for efficiency, such as ITSM ticketing information and bidirectional updates.
You can enrich the following:
· Situation description from:
— related alert properties
— context of the clustering algorithm that created the Situation.
· processes_affected and services_affected from data in an external data source, to drive team assignment. In this case you can use core Situation fields or custom_info fields to query the external data source.
· Other Situation core fields or custom_info fields.
Situation enrichment options
You can use the following options for Situation enrichment:
· Built-in enrichment that doesn't require any custom code:
· The Situation Workflow Engine workflow engine functions let you modify Situation custom_info properties and change the Situation description. You can also assign or change the services_affected and process_affected properties. See Process Situations with the Situation Workflow Engine.
· Recipe settings that dynamically substitute alert property aggregates and other data into Situations based on special commands embedded into the Situation description. For information on how to use substitution in recipes, see Situation Manager Labeler.
· Custom enrichment that requires coding custom Enricher Moolet. This requires you to write JavaScript using the provided Mooot Modules See Moobot Modules.
Learn more
For more information on enrichment, see Enrichment Overview.
For more information on the Workflow Engine, see Workflow Engine.
Process Situations with the Situation Workflow Engine
The Situation Workflow Engine in Cisco Crosswork Situation Manager processes Situations after the Situation Manager. Typical use cases include:
1. Situation Enrichment. See Situation Enrichment.
2. Integrations with ticketing systems. See Integrate with Ticketing Services.
For all Workflow Engines, the ones delivered with the product and new ones you add, you configure the programmatic data processing in the Cisco Crosswork Situation Manager UI. See Workflow Engine for more information.
Learn more
For an introduction to the Workflow Engine, see Introduction to the Workflow Engine.
For a list of Workflow Engine functions, see Workflow Engine Functions Reference.
For general information on the Workflow Engine, see Workflow Engine.
Create a Situation Action Workflow Engine
You can create a new Workflow Engine to trigger workflows based upon Situation actions (sigAction). For example, when a new situation is created, updated, or closed. For a full list of Situation actions, see Situation Action Codes.
Before you begin
Before you start to create a Situation Action Workflow Engine:
a. Verify you have SSH access to all core machines that run Moogfarmd.
b. Make sure you have the credentials for the user that runs the Cisco processes on the core machine so you can restart Moogfarmd.
Create the Situation Action Workflow Engine Moolet
To create the Situation Action Workflow Engine, add a new Moolet to Moogfarmd on all core machines as follows:
· Create and edit a new Moolet configuration file:
$MOOGSOFT_HOME/config/moolets/situation_action_workflows.conf
· Add the following text to the configuration file:
{
name: "Situation Action Workflows",
classname: "com.moogsoft.farmd.moolet.workflowengine.CWorkflowEngine",
message_type: "situation",
run_on_startup : true,
metric_path_moolet: true,
moobot: "WorkflowEngine.js",
standalone_moolet: true,
mooms_event_handler: false,
event_handlers : [ "SigAction" ]
}
The Situation Action Workflow Engine runs outside the data processing flow. Situation actions (Sigaction) trigger the workflows in the standalone engine.
· Add the Situation Action Workflow Engine Moolet to the array of Moolets in the Moogfarmd configuration file: $MOOGSOFT_HOME/config/moog_farmd.conf. For example:
moolets : [
...
{
include : "alert_inform_workflows.conf"
},
{ include : "situation_inform_workflows.conf"
},
{
include : "situation_action_workflows.conf"
}
]
· Restart Moogfarmd.
After Moogfarmd restarts, the Situation Action Workflow appears in the list of available Workflow Engines in the Cisco Crosswork Situation Manager UI under Settings > Automation > Workflow Engine.
Create a workflow and with an action using the sigActionFilter function to trigger a workflow when the Situation action occurs.
Integrate with Ticketing Services
This topic covers the options to integrate Cisco Crosswork Situation Manager with third party service ticketing software.
Ticketing Integrations and the Workflow Engine
You can integrate with the following ticketing applications:
· Atlassian
· BMC Remedy
· Cherwell
· PagerDuty
· ServiceNow
After you set up the integration, you can use the createServiceTicket function for the Situation Workflow Engine to open incidents in the ticketing software.
Other integration options
If the UI integrations and the Workflow Engine do not meet your requirements, you can write custom code to perform the integration. See Moobot Modules for more information.
URL-based Filters
You can create URLs to open filtered alerts and Situation Views. This is useful for context linking from a third-party application directly to Cisco Crosswork Situation Manager.
For example, context linking a device in a topology mapping product to an alert view for that device. It also allows creation of powerful dynamic alert and Situation Client Tools.
Creating a URL (Basic)
To create a valid URL, it must contain the location of Cisco Crosswork Situation Manager, the type of view and the basic filter query syntax to define the filter.
When creating a new URL, it should contain the following components:
| Component |
Example |
Description |
| The host server |
https://<localhost>/ |
Host name of your Cisco Crosswork Situation Manager instance. |
| The view type |
[#/alerts | #/situations | #/situationalerts] |
Defines whether an alert view, Situation view or alerts assigned to Situations are displayed. |
| The filter type |
?[filtereditor=basic | filtereditor=advanced] |
Defines whether the filter will use basic or advanced query syntax. Note Please note: Place a question mark (?) at the start of your query parameter and separate each subsequent parameter with an ampersand (&) |
| The parameters |
&[filter-active_sig_list= |filter-alert_id= | filter-agent=] |
These are the parameters, operators and values used to define in the filter. E.g. &filter-alert_id=12, &filter-count=5 etc. For all available parameters click here. Note Please note: All parameter names must be prefixed by 'filter-' |
Basic Example
The example below shows a URL-based filter using basic filter syntax:
https://<localhost>/#/situationalerts/172?filtereditor=basic&filter-type=CPUHigh&filter-severity=2
A breakdown of this URL's components are described in the table below:
| Example Component |
Description |
| https://<localhost>/ |
Host name of your Cisco Crosswork Situation Manager instance. |
| #/situationalerts/172 |
Specifies an alert view of all alerts assigned to Situation 172. |
| ?filtereditor=basic |
Specifies that you want to use basic filter query string. |
| &filter-type=CPUHigh&filter-severity=2 |
Defines the filter will display all alerts with the alert type 'CPUHigh' and that have the severity of 'Warning' (severity level 2). |

Note
Please note: When using the URLs, if not currently logged into Cisco Crosswork Situation Manager, users are prompted to login. alerts and Situation Views opened are active and are updated with the latest data, with filter and action and navigation functions available as normal for that user.
Custom_info Field
You can filter URL-based filters for custom_info fields if you have added any to your instance of Cisco Crosswork Situation Manager.
Note
Please note: For more information on adding custom_info fields see Custom Info.
The example below shows a URL-based filter
https://<localhost>/#/situations?filtereditor=basic&filter-custom_info.something_new=5
| Component |
Description |
| https://<localhost>/ |
Host name of your Cisco Crosswork Situation Manager instance. |
| #/situations? |
Specifies an alert view of all alerts assigned to Situation 172. |
| ?filtereditor=basic |
Specifies that you want to use basic filter query string. |
| &filter-custom_info.something_new=5 |
Defines that you filter the custom_info field 'something_new', this must be column field. The basic filter treats the field as text and uses 'matches' rather than 'equals'. |
Creating a URL (Advanced)
To create a valid URL using the Advanced Filter, it must contain the same components as before but they must be URL-encoded. See "Advanced Filter Syntax" on Filter Search Data.Filter Search Data
Note
*Please note: To encode a filter query, open DevTools (right-click and select Inspect) and go to Console:
Type 'encodeURI', insert the query in brackets and then double quotation marks:
Console Entry
encodeURI ("Severity = 'Warning' AND Type = 'DBFail'")
Press Enter to continue and encode the entry:
Encoded Result
"Severity%20=%20'Warning'%20AND%20Type%20=%20'DBFail'"
Advanced Example
The example below shows a URL-based filter using advanced filter query syntax:
https://<localhost>/#/situationalerts/172?filtereditor=advanced&filter-query=Severity%20=%20'Critical'%20AND%20Severity%20=%20'Minor'
This URL can be broken down into the following components:
| Component |
Description |
| https://<localhost>/ |
Host name of your Cisco Crosswork Situation Manager instance. |
| #/situationalerts/172 |
Directs the filter to a view of all alerts assigned to Situation 172. |
| ?filtereditor=advanced |
Specifies that you want to use advanced filter query syntax. |
| &filter-query=Severity%20=%20'Critical'%20AND%20Severity%20=%20'Minor' |
Defines the filter will display all alerts with 'Critical' and 'Minor' severity. |

Custom_info field
You can also filter custom_info fields if you have added any to your instance of Cisco Crosswork Situation Manager.
Example:
https://<servername>/#/situations?/?filtereditor=advanced&filter-query=%60Something%20new%60%20MATCHES%20%225%22
| Example Component |
Description |
| https://<localhost>/ |
Host name of your Cisco Crosswork Situation Manager instance. |
| #/situations? |
Directs the filter to a Situations view. |
| ?filtereditor=advanced |
Specifies that you want to use advanced filter query string. |
| &filter-query=%60Something%20new%60%20MATCHES%20%225%22 |
Defines that you filter the custom_info field 'something_new'. This must be a column field. |
Popout Shortcut
There is a method to quickly popout a URL for Situation alerts.
Note
Please note: The Popout action can only be performed on alerts that are assigned to Situations at present
To do this, go to the Situation Room for the Situation you are interested in and select the alerts tab.
Create a Basic or Advanced filter then go to Tools > Popout:

This will launch a new browser tab with the URL for the filter. See example below:
https://<servername>/#/situationalerts/172?filter-severity=4&filter-type=DBTrans&filtereditor=basic&sort=severity%3ADESC%2Calert_id%3ADESC
The filter URL will include the default sort order of alerts in descending severity order then by descending alert ID:
sort=severity%3ADESC%2Calert_id%3ADESC
Note
Please note: If using the Popout method to generate a URL-based filter with advanced filter query syntax it will be automatically URL encoded
Use in alert and Situation Client Tools
You can create powerful dynamic alert and Situation Client Tools. URLs created using this mechanism can be added to alert and Situation client tools, so that their functionality is available from right-click menus in Situation and alert Views in Cisco Crosswork Situation Manager.
Examples
In an alert client tool, with the HTTP Method GET selected, the following code in the URL field shows an alert View with all alerts that have the same host as the alert the tool was run form:
https://<servername>/#/alerts?filtereditor=basic&filter-source=$source
In a Situation client tool, with the HTTP Method GET selected, the following code in the URL field shows a Situation View of all Situations that are impacting the same services at the Situation the tool was run from:
https://<servername>/#/situations?filtereditor=basic&filter-service_list=$service_list
Parameters
The tables below list the available parameters and the associated operators for alerts and Situations:
Warning
Please note: The operators listed below are to be used in the filter query only, prior to using either the Popout or URI-encoding to form your URL
alert Parameters
| UI/Display Name |
Filter Parameter |
Operator |
| Active Situations |
active_sig_list |
IN |
| alert Id |
alert_id |
> >= < <= != = |
| Agent Name |
agent |
MATCHES |
| Agent Host |
agent_location |
MATCHES |
| Class |
class |
MATCHES |
| Count |
count |
> >= < <= != = |
| Description |
description |
MATCHES |
| Entropy |
entropy |
> >= < <= != = |
| External ID |
external_id |
MATCHES |
| First Event Time |
first_event_time |
>= AND <=* |
| Host |
source |
MATCHES |
| Internal Last Event Time |
int_last_event_time |
>= AND <=* |
| Last Change |
last_state_change |
>= AND <=* |
| Last Event Time |
last_event_time |
>= AND <=* |
| Manager |
manager |
MATCHES |
| Owned By |
owner |
IN |
| Severity |
severity |
IN |
| Significance |
significance |
IN |
| Situations |
sig_list |
IN |
| Source ID |
source_id |
MATCHES |
| Status |
state |
IN |
| Type |
type |
MATCHES |
Situation Paramaters
| UI/Display Name |
Filter Parameter |
Operator |
| Category |
category |
MATCHES |
| Created At |
created_at |
>= AND <=* |
| Description |
description |
MATCHES |
| First Event Time |
first_event_time |
>= AND <=* |
| ID |
sig_id |
> >= < <= != = |
| Last Change |
last_state_change |
>= AND <=* |
| Last Event Time |
last_event_time |
>= AND <=* |
| Owned By |
owner |
IN |
| Participants |
participants |
> >= < <= != = |
| Process Impacted |
process_list |
CONTAINS |
| Scope Trend |
delta_entities |
>0 <=0 |
| Services Impacted |
service_list |
CONTAINS |
| Sev Trend |
delta_priority |
>0 <=0 |
| Severity |
severity |
IN |
| Status |
state |
IN |
| Story |
story_id |
> >= < <= != = |
| Teams |
teams |
IN |
| Total alerts |
total_alerts |
> >= < <= != = |
| User Comments |
user_comments |
> >= < <= != = |
*Please note: These parameters have operators defining two times, 'from' and 'to' separated by a colon. These times need to be epoch/Unix times:
E.g. First Event Time: From May 3, 2017 00:45:00 to May 3, 2017 00:45:00 would appear as (`First Event Time` >= 1493768700) AND (`First Event Time` <= 1493768700) in advanced filter query syntax and in the URL, this will appear as follows:
?filter-first_event_time=1493768700000%3A1493768700000
Learning Resources for Ticketing
Operational Administration

Configure Operator Experience tells you how to configure the UI to best suit your operators, including the landing page, hotkeys, alert and Situation columns, and ChatOps. It also tells you how to configure and retrain Probable Root Cause (PRC).
Other Data Processing Configuration ??? Nothing in here.
Reporting and Dashboards tells you how to use Insights to analyze trends in operational performance. You can use the default dashboard or you can use Grafana to create a custom dashboard.
Customize Cisco Crosswork Situation Manager Further tells you how to use customization options in Cisco Crosswork Situation Manager including server and client tools. It also contains information on how to troubleshoot problems in Cisco Crosswork Situation Manager and how to run diagnostic tools.
Housekeeping Tasks provides instructions on maintaining your Cisco Crosswork Situation Manager system, including upgrading the software, maintaining Situation design, configuring historic data retention, archiving Situations and alerts, and scheduling system downtime.
Configure Operator Experience
UI customization
Check the slides and video of UI Elements Tour and UI Customization and extract what's needed
Configure the Landing Page
You can configure the landing page users land on when they open Cisco Crosswork Situation Manager. You can set the landing page for each user's role, for each team and for the system. The default system landing page is the Summary screen. The landing page a user adopts follows the priority order: role > team > system.
Set a Role's Landing Page
To configure the landing page for a role:
· Go to System Settings > Roles.
· Select the Role you want to edit.
· Set the 'Landing Page' and save your changes.
See Manage Roles for more details.
Configure other Landing Pages
You can also configure landing pages for teams and the Cisco Crosswork Situation Manager system in the System Settings. To add landing page for a team see Manage Teams. To add a landing page for your system see Customize User Experience and Workflow.
Customize User Experience and Workflow
You can configure the functionality and default tabs of Cisco Crosswork Situation Manager for Situation Rooms, Workflow, System Settings and Interface Settings. To access these options, click Customization in the System section of the Settings tab.
Situation Room
Use the Situation Room tab to select the default tab that displays when any user opens the Situation Room and the columns that appear in the Situation Room header.
Default tab
You can choose between Next Steps, Alerts, Collaborate, Topology, and Visualize as the default tab that displays. By default, the tab is Next Steps. To change the default tab, select the default tab that you want from the drop-down list.
Situation Header Columns
You can select up to eight columns to display in the Situation Room header. To change the columns that you want to display in the Situation Room header:
· To add a new column, click Add Field and select a column from the drop-down list.
· To delete an existing column, click x next to the column name.
· To move a column, click on a column and drag it to the place where you want it to display.
Workflow
The Workflow tab allows you to alter the standard workflow of all Situations.
Propagate Situation actions to alerts
When enabled, this mirrors any actions to the Situation down to its alerts. Click Enable to continue and then define the scope:
| Setting |
Description |
| Any unassigned Alerts |
Action applies to any currently unassigned alerts in the Situation. |
| Any unassigned Alerts and any assigned but not acknowledged Alerts |
Action applies to any unassigned alerts and any assigned but not acknowledged alerts. |
| All Alerts |
Action applies to all of the alerts in the Situation. |
Close Situations
These settings determine the behavior when closing Situations:
| Setting |
Description |
| Close Situation and Open Alerts |
This closes the Situation and all open alerts within it. |
| Close Situation and Unique Open Alerts |
This closes the Situation and all unique open alerts. |
| Close Situation Only (Not recommended for normal operation) |
This only closes the Situation but not its alerts. |
System Settings
The System Settings tab enables you to set a session timeout and block file extensions.
Set session timeout
You can set when Cisco Crosswork Situation Manager times out, either with the system default or a custom timeout:
| Setting |
Description |
| Use system defined timeout (60 minutes) |
Use the default system timeout of 60 minutes. |
| Custom timeout |
Enter a value between 60 and 720 for the number of minutes you want before Cisco Crosswork Situation Manager times out. |
Block file extensions
You can define a comma-separated list of file extensions that you want to block users from uploading in Cisco Crosswork Situation Manager, such as in a Situation Room, or a Team Room, or uploading a profile logo or a branding logo. These are file extensions that are potentially dangerous or could pose a security threat. Cisco Crosswork Situation Manager provides a default list which you can change.
Interface Settings
The Interface Settings tab enables you to configure the default time format, landing page and theme for the Cisco Crosswork Situation Manager interface.
| Setting |
Input |
Description |
| Default Time Format |
US (hh:mm:ss MM/DD/YYYY) International (hh:mm:ss DD/MM/YYYY)* Sortable (YYYY-MM-DD hh:mm:ss) |
The default time format that applies throughout Cisco Crosswork Situation Manager . |
| Use Friendly Time Format |
Check Box |
Displays times in a 'friendly' format rather than an actual date format. 'Last Thursday 15:22', '12 minutes ago', and 'a few seconds ago' are examples of friendly time formats. Disabled by default. |
| Landing Page |
Summary* Management Dashboard Cisco Crosswork Situation Manager Dashboard My Situations Open Situations Open Situations with Impacted Services |
The default landing page that opens when you launch Cisco Crosswork Situation Manager or click the Cisco logo in the top left corner. |
| Default Theme |
Light* Dark |
The color scheme of Cisco Crosswork Situation Manager (dark or light). |
| Allow Users to Select Theme |
Check Box |
Allows users to select their own color scheme. Enabled by default. |
| Default Time Zone |
Use Client Time Zone* |
Defines the default time zone for new users logging in to Cisco Crosswork Situation Manager . The default 'User Client Time Zone' means Cisco Crosswork Situation Manager adopts the local time zone. |
| Allow Users to Select Time Zone |
Check Box |
Allows users to set their own time zone under the My Account settings. Enabled by default. |
| Select Custom Logo |
- |
Upload an image such as a logo to display on the login page and on the top bar of the workbench. See Upload a logo for details. |
Note
* These are the default settings for Cisco Crosswork Situation Manager .
Upload a logo
You can upload a custom image such as a company or brand logo to appear on the login page and on the top bar of the workbench:
· Click Upload and select the desired image file from your computer. Currently PNG, JPG and GIF files up to 5MB in size are supported.
· Click Save Changes for the changes to be applied.
· Click the image to go to the default or configured landing page.
Configure Hotkeys
Hotkeys are keyboard shortcuts you can use on the Alert View, Situation View and Situation Room screens in Cisco Crosswork Situation Manager. The default hotkeys are as follows:
| Key |
Action |
| A |
Assign |
| D |
Show Details |
| I |
Invite User |
| M |
Own |
| T |
Open Server Tools |
You can add more custom hotkeys for additional actions to make navigation easier for you and your team.
Add a Hotkey
Click + Create Hotkey in the top left corner of the window to add a new hotkey shortcut.
Under 'Key', select a number between 0-9 or a letter between A-Z then select an action for it to represent. The new hotkey is highlighted with orange markers.
Click Save Changes to continue.
Change an existing Hotkey
Select any assigned Action from the list, click on the KEY dropdown menu and select from any available alphanumeric character.
The new key assigned to the action in the list will have a red indicator informing the user that the change is ready to be saved.
Delete a Hotkey
Select any unwanted hotkey from the list, default hotkeys included, and click - Remove Hotkey. The selected hotkey disappears from the list.
Click Save Changes to continue or click Revert Changes to undo the action.
Tool Runner
In Cisco Crosswork Situation Manager you can use the Tool Runner to run non-interactive command line tools that do not require root permission such as "ping" and "cat". It can not be used to execute Cisco Crosswork Situation Manager client tools. The tool is a servlet running under Apache-Tomcat whose output is sent back to the web browser asynchronously.
All commands are run in a Linux shell via ssh and executed on a specified user@hostuser@host.
When a tool is run from the UI, a user/password@host can be specified but, if not provided, the tool runs on a default user@host (configured in web.xml).
Using server tools in the Cisco UI
From the alert view:
1. Right-click an alert to open the menu.
2. Select Tools > Server Tools to open Tool Runner.
For each alert, based on alert type, a list of configured tools is displayed with the following fields:
| Field |
Description |
| Tool |
Display name of the tool. |
| Run from host |
If left blank, the tool runs either on localhost, or the default machine (which you can configure). If specified, the tool runs on the specified host. |
| Username |
If you specify a run host, use this field to specify the user to ssh into the run host. |
| Password |
If a username is specified, this is the password used to log in to the run host. If left blank, the system attempts to use ssh public/private keys. |
| Fire & forget |
If checked, the tool runs and all output is ignored (the equivalent of 'nohup &'). |
Tool Runner servlet configuration
Tool Runner is implemented as a servlet which can be configured using MySQL or web.xml.
Supporting configuration
Depending upon the exact environment, some support configurations may be required. Tool Runner uses ssh to log in to a system with a certain username and password to run tools/integrations. As a result, 'PasswordAuthentication' must to be set to 'yes' in /etc/ssh/sshd_config for this to work. Changes to that file require restarting the sshd service before they take effect.
MySQL
The database contains one table for the configuration of tools. The schema is as follows:
| Element |
Type |
Description |
| tid |
[INT AUTO_INCREMENT] |
Alert tool ID. |
| displayname |
[VARCHAR(100)] |
Tool name displayed in the UI. |
| cmd |
[VARCHAR(250)] |
Tool command (with no arguments). |
| args |
[VARCHAR(500)] |
Arguments to the command. |
| alerttype |
[TEXT] |
Alert type of the alert that is used to determine the list of valid tools. |
| description |
[TEXT] |
A textual description. |
When first installed, the table does not contain any tools. Tools can be added using the following SQL:
insert into moogdb.alert_tools value( 0,'Ping localhost', 'ping', '-c 5 localhost','SWBFence', 'This is an example tool');
Tool arguments
The arguments can be null if no argument is required. In addition, you can configure the argument to substitute information from the alert. For example:
cmd = ping
args = -c 5 $source -> -c 5 polyanna (after substitution)
You can use any alert internal field name in the argument substitution, for example $source, $source_id, $severity. The case must match the internal field name.
Escaped argument variables
When an argument is substituted into the argument string it will also be escaped using a backslash. This allows you to substitute values to contain special characters, and also provides some security against command insertion. Be careful, the combination of the escaped value and the original argument string can produce unexpected results. For example, the command echo with the following argument strings will produce slightly different results:
argsV1 = $source
argsV2 = "$source"
if $HOST = local.host
resultV1= local.host
resultV2 = local\.host
Only the values are escaped, not the original argument string. For further information on how to build the full argument string, see Combining multiple arguments into a single argument string.
Combining multiple arguments into a single argument string
The following command has two arguments:
printf "%s\n" "hello world"
If the 'hello' and 'world' were from $X and $Y, the configuration for the command would be as follows:
cmd = printf
args = "%s\n" $x\ $y (version 1)
Alternatively:
args = "%s\n" "$x $y" (version 2)
Due to the argument value escaping, version 1 is probably the better choice, although version 2 is probably more readable/natural.
web.xml
Here is an example web.xml (/usr/share/apache-tomcat/webapps/toolrunner/WEB-INF):
<web-app>
<servlet>
<servlet-name>toolrunner</servlet-name>
<servlet-class>com.moogsoft.toolrunner.CToolRunner</servlet-class>
<async-supported>true</async-supported>
<init-param>
<param-name>webhost</param-name>
<param-value>https://localhost</param-value>
</init-param>
<init-param>
<param-name>polluri</param-name>
<param-value>/poll</param-value>
</init-param>
<init-param>
<param-name>toolrunuri</param-name>
<param-value>/run</param-value>
</init-param>
<init-param>
<param-name>toolstopuri</param-name>
<param-value>/stop</param-value>
</init-param>
<init-param>
<param-name>sshtimeout</param-name>
<param-value>900000</param-value>
</init-param>
<init-param>
<param-name>toolrunnerhost</param-name>
<param-value>localhost</param-value>
</init-param>
<init-param>
<param-name>toolrunneruser</param-name>
<param-value>toolrunner</param-value>
</init-param>
<init-param>
<param-name>toolrunnerpassword</param-name>
<param-value>toolrunner</param-value>
</init-param>
<load-on-startup>1</load-on-startup>
</servlet>
<servlet-mapping>
<servlet-name>toolrunner</servlet-name>
<url-pattern>/poll</url-pattern>
<url-pattern>/run</url-pattern>
<url-pattern>/stop</url-pattern>
</servlet-mapping>
<listener>
<listener-class>com.moogsoft.toolrunner.CSessionListener</listener-class>
</listener>
</web-app>
The following parameters can be edited; however, these are 'global' settings and would apply to all tools:
webhost
Defines the value of the HTTP header 'Access-Control-Allow-Origin' that is used to control cross-origin resource sharing (CORS). The default value ishttps://localhost.
sshtimeout
If a tool running via ssh stops providing any output for a specified period of time, due to the tool hanging or a problem with the connection, sshtimeout can be used to shutdown any resources associated with the tool. This configuration value is specified in milliseconds and the default value is 900000 (1000 * 60 * 15 = 15 minutes).
toolrunnerhost / toolrunneruser / toolrunnerpassword
These three configurations relate to the running of tools 'locally'. From the UI, if only a tool name is specified then use/this configuration comes into play. There are basically two valid configurations:
· All three configured: Any tools with no run host specified will run on the configured run host. The system will ssh to the run host using the configured username and password
· Run host and username configured: If no password is configured, then the system will attempt to ssh to the run host using the configured username with a private key that must be located in a specific directory. For further information refer to Passwordless SSH.
SSH
You must have ssh installed on the remote machine that you want to run tools on.
Enable password authentication
In order to successfully log in to a remote machine, you must configure the remote ssh to allow password authentication. In /etc/ssh/sshd_config configure the following:
PasswordAuthentication yes
Passwordless SSH
To set up a user account that does not require a password:
· On the web server machine generate a secure SSH key by typing: ssh-keygen.
· Copy the generated key to the remote server. For each user account you plan to use to run tools you want to setup password-less logins with. Use the following command string, or, you can use scp: cat ~/.ssh/id_dsa.pub | ssh user@remotehost 'cat >> ~/.ssh/authorized_keys'. This command takes the generated SSH key from the local machine, connects to the remote host via SSH, and then uses cat to append the key file to the remote users authorized key list. As this connects with SSH to the remote machine, you will need to enter the password to use this command.
· Confirm that you can now login to the remote SSH server without a password: ssh user@remotehost.com.
· Copy the private key ( id_rsa) to a directory called keys, which you need to create in the Tomcat Apache home directory, for example, /export/apache-tomcat-7.0.29.
Additional considerations
· At present stdout and stderr are combined together and displayed in the web UI.
· If a tool is run that produces a large amount of output, it can take a significant amount of time for the output to be processed over to the web ui so expect a time lag.
Configure Tool Runner
Tool Runner allows an administrator to set up custom scripts to run on a server. It uses ssh to run tools and integrations. You must edit the servlets configuration file in Cisco Crosswork Situation Manager in order to use Tool Runner in the UI.
Warning
The Tool Runner user can run any command on the operating system. Only implement Tool Runner if absolutely necessary and follow the security-related recommendations closely.
Before you begin
Before you begin to configure Tool Runner, ensure you have met the following requirements:
1. You have created or identified an operating system user that you will use to run tools:
— Do not run Tool Runner as root.
— Run Tool Runner in a user-restricted shell, for example, bash --restricted. See also https://www.gnu.org/software/bash/manual/html_node/.
— Run Tool Runner as a non-privileged user.
— Allow specific permissions to Tool Runner so that it only accesses the tools it needs.
· You have identified a separate host or a sandboxed environment. Cisco recommends that you do not run Tool Runner locally.
· You have the permissions to modify Cisco Crosswork Situation Manager configuration files.
· You have set the PasswordAuthentication property to yes in the /etc/ssh/sshd_config file on the Cisco Crosswork Situation Manager server and restarted the sshd service.
Configure Tool Runner
To manually configure Tool Runner, edit the servlets configuration file located at $MOOGSOFT_HOME/config/servlets.conf:
· You can configure these properties in the toolrunner section of the file:
— toolrunnerhost: The host on which Tool Runner runs commands. This should not be the host on which Cisco Crosswork Situation Manager is installed.
— toolrunneruser: The Tool Runner username. The user must exist on the toolrunnerhost system and have the appropriate permissions to run the required tools.
— toolrunnerport: SSH port on which to run Tool Runner. Default is 22.
— toolrunnerpassword: The Tool Runner user password on the toolrunnerhost system.
If the password is not defined, Tool Runner uses the public key defined in ssh_key_file, or if that is not set, $MOOGSOFT_HOME/etc/keys/id_rsa.
For ssh_key_file, if the path is a relative path, it is assumed to be relative to $MOOGSOFT_HOME/etc. Your SSH key should have a passphrase set. You can specify this in the configuration file in encrypted form under encrypted_ssh_passphrase or in plaintext (not recommended) in ssh_passphrase.
If neither is set, the assumed password is keyPwd.
— encrypted_toolrunnerpassword: An encrypted Tool Runner password. Use either the password or encrypted password property. See Moog Encryptor for more information.
— execute_locally: If set to true, Tool Runner executes commands on the server where the Tool Runner servlet is hosted and ignores toolrunnerhost. Otherwise, commands are run on toolrunnerhost. Default is false.
— webhost: Not used.
— sshtimeout: SSH timeout period in milliseconds. If set to 0, timeout will never occur. Default is 0.
· Restart Apache Tomcat.
· Restart Moogfarmd.
Once you have completed the configuration, Tool Runner is available in the Cisco Crosswork Situation Manager UI.
An example toolrunner section in the servlets configuration file:
toolrunner:
{
toolrunnerhost : "localhost",
toolrunneruser : "moogtoolrunner",
toolrunnerport : 22,
toolrunnerpassword : "moogtoolrunner",
#encrypted_toolrunnerpassword : "rmW2daCwMyI8JGZygfEJj0MZdbIkUqX3tT/OIVfMGyI=",
#execute_locally : false,
#webhost : "https://localhost",
sshtimeout : 900000
}
Create Link Definitions
Link Definitions allow you to format alert and Situation view custom info values as links to external tools for individual alerts or Situations.
You can add Link Definitions to columns in alert and Situation views. You can configure links using Situation and alert data and custom info fields. You can use them to perform queries and to link directly to corresponding tickets in third-party ticketing systems.
Create a Link Definition
To create a new Link Definition:
· Go to Settings > Link Definitions and click + to create a new definition. Complete the details for the Link Definition as follows:
·Link. Link format, including query syntax if required. It can include a $reference to one or more alert or Situation fields.
·Display. Link text to appear in Situation and alert views. It can include the $value of a
— in a Situation or alert view column, go to Settings > Situation Columns and Settings - Alert Columns. See Configure Alerts and Situation Columns for more information.
The following screenshot displays two example Link Definitions, ServiceNow Ticket and Google Link.

Third Party Ticketing Example
The Link Definition for ServiceNow Ticket is configured to take the value of the custom info servicenow field, and also displays this value as part of the link itself:
· Name: ServiceNow
· Link: https://instance.service-now.com/nav_to.do?uri=incident.do?number=$value
· Display: ServiceNow $value
The Situation column is configured to display data from the custom_info servicenow field and links to the ServiceNow link definition:
· Field: custom_info.servicenow
· Header: ServiceNow Ticket
· Type: Text
· Link Definition: ServiceNow
Situation #25 has the following custom_info:
· Name: servicenow
· Value: INC1190341
In the screenshot example, the ServiceNow INC1190341 link for Situation #25 contains the following URL: https://instance.service-now.com/nav_to.do?uri=incident.do?number=INC1190341
Query Example
The Link Definition for Google Link is configured to perform a google query for the text strings in the $description Situation field and the custom info impact field:
· Name: Google Description
· Link: https://www.google.com/search?q=$description&q=$custom_info.impact
· Display: Google Description
The Situation column is configured to link to the Google Description link definition. In this example, the Field setting is ignored, but you must still enter a valid custom info attribute into it to make the link appear:
1. Field: custom_info.impact
2. Header: Google Link
3. Type: Text
4. Link Definition: Google Description
Situation #26 has the following custom_info:
1. Name: impact
2. Value: documentation
In the screenshot example, the Google Description link for Situation #26 contains the following URL: https://www.google.com/search?q=Service%20Pack%20Update%20SP21&q=documentation
Configure ChatOps Shortcuts
The ChatOps feature enables Cisco Crosswork Situation Manager users to run tools, such as executing utilities on remote hosts, from the Collaborate tab in a Situation Room. Tools that can be run include Generic, Alert and Situation Server tools. The output of the tool being executed is displayed in the Situation Room. For more information, see Take Additional Actions in the Operator Guide.Take Additional Actions
For certain tools, the diagnostic results will appear as a comment under that entry so that all collaborators and team members can see it. If the ChatOps tool successfully resolves the root cause of the incident, it should be marked as a "Resolving Step". Examples of tools that can be run are scripts to perform issue diagnostics and remediation as well as integration activities such as creating tickets in third party ticketing tools.
The ChatOps shortcuts can be set up to give your users quick access to the available tools. To do this, go to System Settings > ChatOps Shortcuts:
Any existing shortcuts are listed under the Tools panel to the right of the window.
Create a ChatOps Shortcut
Click the + Create Shortcut button to get started.
Next enter a name for your new ChatOps shortcut in the Shortcut text box. This is what users enter to run the ChatOps tool.
Note
You can use 0-9, lowercase a-z, dash (-), underscore (_) and period(.) If the name already exists, the name highlights in red in the list on the left and you cannot save until the name is edited to be unique.
Select the checkbox for the tool you want. To search for a tool, type text to the right of the search icon. Default alert and Situation workflow tools, such as ping, nslookup, are available.
Repeat the steps above to create as many shortcuts as required.
Click Save Changes when you are finished.
Remove a ChatOps Shortcut
Select the ChatOps shortcut you want to delete, from the list on the left.
Click the - Remove Shortcut button to remove the shortcut from the list.
If you accidentally remove the wrong shortcut, you can click Revert Changes to undo this. This discards all changes since the last save.
Configure SMS Notifications
Cisco Crosswork Situation Manager for Mobile uses a cloud-based notification service that allows users with an active Twilio account to receive SMS messages from the REST API.

To configure the mobile version of Cisco Crosswork Situation Manager to send and receive SMS messages:
· In the Cisco Crosswork Situation Manager UI, navigate to System Settings > Users and add phone numbers for the users you want to receive SMS messages.
Note
Phone numbers must include the international dial code in E.164 format. For example +1, +44, +61.
1. Requests to the notification service's REST API require authentication, which you configure in $MOOGSOFTHOME/config/system.conf.
Add your details in the following format:
"sms_sender":
{
"account_sid" : "AB1234c6d91dfe4eef9b3899dkrw34aabbab2b",
"auth_token" : "4eee23d50de54333f6949366fe0882a4",
"phone_number" : "+12345678910",
"character_limit" : 1600
}
Note
The API limits text messages to 1600 characters and truncates messages exceeding this limit.
· Restart Apache Tomcat to activate the changes. See Control Moogsoft AIOps Processes for details.
At present only the default configuration is available, which sends SMS notifications about all invitations and assignments.
Create Shared Alert and Situation Filters
You can use filters to configure which alerts and Situations you want to access and display from the Cisco Crosswork Situation Manager Workbench.
You can choose whether the filter is available to all users, specified teams, or yourself only.
Create a Filter
To create an alert or Situation filter:
· Click Alert Filters or Situation Filters in the Display Options section of the Settings tab.
· On the Filter tab, click the + icon to create a new filter.
· Fill in the available fields to configure the filter:
| Field |
Input |
Description |
| Name |
String (Required) |
Name of the new filter (up to a maximum of 100 characters). |
| Description |
String |
Text description of the filter. |
| Show in |
Navigation Dashboards |
Select whether the filter is shown in Navigation and/or Dashboards. |
· Define the filter that you want to use:
· Click Add Clause to start building the filter.
· Click the drop-down menu arrow and select a parameter.
· Click the drop-down menu below this and select an operator.
· Depending on the parameter selected, enter or select a value in the final box and then click Apply.
· To add more clauses, click the clause and then click AND, OR, or NOT and fill in the boxes as before.
· On the Shared With tab, select whether you want to share this tool with everyone, specific teams, or only yourself.
· If you select to share the filter with specific teams, add the teams you want to share the filter with to the list below.
· Click Save Changes to create the new filter.
See Filter Search Data for filter examples.Filter Search Data
Configure Alert and Situation Columns
You can change the columns to display on Situation and Alert Views and add new columns based on custom_info fields. Optionally add link definitions to custom_info columns, for example, to link the custom_info data to a third-party system. See Link Definitions.
Navigation
Click the Columns drop-down menu in the top right corner to display which columns are displayed by default. Check or uncheck columns to add or remove them from the default column layout.
| Icon |
Description |
|
|
Click the border of any column and drag left or right to make the column narrower or wider. Double-click to auto-resize the column to the current content. |
|
|
Click and drag any column to another position to change the order the columns appear in. |
Click any column and edit the text next to 'Header' to change the column header.
Create a New Column
Click Columns > Add Column to add a new custom column to the default layout. Edit the available fields to configure the column:
| Field |
Input |
Description |
| Field |
String |
Enter the custom_info field you want to use or show in the column. Note: This entry must start with custom_info. (added when creating a new column). For example, to use a Custom_info field 'TPS_ID' enter: custom_info.TPS_ID |
| Header |
String |
This is the header name of the column. |
| Type |
Number OR Text OR List |
Select 'Number' if the column content is numeric. Select 'Text' if the column content is a text string. Select 'List' if the column content is based on a custom_info field containing a list. You filter this using CONTAINS. For example, filtering using 'Youtube CONTAINS ("5z508TD97Sg","i9gQ7TFIpEA")' finds Situations where the list field contains both of those items. |
| Link Definition |
Selection |
Select the Link Definition from the list (if required). |
| Indexed |
Boolean |
If enabled, the column data is indexed in the database. When new columns are added they are filterable and sortable by default. This improves performance of filtering and sorting, but may affect the performance of additions. If you are planning to use this custom_info field in alert or Situation filters or you are planning to sort using this column, we recommend you enable the indexed option to aid filter loading performance. Too many indexed columns may impact performance. |
Adjust the column width as required and change the order by dragging and dropping the new column where you would like it to be. Click Save Changes to continue and confirm when prompted. Alternatively, click Revert Changes to discard your changes.
Example
This example walks you through setting up an Alert Column with Custom_info Data from Prompt. The custom_info field 'TPSLEVEL' is added to Alerts using a client tool with a prompt variable: 'Set TPS Level'. See Client Tools for information on how to set up the TPS Level client tool.
1. Right-click and select Tools > Set TPS Level tool or Tools > Tools > Set TPS Level to run the tool on an alert.
2. Select the TPS level on the prompt window.
3. Right-click on the alert, select Show Details... and Custom Info...
4. Navigate to System Settings > Columns > Alert Columns to create the custom_info column.
5. Click Columns > Add Column and then configure the column.
6. Click Save Changes to continue.
The Alert Views window displays the TPS Level column display custom_info data in the second column.
Probable Root Cause
Probable Root Cause (PRC) is a machine learning process in Cisco Crosswork Situation Manager that identifies which Alerts responsible for causing a Situation. PRC looks for patterns in user supplied feedback. It does not use 'Root Cause Analysis' techniques.
With Probable Root Cause:
· You can immediately determine where to begin troubleshooting and diagnosis as soon as you open a Situation by looking at the Probable Root Cause Alerts.
· You can resolves Situations quickly by examining the The Top 3 Probable Root Cause Alerts appear under Next Steps in a Situation Room.
How does PRC work?
You manually label Alerts as either a Root Cause Alert or a Symptom Alert, the Cisco Crosswork Situation Manager PRC Model uses this data to predict Situation root causes.
Subsequently, when Cisco Crosswork Situation Manager generates Situations, it labels an Alert or Alerts as having a Root Cause Estimate. A Root Cause Estimate is always assigned even if the data set is small. Generally, the more data Cisco Crosswork Situation Manager has the more accurate it is. However, that data needs to be consistent and the model is only as effective as the data it is supplied with. For example, two conflicting labels will confuse the model. If you do not know the status of an Alert do not label it. You do not have to label every Alert.
How does Cisco Crosswork Situation Manager learn?
Machine Learning uses features like Severity, Host, Description and Class and takes the values of those features for all labelled Alerts and uses a Neural Network to estimate the Root Cause for all the Alerts in a newly created Situation. It does this even if that Situation has not been seen before based on the model and labelled data.
See Configure and Retrain Probable Root Cause for more information on training your model.
PRC Column
This column (Situation, Alerts Tab) shows the Probable Root Cause Estimate as a percentage of the Alerts in that Situation and is useful as a prioritisation aid. For example, the higher the value an Alert has, the higher the probability that the Alert is the root cause of the Situation
As Alerts are added to a Situation, the Root Cause is recalculated (Situation, Alerts list) and therefore the PRC column may change. The more accurate and consistent data you feed your model the more accurate the estimate.
Configure and Retrain Probable Root Cause
Probable root cause (PRC) for Cisco Crosswork Situation Manager is enabled by default. This means that you can mark Situation alerts as having a root cause or not and Cisco Crosswork Situation Manager shows a root cause estimate in Next Steps in the Situation Room.
Navigate to System Settings > Configure & Retrain to enable or disable PRC.
To configure which users can mark alerts for PRC, go to Security > Roles. Select the role you want to edit and under Permissions, move 'prc_feedback' to 'Selected' using the direction arrows. This permission is enabled for Administrator and Super User roles by default.
Root Cause
The PRC Model gives each alert within a Situation a probable root cause estimate. Retrain recalculates the estimates with the current data. You can choose which features your model uses when predicting the probable root cause of an alert. The default PRC configuration uses two types of Severity. The other features are listed below:
| Feature |
Description |
| Agent |
The agent of the alert represented as an enumeration. Each value of 'agent' is considered to be independent from all other values. |
| Alert Arrival Order |
Represents the arrival order of the alert in a Situation. |
| Alert Time |
Represents the alert time as the components of the 'time of day', for example, hours of day, minutes of hour. |
| Class |
The class of the alert, represented in a way that identifies naming conventions in the class name. |
| Description |
Tokenizes the description into words and uses those words to identify key words and phrases that may indicate root cause. |
| Host |
The host of the alert, represented in a way that identifies naming conventions in the class name. |
| Manager |
The manager of the alert represented as an enumeration. Each value of 'manager' is considered to be independent from all other values. |
| Severity & Arrival Order (default ) |
The severity of the alert represented as independent values and when the alert arrived for each value of severity. For best results use in conjunction with 'Severity Raw'. |
| Severity Enum |
The severity of the alert represented as independent values. For best results use in conjunction with 'Severity Raw'. |
| Severity Raw (default) |
The severity of the alert represented as a continuous value such that 'Warning' < 'Major' < 'Critical'. For best results use in conjunction with 'Severity Enum' or 'Severity & Arrival Order'. |
| Situation Alert Time |
Represents the alert time as the components of time, for example, hours of day, minutes of hour, relative to the first alert in the Situation. |
| Type |
The type of the alert, represented in a way that identifies naming conventions. |
Display Additional Data in Custom Info Fields
Custom info fields are customizable fields relating to either an alert or a Situation that can be added to Cisco Crosswork Situation Manager during configuration. Custom info fields hold data in addition to the core event fields for events and alerts. See Alert and Event Field Reference.
These fields are displayed in the UI as columns in the Alert and Situation Views and can be configured with optional sorting and filtering.
Custom info commands can be found in the usr/share/moogsoft/bin/utils folder.
Add custom info fields
You can use the following commands to add either alert or Situation custom info fields:
| Command |
Description |
| moog_add_alert_custom_field |
Adds a new alert custom info field. |
| moog_add_sitn_custom_field |
Adds a new Situation custom info field. |
You can use the following options to configure the display name, the field name and indexing:
| Option |
Description |
| -d, --display_name <arg> |
Name of the field displayed in the UI. |
| -f, --field <arg> |
Custom info field name. |
| -i, --index |
Indicates the field is indexed for filtering and sorting. This option cannot be used with display only fields. If you are planning to use this custom info field in alert or Situation filters ,or you are planning to sort using this column weCisco recommends that you use the --index option to aid filter loading performance. Too many indexed columns may affect the performance of additions. |
| -l, --loglevel <arg> |
Specify INFO, WARN, or ALL to choose the level of debug output. |
| -o, --display_only |
Indicates the field is for display only and cannot be used to filter, sort or search. |
| -s, --size <arg> |
Index size (the number of characters). This is valid for indexed text fields only. Default is 50. |
| -t, --type <arg> |
Type of field (number or text). Default is number. |
Example
Example to add an alert custom info text field which is also indexed so that you can sort or filter on it:
[root@moogsoft ~]# moog_add_alert_custom_field -d newfield -f new_field -i -t TEXT
Successfully adding the new custom info field is confirmed with a message similar to the following:
Field newfield was added to UI successfully
Filterable field custom_info.new_field was added successfully
Fill custom info fields
There is a utility that enables you to fill the alerts or Situations filterable custom info fields using retrospective data:
| Command |
Description |
| moog_fill_alert_custom_fields |
Fills the filterable alert custom info fields using retrospective data. |
| moog_fill_sitn_custom_fields |
Fills the filterable Situation custom info fields using retrospective data. |
You can configure the amount of time the fill utility goes back and the log level using the following options:
| Option |
Description |
| -b, --back <arg> |
Defines how far back the fill utility goes, with 's' for seconds, 'm' for minutes, 'h' for hours, 'd' for days and 'w' for weeks. You can leave empty for all but this might take some time. For example: -b 2w for two weeks. |
| -l, --loglevel <arg> |
Specify INFO, WARN, or ALL to choose the level of debug output. |
Example
Example to fill Situation custom info fields with retrospective data from the past three days:
[root@centos7 ~]# moog_fill_sitn_custom_fields -b 3d
Filterable custom info data was filled successfully
Remove custom info fields
You can use the following commands to remove previously configured alert or Situation custom info fields:
| Command |
Description |
| moog_remove_alert_custom_field |
Removes an alert custom info field. |
| moog_remove_sitn_custom_field |
Removes a Situation custom info field. |
You can configure the custom infor field you want to remove using the following option:
| Option |
Description |
| -f <arg> |
Defines the custom info field name to select the field you want to remove. |
Example
Example to remove a custom info field called 'new_field'.
[root@moogsoft ~]# moog_remove_alert_custom_field -f new_field
Field custom_info.new_field was removed successfully
Configure custom info search
You must run a utility if custom info columns are added and existing alerts or Situations contain values in that column for them to be filterable in the UI. Alerts or Situations which are new or updated after the new column has been added will be filterable automatically.
If you added an alert custom info field, run $MOOGSOFT_HOME/bin/utils/moog_fill_alert_custom_fields.
If you added a Situation custom info field, run $MOOGSOFT_HOME/bin/utils/moog_fill_sitn_custom_fields.
Other Data Processing Configuration
Create Services using Situation Manager Labeler
You can add Situation Manager Labeler macros to the Situation description in a Sigaliser. When Cisco Crosswork Situation Manager creates a Situation based upon the Sigaliser configuration, it automatically creates services based on the function and the alert data.
Before you begin
Before you start to create services with Situation Manager Labeler, ensure you have met the following requirements:
· You have the Situation Manager Labeler installed on your Cisco Crosswork Situation Manager system. The utility is installed by default with Cisco Crosswork Situation Manager v7.3 and higher. For previous releases, contact Cisco Customer Support to obtain installers and instructions.
· You have identified the service data in your alerts or set up an Enrichment method to import the data into custom_info. See Enrichment Overview for further information.
For example, an alert contains the following custom_info data:
{"services":["WinTel","Lync"]}
Configure a recipe to automatically create services
The following example demonstrates how to use labeler utility macros in a Cookbook Recipe to create services.
· In the Cisco Crosswork Situation Manager UI, go to Settings > Cookbook Recipes.
· Create a new Recipe, completing the mandatory fields such as name, type and clustering information. See Configure a Cookbook Recipe for more information.Configure a Cookbook Recipe
· Add a Situation Description that utilizes labeler macros. See the example below.
· Activate the Recipe. See Configure a Cookbook Recipe for further information.Configure a Cookbook Recipe
An example Situation description is as follows:
Issue affecting the service:$$UNIQUE(custom_info.services). $$SERVICES(custom_info.services)
This instructs to perform the following actions as it ingests data:
· Parse the data in the custom_info.services field of incoming events.
· Obtain unique service names for the alerts the system adds to a Situation.
· Preface the Situation's "Description" field with the text "Issue affecting the service: ".
· Create a service in the Cisco Crosswork Situation Manager database.
· Assign the service to the Situation.
· Append the Situation's Description field with the names of the impacted services.
When you are parsing a list of values stored as a JavaScript array, use $$ to prefix the macro. If the data is a string use the prefix $.
Once configured, Cisco Crosswork Situation Managert processes alerts using the Situation Description and the resulting Situation appears in the Cisco Crosswork Situation Manager UI.
For example:
![]()
Reporting and Dashboards
You can take advantage of Cisco Crosswork Situation Manager Insights to analyze trends in operational performance. You can use the default dashboard or you can use Grafana to create a custom dashboard.
Insights
Insights is built on the Stats API that exposes time-series data so you can report on:
· Active Situations, the teams they're assigned to, and the services they impact.
· Reoccurring Situations that could indicate deeper systemic issues.
· Key performance indicators like Mean Time To Resolution.
You can use the reporting tool of your choice to take advantage of the Stats API. Otherwise, check out the Cisco Crosswork Situation Manager app for Grafana to view and modify the default dashboard. See Grafana Dashboards for more information.
Insights exposes a variety of statistics and metrics to help you understand your operations. For example, consider the valuable data in the default dashboard:

You can see how your teams are managing active Situations:
· View the number of open Situations system-wide and see how many open Situations are unassigned, unacknowledged or that have been reassigned.
· Identify if the number of open reoccurring Situations which can highlight areas of impact that need increased attention or resource allocation.
You can monitor the distribution of your Situations over time, to see which teams handle the most Situations and which services are most impacted by Situations. Key Performance Indicator metrics reveal how quickly Cisco Crosswork Situation Manager detects Situations and how quickly teams address open Situations over time:
· Mean Time To Detect: the mean time to detect a Situation from the first event time.
· Mean Time To Acknowledge: the mean time to acknowledge a Situation from the first event time.
· Mean Time To Resolution: the mean time to resolve a Situation from the first event time.
For details on all the available Insights, see the Stats API.
Grafana Dashboards
You can view Cisco Crosswork Situation Manager statistics and reports in dashboards using Grafana.
To set this up, you need to install Grafana, install the Moogsoft AIOps plugin and install the Grafana integration in Cisco Crosswork Situation Manager.
Before You Begin
Before you install the Moogsoft AIOps plugin, ensure you have met the following requirements:
· You have installed Grafana or you have a hosted instance of Grafana.
· Enable HTTPS if you are using an on-premises instance of Grafana. See the Grafana docs for how to edit the protocol, cert_file, and cert_key properties in the Grafana configuration .ini file.
· The port for Cisco Crosswork Situation Manager is open and accessible from Grafana.
Install the Moogsoft AIOps App
To install the Moogsoft AIOps app in Grafana, follow these steps:
· Install the app.
· Find it under Apps in your Grafana plugins and enter the following settings:
| Field |
Value |
| URL |
<Your Cisco Crosswork Situation Manager URL> |
| User |
Your Graze username |
| Password |
Your Graze password |
1. Enable the app. A "Test Success" message appears if successful.
After you have set up the app, you can configure your dashboards.
Default Dashboards
You can configure the statistics that Cisco Crosswork Situation Manager collects depending on which dashboards you want to use. You can also create a custom dashboard.
Global Situation Overview
The Global Situation Overview dashboard provides a broad overview of your Situation statistics, teams insights, and mean times to acknowledge, detect and resolve.
The dashboard's panels display the number of open Situations, unassigned Situations, reassigned Situations and recurring Situations. Other panels include the top 10 teams by open Situations, the top 10 services by open Situations, the number of Situations by status, the number of Situations by severity and a graph view of MTTA, MTTD and MTTR.

To edit the dashboard, click the header of any panel and edit the statistic endpoint or add a query. Alternatively, click Add Row at the bottom of the screen.
Team Situation Overview
The Team Situation Overview dashboard displays a broad overview of your team's Situation statistics, team insights and mean time to acknowledge and resolve.
The dashboard's panels display the number of reassigned Situations per team, the number of reoccuring Situations per team, number of Situations impacting each service per team, the number of Situations by status per team and the MTTA/MTTR for the team.

To edit the dashboard, click the header of any panel and edit the statistic endpoint or add a query. Alternatively, click Add Row at the bottom of the screen.
Team Workload Breakdown
The Team Workload dashboard provides an overview of how an individual team is performing in Cisco Crosswork Situation Manager.
The dashboard's panels pull statistical data about the MTTA/MTTR per team, the status of the team's Situations, and the number of comments made by the team.

To edit the dashboard, click the header of any panel and edit the statistic endpoint or add a query. Alternatively, click Add Row at the bottom of the screen.
Noise Reduction
The Noise Reduction dashboard displays an overview of the noise reduction performance of Cisco Crosswork Situation Manager.
This dashboard shows statistics including the number of accumulated events reduced into alerts and Situations over a period of time, the percentage reduction of events to alerts, the percentage reduction of alerts to Situations and the overall reduction.

To edit the dashboard, click the header of any panel and edit the statistic endpoint or add a query. Alternatively, click Add Row at the bottom of the screen.
Individual Stats Overview
The Individual Stats Overview dashboard allows you to view and compare statistics for multiple Cisco Crosswork Situation Manager users.
The dashboard includes Situation metrics, MTTA and MTTR, user activity, Situation stats by user, user performance overview and user activity overview.
By default, Cisco Crosswork Situation Manager collects statistical data for this dashboard for all users with the Operator role. You can add the 'collect_insights' permission to other roles if you want to include other users in the dashboard. See Role Permissions for more information.

Individual User Deep Dive
The Individual User Deep Dive dashboard provides an in-depth summary of different performance metrics for a single user.
The dashboard includes a user Situation metric overview, a user activity overview, a user performance overview, Situation stats by users, user activity overview and user performance overview. You can view a breakdown of specific statistics such as the number of Situations the user has acknowledged, assigned, closed, reassigned and how many they have open. You can also see which ChatOps tools the user has executed, the number of comments they have made, the number of invitations they have received, the number of alerts they have marked with PRC and the individual's MTTA and MTTR.
By default, Moogsoft AIOps collects statistical data for this dashboard for all users with the Operator role. You can add the 'collect_insights' permission to other roles if you want to include other users in the dashboard. See Role Permissions for more information.

Create a Custom Dashboard
You can add and configure custom dashboards to display different Cisco Crosswork Situation Manager statistics in Grafana. For more information see the Grafana documentation. To create a dashboard, follow these steps:
· Log in to your Grafana instance.
· Click + and Dashboard.
· Configure the dashboard to meet your requirements. For more information on the available API endpoints and statistics see the Stats API.Stats API
Once created, statistics from Cisco Crosswork Situation Manager appear in the dashboard.
Statistics Collection
You can enable and disable the collection of different statistics for Insights. See Grafana Dashboards for more details.
Navigate to Settings > System > Insights to configure statistics collection. Available collections that populate the default Grafana dashboards include:
· Ops Insights
· Noise Reduction Insights
· Team Ops Insights
· Team Performance Insights
· Individual Performance Insights
You can also enable and disable Team Room overview charts.
All collections are active by default. Uncheck a collection if you do not want to use that particular dashboard. You might want to disable collections and their related processes if you are only interested in retrieving a specific set of statistics or you want to keep the load on your system to a minimum.
Learning Resources for Reports and Dashboards
Access the following helpful videos on reports and dashboards in Moogsoft University.
Customize Cisco Crosswork Situation Manager Further
Troubleshooting and Diagnostic Tools
As an Administrator, you can set up tools that enable operators to troubleshoot and diagnose Situations.
You can configure server tools to execute utilities on a remote host. These can be generic tools, or specific to Situations or alerts.
You can also set up client tools, to retrieve or send information to a client, to help diagnose problems in Situations or alerts.
Cisco Crosswork Situation Manager provides a number of default hotkeys but you can set up additional hotkey shortcuts to make navigation easier for Cisco Crosswork Situation Manager users.
You can also set up ChatOps shortcuts to enable users to run tools from the Collaborate tab in the Situation Room. This gives Cisco Crosswork Situation Manager users quick access to the available tools.
Implement Generic Server Tools
Generic server tools in Cisco Crosswork Situation Manager are tools that allow a user to execute a utility on a remote host.
These tools specify a command that is run using ToolRunner, which is configured to connect to the remote host. The command can be anything that is executable from the Linux command line. For example a ping or cat or a custom bash script. See Configure Tool Runner for more information.
In Cisco Crosswork Situation Manager, the generic server tools managed here are available from Situation Room ChatOps feature. See Take Additional Actions for details.Take Additional Actions
The steps below describe how to create a generic server tool and its command. Any arguments required are defined by the user when the tool is run.
You can make tools available to all users, specified teams, specified roles, or yourself only.
Create a new generic server tool
To create a new generic server tool:
1. Click Generic Server Tools in the Tools section of the Settings tab.
2. Click + to create a new tool.
3. Fill in the available fields to define the tool:
| Field |
Input |
Description |
| Name |
String (Required) |
Name for the generic server tool (up to 100 characters). This appears in ChatOps when accessing the tool. |
| Description |
String |
Text description of the generic server tool. |
| Command |
String |
The file path of the command. This command must be an accessible path on the host system. The host system and access information is defined in the Tool Runner servlet. |
| Run For |
Boolean +String |
Select a duration in with the spin box (minimum of 5 seconds). This sets how long to allow the tool to run for before it is stopped. If no time is set, the tool runs until it completes (or indefinitely). |
· On the Shared With tab, select whether you want to share this tool with everyone, specific teams, specific roles or only yourself. You must have the permission share_filters_public to share a tool with all users. You must have the permission share_filters_teams to share a tool with specific teams. See Manage Roles for more information.
· If you select to share the tool with specific teams or specific roles, add the teams or roles you want to share the tool with to the list below.
· Click Save Changes to add the tool to the list of generic server tools in the left hand pane.
Example
A generic server tool with the following command runs the script myTests.sh which is located on the remote host at the path /home/moog/bin, using remote host access information defined in the ToolRunner servlet:
/home/moog/bin/myTests.sh
Implement Situation Server Tools
Situation server tools in Cisco Crosswork Situation Manager are tools that enable a user to execute a utility on a remote host.
These tools specify a command that is run using ToolRunner, which is configured to connect to the remote host. The command can be anything that is executable from the Linux command line. For example a ping or cat or a custom bash script. See Configure Tool Runner for more information.
· The command can be anything you can run on the host in a Linux terminal command line, such as an inbuilt part of the operating system, such as ping, or your own script.
· The arguments are extracted from Situation attributes by prefixing the attribute name with '$', such as $description for the Situation description.
In Cisco Crosswork Situation Manager, the Situation server tools managed here are only available from ChatOps in the Situation Room. See Take Additional Actions in the Operator Guide for more information.Take Additional Actions
The steps below describe how to create a Situation server tool, its availability filter, command and arguments. You can also create Situation server tools via a command prompt.
You can make tools available to all users, specified teams, specified roles, or yourself only.
Create a new Situation server tool
To create a new Situation server tool:
· Click Situation Server Tools in the Tools section of the Settings tab.
· On the Tool tab, click the + to create a new tool.
· Fill in the available fields to define the tool:
| Field |
Input |
Description |
| Name |
String (Required) |
Name for the Situation server tool (up to 100 characters). This appears in ChatOps when accessing the tool. |
| Description |
String |
Text description of the Situation server tool. |
| Context Filter |
Filter |
Click the pencil icon to create a filter for specific criteria which Situations must match for this tool to be available. |
| Command |
String (Required) |
File path of the command. This command must be an accessible path on the host system. The host system and access information is defined in the Tool Runner servlet. |
| Arguments |
String |
The specific input for the command, which can use Situation attributes. To use Situation attributes, type '$' as a prefix and enter the attribute you want from the drop-down list. |
| Run For |
Boolean +Integer |
If you select this check box, you can define the number of seconds the tool runs for. The minimum value for this field is 5 seconds. |
To prevent substitution with potentially malicious commands, arguments are escaped using a backslash.
For example:
Command: echo
Argument: $args, where $args is echo_something; rm file.txt
This results in the following command being executed:
echo echo_something\; rm file.txt
The semi-colon is escaped to prevent the rm command from being run.
· On the Shared With tab, select whether you want to share this tool with everyone, specific teams, specific roles or only yourself. You must have the permission share_filters_public to share a tool with all users. You must have the permission share_filters_teams to share a tool with specific teams. See Manage Roles for more information.
· If you select to share the tool with specific teams or specific roles, add the teams or roles you want to share the tool with to the list below.
· Click Save Changes to add the tool to the list of Situation server tools in the left hand pane.
Example
The screenshot below shows a Situation server tool called 'LogSitnDetails' with the Command: /home/moog/bin/logger.sh.

This tool runs the script logger.sh on the remote host which logs Situation details to a file. The details logged are the Situation ID, created time, description and total number of alerts, which are defined with the Arguments: ig_id $created_at $description $total_alerts.
Each Situation attribute name is prefixed with $. The Context Filter makes this tool available only for Closed Situations.
Create a tool with a command prompt
You can create Situation server tools via a command prompt. This is useful for efficient creation of multiple tools using a scripted process, for example:
· Open a new Terminal window on the Cisco Crosswork Situation Manager system and type the following:
moog_add_sitn_server_tool
· Type any flags and arguments for the tool settings. See the examples below.
Note
Cisco Crosswork Situation Manager command line tools are located here:
$MOOGSOFT_HOME/bin/utils
To display the help information for this tool, type:
moog_add_sitn_server_tool and press Enter.
Use a double-dash prefix "--" to define all following text as arguments. This ensures arguments are not misinterpreted as flags.
For example, "-- -c" to define the argument "-c", which would otherwise be interpreted as the command flag.
If included, the Run For time must be 5 seconds or longer.
· When you have defined the tool, press Enter. If successful, "Tool was added" appears.
Once the UI is refreshed, newly created tools appear in the Situation server tools configuration window.
Examples
The following example creates a Situation server tool to return the Situation ID:
moog_add_sitn_server_tool --name "Sitn Id" --desc "Get the Situation ID" --cmd echo --args "Situation ID = \$sig_id" --run_for 42
This command creates a tool with the following settings:
· Name: Sitn ID (--name "Sitn ID").
· Description: Get the Situation ID (--desc "Get the Situation ID")
· Context Filter: none
· Command: echo (--cmd echo)
· Arguments: display 'Situation ID = ID'
· (--args "Situation ID = \$sig_id"). The backslash is required to escape the '$' because it is an environment variable.
· Run for: 42 seconds (--run_for 42)
The following example creates a Situation server tool that pings the server five times:
moog_add_sitn_server_tool -d "five pings" -m "sig_id<10" -c ping -a -- -c 5
This command creates a tool with the following settings:
1. Description: five pings (-d "five pings")
2. Context Filter: ID < 10 (-m "sig_id<10")
3. Command: ping (-c ping)
4. Arguments: ping five times (-- -c 5). The argument starts with -c which is itself a tool flag. Therefore the "--" double-dash prefix is used to interpret -c 5 as an argument, and not a flag.
5. Run for: no time set (no -r flag and argument)
6. Name: ping. The name is not defined here (no -n flag and argument) so the command is used as the name by default.
Implement Alert Server Tools
Alert server tools allow you to execute a utility on a remote host. You define the host when you run the tool. You can control which tools are available for different types of alerts.
There are two ways of running alert server tools:
1. If you run them via ChatOps shortcuts, they always run on the ToolRunner host.
2. If you run them from the Tools menu in an Alert List, they run on the host of your choice.
These tools specify a command that is run using ToolRunner, which is configured to connect to the remote host. The command can be anything that is executable from the Linux command line. For example a ping or cat or a custom bash script. See Configure Tool Runner for more information.
Alert server tools pass arguments to utilities based upon alert attributes. For example, testing the reachability (ping) of hardware using the source attribute of the alert.
You can make tools available to all users, specified teams, specified roles, or yourself only.
Create a new alert server tool
To create a new alert server tool:
1. Click Alert Server Tools in the Tools section of the Settings tab.
2. On the Tool tab, click the + icon to create a new tool.
3. Fill in the available fields to define the tool:
| Field |
Input |
Description |
| Name |
String (Required) |
Name for the alert server tool (up to 100 characters). |
| Description |
String |
Text description of the alert server tool |
| Alert Type Filter |
String |
Alert types for which the alert server tool is available. Enter .* to make it available for all alert types. |
| Filter Using Regex |
Boolean |
If you select this check box, the Alert Type Filter uses a regular expression. |
| Command |
String (Required) |
Command to carry out on alerts. The host system is the ToolRunner host if you are running the tool via a ChatOps shortcut, or you can define it when running the tool from the Tools menu on an Alert List. |
| Arguments |
String |
Specific input for the command. |
| Run For |
Boolean +Integer |
If you select this check box, you can define the number of seconds the tool runs for. The minimum value for this field is 5 seconds. |
· On the Shared With tab, select whether you want to share this tool with everyone, specific teams, specific roles or only yourself. You must have the permission share_filters_public to share a tool with all users. You must have the permission share_filters_teams to share a tool with specific teams. See Manage Roles for more information.
· If you select to share the tool with specific teams or specific roles, add the teams or roles you want to share the tool with to the list below.
· Click Save Changes to add the tool to the list of alert server tools in the left hand pane.
Example
The following screenshot shows an alert server tool that tests the reachability of the source alert and returns the results.
The Command ping is used with Arguments$source and -c5 which specify the source, from the alert attribute, and the number of times to ping (five).

The Alert Type Filter uses a regular expression '.*' to make the tool available for all alerts.
Implement Client Tools
You can create client tools in Cisco Crosswork Situation Manager to execute actions through a specified URL. The client tools can send Situation and alert data to the URL.
Client tools can return HTTP response data. The response data includes the HTTP response and HTTP message body. See HTTP Response for more information. Providing a more detailed response in the UI, that includes response status and data, can yield useful and important information. For example, tools to link to an external trouble ticket system (via its URL) can open a new ticket using data from the selected Situation.
There are two client tool types: alert client tools and Situation client tools.
You can make tools available to all users, specified teams, specified roles, or yourself only.
Create a new client tool
To set up a new alert client tool or a new Situation client tool, follow these steps.
· Click Alert Client Tools or Situation Client Tools in the Tools section of the Settings tab.
· On the Tools tab, click the + icon to create a new tool.
· Complete the fields to define the tool:
| Field |
Input |
Description |
| Name |
String (Required) |
Name for the Client Tool (up to 100 characters). |
| Description |
String |
Text description of the tool. |
| Context Filter |
Filter |
Click the pencil icon to create a filter for specific criteria which the alerts or Situations must match for this tool to be available. |
· Select whether you want to create a URL Tool or if you want to Merge Custom Info.
When creating a client tool, you can enter Situation or alert attributes, and prompt variables, in the URL, Custom Info, and URL Encoded Content fields. For example, you can enter $description for the contents of the Situation or alert description field.
· To create a tool that uses a URL, complete the following fields:
| Field |
Input |
Description |
| Show All Response Data |
Boolean |
If enabled, the tool returns a more detailed response in the UI, including the response status and data. |
| HTTP Method |
GET POST |
Select GET if the tool retrieves information or POST if the tool sends information. |
| Open Window |
Boolean |
If enabled, this opens a new browser window when using the GET HTTP Method. Disables the Show Response Data option. If you are creating a tool to perform a GET request against a Graze API endpoint, you cannot open the response in a new window. Select Show All Response Data instead. |
| URL |
String |
URL of the Client Tool. You can add prompt variables. Type '$' and select an existing variable or enter a new variable. If you enter a new prompt variable, see Add prompt variables for details. If you are creating a tool to connect to the Graze API, the URL must start with /graze. For example, use /graze/v1/getAlertDetails?alert_id=$alert_id instead of https://example.com/graze/v1/getAlertDetails?alert_id=$alert_id. |
| URL Formatted Content |
String |
Payload data to be posted when the tool is run, when using the POST HTTP Method. The payload data must be URL encoded and can include Situation and alert attributes and prompt variables. To add a prompt variable, type '$' and select an existing variable or enter your own variable. If you enter a new prompt variable, see Add prompt variables for details. |
· To create a tool that uses custom info fields, enter valid JSON for the custom info you want the tool to add. The JSON can include Situation and alert attributes and prompt variables. For example, the following JSON adds a set of custom info called "TPS data" that contains a string "From system", the Situation ID and the timestamp for when the Situation was created:
{ "TPS data": [ "From system", "$sig_id", "$created_at" ] }
To add a prompt variable, type '$' and select an existing variable or enter your own variable. If you enter a new prompt variable, see Add prompt variables for details.
· Prompts appear in the Prompts table if you have added them in the URL, URL Formatted Content, or Custom Info fields. See Add prompt variables for details.
· On the Shared With tab, select whether you want to share this tool with everyone, specific teams, specific roles or only yourself. You must have the permission share_filters_public to share a tool with all users. You must have the permission share_filters_teams to share a tool with specific teams. See Manage Roles for more information.
· If you select to share the tool with specific teams or specific roles, add the teams or roles you want to share the tool with to the list below.
· Click Save Changes to add the tool to the list of alert client tools or Situation client tools in the left hand pane.
Add prompt variables
Prompt variables open a message box when the tool is run, prompting the user to type text, a number, or select from a list.
To add a new prompt variable:
· In the URL, URL Formatted Content, or Custom Info fields, enter prompt variables in the following format:
$<prompt_name>
The prompt name cannot be any of the existing Situation or alert attribute names. The prompt name appears in the Prompts table.
· To edit the prompt, double-click on it, or select it and then click Edit Prompt. A new window displays.
· Enter a Display Name. This is what appears in the prompt message.
· Select whether the user will be prompted for text, a number or a list.
If you select Text or Number, enter the default value and minimum and maximum length of the prompt. Numbers can be integers or floating point, in which case they are truncated to two decimal places.
If you select List, enter the default value and add the available list options.
· Click Save Changes to add the new tool appears in the list in the left hand pane.
Client custom info tool example with a prompt variable
You can configure client tools to change custom info fields. For example, you can configure a tool to raise a ticket on a third party system to prompt for entries of pre-defined (custom info) values to provide more information in the ticket.
To create a client custom info tool with a prompt variable, select the Merge Custom Info option:

In this example, the custom info is:
{ "LEVEL": $prompt1 }
The screenshot below shows how the prompt variable settings can be configured:

Run client tools
The client tools can be accessed from the following areas:
· Alert Client Tools: On the Alert Tools Menu, see Alerts Overview (Right-Click menu). Or via "Situation Alerts" in a Situation Room.Alerts OverviewSituation Rooms
· Situation Client Tools: The Situation Tools Menu, from the Tools menu on the Situation Room or via ChatOps in the Collaborate tab.
If you want to run client tools using Safari, go to Safari > Preferences > Security and uncheck 'Block pop-up windows' as this is checked by default.
Run client tool example
To run a tool 'Set LEVEL data for TPS':
· Go to an alert, right-click or click Tools > Tools > Set LEVEL data for TPS.
· The following prompt appears:

· Click OK to run the tool.
Housekeeping Tasks
Situation Design Maintenance
Your monitored environment and business practices are constantly evolving. With that, your alert clustering settings need to change also. In this section, we will discuss what you can do to detect changes and update your clustering logic.
Ensure All Important Alerts Become Situations

You may have produced a perfect Situation design for a given environment. But the environment and the requirements change every day in the busy ITOps world. With the changes, your entropy threshold may become obsolete, and as a result, your Entropy filter may block out an important alert from becoming a Situation. If the operators do not want to miss these alerts with low entropy values, you can forward them to a separate ‘low entropy alerts’ Cookbook. For example, you could cluster these alerts into Situations based on the same hostname. Ask the teams to examine the content of these Situations periodically to make sure nothing important has been missed. If an operator identifies a loose alert that is of low entropy but actually should have been part of a Situation, whether on its own or part of a wider Situation, then a few things can be done:
· You could create a specific Cookbook Recipe just for that alert type. Having a single alert Situation is a valid use case.
· Look at lowering the entropy threshold for that particular event stream.
· Create a list of priority words that will bias the entropy of the corresponding alerts. Events containing a word in the priority words list will always be given an entropy value of 1. So priority words should be chosen with care - they should be very uncommon; a widely used word will bump up the entropy for all alerts containing that word.
This is also a good way to validate your Situation design after the initial configuration. During the tuning phase, check if any of the loose alerts (alerts that have not been clustered into any Situations) should actually be creating Situations on their own or be part of existing Situations created at the time.
Avoid Aged Situations Crowding the Workspace

If Situations are not actioned and are left open with no intent to ever being closed, your system might end up being overrun with aged situations still in an open state. This is not only distracting for the operators but also have memory performance implications any active situations are still being retained in memory for Merge and Resolve activities. For alerts, keeping them open means those alerts would never get the chance to renew their enrichment.
You can set up an Auto-close on unworked alerts and Situations of a certain age to avoid such problems.
Handle Overly Noisy Alerts of High Count
Very hight count alerts impact the performance when data is being moved from active to the historic database due to database split. Implement an auto close in the AlertRulesEngine, so when an overly noisy alert goes beyond a certain count limit they can be closed automatically.
See below for a sample set up in the AlertRulesEngine. In this case, alerts with a count higher than 10000 are being transitioned to the CloseAlert state. Once the alert enters the state it is processed by the closeAlert function in ARE.
The benefit of using ARE instead of the usual Auto-Close rule is because the later requires the alert to be older than a certain period (minimum 5 minutes given the task run) while the ARE closes the alert instantly once it reaches the count limit.
Note
This function will only close alerts that are not part of any active Situations.


In AlertRulesEngine.js:
.....
// function in ARE to close an alert that is not part of any active Situations
function closeAlert(alert,associated){
var alert_id=alert.value("alert_id");
if (alert.value("active_sig_list").length === 0 ) {
var closed_flag=moogdb.closeAlert(alert_id);
if (closed_flag) {
logger.debug("Alert closed by ARE. Alert_id: " + alert_id);
} else {
logger.warning("closeAlert: Alert failed to close by ARE. Alert_id: " + alert_id);
}
} else {
alert.forward(this);
}
}
Upgrade Cisco Crosswork Situation Manager
This topic describes how to upgrade Cisco Crosswork Situation Manager to v8.0 from any of the following versions:
· v7.1.x
· v7.2.x
· v7.3.x
For information on how to upgrade from other versions, see Releases.
For instructions on how to install a distributed high availability (HA) configuration, see HA Installation.
Your upgrade path depends on your preferred mode of deployment:
1. RPM: Use this method if you have root access to your Cisco Crosswork Situation Manager server(s) and you do not want to change the default installation locations.
2. If you have root access but your Cisco Crosswork Situation Manager servers do not have access to the internet, see "Prepare for an offline upgrade" in RPM - Prepare to upgrade.
Your Cisco Crosswork Situation Manager deployment is broken up into a set of roles. A role is a functional entity containing components that should always reside on the same server:
1. UI: Nginx, Apache Tomcat, UI integrations.
2. Core: Elasticsearch, Moogfarmd, RabbitMQ, Events Analyser.
3. Databases: MySQL, Cisco Crosswork Situation Manager databases.
4. Data ingestion: Server side LAMs.
This process enables you to upgrade the components in each role, whether your Cisco Crosswork Situation Manager system is distributed on several servers or installed on a single host.
Note
The implementation of a new Topology API means any old topologies are removed as part of the upgrade. It is important that any recipes using topology in any way are updated once the topologies have been recreated in v8.0.x post-upgrade, before events are sent into MoogFarmD.
Hop limit has been removed from Recipe configurations in Cisco Crosswork Situation Manager v8.0. You can reconfigure a hop limit if you are using a named or inferred Topology to filter a Recipe.
RPM upgrade to Cisco Crosswork Situation Manager v8.0.x
To perform the RPM upgrade to Cisco Crosswork Situation Manager v8.0.x, complete the steps in the following documents, in this order:
4. Upgrade database components.
5. Upgrade data ingestion components.
6. Final steps and validate the upgrade.
8. Troubleshooting.
Minimize upgrade downtime
To minimize the amount of downtime required for the upgrade process, follow this process:
· Disable historic data retention.
· Perform the upgrade according to your chosen method of deployment.
· Re-enable the Historic Data Utility.
· Let the historic data retention utility process any alerts that have accumulated. This should not take long if the process has been disabled for only a few hours.
Install Cisco Add-Ons
Cisco periodically releases add-ons to extend and enhance the core Cisco Crosswork Situation Manager functionality. For example, new Workflow Engine functions, new Workflow Engines, or Integrations tiles. All add-ons releases are cumulative and include the fixes from previous releases.
Once you have finished upgrading or installing Cisco Crosswork Situation Manager, you should install the Cisco Crosswork Situation Manager add-ons to ensure you have the latest version.
See Install Cisco Add-ons for more information on how to install the Cisco Crosswork Situation Manager add-ons.
RPM - Prepare to upgrade
Follow these steps before you perform an RPM upgrade to Cisco Crosswork Situation Manager v8.0.x from v7.0.x, v7.1.x, 7.2.x, or 7.3x.
Refer to Upgrade Cisco Crosswork Situation Manager or general information and upgrade instructions for other components and versions.
Note
Cisco has provided an optional enhanced Content Security Policy (CSP) as part of this release. If you enable the CSP you must follow some additional steps to allow access to external domains. If you want to access the UI with the Safari web browser there are additional steps to configure Cisco Crosswork Situation Manager for use with Safari. For more information see RPM - Prepare to Upgrade.
The upgrade process truncates the incremental_token_data table in the moog_reference database. If you are using entropy in your deployment, it is important to initialize a full Events Analyser job towards the end of the upgrade process. See the Finalize and validate the upgrade step for details.
Prepare for an offline upgrade
To prepare for an offline upgrade, where the Cisco Crosswork Situation Manager packages reside in a local Yum repository, complete the steps in the document Cisco Crosswork Situation Manager - Offline RPM pre-installation and then continue with the rest of the steps in this document.
Back up the existing system
To back up the existing system:
1. Back up $MOOGSOFT_HOME, particularly the following folders:
— $MOOGSOFT_HOME/config/
— $MOOGSOFT_HOME/bots/
— $MOOGSOFT_HOME/etc/
— $MOOGSOFT_HOME/contrib/
— For RPM deployments: /var/lib/moogsoft/moog-data/
— For Tarball deployments: $MOOGSOFT_HOME/moog-data/
· Take a snapshot (for VMs).
· Back up MySQL.
Note and uninstall UI integrations
Note
Only perform this step if you are upgrading from Cisco Crosswork Situation Manager v7.0.x or v7.1.x.
If you are using any of the following UI integrations and are upgrading from v7.0.x or v7.1.x, before you start the upgrade:
· Note the integrations' connection and configuration information.
· Use the UI to uninstall the integrations.
The post-upgrade steps have information on how to reconfigure the integrations. You must do this because of UI changes in Cisco Crosswork Situation Manager v8.0.x.
· AWS CloudWatch
· Cherwell
· JIRA Service Desk and JIRA Software
· JMS
· New Relic
· Remedy
· ServiceNow
· SevOne
· Slack
· SolarWinds
· VMware vCenter and vSphere
· vRealize Log Insight
· WebSphere MQ
· xMatters
Note
Only perform this step if you are upgrading from Cisco Crosswork Situation Manager v7.2.x
You must reinstall the xMatters integration after upgrading. Make a note of all configuration settings before you start the upgrade process.
To continue with the upgrade, see RPM - Upgrade UI components.
RPM - Upgrade UI components
Follow these steps to perform an RPM upgrade on the Cisco Crosswork Situation Manager UI components to v8.0.x from v7.1.x, v7.2.x, or 7.3.x:
· Nginx
· Apache Tomcat
· UI integrations
These components should always reside on the same server.
Refer to Upgrade Cisco Crosswork Situation Manager or general information and upgrade instructions for other components and versions.
Stop services and processes
Run the following command as root to stop the default tomcat service on any servers with the moogsoft-ui package installed and where the Apache Tomcat service is running. Change the service name if you are not using the default.
service apache-tomcat stop
Run the following commands as root to query/stop the default LAM/integrations services on any servers with the moogsoft-integrations/moogsoft-integrations-ui package installed and where the LAMs/integrations are running.
Check for running LAM and integration processes and stop them using the relevant service scripts:
systemctl status | grep lamd
service <lam_service_name> stop
Run the following command to stop any remaining active LAM and integration processes:
kill -9 $(ps -ef | grep java | grep _lam | awk '{print $2}') 2>/dev/null
Note
Complete the Elasticsearch steps below if you have installed Elasticsearch on the same server as your UI components. Cisco Crosswork Situation Manager recommends that you move Elasticsearch to your Core server (the server running Moogfarmd) to optimize index performance.
Delete the Elasticsearch indexes
Run this command on the moogsoft-search/Elasticsearch server to remove the old Elasticsearch indexes:
curl -XDELETE 'http://localhost:9200/alerts/' && curl -XDELETE 'http://localhost:9200/situations/'
If the command completes successfully, the following message is displayed:
{"acknowledged":true}{"acknowledged":true}
Modify the Elasticsearch repo
Note
You can skip this section if you are following the 'Offline RPM' upgrade process, as the Elasticsearch package is obtained from the local Yum repository instead.
Run the following command to modify the Elasticsearch Yum repository to point to v6 instead of v5:
sed -i 's/5.x/6.x/g' $(grep 'artifacts.elastic' /etc/yum.repos.d/* | awk -F: '{ print $1 }' | sort -u | head -1)
Upgrade Cisco Crosswork Situation Manager
To upgrade Cisco Crosswork Situation Manager, run the upgrade command below that corresponds to your chosen upgrade mechanism.
If you have already run this step on the current host as part of this upgrade (for single-host upgrade for example), you can skip this step.
· If you are using a remote or offline Yum repository, run the following command on every host where a Cisco Crosswork Situation Manager RPM package is installed:
yum -y upgrade $(rpm -qa --qf '%{NAME}\n' | grep moogsoft | sed 's/$/-8.0.0.1/')
· If you are using downloaded RPM files on a host, run the following command from the location where the files are installed:
yum -y upgrade moogsoft-*8.0.0.1*.rpm
Merge the latest configuration file changes
Note
In Cisco Crosswork Situation Manager v7.3.x and 8.0.x, the Cookbooks, Tempus, and merge groups (default and custom) are imported into the database by default, enabling you to to access and configure them via the UI and API. The migration occurs once when Moogfarmd is restarted.
A file_only_config=true flag has been added to the 7.3.x and 8.0.x versions of moog_farmd.conf that you can use to prevent the migration from taking place. If this flag is missing or is set to false, Moogfarmd attempts to perform the import when it starts.
Note
If the file_only_config flag is set to true, UI-based Cookbooks will not run.
The following moolets are no longer supported in v8.0.x and should be removed from the moog_farmd.conf file as part of the upgrade:
Sigaliser Classic
Nexus
Speedbird
AlertRootCause
Version specific config file differences:
v7.1.x-v7.2.x
$MOOGSOFT_HOME/config/system.conf
message_persistence is now enabled by default
$MOOGSOFT_HOME/config/security.conf
The 'Google' realm has been deprecated and removed
$MOOGSOFT_HOME/config/servlets.conf
The toolrunner servlet now optionally supports ssh key authentication as well as username/password-based authentication
$MOOGSOFT_HOME/config/moog_farmd.conf
alert_workflows.conf moolet has been added
enrichment_workflows.conf moolet has been added
event_workflows.conf moolet has been added
situations_workflows.conf moolet has been added
v7.2.x-v7.3.x
$MOOGSOFT_HOME/config/system.conf
New integration database property has been added: intdb_database_name
$MOOGSOFT_HOME/config/moog_farmd.conf
The entire sig_resolution block containing merge groups, retention_period etc has been removed but is still supported as long as file_only_config is true
alert_root_cause.conf moolet has been removed and is no longer supported
nexus.conf moolet has been removed and is no longer supported
speedbird.conf moolet has been removed and is no longer supported
sigaliser.conf moolet has been removed and is no longer supported
cookbook.conf has been removed but is still supported as long as file_only_config is set to true
tempus.conf has been removed but is still supported as long as file_only_config is set to true
v7.3.x-v8.0.x
$MOOGSOFT_HOME/config/system.conf
ElasticSearch now supports basic authentication
$MOOGSOFT_HOME/config/security.conf
There is a new global_settings block which allows control of the CSRF protection feature
$MOOGSOFT_HOME/config/servlets.conf
It is now possible to configure the toolrunner to run on a port other than 22 using toolrunnerport property
$MOOGSOFT_HOME/config/moog_farmd.conf
alert_inform_workflows.conf moolet has been added
situation_inform_workflows.conf moolet has been added
The 'modules' block has been removed as it only contained Topology-related functionality and this has been deprecated in the v8.0.x release - the Topology feature works differently.
Manually merge and compare .rpmsave versions of files with the new versions of those files. Add any new properties to the older versions of the files. You can skip this step if you have already completed this step as part of this upgrade process on the current host.
The config and bot files from the previous version should not be copied on top of (replace) the new version of those files in 7.3.x, as they are not always forwards-compatible, and some config/bot lines need to be added for the new version to work.
To find files that have been changed, moved or deleted, run these commands:
find $MOOGSOFT_HOME -name '*.rpmsave'
find /etc/init.d/ -name '*.rpmsave'
For example, the following command displays the differences in the new version of the system.conf file:
diff -u $MOOGSOFT_HOME/config/system.conf $MOOGSOFT_HOME/config/system.conf.rpmsave
Follow this process to merge the file differences:
· Rename the new versions of the files, without the .rpmsave extension, to end with .bak.
· Merge the .rpmsave file with the new .bak file by adding new properties/configuration where needed (from the new version of the file into the old version), so the structure matches the new version of the file.
· Rename the .rpmsave file to remove the .rpmsave extension.
Update JVM to use Java 11
Install the latest Java packages using the command below. It's possible that the yum upgrade of the moogsoft packages will have done this already and even possibly installed a newer version of Java than the one below. In this case, yum will report the packages are already installed and are the latest version. Continue with the subsequent steps even if this is the case.
yum -y install java-11-openjdk-11.0.7.10 \
java-11-openjdk-devel-11.0.7.10 \
java-11-openjdk-headless-11.0.7.10
On each server with a Cisco Crosswork Situation Manager RPM package installed, run the following command to replace the /usr/java/latest symlink so it points at the JDK11 JAVA_HOME directory:
source $MOOGSOFT_HOME/bin/utils/moog_init_functions.sh
If there are non-Cisco Crosswork Situation Manager packages on this server that do not support JDK11, you must update those applications to use a different JAVA_HOME symlink (not /usr/java/latest).
You can skip this step if you have already completed this step as part of this upgrade process on the current host.
To confirm this has worked, run the following command:
$JAVA_HOME/bin/java -version
It should return (as a minimum version):
openjdk version "11.0.7" 2020-04-14 LTS
You can also use the 'alternatives' command to point the system 'java' shortcut to the new version:
alternatives --config java
Remove references to the old MySQL connector
Note
Only perform this step if you are upgrading from Cisco Crosswork Situation Manager v7.0.x or v7.1.x.
The MySQL connector is upgraded in this release.
The original connector may be used by the External Database module in the current deployment, configured in $MOOGSOFT_HOME/config/moog_external_db_details.conf.
If this file is configured in the current deployment, update it to reference the new mariadb connector here: $MOOGSOFT_HOME/lib/cots/mariadb-java-client-2.4.0.jar.
You can skip this step if you have already completed this step as part of this upgrade process on the current host.
Change ownership of Apache Tomcat folders
Apache Tomcat is now run as the 'moogsoft' system user, which requires a change in ownership for the folders previously owned by Apache Tomcat.
Run the following commands to change ownership:
chown -R moogsoft:moogsoft /var/lib/moogsoft
chown -R moogsoft:moogsoft /var/run/apache-tomcat
chown -R moogsoft:moogsoft $MOOGSOFT_HOME/etc/saml
If SAML SSO is in use in the deployment, the IDP metadata file specified in $MOOGSOFT_HOME/config/security.conf needs to be readable by the 'moogsoft' system user. Use an appropriate chmod/chown command to ensure the readability and ownership is correct.
Upgrade Apache Tomcat and Nginx
Cisco Crosswork Situation Manager v8.0.x ships with Apache Tomcat version 9.0.22 and has changes to the nginx configuration files
Note
Cisco Crosswork Situation Manager v7.3 no longer runs Apache Tomcat as the 'tomcat' UNIX user. When you follow the instructions below, the new version of Apache Tomcat is deployed to run as the 'moogsoft' user instead. As more threads and processes are now used by the moogsoft UNIX system user, you may need to increase ulimits for this user.
Run the following commands in this section on the server with the moogsoft-ui RPM package installed on it.
· Stop Apache Tomcat on any servers where it is running:
service apache-tomcat stop;
ps -ef | grep java | grep tomcat | awk '{print $2}' | xargs kill -9 2>/dev/null
· Remove the existing Apache Tomcat:
rm -rf /etc/init.d/apache-tomcat;
rm -rf $APPSERVER_HOME
rm -rf /usr/share/apache-tomcat
· Back up the Nginx configuration files and any certificates. Copy the files in the following location to another location before continuing: /etc/nginx/. This folder is based on the default Nginx installation location.
· Deploy the new version of Apache Tomcat and Nginx using the command below. The script will ask for a hostname. This hostname or IP must be the same as what is used to access the instance via a browser:
$MOOGSOFT_HOME/bin/utils/moog_init_ui.sh -tfn
· If you made any changes to the original Apache Tomcat service script, apply the same changes to the new version.
· Update /etc/nginx/conf.d/moog-ssl.conf with the locations of any certificates used and then restart Nginx:
service nginx restart
Enable the enhanced Content Security Policy (optional)
Cisco has provided an optional enhanced Content Security Policy (CSP) as part of this release. CSP is a security standard introduced to prevent Cross Site Scripting (XSS) and other data injection attacks. For more information, see the Mozilla document on Content Security Policy.
The CSP is controlled by Nginx and is disabled by default. To enable it:
1. Edit the following file:
/etc/nginx/conf.d/moog-ui-headers.conf
1. Uncomment the line that starts with add_header Content-Security-Policy and save the file.
· Restart Nginx:
service nginx reload
Note
If you enable the enhanced CSP you must follow the steps below to allow access to external domains. If you want to access the UI with the Safari web browser, you must follow the steps below to configure Cisco Crosswork Situation Manager for use with Safari.
Allow access to external domains
If you enable the enhanced CSP, the following features require additional configuration to allow access to external domains:
· Situation Room plugins to external domains
· Situation client tools to external URLs
To allow access to required external domains:
· Edit the following file:
/etc/nginx/conf.d/moog-ui-headers.conf
1. Add a frame-src directive to the Content-Security-Policy header for the required domain. For example, run the following command to allow Google domains:
sed -i "s/add_header Content-Security-Policy\(.*\)\" always/add_header Content-Security-Policy\1; frame-src 'self' *.google.com\" always/" /etc/nginx/conf.d/moog-ui-headers.conf
· Restart Nginx:
service nginx reload
Note
Cisco Crosswork Situation Manager allows access to Pendo and WalkMe domains by default.
Configure Cisco Crosswork Situation Manager for use with Safari
Due to a known issue in the Safari web browser, you must take additional steps if you've enabled the enhanced CSP and you want to access the UI with Safari:
· Edit the following file:
/etc/nginx/conf.d/moog-ui-headers.conf
· Add the following websocket URLs to the Content-Security-Policy section of the file. Substitute your hostname for <webhost>:
wss://<webhost>/moogpoller/ws
wss://<webhost>/integrations/ws/v1
You can update the configuration using a command similar to the following. Substitute your hostname for <webhost>:
sed -i.bak "s;connect-src 'self' app;connect-src 'self' wss://<webhost>/moogpoller/ws wss://<webhost>/integrations/ws/v1 app;g" /etc/nginx/conf.d/moog-ui-headers.conf
· Restart Nginx:
service nginx reload
To continue with the upgrade, see RPM - Upgrade Core components.
RPM - Upgrade Core components
Follow these steps to perform an RPM upgrade on the Cisco Crosswork Situation Manager Core components to v8.0.x from v7.1.x, v7.2.x, or 7.3.x:
· Elasticsearch
· Moogfarmd
· RabbitMQ
· Events Analyser
These components should always reside on the same server.
Refer to Upgrade Cisco Crosswork Situation Manager or general information and upgrade instructions for other components and versions.
Stop services and processes
Run the following command as root to stop the default Moogfarmd service on any servers with the moogsoft-server package installed and where the Moogfarmd service is running. Change the service name if you are not using the default.
service moogfarmd stop
Ensure no more Moogfarmd processes are running with the following command. This will force-kill any remaining java processes which have failed to stop cleanly.
kill -9 $(ps -ef | grep java | grep farm | awk '{print $2}') 2>/dev/null
Run the following commands as root to stop the Events Analyser and Graph Analyser processes on any servers with the moogsoft-server package installed and where the Events Analyser or Graph Analyser is configured to run.
· Comment out the relevant lines in crontab:
(crontab -l | sed -e 's/^\(.*events_analyser.*\)$/#\1/') | crontab -
(crontab -l | sed -e 's/^\(.*graph_analyser.*\)$/#\1/') | crontab -
· Stop any active Events Analyser processes:
ps -ef | grep java | egrep 'events_analyser|graph_analyser' | awk '{print $2}' | xargs kill 2>/dev/null
Note
Complete the Elasticsearch steps below if you have installed Elasticsearch on the same server as your Core components. Cisco recommends this in order to optimize index performance.
Delete the Elasticsearch indexes
Run this command on the moogsoft-search/Elasticsearch server to remove the old Elasticsearch indexes:
curl -XDELETE 'http://localhost:9200/alerts/' && curl -XDELETE 'http://localhost:9200/situations/'
If the command completes successfully, the following message is displayed:
{"acknowledged":true}{"acknowledged":true}
Modify the Elasticsearch repo
Note
You can skip this section if you are following the 'Offline RPM' upgrade process, as the Elasticsearch package is obtained from the local Yum repository instead.
Run the following command to modify the Elasticsearch Yum repository to point to v6 instead of v5:
sed -i 's/5.x/6.x/g' $(grep 'artifacts.elastic' /etc/yum.repos.d/* | awk -F: '{ print $1 }' | sort -u | head -1)
Upgrade Cisco Crosswork Situation Manager
To upgrade Cisco Crosswork Situation Manager, run the upgrade command below that corresponds to your chosen upgrade mechanism.
If you have already run this step on the current host as part of this upgrade (for single-host upgrade for example), you can skip this step.
· If you are using a remote or offline Yum repository, run the following command on every host where a Cisco Crosswork Situation Manager RPM package is installed:
yum -y upgrade $(rpm -qa --qf '%{NAME}\n' | grep moogsoft | sed 's/$/-8.0.0.1/')
· If you are using downloaded RPM files on a host, run the following command from the location where the files are installed:
yum -y upgrade moogsoft-*8.0.0.1*.rpm
Merge the latest configuration file changes
Note
In Cisco Crosswork Situation Manager v7.3.x and 8.0.x, the Cookbooks, Tempus, and merge groups (default and custom) are imported into the database by default, enabling you to to access and configure them via the UI and API. The migration occurs once when Moogfarmd is restarted.
A file_only_config=true flag has been added to the 7.3.x and 8.0.x versions of moog_farmd.conf that you can use to prevent the migration from taking place. If this flag is missing or is set to false, Moogfarmd attempts to perform the import when it starts.
Note
If the file_only_config flag is set to true, UI-based Cookbooks will not run.
The following moolets are no longer supported in v8.0.x and should be removed from the moog_farmd.conf file as part of the upgrade:
Sigaliser Classic
Nexus
Speedbird
AlertRootCause
Version specific config file differences:
v7.1.x-v7.2.x
$MOOGSOFT_HOME/config/system.conf
message_persistence is now enabled by default
$MOOGSOFT_HOME/config/security.conf
The 'Google' realm has been deprecated and removed
$MOOGSOFT_HOME/config/servlets.conf
The toolrunner servlet now optionally supports ssh key authentication as well as username/password-based authentication
$MOOGSOFT_HOME/config/moog_farmd.conf
alert_workflows.conf moolet has been added
enrichment_workflows.conf moolet has been added
event_workflows.conf moolet has been added
situations_workflows.conf moolet has been added
v7.2.x-v7.3.x
$MOOGSOFT_HOME/config/system.conf
New integration database property has been added: intdb_database_name
$MOOGSOFT_HOME/config/moog_farmd.conf
The entire sig_resolution block containing merge groups, retention_period etc has been removed but is still supported as long as file_only_config is true
alert_root_cause.conf moolet has been removed and is no longer supported
nexus.conf moolet has been removed and is no longer supported
speedbird.conf moolet has been removed and is no longer supported
sigaliser.conf moolet has been removed and is no longer supported
cookbook.conf has been removed but is still supported as long as file_only_config is set to true
tempus.conf has been removed but is still supported as long as file_only_config is set to true
v7.3.x-v8.0.x
$MOOGSOFT_HOME/config/system.conf
ElasticSearch now supports basic authentication
$MOOGSOFT_HOME/config/security.conf
There is a new global_settings block which allows control of the CSRF protection feature
$MOOGSOFT_HOME/config/servlets.conf
It is now possible to configure the toolrunner to run on a port other than 22 using toolrunnerport property
$MOOGSOFT_HOME/config/moog_farmd.conf
alert_inform_workflows.conf moolet has been added
situation_inform_workflows.conf moolet has been added
The 'modules' block has been removed as it only contained Topology-related functionality and this has been deprecated in the v8.0.x release - the Topology feature works differently.
Manually merge and compare .rpmsave versions of files with the new versions of those files. Add any new properties to the older versions of the files. You can skip this step if you have already completed this step as part of this upgrade process on the current host.
The config and bot files from the previous version should not be copied on top of (replace) the new version of those files in 7.3.x, as they are not always forwards-compatible, and some config/bot lines need to be added for the new version to work.
To find files that have been changed, moved or deleted, run these commands:
find $MOOGSOFT_HOME -name '*.rpmsave'
find /etc/init.d/ -name '*.rpmsave'
For example, the following command displays the differences in the new version of the system.conf file:
diff -u $MOOGSOFT_HOME/config/system.conf $MOOGSOFT_HOME/config/system.conf.rpmsave
Follow this process to merge the file differences:
· Rename the new versions of the files, without the .rpmsave extension, to end with .bak.
· Merge the .rpmsave file with the new .bak file by adding new properties/configuration where needed (from the new version of the file into the old version), so the structure matches the new version of the file.
· Rename the .rpmsave file to remove the .rpmsave extension.
Note
In Cisco Crosswork Situation Manager v8.0x, hop limit has been removed from existing Recipe configurations. You can reconfigure a hop limit if you are using a named or inferred Topology to filter a Recipe.
Update JVM to use Java 11
Install the latest Java packages using the command below. It's possible that the yum upgrade of the moogsoft packages will have done this already and even possibly installed a newer version of Java than the one below. In this case, yum will report the packages are already installed and are the latest version. Continue with the subsequent steps even if this is the case.
yum -y install java-11-openjdk-11.0.7.10 \
java-11-openjdk-devel-11.0.7.10 \
java-11-openjdk-headless-11.0.7.10
On each server with a Cisco Crosswork Situation Manager RPM package installed, run the following command to replace the /usr/java/latest symlink so it points at the JDK11 JAVA_HOME directory:
source $MOOGSOFT_HOME/bin/utils/moog_init_functions.sh
If there are non-Cisco Crosswork Situation Manager packages on this server that do not support JDK11, you must update those applications to use a different JAVA_HOME symlink (not /usr/java/latest).
You can skip this step if you have already completed this step as part of this upgrade process on the current host.
To confirm this has worked, run the following command:
$JAVA_HOME/bin/java -version
It should return (as a minimum version):
openjdk version "11.0.7" 2020-04-14 LTS
You can also use the 'alternatives' command to point the system 'java' shortcut to the new version:
alternatives --config java
Remove references to the old MySQL connector
Note
Only perform this step if you are upgrading from Cisco Crosswork Situation Manager v7.0.x or v7.1.x.
The MySQL connector is upgraded in this release.
The original connector may be used by the External Database module in the current deployment, configured in $MOOGSOFT_HOME/config/moog_external_db_details.conf.
If this file is configured in the current deployment, update it to reference the new mariadb connector here: $MOOGSOFT_HOME/lib/cots/mariadb-java-client-2.4.0.jar.
You can skip this step if you have already completed this step as part of this upgrade process on the current host.
Update the RabbitMQ configuration
Note
Only perform this step if you are upgrading from Cisco Crosswork Situation Manager v7.0.x.
Cisco recommends that you update the RabbitMQ configuration to support autoheal and other processes that improve stability in HA environments.
Run the command(s) below which are appropriate for the deployment type. Replace <VHOST> with your desired RabbitMQ VHOST/Zone.
· RPM:
cp -f $MOOGSOFT_HOME/etc/cots/rabbitmq/rabbitmq.config /etc/rabbitmq/
bash $MOOGSOFT_HOME/bin/utils/moog_init_mooms.sh -z <VHOST> -p
1. Tarball:
cp -f $MOOGSOFT_HOME/etc/cots/rabbitmq/rabbitmq.config $MOOGSOFT_HOME/cots/rabbitmq-server/etc/rabbitmq/
bash $MOOGSOFT_HOME/bin/utils/moog_init_mooms.sh -z <VHOST> -p
Next steps
To continue with the upgrade, see RPM - Upgrade database components.
RPM - Upgrade database components
Follow these steps to perform an RPM upgrade on the Cisco Crosswork Situation Manager database components to v8.0.x from v7.1.x, v7.2.x, or 7.3.x:
· Cisco Crosswork Situation Manager databases
· MySQL/Percona
Refer to Upgrade Cisco Crosswork Situation Manager for general information and upgrade instructions for other components and versions.
Upgrade Cisco Crosswork Situation Manager
To upgrade Cisco Crosswork Situation Manager, run the upgrade command below that corresponds to your chosen upgrade mechanism.
If you have already run this step on the current host as part of this upgrade (for single-host upgrade for example), you can skip this step.
· If you are using a remote or offline Yum repository, run the following command on every host where a Cisco Crosswork Situation Manager RPM package is installed:
yum -y upgrade $(rpm -qa --qf '%{NAME}\n' | grep moogsoft | sed 's/$/-8.0.0.1/')
1. If you are using downloaded RPM files on a host, run the following command from the location where the files are installed:
yum -y upgrade moogsoft-*8.0.0.1*.rpm
Update my.cnf for MySQL
You must update the /etc/my.cnf file to reflect the new variables for MySQL. Run the following commands to update this file. The following command assumes the Database my.cnf file is under the /etc/ directory.
sed -i '/\[mysqld\]/a log_bin_trust_function_creators = 1\nthread_stack = 524288\n' /etc/my.cnf
Restart MySQL:
service mysqld restart
Upgrade Percona to v5.7.28
Note
Use the following instructions if the database deployed is Percona instead of MySQL Community. Instructions for MySQL Community follow this section.
You should upgrade Percona to v5.7.28 to address a number of bugs and security vulnerabilities.
You should back up your database before upgrading.
· Check if Percona is configured to run with --gtid-mode=ON using the following command in the MySQL CLI:
show variables like 'gtid_mode';
Remember what the value is because you will need it later.
· Download and install the Percona packages using the appropriate step below:
— Stop Percona:
service mysqld stop
— If the server running Percona has internet access, download and install the packages from the Percona Yum repository:
yum -y upgrade Percona-XtraDB-Cluster-shared-compat-57-5.7.28 \
Percona-XtraDB-Cluster-client-57-5.7.28 \
Percona-XtraDB-Cluster-server-57-5.7.28 \
Percona-XtraDB-Cluster-shared-57-5.7.28
— If the server running Percona does not have internet access, download the packages on a server that does have internet access and copy the files to the server running Percona:
curl -L -O http://repo.percona.com/percona/yum/release/7/RPMS/x86_64/Percona-XtraDB-Cluster-shared-57-5.7.28-31.41.1.el7.x86_64.rpm
curl -L -O http://repo.percona.com/percona/yum/release/7/RPMS/x86_64/Percona-XtraDB-Cluster-client-57-5.7.28-31.41.1.el7.x86_64.rpm
curl -L -O http://repo.percona.com/percona/yum/release/7/RPMS/x86_64/Percona-XtraDB-Cluster-server-57-5.7.28-31.41.1.el7.x86_64.rpm
curl -L -O http://repo.percona.com/percona/yum/release/7/RPMS/x86_64/Percona-XtraDB-Cluster-shared-compat-57-5.7.28-31.41.1.el7.x86_64.rpm
curl -L -O http://repo.percona.com/percona/yum/release/7/RPMS/x86_64/percona-xtrabackup-24-2.4.19-1.el7.x86_64.rpm
Then manually install the packages:
yum -y upgrade Percona-*5.7.28*.rpm
· Restart Percona:
service mysqld restart
· If the gtid-mode was OFF (based on the command run earlier in the upgrade), run the MySQL upgrade utility. Provide the MySQL root password when prompted, or press Enter if you have not set a password.
mysql_upgrade -u root -p
if the gtid-mode was ON, you do not need to do this step.
See the MySQL documentation on restrictions on replication with GTIDs for more information.
· Restart Percona to save any changes to system tables:
service mysqld restart
See the Upgrading MySQL documentation for more information.
Upgrade MySQL Community to v5.7.28
Note
Use the following instructions if the database deployed is MySQL Community instead of Percona.
You should upgrade MySQL to 5.7.28 to address a number of bugs and security vulnerabilities.
Before you start the upgrade process, you should back up your database.
Check if MySQL is configured to run with --gtid-mode=ON using the following command in the MySQL CLI:
show variables like 'gtid_mode';
Remember what the value is because you will need it later.
· Stop mysql:
service mysqld stop
· Download and install the MySQL packages using the appropriate step below:
— If the server running MySQL has internet access, download and install the packages from the MySQL Yum repository:
yum -y upgrade mysql-community-libs-5.7.28 \
mysql-community-libs-compat-5.7.28 \
mysql-community-server-5.7.28 \
mysql-community-common-5.7.28 \
mysql-community-client-5.7.28
— If the server running MySQL does not have internet access, download the packages on a server that does have internet access and copy the files to the server running mySQL:
curl -L -O https://repo.mysql.com/yum/mysql-5.7-community/el/7/x86_64/mysql-community-libs-5.7.28-1.el7.x86_64.rpm;
curl -L -O https://repo.mysql.com/yum/mysql-5.7-community/el/7/x86_64/mysql-community-libs-compat-5.7.28-1.el7.x86_64.rpm;
curl -L -O https://repo.mysql.com/yum/mysql-5.7-community/el/7/x86_64/mysql-community-server-5.7.28-1.el7.x86_64.rpm;
curl -L -O https://repo.mysql.com/yum/mysql-5.7-community/el/7/x86_64/mysql-community-common-5.7.28-1.el7.x86_64.rpm;
curl -L -O https://repo.mysql.com/yum/mysql-5.7-community/el/7/x86_64/mysql-community-client-5.7.28-1.el7.x86_64.rpm;
Then manually install the packages:
yum -y upgrade mysql-*5.7.28*.rpm
· Restart mysql:
service mysqld restart
· If the gtid-mode was OFF (based on the command run earlier in the upgrade), run the MySQL upgrade utility. Provide mysql root password when prompted or just press Enter if no password set.
mysql_upgrade -u root -p
if the gtid-mode was ON, you do not need to do this step.
See the MySQL documentation on restrictions on replication with GTIDs for more information.
· Restart MySQL to save any changes to system tables:
service mysqld restart
See the Upgrading MySQL documentation for more information.
Merge the latest configuration file changes
Note
In Cisco Crosswork Situation Manager v7.3.x and 8.0.x, the Cookbooks, Tempus, and merge groups (default and custom) are imported into the database by default, enabling you to to access and configure them via the UI and API. The migration occurs once when Moogfarmd is restarted.
A file_only_config=true flag has been added to the 7.3.x and 8.0.x versions of moog_farmd.conf that you can use to prevent the migration from taking place. If this flag is missing or is set to false, Moogfarmd attempts to perform the import when it starts.
Note
If the file_only_config flag is set to true, UI-based Cookbooks will not run.
The following moolets are no longer supported in v8.0.x and should be removed from the moog_farmd.conf file as part of the upgrade:
Sigaliser Classic
Nexus
Speedbird
AlertRootCause
Version specific config file differences:
v7.1.x-v7.2.x
$MOOGSOFT_HOME/config/system.conf
message_persistence is now enabled by default
$MOOGSOFT_HOME/config/security.conf
The 'Google' realm has been deprecated and removed
$MOOGSOFT_HOME/config/servlets.conf
The toolrunner servlet now optionally supports ssh key authentication as well as username/password-based authentication
$MOOGSOFT_HOME/config/moog_farmd.conf
alert_workflows.conf moolet has been added
enrichment_workflows.conf moolet has been added
event_workflows.conf moolet has been added
situations_workflows.conf moolet has been added
v7.2.x-v7.3.x
$MOOGSOFT_HOME/config/system.conf
New integration database property has been added: intdb_database_name
$MOOGSOFT_HOME/config/moog_farmd.conf
The entire sig_resolution block containing merge groups, retention_period etc has been removed but is still supported as long as file_only_config is true
alert_root_cause.conf moolet has been removed and is no longer supported
nexus.conf moolet has been removed and is no longer supported
speedbird.conf moolet has been removed and is no longer supported
sigaliser.conf moolet has been removed and is no longer supported
cookbook.conf has been removed but is still supported as long as file_only_config is set to true
tempus.conf has been removed but is still supported as long as file_only_config is set to true
v7.3.x-v8.0.x
$MOOGSOFT_HOME/config/system.conf
ElasticSearch now supports basic authentication
$MOOGSOFT_HOME/config/security.conf
There is a new global_settings block which allows control of the CSRF protection feature
$MOOGSOFT_HOME/config/servlets.conf
It is now possible to configure the toolrunner to run on a port other than 22 using toolrunnerport property
$MOOGSOFT_HOME/config/moog_farmd.conf
alert_inform_workflows.conf moolet has been added
situation_inform_workflows.conf moolet has been added
The 'modules' block has been removed as it only contained Topology-related functionality and this has been deprecated in the v8.0.x release - the Topology feature works differently.
Manually merge and compare .rpmsave versions of files with the new versions of those files. Add any new properties to the older versions of the files. You can skip this step if you have already completed this step as part of this upgrade process on the current host.
The config and bot files from the previous version should not be copied on top of (replace) the new version of those files in 7.3.x, as they are not always forwards-compatible, and some config/bot lines need to be added for the new version to work.
To find files that have been changed, moved or deleted, run these commands:
find $MOOGSOFT_HOME -name '*.rpmsave'
find /etc/init.d/ -name '*.rpmsave'
For example, the following command displays the differences in the new version of the system.conf file:
diff -u $MOOGSOFT_HOME/config/system.conf $MOOGSOFT_HOME/config/system.conf.rpmsave
Follow this process to merge the file differences:
· Rename the new versions of the files, without the .rpmsave extension, to end with .bak.
· Merge the .rpmsave file with the new .bak file by adding new properties/configuration where needed (from the new version of the file into the old version), so the structure matches the new version of the file.
· Rename the .rpmsave file to remove the .rpmsave extension.
Update JVM to use Java 11
Install the latest Java packages using the command below. It's possible that the yum upgrade of the moogsoft packages will have done this already and even possibly installed a newer version of Java than the one below. In this case, yum will report the packages are already installed and are the latest version. Continue with the subsequent steps even if this is the case.
yum -y install java-11-openjdk-11.0.7.10 \
java-11-openjdk-devel-11.0.7.10 \
java-11-openjdk-headless-11.0.7.10
On each server with a Cisco Crosswork Situation Manager RPM package installed, run the following command to replace the /usr/java/latest symlink so it points at the JDK11 JAVA_HOME directory:
source $MOOGSOFT_HOME/bin/utils/moog_init_functions.sh
If there are non-Cisco Crosswork Situation Manager packages on this server that do not support JDK11, you must update those applications to use a different JAVA_HOME symlink (not /usr/java/latest).
You can skip this step if you have already completed this step as part of this upgrade process on the current host.
To confirm this has worked, run the following command:
$JAVA_HOME/bin/java -version
It should return (as a minimum version):
openjdk version "11.0.7" 2020-04-14 LTS
You can also use the 'alternatives' command to point the system 'java' shortcut to the new version:
alternatives --config java
Remove references to the old MySQL connector
Note
Only perform this step if you are upgrading from Cisco Crosswork Situation Manager v7.0.x or v7.1.x.
The MySQL connector is upgraded in this release.
The original connector may be used by the External Database module in the current deployment, configured in $MOOGSOFT_HOME/config/moog_external_db_details.conf.
If this file is configured in the current deployment, update it to reference the new mariadb connector here: $MOOGSOFT_HOME/lib/cots/mariadb-java-client-2.4.0.jar.
You can skip this step if you have already completed this step as part of this upgrade process on the current host.
Upgrade the Cisco Crosswork Situation Manager database schema
Before upgrading the schema, check if the MySQL log_bin_trust_function_creators variable is enabled:
mysql -e "show variables like '%log_bin_trust_function_creators%';"
The value must be ON or 1. If the value is OFF or 0, you must enable this variable and restart the database:
· Open the /etc/my.cnf file on the host running Percona MySQL.
· If the variable is not in this file, run the following to add the variable to the file:
sed -i 's/\(innodb_autoinc_lock_mode.*\)/\1\nlog_bin_trust_function_creators = 1\n/' /etc/my.cnf
If the variable is already in the /etc/my.cnf file, set the variable to 1.
· Once you have enabled the variable, restart the database:
service mysqld restart
To upgrade the Cisco Crosswork Situation Manager database, provide the Auto Upgrader utility with the credentials of a database user with super privileges. For single-host installations where MySQL was installed as part of the Cisco Crosswork Situation Manager deployment, you can use the default 'root' user.
· Run the following command, replacing <MySQL-SuperUsername> with the username of your super user:
Note
Run this command on the server where the database is installed (on an RPM deployment, this is where the moogsoft-db package is deployed).
bash $MOOGSOFT_HOME/bin/utils/moog_db_auto_upgrader -t 8.0.0 -u <MySQL-SuperUsername>
· Enter the password for the user.
Note
You can provide the password to the utility with the -p flag but Cisco does not recommend this in non-test deployments for security reasons.
Import the latest CCSM Licence
Import the latest version of the CCSM Licence:
$MOOGSOFT_HOME/bin/utils/moog_mysql_client < <(cat $MOOGSOFT_HOME/etc/moog/moog_sigdb/default_data/default_data_cisco.sql | grep -v features)
Drop deprecated historic database tables
Note
Only perform this step if you are upgrading from Cisco Crosswork Situation Manager v7.0.x.
Run the following commands to drop two tables from the historic database that are no longer used. If you do not drop the tables at this stage, the Database Validator utility that you run during the validation step reports their presence as a delta.
Note
Run these commands on the server where the database or, on RPM deployments, the moogsoft-db package is installed.
These commands may fail if DBSplit has never been enabled. You can ignore these errors.
bash $MOOGSOFT_HOME/bin/utils/moog_mysql_client -i -e "drop table room_post_sigs" 2>/dev/null;
bash $MOOGSOFT_HOME/bin/utils/moog_mysql_client -i -e "drop table room_posts" 2>/dev/null;
To continue with the upgrade, see RPM - Upgrade data ingestion components.
RPM - Upgrade data ingestion components
Follow these steps to perform an RPM upgrade on the data ingestion LAMs to v8.0.x from v7.1.x, 7.2.x or 7.3.x.
To upgrade UI integrations, see RPM - Upgrade UI Components.
Refer to Upgrade Cisco Crosswork Situation Manager or general information and upgrade instructions for other components and versions.
Stop services and processes
Run the following commands as root to query/stop the default LAM/integrations services on any servers with the moogsoft-integrations/moogsoft-integrations-ui package installed and where the LAMs/integrations are running.
Check for running LAM and integration processes and stop them using the relevant service scripts:
systemctl status | grep lamd
service <lam_service_name> stop
Run the following command to stop any remaining active LAM and integration processes:
kill -9 $(ps -ef | grep java | grep _lam | awk '{print $2}') 2>/dev/null
Upgrade Cisco Crosswork Situation Manager
To upgrade Cisco Crosswork Situation Manager, run the upgrade command below that corresponds to your chosen upgrade mechanism.
If you have already run this step on the current host as part of this upgrade (for single-host upgrade for example), you can skip this step.
· If you are using a remote or offline Yum repository, run the following command on every host where a Cisco Crosswork Situation Manager RPM package is installed:
yum -y upgrade $(rpm -qa --qf '%{NAME}\n' | grep moogsoft | sed 's/$/-8.0.0.1/')
· If you are using downloaded RPM files on a host, run the following command from the location where the files are installed:
yum -y upgrade moogsoft-*8.0.0.1*.rpm
Merge the latest configuration file changes
Note
In Cisco Crosswork Situation Manager v7.3.x and 8.0.x, the Cookbooks, Tempus, and merge groups (default and custom) are imported into the database by default, enabling you to to access and configure them via the UI and API. The migration occurs once when Moogfarmd is restarted.
A file_only_config=true flag has been added to the 7.3.x and 8.0.x versions of moog_farmd.conf that you can use to prevent the migration from taking place. If this flag is missing or is set to false, Moogfarmd attempts to perform the import when it starts.
Note
If the file_only_config flag is set to true, UI-based Cookbooks will not run.
The following moolets are no longer supported in v8.0.x and should be removed from the moog_farmd.conf file as part of the upgrade:
Sigaliser Classic
Nexus
Speedbird
AlertRootCause
Version specific config file differences:
v7.1.x-v7.2.x
$MOOGSOFT_HOME/config/system.conf
message_persistence is now enabled by default
$MOOGSOFT_HOME/config/security.conf
The 'Google' realm has been deprecated and removed
$MOOGSOFT_HOME/config/servlets.conf
The toolrunner servlet now optionally supports ssh key authentication as well as username/password-based authentication
$MOOGSOFT_HOME/config/moog_farmd.conf
alert_workflows.conf moolet has been added
enrichment_workflows.conf moolet has been added
event_workflows.conf moolet has been added
situations_workflows.conf moolet has been added
v7.2.x-v7.3.x
$MOOGSOFT_HOME/config/system.conf
New integration database property has been added: intdb_database_name
$MOOGSOFT_HOME/config/moog_farmd.conf
The entire sig_resolution block containing merge groups, retention_period etc has been removed but is still supported as long as file_only_config is true
alert_root_cause.conf moolet has been removed and is no longer supported
nexus.conf moolet has been removed and is no longer supported
speedbird.conf moolet has been removed and is no longer supported
sigaliser.conf moolet has been removed and is no longer supported
cookbook.conf has been removed but is still supported as long as file_only_config is set to true
tempus.conf has been removed but is still supported as long as file_only_config is set to true
v7.3.x-v8.0.x
$MOOGSOFT_HOME/config/system.conf
ElasticSearch now supports basic authentication
$MOOGSOFT_HOME/config/security.conf
There is a new global_settings block which allows control of the CSRF protection feature
$MOOGSOFT_HOME/config/servlets.conf
It is now possible to configure the toolrunner to run on a port other than 22 using toolrunnerport property
$MOOGSOFT_HOME/config/moog_farmd.conf
alert_inform_workflows.conf moolet has been added
situation_inform_workflows.conf moolet has been added
The 'modules' block has been removed as it only contained Topology-related functionality and this has been deprecated in the v8.0.x release - the Topology feature works differently.
Manually merge and compare .rpmsave versions of files with the new versions of those files. Add any new properties to the older versions of the files. You can skip this step if you have already completed this step as part of this upgrade process on the current host.
The config and bot files from the previous version should not be copied on top of (replace) the new version of those files in 7.3.x, as they are not always forwards-compatible, and some config/bot lines need to be added for the new version to work.
To find files that have been changed, moved or deleted, run these commands:
find $MOOGSOFT_HOME -name '*.rpmsave'
find /etc/init.d/ -name '*.rpmsave'
For example, the following command displays the differences in the new version of the system.conf file:
diff -u $MOOGSOFT_HOME/config/system.conf $MOOGSOFT_HOME/config/system.conf.rpmsave
Follow this process to merge the file differences:
· Rename the new versions of the files, without the .rpmsave extension, to end with .bak.
· Merge the .rpmsave file with the new .bak file by adding new properties/configuration where needed (from the new version of the file into the old version), so the structure matches the new version of the file.
· Rename the .rpmsave file to remove the .rpmsave extension.
Update JVM to use Java 11
Install the latest Java packages using the command below. It's possible that the yum upgrade of the moogsoft packages will have done this already and even possibly installed a newer version of Java than the one below. In this case, yum will report the packages are already installed and are the latest version. Continue with the subsequent steps even if this is the case.
yum -y install java-11-openjdk-11.0.7.10 \
java-11-openjdk-devel-11.0.7.10 \
java-11-openjdk-headless-11.0.7.10
On each server with a Cisco Crosswork Situation Manager RPM package installed, run the following command to replace the /usr/java/latest symlink so it points at the JDK11 JAVA_HOME directory:
source $MOOGSOFT_HOME/bin/utils/moog_init_functions.sh
If there are non-Cisco Crosswork Situation Manager packages on this server that do not support JDK11, you must update those applications to use a different JAVA_HOME symlink (not /usr/java/latest).
You can skip this step if you have already completed this step as part of this upgrade process on the current host.
To confirm this has worked, run the following command:
$JAVA_HOME/bin/java -version
It should return (as a minimum version):
openjdk version "11.0.7" 2020-04-14 LTS
You can also use the 'alternatives' command to point the system 'java' shortcut to the new version:
alternatives --config java
Remove references to the old MySQL connector
Note
Only perform this step if you are upgrading from Cisco Crosswork Situation Manager v7.0.x or v7.1.x.
The MySQL connector is upgraded in this release.
The original connector may be used by the External Database module in the current deployment, configured in $MOOGSOFT_HOME/config/moog_external_db_details.conf.
If this file is configured in the current deployment, update it to reference the new mariadb connector here: $MOOGSOFT_HOME/lib/cots/mariadb-java-client-2.4.0.jar.
You can skip this step if you have already completed this step as part of this upgrade process on the current host.
Update the RabbitMQ configuration
Note
Only perform this step if you are upgrading from Cisco Crosswork Situation Manager v7.0.x.
If you have RabbitMQ installed and running on this server, complete the following step.
Cisco recommends that you update the RabbitMQ configuration to support autoheal and other processes that improve stability in HA environments.
Run the command(s) below which are appropriate for the deployment type. Replace <VHOST> with your desired RabbitMQ VHOST/Zone.
· RPM:
cp -f $MOOGSOFT_HOME/etc/cots/rabbitmq/rabbitmq.config /etc/rabbitmq/
bash $MOOGSOFT_HOME/bin/utils/moog_init_mooms.sh -z <VHOST> -p
· Tarball:
cp -f $MOOGSOFT_HOME/etc/cots/rabbitmq/rabbitmq.config $MOOGSOFT_HOME/cots/rabbitmq-server/etc/rabbitmq/
bash $MOOGSOFT_HOME/bin/utils/moog_init_mooms.sh -z <VHOST> -p
To continue with the upgrade, see Finalize and validate upgrades.
RPM - Migrate from MySQL to Percona
This topic describes the RPM migration procedure from MySQL to Percona XtraDB Cluster.
Follow these steps to perform this process with root privileges.
Cisco Crosswork Situation Manager uses Percona XtraDB Cluster which supports the Galera replication protocol to support high availability (HA). Percona XtraDB is similar to MySQL with improvements for HA, scalability, and usability.
Cisco strongly recommends you perform the migration from MySQL to Percona XtraDB Cluster and HAProxy. See Post-upgrade steps for more information.
Before you begin
Before you begin the migration process, ensure you have met the following requirements:
1. You have root access to the servers you will use for your database nodes, and to any servers HAProxy will be installed on.
Configure the Percona XtraDb Cluster donor node
To migrate to Percona XtraDB Cluster, perform the following steps on the server where the moogsoft-db package is installed.
Note
If you have installed the moogsoft-db package on more than one server, for example in a master/standby configuration, use the master as the donor node.
1. Navigate to the desired location and install the Percona repository:
yum -y install https://repo.percona.com/yum/percona-release-latest.noarch.rpm
2. Install Percona XtraBackup:
yum -y install percona-xtrabackup-24.x86_64
3. Back up MySQL using the Percona XtraBackup tool:
innobackupex --user=root --password= /backups/mysql
This is a precaution. You do not have to back up MySQL before setting up the Percona XtraDB cluster.
4. When the backup is complete, repeat the process using the "apply log" setting to apply any transactions that may have occurred during the backup process:
innobackupex --apply-log /backups/mysql
5. Stop MySQL:
service mysqld stop
6. Uninstall MySQL:
yum -y remove mysql-*community*
Stopping and uninstalling MySQL does not delete the backup data. The backup data is available at /backups/mysql and the data directory used by MySQL remains instact.
7. Install Percona Cluster Binary 5.7:
yum -y install Percona-Server-shared-compat-57-5.7.28
yum -y install Percona-XtraDB-Cluster-server-57-5.7.28
8. Configure the Percona cluster to start in bootstrap mode.
· Edit the /etc/percona-xtradb-cluster.conf.d/wsrep.cnf file so that wsrep_cluster_address is not set to an IP address. For example:
[mysqld]
wsrep_cluster_address=gcomm://
· Uncomment the following property, to enable the Percona user to be used for replication.
wsrep_sst_auth="username:password"
Note
The Percona SST (State Transfer) user in the wsrep_sst_auth property does not exist yet. Set the authentication details here and you will create the user below.
· Start the Percona donor node:
service mysqld start
1. Create a Percona SST user, grant the required permissions and add the user to the bootstrapped node.
Run the following command, replacing the username and password with your chosen user credentials:
mysql -u root -e "GRANT PROCESS, RELOAD, LOCK TABLES, REPLICATION CLIENT ON *.* TO 'username'@'localhost' identified by 'password';"
· Run the following commands to create the clustercheck user required by HA Proxy:
mysql -u root -e "GRANT PROCESS ON *.* TO 'clustercheckuser'@'localhost' IDENTIFIED BY 'clustercheckpassword\!';"
mysql -u root -e "FLUSH PRIVILEGES;"
· Add the IP addresses for the remaining nodes to the Percona configuration file.
Configure the wsrep_cluster_address property in the /etc/percona-xtradb-cluster.conf.d/wsrep.cnf file to contain a comma-separated list of all of the nodes you will add to the cluster. For example:
[mysqld]
wsrep_cluster_address=gcomm://1.1.1.1,1.1.1.2,1.1.1.3
· Copy or move the backup data from the MySQL data directory at /backups/mysql to the Percona data directory at /var/lib/mysql.
For more information on restoring from backup data, see the Percona documentation on restoring a full backup.
Configure the Percona clustercheck script
The Percona clustercheck script is distributed as part of Percona XtraDB Cluster. It works with HA Proxy to monitor nodes in the cluster and performs health checks on backend servers.
To configure and deploy the script:
· Install the Extended Internet Service Daemon xinetd:
yum -y install xinetd
· Create a script to launch clustercheck on request, on port 9198:
cat > /etc/xinetd.d/mysqlchk << EOF
# default: on
# description: mysqlchk
service mysqlchk
{
disable = no
flags = REUSE
socket_type = stream
port = 9198
wait = no
user = nobody
server = /usr/bin/clustercheck
log_on_failure += USERID
only_from = 0.0.0.0/0
per_source = UNLIMITED
}
EOF
· Add the script mysqlchk as a service to be run on request on port 9198 by xinetd. (edited)
echo "mysqlchk 9198/tcp # mysqlchk" >> /etc/services
· Restart xinetd:
systemctl restart xinetd
Configure additional nodes
When you have configured the donor node, follow these steps to add your second and subsequent nodes.
· Stop MySQL on the node:
service mysqld stop
· Uninstall MySQL on the node:
yum -y remove mysql-*community*
· Run the install_percona_nodes script to install the Percona Cluster Binary 5.7, add the node to the configuration file and start the node.
The script syntax is as follows:
RPM:
install_percona_nodes.sh -p|--primary -i|--ips [IP1,IP2,IP3] -u|--username -w|--password -h|--help
Tarball:
install_percona_nodes_tarball.sh -p|--primary -i|--ips [IP1,IP2,IP3] -u|--username -w|--password -h|--help
· -p: Set this node as primary, so it starts with default bootstrap enabled.
· -i: Comma-separated list of node IP addresses or hostnames.
· -u: Username of your Percona SST user.
· -w: Password of your Percona SST user.
· -h: Display the help information for the script.
Note
For more information on how nodes join the cluster and state transfer (SST), see the Galera Cluster documentation on Node Provisioning.
Copy and execute the Percona install script to additional nodes
Copy the moogsoft-db RPM to the servers where you want to install Percona. For example:
rpm2cpio moogsoft-db-8.0.*.rpm | cpio -i --to-stdout ./usr/share/moogsoft/bin/utils/install_percona_nodes.sh > install_percona_nodes.sh;
chmod a+x install_percona_nodes.sh;
Run the install_percona_nodes.sh script. For example:
./install_percona_nodes.sh -i 1.1.1.1,1.1.1.2,1.1.1.3 -u mysstusername -w mysstpassword
If rpm2cpio is not available on the server, you can install the moogsoft-common, moogsoft-db and moogsoft-ccsm packages as follows:
yum install moogsoft-db-8.0.*.rpm moogsoft-common-8.0.*.rpm moogsoft-ccsm-8.0.*.rpm
Then the percona install script is available under ${MOOGSOFT_HOME}/bin/utils (/usr/share/moogsoft by default).
Configure for Disaster Recovery
In a Disaster Recovery configuration with two or more data centres, you can enable synchronization of the binary log to disk before transactions are committed.
1. Edit the ~/.my.cnf file and set the following property:
sync_binlog = 1
· Restart the databases to apply the change:
RPM:
systemctl restart mysqld
Tarball:
$MOOGSOFT_HOME/bin/utils/process_cntl mysql restart
Note
Do not change this setting in a standard configuration, as it will impact negatively on performance.
Install HA Proxy
An administrator must install HA Proxy on all Cisco Crosswork Situation Manager servers on your network. Root privileges are required. The HA Proxy installer script syntax is as follows:
haproxy_installer.sh -l|--listener-port [3306] -i|--ips [IP1:PORT1,IP2:PORT2,IP3:PORT3] -c|--configure-aiops -h|--help
· -i: Comma-separated list of node IP addresses or hostnames and ports.
· -l: Port on which HA Proxy listens for connections. Default is 3306.
· -c: Configure the local Cisco Crosswork Situation Manager to use HA Proxy's port.
· -h: Display the help information for the script.
To install HA Proxy:
· Set $MOOGSOFT_HOME to the correct location. For example:
export $MOOGSOFT_HOME=/home/admin/moogsoft
1. Run the HA Proxy installer script. For example:
rpm2cpio moogsoft-db-8.0.*.rpm | cpio -i --to-stdout ./usr/share/moogsoft/bin/utils/haproxy_installer.sh > haproxy_installer.sh;
chmod a+x haproxy_installer.sh;
Run the haproxy_installer.sh script. For example:
./haproxy_installer.sh -c -i 10.101.10.109:3306,10.101.10.110:3306,10.101.10.111:3306 -u mysstusername -w mysstpassword
If you already copied the RPM's, the script can be found in $MOOGSOFT_HOME/bin/util.
· Restart Moogfarmd, Apache Tomcat and any integrations you are using. See Control Cisco Crosswork Situation Manager Processes for details.
Configuration Migration Utility
The Configuration Migration utility upgrades your existing Cisco Crosswork Situation Manager configuration files for merge groups and the Cookbook and Tempus moolets to make them compatible with Cisco Crosswork Situation Manager 7.3.
The utility is embedded in Moogfarmd and runs automatically the first time a 7.3 instance of Moogfarmd is started.
· The file_only_config property in moog_farmd.conf serves two purposes related to the configuration migration utility:
· Setting the property to true before upgrading prevents the configuration migration utility from running.
· Setting the property to true after upgrading causes Cisco Crosswork Situation Manager to ignore all database configurations for Cookbook and Tempus clustering algorithms as well as merge groups, and only load their file configurations instead.
See Moogfarmd Reference for more information on Moogfarmd properties.
The following also applies to the Configuration Migration utility:
· The utility migrates the default merge group to your database. Any moolets that do not have a merge group explicitly defined will use the default merge group.
· The utility only migrates Tempus and Cookbook moolets. If a merge group contains Feedback or Classic Sigaliser, the utility still migrates the merge group, but without these moolets within it.
· During the upgrade process, the utility tarballs and copies all 7.2 configuration files to a backup folder. The utility provides you with the location of these during the upgrade.
· The utility notifies you of any conflicts during the upgrade. To avoid loss of data, it renames any moolets, merge groups and cookbook recipes in the file it is attempting to migrate to the database.
Finalize and validate the upgrade
Follow these steps to perform the final tasks for an upgrade to Cisco Crosswork Situation Manager v8.0.x from v7.0.x, v7.1,.x or 7.2.x.
Refer to Upgrade Cisco Crosswork Situation Manager for general information and upgrade instructions for other components and versions.
Configure the ServiceNow MID server to use Java 8
Note
Only perform this step if you are upgrading from Cisco Crosswork Situation Manager v7.0.x or v7.1.x.
If you are using a ServiceNow MID server installed on the same host as Cisco Crosswork Situation Manager, you must configure it to point to Java 8. The MID server requires Java 8 (update 152 or later). It will not work with Java 9+. To do this:
· Install the latest version of Java 8. See the ServiceNow MID server system requirements for more information.
· Stop the MID server by running the appropriate command. For example:
· kill -9 $(ps -ef | grep mid_server | grep -v grep | awk '{print $2}')
· Configure the wrapper.java.command property to point to the Java 8 binary in the following file:
/usr/local/servicenow/moog_mid_server/agent/conf/wrapper-override.conf
For example:
wrapper.java.command=/usr/java/jre1.8.0_171-amd64/bin/java
Please note that in v7.3, the MID Server is not deployed or managed by Apache Tomcat and all MID Server configuration is now a manual task.
Configure Elasticsearch heap size
The minimum and maximum JVM heap sizes must be large enough to ensure that Elasticsearch starts.
To set the minimum and maximum JVM heap sizes:
1. For RPM, edit the /etc/elasticsearch/jvm.options file.
2. For Tarball, edit the $MOOGSOFT_HOME/cots/elasticsearch/config/jvm.options file.
These heap sizes must be the same value. For example, to set the heap to 4 GB:
# Xms represents the initial size of total heap space
# Xmx represents the maximum size of total heap space
-Xms4g
-Xmx4g
If you change the heap size, you must restart Elasticsearch:
· For RPM, run service elasticsearch restart.
· For Tarball, run $MOOGSOFT_HOME/bin/utils/process_cntl elasticsearch restart.
Upgrade Moogsoft Add-ons
Cisco periodically releases add-ons to extend and enhance the core Cisco Crosswork Situation Manager functionality. For example, new Workflow Engine functions, new Workflow Engines, or Integrations tiles. All add-ons releases are cumulative and include the fixes from previous releases.
Upgrading the Cisco Crosswork Situation Manager core components replaces any manually installed add-ons with versions of those add-ons that come with the upgrade by default. These default versions can be an earlier version than the manually installed versions of the add-ons.
Once you have finished upgrading the core components, you should install the Cisco Crosswork Situation Manager add-ons to ensure you have the latest versions of these add-ons.
See Install Cisco Add-ons for more information on how to install the Cisco Crosswork Situation Manager add-ons.
Restart services and processes
It is important to restart processes in the correct order. Follow each section below on the relevant servers, and run the commands in the specified order.
Database
Only do this step if the database is not running. If you have followed the documented upgrade process until this point, the database should be running.
On the database server (and any node where the database is configured to run), run the command appropriate to your deployment type:
RPM:
service mysqld restart
Tarball:
$MOOGSOFT_HOME/bin/utils/process_cntl mysql restart
Message Bus (RabbitMQ)
On the Core server (or any node where RabbitMQ is configured), run the command appropriate to your deployment type:
RPM:
service rabbitmq-server restart
Tarball:
$MOOGSOFT_HOME/bin/utils/process_cntl rabbitmq restart
Elasticsearch
On the Core server (or where Elasticsearch is configured), run the command appropriate to your deployment type:
RPM:
service elasticsearch restart
Tarball:
$MOOGSOFT_HOME/bin/utils/process_cntl elasticsearch restart
Moogfarmd
On the Core server (where Moogfarmd is configured), run the command appropriate to your deployment type:
RPM:
service moogfarmd restart
Tarball:
$MOOGSOFT_HOME/bin/utils/process_cntl moog_farmd restart
Warning
When you upgrade to Cisco Crosswork Situation Manager v8.0.x, Moogfarmd may not run if you are using Workflow Engine actions that have either changed from v7.x or are not in v8.0.x.
When you restart Moogfarmd, check the moog_farmd.log file for errors such as the following which indicates a missing function:
ERROR: [main][20200416 17:07:03.791 +0100] [CMooletCntr.java:1664] +|Error during initialization: [No such function: 'myWFEdoSomethingFunction' in the bot file of moolet: 'Situation Workflows']|+
If the log reports that Moogfarmd is not running or there is a missing function, contact Moogsoft support for more information.
Data Ingestion
On the Data Ingestion server (where back-end LAMs are configured), run the commands appropriate to your deployment type:
RPM:
Run the relevant service command for each of the LAMs deployed on the server. Follow this format replacing <LAM_service_name> as appropriate:
service <LAM_service_name> restart
For example:
service restlamd restart
Tarball:
Run the relevant process_cntl command for each of the LAMs deployed on the server. Follow this format replacing <LAM_instance_name> as appropriate:
$MOOGSOFT_HOME/bin/utils/process_cntl <LAM_instance_name> restart
For example:
$MOOGSOFT_HOME/bin/utils/process_cntl rest_lam restart
UI
On the UI server, run the commands appropriate to your deployment type:
RPM:
Rebuild the webapps and start Apache Tomcat:
$MOOGSOFT_HOME/bin/utils/moog_init_ui.sh -w
Restart Nginx:
service nginx restart
— Tarball:
Rebuild the webapps and start Apache Tomcat:
$MOOGSOFT_HOME/bin/utils/moog_init_ui.sh -w
Restart Nginx:
$MOOGSOFT_HOME/bin/utils/process_cntl nginx restart
Finalize the Events Analyser configuration
You can configure the Events Analyser in v8.0.x in two ways:
· Use the Events Analyser database configuration and schedule. This is the default method for Cisco Crosswork Situation Manager v8.0.x.
· Use the event_analyser.conf file (for example in the case of significant customisations) and schedule through cronjob. This is the pre-v8.0.x method. See the 'Important' section below for steps if this is needed.
We recommend that you use the default Events Analyser database configuration and schedule method. Upgrading to Cisco Crosswork Situation Manager v8.0.x automatically creates the database configuration and schedule.
After you have finished the upgrade, you must update the cronjob to check each minute if the job needs to run. Remove any existing cronjobs by running the following:
(crontab -l | grep -v events_analyser) | crontab -
Add the new cronjob:
$MOOGSOFT_HOME/bin/utils/moog_init_server.sh -e
Important
If you are using a significantly customised Events Analyser configuration file or are running the Events Analyser using the stream or partition flags, you should continue to use the pre-v8.0.x method.
Uncomment the existing events_analyser cronjob(s):
(crontab -l | sed -e 's/^\#\+\(.*events_analyser.*\)/\1/') | crontab -
Use the crontab -e command (a 'vi'-like editor) to update any events_analyser cronjobs.
Specify the events_analyser configuration file at the end of each events_analyser command. The following example schedules a run every day at 3am, and each run will analyze two weeks of data. We recommend that you use this schedule if you do not have an existing schedule that works for your deployment.
03 * * * /usr/share/moogsoft/bin/events_analyser --incremental --readage 2w --config /usr/share/moogsoft/config/events_analyser.conf
If you want to migrate from the pre-v8.0.x method to the v8.0.x database method, contact Moogsoft Support.
Reindex Elasticsearch
Note
Run the following command on the server that houses the Core components. See Upgrade Cisco Crosswork Situation Manager for a description of the component groups.
Ensure that Moogfarmd is running, then run the following command to reindex alerts and Situations:
$MOOGSOFT_HOME/bin/utils/moog_indexer -f -n
The reindex process occurs in the background and may take a while to complete, depending on the number of alerts and Situations in your system.
Reconfigure UI integrations
Note
Only perform this step if you are upgrading from Cisco Crosswork Situation Manager v7.0.x or v7.1.x.
If you are using any of the following UI integrations and are upgrading from v7.0.x or v7.1.x, reconfigure them using the details you noted prior to the upgrade. This is required due to UI changes in the new version.
· AWS CloudWatch
· Cherwell
· JIRA Service Desk and JIRA Software
· JMS
· New Relic
· Remedy
· ServiceNow
· SevOne
· Slack
· SolarWinds
· VMware vCenter and vSphere
· vRealize Log Insight
· WebSphere MQ
· xMatters
If you have configured an xMatters or Dynatrace Synthetic UI integration, then these have are deprecated in 8.0.x. If you do not have these UI integrations installed, the section below can be skipped.
Important
This section is for offline deployments only, which had a configured xMatters or Dynatrace Synthetic UI integration installed.
These steps must be run on the UI server only
Download the following two files and place them in $MOOGSOFT_HOME/etc/integrations/deprecated to be able to view the configuration.
· https://integrations-downloads.s3.amazonaws.com/deprecated/dynatrace_synthetic_lam.zip
· https://integrations-downloads.s3.amazonaws.com/deprecated/xMatters.zip
Run the following commands to ensure the old integrations can be safely removed:
mkdir -p $MOOGSOFT_HOME/etc/integrations/deprecated
chown -R moogsoft:moogsoft $MOOGSOFT_HOME/etc/integrations/deprecated
cp dynatrace_synthetic_lam.zip $MOOGSOFT_HOME/etc/integrations/deprecated
cp xMatters.zip $MOOGSOFT_HOME/etc/integrations/deprecated
Restart apache-tomcat:
· For non-root tarball deployments: $MOOGSOFT_HOME/bin/utils/process_cntl apache-tomcat restart
· For RPM deployments: service apache-tomcat restart
The xMatters and Dynatrace Synthetic UI integrations should now be uninstalled from using the UI.
Validate the upgrade: UI components
Note
Run the following commands/tasks on the server that houses the UI components. See Upgrade Cisco Crosswork Situation Manager for a description of the component groups.
Run this utility to confirm that all Apache Tomcat files were deployed correctly in $MOOGSOFT_HOME:
$MOOGSOFT_HOME/bin/utils/tomcat_install_validator.sh
If there are webapp differences, run the following command to extract the webapps with the correct files:
$MOOGSOFT_HOME/bin/utils/moog_init_ui.sh -w
If you set the file_only_config property to false (or the property is missing) in $MOOGSOFT_HOME/config/moog_farmd.conf when you merged the latest configuration file changes, Moogfarmd will attempt to import the following items from your Moogfarmd configuration into the MoogDb database:
· Cookbooks (including value and bot Recipes)
· Tempus configurations
· The default Merge Group and any custom Merge Groups
After the import operation, Moogfarmd backs up the entire $MOOGSOFT_HOME/config folder to $MOOGSOFT_HOME/config_backup_720.tgz. The version number at the end will change depending on version being upgraded to. The import process did not remove any entries from the configuration files on disk. You can check that the import process completed successfully as follows:
Tempus configurations:
· The Cisco Crosswork Situation Manager UI now has a new UI System Settings panel for Tempus which displays the same settings that were used by your file-based Tempus configurations.
· If more than one Tempus is defined or referenced in your Moogfarmd configuration, they are all imported, but the UI is only designed to display the configuration for one. You can use the Graze API endpoint getTempus to confirm that the configuration is correct.
· Run the ha_cntl -v utility to confirm whether the correctly-named Tempus is running.
Cookbooks:
· Run the ha_cntl -v utility to confirm whether the correctly-named Cookbook is running.
· Run the new Graze API endpoints getCookbooks and getRecipes and to check whether the Cookbooks and Recipes were imported successfully.
Default Merge Group:
· Run the new Graze API endpoint getDefaultMergeGroup to check whether the default merge group was successfully imported.
Custom Merge Groups:
1. Run the new Graze API endpoint getMergeGroups to check whether the custom merge groups were imported successfully.
If the import was successful and the database-based Sigalisers and merge groups work as expected over a period of time, you can delete their entries in $MOOGSOFT_HOME/config/moog_farmd.conf. Moogfarmd will no longer attempt to import or run the Sigalisers or merge groups defined in the configuration filter after the import.
If one or more of the configuration items did not successfully migrate or are not present at all:
· Confirm that the moog_farmd.conf property file_only_config is not set to true.
· Confirm that your Sigalisers and Merge Groups are defined in the upgraded moog_farmd.conf file, or imported via 'included' Moolet configuration files.
· Look for any startup errors in the Moogfarmd log file (the default log file is MOO.moog_farmd.log).
· You can attempt the import again by truncating the config_migration table in the MoogDb database. To do this, run the following command:
$MOOGSOFT_HOME/bin/utils/moog_mysql_client -e "truncate config_migration"
· Restart Moogfarmd.
· Re-validate the import and check the Moogfarmd log for any errors on startup.
Note
If you have already completed this step previously (as part of this upgrade process) on the current host, you can skip this step.
Run the Install Validator utility to ensure that all Cisco Crosswork Situation Manager files were deployed correctly in $MOOGSOFT_HOME:
$MOOGSOFT_HOME/bin/utils/moog_install_validator.sh
Validate the upgrade: Core components
Note
Run the following command on the server that houses the core components. See Upgrade Cisco Crosswork Situation Manager for a description of the component groups.
Note
If you have already completed this step previously (as part of this upgrade process) on the current host, you can skip this step.
Run the Install Validator utility to ensure that all Cisco Crosswork Situation Manager files were deployed correctly in $MOOGSOFT_HOME:
$MOOGSOFT_HOME/bin/utils/moog_install_validator.sh
Validate the upgrade: Data ingestion components
Note
Run the following command on the server that houses the data ingestion components. See Upgrade Cisco Crosswork Situation Manager for a description of the component groups.
Note
If you have already completed this step previously (as part of this upgrade process) on the current host, you can skip this step.
Run the Install Validator utility to ensure that all Cisco Crosswork Situation Manager files were deployed correctly in $MOOGSOFT_HOME:
$MOOGSOFT_HOME/bin/utils/moog_install_validator.sh
Validate the upgrade: Database components
Note
Run the following command on the server that houses the database components. See Upgrade Cisco Crosswork Situation Manager for a description of the component groups.
Note
If you have already completed this step previously (as part of this upgrade process) on the current host, you can skip this step.
Run the Database Validator utility to validate the database schema:
$MOOGSOFT_HOME/bin/utils/moog_db_validator.sh
Note
Some schema differences are valid, for example those related to custom_info (new columns added etc).
An additional schema upgrade step is required if you are upgrading from v7.0.x, v7.1.x, or v7.2.x.
This additional step is documented on the Post-upgrade steps page.
Until you have complete this step, you should expect to see the following differences in the output of the Database Validator utility:
Differences found in 'historic_moogdb' tables:
41,49c41,43
< primary key (`alert_id`),
< unique key `idx_signature` (`signature`),
< key `idx_first_event_time` (`first_event_time`),
< key `idx_state_last` (`state`,`last_state_change`),
< key `idx_severity` (`severity`,`state`),
< key `idx_agent` (`agent`(12)),
< key `idx_source` (`source`(12)),
< key `idx_type` (`type`(12)),
< key `idx_manager` (`manager`(12))
---
> primary key (`signature`),
> key `alert_id` (`alert_id`),
> key `first_event_time` (`first_event_time`,`alert_id`)
93,94c87
< key `timestamp` (`timestamp`,`type`),
< key `idx_type_time` (`type`,`timestamp`)
---
> key `timestamp` (`timestamp`,`type`)
241,242c234
< key `sig_id` (`sig_id`,`action_code`,`timestamp`),
< key `idx_action_sig` (`action_code`,`sig_id`)
---
> key `sig_id` (`sig_id`,`action_code`,`timestamp`)
The differences above will not have any functional impact, but you must complete the rest of the upgrade to ensure the system is performant and the schema is ready for future upgrades.
If you have performed an upgrade and you see errors similar to the following:
Differences found in 'moogdb' tables:
57a58
> key 'filter_id' ('filter_id'),
194a196
> key 'enrichment_static_mappings_ibfk_1' ('eid'),
1196a1199
> key 'sig_id' ('sig_id'),
1325a1329
> key 'filter_id' ('filter_id'),
Run the following commands to resolve these index-related problems:
mysql moogdb -u root -e "alter table alert_filters_access drop key filter_id"
mysql moogdb -u root -e "alter table situation_filters_access drop key filter_id"
mysql moogdb -u root -e "alter table enrichment_static_mappings drop key enrichment_static_mappings_ibfk_1"
mysql moogdb -u root -e "alter table sig_stats_cache drop key sig_id"
Add Tempus (optional)
A new install of Cisco Crosswork Situation Manager v8.0.x includes the Tempus clustering algorithm by default. You will need to add Tempus manually when you upgrade to v8.0.x if you did not already add Tempus to an earlier version of your Cisco Crosswork Situation Manager deployment.
Run the following command to add the default configuration of Tempus to Cisco Crosswork Situation Manager. Replace the following parameters' default values if required:
· run_on_startup: Set this value to true to enable Tempus.
You can also enable Tempus by going to System Settings in the UI after you have run this command.
· localhost: If you run the command from a different server to your UI server, replace localhost with the hostname of your UI server.
· graze:graze: Replace graze:graze with the credentials of a user with the grazer role in your deployment if needed.
· MaintenanceWindowManager: If the non-Tempus clustering algorithms do not process events from the Maintenance Window Manager Moolet, replace this default value with the Moolet that the non-Tempus clustering algorithms process events from.
See Clustering Algorithm Guide for more information on the non-Tempus clustering algorithms.
See Maintenance Window Manager for more information on this Moolet.
curl -X POST -u graze:graze -k "https://localhost/graze/v1/addTempus" -H "Content-Type: application/json; charset=UTF-8" --data '{
"name" : "Time Based (Tempus)",
"description" : "A Tempus Situation",
"run_on_startup" : false,
"entropy_threshold" : 0.0,
"threshold_type" : "global",
"process_output_of" : [ "MaintenanceWindowManager" ],
"execution_interval" : 60,
"window_size" : 1200,
"bucket_size" : 5,
"arrival_spread" : 15,
"minimum_arrival_similarity" : 0.6667,
"alert_threshold" : 4,
"pre_partition" : null,
"partition_by" : null,
"significance_test" : "Poisson1",
"significance_threshold" : 1,
"detection_algorithm" : "Louvain"
}'
See the Time-based Clustering with Tempus for more information on this clustering algorithm.
Next steps
Now that the upgrade is complete, follow the instructions in Post upgrade steps.
Post-upgrade steps
Follow these steps to perform the post-upgrade tasks for an upgrade to Cisco Crosswork Situation Manager v8.0.x from v7.0.x, v7.1.x, or 7.2.x.
Refer to Upgrade Cisco Crosswork Situation Manager for general information and upgrade instructions for other components and versions.
Upgrade the historic database
Note
Only perform this step if you are upgrading from Cisco Crosswork Situation Manager v7.0.x, v7.1.x or v7.2.x.
You must upgrade the historic database. This can be done after the main upgrade process has been completed and while the system is running.
The upgrade process runs in the background. This process is separate from the main schema upgrade because for very large databases it can take several hours to complete. You can upgrade the historic database either before or after you migrate from MySQL to Percona XtraDB Cluster.
The Events Analyser utility should not run at the same time as the migration utility. To temporarily disable the Events Analyser:
· Disable the events_analyser crontab:
(crontab -l | sed -e 's/^\(.*events_analyser.*\)$/#\1/') | crontab -
· Stop the events_analyser if it is running:
kill $(ps -ef | grep events_analyser | grep -v grep | grep java | awk '{print $2}')
To upgrade the historic database schema:
· Run the moog_historic_post_migration script with the valid arguments for your system, on a terminal dedicated to the process. Use the -h flag to see all available options. Allow the process time to finish - it is recommended that this script is run during a period of low event throughput (For example at midnight). For example:
$MOOGSOFT_HOME/bin/utils/moog_historic_post_migration.sh -H localhost -P 3306 -u root
This script will attempt to add indexes to a number of tables to improve performance. Check the script output for errors. If any are seen contact Moogsoft Support.
· Validate the migration is complete using the database validator utility:
$MOOGSOFT_HOME/bin/utils/moog_db_validator.sh
· Optionally, enable compression on the historic database snapshots table. Cisco recommends this if disk space is a concern.
This utility is documented here: Table Compression Utility
Note
This utility requires a number of Perl dependencies to run. The following commands can be run to install these dependencies (root required for the final 'yum' command):
for PACKAGE in perl-Compress-Raw-Bzip2-2.061-3.el7.x86_64.rpm perl-Compress-Raw-Zlib-2.061-4.el7.x86_64.rpm perl-DBD-MySQL-4.023-6.el7.x86_64.rpm perl-DBI-1.627-4.el7.x86_64.rpm perl-Data-Dumper-2.145-3.el7.x86_64.rpm perl-Digest-1.17-245.el7.noarch.rpm perl-Digest-MD5-2.52-3.el7.x86_64.rpm perl-IO-Compress-2.061-2.el7.noarch.rpm perl-Net-Daemon-0.48-5.el7.noarch.rpm perl-PlRPC-0.2020-14.el7.noarch.rpm perl-IO-Socket-IP-0.21-5.el7.noarch.rpm perl-IO-Socket-SSL-1.94-7.el7.noarch.rpm perl-Mozilla-CA-20130114-5.el7.noarch.rpm perl-Net-LibIDN-0.12-15.el7.x86_64.rpm perl-Net-SSLeay-1.55-6.el7.x86_64.rpm
do
curl -L -O http://mirror.centos.org/centos/7/os/x86_64/Packages/${PACKAGE};
done;
Then install the packages downloaded:
yum -y install *.rpm
After you have run these steps, you can re-run the Database Validator utility to confirm that the schemas are now in sync. See #UUIDd358b3ec37673c4213b876db4d326dc9_titleidm123139870443886 for details on how to run the utility.
You can now re-enable the Events Analyser utility. If the current deployment does not use entropy, you should not re-enable the Events Analyser because this utility is a CPU and memory-intensive process.
(crontab -l | sed -e 's/^\#\+\(.*events_analyser.*\)/\1/') | crontab -
Migrate the databases to Percona XtraDb Cluster and HA Proxy
Cisco Crosswork Situation Manager uses Percona XtraDB Cluster which supports the Galera replication protocol to support high availability (HA). Percona XtraDB is similar to MySQL with improvements for HA, scalability, and usability.
Cisco strongly recommends you perform the migration from MySQL to Percona XtraDB Cluster and HAProxy. See Post-upgrade steps for more information.
To perform the migration, refer to the appropriate instructions, depending on your deployment type:
· Migrate from MySQL to Percona - RPM
· Migrate from MySQL to Percona - Tarball
Install add-ons
Download and deploy the latest version of the Cisco Add-ons. See Install Cisco Add-ons for more information.
The upgrade is now complete.
Monitor and Troubleshoot Cisco Crosswork Situation Manager
The following topics describe the available health and performance indicators included with the Cisco Crosswork Situation Manager system. They also also provide some guidance on how to monitor your system and how to troubleshoot performance problems.
Note
For the locations of specific installation and log files, see Configure Logging.
· Monitor Component Performance
· Monitor Moogfarmd Data Processing Performance
· Monitor Moogfarmd Health Logs
· Monitor Component CPU and Memory Usage
· Monitor System Performance Metrics
· Monitor RabbitMQ Message Bus Performance
The following topics provide troubleshooting advice and guidance:
· Troubleshoot Installation and Upgrade
· Troubleshoot Slow Alert/Situation Creation
· Troubleshoot Required Services for a Functional Production System
Monitor Component Performance
Cisco Crosswork Situation Manager features the ability to ingest large amounts of event data from various sources, process the data using configurable logic, and display the data to multiple concurrent users. This document outlines the various system components and how their interactions can impact system performance. It includes performance tuning suggestions where applicable.
To learn about opportunities to plan your implementation for increased performance capabilities, see Scale Your Cisco Crosswork Situation Manager Implementation.
For information on monitoring your system performance and handling performance issues, see Monitor and Troubleshoot Cisco Crosswork Situation Manager.
System Component Summary
Cisco Crosswork Situation Manager comprises several components which have tuning and configuration options available:
· Integrations and LAMs that listen or poll for data, parse and encode them into discrete events, and then pass the events to the Message Bus.
· The Message Bus (RabbitMQ) that receives published messages from integrations and LAMs. It publishes messages destined for data processing (Moogfarmd) and the web application server.
· The system datastore (MySQL) that handles transactional data from other parts of the system: integrations and LAMs, data processing, and the web application server.
· The data processing component (Moogfarmd), an application that consumes messages from the Message Bus. It processes event data in a series of servlet-like modules called Moolets. Moogfarmd reads and writes to the database and publishes messages to the bus. See Monitor Moogfarmd Health Logs for more details.
· The web application server (Apache Tomcat) that reads and writes to the bus and the database.
The diagram below shows the general data flow of the components:

Other components include:
A proxy (Ngnix) for the web application server and for integrations. See the Ngnix docs for more information.
The search engine (Elasticsearch) for the UI that indexes documents from the indexer Moolet in the data processing series. It returns search results to Apache Tomcat. See the Elasticsearch documentation for more information.
Integration Performance
Event data enters the system via integrations and LAMs. Integrations and LAMs running on a large system can normally process up to 10,000 events per secondand publish them to the Message Bus at an equivalent rate. Integrations can buffer events under event storm conditions. The following factors affect the capacity to process events:
· CPU clock speed and number of available cores.
· Threads setting.
· Complexity of the LAMbot logic.
· Whether you have enabled "guaranteed delivery settings". For example, rest_response_mode for the REST LAM.
· Log level. For example, DEBUG is the slowest.
You can specify a value for the number of threads in the LAM's configuration file to control the number of active threads for the integration. To tune the socket LAM, for example, edit socket_lam.conf. Increasing the number of threads can improve ingestion performance. However it will also result in higher CPU usage and may cause internal buffering. Buffering increases memory usage until the buffer is cleared.
Message Bus Performance
RabbitMQ is very lightweight and, in all known cases, has been able to process the incoming event rate from Integrations. Refer to the RabbitMQ documentation for its performance tuning options.
Database Performance
Manage and tune your MySQL instance as you would any other database system in your enterprise. In addition to the standard tuning options in the MySQL documentation, consider the following recommendations for settings in /etc/my.cnf :
· On servers with >= 16 GB RAM that run MySQL and Cisco Crosswork Situation Manager applications ,set innodb-buffer-pool-size to 50% of system RAM.
· On servers where only MySQL is running, set innodb-buffer-pool-size to 80% of system RAM.
· If innodb-buffer-pool-size > 8 GB, increase the innodb-buffer-pool-instances to divide the buffer buffer pool into 1 G (GB) chunks to the maximum supported value of 64 G. For example, if your buffer pool size is 64 GB:
innodb-buffer-pool-size=64G
innodb_buffer_pool_instances=64
JVM Performance
Integrations and LAMs, Moogfarmd, and Tomcat are all Java processes so you can tune the memory allocation pool settings for the JVM to optimize performance. This -Xmx setting defines the maximum allowed Java heap size of the process. The default memory allocation for a Java process is one quarter of the server's RAM.
For LAMs, integrations and Moogfarmd, you can add the -Xmx argument to the line in $MOOGSOFT_HOME/bin/<lam name> or $MOOGSOFT_HOME/bin/moogfarmd where the JVM is launched.
For example, to set the maximum Java heap size for the Moogfarmd process to 16 GB, add "-Xmx16g" to the java_vm command line in $MOOGSOFT_HOME/bin/moogfarmd as follows:
#Run app
$java_vm -server -Xmx16g -DprocName=$proc_name -DMOOGSOFT_HOME=$MOOGSOFT_HOME -classpath $java_classpath $java_main_class "$@" &
For Tomcat, the default setting is 2GB. If you need to change it you can edit the service script /etc/init.d/apache-tomcat.
Monitor Component CPU and Memory Usage
MySQL Tuner provides useful diagnostics and recommendations on MySQL settings. See MySQL Tuner for more information.
To monitor the CPU and memory usage of the running components of a Cisco Crosswork Situation Manager system, you can run the following script that offers simple CPU and memory monitoring of the RabbitMQ, Socket LAM, Moogfarmd, Tomcat and MySQL processes:
#!/bin/bash
SLEEPTIME=$1
f_return_metrics() {
PROCPID=$1
TOPOUTPUT=`top -p $PROCPID -n1 | tail -2 | head -1 |sed 's/[^ ]\+\s\(.*\)/\1/g'`
PROCICPU=`echo $TOPOUTPUT| awk '{print $8}'`
if [ "$PROCICPU" == "S" ]; then PROCICPU=`echo $TOPOUTPUT| awk '{print $9}'`;fi
PROCPCPU=`ps -p $PROCPID -o pcpu|tail -1|awk '{print $1}'`
PROCMEM=`ps -p $PROCPID -o rss|tail -1|awk '{print $1}'`
echo $PROCICPU,$PROCPCPU,$PROCMEM
}
#Capture PIDs
RABBITPID=`ps -ef|grep beam|grep -v grep|awk '{print $2}'`
LAMPID=`ps -ef|grep socket_lam|grep java|grep -v grep|awk '{print $2}'`
MYSQLPID=`ps -ef|grep mysqld|grep -v mysqld_safe|grep -v grep|awk '{print $2}'`
TOMCATPID=`ps -ef|grep tomcat|grep java|grep -v grep|awk '{print $2}'`
FARMDPID=`ps -ef|grep moog_farmd|grep java|grep -v grep|awk '{print $2}'`
echo "DATE,TIME,RABBITICPU(%),RABBITPCPU(%),RABBITRSS(Kb),LAMICPU(%),LAMPCPU(%),LAMRSS(Kb),FARMDICPU(%),FARMDPCPU(%),FARMDRSS(Kb),TOMCATICPU(%),TOMCATPCPU(%),TOMCATRSS(Kb),MYSQLICPU(%),MYSQLPCPU(%),MYSQLRSS(Kb)"
while [ true ]; do
DATENOW=`date +"%m-%d-%y"`
TIMENOW=`date +"%T"`
RABBITMEAS=$(f_return_metrics $RABBITPID)
LAMMEAS=$(f_return_metrics $LAMPID)
FARMDMEAS=$(f_return_metrics $FARMDPID)
TOMCATMEAS=$(f_return_metrics $TOMCATPID)
MYSQLMEAS=$(f_return_metrics $MYSQLPID)
TOMCATMEAS=$(f_return_metrics $TOMCATPID)
echo "$DATENOW,$TIMENOW,$RABBITMEAS,$LAMMEAS,$FARMDMEAS,$TOMCATMEAS,$MYSQLMEAS"
sleep $SLEEPTIME
done
Sample Usage and Output
[root@ldev04 640]# ./perfmon.sh 5
DATE,TIME,RABBITICPU(%),RABBITPCPU(%),RABBITRSS(Kb),LAMICPU(%),LAMPCPU(%),LAMRSS(Kb),FARMDICPU(%),FARMDPCPU(%),FARMDRSS(Kb),TOMCATICPU(%),TOMCATPCPU(%),TOMCATRSS(Kb),MYSQLICPU(%),MYSQLPCPU(%),MYSQLRSS(Kb)
05-10-18,22:44:26,28.0,8.5,203068,2.0,1.0,557092,20.0,13.5,2853408,4.0,2.1,5680584,28.0,17.4,9657152
05-10-18,22:44:34,14.0,8.5,183492,4.0,1.0,557092,16.0,13.5,2850484,0.0,2.1,5680584,33.9,17.4,9657152
05-10-18,22:44:43,0.0,8.5,181072,0.0,1.0,557092,0.0,13.5,2850484,0.0,2.1,5680584,4.0,17.4,9658312
05-10-18,22:44:51,12.0,8.5,181040,0.0,1.0,557092,0.0,13.5,2850484,0.0,2.1,5680584,4.0,17.4,9658312
05-10-18,22:44:59,0.0,8.5,181040,0.0,1.0,557092,0.0,13.4,2850484,0.0,2.1,5680584,0.0,17.4,9658312
Notes:
Notes
· The script only outputs to the console, so you should redirect the output to a file for logging results.
· Output is in csv format.
· ICPU = "Instantaneous CPU Usage (%)"
· PCPU = "Percentage of CPU usage since process startup (%)"
· RSS = "Resident Set Size i.e. Memory Usage in Kb"
· For CPU measurements a measure of 100% represents all of one processor so results > 100% are achievable for multi-threaded processes.
Other Utilities
MySQLTuner provides useful diagnostics and recommendations on MySQL settings. See MySQL Tuner for more information.
To monitor the CPU and memory usage of the running components of a Cisco Crosswork Situation Manager system, you can run the following script that offers simple CPU and memory monitoring of the RabbitMQ, Socket LAM, Moogfarmd, Tomcat and MySQL processes:
#!/bin/bash
SLEEPTIME=$1
f_return_metrics() {
PROCPID=$1
TOPOUTPUT=`top -p $PROCPID -n1 | tail -2 | head -1 |sed 's/[^ ]\+\s\(.*\)/\1/g'`
PROCICPU=`echo $TOPOUTPUT| awk '{print $8}'`
if [ "$PROCICPU" == "S" ]; then PROCICPU=`echo $TOPOUTPUT| awk '{print $9}'`;fi
PROCPCPU=`ps -p $PROCPID -o pcpu|tail -1|awk '{print $1}'`
PROCMEM=`ps -p $PROCPID -o rss|tail -1|awk '{print $1}'`
echo $PROCICPU,$PROCPCPU,$PROCMEM
}
#Capture PIDs
RABBITPID=`ps -ef|grep beam|grep -v grep|awk '{print $2}'`
LAMPID=`ps -ef|grep socket_lam|grep java|grep -v grep|awk '{print $2}'`
MYSQLPID=`ps -ef|grep mysqld|grep -v mysqld_safe|grep -v grep|awk '{print $2}'`
TOMCATPID=`ps -ef|grep tomcat|grep java|grep -v grep|awk '{print $2}'`
FARMDPID=`ps -ef|grep moog_farmd|grep java|grep -v grep|awk '{print $2}'`
echo "DATE,TIME,RABBITICPU(%),RABBITPCPU(%),RABBITRSS(Kb),LAMICPU(%),LAMPCPU(%),LAMRSS(Kb),FARMDICPU(%),FARMDPCPU(%),FARMDRSS(Kb),TOMCATICPU(%),TOMCATPCPU(%),TOMCATRSS(Kb),MYSQLICPU(%),MYSQLPCPU(%),MYSQLRSS(Kb)"
while [ true ]; do
DATENOW=`date +"%m-%d-%y"`
TIMENOW=`date +"%T"`
RABBITMEAS=$(f_return_metrics $RABBITPID)
LAMMEAS=$(f_return_metrics $LAMPID)
FARMDMEAS=$(f_return_metrics $FARMDPID)
TOMCATMEAS=$(f_return_metrics $TOMCATPID)
MYSQLMEAS=$(f_return_metrics $MYSQLPID)
TOMCATMEAS=$(f_return_metrics $TOMCATPID)
echo "$DATENOW,$TIMENOW,$RABBITMEAS,$LAMMEAS,$FARMDMEAS,$TOMCATMEAS,$MYSQLMEAS"
sleep $SLEEPTIME
done
Example usage and output:
[root@ldev04 640]# ./perfmon.sh 5
DATE,TIME,RABBITICPU(%),RABBITPCPU(%),RABBITRSS(Kb),LAMICPU(%),LAMPCPU(%),LAMRSS(Kb),FARMDICPU(%),FARMDPCPU(%),FARMDRSS(Kb),TOMCATICPU(%),TOMCATPCPU(%),TOMCATRSS(Kb),MYSQLICPU(%),MYSQLPCPU(%),MYSQLRSS(Kb)
05-10-18,22:44:26,28.0,8.5,203068,2.0,1.0,557092,20.0,13.5,2853408,4.0,2.1,5680584,28.0,17.4,9657152
05-10-18,22:44:34,14.0,8.5,183492,4.0,1.0,557092,16.0,13.5,2850484,0.0,2.1,5680584,33.9,17.4,9657152
05-10-18,22:44:43,0.0,8.5,181072,0.0,1.0,557092,0.0,13.5,2850484,0.0,2.1,5680584,4.0,17.4,9658312
05-10-18,22:44:51,12.0,8.5,181040,0.0,1.0,557092,0.0,13.5,2850484,0.0,2.1,5680584,4.0,17.4,9658312
05-10-18,22:44:59,0.0,8.5,181040,0.0,1.0,557092,0.0,13.4,2850484,0.0,2.1,5680584,0.0,17.4,9658312
Notes:
· Script only outputs to the console so should be redirected to a file for logging results
· Output is in csv format.
· ICPU = "Instantaneous CPU Usage (%)"
· PCPU = "Percentage of CPU usage since process startup (%)"
· RSS = "Resident Set Size i.e. Memory Usage in Kb"
· For CPU measurements a measure of 100% represents all of one processor so results > 100% are achievable for multi-threaded processes.
Monitor Database
MySQL Tuner provides useful diagnostics and recommendations on MySQL settings. See MySQL Tuner for more information.
Database pool diagnostics
Cisco Crosswork Situation Manager features the ability to print the current state of the database pool in both Moogfarmd and Apache Tomcat. You can use this information to diagnose problems with slow event processing or UI response.
To trigger logging, run the ha_cntl utility and pass the cluster name using the -i argument. For example:
ha_cntl -i MOO
This will perform task "diagnostics" all groups within the [MOO] cluster.
Diagnostics results will be in the target process log file.
Are you sure you want to continue? (y/N)
The ha_cntl utility triggers logging to the Moogfarmd log file, for example /var/log/moogsoft/MOO.moog_farmd.log. An example log entry in a performant system is as follows:
WARN : [pool-1-][20180511 10:06:07.690 +0100] [CDbPool.java]:792 +|[farmd] DATABASE POOL DIAGNOSTICS:|+
WARN : [pool-1-][20180511 10:06:07.690 +0100] [CDbPool.java]:793 +|[farmd] Pool created at [20180510 17:54:48.911 +0100].|+
WARN : [pool-1-][20180511 10:06:07.690 +0100] [CDbPool.java]:797 +|[farmd] [2] invalid connections have been removed during the lifetime of the pool.|+
WARN : [pool-1-][20180511 10:06:07.690 +0100] [CDbPool.java]:833 +|[farmd] Pool size is [10] with [10] available connections and [0] busy.|+
The ha_cntl utility also triggers logging to /usr/share/apache-tomcat/logs/catalina.out. For example:
WARN : [0:MooMS][20180511 10:06:07.690 +0100] [CDbPool.java]:792 +|[SituationSimilarity] DATABASE POOL DIAGNOSTICS:|+
WARN : [0:MooMS][20180511 10:06:07.690 +0100] [CDbPool.java]:793 +|[SituationSimilarity] Pool created at [20180510 17:55:04.262 +0100].|+
WARN : [3:MooMS][20180511 10:06:07.690 +0100] [CDbPool.java]:792 +|[MoogPoller] DATABASE POOL DIAGNOSTICS:|+
WARN : [3:MooMS][20180511 10:06:07.690 +0100] [CDbPool.java]:793 +|[MoogPoller] Pool created at [20180510 17:55:01.990 +0100].|+
WARN : [0:MooMS][20180511 10:06:07.690 +0100] [CDbPool.java]:833 +|[SituationSimilarity] Pool size is [5] with [5] available connections and [0] busy.|+
WARN : [3:MooMS][20180511 10:06:07.691 +0100] [CDbPool.java]:833 +|[MoogPoller] Pool size is [10] with [10] available connections and [0] busy.|+
WARN : [1:MooMS][20180511 10:06:07.693 +0100] [CDbPool.java]:792 +|[ToolRunner] DATABASE POOL DIAGNOSTICS:|+
WARN : [1:MooMS][20180511 10:06:07.694 +0100] [CDbPool.java]:793 +|[ToolRunner] Pool created at [20180510 17:55:00.183 +0100].|+
WARN : [1:MooMS][20180511 10:06:07.694 +0100] [CDbPool.java]:792 +|[MoogSvr : priority] DATABASE POOL DIAGNOSTICS:|+
WARN : [1:MooMS][20180511 10:06:07.694 +0100] [CDbPool.java]:833 +|[ToolRunner] Pool size is [5] with [5] available connections and [0] busy.|+
WARN : [1:MooMS][20180511 10:06:07.694 +0100] [CDbPool.java]:793 +|[MoogSvr : priority] Pool created at [20180510 17:54:56.800 +0100].|+
WARN : [1:MooMS][20180511 10:06:07.695 +0100] [CDbPool.java]:797 +|[MoogSvr : priority] [5] invalid connections have been removed during the lifetime of the pool.|+
WARN : [1:MooMS][20180511 10:06:07.695 +0100] [CDbPool.java]:833 +|[MoogSvr : priority] Pool size is [25] with [25] available connections and [0] busy.|+
WARN : [1:MooMS][20180511 10:06:07.695 +0100] [CDbPool.java]:792 +|[MoogSvr : normal priority] DATABASE POOL DIAGNOSTICS:|+
WARN : [1:MooMS][20180511 10:06:07.695 +0100] [CDbPool.java]:793 +|[MoogSvr : normal priority] Pool created at [20180510 17:54:56.877 +0100].|+
WARN : [1:MooMS][20180511 10:06:07.695 +0100] [CDbPool.java]:833 +|[MoogSvr : normal priority] Pool size is [50] with [50] available connections and [0] busy.|+
In both of these examples, the connections are "available" and none show as busy. However, in a busy system with flagging performance, the Moogfarmd log shows different results. In the example below, all connections are busy and have been held for a long time. This type of critical issue causes Moogfarmd to stop processing:
WARN : [pool-1-]20180309 16:49:30.031 +0000] [CDbPool.java]:827 +|[farmd] Pool size is [10] with [0] available connections and [10] busy.|+
WARN : [pool-1-][20180309 16:49:30.031 +0000] [CDbPool.java]:831 +|The busy connections are as follows:
1: Held by 5:SituationMgrLOGFILECOOKBOOK for 173603 milliseconds. Checked out at [CArchiveConfig.java]:283.
2: Held by 7:SituationMgrSYSLOGCOOKBOOK for 173574 milliseconds. Checked out at [CArchiveConfig.java]:283.
3: Held by 8:SituationMgrSYSLOGCOOKBOOK for 173658 milliseconds. Checked out at [CArchiveConfig.java]:283.
4: Held by 9:SituationMgrSYSLOGCOOKBOOK for 173477 milliseconds. Checked out at [CArchiveConfig.java]:283.
5: Held by 8:TeamsMgr for 173614 milliseconds. Checked out at [CArchiveConfig.java]:283.
6: Held by 4:SituationMgrSYSLOGCOOKBOOK for 173514 milliseconds. Checked out at [CArchiveConfig.java]:283.
7: Held by 5:PRC Request Assign - SituationRootCause for 173485 milliseconds. Checked out at [CArchiveConfig.java]:283.
8: Held by 2:SituationMgrSYSLOGCOOKBOOK for 173661 milliseconds. Checked out at [CArchiveConfig.java]:283.
9: Held by 6:SituationMgrSYSLOGCOOKBOOK for 173631 milliseconds. Checked out at [CArchiveConfig.java]:283.
10: Held by 6:TeamsMgr for 172661 milliseconds. Checked out at [CArchiveConfig.java]:283.|+
It is expected that occasionally some of the connections will be busy but as long as they are not held for long periods of time the system will function normally.
You can use the following bash script to automatically gather database pool diagnostics:
#!/bin/bash
#Get the cluster name
CLUSTER=$($MOOGSOFT_HOME/bin/utils/moog_config_reader -k ha.cluster)
#Get the current line numbers of latest log lines
FARMLINES=$(wc -l /var/log/moogsoft/moogfarmd.log|awk '{print $1}')
TOMLINES=$(wc -l /usr/share/apache-tomcat/logs/catalina.out|awk '{print $1}')
#Run ha_cntl -i <cluster>
ha_cntl -i $CLUSTER -y > /dev/null
sleep 5
#Print the results
echo "moog_farmd:"
tail -n +$FARMLINES /var/log/moogsoft/moogfarmd.log|egrep "CDbPool|Held by"
echo "tomcat:"
tail -n +$TOMLINES /usr/share/apache-tomcat/logs/catalina.out|egrep "CDbPool|Held by"
To run the script, execute the following command:
./get_dbpool_diag.sh
See HA Control Utility Command Reference for more information on the utility.
Monitor Graze API
The getSystemStatus endpoint returns useful information about running processes within the system. For example:
curl -u graze:graze -k "https://localhost/graze/v1/getSystemStatus"
See Graze API for more detail.Graze API
Monitor Moogfarmd Health Logs
The CFarmdHealth class in Moogfarmd logs detailed health information in JSON format once a minute. The log file provides the following information:
· totals: running totals since Moogfarmd was started.
· interval_totals: running totals since the last 60 second interval).
· current_state: a snapshot of the important queues in Moogfarmd.
· garbage_collection: JVM garbage collection data.
· JVM_memory: JVM memory usage data.
· message_queues: Queue usage and capacity.
· locked_thread_count: Sum of locked threads.
· total_thread_count: Sum of all threads.
· top_blocking_query: The query that is blocking the most other queries in the database. Only logged if there are blocking queries in the database at the time.
· top_blocking_query_count: The number of other queries being blocked by the top blocking query. Only logged if there are blocking queries in the database at the time.
For example, you can search on "CFarmdHealth" in the Moogfarmd log to view health messages:
WARN : [0:HLog][20190730 14:48:28.524 +0100] [CFarmdHealth.java:566] +|{"db_stats":
{"top_blocking_query_count":12,"locked_thread_count":18,"total_thread_count":35,"top_blocking_query":"DELETE FROM notification WHERE sig_id = i_sig_id"}, "garbage_collection":{"total_collections_time":12827,"last_minute_collections":0,"last_minute_collections_time":0,"total_collections":1244},"current_state":{"pending_changed_situations":0,"total_in_memory_situations":4764,"situations_for_resolution":0,"event_processing_metric":0.047474747474747475,"message_queues":{"AlertBuilder":0,"TeamsMgr":0,"Housekeeper":0,"Indexer":0,"bus_thread_pool":0,"Cookbook3":0,"Cookbook1":0,"SituationMgr":0,"SituationRootCause":0,"Cookbook2":0},"in_memory_entropies":452283,"cookbook_resolution_queue":0,"total_in_memory_priority_situations":0,"active_async_tasks_count":0},"interval_totals":{"created_events":1782,"created_priority_situations":0,"created_external_situations":0,"created_situations":10,"messages_processed":{"TeamsMgr":182,"Housekeeper":0,"AlertBuilder":1782,"Indexer":2082,"Cookbook3":1782,"SituationRootCause":172,"Cookbook1":1782,"SituationMgr":172,"Cookbook2":1782},"alerts_added_to_priority_situations":0,"alerts_added_to_situations":111,"situation_db_update_failure":0},"JVM_memory":{"heap_used":1843627096,"heap_committed":3007840256,"heap_init":2113929216,"nonheap_committed":66912256,"heap_max":28631367680,"nonheap_init":2555904,"nonheap_used":64159032,"nonheap_max":-1},"totals":{"created_events":453252,"created_priority_situations":0,"created_external_situations":0,"created_situations":4764,"alerts_added_to_priority_situations":0,"alerts_added_to_situations":36020,"situation_db_update_failure":0}}|+
The message_queues block contains string values and queue limits. "-" represents an unlimited queue. An example message_queues block is as follows:
"message_queues":{"AlertBuilder":"0/-","Cookbook":"0/-","Housekeeper":"0/-","Indexer":"0/-","bus_thread_pool":"0/-","SituationMgr":"0/-"}
In a healthy system that is processing data:
· The count of created events and created Situations increases.
· The messages_processed shows that Moolets are processing messages.
· The current_state.message_queues does not accumulate (there may be spikes).
· The total_in_memory Situations increases over time but reduces periodically due to the retention_period.
· The situation_db_update_failure should be zero.
Monitor Moogfarmd Data Processing Performance
The data processing component for Cisco Crosswork Situation Manager, Moogfarmd, is the most complex and configurable system component. It offers a range of performance capabilities depending on which Moolets you use and the workload for those Moolets. The following factors affect Moogfarmd performance:
· Incoming event rate from integrations and LAMs.
· CPU clock speed and number of available cores.
· Available memory and -Xmx setting of Moogfarmd process.
· Top-level and per-Moolet threads setting.
· Number of Moolets and their complexity and/or interaction with external services.
· Database load from other parts of the system, for example API requests.
· Incoming messages from the Message Bus or other parts of the system.
Moogfarmd buffers messages in message storm conditions. Each Moolet has its own message queue that enables it to handle message storms and process the backlog once the storm has cleared.
You can configure thread allocation for Moogfarmd in the $MOOGSOFT_HOME/config/moog_farmd.conf file as follows:
The top-level threads property controls the following:
— The default number of threads for each Moolet unless you specify a setting for a particular Moolet.
— The size of the database pool for Moogfarmd to database connections.
· The per-Moolet level threads property allows individual control of the number of threads for a particular Moolet.
Increasing either setting can lead to improved processing performance but will likely increase CPU and memory usage. Too many threads can lead to overload of connections or transactions to the database and impact other areas of the system. For example, increasing the number of threads for the Alert Builder Moolet can improve the event processing rate, but increases load on the database potentially causing deadlocks.
Alert Builder Moolet
The main performance gateway for Moogfarmd is the Alert Builder because it interacts with MySQL the most. In simple configurations with a tuned MySQL database and no other load, you can increase number of threads for the Alert Builder to process up to 2500 events per second and write them to the database at an equivalent rate. The following graph illustrates the performance impact of adding Alert Builder threads for moogfarmd running only with Alert Builder.

This scenario does not account for other database load, other Moolets, or any custom logic added to the Alert Builder Moobot. Event processing would run at about half this rate in a real-world case.
Sigalisers
Cisco Crosswork Situation Manager clustering algorithms or Sigalisers, employ complex calculations. Depending on its settings, the Sigaliser can account for a lot of processing time and memory within Moogfarmd. It is impossible to predict a processing rate for these algorithms because as they vary greatly according to configuration and workload. Normally Sigalisers do not add much load to the database except in a burst of Situation creation. Moogfarmd retains previously created active Situations in memory according to the retention_period setting in the Moogfarmd configuration file. You can expect memory to grow in Moogfarmd as a consequence under a high rate of Situation generation.
Other Moolets
The performance of other Moolets varies based upon configuration and the rate at which they receive messages to process. Moolets that interact with external services may introduce processing delay to Moogfarmd when there is network or processing latency associated with the external service.
Web Application Server Performance
The Apache Tomcat servlets provide the backend for the Cisco Crosswork Situation Manager UI which drives the end-user experience. Scalability tests show that a single Tomcat instance can support up to 500 concurrent UI users before response times degrade. Tomcat performance depends on the following factors:
· Incoming event rate from integrations and LAMs.
· Incoming messages from other parts of the system, such as Moogfarmd.
· CPU clock speed and number of available cores.
· Available memory and -Xmx setting of the Tomcat process.
· Database load from other parts of the system.
· Number and complexity of alert and Situation filters being used.
· Activities of the users.
To provide quicker load times for users, the UI employs caching benefits for filtered views. Tomcat writes to the Message Bus to cope with event or update storms.
The db_connections and priority_db_connections settings $MOOGSOFT_HOME/config/servlets.conf control the size of the database connection pool that Tomcat uses to connect to MySQL. You can increase either setting to potentially improve UI performance. Exercise caution when changing these values because increases to will typically increase CPU and memory usage of both the Tomcat and database processes. Too many connections can lead to an overload of transactions to the database which impacts other areas of the system.
Monitor RabbitMQ Message Bus Performance
RabbitMQ includes an admin UI that gives performance information about the message bus. By default this is accessible via http://hostname:15672 with credentials moogsoft/m00gs0ft. Check for the following scenarios:
· Early warning of any system resource issues in the "Nodes" section on the Overview page. For example, file/socket descriptors, Erlang processes, memory and disk space.
· Build-up of "Ready" messages in a queue - this indicates a message queue is forming. This means that the associated Cisco Crosswork Situation Manager process is not consuming messages from this queue. It could also point to an orphaned queue that no longer has an associated consumer. This could happen if "message_persistence" has been enabled in system.conf and Moogfarmd and or Tomcat has been reconfigured with a different HA process group name.
See the RabbitMQ docs for information on how to use the admin UI.
Monitor System Performance Metrics
Navigate to System Settings > Self Monitoring > Processing Metrics to see a breakdown of the current state of the system based on the metrics received from the running components.
· The Moogfarmd process and all LAMs publish detailed performance information.
· A bullet chart at the top of the page shows the key performance metric for the system: Current Maximum Event Processing Time. The defined performance ranges are color coded: good (green), marginal (yellow) and bad (red). As the metric changes the bullet chart updates to reflect good, marginal or bad performance.
· The system calclulates Current Maximum Event Processing Time as the approximate 95th percentile of the current maximum time in seconds that it takes for an event to make its way through the system from its arrival at a LAM until its final processing by a Moolet in Moogfarmd.
· By default, AlertBuilder, AlertRulesEngine and All Sigalisers are used to calculate the Current Maximum Event Processing Time metric.
· You can configure the metric_path_moolet property in moog_farmd.conf to specify the Moolets to use to calculate Current Maximum Event Processing Time.
By default, the good, marginal and bad ranges of the bullet chart are set to 0-10secs, 10-15secs and 15-20secs respectively. You can change the configuration in the in the eventProcessingTimes section in the portal block of $MOOGSOFT_HOME/ui/html/web.conf.
Good performance means LAMs are consuming and publishing events without problem as indicated by:
· Message Queue Size is 0.
· Socket Backlog (if relevant) is not increasing.
Additionally, Moogfarmd is consuming and processing events successfully as indicated by all of:
— Total Abandoned Messages is 0 for the majority of the time.
— Asynchronous Task Queue Size is 0 for the majority of the time.
— Cookbook Resolution Queue is 0 for the majority of the time.
— Message backlogs for all Moolets is 0 for the majority of the time.
— The Messages Processed count for all running Moolets should be the same (unless custom configuration causes event routing through different Moolets) i.e. no Moolet is falling behind.
The above should lead to a stable low Current Maximum Event Processing Time depending on the complexity of the system.
Marginal or Bad performance means LAMs are not consuming and publishing events at the rate at which they receive them, as indicated by:
· Message Queue Size is > 0 and likely increasing.
· Socket Backlog is increasing.
Additionally, Moogfarmd is not consuming and processing events in a timely fashion as indicated by some or all of:
· Total Abandoned Messages is constantly > 0 and likely increasing.
· Asynchronous Task Queue Size is > 0 and likely increasing.
· Cookbook Resolution Queue is constantly > 0 and likely increasing.
· Message backlogs for all Moolets is constantly > 0 and likely increasing.
· The Messages Processed count for all running Moolets is not the same indicating that some Moolets are falling behind. This doesn't apply for cases where custom configuration causes event routing through different Moolets.
The above will likely lead to an unstable high Current Maximum Event Processing Time depending on the complexity of the system.
See Self Monitoring for more detail.
Monitor Tomcat Servlet Logs
Tomcat writes counter information from each of the main servlets to its catalina.out once a minute.
Example output:
WARN : [Thread-][20180510 20:57:05.501 +0100] [CReporterThread.java]:136 +|MoogPoller read [16722] MooMs messages in the last [60] seconds.|+
WARN : [Thread-][20180510 20:57:07.169 +0100] [CReporterThread.java]:136 +|Graze handled [55] requests in the last [60] seconds.|+
WARN : [Thread-][20180510 20:57:10.181 +0100] [CReporterThread.java]:136 +|MoogSvr handled [86] requests in the last [60] seconds.|+
WARN : [Thread-][20180510 20:58:03.197 +0100] [CReporterThread.java]:136 +|Situations similarity component calculated similarities for [264] situations in the last [60] seconds.|+
The counters are:
· Number of MoogSvr requests in the last minute (i.e. number of standard UI requests made).
· Number of Moogpoller MooMs messages in the last minute (i.e. number of messages read from the bus).
· Number of Graze requests in the last minute.
· Number of similar Situations calculated in the last minute.
In a healthy system that is processing data:
· The Moogpoller count should always be non-zero.
· The MoogSvr and Graze counters may be zero, but should reflect the amount of UI and Graze activity.
· The similar Situations counter may be zero but should reflect the number of similar Situations that are occurring in the system.
Self Monitoring
Administrators can use Self Monitoring to view the status, health, and processing metrics of the Cisco Crosswork Situation Manager processes. The different tabs show the state of Processing Metrics, Event Processing, Web Services, Event Ingestion and Message Bus.
Heartbeats are one of the key concepts in Self Monitoring. A heartbeat is an internal message sent by a process every 10 seconds to inform Self Monitoring that it is still running.
All data displayed in this screen is live and updates continually.
Package States
The table below describes the possible states for a package:
| Icon |
Description |
| Green circle with a white check. |
The process is running (reserved or unreserved*). |
| Yellow circle with a white exclamation mark. |
The reserved process has missed some heartbeats. This could indicate a potential problem and should be investigated. |
| Red circle with a white cross. |
The reserved process is either not running or has missed its last heartbeat. This could indicate the process has failed, has not started or that Cisco Crosswork Situation Manager is not working properly. |
| Gray circle with a white backslash. |
The unreserved process is not running. |
| White circle with a green check. |
The process is in passive mode. This is for High Availability deployments only. See High Availability Overview for more information. |
You can set processes as reserved or unreserved in the system.conf file ($MOOGSOFT_HOME/config/system.conf. If a package's 'reserved' setting is 'true', the self monitoring reports a warning if the package is not running. Stopped unreserved processes do not generate warnings.
Controls
There are a number of controls in Self Monitoring that can be used to stop, start and restart Moogfarmd and the LAM services:
| Button |
Description |
| Refresh symbol. |
Restart. |
| Stop symbol. |
Stop - only works if Moogfarmd is running as a process rather than a service. |
| Play symbol. |
Start. |
These can be configured by users with Super User permissions.
Self Monitoring Tabs
The Self Monitoring screen is divided into a number of tabs. Each section displays the states of the various processes, indicating which are running or which have issues:
· Processing Metrics
· Event Processing
· Web Services
· Event Ingestion
· Message Bus
Processing Metrics
This tab, which is open by default when Self Monitoring is launched, displays event processing times and other metrics.

The icon in the top left corner indicates the overall state of event processing. This is determined by the Current Maximum Event Processing Time in seconds. This time is indicated by the position of the gray bar on the colored bullet graph shown below. The Current Maximum Event Processing Time is 1.917s in this example:

The default bullet chart color values are as follows:
· GREEN (0 - 10 seconds) Good performance
· YELLOW (10 - 15 seconds) Marginal performance
· RED (15 - 20 seconds) Poor performance
The time values are configurable in the web.conf file.
Using Processing Metrics
To use the Processing Metrics tab, open the LAMs and moog_farmd folders and look for deviations from normal values.

The numeric value itself may not be an absolute measurement of health, so as a general rule, look for unusual or sudden changes in the values or behavior. See the examples below:
· If a particular LAM becomes a data flow bottleneck, expect to see substantial increases in the values for the Message Queue Size and/or Socket Backlog metrics for that LAM. This leads to an increasing Event Processing Time for the appropriate Moogfarmd (which is expecting data from the LAM).
· If an AlertRulesEngine in a Moogfarmd instance becomes a data flow bottleneck, expect to see a substantial increase in the Message Backlog and possibly the Messages Processed decreasing for that AlertRulesEngine. This also leads to an increasing Event Processing Time for the Moogfarmd.
Both of these result in the bullet chart (at the top) showing increasing Current Maximum Event Processing Time, from green to yellow to red.
Event Processing
This tab contains a process group including Moogfarmd (the core Cisco Crosswork Situation Manager application) and the Moolets, such as AlertBuilder, Alert Rules Engine, Sigalisers.

The icon in the top left corner indicates the overall state (running normally in the example above). The group and cluster names are displayed in the top right corner. The time and date of the last heartbeat is displayed above the list of Moolet processes.
Web Services
This tab contains all processes related to Tomcat web applications: moogsvr, moogpoller, toolrunner and Graze.

Each row displays the following information:
| Column |
Description |
| + |
Click this button to expand or collapse the row for further information. For example 'No reported problems'. |
| State |
This shows an indicator icon showing whether or not the process is running as normal. |
| Process |
The name of the Cisco Crosswork Situation Manager component. |
| *Instance |
The name of the instance (in High Availability there are multiple instances of Cisco Crosswork Situation Manager). |
| *Group |
The name of the Process Group the component belongs to. |
| *Cluster |
The name of the Cluster the component's Process Group belongs to. |
| Last Heartbeat |
The time of the last received heartbeat. A heartbeat indicates a health component. |
Note
* These only apply to High Availability deployments where there are more than one instance of Cisco Crosswork Situation Manager and its component processes.
Event Ingestion
This tab displays information about the state of all processes relating to the LAMs and the individual processes which process raw data and create events:

The controls in the far right column can be used to stop and restart active LAM processes or to start inactive LAMs.
Message Bus
The final tab provides a link to the Message Bus Console, also known as the MooMs (Moogsoft Messaging System). This is hosted by message-queueing software RabbitMQ.

Click the link to proceed to the RabbitMQ management console.
The username and password to log in are specified and can be configured in $MOOGSOFT_HOME/config/system.conf (under mooms.username and mooms.password in the JSON) and correspondingly in RabbitMQ. See Configure the Message Bus for more information.Configure the Message Bus
Once logged in, RabbitMQ displays information about message rates, connections, channels, queued messages, etc.

Configuration
The 'Restart/Stop/Start' feature uses the moogfarmd/LAM service scripts under /etc/init.d, for example, /etc/init.d/moogfarmd and /etc/init.d/logfilelamd, in combination with the Apache Tomcat 'toolrunner'.
You need Super User role permissions to configure this feature. Create a user in the 'moogsoft' group. This user must be used by the toolrunner and the services in order to start/stop services via the UI. For example:
· /etc/init.d/moogfarmd - PROCESS_OWNER set to 'controluser'
· $APPSERVER_HOME/webapps/toolrunner/WEB-INF/web.xml - toolrunneruser set to 'controluser' (toolrunnerpassword needs to be the password for that user)
Cisco recommends that you do not use the default 'moogsoft' user because that is a system user and does not allow you to log in using a password. Update the /etc/init.d/ service scripts to have the correct:
· SERVICE_NAME (to make the services unique)
· PROCESS_OWNER (must be the same user as the toolrunner user)
· INSTANCE/CLUSTER/GROUP (unless already configured via relevant the LAM/Moogfarmd/system.conf configuration file). These need to be provided to the 'daemon' lines as command line parameters. For example --instance MY_INSTANCE --group MY_GROUP --cluster MY_CLUSTER.
Add the name of the service script into the 'service_name' field in $MOOGSOFT_HOME/config/system.conf for that Cisco Crosswork Situation Manager process. To ensure the service appears in the right Self Monitoring tab, the process_type field must be set. See the default system.conf file for examples.
If a Moogfarmd service or LAM service is run that does not match a configuration block in system.conf/'processes', then it still appears within the UI 'Self Monitoring' dialog, but it is not possible to start/stop/restart the service.
The 'toolrunner' is used to control the services (requires configuring $APPSERVER_HOME/webapps/toolrunner/WEB-INF/web.xml):
1. The 'toolrunneruser' must match the PROCESS_OWNER specified within the relevant service script. This is because only root can run services as a different user.
2. The 'toolrunnerpassword' must be the password of the 'toolrunneruser'.
3. The 'toolrunnerhost' value must match the host of the machine which contains the moogfarmd/LAM services and the PROCESS_OWNER user.
It is more likely that an existing LAM/Moogfarmd service will have been run already in upgrade scenarios. If the service is one which needs to be controlled via the UI, then the service log file and PID (if present) need to be 'chowned' to the new service script PROCESS_OWNER/toolrunner user before it will work. For example:
chown toolrunneruser /var/log/moogsoft/moogfarmd.log
See the example of a $MOOGSOFT_HOME/config/system.conf file below:
{
"group" : "moog_farmd",
"instance" : "",
"service_name" : "moogfarmd",
"process_type" : "moog_farmd",
"reserved" : true,
"subcomponents" :
[
"AlertBuilder",
"Sigaliser",
"Default Cookbook",
"Journaller",
"TeamsMgr"
#"AlertRulesEngine",
#"SituationMgr",
#"Notifier"
]
},
Troubleshoot Installation and Upgrade
This topic outlines troubleshooting steps for issues you may encounter when installing or upgrading Cisco Crosswork Situation Manager.
moog_farmd log
1. Located in /var/log/moogsoft
2. As with LAMs, logging is configured via the Log4j based logging (log_config section of the moog_farmd.conf file
3. Each line references the Moolet or process that wrote the message

Yum errors and workarounds
Yum: Incorrect Cisco Crosswork Situation Manager version
If an incorrect or outdated version is offered when installing Cisco Crosswork Situation Manager your Yum cache may need cleaning.
Run the following command and then re-attempt the installation:
yum clean all
If an attempt to install Cisco Crosswork Situation Manager fails with an error such as the following, it may be caused by a conflict with the MySQL libraries on the host.
Running rpm_check_debug
Running Transaction Test
Transaction Check Error:
file /usr/lib64/mysql/libmysqlclient.so.16.0.0 from install of mysql-community-libs-compat-5.7.22-2.el6.x86_64 conflicts with file from package compat-mysql51-5.1.54-1.el6.remi.x86_64
file /usr/lib64/mysql/libmysqlclient_r.so.16.0.0 from install of mysql-community-libs-compat-5.7.22-2.el6.x86_64 conflicts with file from package compat-mysql51-5.1.54-1.el6.remi.x86_64
Error Summary
-------------
Run the following bash commands to allow the product to be installed successfully:
echo "remove compat-mysql51" > /tmp/moog_yum_shell.txt
echo "install mysql-community-libs-compat-5.7.22" >> /tmp/moog_yum_shell.txt
echo "install mysql-community-client-5.7.22" >> /tmp/moog_yum_shell.txt
echo "install mysql-community-libs-5.7.22" >> /tmp/moog_yum_shell.txt
echo "install mysql-community-server-5.7.22" >> /tmp/moog_yum_shell.txt
echo "install mysql-community-common-5.7.22" >> /tmp/moog_yum_shell.txt
echo "groupinstall moogsoft" >> /tmp/moog_yum_shell.txt
echo "run" >> /tmp/moog_yum_shell.txt
cat /tmp/moog_yum_shell.txt | yum shell -y
The above error is most likely to occur on hosts on which some MySQL components are already installed. The issue is often seen when trying to install moogsoft-db on a system with an existing MySQL installation.
Nginx error and workaround
Error: Package: moogsoft-ui-7.2.0-123.x86_64 (moogsoft-aiops) Requires: nginx >= 1.14.0
If you encounter the following error when attempting to install Cisco Crosswork Situation Manager:
Requires: nginx >= 1.14.0
---> Package moogsoft-ui.x86_64 0:7.2.0-123 will be an update
--> Processing Dependency: nginx >= 1.14.0 for package: moogsoft-ui-7.2.0-123.x86_64
--> Finished Dependency Resolution
Error: Package: moogsoft-ui-7.2.0-123.x86_64 (moogsoft-aiops)
Requires: nginx >= 1.14.0
Try using --skip-broken to work around the problem, or try:
rpm -Va --nofiles --nodigest
Alternatively, you could manually install the Nginx repo with the following command and then re-attempt the Cisco Crosswork Situation Manager installation.
rpm -Uvh http://nginx.org/packages/centos/7/noarch/RPMS/nginx-release-centos-7-2.el7.ngx.noarch.rpm
UI errors and workarounds
If you cannot access the UI from your host machine, check your firewall and if you're listening on the right ports:
1. To check if your firewall is enabled:
sestatus
This returns the status disabled if the firewall is disabled.
2. To disable an active firewall:
setenforce 0
3. To check whether a port is open:
firewall-cmd --zone=public --query-port=8443/tcp
firewall-cmd --zone=public --query-port=8080/tcp
4. To open a port:
firewall-cmd --permanent --zone=public --add-port=8080/tcp
firewall-cmd --permanent --zone=public --add-port=8443/tcp
firewall-cmd --reload
If you do not uninstall certain UI integrations before upgrading to Cisco Crosswork Situation Manager v8.0.x, you may see a 502 gateway error when trying to access integrations in the Cisco Crosswork Situation Manager UI.
To solve the problem, follow these steps to delete the UI integrations and perform some cleanup tasks.
· Run the following SQL against the moogdb database:
use moogdb
DELETE t1 FROM system_config t1 JOIN integration_url_tools t2 ON t1.id = t2.system_config_id;
DELETE t1 FROM system_config t1 JOIN integration_moolets t2 ON t1.id = t2.system_config_id;
DELETE t1 FROM sitroom_plugins t1 JOIN integration_sitroom_plugins t2 ON t1.id = t2.plugin_id;
DELETE t1 FROM link_definitions t1 JOIN integration_link_definitions t2 ON t1.id = t2.link_id;
DELETE t1 FROM alert_column_names t1 JOIN integration_custom_fields t2 ON t1.internal_name = CONCAT('custom_info.',t2.field);
DELETE t1 FROM situation_column_names t1 JOIN integration_custom_fields t2 ON t1.internal_name = CONCAT('custom_info.',t2.field);
1. Run the following SQL against the moog_intdb database:
use moog_intdb
DELETE IGNORE FROM integration_migration;
2. Go to the Integrations tab in the UI and reconfigure your integrations.
Situation Room plugins or Situation client tools to external URLs do not work
A Situation Room plugin or Situation client tool shows an error similar to the following after upgrade:
Refused to frame 'https://site.com/' because it violates the following Content Security Policy directive: "default-src 'self'
This release includes a Content Security Policy that restricts the automatic loading of resources from external domains. You must follow the steps to configure Cisco Crosswork Situation Manager to allow access to required external domains.
For instructions see RPM - Upgrade UI components or Tarball - Upgrade UI components according to your implementation type.
Troubleshoot Integrations Controller
The Integrations Controller provides basic configurations for all of the brokers and integrations in your Cisco Crosswork Situation Manager instance beyond the configurations assigned through broker profiles.
This document provides guidance on how to deal with Integrations Controller-related issues.
“liquidbase.exception.LockException”
In the unlikely event that the Integrations Controller exits during DB table creation (this is only possible on the first startup after install/upgrade), the Controller will fail to initialize on subsequent attempts as there is a lock registered in the database.
You can detect if this issue is occurring if the Controller hangs for 5 minutes and then exits with the exception “liquidbase.exception.LockException”. You can then confirm that the lock exists by running the following query against the integrations database:
<integrations_database_name>: SELECT * FROM DATABASECHANGELOGLOCK WHERE LOCKED=TRUE;
If the query returns any results, the lock exists. To correct the issue, complete the following:
· Ensure that no other Integrations Controllers are currently starting up and performing the DB table creation. If there are, allow them to finish.
· Assuming no Controllers are performing the creation, run the following against the integrations database:
<integrations_database_name>: UPDATE DATABASECHANGELOGLOCK SET LOCKED=FALSE, LOCKGRANTED=null, LOCKEDBY=null where ID=1;
· Restart Tomcat.
Troubleshoot Mobile
Cisco Crosswork Situation Manager includes a self-signed certificate by default. If you want to use Cisco Crosswork Situation Manager for Mobile on an iPhone, you need to add a valid SSL certificate. This is because WebSockets do not work on iOS with self-signed certificates.
If a valid root CA certificate is not added, a 'Connection Error' appears at login and Cisco Crosswork Situation Manager for Mobile does not work.
Nginx: SSL configuration
To apply a valid certificate to Nginx, edit the moog-ssl.conf file in one of the following locations, depending on your implementation type:
RPM: /etc/nginx/conf.d/moog-ssl.conf
Tarball: /usr/share/moogsoft/etc/cots/nginx/moog-ssl.conf
Change the default self-signed certificate and key locations to point to the valid root certificate and key:
#ssl_certificate /etc/nginx/ssl/certificate.pem;
#ssl_certificate_key /etc/nginx/ssl/certificate.key;
ssl_certificate /etc/certificates/GeoTrust_Universal_CA.crt;
ssl_certificate_key /etc/certificates/GeoTrust_Universal_CA.key;
Restart Nginx.
Troubleshoot Percona
Percona XtraDB Cluster is the database clustering solution installed with this version of Cisco Crosswork Situation Manager. If you are an upgrading customer, strongly recommends that you upgrade to Percona.
This document provides guidance on how to deal with Percona-related issues.
Nodes in the Percona cluster are down
If two nodes in the Percona cluster go down simultaneously, it is a critical failure. It can produce the following symptoms:
· The Alert Builder can appear to become "stuck". It may be consuming events from the Message Bus but is not writing them to the database, causing a message queue to form.
Example output using the HA Control utility is as follows:
WARN : [0:HA Controller][20190614 10:47:20.194 +0100] [CAbstractPool.java:214] +|[moog_farmd] POOL DIAGNOSTICS:|+
WARN : [0:HA Controller][20190614 10:47:20.194 +0100] [CAbstractPool.java:216] +|[moog_farmd] Pool created at [20190613 16:24:53.302 +0100].|+
WARN : [0:HA Controller][20190614 10:47:20.194 +0100] [CAbstractPool.java:222] +|[moog_farmd] [12] invalid resources have been removed during the lifetime of the pool.|+
WARN : [0:HA Controller][20190614 10:47:20.194 +0100] [CAbstractPool.java:227] +|[moog_farmd] Pool size is [30] with [23] available connections and [4] busy.|+
WARN : [0:HA Controller][20190614 10:47:20.198 +0100] [CAbstractPool.java:244] +|The busy resources are as follows:
0: Held by 1:AlertBuilder for 584832 milliseconds. Currently in
java.net.SocketInputStream#socketRead0 - SocketInputStream.java:-2
java.net.SocketInputStream#socketRead - SocketInputStream.java:115
java.net.SocketInputStream#read - SocketInputStream.java:168
java.net.SocketInputStream#read - SocketInputStream.java:140
To resolve, try the following:
· Ensure that you have bootstrapped the first node (started the node without any known cluster addresses). Depending on your installation type, see one of the following guides for more information:
· Ensure that the other nodes do not have a file named grastate.dat in the MySQL data directory. If the file is present, delete it.
· Restart one of the secondary nodes and wait for it to sync from the bootstrapped node. Note that this can create a temporary write lock on the bootstrapped node.
· Once the second node is up and running, start the remaining nodes.
You can also refer to the Percona documentation on how to recover a PXC cluster in various scenarios.
Troubleshoot Processes
The following sections include troubleshooting advice for Cisco Crosswork Situation Manager, moogfarmd, RabbitMQ, LAM, and NGinix, alert, and situation processing issues.
Cisco Cisco Crosswork Situation Manager does not Start
Check the following:
· Check the file system with the command df -m and look for partitions that are full.
· The environment variables in your shell might not be set up correctly. Run the environment and check the location set for $MOOGSOFT_HOME.
Moogfarmd does not Start
The message +|No config present|+ in message in /var/log/moogsoft/moogfarmd.log indicates a syntax error in . Do the following:
· Check the config file for punctuation mistakes. Look for:
— Missing commas
— Unbalanced quotes
— Missing {' or '}
In this case, use f# to comment out code instead of */and /*
· Edit moog_farmd.conf and then restart the service
RabbitMQ Errors
See also Message System Deployment.
"No such user" Message on Startup
If you see the message No such user in /var/log/rabbitmq/startup_err, do the following:
· Check /etc/passwd for user rabbitmq with the following command:
grep rabbitmq/etc/passwd
· If no user is found, add the following to /etc/passwd:
rabbitmq:x:491:488:RabbitMQ messaging server:/var/lib/rabbitmq:/bin/bash
"Failed to create aux thread" Message
If you see the following message "Failed to create aux thread" in var/log/rabbitmq/startup_err, this is most likely a ulimit issue for the RabbitMQ user.
Do the following:
· Check ulimit settings for the RabbitMQ user by running the following command as root:
su - rabbitmq
bash-4.1$ ulimit -a
core file size (blocks, -c) 0
data seg size (kbytes, -d) unlimited
scheduling priority (-e) 0
file size (blocks, -f) unlimited
pending signals (-i) 515675
max locked memory (kbytes, -l) 64
max memory size (kbytes, -m) unlimited
open files (-n) 1024
pipe size (512 bytes, -p) 8
POSIX message queues (bytes, -q) 819200
real-time priority (-r) 0
stack size (kbytes, -s) 10240
cpu time (seconds, -t) unlimited
max user processes (-u) 1024
virtual memory (kbytes, -v) unlimited
file locks (-x) unlimited
· The above example shows ulimit settings that are likely too low for RabbitMQ.
· As per instructions here it may be appropriate to increase the ulimit settings for "open files" and "max user processes" to at least 4096 for development/QA environments and 65536 for production environments
"Unable to create connection" Message
If you see the message "Unable to create connection" message appearing in a LAM, Moogfarmd, or Apache Tomcat logs, it indicates that the process unable to connect to the Message Bus zone in RabbitMQ.
· Check that the RabbitMQ server is running:
service rabbitmq-server status
· If the service is not running, start it:
service rabbitmq-server start
· If the service is running, check that the zone used in Cisco Cisco Crosswork Situation Manager matches the vhost in RabbitMQ. List the zones (vhosts) added in RabbitMQ:
rabbitmqctl list_vhosts
· Check the MooMS section in /usr/share/moogsoft/config/system.conf for the zone used in Cisco Cisco Crosswork Situation Manager .
· If the zone is missing, add the zone (vhost) to RabbitMQ manually (see Message System Troubleshooting).
· Restart the affected process.
LAMs do not Start from Command Line
If LAMs run from the command line or as a service result in the following error:
[root@moogbox2 bin]# ./socket_lam
./socket_lam: error while loading shared libraries: libjvm.so: cannot open shared object file: No such file or directory
it may be because /usr/java/jdk1.8.0_171/jre/lib/amd64/server has not been added to the LD_LIBRARY_PATH.
To run the LAMs via a command line, a change the LD_LIBRARY_PATH to be as follows (the default initd files contain this setting):
export LD_LIBRARY_PATH=$MOOGSOFT_HOME/lib:/usr/GNUstep/Local/Library/Libraries:/usr/GNUstep/System/Library/Libraries:$JAVA_HOME/jre/lib/amd64/server
Generic LAM does not Start
"Unable to parse configuration file" Error
Check the following:
· Unable to parse configuration file" message in /var/log/moogsoft/<lamd_name>.log" indicates a syntax error in the LAM configuration file.
· Check the config file for syntax mistakes. Look for missing commas and unbalanced quotes.
· Compare the configuration file to a default configuration file for the same LAM. Use the following command to locate differences in the files:
· diff -y <current_lam>.conf <default_lam>.conf | less
· Edit <current_lam>.conf. to resolve any syntax errors and restart the LAM.
Check the following:
· "Failed to connect to [host:port]: Connection refused" error in /var/log/moogsoft/<lamd_name>.log means that the port specified in the LAM configuration file is already in use.
· Use the following command to check that the LAM is not already started:
ps -ef | grep <lamd_name>
· Check that another process is not already bound to the port.
· If required, edit the port setting for the LAM in the configuration file and restart the LAM.
"Host unresolvable" Error
Check the following:
· "Host [hostname] unresolvable" error in /var/log/moogsoft/<lamd_name>.log means that the LAM is unable to resolve the host, or the hostname is incorrectly set.
· In the LAM config file, check the address property and correct any errors.
· Check that the /etc/hosts file contains an entry for the specified hostname.
"Failed to open file" Error
Check the following:
· "Failed to open file [<path to file>] error in /var/log/moogsoft/<lamd_name>.log means that the LAM is unable to locate a file specified in the LAM configuration file.
· Locate the missing file in $MOOGSOFT_HOME/bots/lambots or $MOOGSOFT_HOME/contrib.
· Update the LAM configuration file with the correct file path and restart the LAM.
Syntax Error in Presend Filter
Check the following:
· In the LAM configuration file, locate the presend filter file name.
You can do this with a JavaScript editor. Check the code to locate any syntax errors.
· If you have Node.js installed, you can run the following command to locate the incorrect line in the code:
node $MOOGSOFT_HOME/bots/lambots/<path_to_filter_file>.js
· Edit $MOOGSOFT_HOME/bots/lambots/<path_to_filter_file>.js to resolve the error and restart the LAM.
Empty Columns in Alert Lists
Check the following:
· Empty columns in alert lists may indicate incorrect field mapping assignments.
· Check field mappings at the bottom of the LAM configuration file.
· Edit the configuration file to properly map the field to the column name and then restart the LAM.
Socket LAM is not Processing
Check the following:
· The LAM may be set to Server mode rather than Client mode in the configuration file. For a description of mode types see Socket LAM.Socket LAM
· Set the mode correctly in the configuration file and restart the LAM.
JSON Feed is not Processing
Check the following:
· The JSON string might be incorrectly formatted. For example, event data contains nested JSON.
· Run the LAM in debug mode and look for nested JSON.
· Either modify the event data or edit the presend filter to match values in the nested JSON.Either modify the event data or edit the presend filter to match values in the nested JSON.
Logfile LAM Does not Start
Check the following:
1. In the LAM configuration file, check the target setting and confirm the file path to the target log file.
2. "Could not stat file [-1] error: [Bad file descriptor]" error in /var/log/moogsoft/<lamd_name>.log shows that the Logfile LAM cannot locate the log file to read.
REST LAM Does not Start
If the REST LAM does not start and you are using SSL, the SSL path might be missing. Do the following:
· Verify that the following properties are correctly set:
path_to_ssl_files
ssl_cert_filename
ssl_key_filename
· Verify that the value of the use_ssl property has been set correctly.
· indicates a missing SSL path in the LAM configuration file./var/log/moogsoft/<lamd_name>.log"No file path specified" error in
+|No file path specified|+ message in /var/log/moogsoft/<lamd_name>.log
Nginx Fails on Startup if IPv6 not Configured
Comment out the following references in two configuration files:
· Go to /etc/nginx/conf.d
· Edit out IPv6 references with a hash #:
| Configuration File |
Section |
| moog-default.conf |
listen 80 default_server; #listen [::]:80 default_server; |
| moog-ssl.conf |
listen 443 ssl default_server; #listen [::]:443 ssl; |
Alert Processing Issues
Do the following:
· Ensure that the product license has been applied.
· Check that the RabbitMQ server is running:
service rabbitmq-server status
· Check that the "run on startup" setting for Alert Builder in the Moogfarmd configuration file is set to true.
· Check the Moogfarmd log:
/var/log/moogsoft/moogfarmd.log
· Check the Alert Builder Moolet for syntax errors or errors in logic.
· Check that the LAM is correctly parsing/mapping the data feed.
· Check that the LAM is not performing any post-event processing that may be filtering out the events in the associated LAMbot.
No Situations Created
Do the following:
· Ensure that the product license has been applied.
· Check the Moogfarmd configuration file to ensure that the "run on startup" property for the Sigaliser used is set to true.
· In the Moogfarmd configuration file, check that the "process output of" setting for the Sigaliser used lists the correct Moolet.
· Check that the Moolet listed in the "process output of" property is running.
· If Moolet settings are too restrictive or too open they may not produce Situations.
Troubleshoot Required Services for a Functional Production System
These services support the following commands:
service <service-name> status
service <service-name> stop
service <service-name> start
service <service-name> restart
| Service name |
Description |
| apache-tomcat |
Web server that contains the servlets that provide the Cisco Crosswork Situation Manager user interface. |
| nginx |
Web server that handles security, such as Cisco Crosswork Situation Manager login, PHP and HTTP/SSL implementation. |
| socketlamd trapdlamd newreliclamd |
Link Access Modules used for data ingestion. These LAM names are provided as examples; the specific set of service names might differ in your system. At least one instance of a LAM is required for data feed. |
| moogfarmd |
Core Cisco Crosswork Situation Manager system application. |
| mysqld |
Database containing Cisco Crosswork Situation Manager data (database schemas etc.) |
| rabbitmq-server |
Message system for Cisco Crosswork Situation Manager. |
| elasticsearch |
Elasticsearch service for UI search feature. |
Troubleshoot Topologies
This topic outlines troubleshooting steps for issues you may encounter with the topologies feature in Cisco Crosswork Situation Manager.
See Topologies for information on setting up topologies.
Topologies API errors and workarounds
If you fail to delete a topology or cannot make a topology inactive:
· Check whether the topology is being used to filter a Recipe. You must remove the topology from all Recipes before you can delete it or change its status.
413 error when adding nodes or links
If you receive a 413 error when trying to add a large number of nodes or links to a topology:
· There may be too much data for the endpoint to process. Try shortening the names of your nodes and links.
· If your topology data is larger than larger than 40 MB when saved in a .csv file Cisco recommends using the Topology Loader utility. See Load a Topology for more information.
400 error when modifying a topology
If you receive a 400 "bad request" error when attempting to create, retrieve, modify or delete nodes or links for a topology:
· Check that the topology in the request exists. You must create a topology before configuring its nodes and links.
Missing Topologies API functionality
The Topologies API and the Graph Topology Moobot module do not contain identical functionality. Refer to the Graph Topology topic for functionality that may not be available in the Topologies API, for example distance methods.Graph Topology
Topology loader utility errors and workarounds
Topology loader utility fails to run
If the Topology loader utility fails to run, check your .csv file as follows:
· The lines must follow the format <node1>,<node2>,<optional description>.
· Remove any extraneous characters, lines and spaces.
· Enclose any commas in node names in double quotes.
· The source and sink nodes cannot be set to the same node.
See Load a Topology for more information on the utility.
Recipe errors and workarounds
Topology not available to filter a Recipe
If you've created a topology but you can't use it to filter a Recipe, check that the topology is active. You can update its active status using the /topologies endpoint.
Note that cloned topologies are set to inactive. Activate a cloned topology when you want to use it to filter a Recipe.
File-based Cookbook Recipes can no longer cluster on topology. You may see an error similar to the following in the Moogfarmd log file:
“File-based recipe with name [{MyRecipe}] contains topology filter configuration - this is not supported. Topology configuration for this recipe will be ignored.”
To cluster on topology, create a replacement Recipe in the UI with a topology filter.
See Configure Logging for more information on log Moogfarmd files.
Clustering by topology not working
If your alerts are failing to cluster by topology as configured in your Recipe, check that your Recipe alert matching attribute is an event field.
You can also check the contents of a custom info field for an alert you expect to be clustered, and ensure that your Recipe is correctly configured to include the data.
Vertex Entropy errors and workarounds
Vertex Entropy values are incorrect
If you create a large topology with thousands of links, the Graph Analyser process starts to calculate Vertex Entropy when it next runs as part of Housekeeper (every 30 seconds).
If Cisco Crosswork Situation Manager is processing events and updating the topology simultaneously, you may temporarily see unexpected results. Values will be correct once processing completes.
As a workaround, you can use the clone and replace endpoints in the Topologies API to clone an active topology, make changes to the inactive clone, and then replace the active topology with the updated version. See Create and Manage Topologies for more information.
Vertex Entropy values are not being updated
If Vertex Entropy values are not updating, check that the process is turned on. In the Cisco Crosswork Situation Manager UI, go to Settings > Vertex Entropy. This process is enabled by default.
Situation Room errors and workarounds
The topology tab does not appear
If a Situation was created by a Recipe using a topology filter, the topology tab is active in the Situation Room. If the Situation was created in any other way, for example Tempus, manual merge, or a Recipe without a topology filter, the topology tab is disabled.
The topology tab does not display the expected information
If an alert in a Situation is also in another Situation for a different topology (that is, it has been clustered by another Recipe using a different topology), both topologies are shown as impacted. Select another topology from the drop-down list to view it.
Manually created alerts are not visible
Manually created alerts are not added to topologies by design.
Miscellaneous errors and workarounds
If you configured a topology in a previous Cisco Crosswork Situation Manager version the topology no longer exists once you upgrade to v8.0. You can recreate a topology using the Topologies API endpoints. You can also use the Topology Loader utility to load a large topology from a .csv file.Topologies API
Archived Situations don't show topology details
Archived Situations in the historic database do not retain topological data.
Troubleshoot Slow Alert/Situation Creation
If the system is showing signs of latency in alert or Situation creation then the problem is likely with Moogfarmd and/or the database. The following diagnostic steps will help you track down the cause:
| Step |
Description |
Possible Cause and Resolution |
| 1 |
Check the Moogfarmd log for any obvious errors or warning. |
Cause may be evident from any warnings or errors. |
| 2 |
Check the Self Monitoring > Processing Metrics Page |
If the event_process_metric is large and/or increasing then something is backing up. Check Moogfarmd health logging also for sign of message_queue build-up in any of the Moolets. |
| 3 |
Check the CPU/memory usage of the server itself. |
If the server, as a whole, is running close to CPU or memory limit and no other issues can be found (e.g. rogue processes or memory leaks in the Cisco Crosswork Situation Manager components) then consider adding more resource to the server or distributing the Cisco Crosswork Situation Manager components. |
| 4 |
Check whether the Moogfarmd java process is showing constant high CPU/memory usage. |
Moogfarmd may be processing an event or Situation storm. Check Moogfarmd health logging also for sign of message_queue build-up in any of the Moolets. Backlog should clear assuming storm subsides. |
| 5 |
Has the memory of the Moogfarmd java processed reached a plateau? |
Moogfarmd may have reached its java heap limit. Check the -Xmx settings of Moogfarmd. If not specified has Moogfarmd reached approximately a quarter of the RAM on the server? Increase the -Xmx settings as appropriate and restart the Moogfarmd service. |
| 6 |
Is the database tuned? |
Check the innodb-buffer-pool-size and innodb_buffer_pool_instances settings in /etc/my.cnf as per Tuning section above. Ensure they are set appropriately and restart mysql if changes are made. |
| 7 |
Check the server for any other high CPU or memory processes or that which might be impacting the database. |
Something may be hogging CPU/memory on the server and starving Moogfarmd of resources. The events_analyser utility may be running or a sudden burst of UI or Graze activity may be putting pressure on the database and affecting Moogfarmd. |
| 8 |
Run DBPool Diagnostics (see previous section) several times to assess current state of Moogfarmd to database connections. |
Moogfarmd database connections may be maxed out with long running connections - this may indicate a processing deadlock - perform a kill -3 <pid> on the Moogfarmd java process to generate a thread dump (in the Moogfarmd log) and send it to Moogsoft Support. Alternatively Moogfarmd may be very busy with lots of short but frequent connections to the database. Consider increasing the number DBPool connections for Moogfarmd by increasing the top-level "threads" property in the Moogfarmd configuration file and restarting the Moogfarmd service. |
| 9 |
Turn on MySQL slow query logging (see earlier section on how to do this) |
Slow queries from a Moobot in Moogfarmd may be causing problems and they should be reviewed for efficiency. Alternatively slow queries from other parts of the system may be causing problems (e.g. nasty UI filters). Slow queries may also be down to the sheer amount of data in the system. Consider enabling Database Split to move old data and/or using the Archiver to remove old data. |
| 10 |
Check Moogfarmd Situation resolution logging using: grep "Resolve has been running for" /var/log/moogsoft/moogfarmd.log |
If this logging shows non-zero upward trend in "Resolve" time then Moogfarmd is struggling with the number of "in memory" Situations for its calculations. Check the Moogfarmd health logging for the current count of "in memory" situations and consider reducing the retention_period setting in the Moogfarmd log (will need a Moogfarmd restart) and/or closing more old Situations. |
| 11 |
Is Moogfarmd memory constantly growing over time and a memory leak is suspected? Note that Moogfarmd memory does typically increase for periods of time then is trimmed back via Java garbage collection and Sigaliser memory purge (via retention_period property). |
Take periodic heap dumps from the Moogfarmd java process and send them to Moogsoft Support so they can analyse the growth. Use the following commands: DUMPFILE=/tmp/farmd-heapdump-$(date +%s).bin Notes: jmap needs java jdk to be installed. "yum install jdk" should suffice to install this. generating a heap dump is like to make the target process very busy for a period of time and also triggers a garbage collection so the memory usage of the process may well reduce. heapdump files may be very large. |
Troubleshoot the UI
The following sections outline potential problems and solutions related to the Cisco Crosswork Situation Manager user interface.
Slow UI
If the system is showing signs of slow UI performance, such as long login times, spinning summary counters, or other, then the problem is likely with Apache Tomcat and/or the database. The following diagnostic steps will help you track down the cause:
| Step |
Description |
Possible cause and resolution |
| 1 |
Check catalina.out for any obvious errors or warning. |
Cause may be evident from any warnings or errors. |
| 2 |
Check browser console or any errors or timing out requests. |
Possibly a bug or more likely that the query to the database associated with the request is taking longer that 30 seconds (the default browser timeout). Investigate the root cause. |
| 3 |
Check network latency between browser client machine and server using ping. |
Latency of =>100ms can make login noticeably slower. |
| 4 |
Check the CPU/memory usage of the server itself. |
If the server, as a whole, is running close to CPU or memory limit and no other issues can be found (e.g. rogue processes or memory leaks in the Cisco Crosswork Situation Manager components) then consider adding more resource to the server or distributing the Cisco Crosswork Situation Manager components. |
| 5 |
Check MoogSvr/Moogpoller/Graze counter logging in catalina.out |
Tomcat may be processing a high number of requests or Message Bus updates. If Moogpoller count is zero then something may be wrong with Tomcat > RabbitMQ connection. Check RabbitMQ admin UI for signs of message queue build-up. |
| 6 |
Check whether Tomcat java process is showing constant high CPU/memory usage. |
Tomcat may be processing the updates from an event or situation storm. Backlog should clear assuming storm subsides. |
| 7 |
Has the memory of the Tomcat java processed reached a plateau? |
Tomcat may have reached its java heap limit. Check the -Xmx setting in /etc/init.d/apache-tomcat. Increase the -Xmx settings as appropriate and restart the apache-tomcat service. |
| 8 |
Is the database tuned? |
Check the innodb-buffer-pool-size and innodb_buffer_pool_instances settings in /etc/my.cnf as per Tuning section above. Ensure they are set appropriately and restart mysql if changes are made. |
| 9 |
Check the server for any other high CPU or memory processes or that which might be impacting the database. |
Something may be hogging CPU/memory on the server and starving Tomcat of resources. The Events Analyser utility may be running or a sudden burst of Moogfarmd or Graze activity may be putting pressure on the database and affecting the UI. |
| 10 |
Run DBPool Diagnostics (see previous section) several times to assess current state of Tomcat > Database connections. |
Tomcat database connections may be maxed out with long running connections - this may indicate a processing deadlock - perform a kill -3 <pid> on the Tomcat java process to generate a thread dump (in catalina.out) and send it to Cisco Crosswork Situation Manager Support. Alternatively Tomcat may be very busy with lots of short but frequent connections to the database. A Graze request bombardment is another possibility (Graze does not currently have a separate DB Pool). Consider increasing the number DBPool connections for Tomcat by increasing the related properties in servlets.conf and restarting the apache-tomcat service. |
| 11 |
Turn on MySQL slow query logging (see earlier section on how to do this) |
Slow queries from nasty filters in the UI may be causing problems, review them for efficiency. Alternatively slow queries from other parts of the system may be causing problems (e.g. inefficient Moobot code). Slow queries may also be down to the sheer amount of data in the system. Consider enabling Database Split to move old data and/or using the Archiver to remove old data. |
| 12 |
Is Tomcat memory constantly growing over time and a memory leak is suspected? Note that Tomcat memory does typically increase for periods of time then is trimmed back via java garbage collection. |
Take periodic heap dumps from the Tomcat java process and send them to Cisco support so they can analyse the growth. Use the following commands: DUMPFILE=/tmp/tomcat-heapdump-$(date +%s).bin Notes: jmap needs Java JDK to be installed. "yum install jdk" should suffice to install this. Generating a heap dump is likely to make the target process very busy for a period of time and also triggers a garbage collection so the memory usage of the process may well reduce. Heap dump files may be very large. |
Search / Elasticsearch problems
See Configure Search and Indexing for more information.Configure Search and Indexing
Elasticsearch is not running or generating errors (such as MySQL connection problems)
· Check that the Elasticsearch service is running:
service elasticsearch status
· Check errors, they are written to /var/log/elasticsearch/elasticsearch.log.
Elasticsearch does not start or restart using process_cntl
· Check that the Elasticsearch heap size in /etc/elasticsearch/jvm.options is large enough.
See Finalize and Validate the Install for more information on setting the JVM heap sizes.
See the Elasticsearch JVM Options documentation for more information on setting JVM options.
Tomcat cannot connect to Elasticsearch
· Check /usr/share/apache-tomcat/logs/catalina.out for any errors when attempting a search from the UI.
Cron job errors
· Check that cron job that runs the moog_indexer (created by the moog_init_search.sh script to re-index against the Cisco Crosswork Situation Manager database on a once-a-minute basis) exists and is not generating any warnings or errors.
· List the configured cron jobs:
crontab -l
· Check errors, they are written to /var/log/cron.
· Depending on the intervals at which Elasticsearch re-indexes against the Cisco Crosswork Situation Manager database, it is possible that new alerts, Situations, threads or comments have not yet been indexed, and so will not be searchable.
· To change the interval manually:
crontab -ed
Elasticsearch fails to start with /tmp directory permission problems
Elasticsearch fails to start with "java.lang. UnsatisfiedLinkError: /tmp/jna--<text>" error. For example:
[2017-08-07T14:14:31,173][WARN ][o.e.b.Natives] unable to load JNA native support library, native methods will be disabled.
java.lang.UnsatisfiedLinkError: /tmp/jna--1985354563/jna3872404023206022895.tmp: /tmp/jna--1985354563/jna3872404023206022895.tmp: failed to map segment from shared object: Operation not permitted
at java.lang.ClassLoader$NativeLibrary.load(Native Method) ~[?:1.8.0_171]
at java.lang.ClassLoader.loadLibrary0(ClassLoader.java:1941) ~[?:1.8.0_171]
at java.lang.ClassLoader.loadLibrary(ClassLoader.java:1824) ~[?:1.8.0_171]
at java.lang.Runtime.load0(Runtime.java:809) ~[?:1.8.0_171]
at java.lang.System.load(System.java:1086) ~[?:1.8.0_171]
at com.sun.jna.Native.loadNativeDispatchLibraryFromClasspath(Native.java:851) ~[jna-4.2.2.jar:4.2.2 (b0)]
at com.sun.jna.Native.loadNativeDispatchLibrary(Native.java:826) ~[jna-4.2.2.jar:4.2.2 (b0)]
at com.sun.jna.Native.<clinit>(Native.java:140) ~[jna-4.2.2.jar:4.2.2 (b0)]
at java.lang.Class.forName0(Native Method) ~[?:1.8.0_171]
at java.lang.Class.forName(Class.java:264) ~[?:1.8.0_171]
at org.elasticsearch.bootstrap.Natives.<clinit>(Natives.java:45) [elasticsearch-5.6.9.jar:5.6.9]
at org.elasticsearch.bootstrap.Bootstrap.initializeNatives(Bootstrap.java:104) [elasticsearch-5.6.9.jar:5.6.9]
at org.elasticsearch.bootstrap.Bootstrap.setup(Bootstrap.java:203) [elasticsearch-5.6.9.jar:5.6.9]
at org.elasticsearch.bootstrap.Bootstrap.init(Bootstrap.java:333) [elasticsearch-5.6.9.jar:5.6.9]
at org.elasticsearch.bootstrap.Elasticsearch.init(Elasticsearch.java:121) [elasticsearch-5.6.9.jar:5.6.9]
at org.elasticsearch.bootstrap.Elasticsearch.execute(Elasticsearch.java:112) [elasticsearch-5.6.9.jar:5.6.9]
at org.elasticsearch.cli.SettingCommand.execute(SettingCommand.java:54) [elasticsearch-5.6.9.jar:5.6.9]
at org.elasticsearch.cli.Command.mainWithoutErrorHandling(Command.java:122) [elasticsearch-5.6.9.jar:5.6.9]
at org.elasticsearch.cli.Command.main(Command.java:88) [elasticsearch-5.6.9.jar:5.6.9]
at org.elasticsearch.bootstrap.Elasticsearch.main(Elasticsearch.java:89) [elasticsearch-5.6.9.jar:5.6.9]
at org.elasticsearch.bootstrap.Elasticsearch.main(Elasticsearch.java:82) [elasticsearch-5.6.9.jar:5.6.9]
This is most likely due to the noexec directive in the /tmp mount. The solution is to remove the noexec directive, if it is practical to do so:
sudo mount /tmp -o remount,exec
Or set the following in /etc/sysconfig/elasticsearch:
ES_JAVA_OPTS="-Djna.tmpdir=/var/lib/elasticsearch/tmp"
Restart the Elasticsearch service after either of the above changes.
Other UI issues
Unavailable UI login page
· Check that port 443 is not being blocked by the firewall on the server.
· Check that the Nginx service is running with command:
service nginx status
· Check that Nginx is listening on port 443. Example expected output:
netstat -anp|grep 443
tcp 0 0 0.0.0.0:443 0.0.0.0:* LISTEN 42356/nginx
tcp 0 0 :::443 :::* LISTEN 42356/nginx
UI login fails
A possible error is "You could not be logged in. Please try again". First check /usr/share/apache-tomcat/logs/catalina.out to understand the error better. Possible causes are as follows:
· Apache Tomcat is not running. Check its status:
· service apache-tomcat status
· There is a communication problem between the UI and the MySQL database. Check the MySQL service is running:
service mysqld status
If MySQL is running on a different server, check that it is accessible from the Cisco Crosswork Situation Manager web server and the required permissions have been applied.
· There is an authentication problem between the UI and the MySQL database.
— Check that the user exists in the MySQL moogdb.users table.
— Check that the username and password used for authentication are correct.
· If you're using a load balancer, the hostname in the URL you're using to access the UI does not match the webhost in the servlet configuration files.
— Set the "webhost" in $MOOGSOFT_HOME/config/servlets.conf on each UI server to the hostname of the load balancer.
"Your connection is not private"
A message appears in your browser "your connection is not private" and you are unable to proceed to the UI.
After upgrading macOS to Catalina, the Cisco Crosswork Situation Manager UI is inaccessible in Chrome, Safari and Edge browsers because self-signed certificates are no longer trusted. For workaround instructions see Catalina Browser Certificate Workaround.
Empty column in alert views
If you are getting an empty column in your alert views anytime the alert comes from a particular event source and you have checked that:
· The events are being processed by the LAM.
· Moogfarmd is running.
the best place to look for the issue is the relevenat LAM configuration file.
Configure Historic Data Retention
Cisco Crosswork Situation Manager employs two databases, an active database and a historic database to enhance performance of the UI and extend data retention capabilities.
Note
If you are upgrading from Cisco Crosswork Situation Manager v. 6.4 or earlier, manually split the database if you want to benefit from using a separate historic database. See Historic Database Benefits for further details.
See Historic Database Benefits for information on the performance and scalability advantages of separating the active and historic databases.
You can use various closing strategies to help maintain your active database at an optimal size:
1. Manually close alerts.
· Programmatically close alerts.
· Use the Auto Close feature.
The historic database can grow without affecting performance. When it is time to retire data from the historic database, you can archive selected Situations and alerts.
Control historic data retention
Historic data retention requires the Housekeeper Moolet to work. Verify you have configured the Housekeeper Moolet and that this Moolet is enabled within Moogfarmd. The Housekeeper periodically identifies eligible closed alerts and Situations in the active database and moves them into the historic database.Housekeeper Moolet
You can control historic data retention using the database split configurer at $MOOGSOFT_HOME/bin/utils/moog_db_split_configurer.
See the Historic Data Utility Command Reference for a full list of available arguments.
Access historic data
By default, the database split configurer creates a database called historic_moogdb within the same MySQL instance as the active database: moogdb.
The historic database contains alert and Situation related tables that have the same structure as their equivalents in the active database.
You can access this historic data in the UI in read-only format:
1. Search results (when "include close" is selected)
2. Direct URL (for Situation Room, Alert Timeline etc.)
3. Situation Room (including Situation Alert View and Situation Timeline)
4. Similar Situations (historical closed Situations will feature in the Similar Situations list for a Situation)
5. PRC feedback can be set for closed alerts from the historic database (as accessed from the Alerts Tab of a Situation Room)
You can also access historic data from various Graze API endpoints and MoogDb V2 methods. See Graze API Endpoint Reference for details of individual Graze API endpoints or MoogDb V2 Method Reference for details of individual MoogDb v2 methods.
The active database retains event and snapshot data for two weeks by default. At the end of the retention period, the Housekeeper Moolet removes the event and snapshot data from the active database. You can only access this event and snapshot data from the historic database after this point. You can change the default retention period at $MOOGSOFT_HOME/bin/utils/moog_db_split_configurer.
Cisco Crosswork Situation Manager rejects Graze endpoints and MoogDb v2 methods that attempt to modify historic alerts and Situations.
Database split examples
To split the database at 2am every day, with a grace period of 1 hour and an alerts_batch_size and a sigs_batch_size of 1000, run this command:
moog_db_split_configurer -e -r 02:00 -g 1 -a 1000 -s 1000
During the splitting process you can see entries such as the following in the Moogfarmd log:
WARN : [0:House][20180315 15:58:44.207 +0000] [CSplitterService.java]:143 +|Data Splitter started|+
WARN : [0:House][20180315 15:58:44.503 +0000] [CSplitterTask.java]:205 +|Splitter will copy [17] alerts and will move [1983] alerts and [500] situations|+
WARN : [0:House][20180315 15:58:44.706 +0000] [CSplitterTask.java]:205 +|Splitter will copy [152] alerts and will move [1848] alerts and [0] situations|+
WARN : [0:House][20180315 15:58:46.434 +0000] [CSplitterTask.java]:205 +|Splitter will copy [78] alerts and will move [917] alerts and [0] situations|+
WARN : [0:House][20180315 15:58:47.280 +0000] [CSplitterTask.java]:201 +|Nothing more to split|+
WARN : [0:House][20180315 15:58:47.282 +0000] [CSplitterService.java]:145 +|Data Splitter completed|+
If there is no eligible data to move to the historic database, the following entry is logged:
WARN : [0:House][20180315 15:12:22.547 +0000] [CSplitterService.java]:143 +|Data Splitter started|+
WARN : [0:House][20180315 15:12:22.666 +0000] [CSplitterTask.java]:201 +|Nothing more to split|+
WARN : [0:House][20180315 15:12:22.667 +0000] [CSplitterService.java]:145 +|Data Splitter completed|+
Example Split Scenario
The following table illustrates how the Housekeeper Moolet splits an example set of Situations and alerts.
| Pre-Split Active Database |
|
Post-Split Active Database |
Post-Split Historic Database |
| Situation 1 (closed) with member alerts: Alert 1 (closed) Alert 2 (closed) Alert 3 (closed) Situation 2 (closed) with member alerts: Alert 4 (closed) Alert 5 (closed) Alert 6 (closed) Situation 3 (open) with member alerts: Alert 5 (closed) Alert 6 (closed) Alert 7 (closed) Alert 8 (open) Situation 4 (open) with member alerts: Alert 8 (open) Alert 9 (open) Loose alerts: Alert 10 (closed) Alert 11 (open) |
→ Split occurs |
Situation 3 (open) with member alerts: Alert 5 (closed) Alert 6 (closed) Alert 7 (closed) Alert 8 (open) Situation 4 (Open) with member alerts: Alert 8 (open) Alert 9 (open) Loose alerts: Alert 11 (open) |
Situation 1 (closed) with member alerts: Alert 1 (closed) Alert 2 (closed) Alert 3 (closed) Situation 2 (Closed) with member alerts: Alert 4 (closed) Alert 5 (closed) Alert 6 (closed) Loose alerts: Alert 10 (closed) Other alerts: Alert 7 (closed) |
Notes on the above:
· The process copies closed alerts 5 and 6 to the historic database because they are related to open Situation 3. In the historic database they retain their relationship to closed Situation 2, but not open Situation 3 until it is closed and the Housekeeper Moolet moves it to the historic database.
· The process copies closed Alert 7 to the historic database, but within that database the relationship to open Situation 3 is removed, until Situation 3 is closed and the Housekeeper Moolet moves it to the historic database.
Historic Database Benefits
Prior to the release of Cisco Crosswork Situation Manager 6.4, the single-database architecture limited the amount of data you could retain while running a performant system. Systems with tens of millions of alerts could be slow to display the left navigation filters, especially alert filters. Sluggish performance could also affect the rendering of filter data or a refresh after a filter modification. The threshold for acceptable performance hovered around 15M alerts. In very large systems this typically represented two months of data. Aggressive archive management was the only solution to improve performance.
With Cisco Crosswork Situation Manager 6.5, separate active and historic databases are created as part of the installation process. The Housekeeper Moolet periodically migrates closed Situation and alert data from the active to the historic database.
The segmentation of open Situations and alerts from closed ones yields a number of performance and scalability improvements. The extent of the benefits depends on your system size and the size of your database.
If you are upgrading from Cisco Crosswork Situation Manager 6.4 or an earlier release, manually split the database if you want to benefit from using a separate historic database. See Configure Historic Data Retention for further details.
Performance Improvement Metrics
Cisco engineering used the following baselines for testing performance differences between split-database and single-database systems:
· Single Linux server with 64 x 2.3GHz cores
· 128 GB RAM
· 13 months of data from a very large system (100M events,14M alerts and 1M Situations)
· 3% open alerts and Situations.
Splitting the database improved all filtering and loading times. The bar chart below displays the loading times before and after the database split on 13 months of data. Note: most customers could not have operated in production for 13 months with such performance.

The percentage improvements to loading times for different areas of Cisco Crosswork Situation Manager on the 13 months of data were as follows:

Other improvements included:
· 12% reduction in the time to run a full search re-index
· 12% reduction in the time taken for the Alert Builder to process 1M raw events from a Socket LAM to 600,000 events and 4,000 alerts in the database
· the Cookbook Sigaliser algorithms improved performance.
In this test environment example, the open:closed ratio for alerts and Situations was 3:97. The database split only impacts closed alerts and situations, so you might see different results if your system has a higher proportion of open alerts and Situations.
Next Steps
If you are upgrading to Cisco Crosswork Situation Manager v. 6.5 and your system has performance issues related to the amount of data in your database, you can learn more about the Configure Historic Data Retention feature and evaluate its benefits:
1. Read the documentation: Configure Historic Data Retention
2. Follow the instructions to implement a database split in a non-production environment so you can test the performance improvements and understand any potential impacts to your workflow.
3. If you had previously implemented aggressive archiving, relax it incrementally and observe the system and user performance over time.
Be aware of the following impacts when you implement database splitting:
· General system performance depends on the database splitting settings. Aggressive splitting can lead to an increased CPU load because both MySQL and moogfarmd are consuming CPU. You can run the Housekeeper Moolet in its own moogfarmd on a separate host to potentially mitigate any performance impacts.
· Retaining more data means that your database will increase in size. Implement monitors to check your database growth.
Historic Data Utility Command Reference
The Historic Data utility moog_db_split_configurer is a command line utility to configure the retention of historic data.
The utility is located at $MOOGSOFT_HOME/bin/utils.
See Configure Historic Data Retention for more information.
Cisco Crosswork Situation Manager v8.0.0.1 Update
Cisco Crosswork Situation Manager v8.0.0.2 adds a flag to configure the number of days to keep the splitter process logs before deleting them.. For example, to set the aged logs period to 30 days:
moog_db_split_configurer --aged_logs_period 30
Usage
moog_db_split_configurer [ --user <user> --password <password> ] [ --grace_period <period> ] [ --database_name <name> ] [ --alerts_batch_size <size> ] [ --sigs_batch_size <size> ] [ --run_at <hour:minute> ] [ --aged_snapshots_period <days> ] [ --loglevel (WARN|INFO|DEBUG|TRACE) ]
| Argument |
Input |
Description |
| -a, --alerts_batch_size |
Integer <number of alerts> |
Number of alerts per batch when moving data to the historic database. Increasing this value can speed up the process but places more load on the database. Default is 2000. |
| -g, --grace_period |
Integer <number of hours> |
Time in hours since the last update after which closed alerts and Situations are eligible to be included in historic data retention. Default is 24 (one day). |
| -l, --loglevel |
String, one of INFO | WARN | DEBUG | TRACE |
Log level controlling the amount of information logged by the utility. Default is INFO. |
| -n, --database_name |
String <database name> |
The name of the historic database. Default is historic_moogdb. |
| -p, --password |
String <password> |
Password for the MySQL user specified in the --user argument. |
| -s, --sigs_batch_size |
Integer <number of Situations> |
Number of Situations to include in each batch when moving data to the historic database. Default is 500. |
| -u, --user |
String <username> |
MySQL user to run the utility. The user must have schema creation privileges. Default is root. |
| -r, --run_at |
String <hour:minute> |
The point of time in a day to run the utility. Default is 01:00. The provided time is a system timezone. |
| -as, --aged_snapshots_period |
Integer days |
How many days after which to remove snapshots data from the live moogdb database. Default is 14. |
| -al, --aged_logs_period |
Integer <days> |
Available in Cisco Crosswork Situation Manager v8.0.0.2 and later. Number of days to retain the splitter process logs. Default is 90 days. |
| -h, --help |
- |
Display the utility options and syntax. |
Example
moog_db_split_configurer --alerts_batch_size 1000 --loglevel INFO --run_at 12:30 --sigs_batch_size 250
+-------------- DB split configurations --------------------------------+
Grace period (hours): [24]
Alerts batch size: [1000]
Situations batch size: [250]
Run at: [12:30]
Aged snapshots period (seconds): [1209600]
Historic database: [historic_moogdb]
+-------------- DB split configured ------------------------------------+
Table Compression Utility
The Table Compression utility moog_snapshots_online_table_change_utility is a command line utility. Using Percona table compression, it optimizes the snapshots table in the MoogDb database in order to minimize the size of your historic database.
It also runs online, avoiding downtime, and can compress the size of your historic database by up to 85%.
The utility is compatible with all database types.
Note
This utility requires a number of Perl packages to run. See the section at the bottom of this page for instructions on how to install the packages if the utility reports issues with Perl dependencies.
Usage
The command you use to run the utility depends on your system configuration.
If you are installing or upgrading , run the following command:
moog_snapshots_online_table_change.sh -H hostname -P port -d historic_database_name -u username -p password
| Argument |
Input |
Description |
| --host, -H |
String <host name> |
Hostname of the database server. |
| --port, -P |
Integer <port number> |
Port number of the database server. |
| --database, -d |
String <database name> |
Name of the database. |
| --user, -u |
String <username> |
Database username. |
| --password, -p |
String <password> |
Database password. |
| --help, -h |
- |
Display the utility syntax and options. |
Example
$MOOGSOFT_HOME/bin/utils/moog_snapshots_online_table_change.sh -H localhost -P 3306 -d historic_moogdb -u root -p Password123
No slaves found. See --recursion-method if host ldev11 has slaves.
Not checking slave lag because no slaves were found and --check-slave-lag was not specified.
Operation, tries, wait:
analyze_table, 10, 1
copy_rows, 10, 0.25
create_triggers, 10, 1
drop_triggers, 10, 1
swap_tables, 10, 1
update_foreign_keys, 10, 1
Altering `moogdb`.`snapshots`...
Creating new table...
Created new table moogdb._snapshots_new OK.
Altering new table...
Altered `moogdb`.`_snapshots_new` OK.
2019-07-12T15:47:49 Creating triggers...
2019-07-12T15:47:49 Created triggers OK.
2019-07-12T15:47:49 Copying approximately 36064233 rows...
Copying `moogdb`.`snapshots`: 0% 03:05:15 remain
Copying `moogdb`.`snapshots`: 0% 02:56:29 remain
Copying `moogdb`.`snapshots`: 0% 02:50:16 remain
Copying `moogdb`.`snapshots`: 1% 02:53:31 remain
Copying `moogdb`.`snapshots`: 1% 02:54:20 remain
Copying `moogdb`.`snapshots`: 1% 02:58:53 remain
Copying `moogdb`.`snapshots`: 1% 02:59:46 remain
Copying `moogdb`.`snapshots`: 2% 03:03:08 remain
…..
…..
Copying `moogdb`.`snapshots`: 94% 09:07 remain
Copying `moogdb`.`snapshots`: 94% 08:37 remain
Copying `moogdb`.`snapshots`: 94% 08:06 remain
Copying `moogdb`.`snapshots`: 95% 07:40 remain
Copying `moogdb`.`snapshots`: 95% 07:07 remain
Copying `moogdb`.`snapshots`: 95% 06:37 remain
Copying `moogdb`.`snapshots`: 96% 06:06 remain
Copying `moogdb`.`snapshots`: 96% 05:36 remain
Copying `moogdb`.`snapshots`: 96% 05:05 remain
Copying `moogdb`.`snapshots`: 97% 04:35 remain
Copying `moogdb`.`snapshots`: 97% 04:05 remain
Copying `moogdb`.`snapshots`: 97% 03:33 remain
Copying `moogdb`.`snapshots`: 98% 03:02 remain
Copying `moogdb`.`snapshots`: 98% 02:32 remain
Copying `moogdb`.`snapshots`: 98% 02:01 remain
Copying `moogdb`.`snapshots`: 99% 01:29 remain
Copying `moogdb`.`snapshots`: 99% 00:58 remain
Copying `moogdb`.`snapshots`: 99% 00:26 remain
2019-07-12T19:28:57 Copied rows OK.
2019-07-12T19:28:57 Analyzing new table...
2019-07-12T19:28:57 Swapping tables...
2019-07-12T19:28:57 Swapped original and new tables OK.
2019-07-12T19:28:57 Dropping old table...
2019-07-12T19:29:05 Dropped old table `moogdb`.`_snapshots_old` OK.
2019-07-12T19:29:05 Dropping triggers...
2019-07-12T19:29:05 Dropped triggers OK.
Successfully altered `moogdb`.`snapshots`.
Install missing utility dependencies
Run the following commands (requires root permissions for the Yum command) to install the Perl packages the utility requires:
for PACKAGE in perl-Compress-Raw-Bzip2-2.061-3.el7.x86_64.rpm perl-Compress-Raw-Zlib-2.061-4.el7.x86_64.rpm perl-DBD-MySQL-4.023-6.el7.x86_64.rpm perl-DBI-1.627-4.el7.x86_64.rpm perl-Data-Dumper-2.145-3.el7.x86_64.rpm perl-Digest-1.17-245.el7.noarch.rpm perl-Digest-MD5-2.52-3.el7.x86_64.rpm perl-IO-Compress-2.061-2.el7.noarch.rpm perl-Net-Daemon-0.48-5.el7.noarch.rpm perl-PlRPC-0.2020-14.el7.noarch.rpm perl-IO-Socket-IP-0.21-5.el7.noarch.rpm perl-IO-Socket-SSL-1.94-7.el7.noarch.rpm perl-Mozilla-CA-20130114-5.el7.noarch.rpm perl-Net-LibIDN-0.12-15.el7.x86_64.rpm perl-Net-SSLeay-1.55-6.el7.x86_64.rpm
do
curl -L -O http://mirror.centos.org/centos/7/os/x86_64/Packages/${PACKAGE};
done;
yum install *.rpm
Auto Close
The Auto Close feature lets you define criteria for automatically closing alerts and Situations. Auto Close enables you to use filtering rules to organize your data and keep it current so you can focus on the most important active alerts and Situations.
You also see performance improvements because automatically closing old alerts and Situations reduces the amount of data involved in statistic calculations.
Auto Close lets you define the conditions using filters and determine how often Cisco Crosswork Situation Manager checks which alerts and Situations to close. Any alerts and Situations older than a certain time and that meet the defined criteria are closed.
Configure Auto Close for Situations
The Housekeeper Moolet must be configured and running within Moogfarmd in order for Auto Close to work.Housekeeper Moolet
To configure which Situations should be auto closed, create a filter as follows:
1. In the Auto Close > System Settings window, click Edit Filter to open the filter editor.
2. Clear the filter using Empty Filter and Add Clause. Alternatively, you can manually type in your filter rules. You can set up as many auto close rules as you like. In a rule, you can either include or exclude Situations for auto closing but you cannot use both together. See Filter Search Data for reference.Filter Search Data
3. Apply the changes to continue and click Done.
After you add the filter, define the behavior for automatically closing Situations as follows:
· Close the Situation and all the alerts it contains.
· Close the Situation and all the unique alerts it contains. Unique alerts are any alerts that are not part of any other Situations.
· Close the Situation only.
You can create tasks to configure:
· The age when Situations are suitable for Auto Close.
· The number of Situations to close in each Auto Close run.
· Situations only close if all associated alerts are closed.
Edit the default task or click Add Task. The available settings are as follows:
| Setting |
Input |
Options |
Description |
| Situation Age |
Integer |
Minutes Hours Days |
Defines how old a Situation must be for Cisco Crosswork Situation Manager to auto close it. To calculate age, the system looks at both the Situation's last_event_time and last_state_change. Must be a number greater than 1. |
| All Alerts closed |
Boolean |
- |
If enabled, only Situations with no open alerts qualify for automatic closure. |
| Match filter |
Filter |
- |
Defines the criteria a Situation must meet to qualify for automatic closure. |
| Batch size |
Integer |
- |
Defines the maximum number of Situations to auto close in each Auto Close run. Defaults to 1000. Must be a number greater than 1. |
Once saved, the Auto Close task runs after a set period of time. This time period is between five minutes and four hours depending on the age of the Situation.. The older the Situation age, the closer the frequency of the task gets to four hours (see the example below). There is no limit on the number of tasks, so you can add any as many as you need meet your requirements.
The example below demonstrates how you can configure an Auto Close task to close a maximum of 1000 Situations per run that meet the following criteria:
· Older than 23 hours.
· All associated alerts are closed.
· Have a clear severity.

Configure Auto Close for Alerts
To configure which alerts should be auto closed, on the System Settings > Auto Close window, select the Alerts tab and create a filter as follows:
· Click Edit Filter to open the filter editor.
· Clear the filter using Empty Filter and Add Clause. Alternatively, you can manually type in your filter rules. You can set up as many auto close rules as you like. In a rule, you can either include or exclude alerts for auto closing but you cannot use both together. See Filter Search Data for reference.Filter Search Data
· Apply the changes to continue and click Done.
You can create tasks to configure:
· The age when alerts are suitable for Auto Close.
· The number of alerts to close in each Auto Close run.
Edit the default task or click Add Task. The available settings are:
| Setting |
Input |
Options |
Description |
| Alert age |
Integer |
Minutes Hours Days |
Defines how old the alert must be for Cisco Crosswork Situation Manager to auto close it. To calculate age, the system looks at the last time an event was received from a LAM for that alert. Must be a number greater than one. |
| Match filter |
Filter |
- |
Defines which alerts to include in the batch being auto closed. |
| Batch size |
Integer |
- |
Defines the maximum number of alerts to auto close in each Auto Close run. Must be a number greater than one. This is 1000 by default. |
Once saved, the Auto Close task runs after a set period of time. This time period is between five minutes and four hours depending on the age of the alert. The older the alert age, the closer the frequency of the task gets to four hours.
There is no limit on the number of tasks, so you can add any as many as you need meet your requirements.
The example below demonstrates how you can configure a task to Auto Close a maximum of 1000 alerts per run that meet the following criteria:
· Older than 45 minutes.
· Have a clear severity or a minor severity.

Audit Trail
Administrators can use the audit trail feature to review actions that have been performed on Situations or alerts. For example, you might want to view Situations that were resolved and closed within the last two weeks. You can use the Graze API endpoints getAlertActions and getSituationActions to achieve this. See Graze API for details.Graze API
When a user performs an action on a Situation or an alert, Cisco Crosswork Situation Manager records the user that performed this action and the time that it occurred. When a user resolves a Situation, Cisco Crosswork Situation Manager does not mark the alerts within it as resolved and no audit information is recorded for the individual alerts. When a user closes a Situation, the effect on the alerts within it depends on the setting in the Systems > Configure > Workflow tab. Cisco Crosswork Situation Manager records audit information for any alerts that are closed when the Situation is closed.
If a user manually resolves or closes individual alerts, Cisco Crosswork Situation Manager records the user that performed the action and time that it occurred.
You can use the Cisco Crosswork Situation Manager UI, Graze API, or MoogDb V2 to resolve or close Situations and alerts. See Graze API and MoogDb V2 for details of the resolveSituation, closeSituation, resolveAlerts, and closeAlert endpoints/methods.Graze APIMoogDb V2
Audit Logging
Cisco Crosswork Situation Manager provides logging of the following information:
· User sessions and authentication
· Configuration changes by administrators
You can also view changes in the severity of Situations.
Audit log entry details
Audit log entries contain the following markers:
· CONFIG_AUDIT: Configuration changes including creating and updating system configuration properties, and updating user properties.
· SESSION_AUDIT: User sessions and authentication.
· PERMISSIONS_AUDIT: Creating and updating users, changing roles and teams.
User sessions and authentication
Cisco Crosswork Situation Manager logs all of the following for user sessions and for all uses of authentication subsystems, regardless of whether authentication is successful, whether acting as a client or a server, or of the underlying protocol.
These log entries contain the SESSION_AUDIT marker:
· User (DB/SAML/Graze) session creation.
· User (DB/SAML/Graze) session expiry.
· User logging out from UI.
· User login failure.
Access session log information using Graze and MoogDb v2
You can use the following Graze endpoints or MoogDb v2 methods to access session audit log information:
| Description |
Graze Endpoint |
MoogDb V2 Method |
| Return session information for users over a period of time. |
getAllSessionInfo |
getAllSessionInfo |
| Return session information for an individual user. |
getUserSessionInfo |
getUserSessionInfo |
Authorization changes
Cisco Crosswork Situation Manager logs all of the following authorization changes with the PERMISSIONS_AUDIT marker:
· Creating or deleting principals, including usernames, teams, and roles.
· Modifying privileges, team assignments, or other "marks of authority" associated with principals.
· Creating or deleting teams, roles, or other names for authorisation categories.
· Modifying privileges or access associated with teams, roles, or users.
Configuration changes by administrators
Cisco Crosswork Situation Manager logs all of the following administrative changes with the CONFIG_AUDIT marker:
· Creating a new user and updating a user.
· Creating a new team and updating a team.
· Adding and editing a Cookbook.
· Adding, deleting, and editing a Recipe.
· Toggling/editing Tempus.
· Toggling and retraining Probable Root Cause.
· Adding, deleting, and updating merge groups.
· Creating, editing and deleting link definitions.
· Adding, editing, and disabling Situation and alert columns.
· Creating, editing, and deleting the Workflow Engine.
· Customization changes.
· Online help and support changes.
· Changes to Hotkeys.
· Changes to Chatops.
· Adding, editing, and deleting action states.
· Creating, editing, and deleting Situation client tools, Situation server tools, alert client tools, alert server tools, and generic server tools.
· Updating the system config file.
· Restarting Moogfarmd
Enable audit logging
Audit logging is disabled by default. To enable it, follow these steps:
· Locate the log file of the component for which you want to add audit logging. See Configure Logging for details.Configure Logging
· Add a RollingFile section to the configuration.appenders section of the file. For example:
"RollingFile": {
"name": "AUDIT",
"fileName": "/tmp/audit.log",
"filePattern": "audit.log-%d{MM-dd-yy}-%i.gz",
"PatternLayout": {
"pattern": "%-5level: [%thread][%date{yyyMMdd HH:mm:ss.SSS Z}] [%file:%line] +|%message|+%n"
},
"Policies": {
"SizeBasedTriggeringPolicy": {
"size": "500M"
}
},
"DefaultRolloverStrategy": {
"max": "40"
},
"filters": {
"MarkerFilter": {
"marker": "AUDIT",
"onMatch": "ACCEPT",
"onMismatch": "DENY"
}
}
}
Replace the original loggers block in the same log file:
"loggers":
{
"Logger":
{
"name": "com.moogsoft",
"additivity": false,
"AppenderRef": [
{
"ref": "STDOUT"
}],
"level": "info"
}
}
with the following:
"loggers":
{
"Logger": [
{
"name": "com.moogsoft",
"additivity": false,
"AppenderRef": [
{
"ref": "STDOUT"
}],
"level": "info"
},
{
"name": "com.moogsoft",
"additivity": false,
"AppenderRef": [
{
"ref": "AUDIT"
}],
"level": "trace"
}]
}
Situation severity changes
You can use the Graze endpoint getSituationSeverityChanges to return the changes in severity for a Situation. The highest severity of any of the alerts in a Situation determines the severity of the Situation. This endpoint returns increases in severity and a change to a severity of 0 (Clear).
If a Situation has closed, this endpoint returns a severity of 0 (Clear) and the timestamp when the Situation was closed. The endpoint does not return any further changes in severity after it has returned to 0 (Clear).
See getSituationSeverityChanges for more information.
Examples
Example log file entries with the CONFIG_AUDIT marker:
DEBUG: [http-apr-8085-exec-1][20191004 11:40:44.703 +0100] [CMoogSvr.java:703] +|Admin request: [createUser] called by [admin]|+
DEBUG: [http-apr-8085-exec-11][20191004 11:44:21.078 +0100] [CCreateSystemConfig.java:105] +|Admin request: [createSystemConfig] called by [admin]|+
DEBUG: [http-apr-8085-exec-3][20191004 11:44:28.721 +0100] [CDeleteSystemConfig.java:111] +|Admin request: [deleteSystemConfig] called by [admin]|+
DEBUG: [http-apr-8085-exec-8][20191004 11:44:39.936 +0100] [CUpdateSystemConfig.java:109] +|Admin request: [updateSystemConfig] called by [admin]|+
DEBUG: [http-apr-8085-exec-7][20191004 11:54:49.054 +0100] [CMoogSvr.java:703] +|Admin request: [manageAlertColumns] called by [admin]|+
DEBUG: [http-apr-8085-exec-8][20191004 11:56:05.710 +0100] [CMoogSvr.java:703] +|Admin request: [getTempus] called by [admin]|+
DEBUG: [http-apr-8085-exec-7][20191004 12:08:31.005 +0100] [CUpdateSystemConfig.java:109] +|Admin request: [updateSystemConfig] called by [admin]|+
WARN : [http-apr-8085-exec-11][20191004 12:09:34.142 +0100] [CSecurityUtils.java:373] +|User [admin] login failed|+
DEBUG: [http-apr-8085-exec-3][20191004 12:09:46.173 +0100] [CSecurityUtils.java:368] +|Create session: started [username: [admin]; session: [...6f40ab08]]|+
DEBUG: [http-apr-8085-exec-1][20191004 12:11:16.243 +0100] [CMoogSvr.java:703] +|Admin request: [setFeatureToggleState] called by [admin]|+
Example log file entries with the SESSION_AUDIT marker:
WARN : [http-apr-8085-exec-4][20191001 15:12:15.399 +0100] [CSecurityUtils.java:385] +|User [aa] account unknown|+
WARN : [http-apr-8085-exec-9][20191001 15:12:24.018 +0100] [CSecurityUtils.java:373] +|User [admin] login failed|+
DEBUG: [http-apr-8085-exec-9][20191001 15:23:23.666 +0100] [CSecurityUtils.java:498] +|Create session: started [username: [ava]; session: [...141fe68b]]|+
DEBUG: [0:AdapterHandler][20191001 15:25:06.983 +0100] [CSecurityUtilsConfig.java:279] +|Seession [username: [ava]; session: [...141fe68b]] expired.|+
WARN : [http-apr-8085-exec-6][20191001 15:25:21.720 +0100] [CSecurityUtils.java:398] +|User [admin] login failed|+
DEBUG: [http-apr-8085-exec-3][20191001 15:26:58.446 +0100] [CSecurityUtils.java:498] +|Create session: started [username: [isaac]; session: [...e22b6fa0]]|+
DEBUG: [http-apr-8085-exec-4][20191001 15:29:10.686 +0100] [CSubject.java:263] +|Session username: [isaac]; session: [...e22b6fa0] was closed - user logged out.|+
WARN : [http-apr-8085-exec-7][20191001 15:29:34.546 +0100] [CSecurityUtils.java:398] +|User [aloo] login failed|+
DEBUG: [http-apr-8085-exec-8][20191001 15:35:16.658 +0100] [CSecurityUtils.java:368] +|Create session: started [username: [admin]; session: [...1f8a886f]]|+
DEBUG: [http-apr-8085-exec-1][20191001 15:35:21.893 +0100] [CSubject.java:263] +|Session username: [admin]; session: [...1f8a886f] was closed - user logged out.|+
WARN : [http-apr-8085-exec-7][20191001 15:35:28.212 +0100] [CSecurityUtils.java:398] +|User [admin] login failed|+
Example log file entries with the PERMISSIONS_AUDIT marker:
DEBUG: [http-apr-8085-exec-8][20200512 17:19:42.525 +0100] [CMoogSvr.java:727] +|Admin request: [createUser] called by [admin]|+
DEBUG: [http-apr-8085-exec-8][20200512 17:19:42.755 +0100] [CDbUserDAO.java:2116] +|User with Id: [5] and name: [newuser] roles changed, new roles are: [[4]].|+
DEBUG: [http-apr-8085-exec-8][20200512 17:19:42.758 +0100] [CDbUserDAO.java:396] +|Created user [newuser]|+
DEBUG: [http-apr-8085-exec-9][20200512 17:20:12.953 +0100] [CMoogSvr.java:727] +|Admin request: [createTeam] called by [admin]|+
DEBUG: [http-apr-8085-exec-9][20200512 17:20:12.997 +0100] [CTeamUpdateServices.java:698] +|Team [my new team 123] created with ID [2]|+
DEBUG: [http-apr-8085-exec-10][20200512 17:20:35.153 +0100] [CMoogSvr.java:727] +|Admin request: [updateRole] called by [admin]|+
DEBUG: [http-apr-8085-exec-10][20200512 17:20:35.156 +0100] [CRoleDao.java:189] +|Updated role: ID: [4], name: [Operator], permissions: [[sig_visualize, sig_modify, sig_resolve, thread_create, add_media, alert_assign, alert_modify, alert_close, filters, prc_feedback, all_data, manage_maint, moolet_informs, view_summary, collect_insights, collab_write, collab_read]].|+
Archive Situations and Alerts
You can run the command-line archiver utility included with Cisco Crosswork Situation Manager to archive and delete Situations, alerts, and statistical data. The benefits of archiving data include improved system performance, faster backup and recovery, reduced maintenance, and lower storage costs.
How archiving works
The archiver utility archives and deletes a single day's worth of data at a time, to reduce the impact on the database. After you launch the archiver, it automatically processes data in batches which are configurable using the -b, -y and -z options in the Archiver Command Reference.Archiver Command Reference
Both the moogsoft-db and moogsoft-utils packages include the archiver utility. You can find it at:
$MOOGSOFT_HOME/bin/utils/moog_archiver
The archiver exports and deletes data from the historic database. By default it writes files to the /usr/local/archived directory.
Launch the archiver
To launch the archiver execute the moog_archiver command and pass either the -e argument to export or the -r option to delete.
To export all data older than 28 days to the default directory and retain the data in the database:
./moog_archiver -e
To delete all data older than 28 days:
./moog_archiver -r
See the Archiver Command Reference for a full list of available arguments.Archiver Command Reference
Archive loose alerts
You can modify the selection criteria for loose alerts and Situations and their member alerts. You can choose to archive and delete loose alerts only using the last example below.
Export loose alerts that have not been modified in the past 28 days, and closed/dormant/superseded Situations and their member alerts that have not been modified in the past 4 days, and then delete the data from the database:
./moog_archiver -e -r -s 4
Export loose alerts that have not been modified in the past 2 days, and closed/dormant/superseded Situations and their member alerts that have not been modified in the past 7 days, and then delete the data from the database:
./moog_archiver -e -r -l 2 -s 7
Export loose alerts that have not been modified in the past 28 days, and then delete the data from the database:
./moog_archiver -e -r -t
Archive filtered Situations and alerts
You can use global Situation and alert filters to limit the data that is eligible for archiving and deletion.
To export loose alerts that have not been modified in the past 28 days, and Situations and their member alerts that have not been modified in the past 7 days and match the global filter "My Global Alert Filter", and then delete the data from the database:
./moog_archiver -e -r -s 7 -i "My Global Alert Filter"
To delete all Situations that match the filter "My Global Situation Filter" and their member alerts, and delete all loose alerts that match the filter "My Global Alert Filter":
./moog_archiver -r -s 0 -l 0 -i "My Global Situation Filter" -a "My Global Alert Filter"
Use filters that extract data based on age with caution, as they can conflict with specified (or default) age constraints. If you use a filter that selects Situations created during the past day and apply an option to archive Situations older than 28 days, no data will be archived.
Delete Situations, alerts and statistical data
You can use the archiver to delete Situations, alerts and statistical data that match specified criteria from the database.
Delete all Situation and alert data:
./moog_archiver -r -s 0 -l 0
Delete statistical data older than 15 days:
./moog_archiver -m -n 15
Delete files older than 7 days from the default directory:
./moog_archiver -f 7
Archive file names and structure
Archive files are named and structured as follows:
· Archive files containing Situation data including alerts, events and snapshots have the filename format <table name>-<yyyymmdd>.<hhmmss>.csv.
For example alerts-20150410.143637.csv
· Archive files containing loose alert data have the filename format <table name>-loose<yyyymmdd>.<hhmmss>.csv.
For example alerts-loose-20150410.143637.csv
· Quotes are used within the files to handle occurrences of the delimiter. Quote characters in cells are enclosed in a second quote character. Null values from the database are written as \N.
Usage tips
The following tips can help you plan your archiving strategy:
· Cisco recommends running the archiver outside core operational hours to minimize the impact to users. Users of the UI interface should refresh their sessions after the utility has been used to delete data.
· Archiving often in small quantities allows for fast execution and minimal impact.
· You can set up a cron job to run the archiver daily, outside core operational hours.
· You can use a specific alert or Situation filter to remove targeted events.
· Exporting and/or removing large amounts of data on a running system can be slow.
· Exporting from a remote machine is slower because of network latency.
· The archiver tool can export data from the prc_earliest_highest_severity_event table but it cannot delete this data.
· You do not need to re-run the indexer after using the archiver tool to delete data. The -r option deletes records from Elasticsearch to keep the search feature synchronized with the database.
Monitor Your Cisco Crosswork Situation Manager System
As an administrator, you can monitor your Cisco Crosswork Situation Manager system. You can use You can use:
· Self Monitoring to view the status, health, and processing metrics of the Cisco Crosswork Situation Manager processes.
· Audit Trail to review actions that have been performed on Situations or alerts.
· Audit Logging to monitor actions within Cisco Crosswork Situation Manager.
Schedule Maintenance Downtime
You can schedule maintenance windows so that events created during these maintenance periods are not included in Situations. Defining maintenance windows for scheduled downtimes, such as during server or software upgrades, reduces unnecessary noise.
During a maintenance window, events continue to be correlated into alerts and labeled as 'In Maintenance' but you can choose not to group them into Situations. If an alert under a maintenance schedule receives an event, it is tagged as such.
View Maintenance Windows
To view maintenance windows, click the Maintenance Schedule heading in the Side Menu. If you are an Administrator, you can edit one of the displayed windows by double-clicking it.
Historical, expired and manually deleted windows are not displayed here.
Create a Maintenance Window
Click Create Maintenance Window to create a new window. Complete the following:
| Field |
Input |
Description |
| Name the Maintenance Window |
Mandatory String |
Text name for the new maintenance window. |
| Describe the Maintenance Window |
Mandatory String |
Description of the new maintenance window. |
| Define a filter for the Maintenance Window |
- |
Defines a filter to target a specific alert or a group of alerts. |
| Start date and time |
Date/Time |
Sets the start time and date of the new maintenance window. |
| End date and time |
Date/Time |
Sets the end time and date of the new maintenance window. |
| How frequently the Maintenance Window should recur |
Never Daily Weekly Monthly |
Selects whether the maintenance window will never recur or will recur on a daily, weekly or monthly basis. |
| Allow Situation Membership for Alerts under Maintenance |
Boolean |
Allows alerts created during a maintenance schedule to be included in Situations. By default, alerts under maintenance are omitted from Situations. |
Cisco Crosswork Situation Manager adds the new maintenance window in the time zone of the user who created it. When scheduling recurring maintenance windows, Cisco Crosswork Situation Manager takes into account any daylight savings time changes for the time zone. See IANA Time Zone Database for more information on valid time zones.
Uninstall Cisco Crosswork Situation Manager
Follow the instructions in this topic if you need to uninstall Cisco Crosswork Situation Manager and its supporting packages.
Be sure to backup any files that you may need again for another installation.
Stop Core Cisco Crosswork Situation Manager and Supporting Services
· Stop all core Cisco Crosswork Situation Manager services:
service moogfarmd stop
service logfilelamd stop
service restlamd stop
service socketlamd stop
service trapdlamd stop
· Stop any additional moog_farmd or lam instances running as services.
service <service name> stop
As a precaution, forcibly kill any remaining core Cisco Crosswork Situation Manager processes:
kill -9 $(ps -ef|grep java|grep lam|awk '{print $2}') 2>/dev/null
kill -9 $(ps -ef|grep java|grep moog_farmd|awk '{print $2}') 2>/dev/null
· Stop all supporting services:
service nginx stop
service elasticsearch stop
service apache-tomcat stop
service mysqld stop
service rabbitmq-server stop
Uninstall Core Cisco Crosswork Situation Manager Packages and Remove Directories and Users
· Uninstall Core Cisco Crosswork Situation Manager Packages
yum remove $(rpm -qa|grep moogsoft)
If the above command produces errors such as 'Error in PREUN scriptlet' then the following command can be run to bypass script errors:
yum -y --setopt=tsflags=noscripts remove $(rpm -qa|grep moogsoft)
1. Remove Core Cisco Crosswork Situation Manager Directories
rm -rf /usr/share/moogsoft
rm -rf /var/lib/moogsoft
rm -rf /var/log/moogsoft
rm -rf /var/run/moogsoft
2. Remove any Cisco crontab entries with this command:
crontab -l | egrep -v "moog|JAVA_HOME" | crontab -
3. Remove Cisco system users (and their home directories):
userdel -r moogsoft
userdel -r moogadmin
userdel -r moogtoolrunner
groupdel moogsoft
Uninstall Supporting Applications
Follow these steps to remove the supporting applications Apache-Tomcat, ElasticSearch, MySQL, Nginx and RabbitMQ.
Uninstalling Apache Tomcat
Note
Assumption: The Apache Tomcat service has already been stopped as per previous instructions above
To uninstall Apache Tomcat remove the installation directories and the service script:
Note
Please note: Apache Tomcat is not actually installed as an rpm package but is deployed as a tarball (via the moog_init_ui.sh script).
rm -rf /usr/share/apache-tomcat
rm -rf /var/run/apache-tomcat
rm -f /etc/init.d/apache-tomcat
To remove the tomcat system user and its home directory:
userdel -r tomcat
Uninstalling Elasticsearch
Note
Assumption: The Elasticsearch service has already been stopped as per previous instructions above.
To remove the Elasticsearch package:
yum remove elasticsearch
To remove related directories run the following commands:
rm -rf /usr/share/elasticsearch
rm -rf /var/lib/elasticsearch
Uninstalling MySQL
Note
Assumption: The mysqld service has already been stopped as per previous instructions above.
Remove the MySQL community packages with the following command:
yum remove $(rpm -qa|grep mysql)
To remove the related directories:
rm -rf /usr/share/mysql
rm -rf /var/lib/mysql
To remove the MySQL system user and its home directory and group:
userdel -r mysql
Uninstalling Nginx
Note
Assumption: The Nginx service has already been stopped as per previous instructions above.
Remove the nginx and supporting packages with the following command:
yum remove nginx
To remove related directories:
rm -rf /etc/nginx
rm -rf /usr/lib64/nginx
rm -rf /usr/share/nginx
rm -rf /var/log/nginx
rm -rf /var/lib/nginx
To remove the Nginx system user and its home directory and group:
userdel -r nginx
Uninstalling RabbitMQ
Note
Assumption: RabbitMQ server service has already been stopped as per previous instructions above.
Remove the rabbitmq-server package with the following command:
yum remove rabbitmq-server
To remove related directories:
rm -rf /etc/rabbitmq
rm -rf /usr/lib/ocf/resource.d/rabbitmq
rm -rf /var/log/rabbitmq
rm -rf /var/lib/rabbitmq
To stop the erlang epmd daemon:
epmd -kill
Note
Please note: The above command may not be necessary on EL7 installs.
To remove the RabbitMQ system user and its home directory and group:
userdel -r rabbitmq
Uninstall Remaining Packages and Remove Yum Repositories
Optionally, follow these steps to remove the remaining packages that are typically added during a Cisco Crosswork Situation Manager installation and clean up the Yum repositories:
Remove remaining packages:
Warning
Important: Note that the below list of packages is based on reverting back to a "minimal" installation of CentOS 6.9 and will vary with different versions of Linux and installation level.
Care should be taken not to remove packages that impact other important applications that may be installed on the server.
Review carefully the yum summary before proceeding with the removal - specifically any other packages listed in the "Removing for dependencies:" output.
In the list of removal packages below, the libX* and perl* packages may typically impact other applications.
To remove the remaining packages, run these commands:
yum remove GeoIP GeoIP-GeoLite-data GeoIP-GeoLite-data-extra \
apr compat-readline5 erlang fontconfig freetype gd geoipupdate jdk1.8.0_121 \
libX11 libX11-common libXau libXpm libgfortran libjpeg-turbo libkqueue libpng libxcb libxslt \
nginx-filesystem \
perl perl-DBI perl-Module-Pluggable perl-Pod-Escapes perl-Pod-Simple perl-libs perl-version \
socat tomcat-native
Remove Yum Repositories:
Remove EPEL Yum Repository:
yum remove epel-release
rm -f /etc/yum.repos.d/epel*
Remove MySQL Community Yum Repository:
yum remove mysql-community-release
rm -f /etc/yum.repos.d/mysql*
Remove remaining Yum Repositories:
rm -f /etc/yum.repos.d/elasticsearch.repo
rm -f /etc/yum.repos.d/moog.repo
rm -f /etc/yum.repos.d/rabbitmq_rabbitmq-server.repo
 Feedback
Contact Cisco
- Open a Support Case

- (Requires a Cisco Service Contract)