Applications
The following sections provide information about applications.
About Application Visibility
The Application Visibility service lets you manage your built-in and custom applications and application sets.
The Application Visibility service, hosted as an application stack within Cisco DNA Center, lets you enable the Controller-Based Application Recognition (CBAR) function on a specific device to classify thousands of network and home-grown applications and network traffic.
You can install the following packages:
-
Application Policy: Lets you automate QOS policies across LAN, WAN, and wireless within your campus and branch.
-
Application Registry: Lets you view, manage, and create applications and application sets.
-
Application Visibility Service: Provides application classification using Network-Based Application Recognition (NBAR) and CBAR techniques.
NBAR supports provisioning of up to 450 interfaces on Cisco Catalyst 9000 devices. Cisco DNA Center Application Visibility does not exceed this 450-interface limit.
 Note |
To ensure compatibility, the preceding packages must have the same package version. |
If you install Application Registry or both Application Registry and Application Policy, you can see the Applications and Application Sets tabs when you click the menu icon and choose .

If you install Application Registry and Application Visibility Service or Application Registry, Application Policy, and Application Visibility Service, you can see the Applications, Application Sets, Network Devices Enablement, and CBAR Extensions tabs when you click the menu icon and choose .
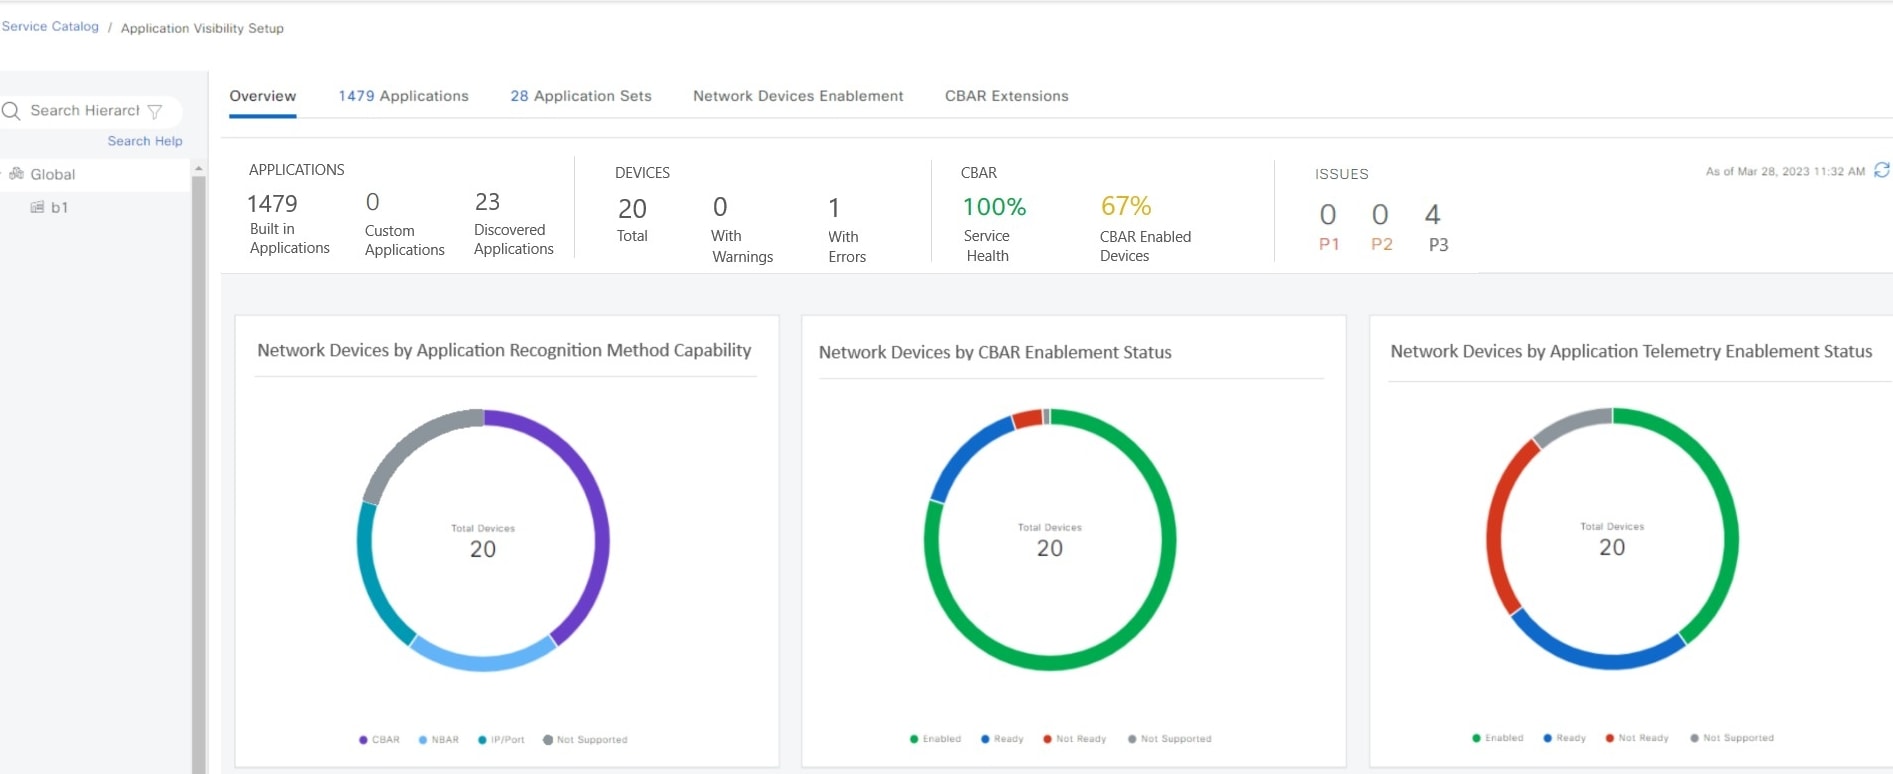
Application Visibility Setup View
The following table describes the dashlets and charts that are available in the Overview tab in Provision > Services > Application Visibility Setup.
|
Item |
Description |
||
|---|---|---|---|
|
Applications |
This chart displays the number of applications available in the Cisco DNA Center application that can be used in Application Policy. The applications are classified as follows:
|
||
|
Devices |
Shows the total number of devices, devices with warning, and devices with error. |
||
|
CBAR |
This widget displays the service health and the average health score for all CBAR-enabled devices. The device is healthy if there are no outstanding errors or warnings on that device. The CBAR health score is calculated across all CBAR-enabled devices. You can view the CBAR health of each CBAR-enabled device. A 0% CBAR health score indicates that the device has at least one error (P1). A 50% CBAR health score indicates that the device has no errors but has at least one warning (P2). A 100% CBAR health score indicates a healthy device. |
||
|
Issues |
All issues are classified by priority:
Click the P1, P2, and P3 tabs to view the device issues and remedy details. |
||
|
Network Devices by Application Recognition Method |
This chart displays the number of devices classified by each of the application recognition methods:
|
||
|
Network Devices by CBAR Enablement Status |
This chart displays the device count in each CBAR readiness status.
|
||
|
Network Devices by Application Telemetry Enablement Status |
This chart displays the device application telemetry enablement status.
|
The following table describes the device information and statuses that are available in Site Devices table, under Network Devices Enablement tab:
|
Column |
Description |
|---|---|
|
Device Name |
Name of the device. Click the device name to view the CBAR Service Status. |
|
Management IP |
IP address of the device. |
|
Device Type |
Group of related devices, such as routers, switches and hubs, or wireless controllers. |
|
Site |
The site to which the device is assigned. |
|
Fabric |
The fabric domain to which the device is assigned. |
|
Role |
Role assigned to each discovered device during the scan process. The device role is used to identify and group devices according to their responsibilities and placement within the network. If Cisco DNA Center cannot determine a device role, it sets the device role to Unknown. |
|
Active Recognition Method |
Shows the device recognition method (CBAR, NBAR, IP/Port, or Not Supported). |
|
OS Version |
Cisco IOS software that is currently running on the device. |
|
CBAR Readiness Status |
Hover over the status displayed in the CBAR Readiness Status column to view the Remedy message. |
|
Protocol Pack Version |
Shows the current version of the protocol pack installed on the device and the protocol pack update status. |
|
Device Registry Status |
Shows the synchronization status of the device with the application registry. Hover over the info icon or the error icon to view more details about the synchronization status. |
|
CBAR Deployment Status |
Shows the CBAR deployment status. For more information, see Reconfigure CBAR on Network Devices. |
|
Service Health Status |
Click the issues in the Service Health Status column to open the CBAR Service status page, which displays a complete list of issues and the service status information of a device. If you click the Cisco Catalyst 9K device name, you can view the footprint (service load, CPU, and flows) of the CBAR service. |
|
Application Telemetry Readiness Status |
Shows the device readiness for Application Telemetry. |
|
Application Telemetry Deployment Status |
Shows Application Telemetry deployment status for the device. If the deployment fails, click the link to view the details of failure. |
|
Application QoS Policy |
The application policy applied to the device. For Cisco Wireless Controllers with more than one application policy, the number of application policies applied and the name of all the applied application policies are displayed. |
|
WAN Interfaces |
Shows the number of WAN interfaces. Click the WAN interface details to view the WAN connectivity settings for the device. |
|
Trunk Interfaces |
Shows the number of Trunk interfaces. Click the Trunk interface details to view the Trunk connectivity settings for the device. |
Configure CBAR Cloud
The Application Visibility service uses the CBAR cloud to enrich the protocol pack and enhance visibility for unknown applications by sending and receiving data from the cloud.
Procedure
|
Step 1 |
From the top-left corner, click the menu icon and choose . |
||||
|
Step 2 |
Click CBAR Extensions > CBAR Cloud tab. |
||||
|
Step 3 |
Click the cloud authentication link to connect with Cisco DNA - Cloud, to enable CBAR and to gain access to CBAR Application Intelligence data. You will be redirected to System > Settings > Cloud Authentication window. |
||||
|
Step 4 |
You should generate a token in Cisco DNA - Cloud and enter it in Cloud Authentication window. Click Where did I get my token Encryption Key link to generate a token. If you do not have a Cisco DNA - Cloud account, click dna.cisco.com link. |
||||
|
Step 5 |
In the Cisco DNA - Cloud GUI, click the menu icon, click Applications, and choose Products. |
||||
|
Step 6 |
From the Region drop-down list, choose the appropriate region and click Register. |
||||
|
Step 7 |
In the Register Product pane, enter the required details, such as Host Name/IP, Name, and Description (if any). Choose the appropriate type of product being registered from the Type drop-down list, such as Cisco DNA Center. Click Register.
The OTP redemption occurs automatically, and Cisco DNA Center opens in a new window. |
||||
|
Step 8 |
If you want to connect manually, the OTP Generated dialog box appears after successful registration of Cisco DNA Center. To copy the OTP, click Copy, and click Close. |
||||
|
Step 9 |
Navigate back to the Cloud Authentication window to establish the connection:
On successful establishment of the connection, CBAR Cloud is enabled by default. |
||||
|
Step 10 |
You can view the list of available CBAR Dynamic Application Feeds under CBAR Cloud tab. To enable all the application feeds, click All radio button.
To enable the required application feeds, do the following:
|
Enable/Disable CBAR Cloud
Before you begin
Procedure
|
Step 1 |
From the top-left corner, click the menu icon and choose Provision > Application Visibility Setup. |
|
Step 2 |
Click CBAR Extensions > CBAR Cloud tab. |
|
Step 3 |
To enable CBAR Cloud, click the Enable toggle button. |
|
Step 4 |
To disable CBAR Cloud, disable the Enable toggle button and click Yes in the subsequent dialog box. |
Enable/Disable CBAR on Network Devices
Before you begin
-
The devices must be assigned to a site.
-
It is recommended to configure CBAR Cloud before enabling CBAR on the network devices. For more information, see Configure CBAR Cloud.
Procedure
|
Step 1 |
From the top-left corner, click the menu icon and choose tab. The Site Devices table is displayed. Click the vertical ellipsis and click All to view all the columns. |
|
Step 2 |
Do the following to enable CBAR on selected devices or all devices:
|
|
Step 3 |
Do the following to disable CBAR on selected devices or all devices:
|
Enable/Disable Application Telemetry
Before you begin
We recommend that you configure CBAR Cloud before enabling Application Telemetry. For more information, see Configure CBAR Cloud.
Procedure
|
Step 1 |
From the top-left corner, click the menu icon and choose Provision > Application Visibility Setup. |
||
|
Step 2 |
Click the Network Devices Enablement tab. |
||
|
Step 3 |
In the Site Devices table, do the following to enable Application Telemetry:
A Success message at the bottom of the window indicates that Application Telemetry is enabled. |
||
|
Step 4 |
To disable Application Telemetry, do the following:
|
Update the Protocol Pack on a CBAR-Enabled Device
You can upgrade the protocol pack on any device that supports CBAR to the latest or any specific protocol pack. You can update protocol pack manually or enable automatic protocol pack update.
Note |
|
Before you begin
-
Configure Cisco credentials on System Settings. For more information about configuring Cisco credentials, see the Cisco DNA Center Administrator Guide.
-
Devices must support CBAR.
-
CBAR must be enabled on the device.
-
Protocol packs for the device must be available on cisco.com.
Procedure
|
Step 1 |
From the top-left corner, click the menu icon and choose . |
||
|
Step 2 |
Click the Network Devices Enablement tab. |
||
|
Step 3 |
In Site Devices table, check the status shown in the Protocol Pack Version column. You can click the Outdated status to view the list of applicable protocols packs in the Update Protocol Pack window. |
||
|
Step 4 |
Click Update corresponding to the required protocol pack version in the Update Protocol Pack window. The Protocol Pack Version column shows In progress status. Click the info icon to view the current updating version. If the Protocol Pack Version column shows Update failed status, click the error icon to view the failure reason. |
||
|
Step 5 |
If you want to manually update all the devices or selected devices to the latest protocol pack, do the following: To update the protocol pack on all applicable CBAR-enabled devices:
To update the protocol pack on the selected devices:
To update the protocol pack on the selected devices from the file:
|
||
|
Step 6 |
If you want to automatically update protocol pack for all the devices, do the following:
To exclude selected devices from automatic protocol pack update, do the following:
To include selected devices for automatic protocol pack update, do the following:
|
Reconfigure CBAR on Network Devices
You can include or exclude interfaces from Site Devices table in the Application Visibility Setup > Network Devices Enablement window.
Procedure
|
Step 1 |
From the top-left corner, click the menu icon and choose . |
|
Step 2 |
Click the Network Devices Enablement tab. |
|
Step 3 |
In the Site Devices table, click Re-Configure in the CBAR Deployment status column for the device that you want to configure and do the following:
|
|
Step 4 |
To include interfaces, choose Excluded Interfaces and enable the toggle button next to the desired interfaces, and click Save. |
|
Step 5 |
Click Enable. |
|
Step 6 |
Based on the Visibility of Configurations settings, choose an available option. For more information, see Visibility and Control of Configurations Workflow.
|
|
Step 7 |
If you choose to Generate configuration preview in the preceding step, enter the task name in the Task Name field and click Apply. |
|
Step 8 |
(Optional) Click Deploy or Discard. If you're not ready to deploy the configurations, click Exit and Preview Later. |
|
Step 9 |
If you choose to deploy the configurations in the preceding step, do the following:
When the configurations are successfully submitted, a success message is displayed. You can view the status of the task on the Work Items window. To navigate to the Work Items window, click the menu icon and choose Activities > Work Items. |
Applications and Application Sets
Applications are the software programs or network signaling protocols that are used in your network. Cisco DNA Center supports all of the applications in the Cisco Next Generation Network-Based Application Recognition (NBAR2) library of approximately 1400 distinct applications.
Applications are grouped into logical groups called application sets. An application set can be assigned a business relevance within a policy.
Applications are mapped into industry standard-based traffic classes, as defined in RFC 4594, that have similar traffic treatment requirements. The traffic classes define the treatments (such as Differentiated Services Code Point [DSCP] marking, queuing, and dropping) that will be applied to the application traffic, based on the business relevance group that is assigned.
If you have additional applications that are not included in Cisco DNA Center, you can add them as custom applications and assign them to application sets.
Unidirectional and Bidirectional Application Traffic
Some applications are completely symmetrical and require identical bandwidth provisioning on both ends of the connection. Traffic for such applications is described as bidirectional. For example, if 100 kbps of Low-Latency Queueing (LLQ) is assigned to voice traffic in one direction, 100 kbps of LLQ must also be provisioned for voice traffic in the opposite direction. This scenario assumes that the same Voice over IP (VoIP) coder-decoders (codecs) are being used in both directions and do not account for multicast Music-on-Hold (MoH) provisioning. However, certain applications, such as streaming video and multicast MoH, are most often unidirectional. Therefore, it might be unnecessary, and even inefficient, to provision any bandwidth guarantees for such traffic on a branch router for the branch-to-campus direction of traffic flow.
Cisco DNA Center lets you specify whether an application is unidirectional or bidirectional for a particular policy.
On switches and wireless controllers, NBAR2 and custom applications are unidirectional by default. However, on routers, NBAR2 applications are bidirectional by default.
Custom Applications
Custom applications are applications that you add to Cisco DNA Center. You can view the number of custom applications available in the Overview window. For wired devices, you can define applications based on server name, IP address and port, or URL. You can define custom applications for Cisco Catalyst 9800 Series Wireless Controllers and not for Cisco AireOS controllers.
When you define an application according to its IP address and port, you can also define a DSCP value and port classification.
To simplify the configuration process, you can define an application based on another application that has similar traffic and service-level requirements. Cisco DNA Center copies the other application's traffic class settings to the application that you are defining.
Cisco DNA Center does not configure ACLs for port numbers 80, 443, 53, 5353, and 8080, even if they are defined as part of a custom application. If the custom application has a transport IP defined, Cisco DNA Center configures the application on the devices.
Note |
For a custom application to be programmed on devices when a policy is deployed, you must assign the custom application to one of the application sets defined in the policy. |
Discovered Applications
Discovered applications are applications that are discovered by importing from the recommended customization, such as an Infoblox DNS server, or by importing from the recommended unclassified applications flow.
The unclassified traffic can come from any flow that the CBAR-enabled device identifies, but that is not recognized by the NBAR engine. In such cases, the applications that have a meaningful bit rate are reported as unclassified and can be imported and used as applications in Cisco DNA Center.
The Application Visibility service lets Cisco DNA Center connect with external authoritative sources through the CBAR cloud to help classify the unclassified traffic or help generate improved signatures.
The available external authoritative sources are Google Meet, Service Now, Sugarcrm, Telegram, SAP, Microsoft Office 365 Cloud Connector, Box, RingCentral, Github, Crashplan, Intuit, Workday, Zscaler, Atlassian, Amazon Chime, Zoom, Dropbox, Webex, Whatsapp, Cisco Meraki, and Salesforce. This list is dynamic. As new sources are added to the cloud, the list is updated. To view the list, choose .
Note |
You must configure a CBAR cloud connector before configuring the applications. |
The discovered applications are imported to the application registry.
Favorite Applications
Cisco DNA Center lets you flag applications that you want to configure on devices before all other applications. Flagging an application as a favorite helps to ensure that the QoS policies for your favorite applications get configured on devices. For more information, see Processing Order for Devices with Limited Resources.
When custom applications are created they are marked as favorite applications.
Although there is no limit to the number of applications that you can mark as favorites, designating only a small number of favorite applications (for example, fewer than 25) helps to ensure that these applications are treated correctly from a business-relevance perspective in deployments with network devices that have limited ternary content addressable memory (TCAM).
Favorite applications can belong to any business-relevance group or traffic class and are configured system-wide, not on a per-policy basis. For example, if you flag the Cisco Jabber video application as a favorite, the application is flagged as a favorite in all policies.
Keep in mind that not only can business-relevant applications be flagged as favorites, even business-irrelevant applications can be flagged as such. For example, if administrators notice a lot of unwanted Netflix traffic on the network, they might chose to flag Netflix as a favorite application (despite it being assigned as business-irrelevant). In this case, Netflix is programmed into the device policies before other business-irrelevant applications, ensuring that the business intent of controlling this application is realized.
Configure Applications and Application Sets
The following subsections describe the various tasks that you can perform in the context of applications and application sets.
Note |
You can edit or delete only custom and discovered applications. You can edit or delete a maximum of 100 custom and discovered applications at one instance. If you choose applications for editing or deleting, a notification message indicates the number of applications that can be edited or deleted, excluding the number of chosen applications. |
Change an Application's Settings
Procedure
|
Step 1 |
From the top-left corner, click the menu icon and choose . |
|
Step 2 |
Click Applications tab. |
|
Step 3 |
Use the Search, Show, or View By fields to locate the application that you want to change. You can search applications based on their name, port number, and traffic class. |
|
Step 4 |
Click the application name. |
|
Step 5 |
In the dialog box, change one or both settings:
|
|
Step 6 |
Click Save. |
Create a Server Name-Based Custom Application
If you have applications that are not in Cisco DNA Center, you can add them as custom applications.
Procedure
|
Step 1 |
From the top-left corner, click the menu icon and choose . |
|
Step 2 |
Click the Application tab. |
|
Step 3 |
Click Add Application at the top-right corner of the window. |
|
Step 4 |
In the slide-in pane, provide the necessary information in the following fields:
|
|
Step 5 |
Click Save. |
Create an IP Address and Port-Based Custom Application
If you have applications that are not in Cisco DNA Center, you can add them as custom applications.
Procedure
|
Step 1 |
From the top-left corner, click the menu icon and choose . |
|
Step 2 |
Click the Application tab. |
|
Step 3 |
Click Add Application. |
|
Step 4 |
In the Application name field, enter a name for the custom application. The name can contain up to 24 alphanumeric characters, including underscores and hyphens. The underscore and hyphen are the only special characters allowed in the application name. |
|
Step 5 |
In the Type area, click the Server IP/Port radio button to indicate that the application is accessible through an IP address and port. |
|
Step 6 |
Check the DSCP check box and define a DSCP value. If you do not define a value, the default value is Best Effort. Best-effort service is essentially the default behavior of the network device without any QoS. |
|
Step 7 |
Check the IP/Port Classifiers check box to define the IP address and subnet, protocol, and port or port range for an application. Valid protocols are IP,
TCP, UDP, and TCP/UDP. If you select the IP protocol, you do not define a port number or range. Click |
|
Step 8 |
Define your application traffic-handling requirements using one of the following methods:
|
|
Step 9 |
From the Application Set drop-down list, choose the application set to which the application will belong. Valid application sets are authentication-services, backup-and-storage, collaboration-apps, consumer-browsing, consumer-file-sharing, consumer-gaming, consumer-media, consumer-misc, consumer-social-networking, custom applications, database-apps, desktop-virtualization, email, enterprise-ipc, file-sharing, generic-browsing, generic-media, generic-misc, tunneling, local-services, naming-services, network-control, network-management, remote-access, saas-apps, signaling, software-development-tools, software-updates, streaming-media. |
|
Step 10 |
Click Save. |
Create a URL-Based Custom Application
If you have applications that are not in Cisco DNA Center, you can add them as custom applications.
Procedure
|
Step 1 |
From the top-left corner, click the menu icon and choose . |
|
Step 2 |
Click the Application tab. |
|
Step 3 |
Click Add Application. The Add Application dialog box appears. |
|
Step 4 |
In the Application name field, enter the name of the custom application. The name can contain up to 24 alphanumeric characters, including underscores and hyphens. (Underscores and hyphens are the only special characters allowed in the application name.) |
|
Step 5 |
For Type, click the URL radio button. |
|
Step 6 |
In the URL field, enter the URL used to reach the application. |
|
Step 7 |
Configure the traffic class:
|
|
Step 8 |
From the Application Set drop-down list, choose an application set in which you want the application to reside. |
|
Step 9 |
Click Save. |
Edit or Delete a Custom Application
If required, you can change or delete a custom application.
Note |
You cannot delete a custom application that is directly referenced by an application policy. Application policies typically reference application sets and not individual applications. However, if a policy has special definitions for an application (such as a consumer or producer assignment or bidirectional bandwidth provisioning), the policy has a direct reference to the application. As such, you must remove the special definitions or remove the reference to the application entirely before you can delete the application. |
Procedure
|
Step 1 |
From the top-left corner, click the menu icon and choose . |
||
|
Step 2 |
Click the Application tab. |
||
|
Step 3 |
Use the Search, Show, or View By fields to locate the application that you want to change. You can search applications based on their name, port number, and traffic class. |
||
|
Step 4 |
To edit the application:
Alternatively, choose the application and from the Actions drop-down list, click Edit to edit an application.
|
||
|
Step 5 |
To delete the application, click Alternatively, you can follow the steps below to delete the application:
|
 in the application box, and then click
 Mark an Application as Favorite
You can mark an application as a favorite to designate that the application's QoS configuration must be deployed to devices before other applications' QoS configuration. An application marked as favorite has a yellow star next to it.
When you add or edit a policy, applications marked as a favorites are listed at the top of the application set.
Applications are configured system-wide, not on a per-policy basis. For more information, see Favorite Applications.
Procedure
|
Step 1 |
From the top-left corner, click the menu icon and choose . |
|
Step 2 |
Click the Application tab. |
|
Step 3 |
Locate the application that you want to mark as a favorite. |
|
Step 4 |
Click the star icon. |
Create a Custom Application Set
If none of the application sets fits your needs, you can create a custom application set.
Procedure
|
Step 1 |
From the top-left corner, click the menu icon and choose . |
|
Step 2 |
Click the Application Sets tab. |
|
Step 3 |
Click Add Application Set. |
|
Step 4 |
In the slide-in pane, enter a name for the new application set. Cisco DNA Center creates the new application set; however, it contains no applications. |
|
Step 5 |
Choose a Default Business Relevance from the drop-down list. Default Business Relevance is the business relevance level in the absence of a concreate application QoS, this level will appear in Assurance for sites that are not assigned to a policy. |
|
Step 6 |
Click Save. |
|
Step 7 |
Use the Search, Show, or View By fields to locate the application set. You can search applications based on their name, port number, and traffic class. |
|
Step 8 |
Locate the applications that you want to move into the new application set. |
|
Step 9 |
Check the check box next to the applications that you want to move. |
|
Step 10 |
Drag and drop the applications into the new application set. |
Edit or Delete a Custom Application Set
If required, you can change or delete a custom application set.
Note |
You cannot delete a custom application set that is referenced by an application policy. You must remove the application set from the policy before you delete the application set. |
Procedure
|
Step 1 |
From the top-left corner, click the menu icon and choose . |
|
Step 2 |
Click the Application Sets tab. |
|
Step 3 |
Use the Search, Show, or View By fields to locate the application set that you want to change. You can search applications based on their name, port number, and traffic class. |
|
Step 4 |
Do one of the following:
|
Discover Unclassified Applications
The Application Visibility service in Cisco DNA Center obtains information on classified and unclassified domains and sockets from devices and displays that information in the Observed Traffic chart. The number of unclassified server names and IP/ports that are discovered by the Application Visibility service is shown under Recommendations.
You can add the unclassified server names and IP/ports to the Application Registry.
Note |
You can add a maximum of 1100 discovered applications in the Application Registry. |
Procedure
|
Step 1 |
From the top-left corner, click the menu icon and choose . |
|
Step 2 |
Click the CBAR Extensions > Discovered Applications tab. |
|
Step 3 |
The table lists the discovered servers or IP/ports that are not classified. Choose the server and check the Hide Ignored Applications check box if you want to hide the selected server or IP/ports in the table. |
|
Step 4 |
Choose the server or IP/ports that you want to import as an application in the Application Registry. |
|
Step 5 |
Choose the required Application, Application Set, and Traffic Class from the drop-down list. |
|
Step 6 |
Click Import. |
|
Step 7 |
Click the Applications tab and from Show drop-down list choose Discovered to view the imported application. |
Application Visibility Service Support for the Cisco DNA Traffic Telemetry Appliance
The Cisco DNA Traffic Telemetry Appliance generates endpoint telemetry from mirrored IP network traffic and shares the telemetry data with Cisco DNA Center for endpoint visibility and segmentation.
The prerequisites for enabling CBAR on the Cisco DNA Traffic Telemetry Appliance include:
-
The device must be assigned to a site.
-
The device role must be set to Distribution mode.
You can configure custom applications with attribute sets and maps on the Cisco DNA Traffic Telemetry Appliance without configuring a QoS policy. For more information, see Create an Application Policy and Deploy an Application Policy.
Discover Infoblox Applications
You can integrate Cisco DNA Center with an organizational Infoblox DNS server to resolve unclassified traffic based on server names.
Before you begin
-
The Infoblox WAPI version must be 1.5 or later. To check the Infoblox WAPI version, log in to the Infoblox server and choose .
-
Create a role with at least Read Only permissions and assign the role to the Infoblox user. For more information, see Manage Users in the Cisco DNA Center Administrator Guide.
Procedure
|
Step 1 |
From the top-left corner, click the menu icon and choose . |
|
Step 2 |
Click the CBAR Extensions > Infoblox tab. |
|
Step 3 |
Under Infoblox, click Here link to configure IPAM/DNS server credentials in Cisco DNA Center. |
|
Step 4 |
Complete the IPAM settings. For more information, see Configure an IP Address Manager in the Cisco DNA Center Administrator Guide. |
|
Step 5 |
Go back to Infoblox and click the
|
|
Step 6 |
Click Save. |
|
Step 7 |
Choose the application that you want to import and complete the following:
|
|
Step 8 |
Click Import. |
|
Step 9 |
Click the Applications tab and choose Discovered in the Show drop-down list to view or edit the imported Infoblox applications. If you change the server name of an application after importing the application, the Application Status column in the Infoblox window shows the status of the application as Updated. The application name that you see in the Application Status column is the new server name of the application. Click the info icon to view the old server names of the application. |
Edit or Delete a Discovered Application
If required, you can edit or delete a discovered application.
Procedure
|
Step 1 |
From the top-left corner, click the menu icon and choose . |
|
Step 2 |
Click the Applications tab. |
|
Step 3 |
Use the Search, Show, or View By fields to locate the discovered application that you want to change. You can search for applications based on their name, port number, and traffic class. |
|
Step 4 |
To edit the application: |
|
Step 5 |
To delete the application, select the application and choose Delete option from the Action drop-down list at the top of the window, and then click OK in the subsequent warning dialog box that appears on the window. |
 Feedback