New and Changed Information
The table provides an overview of the significant changes to this document.
|
Release |
Description |
|---|---|
|
Cisco ACI vRealize 8 Plug-in, Release 1.0.0 |
The document provides details about Cisco ACI and VMware vRealize Automation, Release 8.x integration. Support for vRealize 8.2. |
|
Cisco ACI vRealize 8 Plug-in, Release 1.0.1 |
Support for vRealize 8.2, 8.3, and 8.4. |
Overview
Cisco Application Centric Infrastructure (ACI), in addition to integrating with VMware vCenter, integrates with VMware's products vRealize Automation (vRA) and vRealize Orchestrator (vRO). vRA and vRO are parts of the VMware vRealize Automation Suite for building and managing multivendor hybrid cloud environments.
VMWare vRealize Automation Appliance Services, Release 8.x
The user experience for vRealize Automation has significantly changed for vRealize Automation, Release 8.x. vRA 8.x implements a Kubernetes-based architecture, with HTML 5 based GUI. See VMware’s vRealize Automation, Release 8.x documentation for more information.
The scope of this document is to provide details of Cisco ACI support for vRA 8.x.
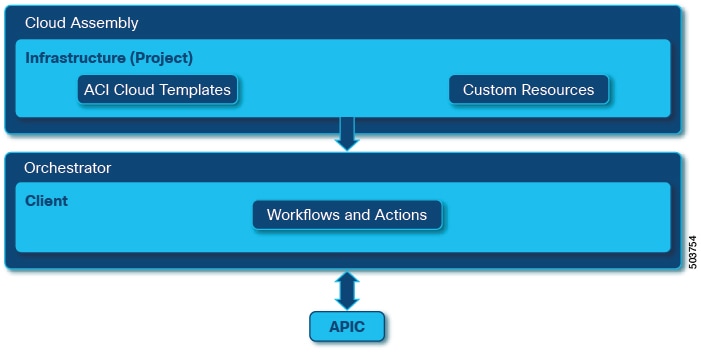
The Cisco ACI vRealize Automation 8.x plug-in uses the following services provided by vRA 8.x:
-
Orchestrator—hosts the Cisco ACI vRealize 8 plug-in and the workflow engine. Workflows allow users to perform actions on the plugged-in technology objects. Actions on the APIC objects are performed using workflows. The custom workflows are packaged as part of the Cisco ACI vRealize 8 plug-in and are designed to create/delete APIC resources. You can use the embedded orchestrator service or a standalone vRO.
-
Cloud Asssembly—manages the infrastructure and cloud templates.
-
Service Broker—manages content sources, catalog items and approvals.
Software Requirements
For the supported versions of vCenter and Cisco APIC, see the ACI Virtualization Compatibility Matrix.
|
Platform |
Supported Release |
|---|---|
|
vRealize Automation Suite |
vRealize Lifecycle Manager 8.x vRealize Identity Manager 8.x vRealize Automation Appliance 8.x |
CPU and Memory Utilization
The Cisco ACI vRealize 8 plug-in has no significant impact on CPU and memory utilization. At peak usages, the CPU is approximately 2% and the memory consumption is less than 2%.
Orchestrator
vRealize Automation Orchestrator is the core service that enables the integration between Cisco ACI and vRA. The components of Orchestrator are:
-
Control Center—for managing plug-ins and enabling logs.
-
Client—for designing, debugging, and running vRO workflows and actions.
-
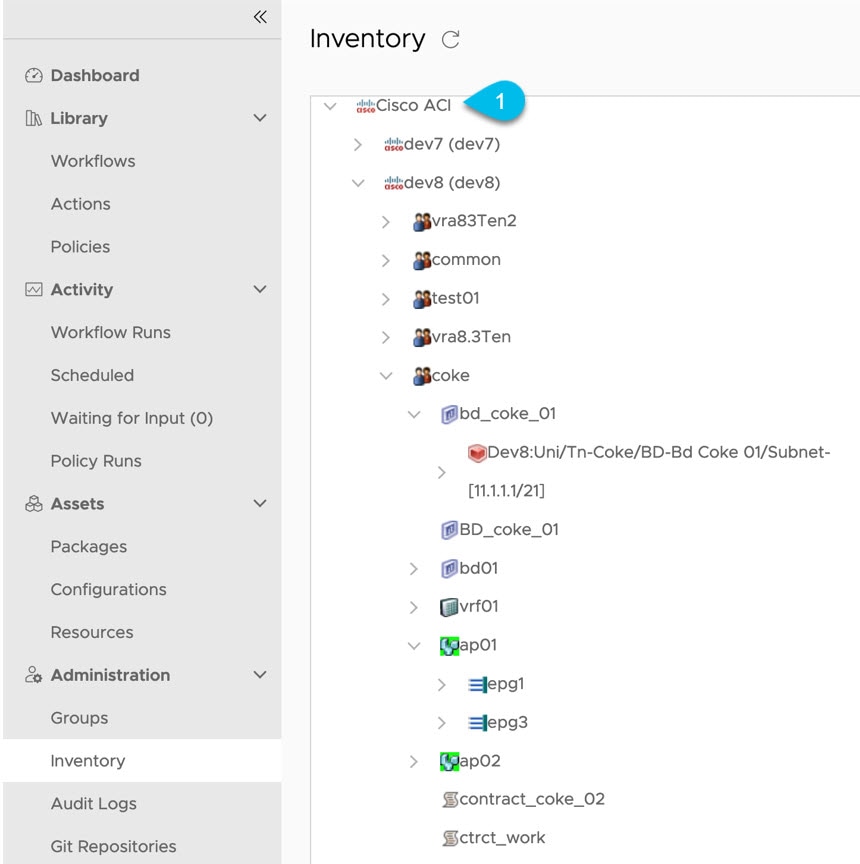
Inventory View—for browsing through the APIC objects.
Cloud Assembly
vRealize Automation Cloud Assembly connects public and private cloud providers so that you can deploy machines, applications, and services that you create for the resources. The main purpose of Cloud Assembly is to design, develop and deploy cloud templates.
The components of Cloud Assembly are:
-
Infrastructure— for provisioning and maintaining various compute and cloud resources.
-
Custom Resources—are building blocks for designing a ACI cloud template. Drag and drop the custom resources on the canvas to design a custom cloud template.
-
Cloud Template—for automating the deployment of ACI resources using the custom resources, canvas and YAML editor.
Cloud Assembly relays the deployment information to the Orchestrator, which is responsible to run the corresponding/respective workflows. Cloud Assembly can not directly communicate with the APICs; communication to APIC is only via the Orchestrator.
Cisco ACI with VMware vRealize Automation 8.x
vRA integration is delivered through a set of cloud templates imported into the vRA appliance. The cloud templates leverage the vRO workflows, providing a set of APIC custom resources that allows you to deploy, manage, and remove networking components.
The Cisco ACI vRealize 8 plug-in allows the creation and deletion of the following APIC objects:
-
Tenant
-
Application Profile
-
VRF
-
Bridge Domain (BD) and BD subnet
-
Endpoint Groups
-
Contracts and filters
Benefits of Integrating Cisco ACI with vMWare vRealize Automation 8.x
vRA acts as a single pane for automating and deploying applications on cloud and on premises environments. Cisco ACI vRealize 8 plug-in enables faster deployment of applications with networking services. This consumption model allows users to deploy single and multi-tier application workloads in a single click with pre-defined, as well as customizable compute and network policies.
Integrating Cisco ACI with VMware vRealize Automation 8.x
To access the Cloud Services Console, login to VMware vRealize Automation Appliance 8.x as the organizational owner using,
https://<appliance_FQDN >/ .
Getting Started with the Cisco ACI and VMware vRealize Automation 8.x Integration
Here is a list of mandatory prerequisites before integrating vRA 8.x with Cisco ACI:
-
Install vRealize Automation Release 8.x. See VMware vRealize 8.x documentation.
-
Set up the vRealize Appliance. See VMware vRealize 8.x documentation.
-
Download and unzip the Cisco ACI vRealize 8 plug-in package.
-
Install Python 3.8 and
requestsandpyYamllibraries. -
For role based control access for APIC, an APIC user must be created with a valid security domain and access privileges.
 Note |
For details about Cisco ACI integration with vRA 7.x, see the Cisco ACI with VMware vRealize chapter in the Virtualization Guide on the Cisco APIC Document support page. |
Cisco APIC Account to vRA Project Association
A project is an abstraction of the compute resources. A set of users gain access to the underlying services and resources through Projects. A project can roughly be compared to an AWS account or a subscription in Azure.
An APIC account is treated as a networking resource for a vRA Project. A vRA project can be connected to an APIC account using the provided Orchestrator workflows. One APIC account can be reused by multiple projects, similar to using the same compute resources for deploying various applications on cloud or an on-prem datacenter. However, multiple APIC accounts can not be linked to one project.
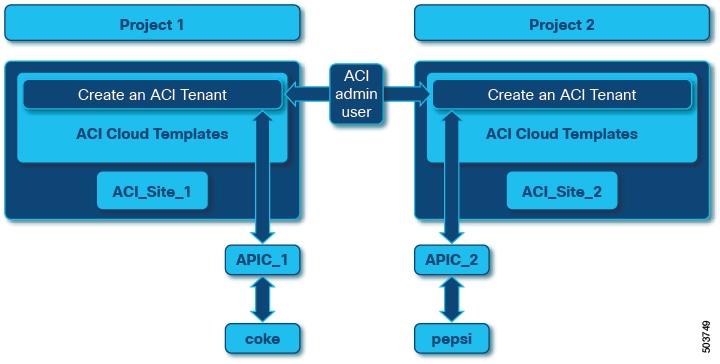
As part of ACI-integration with vRA, this release supports pairing up vRA project with a ACI fabric managed by an APIC-cluster. As part of the plug-in design, the APIC accounts are auto-selected implicitly based on the vRA Project to APIC association. Therefore, when the ACI cloud templates are deployed within a project, the ACI resources are created on the connected APIC. This provides stronger access control and isolation among tenants.
The vRO service administrator has to setup APIC connections with the vRA projects accordingly. APIC accounts can be added with administrator and tenant users.
 Note |
Tenant user must have write permissions to be able to deploy resources on the respective APIC. |
In the example:
Project 1: ACI_Site_1 creates a tenant “coke” on APIC Account, APIC_1, by deploying the Cloud Template, Create an ACI Tenant.
Project 2: ACI_Site_2 creates a tenant “pepsi” on APIC Account, APIC_2, by deploying the Cloud Template with the project. You do not need to provide the APIC account while deploying ACI Cloud Templates as long as the APIC account is added to the Project.
Identifying the Project ID
Use this procedure to identify the project ID for a project.
Before you begin
Create a project. For details about how to create a project, see VMware vRealize 8.x documentation.
Procedure
| Step 1 |
Login to vRA appliance. |
||
| Step 2 |
Navigate to Cloud Assembly > Infrastructure > Projects. |
||
| Step 3 |
Select the project that contains the ACI Cloud templates. The project ID is indicated towards the end of the URL. Remove the first 2 characters after the last "%" sign. In the example,
here -
|
Role Based Access Control in VMware vRealize Automation 8.x
You can create an APIC Account with non admin users. Ensure that a user account with required security domains and roles is created in APIC. Also make sure that the user has the appropriate access rights.
APIC offers the following access rights:
-
readPriv: User with readPriv can only retrieve information about the APIC objects.
-
writePriv: Users can create APIC objects in the assigned security domain.
vRealize Automation 8.x creates a default organization. The user installing the vRA suite is assigned the Organization Owner role. The Organization Owner can create new users and assign them roles. Roles define the set of tasks that a particular user can perform.
The roles offered in vRealize Automation can be classified into three categories:
-
Organizational
-
Service
-
Project
|
Roles |
Responsibilities |
|---|---|
|
Organization |
|
|
Service |
Service administrator:
Service User:
|
|
Project |
Project administrator:
Project Member:
|
Each service, namely Cloud Assembly and Service Broker can have their own set of service administrators, users and viewers. For more information on user management, see VMware vRealize 8.x documentation.
Configuring Orchestrator
Configuring the Orchestrator includes these two procedures:
Installing the Cisco ACI vRealize 8 Plug-in
Use this procedure to install the Cisco ACI plug-in using Control Center.
Before you begin
Download the Cisco ACI vRealize 8 plug-in, tar.gz file.
Procedure
| Step 1 |
Log in to vRO's Control Center , as a root user. |
||
| Step 2 |
Navigate to Manage Plug-ins. |
||
| Step 3 |
Select the |
||
| Step 4 |
Click Upload.
|
||
| Step 5 |
Verify that the Cisco ACI vRealize 8 plug-in (com.cisco.apic package) is properly installed in the vRO client using Orchestrator > Assets > Packages. |
Connecting to an APIC Instance
Use this procedure to connect to an APIC instance.
Before you begin
The vRO service administrator must configure an APIC Account by running the APIC_Configuration workflows included in the plug-in package.
 Note |
An APIC Account can only be created via the vRO service. APIC Configurations using Cloud Assembly are not supported. |
Prerequisite procedure, required to generate a self-signed certificate:
-
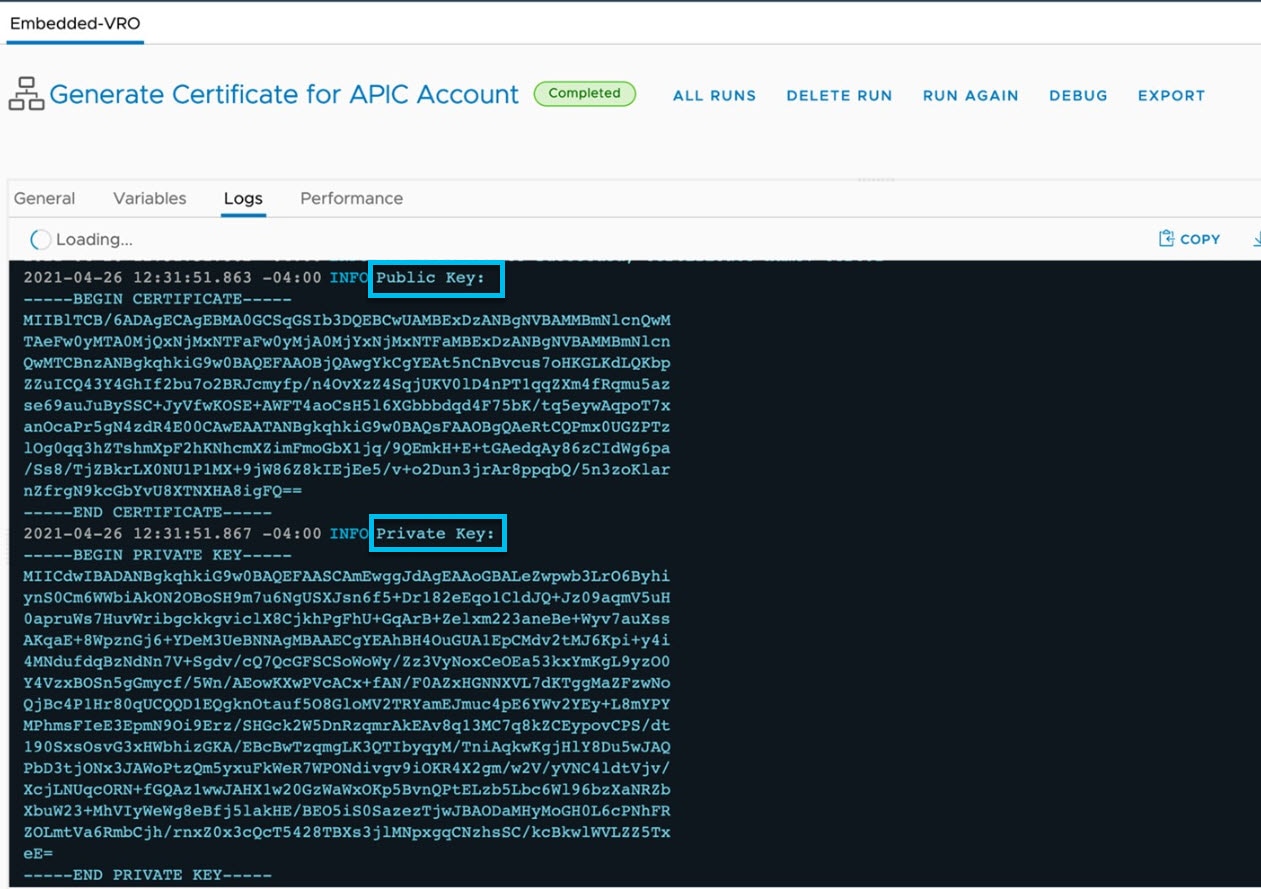
Navigate to Orchestrator > Library > WorkFlows > Generate Certificate for APIC Account > Run.
-
Enter a Certificate Name.
-
In the Logs tab, check for the public and private keys.
-
Copy and add the Public Key (displayed under Logs) to the APIC user. Include ––––BEGIN CERTIFICATE---- and ––––END CERTIFICATE----. Ensure to use the same certificate name in APIC.
Steps to add certificate in APIC:
-
Login to the APIC GUI as administrator.
-
Select Admin on the menu.
-
Navigate to Security Management > Local Users.
-
Select the APIC user.
-
In the Work pane, in the User Certificate section, click the (+) icon to add the certificate. The Create Certificate window is displayed.
-
In the Name field, enter the certificate name.
-
In the Data field, paste the certificate content that you copied earlier (initial step of Step 4).
-
Click Submit.
-
Procedure
| Step 1 |
Navigate to Orchestrator > Library > Workflows > Add APIC Account > Run. Two authentication methods are provided:
Perform Step 2 or Step 3 below, based on the authentication method. |
||
| Step 2 |
Select User Authentication and enter the APIC user name and password. |
||
| Step 3 |
For Self-signed certificate-based authentication, enter the private key and a passphrase to encrypt the private key. The Private Key is displayed under Logs. |
||
| Step 4 |
Switch to the Projects tab and add the vRA Project IDs to this APIC.
|
||
| Step 5 |
Click Run. |
||
| Step 6 |
Verify that the APIC Account was successfully added by ensuring that the workflow run was successful. |
||
| Step 7 |
Navigate to Administration > Inventory to ensure that APIC objects are displayed under its account. If there is a down5 string next to the created APIC account, it indicates that the connection is unsuccessful. In such a case, delete the APIC account before attempting to re-create it. With reference to the example below, down5 appended to the dev7User APIC account indicates that it is not connected. 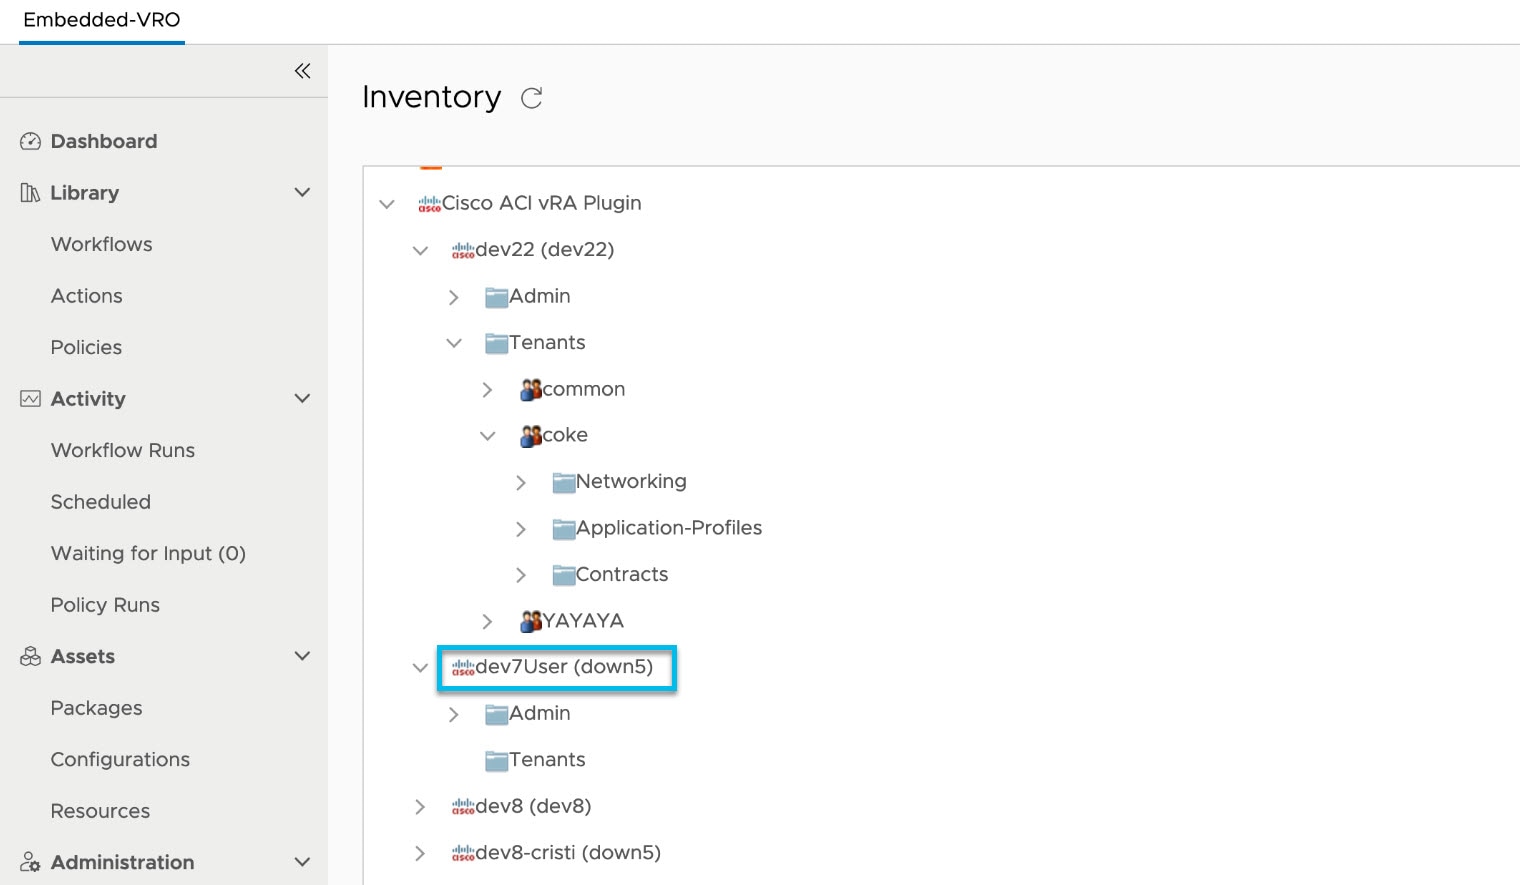
|
APIC Workflows
Each custom resource and catalog item are implemented as a workflow in the vRealize Orchestrator. When a cloud template containing an ACI custom resource is deployed, the corresponding Orchestrator workflow is executed in the backend.
The following APIC configuration workflows are provided to the user:
|
Workflow |
Description |
|---|---|
|
Add APIC Account |
Creates the APIC account with user credentials and self-signed certificate. |
|
Add vRA Projects to an APIC Account |
Links projects to existing APIC accounts. |
|
Set Default APIC Account |
Updates the default APIC account. |
|
Display vRA projects in an APIC Account |
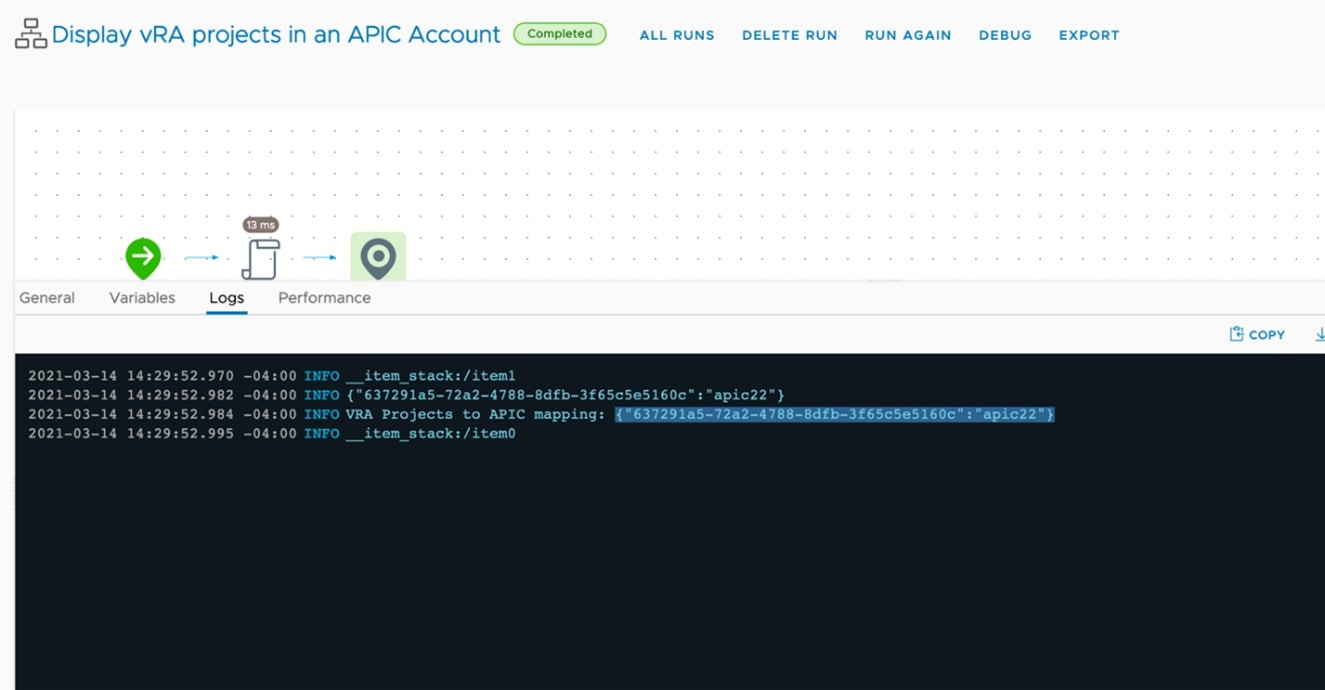
Lists all the vRA project(s) and APIC associations. |
|
Update APIC Account |
Updates an existing APIC account in case of connection failure. |
|
Delete APIC Account |
Deletes the APIC account, and also unlinks the projects. |
|
Delete projects in an APIC Account |
Deletes vRA Projects from an APIC account. Delete projects before deleting an APIC account. |
Running a Workflow
Use this procedure to run a workflow using Orchestrator.
Procedure
| Step 1 |
Log in to the vRA instance as an administrator. |
| Step 2 |
Navigate to Orchestrator > Library > Workflows. |
| Step 3 |
Enter the information in the fields and click Run. |
Inventory View for Cisco ACI Plugin
Navigate to Orchestrator > Administration > Inventory. Use the Inventory View, to ensure that the Orchestrator is connected to an APIC.
Configuring Cloud Assembly
By default, a set of cloud templates are provided. You can create a custom cloud template using the ACI custom resources and the YAML editor in Cloud Assembly. To create APIC objects, you must deploy cloud templates. Use cloud templates to configure multiple ACI objects at the same time.
For example, Deploy ACI network resources creates and deletes the following APIC objects:
-
Tenant
-
Application Profile
-
VRF
-
Bridge Domain
-
Application EPG
Each object will be deployed in a hierarchical fashion under the newly created tenant.
 Note |
In earlier versions of VMware vRealize Automation, Cloud Templates were referred to as Blueprints. |
Configuring Cloud Assembly includes these two procedures:
Importing Custom Resources and Cloud Templates
Use this procedure to import ACI custom resources and cloud templates to Cloud Assembly.
Before you begin
Ensure that the python version is 3.8.
Procedure
|
Run the You need to have Python requests and pyYaml libraries to run the script. The python script can create a vRA project or use an existing project. Provide the following arguments:
You must specify either to export (-e) or import (-i) when running the script. An example for each is shown below: |
Designing Cloud Templates
Use this procedure to design cloud templates using ACI custom resources.
Procedure
| Step 1 |
Navigate to Cloud Assembly. |
| Step 2 |
In the Design tab, select New From Blank Canvas option. |
| Step 3 |
Enter the information needed to create a Cloud Template. |
| Step 4 |
Drag and drop from the available ACI Custom Resources. |
| Step 5 |
Use the YAML editor to complete the Cloud Template or enter the input values using the Properties tab. |
| Step 6 |
Click Deploy. 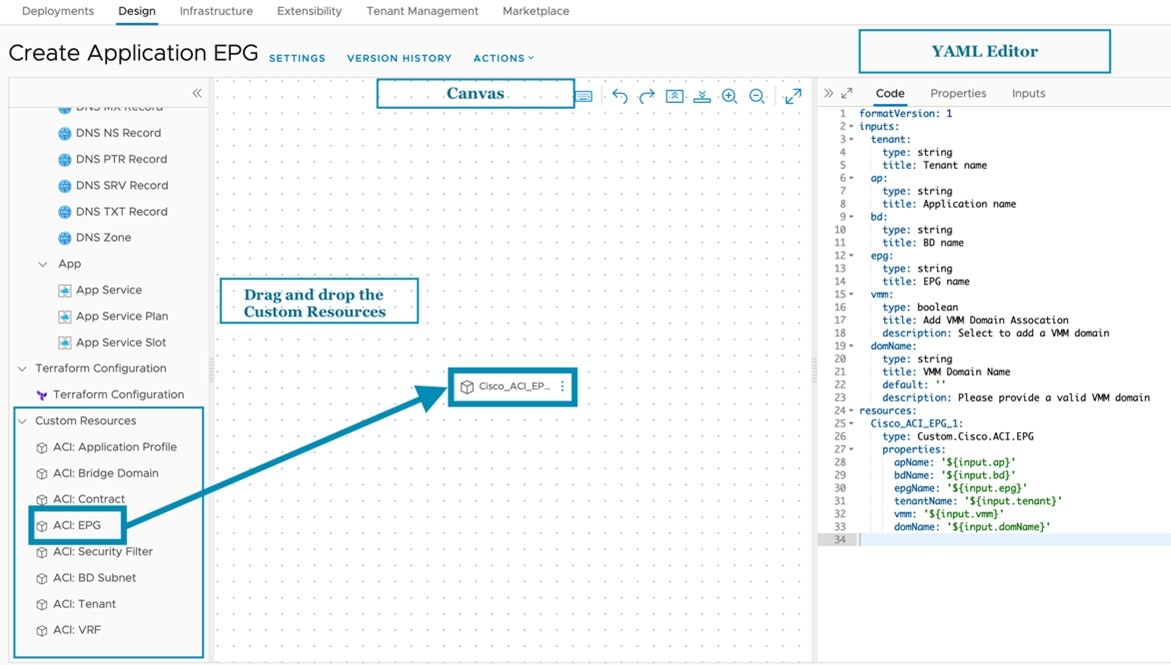
The ACI object(s) are displayed under Topology if the deployment is successful. Click History for details of the deployment. |
Cloud Templates and Custom Resources
A set of cloud templates are provided as a reference. Use these cloud templates to create a chained, automated deployment.
|
Custom Resource |
APIC Resource |
Description |
||
|---|---|---|---|---|
|
ACI: Tenant |
Tenant |
Creates a tenant. |
||
|
ACI: VRF |
VRF (L3 Context) |
Creates Layer 3 context (VRF) in a tenant. |
||
|
ACI: Bridge Domain |
Bridge Domain |
Adds a bridge domain in a tenant. |
||
|
ACI: Application Profile |
Application Profile |
Adds an application profile in a tenant. |
||
|
ACI: EPG |
Application EPG |
Creates an Application EPG. You can add a VMM domain association. Ensure that you have created a valid VMM domain on the APIC before using this workflow. |
||
|
ACI: Security Filter |
Filter with rule entry list |
Creates a Security Policy Filter. You can add or remove access list rules associated with a Security Policy Filter. The access list rules are of the format <source-port, destination-port, protocol, ethertype>.
|
||
|
ACI: Contract |
Contract (Policy) |
Creates the security policy/contract between tenant networks. For example: APIC contracts between consumer EPG and provider EPG. |
|
Cloud Template |
APIC Object |
|---|---|
|
Create Tenant |
Tenant |
|
Create VRF |
VRF (L3 Context) |
|
Create Application Profile |
Application Profile |
|
Create Tenant and Application Profile |
Tenant and Application Profile |
|
Create Bridge Domain |
Bridge Domain |
|
Create Application EPG |
Application EPG |
|
Deploy ACI network resources |
Tenant, VRF, Application Profile, BD, EPG |
|
Create Security Filter |
Filter with rule entry list |
|
Create Contract |
Contract (Policy) |
|
Create Contract and Security Filter |
Filter and Contract |
|
Deploy EPGs, Contract and Security Filter |
Provider, Consumer EPGs, Filter and Contract |
Supplementary Workflows
The following workflows are provided, for updating the APIC Account in projects:
-
Set Default APIC Account
-
Display vRA Projects in APICs
-
Updating an APIC Account
 Note |
It is mandatory for vRO service administrator to use the Orchestrator to configure ACI connections so that the service users can request and deploy ACI resources without the knowledge of the login details for an APIC account. This information is not exposed to Cloud Assembly and Service Broker. |
Changing a Default APIC Account
When a Cloud Template belonging to a vRA project is deployed, the Cisco ACI vRealize 8 plug-in finds the APIC associated to that project and creates the requested APIC objects on it. But if you choose to run Orchestrator workflows, there is no project information available. In this case, the Cisco ACI vRealize 8 plug-in creates objects on the default APIC account.
The very first APIC Account created will be used by default. To change the default account, use the Set Default APIC Account workflow.
 Note |
To use the above workflow, ensure you have atleast two different APIC accounts. |
Getting a list of all vRA Projects connected to APIC Accounts
Run Display vRA projects in an APIC Account workflow to get a list of all the project IDs associated to an APIC account. You can check the list of projects under the Logs tab (as displayed below).
Updating an APIC Account
Use this workflow to reconnect to an APIC account in case of a password change. Provide the valid APIC configurations again and execute this workflow. Ensure that the APIC acccount is disconnected from the Orchestrator, before reconnecting.
APIC Object Configurations
This section provides details for creating APIC objects using cloud templates and custom resources.
Operations on APIC Objects
The following CRUD (Create, Read, Update, Delete) operations can be performed on APIC objects.
 Note |
The Update operation can not be performed on all objects. |
CRD operations on Tenant
-
Parameters—Name, aaaDomain
CRD operations on Application Profile
-
Parameters—Name, Tenant Name
CRD operations on VRF
-
Parameters—Name, Tenant Name
CRUD operations on Bridge Domain
-
Parameters— Name, Tenant name, VRF name, Subnets
-
Option to set scope of the subnet. It is set to private by default. Use the Update operation to modify subnets and their scopes.
CRUD operations on EPGs
-
Parameters—Name, Tenant name, Application Profile name, Bridge Domain, VMM Domains.
-
VMM domain profiles can be attached to an EPG if it is already created on the APIC. They can be added/deleted as part of the update operation.
CRUD operations on Contracts
-
Parameters—Name, Tenant name, Consumers, Providers, Filters.
-
Default subject,
default_vra_subjis created. -
Users cannot create subjects.
-
Plug-in creates contracts only with a single subject.
-
Consumer and provider contracts can be added to- applications EPGs and L3Out/ external EPGs. You have to provide the consumer and provider EPG DNs. An example is shown here:
App EPG Dn : uni/tn-<tenant_name>/ap-<ap_name>/epg-<epg_name>
External/L3 Out Dn: uni/tn-<tenant_name>/out<L3Out_name>/instP-<extEpg_name>
CRUD operations on Filters
-
Parameters—Name, Rules.
-
If you want to attach rule entries, create a valid rule entry list, using the values as indicated below (the available options are listed):
-
dstFormPort—Blank, Unspecified, 1-65535
-
dstToPort—Blank, Unspecified, 1-65535
-
protocol—icmp, icmpv6, tcp, udp, Blank
-
etherType—ip, arp
-
 Note |
You can use APIC objects in tenant common. |
Troubleshooting
This section describes troubleshooting techniques.
Collecting Logs
Use this procedure to collect the log files from the vRealize Appliance.
The Cisco ACI vRealize 8 plug-in for VMware vRealize 8 supports the following log levels:
-
Info
-
Debug
-
Error
-
Warn
You can collect logs from the following location on the vRA appliance - /services-logs/prelude/vco-app/file-logs
To collect logs explicitly for the Cisco ACI vRealize 8 plug-in, use the following steps:
Procedure
| Step 1 |
Ssh to the vRA appliance as root using |
| Step 2 |
Cd to |
| Step 3 |
Modify |
| Step 4 |
Restart the service for changes to take effect. |
| Step 5 |
Run |
| Step 6 |
Run |
| Step 7 |
Wait for 5-10 mins for the Orchestrator to restart. The Cisco ACI vRealize 8 plug-in logs are here - |
Uninstalling the Cisco ACI vRealize 8 Plug-in
Use this procedure for deleting/ uninstalling the Cisco ACI vRealize 8 plug-in.
 Note |
To upgrade to a new version, uninstall the plugin completely and then install the plugin afresh. |
Procedure
| Step 1 |
Login to the vRealize Orchestrator as administrator. |
| Step 2 |
Delete all the APIC Accounts by running the Delete APIC Account workflow. |
| Step 3 |
Login to the vRO Control center as root using https://<vraURL>/vco-controlcenter. |
| Step 4 |
Navigate to Manage Plug-Ins. |
| Step 5 |
Locate the Cisco ACI vRealize 8 plug-in, and disable it before deleting it. |
| Step 6 |
Verify that the Cisco ACI vRealize 8 plug-in is no longer listed under Plug-Ins. |
Plug-in Classes
The following table lists the mapping between plug-in objects and APIC managed objects.
|
vRA Cloud templates input parameters |
vRO Javascript Object Name |
APIC Managed Object Name |
|---|---|---|
|
Tenant |
ApicTenant |
com.cisco.apic.mo.fvTenant |
|
Bridge Domain |
ApicBridgeDomain |
com.cisco.apic.mo.fvBD |
|
VRF |
ApicL3Context |
com.cisco.apic.mo.fvCtx |
|
Tenant Network (EPG) |
ApicEPG |
com.cisco.apic.mo.fvAEPg |
|
Security Policy (Contracts) |
ApicSecurityPolicy |
com.cisco.apic.mo.vzBrCP |
|
Security Filters |
ApicSecurityFilter |
com.cisco.apic.mo.vzFilter |
|
Security Rules |
ApicSecurityRule |
com.cisco.apic.mo.vzEntry |
|
VMM Domain |
ApicVmmDomain |
com.cisco.apic.mo.vmmDomP |
 Feedback