
With Cisco Nexus Dashboard, you can on-board multiple Cisco ACI, Cisco Cloud Network Controller, Cisco NDFC fabrics, as well as NX-OS switches without a controller as "fabrics" to the same cluster. Once the fabrics are on-boarded, they can be used by the applications running on the same Cisco Nexus Dashboard cluster.
To add a fabric, you need its controller’s in-band or out-of-band IP address and credentials. The type of the IP address you will use for fabric onboarding depends on the Nexus Dashboard services that will use the fabric and is described in detail in the following sections. Fabrics added to the Cisco Nexus Dashboard cluster are not enabled in the services by default, so you will need to explicitly enable them directly from each service’s own GUI.
After you on-board one or more fabrics to your Nexus Dashboard, you can view them in the Nexus Dashboard GUI by selecting Fabrics from the left navigation sidebar. You can also use the Fabrics page to launch directly into any of the fabric’s GUIs by clicking the Open link next to the fabric’s name.
If you are using remote authentication to login to your Nexus Dashboard and you have the same login domain and user configured in the fabric you are launching, you will be able to login to the fabric’s GUI automatically without having to re-authenticate yourself.
Fabrics Health
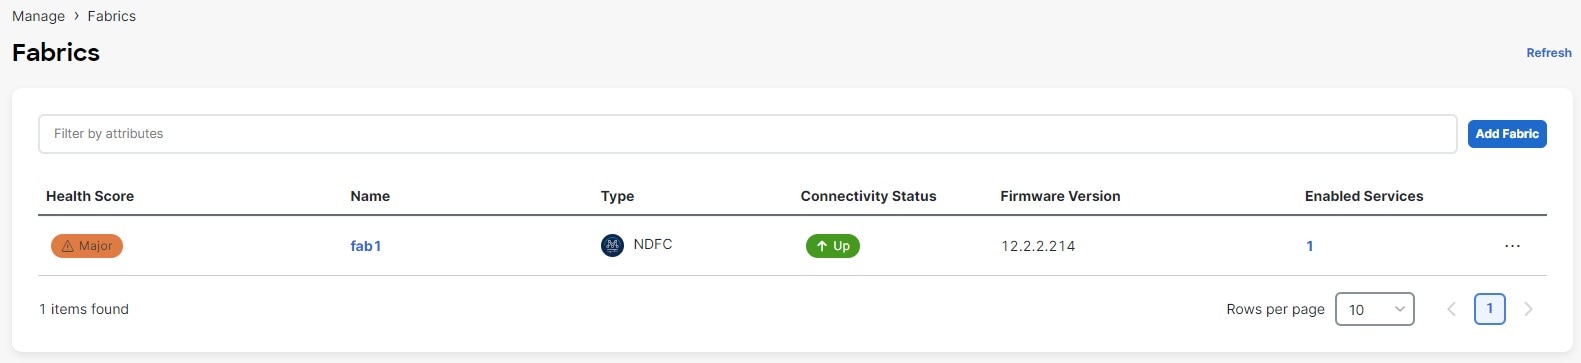
After you add the fabrics as described in the following sections, you can view their status in the Manage > Fabrics page of your Nexus Dashboard Admin Console.
In addition to the fabric’s Name, you can see the following information for each fabric:
-
Health Score
-
Healthy— if the fabric’s health score is 90 or higher. -
Warning— if the fabric’s health score is 76-89. -
Minor— if the fabric’s health score is 50-75. -
Major— if the fabric’s health score is 25-49. -
Critical— if the fabric’s health score is below 25.
-
-
Type
-
ACIfor fabrics managed by Cisco APIC -
NDFCfor fabrics managed by Cisco NDFC -
NX-OSfor standalone NX-OS switches without a controller
-
-
Connectivity Status — shows whether the fabric is reachable from the Nexus Dashboard cluster.
-
Firmware version — the version of the software running on the fabric’s controller or switch.
Adding ACI Fabrics
-
Fabric connectivity must be already configured.
-
For specific fabric versions compatible with your services, see the Services Compatibility Matrix.
-
When adding a Cisco APIC fabric, EPG/L3Out for Cisco Nexus Dashboard data network IP connectivity must be pre-configured.
Refer to Fabric Connectivity for more information.
-
When adding a Cisco APIC fabric and planning to install the Insights service:
-
IP connectivity from Cisco Nexus Dashboard to Cisco APIC Inband IP over data network must be configured.
-
IP connectivity from Cisco Nexus Dashboard to the leaf nodes and spine nodes in-band IPs must be configured.
-
To add an ACI fabric:
-
Navigate to your Nexus Dashboard’s Admin Console.
-
From the main navigation menu, select Manage > Fabrics.
-
In the main pane, click Add Fabric.
The Add Fabric screen opens.
-
In the Add Fabric page, provide the fabric’s information.
-
Host Name/IP Address — provide the IP address used to communicate with the fabric’s controller.
-
User Name and Password — login credentials for a user with
adminprivileges on the fabric you are adding. -
(Optional) Login Domain — if you leave this field empty, the fabric’s local login is used.
-
(Optional) Validate Peer Certificate — allows Nexus Dashboard to verify that the certificates of hosts to which it connects (such as fabric controllers) are valid and are signed by a trusted Certificate Authority (CA).

You must have the certificate for this fabric already imported into your Nexus Dashboard before you can add a fabric using this option. If you have not yet added the certificates, cancel the Add Fabric wizard and follow the instructions described in Validating Peer Certificates first; then after you have imported the certificates, add the fabric as described here.
If you enable the Verify Peer Certificate option but don’t import the valid certificate, fabric onboarding will fail.
After you’ve provided the required information, click Next to continue.
-
-
In the Detail page, provide the additional fabric details.
-
Name — a descriptive name for the fabric.
-
Location — fabric’s geographical location. This option is available only for on-premises fabrics.
After you’ve provided the required information, click Next to continue.
-
-
In the Summary page, verify the information and click Save to finish adding the fabric.
Adding NDFC Fabrics
-
Fabric connectivity must be already configured.
-
For specific fabric versions compatible with your services, see the Services Compatibility Matrix.
-
When adding a Cisco NDFC fabric:
-
You must configure Layer 3 connectivity to the fabric and switches.
-
If you cluster is deployed in AWS or Azure, you must configure inbound rules on the data interface.
This is typically done during initial cluster deployment and described in detail in the Cisco Nexus Dashboard Deployment Guide.
-
To add an NDFC fabric:
-
Navigate to your Nexus Dashboard’s Admin Console.
-
From the main navigation menu, select Manage > Fabrics.
-
In the main pane, click Add Fabric.
The Add Fabric screen opens.
-
In the Add Fabric page, provide the fabric’s information.
-
Host Name/IP Address — provide the IP address used to communicate with the fabric’s controller.
For NDFC fabrics, this must be the in-band IP address of NDFC.
When providing the address, do not include the protocol (http://orhttps://) as part of the URL string or fabric addition will fail.
-
User Name and Password — login credentials for a user with
adminprivileges on the fabric you are adding. -
(Optional) Login Domain — if you leave this field empty, the fabric’s local login is used.
-
(Optional) Validate Peer Certificate — allows Nexus Dashboard to verify that the certificates of hosts to which it connects (such as fabric controllers) are valid and are signed by a trusted Certificate Authority (CA).
You must have the certificate for this fabric already imported into your Nexus Dashboard before you can add a fabric using this option. If you have not yet added the certificates, cancel the Add Fabric wizard and follow the instructions described in Validating Peer Certificates first; then after you have imported the certificates, add the fabric as described here.
If you enable the Verify Peer Certificate option but don’t import the valid certificate, fabric onboarding will fail.
After you’ve provided the required information, click Next to continue.
-
-
In the Detail page, provide the additional fabric details.
-
Name — a descriptive name for the fabric.
-
Location — fabric’s geographical location. This option is available only for on-premises fabrics.
After you’ve provided the required information, click Next to continue.
-
-
In the Summary page, verify the information and click Save to finish adding the fabric.
Adding NX-OS Switches Without Controller
-
Connectivity to a seed switch must be already configured.
Seed switch is used to discover other switches in your fabric.
-
NX-OS switches without a controller (such as APIC or NDFC) are supported by Nexus Dashboard Insights service only.
-
NX-OS discovery is not available when NDI is cohosted with NDFC or NDO.
To add NX-OS switches as a fabric:
-
Navigate to your Nexus Dashboard’s Admin Console.
-
From the main navigation menu, select Manage > Fabrics.
-
In the main pane, click Add Fabric.
The Add Fabric screen opens.
-
In the Add Fabric screen, choose NX-OS Standalone Fabric.
If this is the first time you are onboarding NX-OS switches without a controller, click Enable Fabric Discovery.
-
In the Add Fabric page, provide the fabric’s information.
-
Seed Switch IP Address — provide the IP address of the seed switch used to discover other switches in the fabric.
-
Username and Password — login credentials on the seed switch.
After you’ve provided the required information, click Next to continue.
-
-
In the Detail page, provide the additional fabric details.
-
Name — a descriptive name for the fabric.
-
Location — fabric’s geographical location. This option is available only for on-premises fabrics.
After you’ve provided the required information, click Next to continue.
-
-
In the Switch Selection page, select one or more switches to add as a "Fabric".
By default, the switch discovery process will show switches that are 2 hops away from the seed switch. You can change the default setting using the Number of Hops dropdown and clicking Rediscover Switches.
After the switches are discovered, simply select all the switches you want to add as a fabric to your Nexus Dashboard and click Next.
-
In the Summary page, verify the information and click Save to finish adding the fabric.
Editing Fabrics
To edit a fabric:
-
Navigate to your Nexus Dashboard’s Admin Console.
-
From the main navigation menu, select Manage > Fabrics.
-
From the Actions (…) menu for the fabric you want to edit, select Edit Fabric.
The Edit Fabric screen opens.
-
In the Edit Fabric screen, make the required changes.
-
To remove a security domain, click the Delete icon next to an existing domain.
-
To add one or more security domains, click +Add Security Domain.
-
To re-provision the fabric, check the Re-register Fabric checkbox and provide the required information.
Re-registering a fabric may be required for Cloud Network Controller fabrics used with Nexus Dashboard Orchestrator in case the Cloud Network Controller’s public IP address changes.
You can also use this option if you changed the IP address information for a NDFC fabric managed by the Orchestrator service.
Re-registering a fabric is not supported for the Nexus Dashboard Insights service.
After you re-register the fabric in Nexus Dashboard, you must delete the fabric and then re-add the fabric in Nexus Dashboard Insights. Assurance runs the will fail on data that was collected before you re-registered the fabric.
-
-
Click Save to save the changes
Deleting Fabrics
-
Ensure that the fabric is not used by any applications installed in your Nexus Dashboard.
Deleting a fabric will cause an interruption to all applications using this fabric.
-
When a Cisco ACI fabric is added as a fabric to Nexus Dashboard, some policies may be created in the Cisco APIC. If the Nexus Dashboard is clean rebooted without deleting the on-boarded fabric, the policies created on Cisco APIC will not be deleted. To clean up these policies on Cisco APIC, the fabric should be re-added and deleted.
To remove one or more fabrics:
-
Navigate to your Nexus Dashboard’s Admin Console.
-
From the main navigation menu, select Manage > Fabrics.
-
From the Actions (…) menu for the fabric you want to remove, select Remove Fabric.
-
In the Confirm Delete window, provide the login information for the fabric
-
Click OK to remove the fabric.
Trademarks
THE SPECIFICATIONS AND INFORMATION REGARDING THE PRODUCTS IN THIS MANUAL ARE SUBJECT TO CHANGE WITHOUT NOTICE. ALL STATEMENTS, INFORMATION, AND RECOMMENDATIONS IN THIS MANUAL ARE BELIEVED TO BE ACCURATE BUT ARE PRESENTED WITHOUT WARRANTY OF ANY KIND, EXPRESS OR IMPLIED. USERS MUST TAKE FULL RESPONSIBILITY FOR THEIR APPLICATION OF ANY PRODUCTS.
THE SOFTWARE LICENSE AND LIMITED WARRANTY FOR THE ACCOMPANYING PRODUCT ARE SET FORTH IN THE INFORMATION PACKET THAT SHIPPED WITH THE PRODUCT AND ARE INCORPORATED HEREIN BY THIS REFERENCE. IF YOU ARE UNABLE TO LOCATE THE SOFTWARE LICENSE OR LIMITED WARRANTY, CONTACT YOUR CISCO REPRESENTATIVE FOR A COPY.
The Cisco implementation of TCP header compression is an adaptation of a program developed by the University of California, Berkeley (UCB) as part of UCB’s public domain version of the UNIX operating system. All rights reserved. Copyright © 1981, Regents of the University of California.
NOTWITHSTANDING ANY OTHER WARRANTY HEREIN, ALL DOCUMENT FILES AND SOFTWARE OF THESE SUPPLIERS ARE PROVIDED “AS IS" WITH ALL FAULTS. CISCO AND THE ABOVE-NAMED SUPPLIERS DISCLAIM ALL WARRANTIES, EXPRESSED OR IMPLIED, INCLUDING, WITHOUT LIMITATION, THOSE OF MERCHANTABILITY, FITNESS FOR A PARTICULAR PURPOSE AND NONINFRINGEMENT OR ARISING FROM A COURSE OF DEALING, USAGE, OR TRADE PRACTICE.
IN NO EVENT SHALL CISCO OR ITS SUPPLIERS BE LIABLE FOR ANY INDIRECT, SPECIAL, CONSEQUENTIAL, OR INCIDENTAL DAMAGES, INCLUDING, WITHOUT LIMITATION, LOST PROFITS OR LOSS OR DAMAGE TO DATA ARISING OUT OF THE USE OR INABILITY TO USE THIS MANUAL, EVEN IF CISCO OR ITS SUPPLIERS HAVE BEEN ADVISED OF THE POSSIBILITY OF SUCH DAMAGES.
Any Internet Protocol (IP) addresses and phone numbers used in this document are not intended to be actual addresses and phone numbers. Any examples, command display output, network topology diagrams, and other figures included in the document are shown for illustrative purposes only. Any use of actual IP addresses or phone numbers in illustrative content is unintentional and coincidental.
Cisco and the Cisco logo are trademarks or registered trademarks of Cisco and/or its affiliates in the U.S. and other countries. To view a list of Cisco trademarks, go to this URL: http://www.cisco.com/go/trademarks. Third-party trademarks mentioned are the property of their respective owners. The use of the word partner does not imply a partnership relationship between Cisco and any other company. (1110R)
© 2017-2024 Cisco Systems, Inc. All rights reserved.
First Published: 2024-03-01
Last Modified: 2024-03-01
Americas Headquarters
Cisco Systems, Inc.
170 West Tasman Drive
San Jose, CA 95134-1706
USA
http://www.cisco.com
Tel: 408 526-4000
800 553-NETS (6387)
Fax: 408 527-0883