
First Published: 2024-03-04
Last Modified: 2024-03-13
Americas Headquarters
Cisco Systems, Inc.
170 West Tasman Drive
San Jose, CA 95134-1706
USA
http://www.cisco.com
Tel: 408 526-4000
800 553-NETS (6387)
Fax: 408 527-0883
New and Changed Information
The following table provides an overview of the significant changes up to the current release. The table does not provide an exhaustive list of all changes or the new features up to this release.
| Feature | Description | Release | Where Documented |
|---|---|---|---|
|
Traffic Analytics |
Traffic Analytics enables to monitor your network’s latency, congestion, and drops. |
6.4.1 |
This document is available from your Cisco Nexus Dashboard Insights GUI as well as online at www.cisco.com. For the latest version of this document, visit Cisco Nexus Dashboard Insights Documentation.
Traffic Analytics
Traffic Analytics
Traffic Analytics enables to monitor your network’s latency, congestion, and drops.
Traffic Analytics automatically discovers services running in your network by matching well-know Layer 4 ports to their corresponding service endpoint categories. Nexus Dashboard Insights then assess service performance based on thresholds you define for the following metrics:
An anomaly is raised if there is any deviation in the performance metrics such as latency, congestion, and drops. Performance score is calculated for each conversation and aggregated to Service Endpoint or Endpoint level to raise anomalies.
Performance score is calculated based on the following:
-
Congestion - Consistent congestion avoidance active between endpoints is calculated.
-
Latency - Deviation from measured baseline is calculated.
-
Drops - Directly correspond to an issue with the conversation or service.
Using Traffic Analytics you can
-
Monitor traffic pervasively.
-
Report performance issues using anomalies raised for performance metrics.
-
Sort top talking services and clients and determine the top talkers in the system.
-
Determine the SYN or RST counts per service.
-
Troubleshoot conversations or flows on-demand.
Guidelines and Limitations
-
Traffic Analytics is supported on Cisco NX-OS release 10.4(2)F and later.
-
Traffic Analytics is not supported for Layer 4 to Layer 7 Services.
-
Traffic Analytics is not supported for Multi-Site.
-
Before enabling Traffic Analytics on NDFC sites with Netflow configuration, you must add a freeform policy to the leaf switches. This ensures that if Traffic Analytics is disabled from Nexus Dashboard Insights, Netflow configuration is not removed.
-
Multicast is not supported for Traffic Analytics.
-
Traffic Analytics is only available for traffic flows between IPv4/IPv6 endpoints that are contained within the fabric. These endpoints should be visible in the Manage > Sites > Connectivity > Endpoints page. If the source or destination endpoint exists outside the fabric, then the Traffic Analytics flow will not be displayed in the Traffic Analytics table.
-
Traffic Analytics configurations or export is not supported on Cisco Nexus 9500 modular chassis, however flow troubleshoot jobs is supported for FX platform switches and Cisco Nexus 9500 modular chassis.
-
Traffic Analytics Report only displays TCP services and TCP clients/conversations. Navigate to Analyze > Analysis Hub > Traffic Analytics to view this information.
-
UDP and ICMP flow/conversation reports will be only shown at the endpoint level. Navigate to Manage > Sites. Select a site. Click Connectivity > Endpoints > Endpoint > Traffic Analytics to view this information.
-
Traffic Analytics may display partial data when the VRF instance is configured with the new L3VNI mode. For more information about the new L3VNI mode, see the Cisco Nexus 9000 Series NX-OS VXLAN Configuration Guide.
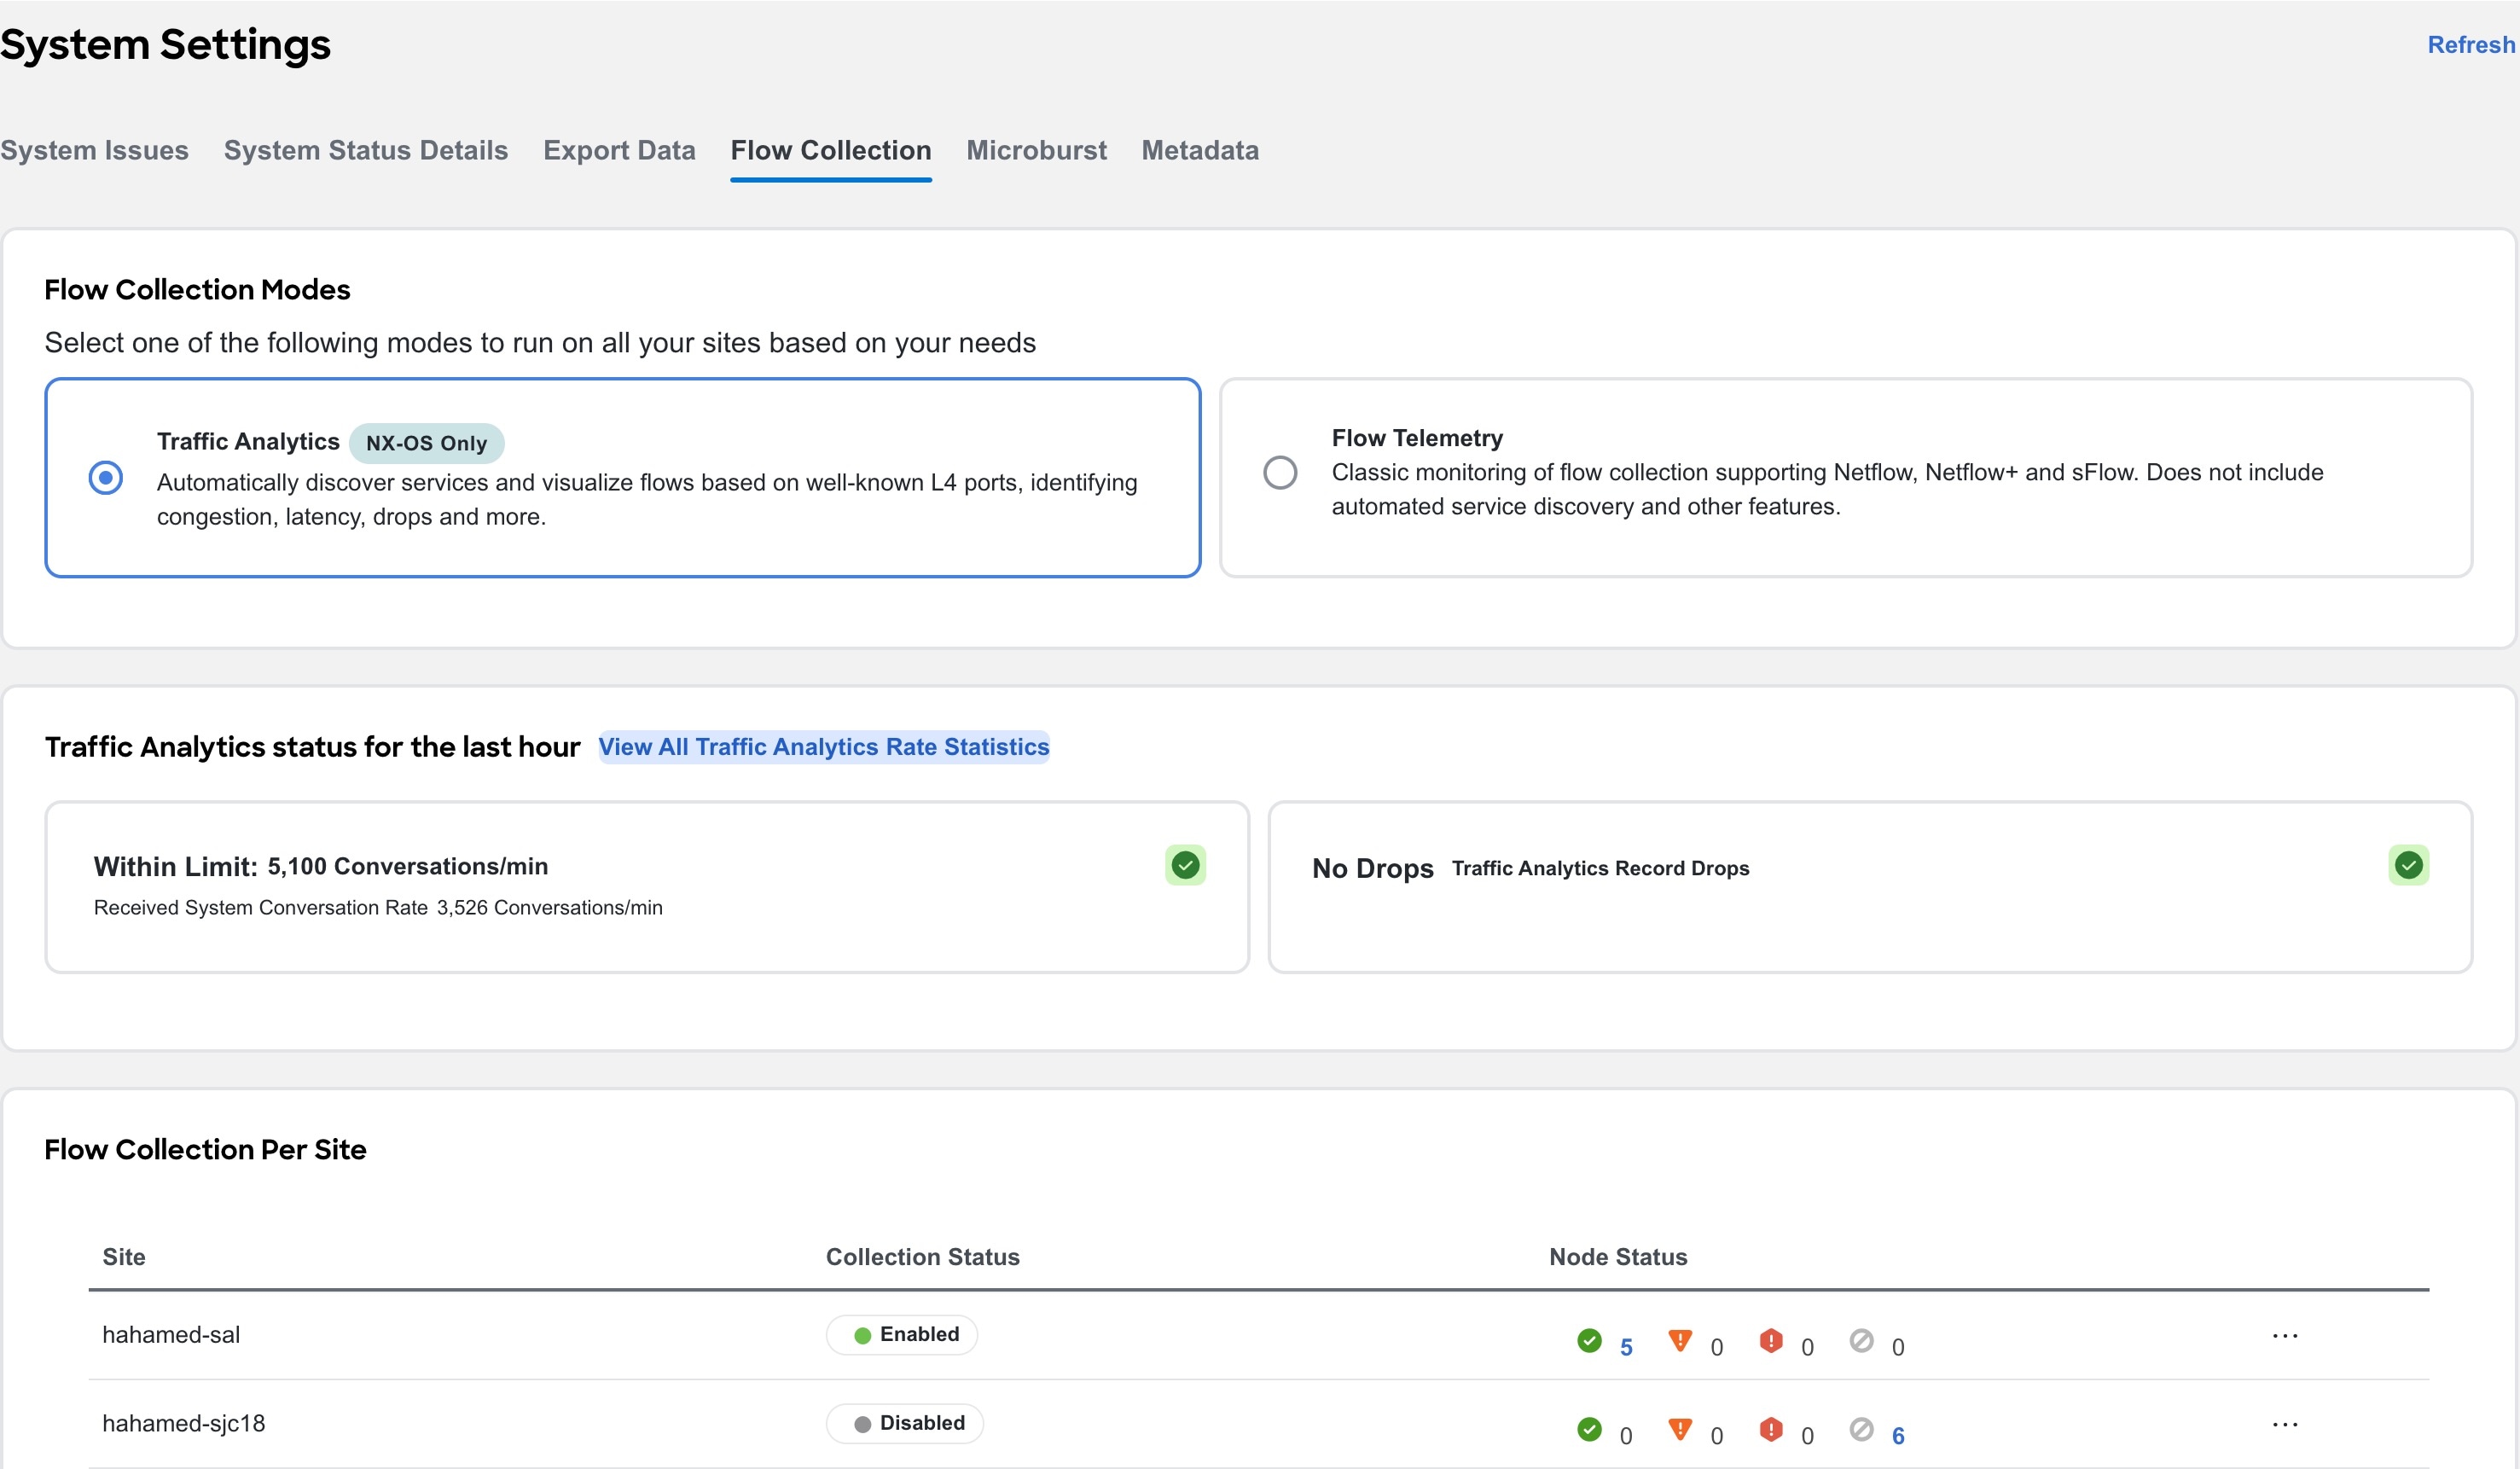
Configure Traffic Analytics
-
Navigate to Admin > System Settings > Flow Collection.
-
In the Flow Collection Mode area, select Traffic Analytics.
-
In the Flow Collection per Site table, select the site.
-
Click the ellipse icon and then click Enable to enable Traffic Analytics.

If flow telemetry is already enabled on the site, you must first disable flow telemetry for all the sites before enabling Traffic Analytics.
-
You can view the Flow Collection status for each node in the Node Status column.
-
Green - Flow collection is successfully enabled.
-
Red - Flow collection is not enabled.
-
Orange - Flow collection is partially enabled.
-
Grey - Flow collection is not supported or data cannot be found. If a switch is in disabled state, it will included in the Grey category.
-
-
In the Traffic Analytics Status For The Last Hour area you can see the number of conversations that are over limit and Traffic Analytics drops. You must make sure that you do not exceed the maximum conversation limit. If you exceed the maximum conversation limit you will see drops in flows records and it will impact the visibility.
-
Click View All Traffic Analytics Rate Statistics to view the statistics for each node in a site.
Apply Traffic Analytics Configuration
For NDFC fabric in Monitored mode, Nexus Dashboard Insights will not deploy Traffic Analytics configuration to all switches in the fabric. You must apply the Traffic Analytics configuration to every switch.
-
Navigate to Admin > System Settings > System Status Details.
-
Select a site.
-
Click the ellipse icon and then click Expected Configuration.
-
From the Expected Configuration area, you can view and copy configurations under Software Telemetry and Flow Telemetry.
-
Using the command line, log in to the switch.
-
Enter the following commands:
switch# configure terminal
switch(config)# copy running-config startup-config
View Traffic Analytics
View Traffic Analytics for an Individual Site
-
Navigate to Manage > Sites.
-
Click site name.

-
Select a time range from the dropdown menu. By default the Current time (last 2 hours) is selected.
-
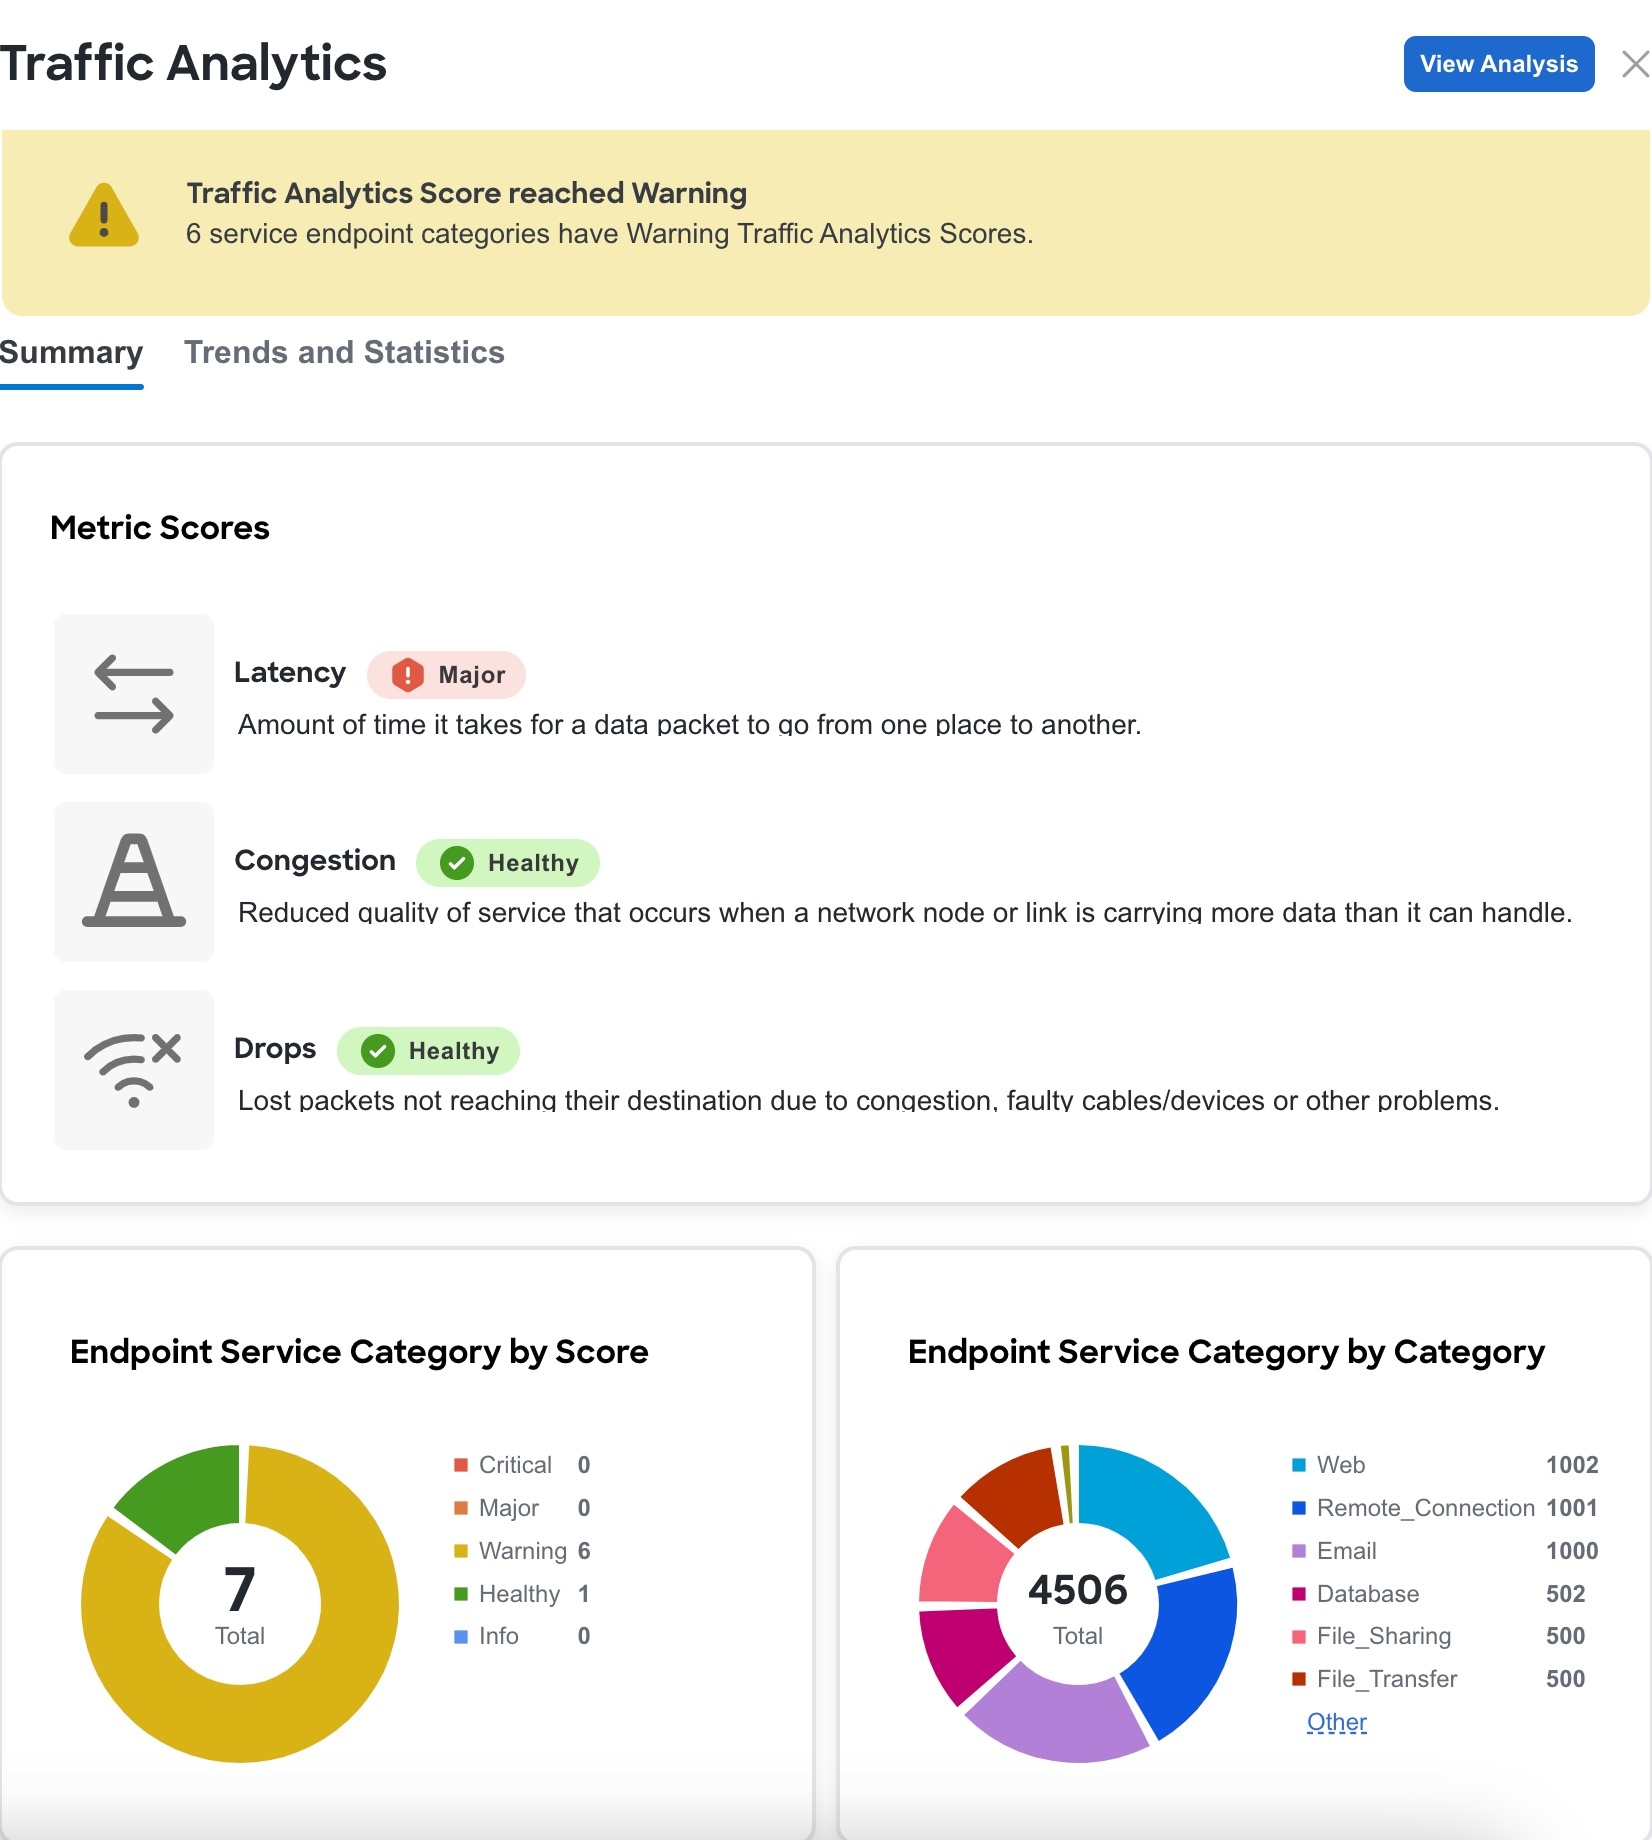
In the General area, click Traffic Analytics to view Traffic Analytics details for that site. In the Traffic Analytics page all the information is grouped as service categories for that site.
-
The Summary area displays the Traffic Analytics Score and how the metrics is determined. You can view the traffic profile for endpoint service category by score and category.
-
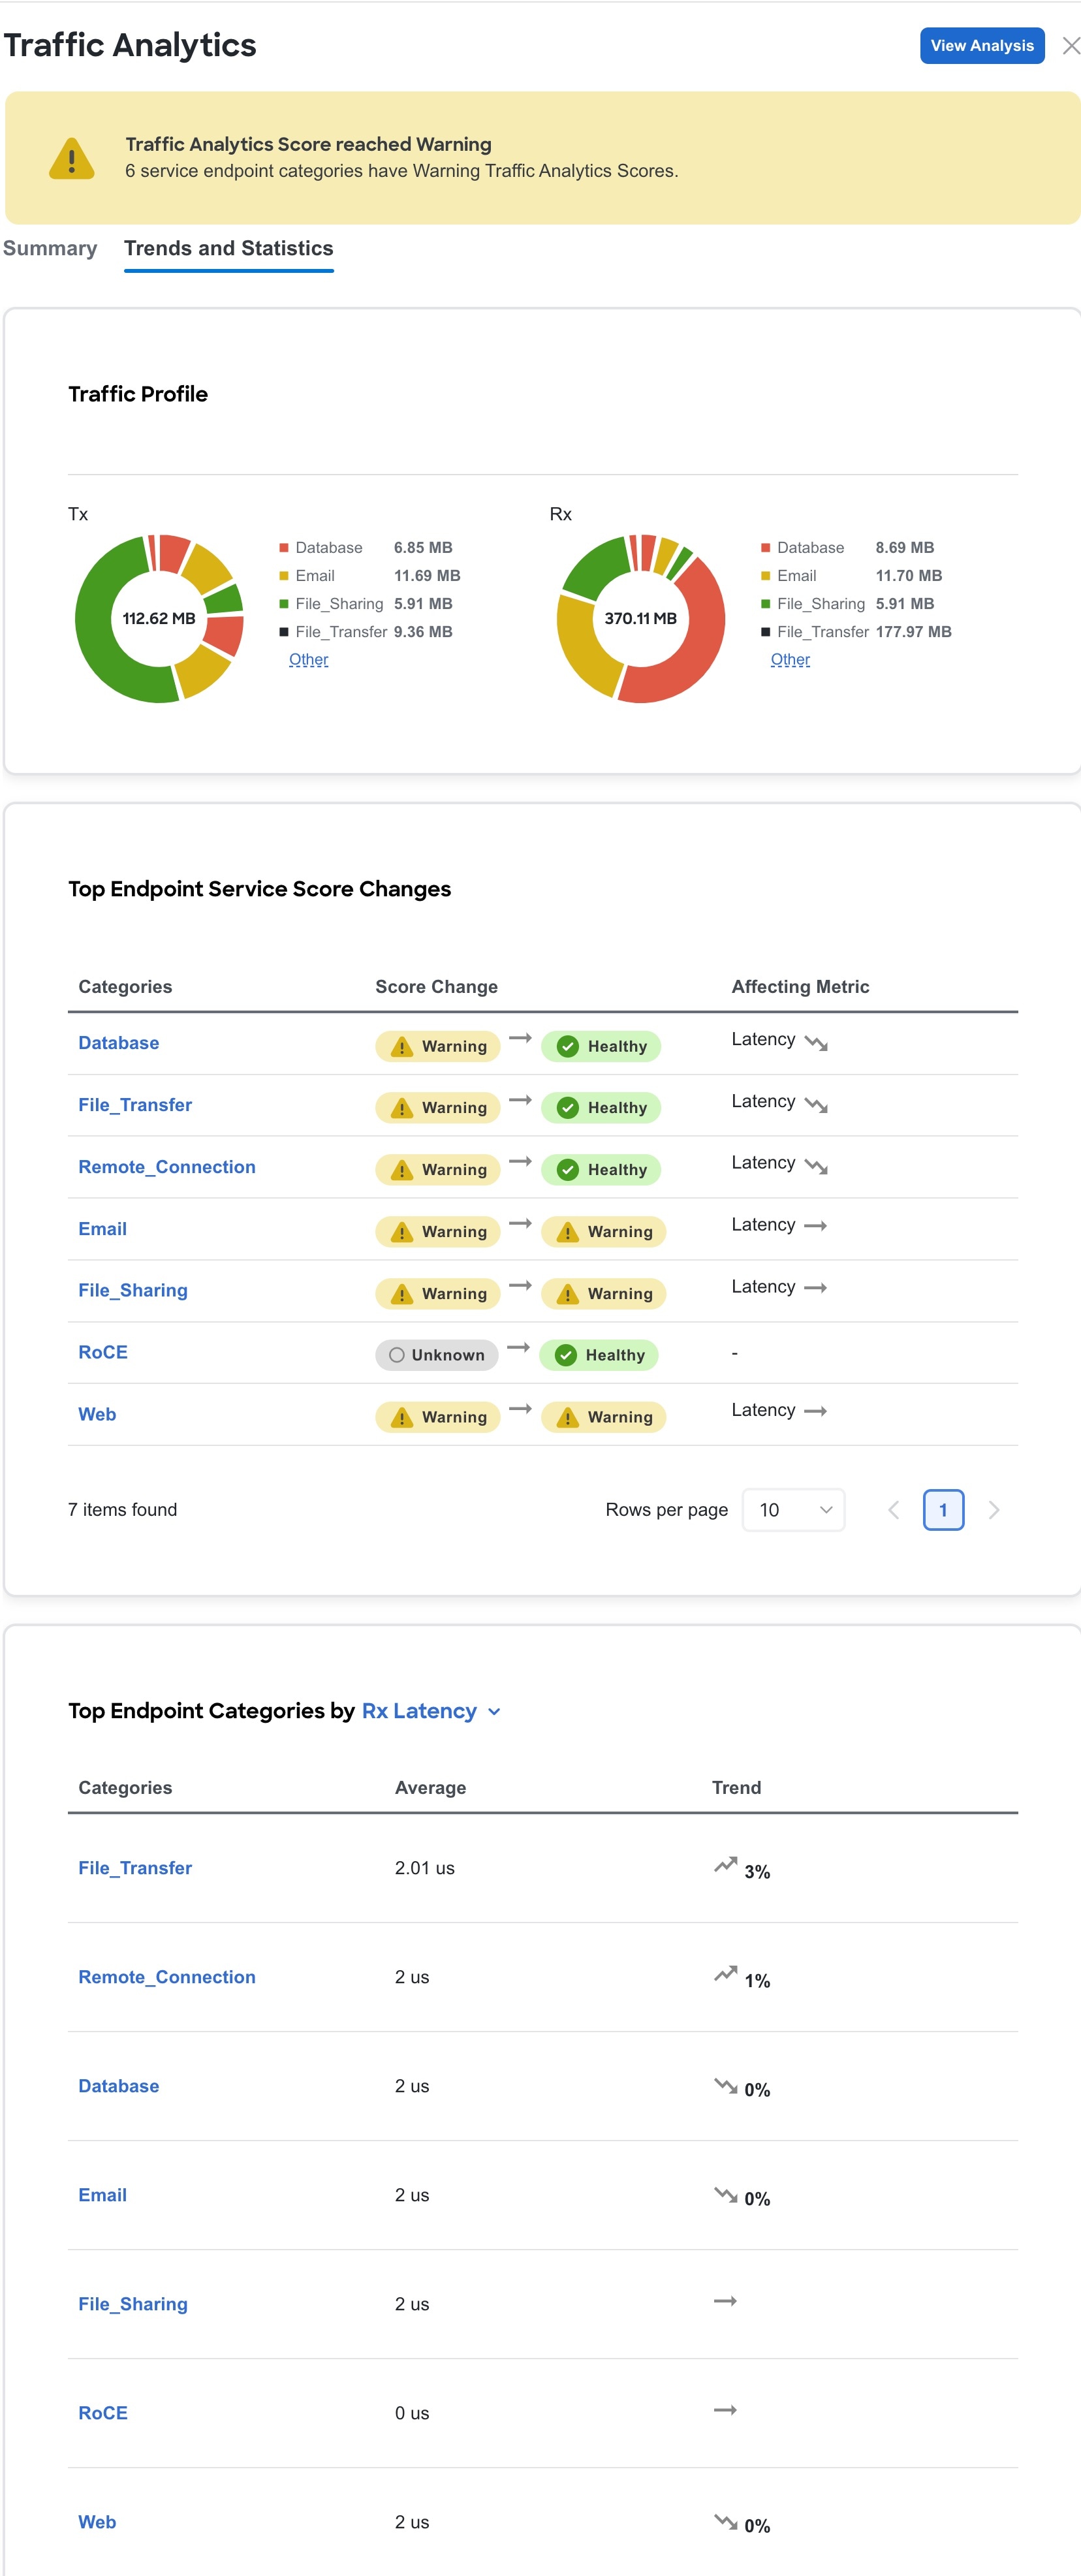
Click Trends and Statistics to view Traffic profile, Top Endpoint Service Score Changes, and Top Endpoint Categories.
-
In the Traffic Profile area you can view the traffic amount for the endpoint service category.
-
In the Top Endpoint Service Score Changes area, you can view the anomaly score change across 2 hours and the metrics (such as latency, congestion, drops) affecting the score change.
-
In the Top Endpoint Categories by area you can see the top categories by Rx and Tx Latency, Congestion Score, and Drop Score.
-
-
Click View Analysis to view Traffic Analytics for all the sites.
View Traffic Analytics for all Sites
-
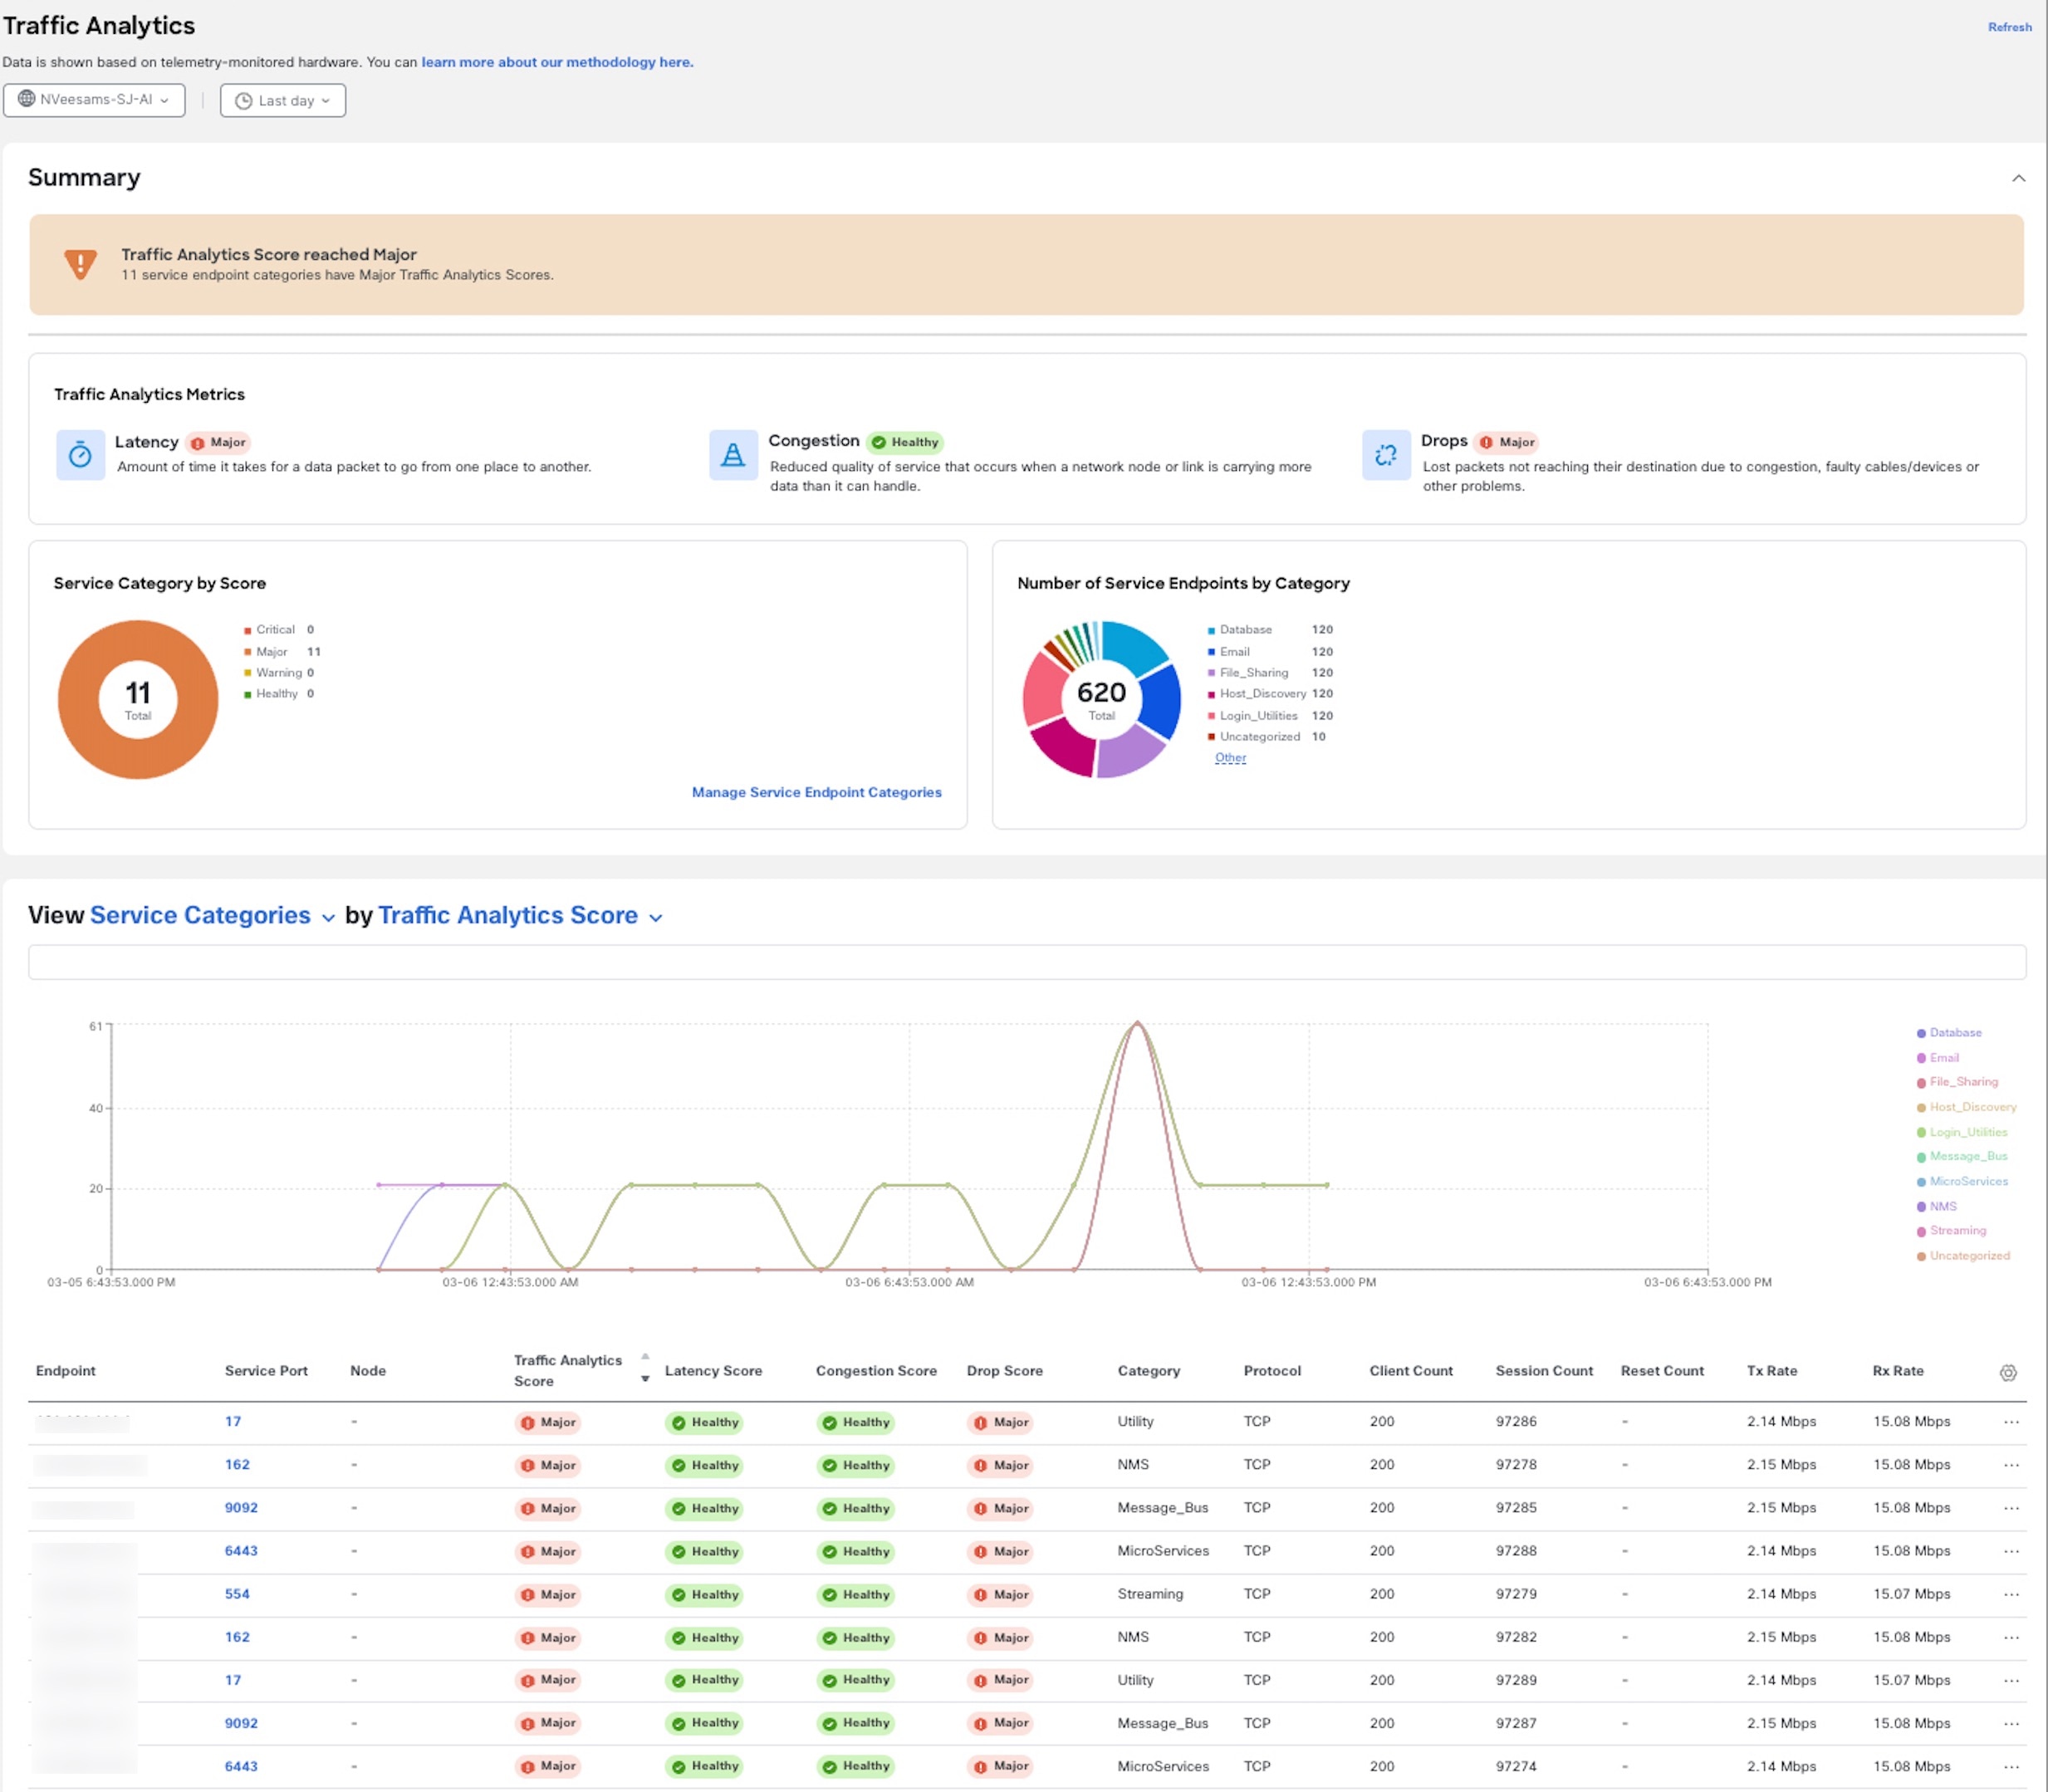
Navigate to Analyze > Analyze Hub > Traffic Analytics.
-
Select a site from the drop-down menu.
-
Select a time range from the dropdown menu. By default the Current time (last 2 hours) is selected. When you select the Current time, any issues observed in the Traffic Analytics score over the last 2 hours is displayed.
-
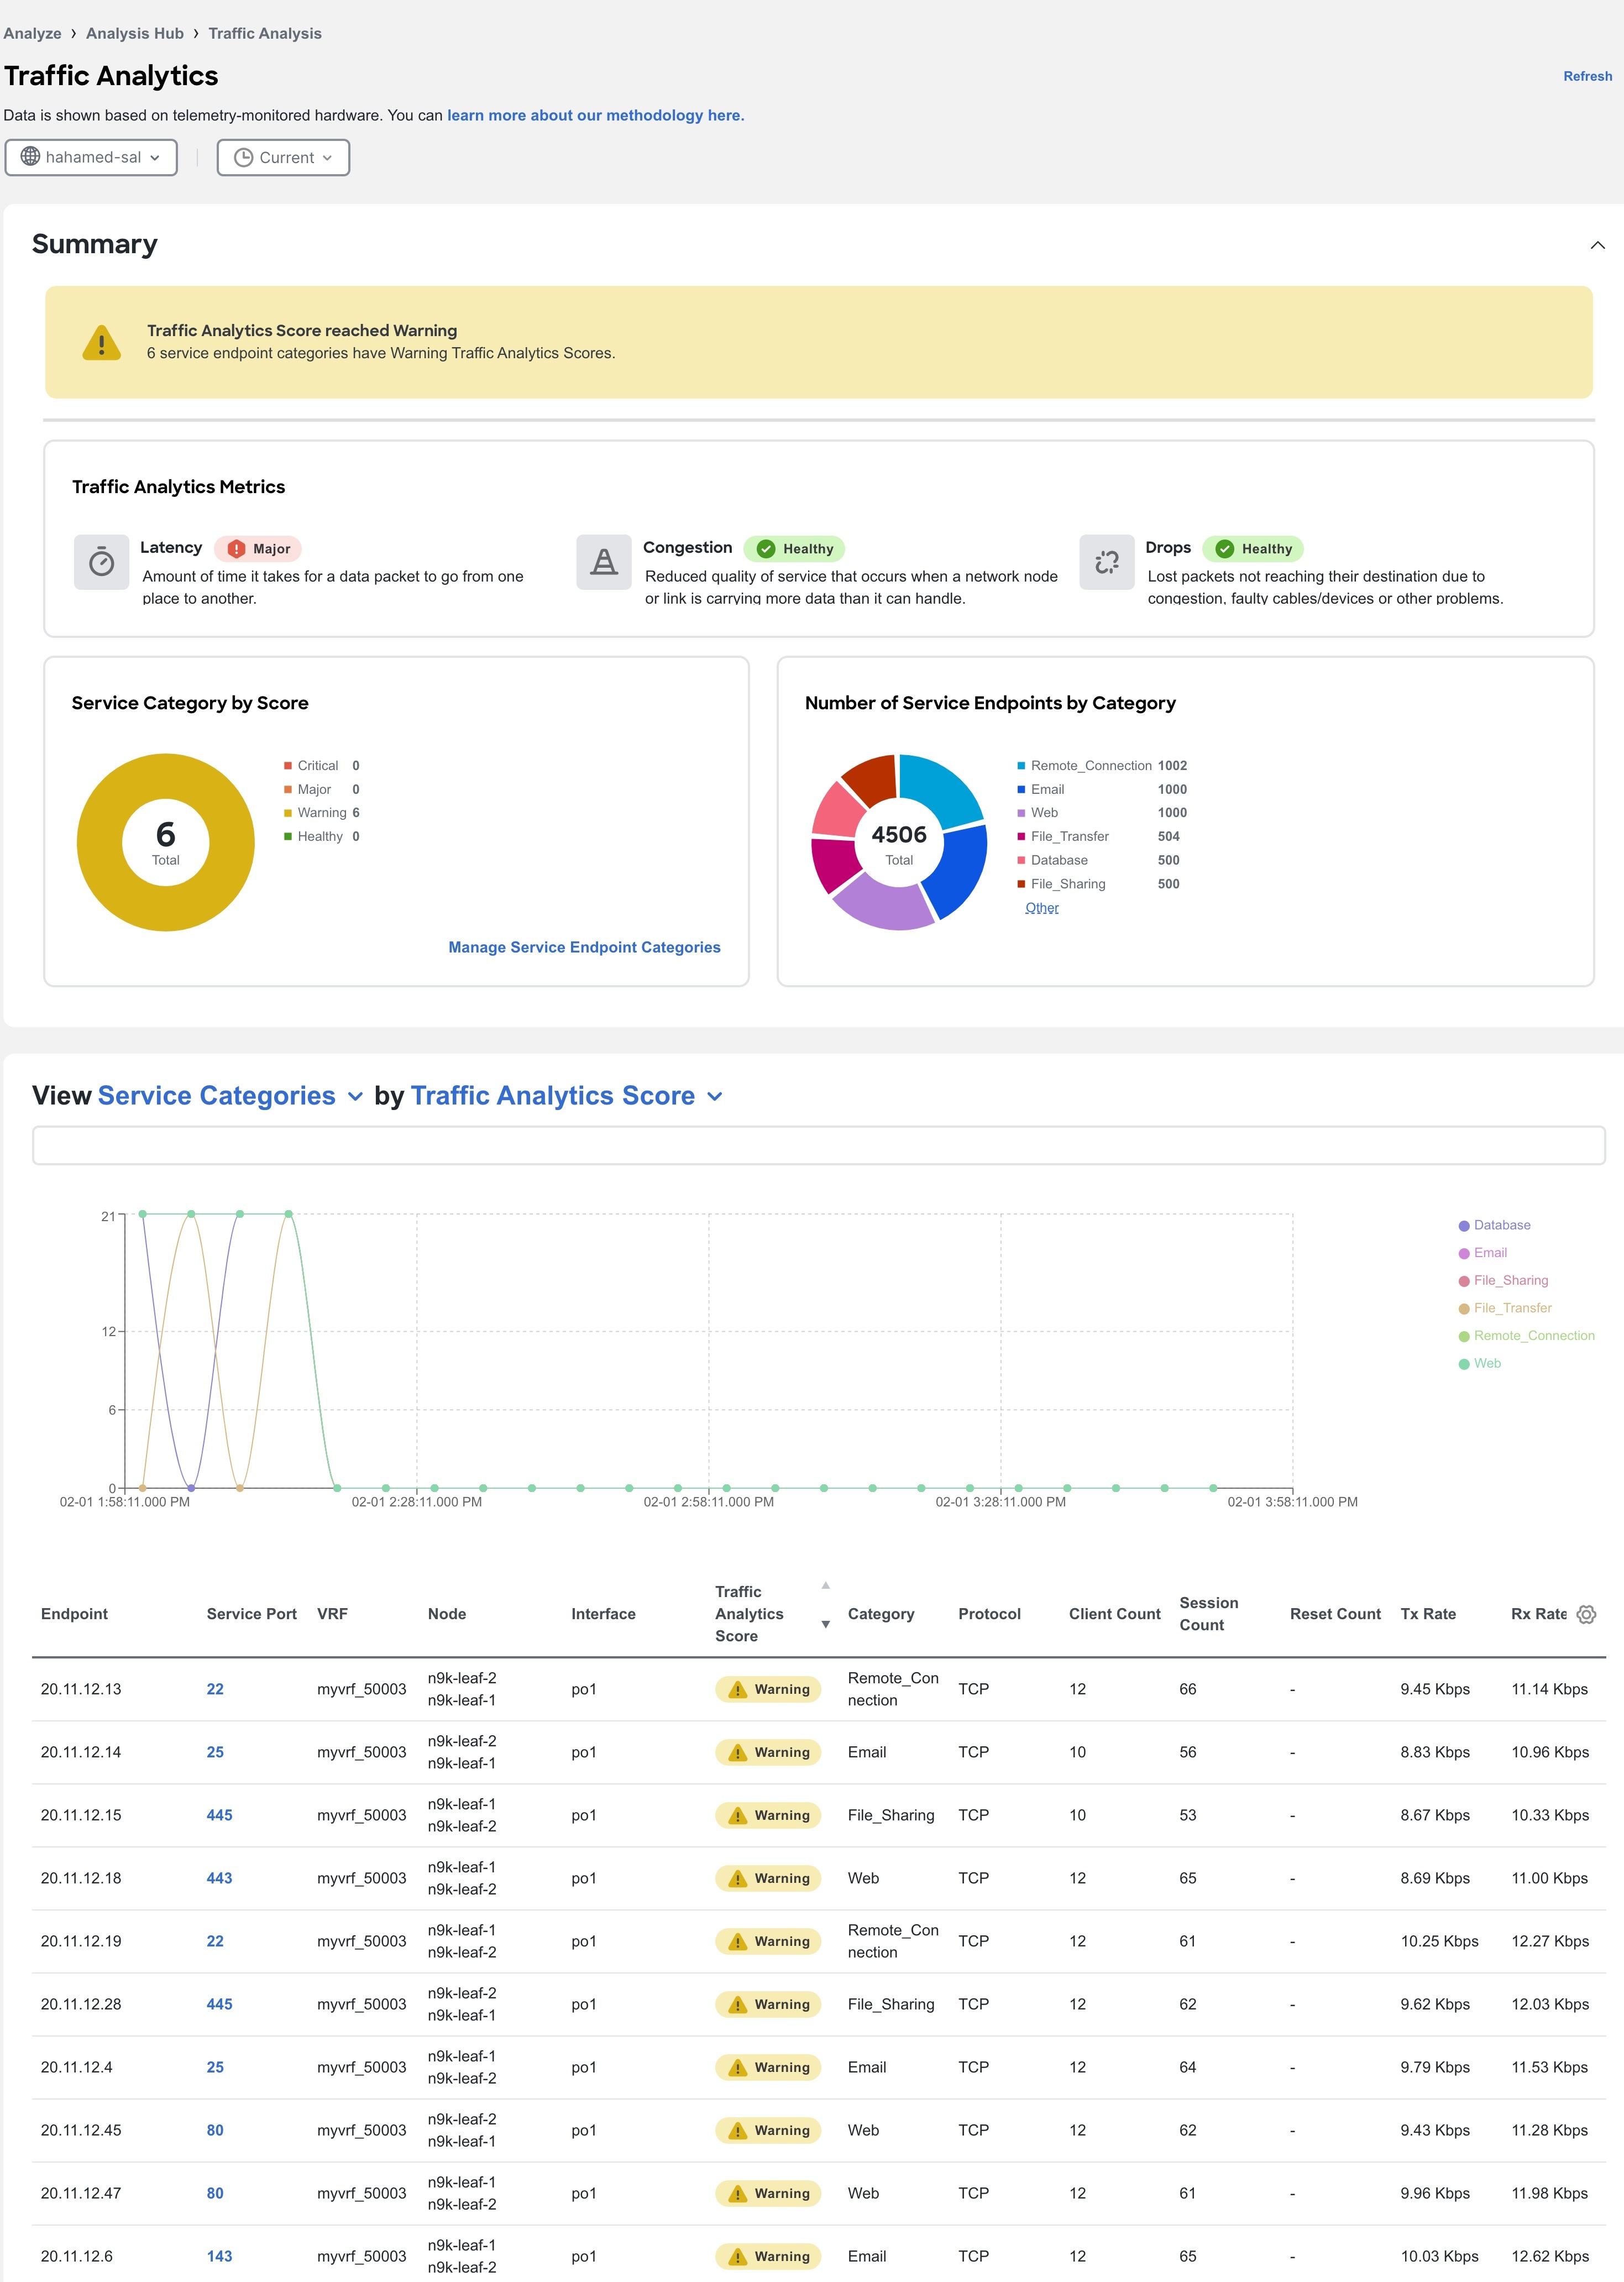
The Summary area displays the Traffic Analytics Score and how the metrics are determined. Next you can view the information for a Service Endpoint Category by Score and Category. Service endpoint categories consists of ports that have been assigned to categories based on standard networking defaults and any categories you may have created. These categories are dynamic and can be updated any time. See Manage Service Endpoint Categories.
-
Next use the drop-down list to view the Service Categories or Service Endpoints information for attributes such as Traffic Score, Congestion Score, Latency Score, Drop Score, and others in a graphical format. When you select Service Endpoints, you can also view the top 10 endpoints for various attributes such as Traffic Analytic Score, Latency Score, Congestion Score, Drop Score, Session Count, Reset Count, TX Rate, and Rx Rate. For Current Time, when you select view Service Categories for Traffic Analytics Score, you can use the graph to view the transition between healthy and unhealthy score.
-
In the Traffic Analytics table, you can view the Service Categories or Service Endpoints information. The Traffic Score information for service categories or endpoints is a combination of congestion score, latency score, and drop score. When the score is calculated, congestion score has the lowest weighage, and drop score has the highest weighage.
-
You can hover on the Traffic Analytics Score column to view the Traffic Analytics Score breakdown for the service.
-
Use the search bar to filter by Service Categories or Service Endpoints values.
-
Click the gear icon to configure the columns in the Traffic Analytics table.
-
-
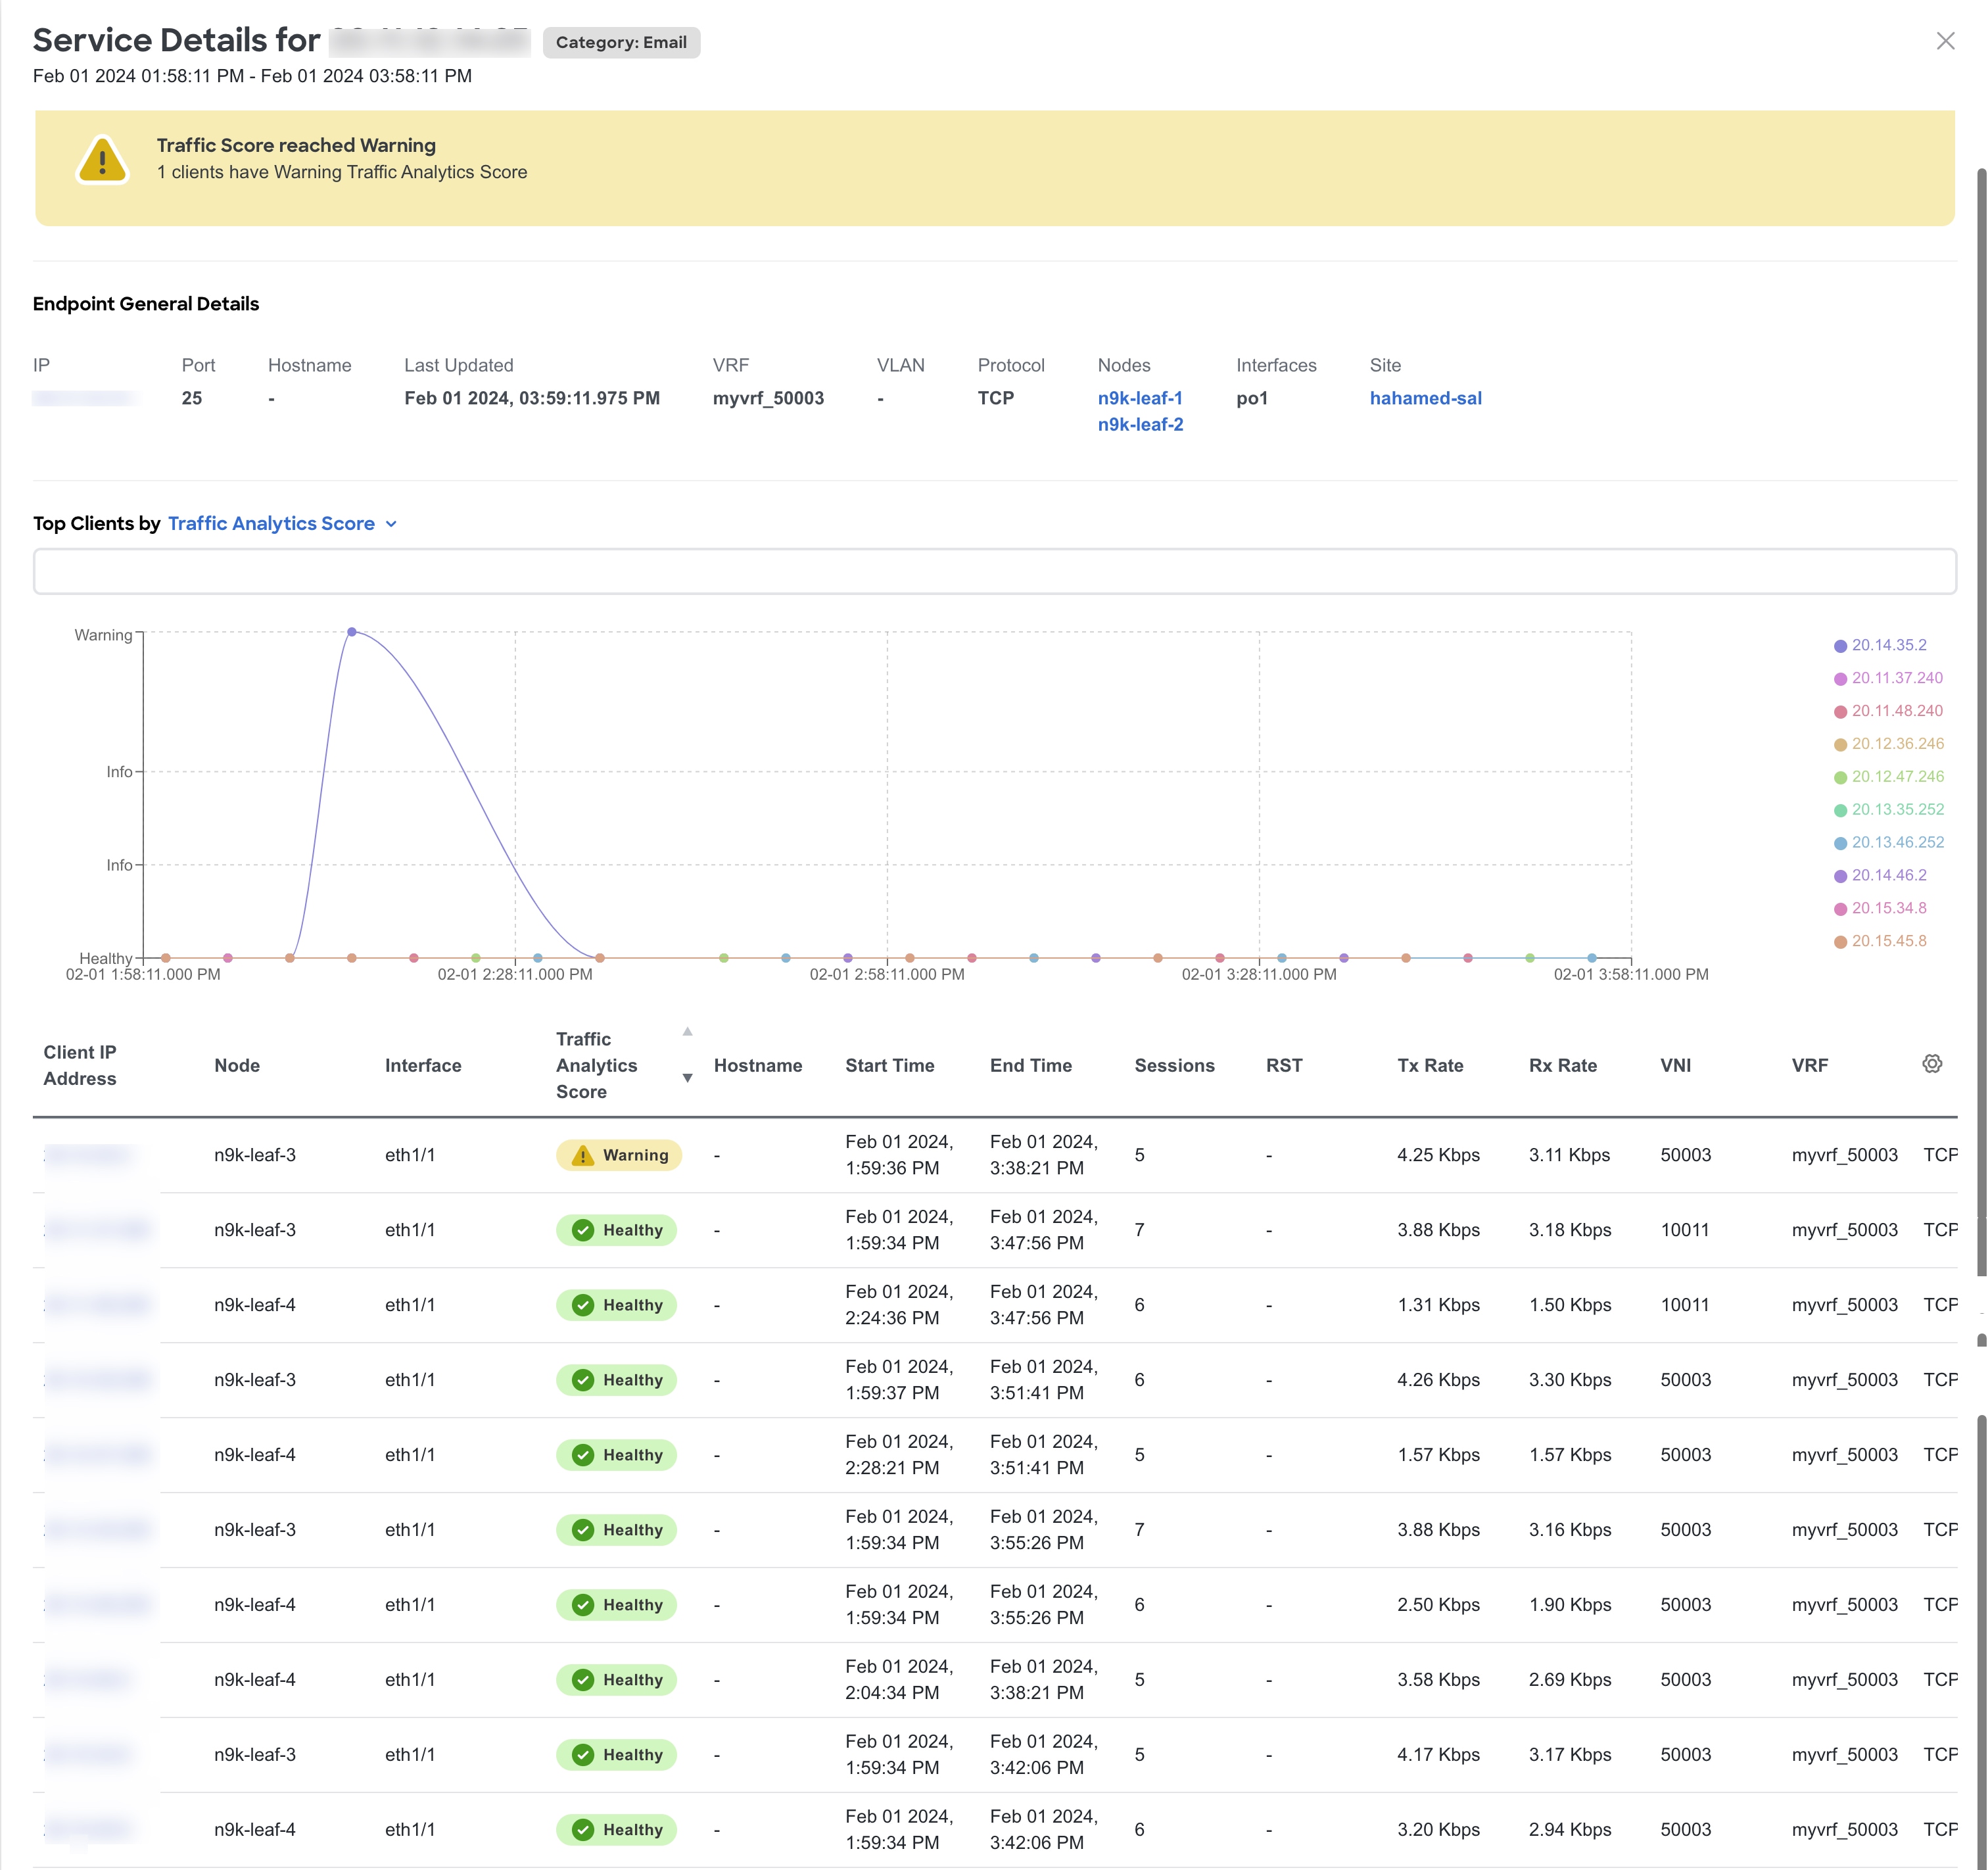
Click Service Port to view additional details for the particular service.
-
In the Overview area you can view the endpoint details and client details such as top clients and conversation between a client and service.
-
In the Endpoint General Details, click Client IP Address to view endpoint details. You can view all the services hosted on that endpoint and connections to other services and IP addresses from this endpoint.
-
Use the drop-down list to view the information for Top Clients by Traffic Analytics Score, Latency Score, Drop Score and others.
-
In the Clients table, hover on the Traffic Analytics Score to view the Traffic Analytics Score breakdown for that service.
-
-
In the Trends and Statistics area you the view the trends for values such clients, service, latency and others for that service.
-
In the Anomalies area, you can view the anomalies for the particular service endpoint based on traffic score.
-
In the Flow Collections area, you can view the flow collections for that service.
-
Manage Service Endpoint Categories
In the Manage Service Endpoint Categories area you can view the ports that have been assigned to categories based on standard networking defaults and any categories you may have created. If a port has not been assigned to a category, you can assign it to one of the existing categories or create a new category. This helps you to organize and manage your network ports more efficiently.
-
Navigate to Analyze > Analyze Hub > Traffic Analytics.
-
Select a site from the drop-down menu.
-
Select a time range from the dropdown menu. By default the Current time (past 2 hours) is selected.
-
In the Service Category by Score area click Manage Service Endpoint Categories.
-
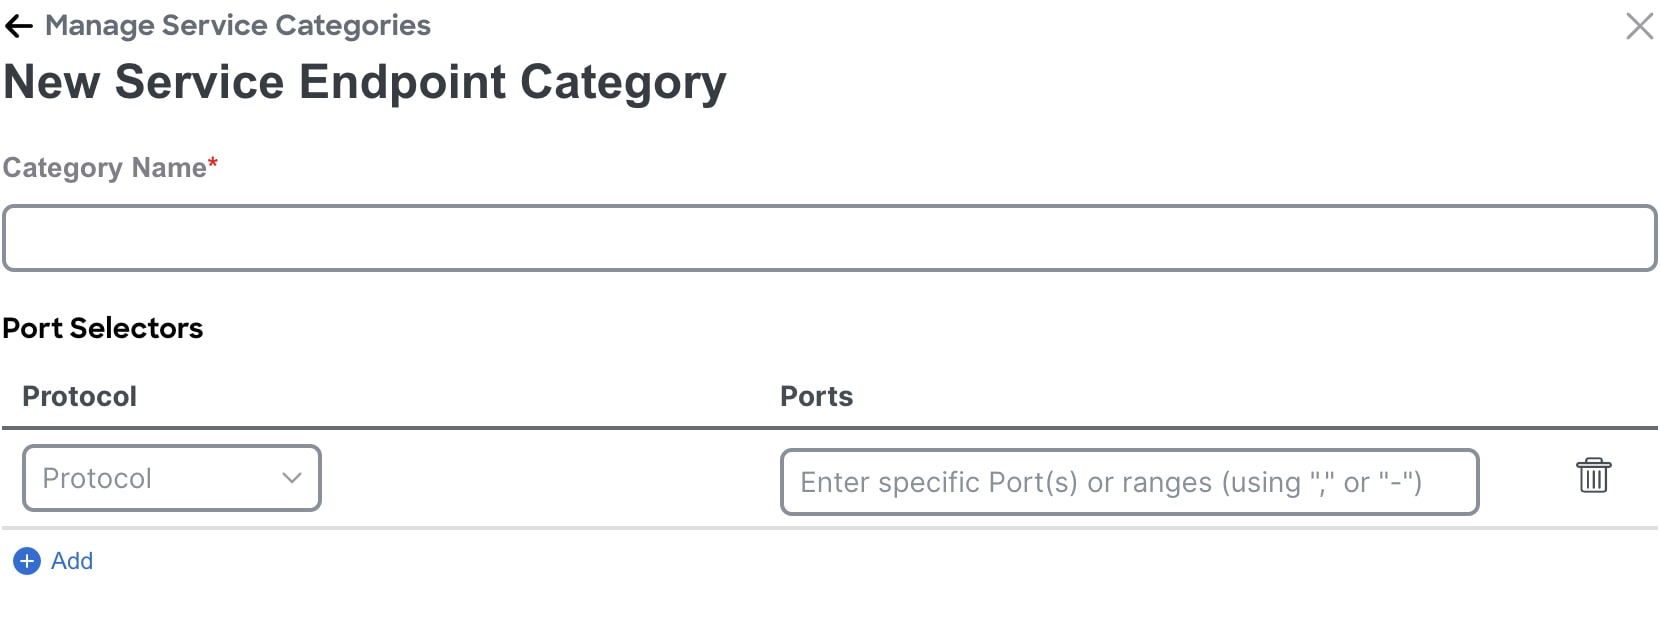
To create a new category, click New Categories.
-
Enter the name of the category.
-
From the Protocol drop-down list, select the protocol.
-
In the Ports field, enter the ports or port range.
-
Click Add to add additional protocols.
-
Click Save.
-
To edit a category, click the ellipse icon and select edit.
-
Edit the values and click Save.
-
-
To delete a category, click the ellipse icon and select delete.
-
Click Confirm.
-
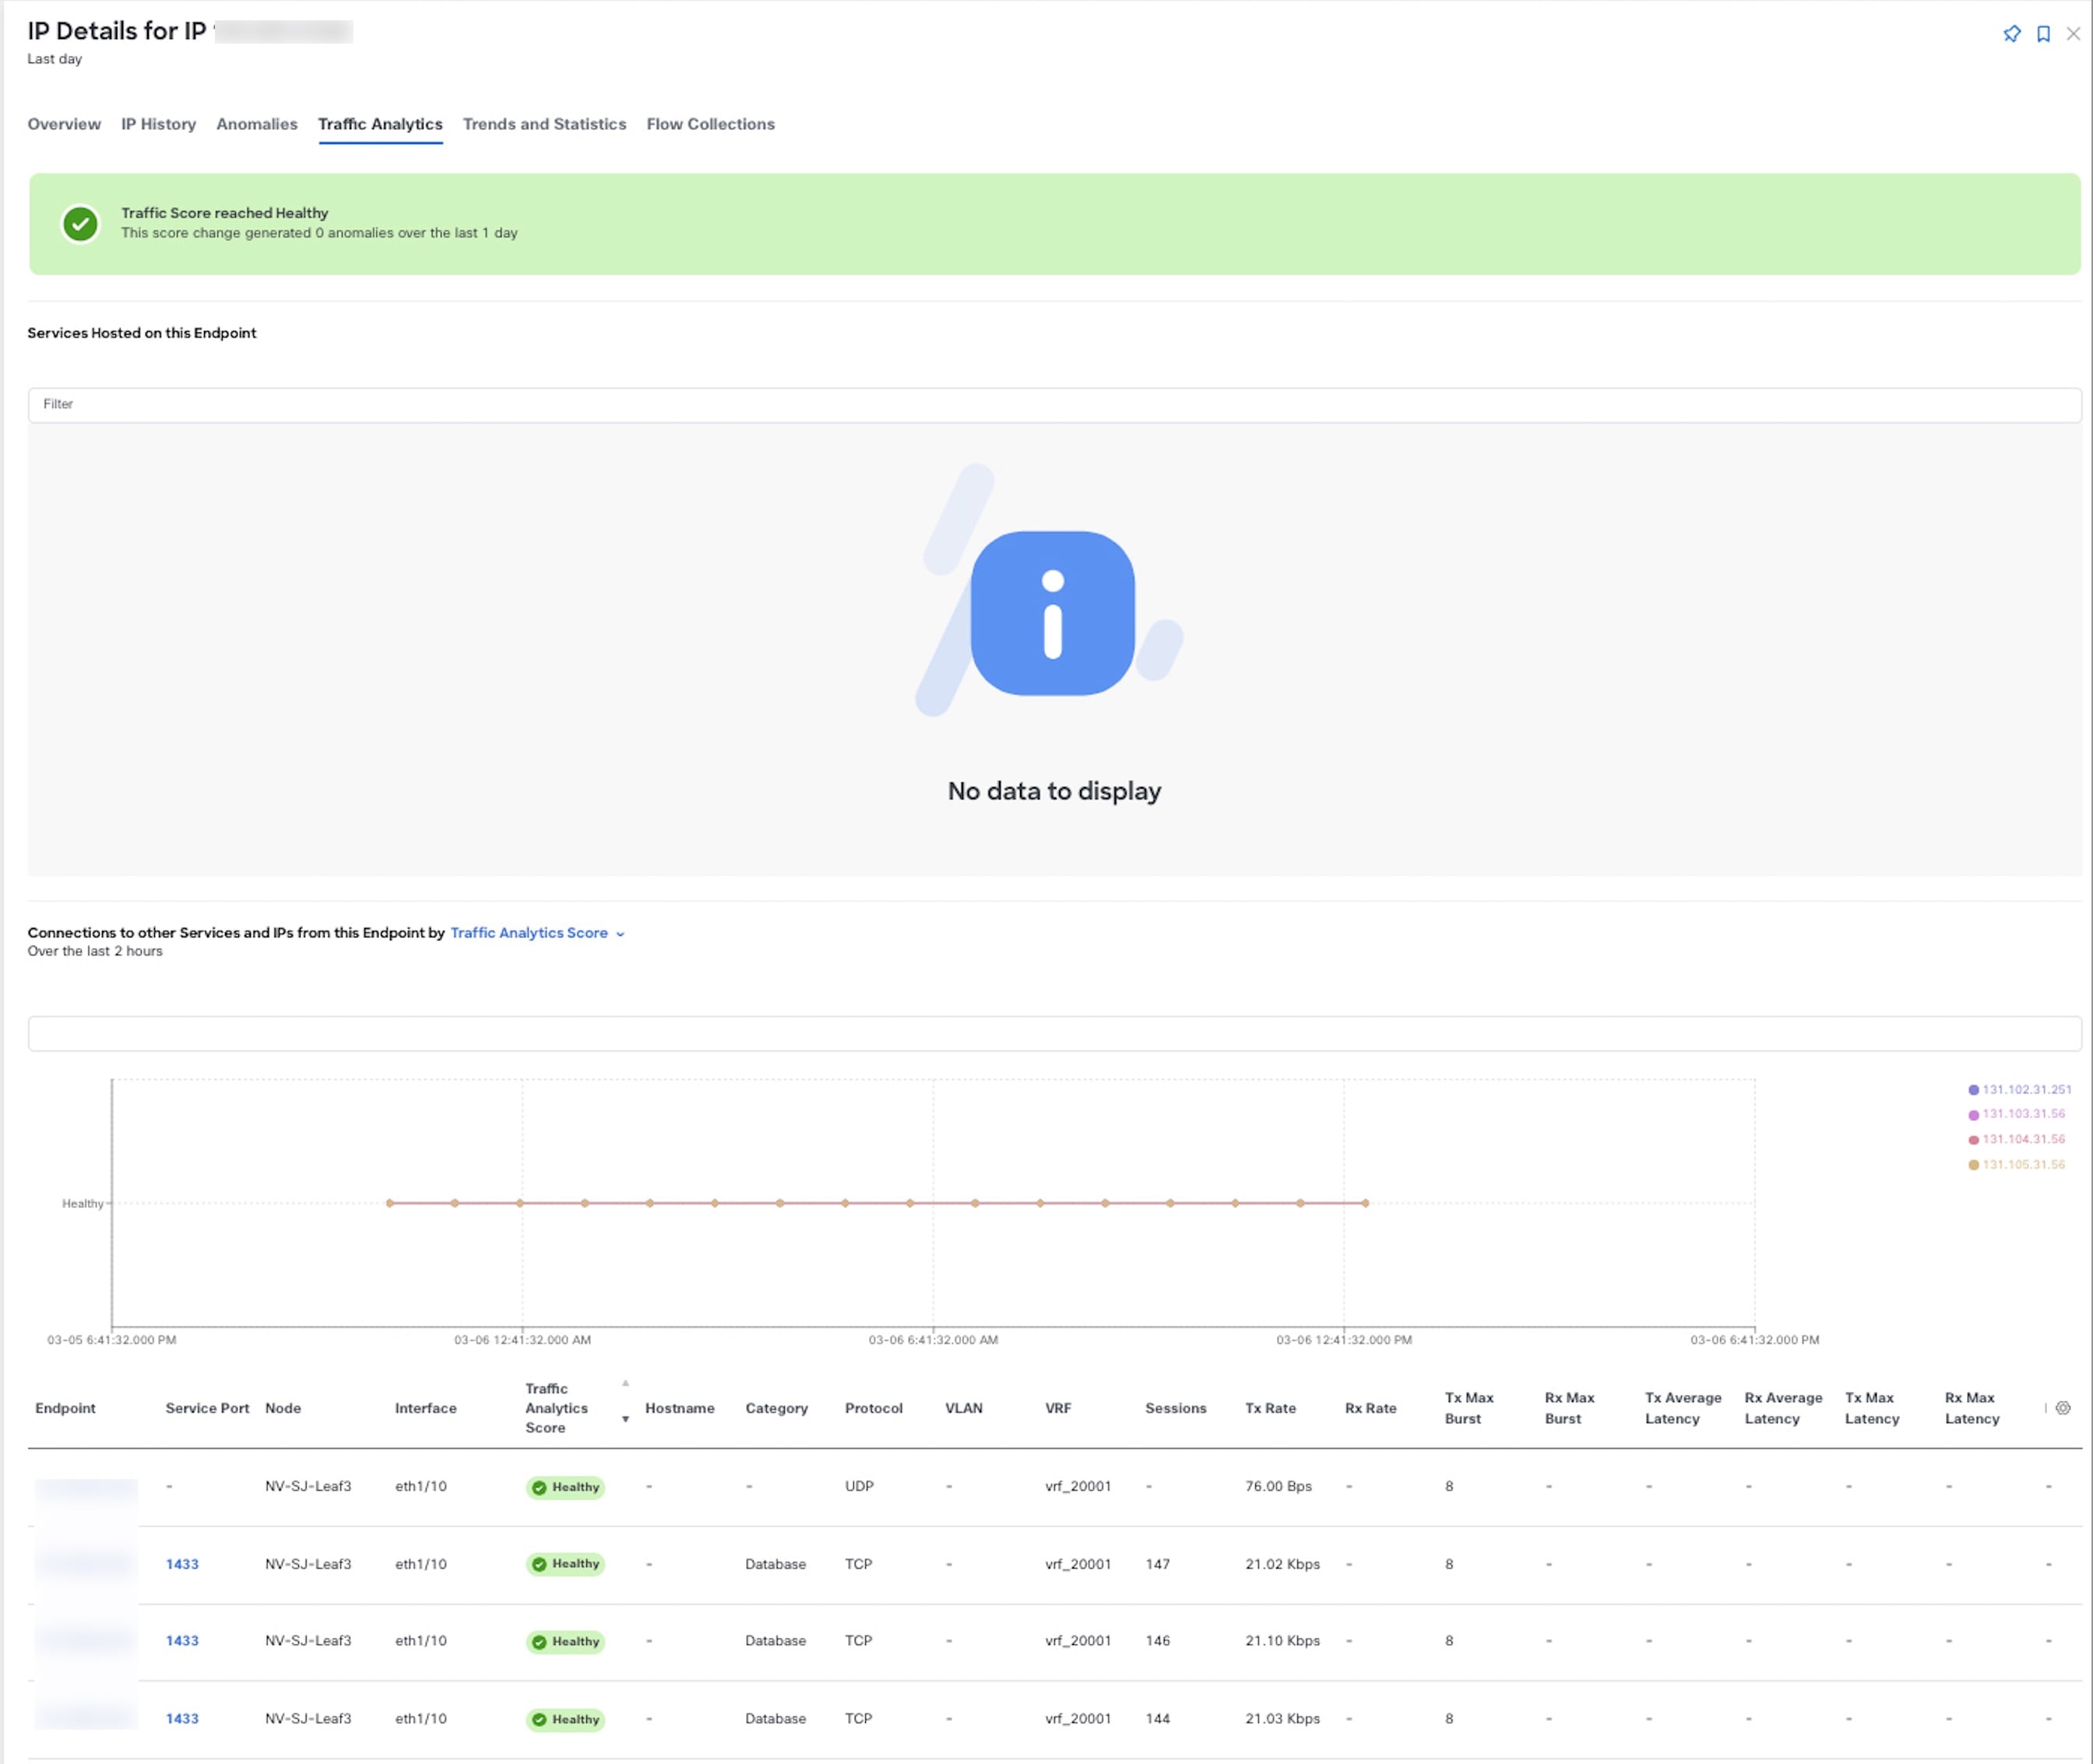
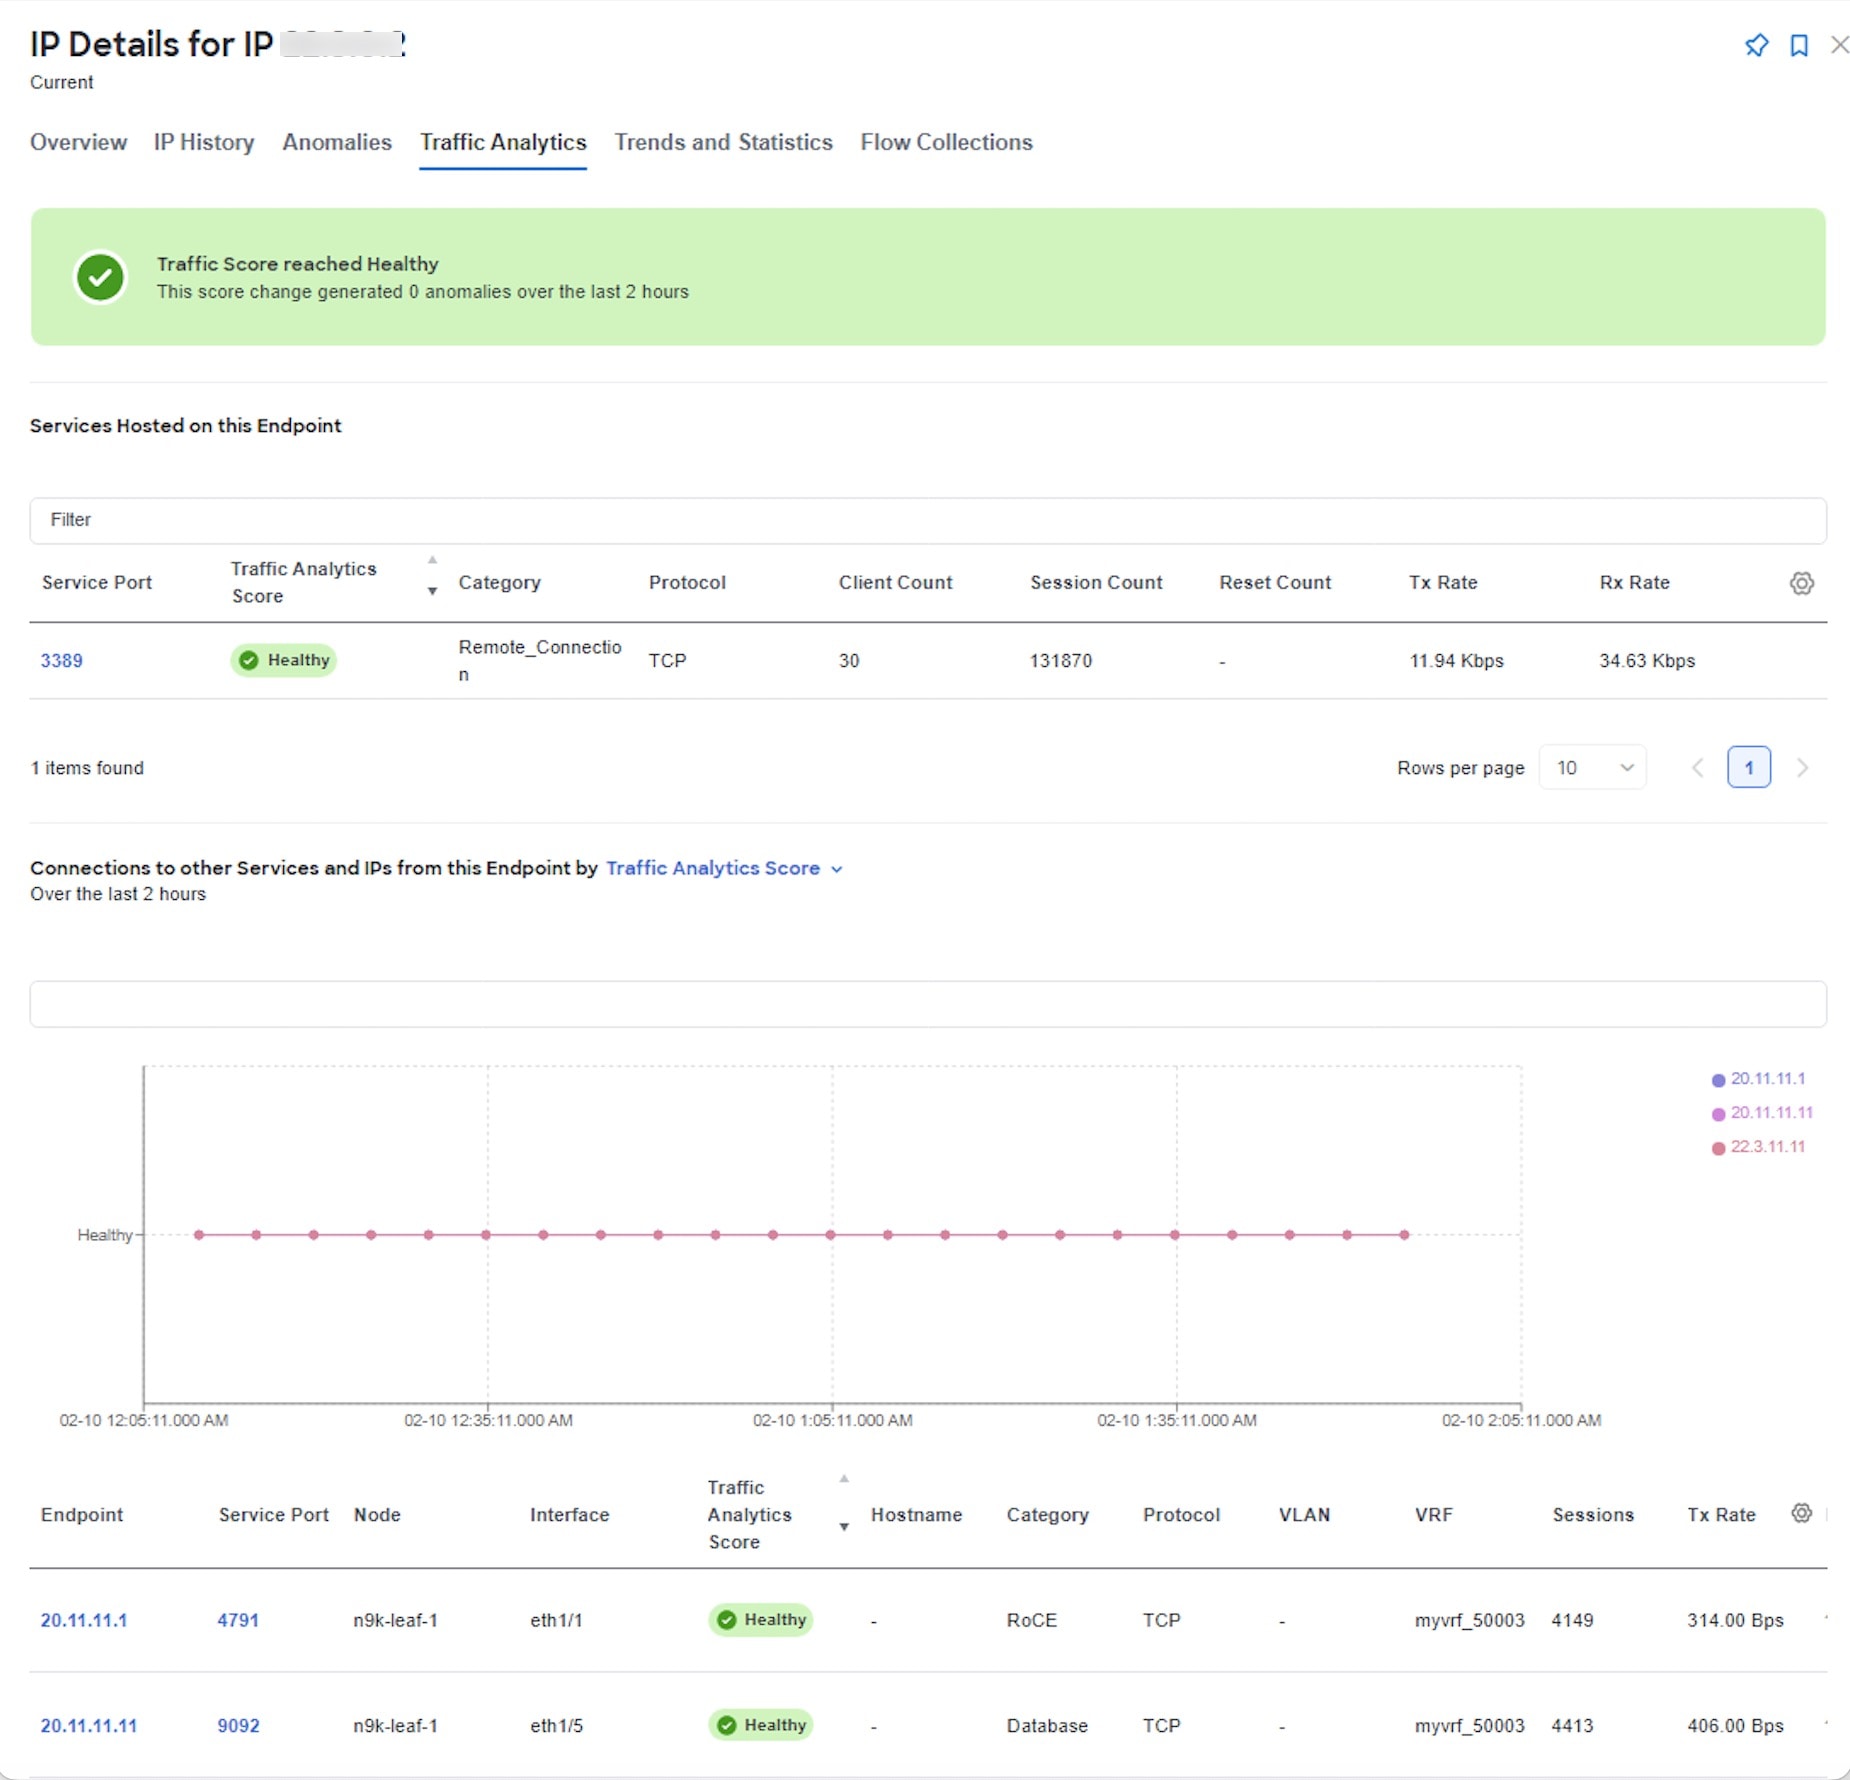
View Traffic Analytics for Endpoints
-
Navigate to Manage > Sites.
-
Click site name.
-
Navigate to Connectivity > Endpoints.
-
In the Endpoint table click an IP address.
-
In the IP Details page, click Traffic Analytics to display the Traffic Analytics view for endpoints.
Flow Troubleshoot Workflow
The Flow Troubleshoot workflow enables you to collect all the flow records between two endpoints when the Traffic Analytics score is unhealthy for a service endpoint. Nexus Dashboard Insights allows you to specify the duration for flow collection and then collect records between specific endpoints for the specified duration. As a result you can view the path visualization, 5-tuple flow information, and any issues seen on individual flows.
-
Navigate to Analyze > Analyze Hub > Traffic Analytics.
-
Select a site from the drop-down menu.
-
Select a time range from the dropdown menu. By default the Current time (last 2 hours) is selected.
-
In the Service Endpoint table, select the endpoint with an unhealthy Traffic Analytics score and click Service Port.
-
In the Service Details page, select the Client IP address with an unhealthy Traffic Analytics score. Click the ellipse icon and choose Start Flow Collection.
-
Select the duration to collect flow records for a specific time period. Click Start.
-
Click Flow Collections to view the status.
-
After the Collection Status displays Completed, click View Records to view the flow record details for that specific service endpoint.
To view the Flow Collection for all the service endpoints for a site, navigate to Manage > Sites. Select a site. Click Connectivity > Flow Collections.
Flow troubleshoot may not show all the nodes through which packet traverses for each record in the following scenarios:
-
When there are flow drops in Nexus Dashboard Insights
-
When there are table collisions in the hardware
Copyright
THE SPECIFICATIONS AND INFORMATION REGARDING THE PRODUCTS IN THIS MANUAL ARE SUBJECT TO CHANGE WITHOUT NOTICE. ALL STATEMENTS, INFORMATION, AND RECOMMENDATIONS IN THIS MANUAL ARE BELIEVED TO BE ACCURATE BUT ARE PRESENTED WITHOUT WARRANTY OF ANY KIND, EXPRESS OR IMPLIED. USERS MUST TAKE FULL RESPONSIBILITY FOR THEIR APPLICATION OF ANY PRODUCTS.
THE SOFTWARE LICENSE AND LIMITED WARRANTY FOR THE ACCOMPANYING PRODUCT ARE SET FORTH IN THE INFORMATION PACKET THAT SHIPPED WITH THE PRODUCT AND ARE INCORPORATED HEREIN BY THIS REFERENCE. IF YOU ARE UNABLE TO LOCATE THE SOFTWARE LICENSE OR LIMITED WARRANTY, CONTACT YOUR CISCO REPRESENTATIVE FOR A COPY.
The Cisco implementation of TCP header compression is an adaptation of a program developed by the University of California, Berkeley (UCB) as part of UCB’s public domain version of the UNIX operating system. All rights reserved. Copyright © 1981, Regents of the University of California.
NOTWITHSTANDING ANY OTHER WARRANTY HEREIN, ALL DOCUMENT FILES AND SOFTWARE OF THESE SUPPLIERS ARE PROVIDED “AS IS" WITH ALL FAULTS. CISCO AND THE ABOVE-NAMED SUPPLIERS DISCLAIM ALL WARRANTIES, EXPRESSED OR IMPLIED, INCLUDING, WITHOUT LIMITATION, THOSE OF MERCHANTABILITY, FITNESS FOR A PARTICULAR PURPOSE AND NONINFRINGEMENT OR ARISING FROM A COURSE OF DEALING, USAGE, OR TRADE PRACTICE.
IN NO EVENT SHALL CISCO OR ITS SUPPLIERS BE LIABLE FOR ANY INDIRECT, SPECIAL, CONSEQUENTIAL, OR INCIDENTAL DAMAGES, INCLUDING, WITHOUT LIMITATION, LOST PROFITS OR LOSS OR DAMAGE TO DATA ARISING OUT OF THE USE OR INABILITY TO USE THIS MANUAL, EVEN IF CISCO OR ITS SUPPLIERS HAVE BEEN ADVISED OF THE POSSIBILITY OF SUCH DAMAGES.
Any Internet Protocol (IP) addresses and phone numbers used in this document are not intended to be actual addresses and phone numbers. Any examples, command display output, network topology diagrams, and other figures included in the document are shown for illustrative purposes only. Any use of actual IP addresses or phone numbers in illustrative content is unintentional and coincidental.
The documentation set for this product strives to use bias-free language. For the purposes of this documentation set, bias-free is defined as language that does not imply discrimination based on age, disability, gender, racial identity, ethnic identity, sexual orientation, socioeconomic status, and intersectionality. Exceptions may be present in the documentation due to language that is hardcoded in the user interfaces of the product software, language used based on RFP documentation, or language that is used by a referenced third-party product.
Cisco and the Cisco logo are trademarks or registered trademarks of Cisco and/or its affiliates in the U.S. and other countries. To view a list of Cisco trademarks, go to this URL: http://www.cisco.com/go/trademarks. Third-party trademarks mentioned are the property of their respective owners. The use of the word partner does not imply a partnership relationship between Cisco and any other company. (1110R)
© 2017-2024 Cisco Systems, Inc. All rights reserved.