How to Configure Event Forwarding using Cisco Nexus Dashboard Fabric Controller
Available Languages
Bias-Free Language
The documentation set for this product strives to use bias-free language. For the purposes of this documentation set, bias-free is defined as language that does not imply discrimination based on age, disability, gender, racial identity, ethnic identity, sexual orientation, socioeconomic status, and intersectionality. Exceptions may be present in the documentation due to language that is hardcoded in the user interfaces of the product software, language used based on RFP documentation, or language that is used by a referenced third-party product. Learn more about how Cisco is using Inclusive Language.
- US/Canada 800-553-2447
- Worldwide Support Phone Numbers
- All Tools
 Feedback
 Feedback
How to Configure Event Forwarding using Cisco Nexus Dashboard Fabric Controller
Event Forwarding – A High-Level Workflow
Event Forwarding Method as Email Notification
Event Forwarding Method as SNMP Trap
This document provides step-by-step instructions to configuring event forwarding from Cisco Nexus Dashboard Fabric Controller (NDFC).
The command outputs, screenshots, and capabilities provided in this document are based on Cisco Nexus Dashboard (ND) 3.1(1k) and Nexus Dashboard Fabric Controller (NDFC) 12.2.1. Although the procedures and recommendations outlined in this document also apply to other NDFC versions, we recommend referring to the release notes and configuration guides for up-to-date information.
What is Cisco Nexus Dashboard and Cisco Nexus Dashboard Fabric Controller?
Cisco Nexus Dashboard (ND) serves as a comprehensive hosting platform, offering a unified operational perspective across various sites and services. Within this framework, the Cisco Nexus Dashboard Fabric Controller (NDFC) functions as an application service hosted on ND.
NDFC introduces a dynamic feature management system, allowing you to seamlessly choose from different personas, such as SAN Controller, Fabric Controller, or Fabric Discovery, along with their corresponding capabilities. Notably, you do not have to specify a mode for LAN, SAN, or IP Fabric for Media (IPFM) during the installation process.
The ND and NDFC deliver a range of advantages, including active-active clustering, enhanced scalability, anomaly detection, event analytics, and other features that contribute to a robust and efficient operational environment.
For more details on ND and NDFC, please refer to the References section.
What is Event Forwarding?
Based on the configured event forwarding rules and filtering, NDFC can selectively forward events that require urgent attention to the respective owners or automated ticketing systems. In this context, events encompass both switch SNMP traps and syslogs.
Within the event forwarding rule configuration, you can choose events based on their source. You can categorize an event source as either "NDFC," referring to SNMP trap events, or as "Syslog," referring to syslog events. This enables you to forward events based on their specific source and type.
NDFC as source
NDFC being selected as the event source signifies events generated by SNMP traps, which, in turn, are initiated by the switches. You can easily select the specific type of event from a drop-down list when NDFC is chosen as the event source. Table 1 provides a complete list of the types available for selection. This streamlined approach ensures that you can efficiently choose the desired event type from the provided options.
Table 1. NDFC Source Types
| NDFC Source Types |
| All |
| FICON* |
| IVR* |
| License |
| Other |
| Port Alarm |
| Port Up |
| Port Down |
| Switch Hardware |
| Switch Manageability |
| Threshold |
| VSAN* |
| Zone |
*Only for NDFC SAN Controller
Syslog as source
Syslog being designated as the event source enables you to choose the facility from a drop-down list. The syslog facility corresponds to the NX-OS service or process operating in the switch responsible for generating the syslog message.
In this configuration, you are provided with fields to input the type and a description regex. These fields empower you to narrow focus to specific events for forwarding. By entering additional details in the type and description regex, you can precisely tailor the selection criteria, enhancing your ability to forward syslog events that align with your specific requirements. This level of customization ensures a more granular and targeted approach to event management.
Event Forwarding – A High-Level Workflow
This section provides a high-level workflow of how events are forwarded.
High-level workflow
● An event occurs on the MDS or Nexus switch.
● A SNMP trap or syslog are generated for that event.
● The switch sends this SNMP Trap or syslog to all SNMP-Server or Syslog hosts configured on it.
● NDFC receives this SNMP Trap or syslog.
◦ Based on any ignore rules, NDFC further processes or ignores this notification.
● NDFC checks if any event forwarding rules are configured and forwards accordingly.
Event Forwarding Method as Email Notification
The following section provides a detailed step-by-step procedure for enabling the event forwarding feature within NDFC to forward events as email notifications.
Step 1. Initial NDFC Server Settings
To initiate the configuration process, you first set up various parameters within the server settings. Navigate to the Admin menu and select System Settings. Here, go to the Events tab. This tab specifically deals with the configuration of event-related settings. In the Events tab, locate the "Trap Listen" option and ensure that it is enabled. Enabling this option allows NDFC to actively listen for SNMP traps generated by switches in the managed fabric. Similarly, locate the "Enable Event Forwarding" option and ensure that it is enabled. This setting activates the event forwarding functionality, allowing NDFC to forward relevant events to specified destinations. By following these steps, you can configure the foundational server settings in NDFC.
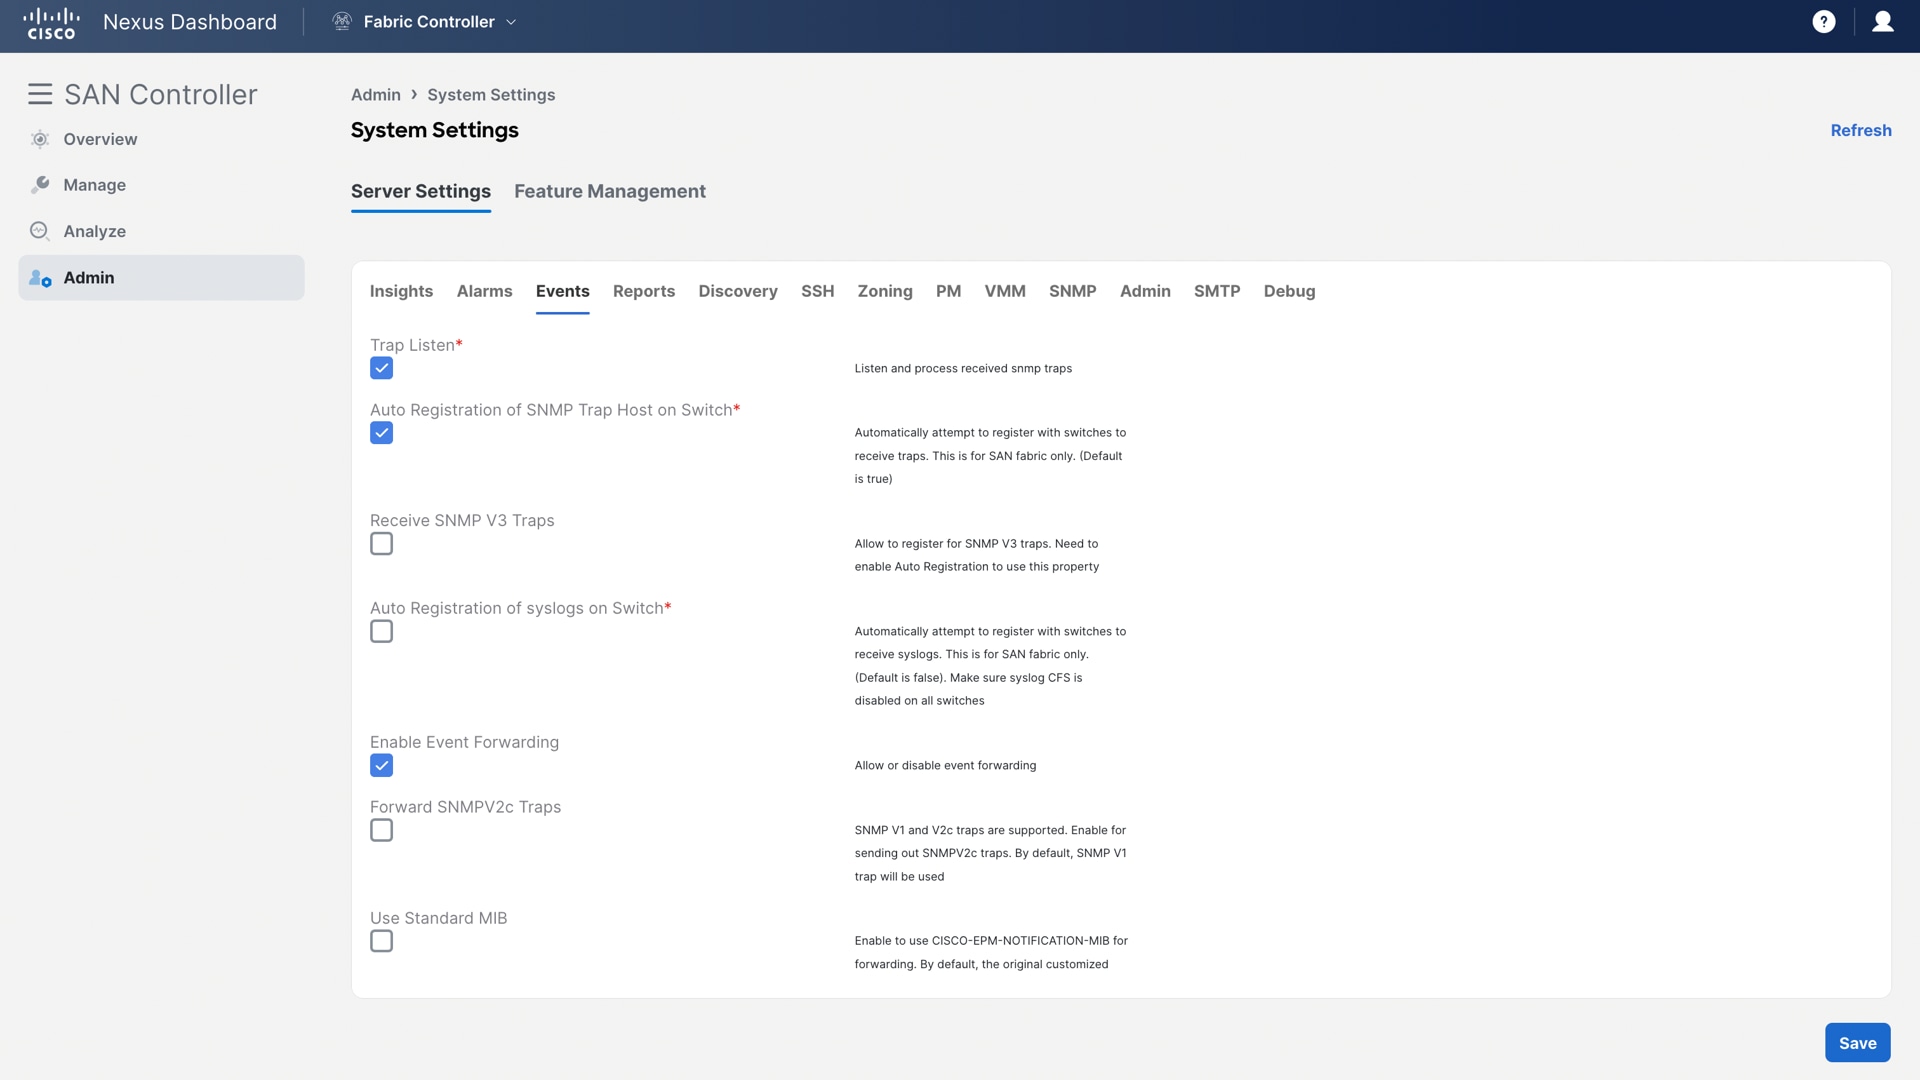
Figure 1 Server Settings - Events
Next, go to the SMTP Tab to configure essential SMTP-related parameters to align with your environment. Enter the appropriate values for “SMTP Host” and “SMTP Host Port” to reflect your SMTP server. If the SMTP server requires authentication, provide the necessary credentials. If authentication is not required, this can be left unchecked. Optionally, configure the “From Email” address. This is the email address that is displayed as the sender of the forwarded event notifications.
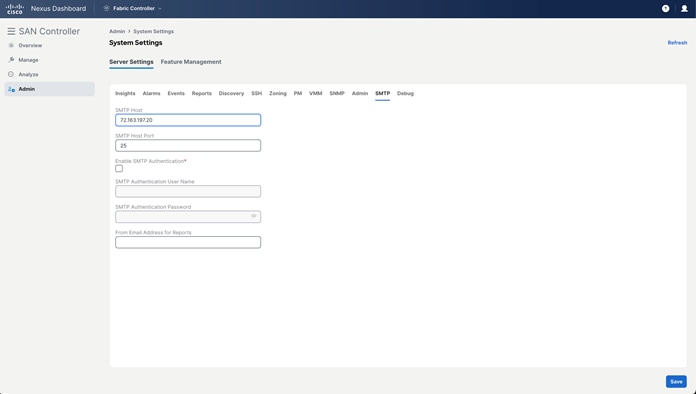
Figure 2 Server Settings – SMTP
Step 2. Adding Rule for Event Forwarding
After this, add a rule in NDFC Event Setup to forward the events as email notifications from NDFC. To do this, navigate to Analyze > Event Analytics and select the Events Tab. Here, under the Actions drop-down list, select Event Setup. Once in the Event Setup page, go to the Forwarding Tab. This is where you can define rules for forwarding events.
Select the Actions drop-down list and click “Add Rule.”
In SAN Controller
Next, for NDFC with the SAN Controller personality, ensure that the below settings should be configured as per requirements/environment:
● Email is selected as the forwarding method.
● The email addresses of the recipients who are to receive the forwarded events are entered.
● The forwarding scope is either Fabrics or Port Groups.
◦ You can select “All Fabrics” or a specific fabric discovered in NDFC.
◦ You can also select All VSANs or a specific VSAN.
◦ If the forwarding scope is Port Groups, you can select All Port Groups or specific port groups.
● The source is either NDFC or Syslog.
◦ If you selected NDFC as the source, NDFC is configured as SNMP trap receiver and enables NDFC to receive all traps generated by the switches. Select the event type from the Type drop-down list. You can select “All” or a specific type, such as “license,” “manageability,” etc.
◦ For port-related events such as Port Alarm, Port Up, and Port Down, you can select the “Storage Ports Only” checkbox.
◦ If you selected Syslog as the source, select the syslog facility. The syslog facility represents the NX-OS service or process running in the MDS switch that created the syslog messages.
◦ You can also enter a syslog type in the Type field and enter a description that matches the event description in the Description Regex field.
● The minimum severity is selected. In Cisco MDS, events are generated with various levels of severity: Emergency, Alert, Critical, Error, Warning, Notice, Info, and Debug. You can opt for the minimum severity, which forwards all events from the minimum severity and above as a notification. For example, if you select "Critical" as the minimum severity, all events with severity level Emergency, Alert, and Critical are forwarded.
Once you have made these configurations, click “Add Rule” in the lower-right corner to save the rule.
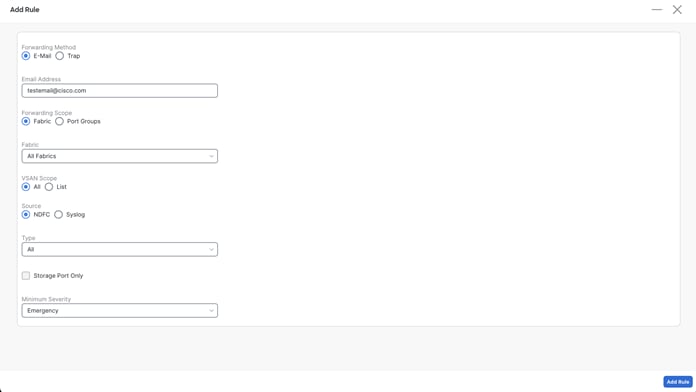
Figure 3 Adding a Rule for Event Forwarding as Email Notification – SAN Controller
In Fabric Controller (LAN)
For NDFC with the Fabric Controller personality, ensure that the below settings should be configured as per requirements/environment:
● Email is selected as the forwarding method.
● The email addresses of the recipients who are to receive the forwarded events are entered.
● “All LAN Groups” or a specific fabric name are selected as the forwarding scope from the Fabric drop-down list.
● The source is either NDFC or Syslog.
◦ If you selected NDFC as the source, NDFC is configured as SNMP trap receiver, which enables NDFC to receive all traps generated by the switches. Select the event type from the Type drop-down list. You can select “All” or a specific type, such as “license,” “manageability,” etc.
◦ If you selected Syslog as the source, select the syslog facility. The syslog facility represents the NX-OS service or process running in the Nexus switch that created the syslog messages.
◦ You can also enter a syslog type in the Type field and enter a description that matches the event description in the Description Regex field.
● The minimum severity is selected. In Cisco Nexus switches, events are generated with various levels of severity: Emergency, Alert, Critical, Error, Warning, Notice, Info, and Debug. You can opt for the minimum severity, which forwards all events from the minimum severity and above as a notification. For example, if you select "Critical" as the minimum severity, all events with severity level Emergency, Alert, and Critical are forwarded.
Once you have made these configurations, click “Add Rule” in the lower-right corner to save the rule.

Figure 4 Adding a Rule for Event Forwarding as Email Notification – Fabric Controller
Step 3. Run Test
After you have added the rule, you can validate the configuration by utilizing the “Run Test” feature, ensuring connectivity and verifying the reception of email notifications from NDFC to the intended email addresses. You can select a specific fabric to run the test. Once initiated, NDFC generates a test trap on each switch that is part of the selected fabric. These test traps simulate events and trigger the configured forwarding rule. The events generated during the test are forwarded to the email addresses specified in the rule. This allows you to confirm that the email notifications are being sent as expected.
After the test completes, the status of the test for each switch is displayed. Details about the test results, including whether it was successful or any issues encountered, are presented on the screen, ensuring that the forwarding rule is working effectively and that email notifications are being delivered as intended.
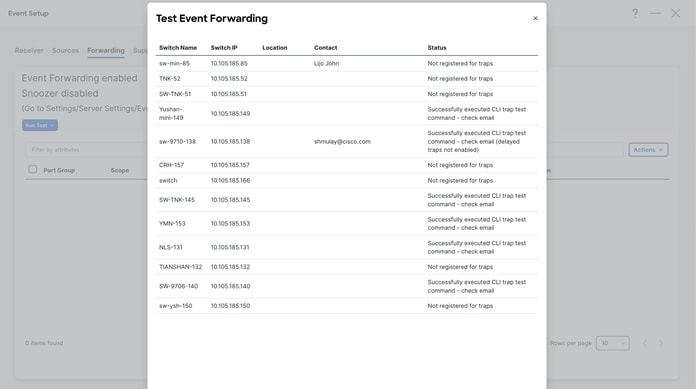
Figure 5 Test Event Forwarding
Step 4. Add More Rules as per Specific Requirements
To enhance event management and forwarding in NDFC, you can add multiple rules with distinct configurations for forwarding events based on severity level and event type from different fabrics to various email addresses.
Event Forwarding Method as SNMP Trap
The following section outlines a step-by-step procedure for configuring the Event Forwarding feature within NDFC to enable the forwarding of events as trap notifications to SNMP trap receivers.
Step 1. Initial NDFC Server Settings
To initiate the configuration process, you first set up various parameters within the server settings. Navigate to the Admin menu and select System Settings. Here, go to the Events tab. This tab specifically deals with the configuration of event-related settings. In the Events tab, locate the "Trap Listen" option and ensure that it is enabled. Enabling this option allows NDFC to actively listen for SNMP traps generated by switches in the managed fabric. Similarly, locate the "Enable Event Forwarding" option and ensure that it is enabled. This setting activates the event forwarding functionality, allowing NDFC to forward relevant events to specified destinations. By following these steps, you can configure the foundational server settings in NDFC.
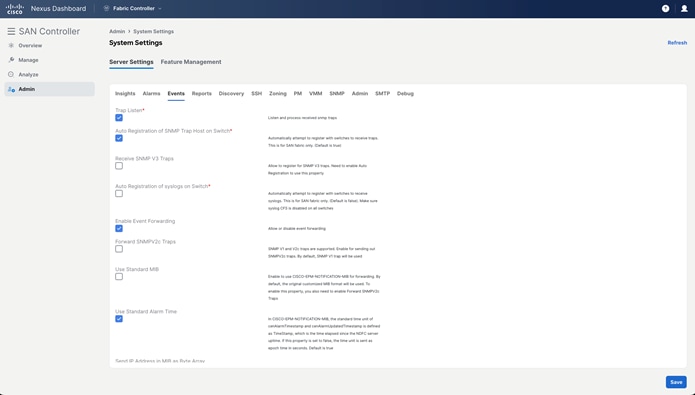
Figure 6 Server Settings - Events
Step 2. Adding Rule for Event Forwarding
After this, add a rule in NDFC Event Setup to forward the events as a trap notification from NDFC. To do this, navigate to Analyze > Event Analytics and select the Events Tab. Here, under the Actions drop-down list, select Event Setup. Once in the Event Setup page, go to the Forwarding tab. Here, you can define rules for forwarding events.
Select the Actions drop-down list and click “Add Rule.”
In SAN Controller
For NDFC with the SAN Controller personality, the below settings should be configured as per requirements/environment:
● Trap is selected as the forwarding method.
● The IP address or DNS server name of the SNMP Trap receiver and port number where the traps must be sent is entered. Both IPv4 and IPv6 address formats are supported.
● The forwarding scope is either Fabrics or Port Groups.
◦ You can select “All Fabrics” or a specific fabric discovered in NDFC.
◦ You can also select “All VSANs” or specific VSANs.
◦ If the forwarding scope is Port Groups, you can select All Port Groups or specific port groups.
● The source is either NDFC or Syslog.
◦ NDFC as the source represents events generated by SNMP traps, which are generated by the switches. If you selected NDFC as the source, select the event type from the Type drop-down list. You can select “All” or a specific type, such as “license,” “manageability,” etc.
◦ For port-related events such as Port Alarm, Port Up, and Port Down, you can select the “Storage Ports Only” checkbox.
◦ If you selected Syslog as the source, select the syslog facility. The syslog facility represents the NX-OS service or process running in the MDS switch that created the syslog messages.
◦ You can also enter a syslog type in the Type field and enter a description that matches the event description in the Description Regex field.
● The minimum severity is selected. In Cisco MDS, events are generated with various levels of severity: Emergency, Alert, Critical, Error, Warning, Notice, Info, and Debug. You can opt for the minimum severity, which forwards all events from the minimum severity and above as a notification. For example, if you select "Critical" as the minimum severity, all events with severity level Emergency, Alert, and Critical are forwarded.
Once you have made these configurations, click “Add Rule” in the lower-right corner to save the rule.
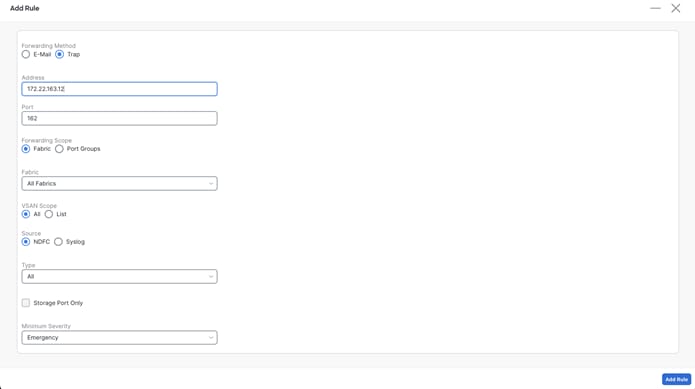
Figure 7 Adding a Rule for Event Forwarding as Trap – SAN Controller
In Fabric Controller (LAN)
For NDFC with the Fabric Controller personality, the below settings should be configured as per requirements/environment:
● Trap is selected as the forwarding method.
● The IP address or DNS server name of the SNMP trap receiver and port number where the traps must be sent is entered. Both the IPv4 and IPv6 address formats are supported.
● “All LAN Groups” or a specific fabric name are selected as the forwarding scope from the Fabric drop-down list.
● The source is either NDFC or Syslog.
◦ NDFC as the source represents events generated by SNMP traps, which are generated by the switches. If you selected NDFC as the source, select the event type from the Type drop-down list. You can select “All” or a specific type, such as “license,” “manageability,” etc.
◦ If you selected Syslog as the source, select the syslog facility. The syslog facility represents the NX-OS service or process running in the Nexus switch that created the syslog messages.
◦ You can also enter a syslog type in the Type field and enter a description that matches the event description in the Description Regex field.
● The minimum severity is selected. In Cisco Nexus, events are generated with various levels of severity: Emergency, Alert, Critical, Error, Warning, Notice, Info, and Debug. You can opt for the minimum severity, which forwards all events from the minimum severity and above as a notification. For example, if you select "Critical" as the minimum severity, all events with severity level Emergency, Alert, and Critical are forwarded.
Once you have made these configurations, click “Add Rule” in the lower-right corner to save the rule.
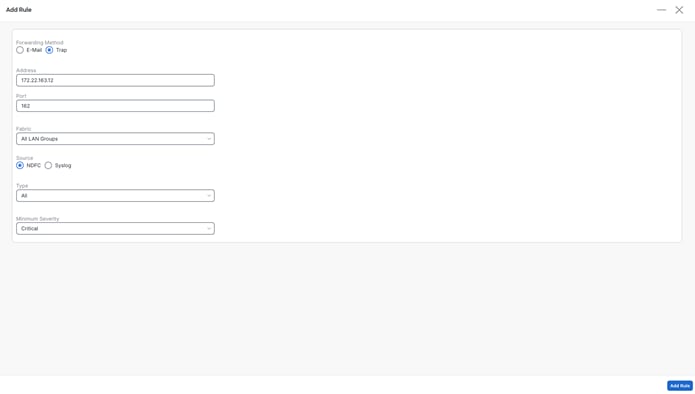
Figure 8 Adding a Rule for Event Forwarding as Trap – Fabric Controller
Step 3. Test the event forwarding rule
After adding the rule, you can validate the configuration by using the “Run Test” option or by simulating a trap event on the specific switch port of the fabric. The test trap simulates an event and triggers the configured forwarding rule on NDFC. This forwards the SNMP trap from NDFC to the configured SNMP trap receiver, thereby verifying the effectiveness of the configured forwarding rule. This allows you to confirm that the SNMP traps are sent as expected.
In the following example, an event forwarding rule is created to forward SNMP traps to a SNMP trap receiver with IP “172.22.163.234” from fabric “V-Fabric-1” with source set to NDFC, type set to “All Events,” and minimum severity set to “Info.”
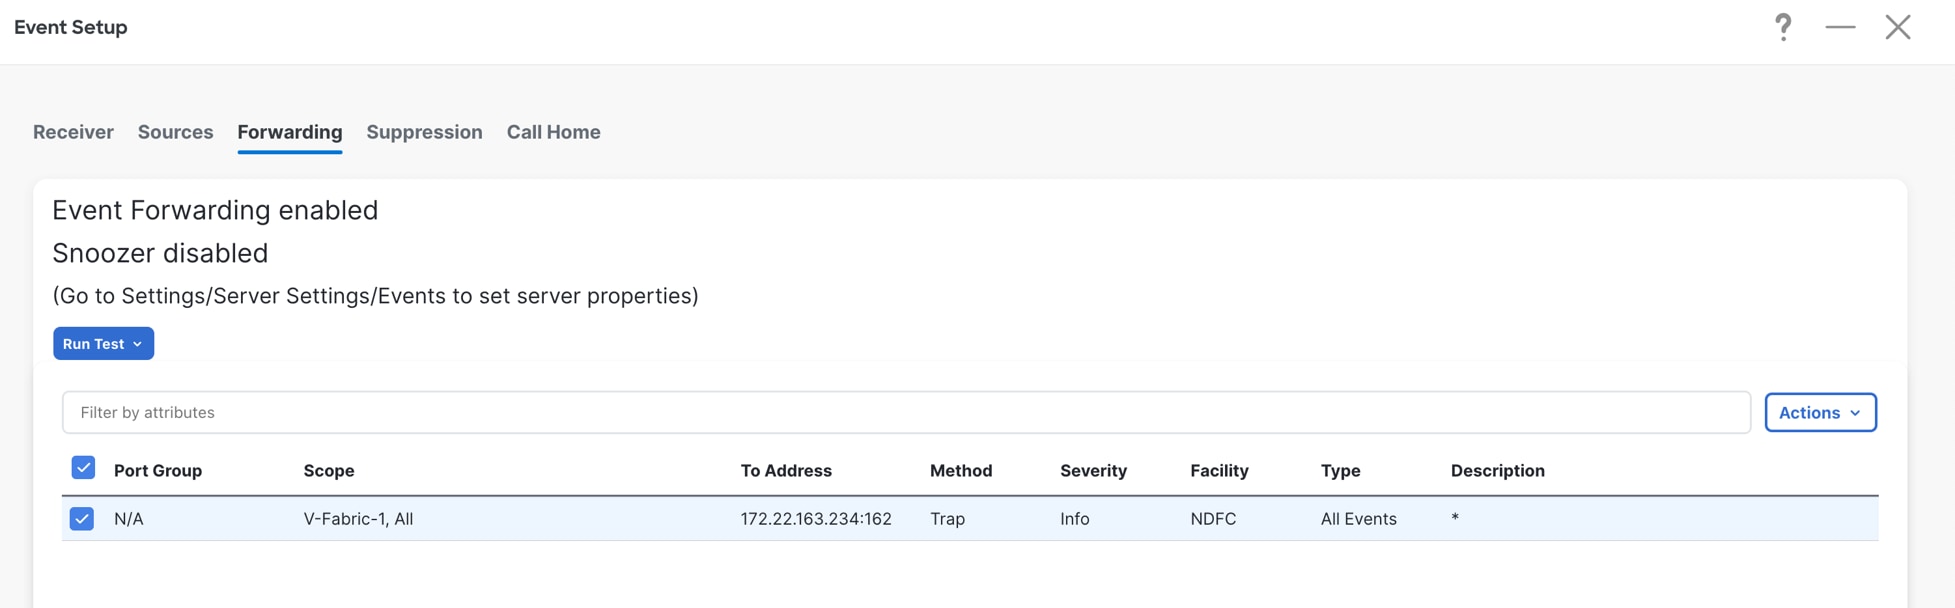
Figure 9 Example Event Forwarding Rule for SNMP Trap
The below screenshot is from the SNMP trap receiver after the “Run Test” feature of NDFC Event Forwarding has been used.
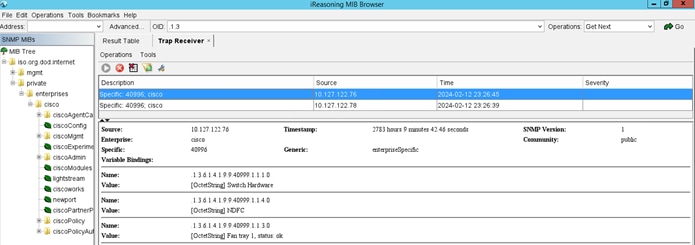
Figure 10 Run Test - SNMP Trap Receiver
The below screenshot is from the SNMP trap receiver and simulates the “port down/up” event.
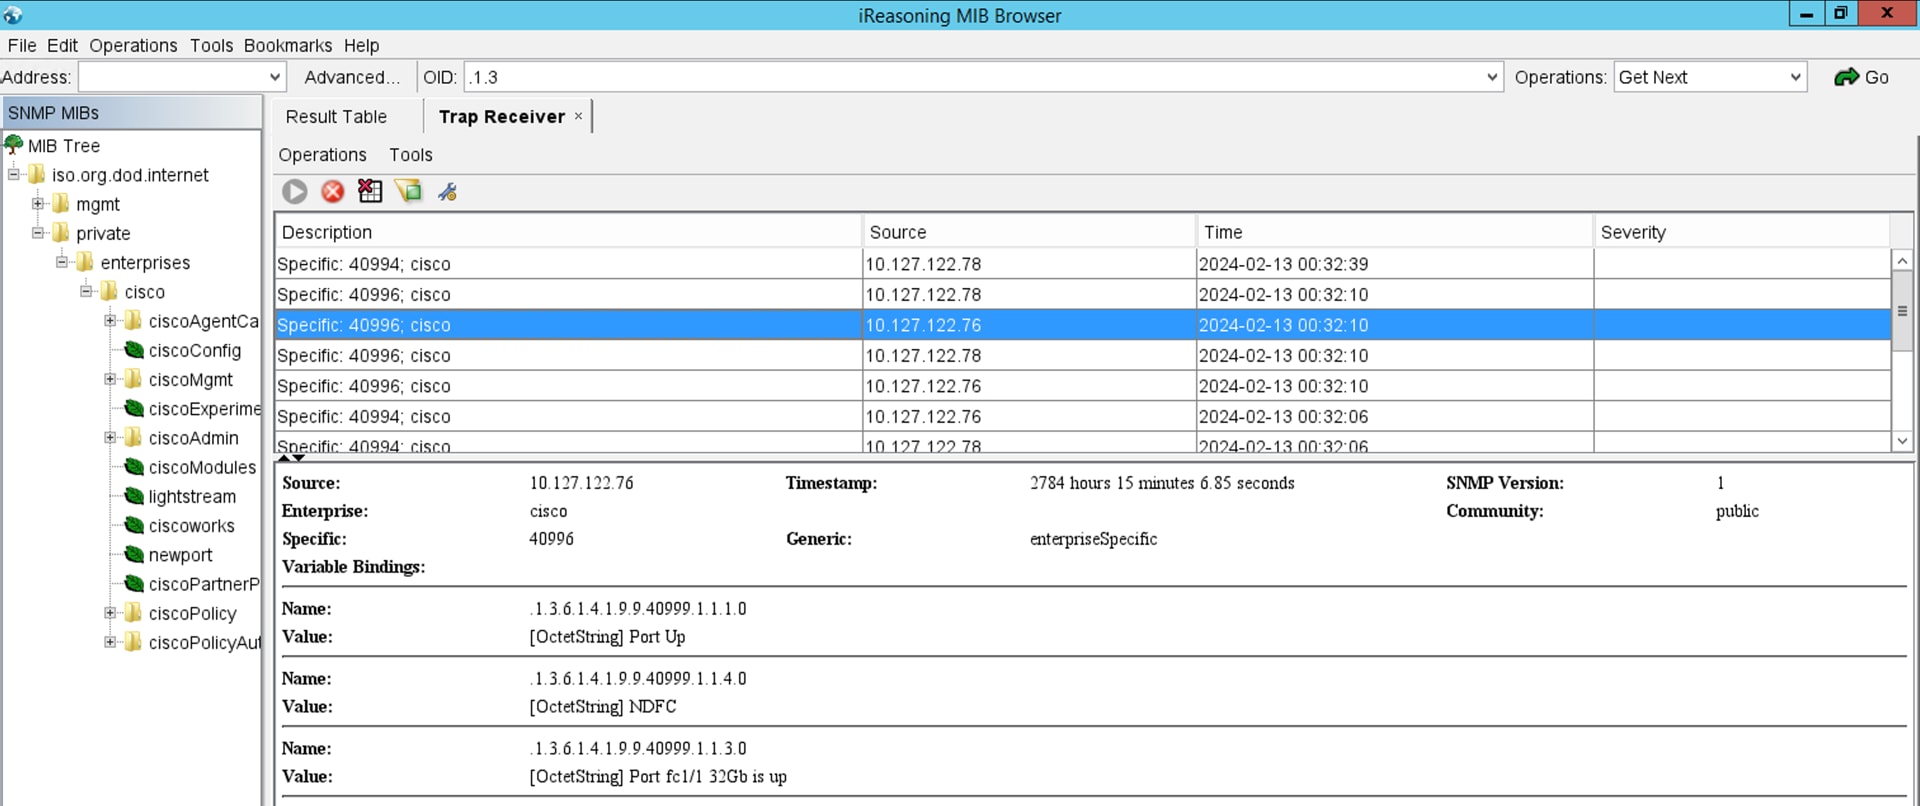
Figure 11 Example Event Forwarding Rule for SNMP Trap
Step 4. Add more rules as per specific requirement
To enhance event management and forwarding in NDFC, you can add multiple rules with distinct configurations for forwarding events based on severity level and event type from different (and/or the same) fabrics to various SNMP trap receivers.
Below are common troubleshooting steps for addressing issues with event forwarding.
● Verify that the necessary firewall ports are enabled to permit communication for SNMP, SMTP, and other essential services. For a complete list of the required communication ports, refer to the Cisco Nexus Dashboard Deployment Guide, which you can access through the References section.
● Confirm that the switches establish connectivity with both Nexus Dashboard (ND) and Nexus Dashboard Fabric Controller (NDFC) External Service IPs.
● Ensure that External Service IPs are correctly configured in Nexus Dashboard (ND).
● For NDFC SAN Controller specifically, ensure that External Service IPs are within the Data Subnet pool as per the mandate.
Through the step-by-step guidance provided above, this guide provides comprehensive insight into configuring Event Forwarding for email notifications and/or traps using Cisco Nexus Dashboard Fabric Controller (NDFC). These best practices ensure a systematic and efficient setup, allowing you to tailor event management based on your unique requirements. Whether forwarding events as email notifications or traps, the outlined procedures empower you to customize rules, select specific fabrics, and test the configuration for seamless connectivity. This approach enhances the overall functionality of NDFC, facilitating proactive event monitoring and timely notifications for effective system management. In addition, this guide presents a concise exploration of the requirements and deployment aspects of Cisco Nexus Dashboard and NDFC.
More for information, please refer to the following documents:
· Cisco Nexus Dashboard Deployment Guide
· Monitoring and Alerting in SAN Fabric with Cisco MDS 9000 Series Switches and NDFC
· Cisco Nexus Dashboard Fabric Controller 12 Release notes
· Cisco Nexus Dashboard Fabric Controller 12 Configuration Guide
![]()
