AON Policies
Available Languages
Table Of Contents
Configure Message Log Domain Property
Adjusting Quality and Performance
Working with XSL Transformation
Configuring Delivery Semantics
Binding Message Delivery Properties to a Message Type
Working with Message Transport
Configuring Cisco AON Promiscuous Mode
Prerequisites for Promiscuous Mode
Information About Promiscuous Mode
How to Configure Promiscuous Mode
Managing AON Properties
Properties control how messages are processed in an application-oriented network. Properties can be applied globally to the entire AON environment, or they can be applied only to individual nodes.

Note
Access to items on the Properties tab may be limited depending on the privileges assigned to you. For further details, see the "Assigning Roles to Users" section. Also, you must open a project to gain access to the Properties tab in AMC.
This chapter includes the following sections:
•
•
Note
Monitoring Activity
Bladelet Monitoring Property
The Bladelet Monitoring Property configures which events are stored for retrieval using the screen at Monitor > View Events. You can configure this property globally, or you can apply it to individual nodes.
How to Get There
Open a project, then go to Properties > Monitoring.
Action to Take
To configure the Monitoring Property, change events that you want monitored to True, then click the Submit button.
Message Log Domain
AON nodes are able to capture application log messages and store them in a database for later retrieval. This functionality requires you to complete the following tasks:
1.
2.
Upon completion of these steps, ADS users are able to use the Log bladelet to store messages in the database.
Create a Message Log Database
If you enable AON message logging, you can configure an external Oracle or Sybase database to store log messages. An existing Oracle database can be used for message logging. However, a Sybase database must have a specific configuration to be compatible with AON. For this reason, we recommend that you create a new database.
Step 1
Use one of the following for the Message Log Database:
•
You can create a separate Oracle 9i database for AON Message Logging.
•
You should create a separate Sybase 12.5.1 Adaptive Sever (database) for AON message logging, The requirements for this external database are summarized below.
–
–
–
Note
Step 2
Configure Message Log Domain Property
After a database as been configured, you can configure Message Log Domain Property. This is a device level property.
How to Get There
Open a project, then go to Properties > Application > Node. Select a node, then click the Edit Properties button.
Data to Enter
The Message Log Domain Property page includes the entries described in Table 3-1.
Adaptive Load Balancer
Adaptive Load Balancer is used to change the adaptive load balancing algorithm used by AON.
How to Get There
Open the System Project, then go to Properties > Application > Global.
Data to Enter
The Adaptive Load Balancing property page includes the entries described in Table 3-2.
Adjusting Quality and Performance
AON allows you to measure and control runtime control quality and performance for message types that you specify.
Caching
AON includes a built-in cache engine that can be used as a proxy cache or reverse proxy cache depending on where and in which administrative domain the cache is placed. Use the Caching Property to configure how the AON cache engine operates. This is a device-level property, and it is used in conjunction with PEPs that include the CacheData and RetrieveCache bladelets.
How to Get There
Open a project, then go to Properties > Application > Node. Select a node, then click the Edit Properties button.
Data to Enter
The Caching Property page includes the entries described in Table 3-3.
Application QoS
The Application QoS feature enables AON to prioritize message processing based on the differentiated services code point (DSCP) contained in the IP header. Use the QoSMapping page in AMC to define appropriate DSCP values for the following categories (listed in priority order):
•
•
•
•
•
These categories are available to PEP developers who use the Application QOS bladelet.
How to Get There
Open the System Project, then go to Properties > Application > Global, then select QoSMapping.
Actions to Take
Click the radio button for the property set you want to change, then click the Edit button. On the screen that follows, enter the new DSCP value and click the Submit button.
Fastpath
How to Get There
Open a project, then go to Properties > Application > (Global or Node) > Fastpath
Actions to Take
Use this page to change the HTTP port on which the node listens for messages to be processed by Fastpath. The default port is 5556.
Working with Message Content
AON allows you to work with the content of your messages based on properties that you set.
Content Parser
The content parser property specifies a Java class that implements a content parser to use for reading an input content and converting it to an equivalent XML content. This property can also specify a Java class to use to perform the transformation instead of using XSLT-based transformation.
Prerequisite
You must upload a content parser. See the "Managing Extensions" section.
How to Get There
Open a project, then go to Properties > Application > Node. Select a node, then click the Edit Properties button.
Data to Enter
The Content Parser Property page includes the entries described in Table 3-4.
Content Validation
A Content Validation application property imposes an external schema on an XML message that contains no predefined grammar declarations. This property is used when input XML does not contain any grammar declaration (XSD or DTD) but is expected to conform to a receiver point schema. It is also used when Input XML is transformed within AON and is expected to conform to a target schema.
How to Get There
Open a project, then go to Properties > Application > Node. Select a node, then click the Edit Properties button.
Data to Enter
The Content Validation property page includes the entries described in Table 3-5.
Working with XSL Transformation
This property configures AON to perform XSL transformation (XSLT). The Transformation property determines the document style sheet, target content type, and transformation package. This property can be configured globally or for individual nodes.
How to Get There
Open a project, then go to Properties > Application > (Global or Node and select a node), then click the Edit Properties button.
Data to Enter
The Transformation page includes the entries described in Table 3-6.
Controlling Message Delivery
Message delivery properties define the delivery characteristics associated with a message type. All message types have a default delivery property, which is specified when you create the message type in the ADS. After a message is classified, the delivery properties of that message are dictated by the delivery property associated with that message type. Message delivery properties must be configured in the following order:
1.
2.
3.
After you configure Send Properties and Delivery Semantics, synchronize ADS with the AMC to begin using the new delivery properties with message types.
Configuring Send Properties
The Send Properties page specifies how long a message type should wait for a timeout.
How to Get There
Open a project, then go to Properties > Application > (Global or Node). Then select Send Properties.
Data to Enter
The Delivery Notification property page includes the entries described in Table 3-7.
Configuring Delivery Semantics
The Delivery Semantics property specifies delivery properties for a message type. Use this property in conjunction with the Send Properties page to configure the delivery of messages.
Note
How to Get There
Open a project, then go to Properties > Application > (Global or Node and select a node). Then select Delivery Semantics.
Data to Enter
The Delivery Semantics page includes the entries described in Table 3-8.
Table 3-8 Delivery Semantics Property Entries
Name
Name of your choosing for this property.
Time to live
How long either request message or response message can stay in the system Specified in milliseconds.
Send Properties
Select a Send Property. See Configuring Send Properties for further details.
Actions to Take
Use the Edit List button to choose a delivery notification and connection property.
Binding Message Delivery Properties to a Message Type
After you configure message delivery properties in the AMC, the property is available to ADS users when they configure message types.
After you configure an Encoding profile, it is available to ADS users when they configure a message type.
Next Hop Domain
Next Hop Domain Property enables a device to forward all traffic using a specified protocol to a designated AON node. Next Hop Domain is a device-level property.
Note
Note
How to Get There
Open the System project, then go to Properties > Application > Node. Select a node, then click the Edit Properties button.
Data to Enter
The Next Hop Domain Property page includes the entries described in Table 3-9.
Node Capabilities
The Node Capabilities property enables you to configure message delivery persistence on a node. Node Capabilities is a device level property.
Note
How to Get There
Open the System Project, then go to Properties > Application > Node. Select a node, then click the Edit Properties button.
Data to Enter
The Node Capabilities property page includes the entries described in Table 3-10.
Working with Adapters
You can use AMC to control how adapters function within your AON implementation. You can also configure additional properties and extensions for each adapter. Adapters can only be configured in the System project. For more details about adapters, properties, and extensions, see the AON Programming Guide.
Adapter Registry
The Adapter Registry page enables you to manage the properties of both built-in and custom adapters. You can activate or deactivate an adapter, change the start-up mode, and change the protocol to be used by the adapter.
How to Get There
Open the System project, then go to Properties > Adapter.
Adapter Listener Domain
Adapter Listener Domain enables you to configure the listening parameters of an adapter. You can specify the port on which the adapter listens, and you can choose either clear or secure communication.
How to Get There
Open the System project, then go to Properties > Application > Adapter Listener Domain.
For more information about adapters, see the AON Programming Guide.
Service Profiles for Adapters
Service Profiles are used in conjunction with the development of custom bladelets and custom adapters. Available services include the following:
•
•
•
•
•
Developers can create profiles, which are sets of attributes that describe how the services listed above are implemented in custom bladelets or adapters. Profiles contain multiple named contexts for a service, and these profiles must be created in AMC in order for developers to access these contexts by name.
For more details about custom bladelets, custom adapters, and external services, see the AON Programming Guide.
How to Get There
Open a project, then go to Properties > Service Profiles.
Working with Message Transport
Encoding
The Encoding property enables you to configure AON nodes to compress outgoing traffic. After you configure an encoding property, that property is available to ADS users. When message types are configured, each message type can be associated with an encoding property.
How to Get There
Open the System project, then go to Properties > Application > Node. Select a node, then click the Edit Properties button.
Data to Enter
The Encoding property page includes the entries described in Table 3-11.
Configuring JMS Properties
Use JMS properties to configure the way AON nodes handle JMS messages. You must configure JMS properties in the following order:
3.
JMS Destination Property
The JMS Destination Property enables you to specify a new destination for JMS messages.
How to Get There
Open a project, then go to Properties > JMS > Node. Select a node, then click the Edit Properties button.
Data to Enter
The JMS Destination Configuration page includes the entries described in Table 3-12.
JMS Source Property
The JMS Source Property Page enables you to specify a new source for JMS messages. It requires you to specify a JMS Destination, which you should have configured in the previous section.
How to Get There
Open a project, then go to Properties > JMS > Node. Select a node, then click the Edit Properties button.
Data to Enter
The JMS Source Configuration page includes the entries described in Table 3-13.
JMS Reply To
The JMS ReplyTo property enables you to specify a new reply queue to be used by JMS clients.
How to Get There
Open a project, then go to Properties > JMS > Node. Select a node, then click the Edit Properties button.
Data to Enter
The JMS Reply To Property page includes the entries described in Table 3-14.
JMS Connections Property
How to Get There
Open a project, then go to Properties > JMS > Node. Select a node, then click the Edit Properties button.
Data to Enter
The JMS Connection Property page includes the entries described in Table 3-15.
Note
JMS Naming Property
Note
How to Get There
Open a project, then go to Properties > JMS > Node. Select a node, then click the Edit Properties button.
Data to Enter
The JMS Naming Property page includes the entries described in Table 3-16.
Step 3
Step 4
Step 5
Step 6
Step 7
Configuring Cisco AON Promiscuous Mode
Promiscuous mode (PMode) enables out-of-band message processing using a Cisco AON node. It provides the capability to receive and process messages without introducing latency in the flow of inline network traffic, supporting out-of-band monitoring and analysis.
Prerequisites for Promiscuous Mode
•
•
•
•
Information About Promiscuous Mode
Promiscuous mode allows for message traffic monitoring without affecting traffic flow. When promiscuous mode is enabled, message packets are duplicated in the node and forwarded, in the form of framed application messages, to a third-party application. The forwarded messages can be analyzed or otherwise processed. Figure 1 shows a sample runtime topology where an AON node is using PMode to forward traffic to a traffic analyzer.
Figure 1 Promiscuous Mode Sample Topology
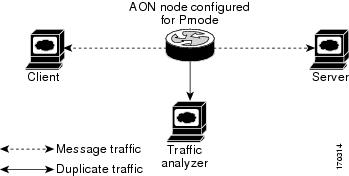
The sample topology shown in Figure 1 requires the following runtime components:
•
•
•
•
Pmode Deployment Options
You can run promiscuous mode both on AON-NM and on AON-SM.
When you use AMC to deploy PMode on an AON-NM, PMode is enabled, by default, on the external interface—with the option of changing to an internal monitoring interface. You can choose to use either of the interfaces, or set up a deployment that uses both interfaces simultaneously. For information on changing to an internal monitoring interface, see the section Enabling the Internal Interface on an AON-NM.
When you use AMC to deploy PMode on an AON-SM, PMode is enabled on Gigabit Ethernet 3, a deployment for which you must configure either SPAN or VACL for forwarding the traffic.
For copying traffic to AON, you can select from the following options:
•
•
Note
To configure RITE, see the following:
•
To configure either SPAN or VACL see the following:
•
•
Note
For information on SPAN and on VACL configurations, see the following documents:
•
•
Promiscuous Mode Enhancements
Beginning with AON Version 2.4, PMode provides the following enhancements:
Promiscuous Mode Support for UDP Packets
Pmode now has the ability to capture UDP packets. The feature is enabled by default; no further configuration is necessary.
Promiscuous Mode Support for Time-Based Interval Sampling
To configure time-based sampling, open a project and go to Properties > Adapter and select the pmode adapter. Click the Properties button, then choose the PmodeAdapter and click the New button. The page that loads includes three new elements, which are described in the following table:
How to Configure Promiscuous Mode
PMode configuration involves the following:
•
•
Enabling the Internal Interface on an AON-NM
This optional procedure is required only if you are enabling PMode on the internal interface of an AON-NM. To configure this, complete the following steps.
Step 1
aon-nm> configuration terminalEnter configuration commands, one per line. End with exit.Step 2
aon-nm(config)>aon monitoring interface internalStep 3
aon-nm(config)>exitConfiguring PMode Adapter on AMC
Activate the Cisco AON PMode adapter by performing the following steps.
Step 1
Step 2
Step 3
Step 4
Step 5
Configuring the PMode Adapter
To configure the PMode adapter and deploy the changes to the node, perform the following steps:
Step 1
Step 2
Step 3
Step 4
Step 5
Step 6
Step 7
Step 8

Warning
Step 9
Step 10
Step 11
Step 12
Step 13
Step 14
Step 15
Step 16
Once deployed, a message `Successfully deployed all configurations to the node' displays.
Loading the HTTP Extension
To load the HTTP extension, perform the following steps:
Step 1
Step 2
Step 3
Step 4
Enabling the HTTP Extension
To enable the HTTP Extension, perform the following steps:
Step 1
Step 2
Step 3
The PMode Adapter Extensions: Global Properties window displays.
Step 4
Step 5
The adapter extension is now activated.
Configuring HTTP Extension
To configure the HTTP Extension, perform the following steps:
Step 1
Step 2
Step 3
Step 4
Step 5
Step 6
Step 7
Step 8
Step 9
Step 10
Once deployed a message `Successfully deployed all configurations to the node' is displayed.
Step 11
Step 12
Step 13
Step 14
Step 15
Step 16
Step 17
Step 18
Step 19
Step 20
Step 21
Step 22
Step 23
Step 24
Step 25
Step 26
Step 27
Step 28
Step 29
Once the request is successfully deployed, a message `Successfully deployed configuration to node' displays.
Step 30
aon-node> enableaon-node# aon restart forceCAUTION! Stopping all AON processes!Are you sure[n]? y
Note
Connecting to Databases
Database properties enable AON to read and write to databases. For example, PEPs that use the Log bladelet need a database property that tells AON where to write log data. This is a global property.
How to Get There
Open a project, then go to Properties > Application > Global, then select Databases.
Data to Enter
The Database Property page includes the entries described in Table 3-18.
Actions to Take
After completing the entries, you can take one of the following actions:
•
Click Cancel to discard your changes and return to the previous screen.
 Feedback