Cisco Configuration Professional Express Quick Start Guide
Available Languages
Table of Contents
Cisco Configuration Professional Express Quick Start Guide
Downloading the Latest Cisco CP Express Files
Task 1: Configure the Router for Cisco CP Express
Copying the Default Configuration File to Router NVRAM
Configuring the Router for Cisco CP Express
Entering the Configuration Commands Manually
Task 2: Connect the PC to the Router
Task 3: Verify the Initial Configuration and Use Cisco CP Express
More Information About Cisco CP Express and About Your Router
Cisco Configuration Professional Express Quick Start Guide
First Published: August 2, 2017
This document explains how to start using Cisco Configuration Professional Express (Cisco CP Express) 3.4.
Cisco CP Express, a lightweight version of Cisco Configuration Professional, is an embedded device-manager that is available on the router flash memory. It can be used to configure some of the LAN and WAN interfaces and basic configurations of the router to bootstrap the router. By default, the Cisco CP Express is made available on the router flash memory.
This document is intended for users who have ordered the routers with one of the ordering options (SKU) listed in Table 1 . Refer to the Release Notes for Cisco Configuration Professional Express for information about supported routers and web browsers.
Cisco CP ordering options are provided to suit a variety of deployments. Table 1 describes the Cisco CP Express ordering options, the deployment each supports, and how this document can be used.

Note By default, the “None Selected” option is selected as the default configuration option and it is the same as the ISR-CCP-EXP ordering option.
Downloading the Latest Cisco CP Express Files
You can download the most recent version of the Cisco CP Express files from
https://software.cisco.com/download/release.html?i=!y&mdfid=281795035&softwareid=282159854&release=3.4&os
For more information, on installing and configuring Cisco CP Express, refer the Cisco CP Express 3.3 Administration Guide.
Task 1: Configure the Router for Cisco CP Express
This task section explains how to configure the router to support Cisco CP Express.
Note If your ordering option includes a configuration file in NVRAM, you can skip this section. The router is configured out-of-box to support Cisco CP Express.
Cisco CP Express requires these basic configuration in order to connect to the router and manage it.
- An http or https server that is enabled with local authentication.
- A local user account with privilege level 15 and accompanying password that is configured.
- Virtual Terminal Lines (VTY) line with protocol ssh/telnet that is enabled with local authentication. This is required for interactive commands.
There are two ways that you can ensure that the router configuration meets these requirements:
- You can copy the default configuration file from the router flash memory to the router NVRAM. All ordering options provide the default configuration file in the router flash memory. To use this method, see Copying the Default Configuration File to Router NVRAM.
- You can use the Cisco IOS CLI to enter necessary configuration commands. To use this method, see Entering the Configuration Commands Manually.
Copying the Default Configuration File to Router NVRAM
If you want to start with a factory default configuration that is designed to support Cisco CP Express, you can use the procedure in this section. The factory default configuration includes all commands necessary to support Cisco CP Express and configures an Ethernet interface with the IP address 10.10.10.1.
To copy the default configuration file from the router flash memory to NVRAM, perform these steps:
Step 1 Log on to the router through the Console port or through an Ethernet port.
Step 2 If you use the Console port, and no running configuration is present on the router, the Setup command Facility starts automatically, and displays this:
Enter no so that you can enter Cisco IOS CLI commands directly.
If the Setup Command Facility does not start automatically, a running configuration is present; therefore, proceed to Step 3.
Step 3 When the router displays the user EXEC mode prompt, enter the enable command, and the enable password, if one is configured, thus:
Step 4 To identify the default configuration file, enter the show flash command.
The filename is of the form cpconfig- modelnumber .cfg, where modelnumber represents the router series. For example, the configuration file name for the Cisco 860 and 880 series routers is cpconfig-8xx.cfg.Step 5 To copy the default configuration file to router NVRAM, enter the copy flash: nvram: command, as shown in this example:
When the default configuration file is in NVRAM, it becomes the router startup configuration.
Step 6 To make the new startup configuration the running configuration, so that the router can support Cisco CP Express, enter the copy startup-config running-config command, as shown in this example:
Configuring the Router for Cisco CP Express
This task section explains how to configure the router without a layer 3 interface to support Cisco CP Express.
Cisco CP Express requires these basic configuration in order to connect to the router and manage it.
- An http or https server that is enabled with local authentication.
- A local user account with privilege level 15 and accompanying password that is configured.
- VTY line with protocol ssh/telnet must be enabled with local authentication. This is needed for interactive commands.
You can use the Cisco IOS CLI to enter the necessary configuration commands. To use this method, see Entering the Configuration Commands Manually.
You can also copy the default configuration file from router Flash memory to router NVRAM. To use this method, see Copying the Default Configuration File to Router NVRAM.
Entering the Configuration Commands Manually
To enter the Cisco IOS commands manually, perform these steps:
Step 1 Log on to the router through the Console port or through an Ethernet port.
Step 2 If you use the Console port, and no running configuration is present on the router, the Setup command Facility starts automatically, and displays the following text:
Enter no so that you can enter Cisco IOS CLI commands directly.
If the Setup Command Facility does not start automatically, a running configuration is present; therefore, proceed with Step 3.
Step 3 When the router displays the user EXEC mode prompt, enter the enable command, and the enable password, if one is configured, as shown in this example:
Step 4 Enter config mode by entering the config terminal command, as shown in this example.
Step 5 Using the command syntax shown, create a user account with privilege level 15.
a. has a layer 3 interface, configure an IP address under an interface such fastethernet0 as shown in the example.
b. If your router does not have a layer 3 interface, configure the Vlan1 as show in the example.
If you are connecting the PC directly to the router, the PC must be on the same subnet as this interface.
Step 7 Configure the router as an http server for nonsecure communication, or as an https server for secure communication.
To configure the router as an http server, enter the ip http server command shown in this example:
To configure the router as an https server, enter the ip http secure-server command shown in this example:
Step 8 Configure the router for local authentication, by entering the ip http authentication local command, as shown in this example:
Step 9 Configure the http timeout policy as shown in this example:
Task 2: Connect the PC to the Router
This task section explains how to cable the PC to the router to perform initial configuration.
Note If you are setting up a new router, and want to use Cisco CP Express to give the router a basic configuration, use this section.
Cable the PC to the router as shown in Figure 1.
Figure 1 Connect the PC to the Router Using an Ethernet Cable

Figure 1 shows a general example. Use the information in Table 2 to connect the PC Ethernet port to the correct router Ethernet port.
Note If the router model you want to connect to does not appear in Table 2, see the router hardware installation guide for information.
Task 3: Verify the Initial Configuration and Use Cisco CP Express
This task section explains how to verify the initial configuration and start using Cisco CP Express.
Cisco CP Express is supported on these browsers:
To verify if Cisco CP Express is installed correctly, perform these steps:
Step 2 In the address bar, type the IP address of the router where Cisco CP Express is installed.
For example, type http://10.10.10.1 or https://10.10.10.1
Step 3 Specify the username and the password of the router.

If you are using the router for the first time, use the one-time username and password (by default, cisco/cisco) configured for the router.
Step 4 Click Log In.
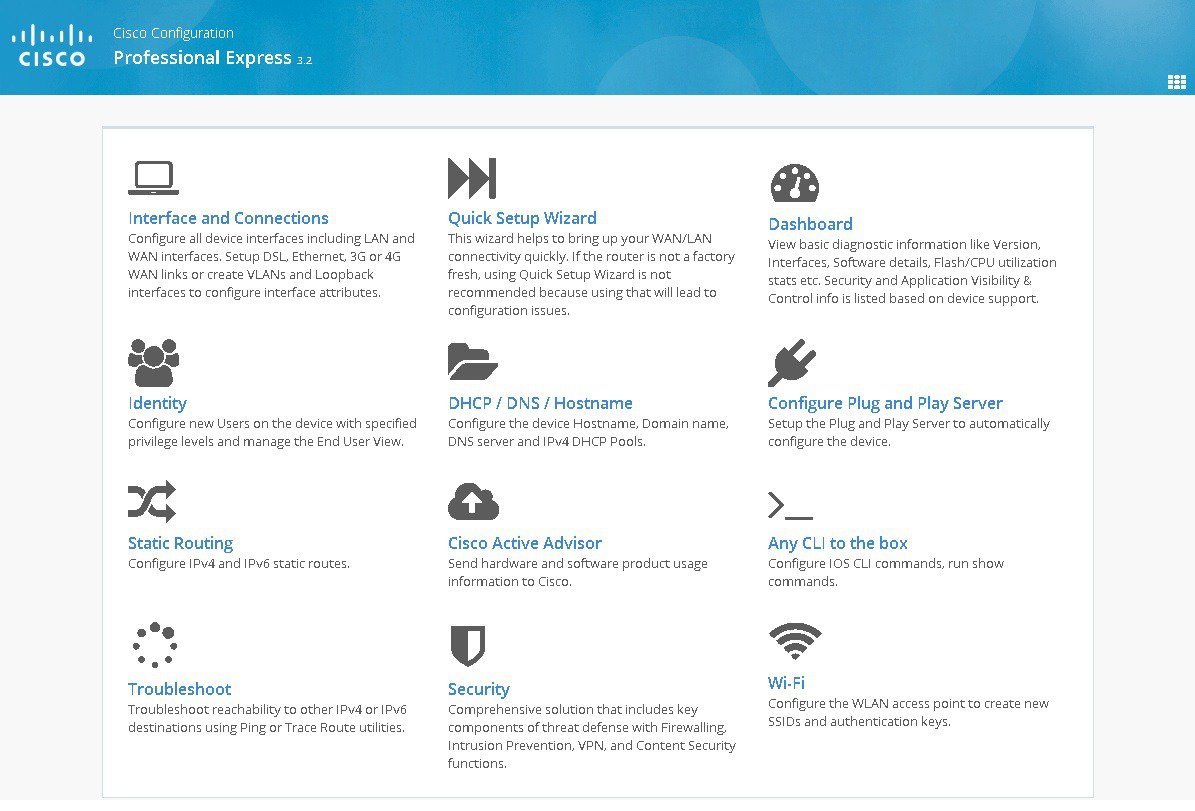
The Cisco CP Express launches and is ready for use.Figure 2 shows the Cisco CP Express page.
Figure 2 The Cisco CP Express page
Where to Go from Here
You can now continue to use Cisco CP Express to configure additional features or modify existing feature configurations.
More Information About Cisco CP Express and About Your Router
These additional documentation is available for Cisco CP Express:
- Cisco Configuration Professional Express Administration Guide
- Cisco Configuration Professional Express 3.4 Feature Guide
- Cisco Configuration Professional Express 3.4 Release Notes
Refer to the router’s Quick Start Guide for other procedures, such as connecting a PC to the router console port so that you can use the CLI when you need to, and using the router LEDs to verify installation. The router’s Quick Start Guide may also contain important warranty information.
Cisco Website
You can access the Cisco website at this URL:
Refer to the Quick Start Guide for the router you have just configured for information on obtaining other documentation, providing documentation feedback, and obtaining technical assistance.
Cisco and the Cisco logo are trademarks or registered trademarks of Cisco and/or its affiliates in the U.S. and other countries. To view a list of Cisco trademarks, go to this URL: www.cisco.com/go/trademarks . Third-party trademarks mentioned are the property of their respective owners. The use of the word partner does not imply a partnership relationship between Cisco and any other company. (1721R)
Any Internet Protocol (IP) addresses and phone numbers used in this document are not intended to be actual addresses and phone numbers. Any examples, command display output, network topology diagrams, and other figures included in the document are shown for illustrative purposes only. Any use of actual IP addresses or phone numbers in illustrative content is unintentional and coincidental.
 Feedback
Contact Cisco
- Open a Support Case

- (Requires a Cisco Service Contract)