Cisco Prime Service Catalog 12.0 Installation Guide
Bias-Free Language
The documentation set for this product strives to use bias-free language. For the purposes of this documentation set, bias-free is defined as language that does not imply discrimination based on age, disability, gender, racial identity, ethnic identity, sexual orientation, socioeconomic status, and intersectionality. Exceptions may be present in the documentation due to language that is hardcoded in the user interfaces of the product software, language used based on RFP documentation, or language that is used by a referenced third-party product. Learn more about how Cisco is using Inclusive Language.
- Updated:
- April 13, 2015
Chapter: Upgrading Prime Service Catalog
Overview
This chapter describes how to perform an upgrade from a previous release of Cisco Prime Service Catalog to this release.
Release Upgrade Path
This upgrade process supports direct database component upgrade from Service Catalog Release 10.1 or above to Release 12.0. To bring the database schema to the supported upgrade level, the database installer program for the most recently available service pack, as listed in Table 5-1 below, has to be executed against the database.
If you are upgrading from releases prior to 11.0, first upgrade your installation to release 11.0 using the 11.0 installer. Then without starting the Prime Service Catalog instance, run the 12.0 installer to upgrade the instance to release 12.0.
Limitations and Notes
The following section includes product limitation or important notes that should be considered when upgrading to this version.
New Platform Support
Please refer to the Cisco Prime Service Catalog Compatibility Matrix for changes in platform support in this release.
Highlights of the new platforms are:
- For release to release upgrade, use a new folder as installation directory, instead of using the default directory. You can continue using an existing database.
- Make sure KEK_New.txt and Kek_Old.txt files are saved. And while upgrading to the latest installer you will be prompted to provide kek_new.txt, the file should be provided to continue the installation. If KEK doesn’t match you will not be able to start the PSC.
- Operating System: Prime Service Catalog 12.0 will only support Windows Server 2012 R2 and Red Hat Enterprise Linux Server 7.2. If your existing Prime Service Catalog installation was done on a different Windows or Linux Operating System, make sure that you set up new machines with the newly supported Operating System, and prepare the machines with all the necessary prerequisites.
- SQL Server: If your existing database is on SQL Server 2008, you must perform the tasks described in the Preparing the Upgrade Environment section, prior to running the upgrade for Prime Service Catalog.
- Oracle: If your existing database is on Oracle 11g, you must perform the tasks described in the Preparing the Upgrade Environment section, prior to running the upgrade for Prime Service Catalog.
- Audit Log Data: Before the upgrade, migrate the Audit Log data from previous release Prime Service Catalog 10.1/11.0 to Prime Service Catalog 12.0. For more information, see Migrating the Audit Log Data section.
After the upgrade is completed, disable the Change Data Capture feature as detailed in Step 8 of the Performing Post-upgrade Tasks.
- WebSphere: WebSphere Application Server is no longer supported. Please contact Cisco TAC if you have WebSphere, and is interested in upgrading to Prime Service Catalog 12.0.
- Oracle Java: Oracle JDK 8 Update 91 (or higher update) must be used for WildFly on Windows Operating System. You must install Oracle JDK 8 Update 91 (or higher update) on your machine prior to running the upgrade for Prime Service Catalog.
- OpenJDK: Red Hat OpenJDK 8 (version 1.8.0_91 or higher 1.8.0_x) must be used for WildFly on Red Hat Enterprise Linux Operating System. You must install OpenJDK 1.8.0_91 (or higher 1.8.0_x) on your machine prior to installing Prime Service Catalog.Browser: Please refer to the Cisco Prime Service Catalog Compatibility Matrix for a list of new browsers that are supported for this release of Prime Service Catalog.
Rating Facet
If you have an existing facet with display name as Rating, make sure that you rename this facet before upgrading. This is to avoid conflict with the new Rating facet available in Cisco Prime Service Catalog 12.0.
New JDBC Drivers
New JDBC drivers for Oracle and SQL Server are shipped with this release of Prime Service Catalog. More details are described in the Preparing the Upgrade Environment section.

Note If you have any customization that makes use of the newScale unified driver, it has to be replaced with the appropriate JDBC driver based on the database type.
Service Import/Export Not Backwards Compatible
Service Import/Export is not backwards compatible to previous releases. Services exported in prior releases cannot be imported to this release. Please be sure to export any services you maintain in a code repository after the upgrade is complete.
Catalog Deployer Packages Not Backwards Compatible
Due to the change in the XML format in Catalog Deployer in Release 12.0, packages in “Deployed” or “Received for Deployment” status are no longer usable. The content also may not render. For this reason, all packages pending deployment should be processed before upgrading to Release 12.0.
What is Upgraded
The upgrade process outlined in this chapter upgrades Service Catalog software as well as the Service Catalog database to support new capabilities provided in Service Catalog. These capabilities include more stringent control over data and referential integrity, ensuring enhanced data quality of the Service Catalog database.
What is Not Upgraded
The upgrade process identifies all objects in the existing database that are not recognized as part of the application schema.
- Unrecognized objects are automatically removed from the database, if they interact with any Service Catalog tables. For examples, the following objects (if they exist) will be dropped:
– An unrecognized index on a Service Catalog table.
– An unrecognized trigger on a Service Catalog table.
– An unrecognized constraint on a Service Catalog table.
– An unrecognized foreign key constraint that points to a Service Catalog table.
- All other types of unrecognized objects that do not interact with Service Catalog tables will only be reported and not dropped. For examples, the following objects (if they exist) are left alone: tables, columns, sequences, stored procedures, functions, and indexes that do not reference Service Catalog tables, constraints that do not affect Service Catalog tables.
Assumptions and Best Practices
- You must create and validate database backups and file system backups before upgrading. This is critical because you can rollback an upgrade only by restoring your databases and file system manually; no rollback function is built into the upgrade program.
- The production site will be down during the upgrade process, so you should schedule the upgrade for maintenance periods.
- You are upgrading from 10.0 or later. See the Release Upgrade Path.
Prerequisites
- A sandbox environment for upgrade.
- Database backups and a well-rehearsed restore process.
- A complete list of all customizations (custom style sheets, JavaScript libraries, LDAP Java mapping code, and so on.)
- All databases should meet the requirements as stated in the Configuring the Service Catalog Database.
High-Level Upgrade Procedure
Your organization most likely has already developed an upgrade methodology for Service Catalog solutions or has best practices for other enterprise software upgrades. The methodology described in this guide is useful to either follow as an alternate or to augment your established practices for specific new upgrade requirements.
We recommend that you create a sandbox environment where you rehearse a dry run of the upgrade procedures for your existing Service Catalog system. Take notes of any technical issues and resolutions that may arise along the way. This will help you prepare for the actual upgrade of your production system. This dry run exercise will also provide you with an overall timeline of the upgrade process from beginning to end, which can help you plan the appropriate system downtime needed to complete the upgrade of your production system.
Once you can successfully upgrade the system in your sandbox environment and feel comfortable with the process, you can schedule the upgrade of your production system, and repeat the same process by following the instructions in this guide, in conjunction with the technical notes that you prepared during the dry run exercise.
At a high level, the upgrade procedures are as follows:
Step 1 Back up the current production databases and restore them onto another set of databases.
Note You must restore your database backups onto a brand new SQL Server 2012 SP3 database or an Oracle 12c database.
Step 2 Create a sandbox environment that has all the prerequisites for Release 12.0, including new version of application server, Java and JDBC driver. This is the environment where you will be executing the upgrade program from the Release 12.0 package and needs to be configured to connect to the copy of production databases.
Step 3 Execute the Service Catalog setup program as described in the Installing Prime Service Catalog on WildFly Application Server. On the Service Catalog Database panel of the installation wizard, enter the connection information for the copy of the production database.
Step 5 Click Upgrade Existing Database.
Step 6 Click Validate Schema .
Step 7 Click View Errors. If any schema errors in your database are reported, work with your database administrator and application programmer to fix the schema errors. Some schema errors may come with a suggested SQL command to fix the error, which you can discuss with your DBA and application programmer to see if it is applicable for your error condition. Others may require that you consult with the Cisco Technical Assistance Center (TAC) to come up with an appropriate fix. Document all of the validation errors and resolutions you encounter.
Step 8 Click Validate Schema iteratively after each time you fix the validation errors, until there are no more errors reported .
Step 10 Click View Errors. If any data errors in your database are reported, work with your database administrator and application programmer to fix the errors in the data. There are two types of data errors—Validation Errors and Auto-Repairable Errors. Some validation errors may come with a suggested SQL command to fix the error, which you can discuss with your DBA and application programmer to see if it is applicable for your error condition. Others may require that you consult with the Cisco Technical Assistance Center (TAC) to come up with an appropriate fix. Document all of the validation errors you encounter and the resolutions that you come up with.
Step 11 Click Validate Data iteratively after each time you fix the validation errors, until no Validation Errors are reported. It is OK to have some Auto-Repairable Errors. They will be programmatically fixed in the next step.
Step 12 Click Repair Database . This function will programmatically fix all Auto-Repairable Errors reported in the previous step.
Step 13 When the repair database function completes, click Next to complete the remaining pages of the Service Catalog installation wizard.
Step 14 After the installation wizard completes the upgrade installation, reapply any necessary customizations on your sandbox environment.
Step 15 Perform user acceptance testing for the upgraded system in the sandbox environment.
Step 16 Gather all of the technical notes that you have created along the way.
Step 17 At this point, if you feel that you are still not comfortable with the upgrade process, you may want to clean up your sandbox environment, and repeat all steps one more time in the sandbox environment. This time, follow the instructions in this guide, in conjunction with the technical notes that you have documented so far.
Step 18 When you are ready, repeat the entire upgrade process on your production environment.
Upgrading Prime Service Catalog
Several platforms have been de-supported since Release 12.0. Therefore, review Release Upgrade Path to find out whether you need to upgrade the versions of the database, application server, Java, web server, or Operating System, prior to upgrading Prime Service Catalog.
If the platform that your existing Service Catalog is running on is no longer supported, you need to prepare a new environment for one of the newly supported platforms, as described in Chapter 2, “Installation Requirements”.
Upgrading Service Catalog involves:
- Performing preupgrade tasks while the current version of the application is up and running
- Preparing a sandbox environment that meets the newly supported platforms and prerequisites for the Service Catalog Release 12.0 installation
- Running the Service Catalog installation wizard and selecting Upgrade Existing Database.
- Validating the integrity of preupgrade database, and repairing any schema or data issues found
- Performing post-upgrade tasks
The upgrade procedures are described in more detail in the following sub-sections:
- Performing Preupgrade Tasks
- Preparing the Upgrade Environment
- Run the Installation Wizard to the Validation Page
- Validating Database
- Validating Schema
- Validating Data
- Repairing the Database
- Completing Installation
- Performing Post-upgrade Tasks
Performing Preupgrade Tasks
Perform the following mandatory preupgrade tasks on your production environment.
Step 1 If you do not have the Advanced Reporting module, proceed to Step 2. Otherwise, you need to perform several preupgrade tasks for the Advanced Reporting module, as described in the Performing Preupgrade Tasks for Reporting. Perform only the preupgrade steps for the Advanced Reporting module, then return to this section, and complete the rest of the procedures outlined here.
Step 2 If there are application server version changes, the unprocessed messages residing in the JMS queues for Service Link will not be migrated automatically to the new application servers. Prior to upgrade, you should check that there are no unprocessed messages in the queues and resolve any that may be present. Once the queues are clear, stop all Service Link agents, so that you have a chance to verify Service Link communication before any agent is restarted after upgrade.
Step 3 Catalog Deployer does not support deploying packages between different release levels of Service Catalog. Therefore, prior to upgrade, ensure that you have deployed all assembled packages that are ready for deployment. Otherwise, you will not be able to deploy them after your database is upgraded to Release 12.0. Furthermore, as you approach the time for the upgrade, for any new package that you assemble in your current system, you might want to include the release version of Service Catalog in the description. This will make it easier for you to identify different release versions of packages.
Step 4 An optional activity that may be included in the preupgrade checklist is to review the list of deployed packages. You may want to export and delete the packages that no longer need to be maintained online. Since these packages can no longer be deployed (once the upgrade has taken place), keeping them online is useful only for querying deployment history. By deleting these packages, you recover space in the database. Such clean-up activities can be conducted in all systems (development, test/QA, and production).
Step 5 Stop all Service Catalog services on the application server.
Step 6 Back up all Service Catalog databases. Make sure that you back up all Service Catalog-related databases if you have more than one. For example, in addition to the Service Catalog database, you may have a separate Data Mart database or Content Store database (which is used by Cognos). If so, you need to back up all databases.
Step 7 Back up all customization scripts or files. The upgrade process will not preserve any customizations on your existing installation. Therefore, after the upgrade, you may need to reapply some or all of these customizations on your system if they are still applicable.
Step 8 Back up the installation directory. Back up the directory where you originally installed the Service Catalog software.
Step 9 Migrate the Audit Log Data. See Migrating the Audit Log Data.
Step 10 Proceed to the Preparing the Upgrade Environment section below.
Migrating the Audit Log Data
To migrate the Audit Log data from an older release (such as 10.1 on Oracle 11g) to the current release(12.0 on Oracle 12c), the CDCADMIN schema should be imported into the current release.
Before the upgrade process, run the following commands to create the appropriate table spaces in the current release:
1. create table space cdc_tbsp
After executing the above commands, ensure that the RCUser schema is prepared in the same name as was used earlier, and then import the Audit Log data into the CDCADMIN schema, which was created now.
Preparing the Upgrade Environment
Skip this section if you are ready to perform the upgrade on your production environment.
In this section, you will be creating a sandbox environment which you will use to perform the dry run exercise for the upgrade process. Once you are comfortable with the upgrade process and are armed with the technical notes that you have collected during the dry run exercise, you can then begin the upgrade procedures on the actual production system.
Perform the mandatory preuprade tasks in Performing Preupgrade Tasks.
To prepare a sandbox environment:
Step 1 Restore the production database backups onto another set of databases. If you have enabled Audit Logs in Service Catalog Version 10.1 in your SQL Server environment, execute the following commands to display Audit Log records when restoring database during an upgrade from Service Catalog Version 10.1 to 12.0:
Note Audit Logs are displayed by default for database backup operations during a direct upgrade of Service Catalog 10.1 to Service Catalog 12.0.
Step 2 If you are using Oracle DBMS, it is recommended that you execute recompile the statistics for each database after it is restored. This step is essential for enhancing the performance of upgrade processes on large databases. Make sure that you meet all the requirements as described in the “Configuring Oracle” section of Chapter 3.
Step 3 If your database is SQL Server, you must activate the READ_COMMITTED_SNAPSHOT by performing the following:
a. Connect to your SQL Server as the “sa” user, and set the SQL Server in single-user mode.
b. Execute the following commands. Replace <database_name> with the name of your RequestCenter database.
ALTER DATABASE < database_name > SET READ_COMMITTED_SNAPSHOT ON
ALTER DATABASE <database_name> SET COMPATIBILITY_LEVEL=110
c. Put the SQL Server back in multiuser mode.
Step 4 Grant the additional permissions for the database user "CPSCUser", as described in the Configuring Databases section in Chapter 1. If you are not sure that "CPSCUser" has all of the necessary permissions for this release, you can execute the commands described in the Configuring Databases section again; these commands can be executed multiple times without causing any issues.
Step 5 Review the list of supported platforms and the prerequisite information as described in Cisco Prime Service Catalog Compatibility Matrix . If your platform is no longer supported, then make sure that for the sandbox environment, install the correct versions of application server, web server and JDK on a supported Operating System.
Step 6 Read through all the instructions in the Preinstallation Tasks for WildFly to see if you need to reconfigure or adjust any settings in your existing application server environment. There may be new jar files that you need to copy, or new settings that you need to add for this release of Prime Service Catalog.
Step 7 Proceed to the Run the Installation Wizard to the Validation Page section below.
Run the Installation Wizard to the Validation Page
Perform the following steps to run the installation wizard:
Step 1 Run the Service Catalog installation wizard as described in the Installing Prime Service Catalog on WildFly Application Server for a Typical and Custom installation.
Step 2 On the Service Catalog Database panel of the installation wizard, enter the values for the database.
Step 3 Click Next to proceed to the next page of the wizard.
The Existing Installation Detected dialog box appears, as shown in Figure 5-1 below.
Figure 5-1 Existing Installation Detected
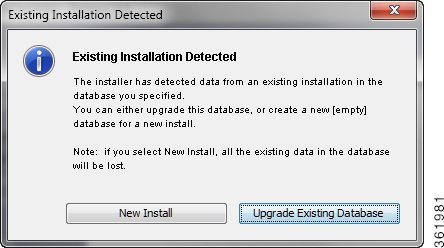
Step 4 Click Upgrade Existing Database.
The Validation page of the installation wizard appears.
The Service Catalog installation wizard will not allow you to upgrade an existing database until it has been successfully validated and repaired. The Validation page is designed so that the functions are executed in sequential order:
You cannot execute Validate Data without having executed Validate Schema at least once. You cannot execute Repair Database without having executed Validate Data at least once.
You can execute each function multiple times. However, each time that you execute Validate Schema, the program reinitializes as if you start the validation process from the beginning. For example, let’s say you have just completed Validate Data. You can proceed with Repair Database. But, instead you choose to execute Validate Schema again. Because you execute Validate Schema, the system is reinitialized, and thus after you complete Validate Schema, you cannot jump to Repair Database. You must execute Validate Data next.
Step 5 Proceed to the Validating Database section below.
Validating Database
Skip this section and proceed to the Validating Schema section if you are already familiar with the database validation process during the Prime Service Catalog upgrade. You can always come back to review this section when the Validate Schema and Validate Data steps return any error.
The functions on the Validation page verify the integrity of your existing schema and database. The results for all validation scripts are stored in a table called SchValidationLog in the database. See the SchValidationLog Table for instructions to view this log file. All possible validation entry ErrorLevels and their descriptions are shown in Table 5-2 below.
As described in Table 5-2 above, only validation entries with ErrorLevel= “error”, as shown in the Validation Errors table when you click View Errors for the Validate Schema or Validate Data function, must be manually fixed. All other validation errors, reported in the SchValidationLog t able, are automatically handled.
After you manually fix all validation entries with ErrorLevel= “error”, click the same Validate function again to verify that no more errors are reported. It is possible that as a result of your manual fixes, new validation errors may appear. If this happens, you have to repeat the Validate function again, and fix the validation errors, iteratively.
We recommend that you review and address validation errors by doing so iteratively first for all schema validation errors, and then for all data validation errors. This methodology reduces the chance of regression errors you may encounter by mixing schema validation error fixes with data validation error fixes.
SchValidationLog Table
The results for all validation scripts, regardless of whether validation errors were found or not, are stored in a table called SchValidationLog in the database.
To view the SchValidationLog table:
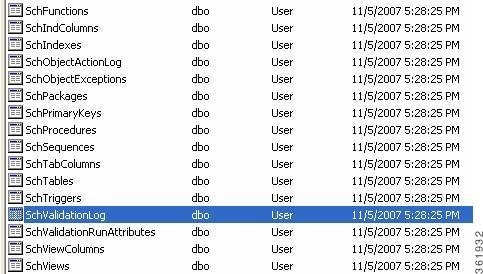
Step 1 Connect to your database as the schema owner (that is, CPSCUser), and browse the table SchValidationLog to view the validation results. You can use a utility like SQL Analyzer (Figure 5-2) or SQL*Plus to connect to your database.
Figure 5-2 Browse SchValidationLog Table
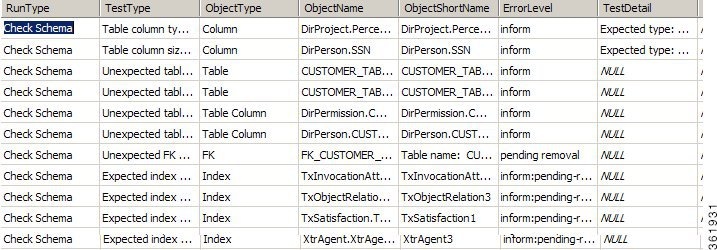
Step 2 Open the SchValidationLog table to view its contents (Figure 5-3).
Figure 5-3 SchValidationLog Contents
Step 3 Check the ErrorLevel column in the SchValidationLog table for the following values and take the recommended actions.
Step 4 Your SchValidationLog table may contain a lot of entries. Thus, you may want to use the following SQL command to filter the contents:
SELECT * FROM SchValidationLog WHERE ErrorLevel= “error”
Include the WHERE clause “ ErrorLevel= ‘error’” if you just want to see the validation errors that you must fix manually before you can proceed with the upgrade process. Exclude that WHERE clause, or change the value “error” to another value (such as “inform: auto-repairable”; see Table 5-2 for more information) if you want to view other entries in the SchValidationLog table.
Notes about the RunType column in the SchValidationLog table:
Validating Schema
Perform the following steps to validate schema:
Step 1 Click Validate Schema .
If the schema validation test completes without validation errors, a “Completed” message appears.
If no errors are reported, proceed to the Validating Data.
If the schema validation test completes with validation errors, a “Completed with errors” message appears.
The Validation Errors window appears. Resize the window to see the complete table, as shown in the example below (Figure 5-4).
Figure 5-4 Validation Errors (Validate Schema)
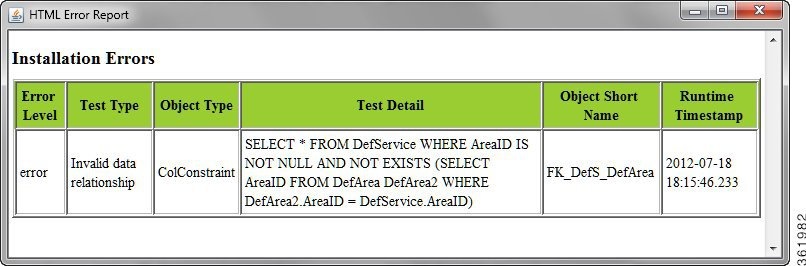
Step 3 You need to manually fix the errors shown in the Validation Errors table before continuing the upgrade process. See the Validating Database for more information.
Step 4 When all validation errors have been fixed iteratively, proceed to the Validating Data section below.
Validating Data
Perform the following steps to validate data:
If the data validation test completes without validation errors, a “Completed” message appears.
If no errors are reported, proceed to the Repairing the Database.
If the data validation encounters validation errors, then a “Completed with errors” message appears.
The Validation Errors window appears.
Step 3 You need to manually fix the errors shown in the Validation Errors table before continuing the upgrade process. See the Validating Database for more information.
Step 4 When all validation errors have been fixed iteratively, proceed to the Repairing the Database section below.
Repairing the Database
Perform the following steps to repair the database:
Step 1 Click Repair Database .
When the database has been repaired a “Completed” message appears,
Step 2 (Optional) Click View Errors.
The Validation Errors window appears. Resize the window to see the complete table.
Note that the Validation Errors are only with ErrorLevel= “inform:auto-repaired” that are fixed programmatically by the Repair Database function.
Step 3 Proceed to the Completing Installation section below.
Completing Installation
You have validated and repaired your database, and are now ready to proceed with the upgrade.
Step 1 Click Next to proceed to the next page of the Service Catalog installation wizard.
Step 2 Continue to run the installation wizard as described in the Installing Prime Service Catalog on WildFly Application Server.
When you click Install on the Pre-Installation Summary page of the installation wizard, the installer proceeds to execute the upgrade scripts to modify your database schema and contents. Depending on the size of your database, the upgrade scripts may take a long time to run. After the upgrade scripts modify the database schema and contents, the installer proceeds to create the WAR files. Follow the same procedures described in Postinstallation Tasks for WildFly section to deploy the WAR files for the Service Catalog product.
Step 3 Once you finish the deployment of the WAR files, and are able to start up the application servers, you have essentially completed the upgrade process. Your Service Catalog application is now at Release 12.0. At this time, if you wish, you can take a backup of the databases and the installation directory. If you are using Oracle DBMS, it is recommended that you again execute recompile statistics for the upgraded databases in order to improve the system runtime performance.
Performing Post-upgrade Tasks
To perform post-upgrade tasks:
Step 1 Where necessary, recreate custom database objects that were deleted from the database by the installer.
Step 2 Any custom code must be compatible with the new version of the JDK:
Step 3 Service Import/Export is not backward compatible with previous releases. Services exported in prior releases cannot be imported into Release 12.0. If you have maintained any Services export files in a code repository prior to upgrade, then you may want to export them again, and mark them for Release 12.0.
Note Users imported from a different database (for example, using Catalog Deployer) must reset their passwords for logging into the application. This is because the Key Encryption Key is different for different databases.
Step 4 Follow procedures your organization has used in the past to re-implement all customizations for the application.
Step 5 Connect to the Service Catalog application as an administrative user. Navigate to the “Administration” module, and click the Settings tab. Under Customizations Settings, look for “Browser Cache” (as shown in Figure 5-5).
Figure 5-5 Enable Browser Cache Setting

Step 6 Click the Enabled radio button for the “Browser Cache” setting. Click the + button located to the right of the Version text box. This will increment the Version number by one. Then click Update. This setting will notify the users to clear their browser cache when they connect to the Service Catalog URL for the first time after the Service Catalog system is upgraded.
Step 7 The master key password files kek_new.txt and kek_old.txt, located under the <ServiceCatalog_Install_Dir>/dist directory, must be backed-up to a secure location.
Step 8 After the Audit Log data has been migrated, disable the Change Data Capture feature provided by the database vendor, as Prime Service Catalog 12.0 no longer uses this feature.
The next chapter describes the procedures for upgrading the Cognos component of the Reporting module. If your preupgrade Service Catalog system included the Reporting module, then you must continue with the next chapter to complete the upgrade process for the Cognos component so that the Reporting module will work for Release 12.0.
 Feedback