Cisco Prime Service Catalog 12.0.1 Installation Guide
Bias-Free Language
The documentation set for this product strives to use bias-free language. For the purposes of this documentation set, bias-free is defined as language that does not imply discrimination based on age, disability, gender, racial identity, ethnic identity, sexual orientation, socioeconomic status, and intersectionality. Exceptions may be present in the documentation due to language that is hardcoded in the user interfaces of the product software, language used based on RFP documentation, or language that is used by a referenced third-party product. Learn more about how Cisco is using Inclusive Language.
- Updated:
- April 13, 2015
Chapter: Installation on WildFly Application Server
Setting Up WildFly Application Server
Cisco Prime Service Catalog is bundled with the WildFly-8.2.0.Final software distribution. If you select WildFly as the application server on the installation wizard, the installer will automatically install and deploy the WildFly software on the same machine where you are running the installer. You do not need to install the WildFly Application Server software as a prerequisite. We recommend that you let the Service Catalog installer install the WildFly software for you. The Cisco Prime Service Catalog installer will automatically install the WildFly Application Server and deploy the Service Catalog applications.
The WildFly application server can be configured in both standalone and cluster setup. The subsequent sections in this chapter describes various deployment topologies for WildFly Application Servers.
You can choose to install the Service Catalog and Service Link in two separate virtual machines using the Standalone Custom option. Always install the Service Catalog node first, followed by Service link on the second virtual machine. The Service Catalog node will have the WildFly application server instance with Service Catalog installation folder. To install Service Catalog and Service Link on the same virtual machine, either choose the Standalone Typical option or Standalone > Custom > Both options. In this case, the installer will create single WildFly instance with Service Catalog and Service Link folder under the WildFly application server. For setting up Prime Service Catalog in standalone mode for both Typical and Custom type, see Setting Up WildFly Standalone Application Server.

Note Standalone Typical is recommended only for a demo or test system.
For setting up Wildfly application server in cluster for the failover scenarios, see Setting Up WildFly Clustered Application Servers.
The JMS service is configured in the WildFly server where the Service Link component application resides.
Follow the instructions in the Preinstallation Configuration for WildFly section of this chapter to prepare your machine. Then after you execute the Cisco Prime Service Catalog installer, follow the Postinstallation Configuration for WildFly section of this chapter to verify your installation.
Preinstallation Tasks for WildFly
This section contains instructions for preparing your computer, prior to installing Prime Service Catalog with WildFly application server.
Th is release of Prime Service Catalog supports WildFly Application Server on the following Operating Systems, web servers, and Java Development Kit:
Preinstallation Checklist
- Review the Installation Requirements to ensure that you have adequately addressed the minimum hardware and software requirements for running the system.
- Ensure that you have performed the database tasks described in the Configuring the Service Catalog Database, and completed the Database Information Worksheet.
- Ensure that you have performed the preinstallation tasks for your type of application server and completed the Application Server Information Worksheet in Appendix A, “Worksheets” .
- The Cisco Prime Service Catalog installer requires Java 1.8. For the prerequisite details, see “Installing Java” section.
- If you are on a Windows Operating System, stop the IIS web server.
- Extract the electronic software distribution file that you downloaded from the Cisco web site to your computer, if you have not already done so. For more information, see Downloading Prime Service Catalog Software Image.
- Add the %JAVA_HOME%\bin (or $JAVA_HOME/bin if you are on Linux) to the beginning of the PATH environment variable on your machine, where %JAVA_HOME% points to the correct JDK directory.
- The Cisco Prime Service Catalog installer is a GUI program. On Linux Operating System, you will need a graphical display, such as X-window. The installer does not support console mode or CLI mode.
- During the installation, you will be asked to specify the destination directory for the software.
On Windows, the default destination directory is "C:\CiscoPrimeServiceCatalog".
On Linux, the default destination directory is "/opt/CiscoPrimeServiceCatalog". Ensure that there is at least 2 GB free disk space in the destination directory; otherwise, the installer will display the following error message:
- During installation, the installer requires an additional 2 GB of free disk space in the TMP directory, where it extracts some temporary files. The TMP directory is different for different Operating Systems and/or user profiles.
On Windows, the TMP directory is the %TMP% or %TEMP% environment variable for the user profile.
On Linux, the TMP directory is usually either /tmp or /var/tmp directory.
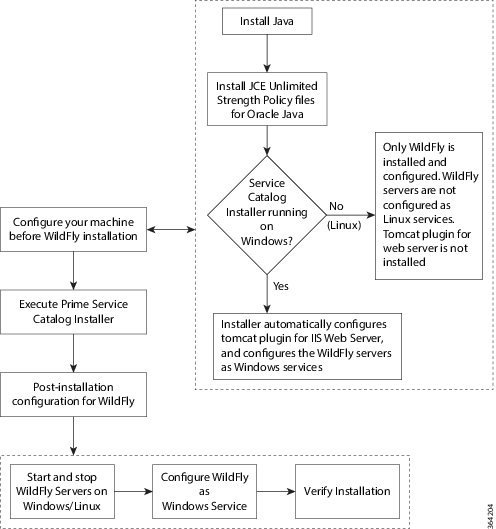
WildFly Installation Flow
The following figure illustrates steps to install Prime Service Catalog on WildFly Application Server.
Figure 4-1 Installation Flow for WildFly Application Server
Installing Java
In this section, you will install JDK as a prerequisite, and prepare the environment variables on your computer.
Note If you are on Windows Server, you must install Oracle JDK as a prerequisite, plus the JCE Unlimited Strength Policy jar files. If you are on Red Hat Enterprise Linux Server, you must install Red Hat OpenJDK as a prerequisite. You don't need JCE Unlimited Strength Policy jars for Red Hat OpenJDK.
Oracle JDK
Step 1 Download Oracle JDK 8 Update 77 (or higher Update) from the Oracle website. Ensure that you download the correct version of JDK 8. Only Update 77 or later is supported.
Note During the installation, the installer prompts for the Java path and this prompt appears only for WildFly, and not for WebLogic. However the installer does not use the JAVA_HOME path that you enter in this screen to launch its own Java process, but uses the Java executable that it finds in the PATH environment variable of the Operating System.
Step 2 Copy the unlimited strength JCE policy files to the %JAVA_HOME%\jre\lib\security directory, overwriting the existing files. The unlimited strength policy files are "local_policy.jar" and "US_export_policy.jar", which can be downloaded from the following link:
http://www.oracle.com/technetwork/java/javase/downloads/jce8-download-2133166.html
Step 3 Add the <path_to_oracle_jdk_1.8_java_executable> to the PATH environment variable. You may have multiple Java installation on your machine. Make sure that the path to the Java executable for Oracle JDK 1.8.0_x is first in the PATH environment variable. This is what the Prime Service Catalog installer will use when it is first launched.
Note By default, after successful installation of JDK 1.8, the value C:\ProgramData\Oracle\Java\javapath is updated in the path variable (environment variables). You must remove this manually and add the appropriate installed java folder.
For example:
set JAVA_HOME=C:\jdk1.8.0_77
set PATH=%JAVA_HOME%\bin;%PATH%
Red Hat OpenJDK
Step 1 Install OpenJDK on your Red Hat Enterprise Linux Server by executing the "yum install java-1.8.0-openjdk-devel" command.
Note You must have Red Hat license and subscription in order to do "yum install".
Step 2 Add the <path_to_openjdk_1.8_java_executable> to the PATH environment variable. You may have multiple Java installation on your machine. Just make sure that the path to the Java executable for OpenJDK 1.8.0_x is first in the PATH environment variable. This is what the Prime Service Catalog installer will use when it is first launched.
For example:
– export JAVA_HOME=/usr/lib/jvm/java-1.8.0-openjdk-1.8.0.85-2.6.1.2.el7_1.x86_64
– export PATH=$JAVA_HOME/bin:$PATH
Preparing IIS Web Server
If you are running the Service Catalog installer on a Windows Operating System, the installer can automatically configure the tomcat plugin for the IIS web server, and configure the Wildfly servers as Windows services. The options for "Configure IIS" and "Configure windows services" are presented on the installation wizard, and you can select or deselect each option as you desire.
If you want the Service Catalog installer to configure the tomcat plugin for the IIS web server, then you need to perform the following prerequisite tasks:
- Install IIS on the same Windows Operating System where you plan to execute the installer.
-
Add the following role services for IIS: ISAPI Extensions, ISAPI Filters.
For more information on adding role services, see the IIS documentation on www.iis.net . - Stop the World Wide Web Publishing Service prior to executing the Service Catalog installer.
- You will be prompted to enter the name of the IIS web site. You can enter either "Default Web Site" or the name of another web site. If you enter the name of another website, then you must create that website as a prerequisite.
If you are running the Service Catalog installer on a Linux Operating System, then the installer will install only the WildFly software. It will not configure the tomcat plugin for the Http web server, and will not configure the WildFly servers to run as Linux services.
Downloading Prime Service Catalog Software Image
In this section, you will download the electronic software distribution for Prime Service Catalog.
Step 1 Access the Cisco product download web site and authenticate with the user name and password provided to you.
Step 2 Search by product name, or navigate within the product selector to locate the product you want to download. (Navigation: Downloads Home > Products > Cloud and Systems Management > Service Catalog > Prime Service Catalog).
Step 3 A list of different releases is displayed. Locate Prime Service Catalog 12.0.1 and click it.
Step 4 Click the Prime Service Catalog Software link. Then click the link for the appropriate operating system.
Step 5 Download file CPSC_12.0.1_win.zip for the Windows Operating System, or file CPSC_12.0.1_linux.tar.gz for the Linux Operating System.
Note If you are installing the Prime Service Catalog 12.0.1 Virtual Appliance, you need to click the link called VMware for Operating System, then download the OVA file. Do not use this guide for installation instructions. Refer to the Prime Service Catalog Quick Start Guide for the installation instructions for the Virtual Appliance.
Step 6 Extract the software image to a directory on your application server machine.
Note The CPSC_12.0.1_linux.tar.gz file must be untarred using a GNU-compatible tar utility. Older tar utilities may have problems unzipping tar files that contain filenames longer than 100 characters.
Installing Prime Service Catalog on WildFly Application Server
After your WildFly environment is prepared, proceed to configure WildFly application server in one of the following modes:
Setting Up WildFly Standalone Application Server
Prime Service Catalog standalone installation provides two installation types —Typical and Custom. The Typical installation performs a streamlined installation using default settings. It requires a smaller footprint as the three foundational application components—Service Catalog application, Service Link application, and JMS service—are hosted on the same application server. Typical installation is commonly used when setting up a sandbox environment.
The Custom installation allows you to configure a different deployment topology and to apply custom changes to the application. Using the custom option, you can choose to install only the Service Catalog component application on your computer, only the Service Link component application on your computer, or both Service Catalog and Service Link component applications together on the same computer.
When you choose to install both component applications together on the same computer, the installer will always create only one WildFly server instances, for both Service Catalog and Service Link component.
The JMS service is configured in the WildFly server where the Service Link component application resides.
- Have separate tablespaces for definitional data, transactional data and indexes (for Oracle Only)
- Add custom content to the RequestCenter.war
- Recreate the RequestCenter.war or ISEE.war files without executing any database scripts
- For WildFly, the Custom mode allows the user to install "Service Catalog only", "Service Link only" or "both"
For information about performing an upgrade installation, see Chapter 6, “Upgrading Prime Service Catalog”.
Before You Begin
Verify all the other preinstallation tasks are completed before proceeding with the installation. The preinstalltion tasks are summarized in Preinstallation Checklist.
Procedure
Step 1 Launch the web interface installation wizard.
- On Windows Operating System, log in as a user with administrator rights and double-click setup.cmd.
- On Linux Operating System, log in as the root user and execute./setup.sh from a graphical interface, such as X-window.
Step 2 When the Introduction panel appears, click Next.
Step 3 In the Choose Install Folder panel, enter a directory path (or click the Choose button to select a directory) as the destination folder for Service Catalog, and click Next.
- On Windows, the default value for destination folder is C:\CiscoPrimeServiceCatalog.
- On Linux, the default value is /opt/CiscoPrimeServiceCatalog. The value for destination directory must not contain any space character.
Throughout this document, this destination folder is referred to as <ServiceCatalog_Install_Dir>. For WildFly, this directory is also where the Service Catalog installer installs and configures the WildFly Application Server software.
Step 4 On the Application Server Selection panel, select the application server WildFly and click Next.
Step 5 On the Setup Mode Selection panel, select Standalone radio button and click Next .
Step 6 Depending on your requirements, select one of the following and click Next.
- Typical . Use the typical installation if you want to perform a streamlined installation using default settings. Service Catalog application, Service Link application, and JMS service—are hosted on the same application server.
- Custom . Use the custom installation if want to customize various aspects of the installation rather than accepting the defaults.
Step 7 (For Custom Installation Type Only) Select a component in the Component Selection panel and click Next.
The Custom installation mode for WildFly allows you to install
- only the Service Catalog server,
- only the Service Link server, or
- both Service Catalog and Service Link servers on the same computer.
The custom installation type allows you to install Service Catalog and Service Link on different virtual machines or on the same virtual machine.
Step 8 On the Database Selection panel, select a database platform (Microsoft SQL Server or Oracle) and click Next.
The subsequent panels may look different depending on which database platform you select at this point. Refer to the Database Information Worksheet that you filled out in Appendix A to determine your database platform.
Step 9 On the Service Catalog Database Creation panel:
- If you have not created the database in advance, select Yes. By selecting Yes , you are telling the installer to create the database automatically for you. In the next panel, you will be prompted for the information that the installer will use to create the database user and database schema for Service Catalog. Refer to the Database Information Worksheet for the description of each field on this panel.
- If you have already created your database, then select No. In the next panel, you will be prompted for the information of the existing database user and database schema. Refer to the Database Information Worksheet for the description of each field on this panel. (If you are performing an upgrade installation, you must select No. Refer to Chapter 7: Upgrading Prime Service Catalog for more detailed information).
Step 10 On the Service Catalog Database panel, enter the information for the Service Catalog database.
- If you selected Yes in Step 9, you will see a Create Database button on this panel, and the Next button is grayed out.
Notice that you need to enter the password for either the “sys” user (for Oracle) or the “sa” user (for SQL Server) which the installer will use to connect to your database server. Once you enter the information on this panel, click Create Database. If you get the message “ Service Catalog database created successfully ,” click OK to close the message. The Next button is now enabled.
- If you selected No in Step 9, enter the details of the existing Service Catalog database, and select the Execute database scripts check box.
Note The “Create Database” feature creates a very basic Service Catalog database that meets the minimum requirements for the Service Catalog application to operate. This feature is recommended for a Demo or Test system. For a Production system, contact your DBA in advance, to create the Service Catalog database which meets all of the product requirements as described in the Configuring Databases section, as well as any performance, reliability, and security requirements that adhere to your corporate policy.
Step 11 Click Next to continue.
The installer connects to the database to validate the required settings for the database. If the installer created the database for you, then it would meet all of the required settings, and the validation test would pass. If you provided the information for an existing database, then the installer may report a validation error if any database setting is missing. See the Software Requirements for the database requirements. If a database validation error occurs, you can do the following:
- Close the error dialog and click Cancel to exit the installation wizard, or
- Fix the missing database setting on a separate database connection session. Then come back to this screen, close the error dialog, and click Next again. At this point, the installer will repeat the validation test, and if the test passes, it will let you move to the next panel.
Step 12 On the Master Key Password panel, enter the master key password.
As part of the security requirement, a master key password must be provided that would be used to encrypt all the passwords that are available in the application. The password provided must match the password rules, as described on the panel.
The master key password is saved in two files, kek_new.txt and kek_old.txt, under the <ServiceCatalog_Install_Dir>/dist directory. The kek_new.txt and kek_old.txt files must be backed up and stored in a safe location. The application server cannot login to the ServiceCatalog database without the master key password files. If you lose these master key password files, please contact Cisco TAC for help.
Step 13 On the Choose Java Virtual Machine panel, select the correct Java JDK version 1.8.0_x from the list or click the Search Another Location button to navigate to the correct location of Java JDK version 1.8.0_x on your computer and click Next.
Note You must specify the location of Java for WildFly because the installer will install the WildFly Application Server software on your computer, and it will set the JAVA_HOME variable in the WildFly configuration to use this particular Java.
Step 14 On the Service Catalog Configuration panel, do the following and click Next .
- Enter the information for the WildFly server where the Service Catalog application (i.e. RequestCenter.war) will be deployed. Refer to the Service Catalog Configuration Table for WildFly for the description of each field on this panel.
- (For Custom Installation Type Only) Click the Advanced Options button. Enter the information on the Advanced Options window, see Advanced Options Table for Service Catalog Configuration panel for reference and click Close.
- Click the Change Ports button if you want to change any of the default port numbers assigned to the WildFly server for Service Catalog Configuration panel for reference and click Close.
Step 15 On the Service Link Configuration panel, do the following and click Next .
- Enter the information for the WildFly server where Service Link application (i.e. ISEE.war) will be deployed. Refer to the Service Link Configuration Table for WildFly for the description of each field on this panel
- Click the Change Ports button if you want to change any of the default port numbers assigned to the WildFly server for Service Link and click Close.
Step 16 On the Messaging Configuration panel, enter the information for the JMS Queue server and click Next .
Refer to the Messaging Configuration Table for the description of each field on this panel.
Note The JMS Queue server will always be installed on Service Link server.
Step 17 On the Service Catalog Administration Configuration panel, enter the information for the SMTP server, and the password for the Site Administrator. Refer to the Service Catalog Administration Configuration Table for the description of each field on this panel. Click Next.
Step 18 Click Install in the Pre-Installation Summary panel to begin installation.
The installer will display the progress bar. It may take up to 30 minutes for the installer to complete. Do not interrupt or abort the installer during this process.
Step 19 If the installation process completes successfully, the Install Complete panel appears. Click Done to exit the installation wizard.
Step 20 Configure the web server.
If you selected the Configure IIS option on both the Service Catalog Configuration panel and the Service Link Configuration panel during the installation, then the IIS web server on your VM was automatically configured by the Prime Service Catalog Installer to point to the WildFly servers. You can connect to the Service Catalog UI with the following URL:
http://<web_server_host>: port/RequestCenter,
<web_server_host> is the IP address of your VM.
If you are on Linux operating system, then the Prime Service Catalog Installer does not automatically configure the web server for you. You have to install either the Apache web server or the IIS web server (on a Windows machine) and configure it to point to the WildFly server for Service Catalog.
Refer to the Configure Web Server for WildFly document for instructions on how to configure web server.
Next Steps
Perform Postinstallation Tasks for WildFly.
Setting Up WildFly Clustered Application Servers
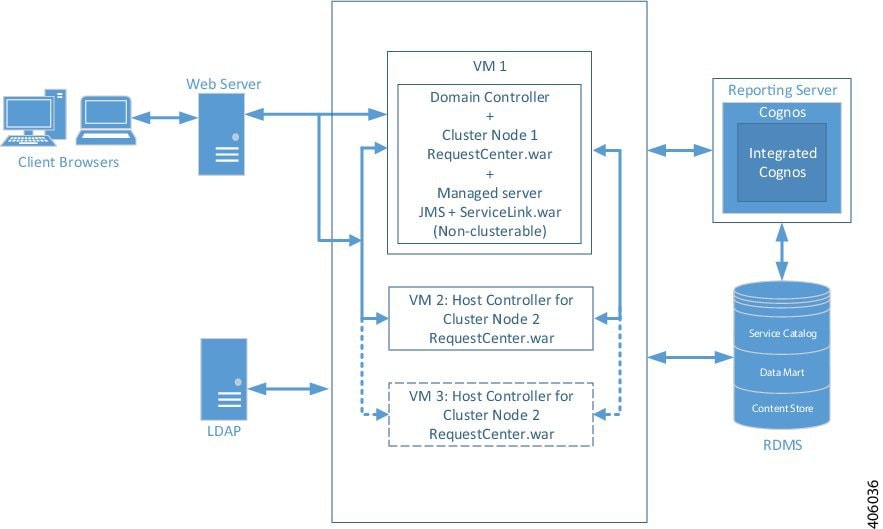
The Prime Service Catalog WildFly cluster configuration comprises of a Domain Controller, Service Link with JMS service, and two Host Controllers for cluster nodes - Host 1 and Host 2 that host the RequestCenter.war file.
A two node cluster means that there are two horizontal nodes (i.e. two separate hosts) that belong to a WildFly cluster configuration. The user can start with two nodes, and add more nodes (i.e. more hosts) to the cluster, if desired. The Prime Service Catalog Installer will support only up to 6th node for the cluster. To add a 7th node or more, please contact Cisco TAC for manual instructions.
Note Only the Host Controllers that host the RequestCenter.war can be configured as clusters. Service Link application with JMS service cannot be deployed in a cluster. JMS service resides with the Service Link server.
Prime Service Catalog installer supports two types of cluster topologies for WildFly application server.
- Two VM Topology . Requires minimum of two virtual machines: In this configuration, first virtual machine includes a Domain Controller, Service Link Component, and host controllers for the Host 1. Second virtual machine includes only an host controller for the Host 2. For more information on setting this type of cluster, see Performing WildFly Cluster Installation for Two VM Topology.
- Four VM Topology . Requires a minimum of four virtual machines: In this configuration, first virtual machine is for the Domain Controller, second virtual machines for the Service Link Component with JMS service, third virtual machine is for the host controller for the Host 1, and fourth virtual machine is for the host controller for the Host 2. For more information on setting this type of cluster, see Performing WildFly Cluster Installation for Four VM Topology.
Note After you initiate the installation of a particular topology type, you cannot modify the configurations at a later stage. You can only add new nodes for the host controllers.
Performing WildFly Cluster Installation for Two VM Topology
Note This is an overview procedure for setting up two VM topology and the detailed setup instructions are described in the subsequent sections. To complete the setup, you must perform all the steps described in this overview procedure.
In the two VM topology, Domain Controller, Host Controller for Host 1, Service Link application with JMS service are installed on the first virtual machine and Host Controller for Host 2 is installed on the second virtual machine. The two VM topology diagram is shown below.
Before You Begin
Verify all the other preinstallation tasks are completed before proceeding with the installation. The preinstalltion tasks are summarized in Preinstallation Checklist.
Procedure
Step 1 Prepare the database server.
Make sure database server meets all the requirements. For more information, see Configuring the Service Catalog Database, and completed the Database Information Worksheet .
Step 2 Prepare the virtual machines.
Make sure both the virtual machines meet all the hardware and software requirements. For more information, see the Installation Requirements. Plan the requirements such that Host 1 and Host 2 can include the following components:
- Host 1: Domain Controller, Host Controller 1 for Service Catalog, Service Link and JMS
- Host 2: Host Controller 2 for Service Catalog
Step 3 Set up Host 1. For more information on how to set up the Host 1, see the instructions in Setting Up the Host 1 in Two VM Topology procedure.
Step 4 Set up Host 2. For more information on how to set up the Host 2, see the instructions in Setting Up the Host 2 in Two VM Topology procedure.
Step 5 Install the Web Server.
Install the Apache web server, and configure it to point to the Cluster WildFly server group where RequestCenter.war was deployed. You must have a web server that acts as a load balancer on top of the cluster. All client connection to Service Catalog must go through the web server. Thus, the URL for Service Catalog will be
http://<web_server_host>:<web_server_port>/RequestCenter
You can install the web server on its own VM, or if you'd like, you can install it on any of the existing VM because it won't interfere with the configuration of the other components that you have already installed in the previous steps.
Note Prime Service Catalog Installer does not install or configure the web server. You have to install the web server on your own. For configuring the Apache web server as a common web server for Service Catalog and Service Link, see Setting Up Apache Web Server on WildFly.
If you selected the "Configure Windows Service" option during the installation, stop all the WildFly servers on VM1, VM2 and start them up again as windows services.
To stop the WildFly servers on VM1 or VM2, open the Command Prompt window, where startServiceCatalogCluster.cmd is running, and press Control-C to stop the process and start the windows service called - Cisco Prime Service Catalog .
Step 6 (Optional) Add another node to the cluster.
If you want to add a third node to the cluster, repeat Step 4 for setting up Host 3. After setting up Host 3, modify the Plugin settings for the web server that you set up in Step 5, so that it is aware of the third cluster node.
Note You can execute the Prime Service Catalog Installer to add up to a 4th node to the cluster. If you want to add a 7th node or more, you need to contact Cisco TAC for manual instructions.
Setting Up the Host 1 in Two VM Topology
Step 1 On the machine designated for Host 1, launch the web interface installation wizard:
- On Windows Operating System, log in as a user with administrator rights and double-click setup.cmd.
- On Linux Operating System, log in as the root user and execute./setup.sh from a graphical interface, such as X-window.
Step 2 When the Introduction panel appears, click Next to begin.
Step 3 In the Choose Install Folder panel, enter a directory path (or click the Choose button to select a directory) as the destination folder for Service Catalog, and click Next.
- On Windows, the default value for destination folder is C:\CiscoPrimeServiceCatalog.
- On Linux, the default value is /opt/CiscoPrimeServiceCatalog. The value for destination directory must not contain any space character.
Throughout this document, this destination folder is referred to as <ServiceCatalog_Install_Dir>.
For WildFly, this directory is also where the Service Catalog installer installs and configures the WildFly Application Server software.
Step 4 On the Application Server Selection panel, select the application server as WildFly and click Next. The subsequent panels may look different depending on which application server you select at this point. Refer to the Application Server Information Worksheet that you filled out in Appendix A.
Step 5 On the Setup Mode Selection panel, select Cluster setup radio button and click Next .
Step 6 On the Node Type Selection panel, select Cluster-ready complete installation radio button and click Next.
This option will install the Domain Controller, Host Controller for Host 1, Service Link and JMS on the Host 1.
Step 7 On the Database Selection panel, select a database platform (Microsoft SQL Server or Oracle) and click Next. The subsequent panels may look different depending on which database platform you select at this point. Refer to the Database Information Worksheet that you filled out in Appendix A to determine your database platform.
Step 8 On the Service Catalog Database Creation panel:
By selecting Yes , you are telling the installer to create the database automatically for you. In the next panel, you will be prompted for the information that the installer will use to create the database user and database schema for Service Catalog. Refer to the Database Information Worksheet for the description of each field on this panel.
- If you have already created your database or if you want to upgrade to an existing database, then select No.
In the next panel, you will be prompted for the information of the existing database user and database schema. Refer to the Database Information Worksheet for the description of each field on this panel. (If you are performing an upgrade installation, you must select No. Refer to Chapter 7: Upgrading Prime Service Catalog for more detailed information).
Step 9 On the Service Catalog Database panel, enter the information for the Service Catalog database.
- If you selected Yes in Step 8, you will see a Create Database button on this panel, and the Next button is grayed out.
Notice that you need to enter the password for either the “sys” user (for Oracle) or the “sa” user (for SQL Server) which the installer will use to connect to your database server. Once you enter the information on this panel, click the Create Database. If you get the message “ Service Catalog database created successfully ,” click OK to close the message. The Next button is now enabled.
- If you selected No in Step 8, you just need to fill out the information for the existing Service Catalog database, and select the Execute database scripts check box.
Note The “Create Database” feature creates a very basic Service Catalog database that meets the minimum requirements for the Service Catalog application to operate. This feature is recommended for a Demo or Test system. For a Production system, contact your DBA in advance, to create the Service Catalog database which meets all of the product requirements as described in the Configuring Databases section, as well as any performance, reliability, and security requirements that adhere to your corporate policy.
Step 10 Click Next to continue. The installer connects to the database to validate the required settings for the database. If the installer created the database for you, then it would meet all of the required settings, and the validation test would pass. If you provided the information for an existing database, then the installer may report a validation error if any database setting is missing. See the Software Requirements for the database requirements. If a database validation error occurs, you can do the following:
- Close the error dialog and click Cancel to exit the installation wizard.
- Fix the missing database setting on a separate database connection session. Then come back to this screen, close the error dialog, and click Next again. At this point, the installer will repeat the validation test, and if the test passes, it will let you move to the next panel.
Step 11 In the Master Key Password panel, enter the master key password, if you selected Yes in step 8. Otherwise, enter the path to an existing KEK file that contains the Master Key Password for the existing database that you want to upgrade
As part of the security requirement, a master key password must be provided that would be used to encrypt all the passwords that are available in the application. The password provided must match the password rules, as described on the panel.
The master key password is saved in two files, kek_new.txt and kek_old.txt, under the <ServiceCatalog_Install_Dir>/dist directory. The kek_new.txt and kek_old.txt files must be backed up and stored in a safe location. The application server cannot login to the ServiceCatalog database without the master key password files. If you lose these master key password files, please contact Cisco TAC for help.
Step 12 On Choose Java Virtual Machine panel, select the correct Java version for your platform. Click the Search Another Location button to navigate to the correct location of Java on your computer and click Next.
Note You must specify the location of Java for WildFly because the installer will install the WildFly Application Server software on your computer, and it will set the JAVA_HOME variable in the WildFly configuration to use this particular Java.
Step 13 On the Service Catalog Configuration panel, enter the information for the WildFly server (IP address of this machine, i.e, Host 1) where the Service Catalog application (i.e. RequestCenter.war) will be deployed. Refer to the Service Catalog Configuration Table for WildFly for the description of each field on this panel. Click Next.
Step 14 On the Service Link Configuration panel, enter the information for the WildFly server (IP address of this machine, i.e, Host 1) where Service Link application (i.e. ISEE.war) will be deployed. Refer to the Service Link Configuration Table for WildFly for the description of each field on this panel. Click Next.
Step 15 On the Messaging Configuration panel, enter the information for the JMS Queue server and click Next. Refer to the Messaging Configuration Table for the description of each field on this panel.
Remember the Queue password value that you would fill in the Messaging Configuration panel, as you need to enter same password when you install the 2nd node on VM 2 later.
Step 16 On the Service Catalog Administration Configuration panel, enter the information for the SMTP server, and the password for the Site Administrator. Refer to the Service Catalog Administration Configuration Table for the description of each field on this panel. Click Next.
Step 17 Click Install in the Preinstallation Summary panel to begin installation.
The installer will display the progress bar. It may take up to 30 minutes for the installer to complete. Do not interrupt or abort the installer during this process.
Step 18 If the installation process completes successfully, the Install Complete panel appears. Click Done to exit the installation wizard.
Step 19 Start the Domain Controller and all managed servers on the Host 1.
Note • For the first time after the installation, each WildFly server must be started as an application by executing the start script provided by Cisco, as also described in this step. DO NOT use the windows service called Cisco Prime Service Catalog to start the server.
- This start script will create the content folder and generate necessary files in the installation directory. After this is done, then from the next time you can directly start the servers as windows service.
To start the cluster services for the first time on any of the nodes, do the following:
a. Access the <ServiceCatalog_Install_Dir>\bin directory.
b. Execute the following command to start the Domain Controller, Service Catalog, and Service Link:
This command will automatically start a total of 4 JVM processes on the Host 1:
- The Domain Controller
- The Process Controller
- A managed server for Service Catalog. This managed server belongs to a cluster server group called “main-server-group”. (Note that for this configuration, there is no need to have a separate Host Controller server since the Domain Controller will also act as a Host Controller for the managed server.)
- A managed server for Service Link. This managed server belongs to another server group called “other-server-group”. JMS is configured on this server.
Step 20 Deploy RequestCenter.war and ISEE.war on Host 1. To start the cluster services for the first time on VM1, do the following:
a. Access the <ServiceCatalog_Install_Dir>\bin directory.
b. Execute the following command to the RequestCenter.war:
This command will push the RequestCenter.war to the cluster server group.
At this point, RequestCenter.war is deployed into a cluster server group called “main-server-group”. This cluster server group already contains one managed server. Thus, RequestCenter.war will be deployed immediately to the managed server for Service Catalog.
ISEE.war is deployed into a server group called “other-server-group”. This server group already contains one managed server. Thus, ISEE.war will be deployed immediately to the managed server for Service Link.
You can start and stop individual servers in a cluster. For information on the other start and stop scripts available with the installer for the WildFly cluster environment, see WildFly Scripts. To stop the domain controller and all the managed servers on Host 1, execute the shutdownAllOnHC1 script to stop both the domain controller, process controller, and the managed server for Service Catalog and Service Link.
Proceed to setting up the second node in the cluster. See Setting Up the Host 2 in Two VM Topology.
Setting Up the Host 2 in Two VM Topology
Step 1 On the machine designated for Host 2, launch the web interface installation wizard:
- On Windows Operating System, log in as a user with administrator rights and double-click setup.cmd.
- On Linux Operating System, log in as the root user and execute./setup.sh from a graphical interface, such as X-window.
Step 2 When the Introduction panel appears, click Next to begin.
Step 3 In the Choose Install Folder panel, enter a directory path (or click the Choose button to select a directory) as the destination folder for Service Catalog, and click Next.
- On Windows, the default value for destination folder is C:\CiscoPrimeServiceCatalog.
- On Linux, the default value is /opt/CiscoPrimeServiceCatalog. The value for destination directory must not contain any space character.
Throughout this document, this destination folder is referred to as <ServiceCatalog_Install_Dir>.
For WildFly, this directory is also where the Service Catalog installer installs and configures the WildFly Application Server software.
Step 4 On the Application Server Selection panel, select the application server as WildFly and click Next. The subsequent panels may look different depending on which application server you select at this point. Refer to the Application Server Information Worksheet that you filled out in Appendix A.
Step 5 On the Setup Mode Selection panel, select Cluster setup radio button and click Next .
Step 6 On the Node Type Selection panel, select Host Controller Node radio button and click Next.
Step 7 On the Host Controller Selection panel, select Host2 radio button and click Next.
Note Host 1 is the first node where Domain Controller, Service Link were installed. Second machine is the Host 2 in this cluster topology, so it is important that you select Host 2 here.
Step 8 Enter the Domain Controller IP Address to establish connection to the first machine where domain controller is installed.
Step 9 On Choose Java Virtual Machine panel, select the correct Java version for your platform. Click the Search Another Location button to navigate to the correct location of Java on your computer and click Next.
Note You must specify the location of Java for WildFly because the installer will install the WildFly Application Server software on your computer, and it will set the JAVA_HOME variable in the WildFly configuration to use this particular Java.
Step 10 On the Service Catalog Configuration panel, enter the information for the WildFly server (IP address of this machine, i.e, Host 2) where the Service Catalog application (i.e. RequestCenter.war) will be deployed. Refer to the Service Catalog Configuration Table for WildFly for the description of each field on this panel. Click Next.
Step 11 On the Messaging Configuration panel, enter the information for the JMS Queue server and click Next. Refer to the Messaging Configuration Table for the description of each field on this panel.
In the Queue password field, enter the same password that you entered for "Queue password" during the installation of the Domain Controller on Host 1.
Step 12 On the Service Catalog Administration Configuration panel, enter the information for the SMTP server, and the password for the Site Administrator. Refer to the Service Catalog Administration Configuration Table for the description of each field on this panel. Click Next.
Step 13 Click Install in the Preinstallation Summary panel to begin installation.
The installer will display the progress bar. It may take up to 30 minutes for the installer to complete. Do not interrupt or abort the installer during this process.
Step 14 If the installation process completes successfully, the Install Complete panel appears. Click Done to exit the installation wizard.
Step 15 Start the Host Controller for Host 2.
Note • For the first time after the installation, each WildFly server must be started as an application by executing the start script provided by Cisco, as also described in this step. DO NOT use the windows service called Cisco Prime Service Catalog to start the server.
- This start script will create the content folder and generate necessary files in the installation directory. After this is done, then from the next time you can directly start the servers as windows service.
To start the cluster services for the first time on any of the nodes, do the following:
a. Access the <ServiceCatalog_Install_Dir>\bin directory.
b. Execute the following command to start the Domain Controller, Service Catalog, and Service Link:
The Host Controller will in turn, automatically start the managed server that belongs to the server group “main-server-group”. Since RequestCenter.war was already deployed in the “main-server-group” on the Domain Controller, it will also be automatically deployed onto this managed server.
You can start and stop individual servers in a cluster. For information on the other start and stop scripts available with the installer for the WildFly cluster environment, see WildFly Scripts. To stop the host controller for VM2, execute the forceStopeAllOnHC script to stop both the process controller and the managed server for Service Catalog.
Set up web server. See Step 5 of Performing WildFly Cluster Installation for Two VM Topology.
Performing WildFly Cluster Installation for Four VM Topology
Note This is an overview procedure for setting up four VM topology and the detailed setup instructions are described in the subsequent sections. To complete the setup, you must perform all the steps described in this overview procedure.
In the four VM topology, Domain Controller, Host Controller for Host 1 and Host 2, Service Link application with JMS service are installed on separate virtual machines. The four VM topology diagram is shown below.

Before You Begin
Verify all the other preinstallation tasks are completed before proceeding with the installation. The preinstalltion tasks are summarized in Preinstallation Checklist.
Procedure
Step 1 Prepare the database server.
Make sure database server meets all the requirements. For more information, see Configuring the Service Catalog Database, and completed the Database Information Worksheet .
Step 2 Prepare the virtual machines.
Make sure all the virtual machines meet all the hardware and software requirements. For more information, see the Installation Requirements. Plan the requirements such that following can be installed on each of the VMs:
- VM1: Domain Controller
- VM2: Service Link and JMS
- VM3: Host Controller 1 for Service Catalog
- VM4: Host Controller 2 for Service Catalog
Step 3 Set up VM 1 as Domain Controller. For more information on how to set up domain controller, see the instructions in Setting Up the Domain Controller Node (VM 1) in a Four VM Topology.
Step 4 Set up VM 2 for Service link and JMS. For more information on how to set up Service Link and JMS node, see the instructions in Setting Up the Service Link and JMS Node (VM 2) in a Four VM Topology.
Step 5 Set up VM3 as Host Controller 1 for Service Catalog. For more information on how to set up Host Controller 1 for cluster nodes, see the instructions in Setting Up Host Controller and Service Catalog For Cluster Nodes in a Four VM Topology.
Step 6 Set up VM4 as Host Controller 2 for Service Catalog. For more information on how to set up Host Controller 2 for cluster nodes, see the instructions in Setting Up Host Controller and Service Catalog For Cluster Nodes in a Four VM Topology.
Step 7 (Optional) Set up VM5 as Host Controller 2 for Service Catalog. For more information on how to set up Host Controller 2 for cluster nodes, see the instructions in Adding Subsequent Host Nodes Manually in WildFly Cluster.
Step 8 Install the Web Server.
Install the Apache web server, and configure it to point to the Cluster WildFly server group where RequestCenter.war was deployed. You must have a web server that acts as a load balancer on top of the cluster. All client connection to Service Catalog must go through the web server. Thus, the URL for Service Catalog will be
http://<web_server_host>:<web_server_port>/RequestCenter
You can install the web server on its own VM, or if you'd like, you can install it on any of the existing VM because it won't interfere with the configuration of the other components that you have already installed in the previous steps.
Note Prime Service Catalog Installer does not install or configure the web server. You have to install the web server on your own. For configuring the Apache web server as a common web server for Service Catalog and Service Link, see Setting Up Apache Web Server on WildFly.
If you selected the "Configure Windows Service" option during the installation, stop all the WildFly servers on VM1, VM3, VM4 and start them up again as windows services.
To stop the WildFly servers on these WildFly servers, open the Command Prompt window, where startServiceCatalogCluster.cmd is running, and press Control-C to stop the process and start the windows service called - Cisco Prime Service Catalog
Step 9 (Optional) Add another node to the cluster.
If you want to add a third node to the cluster, repeat Step 5 for setting up Node 3. After setting up Node 3, modify the Plugin settings for the web server that you set up in Step 8, so that it is aware of the third cluster node.
Note You can execute the Prime Service Catalog Installer to add up to a 6th node to the cluster. If you want to add a 7th node or more, see section Adding Subsequent Host Nodes Manually in WildFly Cluster.
Proceed to setting up the domain controller node on VM1. See Setting Up the Domain Controller Node (VM 1) in a Four VM Topology.
Setting Up the Domain Controller Node (VM 1) in a Four VM Topology
Step 1 On the machine designated for installing Domain Controller (in this case VM 1), launch the web interface installation wizard:
- On Windows Operating System, log in as a user with administrator rights and double-click setup.cmd.
- On Linux Operating System, log in as the root user and execute./setup.sh from a graphical interface, such as X-window.
Step 2 When the Introduction panel appears, click Next to begin.
Step 3 In the Choose Install Folder panel, enter a directory path (or click the Choose button to select a directory) as the destination folder for Service Catalog, and click Next.
- On Windows, the default value for destination folder is C:\CiscoPrimeServiceCatalog.
- On Linux, the default value is /opt/CiscoPrimeServiceCatalog. The value for destination directory must not contain any space character.
Throughout this document, this destination folder is referred to as <ServiceCatalog_Install_Dir>.
For WildFly, this directory is also where the Service Catalog installer installs and configures the WildFly Application Server software.
Step 4 On the Application Server Selection panel, select the application server as WildFly and click Next. The subsequent panels may look different depending on which application server you select at this point. Refer to the Application Server Information Worksheet that you filled out in Appendix A.
Step 5 On the Setup Mode Selection panel, select Cluster setup radio button and click Next .
Step 6 On the Node Type Selection panel, select the Domain Controller Node radio button and click Next. This option will install the Domain Controller on the VM 1.
Step 7 On the Database Selection panel, select a database platform (Microsoft SQL Server or Oracle) and click Next. The subsequent panels may look different depending on which database platform you select at this point. Refer to the Database Information Worksheet that you filled out in Appendix A to determine your database platform.
Step 8 On the Service Catalog Database Creation panel:
By selecting Yes , you are telling the installer to create the database automatically for you. In the next panel, you will be prompted for the information that the installer will use to create the database user and database schema for Service Catalog. Refer to the Database Information Worksheet for the description of each field on this panel.
- If you have already created your database or if you want to upgrade to an existing database, then select No.
In the next panel, you will be prompted for the information of the existing database user and database schema. Refer to the Database Information Worksheet for the description of each field on this panel. (If you are performing an upgrade installation, you must select No. Refer to Chapter 7: Upgrading Prime Service Catalog for more detailed information).
Step 9 On the Service Catalog Database panel, enter the information for the Service Catalog database.
- If you selected Yes in Step 8, you will see a Create Database button on this panel, and the Next button is grayed out.
Notice that you need to enter the password for either the “sys” user (for Oracle) or the “sa” user (for SQL Server) which the installer will use to connect to your database server. Once you enter the information on this panel, click the Create Database. If you get the message “ Service Catalog database created successfully ,” click OK to close the message. The Next button is now enabled.
- If you selected No in Step 8, you just need to fill out the information for the existing Service Catalog database, and select the Execute database scripts check box.
Note The “Create Database” feature creates a very basic Service Catalog database that meets the minimum requirements for the Service Catalog application to operate. This feature is recommended for a Demo or Test system. For a Production system, contact your DBA in advance, to create the Service Catalog database which meets all of the product requirements as described in the Configuring Databases section, as well as any performance, reliability, and security requirements that adhere to your corporate policy.
Step 10 Click Next to continue. The installer connects to the database to validate the required settings for the database. If the installer created the database for you, then it would meet all of the required settings, and the validation test would pass. If you provided the information for an existing database, then the installer may report a validation error if any database setting is missing. See the Software Requirements for the database requirements. If a database validation error occurs, you can do the following:
- Close the error dialog and click Cancel to exit the installation wizard.
- Fix the missing database setting on a separate database connection session. Then come back to this screen, close the error dialog, and click Next again. At this point, the installer will repeat the validation test, and if the test passes, it will let you move to the next panel.
Step 11 In the Master Key Password panel, enter the master key password, if you selected Yes in step 8. Otherwise, enter the path to an existing KEK file that contains the Master Key Password for the existing database that you want to upgrade
As part of the security requirement, a master key password must be provided that would be used to encrypt all the passwords that are available in the application. The password provided must match the password rules, as described on the panel.
The master key password is saved in two files, kek_new.txt and kek_old.txt, under the <ServiceCatalog_Install_Dir>/dist directory. The kek_new.txt and kek_old.txt files must be backed up and stored in a safe location. The application server cannot login to the ServiceCatalog database without the master key password files. If you lose these master key password files, please contact Cisco TAC for help.
Step 12 On Choose Java Virtual Machine panel, select the correct Java version for your platform. Click the Search Another Location button to navigate to the correct location of Java on your computer and click Next.
Note You must specify the location of Java for WildFly because the installer will install the WildFly Application Server software on your computer, and it will set the JAVA_HOME variable in the WildFly configuration to use this particular Java.
Step 13 On the Domain Controller Configuration panel, enter the information for the WildFly server (IP address of this machine, i.e, VM 1). Refer to the Service Catalog Configuration Table for WildFly for the description of each field on this panel. Click Next.
Step 14 On the Messaging Configuration panel, enter the information for the JMS Queue server (IP address of VM 2, where you will be installing Service Link next. This is also the IP address for JMS), and click Next. Refer to the Messaging Configuration Table for the description of each field on this panel.
Remember the Queue password value that you would fill in the Messaging Configuration panel, as you need to enter same password when you install the Service Link later on VM 2.
Step 15 On the Service Catalog Administration Configuration panel, enter the information for the SMTP server, and the password for the Site Administrator. Refer to the Service Catalog Administration Configuration Table for the description of each field on this panel. Click Next.
Step 16 Click Install in the Preinstallation Summary panel to begin installation.
The installer will display the progress bar. It may take up to 30 minutes for the installer to complete. Do not interrupt or abort the installer during this process.
Step 17 If the installation process completes successfully, the Install Complete panel appears. Click Done to exit the installation wizard.
Step 18 Start the Domain Controller and all managed servers on the Host 1.
Note • For the first time after the installation, each WildFly server must be started as an application by executing the start script provided by Cisco, as also described in this step. DO NOT use the windows service called Cisco Prime Service Catalog to start the server.
- This start script will create the content folder and generate necessary files in the installation directory. After this is done, then from the next time you can directly start the servers as windows service.
To start the start the domain controller on Host 1, do the following:
a. Access the <ServiceCatalog_Install_Dir>\bin directory.
b. Execute the following command to start the Domain Controller, Service Catalog, and Service Link:
Step 19 Deploy RequestCenter.war. To deploy, do the following:
a. Access the <ServiceCatalog_Install_Dir>\bin directory.
b. Execute the following command to the RequestCenter.war:
To stop the domain controller, execute the stopDomainController script. For information on the other scripts available with the installer for the standalone and cluster environment, see WildFly Scripts.
– IP Address of VM 1 where the Domain Controller was installed.
– Queue password that was set in the Messaging Configuration panel.
- Proceed to setting up the Service Link and JMS node on VM2. See Setting Up the Service Link and JMS Node (VM 2) in a Four VM Topology.
Setting Up the Service Link and JMS Node (VM 2) in a Four VM Topology
Step 1 Copy file “kek_new.txt” from the <ServiceCatalog_Install_Dir>/dist directory on VM 1 to a temporary directory on VM 2.
Step 2 Install Service Link and JMS node on VM2. Launch the web interface installation wizard.
- On Windows Operating System, log in as a user with administrator rights and double-click setup.cmd.
- On Linux Operating System, log in as the root user and execute./setup.sh from a graphical interface, such as X-window.
Step 3 When the Introduction panel appears, click Next.
Step 4 In the Choose Install Folder panel, enter a directory path (or click the Choose button to select a directory) as the destination folder for Service Catalog, and click Next.
- On Windows, the default value for destination folder is C:\CiscoPrimeServiceCatalog.
- On Linux, the default value is /opt/CiscoPrimeServiceCatalog. The value for destination directory must not contain any space character.
Throughout this document, this destination folder is referred to as <ServiceCatalog_Install_Dir>.
Step 5 On the Application Server Selection panel, select the application server WildFly and click Next.
Step 6 On the Setup Mode Selection panel, select Standalone radio button and click Next.
Step 7 On the Installation Type panel, select Custom radio button and click Next.
Step 8 On the Component Selection panel, select the Service Link radio button and click Next.
Step 9 On the Database Selection panel, select a database platform (Microsoft SQL Server or Oracle) and click Next.
Step 10 On the Service Catalog Database panel, enter the information for the Service Catalog database which was already created when you installed Domain Controller on VM 1, and click Next to continue.
The installer connects to the database to validate the required settings for the database. If the installer created the database for you, then it would meet all of the required settings, and the validation test would pass. If you provided the information for an existing database, then the installer may report a validation error if any database setting is missing. See the Software Requirements for the database requirements. If a database validation error occurs, you can do the following:
- Close the error dialog and click Cancel to exit the installation wizard.
- Fix the missing database setting on a separate database connection session. Then come back to this screen, close the error dialog, and click Next again. At this point, the installer will repeat the validation test, and if the test passes, it will let you move to the next panel.
Step 11 In the Master Key Password panel, enter the path to an existing KEK file (from Step 1) that contains the Master Key Password for the existing database.
As part of the security requirement, a master key password must be provided that would be used to encrypt all the passwords that are available in the application. The password provided must match the password rules, as described on the panel.
Step 12 On Choose Java Virtual Machine panel, select the correct Java version for your platform. Click the Search Another Location button to navigate to the correct location of Java on your computer and click Next.
Note You must specify the location of Java for WildFly because the installer will install the WildFly Application Server software on your computer, and it will set the JAVA_HOME variable in the WildFly configuration to use this particular Java.
Step 13 On the Service Link Configuration panel, enter the following information:
- Enter the IP address of this VM in the Service Link Host IP Address field.
- Enter a password in the WildFly admin password field.
- Re-enter the same password in the Confirm password field.
- If the Configure as windows service option is displayed on the screen, select it.
- If the Configure IIS option is displayed on the screen, do NOT select it.
Step 14 On the Messaging Configuration panel, enter the information for the JMS Queue server (IP address of this VM) where the Service Link will be deployed, and click Next. Refer to the Messaging Configuration Table for the description of each field on this panel. See the note below for the queue password field.
Note For the Queue password value, use the same password that you entered for “Queue password” during the installation of the Domain Controller on VM 1.
Step 15 On the Service Catalog Administration Configuration panel, enter the information for the SMTP server, and the password for the Site Administrator. Refer to the Service Catalog Administration Configuration Table for the description of each field on this panel. Click Next.
Step 16 Click Install in the Preinstallation Summary panel to begin installation.
The installer will display the progress bar. It may take up to 30 minutes for the installer to complete. Do not interrupt or abort the installer during this process.
Step 17 If the installation process completes successfully, the Install Complete panel appears. Click Done to exit the installation wizard.
Step 18 Start the Service Link server on the VM 2. This standalone WildFly server contains both the ServiceLink.war and the JMS service. To start the Service Link and JMS services, do the following:
a. Access the <ServiceCatalog_Install_Dir>\bin directory.
b. Execute the following command to start the Domain Controller, Service Catalog, and Service Link:
On the Windows operating system, you can also start or stop the Service Link server, by starting or stopping the following Windows service:
To stop the service link, execute the StopServiceLink script. For information on the other scripts available with the installer for the standalone and cluster environment, see WildFly Scripts.
– IP Address of VM 1 where the Domain Controller was installed.
– IP address of VM 2, where the Service Link server and JMS were installed.
– Queue password that was entered during the installation of the Domain Controller on VM 1.
- Proceed to setting up the VM3 and VM4 as Host Controller 1 and Host Controller 2 respectively. See Setting Up Host Controller and Service Catalog For Cluster Nodes in a Four VM Topology.
Setting Up Host Controller and Service Catalog For Cluster Nodes in a Four VM Topology
Step 1 On the machine designated for Cluster Host 1, launch the web interface installation wizard:
- On Windows Operating System, log in as a user with administrator rights and double-click setup.cmd.
- On Linux Operating System, log in as the root user and execute./setup.sh from a graphical interface, such as X-window.
Step 2 When the Introduction panel appears, click Next to begin.
Step 3 In the Choose Install Folder panel, enter a directory path (or click the Choose button to select a directory) as the destination folder for Service Catalog, and click Next.
- On Windows, the default value for destination folder is C:\CiscoPrimeServiceCatalog.
- On Linux, the default value is /opt/CiscoPrimeServiceCatalog. The value for destination directory must not contain any space character.
Throughout this document, this destination folder is referred to as <ServiceCatalog_Install_Dir>.
Step 4 On the Application Server Selection panel, select the application server as WildFly and click Next.
Step 5 On the Setup Mode Selection panel, select Cluster setup radio button and click Next .
Step 6 On the Node Type Selection panel, select Host Controller Node radio button and click Next.
Step 7 On the Host Controller Selection panel, do the following:
- Choose Host1 radio button if this machine should be set up as the first node of the cluster.
- Choose Host2 radio button if this machine should be set up as the second node of the cluster.
Note The Prime Service Catalog Installer will support only up to six nodes for the cluster. To add 7th node or more, please contact Cisco TAC.
Step 8 Enter the Domain Controller IP Address to establish connection to the first machine (VM 1) where domain controller is installed.
Step 9 On Choose Java Virtual Machine panel, select the correct Java version for your platform. Click the Search Another Location button to navigate to the correct location of Java on your computer and click Next.
Note You must specify the location of Java for WildFly because the installer will install the WildFly Application Server software on your computer, and it will set the JAVA_HOME variable in the WildFly configuration to use this particular Java.
Step 10 On the Service Catalog Configuration panel, enter the following information, and click Next:
- Service Catalog Host IP address: IP address of this machine, i.e, of the Cluster Host 1.
- In the Service Link URL field, enter http://<SL_Address>:6080, where <SL_Address> is the IP address of VM 2, where the Service Link server resides.
- If the “Configure as windows service” option is displayed on the screen, select it.
Step 11 On the Messaging Configuration panel, enter the following information for the JMS Queue server, and click Next:
- Enter the IP address of VM 2 in the Queue Host IP Address field.
- In the Queue password field, enter the same password that you entered for Queue password during the installation of the Domain Controller on VM 1.
Refer to the Messaging Configuration Table for the description of each field on this panel.
Step 12 On the Service Catalog Administration Configuration panel, enter the information for the SMTP server, and the password for the Site Administrator. Refer to the Service Catalog Administration Configuration Table for the description of each field on this panel. Click Next.
Step 13 Click Install in the Preinstallation Summary panel to begin installation.
The installer will display the progress bar. It may take up to 30 minutes for the installer to complete. Do not interrupt or abort the installer during this process.
Step 14 If the installation process completes successfully, the Install Complete panel appears. Click Done to exit the installation wizard.
Step 15 Start the Host Controller for Cluster Host 1.
Note • For the first time after the installation, each WildFly server must be started as an application by executing the start script provided by Cisco, as also described in this step. DO NOT use the windows service called Cisco Prime Service Catalog to start the server.
- This start script will create the content folder and generate necessary files in the installation directory. After this is done, then from the next time you can directly start the servers as windows service.
To start the Host Controller, do the following:
a. Access the <ServiceCatalog_Install_Dir>\bin directory.
b. Execute the following command to start the Domain Controller, Service Catalog, and Service Link:
The Host Controller will in turn, automatically start the managed server that belongs to the server group “main-server-group”. Since RequestCenter.war was already deployed in the “main-server-group” on the Domain Controller, it will also be automatically deployed onto this managed server.
Step 16 Verify that you can connect to the following URL:
http://<VM3_or_VM4_IP_address>:8080/RequestCenter.
To stop the Host Controller and the Service Catalog server on both Host 1 and Host 2, execute the forceStopAllOnHC script. You can start and stop individual servers in a cluster. For information on the other start and stop scripts available with the installer for the WildFly cluster environment, see WildFly Scripts.
Set up web server. See Step 8 of Performing WildFly Cluster Installation for Four VM Topology.
Postinstallation Tasks for WildFly
The Service Catalog installer installs and configures WildFly for the Service Catalog and Service Link services on your computer, but it will not automatically start up the WildFly service. This section contains instructions for starting and stopping the WildFly services for Service Catalog and Service Link and other postinstallation tasks for standalone and cluster WildFly setup.
Postinstallation Tasks for WildFly Standalone Application Server
The following section includes the postinstallation tasks for standalone application server for WildFly.
Enabling Secure Cookie
The secure cookie is an optional feature. To enable the secure cookie feature, you must first enable SSL for the web server, as you have already done in the "Preparing IIS Web Server" section. Then, after you install Prime Service Catalog, you must manually edit the file "<PSC_Install_Dir>\WildFly-8.2.0.Final\ServiceCatalogServer\deployments\RequestCenter.war\WEB-INF\web.xml" by setting the secure property to true as follows:
Starting WildFly Server on Linux
Perform the following steps to start the WildFly Servers on Linux:
Step 1 It is assumed that your installation directory is "/opt/CiscoPrimeServiceCatalog". Use SSH to connect to the Linux machine as the "root" user, and navigate to the "/opt/CiscoPrimeServiceCatalog/bin" directory.
Step 2 Execute the following command to start the WildFly server for Service Link in the background:
nohup ./startServiceLink.sh > startServiceLink.log 2>&1 &
Step 3 Wait for a few minutes for the Service Link server to be completely up. The JMS service is configured in the same WildFly server with the Service Link component application; thus, you want to allow enough time for the JMS service to be ready before starting up the Service Catalog application.
Step 4 Execute the following command to start the WildFly server for Service Catalog in the background:
nohup ./startServiceCatalog.sh > startServiceCatalog.log 2>&1 &
Step 5 To stop the WildFly servers: It is recommended that you stop the Service Catalog application server first. Execute the following scripts as the "root" user to stop the WildFly servers for Service Catalog and Service Link:
Starting WildFly Server on Windows
If you selected the "Configure windows service" option for Service Catalog and Service Link during the installation, then the "Cisco Prime Service Catalog" service and "Cisco Prime Service Link" service are registered on your Windows Operating System.
However, the installer does not automatically start up the windows services for the first time right after the installation. (They will be automatically started the next time you reboot your computer.) You can perform the following steps to start the services for the first time:
Step 1 Select " Start > All Programs > Administrative Tools > Services " on your computer.
Step 2 Do one of the following:
Step 3 Select the service named Cisco Prime Service Link, and click the Start Service button.
Step 4 Wait for a few minutes for the Service Link server to be completely up. The JMS service is configured in the same WildFly server with the Service Link component application; thus, you want to allow enough time for the JMS service to be ready before starting up the Service Catalog server.
Step 5 Select the service named Cisco Prime Service Catalog, and click the Start Service button.
To stop the WildFly servers: It is recommended that you stop the "Cisco Prime Service Catalog" service first, then stop the "Cisco Prime Service Link" service.
If you did not select the "Configure windows service" option during the installation, then you will need to execute a command script to start up each WildFly server. Perform the following steps to start the WildFly servers:
Step 1 It is assumed that your installation directory is "C:\CiscoPrimeServiceCatalog". Open a Command Prompt window, and navigate to the "C:\CiscoPrimeServiceCatalog\bin" directory.
Step 2 Execute the script startServiceLink.cmd to start the WildFly server for Service Link.
Step 3 Wait for a few minutes for the Service Link server to be completely up. The JMS service is configured in the same WildFly server with the Service Link component application; thus, you want to allow enough time for the JMS service to be ready before starting up the Service Catalog server.
Step 4 Execute the script startServiceCatalog.cmd to start the WildFly server for Service Catalog.
Note Because you start the WildFly servers using command scripts, if you log out of the Windows Operating System, the WildFly servers will be automatically killed when your login session is ended. So make sure that you don't log off the session where the WildFly servers are running. Follow the instructions in the "Configure WildFly As Windows Service" section below if you want to configure the WildFly servers as windows services after the installation. When the WildFly servers are running as windows services, they will not be killed when you log out of Windows Operating System.
Step 5 To stop the WildFly servers, you can either:
- Press Control+C in the Command Prompt window where the Service Link server or Service Catalog server is running, or
- Execute the script "stopServiceLink.cmd" or "stopServiceCatalog.cmd", located under the C:\CiscoPrimeServiceCatalog\bin directory.
Configure WildFly as Windows Service
Perform the following steps to configure WildFly as Windows service:
Step 1 It is assumed that your installation directory is " C:\CiscoPrimeServiceCatalog ". Open a Command Prompt window, and navigate to the " C:\CiscoPrimeServiceCatalog\bin " directory. Execute the script " installServiceCatalogService.cmd " to configure the WildFly server for Service Catalog as a Windows service. The service will be named " Cisco Prime Service Catalog ".
Step 2 Execute the script " installServiceLinkService.cmd " to configure the WildFly server for Service Link as a Windows service. The service will be named " Cisco Prime Service Link ".
Step 3 To remove the Windows services: First you need to manually stop the "Cisco Prime Service Catalog" and " Cisco Prime Service Link " services. Then, execute the scripts " uninstallServiceCatalogService.cmd " and " uninstallServiceLinkService.cmd "
Postinstallation Tasks for WildFly Clustered Application Servers
The following section includes the postinstallation tasks for clustered application servers for WildFly.
To start and stop individual servers in a cluster, see WildFly Scripts for information on the scripts available with the installer for the WildFly cluster environment.
Note For WildFly cluster setup on Windows, keep the following in mind:
- For the first time after the installation, each WildFly server must be started as an application by executing the start script provided by Cisco. This script will create the content folder and generate necessary files in the installation directory. After this is done, then from the next time you can directly start the servers as windows service. Before starting the servers as windows service, you need to stop the servers, if they are already running with the help of the scripts provided by Cisco.
- When a WildFly server is started using the script provided by Cisco, the server runs in the foreground instead of background. As a result, if a user accidentally logs off from the machine where the WildFly server is running, the WildFly server process will be terminated.
- Because you start the WildFly servers using command scripts, if you log out of the Windows Operating System, the WildFly servers will be automatically killed when your login session is ended. So make sure that you don't log off the session where the WildFly servers are running. Follow the instructions in the "Configure WildFly As Windows Service" section below if you want to configure the WildFly servers as windows services after the installation. When the WildFly servers are running as windows services, they will not be killed when you log out of Windows Operating System.
Configure WildFly as Windows Service
Perform the following steps to configure WildFly as Windows service:
Step 1 It is assumed that your installation directory is "C:\CiscoPrimeServiceCatalog". Open a Command Prompt window, and navigate to the "C:\CiscoPrimeServiceCatalog\bin" directory. Execute the script "installProcessControllerClusterService.cmd" to configure the WildFly server for Cluster Service as a Windows service. The service will be named "Cisco Prime Service Catalog Cluster".
Step 2 To remove the Windows services: First you need to manually stop the "Cisco Prime Service Catalog Cluster" and execute the script "uninstallServiceCatalogService.cmd".
Setting Up Apache Web Server on WildFly
This section describes how to configure the httpd.conf file as a proxy server for the Service Catalog and Service Link servers. This procedure uses the "mod_proxy" that comes with the installation of Apache (or Httpd) web server.
Note The settings for Service Catalog differ for a clustered Wildfly deployment and a standalone Wildfly deployment.
Procedure
Step 1 Stop the Apache web server:
Step 2 Modify the httpd.conf file:
a. If Service Catalog is deployed in clustered WildFly, replace the IP addresses in the httpd.conf file to the corresponding servers in your environment.
In the example below, replace the IP addresses in the httpd.conf, with the actual IP addresses of the following servers:
Web server's IP address = 10.78.0.100
Service Link's IP address = 10.78.0.200
Host 1 of Service Catalog's IP address = 10.78.0.300
Host 1 of Service Catalog's IP address = 10.78.0.400
b. If the Service Catalog is deployed in standalone WildFly, replace the IP addresses in the httpd.conf file to the corresponding servers in your environment.
In the example below, it is assumed that Service Catalog and Service Link servers reside on the same VM. Replace the IP addresses, with the actual IP addresses of the corresponding servers in your environment:
Web server's IP address = 10.78.0.100
Service Link's IP address = 10.78.0.200
Service Catalog's IP address = 10.78.0.200
Everything in httpd.conf is the same as in 2a) above, except for the <VirtualHost> section at the end:
Step 3 To connect the server to a specific port (for ex:8080), run the below command:
Step 4 To allow the server to access the different IP's and ports defined in the load balancer settings, execute the below command:
Step 5 Start the Apache web server, using the below command:
For 2 VM Cluster Topology
Perform the following steps on a two VM for applying a patch or any customizations.
Note This procedure is based on the assumption that all servers are still running on both VM1 and VM2 for 2 VM topology.
Step 1 Login to VM1 and access the <ServiceCatalog_Install_Dir>\bin directory.
Step 2 Undeploy the .war file:
a. Remove the RequestCenter.war and ISEE.war from all the host controllers, by executing the following command:
b. If you want to undeploy just RequestCenter.war, then execute the following command:
c. if you want to undeploy just ISEE.war, then execute the following command:
Step 3 Shutdown all the servers by executing the following commands on VM1:
Step 4 Backup the original dist/RequestCenter.war and dist/ISEE.war, if you plan to change it. To do so, execute the following command:
Step 5 Extract the appropriate WAR file(s) that you want to customize:
a. Extract the original dist/RequestCenter.war to a temporary directory, such as /temp/RequestCenter.war by executing the following command:
b. Extract the original dist/ISEE.war to a temporary directory, such as /temp/ISEE.war
Step 6 Apply the customizations:
a. Apply the customizations by modifying or overwriting the files in the /temp_dir/RequestCenter.war directory.
b. Apply the customization by modifying or overwriting the files in the /temp_dir/ISEE.war directory.
Step 7 Zip up the RequestCenter.war file and ISEE.war file:
a. To zip up the /temp_dir/RequestCenter.war directory into a RequestCenter.war file, execute the following commands:
A compressed version of RequestCenter.war is created in temp_dir\RequestCenter.war.
b. To zip up the /temp_dir/ISEE.war directory into a ISEE.war file, execute the following commands:
A compressed version of ISEE.war is created in temp_dir\ ISEE.war.
Step 8 Overwrite the new versions of the war files in the "dist" directory:
a. Copy the new version of RequestCenter.war into the <ServiceCatalog_Install_Dir>\dist directory, overwriting the existing file.
b. Copy the new version of ISEE.war into the <ServiceCatalog_Install_Dir>\dist directory, overwriting the existing file.
Step 9 Delete the <ServiceCatalog_Install_Dir>/wildfly-8.2.0.Final/content directory on VM1.
Step 10 Remove the domain/servers/<servername>/tmp/* on VM1:
a. Delete everything under <ServiceCatalog_Install_Dir>/wildfly-8.2.0.Final/domain/servers/server-host1-RC/tmp directory.
b. Delete everything under <ServiceCatalog_Install_Dir>/wildfly-8.2.0.Final/domain/servers/server-host1-SL/tmp directory.
Step 11 Start the servers on VM1. To do this execute the following commands on VM1.
Step 12 Deploy the latest war files on VM1:
- To deploy the latest version of RequestCenter.war followed by ISEE.war, execute the following command:
Step 13 On VM2, do the following:
a. Copy the new version of RequestCenter.war on VM1 into the <ServiceCatalog_Install_Dir>\dist directory on VM2, overwriting the existing file on VM2.
c. Delete the <ServiceCatalog_Install_Dir>/wildfly-8.2.0.Final/content directory on VM2.
d. Delete everything under the <ServiceCatalog_Install_Dir>/wildfly-8.2.0.Final/domain/servers/server-host2-RC/tmp directory.
e. Start all the servers on VM2 by executing the following command:
This script will automatically recreate the missing <ServiceCatalog_Install_Dircontent/content/RequestCenter.war directory on this VM.
Note After applying the patch, each WildFly server must be started as an application by executing the start script provided by Cisco. This script will create the content folder and generate necessary files in the installation directory. After this is done, then from the next time you can directly start the servers as windows service. Before starting the servers as windows service, you need to stop the servers, if they are already running with the help of the scripts provided by Cisco.
For 4 VM Cluster Topology
Perform the following steps on a four VM topology for applying a patch or any customizations.
Note This procedure is based on the assumption that all servers are still running on both VM1, VM3, and VM4 for a 4 VM topology.
Step 1 Login to VM1 and access the <ServiceCatalog_Install_Dir>\bin directory.
Step 2 Remove the RequestCenter.war from all the Host Controllers by executing the following command on VM1:
Step 3 Stop all the servers on VM3 by executing the following command on VM1:
Step 4 Stop all the servers on VM4 by executing the following command on VM1:
Step 5 Backup the original dist/RequestCenter.war file.To do so, execute the following command:
Step 6 Extract the original dist/RequestCenter.war to a temporary directory, such as /temp/RequestCenter.war. To do so, execute the following command:
Step 7 On VM1, apply the customizations by modifying or overwriting the files in the /temp_dir/RequestCenter.war directory.
Step 8 Zip up the /temp_dir/RequestCenter.war directory into a RequestCenter.war file as follows:
A compressed version of RequestCenter.war is created in temp_dir\RequestCenter.war.
Step 9 Copy the new version of RequestCenter.war into the <ServiceCatalog_Install_Dir>\dist directory, overwriting the existing file.
Step 10 On VM1, deploy the latest version of RequestCenter.war in all host controllers. To do this execute the following commands on VM1.
Step 11 On VM2 (Service Link Server), apply the customization in the ISEE.war directory by doing the following:
b. Stop the Service Link Server by executing the following command:
c. Backup <ServiceCatalog_Install_Dir>/wildfly-8.2.0.Final/ServiceLinkServer/deployments/ISEE.war directory to a temporary directory. To do so, execute the following command:
d. Apply the customization directly in the <ServiceCatalog_Install_Dir>\ServiceLinkServer\deployments\ISEE.war directory.
e. Delete everything under the <ServiceCatalog_Install_Dir>/wildfly-8.2.0.Final/ServiceLinkServer/tmp directory.
f. Start the Service Link server by executing the following command:
Step 12 Copy new version of RequestCenter.war from <ServiceCatalog_Install_Dir>\dist directory on VM 1 to the <ServiceCatalog_Install_Dir>\dist directory, overwriting the existing file on VM3 and VM4.
Step 14 Delete the <ServiceCatalog_Install_Dir>/wildfly-8.2.0.Final/content directory.
Step 15 Delete everything under the <ServiceCatalog_Install_Dir>/wildfly-8.2.0.Final/domain/servers/server-host1-RC/tmp directory.
Step 16 Start all the servers on VM3 by executing the following script:
Step 18 Delete the <ServiceCatalog_Install_Dir>/wildfly-8.2.0.Final/content directory.
Step 19 Delete everything under the <ServiceCatalog_Install_Dir>/wildfly-8.2.0.Final/domain/servers/server-host2-RC/tmp directory.
Step 20 Start all the servers on VM3 by executing the following script:
This script will automatically recreate the missing <ServiceCatalog_Install_Dir/content/*.war directory on both VM3 and VM4.
Note After applying the patch, each WildFly server must be started as an application by executing the start script provided by Cisco. This script will create the content folder and generate necessary files in the installation directory. After this is done, then from the next time you can directly start the servers as windows service. Before starting the servers as windows service, you need to stop the servers, if they are already running with the help of the scripts provided by Cisco.
When both Request Center and Service Link applications are deployed, they are in preparation state, they must be moved to Active state by starting them in following order:
First start Service Link. Only after Service Link is in the Active state, start RequestCenter. Make sure it is in active state before you try verifying the installation.
Verifying Your Installation
Verify your installation by performing the following tasks:
Step 1 Open a browser, and connect to the following URL: http://<hostname>:<port>/RequestCenter where
<hostname> = The fully qualified domain hostname or the IP address of the computer where you installed the WildFly server for Service Catalog.
<port> =The HTTP Port number assigned to the Wildfly server for Service Catalog. The default value for HTTP Port number is 8080.
Note If you are on a Windows Operating System, and during the installation you selected the "Configure IIS" option, then the Service Catalog installer automatically configured the tomcat plugin for the IIS web server on your machine to redirect to the WildFly server. Thus, in this case, the URL for Service Catalog should point to the port number used by the IIS web server instead. For example, if your IIS web server is using port 80, then the URL should be http://<hostname>:80/RequestCenter, or http://<hostname>/RequestCenter since port 80 can be omitted from the URL.
Step 2 Log in as the Site Administrator. For a new installation of Service Catalog, the username for the Site Administrator is "admin" and the password is the value you entered on the Service Catalog Administration Configuration panel of the installation wizard.
Step 3 Navigate to the Service Link module.
Step 4 On the left hand side of the panel, under Service Link Status, verify that the connection has a green status.
You have completed the installation for Cisco Prime Service Catalog on WildFly.
 Feedback