The documentation set for this product strives to use bias-free language. For the purposes of this documentation set, bias-free is defined as language that does not imply discrimination based on age, disability, gender, racial identity, ethnic identity, sexual orientation, socioeconomic status, and intersectionality. Exceptions may be present in the documentation due to language that is hardcoded in the user interfaces of the product software, language used based on RFP documentation, or language that is used by a referenced third-party product. Learn more about how Cisco is using Inclusive Language.
Overview to Installation of Management Node Remotely
Cisco VIM fully automates the installation operation of the cloud. In releases prior to Cisco VIM 3.4.1, the management node
installation was always manual, as the bootstrap of the cloud happens from there. Using this feature, the management node,
referred to as Cisco VIM Baremetal Manager is automatically installed over a layer 3 network to accelerate the Cisco VIM installation
process.
Note
In this chapter, the term Cisco VIM Baremetal Manager and Remote Install of Management Node (RIMN) are used interchangeably.
Remote Install of Management Node
Remote Install of Management Node (RIMN) software is deployed on the RIMN deployment node from where one or more management
nodes are installed. Cisco VIM Baremetal Manager or RIMN supports remote installation of servers across WAN or LAN with either
IPv4 or IPv6 connectivity. Cisco VIM Baremetal Manager can be installed on the Cisco VIM Baremetal Manager deployment node
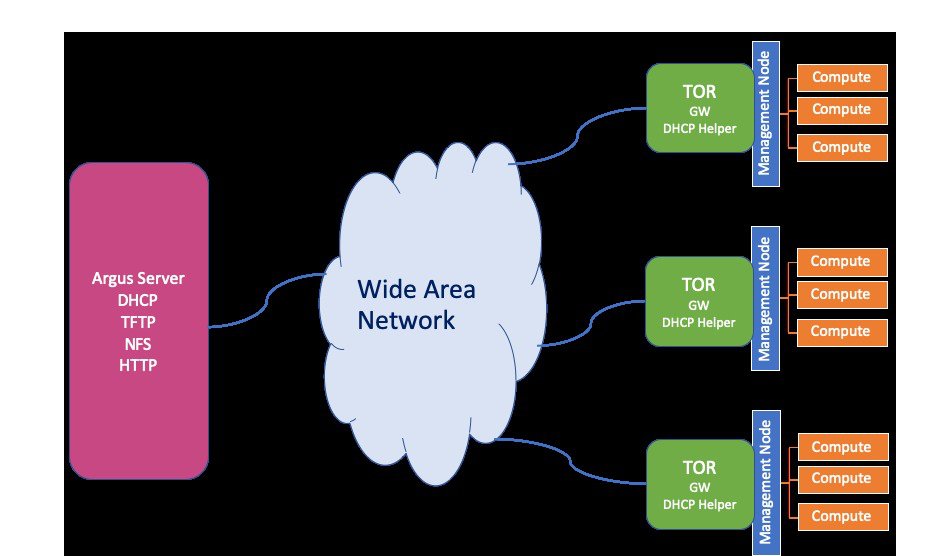
by using air-gapped installation. After you install the RIMN software on its management node, you must define an input file
for bare-metal config (in YAML format) and use Cisco VIM Baremetal Manager CLI or Rest API to deploy the user-specified ISO
into the target platform (as depicted in the figure below):
RIMN solution is built based on the interaction of several components as depicted below:
Rest-API and CLI: Pushes the received input data into Etcd datastore.
Etcd datastore: Stores any stateful data related to sites, jobs, and flavor or policies used in the deployment.
Agent: Golang-based services that installs the servers based on user config, and includes a controller with multiple services
(TFTP, DHCP, HTTP, NFS)
Cisco VIM Baremetal Manager software is designed to be stateful, micro-service based, and easy to use.
Hardware Requirements for RIMN
RIMN/Cisco VIM Baremetal Manager solution consists of two hardware components:
Cisco VIM Baremetal Manager deployment server. Cisco VIM Baremetal Manager service is deployed on the deployment server. Cisco
VIM Baremetal Manager can be deployed on standard CISCO VIM Management node BOM, which is based on UCS-C or Quanta hardware.
Servers to be deployed. These are actual hardware to pxe-boot, install & configure, which can include a number of clusters
and a number of servers in each cluster. CISCO VIM Management node BOM (UCS-C M5, M4 and/or Quanta servers) are supported
target servers. Supported firmware versions are Major = 4.0 and Minor >= 1a.
From a component point of view, a typical CISCO VIM Management node BOM includes:
8, 16 or 24 1.2 TB Hard disks are required to install the OS
Intel 1G NIC (br_api) for PXE and 10/25/40G VIC or Intel NIC (for br_mgmt) NICs to support configuration of multiple bridges,
and other minimum requirements to satisfy the server workload.
API availability for remote server management:
Quanta: Redfish
UCS-C: Redfish + UCS-C XML-API
Enabled pxeboot in UEFI mode for NIC chosen (1g intel NIC: br_api) for the target servers
Network Infrastructure Requirements for RIMN
To install RIMN/Cisco VIM Baremetal Manager pxe-boots target nodes over layer 2 or layer 3 network, certain conditions need
to be met for the solution feasibility:
The Cisco VIM Baremetal Manager server need to have access for the Remote management API interface (Redfish for Quanta, Redfish
with XML-API for UCS-C) of the target nodes.
The Cisco VIM Baremetal Manager server services (agent, including agent, tftp, dhcp, http, nfs ports) need to be reachable
over a layer 2 or layer 3, IPv4 and IPv6 network from the target nodes.
For layer 3 based installation, DHCP forwarder needs to be configured in the intermediate routing infrastructure, so that
the installed nodes can DHCP query the Cisco VIM Baremetal Manager server from its own network across WAN.
For Edge deployment across WAN, DHCP Helper is configured on the network Gateway of management node API network to point out
the Cisco VIM Baremetal Manager Agent IP for DHCP server.
WAN latencies for less than 500 milliseconds needs a successful install within a reasonable time period (< 30 mins). The higher
the latency, the slower the installation and chances for installation failure.
Below are examples of topology deployed with Cisco VIM Baremetal Manager on bare-metal servers over Layer 2 and Layer 3 networks
respectively.
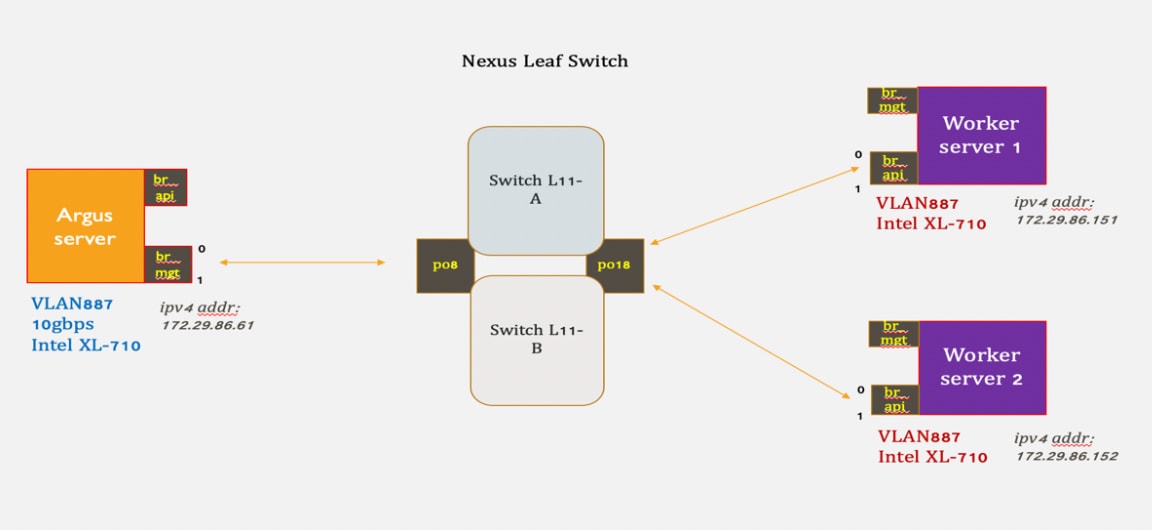
Target server connected to RIMN over Layer 3 IPv4 network
Here, the Cisco VIM Baremetal Management server with agent running on br_mgmt using address 172.29.86.61 is pxe-booting 2
worker nodes on VLAN 887 on ip-address 172.29.86.151 and 172.29.86.152.
Target server connected to RIMN over Layer 3 IPv6 network
Here, the Cisco VIM Baremetal Management server with agent running on br_mgmt on address is pxe-booting 2 remote worker nodes
on VLAN 123 and VLAN124 across WAN. Notice DHCP forwarder is configured on VLAN 123 and 124 to forward DHCP request to the
Cisco VIM Baremetal Manager server IP.
In either case 1 or 2, a port channel configured for installed server pxe-boot interface (eg. po18 on case 1) look like:
interface port-channel18
switchport access vlan 887
spanning-tree port type edge
no lacp suspend-individual
vpc 18
Also, it should be noted that the following network ports are open on the Cisco VIM Baremetal Manager deployment server:
Interface
Type
Port
Protocol
Application
Argus RMI API network
TCP
8141
HTTP
Cisco VIM Baremetal Manager REST-API
Argus RMI management network
CVIM Management node API network
TCP
24601
HTTP
Agent Asset Server
TCP
2049
NFS
Agent NFS Server
UDP
67
DHCP4
Agent DHCPserver ipv4
UDP
547
DHPCP6
Agent DHCP server ipv6
UDP
69
TFTP
Agent tftp server
Workflow for Cisco VIM Baremetal Manager
The workflow for Argus has the following steps:
Install the Cisco VIM Baremetal Manager management node server with the ISO
Create the Cisco VIM Baremetal Manager setup data
Bootstrap the Cisco VIM Baremetal Manager Management Server
Import target ISO file(s) and fetch the associated flavors
Create baremetal files with flavor and target server details
Deploying the Target Servers
Overview to Cisco VIM Baremetal Manager REST API
The following topic explains how to use the Cisco VIM Baremetal Manager REST API to manage RIMN:
Cisco VIM Baremetal Manager provides a Representational State Transfer (REST) API that is used to deploy, expand, and manage
RIMN.
Actions performed using the REST APIs are the following:
Provides a logical grouping of management nodes in form of site, cluster and nodes for better management of nodes globally.
Deploy an Cisco VIM Baremetal Manager site, cluster, and node.
Add cluster to the deployed site.
Delete cluster from the deployed site
Add node to the deployed cluster.
Delete node from a deployed cluster.
Jobs to track deployment of site, cluster, and node.
The Cisco VIM Baremetal Manager API security is provided by the Secure Sockets Layer (SSL) included on the Apache web server.
The Flask-Restplus-based web application runs the Rest API server. The Flask REST API server requires a username and password
to authorize the REST API server requests. Apache handles the authorization process, which authorizes the request to access
the Flask web application. You can access API server on the br_api interface on port 8141. Authentication is enabled by default
in the web service.
By default, basic authentication is enabled for the API endpoints in the management node. You can find the authentication
credentials in the following file in the management node:
/opt/cisco/argus/rest_api/client_config.json
The following code shows a sample client_config.json file.
Cisco VIM Baremetal Manager REST API is a Flask-Restplus-based web application, which comes with Swagger integration. Swagger
is built around OpenAPI Specification that helps to design, build, document, and consume REST-APIs.
The REST-API resources along with their expected payloads and responses have been documented by Swagger. Here is the view
of Cisco VIM Baremetal Manager REST-API.
Installing Cisco VIM Baremetal Manager Management Node On a UCS C-series Server
However, there are two major differences that are listed below:
In Step 11, choose the option to configure the server as a CVIM Baremetal node (Option 5).
Management (br_mgmt) interface has to be routable as it serves host to Cisco VIM Baremetal Manager Agent. The API (br_api)
interface rout-ability depends upon user’s choice. If the intention is to expose Cisco VIM Baremetal Manager REST API externally,
br_api has to be routable.
Note
The default gateway in Cisco VIM Baremetal manager management server node is through br_mgmt, and not through br_api.
In the subsequent prompts, you can enter information such as the hostname, IPv4 or IPv6 addresses for br_api and br_mgmt interfaces,
and gateway addresses (make sure you stick to above mentioned point: 2 while providing inputs), as per the Installing Management Node on UCS C-series (M4/M5) procedure.
The node is installed with RHEL with the following modifications:
Security_Enhanced Linux (SELinux) is enabled on the management node for security.
The Cisco VIM Baremetal code consists of packages with installer code. After provisioning the server with ISO, the installer
code is placed in the following path:
/root/cvim_bm-<tag>
Installing Cisco VIM Baremetal Manager Management Node on Quanta Servers
For Quanta-based system, the CDC management node (CDC SKU1) is used as the Cisco VIM Baremetal manager management node. Please
leave the settings in the quanta to its default.
The bootstrap procedure on the management node sets up Cisco VIM Baremetal manager/RIMN with its components REST API, CLI,
Agent, and ETCD along with the needed data containers. It prepares the Cisco VIM Baremetal manager server for the actual site
deployment.
Preparing the Argus Management Node in an Air-gapped Install
If the Argus management node does not have Internet access, use the prepared USB stick and complete the following steps:
Refer to Preparing to Install Cisco NFVI on Management Nodes Without Internet Access, to prepare the USB stick with the Argus
artifacts.
Note
The only change is in the ‘getartifacts’ command is that --argus needs to be added.
Procedure
Step 1
1. Insert the USB stick into the management node drive after it has been installed with buildnode.iso with the CISCO VIM
Baremetal option.
Step 2
2. Run the import_artifacts.sh script to copy all artifacts onto the management node, for example:
# cd ~/Cisco VIM_bm-<tag_id>/tools
# ./import_artifacts.sh
The installation artifacts are copied to /var/cisco/artifacts/ on the management node. Once the artifacts are available in
the management node, the steps to set up the Argus server is irrespective of the install mode (connected or disconnected).
Preparing the Cisco VIM Baremetal Manager Management Node from Cisco VIM Software Hub Server
When you want to install the Cisco VIM Baremetal Manager node using the artifacts obtained from the Cisco VIM Software Hub
server, you need to provide an additional parameter in setup_data.yaml. Ensure that the release artifacts are pre-installed
on the Cisco VIM Software Hub server and that the setup_data.yaml file is populated with the pod details. Provide the registry
FQDN name to enable installation through Cisco VIM Software Hub. For example, your.domain.com.
Cisco VIM Baremetal Manager node’s setup_data.yaml requires the REGISTRY_USERNAME and REGISTRY_PASSWORD to connect to the
docker registry and fetch docker images. To fetch the docker images from Cisco VIM Software Hub node, provide the user credentials
available in the SDS_READ_ONLY_USERS section of sds_setup_data.yaml. The details of an admin user with read/write access to
docker registry are provided in SDS_REGISTRY_USERNAME and SDS_REGISTRY_PASSWORD field. So, it is recommended to have a read-only
user on Cisco VIM pod.
Users are required to make changes to this example format as per their pod and use case. Argus also supports Cisco VIM Software
hub (SDS) based install. The setup data of Argus has multiple sections; listed below are the snippets of the common section
of the Argus setup_data.yaml
setup_data.yaml
############################################################################
#                      !! ARGUS SETUP CONFIGURATIONS !!                    #
#                     ~~~~~~~~~~~~~~~~~~~~~~~~~~~~~~~~~~~                  #
# User Defined Configuration File
# Information in this file is specific to the user setup


############################################################################
#                         REGISTRY INFORMATION                             #
############################################################################
# Mandatory parameters
# Can be reconfigured, to point to SDS and back
REGISTRY_USERNAME: '<username>'
REGISTRY_PASSWORD: '<password>'

# Mandatory Parameter when SDS is enabled.
# Not required when SDS is not enabled.
# Example registry FQDN name [your.domain.com]
# Can be reconfigured, to point to SDS and back
REGISTRY_NAME: '<registry_name>'


############################################################################
#                          INSTALLATION MODE                               #
############################################################################
# Optional parameter
# Valid options:
#  a) connected (default): Node has connectivity to https://cvim-registry.com
#
#  b) disconnected: Node had NO connectivity to https://cvim-registry.com
#     Refer to CISCO VIM Install Guide for details on disconnected install
#     Chapter 5: Installing Management Node Remotely
#     Section: Preparing the Argus Management Node in an Air-gapped Install
INSTALL_MODE: connected


############################################################################
#                           POD INFORMATION                                #
############################################################################
# Mandatory parameter, must be set to 'rmi' (only option for now)
# rmi -> Remote Management Install
PODTYPE: 'rmi'


############################################################################
#                         NETWORKING INFORMATION                           #
############################################################################
# Optional, valid options are 'v4' (default) and 'v6'.
# This parameter determines whether the CVIM pods going to be deployed via
# RMI the will use IPv6 or IPv4 addresses.
# Mixing IPv4 and IPv6 (CVIM pods) is not supported for now.
DHCP_MODE: 'v4'


# Optional, needed if the pod is behind a proxy
# Name of the proxy server without 'https://'
# Not required for INSTALL_MODE: disconnected
https_proxy_server: '<proxy.domain.com:8080>'
############################################################################
Setting up RIMN/Cisco VIM Baremetal Manager Server
The first step is to set up the Cisco VIM Baremetal Manager management server infrastructure including the REST-API and CLI
Perform hardware validations to check if deployment node is Cisco compliant BOM and validations on user passed setup_data.yaml.
Step 2
Run Ansible playbooks and deploy docker containers namely argus_rest_api_<tag-id>, argus_agent_<tag_id>, argus_etcd_<tag_id>,
CISCO VIM data containers and install a CLI to Argus Baremetal REST-API.
Deploying the Target Servers over Layer 2 and Layer 3
Post Cisco VIM Baremetal Manager or RIMN server installation, you can deploy the remote servers.
Cisco VIM Baremetal Manager CLI Helper:
# argus -h
       usage: argus [-h] [--json] [--debug] <subcommand> ...

       Command-line interface to the Argus Baremetal Installer

       positional arguments:
         <subcommand>
           baremetal   Perform baremetal operations
           job         Perform job operations
           flavor      Perform flavor operations
           iso         Perform ISO operations

       optional arguments:
            -h, --help    show this help message and exit
            --json        Get output in json format
            --debug       Print debugging output
            -y, --yes	Option to skip steps without prompt
Import ISOs to Argus:
You must download the Cisco-provided ISO file to the Argus management node before starting the server deployment. The ISO
file creates a unique flavor for Cisco VIM Baremetal Manager Agent that is then used to decide the base of networking, boot,
and OS for new servers.
# argus iso -h
usage: argus iso [-h] -a action [-f config_file] [-n name]

optional arguments:
  -h, --help      show this help message and exit
  -a action       list    - List all ISOs
                  show    - Show ISO details
                  import  - Import an ISO on the management node
                  delete  - Delete ISO
  -f config_file  Path of an ISO file
  -n name         ISO name
# argus iso -a import -f buildnode-internal-18173.iso -n my_argus-iso
+--------+--------+-------------------+
| Action | Status |      Flavor       |
+--------+--------+-------------------+
| Import |  PASS  | my_argus-iso-18173 |
+--------+--------+-------------------+
The above command can be used multiple times to import different ISO files. Verify the ISO and the corresponding flavor via:
# argus iso -a list
List of Isos:
+--------+--------------+
| SL.NO. |     Isos     |
+--------+--------------+
| 1      | my_argus-iso  |
+--------+--------------+
# argus iso -a show -n master_20928
ISO Details:
+------------------------------+--------------------+
|          File Name           |       Flavor       |
+------------------------------+--------------------+
| buildnode-internal-18173.iso | my_argus-iso-18173  |
+------------------------------+--------------------+
The ISO import creates flavors that define the nature of the server. A flavor is specifically tied to the ISO file imported.
You can verify the flavors that are created from the ISO import operations explained above:
# argus flavor -a list
List of Flavors:
+--------+--------------------+
| SL.NO. |     Flavors        |
+--------+--------------------+
| 1      | my_argus-iso-18173  |
+--------+--------------------+

[root@argus-mgmt ~]# argus flavor -a show -n my_argus-iso-18173

Flavor Details:
+-------------------+-------------------+-----------------+---------------+------------------+-----------+
|        Name       |      Workflow     |  OS Policies    | Disk Policies | Network Policies | Boot Mode |
+-------------------+-------------------+-----------------+---------------+------------------+-----------+
| my_argus-iso-18173| my_argus-iso-18173| huge-pages-1g   |   disk-sriov  |    management    |    uefi   |
|                   |                   |                 |               |       api        |           |
+-------------------+-------------------+-----------------+---------------+------------------+-----------+
The above-mentioned created flavor(s) should be used in the site/cluster/node config during server deployment
* Flavor can be defined either in common or server level, as a single flavor can be used with multiple severs
 clusters:
  ...
  servers:
     - name: server-1
       flavor: my_argus-iso-18173
  [OR]
  common_info:
    flavor: my_argus-iso-18173
Deploy the site:
To help deploy the target nodes, the next step is to create the site configuration data file. To deploy the site, execute
the following:
Listed below is an example of the Cisco VIM Baremetal Managersite config data to deploy the target server. Users are required
to make changes to this example format as per their use case:
Cisco VIM Baremetal Manager Site config:
# Cisco VIM Baremetal Manager CONFIGURATIONS:
# ARGUS BAREMETAL CONFIGURATIONS:
#********************************
# User defined Baremetal configuration file, information specific to user setup

# Structure: Logical grouping of nodes to form a cluster and similar grouping of
# clusters to form a site.

# site
# `-- clusters
#     |-- cluster_0
#     |   `-- servers
#     |       |-- node_0.0
#     |       | .
#     |       | .
#     |       `-- node_0.n
#     | .
#     | .
#     |-- cluster_n
#     |   `-- servers
#     |       |-- node_n.0
#     |       | .
#     |       | .
#     |       `-- node_n.n
#     `-- common_info
# REQUIREMENTS AND CRITERIA:
#***************************
# Do not put values in this section; its just a explanatory section
# referencing to validations of keys used in Section 1 and 2

# Some validations for critical keys have been listed here:
##----------------------------------------------------------------------
## 1. oob_password: BMC/CIMC PASSWORD                                  |
##----------------------------------------------------------------------
## Applies for both UCS-C and Quanta BMC
## Passwords should satisfy at least 3 of the following conditions:
##     a. at least 1 letter between a to z
##     b. at least 1 letter between A to Z
##     c. at least 1 number between 0 to 9
##     d. at least 1 character from !$@%^-_+=
## AND
##     e. No space allowed
##     f. 8<= Length <=20

## 2. name: RESOURCE NAME (SITE/CLUSTER/NODE)                          |
##----------------------------------------------------------------------
## Resource names should satisfy following criteria:
##     a. Required
##     b. Unique
##     c. ASCII chars
##     d. No space allowed
##     e. 1 <= Length <=32

## 3. info: RESOURCE INFORMATION (SITE/CLUSTER)                        |
##----------------------------------------------------------------------
## Resource info keys should satisfy the following criteria:
##     a. Required
##     b. ASCII chars
##     c. 1 <= Length <=50

## 4. boot_network: SERVER'S BOOT NETWORK                              |
##----------------------------------------------------------------------
## Server's boot network holds following criteria:
##     a. Optional, defaults to:
##        -> management_*_v4: if Agent running on DHCP_MODE: v4
##        -> management_*_v6: if v6 management interface defined in
##                            server's ip_address section and Agent
##                            running on DHCP_MODE: v6
##     b. Should follow <api|management>_*_<v4|v6> pattern
##
##  * - Interface Representation Number

## 5. ip_address: SERVER'S NETWORKING INTERFACES AND CONFIGS           |
##----------------------------------------------------------------------
## api_*_v4 --> br_api, ipv4; api_*_v6 --> br_api, ipv6
## management_*_v4 --> br_mgmt, ipv4; management_*_v6 --> br_mgmt, ipv6
##
## Networking Interface(s) dictionary of the server to be deployed
## Dict should satisfy the following criteria:
##     a. Pattern of Keys:
##        # Should follow <api|management>_*_<v4|v6> OR
##                        <api|management>_*_gateway_<v4|v6> pattern
##        # Representation number: * of all interfaces should match
##
##     b. Mandatory Keys:
##        -> api_*_v4, api_*_gateway_v4
##        -> management_*_v4
##
##     c. Optional Keys:
##        -> management_*_gateway_v4
##        -> management_*_gateway_v6
##        # Any 1 of the below 3 keys defined, makes others mandatory
##        -> api_*_v6, api_*_gateway_v6
##        -> management_*_v6
##
##     d. Interfaces:
##        # Different interfaces should NOT share a common network
##        # Interfaces should be in valid v4 or v6 CIDR format
##        -> api_*_v4, api_*_v6
##        -> management_*_v4, management_*_v6
##
##     e. Gateways:
##        # Gateways should have a valid v4 or v6 IP
##        # IP should be in the respective interface network
##        -> api_*_gateway_v4, api_*_gateway_v6
##        -> management_*_gateway_v4, management_*_gateway_v6
##
##  -> No duplicate values allowed
##
##  * - Interface Representation Number                                |
## ---------------------------------------------------------------------

## Representation number: The one which defines an interface's uniqueness
##         ( * )          Eg. '2' in case of api_2_v4
## ---------------------------------------------------------------------

# SECTION 1. SITE INFORMATION AND COMMON CONFIGS:
#************************************************

name: <overall_site_name>
info: <site_description>

# Required
common_info:
    # Required, common username for multiple BMC/CIMC
    # Can be overridden at server level
    oob_username: <oob_username>

    # Required, common password for multiple BMC/CIMC
    # Can be overridden at server level
    oob_password: <oob_password>

    # Required, time zone to be configured for node(s)
    # Daylight saving time not supported
    time_zone: <UTC or US/Pacific, etc>

    # Required
    domain_name: <your.domain.com>

    # Required, max of 3
    # Can be overridden in server level
    domain_name_servers:
      - <8.8.8.8>
    # OR
    domain_name_servers: [171.70.168.183, 173.36.131.10]

    # Required
    ntp_servers:
      - <1.pool.ntp.org>
    # OR
    ntp_servers: [ ntp.cisco.com, time.apple.com ]

    # Required, common flavor for each node
    # Forms the base of OS, Boot and Networking
    # Should be created by ISO import previous to deploy
    # Can be overridden at server level
    flavor: my_argus-iso-18173

    # Required, should start with $6
    # Run python script argus_password_hash.py in cvim_bm-<tag-id>/tools
    # to generate it from the plaintext.
    # Can be overridden at server level
    password_hash: <password hash>

    # Optional
    # Provided SSH key file should contain SSH public key of the node from
    # which password less SSH to all the deploy servers would be enabled.
    # By default password less SSH from the RMI management node will be enabled.
    # Providing a value here will disable the default behaviour as only one
    # public key mapping is supported for now.
    # Can be overridden at server level.
    ssh_key_file: <path_to_ssh_public_key_file>

# SECTION 2. CLUSTER(S) INFORMATION AND SERVER(S) NETWORKING CONFIGS:
#********************************************************************

# Required, at least 1
clusters:
  - name: <cluster_name>
    info: <cluster_description>

    # Required, at least 1
    servers:
      - name: <target_server_name>

        # Required, BMC/CIMC IP of target server
        # IPv4 or v6
        oob_ip: 2001:420:293:2469:DAC4:97FF:FEE9:2D51

        # Optional, defaults to value in common_info
        oob_username: admin

        # Optional, defaults to value in common_info
        oob_password: *********

        # Optional, defaults to value in common_info
        # Should be created by ISO import, previous to the deploy
        flavor: my_argus-iso-26073

        # Optional, defaults to value in common_info; should start with $6
        # Run python script argus_password_hash.py in cvim_bm-<tag-id>/tools
        # to generate it from the plaintext.
        password_hash: <password hash>

        # Optional, defaults to value in common_info
        # Max of 3
        domain_name_servers: [171.70.168.183, 173.36.131.10]

        # Optional, defaults to value in common_info
        # Provided SSH key file should contain SSH public key of the node from
        # which password less SSH to this server would be enabled.
        # No entry in either common_info or here will enable password less SSH
        # from the RMI management node.
        ssh_key_file: <path_to_ssh_public_key_file>

        # #################################################################
        # Server's Interface(s) example configs
        # Please refer validations mentioned in Requirements Section: 4 & 5
        # #################################################################
        boot_network: api_1_v6

        # Required
        ip_address:
          api_1_v4: 10.30.117.248/28
          api_1_gateway_v4: 10.30.117.241
          api_1_v6: 2001:420:293:256a::1248/64
          api_1_gateway_v6: 2001:420:293:256a::2
          management_1_v4: 20.20.30.248/25
          management_1_gateway_v4: 20.20.30.1
          management_1_v6:  2001:420:293:2447:2f6:63ff:fedb:9e2/64
          management_1_gateway_v6:2001:420:293:2447::2

      - name: node-2
        oob_ip: 2001:420:293:2469:DAC4:97FF:FEE8:9690
        ip_address:
          api_2_v4: 10.30.117.246/28
          api_2_gateway_v4: 10.30.117.241
          management_2_v4: 20.20.30.248/25

########################################################################
Note
Note: The information in the common sections is shared across all target servers in the cluster. However, one could potentially
overwrite it on as per server basis. For example: flavor, oob username/password, passwpord_hash, domain_name_servers can be
defined as per server level.
The password is an encrypted string from plain text password; To get you can run python script argus_password_hash.py in Cisco
VIM_bm-<tag-id>/tools to generate it from the plaintext.
The ssh_key is a public SSH key for a host, and if provided, one can automatically get authenticated and SSH into the deployed
nodes after installation without a password. The public/private key pair maybe generated with command below:
This image is not available in
preview/cisco.com
Baremetal CLI Helper:
[root@argus-mgmt ~]# argus baremetal -h
usage: argus baremetal [-h] -a action [-f config_file] [-n name] [--status]

optional arguments:
  -h, --help      show this help message and exit
  -a action       list            - List site/cluster/node
                  show            - Show details of a site/cluster/node
                  fetch-config    - Fetch site yaml config
                  deploy          - Create and deploy a site
                  deploy-cluster  - Add and deploy a cluster
                  deploy-node     - Add and deploy a node
                  delete          - Delete a site
                  delete-cluster  - Delete a cluster
                  delete-node     - Delete a node
  -f config_file  Path of argus config-file
  -d dump_dir     Path of directory to dump site config yaml file
  -n name         Name of site/cluster/node on which operation is to be performed.
  --status        Get status of site/cluster
                  Use this argument with 'show' action.
To start server deploy, the user needs to pass the above-created site config data to the Argus CLI with the appropriate parser and action.
# argus baremetal -a deploy -f /root/argus_baremetal.yaml
Performing this step will boot and deploy the server(s) with the provided flavor.
  Do you want to continue?(Y/N)

+--------+--------+---------------+------------------------------------------------+
| Action | Status | Resource Name |                    Details                     |
+--------+--------+---------------+------------------------------------------------+
| Deploy |  PASS  |  myimage-rms  | job_uuid: 943c1a82-cfdb-4281-a655-d56eb9ce7318 |
|        |        |               |                 status: ToRun                  |
+--------+--------+---------------+------------------------------------------------+

A job is created to deploy the site with UUID shown above. One can query its status as shown below:
# argus job -a show -u 943c1a82-cfdb-4281-a655-d56eb9ce7318

Job Details:
+----------------------+----------+---------+----------------------+----------------------+----------------------+------------+---------+---------+-------+-----+
|     Description      |  Stage   |  Status |      Created_at      |      Started_at      |      Updated_at      | Aborted_at | Command | Version | Error | Log |
+----------------------+----------+---------+----------------------+----------------------+----------------------+------------+---------+---------+-------+-----+
|     deploy site:     | workflow | Running |      2019-07-29      |      2019-07-29      |      2019-07-29      |    N.A     |  deploy |    v1   |  N.A  | N.A |
|     myimage-rms      |          |         |   10:24:20.326375    |  17:24:20.684958544  |  17:25:54.462980001  |            |         |         |       |     |
|                      |          |         |                      |      +0000 UTC       |      +0000 UTC       |            |         |         |       |     |
+----------------------+----------+---------+----------------------+----------------------+----------------------+------------+---------+---------+-------+-----+

Task Details:
+--------------------------------+----------+---------+--------------------------------+--------------------------------+---------+-------+
|             Server             |  Stage   |  Status |           Started_at           |           Updated_at           | Command | Error |
+--------------------------------+----------+---------+--------------------------------+--------------------------------+---------+-------+
|  myimage-rms/cluster-quanta-   | workflow | Running | 2019-07-29 17:24:20.976062896  | 2019-07-29 17:25:29.424103923  |  deploy |  N.A  |
|            rms/qr1             |          |         |           +0000 UTC            |           +0000 UTC            |         |       |
+--------------------------------+----------+---------+--------------------------------+--------------------------------+---------+-------+
|  myimage-rms/cluster-quanta-   | workflow | Running | 2019-07-29 17:24:21.033556299  | 2019-07-29 17:25:36.094923735  |  deploy |  N.A  |
|            rms/qr2             |          |         |           +0000 UTC            |           +0000 UTC            |         |       |
+--------------------------------+----------+---------+--------------------------------+--------------------------------+---------+-------+
|  myimage-rms/cluster-quanta-   | workflow | Running | 2019-07-29 17:24:21.034453335  | 2019-07-29 17:25:44.136601455  |  deploy |  N.A  |
|            rms/qr3             |          |         |           +0000 UTC            |           +0000 UTC            |         |       |
+--------------------------------+----------+---------+--------------------------------+--------------------------------+---------+-------+

If the site is already deployed, irrespective of its status (DeploySuccess or DeployFailed) above command will request Argus to re-deploy all the servers again.
NOTE: Please use re-deploy with caution.
To list all jobs, or fetch job(s) with particular status.
[root@africa installer]# argus job -a list
List of Jobs:
+--------------------------------------+-------------------------------------------------+--------------------------------------+-----------+---------+
|               Job uuid               |                   Description                   |             Updated_at               |    Stage  |  Status |
+--------------------------------------+-------------------------------------------------+--------------------------------------+-----------+---------+
| ed93738c-311b-4090-8db1-c9d9c1941d44 |             deploy site: myimage-rms            | 2019-08-01 03:40:28.357371 +0000 UTC |  workflow | Success |
| 520335b8-dead-4d1b-b5a8-ce3a8c979fa8 |  deploy cluster: myimage-rms/cluster-quanta-rms | 2019-08-01 03:42:27.738706 +0000 UTC |  workflow | Failed  |
| 04dcb381-4702-45de-a101-7ab178c46bd4 | delete node: myimage-rms/cluster-quanta-rms/qr1 | 2019-08-01 03:43:32.451262 +0000 TUC |  workflow | Running |
+--------------------------------------+-------------------------------------------------+--------------------------------------+-----------+---------+

[root@africa installer]# argus job -a list --failed
List of Jobs:
+--------------------------------------+-------------------------------------------------+--------------------------------------+-----------+---------+
|               Job uuid               |                   Description                   |             Updated_at               |    Stage  |  Status |
+--------------------------------------+-------------------------------------------------+--------------------------------------+-----------+---------+
| 520335b8-dead-4d1b-b5a8-ce3a8c979fa8 |  deploy cluster: myimage-rms/cluster-quanta-rms | 2019-08-01 03:42:27.738706 +0000 UTC |  workflow | Failed  |
+--------------------------------------+-------------------------------------------------+--------------------------------------+-----------+---------+


[root@africa installer]# argus job -a list --success
List of Jobs:
+--------------------------------------+-------------------------------------------------+--------------------------------------+-----------+---------+
|               Job uuid               |                   Description                   |             Updated_at               |    Stage  |  Status |
+--------------------------------------+-------------------------------------------------+--------------------------------------+-----------+---------+
| ed93738c-311b-4090-8db1-c9d9c1941d44 |             deploy site: myimage-rms            | 2019-08-01 03:40:28.357371 +0000 UTC |  workflow | Success |
+--------------------------------------+-------------------------------------------------+--------------------------------------+-----------+---------+


[root@africa installer]# argus job -a list --running
List of Jobs:
+--------------------------------------+-------------------------------------------------+--------------------------------------+-----------+---------+
|               Job uuid               |                   Description                   |             Updated_at               |    Stage  |  Status |
+--------------------------------------+-------------------------------------------------+--------------------------------------+-----------+---------+
| 04dcb381-4702-45de-a101-7ab178c46bd4 | delete node: myimage-rms/cluster-quanta-rms/qr1 | 2019-08-01 03:43:32.451262 +0000 TUC |  workflow | Running |
+--------------------------------------+-------------------------------------------------+--------------------------------------+-----------+---------+
And also for a particular server:
# argus baremetal -a show -n myimage-rms/cluster-quanta-rms/qr1
Node Details:+-----------------------------------------+--------------------+---------------------------------------+--------------+--------------------+
|                IP Address               |       Flavor       |                 OOB IP                | OOB Username |       Status       |
+-----------------------------------------+--------------------+---------------------------------------+--------------+--------------------+
|         api_1_v4: 10.30.117.244         | myimage-iso-18173    | 2001:420:293:2469:DAC4:97FF:FEE9:2D51 |    admin     |    Deploying       |
|    api_1_v6: 2001:420:293:248b::1245    |                    |                                       |              |                    |
| management_1_v6: 2001:420:293:148b::245 |                    |                                       |              |                    |
|       management_1_v4: 20.20.0.245      |                    |                                       |              |                    |
+-----------------------------------------+--------------------+---------------------------------------+--------------+--------------------+

The show command can also be used to get only status of the site with –status

# argus baremetal -a show -n myimage-rms –status

Site Status Details:
+--------------------+---------+--------------------+--------------------+--------------------+
|     Cluster(s)     | Node(s) |    Node Status     |   Cluster Status   |    Site Status     |
+--------------------+---------+--------------------+--------------------+--------------------+
|                    |   qr1   |    Deploying       |                    |                    |
| cluster-quanta-rms |   qr2   |    Deploying       |   Deploying        |    Deploying       |
|                    |   qr3   |    Deploying       |                    |                    |
+--------------------+---------+--------------------+--------------------+--------------------+
And also to get the status of a particular cluster
# argus baremetal -a show -n myimage-rms/cluster-quanta-rms –status

Cluster Status Details:
+---------+--------------------+--------------------+
| Node(s) |    Node Status     |   Cluster Status   |
+---------+--------------------+--------------------+
|   qr1   |    Deploying       |                    |
|   qr2   |    Deploying       |      Deploying     |
|   qr3   |    Deploying       |                    |
+---------+--------------------+--------------------+
Users can also abort the above job if required:
NOTE: Only deploy jobs can be aborted, not delete ones.

# argus job -a abort -u 943c1a82-cfdb-4281-a655-d56eb9ce7318
Performing this step will abort the ongoing deploy.
Do you want to continue?(Y/N)

+--------+--------+-------------------------------------------+
| Action | Status |                  Details                  |
+--------+--------+-------------------------------------------+
| Abort  |  PASS  | Abort job request accepted. Please Wait!! |
+--------+--------+-------------------------------------------+
All the above Argus CLI commands can be used with:
--json: Prints the REST-API response in json format instead of tables
--debug: Prints the CLI call as a CURL command, its relative logs along with the REST-API response
Use –json and –debug together to achieve a collective behavior.
Delete the site:
The above-created site can be deleted as per user’s choice, which is nothing but a power-off of all the servers and removal
of their respective data from ETCD datastore.
Performing this step will power-off the server(s) and delete the site from Argus.

Do you want to continue?(Y/N)

[root@argus-mgmt ~]# argus baremetal -a delete -n my_argus-rms
+--------+--------+------------------------------------------------+
| Action | Status |                    Details                     |
+--------+--------+------------------------------------------------+
| Delete |  PASS  | job_uuid: ef648d52-20eb-49d7-b16d-b84cb52eae66 |
|        |        |                 status: ToRun                  |
+--------+--------+------------------------------------------------+
Deploy Cluster:
A new cluster can be added to a deployed site using the modified baremetal file that was used with the site deploy. You must
add the new cluster info in the baremetal file and pass that to the Argus CLI.
 # vim /root/argus_baremetal.yaml
  Add the new cluster info under ‘clusters’ key and save.
# argus baremetal -a deploy -n cluster-rakuten-bms -f /root/argus_baremetal.yaml
Performing this step will boot and deploy the server(s) with the provided flavor.
Do you want to continue?(Y/N)


+--------+--------+----------------------------------+------------------------------------------------+
| Action | Status |          Resource Name           |                    Details                     |
+--------+--------+----------------------------------+------------------------------------------------+
| Deploy |  PASS  |  myimage-rms/cluster-quanta-bms  | job_uuid: 943c1a82-cfdb-4281-a655-d56eb9ce7318 |
|        |        |                                  |                 status: ToRun                  |
+--------+--------+----------------------------------+------------------------------------------------+


If the cluster is already deployed, irrespective of its status (DeploySuccess or DeployFailed) above command will request Argus to re-deploy all the servers again.
NOTE: Please use re-deploy with caution.
Delete Cluster:
Similar to site delete, you can delete a cluster which will again power-off all the servers present in that cluster and delete
the server’s entry from the ETCD datastore.
A new node can be added to a deployed cluster using the modified bare-metal file. You need to add the new node info in the
desired cluster in the baremetal file and pass that to the Argus CLI.
# vim /root/argus_baremetal.yaml
  Add the new node info under ‘clusters-> <cluster_name> -> servers’ key and save.
# argus baremetal -a deploy -n cluster-rakuten-bms/qr3 -f /root/argus_baremetal.yaml
Performing this step will boot and deploy the server(s) with the provided flavor.
Do you want to continue?(Y/N)

+--------+--------+------------------------------------+------------------------------------------------+
| Action | Status |            Resource Name           |                    Details                     |
+--------+--------+------------------------------------+------------------------------------------------+
| Deploy |  PASS  | myimage-rms/cluster-quanta-bms/qr3 | job_uuid: 943c1a82-cfdb-4281-a655-d56eb9ce7318 |
|        |        |                                    |                 status: ToRun                  |
+--------+--------+------------------------------------+------------------------------------------------+

If the node is already deployed, irrespective of its status (DeploySuccess or DeployFailed) above command will request Argus to re-deploy the server again.
NOTE: Please use re-deploy with caution.
Delete Node:
When you delete a node, it is powered off and the server’s entry from the ETCD datastore is deleted.
[root@argus-mgmt ~]# argus baremetal -a delete -n myimage-rms/cluster-quanta-bms/qr3

Performing this step will power-off the server(s) and delete the server from cluster.

Do you want to continue?(Y/N)

+--------+--------+------------------------------------------------+
| Action | Status |                    Details                     |
+--------+--------+------------------------------------------------+
| Delete |  PASS  | job_uuid: ef648d52-20eb-49d7-b16d-b84cb52eae66 |
|        |        |                 status: ToRun                  |
+--------+--------+------------------------------------------------+
Fetch Config
After the first deploy (ongoing or success), you can fetch the passed site config. This helps you to add more clusters or
nodes to the existing site in case multiple users use the system and have no idea of previous deployments. We recommend that
you fetch the site config after you delete a cluster or a node as the existing config will have stale entries of the deleted
cluster and node.
# argus baremetal -a fetch-config -n rakuten -d /var
Site config dumped at: /var/myimage-rms.yaml


 Feedback