Cisco Prime Infrastructure 3.4 Installation and Migration Guide for Microsoft HyperV
Available Languages
How to install Cisco Prime Infrastructure for Microsoft Hyper-V Prime Infrastructure for Microsoft Hyper-VCreate Prime Infrastructure Virtual Machines Using Hyper-V ManagerSet Up Prime Infrastructure on a Hyper-V Virtual MachineModify VM Resource Allocation Using Hyper-V ManagerHow to Recover Prime Infrastructure Administrator Passwords on Hyper VMContents
- Overview
- About This Guide
- Product Overview
- About Cisco Prime Infrastructure Licensing
- About Prime Infrastructure for Microsoft Hyper-V
- Prerequisites
- Cisco Prime Infrastructure ISO image
- System Configuration
- Create Prime Infrastructure Virtual Machines Using Hyper-V Manager
- Set Up Prime Infrastructure on a Hyper-V Virtual Machine
- Modify VM Resource Allocation Using Hyper-V Manager
- Upgrade from Previous Releases of Cisco Prime Infrastructure
- Migrate from Previous Releases of Cisco Prime Infrastructure
- How to Recover Prime Infrastructure Administrator Passwords on Hyper VM
First Published:
Last Updated:
Text Part Number:
Overview
This section provides basic information about the product and this Guide.
About This Guide
This guide describes how to install Cisco Prime Infrastructure 3.4 for Microsoft Hyper-V and how to migrate or upgrade from previous releases of Cisco prime infrastructure to Cisco Prime Infrastructure 3.4.
For upgrading from Cisco Prime Infrastructure 3.1.5, 3.2, and 3.3 to Cisco Prime Infrastructure 3.4, See Upgrade from Previous Releases of Cisco Prime Infrastructure.
For Migrating from previous releases of Cisco prime infrastructure to Cisco Prime Infrastructure 3.4, see Migrate from Previous Releases of Cisco Prime Infrastructure.
For information about configuring and managing this product, see the latest Cisco Prime Infrastructure User Guide and Cisco Prime Infrastructure Administrator Guide.
Product Overview
Prime Infrastructure provides a single integrated solution for comprehensive lifecycle management of the wired or wireless access, campus, and branch networks, and rich visibility into end-user connectivity and application performance assurance issues. Prime Infrastructure accelerates the rollout of new services, secure access and management of mobile devices, making “Bring Your Own Device” (BYOD) a reality for corporate IT. Tightly coupling client awareness with application performance visibility and network control, Prime Infrastructure helps ensure uncompromised end-user quality of experience. Deep integration with the Cisco Identity Services Engine (ISE) further extends this visibility across security and policy-related problems, presenting a complete view of client access issues with a clear path to solving them.
For:
- An overview of Prime Infrastructure features and benefits, see the latest Cisco Prime Infrastructure Data Sheets.
- Information about frequently used Prime Infrastructure features, see the latest Cisco Prime Infrastructure User Guide.
- Information about features intended for administrators, see the latest Cisco Prime Infrastructure Administrator Guide.
About Cisco Prime Infrastructure Licensing
Prime Infrastructure licenses control the features that you can use and the number of devices you can manage using those features. For more information about:
- Cisco Prime Infrastructure license types and how to order them, see the latest Cisco Prime Infrastructure Ordering and Licensing Guide.
- How to apply purchased licenses, see the latest Cisco Prime Infrastructure Administrator Guide.
About Prime Infrastructure for Microsoft Hyper-V
Cisco Prime Infrastructure for Microsoft Hyper-V extends Cisco networking benefits to Microsoft Windows Server Hyper-V deployments.
Hyper-V is a hypervisor-based server-virtualization product that improves utilization, consolidates server workloads, and reduces costs. To achieve this, Cisco Prime Infrastructure on Hyper-V uses hardware virtualization to enable multiple operating systems to run on a single host, and allows the operating systems to share the same underlying physical hardware.
You can deploy Cisco Prime Infrastructure on Hyper-V in a standalone role or as an installable product.
Prime Infrastructure Operations Center is not supported on Microsoft Hyper-V.
Prerequisites
You must have the following before you begin the installation:
See Remotely manage Hyper-V hosts with Hyper-V Manager for more details.
See Install the Hyper-V role on Windows Server 2016 for more details.
Cisco Prime Infrastructure ISO image
The following Prime Infrastructure ISO images must be available:
You can verify the Cisco Signature for the ISO image with the following steps:
- Download PI-APL-3.4.0.0.348-1-K9.iso, PrimeInfra.pem and PI-APL-3.4.0.0.348-1-K9.iso.signature.
- Copy these file to any Linux server and enter the following command.
openssl dgst -sha512 -verify
 PrimeInfra.pem -signature PI-APL-3.4.0.0.348-1-K9.iso.signature PI-APL-3.4.0.0.348-1-K9.iso
The result will be shown as “Verified”.
Direct Cisco Prime Infrastructure 3.4 installation is supported on Microsoft Hyper-V.
Note
Multiple deployments of Prime Infrastructure on the same Hyper-V host in parallel may cause errors, due to non availability of free space when creating VHDs. We recommend that you do not deploy multiple Prime Infrastructure installations on Hyper-V in parallel, unless you have verified that you have enough free disk space required for the respective Cisco Prime Infrastructure models.System Configuration
The system configuration matrix for the image deployment is:
Table 1 System Configuration Matrix Requirement
Express
Express-Plus
Standard
Professional
Windows 2016 server & Hyper-V 2016 server
2016
2016
2016
2016
Virtual CPUs
4
8
16
16
Memory (RAM)
12288 MB
16384 MB
16384 MB
24576 MB
HDD Size
300 GB
600 GB
900 GB
1.2 TB
Throughput (Disk IOPS)
200 MB/s
200 MB/s
200 MB/s
320 MB/s
For maximum management capacities for each installation option, see the section Scaling Prime Infrastructure in the latest Cisco Prime Infrastructure Quick start Guide . You must enter the details about the number of Virtual CPUs, Memory (RAM) and HDD manually during system configuration.
Create Prime Infrastructure Virtual Machines Using Hyper-V Manager
ProcedureHyper-V manager has to be installed Windows 2016 server or Windows 10 client. See Install the Hyper-V role for more details.
Note
The Hyper-V server must be listed in the Hyper-V manager before you proceed with creating a new VM.To create a VM using the new Virtual Machine Wizard in the Microsoft Hyper-V Manager, follow these steps:
Note
System administrator privileges for Hyper-V are required.
Step 1 Login to the Windows 2016 or Windows 10 client and launch Hyper-V manager. Step 2 Right click on the server and select New > virtual Machine. The New Virtual Machine Wizard screen opens
Step 3 Read the Before You Begin information and click Next. Step 4 Enter the VM name and click Next. You can check the Store the virtual machine in a different location check box if you want to specify a location other than the default location.
Step 5 Select Generation 1 in the Specify Generation screen and click Next.
Note Generation 2 is not supported for Prime Infrastructure deployment. Step 6 Enter the start up memory value in the Assign Memory screen and click Next. Refer to the table in the section System Configuration for the startup memory values.
Step 7 Select Virtual Network Adapter from the Connection drop-down and click Next. See Create a virtual switch for Hyper-V virtual machines for more information on a virtual switch.
Step 8 Select Create a virtual hard disk, enter the hard disk size in GB and click Next. Refer to the table in the section System Configuration for the hard disk values.
Step 9 Select Install an operating system from a boot CD/DVD-ROM > Image file (.iso) from the Installation Options screen and browse to the location where the PI-APL-3.4.0.0.348-1-K9.iso is saved and click Next.
Note The ISO image should be available in the Hyper-V server if it is a stand alone Hyper-V server. Step 10 Click Finish in the Completing the New Virtual Machine Wizard screen after reviewing your settings. The Virtual Machine is created with the name used in Step 4.
Step 11 Right click the Virtual Machine and click Settings. 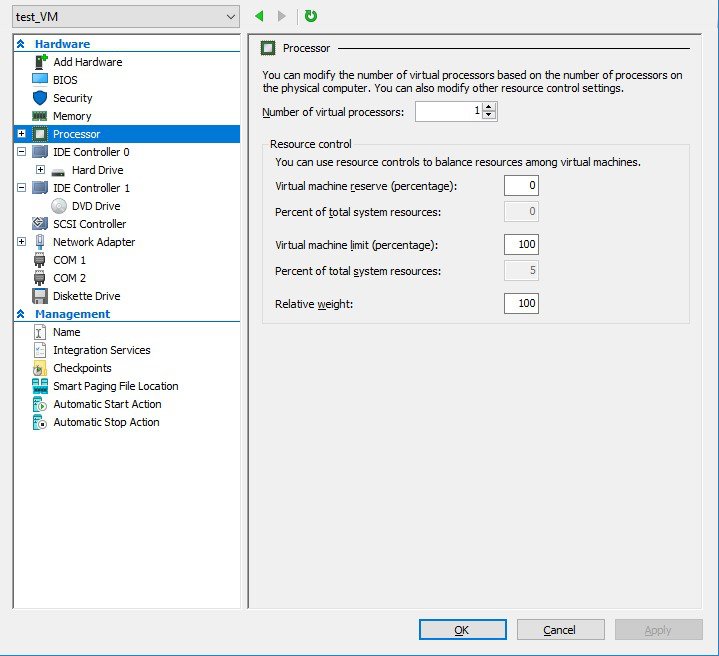
Step 12 Click Processors and enter the following: See the table in the section System Configuration for more details.
Step 13 Click Memory and enter the following:
Start Up RAM.
Set the Memory Weight at 50%.
Note The memory must be in MB. See the table in the section System Configuration for more details. Step 14 Click OK and Apply. Step 15 Select the virtual machine you created, right click and choose Connect to open the VM windows.. Step 16 Select the virtual machine, right click and choose Start to boot the virtual machine. Step 17 Enter 1—Prime Infrastructure System Installation (Keyboard/Monitor as the boot option. 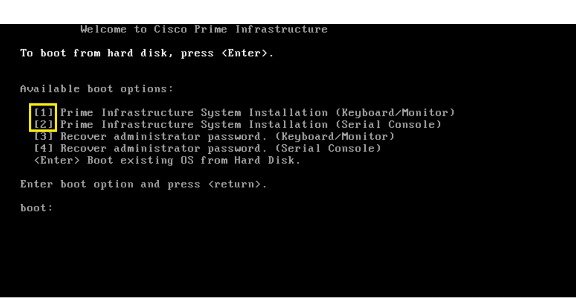
The installation process takes about 10 to 15 minutes to complete.
Set Up Prime Infrastructure on a Hyper-V Virtual Machine
Procedure
Step 1 Click the Console tab. After the server boots up, the localhost login prompt appears.
Step 2 Enter setup at the localhost login prompt. Step 3 Enter the following parameters:
Hostname—The host name of the virtual appliance.
IP Address—The IP address of the virtual appliance.
IP default netmask—The default subnet mask for the IP address.
IP default gateway—The IP address of the default gateway.
Default DNS domain—The default domain name.
Primary nameserver—The IP address of the primary name server.
Secondary name servers—The IP address if the secondary name server, if available. You can add up to three secondary name servers.
Primary NTP server—The IP address or host name of the primary Network Time Protocol server you want to use. (time.nist.gov is the default).
Secondary NTP servers—The IP addresses or host names of the secondary NTP servers to be used when the primary is not available.
System Time Zone—The time zone code you want to use. See the chapter System Timezones in the latest Cisco Prime Infrastructure User Guide .
Clock time—The clock time based on the server’s time zone.
Username—The name of the first administrative user (known as “admin”). This is the administrator account used to log in to the server via the console or SSH. You can accept the default, which is admin.
Password—Enter the admin user password and then confirm it.
The installer application tests the network configuration parameters entered and installs the software if the parameters entered are correct.
Step 4 Enter the following post-installation parameters: Step 5 Select Yes to proceed with the installation, or No to re-enter high availability options. When the installation is complete, the appliance reboots and login prompt appears.
Step 6 Login to the virtual machine using the admin username and password that you specified in Step 4. Step 7 Run ncs status to verify the all the processes have restarted. See the section Check Prime Infrastructure Server Status in the latest Cisco Prime Infrastructure Administrator Guide for more information.
Login and launch the Prime Infrastructure web interface after the installation is complete.
Modify VM Resource Allocation Using Hyper-V Manager
ProcedureUse the following steps to make changes to the virtual appliance RAM, CPU or disk space resource allocations.
Be sure to back up the Prime Infrastructure server before attempting these types of changes. For details, see the chapter Backup and Restore in the latest Cisco Prime Infrastructure Administrator Guide .
The Compliance Services will not work if you expand the RAM, CPU or disk space resource allocations after installation.
Tip
For better performance: If you are changing RAM and CPU resource allocations for the virtual machine on which you run Prime Infrastructure, and you have more than one virtual machine running on the same hardware, you may also want to change your RAM and CPU resource reservations using the Hyper-V Manager.
Upgrade from Previous Releases of Cisco Prime Infrastructure
You can upgrade to Prime Infrastructure 3.4 from the following versions:
- Cisco Prime Infrastructure 3.3
- Cisco Prime Infrastructure 3.2.2
- Cisco Prime Infrastructure 3.2.1
- Cisco Prime Infrastructure 3.2
- Cisco Prime Infrastructure 3.1.7
- Cisco Prime Infrastructure 3.1.6
- Cisco Prime Infrastructure 3.1.5
See the latest Cisco Prime Infrastructure Quick Start Guide for more information.
Migrate from Previous Releases of Cisco Prime Infrastructure
You can restore back up only on Prime Infrastructure 3.4 from the following versions:
- Cisco Prime Infrastructure 3.3
- Cisco Prime Infrastructure 3.2.2
- Cisco Prime Infrastructure 3.2.1
- Cisco Prime Infrastructure 3.2
- Cisco Prime Infrastructure 3.1.7
- Cisco Prime Infrastructure 3.1.6
- Cisco Prime Infrastructure 3.1.5
- Cisco Prime Infrastructure 3.1.4
- Cisco Prime Infrastructure 3.1.3
- Cisco Prime Infrastructure 3.1.2
- Cisco Prime Infrastructure 3.1
If you are running multiple previous releases of Prime Infrastructure (for example, you are running version 3.1.5), you must select one version from which to restore data.
See the section Before You Migrate Your Data in the latest Cisco Prime Infrastructure Quick Start Guide before you restore your data from Prime Infrastructure 3.1.x or 3.2.x or 3.3.x to your newly installed Prime Infrastructure 3.4 server.
You can restore the backup from the Gen 1 physical appliance (3.1.x) or virtual appliance (VMware) or virtual appliance (Hyper-V) on a Hyper-V virtual machine which has an equal or higher configuration.
How to Recover Prime Infrastructure Administrator Passwords on Hyper VM
See the latest Cisco Prime Infrastructure Administrator Guide for details on how to recover administrator passwords.
Cisco and the Cisco logo are trademarks or registered trademarks of Cisco and/or its affiliates in the U.S. and other countries. To view a list of Cisco trademarks, go to this URL: https://www.cisco.com/go/trademarks. Third-party trademarks mentioned are the property of their respective owners. The use of the word partner does not imply a partnership relationship between Cisco and any other company. (1721R)
Any Internet Protocol (IP) addresses and phone numbers used in this document are not intended to be actual addresses and phone numbers. Any examples, command display output, network topology diagrams, and other figures included in the document are shown for illustrative purposes only. Any use of actual IP addresses or phone numbers in illustrative content is unintentional and coincidental.
Copyright © 2018, Cisco Systems, Inc. All rights reserved.


 Feedback
Contact Cisco
- Open a Support Case

- (Requires a Cisco Service Contract)