- Installation Overview
- Installation Requirements
- Preparing for Installation
- Preparing the Oracle External Database
- Installing the Prime Network Gateway and Units Using the Installation Wizard
- Installing the Prime Network Gateway Using CLI
- Installing Prime Network Units
- Installing the Vision, Events, and Administration Clients
- Installing the Prime Network Integration Layer
- Upgrading and Rolling Back Prime Network
- Uninstalling Prime Network
- Next Steps
- Using Chinese Characters in Business Tags
Cisco Prime Network Installation Guide, 5.2
Bias-Free Language
The documentation set for this product strives to use bias-free language. For the purposes of this documentation set, bias-free is defined as language that does not imply discrimination based on age, disability, gender, racial identity, ethnic identity, sexual orientation, socioeconomic status, and intersectionality. Exceptions may be present in the documentation due to language that is hardcoded in the user interfaces of the product software, language used based on RFP documentation, or language that is used by a referenced third-party product. Learn more about how Cisco is using Inclusive Language.
- Updated:
- July 18, 2017
Chapter: Installing the Prime Network Gateway and Units Using the Installation Wizard
Installing the Prime Network Gateway and Units Using the Installation Wizard
This chapter describes how to install the gateway and units using the GUI installation wizard, which is an alternative (and preferred) installation method to the CLI installation.
The following topics are covered in this section:
- Prerequisites for Using the Installation Wizard
- Launching the Installation Wizard
- Installing the Gateway with Embedded Database Using the Installation Wizard
- Installing the Gateway with External Database Using the Installation Wizard
- Installing a Unit Using the Installation Wizard
The installation wizard does not include installation of Operations Reports and the Prime Network Integration Layer.
Prerequisites for Using the Installation Wizard
Before you begin, verify that the following prerequisites are met:
- An X client application, such as Xming, is installed on the local machine on which you plan to launch the wizard.
- A Telnet/SSH client, such as PuTTY, is installed on the local machine on which you plan to launch the wizard, and X11 forwarding is enabled.
- All preinstallation tasks for the gateway and unit are completed. See Preparing for the Installation .
- The database files (linuxx64_12201_database.zip) are available in Cisco Prime Network 5.2 Disk 4.
- Prime Network 5.2 fresh installation will support only Oracle 12.2.0.1.
Launching the Installation Wizard
To launch the installation wizard:
Step 1![]() Launch the X client application (for example, Xming).
Launch the X client application (for example, Xming).
Step 2![]() As the root user, launch a terminal on the server where you want to install the Prime Network gateway.
As the root user, launch a terminal on the server where you want to install the Prime Network gateway.
Step 3![]() Insert Disk 1: New Install in the DVD drive. (See Installation DVDs).
Insert Disk 1: New Install in the DVD drive. (See Installation DVDs).
Step 4![]() Mount the inserted DVD using the mount command, and move to the mount directory.
Mount the inserted DVD using the mount command, and move to the mount directory.
Step 5![]() In the mount directory, locate the install.bin file and run it:
In the mount directory, locate the install.bin file and run it:
This launches the installation wizard.
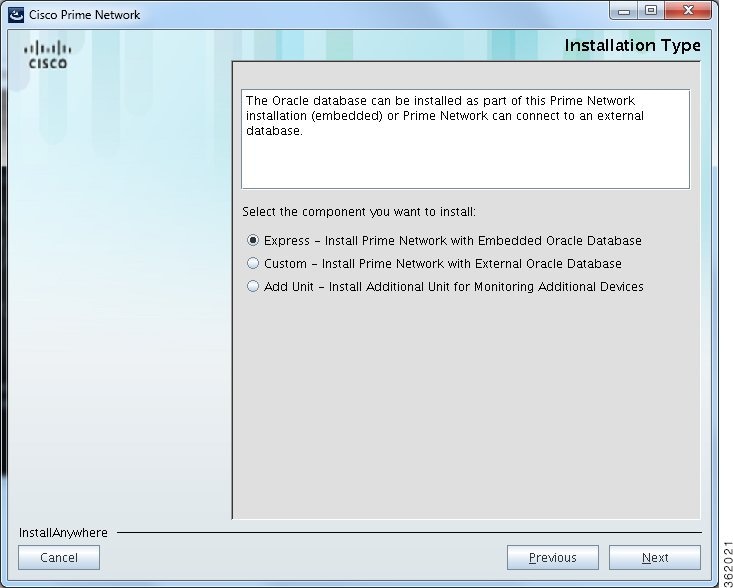
Step 6![]() Read the introduction and click Next. In the Installation Type window, you can choose the relevant installation:
Read the introduction and click Next. In the Installation Type window, you can choose the relevant installation:
- Prime Network gateway with an embedded database. See Installing the Gateway with Embedded Database Using the Installation Wizard.
- Prime Network gateway with an external database. See Installing the Gateway with External Database Using the Installation Wizard.
- Unit. See Installing a Unit Using the Installation Wizard
Installing the Gateway with Embedded Database Using the Installation Wizard
The following procedure describes how to install a Prime Network gateway and an embedded database using the GUI installation wizard.
Step 1![]() Launch the installation wizard using the install.bin file on Disk 1: New Install. See Launching the Installation Wizard.
Launch the installation wizard using the install.bin file on Disk 1: New Install. See Launching the Installation Wizard.
Step 2![]() Read the introduction and click Next.
Read the introduction and click Next.
Step 3![]() In the Installation Type window, select Express - Install Prime Network with Embedded Oracle Database and click Next.
In the Installation Type window, select Express - Install Prime Network with Embedded Oracle Database and click Next.
Step 4![]() In the next four windows, provide the required user and installation folder information, as follows:
In the next four windows, provide the required user and installation folder information, as follows:
Step 6![]() Check the Prerequisites Summary window for items that are not marked [OK] and rectify them as needed (for example, add more disk space). Click Next.
Check the Prerequisites Summary window for items that are not marked [OK] and rectify them as needed (for example, add more disk space). Click Next.
Step 7![]() In the Gateway Installation Embedded Oracle Database window, enter the gateway IP address to be used for communication with the units, if it is different from the IP address that was automatically identified by the system.
In the Gateway Installation Embedded Oracle Database window, enter the gateway IP address to be used for communication with the units, if it is different from the IP address that was automatically identified by the system.
Step 8![]() Select Suite-Integrated (if you are using Prime Network with Prime Central), or Standalone.
Select Suite-Integrated (if you are using Prime Network with Prime Central), or Standalone.

Note![]() For suite-integrated systems, Prime Network Integration Layer must be installed. See Chapter 9, “Installing the Prime Network Integration Layer”.
For suite-integrated systems, Prime Network Integration Layer must be installed. See Chapter 9, “Installing the Prime Network Integration Layer”.
Step 9![]() Provide the following information in the Embedded Database windows.
Provide the following information in the Embedded Database windows.
|
|
|
|
|---|---|---|
|
|
||
Username for the Oracle database user, if you do not want to use the default username. |
||
IP address of the database server (IPv4 or IPv6). The database server could be the gateway or a remote server. |
||
See Creating an External Oracle Database for guidelines (the information also applies to embedded databases). Prime Network calculates memory and storage requirements based on this entry. |
||
If you enter No, you can enable automatic backups later using the emdbctl command. See the Cisco Prime Network 5.2 Administrator Guide. |
||
|
|
||
Path to the directory in which the database zip files are located. |
Default is /. |
|
Default is /export/home/oracle. Must have a minimum of 9GB of disk space for oracle binaries Should not reside under the installation directory ($ PRIME_NETWORK_HOME). |
||
Path to the directory containing the datafiles ( oracle-datafiles-dir) |
||
Step 10![]() If you selected Suite-Integrated, you will be required to enter information enabling communication with Prime Central, including the Prime Central database server IP address, database port, database SID, database username and password. Click Next.
If you selected Suite-Integrated, you will be required to enter information enabling communication with Prime Central, including the Prime Central database server IP address, database port, database SID, database username and password. Click Next.
Step 11![]() In the Operations Reports Database (Infobright) windows, enter the information that will enable connection to the server on which the Infobright database is located and the folders for the Infobright data, then click Next.
In the Operations Reports Database (Infobright) windows, enter the information that will enable connection to the server on which the Infobright database is located and the folders for the Infobright data, then click Next.
|
|
|
|
|---|---|---|
|
|
||
|
|
||
Note![]() Operations Reports are only available to customers with Operations Reports license prior to May 2018. For re-installation of Operations Reports contact a Cisco customer support representative.
Operations Reports are only available to customers with Operations Reports license prior to May 2018. For re-installation of Operations Reports contact a Cisco customer support representative.
Step 12![]() In the Installation Setup Summary window, review and verify the information.
In the Installation Setup Summary window, review and verify the information.
Step 13![]() Click Install. The installation procedure will take between 20-50 minutes to complete.
Click Install. The installation procedure will take between 20-50 minutes to complete.
Step 14![]() When the installation is complete, you will receive a message indicating this. If the installation fails, you will receive a message with details about the failure.
When the installation is complete, you will receive a message indicating this. If the installation fails, you will receive a message with details about the failure.
The following logs are available after the installation:
- Installation logs—/var/adm/cisco/prime-network/logs/.
- Embedded database configuration logs—$ PRIME_NETWORK_HOME /local/scripts/embedded_oracle.
- Prime Network configuration logs—$PRIME_NETWORK_HOME/Main/logs.
Note![]() Before launching Prime Network in the Windows 2008 server from Prime central, ensure that the host file is updated with correct host IP address to resolve the hostname.If hostname is not configured properly, then the Prime Network installation fails.
Before launching Prime Network in the Windows 2008 server from Prime central, ensure that the host file is updated with correct host IP address to resolve the hostname.If hostname is not configured properly, then the Prime Network installation fails.
Installing the Gateway with External Database Using the Installation Wizard
The following procedure describes how to use the GUI installation wizard to install a Prime Network gateway that is connected to an external database.
Step 1![]() Launch the installation wizard using the install.bin file on Disk 1: New Install. See Launching the Installation Wizard.
Launch the installation wizard using the install.bin file on Disk 1: New Install. See Launching the Installation Wizard.
Step 2![]() Read the introduction and click Next.
Read the introduction and click Next.
Step 3![]() In the Installation Type window, select Custom: Install Prime Network with External Oracle Database and click Next.
In the Installation Type window, select Custom: Install Prime Network with External Oracle Database and click Next.
Step 4![]() Provide the required user and installation folder information.
Provide the required user and installation folder information.
Step 6![]() Check the Prerequisites Summary window to see if any items do not say [OK] and rectify them as needed (for example, add more disk space). Once verified, click Next.
Check the Prerequisites Summary window to see if any items do not say [OK] and rectify them as needed (for example, add more disk space). Once verified, click Next.
Step 7![]() In the Gateway Installation window, enter the gateway IP address to be used for communication with the units, if it is different from the IP address that was automatically identified by the system.
In the Gateway Installation window, enter the gateway IP address to be used for communication with the units, if it is different from the IP address that was automatically identified by the system.
Step 8![]() Select Suite-Integrated (if you are using Prime Network with Prime Central), or Standalone.
Select Suite-Integrated (if you are using Prime Network with Prime Central), or Standalone.
Note![]() For suite-integrated systems, Prime Network Integration Layer must be installed. See Chapter9, “Installing the Prime Network Integration Layer”
For suite-integrated systems, Prime Network Integration Layer must be installed. See Chapter9, “Installing the Prime Network Integration Layer”
Step 9![]() Provide the following information in the External Database window.
Provide the following information in the External Database window.
Step 10![]() If you specified that your database needs encryption, you are prompted for an encryption method and algorithm:
If you specified that your database needs encryption, you are prompted for an encryption method and algorithm:
Step 11![]() If you specified that you did not want Prime Network to create the database users, the External Database User Configuration window opens.
If you specified that you did not want Prime Network to create the database users, the External Database User Configuration window opens.
|
|
|
|
|---|---|---|
Step 12![]() If you selected Suite-Integrated, you will be required to enter information enabling communication with Prime Central, including the Prime Central database server IP address, database port, database SID, database username and password.
If you selected Suite-Integrated, you will be required to enter information enabling communication with Prime Central, including the Prime Central database server IP address, database port, database SID, database username and password.
Step 13![]() In the Operations Reports Database (Infobright) windows, enter the information that will enable connection to the server on which the Infobright database is located and the folders for the Infobright data, then click Next.
In the Operations Reports Database (Infobright) windows, enter the information that will enable connection to the server on which the Infobright database is located and the folders for the Infobright data, then click Next.
|
|
|
|
|---|---|---|
|
|
||
See Creating an External Oracle Database for guidelines. |
||
|
|
||
Note![]() Operations Reports are only available to customers with Operations Reports license prior to May 2018. For re-installation of Operations Reports contact a Cisco customer support representative.
Operations Reports are only available to customers with Operations Reports license prior to May 2018. For re-installation of Operations Reports contact a Cisco customer support representative.
Step 14![]() In the Installation Setup Summary window, review and verify the information.
In the Installation Setup Summary window, review and verify the information.
Step 15![]() Click Install. The installation procedure will take between 20-50 minutes to complete.
Click Install. The installation procedure will take between 20-50 minutes to complete.
Step 16![]() When the installation is complete, you will receive a message indicating this. If the installation fails, you will receive a message with details about the failure.
When the installation is complete, you will receive a message indicating this. If the installation fails, you will receive a message with details about the failure.
Installing a Unit Using the Installation Wizard
The following procedure describes how to install an additional unit using the GUI installation wizard.
Note![]() Ensure that the OS version of unit and gateway is same while adding the unit to the gateway.
Ensure that the OS version of unit and gateway is same while adding the unit to the gateway.
Note![]() Before starting the unit installation, ensure that the gateway to which the unit will be connected is up and running.
Before starting the unit installation, ensure that the gateway to which the unit will be connected is up and running.
Step 1![]() Launch the installation wizard using the install.bin file on Disk 1: New Install. See Launching the Installation Wizard.
Launch the installation wizard using the install.bin file on Disk 1: New Install. See Launching the Installation Wizard.
Step 2![]() Read the introduction and click Next.
Read the introduction and click Next.
Step 3![]() In the Installation Type window, select Add Unit and click Next.
In the Installation Type window, select Add Unit and click Next.
Step 4![]() Provide the required user and installation folder information.
Provide the required user and installation folder information.
Step 5![]() Check the Prerequisites Summary window to see if any items do not say [OK] and rectify them as needed (for example, add more disk space). Once verified, click Next.
Check the Prerequisites Summary window to see if any items do not say [OK] and rectify them as needed (for example, add more disk space). Once verified, click Next.
Step 6![]() In the Unit Installation window, enter the following:
In the Unit Installation window, enter the following:
Step 7![]() In the Pre-installation Summary window, verify the information.
In the Pre-installation Summary window, verify the information.
Step 8![]() Click Install to start the Unit installation.
Click Install to start the Unit installation.
Step 9![]() When the installation is complete, click Done.
When the installation is complete, click Done.
 Feedback