Easy Deployment Guide for Cisco Secure Firewall Threat Defense with Security Cloud Control
This document provides information on easy deployment of threat defense devices using zero-touch provisioning for customers using the cloud-delivered Firewall Management Center.
 Note |
For the on-premises management center zero-touch provisioning, see the getting started guide for your model. |
This document is targeted for the following device models:
|
Model |
Version |
||
|---|---|---|---|
|
Firepower 1000 |
7.2 or later |
||
|
Secure Firewall 1210/1220 |
7.6 or later |
||
|
Firepower 2100 |
7.2, 7.3, or 7.4 |
||
|
Secure Firewall 3100
|
7.2 or later |
Branch Manager: Prepare and Connect a New Threat Defense Device to Your Network
Zero-Touch Provisioning allows you to connect a new threat defense device to your network so that your IT department can onboard the device to the cloud-delivered Firewall Management Center and configure it remotely.
Make sure the device is unconfigured or set up as new. Zero-Touch Provisioning is intended for new devices only. Pre-configuration can prevent zero-touch provisioning, based on your settings.
Do you need to reimage your device?
If your device is not already running version 7.2 or later, you can reimage the device to support zero-touch provisioning. See the appropriate getting started guide for your device model:
Connect a New Threat Defense to Your Network
If you received a device at your branch office and your job is to plug it in to your network,![]() watch this video.
watch this video.
The video describes your device and the LED sequences on the device that indicate the device's status. You can confirm the device's status with your IT department by looking at the LEDs. These are the steps described in the video:
-
Look at the shipping carton the device came in. It should have a plain white sticker on it identifying the software installed on the device. The software package number should look similar to one in the following table:
Model Numbers that Support Zero-Touch Provisioning Supported Software Version Software Package Firepower 1000 series device models: 1010, 1120, 1140, 1150 7.2 or later SF-F1K-TDx.x-K9
For example, SF-F1K-TD7.2-K9
Secure Firewall 1210/1220 7.6 or later SF-F1200-TDx.x-K9
For example, SF-F1200-TD7.6-K9
Firepower 2100 series device models: 2110, 2120, 2130, 2140 7.2, 7.3, or 7.4 SF-F2K-TDx.x-K9
For example, SF-F2K-TD7.2-K9
Secure Firewall 3100 series device models: 3110, 3120, 3130, 3140 7.2 or later SF-F3K-TDx.x-K9
For example, SF-F3K-TD7.2-K9
Secure Firewall 3100 series device model: 3105 7.3 or later SF-F3K-TDx.x-K9
For example, SF-F3K-TD7.3-K9
-
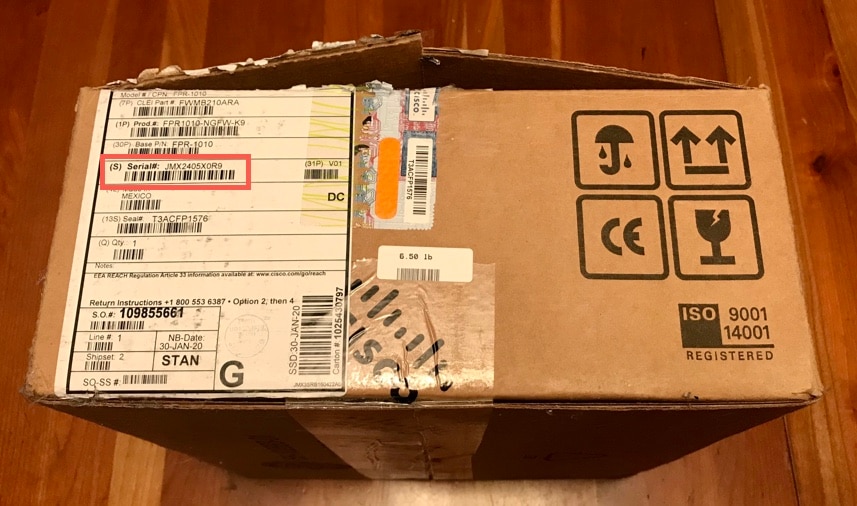
Before you rack the device or throw away the shipping carton, record your device's serial number and send it to your IT department. They need it to manage the device. The serial number of the device is located on the shipping carton the device came in and on a label affixed to the device itself. See Find Your Device's Serial Number for more information.
-
Unpack the box and take inventory of the contents. Keep the shipping carton until you have plugged in the device, you have connected it to your network, and the device has successfully contacted the Cisco cloud.
-
Connect the device to power.
-
Connect the network cable from the Ethernet 1/1 interface to your WAN modem. Your WAN modem is your branch's connection to the internet and your device's route to the internet as well.
Note
Do not connect the network cable from the device's Management interface to your WAN.
Figure 1. Firepower 1010 Cabling 
Figure 2. Firepower 1100 Cabling 
Figure 3. Secure Firewall 1210/1220 Cabling 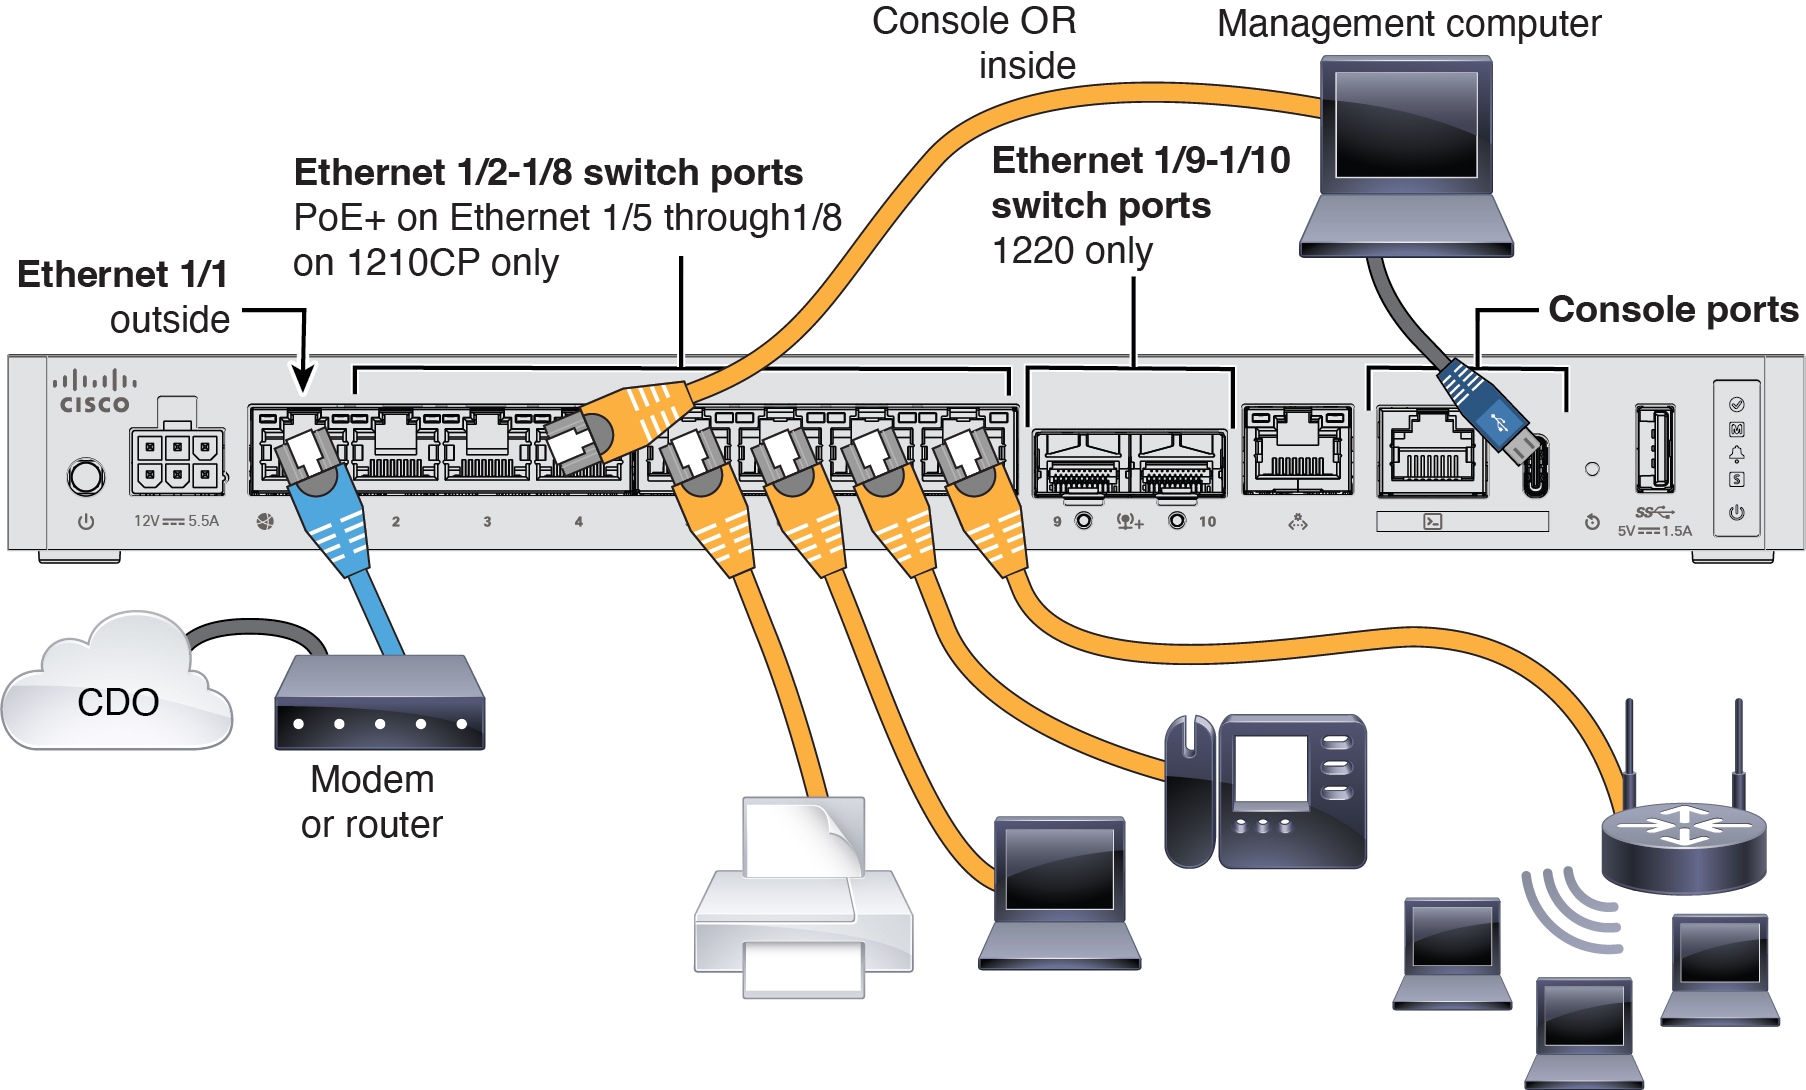
Figure 4. Firepower 2100 Cabling 
Figure 5. Secure Firewall 3100 Cabling 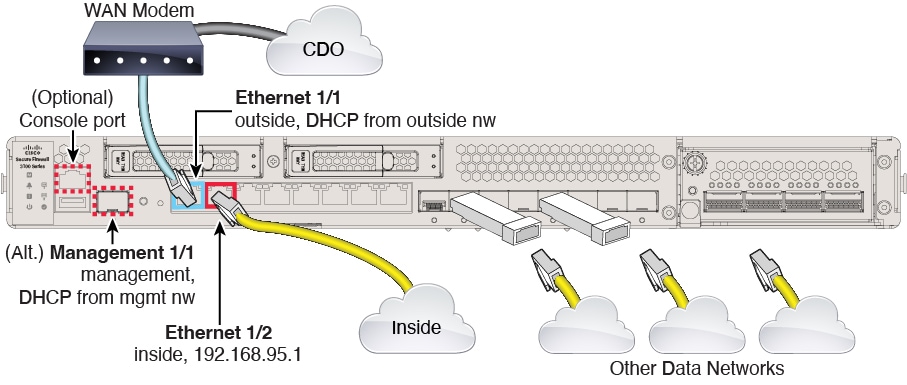
-
Observe the S (System), SYS, or M (Managed) LED, depending on your model, to determine if the device has reached the Cisco cloud. The table below provides the LED statuses and the approximate time they occur after the you connect the Ethernet cables. It may take a little more time or a little less time for the firewall to reach the Cisco cloud based on network conditions and the firewall model you are working with.
LED Status Description Time After Device Powered On (minutes:seconds) Fast flashing green SYS — Firepower 2100
S — All other models
The device is booting up correctly. 01:00 Fast flashing amber SYS — Firepower 2100
S — All other models
The device failed to boot correctly. 01:00 Solid green SYS — Firepower 2100
S — All other models
The application is loaded on the device. 10:00 Solid amber SYS — Firepower 2100
S — All other models
The application failed to load correctly on the device. 10:00 Slow flashing green SYS — Firepower 2100
S — Firepower 1000
M — Secure Firewall 3100 and Secure Firewall 1210/1220
The device is connected to the Cisco cloud. 15:00 Alternating green and amber SYS — Firepower 2100
S — Firepower 1000
M — Secure Firewall 3100 and Secure Firewall 1210/1220
The device failed to connect to the Cisco cloud. 15:00
After you complete this task, locate and supply the device's serial number to your IT administrator. The IT admin will configure the firewall remotely.
Find Your Device's Serial Number
Your IT department needs your device's serial number to connect to the device and manage it remotely. You can find the serial number in three different places.
The Label on the Shipping Carton
The serial number is printed on the label on the shipping carton the device came in. Here is an example:
The Label on the Chassis
Firepower 1010: The serial number is on a label on the bottom of the device.

Firepower 1100: The serial number is on a label on the back of the device or on the bottom of the device.

Firepower 2100: The serial number is on a label on a pull-out tab on the front of the device.

Secure Firewall 3100:The serial number is on a label on a pull-out tab on the front of the device.

Connect to the Device Console Using a Console Cable
You can connect a console cable from a device such as a laptop to your firewall, open up a terminal window, and enter a few commands to display the device's serial number.
Note |
This procedure connects a computer to the firewall using a console cable in order to retrieve the device's serial number, it is for advanced users who are comfortable working with a command line interface and, possibly, installing software drivers on their laptops. |
-
See the appropriate hardware installation guide for your device model for instructions on how to connect a laptop to your device using a console cable.
For more information, please refer to the Getting Started Guide for your specific model.
-
Log in to the device as the admin user. You need to enter the default password if this is your first login attempt: Admin123. You will then be prompted to change the password.
-
At the
firepower#prompt, entershow chassis detail. Here is an example of the output from a 1010 series device. Your device's model number will be listed in the Serial Number (SN) field:firepower# show chassis detail Chassis: Chassis: 1 Overall Status: Operable Oper qualifier: N/A Operability: Operable Product Name: Cisco Firepower 1010 Security Appliance PID: FPR-1010 VID: V01 Vendor: Cisco Systems, Inc Serial (SN): JMX2405X0R9 HW Revision: 0.6 PCB Serial Number: JAD24040S6L Power State: Ok Thermal Status: Ok Boot Status: OK Current Task: firepower#The output shows two serial numbers. You must report the value of the Serial (SN) field to your IT department to complete the onboarding process.
-
When you onboard the device, for the Password Reset area, be sure to choose No because you already set the password.
Onboard a Device to Cloud-delivered Firewall Management Center Using Zero-Touch Provisioning
If you are a cloud-delivered Firewall Management Center administrator and someone at a branch office has connected a device to their network, follow the zero-touch provisioning method described in this section.
Note |
If you want to onboard a fully configured new device, use the CLI registration key method to onboard the device. See Onboard a Threat Defense to the Cloud-delivered Firewall Management Cloud-delivered Firewall Management Center Using Serial Number for more information. |
Procedure
|
Step 1 |
Log in to Security Cloud Control. |
|
Step 2 |
In the left pane, click . |
|
Step 3 |
Click the FTD tile. |
|
Step 4 |
Under Management Mode, ensure you select FTD. |
|
Step 5 |
Click the Use Serial Number tile. |
|
Step 6 |
From the Select FMC drop-down list, select Cloud-Delivered FMC and click Next. |
|
Step 7 |
In the Connection area, enter the Device Serial Number and the Device Name. Select Next. |
|
Step 8 |
In the Password Reset area, choose an option depending on whether the device was logged into and had the password changed or not:
|
|
Step 9 |
Click Next. |
|
Step 10 |
In the Policy Assignment step, use the drop-down menu to select an access control policy to deploy once the device is onboarded. If you have no policies configured, select the Default Access Control Policy. |
|
Step 11 |
Select the subscription licenses you want to apply to the device. Click Next. |
|
Step 12 |
In the Done area, click Go to . |
What to do next
-
If you did not already, create a custom access control policy to customize the security for your environment. See Access Control Overview in Managing Firewall Threat Defense with Cloud-Delivered Firewall Management Center in Cisco Security Cloud Control for more information.
-
Enable Cisco Security Analytics and Logging (SAL) to view events in the Security Cloud Control dashboard or register the device to an Secure Firewall Management Center for security analytics. See Cisco Security Analytics and Logging in Managing Firewall Threat Defense with Cloud-Delivered Firewall Management Center in Cisco Security Cloud Control for more information.
 Feedback