Installing the Cisco ISE System Software on a VMware Virtual Machine
Available Languages
Table Of Contents
Installing Cisco ISE 3300 Series Software in a VMware Virtual Machine
Evaluating Cisco ISE Release 1.0
Configuring a VMware ESX or ESXi Server
Preparing a VMware System for Cisco ISE Software Installation
Configuring a VMware System Using the Cisco Identity Services Engine ISE Software DVD
Installing the Cisco ISE Software on a VMware System
Installing Cisco ISE 3300 Series Software in a VMware Virtual Machine
This chapter describes the system requirements for installing the Cisco Identity Services Engine (ISE) 3300 Series appliance software in a VMware virtual machine. The following topics provides information about the installation process:
•
Evaluating Cisco ISE Release 1.0
•
•
•
•

Note
Virtual Machine Requirements
The minimum system requirements for the virtual machine must be similar to the Cisco ISE 3300 Series appliance hardware configuration. Table 4-1 lists the minimum system requirements to install Cisco ISE 3300 Series software on a VMware virtual machine.
Table 4-1 Minimum VMware System Requirements
CPU
Intel Dual-Core; 2.13 GHz or faster
Memory
4 GB RAM
Hard disks
60 to 600 GB of disk storage (size depends on deployment and tasks)
NIC
1 GB NIC interface required (four NICs are recommended)
Note
Hypervisor
Supported VMware versions include:
•
•
Note
Note
Table 4-2 lists the minimum Cisco ISE hard disk space allocation requirements for running on a VMware server in a production deployment. Use the supported VMware ESX and ESXi server versions listed in Table 4-1 for running Cisco ISE software in a production deployment.
Note
The Cisco ISE Release 1.0 installer is designed to make use of all disk space that is allocated to a VMware server, up to a maximum that is equal to the maximum that is supported by the Cisco ISE hardware appliance. This means that if you create a VMware server with more than 600 GB, the maximum disk space that Cisco ISE will allocate for all deployment types is 600 GB.
Any remaining disk space remains unpartitioned. For example:
•
•
•
Note
Evaluating Cisco ISE Release 1.0
For evaluation purposes, Cisco ISE Release 1.0 can be installed in any of the supported VMware server virtual machines that meet the Virtual Machine Requirements. When evaluating Cisco ISE Release 1.0, you can configure less disk space in the virtual machine, but you still are required to allocate a minimum disk space of 60 GB.
To download the Cisco ISE Release 1.0 software for evaluation, complete the following steps:
Step 1
Step 2
You must already have valid Cisco.com login credentials to access this link.
To download a 90-day evaluation license, complete the following tasks:
Step 1
https://tools.cisco.com/S WIFT/Licensing/PrivateRegistrationServlet?DemoKeys=Y
Step 2
You must already have valid Cisco.com login credentials to access this link.
Note
To migrate a Cisco ISE configuration from an evaluation system to a fully licensed production system, you need to complete the following tasks:
•
•
•
Configuring a VMware ESX or ESXi Server
To install Cisco ISE on a supported VMware server, you must allocate a minimum disk space of 60 GB on the VMware virtual machine. This section describes how to set the minimum required disk space on the VMware virtual machine (to change the disk space size on the VMware virtual machine, log into the VMware ESX server). This section provides procedures for performing some important configuration-related tasks.

Caution
Note
To verify or change disk allocation, complete the following steps:
Step 1
If the block size is 256 MB, you must change it to 4 GB.
Step 2
Note
To remove the default configuration, complete the following steps:
Step 1
A confirmation window appears.
Step 2
The default configuration is removed.
To create a new virtual file size, complete the following steps:
Step 1
You can find the Add Storage wizard at the upper-right corner of the configuration window.
Figure 4-1 Configuration Window

Step 2
Step 3
60 GB is the minimum disk space size that is required for installing VMware with Cisco ISE. However, Cisco ISE will only use up to a maximum of 600 GB, even if you assign extra space in your VMware system. The value that you set should be between 60 and 600 GB, depending on your deployment.
Note
Step 4
The new VMware system with a 60 GB virtual disk size and a 2 MB block size is created successfully.
To check the new file size, choose Configuration > Memory, and click Properties.
Figure 4-2 displays the properties of a disk space created with the name ds1.
Figure 4-2 Disk Space Properties Window

To ensure proper operation of the Cisco ISE Profiler service on a VMware system, you need to configure the VMswitch0 and VMswitch1 interfaces on your VMware ESX or ESXi server (see Figure 4-3).
To configure the VMware server interfaces to support the Cisco ISE Profiler service, complete the following steps:
Step 1
Step 2
Step 3
Repeat the same steps on VMswitch1 (the other VMware ESX server interface).
Figure 4-3 VMNetwork Properties Window

Configuring the VMware Server
This section describes how to configure VMware servers by using the VMware Infrastructure Client.
Prerequisite
Before installing the Cisco ISE software, verify that the VMware virtual machine has a minimum of at least 60 GB of disk space allocated. For more information, see Configuring a VMware ESX or ESXi Server.
To configure the VMware server by using the VMware Infrastructure Client, complete the following steps:
Step 1
Step 2
The New Virtual Machine Wizard appears.
Step 3
Figure 4-4 Virtual Machine Configuration Dialog Box

The Name and Location dialog box appears. (Figure 4-5)
Step 4
Figure 4-5 Name and Location Dialog Box


Tip
The Datastore dialog box appears. (Figure 4-6)
Step 5
Figure 4-6 Datastore Dialog Box

The Guest Operating System dialog box appears. (Figure 4-7)
Step 6
Figure 4-7 Guest Operating System Dialog Box

The Number of Virtual Processors dialog box appears. (Figure 4-8)
Step 7
Figure 4-8 Number of Virtual Processors Dialog Box

The Memory Configuration dialog box appears. (Figure 4-9)
Step 8
Figure 4-9 Memory Configuration Dialog Box

The NIC Configuration dialog box appears. (Figure 4-10)
Step 9
Note
Figure 4-10 NIC Configuration Dialog Box

The Virtual Disk Capacity dialog box appears. (Figure 4-12).
Figure 4-11 Disk Provisioning Dialog Box
Step 10
The Virtual Disk Capacity dialog box appears. (Figure 4-12)
Caution
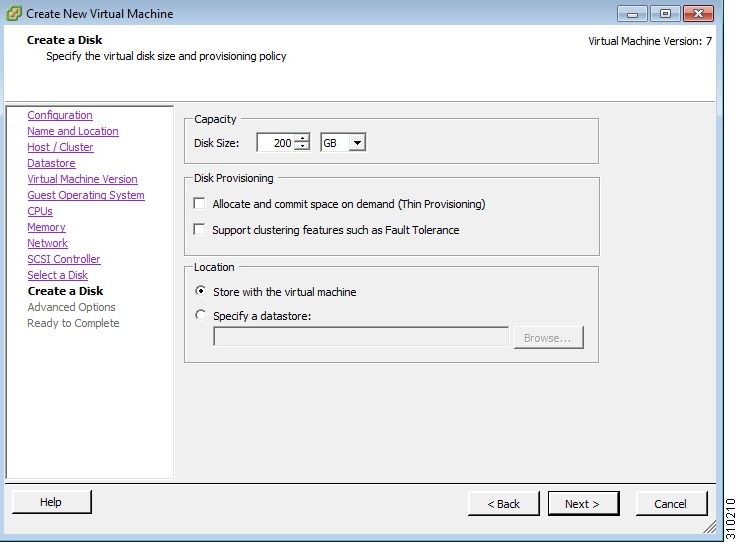
Step 11
Figure 4-12 Virtual Disk Capacity Dialog Box

The Ready to Complete New Virtual Machine dialog box appears. (Figure 4-13)
Step 12
Figure 4-13 Ready to Complete Dialog Box

Step 13
The VMware system is now installed.
To activate the newly created VMware system, right-click VM in the left pane and choose Power On.
Preparing a VMware System for Cisco ISE Software Installation
After configuring the VMware system, you are ready to install the Cisco ISE software. To install the Cisco ISE software from your Cisco Identity Services Engine ISE VM Appliance Software Version 1.0 DVD, you need to configure the VMware system to boot from this Cisco ISE DVD. This requires that the VMware system be configured with a virtual DVD drive to boot from the Cisco Identity Services Engine ISE VM Appliance Software Version 1.0 DVD.
You can do this by using different methods that are dependent upon your network environment. See Configuring a VMware System Using the Cisco Identity Services Engine ISE Software DVD to configure the VMware system by using the DVD drive of your VMware ESX server host.
Configuring a VMware System Using the Cisco Identity Services Engine ISE Software DVD
This section describes how to configure a VMware system to boot from the Cisco Identity Services Engine ISE VM Appliance Software Version 1.0 DVD by using the DVD drive of the VMware ESX server host.
To configure the VMware system by using the DVD drive, complete the following steps:
Step 1
The Virtual Machine Properties window appears. Figure 4-14 displays the properties of a VMware system created with the name Cisco ISE Release 1.0.
Figure 4-14 Virtual Machine Properties Dialog Box

Step 2
The CD/DVD Drive1 properties dialog box appears.
Step 3
Step 4
You can now use the DVD drive of the VMware ESX server to install the Cisco ISE software.
When you complete the configuration, click the Console tab, right-click VM in the left pane, and choose Send Ctrl+Alt+Del to restart the VMware system.
Installing the Cisco ISE Software on a VMware System
This section describes the installation process for the Cisco ISE software on VMware ESX 4.x.
To install the Cisco ISE software on a VMware system, complete the following steps:
Step 1
Step 2
a.
b.
c.
d.
e.
Note
f.
g.
Note
Step 3
Note
When the Cisco Identity Services Engine ISE VM Appliance Software Version 1.0 DVD boots, the console displays:
Welcome to Cisco ISE
To boot from the hard disk press <Enter>
Available boot options:
[1] Cisco Identity Services Engine Installation (Monitor/Keyboard)
[2] Cisco Identity Services Engine Installation (Serial Console)
[3] Reset Administrator Password (Keyboard/Monitor)
[4] Reset Administrator Password (Serial Console)
<Enter> Boot from hard disk
Please enter boot option and press <Enter>.
boot: 1You can choose either the monitor and keyboard port, or the console port to perform the initial setup.
Step 4
This starts the installation of the Cisco ISE software on the VMware system.
Note
When the installation process finishes, the VM reboots automatically.
When the VM reboots, the console displays:
Type 'setup' to configure your appliance
localhost:Step 5
The Setup Wizard appears and guides you through the initial configuration. For more information on the setup process, see Understanding the Setup Program Parameters, page 3-3.
 Feedback