Basic Setup

Administration Portal

Figure 1. Cisco ISE Administration Portal
Table 1. Components of the Cisco ISE Administration Portal

1

Menu Icon

Click the Menu icon () for a slide-in window with the following menus. The slide-in Menu window also contains a search bar with which you can find the window that you need. Click Dashboard for the home page.

Figure 2. Cisco ISE Main Menu

The menu options on the left pane are:

  • Context Visibility: The context visibility windows display information about endpoints, users, and network access devices (NAD). The context visibility information is grouped by features, applications, Bring Your Own Device (BYOD), and other categories, depending on the licenses you have registered. The context visibility windows use a central database and gather information from database tables, caches, and buffers. As a result, the content in the context visibility dashlets and lists gets updated quickly. The context visibility windows consist of dashlets at the top, and a list of information at the bottom. When you filter data by modifying the column attributes in the list, the dashlets get refreshed and display the modified content.

  • Operations: Operations windows include tools to view RADIUS, TACACS+, and TC-NAC Live Logs, the Adaptive Network Control (ANC) policy, and troubleshooting options to diagnose and debug issues related to Cisco ISE deployments.

  • Policy: Policy windows include tools for managing network security in the areas of authentication, authorization, profiling, posture, and client provisioning.

  • Administration: Administration windows include tools for managing Cisco ISE nodes, licenses, certificates, network devices, users, endpoints, and guest services.

  • Work Centers: Work Centers list the following expandable submenus. These submenus act as a single starting point for Cisco ISE administrators, to configure relevant features within a Cisco ISE deployment.

    • Network Access

    • Guest Access

    • TrustSec

    • BYOD

    • Profiler

    • Posture

    • Device Administration

    • PassiveID

2

Top-Right Menu Icons

  • Use this icon to search for endpoints and display their distribution by profiles, failures, identity stores, location, device type, and so on.

  • Click the icon to view the Interactive Help menu that provides access to multiple resources.

  • Click this icon to access the following options:

    • PassiveID Setup: The PassiveID Setup option launches the PassiveID Setup wizard to set up passive identity using Active Directory. Configure the server to gather user identities and IP addresses from external authentication servers and deliver the authenticated IP addresses to the corresponding subscriber.

    • Visibility Setup: Visibility Setup is a Proof of Value (PoV) service that collects endpoint data such as applications, hardware inventory, USB status, firewall status, and the overall compliance state of Windows endpoints. The collected data is then sent to Cisco ISE. When you launch the ISE Visibility Setup wizard, it allows you to specify an IP address range to run endpoint discovery for a preferred segment of the network or a group of endpoints.

      The PoV service uses the Cisco Stealth Temporal agent to collect endpoint posture data. Cisco ISE pushes the Cisco Stealth Temporal agent to computers running Windows with an Administrator account type, which automatically runs a temporary executable file to collect context. The agent then removes itself. To experience the optional debug capabilities of Cisco Stealth Temporal agent, check the Endpoint Logging check box (click the Menu icon (), and choose Visibility Setup > Posture) to save the debug logs in an endpoint or multiple endpoints. You can view the logs in either of the following locations:

      • C:\WINDOWS\syswow64\config\systemprofile\ (64-bit operating system)

      • C:\WINDOWS\system32\config\systemprofile\ (32-bit operating system)

    • Run Endpoint Scripts: Choose this option to run scripts on connected endpoints to carry out administrative tasks that comply with your organization’s requirements. This includes tasks like uninstalling obsolete software, starting or terminating processes or applications, and enabling or disabling specific services.

  • Click this icon for a menu of system activities, including launching online help, and configuring account settings.

Interactive Help

The Interactive Help enables users to work effectively with Cisco ISE by providing tips and step-by-step guidance to complete tasks with ease.

This feature is enabled by default. To disable this feature, click the Menu icon () and choose Administration > System > Settings > Interactive Help, and uncheck the Enable Interactive Help check box.

Click the Show button to view the Interactive Help menu.

If you access the Cisco ISE administrator portal through a Google Chrome Incognito window, you must enable third-party cookies to view and access Interactive Help. See Third-party cookie controls in Incognito mode.

Cisco ISE Home Dashboards

The Cisco ISE Home dashboard displays live consolidated and correlated statistical data that is essential for effective monitoring and troubleshooting. Dashboard elements typically display activity over 24 hours. The following figure is an example of the information available in a Cisco ISE dashboard. You can view the Cisco ISE dashboard data only in the primary Policy Administration node (PAN) portal.

Figure 3. Cisco ISE Home Dashboard
Cisco ISE Home Dashboard

The home page has five default dashboards that display your Cisco ISE data. Each of these dashboards has several predefined dashlets.

  • Summary: This dashboard contains a linear metrics dashlet, pie chart dashlets, and list dashlets. The metrics dashlet is not configurable. By default this dashboard contains the dashlets Status Endpoints, Endpoint Categories, and Network Devices.

  • Endpoints: By default, this dashboard contains the dashlets Status, Endpoints, Endpoint Categories, and Network Devices.

  • Guests: This dashboard contains dashlets that provide information on guest user type, log in failures, and location of acitivity.

  • Vulnerability: This dashboard displays the information that vulnerability servers report to Cisco ISE.

  • Threat: This dashboard displays information from the threat servers reports sent to Cisco ISE.

Configuring Home Dashboards

You can customize a home page dashboard by clicking the Inverted Pyramid icon in the top right corner of the window:

Figure 4. Customize A Dashboard
Cutomising a Cisco ISE Dashboard

The following options are displayed in the drop-down list:

  • Add New Dashboard allows you to add a new dashboard. Enter a value in the field that is displayed and click Apply.

  • Add Dashlet(s) displays a dialog box with a list of dashlets available. Click Add or Remove next to the dashlet name to add or remove a dashlet from the dashboard.

  • Export saves the selected home page view to a PDF.

  • Layout Template configures the number of columns that are displayed in this view.

  • Manage Dashboards contains two options:

    • Mark As Default Dashboard: Choose this option to make the current dashboard the default view when you choose Home.

    • Reset All Dashboards: Use this option to also reset all the dashboards and remove your configurations on all the Home dashboards.

Context Visibility Views

The structure of a Context Visibility window is similar to the home page, except that the Context Visibility windows:

  • Retain your current context (browser window) when you filter the displayed data

  • Are more customizable

  • Focus on endpoint data

You can view the context visibility data only from the primary PAN.

Dashlets on the Context Visibility windows show information about endpoints, and endpoint connections to NADs. The information currently displayed is based on the content in the list of data below the dashlets on each window. Each window displays endpoint data, based on the name of the tab. As you filter the data, both the list and dashlets update. You can filter the data by clicking on parts of one or more of the circular graphs, by filtering rows on the table, or any combination those actions. As you select filters, the effects are additive, also referred to as cascading filter, which allows you to drill down to find the particular data you are looking for. You can also click an endpoint in the list, and get a detailed view of that endpoint.

We recommend that you enable the accounting settings on the network access devices (NADs) to ensure that the accounting start and update information is sent to Cisco ISE.

Cisco ISE can collect accounting information, such as the latest IP address, status of the session (Connected, Disconnected, or Rejected), the number of days an endpoint has been inactive, only if accounting is enabled. This information is displayed in the Live Logs, Live Sessions and Context Visibility windows in the Cisco ISE administration portal. When accounting is disabled on a NAD, there might be a missing, incorrect, or mismatched accounting information between the Live Sessions, Live Logs and Context Visibility windows.

There are four main menu options under Context Visibility:

  • Endpoints: Filter the endpoints you want to view based on types of devices, compliance status, authentication type, hardware inventory, and more. See The Hardware Dashboard for additional information.


    Note


    The Visibility Setup workflow that is available on the Cisco ISE administration portal home page allows you to add a list of IP address ranges for endpoints discovery. After this workflow is configured, Cisco ISE authenticates the endpoints, but the endpoints that are not included in the configured IP address ranges are not displayed in the Context Visibility > Endpoints window and the Endpoints listing page (Work Centers > Network Access > Identities > Endpoints).


  • Users: Displays user-based information from user identity sources.

    If there is a change in the username or password attribute, it reflects in the Users window when there is a change in the authentication status.

    If the username is changed in the Microsoft Active Directory, the updated change is displayed in the Users window immediately after re-authentication.

    If any other attributes such as Email, Phone, Department, etc are changed in the Microsoft Active Directory, the updated attributes are displayed in the Users window 24 hours after re-authentication.

    Note


    Updating User Attributes from AD depends on the interval configured under Active Directory Probe. For more information, see Active Directory Probe.


  • Network Devices: This window displays the list of NADs that have endpoints connected to them. For any NAD, click the number of endpoints that is displayed in the corresponding # of endpoints column. A window that lists all the devices filtered by that NAD is displayed.


    Note


    If you have configured your network device with SNMPv3 parameters, you cannot generate the Network Device Session Status Summary report that is provided by the Cisco ISE monitoring service (Operations > Reports > Catalog > Network Device > Session Status Summary). You can generate this report successfully if your network device is configured with SNMPv1 or SNMPv2c parameters.


  • Application: Use this window to identify the number of endpoints that have a specific application installed. The results are displayed in graphical and table formats. The graphical representation helps you make a comparative analysis. For example, you can find out the number of endpoints with the Google Chrome software along with their Version, Vendor, and Category (Anti-phishing, Browser, and so on) in a table as well as a bar chart. For more information, see The Application Tab.

You can create a new tab in the Context Visibility windows and create a custom list for additional filtering. Dashlets are not supported in custom views.

Click a section of a circular graph in a dashlet to view a new window with filtered data from that dashlet in. From this new window, you can continue to filter the displayed data, as described in Filtering Displayed Data in a View.

For more information about using Context Visibility windows to find endpoint data, see the following Cisco YouTube video https://www.youtube.com/watch?v=HvonGhrydfg.

Attributes in Context Visibility

The systems and services that provide attributes for Context Visibility sometimes have different values for the same attribute name. The following are a few examples:

For Operating System

  • OperatingSystem: Posture operating system.

  • operating-system: NMAP operating system.

  • operating-system-result: Profiler consolidated operating system.


Note


There might be some discrepancies in the endpoint operating system data that is displayed in the Context Visibility window when you enable multiple probes in Cisco ISE for an endpoint.


For Portal Name

  • Portal.Name: Guest portal name when device registration is turned on.

  • PortalName: Guest portal name when device registration is not turned on.

For Portal User

  • User-Name: Username from RADIUS authentication.

  • GuestUserName: Guest username.

  • PortalUser: Portal username.

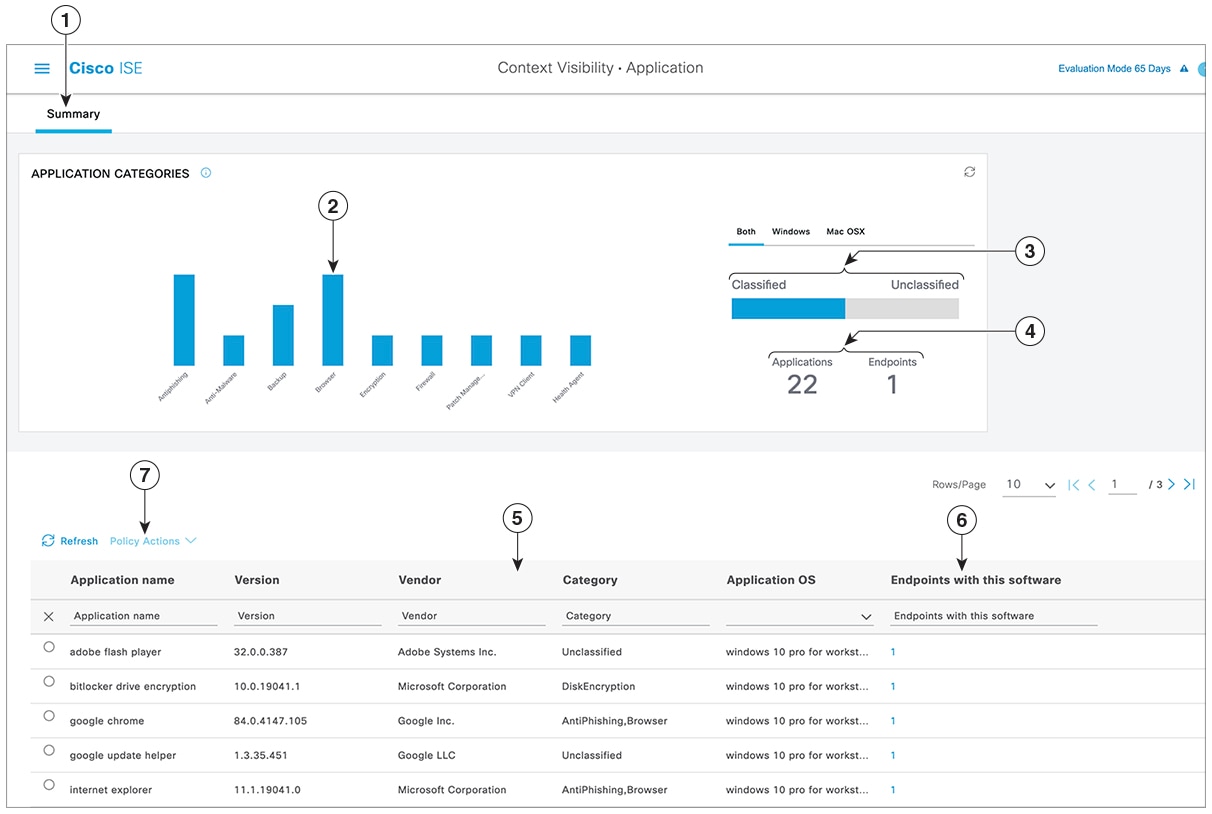
The Application Dashboard

Context Visibility Application tab
Table 2. Description of the Application Dashboard

Label

Description

1

The Summary tab is displayed by default on the home page. It displays the Application Categories dashlet, which contains a bar chart. Applications are classified into 13 categories. Applications that do not fall into any of these categories are grouped as Unclassified.

The available categories are Anti-Malware, Antiphishing, Backup, Browser, Data Loss Prevention, Data Storage, Encryption, Firewall, Messenger, Patch Management, Public File Sharing, Virtual Machine, and VPN Client.

2

Each bar corresponds to a classified category. Hover over each bar to view the total number of applications and endpoints that correspond to the selected application category.

3

The applications and endpoints that fall under the Classified category are displayed in blue. Unclassified applications and endpoints are displayed in gray. Hover over the classified or unclassified category bars to view the total number of applications and endpoints that belong to that category. You can click Classified and view the results in the bar chart and table in the window. When you click Unclassified, the bar chart is disabled and the results are displayed in the table in the window.

4

The applications and endpoints are displayed based on the selected filter. You can view the breadcrumb trail as you click different filters. You can click Clear All Filters to remove all the applied filters.

5

When you click multiple bars, the corresponding classified applications and endpoints are displayed in the table. For example, if you select the Antimalware and Patch Management categories, the following results are displayed:

Application Name Version Vendor Category Application OS Endpoints With This Software

Gatekeeper

9.9.5

Apple Inc.

Antimalware

windows 7 64-bit,mac osx 10.10,mac osx 8,mac osx 9 5

Gatekeeper

10.9.5

Apple Inc.

Antimalware

Windows 8 64-bit, mac osx 10.10 3

Software Update

2.3

Apple Inc.

Patch Management

Windows 7 64 bit, mac osx 10.10,mac osx 8,mac osx 9

5

6

Click an endpoint in the Endpoints With This Software column in the table to view the endpoint details, such as Mac address, NAD IP address, NAD port ID/SSID, IPv4 address, and so on.

7

You can select an application name and choose the Create App Compliance option from the Policy Actions drop-down list to create application compliance condition and remediation.

The Hardware Dashboard

The endpoint hardware tab under context visibility helps you collect, analyze, and report endpoint hardware inventory information within a short time. You can gather information, such as finding endpoints with low memory capacity or finding the BIOS model/version in an endpoint. You can increase the memory capacity or upgrade the BIOS version based on these findings. You can assess the requirements before you plan the purchase of an asset. You can ensure timely replacement of resources. You can collect this information without installing any modules or interacting with the endpoint. In summary, you can effectively manage the asset lifecycle.


Note


The hardware inventory data takes 120 seconds to be displayed in the ISE GUI. The hardware inventory data is collected for posture compliant and non-compliant states.


The Context Visibility > Endpoints > Hardware page displays the Manufacturers and Endpoint Utilizations dashlets. These dashlets reflect the changes based on the selected filter. The Manufacturers dashlet displays hardware inventory details for endpoints with Windows and Mac OS. The Endpoint Utilizations dashlet displays the CPU, Memory, and Disk utilization for endpoints. You can select any of the three options to view the utilization in percentage.

  • Devices With Over n% CPU Usage.

  • Devices With Over n% Memory Usage.

  • Devices With Over n% Disk Usage.


Note


  • The Quick Filters in the Hardware Visibility Page need at least 3 characters to take effect. Another way to make the Quick Filter work efficiently is to click on the filters of other column attributes after entering the characters.

  • Some of the column attributes are greyed out as this table is only used to filter based on attributes related to hardware.

  • The Operating System filter applies only to the Manufacturers Chart. It is not relevant to the table below it.


The hardware attributes of an endpoint and their connected external devices are displayed in a table format. The following hardware attributes are displayed:

  • MAC Address

  • BIOS Manufacturer

  • BIOS Serial Number

  • BIOS Model

  • Attached Devices

  • CPU Name

  • CPU Speed (GHz)

  • CPU Usage (%)

  • Number of Cores

  • Number of Processors

  • Memory Size (GB)

  • Memory Usage (%)

  • Total Internal Disk(s) Size (GB)

  • Total Internal Disk(s) Free Size (GB)

  • Total Internal Disk(s) Usage (%)

  • Number of Internal Disks

  • NAD Port ID

  • Status

  • Network Device Name

  • Location

  • UDID

  • IPv4 Address

  • Username

  • Hostname

  • OS Types

  • Anomalous Behavior

  • Endpoint Profile

  • Description

  • Endpoint Type

  • Identity Group

  • Registration Date

  • Identity Store

  • Authorization Profile

You can click the number in the Attached Devices column that corresponds to an endpoint to view the Name, Category, Manufacturer, Type, Product ID, and Vendor ID of the USB devices that are currently attached to the endpoint.


Note


Cisco ISE profiles the hardware attributes of a client’s system, however, there may be a few hardware attributes Cisco ISE does not profile. These hardware attributes may not appear in the Hardware Context Visibility page.


The hardware inventory data collection interval can be controlled in the Administration > System > Settings > Posture > General Settings page. The default interval is 5 minutes.

Dashlets

The following image is an example of a dashlet:

Network Devices
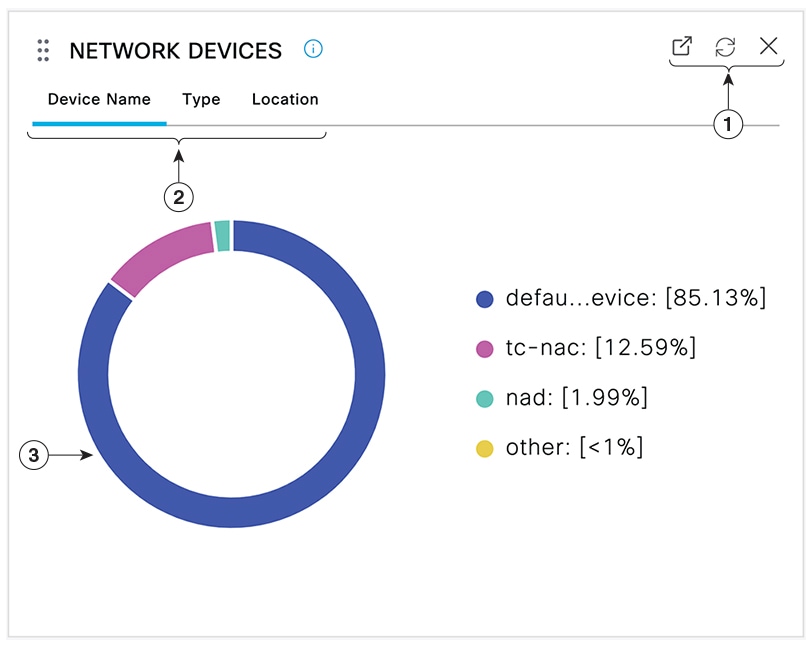
  1. The Open New Window icon opens this dashlet in a new browser window. The pie chart refreshes. Click the X to delete this dashlet. This option is only available on the home page. You delete dashlets in Context Visibility windows using the gear symbol in the top-right corner of the screen.

  2. Some dashlets have different categories of data. Click the category to see a pie chart with that set of data.

  3. The pie chart shows the data that you have selected. Click one of the pie segments to open a new tab in with the filtered data, based on that pie segment.

Click a section of the pie chart in a home page dashboard to open the chart in a new browser window. The new window displays data that is filtered by the section of the pie chart that you clicked on.

When you click a section of the pie chart in a Context Visibility window, the displayed data is filtered but context does not change. You view the filtered data in the same browser window.

Filtering Displayed Data in a View

When you click a dashlet in a Context Visibility window, the corresponding data is filtered by the item you click and displayed. For example, when you click a section of a pie chart, the data for the chosen section is filtered and displayed.

Network devices - Device Name

If you click defau...evice in the Network Devices dashlet, a new window displays the data, as shown in the following image:

Endpoints authentication status

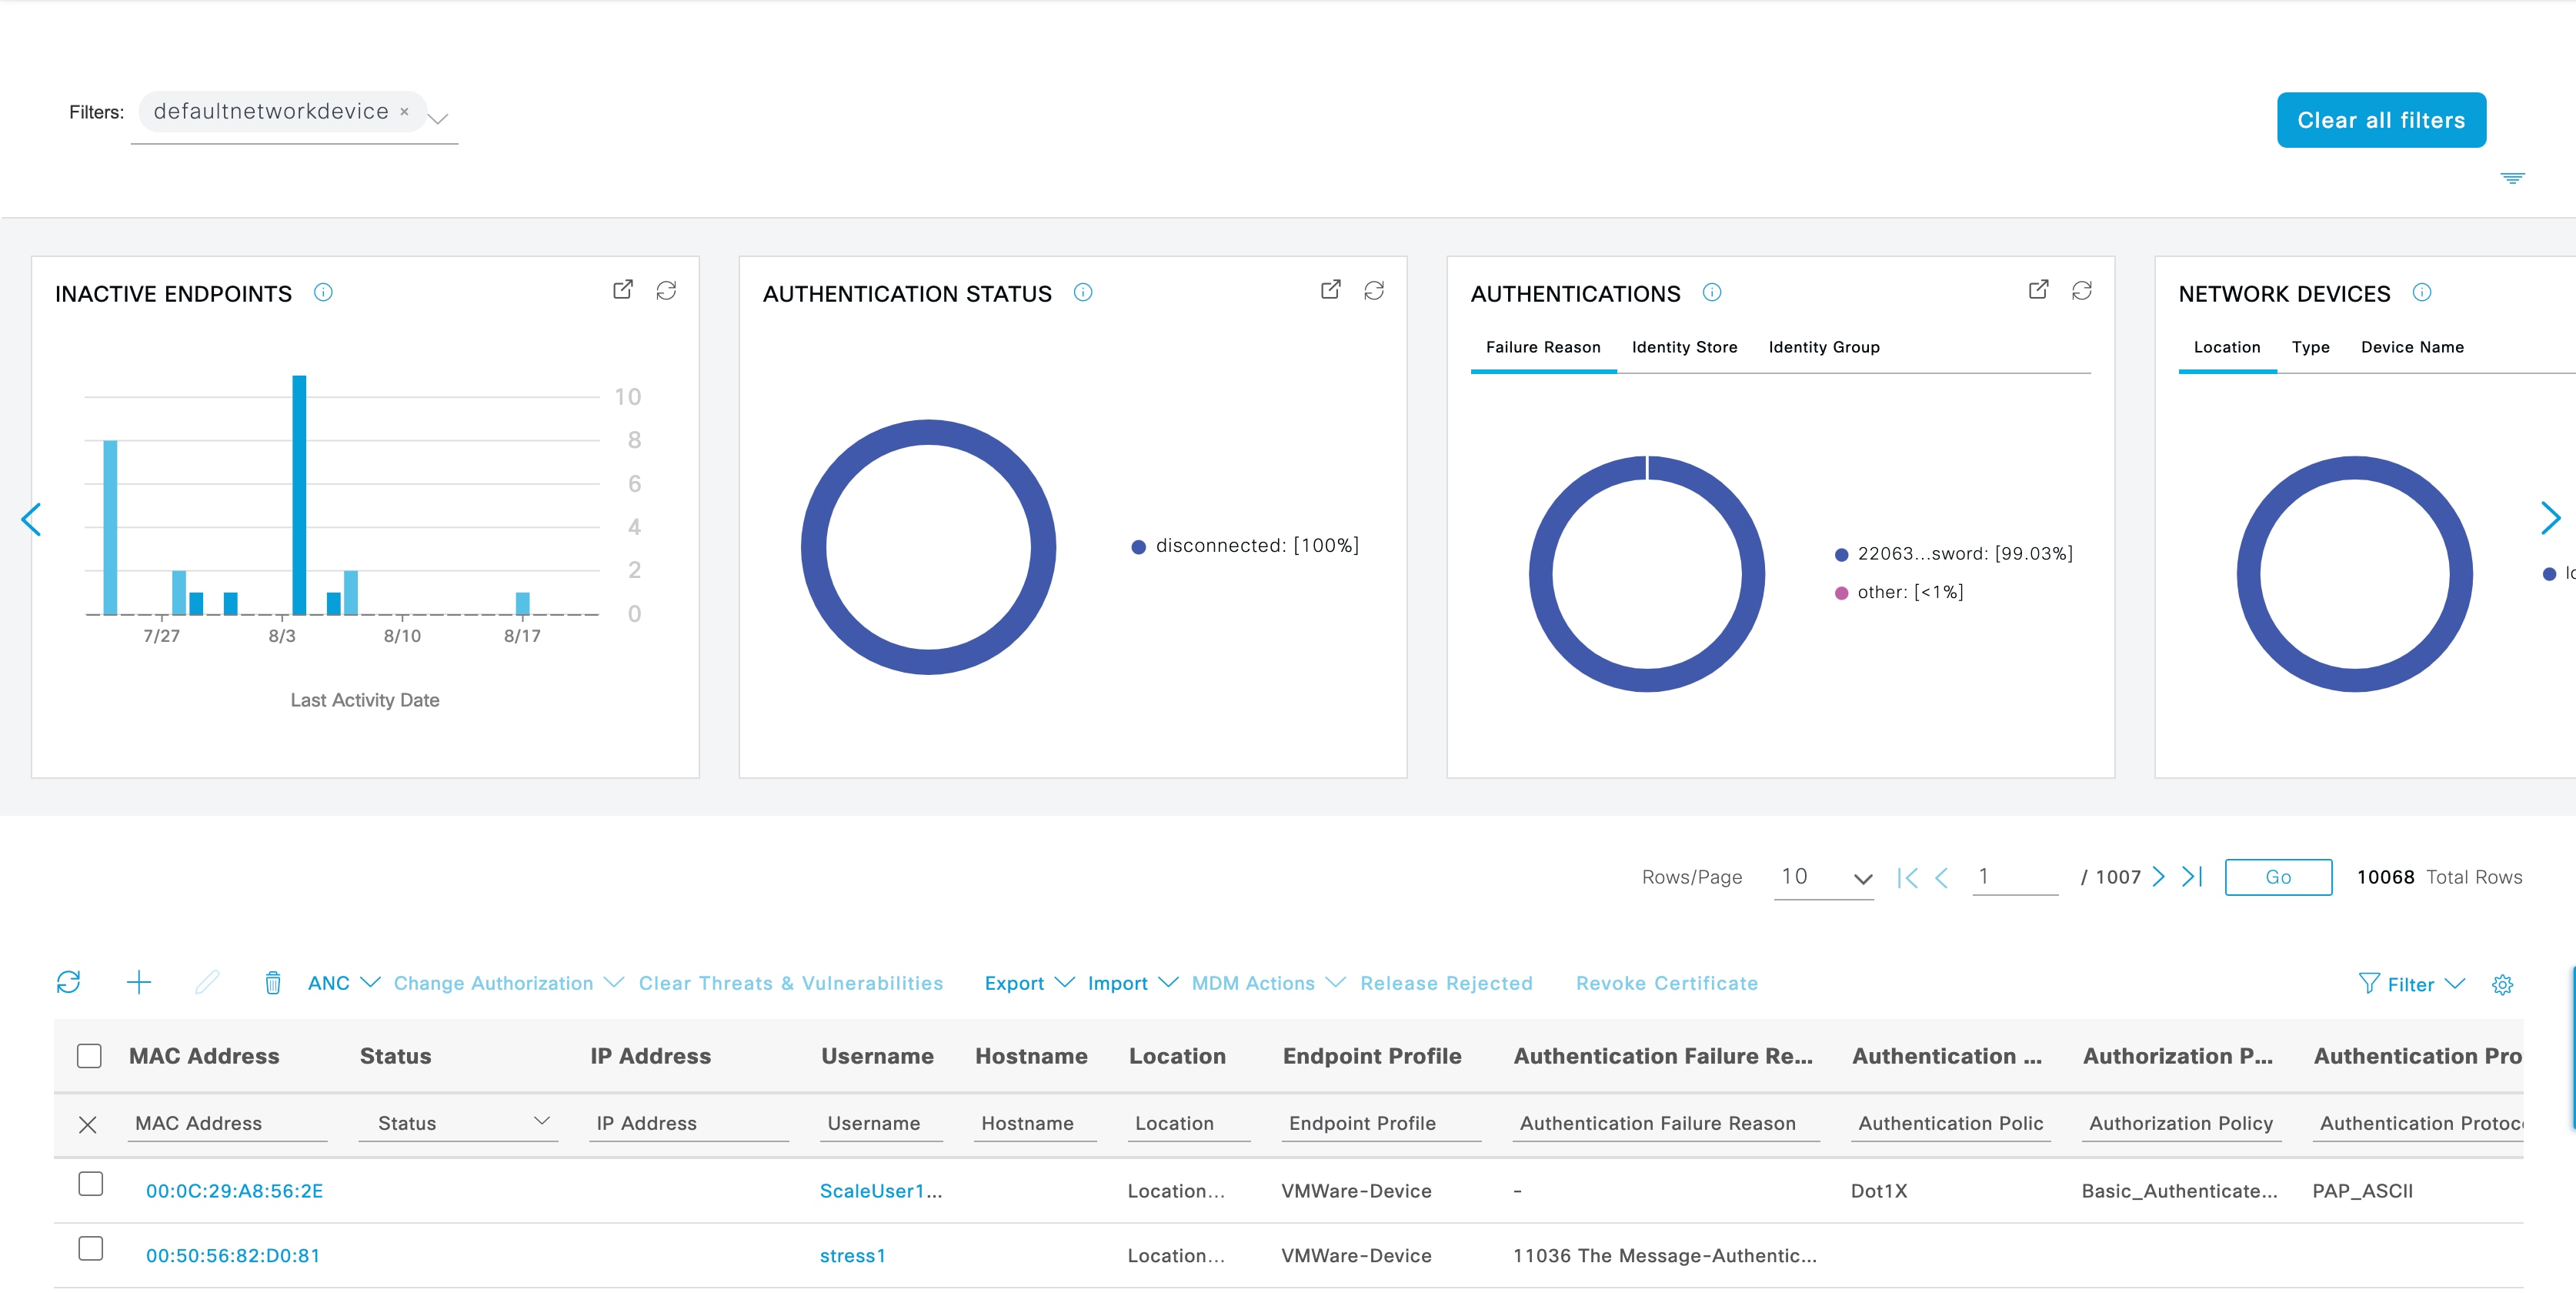
Filter the data further by clicking more sections of the pie charts. You can also use the Filter drop-down list or the gear icon at the top-right corner of the list of data to manage the data displayed.

Save your custom filters.

Create Custom Filters

Create and save user-specific custom filters that are accessible only to you. Other users logging in to Cisco ISE cannot view the custom filters that you create. These custom filters are saved in the Cisco ISE database. You can access them from any computer or browser with which you log in to Cisco ISE.

Procedure


Step 1

Click Filter and choose Advanced Filter from the drop-down list.

Step 2

Specify the search attributes, such as fields, operators, and values from the Filter menus.

Step 3

Click + to add more conditions.

Step 4

Click Go to display the entries that match the specified attributes.

Step 5

Click Save to save the filter.

Step 6

Enter a name and click Save. The filter now appears in the Filter drop-down list.


Filter Data by Conditions Using the Advanced Filter

The Advanced Filter allows you to filter information based on specified conditions, such as, First Name = Mike and User Group = Employee. You can specify more than one condition.

Procedure


Step 1

Click Filter and choose Advanced Filter drop-down list.

Step 2

Specify search the search attributes, such as fields, operators, and values from the filter menus.

Step 3

Click + to add more conditions.

Step 4

Click Go to view the entries that match the specified attributes.


Filter Data by Field Attributes Using the Quick Filter

The Quick Filter allows you to enter a value for any of the field attributes displayed in the listing page, refreshes the page, and lists only those records that match your filter criteria.

Procedure


Step 1

Click Filter and choose Quick Filter from the drop-down list.

Step 2

Enter search criteria in one or more of the attribute fields, and the entries that match the specified attributes display automatically.


Endpoint Actions in Dashlet Views

The toolbar at the top of the list allows you to act on endpoints in the list that you select. Not all actions are enabled for every list. Some actions depend on the feature that is enabled for use. The following list shows two endpoint actions that must be enabled in Cisco ISE before you can use them.

  • Adaptive Network Control Actions

    If you enable the Adaptive Network Control service, you can select endpoints in the list and assign or revoke network access. You can also issue a change of authorization.

    When you click the pie chart on a home page dashlet, the new window that is displayed contains the options ANC and Change Authorization. Check the check box for the endpoint you want to perform an action on, and choose the necessary action from the drop-down lists ofANC and Change Authorization.

    Figure 5. Endpoint Actions in Dashlet Views
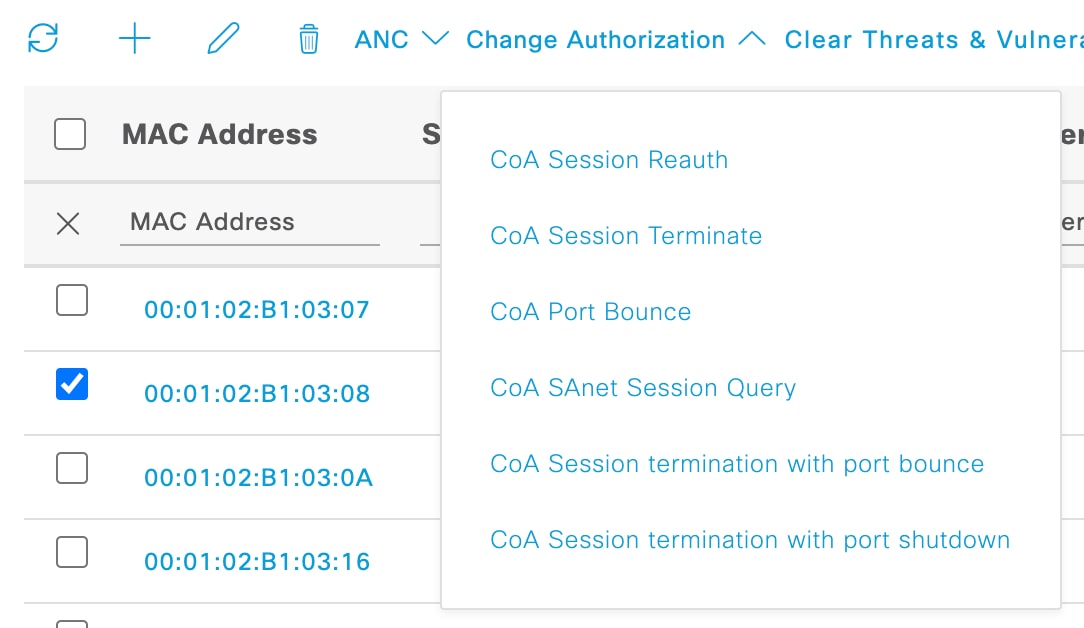
    Endpoint actions in Dashlet Views
  • MDM Actions

    If you connect an MDM server to Cisco ISE, you can perform MDM actions on selected endpoints. Choose the necessary action from the MDM Actions drop-down list.
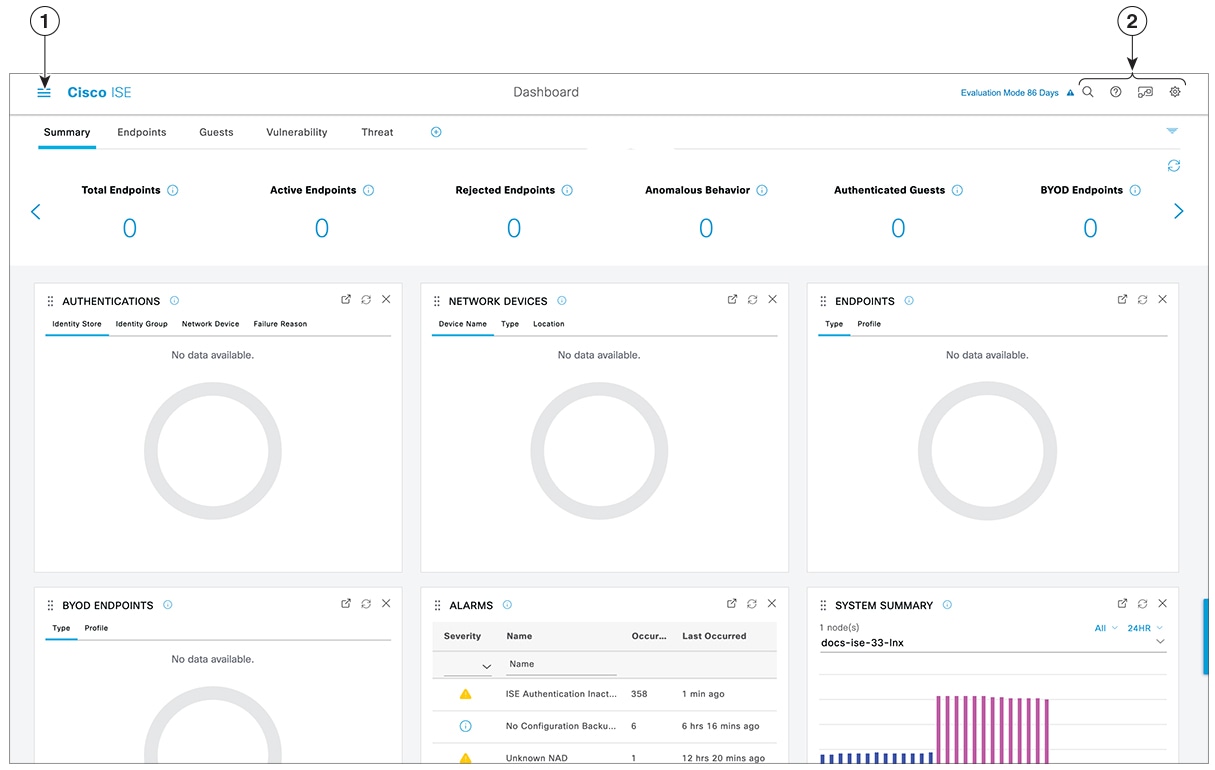
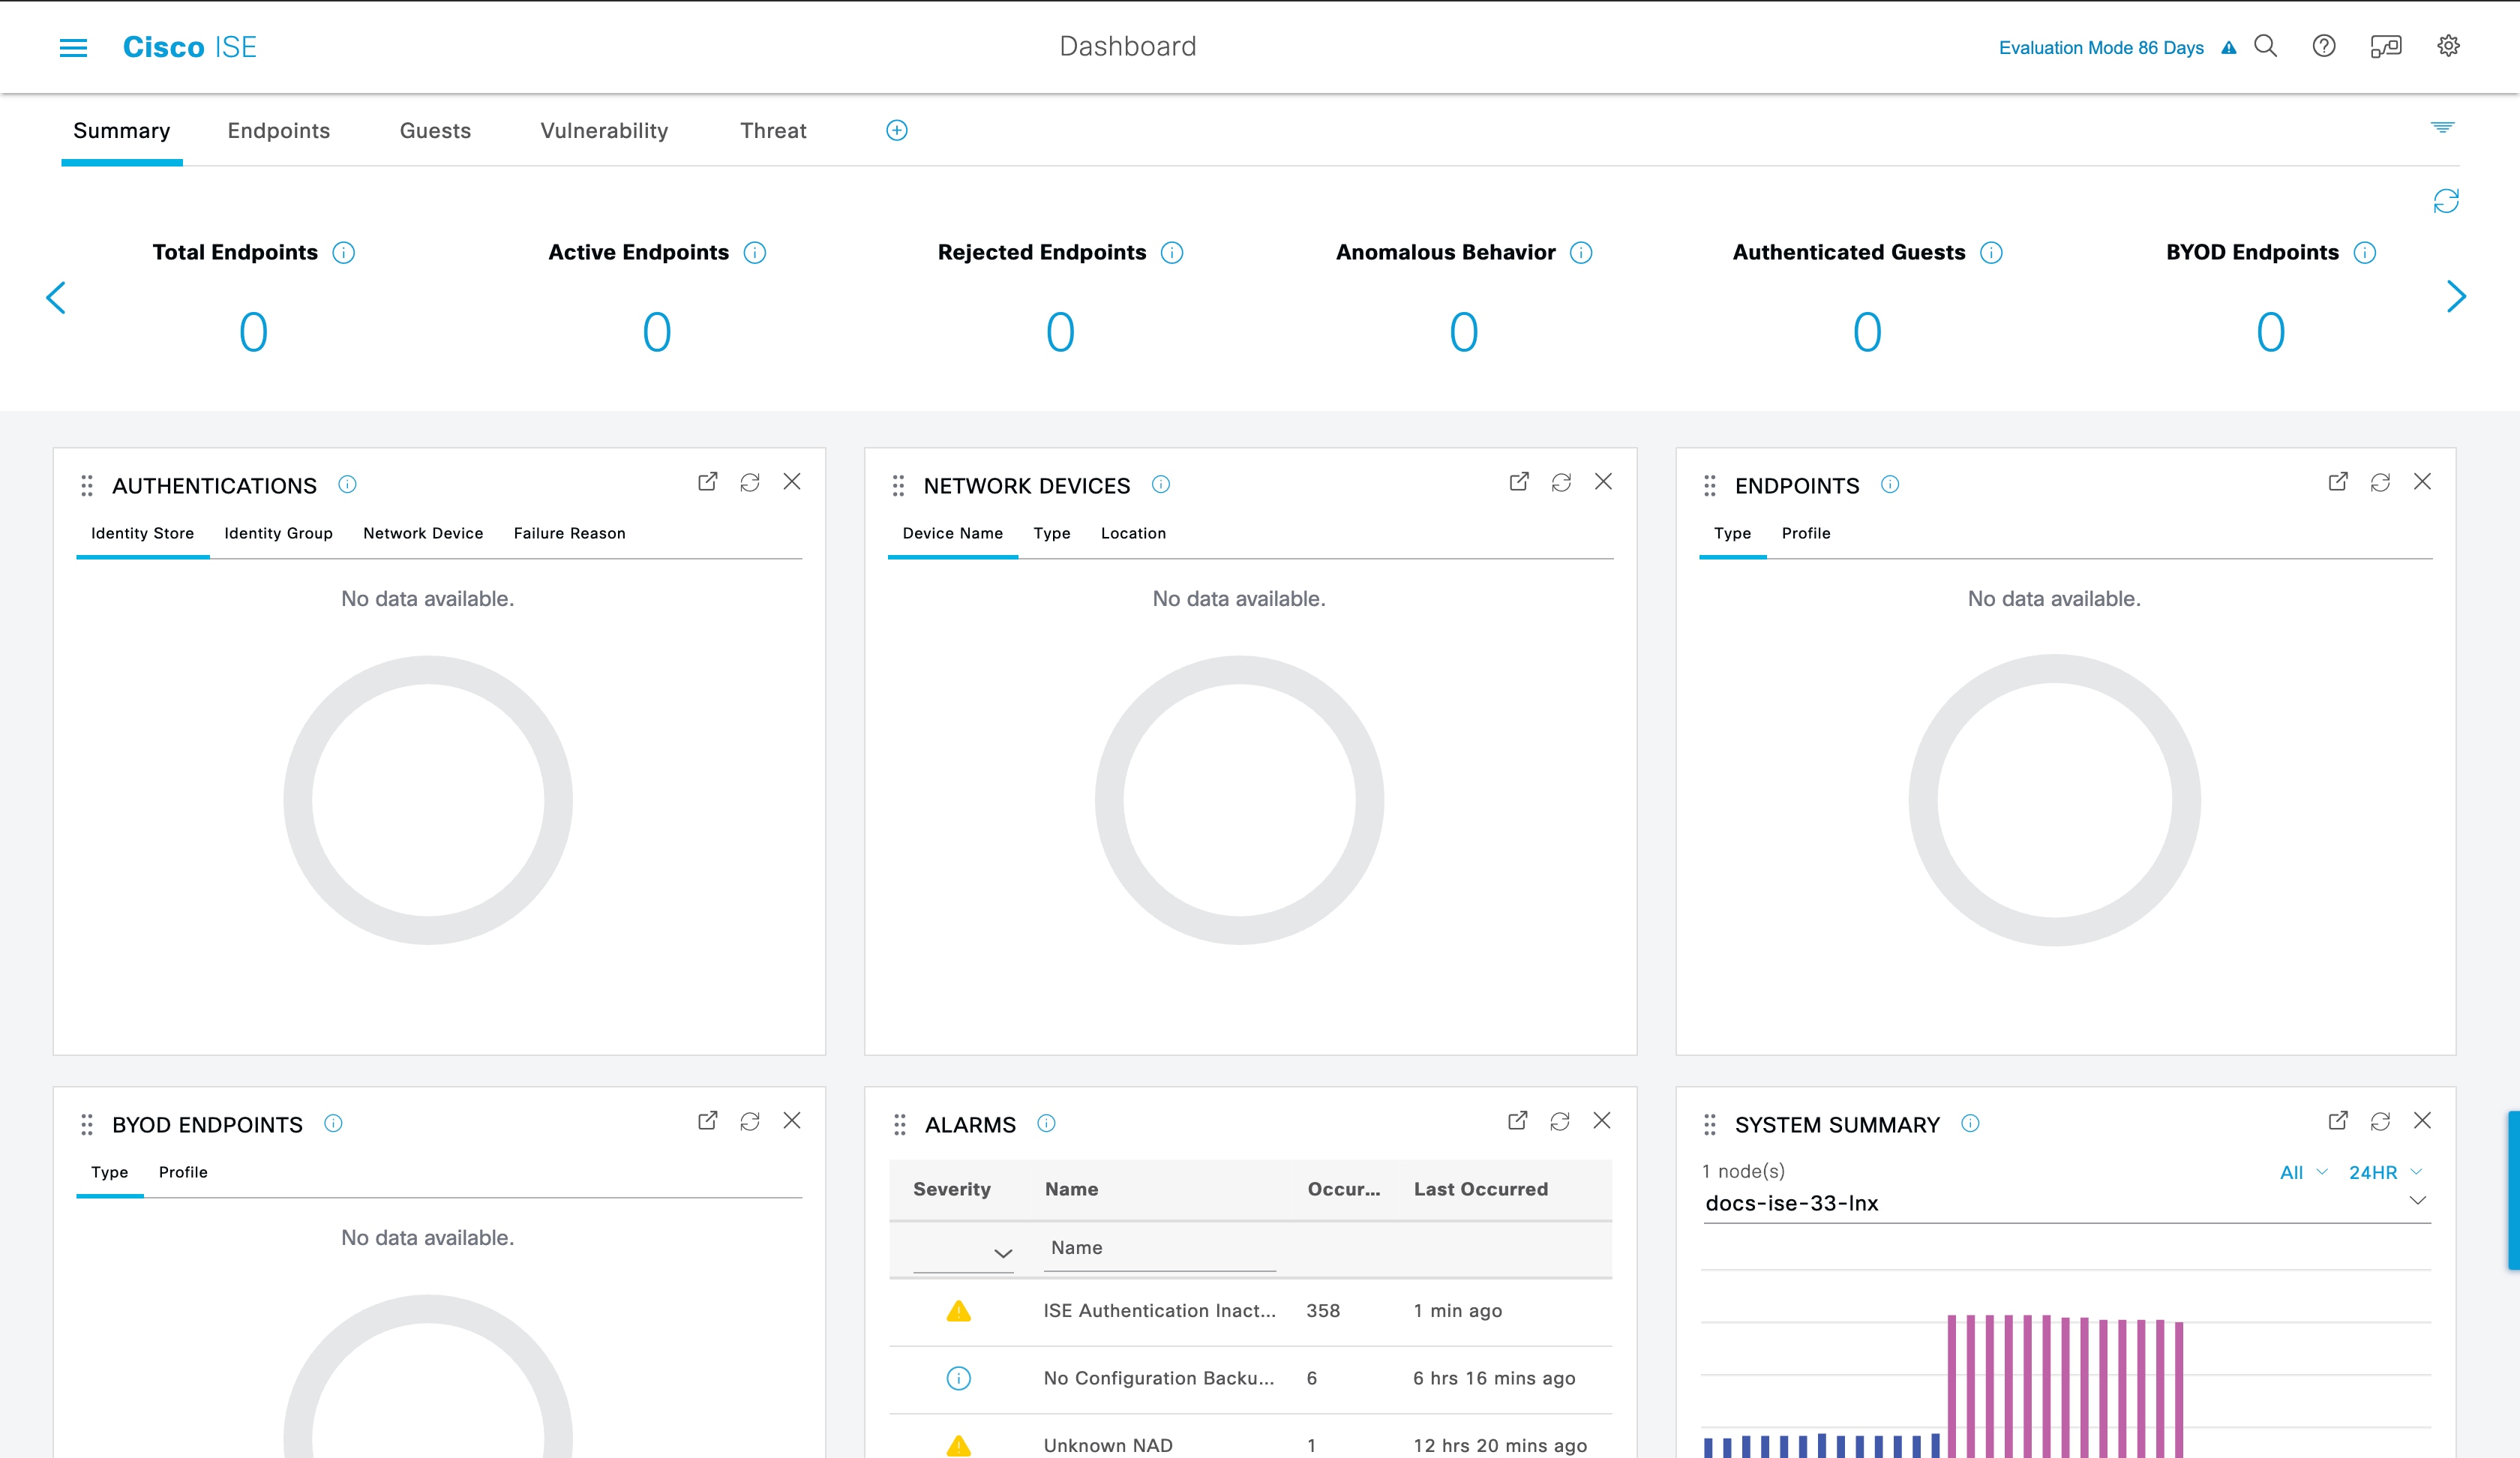
Cisco ISE Dashboard

The Cisco ISE dashboard or home page (click the Menu icon () and choose Dashboard) is the landing page that you view after you log in to the Cisco ISE administration portal. The dashboard is a centralized management console consisting of metric meters along the top of the window, with dashlets below. The default dashboards are Summary, Endpoints, Guests, Vulnerability, and Threat. See Cisco ISE Home Dashboards.


Note


You can view this dashboard data only in the Cisco ISE primary PAN portal.

The dashboard’s real-time data provides an at-a-glance status of the devices and users accessing your network, and an overview of the system's health.

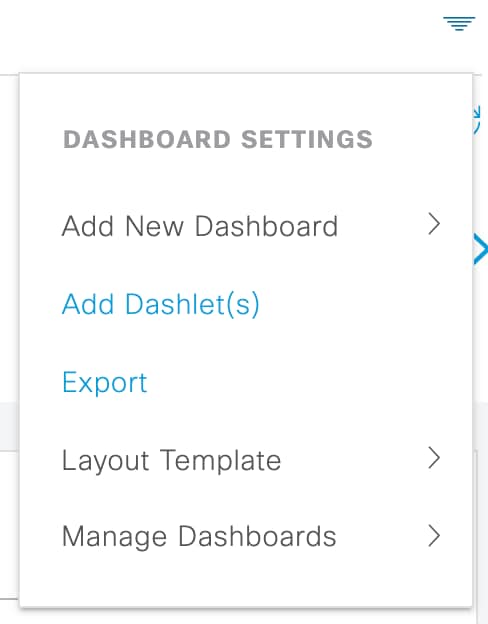
Click the gear icon in the second level menu bar for a drop-down list of dashboard settings. The following table contains descriptions for the dashboard settings options available in the drop-down list:

Drop-Down List Option

Description

Add New Dashboard

You can have a maximum of 20 dashboards, including the five default dashboards.

Rename Dashboard

(This option is available only for custom dashboards) To rename a dashboard:

  1. Click Rename Dashboard.

  2. Specify a new name.

  3. Click Apply.

Add Dashlet

To add a dashlet to the home page dashboard:

  1. Click Add Dashlet(s).

  2. In the Add Dashlets window, click Add next to the dashlets that you want to add.

  3. Click Save.

    Note

     
    You can add a maximum of nine dashlets per dashboard.

Export

You can export the dashboard data as a PDF or a CSV file.

  1. Click Export.

  2. In the Export dialog box, click the radio button next to one of the following file formats:

    • PDF: Choose the PDF format for a snapshot view of the selected dashlets.

    • CSV: Choose the CSV format to download the selected dashboard data as a zip file.

  3. In the Export dialog box, check the check boxes next to the dashlets you want to export.

  4. Click Export.

    The zip file contains individual dashlet CSV files for the selected dashboard. Data related to each tab in a dashlet is displayed as separate sections in the corresponding dashlet CSV file.

When you export a custom dashboard, the zip file is exported with the same name. For example, if you export a custom dashboard that is named MyDashboard, then the exported file's name is MyDashboard.zip.

Layout Template

You can change the layout of the template in which the dashlets are displayed.

To change the layout:

  1. Click Layout Template.

  2. Select the required layout from the options available.

Manage Dashboards

Click Manage Dashboards and choose one of the following options:

  • Mark as Default Dashboard: Use this option to set a dashboard as your default dashboard (the home page).

  • Reset all Dashboards: Use this option to reset all the dashboards to their original settings.

You can delete a dashboard that you have created by clicking the close (x) icon next to the corresponding custom dashboard.


Note


You cannot rename or delete a default dashboard.

Each dashlet has a toolbar at the top-right corner where you can perform the following operations:

  • Detach: To view a dashlet in a separate window.

  • Refresh: To refresh a dashlet.

  • Remove: To remove a dashlet from the dashboard.

You can drag and drop the dashlet using the gripper icon that is present at the top-left corner of the dashlet.

The Alarms dashlet contains a quick filter for the Severity column. You can filter alarms by their severity by choosing Critical, Warning, or Info from the Severity drop-down list.

Cisco ISE Internationalization and Localization

Cisco ISE internationalization adapts the user interface to the supported languages. Localization of the user interface incorporates location-specific components and translated text. In Windows, MAC OSX, and Android devices, the native supplicant provisioning wizard can be used in any of the following supported languages.

In Cisco ISE, internalization and localization support focuses on support for non-English text in UTF-8 encoding to the end user-facing portals and on selective fields in the administration portal.

Supported Languages

Cisco ISE provides localization and internalization support for the following languages and browser locales.

Table 3. Supported Languages and Locales

Language

Browser Locale

Chinese traditional

zh-tw

Chinese simplified

zh-cn

Czech

cs-cz

Dutch

nl-nl

English

en

French

fr-fr

German

de-de

Hungarian

hu-hu

Italian

it-it

Japanese

ja-jp

Korean

ko-kr

Polish

pl-pl

Portuguese (Brazil)

pt-br

Russian

ru-ru

Spanish

es-es

End-User Web Portal Localization

The Guest, Sponsor, My Devices, and Client Provisioning portals are localized into all the supported languages and locales. This includes text, labels, messages, field names, and button labels. If a client browser requests a locale that is not mapped to a template in Cisco ISE, the portal displays content using the English template.

Using the administration portal, you can modify the fields that are used in the Guest, Sponsor, and My Devices portals for each language. You can also add other languages. Currently, you cannot customize these fields for the Client Provisioning portal.

You can further customize the Guest portal by uploading HTML pages to Cisco ISE. When you upload customized pages, you are responsible for the appropriate localization support for your deployment. Cisco ISE provides a localization support example with sample HTML pages, which you can use as a guide. Cisco ISE allows you to upload, store, and render custom internationalized HTML pages.


Note


NAC and MAC agent installers, and WebAgent pages are not localized.


Support for UTF-8 Character Data Entry

Cisco ISE fields that are exposed to the end user (through the Cisco client agent or supplicants, or the Sponsor, Guest, My Devices, and Client Provisioning portals) support UTF-8 character sets for all languages. UTF-8 is a multibyte character encoding for the Unicode character set, which includes many different language character sets including Hebrew, Sanskrit, and Arabic.

Character values are stored in UTF-8 in the administration configuration database, and the UTF-8 characters display correctly in reports and user interface components.

UTF-8 Credential Authentication

Network access authentication supports UTF-8 username and password credentials. This includes RADIUS, Extensible Authentication Protocol (EAP), RADIUS proxy, RADIUS token, and web authentication from the Guest and administration portal login authentications. UTF-8 support for username and password applies to authentication against the local identity store and external identity stores.

UTF-8 authentication depends on the client supplicant that is used for network login. Some Windows native supplicants do not support UTF-8 credentials.


Note


UTF-8 authentication with RSA is not supported as RSA does not support UTF-8 users. RSA servers, which are compatible with Cisco ISE, also do not support UTF-8.


UTF-8 Policies and Posture Assessment

Policy rules in Cisco ISE that are conditioned on attribute values may include UTF-8 text. Rule evaluation supports UTF-8 attribute values. You can also configure conditions with UTF-8 values through the administration portal.

Posture requirements are modified as File, Application, and Service conditions based on a UTF-8 character set.

UTF-8 Support for Messages Sent to Supplicant

RSA prompts and messages are forwarded to the supplicant using a RADIUS attribute REPLY-MESSAGE, or within EAP data. If the text contains UTF-8 data, it is displayed by the supplicant, based on the client’s local operating system language support. Some Windows-native supplicants do not support UTF-8 credentials.

Cisco ISE prompts and messages may not be in synchrony with the locale of the client operating system on which the supplicant is running. You must align the end-user supplicant locale with the languages that are supported by Cisco ISE.

Reports and Alerts UTF-8 Support

Monitoring and troubleshooting reports and alerts support UTF-8 values for relevant attributes for the languages that are supported in Cisco ISE. The following activities are supported:

  • Viewing live authentications.

  • Viewing detailed pages of report records.

  • Exporting and saving reports.

  • Viewing the Cisco ISE dashboard.

  • Viewing alert information.

  • Viewing tcpdump data.

UTF-8 Character Support in the Portals

More character sets are supported in Cisco ISE fields (UTF-8) than are currently supported for localizations in portals and end-user messages. For example, Cisco ISE does not support right-to-left languages, such as Hebrew or Arabic, although the character sets themselves are supported.

The following table lists the fields in the Admin and end-user portals that support UTF-8 characters for data entry and viewing, with the following limitations:

  • Cisco ISE does not support guest usernames and passwords with UTF-8 characters.

  • Cisco ISE does not support UTF-8 characters in certificates.

Table 4. Administration Portal UTF-8 Character Fields

Administration Portal Element

UTF-8 Fields

Network access user configuration

  • Username

    The usernames can contain any combination of upper and lowercase letters, numbers, space, and special characters (except `, %, ^, ;, :, [, {, |, }, ], \, ‘, “, =, <, >, ?, !, and control characters). You cannot submit usernames with only spaces.

  • First Name

  • Last Name

  • Email

User list

  • All filter fields.

  • Values displayed in the User List window.

  • Values displayed in the left navigation quick view.

User password policy

The passwords can contain any combination of upper and lowercase letters, numbers, and special characters (including !, @, #, $, ^, &, *, (, and ). The password field accepts any characters including UTF-8 characters, but it does not accept control characters.

Some languages do not have uppercase or lowercase alphabets. If your user password policy requires the user to enter a password with uppercase or lowercase characters and the user’s language does not support these characters, the user cannot set a password. For the user password field to support UTF-8 characters, uncheck the following check boxes in the user password policy page (Click the Menu icon and chooseAdministration > Identity Management > Settings > User Authentication Settings > Password Policy):

  • Lowercase alphabetic characters

  • Uppercase alphabetic characters

You cannot use dictionary words, their characters in reverse order, or their letters replaced with other characters.

Administrator list

  • All filter fields.

  • Values that aredisplayed in the administrator list window.

  • Values that are displayed in the left navigation quick view.

Admin login page

  • Username

RSA

  • Messages

  • Prompts

RADIUS token

  • Authentication tab > Prompt

Posture Requirement

  • Name

  • Remediation action > Message shown to Agent User

  • Requirement list display

Posture conditions

The following fields in the Policy > Policy Elements > Conditions > Posture windows:

  • File Condition > Add > File Path.

  • Application Condition > Add > Process Name.

  • Service Condition > Add > Service Name.

  • Conditions list displays.

Guest and My Devices settings

  • Sponsor > Language Template: all supported languages, all fields.

  • Guest > Language Template: all supported languages, all fields.

  • My Devices >Language Template: all supported languages, all fields.

System settings

  • SMTP Server > Default email address

Operations > Alarms > Rule

  • Criteria > User

  • Notification > email notification user list

Operations > Reports

  • Operations > Live Authentications > Filter fields

  • Operations > Reports > Catalog > Report filter fields

Operations > Troubleshoot

  • General Tools > RADIUS Authentication Troubleshooting > Username

Policies

  • Authentication > value for the antivirus expression within policy conditions

  • Authorization or posture or client provisioning > other conditions > value for the antivirus expression within policy conditions

Attribute value in policy library conditions

  • Authentication > simple condition or compound condition > value for the antivirus expression

  • Authentication > simple condition list display

  • Authentication > simple condition list > left navigation quick view display

  • Authorization > simple condition or compound condition > value for the antivirus expression

  • Authorization > simple condition list > left navigation quick view display

  • Posture > Dictionary simple condition or dictionary compound condition > value for the antivirus expression

  • Guest > simple condition or compound condition > value for the antivirus expression

UTF-8 Support Outside the Cisco ISE User Interface

This section contains the areas outside the Cisco ISE user interface that provide UTF-8 support.

Debug Log and CLI-Related UTF-8 Support

Attribute values and posture condition details appear in some debug logs. All debug logs accept UTF-8 values. You can download debug logs containing raw UTF-8 data that can be viewed with a UTF-8-supported viewer.

Cisco Secure ACS Migration UTF-8 Support

Cisco ISE allows the migration of Cisco Secure Access Control Server (ACS) UTF-8 configuration objects and values. Migration of some UTF-8 objects may not be supported by Cisco ISE UTF-8 languages, which might render some of the UTF-8 data that is provided during migration unreadable using the administration portal or report methods. Convert the unreadable UTF-8 values (that are migrated from Cisco Secure ACS) into ASCII text. For more information about migrating from Cisco Secure ACS to Cisco ISE, see the Cisco Secure ACS to Cisco ISE Migration Tool for your version of Cisco ISE.

Support for Importing and Exporting UTF-8 Values

The administration and Sponsor portals support plaintext and CSV files with the UTF-8 values to use when importing user account details. Exported files are provided as CSV files.

UTF-8 Support on REST

External Representational State Transfer (REST) communication supports UTF-8 values. This applies to configurable items that have UTF-8 support in the Cisco ISE user interface, except for administrator authentication. Administrator authentication in REST requires ASCII text credentials for login.

UTF-8 Support for Identity Stores Authorization Data

Cisco ISE allows Microsoft Active Directory and Lightweight Directory Access Protocol (LDAP) to use UTF- 8 data in authorization policies for policy processing.

MAC Address Normalization

Cisco ISE supports normalization of the MAC address that you enter in any of the following formats:

  • 00-11-22-33-44-55

  • 0011.2233.4455

  • 00:11:22:33:44:55

  • 001122334455

  • 001122-334455

Provide full or partial MAC addresses in the following Cisco ISE windows:

  • Policy > Policy Sets

  • Policy > Policy Elements > Conditions > Authorization

  • Authentications > Filters (Endpoint and Identity columns)

  • Global search

  • Operations > Reports > Report Filters

  • Operations > Troubleshoot > Diagnostic Tools > General Tools > Endpoint Debug

Provide full MAC addresses (six octets separated by ‘:’ or ‘-’ or ‘.’) in the following Cisco ISE windows:

  • Operations > Adaptive Network Control

  • Operations > Troubleshoot > Diagnostic Tools > General Tools > RADIUS Authentication Troubleshooting

  • Operations > Troubleshooting > Diagnostic Tools > General Tools > Posture Troubleshooting

  • Administration > Identities > Endpoints

  • Administration > System > Deployment

  • Administration > Logging > Collection Filters

REST APIs also support normalization of full MAC address.

The valid ranges for an octet are 0 to 9, a to f, or A to F.

Cisco ISE Deployment Upgrade

Cisco ISE offers a GUI-based centralized upgrade from the administration portal. The progress of the upgrade and the status of the nodes are displayed in the Cisco ISE GUI. For information on the preupgrade and postupgrade tasks you must carry out, see the Cisco Identity Services Engine Upgrade Guide for the Cisco ISE release that you want to upgrade to.

The upgrade Overview window (Administration > System > Upgrade > Overview lists all the nodes in your deployment, the personas that are enabled on them, the Cisco ISE version that is currently in use, and the status (whether a node is active or inactive) of each node. You can begin upgrade only if all the nodes are in the Active state.

Administrator Access Console

The following steps describe how to log in to the administrative portal.

Procedure


Step 1

Enter the Cisco ISE URL in the address bar of your browser (for example, https://<ise hostname or ip address>/admin/).

Step 2

Enter the username and case-sensitive password that were specified and configured during the initial Cisco ISE setup.

Step 3

Click Login or press Enter.

If your login is unsuccessful, click the Problem logging in? link in the log in window and follow the instructions that are displayed.


Administrator Login Browser Support

The Cisco ISE administration portal supports the following HTTPS-enabled browsers:

  • Mozilla Firefox 107 and earlier versions from version 82

  • Mozilla Firefox ESR 102.4 and earlier versions

  • Google Chrome 107 and earlier versions from version 86

  • Microsoft Edge, the latest version and one version earlier than the latest version

ISE Community Resource

ISE Pages Fail to Fully Load When Adblock Plus is Used

Administrator Lockout Because of Login Attempts

If you enter an incorrect password for an administrator user ID enough times, the account is either suspended for a specified time or locked out (as configured). If Cisco ISE is configured to lock you out, the administration portal locks you out of the system. Cisco ISE adds a log entry in the Server Administrator Logins report and suspends the credentials for that administrator ID. Reset the password for that administrator ID as described in the Section "Reset a Disabled Password Due to Administrator Lockout" in the Cisco Identity Services Engine Installation Guide. The number of failed login attempts allowed before an administrator account is disabled is configured as described in the Section "Administrative Access to Cisco ISE" of the Cisco Identity Services Engine Administrator Guide. After an administrator user account is locked out, Cisco ISE sends an email to the associated user, if this information is configured.

Only an administrator with the role of Super Admin (including Microsoft Active Directory users) can configure the disable administrator access option.

Configure Proxy Settings in Cisco ISE

If your existing network topology requires you to use a proxy server to enable Cisco ISE to access external resources (such as the remote download site where you can find client provisioning and posture-related resources), use the administration portal to configure the proxy settings.

The proxy settings impact the following Cisco ISE functions:

  • Partner Mobile Management

  • Endpoint Profiler Feed Service Update

  • Endpoint Posture Update

  • Endpoint Posture Agent Resources Download

  • Certificate Revocation List (CRL) Download

  • Guest Notifications

  • SMS Message Transmission

  • Social Login

  • Microsoft Entra ID

  • pxGrid Cloud

The Cisco ISE proxy configuration supports basic authentication for proxy servers. NT LAN Manager (NTLM) authentication is not supported.


Note


When you select OAuth Authentication Type for MDM configuration and integration , Cisco ISE uses NTLM authentication for proxy servers.


Procedure


Step 1

In the Cisco ISE GUI, click the Menu icon () and choose Administration > System > Settings > Proxy.

Step 2

Enter the proxy IP address or DNS-resolvable hostname, and specify the port through which proxy traffic travels to and from Cisco ISE in the Proxy host server : port field.

Step 3

Check the Password required check box, if necessary.

Step 4

Enter the username and password that are used to authenticate to the proxy servers in the User Name and Password fields. Reenter the password in the Confirm Password field.

Step 5

Enter the IP address or the address range of hosts or domains that must be bypassed in the Bypass proxy for these hosts and domain text box.

Step 6

Click Save.


Ports Used by the Administration Portal

The administration portal uses HTTP port 80 and HTTPS port 443 and you cannot change these settings. You cannot configure any of the end user portals to use these ports, to reduce the risk to the administration portal.

Set Up the Cisco ISE Application Programming Interface Gateway

The Cisco ISE API Gateway is an API management solution that acts as a single entry point to multiple Cisco ISE service APIs to provide better security and traffic management. API requests from external clients are routed to the API Gateway in Cisco ISE. The requests are forwarded to the Cisco ISE nodes where service APIs are running, based on an internal algorithm.

In Cisco ISE Release 3.0, only the MnT (Monitoring) API is routed through the API Gateway.

You can choose the Cisco ISE nodes on which you want to enable the API Gateway. We recommend that you run the API Gateway on at least two nodes in your Cisco ISE deployment.

Procedure


Step 1

Log in to the primary PAN.

Step 2

In the Cisco ISE GUI, click the Menu icon () and choose Administration > System > Settings > API Gateway Settings.

Step 3

In the ISE API Gateway Nodes List area, check the check boxes next to the nodes on which you want to enable the API Gateway.

Step 4

Click Enable.


Troubleshooting

To troubleshoot issues that are related to the API Gateway, set the Log Level for the following components to DEBUG in the Debug Log Configuration window. (To view this window, click the Menu icon () and choose Operations > Troubleshoot > Debug Wizard > Debug Log Configuration.)

  • ise-kong

  • kong

The logs can be downloaded from the Download Logs window. (To view this window, click the Menu icon () and choose Operations > Troubleshoot > Download Logs.) You can choose to download either a support bundle from the Support Bundle tab (by clicking the Download button on the tab), or download the kong debug logs from the Debug Logs tab (by clicking the Log File value for kong debug log).

Verification

If you are able to log in to the Cisco ISE primary PAN successfully every time, the API Gateway setup is working as expected.


Note


If REST APIs are accessed through API Gateway on a different tab in the same web browser where the GUI is logged in, the GUI gets logged out.

This happens only when the API is served by remote nodes other than API Gateway node.

From Cisco ISE 3.0 onwards, the UI services on port 443 are served through a docker service, which may result in behaviour change in cases that involve a multiple Network Interface Controller (NIC) scenario. You may need to adjust the routes to make sure the packets are routed through the intended interface or gateway based on the specific need, using the ip route command from the admin shell. For more information on using the ip route command, see the Cisco ISE CLI Commands in Configuration Mode section in the Cisco ISE CLI Reference Guide.


Enable External RESTful Services Application Programming Interface

The External RESTful Services application programming interfaces (API) are based on HTTPS protocols and REST methodology and use port 9060.

The External RESTful Services APIs support basic authentication. The authentication credentials are encrypted and are part of the request header.

You can use any REST client like JAVA, cURL Linux command, Python, or any other client to invoke External RESTful Services API calls.


Note


The ERS APIs support TLS 1.1 and TLS 1.2. ERS APIs do not support TLS 1.0 regardless of enabling TLS 1.0 in the Security Settings window (Administration > System > Settings > Security Settings). Enabling TLS 1.0 in the Security Settings window is related to the EAP protocol only and does not impact ERS APIs.


You must assign special privileges to a user for the user to perform operations using the External RESTful Services APIs. In Cisco ISE Release 2.6 and later, External RESTful Services users can be either internal users or belong to an external Microsoft Active Directory group. The Active Directory group to which the external users belong must be mapped to either ERS Admin or ERS Operator groups:

  • ERS Admin: This user can create, read, update, and delete External RESTful Services API requests. They have full access to all External RESTful Services APIs (GET, POST, DELETE, PUT).

  • ERS Operator: This user has read-only access (GET requests only).


Note


A user with the role Super Admin can access all External RESTful Services APIs.

ERS session idle timeout is 60 sec. If several requests are sent during this period, the same session is used with the same Cross-Site Request Forgery (CSRF) token. If the session has been idle for more than 60 sec, the session is reset and a new CSRF token is used.


The External RESTful Services APIs are disabled by default. If you evoke the External RESTful Services API calls before enabling them, you will receive an error response. Enable the Cisco ISE REST API feature for the applications developed for a Cisco ISE REST API to be able to access Cisco ISE. The Cisco REST APIs uses HTTPS port 9060, which is closed by default. If the Cisco ISE REST APIs are not enabled on the Cisco ISE administration server, the client application receives a timeout error from the server for any Guest REST API requests.

Procedure


Step 1

In the Cisco ISE GUI, click the Menu icon () and choose Administration > System > Settings > ERS Settings.

Step 2

Click the Enable ERS for Read/Write radio button to enable External RESTful Services on the Primary Administration node (PAN).

Step 3

Click the Enable ERS for Read for All Other Nodes radio button if there are any secondary nodes in your deployment.

External RESTful Service requests of all types are valid only for primary Cisco ISE nodes. Secondary nodes have read-access (GET requests).

Step 4

In the CSRF Check area, click the radio button for one of the following options:

  • Use CSRF Check for Enhanced Security: If this option is enabled, the External RESTful Services client must send a GET request to fetch the CSRF token from Cisco ISE and include the CSRF token in the requests that are sent to Cisco ISE. Cisco ISE will validate a CSRF token when a request is received from the External RESTful Services client. Cisco ISE processes the request only if the token is valid. This option is not applicable for External RESTful Services clients earlier than Cisco ISE Release 2.3.

  • Disable CSRF for ERS Request: If this option is enabled, CSRF validation is not performed. This option can be used for External RESTful Services clients earlier than Cisco ISE 2.3.

Step 5

Click Save.


All REST operations are audited and the logs are logged in the system logs. External RESTful Services APIs have a debug logging category, which you can enable from the debug logging window in the Cisco ISE GUI.

When you disable External RESTful Services in Cisco ISE, port 9060 remains open but no communication is allowed through the port.

Enable External AD Access for External RESTful Services Application Programming Interface

Procedure


Step 1

In the Cisco ISE GUI, click the Menu icon () and choose Administration > Identity Management > External Identity Sources > Active Directory.

Step 2

Add the Active Directory groups that the external user belongs to as an external identity source.

See the section "Active Directory as an External Identity Source" in Chapter "Asset Visibility" in the Cisco ISE Administrator Guide.

Step 3

Add user groups from the Active Directory.

See the section "Add Users" in Chapter "Asset Visibility" in Cisco ISE Administrator Guide.

Step 4

In the Cisco ISE GUI, click the Menu icon () and choose Administration > Admin Access > Authentication > Authentication Method.

Step 5

Choose AD: <Join Point Name> from the Identity Source drop-down list.

Step 6

Choose either Password Based or Client Certificate Based authentication by clicking the corresponding radio button.

Step 7

Choose Administration > System > Admin Access > Administrators > Admin Groups.

Step 8

Click ERS Admin group or ERS Operator from the list of administration groups,

Step 9

Click Add and add the external group to the administrator group as a member user.

Step 10

Click Save.


The Cisco ISE administrator must assign special privileges to a user to allow the user to perform operations using the External RESTful Services APIs. In Cisco ISE Release 2.6 and later, External RESTful Services users can be either internal users or belong to an external Active Directory. The Active Directory group to which the external users belong must be mapped to either ERS Admin or ERS Operator groups:

  • ERS Admin: This user can create, read, update, and delete External RESTful Services API requests. They have full access to all External RESTful Services APIs (GET, POST, DELETE, PUT).

  • ERS Operator: This user has read-only access (GET requests only).


Note


A user with the role Super Admin can access all External RESTful Services APIs.


External RESTful Services Software Development Kit

Use the External RESTful Services (ERS) software development kit (SDK) to build your own tools. You can access the External RESTful Services SDK with the URL https://<ISE-ADMIN-NODE>:9060/ers/sdk. Only users with the role ERS Admin can access the External RESTful Services SDK.

The SDK consists of the following components:

  • Quick reference API documentation.

  • A complete list of all available API operations.

  • Schema files available for download.

  • Sample application in Java available for download.

  • Use cases in cURL script format.

  • Use cases in Python script format.

  • Instructions on using Chrome Postman.

Specify System Time and Network Time Protocol Server Settings

Cisco ISE allows you to configure up to three NTP servers. Use the NTP servers to maintain accurate time and synchronize time across different timezones. You can also specify whether Cisco ISE must use only authenticated NTP servers and enter one or more authentication keys for that purpose.

We recommend that you set all the Cisco ISE nodes to the Coordinated Universal Time (UTC) timezone, especially if your Cisco ISE nodes are installed in a distributed deployment. This procedure ensures that the timestamps of the reports and logs from the various nodes in your deployment are always synchronized.

Cisco ISE supports public key authentication for NTP servers. NTP Version 4 uses symmetric key cryptography and also provides a new Autokey security model that is based on public key cryptography. Public-key cryptography is considered to be more secure than symmetric key cryptography. This is because the security is based on a private value that is generated by each server and never revealed. With the Autokey security model, all the key distribution and management functions involve only public values, which simplify key distribution and storage considerably.

You can configure the Autokey security model for the NTP server from the Cisco ISE CLI in configuration mode. We recommend that you use the identification friend or foe (IFF) system because this system is most widely used.

Before you begin

You must have either the Super Admin or System Admin administrator role assigned to you.

If you have both primary and secondary Cisco ISE nodes in your deployment, log in to the user interface of each node and configure the system time and Network Time Protocol (NTP) server settings.

Procedure


Step 1

In the Cisco ISE GUI, click the Menu icon () and choose Administration > System > Settings > System Time.

Step 2

In the NTP Server Configuration area, enter the unique IP addresses (IPv4 or IPv6 or fully qualified domain name [FQDN] value) for your NTP servers.

Step 3

(Optional) To authenticate the NTP server using private keys, click the NTP Authentication Keys tab and specify one or more authentication keys if any of the servers that you specify require authentication through an authentication key. Carry out the following steps:

  1. Click Add.

  2. Enter the necessary values in the Key ID and Key Value fields. Choose the required Hashed Message Authentication Code (HMAC) value from the HMAC drop-down list.The Key ID field supports numeric values between 1 to 65535 and the Key Value field supports up to 15 alphanumeric characters.

  3. Click OK.

  4. Return to the NTP Server Configuration tab.

Step 4

(Optional) To authenticate the NTP server using public key authentication, configure the Autokey security model on Cisco ISE from the CLI. See the ntp server and crypto commands in the Cisco Identity Services Engine CLI Reference Guide for your Cisco ISE release.

Step 5

Click Save.


Note


Use three or more NTP servers to ensure accurate time synchronization across your network, even if one of the servers fails or two of the servers are out of sync. See https://insights.sei.cmu.edu/blog/best-practices-for-ntp-services.


Change the System Time Zone

Once set, you cannot edit the time zone from the administration portal. To change the time zone setting, enter the following command in the Cisco ISE CLI:

clock timezone timezone

For more information about the clock timezone command, see Cisco Identity Services Engine CLI Reference Guide.


Note


Cisco ISE uses Portable Operating System Interface (POSIX)-style signs in the time zone names and the output abbreviations. Therefore, zones west of Greenwich have a positive sign and zones east of Greenwich have a negative sign. For example, TZ='Etc/GMT+4' corresponds to 4 hours behind Universal Time (UT).


Caution


When you change the time zone on a Cisco ISE appliance after installation, Cisco ISE services restart on that particular node. We recommend that you perform such changes within a maintenance window. Also, it is important to have all the nodes in a single Cisco ISE deployment that is configured to the same time zone. If you have Cisco ISE nodes located in different geographical locations or time zones, you should use a global time zone such as UTC on all the Cisco ISE nodes.


Configure SMTP Server to Support Notifications

Configure an SMTP server for Cisco ISE to be able to send email notifications for the following purposes:

  • Alarms.

  • For sponsors to send email notification to guests with their login credentials and password reset instructions.

  • For guests to automatically receive their login credentials after they successfully register themselves, and for the actions that are required of them before their guest accounts expire.

The recipient of alarm notifications can be any internal admin user with the Include system alarms in emails option enabled. The sender’s email address for sending alarm notifications is set as ise@<hostname> by default, but it can also be configured if needed. To configure the sender's email address, click on Administration > System > Settings > Alarm Settings > Alarm Notification and type in the Enter sender e-mail: field.

The following table shows which node in a distributed Cisco ISE environment sends emails.

Table 5. Cisco ISE Nodes that Send Emails

Purpose of Email

Node That Sends Email

Guest access expiration

Primary Policy Administration Node (PAN)

Alarms

Active Monitoring and Troubleshooting node (MnT)

Sponsor and guest notifications from guest and sponsor portals

Policy Service node (PSN)

Password expirations

Primary PAN

To configure an Simple Mail Transfer Protocol (SMTP) server, click the Menu icon () and Administration > System > Settings > SMTP Server. Configure the following fields:

  • In the SMTP Server Settings area:

    • SMTP Server: Enter the hostname of the outbound SMTP server.

    • SMTP Port: Enter the SMTP port number. This port must be open to connect to the SMTP server.

    • Connection Timeout: Enter the maximum time that Cisco ISE waits for a connection to the SMTP server before starting a new connection. The timeout value is configured in seconds.

  • In the Encryption Settings area, check the Use TLS/SSL Encryption check box to communicate with a secure SMTP server. If you use Secure Sockets Layer (SSL), add the root certificate of the SMTP server to Cisco ISE Trusted Certificates.

  • In the Authentication Settings area, check the Use Password Authentication check box to use username and password for authentication instead of SSL.

Enable Secure Unlock Client Mechanism

The Secure Unlock Client mechanism provides root shell access on Cisco ISE CLI for a certain time. When you exit or close the session, the root access is also revoked.

The Secure Unlock Client feature is implemented using the Consent Token tool. Consent Token is a uniform multifactor authentication scheme to securely grant privileged access for Cisco products in a trusted manner, and only after mutual consent from both the customer and Cisco.

To enable root shell on Cisco ISE CLI, perform the following steps:

Procedure


Step 1

In the Cisco ISE CLI, enter permit rootaccess:

ise/admin# permit rootaccess
1. Generate Challenge Token Request
2. Enter Challenge Response for Root Access
3. Show History
4. Exit
Enter CLI Option: 

Step 2

Generate the Consent Token Challenge by choosing option 1:

1. Generate Challenge Token Request
2. Enter Challenge Response for Root Access
3. Show History
4. Exit
Enter CLI Option: 
1
Generating Challenge..................................... 
Challenge String (Please copy everything between the asterisk lines exclusively):
*****************************************************************************************
GLOX7gAAAQEBAAQAAAABAgAEAAAAAAMACLmJxgub0hitBAAQiUwv+XeD3pnJ4HLnJy30YQUABAAADhAGAANJU0UHAAZJU0VfQ1QIAANJU0UJACcJIDU2NGQ5NjgwLTFmZmEtOWI0ZS0wZjY1LTdlZDllMGQ1M2UzNQo=
*****************************************************************************************
Starting background timer of 15mins 
1. Generate Challenge Token Request
2. Enter Challenge Response for Root Access
3. Show History
4. Exit
Enter CLI Option: 

Step 3

Send the Consent Token Challenge to the Cisco Technical Assistance Center (TAC):

Cisco TAC generates Consent Token Response using the Consent Token Challenge that you provide.

Step 4

Choose option 2 and then enter the Consent Token Response that is provided by Cisco TAC:

Enter CLI Option: 
2
Please input the response when you are ready .........................
vxOOQQAAAQEBAAQAAAABAgAEAAAAAAMBYjJ0Y1RHUU1oT09FRlFwN0FxUm0wbXJ3eW9UeUhTWmIrVmlNaHJtbkVqMlJwT09TK1QvTUx2cmtTT2s3em9XK2UNCklJclpFVHdtb3ROci9ac2cveUdCcGFLS0l2MGJRVnFxbndIckppM2kzWlJweU5DdDQ5bERlb2oreXpPNlZ3MEMNCmxYT2dackRLRUFCMlZWUUpsU1FOZ3BiNmxSZEs1bFZtSVhwem9FaUpTRGlWZ1U5RlNhTlQwRGZRbURGclVKbGQNCjdYRjFQeDVteVpScjhUVDk5V0pUN2ZhT2drRkhpVW9xOG1EelFwejcxVmtSaVNmS0lBOEJjViswN1hRR0pQQysNCjNsR3JULzREYWpzUW1YRmdBUEdoNkVjZmx1Q0VQd3FBVG1MbllMSFRwczFiYm5jdVIxUzN0Wm5GTlpaRHFyYm0NCkNVS2VyUXE5ZW1RemFrZytaU3F6dkE9PQ==
Response Signature Verified successfully ! 
Granting shell access
sh-4.2# ls


Note


The privileged access is enabled if response signature verification is successful.


What to do next

To exit from the shell mode, run the exit command:
sh-4.2# exit
exit
Root shell exited 
View the history of root access sessions by choosing option 3:
1. Generate Challenge Token Request
2. Enter Challenge Response for Root Access
3. Show History
4. Exit
Enter CLI Option: 
3
************************************ 
        SN No : 1 
************************************ 
Challenge 3/WcyAAAAQEBAAQAAAABAgAEAAAAAAMACMt89YhCTVWWBAAQwo9lyianfhO4C5u1+v80AQUABAAADhAGAANJU0UHAAZJU0VfQ1QIAANJU0UJACcJIDU2NGQ5NjgwLTFmZmEtOWI0ZS0wZjY1LTdlZDllMGQ1M2UzNQo= generated at 2019-06-12 15:40:01.000
************************************ 
        SN No : 2 
************************************ 

Federal Information Processing Standards Mode Support

Cisco ISE uses embedded Federal Information Processing Standards (FIPS) 140-2 validated cryptographic modules Cisco Common Cryptographic Module (Certificate #1643 and Certificate #2100). For details of the FIPS compliance claims, see FIPS Compliance Letter.

When the FIPS mode is enabled, the Cisco ISE administrator interface displays a FIPS mode icon at the left of the node name in the top-right corner of the window.

If Cisco ISE detects the use of a protocol or certificate that is not supported by the FIPS 140-2 standard, it displays a warning with the name of the protocol or certificate that is noncompliant, and the FIPS mode is not enabled. Ensure that you choose only FIPS-compliant protocols and replace non-FIPS compliant certificates before you enable the FIPS mode.

The certificates that are installed in Cisco ISE must be re-issued if the cryptographic algorithms or their parameters that are used in the certificates are not supported by FIPS.

When you enable the FIPS mode, the following functions are affected:

  • Lightweight Directory Access Protocol (LDAP) over SSL

Cisco ISE enables FIPS 140-2 compliance via RADIUS shared secret and key management measures. When the FIPS mode is enabled, any function that uses a non-FIPS-compliant algorithm fails.

When you enable the FIPS mode:

  • All non-FIPS compliant cipher suites are disabled for EAP-TLS, PEAP, TEAP, EAP-TTLS, and EAP-FAST.

  • All non-FIPS compliant cipher suites are disabled in SSH.

  • Certificates and private keys must use only FIPS-compliant hash and crytographic algorithms.

  • RSA private keys must be 2048 bits or greater.

  • ECDSA private keys must be 224 bits or greater.

  • ECDSA server certificate works with only TLS 1.2.

  • DHE ciphers work with DH parameters of 2048 bits or greater for all ISE TLS clients.

  • 3DES ciphers are not allowed for Cisco ISE as a server

  • SHA-1 is not allowed for generating certificates.

  • SHA-1 is not allowed in client certificates.

  • The anonymous PAC provisioning option in EAP-FAST is disabled.

  • Local SSH server operates in FIPS mode.

  • The following protocols are not supported for RADIUS:

    • EAP-MD5

    • PAP

    • CHAP

    • MS-CHAPv1

    • MS-CHAPv2

    • LEAP

Once the FIPS Mode is enabled, all the nodes in the deployment are rebooted automatically. Cisco ISE performs a rolling restart by first restarting the primary PAN and then restarting each secondary node, one at a time. Hence, it is recommended that you plan for the downtime before changing the configuration.


Tip


We recommend that you do not enable FIPS mode before completing the database migration process.


Enable Federal Information Processing Standards Mode in Cisco ISE

To enable the FIPS mode in Cisco ISE:

Procedure


Step 1

In the Cisco ISE GUI, click the Menu icon () and choose Administration > System > Settings > FIPS Mode.

Step 2

Choose Enabled from the FIPS Mode drop-down list.

Step 3

Click Save and restart your machine.


What to do next

After you enable FIPS mode, enable and configure the following FIPS 140 compliant functions:

You may want to enable administrator account authorization using a Common Access Card function. Although using Common Access Card functions for authorization is not strictly a FIPS 140 requirement, it is a well-known secure-access measure that is used in several environments to bolster FIPS 140 compliance.

Configure Cisco ISE for Administrator Common Access Card Authentication

Before you begin
  • Ensure that the domain name server (DNS) in Cisco ISE is set for Active Directory.

  • Ensure that Active Directory user and user group memberships have been defined for each administrator certificate.

To ensure that Cisco ISE can authenticate and authorize an administrator based on the Common Access Card-based client certificate that is submitted from the browser, configure the following:

  • The external identity source (Active Directory in the following example).

  • The Active Directory user groups to which the administrator belongs.

  • How to find the user's identity in the certificate.

  • Active Directory user groups to Cisco ISE RBAC permissions mapping.

  • The Certificate Authority (trust) certificates that sign the client certificates.

  • A method to determine if a client certificate has been revoked by the certificate authority.

You can use a Common Access Card to authenticate credentials when logging in to Cisco ISE.

Procedure

Step 1

Configure an Active Directory identity source in Cisco ISE and join all Cisco ISE nodes to Active Directory.

Step 2

Configure a certificate authentication profile according to the guidelines.

Be sure to select the attribute in the certificate that contains the administrator username in the Principal Name X.509 Attribute field. For Common Access Cards, the Signature Certificate on the card is normally used to look up the user in Active Directory. The Principal Name is found in this certificate in the Subject Alternative Name extension, specifically in the Other Name area of the extension. So the attribute selection here should be Subject Alternative Name - Other Name.

If the Active Directory record for the user contains the user's certificate, and you want to compare the certificate that is received from the browser against the certificate in Active Directory, check the Binary Certificate Comparison check box, and select the Active Directory instance name that was specified earlier.

Step 3

Enable Active Directory for password-based administrator authentication. Choose the Active Directory instance name that you connected and joined to Cisco ISE earlier.

Note


You must use password-based authentication until you complete other configurations. Then, you can change the authentication type to client certificate based at the end of this procedure.

Step 4

Create an external administrator group and map it to an Active Directory group. In the Cisco ISE GUI, click the Menu icon () and choose Administration > System > Admin Access > Administrators > Admin Groups. Create an external system administrator group.

Step 5

Configure an administrator authorization policy to assign RBAC permissions to the external administrator groups.

Caution


We strongly recommend that you create an external Super Admin group, map it to an Active Directory group, and configure an administrator authorization policy with Super Admin permissions (menu access and data access), and create at least one user in that Active Directory Group. This mapping ensures that at least one external administrator has Super Admin permissions once Client Certificate-Based Authentication is enabled. Failure to do this may lead to situations where the Cisco ISE administrator is locked out of critical functionality in the administration portal.

Step 6

Administration > System > Certificates > Certificate Store > Trusted Certificates to import certificate authority certificates into the Cisco ISE trusted certificates store.

Cisco ISE does not accept a client certificate unless the certificate authority certificates in the client certificate’s trust chain are placed in the Cisco ISE Certificates store. You must import the appropriate certificate authority certificates in to the Cisco ISE Certificates store.

  1. Click Import and click Choose File in the Certificate File area.

  2. Check the Trust for client authentication and Syslog check box.

  3. Click Submit.

    Cisco ISE prompts you to restart all the nodes in the deployment after you import a certificate. You can defer the restart until you import all the certificates. However, after importing all the certificates, you must restart Cisco ISE before you proceed.

Step 7

Configure the certificate authority certificates for revocation status verification.

  1. Administration > System > Certificates > OSCP Client Profile.

  2. Click Add.

  3. Enter the name of an OSCP server, an optional description, and the URL of the server in the corresponding fields.

  4. Administration > System > Certificates > Certificate Store.

  5. For each certificate authority certificate that can sign a client certificate, specify how to do the revocation status check for that certificate authority. Choose a certificate authority certificate from the list and click Edit. On the edit page, choose OCSP or certificate revocation list (CRL) validation, or both. If you choose OCSP, choose an OCSP service to use for that certificate authority. If you choose CRL, specify the CRL Distribution URL and other configuration parameters.

Step 8

Enable client certificate-based authentication. Choose Administration > System > Admin Access > Authentication.

  1. In the Authentication Method tab, click the Client Certificate Based radio button.

  2. Choose the certificate authentication profile that you configured earlier from the Certificate Authentication Profile drop-down list.

  3. Select the Active Directory instance name from the Identity Source drop-down list.

  4. Click Save.

    Here, you switch from password-based authentication to client certificate-based authentication. The certificate authentication profile that you configured earlier determines how the administrator’s certificate is authenticated. The administrator is authorized using the external identity source, which in this example is Active Directory.

    The Principal Name attribute from the certificate authentication profile is used to look up the administrator in Active Directory.


Supported Common Access Card Standards

Cisco ISE supports U.S. government users who authenticate themselves using Common Access Card authentication devices. A Common Access Card is an identification badge with an electronic chip containing a set of X.509 client certificates that identify a particular employee. Access via the Common Access Card requires a card reader into which you insert the card and enter a PIN. The certificates from the card are then transferred into the Windows certificate store, where they are available to applications such as the local browser running Cisco ISE.

Common Access Card Operation in Cisco ISE

You can configure the administration portal so that Cisco ISE authentications occur only through a client certificate. Credentials-based authentication that requires user IDs or passwords is not permitted. In client certificate-based authentication, you insert a Common Access Card card, enter a PIN, and then enter the Cisco ISE administration portal URL into the browser address field. The browser forwards the certificate to Cisco ISE, and Cisco ISE authenticates and authorizes your login session, based on the contents of the certificate. If this process is successful, the Cisco ISE Monitoring and Troubleshooting home page is displayed and you are given the appropriate RBAC permissions.

Secure SSH Key Exchange Using Diffie-Hellman Algorithm

Configure Cisco ISE to only allow Diffie-Hellman-Group14-SHA1 Secure Shell (SSH) key exchanges. Enter the following commands from the Cisco ISE CLI Configuration Mode:

service sshd key-exchange-algorithm diffie-hellman-group14-sha1

Here is an example:

ise/admin#conf t

ise/admin (config)#service sshd key-exchange-algorithm diffie-hellman-group14-sha1

Configure Cisco ISE to Send Secure Syslog

Before you begin

To configure Cisco ISE to send only TLS-protected secure syslog between the Cisco ISE nodes and to the monitoring nodes, perform the following tasks:

  • Ensure that all the Cisco ISE nodes in your deployment are configured with appropriate server certificates.

  • Ensure that the default network access authentication policy does not allow any version of the SSL protocol.

  • Ensure that all the nodes in your deployment are registered with the primary PAN. Also ensure that at least one node in your deployment has the Monitoring persona enabled on it to function as the secure syslog receiver (TLS server).

  • Check the supported RFC standards for syslogs. See Cisco Identity Services Engine Network Component Compatibility guide for your Cisco ISE release.

Procedure


Step 1

Configure a secure syslog remote logging target.

Step 2

Enable logging categories to send auditable events to the secure syslog remote logging target.

Step 3

Disable TCP Syslog and UDP syslog collectors. Only TLS-protected syslog collectors must be enabled.

Note


Cisco ISE Release 2.6 and later releases include TLS-protected UDP syslogs if you enable the use of Cisco ISE Messaging Service for delivering UDP syslogs to MnT nodes.


Configure Secure Syslog Remote Logging Target

Cisco ISE system logs are collected and stored by log collectors for various purposes. To configure a secure syslog target, choose a Cisco ISE node with the Monitoring persona enabled on it as your log collector.

Procedure


Step 1

Log in to the Cisco ISE administration portal.

Step 2

In the Cisco ISE GUI, click the Menu icon () and choose Administration > System > Logging > Remote Logging Targets.

Step 3

Click Add.

Step 4

Enter a name for the secure syslog server.

Step 5

Choose Secure Syslog from the Target Type drop-down list.

Step 6

Choose Enabled from the Status drop-down list.

Step 7

Enter the hostname or IP address of the Cisco ISE monitoring node in your deployment, in the Host / IP Address field.

Step 8

Enter 6514 as the port number in the Port field. The secure syslog receiver listens on TCP port 6514.

Step 9

Choose the syslog facility code from the Facility Code drop-down list. The default value is LOCAL6.

Step 10

Check the following check boxes to enable the corresponding configurations:

  1. Include Alarms For This Target

  2. Comply to RFC 3164

  3. Enable Server Identity Check

Step 11

Check the Buffer Messages When Server Down check box. If this option is checked, Cisco ISE stores the logs if the secure syslog receiver is unreachable, periodically checks the secure syslog receiver, and forwards the logs when the secure syslog receiver comes up.

  1. Enter the buffer size in the Buffer Size (MB) field.

  2. For Cisco ISE to periodically check the secure syslog receiver, enter the reconnect timeout value in the Reconnect Time (Sec) field. The timeout value is configured in seconds.

Step 12

Choose the CA certificate that Cisco ISE must present to the secure syslog server from the Select CA Certificate drop-down list.

Step 13

Ensure that the Ignore Server Certificate validation check box is not checked when configuring a Secure Syslog.

Step 14

Click Submit.


Remote Logging Target Settings

The following table describes the fields in the Remote Logging Targets window that you can use to create external locations (syslog servers) to store logging messages. To access this window, Administration > System > Logging > Remote Logging Targets, and click Add.

Table 6. Remote Logging Target Settings

Field Name

Usage Guidelines

Name

Enter a name for the new syslog target.

Target Type

Select the target type from the drop-down list. The default value is UDP Syslog.

Description

Enter a brief description of the new target.

IP Address

Enter the IP address or hostname of the destination machine that will store the logs. Cisco ISE supports IPv4 and IPv6 formats for logging.

Port

Enter the port number of the destination machine.

Facility Code

Choose the syslog facility code that must be used for logging, from the drop-down list. Valid options are Local0 through Local7.

Maximum Length

Enter the maximum length of the remote log target messages. Valid values are from 200 through 1024 bytes.

Include Alarms For this Target

When you check this check box, alarm messages are sent to the remote server as well.

Comply to RFC 3164

When you check this check box, the delimiters (, ; { } \ \) in the syslog messages sent to the remote servers are not escaped even if a backslash (\) is used.

Buffer Message When Server Down

This check box is displayed when you choose TCP Syslog or Secure Syslog from the Target Type drop-down list. Check this check box to allow Cisco ISE to buffer the syslog messages when a TCP syslog target or secure syslog target is unavailable. Cisco ISE retries sending messages to the target when the connection to the target resumes. After the connection resumes, messages are sent sequentially, starting with the oldest, and proceeding to the newest. Buffered messages are always sent before new messages. If the buffer is full, old messages are discarded.

Buffer Size (MB)

Set the buffer size for each target. By default, it is set to 100 MB. Changing the buffer size clears the buffer, and all the existing buffered messages for the specific target are lost.

Reconnect Timeout (Sec)

Enter the time (in seconds) to configure how long the TCP and secure syslogs are stored for before being discarded when the server is down.

Select CA Certificate

This drop-down list is displayed when you choose Secure Syslog from the Target Type drop-down list. Choose a client certificate from the drop-down list.

Ignore Server Certificate Validation

This check box is displayed when you choose Secure Syslog from the Target Type drop-down list. Check this check box for Cisco ISE to ignore server certificate authentication and accept any syslog server.

Enable Logging Categories to Send Auditable Events to the Secure Syslog Target

Enable logging categories for Cisco ISE to send auditable events to the secure syslog target.

Procedure


Step 1

In the Cisco ISE administration portal, click the Menu icon () and choose Administration > System > Logging > Logging Categories.

Step 2

Click the radio button next to the Administrative and Operational Audit logging category, then click Edit.

Step 3

Choose WARN from the Log Severity Level drop-down list.

Step 4

In the Targets area, move the secure syslog remote logging target that you created earlier to the Selected area.

Step 5

Click Save.

Step 6

Repeat this task to enable the following logging categories. Both these logging categories have INFO as the default log severity level and you cannot edit it.

  • AAA Audit.

  • Posture and Client Provisioning Audit.


Configure Logging Categories

The following table describes the fields that you can use to configure a logging category. Set a log severity level and choose the logging targets for the logs of a logging category. To access this window, choose Administration > System > Logging > Logging Categories.

Click the radio button next to the logging category that you want to view, and click Edit. The following table describes the fields that are displayed in the edit window of the logging categories.

Table 7. Logging Category Settings

Field Name

Usage Guidelines

Name

Displays the name of the logging category.

Log Severity Level

For some logging categories, this value is set by default, and you cannot edit it. For some logging categories, you can choose one of the following severity levels from a drop-down list:

  • FATAL: Emergency level. This level means that you cannot use Cisco ISE and you must immediately take the necessary action.

  • ERROR: This level indicates a critical error condition.

  • WARN: This level indicates a normal but significant condition. This is the default level set for many logging categories.

  • INFO: This level indicates an informational message.

  • DEBUG: This level indicates a diagnostic bug message.

Local Logging

Check this check box to enable logging events for a category on the local node.

Targets

This area allows you to choose the targets for a logging category by transferring the targets between the Available and the Selected areas using the left and right arrow icons.

The Available area contains the existing logging targets, both local (predefined) and external (user-defined).

The Selected area, which is initially empty, then displays the targets that have been chosen for the category.

Disable TCP Syslog and UDP Syslog Collectors

For Cisco ISE to send only secure syslog between the nodes, you must disable the TCP and UDP syslog collectors, and enable only Secure Syslog collectors.


Note


Cisco ISE Release 2.6 and later releases include TLS-protected UDP syslogs if you enable the use of Cisco ISE Messaging Service for delivering UDP syslogs to MnT nodes.


Procedure


Step 1

In the Cisco ISE GUI, click the Menu icon () and choose Administration > System > Logging > Remote Logging Targets.

Step 2

Click the radio button next to a TCP or UDP syslog collector.

Step 3

Click Edit.

Step 4

Choose Disabled from the Status drop-down list.

Step 5

Click Save.

Step 6

Repeat this process until you disable all the TCP or UDP syslog collectors.


Default Secure Syslog Collector

Cisco ISE provides default secure syslog collectors for the MnT nodes. By default, no logging categories are mapped to these default secure syslog collectors. The default secure syslog collectors are named as follows:

  • Primary MnT node: SecureSyslogCollector

  • Secondary MnT node: SecureSyslogCollector2

You can view this information on the Remote Logging Targets window (Administration > System > Logging > Remote Logging Targets). You cannot delete the default syslog collectors and cannot update the following fields for the default syslog collectors:

  • Name

  • Target Type

  • IP/Host address

  • Port

During a fresh Cisco ISE installation, a certificate that is named Default Self-signed Server Certificate is added to the Trusted Certificates store. This certificate is marked for Trust for Client authentication and Syslog usage, making it available for secure syslog usage. While configuring your deployment or updating the certificates, you must assign relevant certificates to the secure syslog targets.

During a Cisco ISE upgrade, if there are any existing secure syslog targets pointing to MnT nodes on port 6514, the names and configurations of the target are retained. After the upgrade, you cannot delete these syslog targets and you cannot edit the following fields:

  • Name

  • Target Type

  • IP/Host address

  • Port

If no such targets exist at the time of upgrade, default secure syslog targets are created similar to the fresh installation scenario, without any certificate mapping. You can assign the relevant certificates to these syslog targets. If you try to map a secure syslog target that is not mapped to any certificate to a logging category, Cisco ISE displays the following message:
Please configure the certificate for log_target_name

Note


You cannot create a new logging target using the hostname or IP address and port of an already existing target. Each logging target must have a unique hostname or IP address and port.


Offline Maintenance

If the maintenance time period is less than an hour, take the Cisco ISE node offline and perform the maintenance task. When you bring the node back online, the PAN node will automatically synchronize all the changes that happened during maintenance time period. If the changes are not synchronized automatically, you can manually synchronize it with the PAN.

If the maintenance time period is more than an hour, deregister the node at the time of maintenance and reregister the node when you add the node back to deployment.

We recommend that you schedule the maintenance at a time period during which the activity is low.


Note


  1. Data replication issues may occur if the queue contains more than 1,000,000 messages or if the Cisco ISE node is offline for more than six hours.

  2. If you are performing maintenance on the primary MnT node, we recommend that you take an operational backup of the MnT node before performing maintenance activities.


Configure Endpoint Login Credentials

The Endpoint Login Configuration window is where you configure login credentials so Cisco ISE can log in to clients. The login credentials that are configured in this window are used by the following Cisco ISE features:

In the Cisco ISE GUI, click the Menu icon () and choose Administration > System > Settings > Endpoint Scripts > Settings.

The following tabs are displayed:

  • Windows Domain User: Configure the domain credentials that Cisco ISE must use to log in to a client via SSH. Click the Plus icon and enter as many Windows logins as you need. For each domain, enter the required values in the Domain, Username, and Password fields. If you configure domain credentials, the local user credentials that are configured in the Windows Local User tab are ignored.

  • Windows Local User: Configure the local account that Cisco ISE uses to access the client via SSH. The local account must be able to run Powershell and Powershell remote.

  • MAC Local User: Configure the local account that Cisco ISE uses to access the client via SSH. The local account must be able to run Powershell and Powershell remote. In the Username field, enter the Account Name of the local account. To view a Mac OS Account Name, run the following command in the Terminal:

    whoami

Changing the Host Name in Cisco ISE

In Cisco ISE, you can change the host name only through the CLI. For information on this, see the Cisco Identity Services Engine CLI Reference Guide for your version.

Considerations to keep in mind before changing the host name:

  • All Cisco ISE services will undergo an automatic restart at the standalone node level if the host name is changed.

  • If CA-signed certificates were used on this node, you must import them again with the correct host name.

  • If this node will be joining a new Active Directory domain, you must leave your current Active Directory domain before changing the host name. If this node is already joined to an existing Active Directory domain, then it is strongly recommended that you rejoin all currently joined join-points to avoid possible mismatch between the current and previous host names and joined machine account name.

  • If Internal-CA signed certificates are being used, you must regenerate the ISE root CA certificate.

  • Changing the host name will cause any certificate using the old host name to become invalid. Therefore, a new self-signed certificate using the new host name will be generated now for use with HTTPs or EAP.


Note


All the above considerations are applicable for any change in the domain name as well.


Certificate Management in Cisco ISE

A certificate is an electronic document that identifies an individual, a server, a company, or another entity, and associates that entity with a public key. A self-signed certificate is signed by its creator. Certificates can be self-signed or digitally signed by an external CA. A CA-signed digital certificate is considered an industry standard and more secure than a self-signed certificate.

Certificates are used in a network to provide secure access. Certificates identify a Cisco ISE node to an endpoint and secure the communication between that endpoint and the Cisco ISE node.

Cisco ISE uses certificates for:

  • Communication between Cisco ISE nodes.

  • Communication between Cisco ISE and external servers such as the syslog and feed servers.

  • Communication between Cisco ISE and end user portals such as guest, sponsor and BYOD portals.

Manage certificates for all the nodes in your deployment through the Cisco ISE administration portal.

Configure Certificates in Cisco ISE to Enable Secure Access

Cisco ISE relies on public key infrastructure (PKI) to provide secure communication with both endpoints and administrators and between Cisco ISE nodes in a multinode deployment. PKI relies on X.509 digital certificates to transfer public keys for encryption and decryption of messages, and to verify the authenticity of other certificates representing users and devices. Through the Cisco ISE administration portal, you can manage two categories of X.509 certificates:

  • System Certificates: These are server certificates that identify a Cisco ISE node to client applications. Every Cisco ISE node has its own system certificates that are stored on the node along with the corresponding private keys.


    Note


    Cisco ISE cannot import more than one certificate with the same private key. If the certificate is renewed and imported without changing the private key, then the existing certificate is replaced with the imported certificate.


  • Trusted Certificates: These are CA certificates that are used to establish trust for the public keys that are received from users and devices. The Trusted Certificates store also contains certificates that are distributed by the Simple Certificate Enrollment Protocol (SCEP), which enables the registration of mobile devices into the enterprise network. Trusted certificates are managed on the primary PAN, and are automatically replicated to all the other nodes in a Cisco ISE deployment.

In a distributed deployment, you must import the certificate only into the Certificate Trust List (CTL) of the PAN. The certificate gets replicated to the secondary nodes.

To ensure certificate authentication in Cisco ISE is not impacted by minor differences in certificate-driven verification functions, use lowercase hostnames for all Cisco ISE nodes that are deployed in a network.

Certificate Usage

When you import a certificate into Cisco ISE, specify the purpose for which the certificate is to be used. In the Cisco ISE GUI, click the Menu icon () and choose Administration > System > Certificates > System Certificates, and click Import.

Choose one or more of the following uses:

  • Admin: For internode communication and authenticating the administration portal.

  • EAP Authentication: For TLS-based EAP authentication.

  • RADIUS DTLS: For RADIUS DTLS server authentication.

  • Portal: For communicating with all Cisco ISE end-user portals.

  • SAML: For verifying that the SAML responses are being received from the correct identity provider.

  • pxGrid: For communicating with the pxGrid controller.

Associate different certificates from each node for communicating with the administration portal (Admin usage), the pxGrid controller (pxGrid usage), and for TLS-based EAP authentication (EAP Authentication usage). However, you can associate only one certificate from each node for each of these purposes.

You must always use a new private key for each certificate that you import into Cisco ISE. When you reuse private keys across certificates, application initialization errors may occur due to a Red Hat NSS database limitation.

When a new certificate is imported into the Red Hat NSS database, any existing certificate that has the same private key is overridden. Cisco ISE application initialization is impacted if an admin certificate's private key is overridden.

With multiple PSNs in a deployment that can service a web portal request, Cisco ISE needs a unique identifier to identify the certificate that must be used for portal communication. When you add or import certificates that are designated for portal use, define a certificate group tag and associate it with the corresponding certificate on each node in your deployment. Associate this certificate group tag to the corresponding end-user portals (guest, sponsor, and personal devices portals). This certificate group tag is the unique identifier that helps Cisco ISE identify the certificate that must be used when communicating with each of these portals. You can only designate one certificate from each node for each of the portals.


Note


An EAP-TLS client certificate should have KeyUsage=Key Agreement and ExtendedKeyUsage=Client Authentication for the following ciphers:

  • ECDHE-ECDSA-AES128-GCM-SHA256

  • ECDHE-ECDSA-AES256-GCM-SHA384

  • ECDHE-ECDSA-AES128-SHA256

  • ECDHE-ECDSA-AES256-SHA384

An EAP-TLS client certificate should have KeyUsage=Key Encipherment and ExtendedKeyUsage=Client Authentication for the following ciphers:

  • AES256-SHA256

  • AES128-SHA256

  • AES256-SHA

  • AES128-SHA

  • DHE-RSA-AES128-SHA

  • DHE-RSA-AES256-SHA

  • DHE-RSA-AES128-SHA256

  • DHE-RSA-AES256-SHA256

  • ECDHE-RSA-AES256-GCM-SHA384

  • ECDHE-RSA-AES128-GCM-SHA256

  • ECDHE-RSA-AES256-SHA384

  • ECDHE-RSA-AES128-SHA256

  • ECDHE-RSA-AES256-SHA

  • ECDHE-RSA-AES128-SHA

  • EDH-RSA-DES-CBC3-SHA

  • DES-CBC3-SHA

  • RC4-SHA

  • RC4-MD5

To bypass this requirement, choose Administration > System > Settings > Security Settings and check the Accept certificates without validating purpose checkbox.


Certificate Matching in Cisco ISE

When you set up Cisco ISE nodes in a deployment, the nodes communicate with each other. The system checks the FQDN of each Cisco ISE node to ensure that they match (for example ise1.cisco.com and ise2.cisco.com or if you use wildcard certificates then *.cisco.com). In addition, when an external machine presents a certificate to a Cisco ISE server, the external certificate that is presented for authentication is checked (or matched) against the certificate in the Cisco ISE server. If the two certificates match, the authentication succeeds.

For Cisco , matching is performed between the nodes (if there are two), and between Cisco and pxGrid.

Cisco ISE checks for a matching subject name as follows:

  1. Cisco ISE looks at the subject alternative name extension of the certificate. If the subject alternative name contains one or more DNS names, then one of the DNS names must match the FQDN of the Cisco ISE node. If a wildcard certificate is used, then the wildcard domain name must match the domain in the Cisco ISE node’s FQDN.

  2. If there are no DNS names in the subject alternative name, or if the subject alternative name is missing entirely, then the common name in the Subject field of the certificate or the wildcard domain in the Subject field of the certificate must match the FQDN of the node.

  3. If no match is found, the certificate is rejected.


    Note


    X.509 certificates that are imported into Cisco ISE must be in privacy-enhanced mail (PEM) or distinguished encoding rule format. Files containing a certificate chain (a system certificate along with the sequence of trust certificates that sign it) can be imported, subject to certain restrictions.


Validity of X.509 Certificates

X.509 certificates are valid until a specific date. When a system certificate expires, the Cisco ISE functionality that depends on the certificate is impacted. Cisco ISE notifies you about the pending expiration of a system certificate when the expiration date is within 90 days. This notification appears in several ways:

  • Colored expiration status icons appear in the System Certificates window. To view this window, click the Menu icon () and choose Administration > System > Certificate Management > System Certificates.

  • Expiration messages appear in the Cisco ISE System Diagnostic report. To view this window, click the Menu icon () and chooseOperations > Reports > Reports > Diagnostics > System Diagnostic.

  • Expiration alarms are generated 90 days, 60 days, and 30 days before expiration. Expiration alarms are generated every day in the final 30 days before expiration.

If the expiring certificate is a self-signed certificate, you can extend its expiration date by editing the certificate. For a certificate authority-signed certificate, you must allow sufficient time to acquire the replacement certificate from your certificate authority.

Enable Public Key Infrastructure in Cisco ISE

PKI is a cryptographic technique that enables secure communication and verifies the identity of a user using digital signatures.

Procedure


Step 1

Configure system certificates on each node in your deployment for the following:

  • TLS-enabled authentication protocols such as EAP-TLS.

  • Administration portal authentication.

  • Allow browser and REST clients to access Cisco ISE web portals.

  • Allow access to pxGrid controller.

By default, a Cisco ISE node is preinstalled with a self-signed certificate that is used for EAP authentication, and for access to administration portal, end user portals, and pxGrid controller. In a typical enterprise environment, this self-signed certificate is replaced with server certificates that are signed by a trusted CA.

Step 2

Populate the Trusted Certificates store with the CA-signed certificates that are used to establish trust with the user, and device certificates that will be presented to Cisco ISE.

To validate the authenticity of a user or device certificate with a certificate chain that consists of a root CA certificate and one or more intermediate CA certificates:

  • Enable the relevant trust option for the root CA.

    In the Cisco ISE GUI, click the Menu icon () and choose Administration > System >Certificates > Certificate Management > Trusted Certificates. In this window, check the check box for the root CA certificate and click Edit. In the Usage area, check the necessary check boxes in the Trusted For area.

For inter-node communications, you must populate the Trusted Certificates store with the trust certificates that validate the Admin system certificate of each node in the Cisco ISE deployment. To use the default self-signed certificate for internode communication, export this certificate from the System Certificates window of each Cisco ISE node and import it into the Trusted Certificates store. If you replace the self-signed certificates with CA-signed certificates, it is only necessary to populate the Trusted Certificates store with the appropriate root CA and intermediate CA certificates. You cannot register a node in a Cisco ISE deployment until you complete this step.

If you use self-signed certificates to secure communication between a client and a PSN in a deployment, when BYOD users move from one location to another, EAP-TLS user authentication fails. For such authentication requests that have to be serviced between a few PSNs, you must secure communication between the client and the PSN with an externally-signed CA certificate or use wildcard certificates that are signed by an external CA.

Note


After you obtain a backup from a standalone Cisco ISE node or the PAN, if you change the certificate configuration on one or more nodes in your deployment, you must obtain another backup to restore data. Otherwise, if you try to restore data using the older backup, communication between the nodes might fail.


Wildcard Certificates

A wildcard certificate uses a wildcard notation (an asterisk and period before the domain name) and the certificate can be shared across multiple hosts in an organization. For example, the CN value for the certificate subject would be a generic hostname such as aaa.ise.local and the SAN field would include the same generic hostname and a wildcard notation such as DNS.1=aaa.ise.local and DNS.2=*.ise.local.

If you configure a wildcard certificate to use *.ise.local, you can use the same certificate to secure any other host whose DNS name ends with “.ise.local,” such as :

  • aaa.ise.local

  • psn.ise.local

  • mydevices.ise.local

  • sponsor.ise.local

Wildcard certificates secure communication in the same way as a regular certificate, and requests are processed using the same validation methods.

The following figure is an example of a wildcard certificate that is used to secure a website.

Figure 6. Example of Wildcard Certificate
Example of Wildcard Certificate

Wildcard Certificate Support in Cisco ISE

Cisco ISE supports wildcard certificates. In earlier releases, Cisco ISE verified any certificate enabled for HTTPS to ensure the common name field matches the FQDN of the host exactly. If the fields did not match, the certificate could not be used for HTTPS communication.

In earlier releases, Cisco ISE used that common name value to replace the variable in the url-redirect A-V pair string. For all centralized web authentication, onboarding, posture redirection, and so on, the common name value was used.

Cisco ISE uses the hostname of the ISE node as the common name.

Wildcard Certificates for HTTPS and Extensible Authentication Protocol Communication

You can use wildcard server certificates in Cisco ISE for administration (web-based services) and EAP protocols that use SSL or TLS tunneling. When you use wildcard certificates, you do not need to generate a unique certificate for each Cisco ISE node. Also, you no longer have to populate the SAN field with multiple FQDN values to prevent certificate warnings. Use an asterisk (*) in the SAN field to share a single certificate across multiple nodes in a deployment and prevent certificate name mismatch warnings. However, the use of wildcard certificates is considered less secure than assigning a unique server certificate to each Cisco ISE node.

When assigning public wildcard certificates to the guest portal and importing sub-CA with root-CA certificates, the certificate chain is not sent until Cisco ISE services are restarted.


Note


If you use wildcard certificates, we recommend that you partition your domain space for greater security. For example, instead of *.example.com, you can partition it as *.amer.example.com. If you do not partition your domain, it could lead to serious security issues.


Wildcard certificates use an asterisk (*) and a period before the domain name. For example, the common name value for a certificate’s Subject Name would be a generic hostname such as aaa.ise.local and the SAN field would have the wildcard character such as *.ise.local. Cisco ISE supports wildcard certifications in which the wildcard character (*) is the left-most character in the presented identifier. For example, *.example.com or *.ind.example.com. Cisco ISE does not support certificates in which the presented identifier contains other characters along with the wildcard character. For example, abc*.example.com, or a*b.example.com, or *abc.example.com.


Note


When generating a CSR on a node using the wildcard character (*) in the CN or SAN, the certificate will be considered as a wildcard. Cisco ISE adds it to the PAN and replicates it to all other nodes.


Fully Qualified Domain Name in URL Redirection

Authorization profile redirects are carried out for central web authentication, device registration web authentication, native supplicant provisioning, mobile device management, client provisioning, and posture services. When Cisco ISE builds an authorization profile redirect, the resulting cisco-av-pair includes a string similar to the following:

url-redirect=https://ip:port/guestportal/gateway?sessionId=SessionIdValue&action=cwa

When processing this request, Cisco ISE substitutes actual values for some keywords in this string. For example, SessionIdValue is replaced with the actual session ID of the request. For an eth0 interface, Cisco ISE replaces the IP in the URL with the FQDN of the Cisco ISE node. For non-eth0 interfaces, Cisco ISE uses the IP address in the URL. You can assign a host alias (name) for interfaces eth1 through eth3, which Cisco ISE can then substitute in place of IP address during URL redirection.

To do this, use the ip host command in the configuration mode from the Cisco ISE CLI ISE /admin(config)# prompt:

ip host IP_address host-alias FQDN-string

Where IP_address is the IP address of the network interface (eth1 or eth2 or eth3) and host-alias is the name that you assign to the network interface. FQDN-string is the fully qualified domain name of the network interface. Using this command, you can assign a host-alias or an FQDN-string or both to a network interface.

Here is an example using the ip host command: ip host a.b.c.d sales sales.amerxyz.com

After you assign a host alias to the non-eth0 interface, restart the application services on Cisco ISE using the application start ise command.

Use the no form of this command to remove the association of the host alias with the network interface.

no ip host IP_address host-alias FQDN-string

Use the show running-config command to view the host alias definitions.

If you provide the FQDN-string, Cisco ISE replaces the IP address in the URL with the FQDN. If you provide only the host alias, Cisco ISE combines the host alias with the configured IP domain name to form a complete FQDN and replaces the IP address in the URL with the FQDN. If you do not map a network interface to a host alias, then Cisco ISE uses the IP address of the network interface in the URL.

When you use non-eth0 interfaces for client provisioning or native supplicant or guest flows, ensure that the IP address or host alias for non-eth0 interfaces are configured appropriately in the PSN certificate's SAN fields.

Advantages of Using Wildcard Certificates

  • Cost savings: Certificates that are signed by third-party CAs are expensive, especially as the number of servers increases. Wildcard certificates can be used on multiple nodes in the Cisco ISE deployment.

  • Operational efficiency: Wildcard certificates allow all PSNs to share the same certificate for EAP and web services. In addition to significant cost savings, certificate administration is also simplified by creating the certificate once and applying it on all the PSNs.

  • Reduced authentication errors: Wildcard certificates address issues seen with Apple iOS devices when the client stores trusted certificates within the profile and does not follow the iOS keychain where the signing root is trusted. When an iOS client first communicates with a PSN, it does not explicitly trust the PSN certificate, although a trusted CA has signed the certificate. Using a wildcard certificate, the certificate is the same across all PSNs, so the user only has to accept the certificate once and successive authentications to different PSNs proceed without errors or prompts.

  • Simplified supplicant configuration: For example, a Microsoft Windows supplicant with PEAP-MSCHAPv2 and a trusted server certificate requires that you specify each of the server certificate to trust, or the user may be prompted to trust each PSN certificate when the client connects using a different PSN. With wildcard certificates, a single server certificate can be trusted rather than individual certificates from each PSN.

  • Wildcard certificates result in an improved user experience with less prompting and more seamless connectivity.

Disadvantages of Using Wildcard Certificates

The following are some of the security considerations that are related to the use of wildcard certificates:
  • Loss of auditability and nonrepudiation.

  • Increased exposure of the private key.

  • Not common or understood by administrators.

Wildcard certificates are considered less secure than using a unique server certificate in each Cisco ISE node. But cost and other operational factors outweigh the security risk.

Security devices such as Cisco Adaptive Security Appliance also support wildcard certificates.

You must be careful when deploying wildcard certificates. For example, if you create a certificate with *.company.local and an attacker is able to recover the private key, that attacker can spoof any server in the company.local domain. Therefore, it is considered a best practice to partition the domain space to avoid this type of compromise.

To address this possible issue and to limit the scope of use, wildcard certificates may also be used to secure a specific subdomain of your organization. Add an asterisk (*) in the subdomain area of the common name where you want to specify the wildcard.

For example, if you configure a wildcard certificate for *.ise.company.local, that certificate may be used to secure any host whose DNS name ends in “.ise.company.local”, such as:

  • psn.ise.company.local

  • mydevices.ise.company.local

  • sponsor.ise.company.local

Wildcard Certificate Compatibility

Wildcard certificates are usually created with the wildcard listed as the common name of the certificate subject. Cisco ISE supports this type of construction. However, not all endpoint supplicants support the wildcard character in the certificate subject.

All the Microsoft native supplicants that were tested (including Windows Mobile which is now discontinued) do not support wildcard character in the certificate subject.

You can use another supplicant, such as Network Access Manager that might allow the use of wildcard characters in the Subject field.

You can also use special wildcard certificates such as DigiCert's Wildcard Plus that is designed to work with incompatible devices by including specific subdomains in the Subject Alternative Name of the certificate.

Although the Microsoft supplicant limitation appears to be a deterrent to using wildcard certificates, there are alternative ways to create the wildcard certificate that allow it to work with all the devices tested for secure access, including the Microsoft native supplicants.

To do this, instead of using the wildcard character in the Subject, you must use the wildcard character in the Subject Alternative Name field instead. The Subject Alternative Name field maintains an extension that is designed for checking the domain name (DNS name). See RFC 6125 and RFC 2128 for more information.

Certificate Hierarchy

In the administration portal, view the certificate hierarchy or the certificate trust chain of all endpoint, system, and trusted certificates. The certificate hierarchy includes the certificate, all the intermediate CA certificates, and the root certificate. For example, when you choose to view a system certificate from the the administration portal, the details of the corresponding system certificate are displayed. The certificate hierarchy is displayed at the top of the certificate. Click a certificate in the hierarchy to view its details. The self-signed certificate does not have any hierarchy or trust chain.

In the certificate listing windows, you will see one of the following icons in the Status column:

  • Green icon: Indicates a valid certificate (valid trust chain).

  • Red icon: Indicates an error (for example, trust certificate missing or expired).

  • Yellow icon: Warns that a certificate is about to expire and prompts renewal.

System Certificates

Cisco ISE system certificates are server certificates that identify a Cisco ISE node to other nodes in the deployment and to client applications. System certificates are:

  • Used for inter-node communication in a Cisco ISE deployment. Check the Admin check box in the Usage area of these certificates.

  • Used by browser and REST clients who connect to Cisco ISE web portals. Check the Portal check box in the Usage area of these certificates.

  • Used to form the outer TLS tunnel with PEAP and EAP-FAST. Check the EAP Authentication check box in the Usage area for mutual authentication with EAP-TLS, PEAP, and EAP-FAST.

  • Used for RADIUS DTLS server authentication.

  • Used to communicate with SAML identity providers. Check the SAML check box in the Usage area of this certificate. If you choose the SAML option, you cannot use this certificate for any other service.

    A SAML certificate is used by multiple Cisco ISE services such as Posture services and licensing communication between Cisco ISE and the Cisco Smart Software Manager. If you delete the SAML certificate from your Cisco ISE, the associated services are disrupted.

  • Used to communicate with the pxGrid controller. Check the pxGrid check box in the Usage area of these certificates.

Install valid system certificates on each node in your Cisco ISE deployment. By default, two self-signed certificates and one signed by the internal Cisco ISE CA are created on a Cisco ISE node during installation time:

  • A self-signed server certificate designated for EAP, Admin, Portal, and RADIUS DTLS (it has a key size of 2048 and is valid for one year).

  • A self-signed SAML server certificate that can be used to secure communication with a SAML identity provider (it has a key size of 2048 and is valid for one year).

  • An internal Cisco ISE CA-signed server certificate that can be used to secure communication with pxGrid clients (it has a key size of 4096 and is valid for one year).

When you set up a deployment and register a secondary node, the certificate that is designated for pxGrid controller is automatically replaced with a certificate that is signed by the primary node's CA. Thus, all pxGrid certificates become part of the same PKI trust hierarchy.


Note


  • When you export a wildcard system certificate to be imported into the other nodes (for inter-node communication), ensure that you export the certificate and the private key, and specify an encryption password. During import, you will need the certificate, private key, and encryption password.

  • Cisco ISE supports the use of RSASSA-PSS algorithm only for trusted certificates and endpoint certificates for EAP-TLS authentication. When you view the certificate, the signature algorithm is listed as 1.2.840.113549.1.1.10 instead of the algorithm name.

    Cisco ISE does not support system certificates that use RSASSA-PSS as the signature algorithm. This is applicable for the server certificate, root certificate, and intermediate CA certificate.


For supported key and cipher information for your release, see the appropriate version of the Cisco Identity Services Engine Network Component Compatibility guide.

We recommend that you replace the self-signed certificate with a CA-signed certificate for greater security. To obtain a CA-signed certificate, you must:

  1. Create a Certificate-Signing Request and Submit it to a Certificate Authority

  2. Import a Root Certificate into the Trusted Certificate Store

  3. Bind a CA-Signed Certificate to a Certificate Signing Request

ISE Community Resource

How To: Implement ISE Server-Side Certificates

Certificate Renewal on Cisco Identity Services Engine Configuration Guide

View System Certificates

The System Certificate window lists all the system certificates added to Cisco ISE.

Before you begin

To perform the following task, you must be a Super Admin or System Admin.

Procedure

Step 1

Choose Administration > System > Certificates > System Certificates.

Step 2

The following columns are displayed in the System Certificates window:

  • Friendly Name: Name of the certificate.

  • Usage: The services for which this certificate is used.

  • Portal group tag: Applicable only for certificates that are designated for portal use. This field specifies which certificate has to be used for portals.

  • Issued To: Common Name of the certificate subject.

  • Issued By: Common Name of the certificate issuer

  • Valid From: Date on which the certificate was created, also known as the "Not Before" certificate attribute.

  • Valid To (Expiration): Expiration date of the certificate, also known as the "Not After" certificate attribute. The following icons are displayed next to the expiration date:

    • Green icon: Expiring in more than 90 days.

    • Blue icon: Expiring in 90 days or less.

    • Yellow icon: Expiring in 60 days or less.

    • Orange icon: Expiring in 30 days or less.

    • Red icon: Expired.


Import a System Certificate

You can import a system certificate for any Cisco ISE node from the administration portal.


Note


Changing the certificate of the admin role certificate on a primary PAN node restarts services on all other nodes. The system restarts one node at a time, after the primary PAN restart is complete.


Before you begin
  • Ensure that you have the system certificate and the private key file on the system that is running on the client browser.

  • If the system certificate that you import is signed by an external CA, import the relevant root CA and intermediate CA certificates into the Trusted Certificates store (Administration > System > Certificates > Trusted Certificates).

  • If the system certificate that you import contains basic constraints extension with the CA flag set to true, ensure that the key usage extension is present, and the keyEncipherment bit or the keyAgreement bit or both are set.

  • To perform the following task, you must be a Super Admin or System Admin.

Procedure

Step 1

Choose Administration > System > Certificates > System Certificates.

Step 2

Click Import.

The Import Server Certificate window is displayed.

Step 3

Enter the values for the certificate that you are going to import.

Step 4

Click Submit.


System Certificate Import Settings

The following table describes the fields in the Import System Certificate window that you can use to import a server certificate. To view this window, click the Menu icon () and choose Administration > System > Certificates > System Certificates. Click Import.

Table 8. System Certificate Import Settings
Field Name Description

Select Node

(Required) Choose the Cisco ISE node on which you want to import the system certificate from the drop-down list.

Certificate File

(Required) Click Choose File and choose the certificate file from your local system.

Private Key File

(Required) Click Choose File and choose the private key file from your local system.

Password

(Required) Enter the password to decrypt the private key file.

Friendly Name

Enter a friendly name for the certificate. If you do not specify a name, Cisco ISE automatically creates a name in the following format:

<common name> # <issuer> # <nnnnn> where <nnnnn> is a unique five-digit number.

Allow Wildcard Certificates

Check this check box if you want to import a wildcard certificate. A wildcard certificate uses a wildcard notation (an asterisk and period before the domain name). Wildcard certificates are shared across multiple hosts in an organization.

If you check this check box, Cisco ISE imports this certificate to all the other nodes in the deployment.

Validate Certificate Extensions

Check this check box if you want Cisco ISE to validate the certificate extensions. If you check this check box and the certificate that you import contains a basic constraints extension with the CA flag set to true, ensure that the key usage extension is present. The keyEncipherment bit or the keyAgreement bit, or both, must also be set.

Usage

Choose the service for which this system certificate must be used:

  • Admin: Server certificate used to secure communication with the administration portal and between the Cisco ISE nodes in a deployment.

    Note


    Changing the certificate of the admin role certificate on the primary PAN restarts services on all other Cisco ISE nodes.

  • EAP Authentication: Server certificate used for authentications that use the EAP protocol for SSL or TLS tunneling.

  • RADIUS DTLS: Server certificate used for RADIUS DTLS authentication.

  • pxGrid: Client and server certificate to secure communication between the pxGrid client and the server.

  • ISE Messaging Service: Used by Syslog Over Cisco ISE Messaging feature, which enables MnT WAN survivability for built-in UDP syslog collection targets (LogCollector and LogCollector2).

  • SAML: Server certificate used to secure communication with the SAML identity provider. A certificate that is designated for SAML use cannot be used for any other service such as Admin, EAP authentication, and so on.

  • Portal: Server certificate used to secure communication with all Cisco ISE web portals


Note


If the certificate is generated by other third-party tools and not Cisco ISE, you cannot import the certificate or its private key into Cisco ISE.


Generate a Self-Signed Certificate

Add a new local certificate by generating a self-signed certificate. Cisco recommends that you only employ self-signed certificates for your internal testing and evaluation needs. If you plan to deploy Cisco ISE in a production environment, use CA-signed certificates whenever possible to ensure more uniform acceptance around a production network.


Note


If you use a self-signed certificate and you want to change the hostname of your Cisco ISE node, log in to the administration portal of the Cisco ISE node, delete the self-signed certificate that has the old hostname, and generate a new self-signed certificate. Otherwise, Cisco ISE continues to use the self-signed certificate with the old hostname.


Before you begin

To perform the following task, you must be a Super Admin or System Admin.

Self-Signed Certificate Settings

The following table describes the fields in the Generate Self Signed Certificate window. This window allows you to create system certificates for inter-node communication, EAP-TLS authentication, Cisco ISE web portals, and to communicate with the pxGrid controller. To view this window, click the Menu icon () and choose Administration > System > Certificates > System Certificates. Click Generate Self Signed Certificate.

Table 9. Self-Signed Certificate Settings
Field Name Usage Guidelines

Select Node

(Required) Choose the node for which you want to generate the system certificate from the drop-down list.

Common Name (CN)

(Required if you do not specify a SAN) By default, the common name is the FQDN of the Cisco ISE node for which you are generating the self-signed certificate.

Organizational Unit (OU)

Organizational Unit name. For example, Engineering.

Organization (O)

Organization name. For example, Cisco.

City (L)

(Do not abbreviate) City name. For example, San Jose.

State (ST)

(Do not abbreviate) State name. For example, California.

Country (C)

Country name. Enter the two-letter ISO country code. For example, US.

Subject Alternative Name (SAN)

An IP address, DNS name, or Uniform Resource Identifier (URI) that is associated with the certificate.

Key Type

The algorithm to be used for creating the public key, either RSA or ECDSA.

Key Length

The bit size for the public key. Choose one of the following options from the drop-down list for RSA:

  • 512

  • 1024

  • 2048

  • 4096

Choose one of the following options from the drop-down list for ECDSA:

  • 256

  • 384

Note


RSA and ECDSA public keys might have different key lengths for the same security level.

Choose 2048 if you plan to get a public CA-signed certificate or deploy Cisco ISE as a FIPS-compliant policy management system.

Digest to Sign With

Choose one of the following hashing algorithms from the drop-down list:

  • SHA-1

  • SHA-256

Certificate Policies

Enter the certificate policy OID or list of OIDs that the certificate should conform to. Use a comma or space to separate the OIDs.

Expiration TTL

Specify the number of days after which the certificate expires. Choose the value from the drop-down lists.

Friendly Name

Enter a friendly name for the certificate. If you do not specify a name, Cisco ISE automatically creates a name in the format <common name> # <issuer> # <nnnnn> where <nnnnn> is a unique five-digit number.

Allow Wildcard Certificates

Check this check box if you want to generate a self-signed wildcard certificate. A wildcard certificate uses a wildcard notation (an asterisk and period before the domain name) and allows the certificate to be shared across multiple hosts in an organization.

Usage

Choose the service for which this system certificate must be used:

  • Admin: Server certificate used to secure communication with the administration portal and between the Cisco ISE nodes in a deployment.

  • EAP Authentication: Server certificate used for authentications that use the EAP protocol for SSL or TLS tunneling.

  • RADIUS DTLS: Server certificate used for RADIUS DTLS authentication.

  • pxGrid: Client and server certificate to secure communication between the pxGrid client and the server.

  • SAML: Server certificate used to secure communication with the SAML identity provider. A certificate that is designated for SAML use cannot be used for any other service such as Admin, EAP authentication, and so on.

  • Portal: Server certificate used to secure communication with all Cisco ISE web portals.

Edit a System Certificate

Use this window to edit a system certificate and to renew a self-signed certificate. When you edit a wildcard certificate, the changes are replicated to all the nodes in the deployment. If you delete a wildcard certificate, that wildcard certificate is removed from all the nodes in the deployment.

Before you begin

To perform the following task, you must be a Super Admin or System Admin.

Procedure

Step 1

Choose Administration > System > Certificates > System Certificates.

Step 2

Check the check box next to the certificate that you want to edit, and click Edit.

Step 3

To renew a self-signed certificate, check the Renewal Period check box and enter the expiration Time to Live (TTL) in days, weeks, months, or years. Choose the required value from the drop-down lists.

Step 4

Click Save.

If the Admin check box is checked, then the application server on the Cisco ISE node restarts. In addition, if the Cisco ISE node is the PAN in a deployment, then the application server on all the other nodes in the deployment also restart. The system restarts one node at a time, after the primary PAN restart has completed.

For information on troubleshooting, see Launching a BYOD Portal using Google Chrome 65Configuring Wireless BYOD setup using Mozilla Firefox 64.


Launching a BYOD Portal using Google Chrome 65

When using Chrome 65 and above to launch Cisco ISE, it can cause BYOD portal or Guest portal to fail to launch in the browser although the URL is redirected successfully. This is because of a new security feature introduced by Google that requires all certificates to have a Subject Alternative Name field. For Cisco ISE Release 2.4 and later, you must fill the Subject Alternative Name field.

To launch BYOD portal with Chrome 65 and above, follow the steps below:

Procedure

Step 1

Generate a new self-signed certificate from the Cisco ISE GUI by filling the Subject Alternative Name field. Both DNS and IP Address must be filled.

Step 2

Cisco ISE services restart.

Step 3

Redirect the portal in Chrome browser.

Step 4

From browser, View Certificate > Details > Copy the certificate by selecting base-64 encoded

Step 5

Install the certificate in Trusted path.

Step 6

Close the Chrome browser and try to redirect the portal.


Configuring Wireless BYOD setup using Mozilla Firefox 64

When configuring wireless BYOD setup for the browser Firefox 64 and later releases, with operating systems Win RS4 or RS5, you may not be able to add Certificate Exception. This behaviour is expected in case of fresh installs of Firefox 64 and later releases, and does not occur in case of upgrading to Firefox 64 and above from a previous version. The following steps allow you to add certificate exception in this case:

Procedure

Step 1

Configure for BYOD flow single or dual PEAP or TLS.

Step 2

Configure CP Policy with Windows ALL option.

Step 3

Connect Dot1.x or MAB SSID in end client Windows RS4 or Windows RS5.

Step 4

Type any URL in FF64 browser for redirection to Guest or BYOD portal.

Step 5

Click Add Exception > Unable to add certificate, and proceed with flow.

As a workaround, add the certificate manually for Firefox 64. In the Firefox 64 browser, choose Options > Privacy & Settings > View Certificates > Servers > Add Exception.


Delete a System Certificate

It is safe to delete system certificates that are tagged as Not in use in Administration > System > Certificates > System Certificates.

Although you can delete multiple certificates from the System Certificates store at a time, you must have at least one certificate to use for Admin and EAP authentication. Also, you cannot delete any certificate that is in use for Admin, EAP Authentication, Portals, or pxGrid controller. However, you can delete the pxGrid certificate when the service is disabled.

If you choose to delete a wildcard certificate, the certificate is removed from all the Cisco ISE nodes in the deployment.

Procedure

Step 1

In the Cisco ISE GUI, click the Menu icon () and choose Administration > System > Certificates > System Certificates.

Step 2

Check the check boxes next to the certificates that you want to delete, and click Delete.

A warning message is displayed.

Step 3

Click Yes to delete the certificate.


Export a System Certificate

You can export a system certificate or a certificate and its associated private key. If you export a certificate and its private key for backup purposes, you can reimport them later if needed.

Before you begin

To perform the following task, you must be a Super Admin or System Admin.

Procedure

Step 1

In the Cisco ISE GUI, click the Menu icon () and choose Administration > System > Certificates > System Certificates.

Step 2

Check the check box next to the certificate that you want to export and click Export.

Step 3

Choose whether to export only the certificate, or the certificate and its associated private key.

Tip


We do not recommend exporting the private key that is associated with a certificate because its value may be exposed. If you must export a private key (for example, when you export a wildcard system certificate to be imported into the other Cisco ISE nodes for inter-node communication), specify an encryption password for the private key. You must specify this password while importing this certificate into another Cisco ISE node to decrypt the private key.

Step 4

Enter the password if you have chosen to export the private key. The password should be at least eight characters long.

Step 5

Click Export to save the certificate to the file system that is running your client browser.

If you export only the certificate, the certificate is stored in the PEM format. If you export both the certificate and private key, the certificate is exported as a .zip file that contains the certificate in the PEM format and the encrypted private key file.


Trusted Certificates Store

The Trusted Certificates store contains X.509 certificates that are used for trust and for Simple Certificate Enrollment Protocol (SCEP).

X.509 certificates imported to Cisco ISE must be in PEM or Distinguished Encoding Rule format. Files containing a certificate chain, a system certificate along with the sequence of trust certificates that sign it, are imported, subject to certain restrictions.

When assigning public wildcard certificates to the guest portal and importing sub-CA with root-CA certificates, the certificate chain is not sent until the Cisco ISE services restart.

The certificates in the Trusted Certificate store are managed on the primary PAN, and are replicated to every node in the Cisco ISE deployment. Cisco ISE supports wildcard certificates.

Cisco ISE uses the trusted certificates for the following purposes:

  • To verify client certificates used for authentication by endpoints, and by Cisco ISE administrators accessing ISE-PICthe administration portal using certificate-based administrator authentication.

  • To enable secure communication between Cisco ISE nodes in a deployment. The Trusted Certificates store must contain the chain of CA certificates needed to establish trust with the system certificate on each node in a deployment.

    • If a self-signed certificate is used for the system certificate, the self-signed certificate from each node must be placed in the Trusted Certificates store of the PAN.

    • If a CA-signed certificate is used for the system certificate, the CA root certificate, and any intermediate certificates in the trust chain, must be placed in the Trusted Certificates store of the PAN.

  • To enable Secure LDAP authentication, a certificate from the certificate store must be selected when defining an LDAP identity source that will be accessed over SSL.

  • To distribute to personal devices preparing to register in the network using the personal devices portals. Cisco ISE implements the SCEP on PSNs to support personal device registration. A registering device uses the SCEP protocol to request a client certificate from a PSN. The PSN contains a registration authority (RA) that acts as an intermediary. The RA receives and validates the request from the registering device and then forwards the request to an external CA or the internal Cisco ISE CA, which issues the client certificate. The CA sends the certificate back to the RA, which returns it to the device.

    Each SCEP CA used by Cisco ISE is defined by a SCEP RA profile. When a SCEP RA profile is created, two certificates are automatically added to the Trusted Certificates store:

    • A CA certificate (a self-signed certificate)

    • An RA certificate (a Certificate Request Agent certificate), which is signed by the CA.

    The SCEP protocol requires that these two certificates be provided by the RA to a registering device. By placing these two certificates in the Trusted Certificates store, they are replicated to all PSN nodes for use by the RA on those nodes.


    Note


    When a SCEP RA profile is removed, the associated CA chain is also removed from the Trusted Certificates store. However, if the same certificates are referenced by secure syslog, LDAP, system, or trust certificates, only the SCEP profile is deleted.


ISE Community Resource

Install a Third-Party CA Certificate in ISE

Certificates in Trusted Certificates Store

The Trusted Certificate store is prepopulated with trusted certificates: manufacturing certificate, root certificate, and other trusted certificates. The Root certificate (Cisco Root CA) signs the Manufacturing (Cisco CA Manufacturing) certificate. These certificates are disabled by default. If you have Cisco IP phones as endpoints in your deployment, enable the root and manufacturing certificates so the Cisco-signed client certificates for the phones are authenticated.

List of Trusted Certificates

The following table describes the columns in the Trusted Certificates window, where the list of trusted certificates that are added to the administration node is displayed. To view this window, click the Menu icon () and choose Administration > System > Certificates > Trusted Certificates.

Table 10. Trusted Certificates Window Columns

Field Name

Usage Guidelines

Friendly Name

Displays the name of the certificate.

Status

This column displays Enabled or Disabled. If the certificate is disabled, Cisco ISE will not use the certificate for establishing trust.

Trusted for

Displays one or more of the following services for which the certificate is used.

  • Infrastructure

  • Cisco Services

  • Endpoints

Issued To

Displays the common name of the certificate subject.

Issued By

Displays the common name of the certificate issuer.

Valid From

Displays the date and time when the certificate was issued. This value is also known as the “Not Before” certificate attribute.

Expiration Date

Displays the date and time when the certificate expires. This value is also known as the “Not After” certificate attribute.

Expiration Status

Provides information about the status of the certificate expiration. There are five icons and categories of informational message that are displayed in this column:

  • Green: Expiring in more than 90 days

  • Blue: Expiring in 90 days or less

  • Yellow: Expiring in 60 days or less

  • Orange: Expiring in 30 days or less

  • Red: Expired

Trusted Certificate Naming Constraints

A trusted certificate in CTL may contain a name constraint extension. This extension defines a namespace for values of all subject name and subject alternative name fields of subsequent certificates in a certificate chain. Cisco ISE does not check constraints that are specified in a root certificate.

Cisco ISE supports the following name constraints:

  • Directory name

    The directory name constraint should be a prefix of the directory name in the subject or subject alternative name field. For example:

    • Correct subject prefix:

      CA certificate name constraint: Permitted: O=Cisco

      Client certificate subject: O=Cisco,CN=Salomon

    • Incorrect subject prefix:

      CA certificate name constraint: Permitted: O=Cisco

      Client certificate subject: CN=Salomon,O=Cisco

  • DNS

  • Email

  • URI (The URI constraint must start with a URI prefix such as http://, https://, ftp://, or ldap://).

Cisco ISE does not support the following name constraints:

  • IP Address

  • OtherName

When a trusted certificate contains a constraint that is not supported and the certificate that is being verified does not contain the appropriate field, Cisco ISE rejects the certificate because it cannot verify unsupported constraints.

The following is an example of the name constraints definition within the trusted certificate:


X509v3 Name Constraints: critical
                Permitted:
                  othername:<unsupported>
                  email:.abcde.at
                  email:.abcde.be
                  email:.abcde.bg
                  email:.abcde.by
                  DNS:.dir
                  DirName: DC = dir, DC = emea
                  DirName: C = AT, ST = EMEA, L = AT, O = ABCDE Group, OU = Domestic
                  DirName: C = BG, ST = EMEA, L = BG, O = ABCDE Group, OU = Domestic
                  DirName: C = BE, ST = EMEA, L = BN, O = ABCDE Group, OU = Domestic
                  DirName: C = CH, ST = EMEA, L = CH, O = ABCDE Group, OU = Service Z100
                  URI:.dir
                  IP:172.23.0.171/255.255.255.255
                Excluded:
                  DNS:.dir
                  URI:.dir

An acceptable client certificate subject that matches the above definition is as follows:


           Subject: DC=dir, DC=emea, OU=+DE, OU=OU-Administration, OU=Users, OU=X1, 			CN=cwinwell

View Trusted Certificates

The Trusted Certificates window lists all the trusted certificates that are available in Cisco ISE. To view the trusted certificates, you must be a Super Admin or System Admin.

Before you begin

To perform the following task, you must be a Super Admin or System Admin.

Procedure

Step 1

To view all the certificates, choose click the Menu icon () and choose Administration > System > Certificates > Trusted Certificates. The Trusted Certificates window displayed, listing all the trusted certificates.

Step 2

Check the check box of the trusted certificate and click Edit, View, Export, or Delete to perform the required task.


Change the Status of a Certificate in Trusted Certificates Store

The status of a certificate must be enabled so that Cisco ISE can use the certificate for establishing trust. When a certificate is imported into the Trusted Certificates store, it is automatically enabled.

Procedure

Step 1

In the Cisco ISE GUI, click the Menu icon () and choose Administration > System > Certificates > Trusted Certificates.

Step 2

In the ISE-PIC GUI, click the Menu icon () and choose Certificates > Trusted Certificates.

Step 3

Check the check box next to the certificate you want to enable or disable, and click Edit.

Step 4

Choose the status from the Status drop-down list.

Step 5

Click Save.


Add a Certificate to Trusted Certificates Store

The Trusted Certificate store window allows you to add CA certificates to Cisco ISE.

Before you begin
  • To perform the following task, you must be a Super Admin or System Admin.

  • The certificate that you want to add must be in the file system of the computer where your browser is running. The certificate must be in PEM or DER format.

  • To use the certificate for Admin or EAP authentication, define the basic constraints in the certificate and set the CA flag to true.

Edit a Trusted Certificate

After you add a certificate to the Trusted Certificates store, you can further edit it by using the Edit options.

Before you begin

To perform the following task, you must be a Super Admin or System Admin.

Procedure

Step 1

In the Cisco ISE GUI, click the Menu icon () and choose Administration > System > Certificates > Trusted Certificates.

Step 2

Check the check box next to the certificate that you want to edit, and click Edit.

Step 3

(Optional) Enter a name for the certificate in the Friendly Name field. If you do not specify a friendly name, a default name is generated in the following format:

common-name#issuer#nnnnn

Step 4

Define the usage of the certificate by checking the necessary check boxes in the Trusted For area.

Step 5

(Optional) Enter a description for the certificate in the Description field.

Step 6

Click Save.


Trusted Certificate Settings

The following table describes the fields in the Edit window of a Trusted Certificate. Edit the CA certificate attributes in this window. To view this window, click the Menu icon () and choose Administration > System > Certificates > Trusted Certificates. Check the check box for the Trusted Certificate you want to edit, and click Edit.

Table 11. Trusted Certificate Edit Settings

Field Name

Usage Guidelines

Certificate Issuer

Friendly Name

Enter a friendly name for the certificate. This is an optional field. If you do not enter a friendly name, a default name is generated in the following format:

common-name#issuer#nnnnn

Status

Choose Enabled or Disabled from the drop-down list. If the certificate is disabled, Cisco ISE will not use the certificate for establishing trust.

Description

(Optional) Enter a description.

Usage

Trust for authentication within ISE

Check this check box if you want this certificate to verify server certificates (from other Cisco ISE nodes or LDAP servers).

Trust for client authentication and Syslog

(Applicable only if you check the Trust for authentication within ISE check box) Check the check box if you want this certificate to be used to:

  • Authenticate endpoints that connect to Cisco ISE using the EAP protocol.

  • Trust a Syslog server.

Trust for certificate based admin authentication

You can check this check box only when Trust for client authentication and Syslog is selected.

Check this check box to enable usage for certificate-based authentications for admin access. Import the required certificate chains into the Trusted Certificate store.

Trust for authentication of Cisco Services

Check this check box if you want this certificate to be used to trust external Cisco services such as the Feed Service.

Certificate Status Validation

Cisco ISE supports two ways of checking the revocation status of a client or server certificate that is issued by a particular CA. The first way is to validate the certificate using the Online Certificate Status Protocol (OCSP), which makes a request to an OCSP service maintained by the CA. The second way is to validate the certificate against a CRL which is downloaded from the CA into Cisco ISE. Both of these methods can be enabled, in which case OCSP is used first and only if a status determination cannot be made then the CRL is used.

Validate Against OCSP Service

Check the check box to validate the certificate against OCSP services. You must first create an OCSP Service to be able to check this box.

Reject the request if OCSP returns UNKNOWN status

Check the check box to reject the request if certificate status is not determined by the OCSP service. If you check this check box, an unknown status value that is returned by the OCSP service causes Cisco ISE to reject the client or server certificate currently being evaluated.

Reject the request if OCSP Responder is unreachable

Check the check box for Cisco ISE to reject the request if the OCSP Responder is not reachable.

Download CRL

Check the check box for the Cisco ISE to download a CRL.

CRL Distribution URL

Enter the URL to download the CRL from a CA. This field is automatically populated if it is specified in the certificate authority certificate. The URL must begin with “http”, “https”, or “ldap.”

Retrieve CRL

The CRL can be downloaded automatically or periodically. Configure the time interval between downloads.

If download failed, wait

Configure the time interval that Cisco ISE must wait Cisco ISE tries to download the CRL again.

Bypass CRL Verification if CRL is not Received

Check this check box, for the client requests to be accepted before the CRL is received. If you uncheck this check box, all client requests that use certificates signed by the selected CA will be rejected until Cisco ISE receives the CRL file.

Ignore that CRL is not yet valid or expired

Check this check box if you want Cisco ISE to ignore the start date and expiration date and continue to use the not yet active or expired CRL and permit or reject the EAP-TLS authentications based on the contents of the CRL.

Uncheck this check box if you want Cisco ISE to check the CRL file for the start date in the Effective Date field and the expiration date in the Next Update field. If the CRL is not yet active or has expired, all authentications that use certificates signed by this CA are rejected.

Delete a Trusted Certificate

You can delete trusted certificates that you no longer need. However, you must not delete Cisco ISE internal CA certificates. Cisco ISE internal CA certificates can be deleted only when you replace the Cisco ISE root certificate chain for the entire deployment.

Procedure

Step 1

Choose Administration > System > Certificates > Trusted Certificates.

Step 2

Check the check boxes next to the certificates that you want to delete, and click Delete.

A warning message is displayed. To delete the Cisco ISE Internal CA certificates, click one of the following options:

  • Delete: To delete the Cisco ISE internal CA certificates. All endpoint certificates that are signed by the Cisco ISE internal CA become invalid and the endpoints cannot join the network. To allow the endpoints on the network again, import the same Cisco ISE internal CA certificates into the Trusted Certificates store.
  • Delete & Revoke: Deletes and revokes the Cisco ISE internal CA certificates. All endpoint certificates that are signed by the Cisco ISE internal CA become invalid and the endpoints cannot get on to the network. This operation cannot be undone. You must replace the Cisco ISE root certificate chain for the entire deployment.

Step 3

Click Yes to delete the certificate.


Export a Certificate from Trusted Certificates Store

Before you begin

To perform the following task, you must be a Super Admin or System Admin.


Note


If you export certificates from the internal CA and plan to use the exported certificates to restore from backup, use the CLI command application configure ise. See Export Cisco ISE CA Certificates and Keys.


Procedure

Step 1

In the Cisco ISE GUI, click the Menu icon () and choose Administration > System > Certificates > Trusted Certificates.

Step 2

Check the check box next to the certificate that you want to export, and click Export. You can export only one certificate at a time.

Step 3

The chosen certificate downloads in the PEM format into the file system that is running your client browser.


Import a Root Certificate into the Trusted Certificate Store

When you import the root CA and intermediate CA certificates, specify the services for which the trusted CA certificates are to be used.

When you import an external root CA certificate, enable the Trust for certificate based admin authentication usage option in Step 5 of the following task.

Before you begin

You must have the root certificate and other intermediate certificates from the CA that signed your certificate signing requests and returned the digitally signed CA certificates.

Procedure

Step 1

In the Cisco ISE GUI, click the Menu icon () and choose Administration > System > Certificates > Trusted Certificates.

Step 2

Click Import.

Step 3

In the Import a new Certificate into the Certificate Store window, click Choose File to select the root CA certificate that is signed and returned by your CA.

Step 4

Enter a Friendly Name.

If you do not enter a Friendly Name, Cisco ISE autopopulates this field with a name of the format common-name#issuer#nnnnn, where nnnnn is a unique number. You can also edit the certificate later to change the Friendly Name.

Step 5

Check the check boxes next to the services for which you want to use this trusted certificate.

Step 6

(Optional) In the Description field, enter a description for your certificate.

Step 7

Click Submit.


What to do next

Import the intermediate CA certificates into the Trusted Certificates store (if applicable).

Trusted Certificate Import Settings

The following table describes the fields in the Trusted Certificate Import window, which you can use to add CA certificates to Cisco ISE. To view this window, click the Menu icon () and choose Administration > System > Certificates > Trusted Certificates > Import.

Table 12. Trusted Certificate Import Settings

Field Name

Description

Certificate File

Click Browse to choose the certificate file from the computer that is running the browser.

Friendly Name

Enter a friendly name for the certificate. If you do not specify a name, Cisco ISE automatically creates a name in the format <common name># <issuer># <nnnnn>, where <nnnnn> is a unique five-digit number.

Trust for authentication within ISE

Check the check box if you want this certificate to be used to verify server certificates (from other ISE nodes or LDAP servers).

Trust for client authentication and Syslog

(Applicable only if you check the Trust for authentication within ISE check box) Check the check box if you want this certificate to be used to:

  • Authenticate endpoints that connect to ISE using the EAP protocol

  • Trust a Syslog server

Trust for authentication of Cisco Services

Check this check box if you want this certificate to be used to trust external Cisco services such as the feed service.

Validate Certificate Extensions

(Only if you check both the Trust for client authentication and Enable Validation of Certificate Extensions options) Ensure that the “keyUsage” extension is present and the “keyCertSign” bit is set, and that the basic constraints extension is present with the CA flag set to true.

Description

Enter an optional description.

Certificate Chain Import

You can import multiple certificates from a single file that contains a certificate chain received from a Certificate store. All certificates in the file must be in the PEM format, and the certificates must be arranged in the following order:

  • The last certificate in the file must be the client or server certificate issued by the CA.

  • All preceding certificates must be the root CA certificate plus any intermediate CA certificates in the signing chain for the issued certificate.

Importing a certificate chain is a two-step process:

  1. Import the certificate chain file into the Trusted Certificate store in the Cisco ISE administration portal. This operation imports all certificates from the file except the last one into the Trusted Certificates store.

  2. Import the certificate chain file using the Bind a CA-Signed Certificate operation. This operation imports the last certificate from the file as a local certificate.

Install Trusted Certificates for Cisco ISE Inter Node Communication

When you set up the deployment, before you register a secondary node, you must populate the PAN's CTL with appropriate CA certificates that are used to validate the Admin certificate of the secondary node. The procedure to populate the CTL of the PAN is different for different scenarios:

  • If the secondary node is using a CA-signed certificate to communicate with the Cisco ISE administration portal, you must import the CA-signed certificate of the secondary node, the relevant intermediate certificates (if any), and the root CA certificate (of the CA that signed the secondary node's certificate) into the CTL of the PAN.

  • If the secondary node is using a self-signed certificate to communicate with the Cisco ISE administration portal, you can import the self-signed certificate of the secondary node into the CTL of the PAN.


    Note


    • If you change the Admin certificate on a registered secondary node, you must obtain appropriate CA certificates that can be used to validate the secondary node’s Admin certificate and import it into the CTL of the PAN.

    • If you use self-signed certificates to secure communication between a client and PSN in a deployment, when BYOD users move from one location to another, EAP-TLS user authentication fails. For such authentication requests that have to be serviced between a few PSNs, you must secure communication between the client and the PSN with an externally-signed CA certificate or use wildcard certificates signed by an external CA.


Ensure that the certificate issued by the external CA has basic constraints defined and the CA flag is set to true. To install CA-signed certificates for inter-node communication, carry out the following steps. For information on these tasks, refer to Chapter "Basic Setup" in the Cisco ISE Administrator Guide.

Procedure

Step 1

Create a Certificate Signing Request (CSR) and submit the CSR to a Certificate Authority.

Step 2

Import the root certificates to the trusted certificate store.

Step 3

Bind the CA-signed certificate to the CSR.


Default Trusted Certificates in Cisco ISE

The Trusted Certificates store (click the Menu icon () and choose Administration > System > Certificates > Trusted Certificates) in Cisco ISE includes some certificates that are available by default. These certificates are automatically imported into the store to meet security requirements. However, it is not mandatory for you to use all of them. Unless mentioned otherwise in the following table, you can use certificates of your choice instead of the ones that are already available.

Table 13. Default Trusted Certificates

Trusted Certificate Name

Serial Number

Purpose of Certificate

Cisco ISE Releases with Certificate

Baltimore CyberTrust Root CA

02 00 00 B9

This certificate can serve as the root CA certificate in CA chains used by cisco.com in some geographies. The certificate was also used in ISE 2.4 posture/CP update XML files when they hosted at https://s3.amazonaws.com.

Releases 2.4 and later.

DST Root CA X3 Certificate Authority

44 AF B0 80 D6 A3 27 BA 89 30 39 86 2E F8 40 6B

This certificate can serve as the root CA certificate for the CA chain used by cisco.com.

Releases 2.4 and later.

Thawte Primary Root CA

34 4E D5 57 20 D5 ED EC 49 F4 2F CE 37 DB 2B 6D

This certificate can serve as the root CA certificate for the CA chain used by cisco.com and perfigo.com.

Releases 2.4 and later.

VeriSign Class 3 Public Primary Certification Authority

18 DA D1 9E 26 7D E8 BB 4A 21 58 CD CC 6B 3B 4A

This certificate serves as the root CA certificate for VeriSign Class 3 Secure Server CA-G3.

You must use this certificate when configuring profiler feed services in Cisco ISE.

Releases 2.4 and later.

VeriSign Class 3 Secure Server CA - G3

6E CC 7A A5 A7 03 20 09 B8 CE BC F4 E9 52 D4 91

This is an intermediate CA certificate that expires on February 7, 2020. You do not need to renew this certificate.

You can remove the certificate by following the task below.

Releases 2.4 and later.

Cisco CA Manufacturing

6A 69 67 B3 00 00 00 00 00 03

This certificate may be used by certain Cisco devices connecting to Cisco ISE. The certificate is disabled by default.

Releases 2.4 and 2.6.

Cisco Manufacturing CA SHA2

02

This certificate can be used in CA chains for administrator authentications, endpoint authentications, and deployment infrastructure flows.

Releases 2.4 and later.

Cisco Root CA 2048

5F F8 7B 28 2B 54 DC 8D 42 A3 15 B5 68 C9 AD FF

This certificate can be used by certain Cisco devices connecting to Cisco ISE. The certificate is disabled by default.

Releases 2.4 and later.

Cisco Root CA M2

01

This certificate can be used in CA chains for administrator authentications, endpoint authentications, and deployment infrastructure flows.

Releases 2.4 and later.

DigiCert Root CA

02 AC 5C 26 6A 0B 40 9B 8F 0B 79 F2 AE 46 25 77

You must use this certificate for flows where guest login with Facebook is used.

Releases 2.4 and later.

DigiCert SHA2 High Assurance Server CA

04 E1 E7 A4 DC 5C F2 F3 6D C0 2B 42 B8 5D 15 9F

You must use this certificate for flows where guest login with Facebook is used.

Releases 2.4 and later.

HydrantID SSL ICA G2

75 17 16 77 83 D0 43 7E B5 56 C3 57 94 6E 45 63 B8 EB D3 AC

Trusted for Cisco services.

Releases 2.4 and 2.6.

QuoVadis Root CA 2

05 09

You must use this certificate in the profiler, posture, and client provisioning flows.

Releases 2.4 and later.

Cisco ECC Root CA

01

This certificate is part of the Cisco Trust root store bundle that is used in Cisco ISE.

Release 2.6.

Cisco Licensing Root CA

01

This certificate is part of the Cisco Trust root store bundle that is used in Cisco ISE.

Releases 2.6 and later.

Cisco Root CA 2099

01 9A 33 58 78 CE 16 C1 C1

This certificate is part of the Cisco Trust root store bundle that is used in Cisco ISE.

Releases 2.6 and later.

Cisco Root CA M1

2E D2 0E 73 47 D3 33 83 4B 4F DD 0D D7 B6 96 7E

This certificate is part of the Cisco Trust Root Store bundle used in Cisco ISE.

Releases 2.6 and later.

Cisco RXC-R2

01

This certificate is part of the Cisco Trust root store bundle that is used in Cisco ISE.

Releases 2.6 and later.

DigiCert Global Root CA

08 3B E0 56 90 42 46 B1 A1 75 6A C9 59 91 C7 4A

This certificate is part of the Cisco Trust root store bundle that is used in Cisco ISE.

Releases 2.6 and later.

Cisco ECC Root CA 2099

03

This certificate is part of the Cisco Trust root store bundle that is used in Cisco ISE.

Releases 2.6 and later.

Remove a Default Trusted Certificate from Cisco ISE

  • In the Cisco ISE GUI, click the Menu icon () and choose Administration > System > Certificates > Trusted Certificates to view all your trusted certificates.

  • Export the certificate that you wish to delete and save it so that it can be imported again if needed.

    Check the check box against the certificate you wish to export, and click Export on the menu bar above. The key chain downloads to your system.

  • Delete the certificate. Check the check box against the certificate you wish to delete, and click Delete on the menu bar above. You will not be allowed to delete the certificate if it is being used by any CA chain, Secure Syslog, or secure LDAP.

  • Make the necessary configuration changes to remove the certificate from the CA chains, Secure Syslogs, and syslogs it is part of. Then, delete the certificate.

  • After you delete the certificate, check that the related services (refer to the purpose of the certificate) are working as expected.

Certificate-Signing Requests

For a CA to issue a signed certificate, you must create a certificate signing request and submit it to the CA.

The list of certificate-signing requests that you have created is available in the Certificate-Signing Requests window. To view this window, click the Menu icon () and chooseAdministration > System > Certificates > Certificate-Signing Requests. To obtain signatures from a CA, you must export the certificate-signing request and then send the certificates to the CA. The CA signs and returns your certificates.

You can manage the certificates centrally from the Cisco ISE administration portal. You can create certificate-signing requests for all the nodes in your deployment and export them. Then, you should submit the certificate-signing requests to a CA, obtain the signed certificates from the CA, import the root and intermediary CA certificates given by the CA into the Trusted Certificates store, and bind the CA-signed certificates to the certificate-signing requests.

Create a Certificate-Signing Request and Submit it to a Certificate Authority

You can generate a certificate-signing request to obtain a CA-signed certificate for the nodes in your deployment. You can generate the certificate-signing request for a specific node in the deployment or for all the nodes in your deployment.

Procedure

Step 1

Choose Administration > System > Certificates > Certificate-Signing Requests.

Step 2

Click Generate Certificate-Signing Requests (CSR) to generate the certificate-signing request.

Step 3

Enter the values for generating a certificate-signing request. See Trusted Certificate Settings for information on each of the fields in the window displayed.

Step 4

(Optional) Check the check box of the signing request that you want to download and and click Export to download the request.

Step 5

Copy all the text from “-----BEGIN CERTIFICATE REQUEST-----” through “-----END CERTIFICATE REQUEST-----.” and paste the contents of the request in the certificate request of the chosen CA.

Step 6

Download the signed certificate.

Some CAs might email the signed certificate to you. The signed certificate is in the form of a .zip file that contains the newly issued certificate and the public signing certificates of the CA that you must add to the Cisco ISE trusted certificates store. The digitally-signed CA certificate, root CA certificate, and other intermediate CA certificate (if applicable) can be downloaded to the local system running your client browser.


Bind a CA-Signed Certificate to a Certificate Signing Request

After the CA returns the digitally signed certificate, you must bind it to the certificate-signing request. You can perform the bind operation for all the nodes in your deployment, from the Cisco ISE administration portal.

Before you begin
  • You must have the digitally signed certificate, and the relevant root intermediate CA certificates sent by the CA.

  • Import the relevant root and intermediate CA certificates to the Trusted Certificates store (click the Menu icon () and choose Administration > System > Certificates > Trusted Certificates).

Procedure

Step 1

Choose Administration > System > Certificates > Certificate-Signing Requests.

Step 2

Check the check box next to the certificate signing request you must bind with the CA-signed certificate.

Step 3

Click Bind Certificate.

Step 4

In the Bind CA Signed Certificate window displayed, click Choose File to choose the CA-signed certificate.

Step 5

Enter a value in the Friendly Name field.

Step 6

Check the Validate Certificate Extensions check box if you want Cisco ISE to validate certificate extensions.

If you enable the Validate Certificate Extensions option, and the certificate that you import contains a basic constraints extension with the CA flag set to True, ensure that the key usage extension is present, and that the keyEncipherment bit or the keyAgreement bit, or both, are also set.

Note


Cisco ISE requires EAP-TLS client certificates to have digital signature key usage extension.

Step 7

(Optional) Check the services for which this certificate will be used in the Usage area.

This information is autopopulated if you have enabled the Usage option while generating the certificate signing request. You can also choose to edit the certificate at a later time to specify the usage.

Changing the Admin usage certificate on a primary PAN restarts the services on all the other nodes. The system restarts one node at a time, after the primary PAN restarts.

Step 8

Click Submit to bind the certificate-signing request with the CA-signed certificate.

If this certificate is marked for Cisco ISE internode communication usage, the application server on the Cisco ISE node restarts.

Repeat this process to bind the certificate-signing request with the CA-signed certificate on the other nodes in the deployment.


What to do next
Import a Root Certificate into the Trusted Certificate Store

Export a Certificate-Signing Request

Before you begin

To perform the following task, you must be a Super Admin or System Admin.

Procedure

Step 1

Choose Administration > System > Certificates > Certificate-Signing Requests.

Step 2

Check the check box next to the certificates that you want to export, and click Export.

Step 3

The certificate-signing request is downloaded to your local file system.


Certificate-Signing Request Settings

Cisco ISE allows you to generate certificate-signing requests for all the nodes in your deployment from the administration portal in a single request. Also, you can choose to generate the certificate signing request for a single node or multiple both nodes in the deployment. If you choose to generate a certificate signing request for a single node, ISE automatically substitutes the Fully Qualified Domain Name (FQDN) of that particular node in the CN field of the certificate subject. If you enter a domain name other than the FQDN of that node in the CN field, Cisco ISE rejects authentication with that certificate. If you choose to include an entry in the Subject Alternative Name (SAN) field of the certificate, you must enter the FQDN of the ISE node in addition to other SAN attributes. If necessary, you can also add additional FQDNs in the SAN field. If you choose to generate certificate signing requests for all the nodes in your deployment, check the Allow Wildcard Certificates check box and enter the wildcard FQDN notation in the SAN field (DNS name), for example, *.amer.example.com. If you plan to use the certificate for EAP Authentication, do not enter the wildcard value in the CN= field.

With the use of wildcard certificates, you no longer have to generate a unique certificate for each Cisco ISE node. Also, you no longer have to populate the SAN field with multiple FQDN values to prevent certificate warnings. Using an asterisk (*) in the SAN field allows you to share a single certificate across multiple both nodes in a deployment and helps prevent certificate name mismatch warnings. However, use of wildcard certificates is considered less secure than assigning a unique server certificate for each Cisco ISE node.

The following table describes the fields in the certificate-signing request window, which you can use to generate a certificate-signing request that can be signed by a Certificate Authority (CA). To view this window, click the Menu icon () and choose Administration > System > Certificates > Certificate Management > Certificate-Signing Request.

Table 14. Certificate-Signing Request Settings
Field Usage Guidelines

Certificate(s) will be used for

Choose the service for which you are going to use the certificate:

Cisco ISE Identity Certificates

  • Multi-Use: Used for multiple services (Admin, EAP-TLS Authentication, pxGrid, and Portal). Multi-use certificates use both client and server key usages. The certificate template on the signing CA is often called a Computer or Machine certificate template. This template has the following properties:

    • Key Usage: Digital Signature (Signing)

    • Extended Key Usage: TLS Web Server Authentication (1.3.6.1.5.5.7.3.1) and TLS Web Client Authentication (1.3.6.1.5.5.7.3.2)

  • Admin: Used for server authentication (to secure communication with the Admin portal and between ISE nodes in a deployment). The certificate template on the signing CA is often called a Web Server certificate template. This template has the following properties:

    • Key Usage: Digital Signature (Signing)

    • Extended Key Usage: TLS Web Server Authentication (1.3.6.1.5.5.7.3.1)

  • EAP Authentication: Used for server authentication. The certificate template on the signing CA is often called a Computer or Machine certificate template. This template has the following properties:

    • Key Usage: Digital Signature (Signing)

    • Extended Key Usage: TLS Web Server Authentication (1.3.6.1.5.5.7.3.1)

    Note


    Digital signature key usage is required for EAP-TLS client certificates.

  • RADIUS DTLS: Used for RADIUS DTLS server authentication. This template has the following properties:

    • Key Usage: Digital Signature (Signing)

    • Extended Key Usage: TLS Web Server Authentication (1.3.6.1.5.5.7.3.1)

  • ISE Messaging Service: Used by the feature Syslog Over Cisco ISE Messaging, which enables MnT WAN survivability for built-in UDP syslog collection targets (LogCollector and LogCollector2).

    • Key Usage: Digital Signature (Signing)

    • Extended Key Usage: TLS Web Server Authentication (1.3.6.1.5.5.7.3.1)

  • Portal: Used for server authentication (to secure communication with all ISE web portals). The certificate template on the signing CA is often called a Computer or Machine certificate template. This template has the following properties:

    • Key Usage: Digital Signature (Signing)

    • Extended Key Usage: TLS Web Server Authentication (1.3.6.1.5.5.7.3.1)

  • pxGrid: Used for both client and server authentication (to secure communication between the pxGrid client and server). The certificate template on the signing CA is often called a Computer or Machine certificate template. This template has the following properties:

    • Key Usage: Digital Signature (Signing)

    • Extended Key Usage: TLS Web Server Authentication (1.3.6.1.5.5.7.3.1) and TLS Web Client Authentication (1.3.6.1.5.5.7.3.2)

  • SAML: Server certificate used to secure communication with the SAML Identity Provider (IdP). A certificate designated for SAML use cannot be used for any other service such as Admin, EAP authentication, and so on.

    • Key Usage: Digital Signature (Signing)

    • Extended Key Usage: TLS Web Server Authentication (1.3.6.1.5.5.7.3.1)

Note

 
We recommend that you do not use a certificate that contains the value of 2.5.29.37.0 for the Any Purpose object identifier in the Extended Key Usage attribute. If you use a certificate that contains the value of 2.5.29.37.0 for the Any Purpose object identifier in the Extended Key Usage attribute, the certificate is considered invalid and the following error message is displayed:
source=local ; type=fatal ; message="unsupported certificate"

Cisco ISE Certificate Authority Certificates

  • ISE Root CA: (Applicable only for the internal CA service ) Used for regenerating the entire internal CA certificate chain including the root CA on the Primary PAN and subordinate CAs on the PSNs.

  • ISE Intermediate CA: (Applicable only for the internal CA service when ISE acts as an intermediate CA of an external PKI) Used to generate an intermediate CA certificate on the Primary PAN and subordinate CA certificates on the PSNs. The certificate template on the signing CA is often called a Subordinate Certificate Authority. This template has the following properties:

    • Basic Constraints: Critical, Is a Certificate Authority

    • Key Usage: Certificate Signing, Digital Signature

    • Extended Key Usage: OCSP Signing (1.3.6.1.5.5.7.3.9)

  • Renew ISE OCSP Responder Certificates: (Applicable only for the internal CA service) Used to renew the ISE OCSP responder certificate for the entire deployment (and is not a certificate signing request). For security reasons, we recommend that you renew the ISE OCSP responder certificates every six months.

Allow Wildcard Certificates

Check this check box to use a wildcard character (*) in the CN and/or the DNS name in the SAN field of the certificate. If you check this check box, all the nodes in the deployment are selected automatically. You must use the asterisk (*) wildcard character in the left-most label position. If you use wildcard certificates, we recommend that you partition your domain space for greater security. For example, instead of *.example.com, you can partition it as *.amer.example.com. If you do not partition your domain, it might lead to security issues.

Generate CSRs for these Nodes

Check the check boxes next to the nodes for which you want to generate the certificate. To generate a CSR for select nodes in the deployment, you must uncheck the Allow Wildcard Certificates option.

Common Name (CN)

By default, the common name is the FQDN of the ISE node for which you are generating the certificate signing request. $FQDN$ denotes the FQDN of the ISE node. When you generate certificate signing requests for multiple nodes in the deployment, the Common Name field in the certificate signing requests is replaced with the FQDN of the respective ISE nodes.

Organizational Unit (OU)

Organizational Unit name. For example, Engineering.

Organization (O)

Organization name. For example, Cisco.

City (L)

(Do not abbreviate) City name. For example, San Jose.

State (ST)

(Do not abbreviate) State name. For example, California.

Country (C)

Country name. You must enter the two-letter ISO country code. For example, US.

Subject Alternative Name (SAN)

An IP address, DNS name, Uniform Resource Identifier (URI), or Directory Name that is associated with the certificate.

  • DNS Name: If you choose the DNS name, enter the fully qualified domain name of the ISE node. If you have enabled the Allow Wildcard Certificates option, specify the wildcard notation (an asterisk and a period before the domain name). For example, *.amer.example.com.

  • IP Address: IP address of the ISE node to be associated with the certificate.

  • Uniform Resource Identifier: A URI that you want to associate with the certificate.

  • Directory Name: A string representation of distinguished name(s) (DNs) defined per RFC 2253. Use a comma (,) to separate the DNs. For “dnQualifier” RDN, escape the comma and use backslash-comma “\,” as separator. For example, CN=AAA,dnQualifier=O=Example\,DC=COM,C=IL

Key Type

Specify the algorithm to be used for creating the public key: RSA or ECDSA.

Key Length

Specify the bit size for the public key.

The following options are available for RSA:

  • 512

  • 1024

  • 2048

  • 4096

The following options are available for ECDSA:

  • 256

  • 384

Note


RSA and ECDSA public keys might have different key length for the same security level.

Choose 2048 or greater if you plan to get a public CA-signed certificate.

Digest to Sign With

Choose one of the following hashing algorithm: SHA-1 or SHA-256.

Certificate Policies

Enter the certificate policy OID or list of OIDs that the certificate should conform to. Use comma or space to separate the OIDs.

Set Up Certificates for Portal Use

With multiple PSNs in a deployment that can service a web portal request, Cisco ISE needs a unique identifier to identify the certificate that must be used for portal communication. When you add or import certificates that are designated for portal use, define a certificate group tag and associate it with the corresponding certificate on each node in your deployment. Associate this certificate group tag to the corresponding end-user portals (guest, sponsor, and personal devices portals). This certificate group tag is the unique identifier that helps Cisco ISE identify the certificate that must be used when communicating with each of these portals. You can only designate one certificate from each node for each of the portals.


Note


Cisco ISE presents the Portal certificate on TCP port 8443 (or the port that you have configured for portal use).


Procedure


Step 1

Create a Certificate-Signing Request and Submit it to a Certificate Authority.

You must choose a Certificate Group Tag that you have already defined or create a new one for the portal. For example, mydevicesportal.

Step 2

Import a Root Certificate into the Trusted Certificate Store.

Step 3

Bind a CA-Signed Certificate to a Certificate Signing Request.


Reassign Default Portal Certificate Group Tag to CA-Signed Certificate

By default, all Cisco ISE portals use the self-signed certificate. If you want to use a CA-signed certificate for portals, you can assign the default portal certificate group tag to a CA-signed certificate. You can use an existing CA-signed certificate or generate a CSR and obtain a new CA-signed certificate for portal use. You can reassign any portal group tag from one certificate to another.


Note


When you add a new certificate, you can reassign the portal group tag from the Default Portal Certificate Group tag to a different portal group tag. This will change all the portals that are associated with the certificate by default, to those that are mapped to that portal group tag only. The system displays a list of these portals. When you edit an existing certificate, if the portal tag that is associated with the certificate is already in use by any of the portals, then you cannot reassign the Default Portal Certificate Group tag or any other portal group tag to this certificate.


The following procedure describes how to reassign the default portal certificate group tag to a CA-signed certificate.

Procedure

Step 1

Choose Administration > System > Certificates > System Certificates.

Hover the mouse over the i icon next to the Default Portal Certificate Group tag to view the list of portals that use this tag. You can also view the ISE nodes in the deployment that have portal certificates which are assigned this tag.

Step 2

Check the check box next to the CA-signed certificate that you want to use for portals, and click Edit.

Be sure to choose a CA-signed certificate that is not in use by any of the portals.

Step 3

Under the Usage area, check the Portal check box and choose the Default Portal Certificate Group Tag.

Step 4

Click Save.

A warning message appears.

Step 5

Click Yes to reassign the default portal certificate group tag to the CA-signed certificate.


Associate Portal Certificate Tag Before You Register a Node

If you use the "Default Portal Certificate Group" tag for all the portals in your deployment, before you register a new ISE node, ensure that you import the relevant CA-signed certificate, choose "Portal" as a service, and associate the "Default Portal Certificate Group" tag with this certificate.

When you add a new node to a deployment, the default self-signed certificate is associated with the "Default Portal Certificate Group" tag and the portals are configured to use this tag.

After you register a new node, you cannot change the Certificate Group tag association. Therefore, before you register the node to the deployment, you must do the following:

Procedure

Step 1

Create a self-signed certificate, choose "Portal" as a service, and assign a different certificate group tag (for example, tempportaltag).

Step 2

Change the portal configuration to use the newly created certificate group tag (tempportaltag).

Step 3

Edit the default self-signed certificate and remove the Portal role.

This option removes the Default Portal Certificate Group tag association with the default self-signed certificate.

Step 4

Do one of the following:

Option Description

Generate a CSR

When you generate the CSR:

  1. Choose "Portal" as a service for which you will use this certificate and associate the "Default Portal Certificate Group" tag.

  2. Send the CSR to a CA and obtain the signed certificate.

  3. Import the root and any other intermediate certificates of the CA that signed your certificate in to the Trusted Certificates store.

  4. Bind the CA-signed certificate with the CSR.

Import the private key and the CA-signed certificate

When you import the CA-signed certificate:

  1. Choose "Portal" as a service for which you will use this certificate and associate the "Default Portal Certificate Group" tag.

  2. Import the root and any other intermediate certificates of the CA that signed your certificate in to the Trusted Certificates store.

Edit an existing CA-signed certificate.

When you edit the existing CA-signed certificate:

Choose "Portal" as a service for which you will use this certificate and associate the "Default Portal Certificate Group" tag.

Step 5

Register the ISE node to the deployment.

The portal configuration in the deployment is configured to the "Default Portal Certificate Group" tag and the portals are configured to use the CA-signed certificate associated with the "Default Portal Certificate Group" tag on the new node.

User and Endpoint Certificate Renewal

By default, Cisco ISE rejects a request that comes from a device whose certificate has expired. However, you can change this default behavior and configure ISE to process such requests and prompt the user to renew the certificate.

If you choose to allow the user to renew the certificate, Cisco recommends that you configure an authorization policy rule which checks if the certificate has been renewed before processing the request any further. Processing a request from a device whose certificate has expired may pose a potential security threat. Hence, you must configure appropriate authorization profiles and rules to ensure that your organization’s security is not compromised.

Some devices allow you to renew the certificates before and after their expiry. But on Windows devices, you can renew the certificates only before it expires. Apple iOS, Mac OSX, and Android devices allow you to renew the certificates before or after their expiry.

Dictionary Attributes Used in Policy Conditions for Certificate Renewal

Cisco ISE certificate dictionary contains the following attributes that are used in policy conditions to allow a user to renew the certificate:

  • Days to Expiry: This attribute provides the number of days for which the certificate is valid. You can use this attribute to create a condition that can be used in authorization policy. This attribute can take a value from 0 to 15. A value of 0 indicates that the certificate has already expired. A value of 1 indicates that the certificate has less than 1 day before it expires.

  • Is Expired: This Boolean attribute indicates whether a certificate has expired or not. If you want to allow certificate renewal only when the certificate is near expiry and not after it has expired, use this attribute in authorization policy condition.

CWA Redirect to a Renew Certificate

If a user certificate is revoked before its expiry, Cisco ISE checks the CRL published by the CA and rejects the authentication request. In case, if a revoked certificate has expired, the CA may not publish this certificate in its CRL. In this scenario, it is possible for Cisco ISE to renew a certificate that has been revoked. To avoid this, before you renew a certificate, ensure that the request gets redirected to Central Web Authentication (CWA) for a full authentication. You must create an authorization profile to redirect the user for CWA.

Configure Cisco ISE to Allow Users to a Renew Certificate

You must complete the tasks listed in this procedure to configure Cisco ISE to allow users to renew certificates.

Before you begin

Configure a limited access ACL on the WLC to redirect a CWA request.

Procedure

Step 1

Update the Allowed Protocol Configuration

Step 2

Create an Authorization Policy Profile for CWA Redirection

Step 3

Create an authorization policy rule to renew the certificate.

Step 4

Enable BYOD Settings in Guest Portal


Update the Allowed Protocol Configuration

Procedure

Step 1

Choose Policy > Policy Elements > Results > Authentication > Allowed Protocols > Default Network Access.

Step 2

Check the Allow Authentication of expired certificates to allow certificate renewal in Authorization Policy check box under the EAP-TLS protocol and EAP-TLS inner methods for PEAP and EAP-FAST protocols.

Requests that use the EAP-TLS protocol will go through the NSP flow.

For PEAP and EAP-FAST protocols, you must manually install and configure Cisco AnyConnect for Cisco ISE to process the request.

Step 3

Click Submit.


What to do next

Create an Authorization Policy Profile for CWA Redirection

Create an Authorization Policy Profile for CWA Redirection

Before you begin

Ensure that you have configured a limited access ACL on the WLC.

Procedure

Step 1

Choose Policy > Policy Elements > Results > Authorization > Authorization Profiles.

Step 2

Click Add.

Step 3

Enter a name for the authorization profile. For example, CertRenewal_CWA.

Step 4

Check the Web Redirection (CWA, DRW, MDM, NSP, CPP) check box in the Common Tasks area.

Step 5

Choose Centralized Web Auth from the drop-down list and the limited access ACL.

Step 6

Check the Display Certificates Renewal Message check box.

The URL-redirect attribute value changes and includes the number of days for which the certificate is valid.

Step 7

Click Submit.


Enable BYOD Settings in Guest Portal

For a user to be able to renew a personal device certificate, you must enable the BYOD settings in the chosen guest portal.

Procedure

Step 1

Choose Work Centers > Guest Access > Portals & Components > Guest Portals.

  1. Select the chosen CWA portal and click Edit.

Step 2

From BYOD Settings, check the Allow employees to use personal devices on the network check box.

Step 3

Click Save.


Certificate Renewal Fails for Apple iOS Devices

When you use ISE to renew the endpoint certificates on Apple iOS devices, you might see a “Profiled Failed to Install” error message. This error message appears if the expiring or expired network profiles were signed by a different Admin HTTPS certificate than the one that is used in processing the renewal, either on the same Policy Service Node (PSN) or on another PSN.

As a workaround, use a multi-domain SSL certificate, which is commonly referred to as Unified Communications Certificate (UCC), or a wildcard certificate for Admin HTTPS on all PSNs in the deployment.

Certificate Periodic Check Settings

Cisco ISE checks the Certificate Revocation Lists (CRL) periodically. Using this window, you can configure Cisco ISE to check ongoing sessions against CRLs that are downloaded automatically. You can specify the time of the day when the OCSP or CRL checks should begin each day and the time interval in hours that Cisco ISE waits before checking the OCSP server or CRLs again.

The following table describes the fields in the Certificate Periodic Check Settings window, which you can use to specify the time interval for checking the status of certificates (OCSP or CRL). To view this window, click the Menu icon () and choose Administration > System > Certificates > Certificate Management > Certificate Periodic Check Settings.

Table 15. Certificate Periodic Check Settings
Field Name Usage Guidelines

Certificate Check Settings

Check ongoing sessions against automatically retrieved CRL

Check this check box if you want Cisco ISE to check ongoing sessions against CRLs that are automatically downloaded.

CRL/OCSP Periodic Certificate Checks

First check at

Specify the time of the day when the CRL or OCSP check should begin each day. Enter a value between 00:00 and 23:59 hours.

Check every

Specify the time interval in hours that Cisco ISE waits before checking the CRL or OCSP server again.

Cisco ISE doesn’t allow the specification of LDAP binding type in its CRL retrieval configuration, and connects to an LDAP URL using anonymous bind at the certificate distribution point. Cisco ISE only supports LDAP binding for authentication to LDAP servers.

Cisco ISE uses HTTP (port 80), HTTPS (port 443), and LDAP (port 389) protocols by default for CRL processes. In the case of Windows Vista SP1 and Windows Server 2008 endpoints, Microsoft only supports the following protocols for CRLs:

  • HTTP: A PKI client only performs authentications for locally configured proxies. By default, authentication is performed only when a proxy server returns an error message that proxy authentication is required.

  • LDAP: The PKI client signs and encrypts all LDAP traffic for PKI objects and only uses Kerberos authentication if authentication is required for network retrieval.

For more information, see What’s New in Certificate Revocation in Windows Vista and Windows Server 2008

Extract a Certificate and Private Key from a .pfx File

Cisco ISE does not allow import of certificates in .pfx format. Hence, if the certificate intended for import is in the .pfx format, you must convert it to .pem or .key file formats before import.

Before you begin

Ensure that OpenSSL is installed in the server that contains the SSL certificate.

Procedure


Step 1

Start OpenSSL from the OpenSSL\bin folder.

Step 2

Open the command prompt and go to the folder that contains your .pfx file.

Step 3

Run the following command to extract the private key in .pem format: openssl pkcs12 -in certname.pfx -nocerts -out key.pem -nodes

You will be prompted to type the import password. Type the password that you used to protect your keypair when you created the .pfx file. You will be prompted again to provide a new password to protect the .pem file that you are creating. Store the password to your key file in a secure place to avoid misuse.

Step 4

Run the following command to extract the certificate in .pem format: openssl pkcs12 -in certname.pfx -nokeys -out cert.pem

Step 5

Run the following command to decrypt the private key: openssl rsa -in key.pem -out server.key

Type the pasword that you created to protect the private key file in the previous step.

The .pem file and the decrypted and the encrypted .key files are available in the path, where you started OpenSSL.


Cisco ISE CA Service

Certificates can be self-signed or digitally signed by an external Certificate Authority (CA). The Cisco ISE Internal Certificate Authority (ISE CA) issues and manages digital certificates for endpoints from a centralized console to allow employees to use their personal devices on the company's network. A CA-signed digital certificate is considered industry standard and more secure. The Primary PAN is the Root CA. The Policy Service Nodes (PSNs) are subordinate CAs to the Primary PAN (SCEP RA). The ISE CA offers the following functionalities:

  • Certificate Issuance: Validates and signs Certificate Signing Requests (CSRs) for endpoints that connect to your network.

  • Key Management: Generates and securely stores keys and certificates on both PAN and PSN nodes.

  • Certificate Storage: Stores certificates issued to users and devices.

  • Online Certificate Status Protocol (OCSP) Support: Provides an OCSP responder to check for the validity of certificates.

When a CA Service is disabled on the primary administrative node, the CA service is still seen as running on the secondary administration node's CLI. Ideally, the CA service should be seen as disabled. This is a known Cisco ISE issue.

Cisco ISE Certificate Fingerprinting

Certificate fingerprinting process is used to evaluate certificate immediate Issuer Fingerprint SHA256 to match with the trusted certificates. This enforces a secured mechanism for multiple CAs to support different domains and also allows you to lock the trusted CAs for 802.1x protocol.

Ensure that the Issuer- Fingerprint SHA-256 certificate is added to your Cisco ISE deployment before updating the certificate in the policy condition.


Note


After the trusted certificate is configured with a policy, you cannot delete the certificate. The following message is displayed in the This Trusted Certificate Refered by Policy Sets section in the Trusted Certificates window. To view this window, click the Menu icon () and choose Administration > System > Certificates > Trusted Certificates:

Certificate cannot be deleted because it is used in a policy. To delete the certificate, please modify policy condition first.


To configure certificate fringerprint for Cisco ISE, follow the below steps in compliance with the order:

  1. Create an internal user. For more information, see "Add Users" section in the chapter "Asset Visibility" in Cisco Identity Services Engine Administrator Guide, Release 3.0.

  2. Add a network device. For more information, see "Add a Network Device in Cisco ISE" section in the chapter "Basic Setup"in Cisco Identity Services Engine Administrator Guide, Release 3.0.

  3. Import external CA in External Certificates. For more information, see "Import a System Certificate" section in the chapter "Basic Setup" in Cisco Identity Services Engine Administrator Guide, Release 3.0.

    You can also import the Issuer- Fingerprint SHA-256 certificate using the SCEP protocol. In the Cisco ISE GUI, click the Menu icon () and choose Administration > System > Certificates > Certificate Authority > External CA Settings. In the Add SCEP RA Profile window that is displayed, click Add. Enter the certificate name in the Name field. Enter the CA server URL in the URL field. Click Test Connection.

  4. Create a policy with SHA256 fingerprint.

  5. Create and map authentication policy with SHA256 fingerprint.

  6. Create an authorization profile.

  7. Configure and run the supplicant to verify the PRRT logs.

Create a Policy with SHA-256 Fingerprint

Procedure

Step 1

In the Cisco ISE GUI, click the Menu icon () and choose Policy > Policy Set.

Step 2

In the Policy Set window that is displayed, click Settings and from the drop down list, choose insert a new row.

Step 3

In the New Policy Name field, enter a name.

Step 4

Enter the Description for the policy.

Step 5

Click the Add ( + ) icon adjacent to the new Policy Set Name under the Conditions column.

Step 6

In the Condition Studio window that is displayed, click the Click to Add Attribute field.

Step 7

Select the Network Access-Protocol (Dictionary-Attribute) combination from the All Dictionary drop-down list.

Step 8

Select the Equals operator to build a logical condition.

Step 9

Choose RADIUS from the Choose from List or Type drop-down list.

Step 10

Click Use.

Step 11

In the Policy Set window that is displayed, from the Allowed Protocols/ Server Sequence drop down list, select Default Network Access.

Step 12

Click Save.


Create and Map an Authentication Policy with SHA-256 Fingerprint

Procedure

Step 1

In the Cisco ISE GUI, click the Menu icon () and choose Policy > Policy Set > Default.

Step 2

Click Authentication Policy.

Step 3

Click the settings icon and choose insert a new row.

Step 4

In the Authentication Rule Name window, enter the name.

Step 5

Click on the Add ( + ) icon adjacent to the rule name.

Step 6

In the Condition Studio window that is displayed, click the Click to add Attributes field.

Step 7

Choose CERTIFICATE-Issuer- Fingerprint SHA-256 (Dictionary-Attribute) combination from the All Dictionary drop-down list.

Step 8

Select the Equals operator to build a logical condition.

Step 9

Choose Cisco Manufacturing CA SHA2 fingerprint sha256 from Choose from List or Type drop-down list.

Step 10

Click Use.

Step 11

In the Policy Set window that is displayed, from the Allowed Protocols/Server Sequence drop-down list, select Preloaded_Certificate_Profile.

Step 12

Click Save.


Create an Authorization Policy

Procedure

Step 1

Choose In the Cisco ISE GUI, click the Menu icon () and choose Policy > Policy Set > Default.

Step 2

Click Authorization Policy.

Step 3

Click on the settings icon and choose insert a new rowfrom the drop-down list.

Step 4

In the Authorization Rule Name window, enter the name.

Step 5

Click the Add ( + ) icon adjacent to the rule name.

Step 6

In the Condition Studio window that is displayed, click the Click to Add Attributes field.

Step 7

Select the CERTIFICATE-Issuer- Fingerprint SHA-256 (Dictionary-Attribute) combination from the All Dictionary drop-down list.

Step 8

Select the Equals operator to build a logical condition.

Step 9

Select Cisco Root CA 2099 fingerprint shafrom Choose from List or Type drop-down list.

Step 10

Click Use.

Step 11

In the Policy Set window that is displayed, from the Allowed Protocols/Server Sequence drop down list, select PermitAccess.

Step 12

Click Save.


Verify PRRT Logs

Procedure

Step 1

In the Cisco ISE GUI, click the Menu icon () and choose Operation > RADIUS > Live Logs.

Step 2

In the Live Logs window that is displayed, click the latest log details.

Step 3

In the Authentication Details window that is displayed, view the SHA-256 value in the Issuer- Fingerprint SHA-256 column to confirm that the Issuer- Fingerprint SHA-256 certificate is successfully added and validated.


Cisco ISE CA Certificates Provisioned on Administration and Policy Service Nodes

After installation, a Cisco ISE node is provisioned with a Root CA certificate, and a Node CA certificate to manage certificates for endpoints.

Figure 7. Cisco ISE CA Certificates Provisioned on a Standalone Node

Cisco ISE CA certificates provisioned on a standalone node

When you set up a deployment, the node that you designate as the Primary Administration Node (PAN) becomes the Root CA. The PAN has a Root CA certificate and a Node CA certificate that is signed by the Root CA.

When you register a Secondary Administration Node to the PAN, a Node CA certificate is generated and is signed by the Root CA on the Primary Administration Node.

Any Policy Service Node (PSN) that you register with the PAN is provisioned an Endpoint CA and an OCSP certificate signed by the Node CA of the PAN. The Policy Service Nodes (PSNs) are subordinate CAs to the PAN. When you use the ISE CA, the Endpoint CA on the PSN issues the certificates to the endpoints that access your network.

Figure 8. Cisco ISE CA Certificates Provisioned on Administration and Policy Service Nodes in a Deployment


Requirements for CA to Interoperate with Cisco ISE

Client Certificate Requirements for Certificate-Based Authentication

While using a CA server with Cisco ISE, make sure that the following requirements are met:

  • Key size should be 1024, 2048, or higher. In CA server, the key size is defined using certificate template. You can define the key size on Cisco ISE using the supplicant profile.

  • Key usage should allow signing and encryption in extension.

  • While using GetCACapabilities through the SCEP protocol, cryptography algorithm and request hash should be supported. It is recommended to use RSA and SHA1.

  • Online Certificate Status Protocol (OCSP) is supported. This is not directly used in BYOD, but a CA which can act as an OCSP server can be used for certificate revocation.


    Note


    Cisco ISE supports Enterprise Java Beans Certificate Authority (EJBCA) for standard EAP authentication like PEAP, EAP-TLS, and so on. You must disable the Enable End Entity Profile Limitations option (under System > Basic Configurations) in EJBCA to enable EJBCA support for proxy SCEP.


  • If you use an enterprise PKI to issue certificates for Apple iOS devices, ensure that you configure key usage in the SCEP template and enable the Key Encipherment option.

    If you use Microsoft CA, edit the Key Usage Extension in the certificate template. In the Encryption area, click the Allow Key Exchange only with Key Encryption (Key encipherment) radio button and check the Allow Encryption of User Data check box.

  • Cisco ISE supports the use of RSASSA-PSS algorithm for trusted certificates and endpoint certificates for EAP-TLS authentication. When you view the certificate, the signature algorithm is listed as 1.2.840.113549.1.1.10 instead of the algorithm name.


Note


If you use the Cisco ISE internal CA for the BYOD flow, the Admin certificate should not be signed using the RSASSA-PSS algorithm (by an external CA). The Cisco ISE internal CA cannot verify an Admin certificate that is signed using this algorithm and the request would fail.


For certificate-based authentication with Cisco ISE, the client certificate should meet the following requirements:

Table 16. Client-Certificate Requirements for RSA and ECC

RSA

Supported Key Sizes

1024, 2048, and 4096 bits

Supported Secure Hash Algorithms (SHA)

SHA-1 and SHA-2 (includes SHA-256)

ECC 1 2

Supported Curve Types

P-192, P-256, P-384, and P-521

Supported Secure Hash Algorithm (SHA)

SHA-256

Client Machine Operating Systems and Supported Curve Types

Windows

8 and later

P-256, P-384, and P-521

Android

4.4 and later

Note


Android 6.0 requires May 2016 patch to support ECC certificates.

All curve types (except Androidv6.0, which does not support the P-192 curve type).

1 Windows 7 and Apple iOS do not natively support ECC for EAP-TLS authentication.
2 This release of Cisco ISE does not support the use of ECC certificates on MAC OS X devices.

Cisco ISE CA Chain Regeneration

When you regenerate the Cisco ISE CA chain, all the certificates including the Root CA, Node CA, and Endpoint CA certificates are regenerated. You must regenerate the ISE CA chain when you change the domain name or hostname of your PAN or PSN.

When you regenerate a system certificate, whether root CA or an intermediate CA certificate, ISE Messaging Service restarts to load the new certificate chain. Audit logs will be lost until the ISE Messaging Service is available again.


Note


Whenever the Cisco ISE internal CA is replaced in a deployment, then the ISE messaging service must also be refreshed at that time to retrieve the complete certificate chain.

When you regenerate the Cisco ISE internal CA chain, the Valid From field of all the certificates in the chain will display the date one day previous to the day of regeneration.

If there is a change in domain or host name and if the root CA chain is regenerated, all the certificates including the system certificates will get updated with the new domain or host name except the SAML certificate. The SAML certificate has to be regenerated separately.


Cisco ISE Messaging Certificate Support with External CA

Cisco ISE Messaging certificate signed by an external CA must be configured with EKU client and server authentication (like pxGrid). To configure the pxGrid template, see: https://community.cisco.com/t5/security-documents/deploying-certificates-with-cisco-pxgrid-using-an-external/ta-p/3639677. The Cisco ISE Messaging Certificate must be either signed internally by Cisco ISE or by an external (third-party) CA on all nodes. It cannot be a combination of both signatures.

Wildcard certificates are not supported.

Elliptical Curve Cryptography Certificates Support

Cisco ISE CA service supports certificates that are based on Elliptical Curve Cryptography (ECC) algorithms. ECC offers more security and better performance than other cryptographic algorithms even when using a much smaller key size.

The following table compares the key sizes of ECC and RSA and security strength.

ECC Key Size (in bits) RSA Key Size (in bits)
160 1024
224 2048
256 3072
384 7680
521 15360

Because of the smaller key size, encryption is quicker.

Cisco ISE supports the following ECC curve types. The higher the curve type or key size, the greater is the security.

  • P-192

  • P-256

  • P-384

  • P-521

ISE does not support explicit parameters in the EC part of a certificate. If you try to import a certificate with explicit parameters, you get the error: Validation of certificate failed: Only named ECParameters supported.

Cisco ISE CA service supports ECC certificates for devices connecting through the BYOD flow. You can also generate ECC certificates from the Certificate Provisioning Portal.


Note


The following table lists the operating systems and versions that support ECC along with the supported curve types. If your devices are not running a supported operating system or on a supported version, you can use RSA-based certificates instead.

Operating System Supported Versions Supported Curve Types
Windows 8 and later P-256, P-384, and P-521
Android 4.4 and later

Note


Android 6.0 requires May 2016 patch to support ECC certificates.

All curve types (except Android 6.0, which does not support the P-192 curve type).

Windows 7 and Apple iOS do not natively support ECC for authentication over EAP-TLS. This release of Cisco ISE does not support the use of ECC certificates on MAC OS X devices.


If the BYOD flow with Enrollment over Secure Transport (EST) protocol is not working properly, check the following:

  • Certificate Services Endpoint Sub CA certificate chain is complete. To check whether the certificate chain is complete:

    1. Choose Administration > System > Certificates > Certificate Authority > Certificate Authority Certificates.

    2. Check the check box next to the certificate that you want to check and click View.

  • Ensure that the CA and EST services are up and running. If the services are not running, go to Administration > System > Certificates > Certificate Authority > Internal CA Settings to enable the CA service.


Note


  • This release of Cisco ISE does not support EST clients to authenticate directly against the EST Server residing within Cisco ISE. While on-boarding an Android or a Windows endpoint, ISE triggers an EST flow if the request is for an ECC-based certificate.

  • BYOD flow with Android clients might fail when using EST protocol along with a static IP address, an FQDN or a hostname in the authorization profile. The workaround is to use SCEP instead of EST. You can configure SCEP in the native supplicant profile. See Creating Native Supplicant Profiles for more information.


Cisco ISE Certificate Authority Certificates

The Certificate Authority (CA) Certificates page lists all the certificates related to the internal Cisco ISE CA. In previous releases, these CA certificates were present in the Trusted Certificates store and are now moved to the CA Certificates page. These certificates are listed node wise in this page. You can expand a node to view all the ISE CA certificates of that particular node. The Primary and Secondary Administration nodes have the root CA, node CA, subordinate CA, and OCSP responder certificates. The other nodes in the deployment have the endpoint subordinate CA and OCSP certificates.

When you enable the Cisco ISE CA service, these certificates are generated and installed on all the nodes automatically. Also, when you replace the entire ISE Root CA Chain, these certificates are regenerated and installed on all the nodes automatically. There is no manual intervention required.

The Cisco ISE CA certificates follow the following naming convention: Certificate Services <Endpoint Sub CA/Node CA/Root CA/OCSP Responder>-<node_hostname>#certificate_number.

From the CA Certificates page, you can edit, import, export, delete, and view the Cisco ISE CA certificates.

Edit a Cisco ISE CA Certificate

After you add a certificate to the Cisco ISE CA Certificates Store, you can further edit it by using the edit settings.

Before you begin

To perform the following task, you must be a Super Admin or System Admin.

Procedure

Step 1

Choose Administration > System > Certificates > Certificate Authority > Certificate Authority Certificates..

Step 2

In the ISE-PIC GUI, click the Menu icon () and choose .

Step 3

Check the check box next to the certificate that you want to edit, and click Edit.

Step 4

Modify the editable fields as required. See Trusted Certificate Settings for a description of the fields.

Step 5

Click Save to save the changes you have made to the certificate store.


Export a Cisco ISE CA Certificate

To export the Cisco ISE root CA and node CA certificates:

Before you begin

To perform the following task, you must be a Super Admin or System Admin.

Procedure

Step 1

Choose Administration > System > Certificates > Certificate Authority > Certificate Authority Certificates.

Step 2

In the ISE-PIC GUI, click the Menu icon () and choose .

Step 3

Check the check box next to the certificate that you want to export, and click Export. You can export only one certificate at a time.

Step 4

Save the privacy-enhanced mail file to the file system that is running your client browser.


Import a Cisco ISE CA Certificate

If an endpoint tries to authenticate to your network using a certificate issued by Cisco ISE CA from another deployment, you must import the Cisco ISE root CA, node CA, and endpoint sub CA certificates from that deployment in to the Cisco ISE Trusted Certificates store.

Before you begin
  • To perform the following task, you must be a Super Admin or System Admin.

  • Export the ISE root CA, node CA, and endpoint sub CA certificates from the deployment where the endpoint certificate is signed and store it on the file system of the computer where your browser is running.

Procedure

Step 1

Log in to the Admin Portal of the deployment where the endpoint is getting authenticated.

Step 2

Choose Administration > System > Certificates > Trusted Certificates.

Step 3

Click Import.

Step 4

Configure the field values as necessary. See Trusted Certificate Import Settings for more information.

If client certificate-based authentication is enabled, then Cisco ISE will restart the application server on each node in your deployment, starting with the application server on the PAN and followed, one-by-one, by each additional node.


Certificate Templates

Certificate templates contain properties that are common to all certificates issued by the Certificate Authority (CA) based on that template. The certificate template defines the Subject, Subject Alternative Name (SAN), key type, key size, SCEP RA profile that must be used, validity period of the certificate, and the extended key usage (EKU) that specifies whether the certificate has to be used for client or server authentication or both. The internal Cisco ISE CA (ISE CA) uses a certificate template to issue certificates based on that template.

Cisco ISE comes with the following default certificate templates for the ISE CA. You can create additional certificate templates, if needed. The default certificate templates are:

  • CA_SERVICE_Certificate_Template—For other network services that use Cisco ISE as the Certificate Authority. For example, use this certificate template while configuring ISE to issue certificates for ASA VPN users. You can modify only the validity period in this certificate template.

  • EAP_Authentication_Certificate_Template—For EAP authentication.

  • pxGrid_Certificate_Template—For the pxGrid controller while generating the certificate from the Certificate Provisioning Portal.

Certificate Template Name Extension

The Cisco ISE Internal CA includes an extension to represent the certificate template that was used to create the endpoint certificate. All endpoint certificates issued by the internal CA contain a certificate template name extension. This extension represents the certificate template that was used to create that endpoint certificate. The extension ID is 1.3.6.1.4.1.9.21.2.5. You can use the CERTIFICATE: Template Name attribute in authorization policy conditions and assign appropriate access privileges based on the results of the evaluation.

Use Certificate Template Name in Authorization Policy Conditions

You can use the certificate template name extension in authorization policy rules.

Procedure

Step 1

Choose Policy > Policy Sets, and expand the Default policy set to view the authorization policy rules.

Step 2

Add a new rule or edit an existing rule. This example describes editing the Compliant_Device_Access rule:

  1. Edit the Compliant_Device_Access rule.

  2. Choose Add Attribute/Value.

  3. From Dictionaries, choose the CERTIFICATE: Template Name attribute and Equals operator.

  4. Enter the value of the certificate template name. For example, EAP_Authentication_Certificate_Template.

Step 3

Click Save.


Deploy Cisco ISE CA Certificates for pxGrid Controller

Cisco ISE CA provides a certificate template for the pxGrid controller to generate a certificate from the Certificate Provisioning Portal.

Before you begin

Generate a certificate signing request (CSR) for the pxGrid client and copy the contents of the CSR in to the clipboard.

Procedure

Step 1

Create a network access user account (Administration > Identity Management > Identities > Users > Add).

Make note of the user group to which the user is assigned.

Step 2

Edit the Certificate Provisioning Portal Settings (Administration > Device Portal Management > Certificate Provisioning).

  1. Select the certificate provisioning portal and click Edit.

  2. Click the Portal Settings drop-down list. From the Configure authorized groups Available list, select the user group to which the network access user belongs to and move it to Chosen list.

  3. Click the Certificate Provisioning Portal Settings drop-down list. Choose the pxGrid_Certificate_Template. See the Portal Settings for Certificate Provisioning Portal section in Cisco ISE Admin Guide: Guest and BYOD for more information.

  4. Save the portal settings.

Step 3

Launch the Certificate Provisioning Portal. Click the Portal Test URL link.

  1. Log in to the Certificate Provisioning Portal using the user account created in step 1.

  2. Accept the AUP and click Continue.

  3. From the I want to drop-down list, choose Generate a single certificate (with certificate signing request).

  4. In the Certificate Signing Request Details field, paste the contents of the CSR from the clipboard.

  5. From the Certificate Download Format drop-down list, choose PKCS8 format.

    Note


    If you choose the PKCS12 format, you must convert the single certificate file in to separate certificate and key files. The certificate and key files must be in binary DER encoded or PEM format before you can import them in to Cisco ISE.

  6. From the Choose Certificate Template drop-down list, choose pxGrid_Certificate_Template.

  7. Enter a certificate password.

  8. Click Generate.

    The certificate is generated.

  9. Export the certificate.

    The certificate along with the certificate chain is exported.

Step 4

Import the Cisco ISE CA chain in to the Trusted Certificates store in the pxGrid client.


Simple Certificate Enrollment Protocol Profiles

To help enable certificate provisioning functions for the variety of mobile devices that users can register on the network, Cisco ISE enables you to configure one or more Simple Certificate Enrollment Protocol (SCEP) Certificate Authority (CA) profiles (called as Cisco ISE External CA Settings) to point Cisco ISE to multiple CA locations. The benefit of allowing for multiple profiles is to help ensure high availability and perform load balancing across the CA locations that you specify. If a request to a particular SCEP CA goes unanswered three consecutive times, Cisco ISE declares that particular server unavailable and automatically moves to the CA with the next lowest known load and response times, then it begins periodic polling until the server comes back online.

For details on how to set up your Microsoft SCEP server to interoperate with Cisco ISE, see

http://www.cisco.com/en/US/solutions/collateral/ns340/ns414/ns742/ns744/docs/howto_60_byod_certificates.pdf.

Issued Certificates

The Admin portal lists all the certificates issued by the internal ISE CA to endpoints (Administration > System > Certificates > Endpoint Certificates). The Issued Certificates page provides you an at-a-glance view of the certificate status. You can mouse over the Status column to find out the reason for revocation if a certificate has been revoked. You can mouse over the Certificate Template column to view additional details such as Key Type, Key Size or Curve Type, Subject, Subject Alternative Name (SAN), and Validity of the certificate. You can click on the endpoint certificate to view the certificate.

All certificates issued by the ISE CA (certificates automatically provisioned through the BYOD flow and certificates obtained from the Certificate Provisioning portal) are listed in the Endpoint Certificates page. You can manage these certificates from this page.

For example, if you want to view the certificates issued to user7, enter user7 in the text box that appears below the Friendly Name field. All the certificates issued by Cisco ISE to this user appear. Remove the search term from the text box to cancel the filter. You can also use the Advanced Filter option to view records based on various search criteria.

This Endpoint Certificates page also provides you the option to revoke an endpoint certificate, if necessary.

The Certificate Management Overview page displays the total number of endpoint certificates issued by each PSN node in your deployment. You can also view the total number of revoked certificates per node and the total number of certificates that have failed. You can filter the data on this page based on any of the attributes.

Issued and Revoked Certificates

The following table describes the fields on the Overview of Issued and Revoked Certificates window. The PSN nodes in your deployment issue certificates to endpoints. This window provides you information about the endpoint certificates issued by each of the PSN nodes in your deployment. To view this window, click the Menu icon () and choose Administration > System > Certificates > Overview.


Note


Expired or revoked issued certificates will be automatically deleted after 30 days.


Table 17. Issued and Revoked Certificates
Fields Usage Guidelines

Node Name

Name of the Policy Service node (PSN) that issued the certificate.

Certificates Issued

Number of endpoint certificates issued by the PSN node.

Certificates Revoked

Number of revoked endpoint certificates (certificates that were issued by the PSN node).

Certificates Requests

Number of certificate-based authentication requests processed by the PSN node.

Certificates Failed

Number of failed authentication requests processed by the PSN node.

Backup and Restoration of Cisco ISE CA Certificates and Keys

You must back up the Cisco ISE CA certificates and keys securely to be able to restore them back on a Secondary Administration Node in case of a PAN failure and you want to promote the Secondary Administration Node to function as the root CA or intermediate CA of an external PKI. The Cisco ISE configuration backup does not include the CA certificates and keys. Instead, you should use the Command Line Interface (CLI) to export the CA certificates and keys to a repository and to import them. The application configure ise command now includes export and import options to backup and restore CA certificates and keys.

The following certificates from the Trusted Certificates Store are restored on the Secondary Administration Node:

  • Cisco ISE Root CA certificate

  • Cisco ISE Sub CA certificate

  • Cisco ISE Endpoint RA certificate

  • Cisco ISE OCSP Responder certificate

You must back up and restore Cisco ISE CA certificates and keys when you:

  • Have a Secondary Administration Node in the deployment

  • Replace the entire Cisco ISE CA root chain

  • Configure Cisco ISE root CA to act as a subordinate CA of an external PKI

  • Restore data from a configuration backup. In this case, you must first regenerate the Cisco ISE CA root chain and then back up and restore the ISE CA certificates and keys.


Note


Whenever the Cisco ISE internal CA is replaced in a deployment, then the ISE messaging service must also be refreshed that time to retrieve the complete certificate chain.


Export Cisco ISE CA Certificates and Keys

You must export the CA certificates and keys from the PAN to import them on the Secondary Administration Node. This option enables the Secondary Administration Node to issue and manage certificates for endpoints when the PAN is down and you promote the Secondary Administration Node to be the PAN.

Before you begin

Ensure that you have created a repository to store the CA certificates and keys.

Procedure

Step 1

Enter application configure ise command from the Cisco ISE CLI.

Step 2

Enter 7 to export the certificates and keys.

Step 3

Enter the repository name.

Step 4

Enter an encryption key.

A success message appears with the list of certificates that were exported, along with the subject, issuer, and serial number.

Example:
 The following 4 CA key pairs were exported to repository 'sftp' at 'ise_ca_key_pairs_of_ise-vm1':
        Subject:CN=Cisco ISE Self-Signed CA of ise-vm1
        Issuer:CN=Cisco ISE Self-Signed CA of ise-vm1
        Serial#:0x621867df-568341cd-944cc77f-c9820765

        Subject:CN=Cisco ISE Endpoint CA of ise-vm1
        Issuer:CN=Cisco ISE Self-Signed CA of ise-vm1
        Serial#:0x7027269d-d80a406d-831d5c26-f5e105fa

        Subject:CN=Cisco ISE Endpoint RA of ise-vm1
        Issuer:CN=Cisco ISE Endpoint CA of ise-vm1
        Serial#:0x1a65ec14-4f284da7-9532f0a0-8ae0e5c2

        Subject:CN=Cisco ISE OCSP Responder Certificate of ise-vm1
        Issuer:CN=Cisco ISE Self-Signed CA of ise-vm1
        Serial#:0x6f6d4097-21f74c4d-8832ba95-4c320fb1
ISE CA keys export completed successfully

Import Cisco ISE CA Certificates and Keys

After you register the Secondary Administration Node, you must export the CA certificates and keys from the PAN and import them in to the Secondary Administration Node.

Procedure

Step 1

Enter application configure ise command from the Cisco ISE CLI.

Step 2

Enter 8 to import the CA certificates and keys.

Step 3

Enter the repository name.

Step 4

Enter the name of the file that you want to import. The file name should be in the format ise_ca_key_pairs_of_<vm hostname>.

Step 5

Enter the encryption key to decrypt the file.

A success message appears.

Example:
The following 4 CA key pairs were imported:
        Subject:CN=Cisco ISE Self-Signed CA of ise-vm1
        Issuer:CN=Cisco ISE Self-Signed CA of ise-vm1
        Serial#:0x21ce1000-8008472c-a6bc4fd9-272c8da4

        Subject:CN=Cisco ISE Endpoint CA of ise-vm1
        Issuer:CN=Cisco ISE Self-Signed CA of ise-vm1
        Serial#:0x05fa86d0-092542b4-8ff68ed4-f1964a56

        Subject:CN=Cisco ISE Endpoint RA of ise-vm1
        Issuer:CN=Cisco ISE Endpoint CA of ise-vm1
        Serial#:0x77932e02-e8c84b3d-b27e2f1c-e9f246ca

        Subject:CN=Cisco ISE OCSP Responder Certificate of ise-vm1
        Issuer:CN=Cisco ISE Self-Signed CA of ise-vm1
        Serial#:0x5082017f-330e412f-8d63305d-e13fd2a5

Stopping ISE Certificate Authority Service...
Starting ISE Certificate Authority Service...
ISE CA keys import completed successfully

Note


Encryption of exported keys file was introduced in Cisco ISE Release 2.6. The export of keys from Cisco ISE Release 2.4 and earlier versions and import of keys in Cisco ISE Release 2.6 and later versions will not be successful.


Generate Root CA and Subordinate CAs on the Primary PAN and PSN

When you set up the deployment, Cisco ISE generates a root CA on the primary PAN and subordinate CA certificates on the PSNs for the Cisco ISE CA service. However, when you change the domain name or the hostname of the primary PAN or PSN, you must regenerate root CA on the primary PAN and sub CAs on the PSNs respectively.

If you want to change the hostname on a PSN, instead of regenerating the root CA and subordinate CAs on the primary PAN and PSNs respectively, you can deregister the PSN before changing the hostname, and register it back. A new subordinate certificate gets provisioned automatically on the PSN.


Note


PXgrid and IMS certificates will not be replaced by Internal CA while regenerating root CA if the respective certificate is externally signed.

If you want to change the signing by Internal CA for PXgrid certificate, generate a self-signed Pxgrid certificate and regenerate the root CA.

If you want to change the signing by Internal CA for Cisco ISE Messaging Services certificate, regenerate the Cisco ISE Messaging Services certificate from the CSR page.


Procedure


Step 1

Choose Administration > System > Certificates > Certificate Signing Requests

Step 2

Click Generate Certificate Signing Requests (CSR).

Step 3

Choose ISE Root CA from the Certificate(s) will be used for drop-down list.

Step 4

Click Replace ISE Root CA Certificate chain.

The root CA and subordinate CA certificates get generated for all the nodes in your deployment.


Configure Cisco ISE Root CA as Subordinate CA of an External PKI

If you want the root CA on the primary PAN to act as a subordinate CA of an external PKI, generate an ISE intermediate CA certificate signing request, send it to the external CA, obtain the root and CA-signed certificates, import the root CA certificate in to the Trusted Certificates Store, and bind the CA-signed certificate to the CSR. In this case, the external CA is the root CA, the Primary PAN is a subordinate CA of the external CA, and the PSNs are subordinate CAs of the primary PAN.

Procedure


Step 1

Choose Administration > System > Certificates > Certificate Signing Requests.

Step 2

Click Generate Certificate Signing Requests (CSR).

Step 3

Choose ISE Intermediate CA from the Certificate(s) will be used for drop-down list.

Step 4

Click Generate.

Step 5

Export the CSR, send it to the external CA, and obtain the CA-signed certificate.

Step 6

Import the root CA certificate from the external CA in to the Trusted Certificates store.

Step 7

Bind the CA-signed certificate with the CSR.


What to do next

If you have a secondary PAN in the deployment, obtain a backup of the Cisco ISE CA certificates and keys from the primary PAN and restore it on the secondary PAN. Server and root certificates are then automatically replicated in the secondary PAN. This ensures that the secondary PAN can function as subordinate CA of the external PKI in case of administration node failover.

Configure Cisco ISE to Use Certificates for Authenticating Personal Devices

You can configure Cisco ISE to issue and manage certificates for endpoints (personal devices) that connect to your network. You can use the internal Cisco ISE CA service to sign the certificate signing request from endpoints or forward the CSR to an external CA.

Before you begin

  • Obtain a backup of the Cisco ISE CA certificates and keys from the primary PAN and store them in a secure location for disaster recovery purposes.

Procedure


Step 1

Add Users to Employee User Group.

You can add users to the internal identity store or to an external identity store such as Microsoft Active Directory.

Step 2

Create a Certificate Authentication Profile for TLS-Based Authentication .

Step 3

Create an Identity Source Sequence for TLS-Based Authentication.

Step 4

Create a client provisioning policy:

  1. Configure Certificate Authority Settings

  2. Create a CA Template

  3. Create a Native Supplicant Profile to be Used in Client-Provisioning Policy

  4. Download Agent Resources from Cisco for Windows and MAC OS X Operating Systems

  5. Create Client-Provisioning Policy Rules for Apple iOS, Android, and MAC OS X Devices

Step 5

Configure the Dot1X Authentication Policy Rule for TLS-Based Authentication

Step 6

Configure authorization policy rules for TLS-based authentications.

  1. Create Authorization Profiles for Central Web Authentication and Supplicant-Provisioning Flows

  2. Create Authorization Policy Rules

When you use ECDHE-RSA based certificates, while connecting to the wireless SSID from your personal device, you will be prompted to enter the password a second time.


Add Users to Employee User Group

The following procedure describes how to add users to the Employee user group in the Cisco ISE identity store. If you are using an external identity store, make sure that you have an Employee user group to which you can add users.

Procedure

Step 1

Choose Administration > Identity Management > Identities > Users.

Step 2

Click Add.

Step 3

Enter the user details.

Step 4

In the Passwords section, choose the Login Password and TACACS+ Enable Password to set the access level to a network device.

Step 5

Select Employee from the User Group drop-down list.

All users who belong to the Employee user group share the same set of privileges.

Step 6

Click Submit.


What to do next
Create a Certificate Authentication Profile for TLS-Based Authentication

Create a Certificate Authentication Profile for TLS-Based Authentication

To use certificates for authenticating endpoints that connect to your network, you must define a certificate authentication profile in Cisco ISE or edit the default Preloaded_Certificate_Profile. The certificate authentication profile includes the certificate field that should be used as the principal username. For example, if the username is in the Common Name field, then you can define a certificate authentication profile with the Principal Username being the Subject - Common Name, which can be verified against the identity store.

Procedure

Step 1

Choose Administration > Identity Management > External Identity Sources > Certificate Authentication Profile.

Step 2

Enter a name for your certificate authentication profile. For example, CAP.

Step 3

Choose Subject - Common Name as the Principal Username X509 Attribute.

Step 4

Click Save.


What to do next
Create an Identity Source Sequence for TLS-Based Authentication

Create an Identity Source Sequence for TLS-Based Authentication

After you create a certificate authentication profile, you must add it to the identity source sequence so that Cisco ISE can obtain the attribute from the certificate and match it against the identity sources that you have defined in the identity source sequence.

Before you begin

Ensure that you have completed the following tasks:

  • Add users to the Employee user group.

  • Create a certificate authentication profile for certificate-based authentication.

Procedure

Step 1

Choose Administration > Identity Management > Identity Source Sequences.

Step 2

Click Add.

Step 3

Enter a name for the identity source sequence. For example, Dot1X.

Step 4

Check the Select Certificate Authentication Profile check box and select the certificate authentication profile that you created earlier, namely CAP.

Step 5

Move the identity source that contains your user information to the Selected list box in the Authentication Search List area.

You can add additional identity sources and Cisco ISE searches these data stores sequentially until a match is found.

Step 6

Click the Treat as if the user was not found and proceed to the next store in the sequence radio button.

Step 7

Click Submit.


What to do next
Configure Certificate Authority Settings

Configure Certificate Authority Settings

You must configure the external CA settings if you are going to use an external CA for signing the CSRs. The external CA settings was known as the SCEP RA profile in previous releases of Cisco ISE. If you are using the Cisco ISE CA, then you do not have to explicitly configure the CA settings. You can review the Internal CA settings at Administration > System > Certificates > Internal CA Settings.

Once users’ devices receive their validated certificate, they reside on the device as described in the following table.

Table 18. Device Certificate Location

Device

Certificate Storage Location

Access Method

iPhone/iPad

Standard certificate store

Settings > General > Profile

Android

Encrypted certificate store

Invisible to end users.

Note


Certificates can be removed using Settings > Location & Security > Clear Storage.

Windows

Standard certificate store

Launch mmc.exe from the /cmd prompt or view in the certificate snap-in.

Mac

Standard certificate store

Application > Utilities > Keychain Access

Before you begin

If you are going to use an external Certificate Authority (CA) for signing the certificate signing request (CSR), then you must have the URL of the external CA.

Procedure

Step 1

Choose Administration > System > Certificates > External CA Settings.

Step 2

Click Add.

Step 3

Enter a name for the external CA setting. For example, EXTERNAL_SCEP.

Step 4

Enter the external CA server URL in the URL text box.

Click Test Connection to check if the external CA is reachable. Click the + button to enter additional CA server URLs.

Step 5

Click Submit.


What to do next
Create a CA Template

Create a CA Template

The certificate template defines the SCEP RA profile that must be used (for the internal or external CA), Key Type, Key Size or Curve Type, Subject, Subject Alternative Name (SAN), validity period of the certificate, and the Extended Key Usage. This example assumes that you are going to use the internal Cisco ISE CA. For an external CA template, the validity period is determined by the external CA and you cannot specify it.

You can create a new CA template or edit the default certificate template, EAP_Authentication_Certificate_Template.

By default, the following CA templates are available in Cisco ISE:

  • CA_SERVICE_Certificate_Template—For other network services that use the ISE CA. For example, use this certificate template while configuring ISE to issue certificates for ASA VPN users.

  • EAP_Authentication_Certificate_Template—For EAP authentication.

  • pxGrid_Certificate_Template—For pxGrid controller while generating the certificate from the Certificate Provisioning Portal.


Note


Certificate templates that use the ECC key type can be used only with the internal Cisco ISE CA.


Before you begin

Ensure that you have configured the CA settings.

Procedure

Step 1

Choose Administration > System > CA Service > Internal CA Certificate Template.

Step 2

Enter a name for the internal CA template. For example, Internal_CA_Template.

Step 3

(Optional) Enter values for the Organizational Unit, Organization, City, State, and Country fields.

We do not support UTF-8 characters in the certificate template fields (Organizational Unit, Organization, City, State, and Country). Certificate provisioning fails if UTF-8 characters are used in the certificate template.

The username of the internal user generating the certificate is used as the Common Name of the certificate. Cisco ISE Internal CA does not support "+" or "*" characters in the Common Name field. Ensure that your username does not include "+" or "*" special characters.

Step 4

Specify the Subject Alternative Name (SAN) and the validity period of the certificate.

Step 5

Specify a Key Type. Choose RSA or ECC.

The following table lists the operating systems and versions that support ECC along with the curve types that are supported. If your devices are not running a supported operating system or on a supported version, you can use RSA-based certificates instead.

Operating System Supported Versions Supported Curve Types
Windows 8 and later P-256, P-384, and P-521
Android 4.4 and later

Note


Android 6.0 requires May 2016 patch to support ECC certificates.

All curve types (except Android 6.0, which does not support the P-192 curve type).

Windows 7 and Apple iOS do not natively support ECC for EAP-TLS authentication. This release of Cisco ISE does not support the use of ECC certificates on MAC OS X devices.

If the devices in your network run an operating system that is not supported (Windows 7, MAC OS X, or Apple iOS, we recommend that you choose RSA as the Key Type.

Step 6

(Applicable if you choose the RSA Key Type) Specify a key size. You must choose 1024 or a higher key size.

Step 7

(Applicable only if you choose the ECC Key Type) Specify the Curve Type. The default is P-384.

Step 8

Choose ISE Internal CA as the SCEP RA Profile.

Step 9

Enter the validity period in days. The default is 730 days. Valid range is between 1 and 730.

Step 10

Specify the Extended Key Usage. Check the Client Authentication check box if you want the certificate to be used for client authentication. Check the Server Authentication check box if you want the certificate to be used for server authentication.

Step 11

Click Submit.


The internal CA certificate template is created and will be used by the client provisioning policy.

What to do next

Create a Native Supplicant Profile to be Used in Client-Provisioning Policy

Internal CA Settings

The following table describes the fields in the internal CA Settings window. You can view the internal CA settings and disable the internal CA service from this window. To view this window, click the Menu icon () and choose Administration > System > Certificates > Certificate Authority > Internal CA Settings.

Table 19. Internal CA Settings
Field Name Usage Guidelines

Disable Certificate Authority

Click this button to disable the internal CA service.

Host Name

Host name of the Cisco ISE node that is running the CA service.

Personas

Cisco ISE node personas that are enabled on the node running the CA service. For example, Administration, Policy Service, etc.

Role(s)

The role(s) assumed by the Cisco ISE node running the CA service. For example, Standalone or Primary or Secondary.

CA, EST & OCSP Responder Status

Enabled or disabled

OCSP Responder URL

URL for Cisco ISE node to access the OCSP server.

SCEP URL

URL for the Cisco ISE node to access the SCEP server.

Create a Native Supplicant Profile to be Used in Client-Provisioning Policy

You can create native supplicant profiles to enable users to bring personal devices to your Corporate network. Cisco ISE uses different policy rules for different operating systems. Each client provisioning policy rule contains a native supplicant profile, which specifies which provisioning wizard is to be used for which operating system.

Before you begin
  • Configure the CA certificate template in Cisco ISE.

  • Open up TCP port 8905 and UDP port 8905 to enable client agents and supplicant provisioning wizard installation. For more information about port usage, see the "Cisco ISE Appliance Ports Reference" appendix in the Cisco Identity Services Engine Hardware Installation Guide.

Procedure

Step 1

Choose Policy > Policy Elements > Results > Client Provisioning > Resources.

Step 2

Choose Add > Native Supplicant Profile.

Step 3

Enter a name for the native supplicant profile. For example, EAP_TLS_INTERNAL.

Step 4

Choose ALL from the Operating System drop-down list.

Note


The MAC OS version 10.10 user should manually connect to the provisioned SSID for dual-SSID PEAP flow.

Step 5

Check the Wired or Wireless check box.

Step 6

Choose TLS from the Allowed Protocol drop-down list.

Step 7

Choose the CA certificate template that you created earlier.

Step 8

Click Submit.


What to do next
Download Agent Resources from Cisco for Windows and MAC OS X Operating Systems

Download Agent Resources from Cisco for Windows and MAC OS X Operating Systems

For Windows and MAC OS X operating systems, you must download the remote resources from the Cisco site.

Before you begin

Ensure that you are able to access the appropriate remote location to download client provisioning resources to Cisco ISE, by verifying that the proxy settings for your network are correctly configured.

Procedure

Step 1

Choose Policy > Policy Elements > Resources > Client Provisioning > Resources.

Step 2

Choose Add > Agent resources from Cisco site.

Step 3

Check the check boxes next to the Windows and MAC OS X packages. Be sure to include the latest versions.

Step 4

Click Save.


What to do next
Create Client-Provisioning Policy Rules for Apple iOS, Android, and MAC OS X Devices

Create Client-Provisioning Policy Rules for Apple iOS, Android, and MAC OS X Devices

Client provisioning resource policies determine which users receive which version (or versions) of resources (agents, agent compliance modules, and agent customization packages/profiles) from Cisco ISE upon login and user session initiation.

When you download the agent compliance module, it always overwrites the existing one, if any, available in the system.

To enable employees to bring iOS, Android, MAC OS X devices, you must create policy rules for each of these devices on the Client Provisioning Policy page.

Before you begin

You must have configured the required native supplicant profiles and downloaded the required agents from the Client Provisioning Policy pages.

Procedure

Step 1

Choose Policy > Client Provisioning.

Step 2

Create client provisioning policy rules for Apple iOS, Android, and MAC OS X devices.

Step 3

Click Save.


What to do next
Configure the Dot1X Authentication Policy Rule for TLS-Based Authentication

Configure the Dot1X Authentication Policy Rule for TLS-Based Authentication

This task shows how to update the Dot1X authentication policy rule for TLS-based authentications.

Before you begin

Ensure that you have the certificate authentication profile created for TLS-based authentication.

Procedure

Step 1

Choose Policy > Policy Sets.

Step 2

Click the arrow icon from the View column to open the Set view screen and view, manage, and update the authentication policy.

The default rule-based authentication policy includes a rule for Dot1X authentication.

Step 3

To edit the conditions for the Dot1X authentication policy rule, hover over the cell in the Conditions column and click . The Conditions Studio opens.

Step 4

From the Actions column in the Dot1X policy rule, click the cog icon and then from the drop-down menu, insert a new policy set by selecting any of the insert or duplicate options, as necessary.

A new row appears in the Policy Sets table.

Step 5

Enter a name for the rule. For example, eap-tls.

Step 6

From the Conditions column, click the (+) symbol.

Step 7

Create the required conditions in the Conditions Studio Page. In the Editor section, click the Click To Add an Attribute text box, and select the required Dictionary and Attribute (for example, Network Access:UserName Equals User1).

You can drag and drop a Library condition to the Click To Add An Attribute text box.

Step 8

Click Use.

Step 9

Leave the default rule as is.

Step 10

Click Save.


What to do next

Create Authorization Profiles for Central Web Authentication and Supplicant-Provisioning Flows

Create Authorization Profiles for Central Web Authentication and Supplicant-Provisioning Flows

You must define authorization profiles to determine the access that must be granted to the user after the certificate-based authentication is successful.

Before you begin

Ensure that you have configured the required access control lists (ACLs) on the wireless LAN controller (WLC). Refer to the TrustSec How-To Guide: Using Certificates for Differentiated Access for information on how to create the ACLs on the WLC.

This example assumes that you have created the following ACLs on the WLC.

  • NSP-ACL - For native supplicant provisioning

  • BLACKHOLE - For restricting access to block listed devices

  • NSP-ACL-Google - For provisioning Android devices

Procedure

Step 1

Choose Policy > Policy Elements > Results > Authorization > Authorization Profiles.

Step 2

Click Add to create a new authorization profile.

Step 3

Enter a name for the authorization profile.

Step 4

From the Access Type drop-down list, choose ACCESS_ACCEPT.

Step 5

Click Add to add the authorization profiles for central web authentication, central web authentication for Google Play, native supplicant provisioning, and native supplicant provisioning for Google.

Step 6

Click Save.


What to do next

Create Authorization Policy Rules

Create Authorization Policy Rules

Cisco ISE evaluates the authorization policy rules and grants the user access to the network resources based on the authorization profile specified in the policy rule.

Before you begin

Ensure that you have created the required authorization profiles.

Procedure

Step 1

Choose Policy > Policy Sets, and expand the policy set to view the authorization policy rules.

Step 2

Insert additional policy rules above the default rule.

Step 3

Click Save.


CA Service Policy Reference

This section provides reference information for the authorization and client provisioning policy rules that you must create before you can enable the Cisco ISE CA service.

Client-Provisioning Policy Rules for Certificate Services

This section lists the client provisioning policy rules that you must create while using the Cisco ISE certificate services. The following table provides the details.

Rule Name Identity Groups Operating Systems Other Conditions Results
iOS Any Apple iOS All Condition(s) EAP_TLS_INTERNAL (the native supplicant profile that you created earlier). If you are using an external CA, select the native supplicant profile that you have created for the external CA.
Android Any Android Condition(s) EAP_TLS_INTERNAL (the native supplicant profile that you created earlier). If you are using an external CA, select the native supplicant profile that you have created for the external CA.
MAC OS X Any MACOSX Condition(s) Under the Native Supplicant Configuration, specify the following:
  1. Config Wizard: Select the MAC OS X supplicant wizard that you downloaded from the Cisco site.
  2. Wizard Profile: Choose the EAP_TLS_INTERNAL native supplicant profile that you created earlier. If you are using an external CA, select the native supplicant profile that you have created for the external CA.

Authorization Profiles for Certificate Services

This section lists the authorization profiles that you must create for enabling certificate-based authentication in Cisco ISE. You must have already created the ACLs (NSP-ACL and NSP-ACL-Google) on the wireless LAN controller (WLC).

  • CWA - This profile is for devices that go through the central web authentication flow. Check the Web Authentication check box, choose Centralized from the drop-down list, and enter NSP-ACL in the ACL text box.

  • CWA_GooglePlay - This profile is for Android devices that go through the central web authentication flow. This profile enables Android devices to access Google Play Store and download the Cisco Network Setup Assistant. Check the Web Authentication check box, choose Centralized from the drop-down list, and enter NSP-ACL-Google in the ACL text box.

  • NSP - This profile is for non-Android devices that go through the supplicant provisioning flow. Check the Web Authentication check box, choose Supplicant Provisioning from the drop-down list, and enter NSP-ACL in the ACL text box.

  • NSP-Google - This profile is for Android devices that go through the supplicant provisioning flow. Check the Web Authentication check box, choose Supplicant Provisioning from the drop-down list, and enter NSP-ACL-Google in the ACL text box.

Review the default Blackhole_Wireless_Access authorization profile. The Advanced Attributes Settings should be:
  • Cisco:cisco-av-pair = url-redirect=https://ip:port/blockedportal/gateway?portal=PortalID

  • Cisco:cisco-av-pair = url-redirect-acl=BLACKHOLE

Authorization Policy Rules for Certificate Services

This section lists the authorization policy rules that you must create while enabling the Cisco ISE CA service.

  • Corporate Assets-This rule is for corporate devices that connect to the corporate wireless SSID using 802.1X and MSCHAPV2 protocol.
  • Android_SingleSSID-This rule is for Android devices that access the Google Play Store to download the Cisco Network Setup Assistant for provisioning. This rule is specific to single SSID setup.
  • Android_DualSSID-This rule is for Android devices that access the Google Play Store to download the Cisco Network Setup Assistant for provisioning. This rule is specific to dual SSID setup.
  • CWA-This rule is for devices that go through the central web authentication flow.
  • NSP-This rule is for devices that go through the native supplicant provisioning flow using a certificate for EAP-TLS authentication.
  • EAP-TLS-This rule is for devices that have completed the supplicant provisioning flow and are provisioned with a certificate. They will be given access to the network.

The following table lists the attributes and values that you must choose while configuring authorization policy rules for the Cisco ISE CA service. This example assumes that you have the corresponding authorization profiles configured in Cisco ISE as well.

Rule Name Conditions Permissions (Authorization Profiles to be Applied)
Corporate Assets Corp_Assets AND (Wireless 802.1X AND Network Access:AuthenticationMethod EQUALS MSCHAPV2) PermitAccess
Android_SingleSSID (Wireless 802.1X AND Network Access:AuthenticationMethod EQUALS MSCHAPV2 AND Session:Device-OS EQUALS Android) NSP_Google
Android_DualSSID (Wireless_MAB AND Session:Device-OS EQUALS Android) CWA_GooglePlay
CWA Wireless_MAB CWA
NSP (Wireless 802.1X AND Network Access:AuthenticationMethod EQUALS MSCHAPV2) NSP
EAP-TLS (Wireless 802.1X AND Network Access:AuthenticationMethod EQUALS x509_PKI PermitAccess

Cisco ISE CA Issues Certificates to ASA VPN Users

ISE CA issues certificates to client machines connecting over ASA VPN. Using this feature, you can automatically provision certificates to end devices that connect over ASA VPN.

Cisco ISE uses the Simple Certificate Enrollment Protocol (SCEP) for enrollment and to provision certificates to the client machines. The AnyConnect client sends the SCEP request to the ASA over an HTTPS connection. The ASA evaluates the request and enforces policies before it relays the request to Cisco ISE over an HTTP connection established between Cisco ISE and ASA. The response from the Cisco ISE CA is relayed back to the client. The ASA cannot read the contents of the SCEP message and functions as a proxy for the Cisco ISE CA. The Cisco ISE CA decrypts the SCEP message from the client and sends the response in an encrypted form.

The ISE CA SCEP URL is http://<IP Address or FQDN of ISE CA server>:9090/auth/caservice/pkiclient.exe. If you are using FQDN of the ISE node, the DNS server connected to ASA must be able to resolve the FQDN.

You can configure certificate renewal before expiration in the AnyConnect client profile. If the certificate has already expired, the renewal flow is similar to a new enrollment.

Supported versions include:

  • Cisco ASA 5500 Series Adaptive Security Appliances that run software version 8.x

  • Cisco AnyConnect VPN version 2.4 or later

VPN Connection Certificate-Provisioning Flow

Figure 9. Certificate Provisioning for ASA VPN Users

VPN connection certificate provisioning flow

  1. The user initiates a VPN connection.

  2. The AnyConnect client scans the client machine and sends the attributes such as the unique device identifier (for example, IMEI) to the ASA.

  3. The ASA requests certificate-based authentication from the client. The authentication fails because there is no certificate.

  4. The ASA proceeds to primary user authentication (AAA) using the username/password and passes the information to the authentication server (ISE).

    1. If authentication fails, the connection is terminated immediately.

    2. If authentication passes, limited access is granted. You can configure dynamic access policies (DAP) for client machines that request a certificate using the aaa.cisco.sceprequired attribute. You can set the value for this attribute to “true” and apply ACLs and web ACLs.

  5. The VPN connection is established after the relevant policies and ACLs are applied. The client starts key generation for SCEP only after AAA authentication succeeds and the VPN connection is established.

  6. The client starts the SCEP enrollment and sends SCEP requests to ASA over HTTP.

  7. ASA looks up the session information of the request and relays the request to ISE CA, if the session is allowed for enrollment.

  8. ASA relays the response from ISE CA back to the client.

  9. If enrollment succeeds, the client presents a configurable message to the user and disconnects the VPN session.

  10. The user can again authenticate using the certificate and a normal VPN connection is established.

Configure Cisco ISE CA to Issue Certificates to ASA VPN Users

You must perform the following configurations on Cisco ISE and ASA to provision certificates to ASA VPN users.

Before you begin
  • Ensure that the VPN user account is present in Cisco ISE internal or external identity source.

  • Ensure that the ASA and the Cisco ISE Policy Service Nodes are synchronized using the same NTP server.

Procedure

Step 1

Define the ASA as a network access device in Cisco ISE. See Add a Network Device in Cisco ISE for information on how to add ASA as a network device.

Step 2

Configure Group Policy in ASA.

Step 3

Configure AnyConnect Connection Profile for SCEP Enrollment.

Step 4

Configure a VPN Client Profile in ASDM.

Step 5

Import ISE Server Certificates in to ASA.


Add a Network Device in Cisco ISE

You can add a network device in Cisco ISE or use the default network device.

You can also add a network device in the Network Devices (Work Centers > Device Administration > Network Resources > Network Devices) window.

Before you begin
The AAA function must be enabled on the network device to be added. See the section “Command to Enable AAA Functions” in chapter the “Integrations” in the Cisco ISE Administrator Guide for your release.
Procedure

Step 1

In the Cisco ISE GUI, click the Menu icon () and choose Administration > Network Resources > Network Devices.

Step 2

Click Add.

Step 3

Enter the corresponding values in the Name, Description, and IP Address fields.

Step 4

Choose the required values from the Device Profile, Model Name, Software Version, and Network Device Group drop-down lists.

Step 5

(Optional) Check the RADIUS Authentication Settings check box to configure the RADIUS protocol for authentication.

Step 6

(Optional) Check the TACACS Authentication Settings check box to configure the TACACS protocol for authentication.

Step 7

(Optional) Check the SNMP Settings check box to configure SNMP for the Cisco ISE profiling service to collect information from the network device.

Step 8

(Optional) Check the Advanced Trustsec Settings check box to configure a Cisco TrustSec-enabled device.

Step 9

Click Submit.


Configure Group Policy in ASA

Configure a group policy in ASA to define the ISE CA URL for AnyConnect to forward the SCEP enrollment request.

Procedure

Step 1

Log in to Cisco ASA ASDM.

Step 2

From the Remote Access VPN navigation pane on the left, click Group Policies.

Step 3

Click Add to create a group policy.

Step 4

Enter a name for the group policy. For example, ISE_CA_SCEP.

Step 5

In the SCEP forwarding URL field, uncheck the Inherit check box and enter the ISE SCEP URL with port number.

If you are using the FQDN of the ISE node, the DNS server connected to ASA must be able to resolve the FQDN of the ISE node.

Example:
http://ise01.cisco.com:9090/auth/caservice/pkiclient.exe.

Step 6

Click OK to save the group policy.


Configure AnyConnect Connection Profile for SCEP Enrollment

Configure an AnyConnect connection profile in ASA to specify the ISE CA server, authentication method, and ISE CA SCEP URL.

Procedure

Step 1

Log in to Cisco ASA ASDM.

Step 2

From the Remote Access VPN navigation pane on the left, click AnyConnect Connection Profiles.

Step 3

Click Add to create a connection profile.

Step 4

Enter a name for the connection profile. For example, Cert-Group.

Step 5

(Optional) Enter a description for the connection profile in the Aliases field. For example, SCEP-Call-ASA.

Step 6

In the Authentication area, specify the following:

  • Method—Click the Both radio button
  • AAA Server Group—Click Manage and choose your ISE server

Step 7

In the Client Address Assignment area, select the DHCP server and client address pools to use.

Step 8

In the Default Group Policy area, click Manage and select the Group Policy that you have created with the ISE SCEP URL and port number.

Example:
For example, ISE_CA_SCEP.

Step 9

Choose Advanced > General and check the Enable Simple Certificate Enrollment Protocol check box for this connection profile.

Step 10

Click OK.

Your AnyConnect connection profile is created.

Configure a VPN Client Profile in ASDM

Configure a VPN client profile in AnyConnect for SCEP enrollment.

Procedure

Step 1

Log in to Cisco ASA ASDM.

Step 2

From the Remote Access VPN navigation pane on the left, click AnyConnect Client Profile.

Step 3

Select the client profile that you want to use and click Edit.

Step 4

Click Certificate Enrollment from the Profile navigation pane on the left.

Step 5

Check the Certificate Enrollment check box.

Step 6

Enter the values in the following fields:

  • Certificate Expiration Threshold—The number of days before the certificate expiration date that AnyConnect warns users their certificate is going to expire (not supported when SCEP is enabled). The default is zero (no warning displayed). The range of values is zero to 180 days.
  • Automatic SCEP Host—Enter the host name and connection profile (tunnel group) of the ASA that has SCEP certificate retrieval configured. Enter a Fully Qualified Domain Name (FQDN) or a connection profile name of the ASA. For example, the hostname asa.cisco.com and the connection profile name Cert_Group.
  • CA URL—Identifies the SCEP CA server. Enter the FQDN or IP Address of the ISE server. For example, http://ise01.cisco.com:9090/auth/caservice/pkiclient.exe.

Step 7

Enter values for the Certificate Contents that define how the client requests the contents of the certificate.

Step 8

Click OK.

The AnyConnect client profile is created. Refer to the Cisco AnyConnect Secure Mobility Client for your version of AnyConnect for additional information.

Import Cisco ISE CA Certificates into ASA

Import the Cisco ISE internal CA certificates into the ASA.

Before you begin

Export the Cisco ISE internal CA certificates. Go to Administration > System > Certificates > Certificate Authority > Certificate Authority Certificates. Check the check boxes next to Certificate Services Node CA and Certificate Services Root CA certificates and export them, one certificate at a time.

Procedure

Step 1

Log in to Cisco ASA ASDM.

Step 2

From the Remote Access VPN navigation pane on the left, choose Certificate Management > CA Certificates.

Step 3

Click Add and select the Cisco ISE internal CA certificates to import them in to ASA.


Revoke an Endpoint Certificate

If you need to revoke a certificate issued to an employee's personal device, you can revoke it from the Endpoint Certificates page. For example, if an employee's device has been stolen or lost, you can log in to the Cisco ISE Admin portal and revoke the certificate issued to that device from the Endpoint Certificates page. You can filter the data on this page based on the Friendly Name, Device Unique Id, or Serial Number.

If a PSN (sub CA) is compromised, you can revoke all certificates issued by that PSN by filtering on the Issued By field from the Endpoint Certificates page.

When you revoke a certificate issued to an employee, if there is an active session (authenticated using that certificate), the session is terminated immediately. Revoking a certificate ensures that unauthorized users do not have any access to resources as soon as the certificate is revoked.

Procedure


Step 1

Choose Administration > System > Certificates > Certificate Authority > Issued Certificates.

Step 2

Check the check box next to the endpoint certificate that you want to revoke and click Revoke.

You can search for the certificate based on the Friendly Name and Device Type.

Step 3

Enter the reason for revoking the certificate.

Step 4

Click Yes.


OCSP Services

The Online Certificate Status Protocol (OCSP) is a protocol that is used for checking the status of x.509 digital certificates. This protocol is an alternative to the Certificate Revocation List (CRL) and addresses issues that result in handling CRLs.

Cisco ISE has the capability to communicate with OCSP servers over HTTP to validate the status of certificates in authentications. The OCSP configuration is configured in a reusable configuration object that can be referenced from any certificate authority (CA) certificate that is configured in Cisco ISE.

You can configure CRL and/or OCSP verification per CA. If both are selected, then Cisco ISE first performs verification over OCSP. If a communication problem is detected with both the primary and secondary OCSP servers, or if an unknown status is returned for a given certificate, Cisco ISE switches to checking the CRL.

Cisco ISE CA Service Online Certificate Status Protocol Responder

The Cisco ISE CA OCSP responder is a server that communicates with OCSP clients. The OCSP clients for the Cisco ISE CA include the internal Cisco ISE OCSP client and OCSP clients on the Adaptive Security Appliance (ASA). The OCSP clients should communicate with the OCSP responder using the OCSP request/response structure defined in RFC 2560, 5019.

The Cisco ISE CA issues a certificate to the OCSP responder. The OCSP responder listens on port 2560 for any incoming requests. This port is configured to allow only OCSP traffic.

The OCSP responder accepts a request that follows the structure defined in RFC 2560, 5019. Nonce extension is supported in the OCSP request. The OCSP responder obtains the status of the certificate and creates an OCSP response and signs it. The OCSP response is not cached on the OCSP responder, although you can cache the OCSP response on the client for a maximum period of 24 hours. The OCSP client should validate the signature in the OCSP response.

The self-signed CA certificate (or the intermediate CA certificate if ISE acts as an intermediate CA of an external CA) on the PAN issues the OCSP responder certificate. This CA certificate on the PAN issues the OCSP certificates on the PAN and PSNs. This self-signed CA certificate is also the root certificate for the entire deployment. All the OCSP certificates across the deployment are placed in the Trusted Certificates Store for ISE to validate any response signed using these certificates.


Note


Cisco ISE receives from OCSP responder servers a thisUpdate value, which indicates the time since the last certificate revocation. If the thisUpdate value is greater than 7 days, the OCSP certificate verification fails in Cisco ISE.


OCSP Certificate Status Values

OCSP services return the following values for a given certificate request:

  • Good—Indicates a positive response to the status inquiry. It means that the certificate is not revoked, and the state is good only until the next time interval (time to live) value.

  • Revoked—The certificate was revoked.

  • Unknown—The certificate status is unknown. OCSP service returns this value if the certificate was not issued by the CA of this OCSP responder.

  • Error—No response was received for the OCSP request.

OCSP High Availability

Cisco ISE has the capability to configure up to two OCSP servers per CA, and they are called primary and secondary OCSP servers. Each OCSP server configuration contains the following parameters:

  • URL—The OCSP server URL.

  • Nonce—A random number that is sent in the request. This option ensures that old communications cannot be reused in replay attacks.

  • Validate response—Cisco ISE validates the response signature that is received from the OCSP server.

In case of timeout (which is 5 seconds), when Cisco ISE communicates with the primary OCSP server, it switches to the secondary OCSP server.

Cisco ISE uses the secondary OCSP server for a configurable amount of time before attempting to use the primary server again.

OCSP Failures

The three general OCSP failure scenarios are as follows:

  • Failed OCSP cache or OCSP client side (Cisco ISE) failures.

  • Failed OCSP responder scenarios, for example:

    The first primary OCSP responder not responding, and the secondary OCSP responder responding to the Cisco ISE OCSP request.

    Errors or responses not received from Cisco ISE OCSP requests.

    An OCSP responder may not provide a response to the Cisco ISE OCSP request or it may return an OCSP Response Status as not successful. OCSP Response Status values can be as follows:

    • tryLater

    • signRequired

    • unauthorized

    • internalError

    • malformedRequest

      There are many date-time checks, signature validity checks and so on, in the OCSP request. For more details, refer to RFC 2560 X.509 Internet Public Key Infrastructure Online Certificate Status
Protocol - OCSP which describes all the possible states, including the error states.

  • Failed OCSP reports

Add OCSP Client Profiles

You can use the OCSP Client Profile page to add new OCSP client profiles to Cisco ISE.

Before you begin

If the Certificate Authority (CA) is running the OCSP service on a nonstandard port (other than 80 or 443), you must configure ACLs on the switch to allow for communication between Cisco ISE and the CA on that port. For example:

permit tcp <source ip> <destination ip> eq <OCSP port number>

Procedure


Step 1

Choose Administration > System > Certificates > Certificate Management > OCSP Client Profile.

Step 2

Enter the values to add an OCSP Client Profile.

Step 3

Click Submit.


OCSP Client Profile Settings

The following table describes the fields on the OCSP Client Profile window, which you can use to configure OCSP client profiles. To view this window, click the Menu icon () and choose Administration > Certificates > Certificate Management > OCSP Client Profile.

Table 20. OCSP Client Profile Settings
Field Name Usage Guidelines

Name

Name of the OCSP Client Profile.

Description

Enter an optional description.

Configure OCSP Responder

Enable Secondary Server

Check this check box to enable a secondary OCSP server for high availability.

Always Access Primary Server First

Use this option to check the primary server before trying to move to the secondary server. Even if the primary was checked earlier and found to be unresponsive, Cisco ISE will try to send a request to the primary server before moving to the secondary server.

Fallback to Primary Server After Interval n Minutes

Use this option when you want Cisco ISE to move to the secondary server and then fall back to the primary server again. In this case, all other requests are skipped, and the secondary server is used for the amount of time that is configured in the text box. The allowed time range is 1 to 999 minutes.

Primary and Secondary Servers

URL

Enter the URL of the primary and/or secondary OCSP server.

Enable Nonce Extension Support

You can configure a nonce to be sent as part of the OCSP request. The Nonce includes a pseudo-random number in the OCSP request. It is verified that the number that is received in the response is the same as the number that is included in the request. This option ensures that old communications cannot be reused in replay attacks.

Validate Response Signature

The OCSP responder signs the response with one of the following certificates:

  • The CA certificate

  • A certificate different from the CA certificate

    In order for Cisco ISE to validate the response signature, the OCSP responder needs to send the response along with the certificate, otherwise the response verification fails, and the status of the certificate cannot be relied on. According to the RFC, OCSP can sign the response using different certificates. This is true as long as OCSP sends the certificate that signed the response for Cisco ISE to validate it. If OCSP signs the response with a different certificate that is not configured in Cisco ISE, the response verification will fail.

Use OCSP URLs specified in Authority Information Access (AIA)

Click the radio button to use the OCSP URLs specified in the Authority Information Access extension.

Response Cache

Cache Entry Time To Live n Minutes

Enter the time in minutes after which the cache entry expires. Each response from the OCSP server holds a nextUpdate value. This value shows when the status of the certificate will be updated next on the server. When the OCSP response is cached, the two values (one from the configuration and another from response) are compared, and the response is cached for the period of time that is the lowest value of these two. If the nextUpdate value is 0, the response is not cached at all. Cisco ISE will cache OCSP responses for the configured time. The cache is not replicated or persistent, so when Cisco ISE restarts, the cache is cleared. The OCSP cache is used in order to maintain the OCSP responses and for the following reasons:
  • To reduce network traffic and load from the OCSP servers on an already-known certificate

  • To increase the performance of Cisco ISE by caching already-known certificate statuses

By default, the cache is set to 2 minutes for the internal CA OCSP client profile. If an endpoint authenticates a second time within 2 minutes of the first authentication, the OCSP cache is used and the OCSP responder is not queried. If the endpoint certificate has been revoked within the cache period, the previous OCSP status of Good will be used and the authentication succeeds. Setting the cache to 0 minutes prevents any responses from being cached. This option improves security, but decreases authentication performance.

Clear Cache

Click Clear Cache to clear entries of all the certificate authorities that are connected to the OCSP service.

In a deployment, Clear Cache interacts with all the nodes and performs the operation. This mechanism updates every node in the deployment.

OCSP Statistics Counters

Cisco ISE uses OCSP counters to log and monitor the data and health of the OCSP servers. Logging occurs every five minutes. Cisco ISE sends a syslog message to the Monitoring node and it is preserved in the local store. The local store contains data from the previous five minutes. After Cisco ISE sends the syslog message, the counters are recalculated for the next interval. This means, after five minutes, a new five-minute window interval starts again.

The following table lists the OCSP syslog messages and their descriptions.

Table 21. OCSP Syslog Messages

Message

Description

OCSPPrimaryNotResponsiveCount

The number of nonresponsive primary requests

OCSPSecondaryNotResponsiveCount

The number of nonresponsive secondary requests

OCSPPrimaryCertsGoodCount

The number of ‘good’ certificates that are returned for a given CA using the primary OCSP server

OCSPSecondaryCertsGoodCount

The number of ‘good’ statuses that are returned for a given CA using the primary OCSP server

OCSPPrimaryCertsRevokedCount

The number of ‘revoked’ statuses that are returned for a given CA using the primary OCSP server

OCSPSecondaryCertsRevokedCount

The number of ‘revoked’ statuses that are returned for a given CA using the secondary OCSP server

OCSPPrimaryCertsUnknownCount

The number of ‘Unknown’ statuses that are returned for a given CA using the primary OCSP server

OCSPSecondaryCertsUnknownCount

The number of ‘Unknown’ statuses that are returned for a given CA using the secondary OCSP server

OCSPPrimaryCertsFoundCount

The number of certificates that were found in cache from a primary origin

OCSPSecondaryCertsFoundCount

The number of certificates that were found in cache from a secondary origin

ClearCacheInvokedCount

How many times clear cache was triggered since the interval

OCSPCertsCleanedUpCount

How many cached entries were cleaned since the t interval

NumOfCertsFoundInCache

Number of the fulfilled requests from the cache

OCSPCacheCertsCount

Number of certificates that were found in the OCSP cache

Configure Admin Access Policies

An RBAC policy is represented in an if-then format, where "if" is the RBAC Admin Group value and "then" is the RBAC Permissions value.

The RBAC policies window (click the Menu icon () and choose Administration > System > Admin Access > Authorization > RBAC Policy ) contains a list of default policies. You cannot edit or delete these default policies. However, you can edit the data access permissions for the Read-Only Admin policy. The RBAC policies page also allows you to create custom RBAC policies for an admin group specifically for your work place, and apply to personalized admin groups.

When you assign limited menu access, make sure that the data access permissions allow the administrator to access the data that is required to use the specified menus. For example, if you give menu access to the MyDevices portal, but don't allow data access to Endpoint Identity Groups, then that administrator cannot modify the portal.


Note


Admin users can move endpoint MAC addresses from the Endpoint Identity Groups they have read-only access to, to the Endpoint Identity Groups they have full access to. The other way around is not possible.


Before you begin

  • Create all the admin groups for which you want to define the role-based access control (RBAC) policies.

  • Ensure that these admin groups are mapped to individual admin users.

  • Ensure that you have configured the RBAC permissions such as menu access and data access permissions.

Procedure


Step 1

Choose Administration > System > Admin Access > Authorization > RBAC Policy.

The RBAC Policies page contains a set of ready-to-use predefined policies for default admin groups. You cannot edit or delete these default policies. However, you can edit the data access permissions for the default Read-Only Admin policy.

Step 2

Click Actions next to any of the default RBAC policy rule.

Here, you can insert new RBAC policies, duplicate an existing RBAC policy, and delete an existing RBAC policy.

Step 3

Click Insert new policy.

Step 4

Enter values for the Rule Name, RBAC Group(s), and Permissions fields.

You cannot select multiple menu access and data access permissions when creating an RBAC policy.

Step 5

Click Save.


Administrator Access Settings

Cisco ISE allows you to define some rules for administrator accounts to enhance security. You can restrict access to the management interfaces, force administrators to use strong passwords, regularly change their passwords, and so on. The password policy that you define in the Administrator Account Settings in Cisco ISE applies to all administrator accounts.

Cisco ISE supports administrator passwords with UTF-8 characters.

Configure Maximum Number of Concurrent Administrative Sessions and Login Banners

You can configure the maximum number of concurrent administrative GUI or CLI (SSH) sessions and login banners that help and guide administrators who access your administrative web or CLI interface. You can configure login banners that appear before and after an administrator logs in. By default, these login banners are disabled. However, you cannot configure the maximum number of concurrent sessions for individual administrator accounts.

Before you begin

To perform the following task, you must be a Super Admin or System Admin.

Procedure


Step 1

Choose Administration > System > Admin Access > Settings > Access > Session.

Step 2

Enter the maximum number of concurrent administrative sessions that you want to allow through the GUI and CLI interfaces. The valid range for concurrent administrative GUI sessions is from 1 to 20. The valid range for concurrent administrative CLI sessions is 1 to 10.

Step 3

If you want Cisco ISE to display a message before an administrator logs in, check the Pre-login banner check box and enter your message in the text box.

Step 4

If you want Cisco ISE to display a message after an administrator logs in, check the Post-login banner check box and enter your message in the text box.

Step 5

Click Save.

Note


The character limit is set at 1500 for the Pre-login banner and 3000 for the Post-login banner. All characters except % and < are supported. For login banner installation through CLI, the maximum length of the file name used is 256 characters.


Allow Administrative Access to Cisco ISE from Select IP Addresses

Cisco ISE allows you to configure a list of IP addresses from which administrators can access the Cisco ISE management interfaces.

The administrator access control settings are only applicable to Cisco ISE nodes that assume the Administration, Policy Service, or Monitoring personas. These restrictions are replicated from the primary to the secondary nodes.

Before you begin

To perform the following task, you must be a Super Admin or System Admin.

Procedure


Step 1

In the Cisco ISE GUI, click the Menu icon () and choose Administration > System > Admin Access > Settings > Access > IP Access.

Step 2

Click the Allow only Listed IP addresses to Connect radio button.

Note


Connection on Port 161 (SNMP) is used for administrative access. However, when IP access restrictions are configured, the snmpwalk fails if the node from which it was performed is not configured for administrative access.

Step 3

In the Configure IP List for Access Restriction area, click Add.

Step 4

In the Add IP CIDR dialog box, enter the IP addresses in the classless interdomain routing (CIDR) format in the IP Address field.

Note


This IP address can be an IPv4 or an IPv6 address. You can configure multiple IPv6 addresses for a Cisco ISE node.

Step 5

Enter the subnet mask in the Netmask in CIDR format field.

Step 6

Click OK.

Repeat steps 4 to 7 to add more IP address ranges to this list.

Step 7

Click Save to save the changes.

Step 8

Click Reset to refresh the IP Access window.


Allow Access to MnT Nodes in Cisco ISE

Cisco ISE allows you the option either to allow only the nodes within the deployment to send logs and alarms to MnT nodes, or to make no restrictions.

Before you begin

To perform the following task, you must be a Super Admin or System Admin.

Procedure


Step 1

From the Cisco ISE home page, choose Administration > System > Admin Access > Settings > Access.

Step 2

Click the MnT Access tab.

Step 3

To allow nodes or entities either within the deployment or outside the deployment to send syslogs to MnT, click the Allow any IP address to connect to MnT radio button. To allow only nodes or entities within the deployment to send syslogs to MnT, click the Allow only the nodes in the deployment to connect to MnT radio button.

Note


For ISE 2.6 P2 and later, Use ISE Messaging Service for UDP Syslogs delivery to MnT is turned on by default which doesn’t allow syslogs coming from any other entities outside of deployment.


Configure a Password Policy for Administrator Accounts

Cisco ISE also allows you to create a password policy for administrator accounts to enhance security. You can define whether you want a password-based or client certificate-based administrator authentication. The password policy that you define here is applied to all the administrator accounts in Cisco ISE.


Note


  • Email notifications for internal admin users are sent to root@host. You cannot configure the email address, and many SMTP servers reject this email.

    Follow open defect CSCui5583, which is an enhancement to allow you to change the email address.

  • Cisco ISE supports administrator passwords with UTF-8 characters.


Before you begin

  • To perform the following task, you must be a Super Admin or System Admin.

  • Turn off the automatic failover configuration, if this is enabled in your deployment. See Support for Automatic Failover for the Administration Node

    When you change the authentication method, you restart the application server processes. There might be a delay while these services restart. Due to this delay in restart of services, automatic failover of secondary administration node might get initiated.

Procedure


Step 1

In the Cisco ISE GUI, click the Menu icon () and choose Administration > System > Admin Access > Authentication.

Step 2

Click the radio button for one of the following authentication methods:

  • Password Based: Choose this option to use the standard user ID and password credentials for administrator logins. Choose Internal or External from the Identity Source drop-down list.

    Note


    If you have configured an external identity source such as LDAP and want to use that as your authentication source to grant access to the admin user, you must select that particular identity source from the Identity Source list box.

  • Client Certificate Based: Choose this option to specify a certificate-based policy. From the Certificate Authentication Profile drop-down list, choose an existing authentication profile. Choose the required value from the Identity Source drop-down list.

Step 3

Click the Password Policy tab and enter the required values to configure the Cisco ISE GUI and CLI password requirements.

Step 4

Click Save to save the administrator password policy.

Note


If you use an external identity store to authenticate administrators at login, note that even if this setting is configured for the password policy applied to the administrator profile, the external identity store will still validate the administrator’s username and password.


Configure Account Disable Policy for Administrator Accounts

Cisco ISE allows you to disable an administrator account if the administrator account is not authenticated for the configured consecutive number of days.

Procedure


Step 1

In the Cisco ISE GUI, click the Menu icon () and choose Administration > System > Admin Access > Authentication > Account Disable Policy.

Step 2

Check the Disable account after n days of inactivity check box, and enter the number of days in the corresponding field.

This option allows you to disable the administrator account if the administrator account was inactive for the specified number of days. However, you can exclude individual administrator accounts from this account disable policy using the Inactive Account Never Disabled option in the Administration > System > Admin Access > Administrators > Admin Users window.

Step 3

Click Save to configure the global account disable policy for administrators.


Configure Lock or Suspend Settings for Administrator Accounts

Cisco ISE allows you to lock or suspend administrator accounts (including password-based internal administrator accounts and certificate-based administrator accounts) that have more than a specified number of failed login attempts.

Procedure


Step 1

In the Cisco ISE GUI, click the Menu icon () and choose Administration > System > Admin Access > Authentication > Lock/Suspend Settings.

Step 2

Check the Suspend Or Lock Account With Incorrect Login Attempts check box and enter the number of failed attempts after which action should be taken. The valid range is from 3 through 20. Click the radio button for one of the following options:

  • Suspend Account For n Minutes: Choose this option to suspend any account that exceeds a specified number of incorrect login attempts. The valid range is from 15 through 1440.
  • Lock Account: Choose this option to lock an account that exceeds a specified number of incorrect login attempts.

You can enter a custom email remediation message, such as asking the end user to contact the helpdesk to unlock the account. You can also unlock all locked accounts by disabling and then enabling the Suspend Or Lock Account With Incorrect Login Attempts option.


Configure Session Timeout for Administrators

Cisco ISE allows you to determine the length of time an administration GUI session can be inactive and still remain connected. You can specify a time in minutes after which Cisco ISE logs out the administrator. After a session timeout, the administrator must log in again to access the Cisco ISE Admin portal.

Before you begin

To perform the following task, you must be a Super Admin or System Admin.

Procedure


Step 1

Choose Administration > System > Admin Access > Settings > Session > Session Timeout.

Step 2

Enter the time in minutes that you want Cisco ISE to wait before it logs out the administrator if there is no activity. The default value is 60 minutes. The valid range is from 6 to 100 minutes.

Step 3

Click Save.


Terminate an Active Administrative Session

Cisco ISE displays all active administrative sessions from which you can select any session and terminate at any point of time, if a need to do so arises. The maximum number of concurrent administrative GUI sessions is 20. If the maximum number of GUI sessions is reached, an administrator who belongs to the super admin group can log in and terminate some of the sessions.

Before you begin

To perform the following task, you must be a Super Admin.

Procedure


Step 1

Choose Administration > System > Admin Access > Settings > Session > Session Info.

Step 2

Check the check box next to the session ID that you want to terminate and click Invalidate.


Change Administrator Name

Cisco ISE allows you to change your username from the Cisco ISE GUI.

Before you begin

To perform the following task, you must be a Super Admin or System Admin.

Procedure


Step 1

Log in to the Cisco ISE administration portal.

Step 2

Click the Gear icon () at the upper right corner of the Cisco ISE GUI, and choose Account Settings from the drop-down list.

Step 3

Enter the new username in the Admin User dialog box that is displayed.

Step 4

Edit any other details about your account that you want to change.

Step 5

Click Save.


Admin Access Settings

These sections enable you to configure access settings for administrators.

Administrator Password Policy Settings

The following table describes the fields in the Password Policy tab that you can use to define a criteria that administrator passwords should meet. To view this window, click the Menu icon () and choose Administration > System > Admin Access > Authentication > Password Policy.

Table 22. Administrator Password Policy Settings

Field Name

Usage Guidelines

Minimum Length

Specify the minimum length of the password (in characters). The default is six characters.

Password must not contain

Admin name or its characters in reverse order: Check this check box to restrict the use of the administrator username or its characters in reverse order as the password.

Cisco or its characters in reverse order: Check this check box to restrict the use of the word "Cisco" or its characters in the reverse order as the password.

This word or its characters in reverse order: Check this check box to restrict the use of any word that you define or its characters in the reverse order as the password.

Repeated characters four or more times consecutively: Check this check box to restrict the use of repeated characters four or more times consecutively as the password.

Dictionary words, their characters in reverse order, or their letters replaced with other characters: Check this check box to restrict the use of dictionary words, their characters in reverse order, or their letters replaced with other characters, as the password.

Substitution of $ for s, @ for a, 0 for o, 1 for l, ! for i, 3 for e, and so on, is not permitted. For example, Pa$$w0rd is not permitted.

  • Default Dictionary: Choose this option to use the default Linux dictionary in Cisco ISE. The default dictionary contains approximately 480,000 English words.

    This option is selected by default.

  • Custom Dictionary: Choose this option to use your customized dictionary. Click Choose File to select a custom dictionary file. The text file must comprise newline-delimited (JSON format) words, .dic extension, and a size less than 20 MB.

Password must contain at least one character of each of the selected types

Check the check box for the type of characters an administrator's password must contain. Choose one or more of the following options:

  • Lowercase alphabetic characters

  • Uppercase alphabetic characters

  • Numeric characters

  • Non-alphanumeric characters

Password History

Specify the number of previous passwords from which the new password must be different, to prevent the repeated use of the same password. Check the Password must be different from the previous nversions check box, and enter the number in the corresponding field.

Enter the number of days before which you cannot reuse a password. Check the Cannot reuse password within n days check box, and enter the number in the corresponding field.

Password Lifetime

Check the check boxes for the following options to force users to change passwords after a specified time period:

  • Administrator passwords expire n days after creation or last change: Time (in days) before the administrator account is disabled if the password is not changed. The valid range is 1 to 3650 days.

  • Send an email reminder to administrators n days prior to password expiration: Time (in days) before which administrators are reminded that their password will expire. The valid range is 1 to 3650 days.

Display Network Device-Sensitive Data

Require Admin Password

Check this check box if you want the admin user to enter the login password to view network device-sensitive data such as shared secrets and passwords.

Password cached for n Minutes

The password that is entered by the admin user is cached for this time period. The admin user will not be prompted to enter the password again during this period to view the network device-sensitive data. The valid range is from 1 to 60 minutes.

Session Timeout and Session Information Settings

The following table describes the fields in the Session window that you can use to define session timeout and terminate an active administrative session. To access this window, click the Menu icon () and choose Administration > System > Admin Access > Settings > Session.

Table 23. Session Timeout and Session Information Settings

Field Name

Usage Guidelines

Session Timeout

Session Idle Timeout

Enter the time, in minutes, that you want Cisco ISE to wait for, before it logs out the administrator if there is no activity. The default value is 60 minutes. The valid range is from 6 to 100 minutes.

Session Info

Invalidate

Check the check box adjacent to the session ID that you want to terminate and click Invalidate.