Installing Linux
Available Languages
Table Of Contents
Obtaining Linux Installation Media
Post-Installation Configuration
Installing Linux
Revised: August 23, 2011Overview
This appendix provides a step-by-step guide to performing a graphical installation of either Red Hat Enterprise or CentOS Linux version 5 on an x86 or x86-64 server in a suitable configuration for running Connector.
This appendix assumes you have no previous Linux experience, but are familiar with basic computing terminology and systems administration.
Before beginning installation, please ensure your server is capable of running the Linux operating system. See Linux System Requirements.
The screen shots in this appendix have Red Hat Enterprise Linux branding, but the installation steps are identical for CentOS Linux unless specifically stated otherwise.
Obtaining Linux Installation Media
Connector is not supported on any other distributions of Linux or Unix, or any custom configuration beyond the instructions in this appendix.
Red Hat Enterprise Linux 5
Red Hat Enterprise Linux 5 is a commercial distribution which can be purchased and downloaded from the Red Hat website. The advantage of using Red Hat Enterprise Linux is that vendor support is available to assist with installation and configuration issues. It is also certified for use on certain vendors' hardware.
For further information on Red Hat Enterprise Linux 5, go to http://www.redhat.com/.
CentOS Linux 5
CentOS Linux 5 is a freely-available operating system which aims to be 100 percent binary compatible with Red Hat Enterprise Linux. Within the scope of this appendix, Red Hat Enterprise Linux and Cent OS Linux are functionally identical.
To create CentOS Linux installation CD media, download the appropriate ISO image for your type of server and write it to CD.
•
For x86 servers, download from http://mirror.centos.org/centos/5/isos/i386/.
•
For x86-64 servers, download from http://mirror.centos.org/centos/5/isos/x86_64/.
Select the geographically closest mirror server to ensure a fast download. Cisco recommends that you download outside business hours.
When you have chosen a mirror server, download the appropriate ISO image and save it to your computer.
•
For x86 servers, download CentOS-5.2-i386-bin-1of6.iso (624 MB).
•
For x86-64 servers, download CentOS-5.2-x86_64-bin-1of6.iso (622 MB)

Note
There are seven installation ISO images available for download, but you require installation ISO 1 only as you will perform a secure minimal installation of Linux.
When you have downloaded the ISO files, use CD-writing software to convert the ISO image into a physical CD. Please refer to you CD-writing software vendor documentation for specific instructions.
Installing Linux
To install Linux:
Step 1
Insert the first installation CD and reboot the system. After a short delay, a screen containing the boot: prompt should appear.

Step 2
Press Enter to begin the graphical installation. Alternatively, wait 60 seconds for installation to begin automatically.

Note
You may need to change the system's BIOS settings to enable booting from the DVD/CD-ROM drive.
Step 3
When the DVD/CD-ROM drive is found and the driver loaded, you have the option to perform a media check on the DVD/CD.

These checks ensure the server can read the installation packages from the CD media.
Press Tab to highlight OK and then press Enter to perform the test. When the check is completed, press Tab to highlight Continue and press Enter to continue.
Alternatively, press Tab to highlight Skip and press Enter to skip the check.

Note
This will take some time, and you may opt to skip over this step. However, if you later encounter problems with the installation program, you should reboot and perform the media check before calling for support.
Step 4
The welcome screen does not prompt you for any input.

Click Next to continue.
Step 5
The language you choose here will become the default language for the operating system once it is installed. Later on the installation program will try to guess the appropriate time zone based on your choice.

Choose a language to use for the installation.
When you have chosen the appropriate language, click Next to continue.
Step 6
Choose the correct keyboard layout to be used for the installation and as the system default, for example United Kingdom.

When you have made your choice, click Next.
If you are installing Red Hat Enterprise Linux you will be prompted to enter an Installation Number. Enter your 16 digit number in the Installation Number box then click OK.
Step 7
If there is an existing installation on the system you will be prompted to choose between a fresh install or upgrading the existing installation.

Click Install (RedHat or CentOS) then click Next to overwrite the previous installation.
Step 8
Partitioning enables you to divide your hard disk into isolated sections, where each section behaves as if it were a separate hard disk.

In the list, click Remove all partitions on selected drives and create default layout.
Step 9
Clear the Review and modify partitioning layout check box and then click Next.

Note
If you are familiar with Linux, you may wish to create a custom disk partitioning layout. However, this is outside the scope of this document and recommends you use the default layout. The Connector software will be installed into the/opt partition.
If there is no data on the hard disk, or the installation program cannot read the existing data, you will see the following warning:

Click Yes to continue.

CautionAll data on the chosen hard disk(s) will be removed by the installation program. You must backup any data that you have on your systems before proceeding with the installation.
Step 10
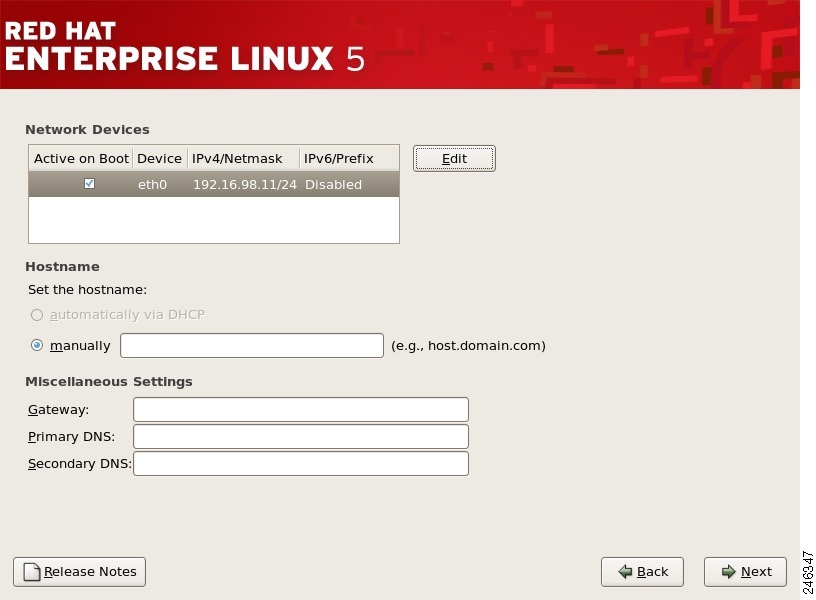
The installation program automatically detects any network devices you have and displays them in the Network Devices list.

Select your primary network device, and click Edit.
To configure the network:
a.
Ensure the Enable IPv4 support check box is selected.

b.
Click Manual Configuration.
c.
Enter the IP Address and Prefix (Netmask) provided by your network administrator.
d.
Clear the Enable IPv6 support check box.
e.
Click OK to return to the previous dialog.
In the Miscellaneous Settings section, enter your system's Gateway, Primary DNS and Secondary DNS then click Next to continue.
Step 11
Set your time zone by choosing the city closest to your system's physical location. The installation program will try and guess the correct location for you based on your earlier choice of language.

Click the interactive map to zoom in to a particular geographical region of the world.
Click a specific city (represented by a yellow dot). A red X indicates your choice. Alternatively, in the country list click a city.
When you have chosen your time zone, click Next to continue.
Step 12
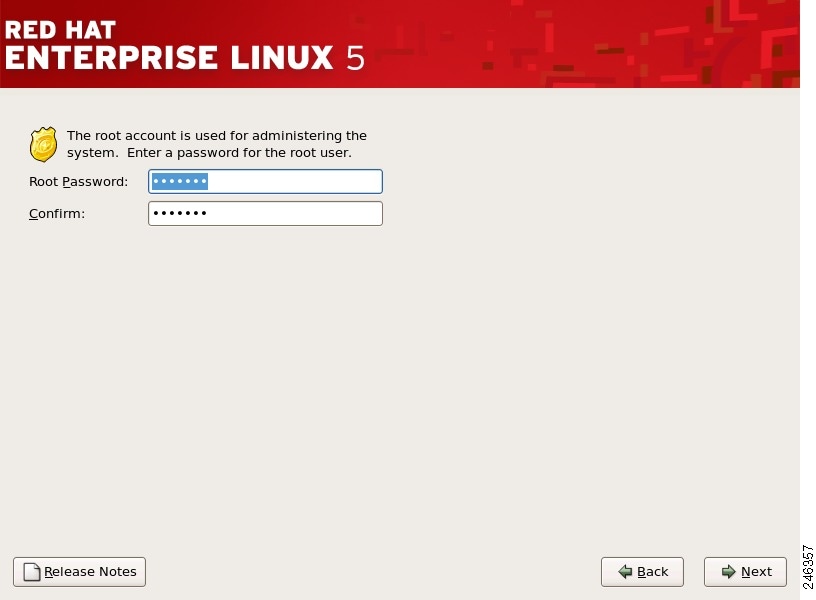
Setting up a root account and password is one of the most important steps during your installation. Your root account is similar to the administrator account used on computers running Microsoft Windows operating systems. The root account is used to install packages, upgrade packages, and perform most system maintenance. Logging in as root gives you complete control over the system.

The root password must be at least six characters long. The password is not displayed so you must enter it twice to ensure you have entered it correctly. You cannot proceed unless the Root Password and Confirm fields match.

CautionThe root user (also known as the superuser) has complete access to the entire system; for this reason it is essential that you keep the password secret.
When you have entered a suitable password, click Next to continue.
Step 13
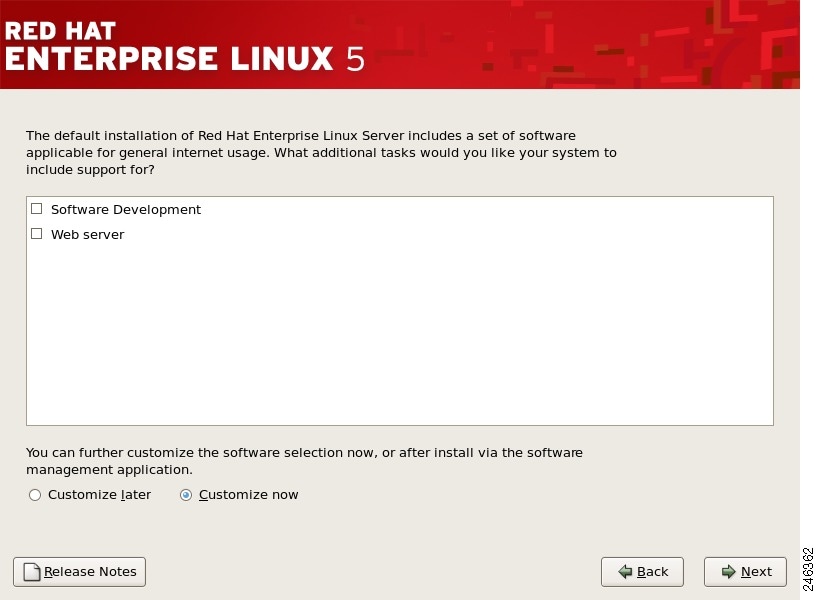
You are prompted to choose the tasks you would like the system to include support for. This dialog varies slightly depending on the version of Red Hat Enterprise or CentOS Linux you are installing.

Because Connector requires a minimal installation of Linux, clear all the check boxes.
Click Customize now, then click Next to continue.
Step 14
Because Connector requires a minimal installation of Linux, clear every installation option except the Base System:Base package.

For each package group in the left column:
a.
Click the package group.
b.
Clear every package in the right column.
When this is done, click the Base System package group in the left column. Click the Base package in the right column.

CautionTake care not to clear the Base System:Base package, or your Linux installation will be missing essential system administration commands and you will not be able to install Connector.
Only one of the optional base packages is required. To remove the others:
a.
Click Optional packages.

b.
Clear every check box except firstboot. This is required for post-installation configuration.
c.
Click Close.
d.
Click Next to continue.
Step 15
At the summary dialog, click Next.

Click Next to begin the installation.

CautionIf, for some reason, you would rather not continue with the installation process, this is your last opportunity to safely cancel the process and reboot your machine. When you click Next, disk partitions are written and packages are installed. If you wish to abort the installation, you should reboot now before any existing information on any hard disk is overwritten.
At this point there is nothing left for you to do until all the packages have been installed. How quickly this happens depends on the number of packages you have selected and your computer's speed.
Step 16
When it has finished, the installation program prompts you to prepare your computer to reboot.

Remove the CD if it is not ejected automatically, then click Reboot to continue.
After your system's normal power-up sequence has completed, the graphical boot loader prompt is displayed.

Press Enter to select the default boot entry. Alternatively, wait for the time-out period (normally five seconds), after which the default boot entry is loaded.
Post-Installation Configuration
The first time you boot after installing the operating system, the text mode Setup Agent is displayed. To configure your Linux installation:
Step 1
Use the arrow keys to highlight System services.

Step 2
Press Tab to highlight Run Tool and then press Enter.

Note
For security reasons, the Setup Agent will close after 30 seconds of inactivity and you will see the login prompt. To return to the Setup Agent, enter the root username and password you created earlier., then at the command prompt type setup and press Enter.
Step 3
Connector requires a minimal, secure installation of Linux therefore it is necessary to turn off all unnecessary system services.

Linux automatically selects a default profile of system services, with some switched on and some switched off. Some of these enabled services (indicated with a * in the box) need to be switched off by removing the star.

CautionDo not modify the status of any service except for those listed below otherwise your system may not work correctly or may be secure.
For each of the following services, use the arrow keys to highlight the service and press the space bar to switch it off:
•
atd
•
auditd
•
cups
•
firstboot
•
haldaemon
•
netfs
•
pcscd
•
portmap
When you are finished, press Tab to highlight Ok, then press Enter to return to the Setup Agent.
Step 4
By default the server firewall is enabled, but it is necessary to switch off a security feature called 'SELinux' before installing Connector. This will not reduce the security of the server or switch off the firewall.

Note
Security-Enhanced Linux (SELinux) is a Linux feature that provides a variety of security policies, including U.S. Department of Defense style mandatory access controls, through the use of Linux Security Modules (LSM) in the Linux kernel.

Use the arrow keys to highlight Firewall configuration.
Step 5
Use the Tab key to highlight Run Tool and press Enter.

Step 6
Ensure that Security Level has an asterisk ( * ) next to Enabled.
Step 7
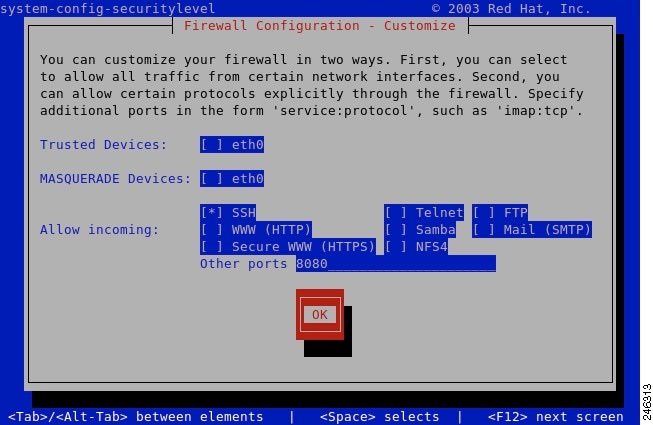
Use the Tab key to move to highlight Customize and press Enter.

Step 8
Use the Tab key to place the cursor in the Other Ports section. Type 8080 into the Other ports box.

Note
If you are have modified the Connector configuration to listen on an alternative port, replace 8080 with the listening port you have chosen.
Step 9
Use the Tab key to move to highlight OK and press Enter.

Step 10
Use the Tab key to move to highlight OK and press Enter.

Step 11
Use the Tab key to highlight Exit and then press Enter to leave the Setup Agent. You should now be presented with the server login screen:

Step 12
Enter the username root and the password you chose earlier in the installation process to log in. At the command prompt type reboot and press Enter to perform a system restart. This will apply your configuration changes made in the setup agent and complete your post-install configuration.
Installation of Linux is now complete. Your system is now running a minimal installation of Linux, with the only externally accessible network port being SSH on TCP port 22 for remote administration.
Troubleshooting
You can ping the system's IP address from another computer on the same network to ensure that it has network connectivity.
If the system does not respond:
•
Check your network settings.
•
Check that the system's network card has a link light displayed.
•
Ensure your firewalls are configured correctly.
 Feedback