Cisco Nexus 1010 Software Configuration Guide, Release 4.0(4)SP1(1)
Bias-Free Language
The documentation set for this product strives to use bias-free language. For the purposes of this documentation set, bias-free is defined as language that does not imply discrimination based on age, disability, gender, racial identity, ethnic identity, sexual orientation, socioeconomic status, and intersectionality. Exceptions may be present in the documentation due to language that is hardcoded in the user interfaces of the product software, language used based on RFP documentation, or language that is used by a referenced third-party product. Learn more about how Cisco is using Inclusive Language.
- Updated:
- April 29, 2010
Chapter: Overview
Overview
This chapter describes the Cisco Nexus 1010 appliance and hosted virtual service blades. This chapter includes the following sections:
•![]() Comparison with a Virtual Machine
Comparison with a Virtual Machine
•![]() Cisco Integrated Management Controller
Cisco Integrated Management Controller
•![]() Getting Started With Cisco Nexus 1010
Getting Started With Cisco Nexus 1010
•![]() Flow Chart: Installing and Configuring the Cisco Nexus 1010
Flow Chart: Installing and Configuring the Cisco Nexus 1010
Description
The Cisco Nexus 1010 is a networking appliance that hosts four Cisco Nexus 1000V virtual supervisor modules (VSMs) and a Cisco Network Analysis Module (NAM). The Cisco Nexus 1010 provides dedicated hardware for the VSM. VSMs that were hosted on VMware virtual machines can now be hosted on a Cisco Nexus 1010 appliance. This allows you to install and manage the VSM like a standard Cisco switch. The modules (VSM or NAM) managed by the Cisco Nexus 1010 are called virtual service blades (VSBs). For more information about VSBs, see the "Virtual Service Blades" section.
Figure 1-1 shows how the Cisco Nexus 1010 hosts a Cisco Nexus 1000V VSM and its VEMs in your network.
The Cisco Nexus 1010 requires VMware vSphere 4 Enterprise+, and works with all Ethernet switches and all VMware compatible servers.
Figure 1-1 Cisco Nexus 1010 Virtual Services Appliance Architecture

Comparison with a Virtual Machine
Table 1-1 compares running a VSM on a Cisco Nexus 1010 with running a VSM on a virtual machine.
|
|
|
|
|---|---|---|
Host (ESX or ESXi) Management Capacity |
64 |
2561 |
VSM with Cisco NX-OS high availability |
Yes |
Yes |
VEM running on vSphere 4 Enterprise Plus |
Yes |
Yes |
Cisco Nexus 1000 features and scalability |
Yes |
Yes |
Software-only switch |
Yes |
No |
Dedicated services appliance, such as Cisco NAM |
No |
Yes |
Installation like a standard Cisco switch |
No |
Yes |
Network Team manages the switch hardware |
No |
Yes |
1 64 hosts per VSM X 4 VSMs |
Figure 1-2 compares running a VSM on a Cisco Nexus 1010 with running a VSM on a virtual machine.
Figure 1-2 VM and Cisco Nexus 1010 Comparison

Cisco Integrated Management Controller
The Cisco Integrated Management Controller (CIMC) is a software interface included with the Cisco Nexus 1010. CIMC allows you to configure serial over LAN (SoL) access and set up remote management in the event the device becomes unreachable. For more information about remote management, see the "Setting Up Remote Management" section on page 3-1
When installing the Cisco Nexus 1010, you have the option to configure the CIMC interface. To configure the CIMC software while installing the Cisco Nexus 1010, see the Cisco Nexus 1010 Virtual Services Appliance Installation Guide.
Virtual Service Blades
The modules (VSM or NAM) hosted, created, and managed by the Cisco Nexus 1010 are called virtual service blades (VSBs). VSBs are created using ISO files found in the Cisco Nexus 1010 bootflash repository. The ISO defines the following for a VSB:
•![]() Required number of interfaces
Required number of interfaces
•![]() Type of virtual service blade
Type of virtual service blade
–![]() Cisco Nexus 1000V VSM Virtual Service Blade
Cisco Nexus 1000V VSM Virtual Service Blade
–![]() Cisco Network Analysis Module Virtual Service Blade
Cisco Network Analysis Module Virtual Service Blade
•![]() Required hard disk emulation
Required hard disk emulation
•![]() Disk and RAM defaults
Disk and RAM defaults
Cisco Nexus 1000V VSM Virtual Service Blade
The Cisco Nexus 1010 can host up to four VSMs, each controlling a group of virtual Ethernet modules (VEMs). From a network management perspective, a VSM and its VEMs make up a virtual switch; and the Cisco Nexus 1010 and the multiple virtual switches it hosts are viewed as a cluster of switches.
You can create redundant virtual supervisor modules (VSMs) on the Cisco Nexus 1010 with the Cisco Nexus 1000V ISO image located in bootflash. The image is copied to a new VSB when you create it. Once you have created the first VSM, you can point to that software image to create additional VSMs. You can upgrade your VSMs to a new release of Cisco Nexus 1000V software as needed.
This section includes the following topics:
To create a VSM virtual service blade, see the "Creating a Virtual Service Blade" procedure on page 5-1.
VSM Management VLAN
The Cisco Nexus 1010 and its hosted Cisco Nexus 1000V VSMs share the same management VLAN. Unlike the control and packet VLANs which are set when a VSB is created, the management VLAN is inherited.
Do not change the management VLAN on a VSB. Since the management VLAN is inherited from the Cisco Nexus 1010, if you change it, then the change is applied to both the Cisco Nexus 1010 and all of its hosted Cisco Nexus 1000V VSMs.
VSM High Availability
High availability is configured for the redundant VSB pairs that you create on the Cisco Nexus 1010.
Not all VSBs are active on the active Cisco Nexus 1010. As long as there is connectivity between the active and standby Cisco Nexus 1010, access through a serial connection is maintained to any VSB. When one Cisco Nexus 1010 fails, the remaining Cisco Nexus 1010 becomes active and all VSBs in the standby state on that Cisco Nexus 1010 become active on their own.
A VSB can be removed completely from both redundant Cisco Nexus 1010s, or from only one. If one of a redundant pair of VSBs becomes unusable, it can be removed from only the Cisco Nexus 1010 where it resides. This mitigates the recovery by preserving the remaining VSB in the pair. This may become necessary if a new instance of the VSM must be provisioned.
For more information about VSM high availability, see the Cisco Nexus 1000V High Availability and Redundancy Configuration Guide, Release 4.0(4)SV1(3).
Figure 1-3 shows the HA components and the communication links between them.
Figure 1-3 Cisco Nexus 1010 HA Components and Communication Links

Cisco Network Analysis Module Virtual Service Blade
You can create a virtual network analysis module (NAM) on the Cisco Nexus 1010 with the NAM ISO image in the Cisco Nexus 1010 bootflash. The image is copied to a new NAM VSB when you create it.
To create a VSB for NAM, see the "Creating a Virtual Service Blade" procedure on page 5-1.
For more information about NAM, see the Cisco Network Analysis Module Software Documentation Guide, 4.2.
Uplinks
This section describes the uplinks that you connected during your installation of the hardware. For more information about these connections and the prerequisites for the switches that are upstream from your Cisco Nexus 1010, see the Cisco Nexus 1010 Virtual Services Appliance Installation Guide.
This section includes the following topics:
•![]() Options for Connecting to the Network
Options for Connecting to the Network
•![]() Topology 2: Two Uplinks—1) Management and Control and 2) Data
Topology 2: Two Uplinks—1) Management and Control and 2) Data
•![]() Topology 3: Two Uplinks—1) Management and 2) Control and Data
Topology 3: Two Uplinks—1) Management and 2) Control and Data
•![]() Topology 4: Three Uplinks—1) Management, 2) Control, and 3) Data
Topology 4: Three Uplinks—1) Management, 2) Control, and 3) Data
Traffic Classification
Table 1-2 lists and describes the classes of network traffic carried on the Cisco Nexus 1010 uplinks:
Options for Connecting to the Network
Table 1-3 describes the available uplink configurations.
You choose the type of uplink for your network using the "Setting Up the Management Software" procedure on page 2-5.

Note ![]() Once you configure an uplink type, the only way to modify it is to reload the software.
Once you configure an uplink type, the only way to modify it is to reload the software.
Topology 1: Single Uplink
In this topology, your Cisco Nexus 1010 pair connects to your network in two uplinks as shown in the following figures:
•![]() Figure 1-4, without vPC or VSS
Figure 1-4, without vPC or VSS
•![]() Figure 1-5, with vPC or VSS
Figure 1-5, with vPC or VSS
For detailed information about connecting uplinks, see the Cisco Nexus 1010 Virtual Services Appliance Installation Guide.
Figure 1-4 Topology 1: Single Uplink Without vPC or VSS

Figure 1-5 Topology 1: Single Uplink With vPC or VSS

Topology 2: Two Uplinks—1) Management and Control and 2) Data
In topology 2, six Gigabit Ethernet ports on each Cisco Nexus 1010 create two uplinks. The ports in each Cisco Nexus 1010 internally form a port channel and network traffic is load balanced based on the source MAC algorithm.
LACP must be configured on the upstream switches connecting to ports 3, 4, 5, and 6.
In topology 2, your Cisco Nexus 1010 pair connects to your network in two uplinks as shown in the following figures:
•![]() Figure 1-6, without vPC or VSS
Figure 1-6, without vPC or VSS
•![]() Figure 1-7, with vPC or VSS
Figure 1-7, with vPC or VSS
For detailed information about connecting uplinks, see the Cisco Nexus 1010 Virtual Services Appliance Installation Guide.
Figure 1-6 Topology 2: Two Uplinks Without vPC or VSS—
1) Management and Control Uplink, and 2) Data Uplink

Figure 1-7 Topology 2: Two Uplinks With vPC or VSS—
1) Management and Control Uplink, and 2) Data Uplink

Topology 3: Two Uplinks—1) Management and 2) Control and Data
In topology 3, the ports in each Cisco Nexus 1010 internally form a port channel and network traffic is load balanced based on the source MAC algorithm.
LACP must be configured on the upstream switches connecting to ports 3, 4, 5, and 6.
In topology 3, your Cisco Nexus 1010 pair connects to your network in two uplinks as shown in the following figures:
•![]() Figure 1-8, without vPC or VSS
Figure 1-8, without vPC or VSS
•![]() Figure 1-9, with vPC or VSS
Figure 1-9, with vPC or VSS
For detailed information about connecting uplinks, see the Cisco Nexus 1010 Virtual Services Appliance Installation Guide.
Figure 1-8 Topology 3: Two Uplinks Without vPC or VSS—
1) Management Uplink, and 2) Control and Data Uplink

Figure 1-9 Topology 3: Two Uplinks With vPC or VSS—
1) Management Uplink, and 2) Control and Data Uplink

Topology 4: Three Uplinks—1) Management, 2) Control, and 3) Data
In topology 4, six Gigabit Ethernet ports on each Cisco Nexus 1010 create three uplinks as shown in one of the following figures:
•![]() Figure 1-10, without vPC or VSS
Figure 1-10, without vPC or VSS
•![]() Figure 1-11, with vPC or VSS
Figure 1-11, with vPC or VSS
For detailed information about connecting uplinks, see the Cisco Nexus 1010 Virtual Services Appliance Installation Guide.
Figure 1-10 Topology 4: Three Uplinks Without vPC or VSS
1) Management, 2) Control, and 3) Data

Figure 1-11 Topology 4: Three Uplinks With vPC or VSS
1) Management, 2) Control, and 3) Data

Software Included
The Cisco Nexus 1010 is shipped with the following software.
|
|
|
|
|---|---|---|
Cisco Nexus 1010 kickstart image |
Image for the Cisco Nexus 1010 Manager virtual machine which manages the shelf and redundancy group configuration. |
nexus-1010-kickstart-mzg.4.0.4.SP1.1.bin1 |
Cisco Nexus 1000V VSM |
Used to create a VSB for the Cisco Nexus 1000V VSM on the Cisco Nexus 1010. |
nexus-1000v.4.0.4.SV1.3.iso2 |
Cisco NAM VSB |
Used to create a VSB for Cisco NAM on the Cisco Nexus 1010. |
nam-4-2-1.iso2 |
Hypervisor with a Cisco Nexus 1010 agent |
The hypervisor consists of a kernel image and RAM disk. |
N/A |
Cisco Integrated Management Controller (CIMC) |
A software interface that allows you to manage the Cisco Nexus 1010 should it become unreachable. |
N/A |
1 In the event of disk corruption on the Cisco Nexus 1010, the system can be brought up by copying the kickstart image from a CD. 2 If it is necessary to update a VSB ISO file in bootflash, use the scp command to copy the new file version into the repository folder. |
Figure 1-12 shows the Cisco Nexus 1010 software components. Each VSM or NAM represents a virtual service blade (VSB) on the Cisco Nexus 1010.
Figure 1-12 Cisco Nexus 1010 Software Components

Getting Started With Cisco Nexus 1010
To get started with the Cisco Nexus 1010, you first install the hardware appliance and connect it to the network. Procedures for doing this are included in the following document.
Cisco Nexus 1010 Virtual Services Appliance Installation Guide
After you install the hardware appliance and connect it to the network, then you can configure the Cisco Nexus 1010 management software, migrating existing VSMs residing on a VM to the Cisco Nexus 1010 as virtual service blades (VSBs), or creating and configuring new NAM or VSM VSBs. Detailed information about configuring the software is found in this document.
The following are the basic steps in the software configuration process.
Step 1 ![]() Setting Up the Management Software, page 2-1
Setting Up the Management Software, page 2-1
Use this section to create and save a configuration for redundant primary and secondary Cisco Nexus 1010s.
Step 2 ![]() Do one of the following to add VSM or NAM virtual service blades to the new Cisco Nexus 1010:
Do one of the following to add VSM or NAM virtual service blades to the new Cisco Nexus 1010:
•![]() Migrate an existing VSM from a VM to the Cisco Nexus 1010 using the "Migrating a VSM" procedure on page 6-1.
Migrate an existing VSM from a VM to the Cisco Nexus 1010 using the "Migrating a VSM" procedure on page 6-1.
•![]() Create a new VSM or NAM virtual service blade using the "Configuring Virtual Service Blades" procedure on page 5-1.
Create a new VSM or NAM virtual service blade using the "Configuring Virtual Service Blades" procedure on page 5-1.
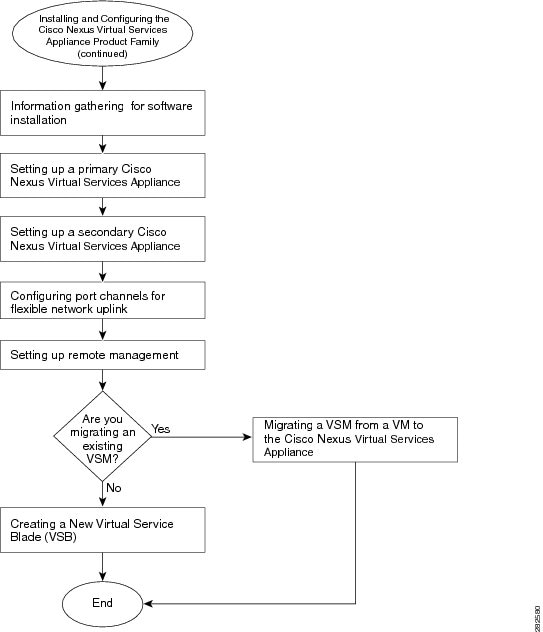
Flow Chart: Installing and Configuring the Cisco Nexus 1010
Figure 1-13 and Figure 1-14 show the basic steps for installing and configuring a Cisco Nexus 1010. To configure the Cisco Nexus 1010 hardware see the Cisco Nexus 1010 Virtual Services Appliance Installation Guide.
Procedures for configuring the software are in this document.
Figure 1-13 Flow Chart: Installing and Configuring the Cisco Nexus 1010

Figure 1-14 Flow Chart: Installing and Configuring the Cisco Nexus 1010 (continued)
Replacing a Cisco Nexus 1010
You can replace a redundant Cisco Nexus 1010 if needed after RMA. For more information, see the "Replacing a Cisco Nexus 1010" section on page 2-10.
 Feedback