Cisco Nexus 1000V Getting Started Guide, Release 4.0(4)SV1(2)
Bias-Free Language
The documentation set for this product strives to use bias-free language. For the purposes of this documentation set, bias-free is defined as language that does not imply discrimination based on age, disability, gender, racial identity, ethnic identity, sexual orientation, socioeconomic status, and intersectionality. Exceptions may be present in the documentation due to language that is hardcoded in the user interfaces of the product software, language used based on RFP documentation, or language that is used by a referenced third-party product. Learn more about how Cisco is using Inclusive Language.
- Updated:
- February 25, 2010
Chapter: Running a VSM and VEM on the Same Host
Running a VSM and VEM on the Same Host
This chapter describes how a VSM and VEM can run on the same host.
This chapter includes the following topics:
•![]() Information About a VSM and VEM on the Same Host
Information About a VSM and VEM on the Same Host
•![]() Configuring a VSM and its VEM on the Same Host
Configuring a VSM and its VEM on the Same Host
Information About a VSM and VEM on the Same Host
The VSM and VEM can run on the same host. In this case, the VSM communicates with the co-located VEM and other VEMs in the network using its own switch.
The following are examples of networks where you could run a VSM on its own host:
•![]() Environments where the server administrator can guarantee that the VSM VM will not be mistakenly powered down or reconfigured.
Environments where the server administrator can guarantee that the VSM VM will not be mistakenly powered down or reconfigured.
•![]() Test and demonstration setups.
Test and demonstration setups.
To avoid any possibility of losing communication with its VEMs, it is recommended that the VSM be installed on a separately-managed server.
The following are examples of networks where you are advised to run your VSM on a separate host from its VEMs:
•![]() Environments where the server administrator cannot guarantee the virtual machine for the VSM will be available and will not be modified.
Environments where the server administrator cannot guarantee the virtual machine for the VSM will be available and will not be modified.
•![]() Environments where server resources (CPU, memory, network bandwidth) cannot be guaranteed for the VSM.
Environments where server resources (CPU, memory, network bandwidth) cannot be guaranteed for the VSM.
•![]() Environments where network administrators have their own ESX server hosts to run network services.
Environments where network administrators have their own ESX server hosts to run network services.
•![]() Environments where network administrators need to quickly create, destroy, and move VSMs without server administrator interaction.
Environments where network administrators need to quickly create, destroy, and move VSMs without server administrator interaction.
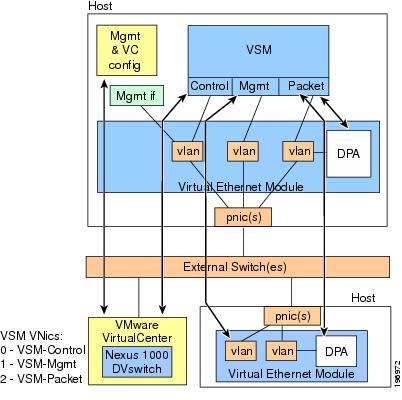
Figure 5-1 shows a VSM and VEM running on the same host.
Figure 5-1 Running a VSM and VEM on the Same Host
Guidelines and Limitations
When running a VSM and its VEM on the same server host, use the following guidelines and limitations:
•![]() When the virtual NICs for a VSM are attached to one of its own VEMs, both network and server administrator must ensure that their actions do not interfere with the configuration that enables the VSM to communicate, including the following:
When the virtual NICs for a VSM are attached to one of its own VEMs, both network and server administrator must ensure that their actions do not interfere with the configuration that enables the VSM to communicate, including the following:
–![]() The management port must use a system port profile.
The management port must use a system port profile.
–![]() The control port must use a system port profile.
The control port must use a system port profile.
–![]() It is recommended that the packet port use a system port profile.
It is recommended that the packet port use a system port profile.
–![]() To bring up a new VSM on a server using its own VEM, it must have at least 2 physical ports.
To bring up a new VSM on a server using its own VEM, it must have at least 2 physical ports.
•![]() If the virtual disk for the VSM is accessed via iSCSI or NFS, the storage vmknic on every host that may run the active/standby VSMs must use a system profile.
If the virtual disk for the VSM is accessed via iSCSI or NFS, the storage vmknic on every host that may run the active/standby VSMs must use a system profile.
•![]() The server administrator must not detach the VSM from its networks, including the following:
The server administrator must not detach the VSM from its networks, including the following:
–![]() Do not stop the host server.
Do not stop the host server.
–![]() Do not remove the host server virtual NICs or change their port groups.
Do not remove the host server virtual NICs or change their port groups.
–![]() Do not remove any physical ports in use by VLANs that are needed by the host server virtual NICs.
Do not remove any physical ports in use by VLANs that are needed by the host server virtual NICs.
•![]() Since the critical management and control ports for the VSM must use system port profiles, these networks will be available on any host that supports the correct VLANs on its physical ports. Therefore, VMotion of either the primary or standby VSM is supported on these hosts.
Since the critical management and control ports for the VSM must use system port profiles, these networks will be available on any host that supports the correct VLANs on its physical ports. Therefore, VMotion of either the primary or standby VSM is supported on these hosts.
•![]() Since the VSM depends on itself for configuring the VEM on which it is running, it must first be brought up using normal vswitches to connect to VC and its server host. This is a transitory state that is only required the first time the VSM is brought up.
Since the VSM depends on itself for configuring the VEM on which it is running, it must first be brought up using normal vswitches to connect to VC and its server host. This is a transitory state that is only required the first time the VSM is brought up.
Configuring a VSM and its VEM on the Same Host
Use this procedure to configure a VSM and its VEM on the same physical server host.
BEFORE YOU BEGIN
Before configuring the VSM and its VEM on a single ESX server, you must know or do the following:
•![]() You have already installed and set up the Cisco Nexus 1000V software on the ESX server using the "Setting Up the Software" section on page 2-1, including the following:
You have already installed and set up the Cisco Nexus 1000V software on the ESX server using the "Setting Up the Software" section on page 2-1, including the following:
–![]() Installing the VSM on an ESX server with vswitches for the following:
Installing the VSM on an ESX server with vswitches for the following:
- management
- packet traffic
- control traffic
–![]() Configuring physical ports on the vswitches for control, management, and packet VLANs.
Configuring physical ports on the vswitches for control, management, and packet VLANs.
–![]() Configuring the system, uplink, and data port profiles.
Configuring the system, uplink, and data port profiles.
–![]() Connecting with vCenter.
Connecting with vCenter.
•![]() The ESX server host has at least two physical ports.
The ESX server host has at least two physical ports.
•![]() The standby VSM can be directly added to Cisco Nexus 1000V when it is created, and will not require the following procedure.
The standby VSM can be directly added to Cisco Nexus 1000V when it is created, and will not require the following procedure.
•![]() A VSM that is already running in a vswitch environment on the same host can also be migrated to a VEM solution using this procedure. By reversing this procedure, a VSM can be moved from the VEM back onto vswitches if needed.
A VSM that is already running in a vswitch environment on the same host can also be migrated to a VEM solution using this procedure. By reversing this procedure, a VSM can be moved from the VEM back onto vswitches if needed.
Step 1 ![]() On the ESX server host where the VSM is installed, add the VEM software using your VMware documentation and the Cisco Nexus 1000V Virtual Ethernet Module Software Installation Guide, Release 4.0(4)SV1(2).
On the ESX server host where the VSM is installed, add the VEM software using your VMware documentation and the Cisco Nexus 1000V Virtual Ethernet Module Software Installation Guide, Release 4.0(4)SV1(2).
Step 2 ![]() Assign the VSM management port to the corresponding port group on the Cisco Nexus 1000V.
Assign the VSM management port to the corresponding port group on the Cisco Nexus 1000V.
VSM management traffic is now using Cisco Nexus 1000V.
Step 3 ![]() Assign the ESX server host management port to the corresponding port group on the Cisco Nexus 1000V.
Assign the ESX server host management port to the corresponding port group on the Cisco Nexus 1000V.
vCenter now uses Cisco Nexus 1000V to talk to the server host.
Step 4 ![]() Assign the VSM control port to the corresponding port group on the Cisco Nexus 1000V.
Assign the VSM control port to the corresponding port group on the Cisco Nexus 1000V.
The VSM and VEM control traffic (and that of other VEMs in the network) now use Cisco Nexus 1000V.
Step 5 ![]() Assign the VSM packet port to the corresponding port group on the Cisco Nexus 1000V.
Assign the VSM packet port to the corresponding port group on the Cisco Nexus 1000V.
Protocols such as CDP, LACP, and IGMP, now communicate using the Cisco Nexus 1000V.
Step 6 ![]() Remove the vswitches.
Remove the vswitches.
You may now reuse the old physical port for Cisco Nexus 1000V.
You have completed configuring a VSM and its VEM running on the same server host.
 Feedback