- New and Changed Information
- Preface
- Overview
- Tools
- Installation
- Licenses
- Upgrade
- High Availability
- VSM and VEM Modules
- Ports
- Port Profiles
- Port Channels and Trunking
- Layer 2 Switching
- VLANs
- Private VLANs
- NetFlow
- ACLs
- Quality of Service
- SPAN
- Multicast IGMP
- DHCP, DAI, and IPSG
- Virtual Service Domain
- System
- Network Segmentation Manager
- VXLANs
- Cisco TrustSec
- VC Plugin
- Ethanalyzer
- Before Contacting Technical Support
- Index
Cisco Nexus 1000V Troubleshooting Guide, Release 4.2(1)SV2(1.1)
Bias-Free Language
The documentation set for this product strives to use bias-free language. For the purposes of this documentation set, bias-free is defined as language that does not imply discrimination based on age, disability, gender, racial identity, ethnic identity, sexual orientation, socioeconomic status, and intersectionality. Exceptions may be present in the documentation due to language that is hardcoded in the user interfaces of the product software, language used based on RFP documentation, or language that is used by a referenced third-party product. Learn more about how Cisco is using Inclusive Language.
- Updated:
- June 8, 2014
Chapter: Layer 2 Switching
Layer 2 Switching
This chapter describes how to identify and resolve problems that relate to Layer 2 switching.
Information About Layer 2 Ethernet Switching
Nexus1000V provides a distributed, layer 2 virtual switch that extends across many virtualized hosts.
It consists of two components:
- Virtual Supervisor Module (VSM), which is also known as the Control Plane (CP), acts as the Supervisor and contains the Cisco CLI, configuration, and high-level features.
- Virtual Ethernet Module (VEM), which is also known as the Data Plane (DP), acts as a line card and runs in each virtualized server to handle packet forwarding and other localized functions.
Port Model
This section describes the following port perspectives:
Viewing Ports from the VEM
The Nexus1000V differentiates between virtual and physical ports on each of the VEMs. Figure 11-1 shows how ports on the Nexus1000V switch are bound to physical and virtual VMware ports within a VEM.
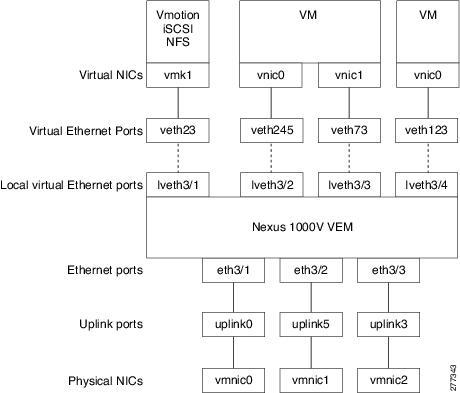
On the virtual side of the switch, there are three layers of ports that are mapped together:
- Virtual NICs: There are three types of Virtual NICs in VMware. The virtual NIC (vnic) is part of the VM, and represents the physical port of the host which is plugged into the switch. The virtual kernel NIC (vmknic) is used by the hypervisor for management, VMotion, iSCSI, NFS and other network access needed by the kernel. This interface would carry the IP address of the hypervisor itself, and is also bound to a virtual Ethernet port. The vswif (not shown) appears only in COS-based systems, and is used as the VMware management port. Each of these types maps to a veth port within Nexus1000V.
- Virtual Ethernet Ports (VEth): A VEth port is a port on the Cisco Nexus 1000V Distributed Virtual Switch. Cisco Nexus 1000V has a flat space of VEth ports 0..N. The virtual cable plugs into these VEth ports that are moved to the host running the VM.
VEth ports are assigned to port groups.
- Local Virtual Ethernet Ports (lveth): Each host has a number of local VEth ports. These ports are dynamically selected for VEth ports that are needed on the host.
These local ports do not move, and are addressable by the module-port number method.
On the physical side of the switch, from bottom to top:
- Each physical NIC in VMware is represented by an interface called a vmnic. The vmnic number is allocated during VMware installation, or when a new physical NIC is installed, and remains the same for the life of the host.
- Each uplink port on the host represents a physical interface. It acts a lot like an lveth port, but because physical ports do not move between hosts, the mapping is 1:1 between an uplink port and a vmnic.
- Each physical port added to Nexus1000V switch appears as a physical Ethernet port, just as it would on a hardware-based switch.
The uplink port concept is handled entirely by VMware, and is used to associate port configuration with vmnics. There is no fixed relationship between the uplink # and vmnic #, and these can be different on different hosts, and can change throughout the life of the host. On the VSM, the Ethernet interface number, such as ethernet 2/4, is derived from the vmnic number, not the uplink number.

Port Types
The following types of ports are available:
–![]() VNICs of a Virtual Machine on the ESX Host.
VNICs of a Virtual Machine on the ESX Host.
- Eths (Physical Ethernet Interfaces) – correspond to the Physical NICs on the ESX Host.
- Po (Port Channel Interfaces) – The physical NICs of an ESX Host can be bundled into a logical interface. This logical bundle is referred to as a port channel interface.
For more information about Layer 2 switching, see the Cisco Nexus 1000V Layer 2 Switching Configuration Guide, Release 4.2(1)SV2(1.1) .
Layer 2 Switching Problems
This section describes how to troubleshoot Layer 2 problems and lists troubleshooting commands. This section includes the following topics:
- Verifying a Connection Between VEM Ports
- Verifying a Connection Between VEMs
- Isolating Traffic Interruptions
- Verifying Layer 2 Switching
Verifying a Connection Between VEM Ports
To verify a connection between two veth ports on a VEM, follow these steps:
Step 1![]() On the VSM, enter the
show vlan
command to view the state of the VLANs associated with the port. If the VLAN associated with a port is not active, then the port may be down. In this case, you must create the VLAN and activate it.
On the VSM, enter the
show vlan
command to view the state of the VLANs associated with the port. If the VLAN associated with a port is not active, then the port may be down. In this case, you must create the VLAN and activate it.
Step 2![]() To see the state of the port on the VSM, enter a
show interface brief
command.
To see the state of the port on the VSM, enter a
show interface brief
command.
Step 3![]() Enter the
module vem module-number execute vemcmd show port
command to display the ports that are present on the VEM, their local interface indices, VLAN, type (physical or virtual), CBL state, port mode, and port name.
Enter the
module vem module-number execute vemcmd show port
command to display the ports that are present on the VEM, their local interface indices, VLAN, type (physical or virtual), CBL state, port mode, and port name.
The key things to look for in the output are:
- State of the port.
- CBL.
- Mode.
- Attached device name.
- The LTL of the port you are trying to troubleshoot. It will help you identify the interface quickly in other VEM commands where the interface name is not displayed.
- Make sure the state of the port is up. If not, verify the configuration of the port on the VSM.
Step 4![]() To view the VLANs and their port lists on a particular VEM, use the
module vem module-number execute vemcmd show bd
command:
To view the VLANs and their port lists on a particular VEM, use the
module vem module-number execute vemcmd show bd
command:
If you are trying to verify that a port belongs to a particular VLAN, make suer you see the port name or LTL in the port list of that VLAN.
Verifying a Connection Between VEMs
To verify a connection between veth ports on two separate VEMs, follow these steps:
Step 1![]() Issue the
show vlan
command to check if the VLAN associated with the port is created on the VSM.
Issue the
show vlan
command to check if the VLAN associated with the port is created on the VSM.
Step 2![]() Issue the
show interface brief
command to check if the ports are up in the VSM.
Issue the
show interface brief
command to check if the ports are up in the VSM.
Step 3![]() On the VEM, issue the
module vem 3 execute vemcmd show port
command to check if the CBL state of the two ports is set to the value of 1 for forwarding (active).
On the VEM, issue the
module vem 3 execute vemcmd show port
command to check if the CBL state of the two ports is set to the value of 1 for forwarding (active).
Step 4![]() On the VEM, issue the
module vem 3 execute vemcmd show bd
command to check if the two veth ports are listed
On the VEM, issue the
module vem 3 execute vemcmd show bd
command to check if the two veth ports are listed![]() in the flood list of the VLAN to which they are trying to communicate.
in the flood list of the VLAN to which they are trying to communicate.
Step 5![]() Verify that the uplink switch to which the VEMs are connected is carrying the VLAN to which the ports belong.
Verify that the uplink switch to which the VEMs are connected is carrying the VLAN to which the ports belong.
Step 6![]() Find out the port on the upstream switch to which the pnic (that is supposed to be carrying the VLAN) on the VEM is connected to.
Find out the port on the upstream switch to which the pnic (that is supposed to be carrying the VLAN) on the VEM is connected to.
The PNIC (Eth 5/2) is connected to swordfish-6k-2 on port Gig1/38.
Step 7![]() Log in to the upstream switch and make sure the port is configured to allow the VLAN you are looking for.
Log in to the upstream switch and make sure the port is configured to allow the VLAN you are looking for.
As this output shows, VLANs 1,60-69, 231-233 are allowed on the port. If a particular VLAN is not in the allowed VLAN list, make sure to add it to the allowed VLAN list of the port.
Isolating Traffic Interruptions
Use the following steps to isolate the cause for no traffic passing across VMs on different VEMs.
Step 1![]() In output of the
show port-profile name
command, verify the following information:
In output of the
show port-profile name
command, verify the following information:
- The control and packet VLANs that you configured are present (in the example, these are 3002 and 3003)
- If the physical NIC in your configuration carries the VLAN for VM, then that VLAN is also present in the allowed VLAN list.
Step 2![]() Inside the VM, use the following command to verify that the Ethernet interface is up.
Inside the VM, use the following command to verify that the Ethernet interface is up.
If not, consider deleting that NIC from the VM, and adding another NIC.
Step 3![]() Using any sniffer tool, verify that ARP requests and responses are received on the VM interface.
Using any sniffer tool, verify that ARP requests and responses are received on the VM interface.
Step 4![]() On the upstream switch, use the following commands to look for the association between the IP and MAC address:
On the upstream switch, use the following commands to look for the association between the IP and MAC address:
Step 5![]() You have completed this procedure.
You have completed this procedure.
Verifying Layer 2 Switching
Use the following commands to display and verify the Layer 2 MAC address configuration.
Displays the MAC address table to verify all MAC addresses on all VEMs controlled by the VSM. |
|
Displays the interface on which the MAC address specified is learned or configured. |
|
Displays the static MAC address of vEthernet interfaces in case a VEM physical port learns a dynamic MAC and the packet source is in another VEM on the same VSM. |
|
show vlan [ all-ports | brief | id < vlan-id > | name < name > | dot1q tag native ] |
Displays VLAN information as specified. See Example 11-4 on page 11-9 . |
Displays a table of interface states. |
|
On the VEM, displays the port state on a particular VEM. |
|
For the specified VEM, displays its VLANs and their port lists . |
|
For the specified VEM, displays the VLAN state on a trunk port. |
|
For the specified VEM, displays the VLAN forwarding table for a specified VLAN. |
|
Displays the MAC addresses and the burn-in MAC address for an interface. |
Example 11-1 show mac address-table

Note The Cisco Nexus 1000VMAC address table does not display multicast MAC addresses.

Tip Module indicates the VEM on which this MAC is seen.
N1KV Internal Port refers to an internal port created on the VEM. This port is used for control and management of the VEM and is not used for forwarding packets.
Example 11-2 show mac address-table address
Tip This command shows all interfaces on which a MAC is learned dynamically.
In this example, the same MAC appears on Eth3/3 and Eth4/3.
Example 11-3 show mac address-table static | inc veth
Tip This command shows the state of each VLAN created on the VSM.
Example 11-5 show interface brief
Example 11-6 module vem module-number execute vemcmd show port
Tip Look for the state of the port.
Example 11-7 module vem module-number execute vemcmd show bd
Tip If a port belongs to a particular VLAN, the port name or LTL should be in the port list for the VLAN.
Example 11-8 module vem module-number execute vemcmd show trunk
Tip If a VLAN is active on a port, then its CBL state should be 1.
If a VLAN is blocked, then its CBL state is 0.
vlan(1) cbl 1, vlan(110) cbl 1, vlan(111) cbl 1, vlan(112) cbl 1, vlan(113) cbl 1, vlan(114) cbl 1,vlan(115) cbl 1, vlan(116) cbl 1, vlan(117) cbl 1, vlan(118) cbl 1, vlan(119) cbl 1,
Example 11-9 module vem module-number execute vemcmd show l2
Troubleshooting Microsoft NLB Unicast Mode
Microsoft Network Load Balancing (MS-NLB) is a clustering technology offered by Microsoft as part of the Windows server operating systems. Clustering enables a group of independent servers to be managed as a single system for higher availability, easier manageability, and greater scalability.
For more information about Microsoft Network Load Balancing. See this URL:
http://technet.microsoft.com/en-us/library/bb742455.aspx
Note Access to third-party websites identified in this document is provided solely as a courtesy to customers and others. Cisco Systems, Inc. and its affiliates are not in any way responsible or liable for the functioning of any third-party website, or the download, performance, quality, functioning or support of any software program or other item accessed through the website, or any damages, repairs, corrections or costs arising out of any use of the website or any software program or other item accessed through the website. Cisco's End User License Agreement does not apply to the terms and conditions of use of a third-party website or any software program or other item accessed through the website.
Limitations and Restrictions
A syslog is generated if one of the following configurations exists when you try to disable automatic static MAC learning for MS-NLB because they do not support this feature:
Disabling Automatic Static MAC Learning on vEthernet
You must disable automatic static MAC learning before you can successfully configure NLB on vEthernet (vEth).
In interface configuration mode use the following commands:
In port profile configuration mode use the following commands:
Checking Status on a VSM
If the NLB unicast mode configuration does not function, check the status of the Virtual Supervisor Module (VSM).
Confirm that no mac auto-static-learn is listed in the vEth and/or port profile configurations.
In interface configuration mode use the following command to generate the VSM status:
switch(config-if)# show running-config int veth1
In port profile configuration mode use the following command to generate the VSM status:
Checking Status on a VEM
If the NLB unicast mode configuration does not function, check the status of the Virtual Ethernet Module (VEM). Check the following:
- Confirm that MS-NLB veths are disabled.
- Confirm that MS-NLB shared-MAC (starting with 02:BF) is not listed in the layer 2 (L2) MAC table
Use the following command to generate the VEM status:
~ # vemcmd show port auto-smac-learning
Use the following command to generate the L2 MAC table for VLAN59:
Bridge domain 15 brtmax 4096, brtcnt 6, timeout 300
Configuring MS NLB for Multiple VM NICs in the Same Subnet
When MS NLB VMs have more than one port on the same subnet, a request is flooded, which causes both ports to receive it. The server cannot manage this situation.
To workaround this situation, enable Unknown Unicast Flood Blocking (UUFB).
Enabling UUFB
To enable UUFB, enter these configuration commands, one on each line. At the end, enter Cntl + Z.
This configuration conceals the requests from the non-NLB ports and allows the system to function as it is expected.
 Feedback