- Preface
- Overview
- Installing Cisco Virtual Switch Update Manager
- Installing Cisco Nexus 1000V Using Cisco Virtual Switch Update Manager
- Managing an Existing Cisco Nexus 1000V Switch
- Migrating Hosts to Cisco Nexus 1000V Using Cisco Virtual Switch Update Manager
- Upgrading Cisco Nexus 1000V Using Cisco Virtual Switch Update Manager
- Monitoring Cisco Nexus 1000V Using Cisco Virtual Switch Update Manager
- Installing a License Using Cisco Virtual Switch Update Manager
- Dashboard-Cisco Nexus 1000V
Cisco Virtual Switch Update Manager Release 1.1 Getting Started Guide for Cisco Nexus 1000V
Bias-Free Language
The documentation set for this product strives to use bias-free language. For the purposes of this documentation set, bias-free is defined as language that does not imply discrimination based on age, disability, gender, racial identity, ethnic identity, sexual orientation, socioeconomic status, and intersectionality. Exceptions may be present in the documentation due to language that is hardcoded in the user interfaces of the product software, language used based on RFP documentation, or language that is used by a referenced third-party product. Learn more about how Cisco is using Inclusive Language.
- Updated:
- November 12, 2014
Chapter: Migrating Hosts to Cisco Nexus 1000V Using Cisco Virtual Switch Update Manager
- Information About Migrating Hosts to the Cisco Nexus 1000V Switch Using Cisco Virtual Switch Update Manager
- Prerequisites for Migrating Hosts to the Cisco Nexus 1000V Using Cisco Virtual Switch Update Manager
- Guidelines and Limitations for Migrating Hosts to the Cisco Nexus 1000V Using Cisco Virtual Switch Update Manager
- Migrating Hosts to the Cisco Nexus 1000V Using Cisco Virtual Switch Update Manager
- Feature History for Migrating Hosts to the Cisco Nexus 1000V Using Cisco Virtual Switch Update Manager
Migrating Hosts to Cisco Nexus 1000V Using Cisco Virtual Switch Update Manager
This chapter contains the following sections:
- Information About Migrating Hosts to the Cisco Nexus 1000V Switch Using Cisco Virtual Switch Update Manager
- Prerequisites for Migrating Hosts to the Cisco Nexus 1000V Using Cisco Virtual Switch Update Manager
- Guidelines and Limitations for Migrating Hosts to the Cisco Nexus 1000V Using Cisco Virtual Switch Update Manager
- Migrating Hosts to the Cisco Nexus 1000V Using Cisco Virtual Switch Update Manager
- Feature History for Migrating Hosts to the Cisco Nexus 1000V Using Cisco Virtual Switch Update Manager
Information About Migrating Hosts to the Cisco Nexus 1000V Switch Using Cisco Virtual Switch Update Manager
You can use the Cisco Virtual Switch Update Manager GUI to migrate hosts from the VMware vSwitch and VMware distributed virtual switch (DVS) to the Cisco Nexus 1000V switch.
Cisco Virtual Switch Update Manager enables you to do the following:
-
Add hosts and/or Migrate multiple hosts.
-
Migrate each VMware port group or kernel NIC to the correct port profile.
-
Migrate each physical NIC from the VMware vSwitch or VMware DVS to the correct uplink on the Cisco Nexus 1000V.
-
Migrate VM NICs from the VMware vSwitch or VMware DVS to the corresponding uplink on the Cisco Nexus 1000V.
See the Cisco Nexus 1000V and VMware Compatibility Information for more information on the compatibility information for Cisco Nexus 1000V.
Prerequisites for Migrating Hosts to the Cisco Nexus 1000V Using Cisco Virtual Switch Update Manager
The migration of hosts to the Cisco Nexus 1000V using Cisco Virtual Switch Update Manager has the following prerequisites:
Guidelines and Limitations for Migrating Hosts to the Cisco Nexus 1000V Using Cisco Virtual Switch Update Manager
When you move the ESX/ESXi host that runs the Virtual Supervisor module (VSM) from the VMware vSwitch or VMware DVS to the Cisco Nexus 1000V, the connectivity between the active and standby VSM might get temporarily lost. In that situation, both active and standby VSMs assume the active role.
The reboot of the VSM is based on the following conditions:

Migrating Hosts to the Cisco Nexus 1000V Using Cisco Virtual Switch Update Manager
You can install a Cisco Nexus 1000V Virtual Ethernet module (VEM) using Cisco Virtual Switch Update Manager. When the Cisco Virtual Switch Update Manager installs VEMs, it migrates all VM kernels and their corresponding VM NICs across vSwitches to the Cisco Nexus 1000V VEMs.
Know the following information about the switch:
| Step 1 | Log in to the VMware vSphere Web Client. | ||||||||||||||||||||||
| Step 2 | In the vSphere Client, choose . | ||||||||||||||||||||||
| Step 3 | Choose a
datacenter and a distributed virtual switch, and then click
Manage.
| ||||||||||||||||||||||
| Step 4 | In the switch pane, click Add Host. | ||||||||||||||||||||||
| Step 5 | (Optional)In case of multiple vCenter Servers, choose . | ||||||||||||||||||||||
| Step 6 | (Optional)You can also access the Cisco Virtual Switch Update Manager in the vSphere Client by navigating to . | ||||||||||||||||||||||
| Step 7 | (Optional) In the switch
pane, click
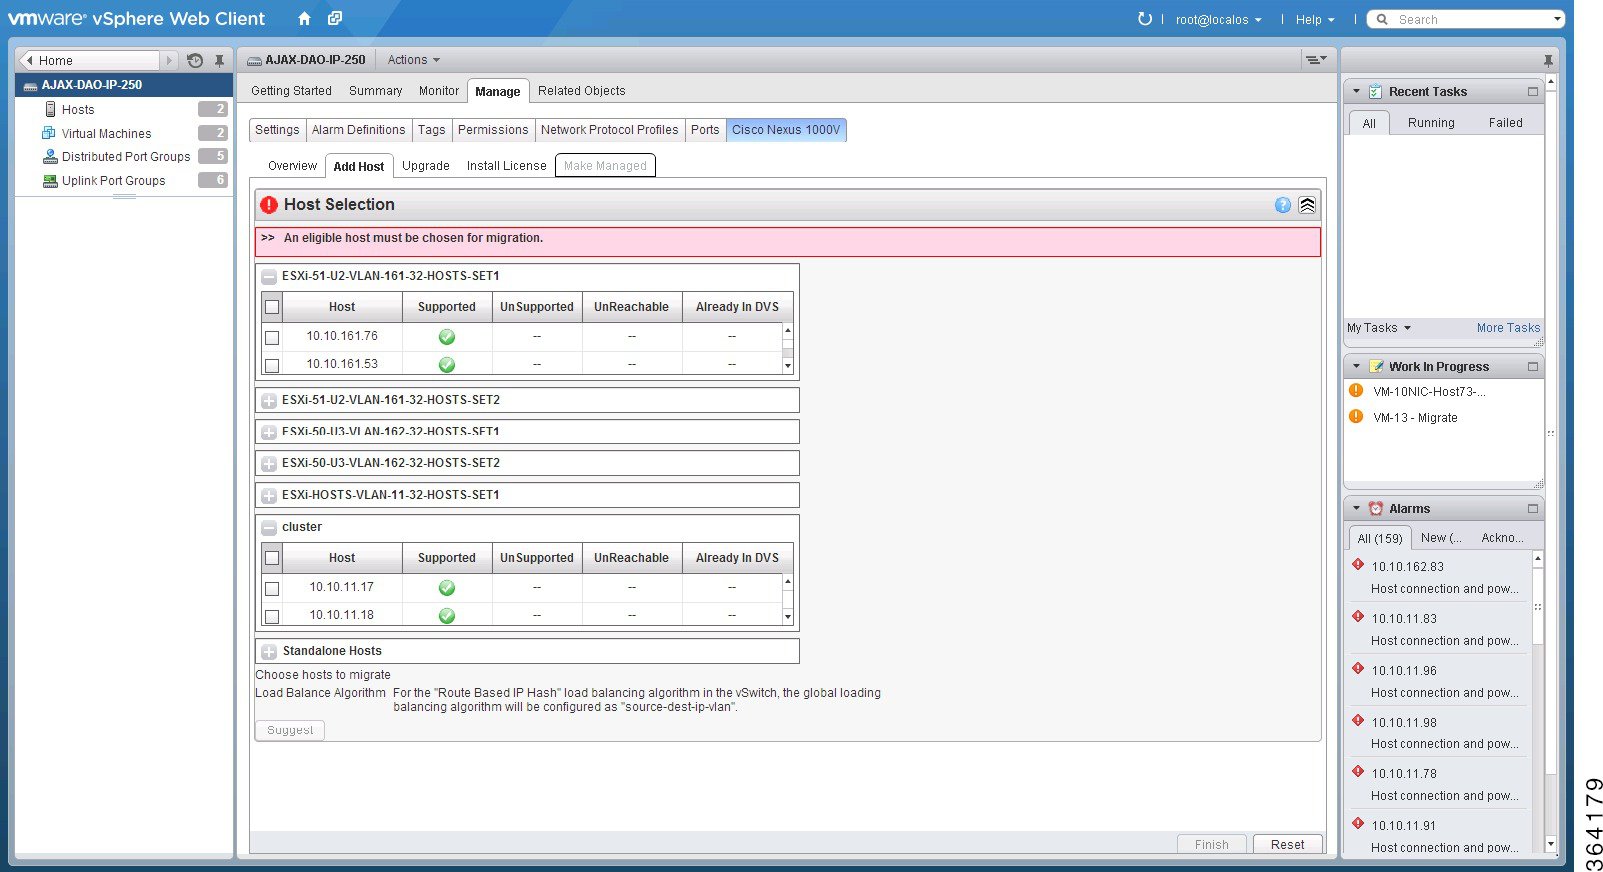 | ||||||||||||||||||||||
| Step 8 | In the
Host
Selection area, review the following fields.
| ||||||||||||||||||||||
| Step 9 | Click Suggest. Cisco Virtual Switch Update Manager displays the list of existing and proposed port profiles and suggests appropriate port profiles for each VMKNIC, VM NIC, and physical NICs. | ||||||||||||||||||||||
| Step 10 | Review the
port profile populated in the
Port
Profile Editor area. You can edit the fields based on your
requirements. To edit the fields, you must use the
Port
Profile Editor.
The port profiles that are already available on the VSM are not editable. You can edit only those port profiles that are suggested by the Cisco Virtual Switch Update Manager. Click the Duplicate button to create a new port profile from an existing or from a suggested port profile. | ||||||||||||||||||||||
| Step 11 | In the
Port
Profile Editor area, complete the following fields.
| ||||||||||||||||||||||
| Step 12 | Scroll down to view the host profile populated in the Physical NIC Migration area. | ||||||||||||||||||||||
| Step 13 | In the
Physical
NIC Migration area, review the following fields.
| ||||||||||||||||||||||
| Step 14 | Scroll down to view the host profile populated in the VM Kernel NIC Setup area. | ||||||||||||||||||||||
| Step 15 | In the
VM Kernel
NIC Setup area, complete the following fields.
| ||||||||||||||||||||||
| Step 16 | Scroll down to view the host profile populated in the VM Migration area. | ||||||||||||||||||||||
| Step 17 | In the
VM
Migration area, review the following fields.
| ||||||||||||||||||||||
| Step 18 | Click Finish to migrate the host from the VMware vSwitch to the Cisco Nexus 1000V switch. | ||||||||||||||||||||||
| Step 19 | Check the
status of the installation by completing the following steps:
|
Feature History for Migrating Hosts to the Cisco Nexus 1000V Using Cisco Virtual Switch Update Manager
This table includes only the updates for those releases that have resulted in additions or changes to the feature.
|
Feature Name |
Releases |
Feature Information |
|---|---|---|
|
Migrating hosts to the Cisco Nexus 1000V using Cisco Virtual Switch Update Manager |
Release 1.0 |
This feature was introduced. |
|
Migrating hosts to the Cisco Nexus 1000V using Cisco Virtual Switch Update Manager |
Release 1.1 |
Users can check status of adding a host with VSUM in the vCenter Task Console. |
 Feedback