Network Management Configuration Guide, Cisco IOS Release 15.2(2)E (Catalyst 2960-XR Switch)
Bias-Free Language
The documentation set for this product strives to use bias-free language. For the purposes of this documentation set, bias-free is defined as language that does not imply discrimination based on age, disability, gender, racial identity, ethnic identity, sexual orientation, socioeconomic status, and intersectionality. Exceptions may be present in the documentation due to language that is hardcoded in the user interfaces of the product software, language used based on RFP documentation, or language that is used by a referenced third-party product. Learn more about how Cisco is using Inclusive Language.
- Updated:
- August 8, 2014
Chapter: Configuring SPAN and RSPAN
- Finding Feature Information
- Prerequisites for SPAN and RSPAN
- Restrictions for SPAN and RSPAN
- Information About SPAN and RSPAN
- Creating a Local SPAN Session
- Creating a Local SPAN Session and Configuring Incoming Traffic
- Specifying VLANs to Filter
- Configuring a VLAN as an RSPAN VLAN
- Creating an RSPAN Source Session
- Specifying VLANs to Filter
- Creating an RSPAN Destination Session
- Creating an RSPAN Destination Session and Configuring Incoming Traffic
- Configuring an FSPAN Session
- Configuring an FRSPAN Session
Configuring SPAN and RSPAN
- Finding Feature Information
- Prerequisites for SPAN and RSPAN
- Restrictions for SPAN and RSPAN
- Information About SPAN and RSPAN
- How to Configure SPAN and RSPAN
- Monitoring SPAN and RSPAN Operations
- SPAN and RSPAN Configuration Examples
- Additional References
- Feature History and Information for SPAN and RSPAN
Finding Feature Information
Your software release may not support all the features documented in this module. For the latest caveats and feature information, see Bug Search Tool and the release notes for your platform and software release. To find information about the features documented in this module, and to see a list of the releases in which each feature is supported, see the feature information table at the end of this module.
Use Cisco Feature Navigator to find information about platform support and Cisco software image support. To access Cisco Feature Navigator, go to http://www.cisco.com/go/cfn. An account on Cisco.com is not required.
Prerequisites for SPAN and RSPAN
SPAN
RSPAN
Restrictions for SPAN and RSPAN
SPAN
- On each switch, you can configure a maximum of 4 (2 if switch is stacked with Catalyst 2960-S switches) source sessions and 64 RSPAN destination sessions. A source session is either a local SPAN session or an RSPAN source session.
- For SPAN sources, you can monitor traffic for a single port or VLAN or a series or range of ports or VLANs for each session. You cannot mix source ports and source VLANs within a single SPAN session.
- The destination port cannot be a source port; a source port cannot be a destination port.
- You cannot have two SPAN sessions using the same destination port.
- When you configure a switch port as a SPAN destination port, it is no longer a normal switch port; only monitored traffic passes through the SPAN destination port.
- Entering SPAN configuration commands does not remove previously configured SPAN parameters. You must enter the no monitor session {session_number | all | local | remote} global configuration command to delete configured SPAN parameters.
- For local SPAN, outgoing packets through the SPAN destination port carry the original encapsulation headers—untagged or IEEE 802.1Q—if the encapsulation replicate keywords are specified. If the keywords are not specified, the packets are sent in native form.
- You can configure a disabled port to be a source or destination port, but the SPAN function does not start until the destination port and at least one source port or source VLAN are enabled.
- You cannot mix source VLANs and filter VLANs within a single SPAN session.
- Stacking is supported only on switches running the LAN Base image.
Traffic monitoring in a SPAN session has the following restrictions:
- Sources can be ports or VLANs, but you cannot mix source ports and source VLANs in the same session.
-
- You can run both a local SPAN and an RSPAN source session in the same switch or switch stack. The switch or switch stack supports a total of 64 source and RSPAN destination sessions.
- You can configure two separate SPAN or RSPAN source sessions with separate or overlapping sets of SPAN source ports and VLANs. Both switched and routed ports can be configured as SPAN sources and destinations.
- You can have multiple destination ports in a SPAN session, but no more than 64 destination ports per switch stack.
- SPAN sessions do not interfere with the normal operation of the switch. However, an oversubscribed SPAN destination, for example, a 10-Mb/s port monitoring a 100-Mb/s port, can result in dropped or lost packets.
- When SPAN or RSPAN is enabled, each packet being monitored is sent twice, once as normal traffic and once as a monitored packet. Monitoring a large number of ports or VLANs could potentially generate large amounts of network traffic.
- You can configure SPAN sessions on disabled ports; however, a SPAN session does not become active unless you enable the destination port and at least one source port or VLAN for that session.
- The switch does not support a combination of local SPAN and RSPAN in a single session.
RSPAN
- RSPAN does not support BPDU packet monitoring or other Layer 2 switch protocols.
- The RSPAN VLAN is configured only on trunk ports and not on access ports. To avoid unwanted traffic in RSPAN VLANs, make sure that the VLAN remote-span feature is supported in all the participating switches.
- RSPAN VLANs are included as sources for port-based RSPAN sessions when source trunk ports have active RSPAN VLANs. RSPAN VLANs can also be sources in SPAN sessions. However, since the switch does not monitor spanned traffic, it does not support egress spanning of packets on any RSPAN VLAN identified as the destination of an RSPAN source session on the switch.
- If you enable VTP and VTP pruning, RSPAN traffic is pruned in the trunks to prevent the unwanted flooding of RSPAN traffic across the network for VLAN IDs that are lower than 1005.
Flow-Based SPAN (FSPAN) and Flow-Based RSPAN (FRSPAN)
- You can attach ACLs to only one SPAN or RSPAN session at a time.
- When no FSPAN ACLs are attached, FSPAN is disabled, and all traffic is copied to the SPAN destination ports.
- When you attach an empty FSPAN ACL to a SPAN session, it does not filter packets, and all traffic is monitored.
-
FSPAN ACLs cannot be applied
to per-port-per-VLAN sessions. You can configure per-port-per-VLAN sessions by
first configuring a port-based session and then configuring specific VLANs to
the session. For example:
Switch(config)# monitor session session_number source interface interface-id
Switch(config)# monitor session session_number filter vlan vlan-id
Switch(config)# monitor session session_number filter ip access-group {access-list-number| name}

Note
Both the filter vlan and filter ip access-group commands cannot be configured at the same time. Configuring one results in rejection of the other.
- EtherChannels are not supported in an FSPAN session.
- FSPAN ACLs with TCP flags or the log keyword are not supported.
- If you configure an IPv6 FSPAN ACL when the switch is running the advanced IP Services feature set but later run a different feature set, after rebooting the switch, the switch might lose the IPv6 FSPAN ACL configuration.
- IPv6 FSPAN ACLs are supported only on IPv6-enabled SDM templates. If you configure an IPv6 FSPAN ACL when running an IPv6 enabled SDM template, but later configure a non-IPv6 SDM template and reboot the switch, you lose the IPv6 FSPAN ACL configuration.
Information About SPAN and RSPAN
SPAN and RSPAN
You can analyze network traffic passing through ports or VLANs by using SPAN or RSPAN to send a copy of the traffic to another port on the switch or on another switch that has been connected to a network analyzer or other monitoring or security device. SPAN copies (or mirrors) traffic received or sent (or both) on source ports or source VLANs to a destination port for analysis. SPAN does not affect the switching of network traffic on the source ports or VLANs. You must dedicate the destination port for SPAN use. Except for traffic that is required for the SPAN or RSPAN session, destination ports do not receive or forward traffic.
Only traffic that enters or leaves source ports or traffic that enters or leaves source VLANs can be monitored by using SPAN; traffic routed to a source VLAN cannot be monitored. For example, if incoming traffic is being monitored, traffic that gets routed from another VLAN to the source VLAN cannot be monitored; however, traffic that is received on the source VLAN and routed to another VLAN can be monitored.
You can use the SPAN or RSPAN destination port to inject traffic from a network security device. For example, if you connect a Cisco Intrusion Detection System (IDS) sensor appliance to a destination port, the IDS device can send TCP reset packets to close down the TCP session of a suspected attacker.
- Local SPAN
- Remote SPAN
- SPAN and RSPAN Concepts and Terminology
- SPAN and RSPAN Interaction with Other Features
- SPAN and RSPAN and Device Stacks
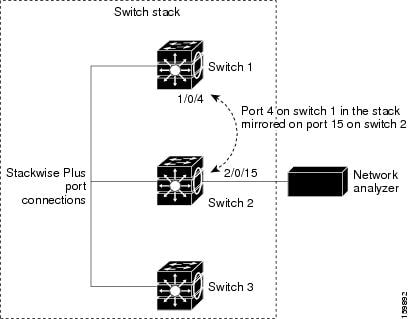
Local SPAN
Local SPAN supports a SPAN session entirely within one switch; all source ports or source VLANs and destination ports are in the same switch or switch stack. Local SPAN copies traffic from one or more source ports in any VLAN or from one or more VLANs to a destination port for analysis.
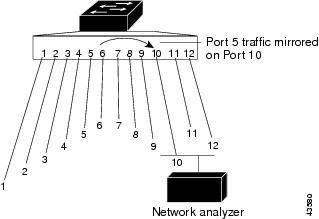
This is an example of a local SPAN in a switch stack, where the source and destination ports reside on different stack members.
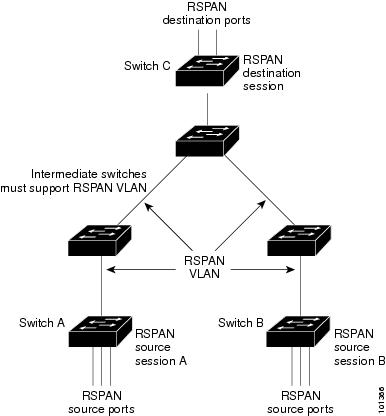
Remote SPAN
RSPAN supports source ports, source VLANs, and destination ports on different switches (or different switch stacks), enabling remote monitoring of multiple switches across your network.
SPAN and RSPAN Concepts and Terminology
SPAN Sessions
SPAN sessions (local or remote) allow you to monitor traffic on one or more ports, or one or more VLANs, and send the monitored traffic to one or more destination ports.
A local SPAN session is an association of a destination port with source ports or source VLANs, all on a single network device. Local SPAN does not have separate source and destination sessions. Local SPAN sessions gather a set of ingress and egress packets specified by the user and form them into a stream of SPAN data, which is directed to the destination port.
RSPAN consists of at least one RSPAN source session, an RSPAN VLAN, and at least one RSPAN destination session. You separately configure RSPAN source sessions and RSPAN destination sessions on different network devices. To configure an RSPAN source session on a device, you associate a set of source ports or source VLANs with an RSPAN VLAN. The output of this session is the stream of SPAN packets that are sent to the RSPAN VLAN. To configure an RSPAN destination session on another device, you associate the destination port with the RSPAN VLAN. The destination session collects all RSPAN VLAN traffic and sends it out the RSPAN destination port.
An RSPAN source session is very similar to a local SPAN session, except for where the packet stream is directed. In an RSPAN source session, SPAN packets are relabeled with the RSPAN VLAN ID and directed over normal trunk ports to the destination switch.
An RSPAN destination session takes all packets received on the RSPAN VLAN, strips off the VLAN tagging, and presents them on the destination port. The session presents a copy of all RSPAN VLAN packets (except Layer 2 control packets) to the user for analysis.
More than one source session and more than one destination session can be active in the same RSPAN VLAN. Intermediate switches also can separate the RSPAN source and destination sessions. These switches are unable to run RSPAN, but they must respond to the requirements of the RSPAN VLAN.
Traffic monitoring in a SPAN session has these restrictions:
- Sources can be ports or VLANs, but you cannot mix source ports and source VLANs in the same session.
-
The
switch supports up to two local SPAN or RSPAN
source sessions.
- You can run both a local SPAN and an RSPAN source session in the same switch or switch stack. The switch or switch stack supports a total of 64 source and RSPAN destination sessions.
- You can configure two separate SPAN or RSPAN source sessions with separate or overlapping sets of SPAN source ports and VLANs. Both switched and routed ports can be configured as SPAN sources and destinations.
- You can have multiple destination ports in a SPAN session, but no more than 64 destination ports per switch stack.
- SPAN sessions do not interfere with the normal operation of the switch. However, an oversubscribed SPAN destination, for example, a 10-Mb/s port monitoring a 100-Mb/s port, can result in dropped or lost packets.
- When SPAN or RSPAN is enabled, each packet being monitored is sent twice, once as normal traffic and once as a monitored packet. Therefore monitoring a large number of ports or VLANs could potentially generate large amounts of network traffic.
- You can configure SPAN sessions on disabled ports; however, a SPAN session does not become active unless you enable the destination port and at least one source port or VLAN for that session.
- The switch does not support a combination of local SPAN and RSPAN in a single session.
Monitored Traffic
SPAN sessions can monitor these traffic types:
- Receive (Rx) SPAN—Receive (or ingress) SPAN monitors as much as possible all of the packets received by the source interface or VLAN before any modification or processing is performed by the switch. A copy of each packet received by the source is sent to the destination port for that SPAN session. Packets that are modified because of routing or Quality of Service (QoS)—for example, modified Differentiated Services Code Point (DSCP)—are copied before modification. Features that can cause a packet to be dropped during receive processing have no effect on ingress SPAN; the destination port receives a copy of the packet even if the actual incoming packet is dropped. These features include IP standard and extended input Access Control Lists (ACLs), ingress QoS policing, VLAN ACLs, and egress QoS policing.
- Transmit (Tx) SPAN—Transmit (or egress) SPAN monitors as much as possible all of the packets sent by the source interface after all modification and processing is performed by the switch. A copy of each packet sent by the source is sent to the destination port for that SPAN session. The copy is provided after the packet is modified. Packets that are modified because of routing (for example, with modified time-to-live (TTL), MAC address, or QoS values) are duplicated (with the modifications) at the destination port. Features that can cause a packet to be dropped during transmit processing also affect the duplicated copy for SPAN. These features include IP standard and extended output ACLs and egress QoS policing.
- Both—In a SPAN session, you can also monitor a port or VLAN for both received and sent packets. This is the default.
The default configuration for local SPAN session ports is to send all packets untagged. SPAN also does not normally monitor bridge protocol data unit (BPDU) packets and Layer 2 protocols, such as Cisco Discovery Protocol (CDP), VLAN Trunk Protocol (VTP), Dynamic Trunking Protocol (DTP), Spanning Tree Protocol (STP), and Port Aggregation Protocol (PAgP). However, when you enter the encapsulation replicate keywords when configuring a destination port, these changes occur:
- Packets are sent on the destination port with the same encapsulation (untagged or IEEE 802.1Q) that they had on the source port.
- Packets of all types, including BPDU and Layer 2 protocol packets, are monitored.
Therefore, a local SPAN session with encapsulation replicate enabled can have a mixture of untagged and IEEE 802.1Q tagged packets appear on the destination port.
Switch congestion can cause packets to be dropped at ingress source ports, egress source ports, or SPAN destination ports. In general, these characteristics are independent of one another. For example:
- A packet might be forwarded normally but dropped from monitoring due to an oversubscribed SPAN destination port.
- An ingress packet might be dropped from normal forwarding, but still appear on the SPAN destination port.
- An egress packet dropped because of switch congestion is also dropped from egress SPAN.
In some SPAN configurations, multiple copies of the same source packet are sent to the SPAN destination port. For example, a bidirectional (both Rx and Tx) SPAN session is configured for the Rx monitor on port A and Tx monitor on port B. If a packet enters the switch through port A and is switched to port B, both incoming and outgoing packets are sent to the destination port. Both packets are the same unless a Layer 3 rewrite occurs, in which case the packets are different because of the packet modification.
Source Ports
A source port (also called a monitored port) is a switched or routed port that you monitor for network traffic analysis. In a local SPAN session or RSPAN source session, you can monitor source ports or VLANs for traffic in one or both directions. The switch supports any number of source ports (up to the maximum number of available ports on the switch) and any number of source VLANs (up to the maximum number of VLANs supported). However, the switch supports a maximum of (local or RSPAN) with source ports or VLANs. You cannot mix ports and VLANs in a single session.
A source port has these characteristics:
- It can be monitored in multiple SPAN sessions.
- Each source port can be configured with a direction (ingress, egress, or both) to monitor.
- It can be any port type (for example, EtherChannel, Gigabit Ethernet, and so forth).
- For EtherChannel sources, you can monitor traffic for the entire EtherChannel or individually on a physical port as it participates in the port channel.
- It can be an access port, trunk port, routed port, or voice VLAN port.
- It cannot be a destination port.
- Source ports can be in the same or different VLANs.
- You can monitor multiple source ports in a single session.
Source VLANs
VLAN-based SPAN (VSPAN) is the monitoring of the network traffic in one or more VLANs. The SPAN or RSPAN source interface in VSPAN is a VLAN ID, and traffic is monitored on all the ports for that VLAN.
VSPAN has these characteristics:
- All active ports in the source VLAN are included as source ports and can be monitored in either or both directions.
- On a given port, only traffic on the monitored VLAN is sent to the destination port.
- If a destination port belongs to a source VLAN, it is excluded from the source list and is not monitored.
- If ports are added to or removed from the source VLANs, the traffic on the source VLAN received by those ports is added to or removed from the sources being monitored.
- You cannot use filter VLANs in the same session with VLAN sources.
- You can monitor only Ethernet VLANs.
VLAN Filtering
When you monitor a trunk port as a source port, by default, all VLANs active on the trunk are monitored. You can limit SPAN traffic monitoring on trunk source ports to specific VLANs by using VLAN filtering.
- VLAN filtering applies only to trunk ports or to voice VLAN ports.
- VLAN filtering applies only to port-based sessions and is not allowed in sessions with VLAN sources.
- When a VLAN filter list is specified, only those VLANs in the list are monitored on trunk ports or on voice VLAN access ports.
- SPAN traffic coming from other port types is not affected by VLAN filtering; that is, all VLANs are allowed on other ports.
- VLAN filtering affects only traffic forwarded to the destination SPAN port and does not affect the switching of normal traffic.
Destination Port
Each local SPAN session or RSPAN destination session must have a destination port (also called a monitoring port) that receives a copy of traffic from the source ports or VLANs and sends the SPAN packets to the user, usually a network analyzer.
A destination port has these characteristics:
- For a local SPAN session, the destination port must reside on the same switch or switch stack as the source port. For an RSPAN session, it is located on the switch containing the RSPAN destination session. There is no destination port on a switch or switch stack running only an RSPAN source session.
-
When a port is configured as
a SPAN destination port, the configuration overwrites the original port
configuration. When the SPAN destination configuration is removed, the port
reverts to its previous configuration. If a configuration change is made to the
port while it is acting as a SPAN destination port, the change does not take
effect until the SPAN destination configuration had been removed.
Note
When QoS is configured on the SPAN destination port, QoS takes effect immediately.
- If the port was in an EtherChannel group, it is removed from the group while it is a destination port. If it was a routed port, it is no longer a routed port.
- It can be any Ethernet physical port.
- It cannot be a secure port.
- It cannot be a source port.
- It can participate in only one SPAN session at a time (a destination port in one SPAN session cannot be a destination port for a second SPAN session).
- When it is active, incoming traffic is disabled. The port does not transmit any traffic except that required for the SPAN session. Incoming traffic is never learned or forwarded on a destination port.
- If ingress traffic forwarding is enabled for a network security device, the destination port forwards traffic at Layer 2.
- It does not participate in any of the Layer 2 protocols (STP, VTP, CDP, DTP, PagP).
- A destination port that belongs to a source VLAN of any SPAN session is excluded from the source list and is not monitored.
- The maximum number of destination ports in a switch or switch stack is 64.
Local SPAN and RSPAN destination ports function differently with VLAN tagging and encapsulation:
- For local SPAN, if the encapsulation replicate keywords are specified for the destination port, these packets appear with the original encapsulation (untagged, ISL, or IEEE 802.1Q). If these keywords are not specified, packets appear in the untagged format. Therefore, the output of a local SPAN session with encapsulation replicate enabled can contain a mixture of untagged, ISL, or IEEE 802.1Q-tagged packets.
- For RSPAN, the original VLAN ID is lost because it is overwritten by the RSPAN VLAN identification. Therefore, all packets appear on the destination port as untagged.
RSPAN VLAN
The RSPAN VLAN carries SPAN traffic between RSPAN source and destination sessions. RSPAN VLAN has these special characteristics:
- All traffic in the RSPAN VLAN is always flooded.
- No MAC address learning occurs on the RSPAN VLAN.
- RSPAN VLAN traffic only flows on trunk ports.
- RSPAN VLANs must be configured in VLAN configuration mode by using the remote-span VLAN configuration mode command.
- STP can run on RSPAN VLAN trunks but not on SPAN destination ports.
- An RSPAN VLAN cannot be a private-VLAN primary or secondary VLAN.
For VLANs 1 to 1005 that are visible to VLAN Trunking Protocol (VTP), the VLAN ID and its associated RSPAN characteristic are propagated by VTP. If you assign an RSPAN VLAN ID in the extended VLAN range (1006 to 4094), you must manually configure all intermediate switches.
It is normal to have multiple RSPAN VLANs in a network at the same time with each RSPAN VLAN defining a network-wide RSPAN session. That is, multiple RSPAN source sessions anywhere in the network can contribute packets to the RSPAN session. It is also possible to have multiple RSPAN destination sessions throughout the network, monitoring the same RSPAN VLAN and presenting traffic to the user. The RSPAN VLAN ID separates the sessions.
SPAN and RSPAN Interaction with Other Features
SPAN interacts with these features:
- Routing—SPAN does not monitor routed traffic. VSPAN only monitors traffic that enters or exits the switch, not traffic that is routed between VLANs. For example, if a VLAN is being Rx-monitored and the switch routes traffic from another VLAN to the monitored VLAN, that traffic is not monitored and not received on the SPAN destination port.
- STP—A destination port does not participate in STP while its SPAN or RSPAN session is active. The destination port can participate in STP after the SPAN or RSPAN session is disabled. On a source port, SPAN does not affect the STP status. STP can be active on trunk ports carrying an RSPAN VLAN.
- CDP—A SPAN destination port does not participate in CDP while the SPAN session is active. After the SPAN session is disabled, the port again participates in CDP.
- VTP—You can use VTP to prune an RSPAN VLAN between switches.
- VLAN and trunking—You can modify VLAN membership or trunk settings for source or destination ports at any time. However, changes in VLAN membership or trunk settings for a destination port do not take effect until you remove the SPAN destination configuration. Changes in VLAN membership or trunk settings for a source port immediately take effect, and the respective SPAN sessions automatically adjust accordingly.
- EtherChannel—You can configure an EtherChannel group as a source port a SPAN destination port. When a group is configured as a SPAN source, the entire group is monitored. If a physical port is added to a monitored EtherChannel group, the new port is added to the SPAN source port list. If a port is removed from a monitored EtherChannel group, it is automatically removed from the source port list. A physical port that belongs to an EtherChannel group can be configured as a SPAN source port and still be a part of the EtherChannel. In this case, data from the physical port is monitored as it participates in the EtherChannel. However, if a physical port that belongs to an EtherChannel group is configured as a SPAN destination, it is removed from the group. After the port is removed from the SPAN session, it rejoins the EtherChannel group. Ports removed from an EtherChannel group remain members of the group, but they are in the inactive or suspended state. If a physical port that belongs to an EtherChannel group is a destination port and the EtherChannel group is a source, the port is removed from the EtherChannel group and from the list of monitored ports.
- Multicast traffic can be monitored. For egress and ingress port monitoring, only a single unedited packet is sent to the SPAN destination port. It does not reflect the number of times the multicast packet is sent.
- A private-VLAN port cannot be a SPAN destination port.
- A secure port cannot be a SPAN destination port. For SPAN sessions, do not enable port security on ports with monitored egress when ingress forwarding is enabled on the destination port. For RSPAN source sessions, do not enable port security on any ports with monitored egress.
- An IEEE 802.1x port can be a SPAN source port. You can enable IEEE 802.1x on a port that is a SPAN destination port; however, IEEE 802.1x is disabled until the port is removed as a SPAN destination. For SPAN sessions, do not enable IEEE 802.1x on ports with monitored egress when ingress forwarding is enabled on the destination port. For RSPAN source sessions, do not enable IEEE 802.1x on any ports that are egress monitored.
SPAN and RSPAN and Device Stacks
Because the stack of switches represents one logical switch, local SPAN source ports and destination ports can be in different switches in the stack. Therefore, the addition or deletion of switches in the stack can affect a local SPAN session, as well as an RSPAN source or destination session. An active session can become inactive when a switch is removed from the stack or an inactive session can become active when a switch is added to the stack.
Flow-Based SPAN
You can control the type of network traffic to be monitored in SPAN or RSPAN sessions by using flow-based SPAN (FSPAN) or flow-based RSPAN (FRSPAN), which apply access control lists (ACLs) to the monitored traffic on the source ports. The FSPAN ACLs can be configured to filter IPv4, IPv6, and non-IP monitored traffic.
You apply an ACL to a SPAN session through the interface. It is applied to all the traffic that is monitored on all interfaces in the SPAN session.The packets that are permitted by this ACL are copied to the SPAN destination port. No other packets are copied to the SPAN destination port.
The original traffic continues to be forwarded, and any port, VLAN, and router ACLs attached are applied. The FSPAN ACL does not have any effect on the forwarding decisions. Similarly, the port, VLAN, and router ACLs do not have any effect on the traffic monitoring. If a security input ACL denies a packet and it is not forwarded, the packet is still copied to the SPAN destination ports if the FSPAN ACL permits it. But if the security output ACL denies a packet and it is not sent, it is not copied to the SPAN destination ports. However, if the security output ACL permits the packet to go out, it is only copied to the SPAN destination ports if the FSPAN ACL permits it. This is also true for an RSPAN session.
You can attach three types of FSPAN ACLs to the SPAN session:
- IPv4 FSPAN ACL— Filters only IPv4 packets.
- IPv6 FSPAN ACL— Filters only IPv6 packets.
- MAC FSPAN ACL— Filters only non-IP packets.
The security ACLs have higher priority than the FSPAN ACLs on a switch. If FSPAN ACLs are applied, and you later add more security ACLs that cannot fit in the hardware memory, the FSPAN ACLs that you applied are removed from memory to allow space for the security ACLs. A system message notifies you of this action, which is called unloading. When there is again space for the FSPAN ACLs to reside in memory, they are added to the hardware memory on the switch. A system message notifies you of this action, which is called reloading. The IPv4, IPv6 and MAC FSPAN ACLs can be unloaded or reloaded independently.
If a VLAN-based FSPAN session configured on a stack cannot fit in the hardware memory on one or more switches, it is treated as unloaded on those switches, and traffic meant for the FSPAN ACL and sourcing on that switch is not copied to the SPAN destination ports. The FSPAN ACL continues to be correctly applied, and traffic is copied to the SPAN destination ports on the switches where the FSPAN ACL fits in the hardware memory.
When an empty FSPAN ACL is attached, some hardware functions copy all traffic to the SPAN destination ports for that ACL. If sufficient hardware resources are not available, even an empty FSPAN ACL can be unloaded.
IPv4 and MAC FSPAN ACLs are supported on all feature sets. IPv6 FSPAN ACLs are supported only in the advanced IP Services feature set.
Default SPAN and RSPAN Configuration
On a trunk interface used as a source port, all VLANs are monitored. |
|
Configuration Guidelines
SPAN Configuration Guidelines
- To remove a source or destination port or VLAN from the SPAN session, use the no monitor session session_number source {interface interface-id | vlan vlan-id} global configuration command or the no monitor session session_number destination interface interface-id global configuration command. For destination interfaces, the encapsulation options are ignored with the no form of the command.
- To monitor all VLANs on the trunk port, use the no monitor session session_number filter global configuration command.
RSPAN Configuration Guidelines
- All the SPAN configuration guidelines apply to RSPAN.
- As RSPAN VLANs have special properties, you should reserve a few VLANs across your network for use as RSPAN VLANs; do not assign access ports to these VLANs.
- You can apply an output ACL to RSPAN traffic to selectively filter or monitor specific packets. Specify these ACLs on the RSPAN VLAN in the RSPAN source switches.
- For RSPAN configuration, you can distribute the source ports and the destination ports across multiple switches in your network.
- Access ports (including voice VLAN ports) on the RSPAN VLAN are put in the inactive state.
- You can configure any VLAN as an RSPAN VLAN as long as these conditions are met:
FSPAN and FRSPAN Configuration Guidelines
- When at least one FSPAN ACL is attached, FSPAN is enabled.
- When you attach at least one FSPAN ACL that is not empty to a SPAN session, and you have not attached one or more of the other FSPAN ACLs (for instance, you have attached an IPv4 ACL that is not empty, and have not attached IPv6 and MAC ACLs), FSPAN blocks the traffic that would have been filtered by the unattached ACLs. Therefore, this traffic is not monitored.
How to Configure SPAN and RSPAN
Creating a Local SPAN Session
Follow these steps to create a SPAN session and specify the source (monitored) ports or VLANs and the destination (monitoring) ports.
1.
enable
3.
no monitor session
{session_number |
all |
local |
remote}
4. monitor session session_number source {interface interface-id | vlan vlan-id} [, | -] [both | rx | tx]
5.
monitor session
session_number
destination
{interface
interface-id
[, |
-] [encapsulation replicate]}
8.
copy running-config
startup-config
DETAILED STEPS
Creating a Local SPAN Session and Configuring Incoming Traffic
Follow these steps to create a SPAN session, to specify the source ports or VLANs and the destination ports, and to enable incoming traffic on the destination port for a network security device (such as a Cisco IDS Sensor Appliance).
1.
enable
3.
no monitor session
{session_number |
all |
local |
remote}
4.
monitor session
session_number
source {interface
interface-id |
vlan vlan-id} [, |
-] [both |
rx |
tx]
5.
monitor session
session_number
destination
{interface
interface-id
[, |
-] [encapsulation replicate]
[ingress {dot1q vlan
vlan-id |
isl |
untagged vlan
vlan-id
|
vlan
vlan-id}]}
8.
copy running-config
startup-config
DETAILED STEPS
| Command or Action | Purpose | |
|---|---|---|
| Step 1 |
enable
Example:
Switch> enable
|
Enables privileged EXEC mode. Enter your password if prompted. |
| Step 2 | configure
terminal
Example: Switch# configure terminal | |
| Step 3 | no monitor session
{session_number |
all |
local |
remote}
Example: Switch(config)# no monitor session all | |
| Step 4 | monitor session
session_number
source {interface
interface-id |
vlan vlan-id} [, |
-] [both |
rx |
tx]
Example: Switch(config)# monitor session 2 source gigabitethernet1/0/1 rx |
Specifies the SPAN session and the source port (monitored port). |
| Step 5 | monitor session
session_number
destination
{interface
interface-id
[, |
-] [encapsulation replicate]
[ingress {dot1q vlan
vlan-id |
isl |
untagged vlan
vlan-id
|
vlan
vlan-id}]}
Example: Switch(config)# monitor session 2 destination interface gigabitethernet1/0/2 encapsulation replicate ingress dot1q vlan 6 |
Specifies the SPAN session, the destination port, the packet encapsulation, and the ingress VLAN and encapsulation.
|
| Step 6 | end
Example: Switch(config)# end | |
| Step 7 | show running-config
Example: Switch# show running-config | |
| Step 8 | copy running-config
startup-config
Example:
Switch# copy running-config startup-config
|
(Optional) Saves your entries in the configuration file. |
Specifying VLANs to Filter
Follow these steps to limit SPAN source traffic to specific VLANs.
1.
enable
3.
no monitor session
{session_number |
all |
local |
remote}
4.
monitor
session
session_number source interface
interface-id
5.
monitor session
session_number
filter vlan
vlan-id
[, |
-]
6.
monitor session
session_number
destination
{interface
interface-id
[, |
-] [encapsulation replicate]}
9.
copy running-config
startup-config
DETAILED STEPS
| Command or Action | Purpose | |
|---|---|---|
| Step 1 |
enable
Example:
Switch> enable
|
Enables privileged EXEC mode. Enter your password if prompted. |
| Step 2 | configure
terminal
Example: Switch# configure terminal | |
| Step 3 | no monitor session
{session_number |
all |
local |
remote}
Example: Switch(config)# no monitor session all | |
| Step 4 | monitor
session
session_number source interface
interface-id
Example: Switch(config)# monitor session 2 source interface gigabitethernet1/0/2 rx |
Specifies the characteristics of the source port (monitored port) and SPAN session. |
| Step 5 | monitor session
session_number
filter vlan
vlan-id
[, |
-]
Example: Switch(config)# monitor session 2 filter vlan 1 - 5 , 9 |
Limits the SPAN source traffic to specific VLANs. |
| Step 6 | monitor session
session_number
destination
{interface
interface-id
[, |
-] [encapsulation replicate]}
Example: Switch(config)# monitor session 2 destination interface gigabitethernet1/0/1 |
Specifies the SPAN session and the destination port (monitoring port).
|
| Step 7 | end
Example: Switch(config)# end | |
| Step 8 | show running-config
Example: Switch# show running-config | |
| Step 9 | copy running-config
startup-config
Example:
Switch# copy running-config startup-config
|
(Optional) Saves your entries in the configuration file. |
Configuring a VLAN as an RSPAN VLAN
Follow these steps to create a new VLAN, then configure it to be the RSPAN VLAN for the RSPAN session.
1.
enable
7.
copy running-config
startup-config
DETAILED STEPS
| Command or Action | Purpose | |
|---|---|---|
| Step 1 |
enable
Example:
Switch> enable
|
Enables privileged EXEC mode. Enter your password if prompted. |
| Step 2 | configure
terminal
Example: Switch# configure terminal | |
| Step 3 | vlan
vlan-id
Example: Switch(config)# vlan 100 |
Enters a VLAN ID to create a VLAN, or enters the VLAN ID of an existing VLAN, and enters VLAN configuration mode. The range is 2 to 1001 and 1006 to 4094. The RSPAN VLAN cannot be VLAN 1 (the default VLAN) or VLAN IDs 1002 through 1005 (reserved for Token Ring and FDDI VLANs). |
| Step 4 | remote-span
Example: Switch(config-vlan)# remote-span | |
| Step 5 | end
Example: Switch(config-vlan)# end | |
| Step 6 | show running-config
Example: Switch# show running-config | |
| Step 7 | copy running-config
startup-config
Example:
Switch# copy running-config startup-config
|
(Optional) Saves your entries in the configuration file. |
You must create the RSPAN VLAN in all switches that will participate in RSPAN. If the RSPAN VLAN-ID is in the normal range (lower than 1005) and VTP is enabled in the network, you can create the RSPAN VLAN in one switch, and VTP propagates it to the other switches in the VTP domain. For extended-range VLANs (greater than 1005), you must configure RSPAN VLAN on both source and destination switches and any intermediate switches.
Use VTP pruning to get an efficient flow of RSPAN traffic, or manually delete the RSPAN VLAN from all trunks that do not need to carry the RSPAN traffic.
To remove the remote SPAN characteristic from a VLAN and convert it back to a normal VLAN, use the no remote-span VLAN configuration command.
To remove a source port or VLAN from the SPAN session, use the no monitor session session_number source {interface interface-id | vlan vlan-id} global configuration command. To remove the RSPAN VLAN from the session, use the no monitor session session_number destination remote vlan vlan-id.
Creating an RSPAN Source Session
Follow these steps to create and start an RSPAN source session and to specify the monitored source and the destination RSPAN VLAN.
1.
enable
3.
no monitor session
{session_number |
all |
local |
remote}
4.
monitor session
session_number
source {interface
interface-id
|
vlan
vlan-id} [, |
-] [both |
rx |
tx]
5.
monitor
session
session_number
destination
remote vlan
vlan-id
8.
copy running-config
startup-config
DETAILED STEPS
| Command or Action | Purpose | |
|---|---|---|
| Step 1 |
enable
Example:
Switch> enable
|
Enables privileged EXEC mode. Enter your password if prompted. |
| Step 2 | configure
terminal
Example: Switch# configure terminal | |
| Step 3 | no monitor session
{session_number |
all |
local |
remote}
Example: Switch(config)# no monitor session 1 | |
| Step 4 | monitor session
session_number
source {interface
interface-id
|
vlan
vlan-id} [, |
-] [both |
rx |
tx]
Example: Switch(config)# monitor session 1 source interface gigabitethernet1/0/1 tx |
Specifies the RSPAN session and the source port (monitored port).
|
| Step 5 | monitor
session
session_number
destination
remote vlan
vlan-id
Example: Switch(config)# monitor session 1 destination remote vlan 100 |
Specifies the RSPAN session, the destination RSPAN VLAN, and the destination-port group. |
| Step 6 | end
Example: Switch(config)# end | |
| Step 7 | show running-config
Example: Switch# show running-config | |
| Step 8 | copy running-config
startup-config
Example:
Switch# copy running-config startup-config
|
(Optional) Saves your entries in the configuration file. |
Specifying VLANs to Filter
Follow these steps to configure the RSPAN source session to limit RSPAN source traffic to specific VLANs.
1.
enable
3.
no monitor session
{session_number |
all |
local |
remote}
4.
monitor
session
session_number source interface
interface-id
5.
monitor session
session_number
filter vlan
vlan-id
[, |
-]
6.
monitor
session
session_number
destination
remote vlan
vlan-id
9.
copy running-config
startup-config
DETAILED STEPS
| Command or Action | Purpose | |
|---|---|---|
| Step 1 |
enable
Example:
Switch> enable
|
Enables privileged EXEC mode. Enter your password if prompted. |
| Step 2 | configure
terminal
Example: Switch# configure terminal | |
| Step 3 | no monitor session
{session_number |
all |
local |
remote}
Example: Switch(config)# no monitor session 2 | |
| Step 4 | monitor
session
session_number source interface
interface-id
Example: Switch(config)# monitor session 2 source interface gigabitethernet1/0/2 rx |
Specifies the characteristics of the source port (monitored port) and SPAN session. |
| Step 5 | monitor session
session_number
filter vlan
vlan-id
[, |
-]
Example: Switch(config)# monitor session 2 filter vlan 1 - 5 , 9 |
Limits the SPAN source traffic to specific VLANs. |
| Step 6 | monitor
session
session_number
destination
remote vlan
vlan-id
Example: Switch(config)# monitor session 2 destination remote vlan 902 |
Specifies the RSPAN session and the destination remote VLAN (RSPAN VLAN). |
| Step 7 | end
Example: Switch(config)# end | |
| Step 8 | show running-config
Example: Switch# show running-config | |
| Step 9 | copy running-config
startup-config
Example:
Switch# copy running-config startup-config
|
(Optional) Saves your entries in the configuration file. |
Creating an RSPAN Destination Session
You configure an RSPAN destination session on a different switch or switch stack; that is, not the switch or switch stack on which the source session was configured.
Follow these steps to define the RSPAN VLAN on that switch, to create an RSPAN destination session, and to specify the source RSPAN VLAN and the destination port.
1.
enable
6.
no monitor session
{session_number |
all |
local |
remote}
7.
monitor
session
session_number
source
remote vlan
vlan-id
8.
monitor
session
session_number
destination interface
interface-id
11.
copy running-config
startup-config
DETAILED STEPS
| Command or Action | Purpose | |
|---|---|---|
| Step 1 |
enable
Example:
Switch> enable
|
Enables privileged EXEC mode. Enter your password if prompted. |
| Step 2 | configure
terminal
Example: Switch# configure terminal | |
| Step 3 | vlan
vlan-id
Example: Switch(config)# vlan 901 |
Specifies the VLAN ID of the RSPAN VLAN created from the source switch, and enters VLAN configuration mode. If both switches are participating in VTP and the RSPAN VLAN ID is from 2 to 1005, Steps 3 through 5 are not required because the RSPAN VLAN ID is propagated through the VTP network. |
| Step 4 | remote-span
Example: Switch(config-vlan)# remote-span | |
| Step 5 | exit
Example: Switch(config-vlan)# exit | |
| Step 6 | no monitor session
{session_number |
all |
local |
remote}
Example: Switch(config)# no monitor session 1 | |
| Step 7 | monitor
session
session_number
source
remote vlan
vlan-id
Example: Switch(config)# monitor session 1 source remote vlan 901 |
Specifies the RSPAN session and the source RSPAN VLAN. |
| Step 8 | monitor
session
session_number
destination interface
interface-id
Example: Switch(config)# monitor session 1 destination interface gigabitethernet2/0/1 |
Specifies the RSPAN session and the destination interface.
|
| Step 9 | end
Example: Switch(config)# end | |
| Step 10 | show running-config
Example: Switch# show running-config | |
| Step 11 | copy running-config
startup-config
Example:
Switch# copy running-config startup-config
|
(Optional) Saves your entries in the configuration file. |
Creating an RSPAN Destination Session and Configuring Incoming Traffic
Follow these steps to create an RSPAN destination session, to specify the source RSPAN VLAN and the destination port, and to enable incoming traffic on the destination port for a network security device (such as a Cisco IDS Sensor Appliance).
1.
enable
3.
no monitor session
{session_number |
all |
local |
remote}
4.
monitor
session
session_number
source
remote vlan
vlan-id
5. monitor session session_number destination {interface interface-id [, | -] [ingress {dot1q vlan vlan-id | isl | untagged vlan vlan-id | vlan vlan-id}]}
8.
copy running-config
startup-config
DETAILED STEPS
| Command or Action | Purpose | |
|---|---|---|
| Step 1 |
enable
Example:
Switch> enable
|
Enables privileged EXEC mode. Enter your password if prompted. |
| Step 2 | configure
terminal
Example: Switch# configure terminal | |
| Step 3 | no monitor session
{session_number |
all |
local |
remote}
Example: Switch(config)# no monitor session 2 | |
| Step 4 | monitor
session
session_number
source
remote vlan
vlan-id
Example: Switch(config)# monitor session 2 source remote vlan 901 |
Specifies the RSPAN session and the source RSPAN VLAN. |
| Step 5 | monitor
session
session_number
destination
{interface
interface-id
[, |
-] [ingress
{dot1q vlan
vlan-id |
isl | untagged
vlan
vlan-id
|
vlan
vlan-id}]}
Example: Switch(config)# monitor session 2 destination interface gigabitethernet1/0/2 ingress vlan 6 |
Specifies the SPAN session, the destination port, the packet encapsulation, and the incoming VLAN and encapsulation.
|
| Step 6 | end
Example: Switch(config)# end | |
| Step 7 | show running-config
Example: Switch# show running-config | |
| Step 8 | copy running-config
startup-config
Example:
Switch# copy running-config startup-config
|
(Optional) Saves your entries in the configuration file. |
Configuring an FSPAN Session
Follow these steps to create a SPAN session, specify the source (monitored) ports or VLANs and the destination (monitoring) ports, and configure FSPAN for the session.
1.
enable
3.
no monitor session
{session_number |
all |
local |
remote}
4. monitor session session_number source {interface interface-id | vlan vlan-id} [, | -] [both | rx | tx]
5.
monitor
session
session_number
destination
{interface
interface-id [, |
-] [encapsulation replicate]}
6.
monitor session
session_number
filter
{ip |
ipv6
|
mac} access-group
{access-list-number |
name}
9.
copy running-config
startup-config
DETAILED STEPS
| Command or Action | Purpose | |||
|---|---|---|---|---|
| Step 1 |
enable
Example:
Switch> enable
|
Enables privileged EXEC mode. Enter your password if prompted. | ||
| Step 2 | configure
terminal
Example: Switch# configure terminal | |||
| Step 3 | no monitor session
{session_number |
all |
local |
remote}
Example: Switch(config)# no monitor session 2 | |||
| Step 4 | monitor session
session_number
source {interface
interface-id
|
vlan vlan-id} [, |
-] [both |
rx |
tx]
Example: Switch(config)# monitor session 2 source interface gigabitethernet1/0/1 |
Specifies the SPAN session and the source port (monitored port).
| ||
| Step 5 |
monitor
session
session_number
destination
{interface
interface-id [, |
-] [encapsulation replicate]}
Example: Switch(config)# monitor session 2 destination interface gigabitethernet1/0/2 encapsulation replicate |
Specifies the SPAN session and the destination port (monitoring port).
| ||
| Step 6 | monitor session
session_number
filter
{ip |
ipv6
|
mac} access-group
{access-list-number |
name}
Example: Switch(config)# monitor session 2 filter ipv6 access-group 4 |
Specifies the SPAN session, the types of packets to filter, and the ACLs to use in an FSPAN session. | ||
| Step 7 | end
Example: Switch(config)# end | |||
| Step 8 | show running-config
Example: Switch# show running-config | |||
| Step 9 | copy running-config
startup-config
Example:
Switch# copy running-config startup-config
|
(Optional) Saves your entries in the configuration file. |
Configuring an FRSPAN Session
Follow these steps to start an RSPAN source session, specify the monitored source and the destination RSPAN VLAN, and configure FRSPAN for the session.
1.
enable
3.
no monitor session
{session_number |
all |
local |
remote}
4.
monitor session
session_number
source {interface
interface-id |
vlan vlan-id} [, |
-] [both |
rx |
tx]
5.
monitor
session
session_number
destination
remote vlan
vlan-id
9.
monitor session
session_number
filter
{ip |
ipv6
|
mac} access-group
{access-list-number |
name}
12.
copy running-config
startup-config
DETAILED STEPS
| Command or Action | Purpose | |||||
|---|---|---|---|---|---|---|
| Step 1 |
enable
Example:
Switch> enable
|
Enables privileged EXEC mode. Enter your password if prompted. | ||||
| Step 2 | configure
terminal
Example: Switch# configure terminal | |||||
| Step 3 | no monitor session
{session_number |
all |
local |
remote}
Example: Switch(config)# no monitor session 2 | |||||
| Step 4 | monitor session
session_number
source {interface
interface-id |
vlan vlan-id} [, |
-] [both |
rx |
tx]
Example: Switch(config)# monitor session 2 source interface gigabitethernet1/0/1 |
Specifies the SPAN session and the source port (monitored port).
| ||||
| Step 5 | monitor
session
session_number
destination
remote vlan
vlan-id
Example: Switch(config)# monitor session 2 destination remote vlan 5 | |||||
| Step 6 | vlan
vlan-id
Example: Switch(config)# vlan 10 |
Enters the VLAN configuration mode. For vlan-id, specify the source RSPAN VLAN to monitor. | ||||
| Step 7 | remote-span
Example: Switch(config-vlan)# remote-span |
Specifies that the VLAN you specified in Step 5 is part of the RSPAN VLAN. | ||||
| Step 8 | exit
Example: Switch(config-vlan)# exit | |||||
| Step 9 | monitor session
session_number
filter
{ip |
ipv6
|
mac} access-group
{access-list-number |
name}
Example: Switch(config)# monitor session 2 filter ip access-group 7 |
Specifies the RSPAN session, the types of packets to filter, and the ACLs to use in an FRSPAN session. | ||||
| Step 10 | end
Example: Switch(config)# end | |||||
| Step 11 | show running-config
Example: Switch# show running-config | |||||
| Step 12 | copy running-config
startup-config
Example:
Switch# copy running-config startup-config
|
(Optional) Saves your entries in the configuration file. |
Monitoring SPAN and RSPAN Operations
| Command | Purpose |
|---|---|
Displays the current SPAN, RSPAN, FSPAN, or FRSPAN configuration. |
SPAN and RSPAN Configuration Examples
Example: Configuring Local SPAN
This example shows how to set up SPAN session 1 for monitoring source port traffic to a destination port. First, any existing SPAN configuration for session 1 is deleted, and then bidirectional traffic is mirrored from source Gigabit Ethernet port 1 to destination Gigabit Ethernet port 2, retaining the encapsulation method.
Switch> enable
Switch# configure terminal
Switch(config)# no monitor session 1
Switch(config)# monitor session 1 source interface gigabitethernet1/0/1
Switch(config)# monitor session 1 destination interface gigabitethernet1/0/2 encapsulation replicate
Switch(config)# end
This example shows how to remove port 1 as a SPAN source for SPAN session 1:
Switch> enable
Switch# configure terminal
Switch(config)# no monitor session 1 source interface gigabitethernet1/0/1
Switch(config)# end
This example shows how to disable received traffic monitoring on port 1, which was configured for bidirectional monitoring:
Switch> enable
Switch# configure terminal
Switch(config)# no monitor session 1 source interface gigabitethernet1/0/1 rx
The monitoring of traffic received on port 1 is disabled, but traffic sent from this port continues to be monitored.
This example shows how to remove any existing configuration on SPAN session 2, configure SPAN session 2 to monitor received traffic on all ports belonging to VLANs 1 through 3, and send it to destination Gigabit Ethernet port 2. The configuration is then modified to also monitor all traffic on all ports belonging to VLAN 10.
Switch> enable
Switch# configure terminal
Switch(config)# no monitor session 2
Switch(config)# monitor session 2 source vlan 1 - 3 rx
Switch(config)# monitor session 2 destination interface gigabitethernet1/0/2
Switch(config)# monitor session 2 source vlan 10
Switch(config)# end
This example shows how to remove any existing configuration on SPAN session 2, configure SPAN session 2 to monitor received traffic on Gigabit Ethernet source port 1, and send it to destination Gigabit Ethernet port 2 with the same egress encapsulation type as the source port, and to enable ingress forwarding with IEEE 802.1Q encapsulation and VLAN 6 as the default ingress VLAN:
Switch> enable
Switch# configure terminal
Switch(config)# no monitor session 2
Switch(config)# monitor session 2 source gigabitethernet1/0/1 rx
Switch(config)# monitor session 2 destination interface gigabitethernet1/0/2 encapsulation replicate ingress dot1q vlan 6
Switch(config)# end
This example shows how to remove any existing configuration on SPAN session 2, configure SPAN session 2 to monitor traffic received on Gigabit Ethernet trunk port 2, and send traffic for only VLANs 1 through 5 and VLAN 9 to destination Gigabit Ethernet port 1:
Switch> enable
Switch# configure terminal
Switch(config)# no monitor session 2
Switch(config)# monitor session 2 source interface gigabitethernet1/0/2 rx
Switch(config)# monitor session 2 filter vlan 1 - 5 , 9
Switch(config)# monitor session 2 destination interface gigabitethernet1/0/1
Switch(config)# end
Examples: Creating an RSPAN VLAN
This example shows how to create the RSPAN VLAN 901:
Switch> enable
Switch# configure terminal
Switch(config)# vlan 901
Switch(config-vlan)# remote span
Switch(config-vlan)# end
This example shows how to remove any existing RSPAN configuration for session 1, configure RSPAN session 1 to monitor multiple source interfaces, and configure the destination as RSPAN VLAN 901:
Switch> enable
Switch# configure terminal
Switch(config)# no monitor session 1
Switch(config)# monitor session 1 source interface gigabitethernet1/0/1 tx
Switch(config)# monitor session 1 source interface gigabitethernet1/0/2 rx
Switch(config)# monitor session 1 source interface port-channel 2
Switch(config)# monitor session 1 destination remote vlan 901
Switch(config)# end
This example shows how to remove any existing configuration on RSPAN session 2, configure RSPAN session 2 to monitor traffic received on trunk port 2, and send traffic for only VLANs 1 through 5 and 9 to destination RSPAN VLAN 902:
Switch> enable
Switch# configure terminal
Switch(config)# no monitor session 2
Switch(config)# monitor session 2 source interface gigabitethernet1/0/2 rx
Switch(config)# monitor session 2 filter vlan 1 - 5 , 9
Switch(config)# monitor session 2 destination remote vlan 902
Switch(config)# end
This example shows how to configure VLAN 901 as the source remote VLAN and port 1 as the destination interface:
Switch> enable
Switch# configure terminal
Switch(config)# monitor session 1 source remote vlan 901
Switch(config)# monitor session 1 destination interface gigabitethernet2/0/1
Switch(config)# end
This example shows how to configure VLAN 901 as the source remote VLAN in RSPAN session 2, to configure Gigabit Ethernet source port 2 as the destination interface, and to enable forwarding of incoming traffic on the interface with VLAN 6 as the default receiving VLAN:
Switch> enable
Switch# configure terminal
Switch(config)# monitor session 2 source remote vlan 901
Switch(config)# monitor session 2 destination interface gigabitethernet1/0/2 ingress vlan 6
Switch(config)# end
Additional References
Related Documents
| Related Topic | Document Title |
|---|---|
| System Commands |
Network Management Command Reference, Cisco IOS Release 15.2(2)E |
Error Message Decoder
| Description | Link |
|---|---|
|
To help you research and resolve system error messages in this release, use the Error Message Decoder tool. |
https://www.cisco.com/cgi-bin/Support/Errordecoder/index.cgi |
Standards and RFCs
| Standard/RFC | Title |
|---|---|
|
None |
- |
MIBs
| MIB | MIBs Link |
|---|---|
|
All supported MIBs for this release. |
To locate and download MIBs for selected platforms, Cisco IOS releases, and feature sets, use Cisco MIB Locator found at the following URL: |
Technical Assistance
| Description | Link |
|---|---|
|
The Cisco Support website provides extensive online resources, including documentation and tools for troubleshooting and resolving technical issues with Cisco products and technologies. To receive security and technical information about your products, you can subscribe to various services, such as the Product Alert Tool (accessed from Field Notices), the Cisco Technical Services Newsletter, and Really Simple Syndication (RSS) Feeds. Access to most tools on the Cisco Support website requires a Cisco.com user ID and password. |
Feature History and Information for SPAN and RSPAN
| Release | Modification |
|---|---|
| Cisco IOS 15.0(2)EX1 |
Switch Port Analyzer (SPAN): Allows monitoring of switch traffic on a port or VLAN using a sniffer/analyzer or RMON probe. This feature was introduced. |
| Cisco IOS 15.0(2)EX1 |
Flow-based Switch Port Analyzer (SPAN): Provides a method to capture only required data between end hosts by using specified filters. The filters are defined in terms of access lists that limit IPv4, IPv6 or IPv4 + IPv6, or non-IP traffic (MAC) between specified source and destination addresses. This feature was introduced. |
| Cisco IOS 15.0(2)EX1 |
SPAN destination port support on EtherChannels: Provides the ability to configure a SPAN destination port on an EtherChannel. This feature was introduced. |
| Cisco IOS 15.0(2)EX1 |
Switch Port Analyzer (SPAN) - distributed egress SPAN: Provides distributed egress SPAN functionality onto line cards in conjunction with ingress SPAN already been distributed to line cards. By distributing egress SPAN functionalities onto line cards, the performance of the system is improved. This feature was introduced. |
 Feedback