Cisco Compute Hyperconverged with Nutanix in Intersight Standalone Mode
Available Languages
Bias-Free Language
The documentation set for this product strives to use bias-free language. For the purposes of this documentation set, bias-free is defined as language that does not imply discrimination based on age, disability, gender, racial identity, ethnic identity, sexual orientation, socioeconomic status, and intersectionality. Exceptions may be present in the documentation due to language that is hardcoded in the user interfaces of the product software, language used based on RFP documentation, or language that is used by a referenced third-party product. Learn more about how Cisco is using Inclusive Language.
- US/Canada 800-553-2447
- Worldwide Support Phone Numbers
- All Tools
 Feedback
 Feedback
About the Cisco Validated Design Program
The Cisco Validated Design (CVD) program consists of systems and solutions designed, tested, and documented to facilitate faster, more reliable, and more predictable customer deployments. For more information, go to: http://www.cisco.com/go/designzone.
Application modernization is the foundation for digital transformation, enabling organizations to integrate advanced technologies. The key technologies include AI, IoT, cloud computing, and data analytics. Once integrated, these technologies enable businesses take advantage of digital innovations and identify opportunities for growth. These applications are diverse , distributed across geographies and deployed across data centers ,edge and remote sites. For instance, new AI workloads, demand modern infrastructure to make inferences in branch offices, in retail locations, or at the network edge. The key challenge for IT Administrators is how to quickly deploy and manage infrastructure at scale, whether with many servers at a core data center or with many dispersed locations.
Hyperconverged Infrastructure (HCI) is the solution to many of today’s challenges because it offers built-in data redundancy and a smooth path to scaling up computing and storage resources as your needs grow.
The Cisco Compute Hyperconverged (CCHC) with Nutanix (Cisco HCI with Nutanix) solution helps you overcome the challenge of deploying on a global scale with an integrated workflow. The solution uses Cisco Intersight® to deploy and manage physical infrastructure, and Nutanix Prism Central to manage your hyperconverged environment. Cisco and Nutanix engineers have tightly integrated our tools through APIs, establishing a joint cloud-operating model.
Whether it is at the core, edge or remote site, Cisco HCI with Nutanix provides you with a best in class solution , enabling zero touch accelerated deployment through automated workflows, simplified operations with an enhanced solution-support model combined with proactive, automated resiliency, secure cloud-based management and deployment through Cisco Intersight and enhanced flexibility with choice of compute and network infrastructure
This Cisco Validated Design and Deployment Guide provides prescriptive guidance for the design, setup, and configuration to deploy Cisco Compute Hyperconverged with Nutanix in Intersight Standalone mode allowing nodes to be connected to a pair of Top-of-Rack (ToR) switches and servers are centrally managed using Cisco Intersight®.
For more information on Cisco Compute for Hyperconverged with Nutanix, go to: https://www.cisco.com/go/hci
This chapter contains the following:
● Audience
The intended audience for this document includes sales engineers, field consultants, professional services, IT managers, partner engineering staff, and customers deploying Cisco Compute Hyperconverged Solution with Nutanix. External references are provided wherever applicable, but readers are expected to be familiar with Cisco Compute, Nutanix, plus infrastructure concepts, network switching and connectivity, and the security policies of the customer installation.
This document describes the design, configuration, deployment steps for Cisco Compute Hyperconverged with Nutanix in Intersight Standalone Mode (ISM)
The Cisco Compute Hyperconverged with Nutanix family of appliances delivers pre-configured UCS servers that are ready to be deployed as nodes to form Nutanix clusters in a variety of configurations. Each server appliance contains three software layers: UCS server firmware, hypervisor (Nutanix AHV), and hyperconverged storage software (Nutanix AOS).
Physically, nodes are deployed into clusters, with a cluster consisting of Cisco Compute Hyperconverged All-Flash Servers. Clusters support a variety of workloads like virtual desktops, general-purpose server virtual machines in edge, data center and mission-critical high-performance environments. Nutanix clusters can be scaled out to the max cluster server limit documented by Nutanix. The minimum depends on the management mode. These servers can be interconnected and managed in two different ways:
UCS Managed mode: The nodes are connected to a pair of Cisco UCS® 6400 Series or a pair of Cisco UCS 6500 Series fabric interconnects and managed as a single system using UCS Manager. The minimum number of nodes in such a cluster is three. These clusters can support both general-purpose deployments and mission-critical high-performance environments.
Intersight Standalone mode: The nodes are connected to a pair of Top-of-Rack (ToR) switches and servers are centrally managed using Cisco Intersight®. While a minimum of three nodes are required to deploy a standard Nutanix cluster, we also offer an option to deploy a single node cluster and a two-node cluster for Edge and branch locations and situations that already have a high-performance network fabric installed.
The present solution elaborates on design and deployment details to deploy Cisco C-Series nodes for Nutanix configured in Intersight Standalone Mode.
This chapter contains the following:
● Cisco Compute Hyperconverged HCIAF240C M7 All-NVMe/All-Flash Servers
As applications and data become more distributed from core data center and edge locations to public clouds, a centralized management platform is essential. IT agility will be a struggle without a consolidated view of the infrastructure resources and centralized operations. Cisco Intersight provides a cloud-hosted, management and analytics platform for all Cisco Compute for Hyperconverged, Cisco UCS, and other supported third-party infrastructure deployed across the globe. It provides an efficient way of deploying, managing, and upgrading infrastructure in the data center, ROBO, edge, and co-location environments.
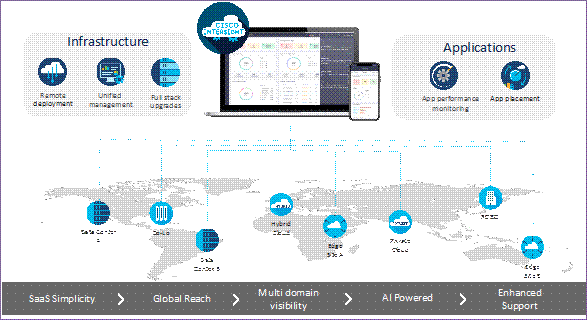
Cisco Intersight provides:
● No Impact Transition: Embedded connector (Cisco HyperFlex, Cisco UCS) will allow you to start consuming benefits without forklift upgrade.
● SaaS/Subscription Model: SaaS model provides for centralized, cloud-scale management and operations across hundreds of sites around the globe without the administrative overhead of managing the platform.
● Enhanced Support Experience: A hosted platform allows Cisco to address issues platform-wide with the experience extending into TAC supported platforms.
● Unified Management: Single pane of glass, consistent operations model, and experience for managing all systems and solutions.
● Programmability: End to end programmability with native API, SDK’s and popular DevOps toolsets will enable you to deploy and manage the infrastructure quickly and easily.
● Single point of automation: Automation using Ansible, Terraform, and other tools can be done through Intersight for all systems it manages.
● Recommendation Engine: Our approach of visibility, insight and action powered by machine intelligence and analytics provide real-time recommendations with agility and scale. Embedded recommendation platform with insights sourced from across Cisco install base and tailored to each customer.
For more information, go to the Cisco Intersight product page on cisco.com.
Cisco Intersight Virtual Appliance and Private Virtual Appliance
In addition to the SaaS deployment model running on Intersight.com, you can purchase on-premises options separately. The Cisco Intersight virtual appliance and Cisco Intersight private virtual appliance are available for organizations that have additional data locality or security requirements for managing systems. The Cisco Intersight virtual appliance delivers the management features of the Cisco Intersight platform in an easy-to-deploy VMware Open Virtualization Appliance (OVA) or Microsoft Hyper-V Server virtual machine that allows you to control the system details that leave your premises. The Cisco Intersight private virtual appliance is provided in a form factor designed specifically for users who operate in disconnected (air gap) environments. The private virtual appliance requires no connection to public networks or to Cisco network.
The Cisco Intersight platform uses a subscription-based license with multiple tiers. You can purchase a subscription duration of 1, 3, or 5 years and choose the required Cisco UCS server volume tier for the selected subscription duration. Each Cisco endpoint automatically includes a Cisco Intersight Base license at no additional cost when you access the Cisco Intersight portal and claim a device. You can purchase any of the following higher-tier Cisco Intersight licenses using the Cisco ordering tool:
● Cisco Intersight Essentials: Essentials includes all the functions of the Base license plus additional features, including Cisco UCS Central software and Cisco Integrated Management Controller (IMC) supervisor entitlement, policy-based configuration with server profiles, firmware management, and evaluation of compatibility with the Cisco Hardware Compatibility List (HCL).
● Cisco Intersight Advantage: Advantage offers all the features and functions of the Base and Essentials tiers. It also includes storage widgets and cross-domain inventory correlation across compute, storage, and virtual environments (VMware ESXi). OS installation for supported Cisco UCS platforms is also included.
Servers in the Cisco Intersight managed mode require at least the Essentials license. For more information about the features provided in the various licensing tiers, go to: https://www.intersight.com/help/saas/getting_started/licensing_requirements
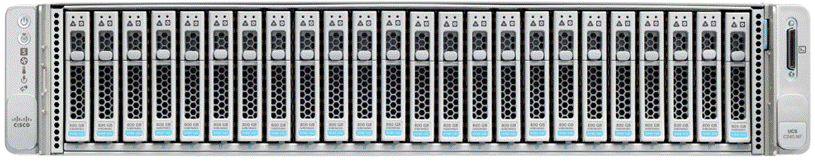
Cisco Compute Hyperconverged HCIAF240C M7 All-NVMe/All-Flash Servers
The Cisco Compute Hyperconverged HCIAF240C M7 All-NVMe/All-Flash Servers extends the capabilities of Cisco’s Compute Hyperconverged portfolio in a 2U form factor with the addition of the 4th Gen Intel® Xeon® Scalable Processors (codenamed Sapphire Rapids), 16 DIMM slots per CPU for DDR5-4800 DIMMs with DIMM capacity points up to 256GB.
The All-NVMe/all-Flash Server supports 2x 4th Gen Intel® Xeon® Scalable Processors (codenamed Sapphire Rapids) with up to 60 cores per processor. With memory up to 8TB with 32 x 256GB DDR5-4800 DIMMs, in a 2-socket configuration. There are two servers to choose from:
● HCIAF240C-M7SN with up to 24 front facing SFF NVMe SSDs (drives are direct-attach to PCIe Gen4 x2)
● HCIAF240C-M7SX with up to 24 front facing SFF SAS/SATA SSDs
For more details, go to: HCIAF240C M7 All-NVMe/All-Flash Server specification sheet
This chapter contains the following:
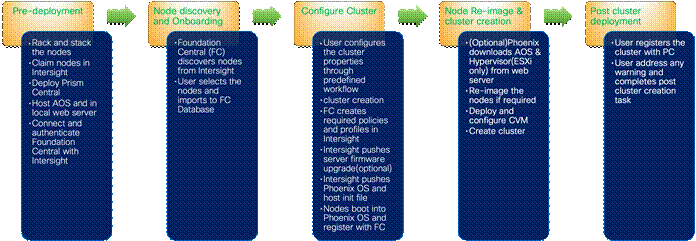
The deployment architecture for Cisco Compute Hyperconverged with Nutanix in Intersight Standalone Mode (ISM) is detailed in Figure 2. The entire Day0 deployment is managed through Cisco Intersight and Nutanix Foundation Central enabled through Prism Central.
Each C240 M7 All NVMe server is configured with the following:
● 2x Intel(R) Xeon(R) Gold I6448H
● 384 GB DDR5 memory
● 2x 240GB M.2 card managed through M.2 RAID controller
● 24x 1.9 TB NVMe
● 1x Cisco VIC 15425 4x 10/25/50G PCIe C-Series w/Secure Boot
Note: This document illustrates the Cisco HCIAF240C M7 All-NVMe/All-Flash Servers specifications as validated in this document. You have several options to configure CPU, Memory, Network cards, GPUs and storage as detailed in this spec sheet: Cisco Compute Hyperconverged with Nutanix
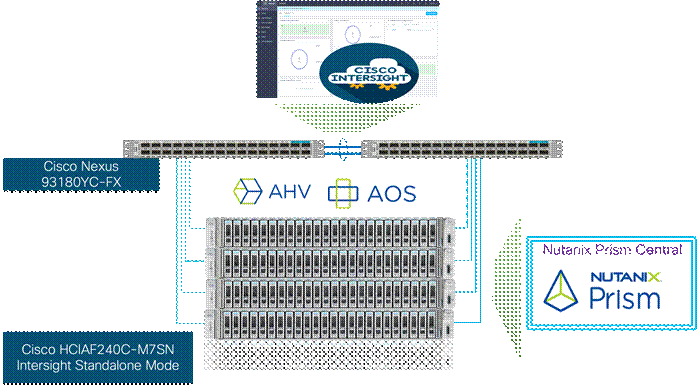
Figure 3 illustrates the cabling diagram for CCHC with Nutanix in ISM mode.

Cisco Intersight uses a subscription-based license with multiple tiers. Each Cisco automatically includes a Cisco Intersight Essential trial license when you access the Cisco Intersight portal and claim a device.
More information about Cisco Intersight Licensing and the features supported in each license can be found here: https://www.cisco.com/site/us/en/products/computing/hybrid-cloud-operations/intersight-infrastructure-service/licensing.html
In this solution, using Cisco Intersight Advantage License Tier enables the following:
● Configuration of Server Profiles for Nutanix on Cisco UCS C-Series Rack Servers
● Integration of Cisco Intersight with Foundation Central for Day 0 to Day N operations
Table 1 lists the software components and the versions validated for the Cisco Compute Hyperconverged with Nutanix in Intersight Standalone Software Components.
Table 1. Software components and versions
| Component |
Version |
| Foundation Central |
1.6 |
| Prism Central deployed on ESXi cluster |
pc.2022.6.0.10 |
| AOS and AHV bundled |
nutanix_installer_package-release-fraser-6.5.5.6 |
| Cisco C240 M7 All NVMe server |
4.3(3.240043) |
This chapter contains the following:
● Cisco Intersight Configuration and Keys
● Claim Servers on Cisco Intersight
● Configure Foundation Central
This chapter describes the solution deployment for Nutanix on Cisco UCS C-Series Rack Servers in Intersight Standalone Mode (ISM), with step-by-step procedures for implementing and managing the deployment. The Intersight Standalone Mode requires the Cisco UCS C-Series Rack Servers to be directly connected to a ethernet switches and the servers are claimed through Cisco Intersight.
Note: If you are deploying a Nutanix ISM cluster, refer to the Nutanix ISM Field Install Guide for step-by-step guidance. This guide explains the installation and initial configuration of Cisco Compute Hyperconverged with Nutanix systems using Standalone Cisco UCS C-Series servers managed by Cisco Intersight. This guide is intended for technical training and educational purposes, for all who wish to install Nutanix on Cisco UCS based hardware following our supported hardware and software integrations and compatibility lists. This document presents our best practices and recommendations as of the time of publishing and will be updated periodically. Please refer to the document history to ensure you are using the most current version available
Figure 4 shows the high-level configuration of Cisco UCS C-Series nodes in Intersight Standalone Mode for Nutanix.
Prior to beginning the installation of Nutanix Cluster on Cisco UCS C-Series servers in Intersight Standalone Mode, you should ensure they have deployed Nutanix Prism Central and enabled Nutanix Foundation Central through Nutanix marketplace available through Prism Central. Foundation Central can create clusters from factory-imaged nodes and reimage existing nodes that are already registered with Foundation Central from Prism Central. This provides benefits such as creating and deploying several clusters on remote sites, such as ROBO, without requiring onsite visits
At a high level, to continue with the deployment of Nutanix on Cisco UCS C-Series servers in Intersight standalone mode (ISM), ensure the following:
● Prism Central is deployed on either a Nutanix Cluster or on ESXi cluster
● Foundation Central 1.6 or later is enabled on Prism Central
● A local webserver is available hosting Nutanix AOS image
Note: Either deploy Prism Central 2023.4 or newer on Nutanix Cluster or deploy Prism Central 2022.6.x available as OVA on ESXi cluster
The following high-level steps describe the process to deploy Prism Central either on a Nutanix Cluster or on an ESXi cluster. You should follow either of the procedures for PC installation.
Procedure 1. Deploy PC 2023.4.x on Nutanix Cluster
Note: Skip this step if you already have PC 2023.4 or newer.
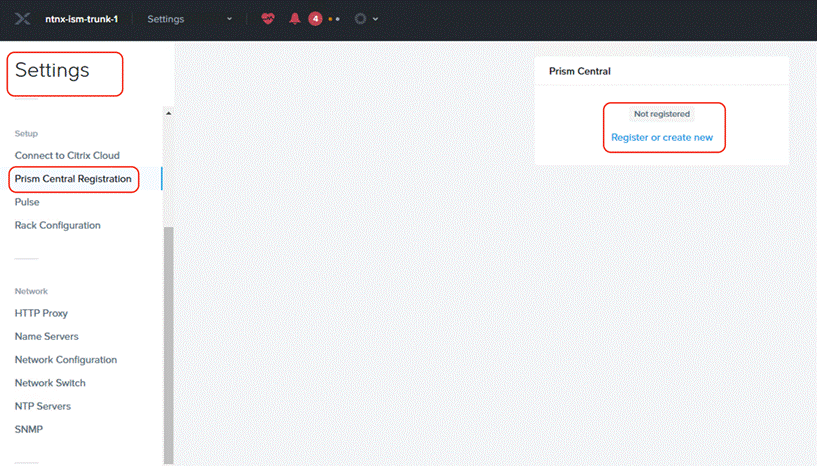
Step 1. Login to Prism Element on Nutanix Cluster and navigate to Settings -> Prism Central Registration.
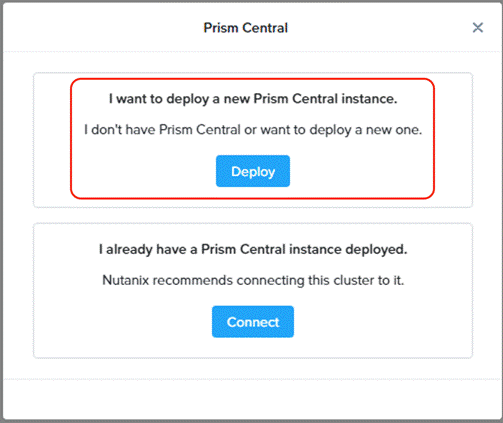
Step 2. Select the option to deploy a new Prism Central instance.
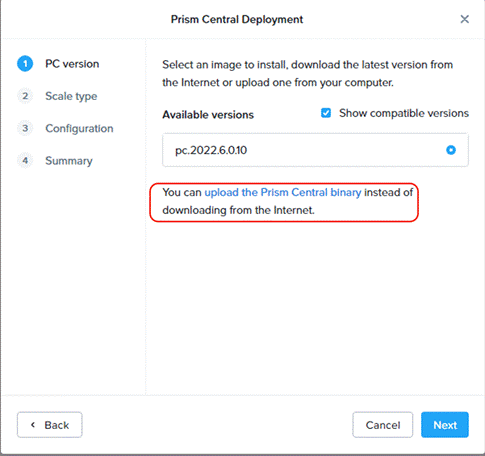
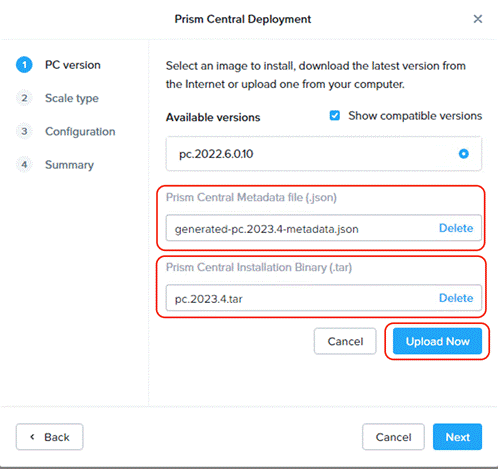
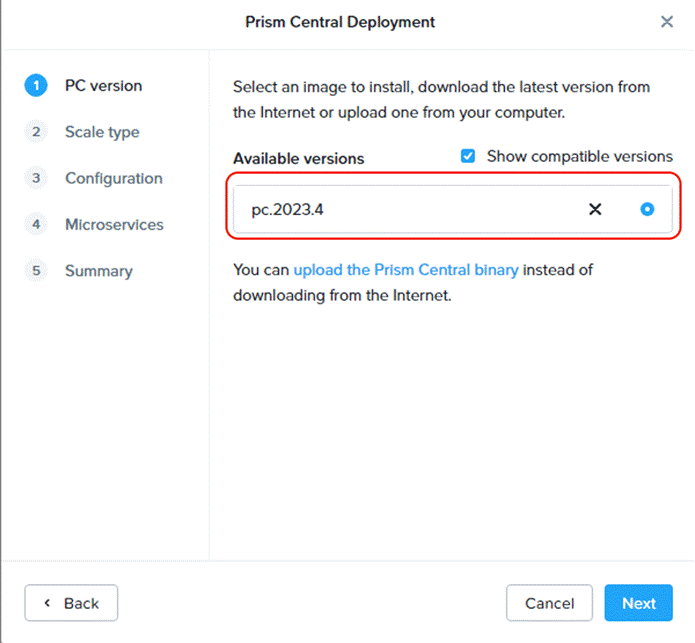
Step 3. Prism Central binaries are available here: https://portal.nutanix.com/page/downloads?product=prism, download PC version 2023.4.x or upload to the library.
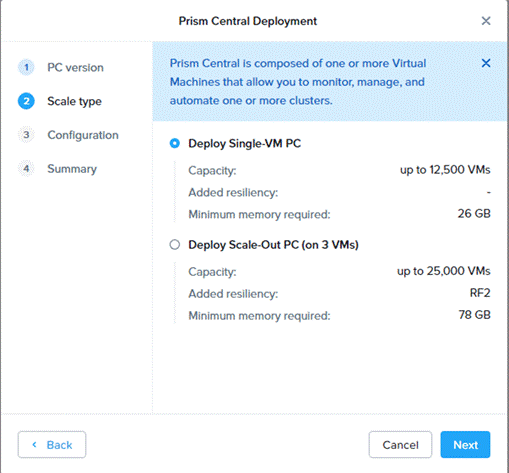
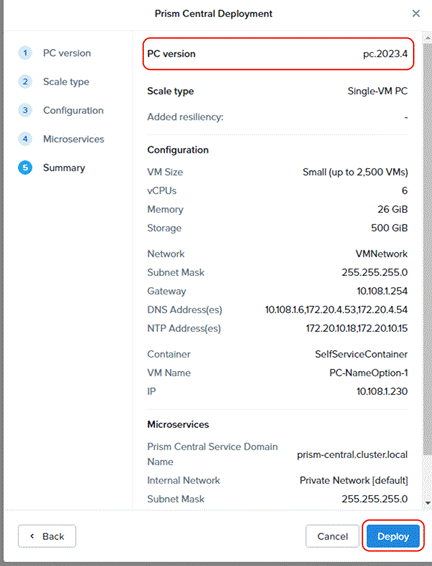
Step 4. Select the appropriate Prism Central deployment option as per your resiliency requirement.
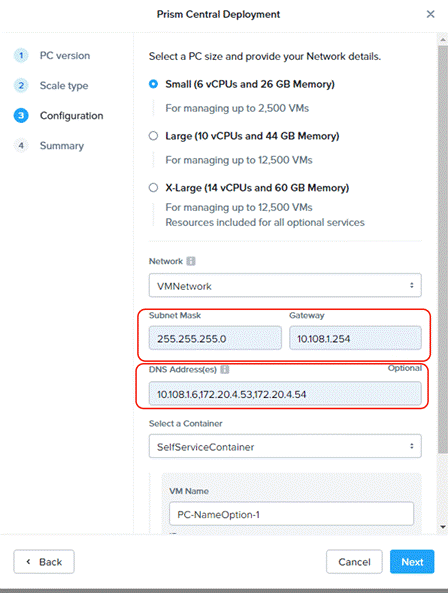
Step 5. Enter valid network details and IP addressing for Prism Central. Even though DNS is optional, ensure a valid DNS is defined for successful discovery of Cisco Intersight domain name.
Step 6. Deploy Prism Central on Nutanix Cluster.
Procedure 2. Deploy PC 2022.6.x on ESXi Cluster
Note: Skip this step if you already have a Prism Central Instance.
Step 1. Download Prism Central 2022.6.x OVA here: https://portal.nutanix.com/page/downloads?product=prism
Step 2. Identify an ESXi host and deploy OVF template.
Step 3. Identify compute, storage, and network resource on ESXi Cluster and deploy the OVF template.
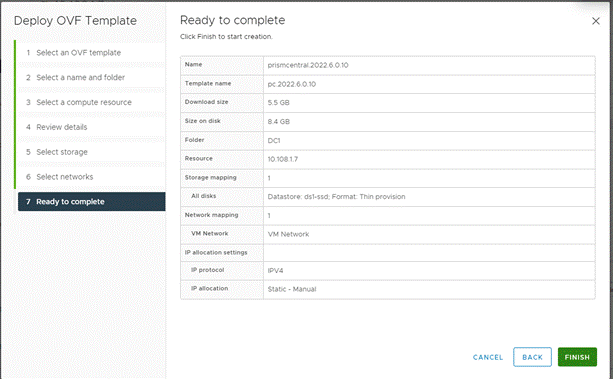
Step 4. Once the OVA is deployed, power ON the VM. Post installation steps for Prism Central on ESXi are detailed here: https://portal.nutanix.com/page/documents/details?targetId=Acropolis-Upgrade-Guide-v6_5:upg-vm-install-wc-t.html.
Note: Please wait at least 20-25 minutes before you login to PC instance through ESXi web console.
Step 5. Launch VM web console and login with login: Nutanix password: nutanix/4u.
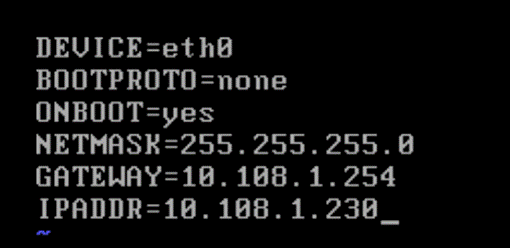
Step 6. Edit the ifcfg-eth0 with the following settings (/etc/sysconfig/network-scripts/ifcfg-eth0):
NETMASK="xxx.xxx.xxx.xxx"
IPADDR="xxx.xxx.xxx.xxx"
BOOTPROTO="none"
GATEWAY="xxx.xxx.xxx.xxx"
Step 7. Restart the Prism Central VM and login with username Nutanix.
Step 8. Create a Prism Central cluster with the following command:
cluster --cluster_function_list="multicluster" -s static_ip_address create
![]()
Step 9. Once completed, login to Prism Central 2022.6.x.
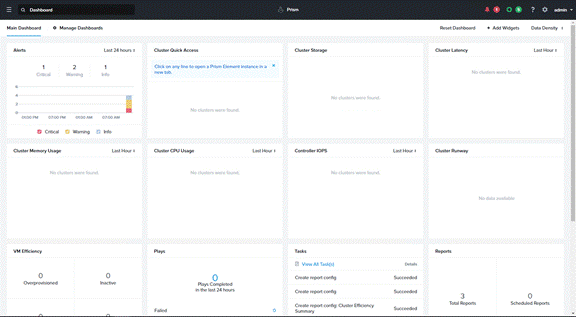
Enable and Upgrade Foundation Central
This section provides the process to enable and upgrade Foundation Central on Prism Central 2022.6.x and 2023.4.x.
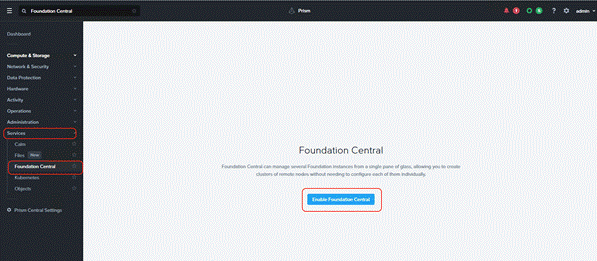
Procedure 1. Enable and Upgrade Foundation Central (FC) on PC 2022.6.x
Note: Ensure the DNS (name server) and NTP settings are updated in Prism Central.
Step 1. Go to Services > Foundation Central and enable Foundation Central.
Step 2. Download FC 1.6 from: https://portal.nutanix.com/page/downloads?product=foundationcentral
Step 3. Upgrade FC to 1.6 as described here: https://portal.nutanix.com/page/documents/details?targetId=Foundation-Central-v1_6:v1-upgrade-fc-cli-t.html .
Step 4. SSH into Prism Central VM with user name nutanix.
Step 5. Stop Foundation Central service ‘genesis stop foundation_central.’
Step 6. Remove existing Foundation Central files, if exists ‘sudo rm -rf /home/docker/foundation_central/*’
Step 7. Extract Foundation Central tar file ‘sudo tar -xf foundation-central-installer.tar.xz -C /home/docker/foundation_central/’
Step 8. Change the directory permission to nutanix:Nutanix ‘sudo chown -R nutanix:nutanix /home/docker/foundation_central/*’
Step 9. Restart Foundation Central service ‘genesis restart.’
Step 10. Foundation Central service will display after some time. You can validate service status by running “genesis status” command on your PC VM.
Procedure 2. Enable and Upgrade Foundation Central (FC) on PC 2023.4.x
Note: Ensure the DNS (name server) and NTP settings are updated in Prism Central.
Note: To enable marketplace on Prism Central 2023.4, the Nutanix cluster hosting PC 2023.4 should be registered to Prism Central.
Step 1. Enable marketplace on Prism Central 2023.4.
Step 2. Go to marketplace and get Foundation Central Application.
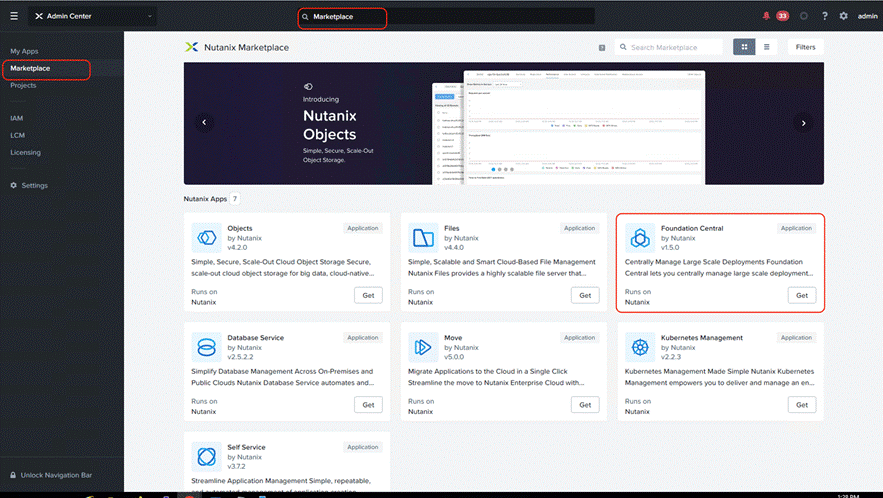
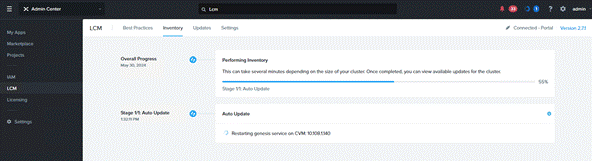
Step 3. Once deployed, upgrade Foundation Central to latest version (1.6 ) by performing Inventory on LCM.
Step 4. Go to marketplace and get Foundation Central Application.
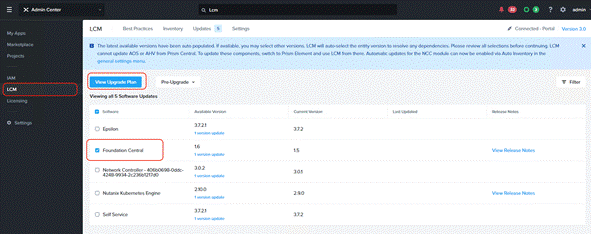
Step 5. Once Foundation Central is upgraded to 1.6, proceed to the subsequent sections.
Create IMC Configuration (CIMC)
Procedure 1. Configure CIMC
Note: This step has to be completed for all the Cisco UCS C-Series nodes configured for Nutanix cluster.
This procedure provides a Management IP to each of the node enabling connection to Cisco Intersight.
Step 1. Attach a keyboard and monitor to the USB ports on the rear panel of the Cisco UCS C240 Rack Server or by using a KVM cable (Cisco PID N20-BKVM) and connector to access the appliance console.
Step 2. During bootup, press F8 when prompted to open the Cisco IMC Configuration Utility.
Step 3. When prompted enter the default CIMC username (admin) and password (password).
Step 4. When prompted, change the default CIMC (IPMI) username and password. You must enter a strong password.
Step 5. Enable the NIC mode Dedicated field by entering a space.
Step 6. Enable either the IP (Basic) IPV4 field or the IP (Basic) IPV6 field to reflect your networking environment.
Step 7. Arrow down to the IP (Basic) DHCP enabled field and enter a space to disable it.
Step 8. Arrow down to the NIC redundancy None field and enter a space to enable it.
Step 9. Enter appropriate values for your network in the following fields:
◦ CIMC IP—Specify the IP address to access the Cisco Integrated Management Controller (CIMC) which is similar to IPMI.
◦ Prefix/Subnet—Specify the Subnet Mask for the CIMC (IPMI) Subnet.
◦ Gateway—Specify the IP address of the Subnet Gateway for the CIMC (IPMI) network interfaces.
◦ Pref DNS Server—Specify the IP Addresses of the preferred Domain Name System (DNS) Server.
The details for the CIMC settings for the Cisco UCS C240 Rack Servers are shown below:
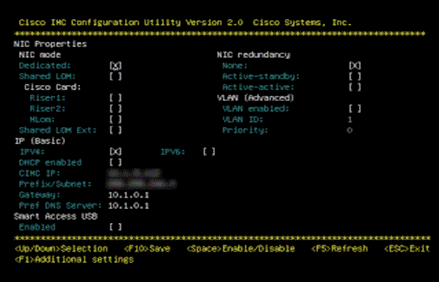
Step 10. Enter F10 to save the settings.
Step 11. Repeats steps 1-10 for all the nodes deployed for Nutanix Cluster in ISM mode.
Cisco Intersight Configuration and Keys
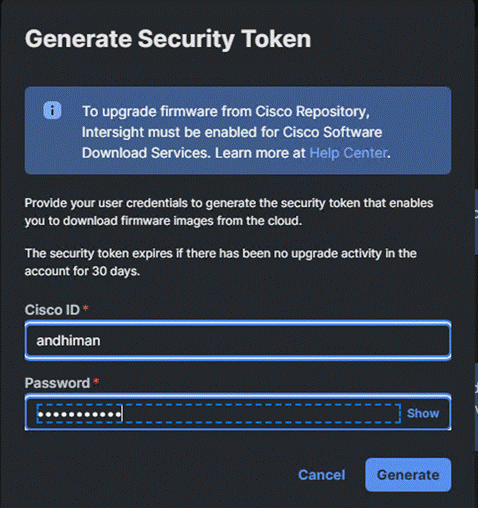
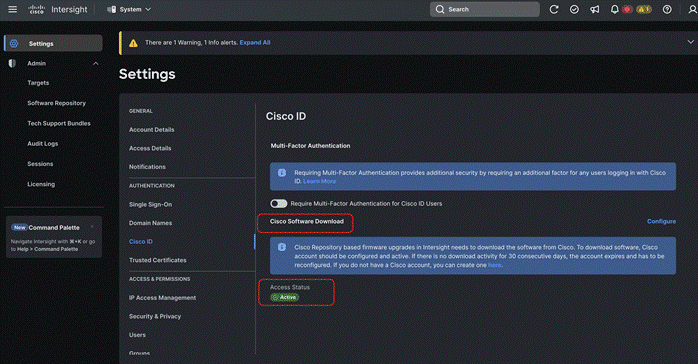
Procedure 1. Enable Intersight software download permission
This option allows Cisco Intersight to download recommend firmware from cisco.com using the user account for cisco.com
Step 1. Login to Cisco Intersight, go to System > Settings > Cisco ID and from the Cisco software download option click Activate.
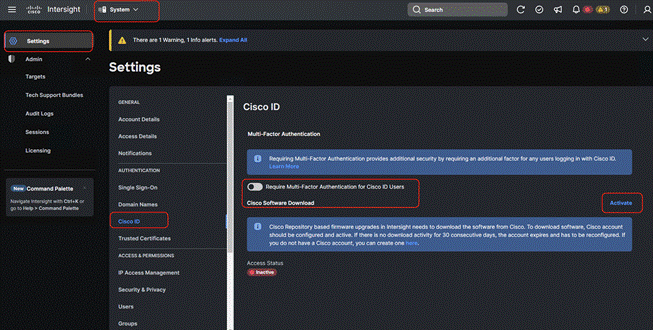
Step 2. Once activated, the login screen displays. Login with your CEC or Cisco ID.
Step 3. Once the user is authenticated, the software download access status will change to the active state.
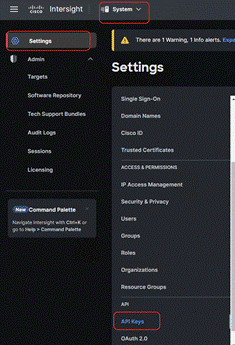
Procedure 2. Generate Cisco Intersight API keys
The Cisco Intersight API keys allows authentication and communication of Nutanix Foundation Central with Cisco Intersight. Further, once the communication channel is setup, Nutanix Foundation Central can identify the Cisco C-Series nodes claimed in Intersight and configure Server profile and upgrade firmware of Cisco UCS C-Series Rack Servers in ISM mode.
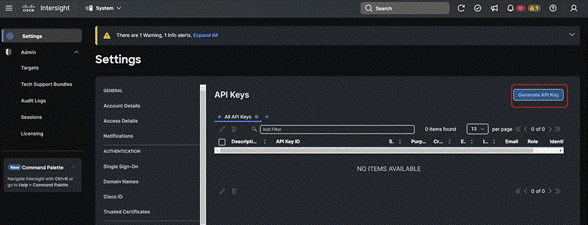
Step 1. Login to Cisco Intersight, go to System > Settings > API keys.
Step 2. Click Generate API Keys.
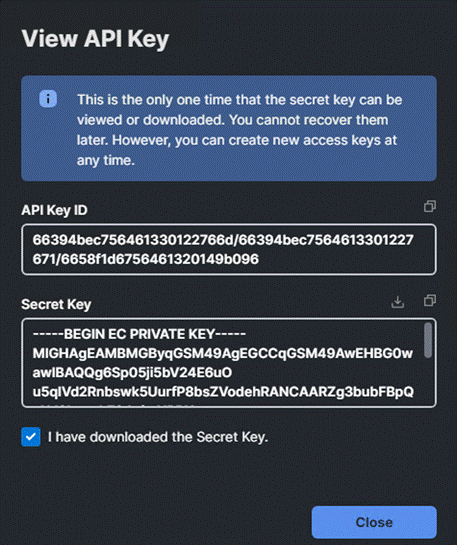
Step 3. Select the API key for OpenAPI schema version 3, add a description and key expiration date and click Generate.
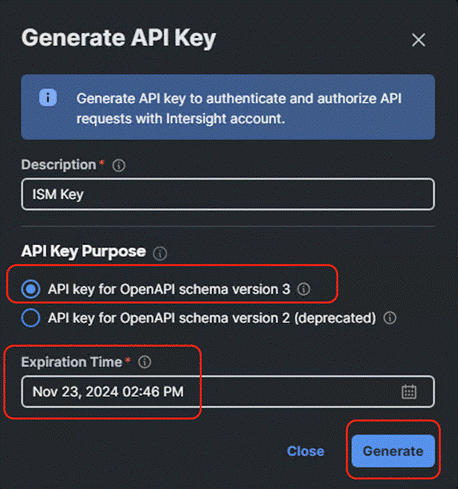
Step 4. Once generated, save the API key ID and Secret Key at a secure place. This will be subsequently added in Nutanix Foundation Central.
Claim Servers on Cisco Intersight
The following high-level steps describe the process to claim servers on Cisco Intersight. Ensure CIMC of all servers have been configured with proper DNS for Cisco Intersight reachability
Procedure 1. Claim servers on Cisco Intersight
Step 1. Open a web browser and type in Cisco IMC IP, login with the username: admin and the password as configured during CIMC configuration.
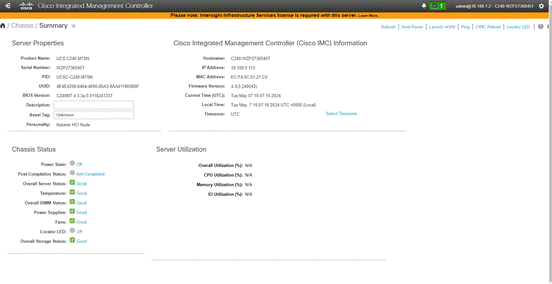
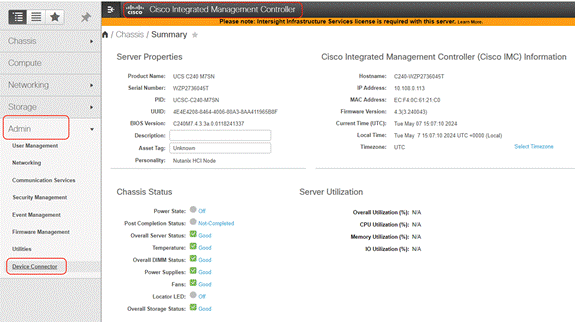
Step 2. From the left navigation pane, go to Admin > Device Connector.
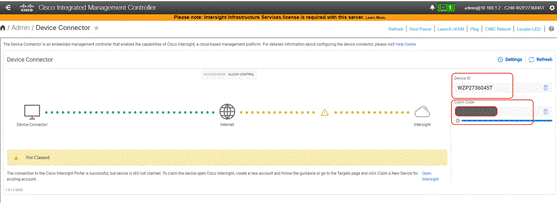
Step 3. From the Device Connector page, ensure the server is not connected to Intersight and identify the Device ID and Claim Code. This will be utilized to claim the server on Cisco Intersight.
Step 4. Login to Cisco Intersight and navigate to System > Targets.
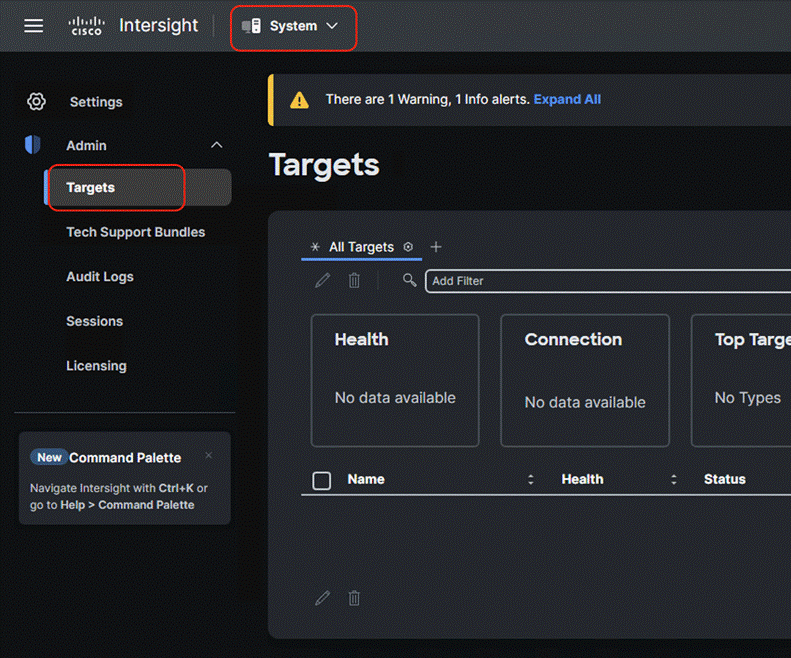
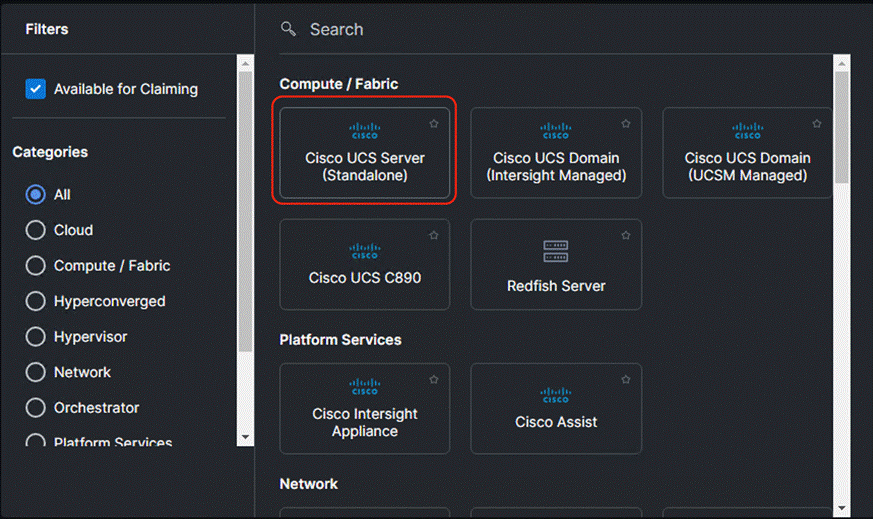
Step 5. Click Claim new target and select Cisco UCS Standalone Server as the target.
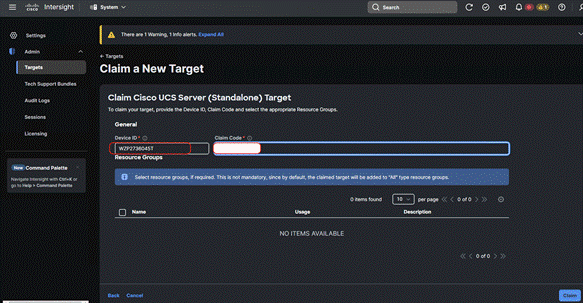
Step 6. Enter the Device ID and Claim code as copied from the Cisco IMC device connector page.
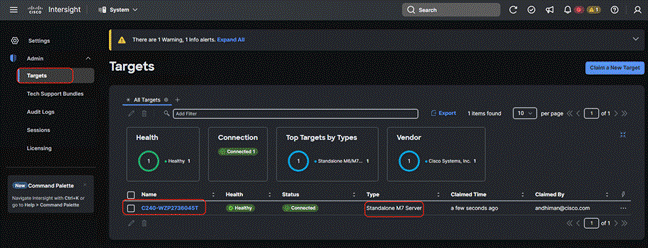
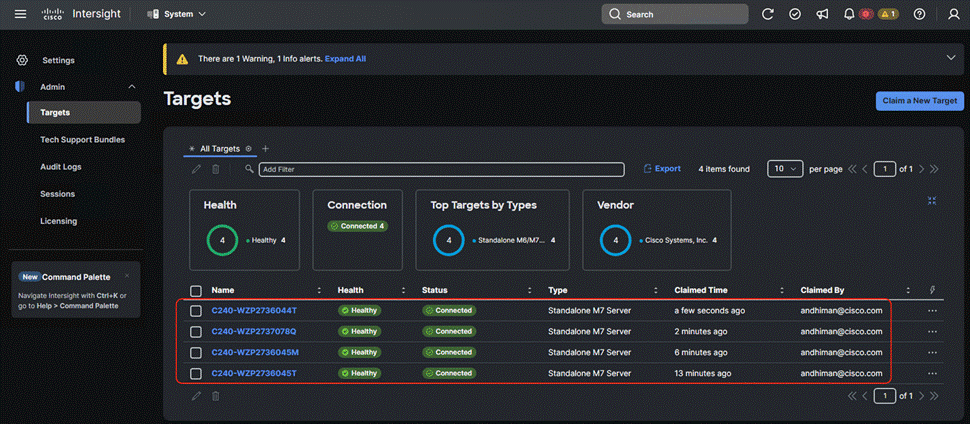
Step 7. Ensure the server is successfully claimed on Cisco Intersight.
Step 8. Repeat Steps 1-7 and claim the remaining servers provisioned for Nutanix cluster with Cisco UCS C240 M7 in ISM mode.
This procedure describes the Foundation Central configuration required for a successful Nutanix cluster creation with Cisco UCS C-Series nodes in ISM mode.
Procedure 1. Generate API key
Note: API key authenticates API communication between the Nutanix node and Foundation Central. It is recommended that you create a unique key for each remote site.
Step 1. Login to Prism Central and navigate to Foundation Central.
Step 2. Click Generate API key.
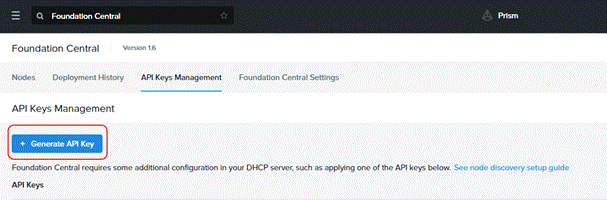
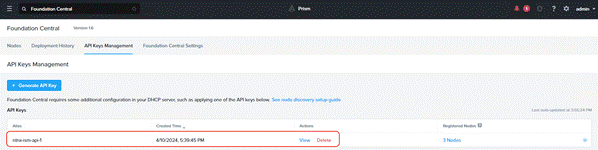
The API key displays. It will be added during the Nutanix cluster creation through Foundation Central.
Procedure 2. Cisco intersight connection to Foundation Central
This procedure allows the connection of Foundation Central to Cisco Intersight through the Cisco Intersight API key created in the Intersight configuration. This allows Foundation Central to discover nodes claimed on Cisco Intersight.
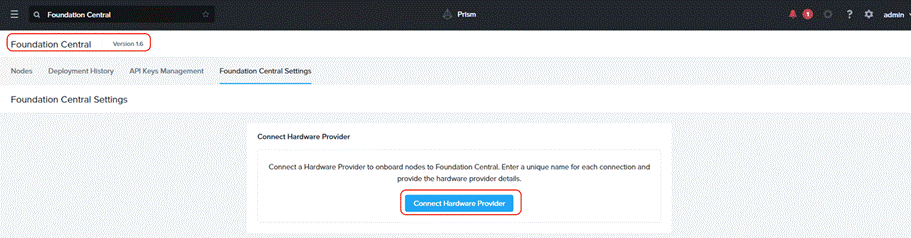
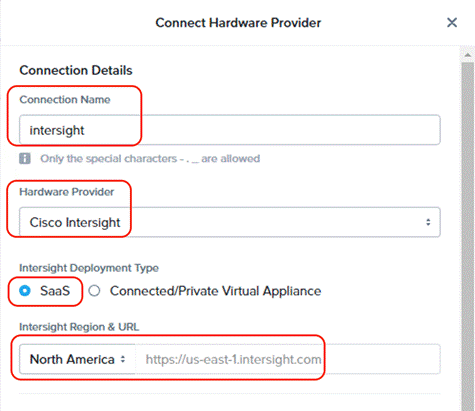
Step 1. From Foundation Central, navigate to Foundation Central Settings. Click Connect Hardware Provider.
Step 2. From Connect Hardware Provider, enter a Connection Name and select the Hardware Provider as ‘Cisco Intersight’ and select the option as ‘SaaS’. Intersight URL is automatically displayed as per the region configured in Foundation Central.
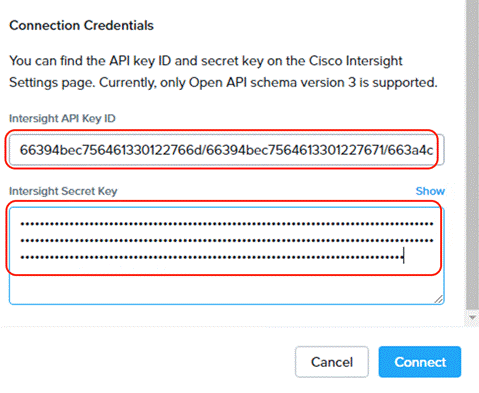
Step 3. From Connection Credential, enter the Intersight API key ID and secret Key generated in the previous section through Cisco Intersight. Click Connect.
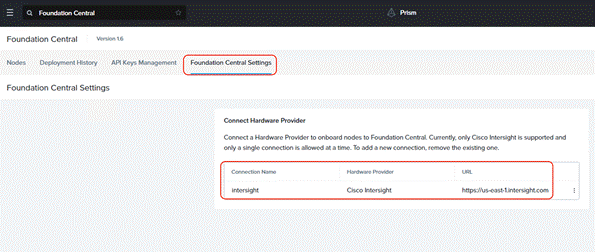
Step 4. Once the authentication to Intersight succeeds, the connection displays under FC settings.
This procedure describes the process to onboard the nodes on Foundation Central and thereafter create the cluster for Cisco UCS C-Series nodes managed in Intersight Standalone Mode (ISM).
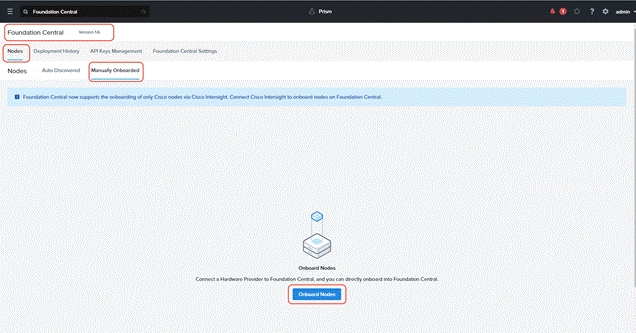
Procedure 1. Onboard nodes on Foundation Central
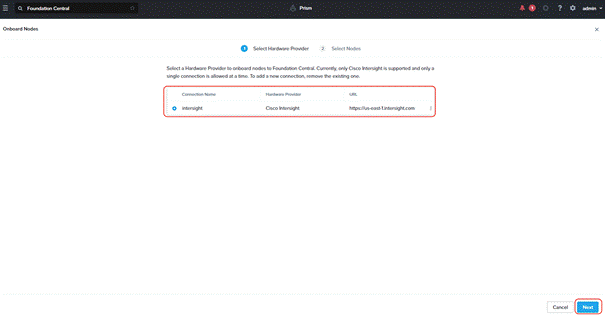
Step 1. Go to Foundation Central, select the Nodes tab and select the Manually Onboarded tab. Click Onboard Nodes.
Step 2. The screen displays the connection details configured for Cisco Intersight. Click Next.
Step 3. Foundation Central connects to Cisco Intersight and displays all the unconfigured nodes existing in Intersight. Select the nodes provisioned for Nutanix and click Onboard.
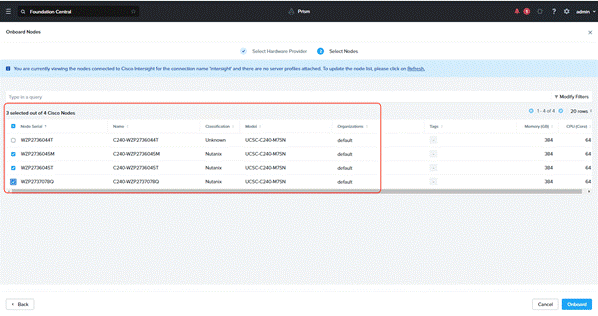
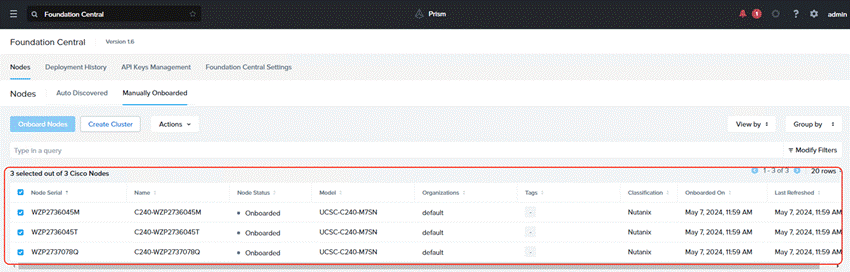
Three Nutanix nodes are onboarded on Foundation Central as shown below:
Procedure 2. Setup Nutanix Cluster
Step 1. Go to Foundation Central, select the Nodes tab and select the Manually Onboarded tab. Select Onboard Nodes. The Cisco UCS C-Series nodes onboarded for Nutanix Cluster creation display.

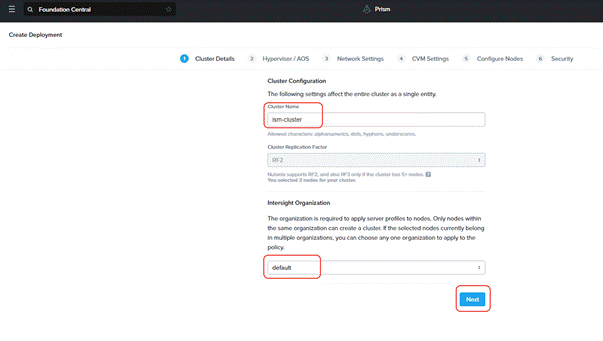
Step 2. Click Create Cluster under the Actions tab.
Step 3. Enter a cluster name, since there are three nodes, the replication factor (RF) of cluster would be RF2, select the Intersight organization in which the servers had been claimed. Click Next.
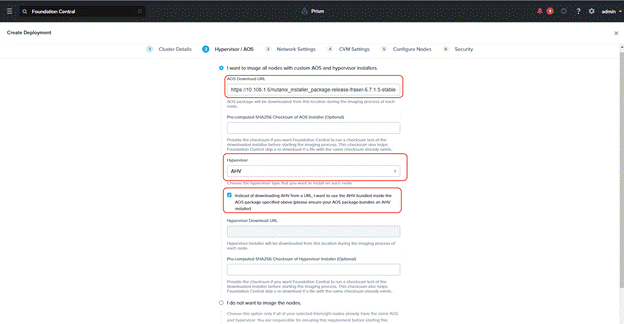
Step 4. Enter the AOS download URL. You are required to host the Nutanix AOS on a http/https web server. The web server should be reachable from Cisco IMC network. Select hypervisor as AHV and check the option to use the AHV version bundled with AOS package. This option is required if AHV is not imaged from the factory, or the nodes are reimaged. Click Next.
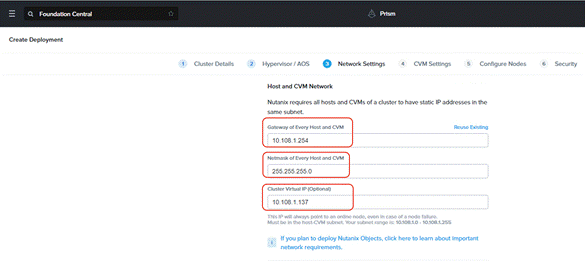
Step 5. Enter the enter subnet, gateway, and Cluster Virtual IP.
◦ Enter VLAN ID to enable trunk mode on the Cisco VIC ports.
◦ In the event customers need access ports , leave the VLAN ID blank. The port type on the uplink switch should be configured as ‘access’ with VLAN defined in the switch
◦ You have a choice to enable LACP with AHV. Default mode is active-backup. Go to: https://portal.nutanix.com/page/documents/solutions/details?targetId=BP-2071-AHV-Networking:bp-ahv-networking-best-practices.html. Enable LACP after cluster configuration and is supported only during re-imaging of nodes.
◦ In the event of LACP configuration failure wherein cluster creation fails with error as “Failed to receive the first heart beat of the node,” go to https://portal.nutanix.com/page/documents/kbs/details?targetId=kA0VO0000001w0L0AQ for resolution
◦ The default FEC setting is CL91 or AUTO (RS-FEC) applicable for 10/40/50/100 GbE cables and optics. Some models of 25GbE cables and optics require CL74 (FC-FEC) for links to be active. Configure appropriate FEC mode both on the Cisco VIC port configuration and uplink switch configuration.
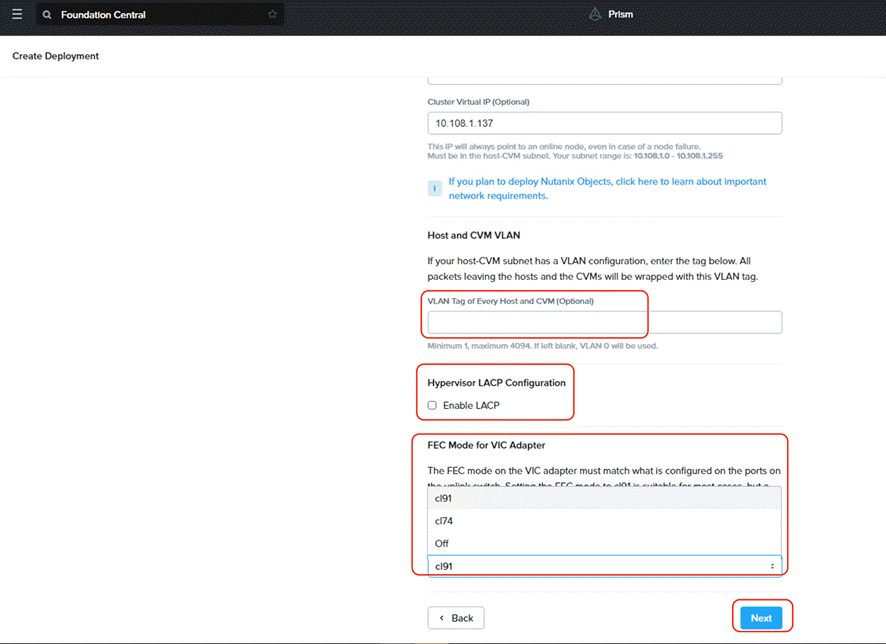
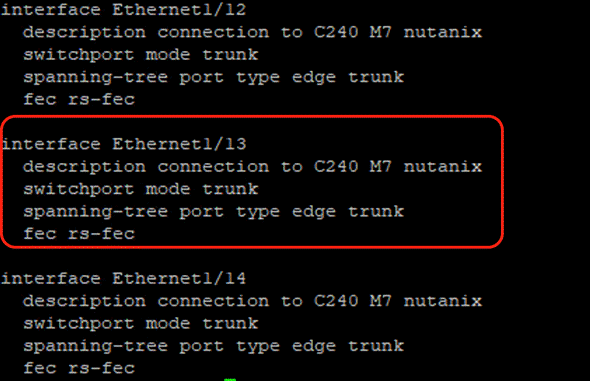
Note: In this deployment, the VLAN tag was not defined (trunk mode) and FEC Mode was selected as CL91. The servers were connected to 25G ports on Nexus 93180YC-FX. The port configuration is detailed below.
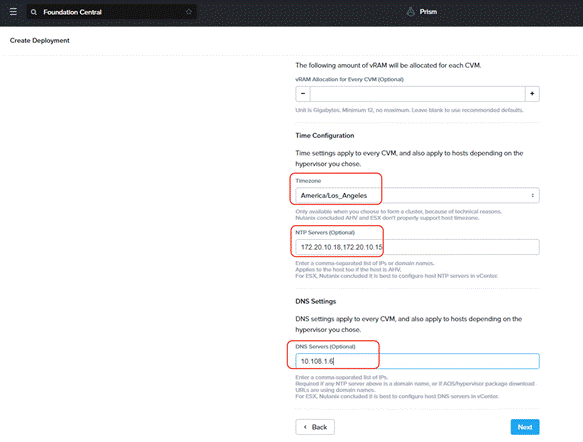
Step 6. Enter the Timezone, DNS and NTP server configuration.
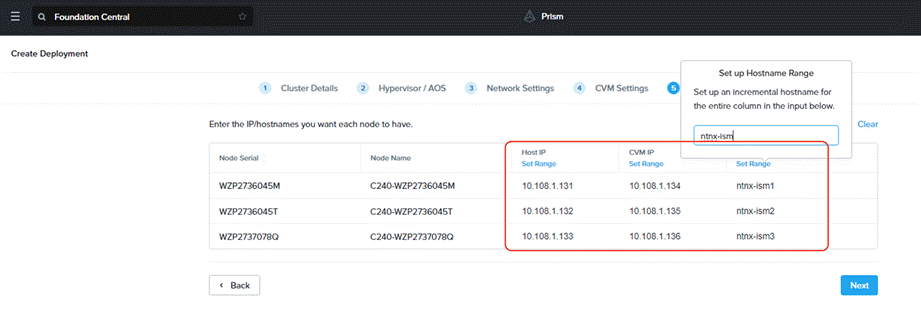
Step 7. Enter the Host IP, CVM IP, and hostnames for all the nodes configured for cluster and click Next.
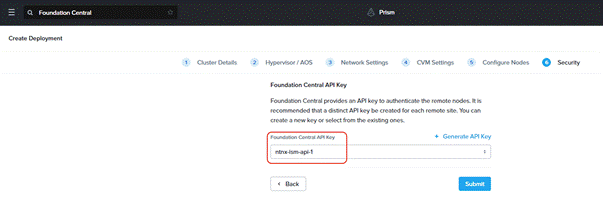
Step 8. Select the Foundation Central API key as created under FC configuration. Click Submit.
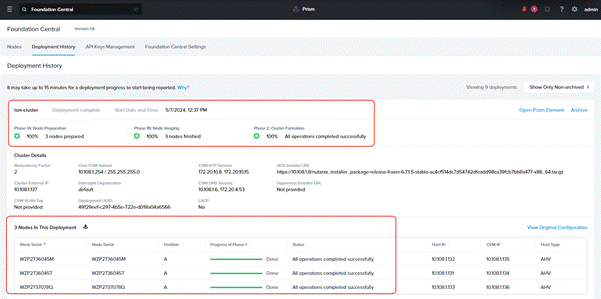
Step 9. Monitor the cluster creation process.

Step 10. Once the cluster is created successfully, go to the cluster VIP, and complete the post cluster creation task such as configuration of Storage containers, High availability reservation, iSCSI Data IP configuration, VM network configuration, and address any warnings displayed during NCC checks.
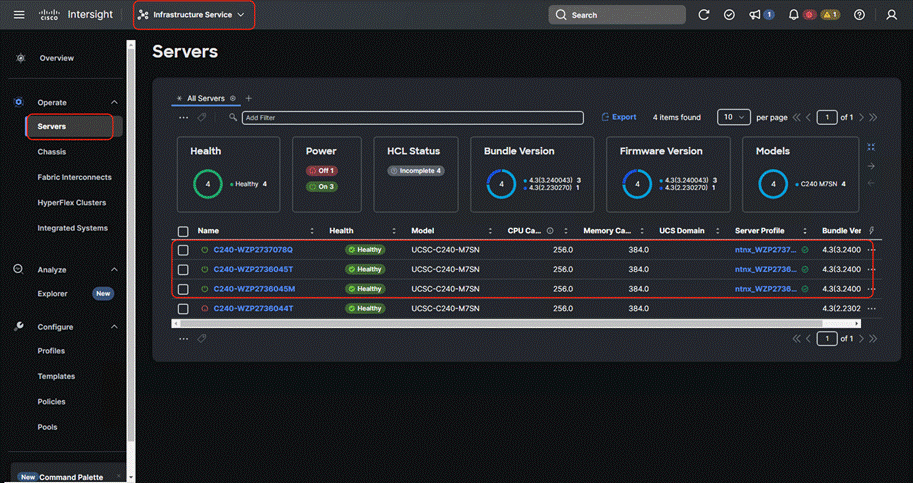
Step 11. Go to Cisco Intersight to view the Server Profile created as part of Day 0 deployment.
This procedure describes the recommended post cluster creation steps.
Procedure 1. Post Cluster Creation task
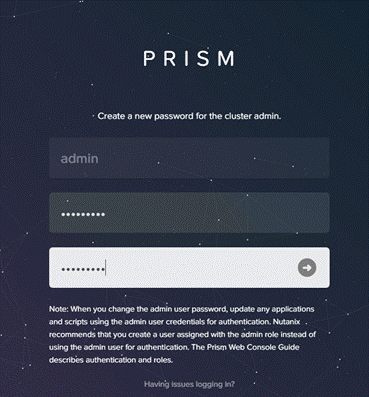
Step 1. Login to Cluster VIP with admin - Nutanix/4u and change the password.
Step 2. Go to the to Storage tab and create the storage container. Click Save.

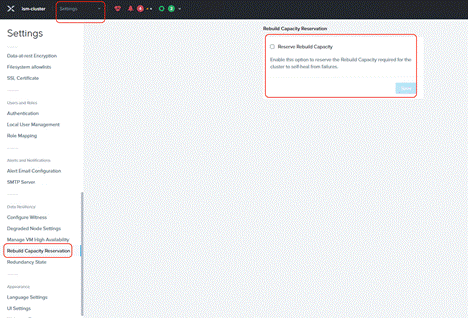
Step 3. Enable Rebuild Capacity Reservation for cluster self-healing from failures.
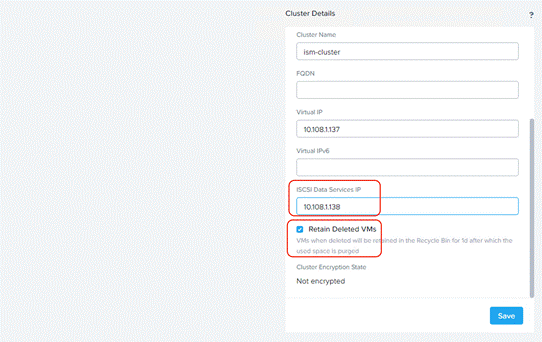
Step 4. Go to Cluster details and enter iSCSI data services IP and enable Retain Deleted VMs for 1 day. Click Save.
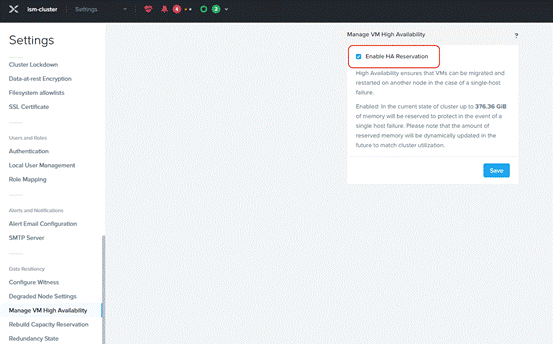
Step 5. Go to Settings > Manage VM High Availability and select Enable HA Reservation. Click Save.
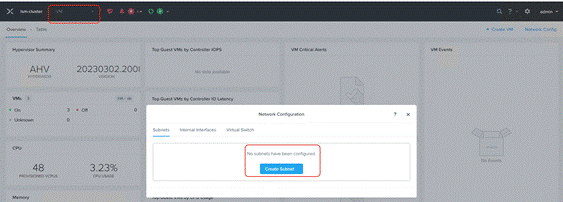
Step 6. Go to the VM tab and create a VM network subnet.
Step 7. Run a NCC check and address warnings such as changing AHV and CVM default passwords.
Appendix
This appendix contains the following:
● Appendix A – Bill of Materials
● Appendix B – References used in this guide
Appendix A – Bill of Materials
Table 2 provides an example the Bill of Materials used for one (3) node cluster deployed, used in the testing and reference design described in this document.
| Part Number |
Description |
Quantity |
| HCIAF240C-M7SN |
Cisco Compute Hyperconverged HCIAF240cM7 All Flash NVMe Node |
3 |
| HCI-IS-MANAGED |
Deployment mode for Standalone Server Managed by Intersight |
3 |
| HCI-NVME4-1920 |
1.9TB 2.5in U.2 15mm P5520 Hg Perf Med End NVMe |
72 |
| HCI-M2-I240GB |
240GB M.2 Boot SATA Intel SSD |
6 |
| HCI-M2-HWRAID |
Cisco Boot optimized M.2 Raid controller |
3 |
| HCI-RAIL-M7 |
Ball Bearing Rail Kit for C220 & C240 M7 rack servers |
3 |
| HCI-TPM-002C |
TPM 2.0, TCG, FIPS140-2, CC EAL4+ Certified, for servers |
3 |
| HCI-AOSAHV-67-SWK9 |
HCI AOS AHV 6.7 SW |
3 |
| UCSC-HSHP-C240M7 |
UCS C240 M7 Heatsink |
6 |
| UCS-DDR5-BLK |
UCS DDR5 DIMM Blanks |
60 |
| UCSC-M2EXT-240-D |
C240M7 2U M.2 Extender board |
3 |
| UCSC-FBRS2-C240-D |
C240 M7/M8 2U Riser2 Filler Blank |
3 |
| UCSC-FBRS3-C240-D |
C240 M7/M8 2U Riser3 Filler Blank |
3 |
| HCI-CPU-I6448H |
Intel I6448H 2.4GHz/250W 32C/60MB DDR5 4800MT/s |
6 |
| HCI-MRX32G1RE1 |
32GB DDR5-4800 RDIMM 1Rx4 (16Gb) |
36 |
| HCI-RIS1A-24XM7 |
C240 M7 Riser1A; (x8;x16x, x8); StBkt; (CPU1) |
3 |
| HCI-MLOM |
Cisco VIC Connectivity |
3 |
| HCI-M-V5Q50G |
Cisco VIC 15428 4x 10/25/50G mLOM C-Series |
3 |
| HCI-PSU1-1200W |
1200W Titanium power supply for C-Series Servers |
6 |
| NO-POWER-CORD |
ECO friendly green option, no power cable will be shipped |
6 |
Appendix B – References use in this guide
Cisco Compute Hyperconverged with Nutanix: https://www.cisco.com/c/en/us/products/hyperconverged-infrastructure/compute-hyperconverged/index.html
Cisco Intersight: https://www.cisco.com/c/en/us/products/servers-unified-computing/intersight/index.html
HCIAF240C M7 All-NVMe/All-Flash Server: https://www.cisco.com/c/dam/en/us/products/collateral/hyperconverged-infrastructure/hc-240m7-specsheet.pdf
Nutanix reference documentation: https://portal.nutanix.com/
For comments and suggestions about this guide and related guides, join the discussion on Cisco Community at https://cs.co/en-cvds.
ALL DESIGNS, SPECIFICATIONS, STATEMENTS, INFORMATION, AND RECOMMENDATIONS (COLLECTIVELY, "DESIGNS") IN THIS MANUAL ARE PRESENTED "AS IS," WITH ALL FAULTS. CISCO AND ITS SUPPLIERS DISCLAIM ALL WAR-RANTIES, INCLUDING, WITHOUT LIMITATION, THE WARRANTY OF MERCHANTABILITY, FITNESS FOR A PARTICULAR PURPOSE AND NONINFRINGEMENT OR ARISING FROM A COURSE OF DEALING, USAGE, OR TRADE PRACTICE. IN NO EVENT SHALL CISCO OR ITS SUPPLIERS BE LIABLE FOR ANY INDIRECT, SPECIAL, CONSEQUENTIAL, OR INCIDENTAL DAMAGES, INCLUDING, WITHOUT LIMITATION, LOST PROFITS OR LOSS OR DAMAGE TO DATA ARISING OUT OF THE USE OR INABILITY TO USE THE DESIGNS, EVEN IF CISCO OR ITS SUPPLIERS HAVE BEEN ADVISED OF THE POSSIBILITY OF SUCH DAMAGES.
THE DESIGNS ARE SUBJECT TO CHANGE WITHOUT NOTICE. USERS ARE SOLELY RESPONSIBLE FOR THEIR APPLICA-TION OF THE DESIGNS. THE DESIGNS DO NOT CONSTITUTE THE TECHNICAL OR OTHER PROFESSIONAL ADVICE OF CISCO, ITS SUPPLIERS OR PARTNERS. USERS SHOULD CONSULT THEIR OWN TECHNICAL ADVISORS BEFORE IMPLE-MENTING THE DESIGNS. RESULTS MAY VARY DEPENDING ON FACTORS NOT TESTED BY CISCO.
CCDE, CCENT, Cisco Eos, Cisco Lumin, Cisco Nexus, Cisco StadiumVision, Cisco TelePresence, Cisco WebEx, the Cisco logo, DCE, and Welcome to the Human Network are trademarks; Changing the Way We Work, Live, Play, and Learn and Cisco Store are service marks; and Access Registrar, Aironet, AsyncOS, Bringing the Meeting To You, Catalyst, CCDA, CCDP, CCIE, CCIP, CCNA, CCNP, CCSP, CCVP, Cisco, the Cisco Certified Internetwork Expert logo, Cisco IOS, Cisco Press, Cisco Systems, Cisco Systems Capital, the Cisco Systems logo, Cisco Unified Computing System (Cisco UCS), Cisco UCS B-Series Blade Servers, Cisco UCS C-Series Rack Servers, Cisco UCS S-Series Storage Servers, Cisco UCS X-Series, Cisco UCS Manager, Cisco UCS Management Software, Cisco Unified Fabric, Cisco Application Centric Infrastructure, Cisco Nexus 9000 Series, Cisco Nexus 7000 Series. Cisco Prime Data Center Network Manager, Cisco NX-OS Software, Cisco MDS Series, Cisco Unity, Collaboration Without Limitation, EtherFast, EtherSwitch, Event Center, Fast Step, Follow Me Browsing, FormShare, GigaDrive, HomeLink, Internet Quotient, IOS, iPhone, iQuick Study, LightStream, Linksys, MediaTone, MeetingPlace, MeetingPlace Chime Sound, MGX, Networkers, Networking Academy, Network Registrar, PCNow, PIX, PowerPanels, ProConnect, ScriptShare, SenderBase, SMARTnet, Spectrum Expert, StackWise, The Fastest Way to Increase Your Internet Quotient, TransPath, WebEx, and the WebEx logo are registered trade-marks of Cisco Systems, Inc. and/or its affiliates in the United States and certain other countries. (LDW_P11)
All other trademarks mentioned in this document or website are the property of their respective owners. The use of the word partner does not imply a partnership relationship between Cisco and any other company. (0809R)
