Cisco HyperFlex Core and Edge Multisite Protection with Veeam
Available Languages
Cisco HyperFlex Core and Edge Multisite Protection with Veeam
Deployment Guide for Data Protection of Cisco HyperFlex Core and Edge Sites with Veeam Backup & Replication
Published: December 2019

About the Cisco Validated Design Program
The Cisco Validated Design (CVD) program consists of systems and solutions designed, tested, and documented to facilitate faster, more reliable, and more predictable customer deployments. For more information, go to:
http://www.cisco.com/go/designzone.
ALL DESIGNS, SPECIFICATIONS, STATEMENTS, INFORMATION, AND RECOMMENDATIONS (COLLECTIVELY, "DESIGNS") IN THIS MANUAL ARE PRESENTED "AS IS," WITH ALL FAULTS. CISCO AND ITS SUPPLIERS DISCLAIM ALL WARRANTIES, INCLUDING, WITHOUT LIMITATION, THE WARRANTY OF MERCHANTABILITY, FITNESS FOR A PARTICULAR PURPOSE AND NONINFRINGEMENT OR ARISING FROM A COURSE OF DEALING, USAGE, OR TRADE PRACTICE. IN NO EVENT SHALL CISCO OR ITS SUPPLIERS BE LIABLE FOR ANY INDIRECT, SPECIAL, CONSEQUENTIAL, OR INCIDENTAL DAMAGES, INCLUDING, WITHOUT LIMITATION, LOST PROFITS OR LOSS OR DAMAGE TO DATA ARISING OUT OF THE USE OR INABILITY TO USE THE DESIGNS, EVEN IF CISCO OR ITS SUPPLIERS HAVE BEEN ADVISED OF THE POSSIBILITY OF SUCH DAMAGES.
THE DESIGNS ARE SUBJECT TO CHANGE WITHOUT NOTICE. USERS ARE SOLELY RESPONSIBLE FOR THEIR APPLICATION OF THE DESIGNS. THE DESIGNS DO NOT CONSTITUTE THE TECHNICAL OR OTHER PROFESSIONAL ADVICE OF CISCO, ITS SUPPLIERS OR PARTNERS. USERS SHOULD CONSULT THEIR OWN TECHNICAL ADVISORS BEFORE IMPLEMENTING THE DESIGNS. RESULTS MAY VARY DEPENDING ON FACTORS NOT TESTED BY CISCO.
CCDE, CCENT, Cisco Eos, Cisco Lumin, Cisco Nexus, Cisco StadiumVision, Cisco TelePresence, Cisco WebEx, the Cisco logo, DCE, and Welcome to the Human Network are trademarks; Changing the Way We Work, Live, Play, and Learn and Cisco Store are service marks; and Access Registrar, Aironet, AsyncOS, Bringing the Meeting To You, Catalyst, CCDA, CCDP, CCIE, CCIP, CCNA, CCNP, CCSP, CCVP, Cisco, the Cisco Certified Internetwork Expert logo, Cisco IOS, Cisco Press, Cisco Systems, Cisco Systems Capital, the Cisco Systems logo, Cisco Unified Computing System (Cisco UCS), Cisco UCS B-Series Blade Servers, Cisco UCS C-Series Rack Servers, Cisco UCS S-Series Storage Servers, Cisco UCS Manager, Cisco UCS Management Software, Cisco Unified Fabric, Cisco Application Centric Infrastructure, Cisco Nexus 9000 Series, Cisco Nexus 7000 Series. Cisco Prime Data Center Network Manager, Cisco NX-OS Software, Cisco MDS Series, Cisco Unity, Collaboration Without Limitation, EtherFast, EtherSwitch, Event Center, Fast Step, Follow Me Browsing, FormShare, GigaDrive, HomeLink, Internet Quotient, IOS, iPhone, iQuick Study, LightStream, Linksys, MediaTone, MeetingPlace, MeetingPlace Chime Sound, MGX, Networkers, Networking Academy, Network Registrar, PCNow, PIX, PowerPanels, ProConnect, ScriptShare, SenderBase, SMARTnet, Spectrum Expert, StackWise, The Fastest Way to Increase Your Internet Quotient, TransPath, WebEx, and the WebEx logo are registered trademarks of Cisco Systems, Inc. and/or its affiliates in the United States and certain other countries.
All other trademarks mentioned in this document or website are the property of their respective owners. The use of the word partner does not imply a partnership relationship between Cisco and any other company. (0809R)
© 2020 Cisco Systems, Inc. All rights reserved.
Table of Contents
Cisco Unified Computing System
Cisco UCS Fabric Interconnects
Cisco UCS S3260 Storage Server
Cisco UCS VIC 1457 MLOM Interface Card
Cisco HyperFlex Data Platform Software
Cisco HyperFlex Connect HTML5 Management Web Page
Cisco HyperFlex HX Data Platform Administration Plug-in
Cisco HyperFlex HX Data Platform Controller
Cisco HyperFlex Storage Integration with Veeam
Backup & Replication for Cisco HyperFlex Edge Sites
Protection of HyperFlex Edge Sites through Remote Backups
Protection of HyperFlex Edge Sites through Local Backups
WAN Acceleration for Backup and Replica
Veeam Backup Enterprise Manager Console
Veeam Transport Mode for HX Cluster
Veeam Proxy Server Distribution
Proxy Distribution for HyperFlex Edge ROBO Replication
Proxy Distribution for Multisite HyperFlex Cluster Deployments
Deployment Hardware and Software
Cisco UCS S3260 Storage Server and HyperFlex Configuration
Perform Initial Setup of Cisco UCS 6454 Fabric Interconnects
Upgrade Cisco UCS Manager Software to Version 4.0(4d)
Add Block of IP Addresses for KVM Access
Create Chassis Firmware Packages
Set Cisco UCS S3260 Disk to Unconfigured Good
Create Network Control Policy for Cisco Discovery Protocol
Create Chassis Profile Template
Create Service Profile Template
Associate Chassis Profile to Cisco UCS S3260 Chassis
Associate Service Profile to Server Node of Cisco UCS S3260 Chassis
Veeam Availability Suite 9.5 Update 4 Installation
Install and Configure Windows 2019
Update Cisco VIC Driver for Windows 2019
Update Intel Chipset Driver for Windows 2019
Configure network for Veeam Backup Server
Power Options for High Performance
Create Disk Volume for Veeam Repository
Install Veeam Availability Suite 9.5 Update 4
Configure Veeam Availability Suite
Configure HyperFlex Veeam Storage Integration
Cisco HyperFlex Edge Site Protection through Remote Backup & Replication
Configure Veeam Proxy for Backup and Replication of Application VM on HyperFlex Edge Cluster
Configure Veeam Backup Repository to Replicate the Application VM on Veeam Console
Configure HyperFlex Edge Cluster Storage Integration on Veeam Backup Console
Cisco HyperFlex Edge Site Protection through Local Veeam Backups
Configure Veeam Backup Local Repository
Backup VM on HX Cluster with HyperFlex and Veeam Storage Integration
Remote Backup of VMs Provisioned on HyperFlex Edge Cluster
Replication of VMs provisioned on HyperFlex Edge Cluster
Failover of VM on HX Edge to Primary HX Cluster
Failback VM to HX Edge cluster
Local Backup of VMs Provisioned on HyperFlex Edge Cluster
Backup Copy Jobs Across HX Edge and Primary HX Site
Today’s data centers are heterogeneous, and most administrators want to avoid siloed data protection for each application or infrastructure stack. Customers need data protection to work across the enterprise and for recovery to be self-service, easy, and fast—whether the data is local or remote. While enterprise applications have been migrating to centralized data centers and to the cloud, the Internet edge has been moving to branch and remote locations closer to users, IoT devices, and organizational touch points. With several distributed end points, failure protection and disaster recovery of these end points has become even more challenging.
Cisco HyperFlex Edge helps you meet the unique challenges of deploying simplified, hyperconverged environments for multisite, distributed computing with global scale. It incorporates key features optimized to lower cost and reduce space consumption. Customers can choose clusters with two or three nodes for ease of meeting a wide range of edge-location computing, GPU acceleration, and storage requirements.
The Cisco HyperFlex™ Systems solution together with Veeam Availability Suite enables a flexible, agile, and scalable platform that is easy to deploy and protects mission critical applications at all times. Cisco and Veeam have partnered to extend this solution to protect Remote Office and Branch Office (ROBO) or HyperFlex Edge locations, which enables backup, restore and replicate, virtualized workloads running on Cisco HyperFlex Edge, utilizing Veeam Availability Suite deployed on Cisco UCS S3260 Storage Server and Cisco UCS C240 LFF Rack Server. More importantly, customers can manage all data protection use cases from a single Veeam Management Console deployed on the primary Data Center.
Veeam and Cisco's solution helps customers realize the full potential of virtualization and hyper converged infrastructures at remote locations, by simplifying management to minimize risk, decrease downtime, and easily adapt to business demands. IT administrators can leverage policy-based controls for smarter data protection to recover the data they want, when they want it, enabling organizations to confidently deploy a high performance, compatible solution that has been tested and validated by Cisco and Veeam experts.
This Cisco Validated Design (CVD), Cisco HyperFlex Edge Protection with Veeam Backup & Replication, is a certified solution built on a modern architecture that delivers fast, reliable recovery, reduced total cost of ownership (TCO) and a better user experience, and addresses the challenge of delivering agile protection for Cisco HyperFlex platform. This solution utilizes Cisco components such as Cisco Intersight, Cisco UCS Manager, Cisco Fabric Interconnect, Cisco HyperFlex Data Platform, Cisco HyperFlex HX220c and HX240c nodes, Cisco Nexus 9000 series networking and Cisco UCS S3260 Storage Server.
A Cisco Validated Design (CVD) and pre-validated reference architectures facilitate faster, more reliable, and more predictable customer deployments:
· Each CVD has been extensively tested, validated, and documented by Cisco and partner experts
· CVD's minimize both integration and performance risks to ensure always-on availability in the enterprise
From design to configuration, instructions to bill of materials (BOMs), CVDs provide everything businesses need to deploy the solutions in the most efficient manner; everything is clearly and precisely explained.
Introduction
Designed specifically for virtual environments, Data Protection for Cisco HyperFlex Edge Systems with Veeam Availability Suite is integrated with VMware vSphere, helping ensure consistent and reliable virtual machine recovery.
The Cisco HyperFlex solution delivers next generation hyperconvergence in a data platform to offer end-to-end simplicity for faster IT deployments, unifying computing, networking, and storage resources. The Cisco HyperFlex solution is built on the Cisco Unified Computing System™ (Cisco UCS®) platform and adheres to a data center architecture supporting traditional, converged, and hyperconverged systems with common policies and infrastructure management. The Cisco HyperFlex HX Data Platform is a purpose-built, high-performance, distributed file system delivering a wide range of enterprise-class data management and optimization services. This platform redefines distributed storage technology, expanding the boundaries of hyperconverged infrastructure with its independent scaling, continuous data optimization, simplified data management, and dynamic data distribution for increased data availability. This agile system is easy to deploy and manage, scales as your business needs change, and provides the first level of data availability. However, as with most systems, a second layer of protection that is equally agile is recommended. Veeam Availability Suite can meet this need.
Veeam is an industry leader in the data protection market. In the era of Digital Transformation, Veeam recognizes the new challenges companies across the globe face in enabling data to be available 24.7.365. As data volumes explode, the value of data continues to exponentially increase and data center strategies evolve to keep up with the needs of the business, customers need a data management platform that solves for today’s needs while seamlessly supporting future data center strategies. Veeam consistently pushes the envelope in bringing sophisticated backup and disaster recovery functionality to enterprises and cloud providers
Veeam® Backup & Replication™ helps business achieve comprehensive data protection for ALL workloads — cloud, virtual and physical. With a single console, achieve fast, flexible and reliable backup, recovery and replication of all applications and data, on-premises or in the cloud.
Audience
The intended audience for this document includes, but is not limited to, sales engineers, field consultants, professional services, IT managers, partner engineering, and customers looking to provision backup, recovery and replication of virtualized application on Cisco HyperFlex Clusters deployed across data centers or in Cisco HyperFlex Edge clusters deployed in several Remote Offices, across different geographies.
Purpose of this Document
This document elaborates on design, deployment, configuration and best practices for protecting Cisco HyperFlex Edge deployments with Veeam Availability Suite and Cisco UCS S3260 Storage Server.
What’s New in this Release?
The last version of the CVD was published in March 2018, which elaborated on protection of multi-site HyperFlex deployment with HyperFlex Data Platform version 2.5(1b) and Veeam 9.5 update2. This version of CVD elaborates on protection of Cisco HyperFlex Edge Clusters with HyperFlex Data Platform Version 4.0(1b) and Veeam 9.5 update 4.
Solution Summary
This solution for protection of Cisco HyperFlex Edge with Cisco UCS S3260 Storage Server and Veeam Availability Suite delivers reliable and fast Backup, Restore and Replication of application VMs residing on multisite Cisco HyperFlex Edge Clusters. The solution extends across the following:
· HyperFlex clusters deployed across Data Center and protected locally on each of the location.
· HyperFlex Edge cluster deployed across different locations through Cisco Intersight and application VMs on Edge Clusters protected through remote Backup with Veeam Proxy deployed on HyperFlex Edge clusters and Veeam Proxy, Repository and Management Console deployed on Cisco UCS S3260 Storage Server in the primary Data Center.
· HyperFlex Edge cluster deployed across different locations through Cisco Intersight and application VMs on Edge Clusters protected through local Backup with Veeam Proxy and Repository deployed on HyperFlex Edge clusters with Veeam Backup Copy Jobs executed between HyperFlex Edge clusters and Veeam Proxy, Repository and Management Console deployed on Cisco UCS S3260 Storage Server in the primary Data Center.
· Replication of application VMs deployed on HyperFlex Edge cluster to HyperFlex Cluster deployed on the primary Data Center.
This solution can be accurately sized in accordance with present demands of enterprise deployments and thereafter can be scaled as per the future growth projections.
Veeam Availability Suite comprises of Veeam Repository, Veeam Proxy and Veeam Backup Server all reside on a single Cisco UCS S3260 Storage Server which provides up to 784 TB of raw storage capacity.
Figure 1 provides a high-level view of Cisco HyperFlex with Veeam Backup & Replication Server deployed on Cisco UCS S3260 Storage Server and Veeam Proxy and Repository deployed on HyperFlex Edge Clusters with local or remote backups. In additions, application VMs provisioned on HyperFlex Edge clusters are replicated with Veeam to primary HyperFlex clusters in accordance with the Veeam replication schedule, administered in accordance with network latencies across HyperFlex Edge site and HyperFlex primary site.

Cisco Unified Computing System
Cisco Unified Computing System (Cisco UCS) is a next-generation data center platform that integrates computing, networking, storage access, and virtualization resources into a cohesive system designed to reduce total cost of ownership and increase business agility. The system integrates a low-latency, lossless 10-100 Gigabit Ethernet unified network fabric with enterprise-class, x86-architecture servers. The system is an integrated, scalable, multi-chassis platform with a unified management domain for managing all resources.
Cisco Unified Computing System consists of the following subsystems:
· Compute - The compute piece of the system incorporates servers based on the Second-Generation Intel® Xeon® Scalable processors. Servers are available in blade and rack form factor, managed by Cisco UCS Manager.
· Network - The integrated network fabric in the system provides a low-latency, lossless, 10/25/40/100 Gbps Ethernet fabric. Networks for LAN, SAN and management access are consolidated within the fabric. The unified fabric uses the innovative Single Connect technology to lowers costs by reducing the number of network adapters, switches, and cables. This in turn lowers the power and cooling needs of the system.
· Virtualization - The system unleashes the full potential of virtualization by enhancing the scalability, performance, and operational control of virtual environments. Cisco security, policy enforcement, and diagnostic features are now extended into virtual environments to support evolving business needs.
· Storage access – Cisco UCS system provides consolidated access to both SAN storage and Network Attached Storage over the unified fabric. This provides customers with storage choices and investment protection. Also, the server administrators can pre-assign storage-access policies to storage resources, for simplified storage connectivity and management leading to increased productivity.
· Management: The system uniquely integrates compute, network and storage access subsystems, enabling it to be managed as a single entity through Cisco UCS Manager software. Cisco UCS Manager increases IT staff productivity by enabling storage, network, and server administrators to collaborate on Service Profiles that define the desired physical configurations and infrastructure policies for applications. Service Profiles increase business agility by enabling IT to automate and provision resources in minutes instead of days.
Cisco UCS Differentiators
Cisco Unified Computing System is revolutionizing the way servers are managed in the datacenter. The following are the unique differentiators of Cisco Unified Computing System and Cisco UCS Manager:
· Embedded Management — In Cisco UCS, the servers are managed by the embedded firmware in the Fabric Interconnects, eliminating need for any external physical or virtual devices to manage the servers.
· Unified Fabric — In Cisco UCS, from blade server chassis or rack servers to FI, there is a single Ethernet cable used for LAN, SAN and management traffic. This converged I/O results in reduced cables, SFPs and adapters – reducing capital and operational expenses of the overall solution.
· Policy Based Resource Classification — Once a compute resource is discovered by Cisco UCS Manager, it can be automatically classified to a given resource pool based on policies defined. This capability is useful in multi-tenant cloud computing. This CVD showcases the policy-based resource classification of Cisco UCS Manager.
· Combined Rack and Blade Server Management — Cisco UCS Manager can manage Cisco UCS B-series blade servers and Cisco UCS C-series rack servers under the same Cisco UCS domain. This feature, along with stateless computing makes compute resources truly hardware form factor agnostic.
· Model based Management Architecture — The Cisco UCS Manager architecture and management database is model based, and data driven. An open XML API is provided to operate on the management model. This enables easy and scalable integration of Cisco UCS Manager with other management systems.
· Policies, Pools, Templates — The management approach in Cisco UCS Manager is based on defining policies, pools and templates, instead of cluttered configuration, which enables a simple, loosely coupled, data driven approach in managing compute, network and storage resources.
· Loose Referential Integrity — In Cisco UCS Manager, a service profile, port profile or policies can refer to other policies or logical resources with loose referential integrity. A referred policy cannot exist at the time of authoring the referring policy or a referred policy can be deleted even though other policies are referring to it. This provides different subject matter experts to work independently from each other. This provides great flexibility where different experts from different domains, such as network, storage, security, server and virtualization work together to accomplish a complex task.
· Policy Resolution — In Cisco UCS Manager, a tree structure of organizational unit hierarchy can be created that mimics the real-life tenants and/or organization relationships. Various policies, pools and templates can be defined at different levels of organization hierarchy. A policy referring to another policy by name is resolved in the organizational hierarchy with closest policy match. If no policy with specific name is found in the hierarchy of the root organization, then the special policy named “default” is searched. This policy resolution practice enables automation friendly management APIs and provides great flexibility to owners of different organizations.
· Service Profiles and Stateless Computing — A service profile is a logical representation of a server, carrying its various identities and policies. This logical server can be assigned to any physical compute resource as far as it meets the resource requirements. Stateless computing enables procurement of a server within minutes, which used to take days in legacy server management systems.
· Built-in Multi-Tenancy Support — The combination of policies, pools and templates, loose referential integrity, policy resolution in the organizational hierarchy and a service profiles-based approach to compute resources makes Cisco UCS Manager inherently friendly to multi-tenant environments typically observed in private and public clouds.
· Simplified QoS — Even though Fibre Channel and Ethernet are converged in the Cisco UCS fabric, built-in support for QoS and lossless Ethernet makes it seamless. Network Quality of Service (QoS) is simplified in Cisco UCS Manager by representing all system classes in one GUI panel.
Cisco UCS Manager
Cisco UCS Manager (UCSM) provides unified, integrated management for all software and hardware components in Cisco UCS. Using Cisco Single Connect technology, it manages, controls, and administers multiple chassis for thousands of virtual machines. Administrators use the software to manage the entire Cisco Unified Computing System as a single logical entity through an intuitive graphical user interface (GUI), a command-line interface (CLI), or a through a robust application programming interface (API).
Cisco UCS Manager is embedded into the Cisco UCS Fabric Interconnects and provides a unified management interface that integrates server, network, and storage. Cisco UCS Manger performs auto-discovery to detect inventory, manage, and provision system components that are added or changed. It offers comprehensive set of XML API for third party integration, exposes thousands of integration points and facilitates custom development for automation, orchestration, and to achieve new levels of system visibility and control.
Cisco UCS™ Manager 4.0 provides unified, embedded management of all software and hardware components of the Cisco Unified Computing System™ (Cisco UCS) across multiple chassis and Cisco UCS servers. Cisco UCS Manager4.0 is a unified software release for all supported Cisco UCS hardware platforms. Release 4.0 enables support for UCS 6454 Fabric Interconnects, VIC 1400 series adapter cards on Cisco UCS M5 servers and Second-Generation Intel® Xeon® Scalable processor refresh and Intel® Optane™ Data Center persistent memory modules on UCS Intel-based M5 servers.
For more information on Cisco UCS Manager Release 4.0 refer to the Release Notes page.
Cisco Intersight
Cisco Intersight is Cisco’s new systems management platform that delivers intuitive computing through cloud-powered intelligence. This platform offers a more intelligent management level and enables IT organizations to analyze, simplify and automate their IT environments in ways that were not possible with prior generations of tools. This capability empowers organizations to achieve significant savings in Total Cost of Ownership (TCO) and to deliver applications faster to support new business initiatives.
The Cisco UCS platform uses model-based management to provision servers and fabric automatically, regardless of form factor. Cisco Intersight works in conjunction with Cisco UCS Manager and the Cisco Integrated Management Controller (IMC). By simply associating a model-based configuration with a resource through service profiles, your IT staff can consistently align policy, server personality, and workloads. These policies can be created once and used by IT staff with minimal effort to deploy servers. The result is improved productivity and compliance and lower risk of failures due to inconsistent configuration.
Cisco Intersight will be integrated with data center, hybrid cloud platforms and services to securely deploy and manage infrastructure resources across data center and edge environments. In addition, Cisco will provide future integrations to third-party operations tools to allow customers to use their existing solutions more effectively.
Cisco Intersight manages all Cisco UCS servers and switches in the solution and offers cloud-based, centralized management of Cisco UCS servers across all Enterprise locations and delivers unique capabilities such as:
· Integration with Cisco TAC for support and case management
· Proactive, actionable intelligence for issues and support based on telemetry data
· Compliance check through integration with Cisco Hardware Compatibility List (HCL)
· Centralized service profiles for policy-based configuration
For more information about Cisco Intersight and the different editions, go to: Cisco Intersight – Manage your systems anywhere.
Cisco UCS Fabric Interconnects
The Cisco UCS Fabric Interconnects (FIs) provide a single point for connectivity and management for the entire Cisco UCS system. Typically deployed as an active-active pair, the systems fabric interconnects integrate all components into a single, highly-available management domain controlled by the Cisco UCS Manager. Cisco UCS FIs provide a single unified fabric for the system, with low-latency, lossless, cut-through switching that supports LAN, SAN and management traffic using a single set of cables.
The 3rd generation (6300) Fabric Interconnect deliver options for both high workload density, as well as high port count, with both supporting either Cisco UCS B-Series blade servers, or Cisco UCS C-Series rack mount servers. The Fabric Interconnect models featured in this design is Cisco UCS 6332-16UP Fabric Interconnect which is a 1RU 40GbE/FCoE switch and 1/10 Gigabit Ethernet, FCoE and FC switch offering up to 2.24 Tbps throughput. The switch has 24x40Gbps fixed Ethernet/FCoE ports with unified ports providing 16x1/10Gbps Ethernet/FCoE or 4/8/16Gbps FC ports. This model is aimed at FC storage deployments requiring high performance 16Gbps FC connectivity to Cisco MDS switches or FC direct attached storage.

See the Solution Design section for additional information on Fabric Interconnects.
The Cisco UCS 6454 54-Port Fabric Interconnect is a One-Rack-Unit (1RU) 10/25/40/100 Gigabit Ethernet, FCoE and Fibre Channel switch offering up to 3.82 Tbps throughput and up to 54 ports. The switch has 28 10/25-Gbps Ethernet ports, 4 1/10/25-Gbps Ethernet ports, 6 40/100-Gbps Ethernet uplink ports and 16 unified ports that can support 10/25-Gbps Ethernet ports or 8/16/32-Gbps Fibre Channel ports. All Ethernet ports are capable of supporting FCoE.

Cisco UCS S3260 Storage Server
The Cisco UCS S3260 Storage Server (3) is a modular, high-density, high-availability dual-node rack server well suited for service providers, enterprises, and industry-specific environments. It addresses the need for dense, cost-effective storage for the ever-growing amounts of data. Designed for a new class of cloud-scale applications and data-intensive workloads, it is simple to deploy and excellent for big data, software-defined storage, and data-protection environments.

The Cisco UCS S3260 server helps you achieve the highest levels of data availability and performance. With dual-node capability that is based on the 2nd Gen Intel® Xeon® Scalable and Intel Xeon Scalable processor, it features up to 840 TB of local storage in a compact 4-Rack-Unit (4RU) form factor. The drives can be configured with enterprise-class Redundant Array of Independent Disks (RAID) redundancy or with a pass-through Host Bus Adapter (HBA) controller. Network connectivity is provided with dual-port 40-Gbps nodes in each server, with expanded unified I/O capabilities for data migration between Network-Attached Storage (NAS) and SAN environments. This storage-optimized server comfortably fits in a standard 32-inch-depth rack, such as the Cisco® R 42610 Rack.
You can deploy Cisco UCS S-Series Storage Servers as standalone servers or as part of a Cisco UCS managed environment to take advantage of Cisco® standards-based unified computing innovations that can help reduce your TCO and increase your business agility.
The Cisco UCS S3260 uses a modular server architecture that, using Cisco’s blade technology expertise, allows you to upgrade the computing or network nodes in the system without the need to migrate data from one system to another. It delivers:
· Dual 2-socket server nodes based on 2nd Gen Intel Xeon Scalable and Intel Xeon Scalable processors with up to 48 cores per server node
· Up to 1.5 TB of DDR4 memory per M5 server node and up to 1 TB of Intel Optane™ DC Persistent Memory
· Support for high-performance Nonvolatile Memory Express (NVMe) and flash memory
· Massive 840-TB data storage capacity that easily scales to petabytes with Cisco UCS Manager software
· Policy-based storage management framework for zero-touch capacity on demand
· Dual-port 40-Gbps system I/O controllers with a Cisco UCS Virtual Interface Card 1300 platform embedded chip or PCIe-based system I/O controller for Quad Port 10/25G Cisco VIC 1455 or Dual Port 100G Cisco VIC 1495
· Unified I/O for Ethernet or Fibre Channel to existing NAS or SAN storage environments
Cisco UCS C240 M5 LFF Server
The Cisco UCS C240 M5 LFF server extends the capabilities of the Cisco Unified Computing System portfolio in a 2U form factor with the addition of the Intel® Xeon® Processor Scalable Family, 24 DIMM slots for 2666-MHz or 2933-MHz DIMMs with capacity points up to 128 GB, 2666-MHz DCPMMs with capacity points up to 512 GB, up to 6 PCI Express (PCIe) 3.0 slots, and up to 12 front-facing internal LFF drives. The Cisco UCS C240 M5 LFF server also includes one dedicated internal slot for a 12G SAS storage controller card.
The latest update includes support for 2nd Generation Intel® Xeon® Scalable Processors, 2933-MHz DDR4 memory, and the new 512GB Intel® OptaneTM DC Persistent Memory Modules (DCPMMs). With this combination of features, up to 9 TB of memory is possible (using 12 x 256 GB DDR4 DIMMs and 12 x 512 GB DCPMMs).
The Cisco UCS C240 M5 server includes a dedicated modular LAN on motherboard (mLOM) slot for installation of a Cisco Virtual Interface Card (VIC) or third-party network interface card (NIC) without consuming a PCI slot, in addition to 2 x 10 Intel x550 10Gbase-T embedded (on the motherboard) LOM ports. The Cisco UCS C240 M5 server can be used standalone, or as part of the Cisco Unified Computing System, which unifies computing, networking, management, virtualization, and storage access into a single integrated architecture enabling end-to-end server visibility, management, and control in both bare metal and virtualized environments.

Cisco UCS VIC 1457 MLOM Interface Card
The Cisco UCS VIC 1457 Card is a quad-port Enhanced Small Form-Factor Pluggable (SFP+) 10/25-Gbps Ethernet and Fibre Channel over Ethernet (FCoE)-capable PCI Express (PCIe) modular LAN-on-motherboard (mLOM) adapter installed in the Cisco UCS C-Series Rack Servers. The Cisco UCS VIC 1457 is used in conjunction with the Cisco UCS 6454 model Fabric Interconnects. The mLOM slot can be used to install a Cisco VIC without consuming a PCIe slot, which provides greater I/O expandability. It incorporates next-generation converged network adapter (CNA) technology from Cisco, providing investment protection for future feature releases. The card enables a policy-based, stateless, agile server infrastructure that can present up to 256 PCIe standards-compliant interfaces to the host, each dynamically configured as either a network interface card (NICs) or host bus adapter (HBA). The personality of the interfaces is set programmatically using the service profile associated with the server. The number, type (NIC or HBA), identity (MAC address and World Wide Name [WWN]), failover policy, adapter settings, bandwidth, and quality-of-service (QoS) policies of the PCIe interfaces are all specified using the service profile.

Cisco HyperFlex Data Platform Software
The Cisco HyperFlex delivers a new generation of flexible, scalable, enterprise-class hyperconverged solutions. The solution also delivers storage efficiency features such as thin provisioning, data deduplication, and compression for greater capacity and enterprise-class performance. Additional operational efficiency is facilitated through features such as cloning and snapshots.
The complete end-to-end hyperconverged solution provides the following benefits to customers:
· Simplicity: The solution is designed to be deployed and managed easily and quickly through familiar tools and methods. No separate management console is required for the Cisco HyperFlex solution.
· Centralized hardware management: The cluster hardware is managed in a consistent manner by Cisco Intersight. Cisco Intersight also provides a single console for solution management, including firmware management. Cisco HyperFlex HX Data Platform clusters are managed through a plug-in to VMware vCenter, or through HyperFlex Connect, a native HTML5 UI.
· High availability: Component redundancy is built into most levels at the node. Cluster-level tolerance of node and network failures is implemented as well.
· Enterprise-class storage features: Complementing the other management efficiencies are features such as thin provisioning, data deduplication, compression, cloning, and snapshots to address concerns related to overprovisioning of storage.
· Flexibility with a "pay-as-you-grow" model: Customers can purchase the exact amount of computing and storage they need and expand one node at a time up to the supported cluster node limit.
· Agility to support different workloads: Support for both hybrid and all-flash models allows customers to choose the right platform configuration for capacity-sensitive applications or performance-sensitive applications according to budget requirements.
The Cisco HyperFlex HX Data Platform is a purpose-built, high-performance, distributed file system with a wide array of enterprise-class data management services. The data platforms innovations redefine distributed storage technology, exceeding the boundaries of first-generation hyperconverged infrastructures. The data platform has all the features that you would expect of an enterprise shared storage system, eliminating the need to configure and maintain complex Fibre Channel storage networks and devices. The platform simplifies operations and helps ensure data availability. Enterprise-class storage features include the following:
· Replication of all written data across the cluster so that data availability is not affected if single or multiple components fail (depending on the failure scenario).
· Deduplication is always on, helping reduce storage requirements in which multiple operating system instances in client virtual machines result in large amounts of duplicate data.
· Compression further reduces storage requirements, reducing costs, and the log- structured file system is designed to store variable-sized blocks, reducing internal fragmentation.
· Thin provisioning allows large volumes to be created without requiring storage to support them until the need arises, simplifying data volume growth and making storage a “pay as you grow” proposition.
· Fast, space-efficient clones rapidly replicate virtual machines simply through metadata operations.
· Snapshots help facilitate backup and remote-replication operations: needed in enterprises that require always-on data availability.
The HX Data Platform can be administered through a VMware vSphere web client plug-in or through the HTML5-based native Cisco HyperFlex Connect management tool. Additionally, since the HX Data Platform Release 2.6, Cisco HyperFlex systems can also be managed remotely by the Cisco Intersight™ cloud-based management platform. Through the centralized point of control for the cluster, administrators can create datastores, monitor the data platform health, and manage resource use.
Cisco HyperFlex Connect HTML5 Management Web Page
A HTML 5 based Web UI is available for use as the primary management tool for Cisco HyperFlex. Through this centralized point of control for the cluster, administrators can create volumes, monitor the data platform health, and manage resource use. Administrators can also use this data to predict when the cluster will need to be scaled. To use the HyperFlex Connect UI, connect using a web browser to the HyperFlex cluster IP address: http://<hx controller cluster ip>.

Cisco HyperFlex HX Data Platform Administration Plug-in
The Cisco HyperFlex HX Data Platform is also administered secondarily through a VMware vSphere web client plug-in.

Cisco HyperFlex HX Data Platform Controller
A Cisco HyperFlex HX Data Platform controller resides on each node and implements the distributed file system. The controller runs as software in user space within a virtual machine, and intercepts and handles all I/O from the guest virtual machines. The Storage Controller Virtual Machine (SCVM) uses the VMDirectPath I/O feature to provide PCI passthrough control of the physical servers SAS disk controller. This method gives the controller VM full control of the physical disk resources, utilizing the SSD drives as a read/write caching layer, and the HDDs or SDDs as a capacity layer for distributed storage. The controller integrates the data platform into the VMware vSphere cluster using three preinstalled VMware ESXi vSphere Installation Bundles (VIBs) on each node:
· IO Visor: This VIB provides a network file system (NFS) mount point so that the ESXi hypervisor can access the virtual disks that are attached to individual virtual machines. From the hypervisors perspective, it is simply attached to a network file system. The IO Visor intercepts guest VM IO traffic, and intelligently redirects it to the HyperFlex SCVMs.
· VMware API for Array Integration (VAAI): This storage offload API allows vSphere to request advanced file system operations such as snapshots and cloning. The controller implements these operations via manipulation of the filesystem metadata rather than actual data copying, providing rapid response, and thus rapid deployment of new environments.
· stHypervisorSvc: This VIB adds enhancements and features needed for HyperFlex data protection and VM replication.
Cisco HyperFlex Storage Integration with Veeam
Veeam Backup & Replication integrates with HyperFlex by calling Cisco’s native snapshot APIs which improve the performance of backup and replication of VMware vSphere VMs hosted on Cisco HyperFlex. HyperFlex snapshots leverage VMware vSphere Storage APIs Array Integration (VAAI), which enables VMware vSphere ESXi hosts to communicate with storage devices and offload storage operations such as snapshot creation and cloning to the storage controller. Veeam Backup & Replication can use HyperFlex Snapshots for VM data processing, which helps speed up backup and replication operations, reduce impact of backup and replication activities on the production environment and improve Recovery Point Objectives (RPO). During the Backup or Replication process, Veeam processes application aware consistency with the Agentless VM Ingest processing and uses the HyperFlex Snapshots to preserve this stage for backup. Cisco’s integration into VMware allow Veeam to completely avoid the usage of VMware VM Snapshots.

Veeam Availability Suite
Backup
Veeam Backup & Replication operates at the virtualization layer and uses an image-based approach for VM backup. To retrieve VM data, no agent software needs to be installed inside the guest OS. Instead, Veeam Backup & Replication leverages vSphere snapshot capabilities and Application Aware Processing. When a new backup session starts, a snapshot is taken to create a cohesive point-in-time copy of a VM including its configuration, OS, applications, associated data, system state and so on. Veeam Backup & Replication uses this point-in-time copy to retrieve VM data. Image-based backups can be used for different types of recovery, including full VM recovery, VM file recovery, Instant VM Recovery, file-level recovery and application item recovery.
Use of the image-based approach allows Veeam Backup & Replication to overcome shortfalls and limitations of traditional backup. It also helps streamline recovery verification and the restore process — to recover a single VM, there is no need to perform multiple restore operations. Veeam Backup & Replication uses a cohesive VM image from the backup to restore a VM to the required state without the necessity for manual reconfiguration and adjustment. In Veeam Backup & Replication, backup is a job-driven process where one backup job can be used to process one or more VMs. A job is a configuration unit of the backup activity. Essentially, the job defines when, what, how and where to back up. It indicates what VMs should be processed, what components should be used for retrieving and processing VM data, what backup options should be enabled and where to save the resulting backup file. Jobs can be started manually by the user or scheduled to run automatically. The resulting backup file stores compressed and deduplicated VM data. Compression and Deduplication is done by the Veeam Proxy server.
Regardless of the Backup method you use, the first run of a job creates a full backup of VM image. Subsequent job runs are incremental — Veeam Backup & Replication copies only those data blocks that have changed since the last backup job run. To keep track of changed data blocks, Veeam Backup & Replication uses different approaches, including the VMware Changed Block Tracking (CBT) technology.
Changed Block Tracking
To perform incremental backup, Veeam Backup & Replication needs to know which data blocks have changed since the previous job run.

For VMware VMs with hardware version 7 or later, Veeam Backup & Replication employs VMware vSphere Changed Block Tracking (CBT) — a native VMware feature. Instead of scanning VMFS, Veeam Backup & Replication queries CBT on vSphere through VADP and gets the list of blocks that have changed since the last run of this job. Use of CBT increases the speed and efficiency of block-level incremental backups. CBT is enabled by default; if necessary, you can disable it in the settings of a specific backup job.
Restore
Veeam Backup & Replication offers several recovery options for various disaster recovery scenarios:
· Veeam Explorer enables you to restore Single Application specific items
· Instant VM Recovery enables you to instantly start a VM directly from a backup file
· Full VM recovery enables you to recover a VM from a backup file to its original or another location
· VM file recovery enables you to recover separate VM files (virtual disks, configuration files and so on)
· Virtual drive restore enables you to recover a specific hard drive of a VM from the backup file, and attach it to the original VM or to a new VM
· Windows file-level recovery enables you to recover individual Windows guest OS files (from FAT, NTFS and ReFS file systems)
· Multi-OS file-level recovery enables you to recover files from 15 different guest OS file systems
Veeam Backup & Replication uses the same image-level backup for all data recovery operations. You can restore VMs, VM files and drives, application objects and individual guest OS files to the most recent state or to any available restore point.
Veeam Explorer
Veeam Explorers are tools included in all editions of Veeam Backup & Replication. As of v9 and restore application items directly from VM backups and replicas. It provides fast and effortless Active Directory, Exchange, SharePoint, SQL Server and Oracle recovery without needing to provision extra storage, deploy agents, restore an entire virtual machine (VM) for granular recovery or spin anything up in an isolated network. This includes powerful, easy-to-use and affordable eDiscovery and granular recovery for:
· Microsoft Active Directory: Search and restore all Active Directory object types (e.g., users, groups, computer accounts, contacts, expiring links), Group Policy Objects (GPOs), Active Directory-integrated Microsoft DNS records and Configuration Partition objects.
· Microsoft Exchange: Get instant visibility into Exchange 2010, 2013 and 2016 backups, advanced search capabilities and quick recovery of individual Exchange items (e.g., emails, contacts, notes, etc.), Online Archive mailboxes, Purges folder support and hard-deleted (i.e., permanently deleted) items; eDiscovery features include detailed export reports and export size estimation based on query search criteria.
· Microsoft SharePoint: Get instant visibility into SharePoint 2010, 2013 and 2016 backups, search for and quickly restore full SharePoint sites, item permissions and specific files. Export recovered items directly to their original SharePoint server or send them as an email attachment.
· Microsoft SQL Server: Get fast transaction- and table-level recovery of SQL databases, including agentless transaction log backup and replay, so you can restore your SQL databases to a precise point in time and achieve low RTPO.
· Oracle: Get transaction-level recovery of Oracle databases including agentless transaction log backup, so you can restore your Oracle databases to a precise point in time, self-service restore and restore via PowerShell.
![]() Each Explorer has a corresponding User guide.
Each Explorer has a corresponding User guide.
Instant VM Recovery
With instant VM recovery, you can immediately restore a VM into your production environment by running it directly from the backup file. Instant VM recovery helps improve recovery time objectives (RTO), minimize disruption and downtime of production VMs. It is like having a "temporary spare" for a VM; users remain productive while you can troubleshoot an issue with the failed VM.
When instant VM recovery is performed, Veeam Backup & Replication uses the Veeam vPower technology to mount a VM image to an ESX(i) host directly from a compressed and deduplicated backup file. Since there is no need to extract the VM from the backup file and copy it to production storage, you can restart a VM from any restore point (incremental or full) in a matter of minutes.
After the VM is back online you can use VMware storage vMotion to migrate the VM back to production storage.
VM Object Recovery
Veeam Backup & Replication can help you to restore specific VM files (.vmdk, .vmx and others) if any of these files are deleted or the datastore is corrupted. This option provides a great alternative to full VM restore, for example, when your VM configuration file is missing and you need to restore it. Instead of restoring the whole VM image to the production storage, you can restore the specific VM file only. Another data recovery option provided by Veeam Backup & Replication is restore of a specific hard drive of a VM. If a VM hard drive becomes corrupted for some reason (for example, with a virus), you can restore it from the image-based backup to any good-to-know point in time.
Replication
To ensure efficient and reliable data protection in your virtual environment, Veeam Backup & Replication complements image-based backup with image-based replication. Replication is the process of copying a VM from its primary location (source host) to a destination location (redundant target host). Veeam Backup & Replication creates an exact copy of the VM (replica), registers it on the target host and maintains it in sync with the original VM.
Replication provides the best recovery time objective (RTO) and recovery point objective (RPO) values, since you have a copy of your VM in a ready-to-start state. That is why replication is commonly recommended for the most critical VMs that need minimum RTOs. Veeam Backup & Replication provides means to perform both onsite replication for high availability (HA) scenarios and remote (offsite) replication for disaster recovery (DR) scenarios. To facilitate replication over WAN or slow connections, Veeam Backup & Replication optimizes traffic transmission — it filters out unnecessary data blocks (such as, duplicate data blocks, zero data blocks or blocks of swap files) and compresses replica traffic. Veeam Backup & Replication also allows you to apply network throttling rules to prevent replication jobs from consuming the entire bandwidth available in your environment.
Replication is a job-driven process with one replication job used to process one or more VMs. You can start the job manually every time you need to copy VM data or, if you want to run replication unattended, create a schedule to start the job automatically. Scheduling options for replication jobs are like those for backup jobs.
WAN Acceleration
WAN accelerators are optional components in the replication infrastructure. You can use WAN accelerators if you replicate VMs over a slow connection or over the WAN.
In the replication process, WAN accelerators are responsible for global data caching and deduplication. To use WAN acceleration, you must deploy two WAN accelerators in the following manner:
· The source WAN accelerator must be deployed in the source side, close to the backup proxy running the source-side Data Mover Service.
· The target WAN accelerator must be deployed in the target side, close to the backup proxy running the target-side Data Mover Service.
Deployment Types
Veeam Backup & Replication supports several replication scenarios that depend on the location of the target host and the data transport path.
Onsite Replication
If the source host and the target host are in the same site, you can perform onsite replication.
Onsite replication requires the following replication infrastructure components:
· Backup proxy. In the onsite replication scenario, the source-side Data Mover Service and the target-side Data Mover Service are started on the same backup proxy. The backup proxy must have access to the backup server, source host, target host and backup repository holding replica metadata.
· Backup repository for storing replica metadata.

In the onsite replication scenario, Veeam Backup & Replication does not perform data compression. Replication traffic is transferred uncompressed between the two Data Mover Services started on the same backup proxy.
Offsite Replication
If the source host is in the primary site and the target host is in the DR site, you can perform offsite replication.
Offsite replication can run over two data paths:
· Direct data path
· Via a pair of WAN accelerators
Direct Data Path
The common requirement for offsite replication is that one Data Mover Service runs in the production site, closer to the source host, and another Data Mover Service runs in the remote DR site, closer to the target host. During backup, the Data Mover Services maintain a stable connection, which allows for uninterrupted operation over the WAN or slow links. For more information, see Resume on WAN Disconnect.

WAN Accelerators
If you have a high latency WAN link, you can replicate VM data using a pair of WAN accelerators. WAN accelerators provide advanced technologies to optimize VM data transfer:
· Global data caching and deduplication
· Resume on disconnect for uninterrupted data transfer
WAN accelerators add a new layer in the backup infrastructure — a layer between the source-side Data Mover Service and the target-side Data Mover Service. The data flow goes from the source backup proxy via a pair of WAN accelerators to the target backup proxy that, finally, transports VM data to the target host.

Failover and Failback
In case of software or hardware malfunction, you can quickly recover a corrupted VM by failing over to its replica. When you perform failover, a replicated VM takes over the role of the original VM. You can fail over to the latest state of a replica or to any of its good known restore points.
In Veeam Backup & Replication, failover is a temporary intermediate step that should be further finalized. Veeam Backup & Replication offers the following options for different disaster recovery scenarios:
· You can perform permanent failover to leave the workload on the target host and let the replica VM act as the original VM. Permanent failover is suitable if the source and target hosts are nearly equal in terms of resources and are located on the same HA site.
· You can perform failback to recover the original VM on the source host or in a new location. Failback is used in case you failed over to a DR site that is not intended for continuous operations and would like to move the operations back to the production site when the consequences of a disaster are eliminated.
Veeam Backup & Replication supports failover and failback operations for one VM and for several VMs. In case one or several hosts fail, you can use failover plans to restore operations with minimum downtime.
Failover-Plans
If you have several VMs running interdependent applications, you need to failover them one by one, as a group. To do this automatically, you can prepare a failover plan.
In a failover plan, you set the order in which VMs must be processed and time delays for VMs. The time delay is an interval of time for which Veeam Backup & Replication must wait before starting the failover operation for the next VM in the list. It helps to ensure that some VMs, such as a DNS server, are already running at the time the dependent VMs start. The failover plan must be created in advance. In case the primary VM group goes offline, you can start the corresponding failover plan manually. When you start the procedure, you can choose to fail over to the latest state of a VM replica or to any of its good known restore points.
Planned Failover
If you know that your primary VMs are about to go offline, you can proactively switch the workload to their replicas. A planned failover is smooth manual switching from a primary VM to its replica with minimum interrupting in operation. You can use the planned failover, for example, if you plan to perform datacenter migration, maintenance or software upgrade of the primary VMs. You can also perform planned failover if you have an advance notice of a disaster approaching that will require taking the primary servers offline.
Failback
If you want to resume operation of a production VM, you can fail back to it from a VM replica. When you perform failback, you get back from the VM replica to the original VM, shift your I/O and processes from the target host to the production host and return to the normal operation mode.
If you managed to restore operation of the source host, you can switch from the VM replica to the original VM on the source host. If the source host is not available, you can restore the original VM to a new location and switch back to it.
Backup Server
Components
Veeam Availability Suite combines the backup, restore and replication capabilities of Veeam Backup & Replication™ with the advanced monitoring, reporting and capacity planning functionality of Veeam ONE™. Veeam Availability Suite delivers everything you need to reliably protect and manage your Cisco HyperFlex VMware environment. Veeam Backup & Replication is a modular solution that lets you build a scalable backup infrastructure for environments of different sizes and configuration. The installation package of Veeam Backup & Replication includes a set of components that you can use to configure the backup infrastructure. Some components are mandatory and provide core functionality; some components are optional and can be installed to provide additional functionality for your business and deployment needs. You can co-install all Veeam Backup & Replication components on the same machine, physical or virtual, or you can set them up separately for a more scalable approach.
Figure 14 shows an overview on the main Veeam components.

Backup Server
The backup server is a Windows-based physical or virtual machine on which Veeam Backup & Replication is installed. It is the core component in the backup infrastructure that fills the role of the “configuration and control center”. The backup server performs all types of administrative activities:
· Coordinates backup, replication, recovery verification and restore tasks
· Controls job scheduling and resource allocation
· Manages all Proxy and Repository servers and other components of the backup infrastructure
The backup server is used to set up and manage backup infrastructure components as well as specify global settings for the backup infrastructure.

In addition to its primary functions, a newly deployed backup server also performs the roles of the default backup proxy and the backup repository.
The backup server uses the following services and components:
· Veeam Backup Service is a Windows service that coordinates all operations performed by Veeam Backup & Replication such as backup, replication, recovery verification and restore tasks. The Veeam Backup Service runs under the Local System account or account that has the Local Administrator permissions on the backup server.
· Veeam Backup Shell provides the application user interface and allows user access to the application's functionality.
· Veeam Guest Catalog Service is a Windows service that manages guest OS file system indexing for VMs and replicates system index data files to enable search through guest OS files. Index data is stored in the Veeam Backup Catalog — a folder on the backup server. The Veeam Guest Catalog Service running on the backup server works in conjunction with search components installed on Veeam Backup Enterprise Manager and (optionally) a dedicated Microsoft Search Server.
· Veeam Backup SQL Database is used by Veeam Backup Service, Veeam Backup Shell and Veeam Guest Catalog Service to store data about the backup infrastructure, jobs, sessions and so on. The database instance can be located on a SQL Server installed either locally (on the same machine where the backup server is running) or remotely.
· Veeam Backup PowerShell Snap-In is an extension for Microsoft Windows PowerShell 2.0. Veeam Backup PowerShell adds a set of cmdlets to allow users to perform backup, replication and recovery tasks through the command-line interface of PowerShell or run custom scripts to fully automate operation of Veeam Backup & Replication.
· Backup Proxy Services. In addition to dedicated services, the backup server runs a set of data mover services.
Backup Proxy
The backup proxy is an architecture component that sits between data source and target and is used to process jobs and deliver backup traffic. In particular, the backup proxy tasks include retrieving VM data from the production storage, compressing, deduplicating and sending it to the backup repository (for example, if you run a backup job) or another backup proxy (for example, if you run a replication job). As the data handling task is assigned to the backup proxy, the backup server becomes the “point of control” for dispatching jobs to proxy servers.
The role of a backup proxy can be assigned to a dedicated Windows server (physical or virtual) in your environment. You can deploy backup proxies both in the primary site and in remote sites. To optimize performance of several concurrent jobs, you can use several backup proxies. In this case, Veeam Backup & Replication will distribute the backup workload between available backup proxies.
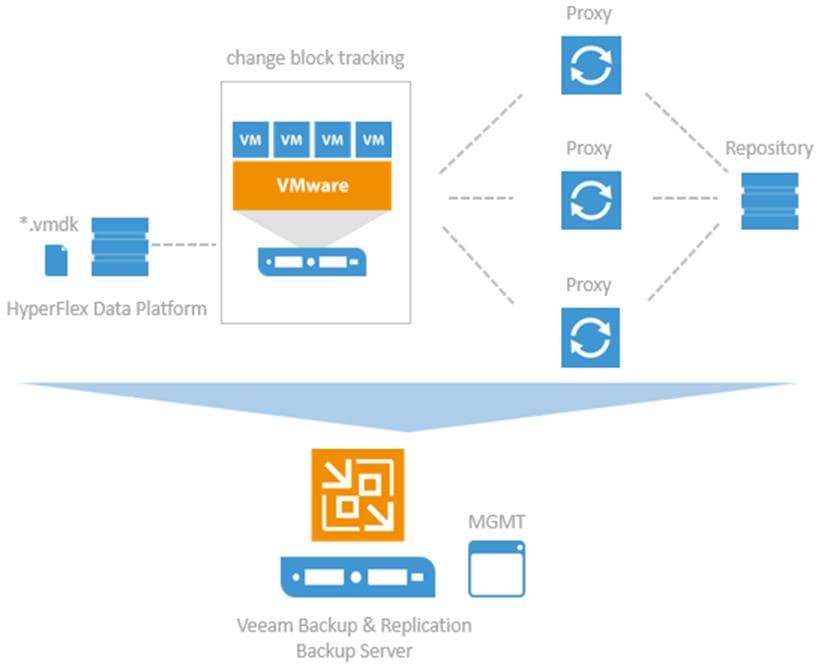
Use of backup proxies lets you easily scale your backup infrastructure up and down based on your demands. Backup proxies run light-weight services that take a few seconds to deploy. The primary role of the backup proxy is to provide an optimal route for backup traffic and enable efficient data transfer.
The backup proxy uses the following services and components:
· Veeam Installer Service is an auxiliary service that is installed and started on any Windows server once it is added to the list of managed servers in the Veeam Backup & Replication console. This service analyses the system, installs and upgrades necessary components and services depending on the role selected for the server.
· Veeam Data Mover Service is responsible for deploying and coordinating executable modules that act as "data movers" and perform main job activities on behalf of Veeam Backup & Replication, such as communicating with VMware Tools, copying VM files, performing data deduplication and compression and so on.
Backup Repository
A backup repository is a location used by Veeam Backup & Replication jobs to store backup files, copies of VMs and metadata for replicated VMs. By assigning different repositories to jobs and limiting the number of parallel jobs for each one, you can balance the load across your backup infrastructure.
You can configure one of the following types of backup repositories:
· Microsoft Windows server with local or directly attached storage. The storage can be a local disk, directly attached disk-based storage (such as a USB hard drive), or iSCSI/FC SAN LUN in case the server is connected into the SAN fabric.
· Linux server with local, directly attached storage or mounted NFS. The storage can be a local disk, directly attached disk-based storage (such as a USB hard drive), NFS share, or iSCSI/FC SAN LUN in case the server is connected into the SAN fabric.
· CIFS (SMB) share. SMB share cannot host Veeam Data Mover Services. For this reason, data to the SMB share is written from the gateway server. By default, this role performed by a backup proxy that is used by the job for data transport.
· Deduplicating storage appliance. Veeam Backup & Replication supports different deduplicating storage appliances.
Backup & Replication Console
The Veeam Backup & Replication console is a separate client-side component that provides access to the backup server. The console is installed locally on the backup server by default. You can also use it in a standalone mode — install the console on a dedicated machine and access Veeam Backup & Replication remotely over the network. The console lets you log into Veeam Backup & Replication and perform all kinds of data protection and disaster recovery operations as if you are working on the backup server.

You can install as many remote consoles as you need so that multiple users can access Veeam Backup & Replication simultaneously. Veeam Backup & Replication prevents concurrent modifications on the backup server.
Backup Proxy
Transport Modes
Job efficiency and time required for job completion greatly depends on the transport mode. The transport mode is a method that is used by the Veeam Data Mover Service to retrieve VM data from the source and write VM data to the target.
For data retrieval, Veeam Backup & Replication offers the following modes:
· Network (NBD)

In the Direct storage access mode, Veeam Backup & Replication reads/writes data directly from/to the storage system where VM data or backups are located. With the Direct NFS access mode for Cisco HyperFlex, Veeam Backup & Replication bypasses the ESX(i) host and reads/writes data directly from/to NFS datastores. To do this, Veeam Backup & Replication deploys its native NFS client on the backup proxy and uses it for VM data transport. VM data still travels over the LAN but there is no load on the ESX(i) host.
The Virtual appliance mode is recommended if the role of a backup proxy is assigned to a VM. In the Virtual appliance mode, Veeam Backup & Replication uses the VMware SCSI HotAdd capability that allows attaching devices to a VM while the VM is running. During backup, replication or restore disks of the processed VM are attached to the backup proxy. VM data is retrieved or written directly from/to the datastore, instead of going through the network.
The Network mode can be used with any infrastructure configuration. In this mode, data is retrieved via the ESX(i) host over the LAN using the Network Block Device protocol (NBD). The Network mode is the recommended data transport mode to be used with Cisco HyperFlex in combination with Native HX Snapshots. To take the full advantage of the mode a 10Gbit/s Ethernet is mandatory.
Veeam Repository Sizing
When estimating the amount of required disk space, you should know the following:
· Number of backup VMs
· Total size of VMs and the data change rate
· Frequency of backups
· Retention period for backups
· Will jobs use forward or reverse incremental
· Frequency of active and synthetic fulls
When testing for backup and recoveries, it is not possible beforehand, you should make assumptions on compression and deduplication ratios, change rates, and other factors. The following figures are typical for most deployments; however, it is important to understand the specific environment to find out possible exceptions:
· Data reduction thanks to Compression and Deduplication is usually 2:1 or more; it's common to see 3:1 or better, but you should always be conservative when estimating required space.
· Typical daily change rate is between 2 and 5% in a mid-size or enterprise environment; this can greatly vary among servers; some servers show much higher values. If possible, run monitoring tools like Veeam ONE to have a better understanding of the real change rate values.
· Include additional space for one-off full backups.
· Include additional space for backup chain transformation (forward forever incremental, reverse incremental) – at least the size of a full backup multiplied by 1.25x.
· Using the numbers above, you can estimate required disk space for any job. Besides, always leave plenty of extra headroom for future growth, additional full backups, moving VMs, restoring VMs from tape.
![]() A repository sizing tool that can be used for estimation is available at http://vee.am/rps. Note that this tool is not officially supported by Veeam, and it should be used "as is", but it is nonetheless heavily used by Veeam Architects and regularly updated.
A repository sizing tool that can be used for estimation is available at http://vee.am/rps. Note that this tool is not officially supported by Veeam, and it should be used "as is", but it is nonetheless heavily used by Veeam Architects and regularly updated.
Data Protection for Cisco HyperFlex with Veeam Availability Suite is designed to deliver reliable backup and recovery solution with low recovery time objectives (RTOs) and recovery point objectives (RPOs) for all applications and data residing in virtual machines within the HyperFlex environment.
In addition to reliable backup and recovery of application data and VMs, the solution provides:
· Granular recovery of virtual machines and files
· Ability to automatically verify every backup, VM and replica
· Instant VM recovery of failed VM through backups located in primary and HyperFlex Edge sites.
· Multiple backup end points such as tape drives, on cloud or on local repository
· SureBackup and SureReplica for Backup and Replication verification
· Storage Integration of Cisco Hyperflex with Veeam Backup and Replication
This section elaborates on the deployment architecture, design considerations, deployment procedure and validations for protection of application data and Virtual Machines through Veeam Availability Backup and Replication suite. The application VMs can reside, across multiple HyperFlex across Data Centers or on HyperFlex Edge clusters deployed in a Remote Office Branch Office (ROBO)
The key deployment scenarios to protect Cisco HyperFlex cluster with Veeam Availability Suite are listed as below
· Cisco HyperFlex Single Site Backup and Replication
· Cisco HyperFlex Edge Remote office - Branch Office Replication
· Cisco HyperFlex multi-site Backup and Replication
![]() To protect multiple HyperFlex Cluster and HyperFlex Edge sites through single Veeam Management Console, all the HyperFlex Clusters must be connected to the same vCenter. In the event, customers have different vCenter connected to HyperFlex Clusters, each vCenter should be configured through a different Veeam Management Console. In this case, Customers can configure Veeam Backup copy Jobs across different protection end points. Veeam Backup Enterprise Manager (Enterprise Manager) can be deployed to manage multiple Veeam Backup & Replication installations from a single web console.
To protect multiple HyperFlex Cluster and HyperFlex Edge sites through single Veeam Management Console, all the HyperFlex Clusters must be connected to the same vCenter. In the event, customers have different vCenter connected to HyperFlex Clusters, each vCenter should be configured through a different Veeam Management Console. In this case, Customers can configure Veeam Backup copy Jobs across different protection end points. Veeam Backup Enterprise Manager (Enterprise Manager) can be deployed to manage multiple Veeam Backup & Replication installations from a single web console.
Figure 19 illustrates the end-to-end deployment scenarios for Cisco HyperFlex with Veeam Availability Suite.
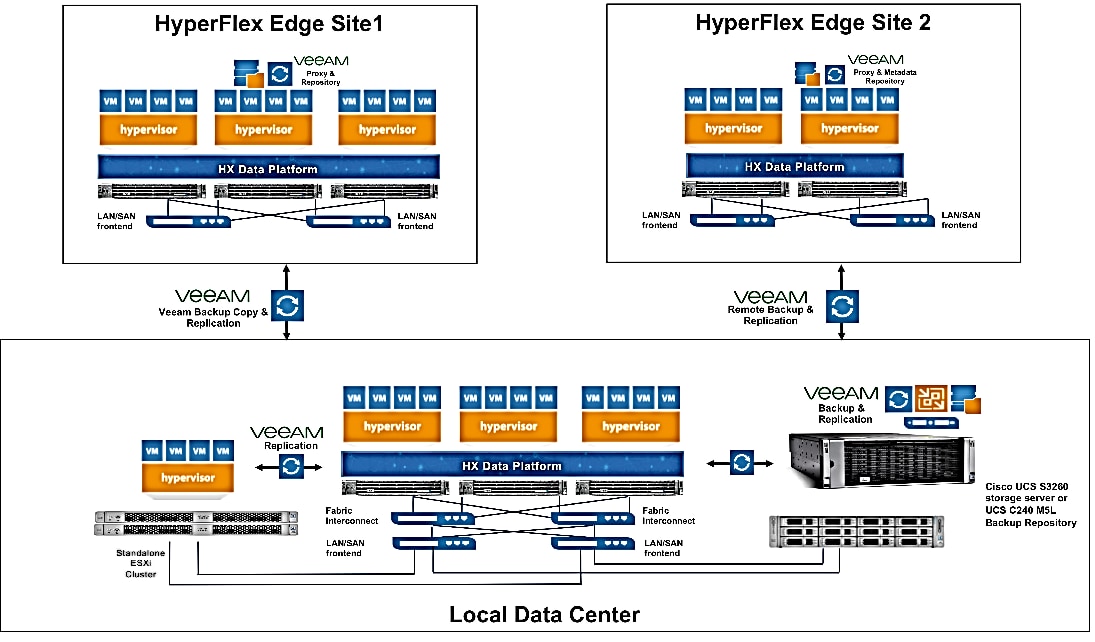
Backup & Replication for Cisco HyperFlex Edge Sites
Several organizations today have Remote office and Branch offices (ROBO) spread across geographies, which provide localized data availability and allow businesses to execute critical workloads locally. ROBO deployments typically require fewer compute and storage resources with just few servers running workloads to support local needs.
Cisco HyperFlex™ Edge brings the robust feature set and simplicity of Cisco HyperFlex systems to customers edge environments with a flexible, scalable, low-cost, centrally managed solution that can be deployed and maintained with massive scale
Organizations may have several HyperFlex Edge or other ROBO deployments, spread across regions but a major challenge faced by these deployments is provisioning of availability of several compute and storage sites deployed remotely. The present design overcomes these challenges by providing the following features:
· Local or Remote Backup of application VMs deployed on HyperFlex Edge sites
· Protection of local Backups on HyperFlex Edge sites through Veeam Backup copy jobs
· Restoration of application Data either on the Primary HyperFlex Edge cluster or to remote HyperFlex Edge clusters
· Replication of application VMs always deployed on HyperFlex Edge site and provision of Failover and Fail Back
· Management of HX Edge Site protection through a single Veeam Backup and Management Console
This requires minimal infrastructure and protection is executed through a Veeam Proxy and Repository installed in a Virtual Machine provisioned on the HyperFlex Edge Cluster. Moreover, it ensures remote sites are in compliance and reduces IT management time at remote offices.
Protection of Cisco HyperFlex Edge sites can be achieved through:
· Local Backups of HX Edge application VMs
· Remote Backups of HX Edge application VMs
The replication process for the scenarios remain same, for example, application VMs on Edge sites can be replicated to primary site and the RPO is dependent on the network latencies between the HyperFlex Edge site and HyperFlex primary site.
Table 1 Local Backup versus Remote Backup for HyperFlex Edge Protection
| Local Backup for HX Edge Protection |
Remote Backup for HX Edge Protection |
| Requires high storage allocation on the HX Edge site. The recommended storage for repository on HX Edge is 50% of the storage of HX Edge site |
Requires low storage allocation on HX Edge Site. The small Repository on HX Edge site is utilized only for Veeam replication meta data. The recommended storage for Veeam is 400 GB |
| Suggested for deployments which involve high latencies between HX Edge and Veeam repository on Cisco UCS S3260 storage server. Local Repository on Edge helps to quickly restore VMs or VM files to HX edge cluster. |
Requires low latencies across HX Edge and HX Primary site. Recovery Point Objective (RPO) is dependent on the latencies between HX Edge and Veeam repository on Cisco UCS S3260 storage server |
| Backups on HX Edge Site are protected through Veeam Backup Copy jobs to Primary S3260 storage server |
Backups are remote, hence the backup protection policy for primary site is applicable |
| Lower RTOs for cases when some VMs on HX Edge Site fail i.e. entire HX Edge site has not failed |
Higher RTOs, as the VMs must be restored from primary site |
| May involve higher data loss during disasters i.e. entire HX Edge is destroyed or failed. RPOs during disaster is dependent on the Veeam Backup Copy job schedule |
Data loss is dependent on the RPO |
| Suggested when some VMs or VM files on HX Edge site need to be restored frequently. Such as Test/Dev/QA deployments |
Suggested when VM or VM files need to be restored infrequently |
Protection of HyperFlex Edge Sites through Remote Backups
This section elaborates on the key features for protection of HyperFlex Edge sites through Remote Backups.
Figure 20 illustrates the topology of this deployment.

The key deployment features are:
· Veeam Management Console, Veeam Primary Proxy, and Veeam Repository reside on Cisco UCS S3260 or Cisco UCS C240 LFF M5 server located in the Primary Data Center.
· Remote backups of HX Edge VMs on Cisco UCS S3260 server on primary Data Center.
· Veeam Proxy is deployed as a Virtual Machine on each of the protected HyperFlex Edge sites.
· Veeam Repository is deployed on the same virtual machine as Veeam Proxy. This Repository is used to store Metadata for Veeam Replication.
· Replication through Veeam between HX Edge and primary HyperFlex Cluster.
· Frequency of VM replication across HX Edge and HX primary cluster is dependent on network latencies, amount of changes to VM Data and performance of Veeam Proxies and Repository across the two replication sites.
· All the Backups and its components are managed through a single Veeam Console.
· The RPO for application VMs on HX Edge Cluster is dependent on the network latencies between HX Edge and HX Primary Cluster.
· All the HyperFlex clusters must be connected to the same vCenter.
For details on deployment procedure, go to section Cisco HyperFlex Edge Site Protection through Remote Backup & Replication.
Protection of HyperFlex Edge Sites through Local Backups
This section elaborates on the key features for protection of HyperFlex Edge sites through Local Backups.
Figure 21 illustrates the topology of this deployment.

The key deployment features are
· Veeam Management Console, Veeam Primary Proxy and Veeam Repository reside on either Cisco UCS S3260 or Cisco UCS C240 LFF M5 server located in the Primary Data Center.
· Local backups of HX Edge VMs on Veeam Repository deployed as a virtual machine on HyperFlex Edge Cluster.
· Veeam Proxy and Repository is deployed on the same Virtual Machine on each of the protected HyperFlex Edge sites.
· Veeam Backup Copy jobs are scheduled between HX Edge Site and S3260 storage server located in primary Data Center.
· As the backups are local to HX Edge and Veeam full backups should exist on local repository, it is recommended to use the Veeam Repository Sizing guidelines to allocate storage to repository.
· Replication through Veeam between HX Edge and primary HyperFlex Cluster.
· Schedule of VM replication across HX Edge and HX primary cluster is dependent on network latencies, amount of changes to VM Data and performance of Veeam Proxies and Repository across the two replication sites.
· All the Backups and its components are managed through a single Veeam Console.
· All the HyperFlex clusters must be connected to the same vCenter.
For details on deployment procedure, go to section Cisco HyperFlex Edge Site Protection through Remote Backup & Replication.
This section elaborates on the design considerations for Backup and Replication of Application VM on HyperFlex with Veeam Availability Suite and Cisco UCS S3260 Storage Server.
Cisco UCS Management
Cisco UCS provides unified management across Cisco UCS, HyperFlex hyperconverged infrastructure, and third-party storage, servers, and networks.
Cisco UCS Manager can manage Cisco UCS B-Series Blade Servers, Cisco UCS C-Series Rack Servers and Cisco UCS S3260 Storage Servers under the same Cisco UCS domain. This feature, along with stateless computing, makes compute resources truly hardware agnostic.
Cisco Intersight (https://intersight.com) is an API driven, cloud-based system management platform enables the support of monitoring and deploying Cisco HyperFlex clusters. The Cisco Intersight website and framework can be upgraded with new and enhanced feature sets independently of the products that are managed, meaning that many new features and capabilities can come with no downtime or upgrades required by the end users. Future releases of Cisco HyperFlex will enable further functionality along with these upgrades to the Cisco Intersight framework. This unique combination of embedded and online technologies will result in a complete cloud-based management solution that can care for Cisco HyperFlex throughout the entire lifecycle, from deployment through retirement.
In the latest release of Cisco Intersight, you can monitor standalone Cisco UCS S3260 storage servers managed through IMC, Integrated Management Controller Version 4.0(4e).
In addition, Cisco UCS Central Software extends the policy-based functions and concepts of Cisco UCS Manager across multiple Cisco Unified Computing System (Cisco UCS) domains in one or more physical locations. This allows hardware configuration from a single Cisco UCS Central window, across multiple UCS domains, either in same Data Center or across Data Centers.
Cisco Unified Computing System™ (Cisco UCS) management helps significantly reduce management and administration expenses by automating routine tasks to increase operational agility. Cisco UCS management provides enhanced storage management functions for the Cisco UCS S3260 and all Cisco UCS servers. Cisco UCS Manager supports Storage profiles give you flexibility in defining the number of storage disks and the roles and uses of these disks and other storage parameters.
Figure 22 illustrates the single management window through Cisco UCS Central.

Network
The connectivity hybrid display of Cisco UCS S3260 storage server with Cisco UCS Fabric Interconnect 6454 is shown in Figure 23.

The LAN network provides network reachability to the applications hosted on Cisco UCS servers in the data center. The infrastructure consists of a pair of Cisco Nexus 9336C-FX2 switches deployed in NX-OS standalone mode. Redundant 40Gbps links from each Cisco Nexus switch are connected to ports on each FI and provide 80Gbps of bandwidth through each Cisco Nexus. Virtual Port Channels (vPCs) are used on the Cisco Nexus links going to each FI. Jumbo Frames are also enabled in the LAN network to support backup and replication of application VMs on Veeam Server.
The design also uses the following best practices:
· Jumbo frames on unified fabric links between Cisco UCS and fabric interconnects
· QoS policy for traffic prioritization on the unified fabric
· Port-channels with multiple links are used in the unified fabric for higher aggregate bandwidth and redundancy
The Veeam Backup & Replication Server is deployed on Cisco UCS 3260 Storage Server and provides an aggregated bandwidth of 100 Gbps for VM backup and Replication. The present deployment supports Veeam AS on Cisco UCS C240 M5 LFF server connected to common pair of Fabric interconnects and provides network throughput of up to 100 Gbps.
WAN Acceleration for Backup and Replica
Remote Site Backup and Replication always involves moving large volumes of data between remote sites. The most common problems that backup administrators encounter during Remote Site Backup and Replication are:
· Insufficient network bandwidth to support VM data traffic
· Transmission of redundant data
Veeam Backup and Replication offers the WAN acceleration technology that helps optimize data transfer over WAN. Built-in WAN Acceleration utilizes global caching, variable block length data fingerprinting and traffic compression to significantly reduce bandwidth requirements, while multiple WAN optimization ensures that available bandwidth is leveraged to its fullest potential.
Figure 24 illustrates the WAN Acceleration for faster Backup and Replication jobs across distributed Data Centers.

In this design, Veeam WAN Acceleration is utilized for Remote Site Backup and Replication. It is recommended to have a caching layer such as SSD to create global cache across the Primary and Remote Site; WAN Accelerator is installed on a Cisco UCS S3260 Storage Server.
Veeam Backup Enterprise Manager Console
Veeam Enterprise Manager is intended for centralized reporting and management of multiple backup servers. It provides delegated restore and self-service capabilities as well as the ability for users to request Virtual Labs from backup administrators. It provides a central management point for multiple backup servers from a single interface. Enterprise Manager is also a part of the data encryption and decryption processes implemented in the Veeam solution. For best practices, Veeam recommends deploying Enterprise Manager in the following scenarios:
· It is recommended to deploy Enterprise Manager if you are using encryption for backup or backup copy jobs. If you have enabled password loss protection (http://helpcenter.veeam.com/backup/em/index.html?em_manage_keys.html) for the connected backup servers backup files will be encrypted with an additional private key which is unique for each instance of Enterprise Manager. This will allow Enterprise Manager administrators to unlock backup files using a challenge/response mechanism effectively acting as a Public Key Infrastructure (PKI).
· If an organization has Remote Office/Branch Office (ROBO) deployments, then leverage Enterprise Manager to provide site administrators with granular restore access via web UI (rather than providing access to the Backup and Replication console).
· In enterprise deployments, delegation capabilities can be used to elevate the first line support to perform in-place restores without administrative access.
· For deployments spanning multiple locations with stand-alone instances of Veeam Backup and Replication, Veeam Enterprise Manager will be helpful in managing licenses across these instances to ensure compliance.
· Enterprise Manager is required when automation is essential to delivering IT services — to provide access to the Veeam RESTful API.
Veeam Transport Mode for HX Cluster
The best practice is to utilize the HyperFlex and Veeam Storage integration which enables VMware vSphere ESXi hosts to communicate with storage devices and offload storage operations such as snapshot creation and cloning to the HyperFlex storage controller. This allows space efficient and nearly instant snapshots without performance impact.
Customers can allow Veeam Backup & Replication to read data from Cisco HyperFlex snapshots in the following transport modes:
· Direct Storage access
· Virtual appliance
· Network
The recommended mode is Direct Storage access which uses the NFS protocol to directly connect to the HyperFlex data store. It provides the best performance and the lowest overhead on ESXi hosts. In this mode, Veeam Backup & Replication bypasses the ESXi host and reads/writes data directly from/to the HyperFlex data store over the “Storage Controller Data Network.”
This design utilizes the Veeam and HyperFlex Storage Integration feature. The setup for Backup with Direct Storage Access is detailed in section Configure HyperFlex Veeam Storage Integration.
For Further details on implementation of Veeam storage integration with HyperFlex, go to: Veeam Cisco HyperFlex Integration.
![]() Veeam Direct NFS mode utilizing HyperFlex storage network may cause high latency for application VMs running on HyperFlex Cluster. You should restrict the number of parallel backups when application VMs are running CPU, memory or disk intensive workloads as well as backups concurrently on same HyperFlex cluster.
Veeam Direct NFS mode utilizing HyperFlex storage network may cause high latency for application VMs running on HyperFlex Cluster. You should restrict the number of parallel backups when application VMs are running CPU, memory or disk intensive workloads as well as backups concurrently on same HyperFlex cluster.
Veeam Proxy Server Distribution
This section elaborates on the recommendations for placement of Veeam proxy servers across Remote Offices and multi-site for backup and replication jobs. Customers should be cautious on selecting a Veeam Proxy as a virtual or bare metal, as having several virtual proxies on a single site may lead to excessive Windows licensing and high manageability cost but may provide high availability of backup and replication jobs as compared to a single bare metal server proxy. Veeam proxy deployed in a physical sever would provide several physical cores for parallel processing of Backup and Replication jobs, few Veeam proxies to manage, less Windows licensing cost but in the event of failed single server proxy, it would lead to single point of failure.
Proxy Distribution for HyperFlex Edge ROBO Replication
Veeam Backup and Replication provides replication of application VM on HyperFlex Edge Cluster deployed on a Remote Office to the Primary HyperFlex Cluster. The Solution Design is explained in the previous section under Backup & Replication for Cisco HyperFlex Edge Sites.
As the HyperFlex Edge sites are either 2 nodes or 3 node clusters, the Veeam Proxy Server is configured as a virtual machine deployed on HyperFlex Edge cluster. This avoids any separate hardware requirements on remote site for HyperFlex Edge Cluster protection. Moreover, to avoid excessive resource utilization through Veeam Proxy, the Max concurrent task in Veeam Proxy is configured as 4.
The validation for protection of the HyperFlex Edge site through Backup and Replication is detailed in section Validation.
Proxy Distribution for Multisite HyperFlex Cluster Deployments
Veeam Backup & Replication provides backup and replication of application VM on HyperFlex Cluster across Data Centers.
In the deployment, each of the Veeam backup server across the data center is deployed on a physical Cisco UCS C240 M4 LFF or Cisco UCS S3260 Storage server. The Veeam Proxy is deployed on the same Backup Server. Some of the important design consideration for location of Veeam Proxy in multisite HyperFlex deployments are as follows:
· Backup through Veeam for application VM residing on HyperFlex cluster utilizes Veeam and HyperFlex Storage Integration which enables HX native snapshot and backup through HyperFlex storage network. This provides offloading of overhead for snapshot from ESXi Host to HyperFlex Storage Controller. It also enables distribution of Backup traffic to each of HyperFlex storage networks on ESXi nodes. One of the requirements for this feature is; Veeam Proxy should have access to private HyperFlex Storage network.
· In cases where the Proxy Server is connected to the same Fabric Interconnect of HyperFlex Cluster, customers can easily create vNIC on Proxy server which has same VLAN as that of the HyperFlex Storage Network. The configuration details are detailed in section Cisco UCS S3260 Configuration. The selection of the proxy and Backup server on the same bare metal server, connected to the Fabric Interconnect to the HyperFlex Cluster, allows the ease of deployment, scalability of parallel backup with up to 36 jobs (maximum number of physical cores on Cisco UCS S3260 Storage Server), and faster backup time, since having the Backup and Proxy server on the same physical server, allows minimal latencies between proxy and Backup Server. Hence, for large parallel backup jobs, and decreased backup time, it is recommended to deploy Veeam Proxy and Backup Server on same S3260 storage sever, connected to Fabric Interconnect of HyperFlex Cluster.
· For scenarios wherein Veeam Proxy is unable to access HyperFlex Storage network, Veeam Backup transport mode will fall back to Network mode. To allow HyperFlex snapshots executed through Veeam, ensure HyperFlex Cluster is discovered by Veeam Backup & Replication Server. In this case, during Storage discovery or ReScan of HyperFlex in Veeam console, you will see the warning o Unable to find any ESXi IP suitable for backup from HyperFlex snapshots.
This is illustrated in Figure 25 marked in RED.

Veeam Backup Copy Jobs
Customers should protect their backups on either Primary Data Center or Remote Data Center through Veeam Backup Copy jobs, executed across backup locations. In present design, Backup Copy jobs are executed across primary Data and HyperFlex Edge site executing local Backups.
This is detailed in section Cisco HyperFlex Edge Site Protection through Local Veeam Backups.
Capacity
Disk drive manufacturers have adopted a size reporting methodology using calculation by powers of 10, also known as decimal prefix. As an example, a 120 GB disk is listed with a minimum of 120 x 10^9 bytes of usable addressable capacity, or 120 billion bytes. However, many operating systems and filesystems report their space based on standard computer binary exponentiation, or calculation by powers of 2, also called binary prefix. In this example, 2^10 or 1024 bytes make up a kilobyte, 2^10 kilobytes make up a megabyte, 2^10 megabytes make up a gigabyte, and 2^10 gigabytes make up a terabyte. As the values increase, the disparity between the two systems of measurement and notation get worse, at the terabyte level, the deviation between a decimal prefix value and a binary prefix value is nearly 10 percent.
The International System of Units (SI) defines values and decimal prefix by powers of 10 as listed in Table 2.
Table 2 SI Unit Values (Decimal Prefix)
| Value |
Symbol |
Name |
| 1000 bytes |
kB |
Kilobyte |
| 1000 kB |
MB |
Megabyte |
| 1000 MB |
GB |
Gigabyte |
| 1000 GB |
TB |
Terabyte |
The International Organization for Standardization (ISO) and the International Electrotechnical Commission (IEC) defines values and binary prefix by powers of 2 in ISO/IEC 80000-13:2008 Clause 4 as listed in Table 3.
Table 3 IEC Unit Values (Binary Prefix)
| Value |
Symbol |
Name |
| 1024 bytes |
KiB |
Kibibyte |
| 1024 KiB |
MiB |
Mebibyte |
| 1024 MiB |
GiB |
Gibibyte |
| 1024 GiB |
TiB |
Tebibyte |
For the purpose of this document, the decimal prefix numbers are used only for raw disk capacity as listed by the respective manufacturers. For all calculations where raw or usable capacities are shown from the perspective of the Veeam software, filesystems or operating systems, the binary prefix numbers are used. This is done primarily to show a consistent set of values as seen by the end user from within the Veeam management console when viewing Veeam Repository capacity, allocation and consumption, and within most operating systems.
Table 4 lists a set of Veeam usable capacity values, using binary prefix. These values provide an example of the capacity calculations, for determining the appropriate size of Veeam Repository.
Table 4 Veeam Usable Physical Capacities
| Cisco UCS C-Series Server Model |
Capacity Disk Size (each) |
Capacity Disk Quantity (per node) |
RAID configuration |
Usable Capacity (per node) |
| S3260 M5 storage server |
8 TB |
56 |
RAID 60 – 4 SPANs 13 disks per SPAN 4 Global hot spare disk |
320 TiB |
Table 5 and Table 6 lists the software revisions and physical components used throughout this document.
Software Versions
|
|
Components |
Software Version |
Comments |
| Compute & Storage |
Cisco UCS S3260 M5 Storage Server |
4.0(4d) |
Cisco UCS S3260 Storage Server is directly managed through Fabric Interconnect. |
|
|
HX-E-220M5SX |
|
Hyper Converged node for HX Edge Cluster |
|
|
Cisco HX240c M5 LFF |
|
Hyper Converged Node for HX Cluster |
| Management |
Cisco UCS Manager |
4.0(4d) |
Cisco UCS Management for all servers directly attached to Fabric Interconnects |
| Backup and Replication |
Veeam Availability Suite |
9.5 update 4 |
Pre-configured with Veeam Backup Server, Veeam Proxy, Veeam Repository |
|
|
Operating System |
Windows 2019 Data Center Edition |
|
| Hyper Converged Software |
Cisco HX Data Platform |
HX Data Platform Release 4.01(1b) |
|
| Virtualization |
VMware vSphere |
6.5.0 U2 |
|
|
|
VMware vCenter |
6.5 U2 |
|
| Network |
Cisco Nexus9000 C9336C-FX2 |
NXOS: version 9.3(1) |
Cisco Platform Switch for ToR, MoR, Ebor deployments; Provides connectivity to users and other networks and deployed in NX-OS Standalone mode |
|
|
Cisco UCS 6454 FI |
4.0(4d) |
Fabric Interconnect with embedded UCS Manager for Cisco UCS S3260 Storage Server |
|
|
Cisco UCS 6332 UP |
4.0(4d) |
Fabric Interconnect with embedded UCS Manager for Cisco HyperFlex Cluster |
Physical Components
Table 6 Veeam Deployment Hardware Components
| Component |
Hardware Required |
| Fabric Interconnects |
Two (2) Cisco UCS 6454 Fabric Interconnects |
| Servers |
One Cisco UCS S3260 Storage Server |
For complete server specifications and more information, please refer to the links below:
Cisco Fabric Interconnect 6454
Cisco UCS S3260 M5 Storage Server
Table 7 lists the required hardware components and disk options for the Cisco UCS S3260 M5 storage server model, which is used for Veeam Backup & Replication server.
Table 7 Cisco UCS S3260 Storage Server
| Cisco UCS C240 M5 LFF options |
Hardware Required |
|
| Processors |
Two Intel Xeon Processor 5220 Scalable Family CPUs |
|
| Memory |
256 GB of total memory using four (8) 32 GB DDR4 2666 MHz 1.2v modules |
|
| Disk Controller |
Cisco UCS S3260 Dual Raid Controller |
|
| Storage |
HDDs 56 8 TB 3.5 Inch, 12G SATA, 7200 RPM, 4K sector HDDs |
|
| Network |
Cisco UCS VIC 1455 Quad Port 10/25G |
|
| Boot Device |
Two UCS S3260 480GB Boot SSD |
|
VLAN Configurations
Table 8 lists the VLANs necessary for deployment as outlined in this guide.
| VLAN Name |
VLAN Purpose |
VLAN ID Used in Validating This Document |
| hx-inband-mgmt |
ESXi host management interfaces HX Storage Controller VM management interfaces HX Storage Cluster roaming management interface Veeam Network |
3175 |
| hx-storage-data |
ESXi host storage vmkernel interfaces HX Storage Controller storage network interfaces HX Storage Cluster roaming storage interface |
3172 |
| hx-vm-data |
Guest VM network interfaces |
3174 |
| hx-vmotion |
ESXi host vMotion vmkernel interfaces |
3173 |
| Native-VLAN |
VLAN to which untagged frames are assigned |
1 |
| Multisite -VLAN |
VLAN which allows communication across Primary and Remote DataCenter. This VLAN is not required when hx-inband-mgmt VLAN allows communication across Data Center |
215 |
Licensing
Cisco UCS systems and the Veeam software must be properly licensed for all software features in use, and for all ports in use on the Cisco UCS Fabric Interconnects. Please contact your resale partner or your direct Cisco and Veeam sales teams to ensure you order all the necessary and appropriate licenses for your solution.
![]() Veeam Enterprise License is required for Veeam Storage Integration with Cisco HyperFlex.
Veeam Enterprise License is required for Veeam Storage Integration with Cisco HyperFlex.
Network Design
Cisco UCS Uplink Connectivity
Cisco UCS network uplinks connect “northbound” from the pair of Cisco UCS Fabric Interconnects to the LAN in the customer datacenter. All Cisco UCS uplinks operate as trunks, carrying multiple 802.1Q VLAN IDs across the uplinks. The default Cisco UCS behavior is to assume that all VLAN IDs defined in the Cisco UCS configuration are eligible to be trunked across all available uplinks.
Cisco UCS Fabric Interconnects appear on the network as a collection of endpoints versus another network switch. Internally, the Fabric Interconnects do not participate in spanning-tree protocol (STP) domains, and the Fabric Interconnects cannot form a network loop, as they are not connected to each other with a layer 2 Ethernet link. All link up/down decisions through STP will be made by the upstream root bridges.
Uplinks need to be connected and active from both Fabric Interconnects. For redundancy, multiple uplinks can be used on each FI, either as 802.3ad Link Aggregation Control Protocol (LACP) port-channels or using individual links. For the best level of performance and redundancy, uplinks can be made as LACP port-channels to multiple upstream Cisco switches using the virtual port channel (vPC) feature. Using vPC uplinks allows all uplinks to be active passing data, plus protects against any individual link failure, and the failure of an upstream switch. Other uplink configurations can be redundant, however spanning-tree protocol loop avoidance may disable links if vPC is not available.
All uplink connectivity methods must allow for traffic to pass from one Fabric Interconnect to the other, or from fabric A to fabric B. There are scenarios where cable, port or link failures would require traffic that normally does not leave the Cisco UCS domain, to now be forced over the Cisco UCS uplinks. Additionally, this traffic flow pattern can be seen briefly during maintenance procedures, such as updating firmware on the Fabric Interconnects, which requires them to be rebooted. The following sections and figures detail several uplink connectivity options.
Single Uplinks to Single Switch
This connection design is susceptible to failures at several points; single uplink failures on either Fabric Interconnect can lead to connectivity losses or functional failures, and the failure of the single uplink switch will cause a complete connectivity outage.

Port Channels to Single Switch
This connection design is now redundant against the loss of a single link but remains susceptible to the failure of the single switch.

Single Uplinks or Port Channels to Multiple Switches
This connection design is redundant against the failure of an upstream switch, and redundant against a single link failure. In normal operation, STP is likely to block half of the links to avoid a loop across the two upstream switches. The side effect of this is to reduce bandwidth between the Cisco UCS domain and the LAN. If any of the active links were to fail, STP would bring the previously blocked link online to provide access to that Fabric Interconnect through the other switch. It is not recommended to connect both links from a single FI to a single switch, as that configuration is susceptible to a single switch failure breaking connectivity from fabric A to fabric B. For enhanced redundancy, the single links in Figure 28 could also be port-channels.

vPC to Multiple Switches
This recommended connection design relies on using Cisco switches that have the virtual port channel feature, such as Catalyst 6000 series switches running VSS, Cisco Nexus 5000 series, and Cisco Nexus 9000 series switches. Logically the two vPC enabled switches appear as one, and therefore spanning-tree protocol will not block any links. This configuration allows for all links to be active, achieving maximum bandwidth potential, and multiple redundancy at each level.

Cisco UCS Base Configuration
This deployment details the configuration steps for the Cisco UCS 6332 Fabric Interconnects (FI) in a design that supports both HyperFlex (HX) Cluster and Cisco UCS S3260 Storage Server. The base configuration of Cisco UCS will remain similar for both Cisco HX and Cisco UCS S3260 Storage Server.
If you have a pre-installed HyperFlex environment and discovered S3260 storage server, proceed to section Cisco UCS S3260 Configuration.
Perform Initial Setup of Cisco UCS 6454 Fabric Interconnects
This section describes the steps to configure the Cisco Unified Computing System (Cisco UCS) to use in a HyperFlex environment. These steps are necessary to provision the Cisco HyperFlex and Cisco UCS S3260 Storage Server and should be followed precisely to avoid improper configuration.
Cisco UCS Fabric Interconnect A
To configure Fabric Interconnect A, follow these steps:
1. Make sure the Fabric Interconnect cabling is properly connected, including the L1 and L2 cluster links, and the management ports, then power the Fabric Interconnects on by inserting the power cords.
2. Connect to the console port on the first Fabric Interconnect, which will be designated as the A fabric device. Use the supplied Cisco console cable (CAB-CONSOLE-RJ45=), and connect it to a built-in DB9 serial port, or use a USB to DB9 serial port adapter.
3. Start your terminal emulator software.
4. Create a connection to the COM port of the computers DB9 port, or the USB to serial adapter. Set the terminal emulation to VT100, and the settings to 9600 baud, 8 data bits, no parity, and 1 stop bit.
5. Open the connection which was just created. You may have to press ENTER to see the first prompt.
6. Configure the first Fabric Interconnect, using the following example as a guideline:
---- Basic System Configuration Dialog ----
This setup utility will guide you through the basic configuration of
the system. Only minimal configuration including IP connectivity to
the Fabric interconnect and its clustering mode is performed through these steps.
Type Ctrl-C at any time to abort configuration and reboot system.
To back track or make modifications to already entered values,
complete input till end of section and answer no when prompted
to apply configuration.
Enter the configuration method. (console/gui) ? console
Enter the setup mode; setup newly or restore from backup. (setup/restore) ? setup
You have chosen to setup a new Fabric interconnect. Continue? (y/n): y
Enforce strong password? (y/n) [y]: y
Enter the password for "admin":
Confirm the password for "admin":
Is this Fabric interconnect part of a cluster (select 'no' for standalone)? (yes/no) [n]: yes
Enter the switch fabric (A/B) []: A
Enter the system name: HX1-FI
Physical Switch Mgmt0 IP address : 192.168.110.8
Physical Switch Mgmt0 IPv4 netmask : 255.255.255.0
IPv4 address of the default gateway : 192.168.110.1
Cluster IPv4 address : 192.168.110.10
Configure the DNS Server IP address? (yes/no) [n]: yes
DNS IP address : 192.168.110.16
Configure the default domain name? (yes/no) [n]: no
Join centralized management environment (UCS Central)? (yes/no) [n]: no
Following configurations will be applied:
Switch Fabric=A
System Name=HX1-FI
Enforced Strong Password=no
Physical Switch Mgmt0 IP Address=192.168.110.8
Physical Switch Mgmt0 IP Netmask=255.255.255.0
Default Gateway=192.168.110.1
Ipv6 value=0
DNS Server=192.168.110.16
Cluster Enabled=yes
Cluster IP Address=192.168.110.10
NOTE: Cluster IP will be configured only after both Fabric Interconnects are initialized
Apply and save the configuration (select 'no' if you want to re-enter)? (yes/no): yes
Applying configuration. Please wait.
Configuration file - Ok
Cisco UCS Fabric Interconnect B
To configure Fabric Interconnect B, follow these steps:
1. Connect to the console port on the first Fabric Interconnect, which will be designated as the B fabric device. Use the supplied Cisco console cable (CAB-CONSOLE-RJ45=), and connect it to a built-in DB9 serial port, or use a USB to DB9 serial port adapter.
2. Start your terminal emulator software.
3. Create a connection to the COM port of the computers DB9 port, or the USB to serial adapter. Set the terminal emulation to VT100, and the settings to 9600 baud, 8 data bits, no parity, and 1 stop bit.
4. Open the connection which was just created. You may have to press ENTER to see the first prompt.
5. Configure the second Fabric Interconnect, using the following example as a guideline:
---- Basic System Configuration Dialog ----
This setup utility will guide you through the basic configuration of
the system. Only minimal configuration including IP connectivity to
the Fabric interconnect and its clustering mode is performed through these steps.
Type Ctrl-C at any time to abort configuration and reboot system.
To back track or make modifications to already entered values,
complete input till end of section and answer no when prompted
to apply configuration.
Enter the configuration method. (console/gui) ? console
Installer has detected the presence of a peer Fabric interconnect. This Fabric interconnect will be added to the cluster. Continue (y/n) ? y
Enter the admin password of the peer Fabric interconnect:
Connecting to peer Fabric interconnect... done
Retrieving config from peer Fabric interconnect... done
Peer Fabric interconnect Mgmt0 IPv4 Address: 192.168.110.8
Peer Fabric interconnect Mgmt0 IPv4 Netmask: 255.255.255.0
Cluster IPv4 address : 192.168.110.10
Peer FI is IPv4 Cluster enabled. Please Provide Local Fabric Interconnect Mgmt0 IPv4 Address
Physical Switch Mgmt0 IP address : 192.168.110.9
Apply and save the configuration (select 'no' if you want to re-enter)? (yes/no): yes
Applying configuration. Please wait.
Configuration file – Ok
Cisco UCS Setup
Log into Cisco UCS Manager
To log into the Cisco Unified Computing System (Cisco UCS) environment, follow these steps:
1. Open a web browser and navigate to the Cisco UCS fabric interconnect cluster address.
2. Click the Launch UCS Manager link to download the Cisco UCS Manager software.
3. If prompted to accept security certificates, accept as necessary.
4. When prompted, enter admin as the user name and enter the administrative password.
5. Click Login to log into Cisco UCS Manager.
Upgrade Cisco UCS Manager Software to Version 4.0(4d)
This document assumes you are using Cisco UCS 4.0(4d). To upgrade the Cisco UCS Manager software and the Cisco UCS Fabric Interconnect software to version 4.0(4d), refer to Cisco UCS Manager Install and Upgrade Guides.
Anonymous Reporting
To create anonymous reporting, follow this step:
1. In the Anonymous Reporting window, select whether to send anonymous data to Cisco for improving future products:

Add Block of IP Addresses for KVM Access
To create a block of IP addresses for in band server Keyboard, Video, Mouse (KVM) access in the Cisco UCS environment, follow these steps:
1. In Cisco UCS Manager, click the LAN tab in the navigation pane.
2. Select Pools > root > IP Pools.
3. Right-click IP Pool ext-mgmt and select Create Block of IPv4 Addresses.
4. Enter the starting IP address of the block and the number of IP addresses required, and the subnet and gateway information.

5. Click OK to create.
6. Click OK in the confirmation message.
Synchronize Cisco UCS to NTP
To synchronize the Cisco UCS environment to the NTP server, follow these steps:
1. In Cisco UCS Manager, click the Admin tab in the navigation pane.
2. Select All > Timezone Management.

3. In the Properties pane, select the appropriate time zone in the Timezone menu.
4. Click Add NTP Server.
5. Enter <<var_switch_a_ntp_ip>> and click OK.
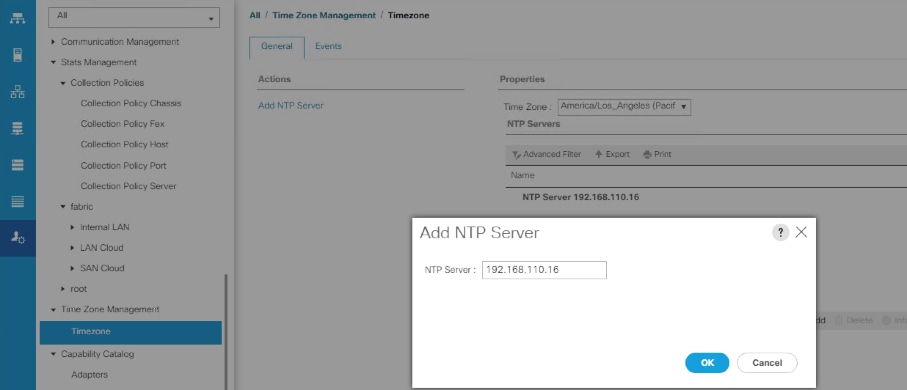
6. Click OK.
7. Click Save Changes
Uplink Ports
Fabric Interconnect 6454 support unified fabric and provide both LAN and SAN connectivity for all servers within their domains. By default, all ports are unconfigured, and their function must be defined by the administrator. To define the specified ports to be used as network uplinks to the upstream network, follow these steps:
1. In Cisco UCS Manager, click the Equipment tab in the navigation pane.
2. Select Fabric Interconnects > Fabric Interconnect A > Fixed Module > Ethernet Ports.
3. Select the ports that are to be uplink ports, right click them, and click Configure as Uplink Port.
4. Click Yes to confirm the configuration and click OK.
5. Select Fabric Interconnects > Fabric Interconnect B > Fixed Module > Ethernet Ports.
6. Select the ports that are to be uplink ports, right-click them, and click Configure as Uplink Port.

7. Click Yes to confirm the configuration and click OK.


8. Verify all the necessary ports are now configured as uplink ports.
Uplink Port Channels
If the Cisco UCS uplinks from one Fabric Interconnect are to be combined into a port channel or vPC, you must separately configure the port channels using the previously configured uplink ports. To configure the necessary port channels in the Cisco UCS environment, follow these steps:
1. In Cisco UCS Manager, click the LAN tab in the navigation pane.
2. Under LAN > LAN Cloud, click to expand the Fabric A tree.
3. Right-click Port Channels underneath Fabric A and select Create Port Channel.
4. Enter the port channel ID number as the unique ID of the port channel.
5. Enter the name of the port channel.
6. Click Next.
7. Click each port from Fabric Interconnect A that will participate in the port channel and click the >> button to add them to the port channel.
8. Click Finish.
9. Click OK.
10. Under LAN > LAN Cloud, click to expand the Fabric B tree.
11. Right-click Port Channels underneath Fabric B and select Create Port Channel.
12. Enter the port channel ID number as the unique ID of the port channel.
13. Enter the name of the port channel.
14. Click Next.
15. Click on each port from Fabric Interconnect B that will participate in the port channel and click the >> button to add them to the port channel.
16. Click Finish.
17. Click OK.
18. Verify the necessary port channels have been created. It can take a few minutes for the newly formed port channels to converge and come online.

Edit Chassis Discovery Policy
Setting the discovery policy simplifies the addition of B-Series Cisco UCS chassis and of additional fabric extenders for further C-Series connectivity. To modify the chassis discovery policy, follow these steps:
1. In Cisco UCS Manager, click the Equipment tab in the navigation pane and select Equipment.
2. In the right pane, click the Policies tab.
3. Under Global Policies, set the Chassis/FEX Discovery Action to Platform Max.

4. Click Save Changes.
5. Click OK.
Server Ports
The Ethernet ports of a Cisco UCS Fabric Interconnect connected to the rack-mount servers, or to the blade chassis, or to Cisco UCS S3260 Storage Server must be defined as server ports. When a server port is activated, the connected server or chassis will begin the discovery process shortly afterwards. Rack-mount servers, blade chassis, and S3260 chassis are automatically numbered in the order which they are first discovered. For this reason, it is important to configure the server ports sequentially in the order you wish the physical servers and/or chassis to appear within Cisco UCS Manager. For example, if you installed your servers in a cabinet or rack with server #1 on the bottom, counting up as you go higher in the cabinet or rack, then you need to enable the server ports to the bottom-most server first, and enable them one-by-one as you move upward. You must wait until the server appears in the Equipment tab of Cisco UCS Manager before configuring the ports for the next server. The same numbering procedure applies to blade server chassis.
To define the specified ports to be used as server ports, follow these steps:
1. In Cisco UCS Manager, click the Equipment tab in the navigation pane.
2. Select Fabric Interconnects > Fabric Interconnect A > Fixed Module > Ethernet Ports.
3. Select the port17-18 port that is to be a server port, right-click it, and click Configure as Server Port.
4. Click Yes to confirm the configuration and click OK.

5. Select Fabric Interconnects > Fabric Interconnect B > Fixed Module > Ethernet Ports.
6. Select the matching four ports as chosen for Fabric Interconnect A which would be configured as Server Port.
7. Click Yes to confirm the configuration and click OK.
8. Repeat steps 6-8 for Fabric Interconnect B
9. Wait for a brief period, until the rack-mount server appears in the Equipment tab underneath Equipment > Rack Mounts > Servers, or the chassis appears underneath Equipment > Chassis.
Server Discovery
As previously described, when the server ports of the Fabric Interconnects are configured and active, the servers connected to those ports will begin a discovery process. During discovery the servers internal hardware inventories are collected, along with their current firmware revisions. Before continuing with the HyperFlex and Cisco UCS S3260 storage server installation processes, wait for all the servers to finish their discovery process and show as unassociated servers that are powered off, with no errors.
To view the server discovery status, follow these steps:
1. In Cisco UCS Manager, click the Equipment tab in the navigation pane, and click Equipment.
2. In the properties pane, click the Servers tab.
3. Click the Chassis > Chassis1 Tab and view the Chassis status in the Overall Status column.
4. When the chassis is discovered, the S3260 storage server is displayed as shown below:

HyperFlex Installation
The Cisco HyperFlex software is distributed as a deployable virtual machine, contained in an Open Virtual Appliance (OVA) file format. The HyperFlex OVA file is available for download at www.cisco.com.
When the OVA is installed, the HyperFlex installer is accessed via a webpage using your local computer and a web browser. The HyperFlex Installer configures Cisco UCS and deploys the HyperFlex Data Platform on a Cisco UCS Cluster. To configure Cisco UCS for HyperFlex and then install HyperFlex Data Platform, refer to: Cisco HyperFlex Installation Guide.
As shown in Figure 30, the present setup is deployed with four node HyperFlex Cluster with HX240C-M5L nodes. The cluster is attached to a separate pair of Cisco UCS Fabric Interconnect 6332UP.

Figure 31 details the HyperFlex Cluster summary through the HX Connect.

Cisco UCS S3260 Configuration
This section details the steps for the Cisco UCS configuration for the Cisco UCS S3260 Storage Server.
Create Sub-Organization
In this setup, there are two sub-organizations under the root, each for HX and Veeam Infrastructure. Sub-organizations help to restrict user access to logical pools and objects in order to facility security and to provide easier user interaction. For Veeam Backup infrastructure, create a sub-organization as "Veeam." To create a sub-organization, follow these steps:
1. In the Navigation pane, click the Servers tab.
2. In the Servers tab, expand Service Profiles > root. You can also access the Sub-Organizations node under the Policies or Pools nodes.
3. Right-click Sub-Organizations and choose Create Organization.

Create Chassis Firmware Packages
To create S3260 Chassis Firmware packages, follow these steps:
1. In the Navigation pane, click the Chassis tab.
2. In the Chassis tab, expand Policies > root > sub-Organizations > Veeam.
3. Right-click Chassis Firmware Packages and select Create Chassis Firmware Packages.
4. Enter S3260_FW_Package as the Package name.
5. Select 4.0(4c)C from the Chassis Package drop-down list.
6. Click OK.

Create Disk Zoning Policy
You can assign disk drives to the server nodes using disk zoning. Disk zoning can be performed on the controllers in the same server or on the controllers on different servers.
To create S3260 Disk Zoning Policy, follow these steps:
1. In the Navigation pane, click Chassis.
2. Expand Policies > root > Sub-Organizations > Veeam.
3. Right-click Disk Zoning Policies and choose Create Disk Zoning Policy.

4. Enter S3260_DiskZone as the Disk Zone Name.
5. In the Disk Zoning Information Area, click Add.
6. Select Ownership as Dedicated.
7. Select Server as 1 (Disk would be assigned to node 1 of S3260 Storage server).
8. Select Controller as 1.
9. Slot range as 1-56 (In the present setup we have 56 X 8 TB SAS drives).

10. Click OK.
11. Click OK to complete the Disk Zoning Configuration Policy.

Set Cisco UCS S3260 Disk to Unconfigured Good
To prepare all disks from the Cisco UCS S3260 Storage Servers for storage profiles, the disks must be converted from JBOD to Unconfigured Good. Identify the disk in JBOD mode and set to Unconfigured Good. To convert the disks, follow these steps:
1. Select the Equipment tab in the left pane of the Cisco UCS Manager GUI.
2. Go to Equipment >Chassis > Chassis 1 > Storage Tab> Disks.
3. Select disks and right-click Set JBOD to Unconfigured Good.
Create MAC Address Pools
To configure the necessary MAC address pools for the Cisco UCS environment, follow these steps:
1. In Cisco UCS Manager, click the LAN tab in the navigation pane.
2. Select Pools > root > Sub-organizations > Veeam.
![]() In this procedure, a single MAC address pool is created, thus creating single vNIC for each VLAN. vNIC failover will be addressed through Fabric Failover under vNIC.
In this procedure, a single MAC address pool is created, thus creating single vNIC for each VLAN. vNIC failover will be addressed through Fabric Failover under vNIC.
3. Right-click MAC Pools under the root organization.
4. Select Create MAC Pool to create the MAC address pool.
5. Enter Veeam_MAC_Pool as the name of the MAC pool.
6. Optional: Enter a description for the MAC pool.
7. Select Sequential as the option for Assignment Order.

8. Click Next.
9. Click Add.
10. Specify a starting MAC address.
11. Specify a size for the MAC address pool that is sufficient to support the available blade or server resources.

12. Click OK.
13. Click Finish.
Create IP Pool
To configure the necessary IP Pools to allow KVM access to Cisco UCS S3260 compute node, follow these steps:
1. In Cisco UCS Manager, click the Servers tab in the navigation pane.
2. Select Pools > root > Sub-Organizations >Veeam.
3. Right-click IP Pools and select create IP Pools.
4. Enter IP Pool Name as Veeam-ip-pool.
5. Add Block of IP address as shown in the figure below and click Finish.

Create UUID Suffix Pool
To configure the necessary universally unique identifier (UUID) suffix pool for the Cisco UCS environment, follow these steps:
1. In Cisco UCS Manager, click the Servers tab in the navigation pane.
2. Select Pools > root > Sub-Organizations >Veeam.
3. Right-click UUID Suffix Pools.
4. Select Create UUID Suffix Pool.
5. Enter UUID_Pool as the name of the UUID suffix pool.
6. Optional: Enter a description for the UUID suffix pool.
7. Keep the prefix at the derived option.
8. Select Sequential for the Assignment Order.
9. Click Next.
10. Click Add to add a block of UUIDs.
11. Keep the From field at the default setting.
12. Specify a size for the UUID block that is sufficient to support the available server resources.

13. Click OK.
14. Click Finish.
15. Click OK.
Create Server Pool
To configure the necessary server pool for the Cisco UCS environment, follow these steps:
![]() Consider creating unique server pools to achieve the granularity that is required in your environment.
Consider creating unique server pools to achieve the granularity that is required in your environment.
1. In Cisco UCS Manager, click the Servers tab in the navigation pane.
2. Select Pools > root.
3. Right-click Server Pools.
4. Select Create Server Pool.
5. Enter S3260-Pool as the name of the server pool.
6. Optional: Enter a description for the server pool.
7. Click Next.
8. Select S3260 server node to be used for and click >> to add them to the S3260-Pool server pool.

9. Click Finish.
10. Click OK.

Create VLANs
![]() If HyperFlex is already configured and Cisco UCS S3260 is connected to the same Cisco UCS Fabric Interconnect as Cisco HyperFlex nodes, this step is not required. HX Management and Veeam network are on the same VLAN. We need to add multisite VLAN for communication across data center and to HyperFlex ROBO deployments. If HX Management VLAN can communicate across Data Center, then the addition of multisite VLAN is not required.
If HyperFlex is already configured and Cisco UCS S3260 is connected to the same Cisco UCS Fabric Interconnect as Cisco HyperFlex nodes, this step is not required. HX Management and Veeam network are on the same VLAN. We need to add multisite VLAN for communication across data center and to HyperFlex ROBO deployments. If HX Management VLAN can communicate across Data Center, then the addition of multisite VLAN is not required.
To configure the necessary virtual local area networks (VLANs) for the Cisco UCS environment, follow these steps:
1. In Cisco UCS Manager, click the LAN tab in the navigation pane.
2. Select LAN > LAN Cloud.
3. Right-click VLANs.
4. Select Create VLANs.
5. Enter HX-multisite as the name of the VLAN to be used
6. Keep the Common/Global option selected for the scope of the VLAN.
7. Keep the Sharing Type as None.
8. Click OK and then click OK again.
9. Repeat steps 3-8 to add backup VLAN as shown below:

10. VLANs configured in the present configuration are details below:
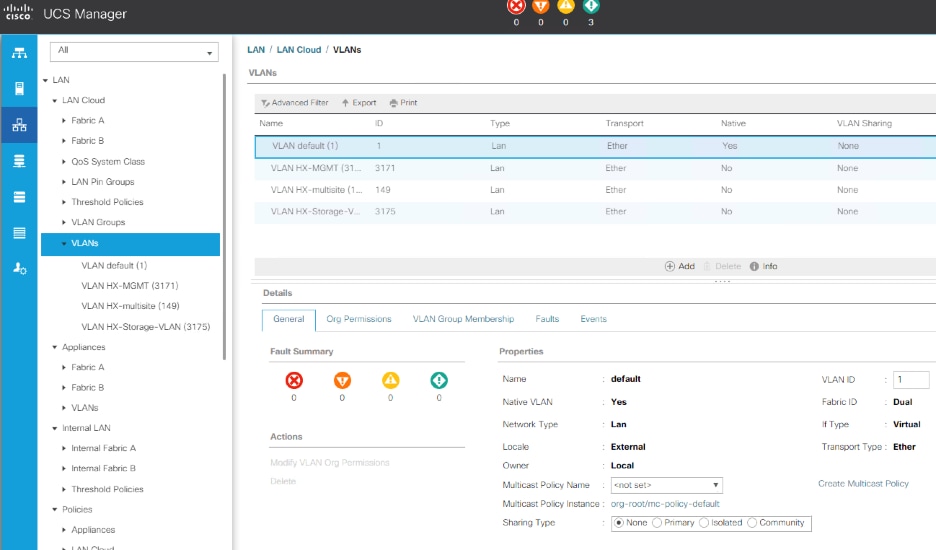
Create Host Firmware Package
Firmware management policies allow the administrator to select the corresponding packages for a given server configuration. These policies often include packages for adapter, BIOS, board controller, FC adapters, host bus adapter (HBA) option ROM, and storage controller properties.
To create a firmware management policy for a given server configuration in the Cisco UCS environment, follow these steps:
1. In Cisco UCS Manager, click the Servers tab in the navigation pane.
2. Select Policies > root >Sub-Organizations > Veeam.
3. Expand Host Firmware Packages.
4. Right-click and Select Create Host Firmware Package.
5. Select the version 4.0(4d)B for Blade and 4.0(4d)C for Rack Packages.
6. Click OK to add the host firmware package.

QoS Policy
To enable quality of service and create QoS policy in the Cisco UCS fabric, follow these steps:
1. In Cisco UCS Manager, click the LAN tab in the navigation pane.
2. Select LAN > LAN Cloud > QoS System Class.
3. In the right pane, click the General tab.
4. Make sure the Class of Service is configured as shown below. This is already created through the HyperFlex installer.

![]() The QoS System Class describes are in alignment with the HyperFlex Infrastructure configuration.
The QoS System Class describes are in alignment with the HyperFlex Infrastructure configuration.
5. In Cisco UCS Manager, click the LAN tab in the navigation pane.
6. Select LAN > Policies > root > Sub-Organizations> Veeam >QoS Policies.
7. Right-click QoS Policies and select Create QoS Policy.
8. Enter the name as Silver and select Silver for the priority.
9. Click OK.

Create Network Control Policy for Cisco Discovery Protocol
To create a network control policy that enables Cisco Discovery Protocol (CDP) on virtual network ports, follow these steps:
1. In Cisco UCS Manager, click the LAN tab in the navigation pane.
2. Select Policies > root >Sub-Organization > Veeam.
3. Right-click Network Control Policies.
4. Select Create Network Control Policy.
5. Enter Veeam_NCP as the policy name.
6. For CDP, select the Enabled option.
7. Click OK to create the network control policy.

8. Click OK.
Create Power Control Policy
To create a power control policy for the Cisco UCS environment, follow these steps:
1. In Cisco UCS Manager, click the Servers tab in the navigation pane.
2. Select Policies > root >Sub-Organizations >Veeam.
3. Right-click Power Control Policies.
4. Select Create Power Control Policy.
5. Enter No-Power-Cap as the power control policy name.
6. Change the power capping setting to No Cap.
7. Click OK to create the power control policy.
8. Click OK.

Create Server BIOS Policy
To create a server BIOS policy for the Cisco UCS environment, follow these steps:
1. In Cisco UCS Manager, click the Servers tab in the navigation pane.
2. Select Policies > root > sub-Organizations >Veeam.
3. Right-click BIOS Policies.
4. Select Create BIOS Policy.
5. Enter S3260-BIOS as the BIOS policy name.
6. Keep options under Main” tab as Platform dependent.
7. Click Finish to create the BIOS policy.

8. Go to Advanced options > Processor.
Table 12 lists the details of each vNIC.
Table 9 Processor BIOS Options
| Processor options |
Value |
| Energy Efficient Turbo |
Disabled |
| Package C State Limit |
Co C1State |
| Autonomous Core C State |
Disabled |
| Processor C State |
Disabled |
| Processor C1E |
Disabled |
| Processor C3 Report |
Disabled |
| Processor C6 Report |
Disabled |
| Processor C7 Report |
Disabled |
These options are detailed in the figure below, marked in RED.

9. Go to Advanced tab >RAS Memory.
10. Select Maximum Performance Value for Memory RAS Configuration row.

11. Click Save Changes.
12. Click OK.
![]() The recommended BIOS settings are critical for maximum Veeam Backup Performance on the Cisco UCS S3260 Server.
The recommended BIOS settings are critical for maximum Veeam Backup Performance on the Cisco UCS S3260 Server.
Create Maintenance Policy
To update the default Maintenance Policy, follow these steps:
1. In Cisco UCS Manager, click the Servers tab in the navigation pane.
2. Select Policies > root.>Veeam
3. Right-click Maintenance Policies and Select Create Maintenance Policy.
4. Change the Reboot Policy to User Ack.
5. (Optional: Click “On Next Boot” to delegate maintenance windows to server owners).

6. Click Save Changes.
7. Click OK to accept the change.
Create Adaptor Policy
To create adaptor policy, follow these steps:
1. In Cisco UCS Manager, click the Servers tab in the navigation pane.
2. Select Policies > root > Sub-Organizations > Veeam.
3. Right Click on Adaptor Policies and Select Ethernet Adaptor Policy.
4. Enter name as veeam_adaptorpol.
5. Enter Transmit Queues = Receive Queues = 8, Ring Size = 4096.
6. Enter Completion Queues = 16 and Interrupts = 32.
7. Under Options, ensure Receive Side Scaling (RSS) is enabled.
8. Click OK.
![]() To enable maximum throughout, it is recommended to change the default size of Rx and Tx Queues. RSS should be enabled, since it allows the distribution of network receive processing across multiple CPUs in a multiprocessor system.
To enable maximum throughout, it is recommended to change the default size of Rx and Tx Queues. RSS should be enabled, since it allows the distribution of network receive processing across multiple CPUs in a multiprocessor system.
Create vNIC Templates
To create multiple virtual network interface card (vNIC) templates for the Cisco UCS environment, follow these steps. A total of 3 vNIC Templates will be created.
1. vNIC_veeam_mgmt – Veeam Management vNIC. This vNIC has the same VLAN as the HX Management VLAN.
2. vNIC_multisite. This vNIC provides communication across DataCenter. If the HX Management VLAN can communicate across data center, this vNIC is not required.
3. vNIC_storage- This vNIC provides communication of the Cisco UCS S3260 with the HX Storage network. This is required for Cisco HyperFlex storage integration with Veeam.
Create Data vNICs
To create the data vNICs, follow these steps:
1. In Cisco UCS Manager, click the LAN tab in the navigation pane.
2. Select Policies > root > Sub-Organizations > Veeam.
3. Right-click vNIC Templates.
4. Select Create vNIC Template.
5. Enter vNIC_veeam_mgmt as the vNIC template name.
6. Keep Fabric A selected.
7. Select the Enable Failover checkbox.
8. Select Updating Template as the Template Type.
9. Select Redundancy Type as No Redundancy
10. Under VLANs, select the checkbox for hx-inband-mgmt VLAN.
11. Set hx-inband-mgmt as the native VLAN.
12. For MTU, enter 1500
13. In the MAC Pool list, select Veeam_mac_pool
14. Ensure vNIC_veeam_mgmt is pinned to Fabric A
15. In the Network Control Policy list, select Veeam_NCP.
16. Select QoS Policy as Silver.


17. Click OK to create the vNIC template.
18. Click OK.
Follow these steps for the multisite VLAN template:
1. In the navigation pane, select the LAN tab.
2. Select Policies > root.
3. Right-click vNIC Templates.
4. Select Create vNIC Template.
5. Enter vNIC_veeam_msite as the vNIC template name.
6. Select Fabric A.
7. Select the Enable Failover checkbox.
8. Under Target, make sure the VM checkbox is not selected.
9. Select Redundancy Type as No Redundancy.
10. Select Updating Template as the template type.
11. Under VLANs, select the checkboxes for HX_multisite.
12. Set HX_multisite as the native VLAN.
13. Select vNIC Name for the CDN Source.
14. For MTU, enter 1500.
15. Select QoS Policy as Veeam_qos.
16. In the MAC Pool list, select Veeam_mac_pool.
17. In the Network Control Policy list, select Veeam_NCP.


18. Click OK to create the vNIC template.
19. Click OK.
![]() The multisite vNIC is required only if HX Management VLAN does not have connectivity to Remote DataCenter. If Management VLAN has access to remote data center, Veeam Replication or Backup copy traffic would be on HX Management VLAN
The multisite vNIC is required only if HX Management VLAN does not have connectivity to Remote DataCenter. If Management VLAN has access to remote data center, Veeam Replication or Backup copy traffic would be on HX Management VLAN
Follow these steps for the HXStorage vNIC template:
1. In the navigation pane, select the LAN tab.
2. Select Policies > root.
3. Right-click vNIC Templates.
4. Select Create vNIC Template
5. Enter vNIC_veeam_strge as the vNIC template name.
6. Ensure vNIC_veeam_strge is pinned to Fabric B. This is required as the HyperFlex storage network traffic is pinned to Fabric B. This avoids backup traffic on HX Storage VLAN traverse upstream switch.
7. Select the Enable Failover checkbox.
8. Under Target, make sure the VM checkbox is not selected.
9. Select Redundancy Type as No Redundancy.
10. Select Updating Template as the template type.
11. Under VLANs, select the checkboxes for hx-storage-vlan.
12. Set hx-storage-vlan as the native VLAN.
13. Select vNIC Name for the CDN Source.
14. For MTU, enter 1500.
15. Select QoS Policy as Bronze.
16. In the MAC Pool list, select Veeam_mac_pool.
17. In the Network Control Policy list, select Veeam_NCP.


18. Click OK to create the vNIC template.
19. Click OK.
![]() HX Storage VNIC on HX Storage VLAN is required to allow backup traffic to flow through HyperFlex storage network. This allows utilization of Veeam Direct NFS mode for backup jobs.
HX Storage VNIC on HX Storage VLAN is required to allow backup traffic to flow through HyperFlex storage network. This allows utilization of Veeam Direct NFS mode for backup jobs.
Create Disk Group Policy
A storage profile encapsulates the storage requirements for one or more service profiles. LUNs configured in a storage profile can be used as boot LUNs or data LUNs and can be dedicated to a specific server. You can also specify a local LUN as a boot device. The introduction of storage profiles allows you to do the following:
· Configure multiple virtual drives and select the physical drives that are used by a virtual drive. You can also configure the storage capacity of a virtual drive.
· Configure the number, type and role of disks in a disk group.
· Associate a storage profile with a service profile
The Cisco UCS Manager Storage Profile and Disk Group Policies are utilized to define storage disks, disk allocation, and management in the Cisco UCS S3260 system. You would create two disk Group Policies as follows:
· RAID 1 from two Rear SSDs for OS Boot
· RAID60 from 56 HDD as defined under Disk Zoning Policy
Table 10 lists the RAID Policies which can be configured on Cisco UCS S3260.
Table 10 RAID Group Configuration on Cisco UCS S3260
| # Disk |
RAID Group |
# SPANs |
# Disk per SPAN |
# Global Hot Spares |
| 14 |
RAID 6 |
NA |
NA |
1 |
| 28 |
RAID 60 |
2 |
13 |
2 |
| 42 |
RAID 60 |
3 |
13 |
3 |
| 56 |
RAID 60 |
4 |
13 |
4 |
To create Disk Group Policy, follow these steps:
1. In Cisco UCS Manager, click the Storage tab in the navigation pane.
2. Select Storage Policies > root >Sub-Organizations > Veeam >Disk Group Policies.
3. Right Click on Disk Group Policy and Select Create Disk Group Policy.
4. Enter name as RAID1_OS.
5. Select RAID Level as RAID1 Mirrored.
6. Number of drives as 2 and Drive Type as SSD.
7. Strip Size = 64KB, Access Policy = Read Write, Write Cache Policy = Write Back Good BBU, IO Policy = Direct, Drive Cache = Platform Default.
8. Click OK.

9. Create second Disk Group Policy with RAID 60.
10. Create a RAID60 with 56 HDDs.
11. For 56 DISK configurations of RAID60, we would have 4 SPANs and each SPAN would have 13 disks.
12. Remaining 4 DISK are allocated for Global Hot Spares.
13. Enter name as S3260-RAID60-56d, Select RAID60 from RAID Level and opt for Manual Disk Group Configuration.
14. Click Add, Enter Slot Number as 1, Role as Normal and Span ID as 0.

15. Repeat step 12, for Slot numbers 2 to 13 with Span ID 0.

16. For Slot 14, Select Role as Global Hot Spare and Span Id as 0 and for Slot 14 Select Role as Global Hot Spare and Span Id as unspecified.

17. Repeat steps 12 - 14, for Slot 15 to Slot 28 and enter Span ID as 1.
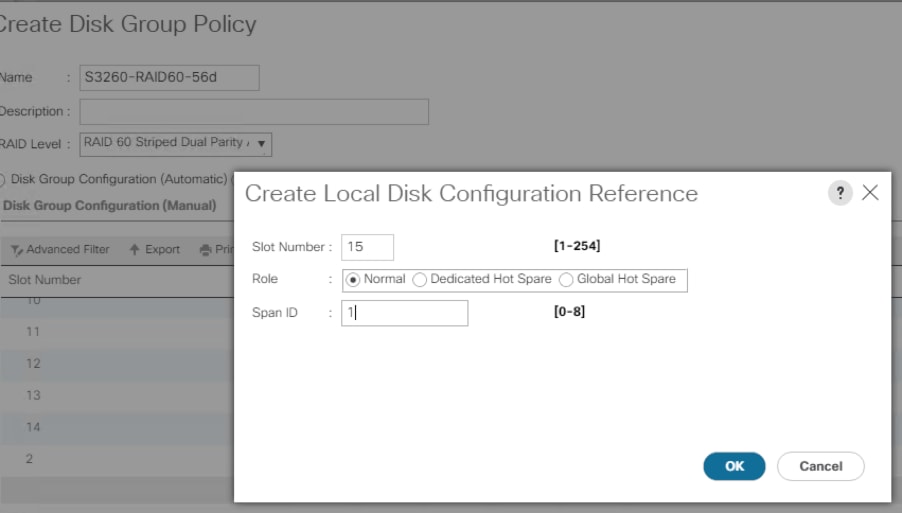
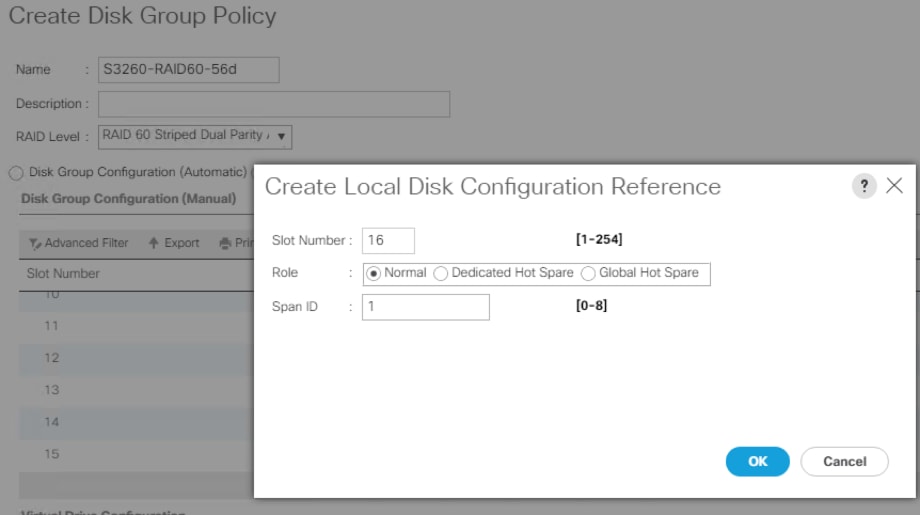
18. For Slot 27, select Role as Dedicated Hot Spare and SPAN ID as 1.

19. For Slot 28, select Role as Global Hot Spare and leave the Span ID as unspecified.
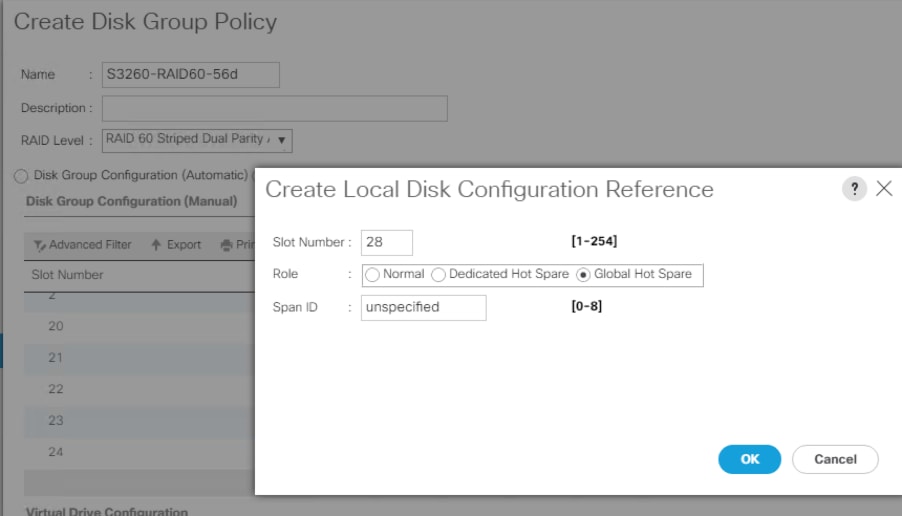
20. Repeat the steps for Slot 29-42 with slot 29-41 with Role as Normal and Span ID as 2 and Slot 42 with Role as Global Hot Spare and SPAN ID as unspecified.
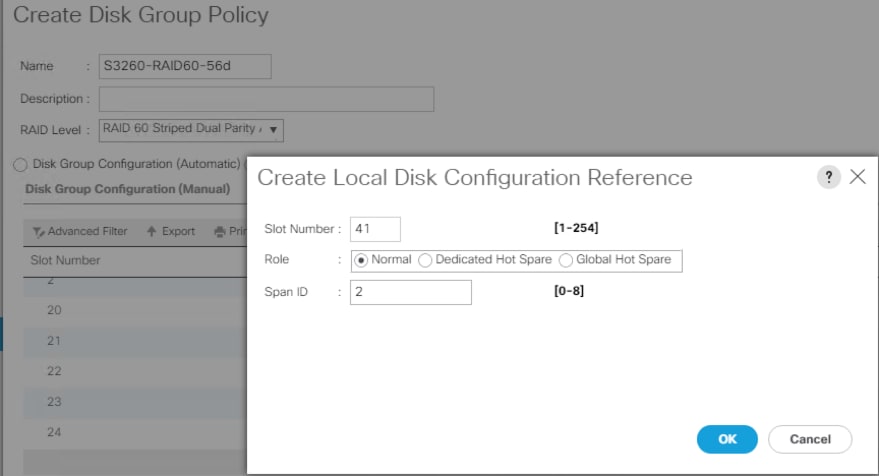

21. Repeat the steps for Slot 43-56 with slot 43-57 with Role as Normal and Span ID as 3 and Slot 56 with Role as Global Hot Spare and SPAN ID as unspecified
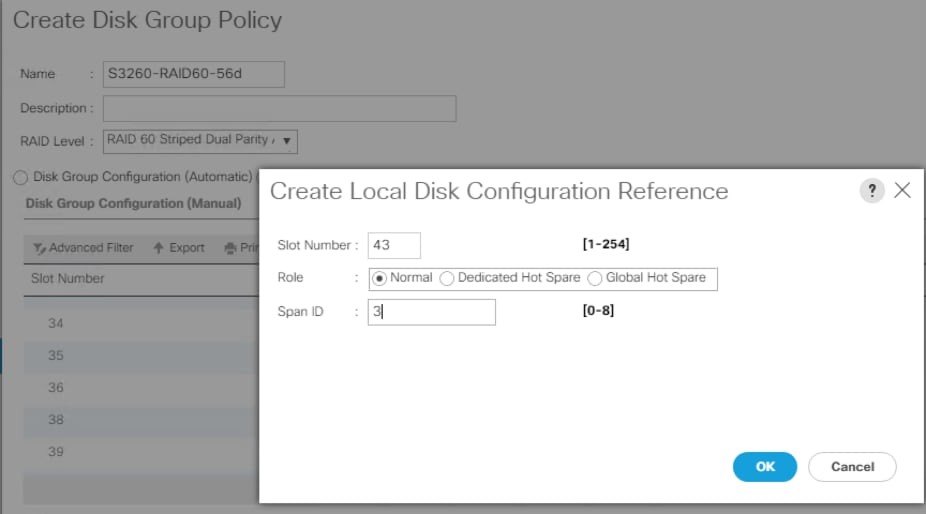


22. When all 56 Disks with 4 Spans are configured:
a. Select Strip Size as 64KB
b. Access Policy as Read Write
c. Read Policy as Read Ahead
d. Write Cache Policy as Write Back Good BBU
e. IO Policy as Direct
f. Drive Cache Policy as Platform Default
The figure below displays the RAID60 configuration with 56 Disk and suggested Virtual Drive Configuration.
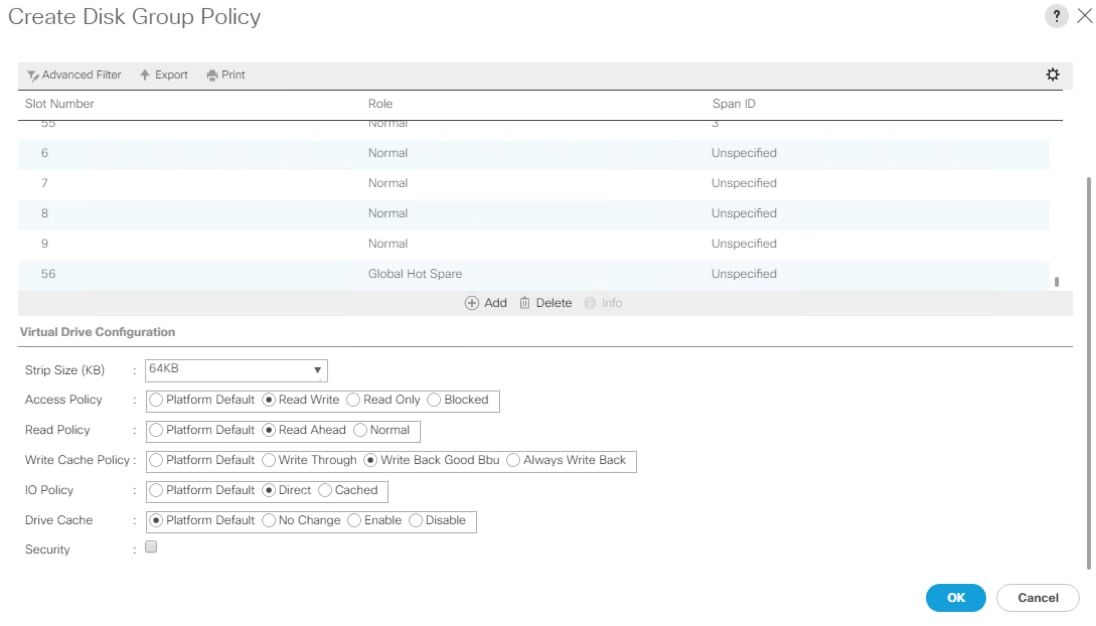
Table 11 RAID Configuration for Cisco UCS S3260 and Cisco UCS C240 M4 LFF Server
|
|
Small – 1 |
Small – 2 |
Medium -1 |
Medium -2 |
Large -1 |
Large-2 |
| Raw Capacity |
48 TB |
72 TB |
140TB |
280 TB |
560 TB |
1680 TB |
| Minimum Usable Capacity |
36 TB |
54 TB |
110TB |
220 TB |
440 TB |
1320 TB |
| Storage |
12 x 4-TB SAS 7200-rpm drives
48 TB raw capacity |
12 x 6-TB SAS 7200-rpm drives
72 TB raw capacity |
14 x 10-TB SAS 7200-rpm drives
140 TB raw capacity |
28 x 10-TB SAS 7200-rpm drives
280 TB raw capacity |
56 x 10-TB SAS 7200-rpm drives
560 TB raw capacity |
168 x 10-TB SAS 7200-rpm drives
1680 TB raw capacity |
| Servers |
1 Cisco UCS C240 M5 (LFF) |
1 Cisco UCS C240 M5 (LFF) |
1 Cisco UCS S3260 |
1 Cisco UCS S3260 |
1 Cisco UCS S3260 |
3x Cisco UCS S3260 |
| CPU |
Intel Xeon processor 4214 (12 cores, 2.3 GHz, and 105W) |
Intel Xeon processor 4214 (12 cores, 2.3 GHz, and 105W) |
Intel Xeon processor 5220 (18 cores, 2.2 GHz, and 125W) |
Intel Xeon processor 5220 (18 cores, 2.2 GHz, and 125W) |
Intel Xeon processor 5220 (18 cores, 2.2 GHz, and 125W) |
Intel Xeon processor 5220 (18 cores, 2.2 GHz, and 125W) |
| Memory |
64 GB |
128 GB |
256 GB |
256 GB |
256 GB |
256 GB per server |
| RAID Cache |
2 GB |
2 GB |
4 GB |
4 GB |
4 GB |
4 GB |
| RAID |
RAID 6 |
RAID 6 |
RAID 60 |
RAID 60 |
RAID 60 |
RAID 60 |
| Maximum Bandwidth |
2x 40 Gbps 4x 25 Gbps |
2x 40 Gbps 4x 25 Gbps |
2x 40 Gbps 4x 25 Gbps |
2x 40 Gbps 4x 25 Gbps |
2x 40 Gbps 4x 25 Gbps |
2x 40 Gbps 4x 25 Gbps |
Create Storage Profile
To create Storage Profile for Cisco UCS S3260, follow these steps:
1. In Cisco UCS Manager, click the Storage tab in the navigation pane.
2. Select Storage Profiles > root >Sub-Organizations >Veeam.
3. Right-click and Select Create Storage Profile.
4. Enter name as S3260_Str_Prf_1.
5. Under Local Lun Selection, click Add.

6. Enter Name as OS_Boot.
7. Check Expand to Available; this creates a single lun with maximum space available.
8. Select Disk Group Selection as RAID_OS and click OK.

9. Click Add under Local LUN.
10. Enter Name as Veeam_Rep; this is the LUN used by Veeam Repository.
11. Check Expand to Available and Select Disk Group Configuration as S3260-RAID60-56d.
12. Click OK.

13. Click OK on the Create Storage Profile.

Create Chassis Profile Template
A chassis profile defines the storage, firmware and maintenance characteristics of a chassis. You can create a chassis profile for the Cisco UCS S3260 Storage Server. When a chassis profile is associated to a chassis, Cisco UCS Central automatically configures the chassis to match the configuration specified in the chassis profile.
A chassis profile includes four types of information:
· Chassis definition—Defines the specific chassis to which the profile is assigned.
· Maintenance policy—Includes the maintenance policy to be applied to the profile.
· Firmware specifications—Defines the chassis firmware package that can be applied to a chassis through this profile.
· Disk zoning policy—Includes the zoning policy to be applied to the storage disks.
To create Chassis Profile Template for Cisco UCS S3260 storage server, follow these steps:
1. In Cisco UCS Manager, click the Chassis tab in the navigation pane.
2. Select Chassis Profile Templates > root > Sub-Organizations > Veeam.
3. Right-click and select Create Chassis Profile Template.
4. Enter name as S3260_Chs_Tmplte.
5. Select Type as Updating Template.
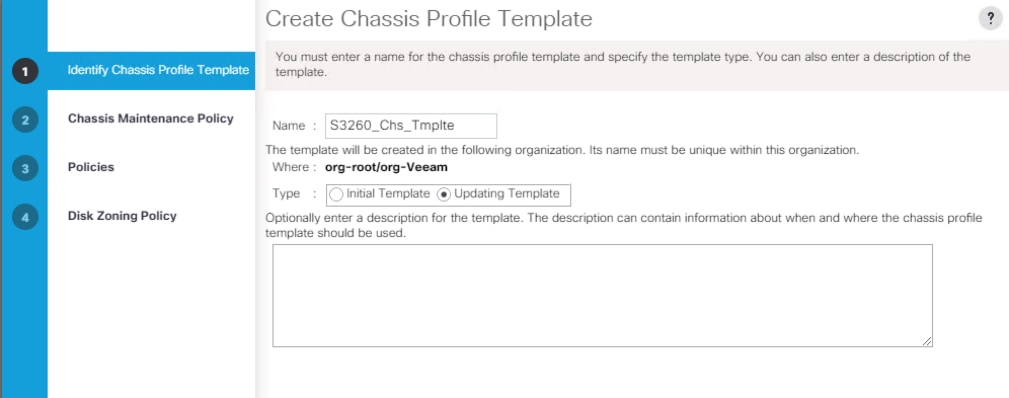
6. Select default as the Maintenance Policy and click Next.
7. Select Chassis Firmware Package as S3260_FW_Package.

8. Select Disk Zoning Policy as S3260_DiskZone and click Finish.

Create Service Profile Template
With a service profile template, you can quickly create several service profiles with the same basic parameters, such as the number of vNICs and vHBAs, and with identity information drawn from the same pools.
![]() If you need only one service profile with similar values to an existing service profile, you can clone a service profile in the Cisco UCS Manager GUI.
If you need only one service profile with similar values to an existing service profile, you can clone a service profile in the Cisco UCS Manager GUI.
For example, if you need several service profiles with similar values to configure servers to host database software, you can create a service profile template, either manually or from an existing service profile. You then use the template to create the service profiles.
Cisco UCS supports the following types of service profile templates:
· Initial template: Service profiles created from an initial template inherit all the properties of the template. However, after you create the profile, it is no longer connected to the template. If you need to make changes to one or more profiles created from this template, you must change each profile individually.
· Updating template: Service profiles created from an updating template inherit all the properties of the template and remain connected to the template. Any changes to the template automatically update the service profiles created from the template.
To create the service profile template, follow these steps:
1. In Cisco UCS Manager, click the Servers tab in the navigation pane.
2. Select Service Profile Templates > root >Sub-Organizations > Veeam.
3. Right-click Veeam.
4. Select Create Service Profile Template to open the Create Service Profile Template wizard.
5. Enter S3260_SP_Template as the name of the service profile template.
6. Select the “Updating Template” option.
7. Under UUID, select UUID_Pool as the UUID pool.

8. Click Next.
Configure Storage Provisioning
To configure the storage provisioning, follow these steps:
1. Click Storage Profile Policy Tab and select S3260_Str_Prf_1 (as created under Storage Profile section).

2. Click Next.
Configure Networking Options
To configure the networking options, follow these steps:
1. Keep the default setting for Dynamic vNIC Connection Policy.
2. Under How would you like to configure LAN connectivity, select Expert Mode.
3. Select the “Use Connectivity Policy” option to configure the LAN connectivity.
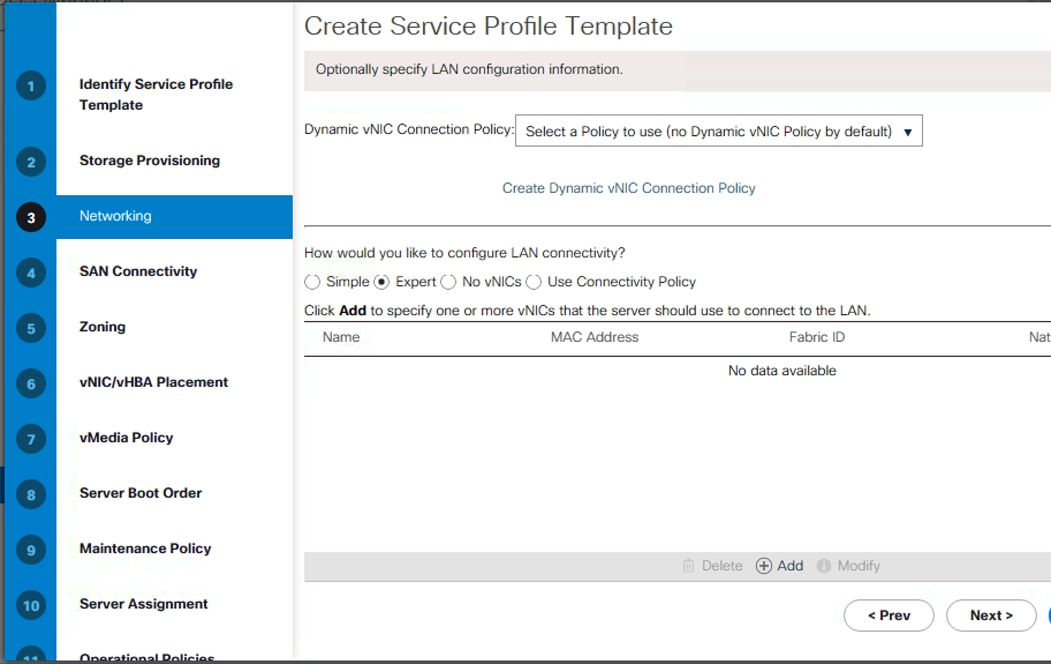
4. Click Add.
5. Under Create vNIC option, enter name as vnic_Mgmt.
6. Select use vNIC Template and choose vNIC_veeam_mgmt.
7. Under Adaptor Policy Select veeam_adaptorpol and click OK.

8. Repeat steps 1 - 7 and name the vNIC as vnic_Storage, vNIC Template as vNIC_veeam_strge and adaptor policy as Veeam_adaptorpol

9. Repeat steps 1-7 and name the vNIC as vnic_multisite, vNIC Template as vNIC_msite and adaptor policy as Veeam_adaptorpol.

10. Verify that there are 3 vNICs attached to Service Profile adaptor.
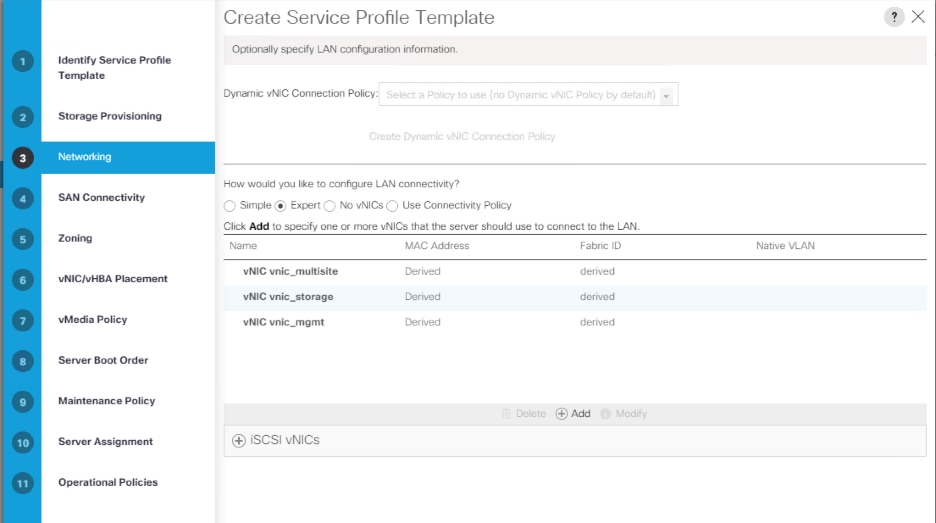
11. Click Next.
Table 12 lists the details of each vNIC.
Table 12 vNIC Configured for HX Multisite Backup and Replication
| vNIC |
Description |
| vnic_mgmt |
Required to manage the Veeam Backup and Replication Server. This would exist on the HX Management VLAN |
| vnic_Storage |
Required for Cisco HyperFlex storage integration with Veeam. This feature requires Veeam Enterprise Plus license |
| Vnic_multisite |
This is required for backup and replication across data center. In case, HX Management VLAN can communicate across Data Center, this vNIC is not required |
Configure Storage Options
Skip the SAN Connectivity since you will use local storage for S3260 created through Storage Policy and Select No vHBAs
Configure Zoning Options
1. Set no Zoning options and click Next.
Configure vNIC/HBA Placement
1. In the “Select Placement” list, leave the placement policy as “Let System Perform Placement”.
2. Click Next.
Configure vMedia Policy
1. From the vMedia Policy, leave as default
2. Click Next.
Configure Server Boot Order
1. Choose Default Boot Policy.
Configure Maintenance Policy
1. Change the Maintenance Policy to Veeammaintenence policy (userAck).

2. Click Next.
Configure Server Assignment
To configure server assignment, follow these steps:
1. In the Pool Assignment list, select S3260_Pool.
2. Firmware Management at the bottom of the page select S3260-Host_FW as created in the previous section.
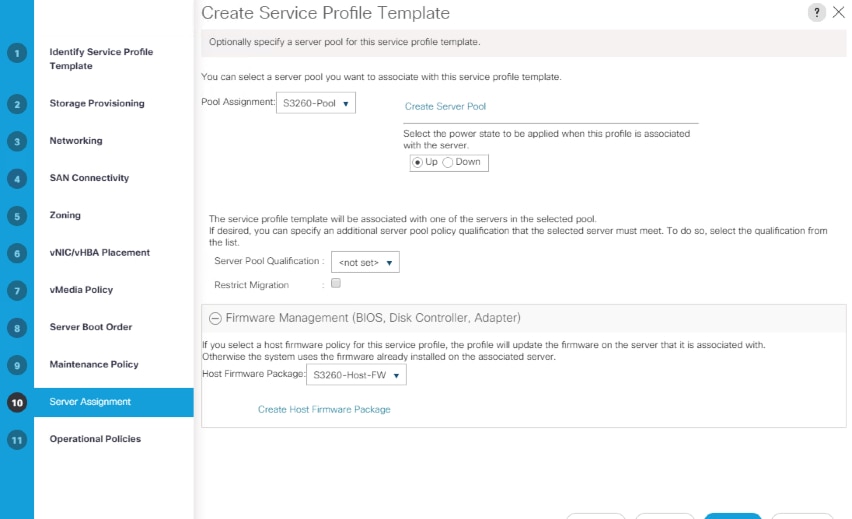
3. Click Next.
Configure Operational Policies
To configure the operational policies, follow these steps:
1. In the BIOS Policy list, select S3260-BIOS.
2. Expand Power Control Policy Configuration and select No-Power-Cap in the Power Control Policy list.

3. Expand Management IP address and select Veeam-ip-pool.
4. Click Finish to create the service profile template.
5. Click OK in the confirmation message.
Create Chassis Profile
To create chassis profile from the chassis profile template, follow these steps:
1. Click the Chassis tab in the navigation pane.
2. Select Chassis Profile Templates > root > Sub-Organizations > Veeam > Chassis Profile Template Chassis_Template.
3. Right-click Chassis Profile Template Chassis_S3260_Chs_Tmplte and Select Create Chassis Profiles from Template.
4. Enter S3260_ChassisSP as the Chassis profile prefix.
5. Enter 1 as “Name Suffix Starting Number and 1 as Number of Instances.

6. The screenshot below displays the S3260_ChassisSP1 under Chassis > root > Sub-Organizations > Veeam > Chassis Profile.

Associate Chassis Profile to Cisco UCS S3260 Chassis
To Associate Chassis Profile to Cisco UCS S3260 Chassis, follow these steps:
1. Click the Chassis tab in the navigation pane.
2. Select Chassis Profiles > root > Sub-Organizations > Veeam.
3. Right-click S3260_Chassis_SP1 and select Change Chassis Profile Association.
4. In the Assignment tab, select Existing Chassis.
5. Select the existing chassis.

6. Click OK.
7. Since having selected User Ack for the Maintenance Policy, you need to acknowledge the Chassis Reboot for Chassis Profile Association.

8. On FSM Tab you will see the Association Status.

9. When the Chassis is Associated you will see the assigned status as Assigned.

10. Click the Equipment tab >Chassis > Chassis 1and then click Firmware tab.
11. Ensure Chassis Firmware is updated to attached Firmware Package (4.04d).

Create Service Profiles
This section describes how to associate the Compute Node on S3260 Storage server to a Service Profile.
To create service profiles from the service profile template, follow these steps:
1. On Servers tab in the navigation pane.
2. Select Service Profile Templates > root > Sub-Organizations > Veeam > Service Template S3260_SP_Template.
3. Right-click S3260_SP_Template and select Create Service Profiles from Template.
4. Enter SP_S3260_node as the service profile prefix.
5. Enter 1 as “Name Suffix Starting Number.”
6. Enter 1 as the “Number of Instances.”
7. Click OK to create the service profile.

8. Click OK in the confirmation message.
Associate Service Profile to Server Node of Cisco UCS S3260 Chassis
Adding the compute node of S3260 chassis to the Server Pool and associated this pool to Service Profile template, the association of server Service Profile to compute node is automatic. If there is no unassociated compute node in the Server Pool, you will need to add a node to server pool which would allow association to Service Profile.
To associate the service profile to the server node of the Cisco UCS S3260 chassis, follow these steps:
The status for association of Service Profile to compute node is displayed below.

1. When Service Profile Association is complete, confirm that the overall status is OK.

2. Verify the Boot Lun and Veeam Repository LUN under Storage tab of Service Profile.

3. Verify Service Profile has 3 vNICs.
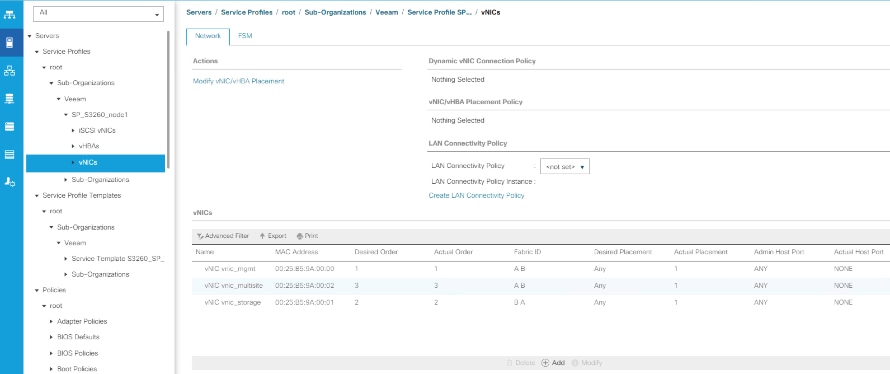
4. Ensure all the components of S3260 are updated to Firmware version 4.0(4c).

This section elaborates on the installation and configuration of Veeam Availability Suite 9.5 update 4 on Cisco UCS S3260 storage server node. The important high-level steps are as follows:
· Install and configure Windows 2019 on S3260 server node
· Install Veeam Availability Suite 9.5 update 4
· Configure Backup Infrastructure for Veeam Availability Suite
Install and Configure Windows 2019
To install and configure Windows 2016, follow these steps:
1. In the Navigation pane, select Server tab.
2. In the Servers tab, expand Service Profiles > root > Sub-Organizations > Veeam >SP_S3260_node1.
3. Click KVM console and open the *.jnlp with java webstart.

4. In KVM Console, go to the Virtual Media tab and select Activate Virtual Devices.
5. On the Virtual Media tab, select MAP CD/DVD and browse to Windows 2019 Installer and Map Device.

6. Reset the server and wait for the ISO image to load.
7. Install Windows 2019.

8. Select the Drive0. This drive is RAID1 config created from the two SSD in the rear of S3260 chassis for OS installation through Storage Profile in the Cisco UCS Service Profile. Drive3 is the RAID60 configuration created from the top load SAS drives for Veeam Repository.

9. Click Next and complete Windows 2019 installation.
Update Cisco VIC Driver for Windows 2019
For detailed information, refer to Installing Windows 2016/2019 Drivers.
Use the Windows drivers ISO located here: UCS C3260 Rack Server Software
To update the Cisco VIC driver for Windows 2019, follow these steps:
1. Open the UCS KVM Console and login to Windows 2019 installed on the Cisco UCS S3260 Storage Server.
2. Map the S3260 drivers through Map CD/DVD option under the Virtual Media tab in the KVM Console.

3. In Windows 2019, under Computer Management, select Device Manager.
4. Select Ethernet Controller and update drivers for all the available Ethernet Controllers. The Cisco VIC drivers are located under Network\Cisco\VIC\W2K19\64.


Update Intel Chipset Driver for Windows 2019
For detailed information, refer to Installing Windows 2016/2019 Drivers.
Use the Windows drivers ISO located here: Cisco UCS C3260 Rack Server Software
To update the Intel chipset driver for Windows 2019, follow this step:
1. Post updating drivers and Reboot, verify that all the drivers and all vNICs on the Windows 2019 OS are updated.

Configure network for Veeam Backup Server
Cisco UCS S3260 storage server configured as Veeam Backup Server has three networks. The number of networks on S3260 is dependent on customer topology and may change accordingly.
1. Configure vNIC_multisite with IP Address on VLAN which can access Remote HX vCenter and Remote Proxy Server. Remote Proxy Server allows Replication of HyperFlex Remote Site. vNIC_multisite configuration is only required if HX Management network cannot be accessed outside the Primary Data Center.
2. Configure vNIC_Mgmt with IP Address on HX Management VLAN.
3. Configure vNIC_Storage with IP Address on HX Storage VLAN. This is required for Cisco HyperFlex and Veeam Storage Integration.
Power Options for High Performance
On Windows 2019, go to Power options and Select High Performance option. This is detailed in the figure below:

Create Disk Volume for Veeam Repository
To create disk volume for Veeam repository, follow these steps:
1. Go to Server Manager > File and Storage Services.
2. Navigate to Volumes > Disks and select the volume with Partition type as Unknown.
3. Create a New Volume.

4. Click Next until you reach Select File System settings window.
5. Create a Volume Label, select File system to ReFS, Allocation unit size to 64k, Volume label to 'VeeamRep.'
6. Click Next.

7. Confirm the File System Settings and click Create. Figure below displays the Volumes existing on the Cisco UCS S3260 for Veeam.

![]() ReFS volumes provide significantly faster synthetic full backup creation and transformation performance, as well as reduce storage requirements and improve reliability. Even more importantly, this functionality improves Availability of backup storage by significantly reducing its load — which results in improved backup and restore performance and enables customers to do much more with virtual labs running off backup storage.
ReFS volumes provide significantly faster synthetic full backup creation and transformation performance, as well as reduce storage requirements and improve reliability. Even more importantly, this functionality improves Availability of backup storage by significantly reducing its load — which results in improved backup and restore performance and enables customers to do much more with virtual labs running off backup storage.
Install Veeam Availability Suite 9.5 Update 4
This section highlights the steps to ensure the proper installation of Veeam on Cisco UCS S3260 storage server. For detailed information about installing Veeam Availability Suite 9.5, go to Veeam Installation.
Make sure that the Veeam Installation, vPower Cache folder, and Guest Catalog folder are located on the C: Drive, as shown below:

Configure Veeam Availability Suite
To configure the Veeam Backup & Replication Server, follow these steps. All the Veeam components, such as Veeam Console, Veeam Proxy and Veeam Repository are configured on same Cisco UCS S3260 storage node.
1. Add VMware vSphere Server ref Adding vSphere Servers . The addition of vCenter as shown below:

2. Configure Backup Repository on the S3260 Storage Server, for detailed information see: Adding Repositories.
a. Open Veeam Console. Right-click Backup Repository and select Add Backup Repository.
b. Select Direct Attached Storage option.

c. Select Microsoft Windows.
d. Name the Repository as VeeamRepo.

e. Click Populate under the default Windows Server.
f. Select D: drive as the repository and click Next. This volume was created as RAID 60 for the 56 top load drives on Cisco UCS S3260 Storage Server.

g. Ensure to uncheck Limit maximum number of tasks under Repository configuration and click Next
h. Go to Advanced and Check Use per-VM backup files, as shown below:

i. Complete the Add Repository flow and click Finish.

j. Select No for the Change the configuration backup location to the newly created directory.

3. Edit Max Concurrent Connection under Backup Proxies Configuration; this should be total physical cores available -2. In this example, the total physical cores are 36, hence the max concurrent connection is 34.

4. Add the MaxSnapshotsPerDatastore parameter in Registry.
![]() The default Number of Snapshots per datastore is 4. You should be cautious with altering Max Number of Snapshots per data store parameter since this causes IO degradation of applications running on HyperFlex cluster. For instance, if the HX Cluster is not running IO intensive transactions or HX Cluster is not hosting IO latency sensitive applications during Veeam backup jobs, then the Max Snapshots per Data store can be increased.
The default Number of Snapshots per datastore is 4. You should be cautious with altering Max Number of Snapshots per data store parameter since this causes IO degradation of applications running on HyperFlex cluster. For instance, if the HX Cluster is not running IO intensive transactions or HX Cluster is not hosting IO latency sensitive applications during Veeam backup jobs, then the Max Snapshots per Data store can be increased.
5. Using the registry key Editor, go to HKEY_LOCAL_MACHINE\SOFTWARE\Veeam\Veeam Backup and Replication\; add a RegDWord with the name MaxSnapshotsPerDatastore value greater than 4.

6. Restart the Windows 2019 Server for Registry Settings to be applied.
Configure HyperFlex Veeam Storage Integration
To allow storage integration of Hyperflex with Veeam Backup Server, follow these steps:
1. Got to Storage Infrastructure and click Add Storage.

2. Click Cisco HyperFlex and proceed with configuration, specify the Name as the DNS name of HyperFlex Cluster Management or the Cluster Management IP Address.

3. Configure Credentials with Cisco HX Connect username and password and click OK.

4. Click Next and proceed with connect of Veeam with Cisco HyperFlex Cluster Management.

5. Keep the Backup Proxies as default to Automatic Selection.
6. Validate connection details and click Finish.

7. Veeam validates configuration of HyperFlex storage integration, whitelisting Veeam Proxy IP on HyperFlex. This enables backup through HyperFlex Snapshots through the whitelisted Veeam Proxy.

8. As displayed in the figure above, Veeam displays the warning “Cannot find any NFS ESXi IP suitable for Backup from HyperFlex Snapshots.” This limits Veeam Backup of HyperFlex snapshot over HyperFlex Management Interface.
9. To allow NFS Access of HyperFlex Snapshots over Hyperflex Storage network, you need to edit ESXi security profile and add Veeam Proxy IP on Hyperflex Storage VLAN for NFS Access. In this deployment, Veeam Proxy, Veeam Repository and Veeam Management server are deployed on the same Cisco UCS S3260 chassis node.
10. Identify the Veeam Proxy IP on Cisco UCS S3260 server which has access to the HyperFlex Storage controller data network. This network is under vNIC_veeam_strge as created in the UCSM Service Profile for S3260 storage server.

11. Ensure the HyperFlex storage controller data network is accessible through the S3260 Server. In the present deployment,192.168.115.200 is the storage controller data network for HyperFlex cluster.

12. Allow the IP (192.168.115.40) of the S3260 storage server under hyperflex storage controller data network, NFS Access under Security Profile of each of the HyperFlex ESXi nodes.
13. Go to Edit security profile of each of HyperFlex ESXi nodes and allow NFS Access to the HyperFlex storage controller data network IP of S3260 server (192.168.115.40).

14. Repeat steps 1-13 for each of the HyperFlex ESXi nodes, existing under HyperFlex cluster.
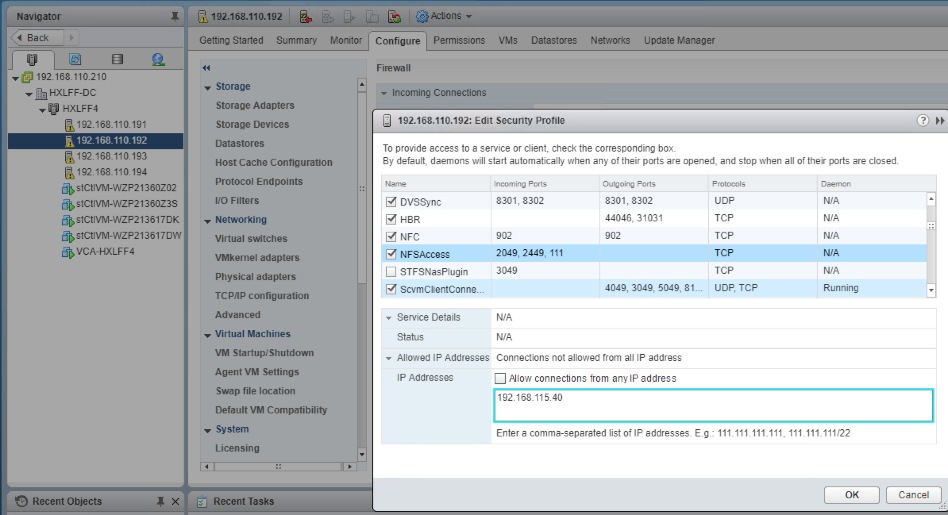
15. ReScan Storage under Veeam Storage Infrastructure.
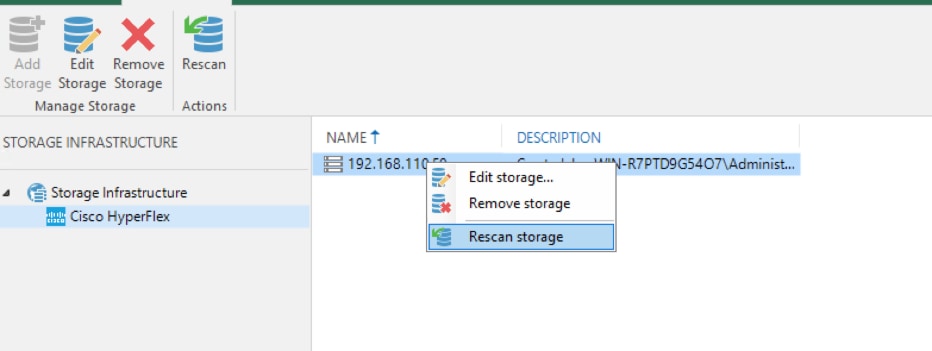
16. Once Veeam validates of NFS Access completes we would see no errors or warnings for Storage discovery.

![]() Veeam Direct NFS mode utilizing HyperFlex storage network may cause high latency for application VMs running on HyperFlex Cluster. You should restrict the number of parallel backups when application VMs are running CPU, memory or disk intensive workloads as well as backups concurrently on same HyperFlex cluster.
Veeam Direct NFS mode utilizing HyperFlex storage network may cause high latency for application VMs running on HyperFlex Cluster. You should restrict the number of parallel backups when application VMs are running CPU, memory or disk intensive workloads as well as backups concurrently on same HyperFlex cluster.
Cisco HyperFlex Edge Site Protection through Remote Backup & Replication
Veeam allows protection of Cisco HyperFlex Edge Site by backup and replication of Application VM to the Primary Site Veeam Backup Server. The high-level workflow is detailed below:

Some of the important aspects of this design are as follows:
· Veeam Backup & Replication Server on the primary site, is installed on a physical Cisco UCS S3260 storage Server. The server node hosts the Veeam Console, Veeam Primary Repository and Veeam Proxy Server.
· The Veeam Backup Server on Cisco UCS S3260 managed the Veeam Proxy installed on Windows 2019 VM provisioned on HyperFlex Edge Cluster.
· Backups jobs of application VMs hosted on HX Edge Cluster exist remotely on Cisco UCS S3260 Storage Server provisioned on Primary Data Center.
· The design may have higher RPOs as compared to local backups on HX Edge Cluster. RPOs are dependent on the network latencies existing between HX Edge Site and HX Primary Site.
· Applications VMs on HX Edge can be restored either through backup restores or replicas created through Veeam Replication jobs.
· In the event of entire HyperFlex Edge Site failure, the restoration of applications VMs can either be done though VM replicas hosted on Primary HyperFlex Cluster or through backups existing on the repository of primary site Cisco UCS S3260 Storage Server.
· The design requires minimal storage requirement on HyperFlex Edge for virtualized Veeam Proxy existing on HX Edge Site.
· This design requires that all the HX Edge Sites and the primary HyperFlex Cluster be managed through a single vCenter.
In this design, the Veeam Proxy Server is installed as a Windows 2019 Server virtual machine, provisioned on the Cisco Edge Cluster. The configuration of Veeam Proxy virtual machine is listed in Table 13.
Table 13 Veeam Proxy Virtual Machine Configuration
| Setting |
Value |
| Virtual Machine Name |
<Veeam-proxy> |
| Virtual Machine Location |
Either of the HyperFlex Edge nodes |
| Compatibility |
ESXi 6.5 and later |
| Operating System |
Microsoft Windows Server 2019 (64bit) |
| vCPUs |
4 |
| Memory |
12 GB |
| Hard Disk Size |
400 GB |
| Provisioning Type |
Thin |
| Access Network Type |
VMXNET3 – configured on HX controller Management Network |
| Storage Backup Network 2 Type |
VMXNET3 – configured on HX controller storage network |
![]() To allow the remote backup of HX Edge application VMs through Veeam, it is mandatory to add all HyperFlex Primary Site Cluster and HyperFlex Edge Clusters to the same vCenter.
To allow the remote backup of HX Edge application VMs through Veeam, it is mandatory to add all HyperFlex Primary Site Cluster and HyperFlex Edge Clusters to the same vCenter.
Configure Veeam Proxy for Backup and Replication of Application VM on HyperFlex Edge Cluster
To Add Remote Proxy to Veeam Server, follow these steps:
1. Identify the HX Edge Cluster managed through Cisco Intersight.

2. Login to vCenter managing the primary HyperFlex Cluster and HX Edge Cluster.

3. Add a Windows 2019 Server VM on HX Edge Cluster with configuration as listed in Table 13.
4. Verify the VM details as shown below:

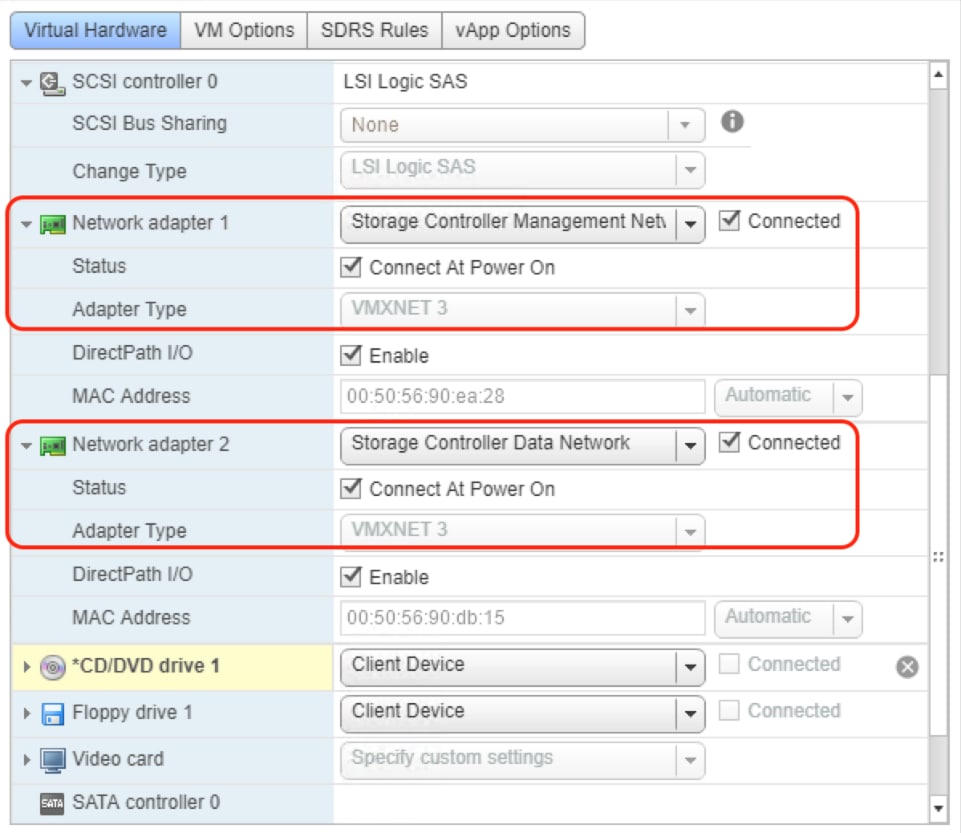
5. Install Windows 2019 Server on the Veeam Proxy VM configured on HX Edge Cluster.
6. Install VMware Tools and configure network.
7. Configure IP details on Storage Controller Management Network for HX Edge.
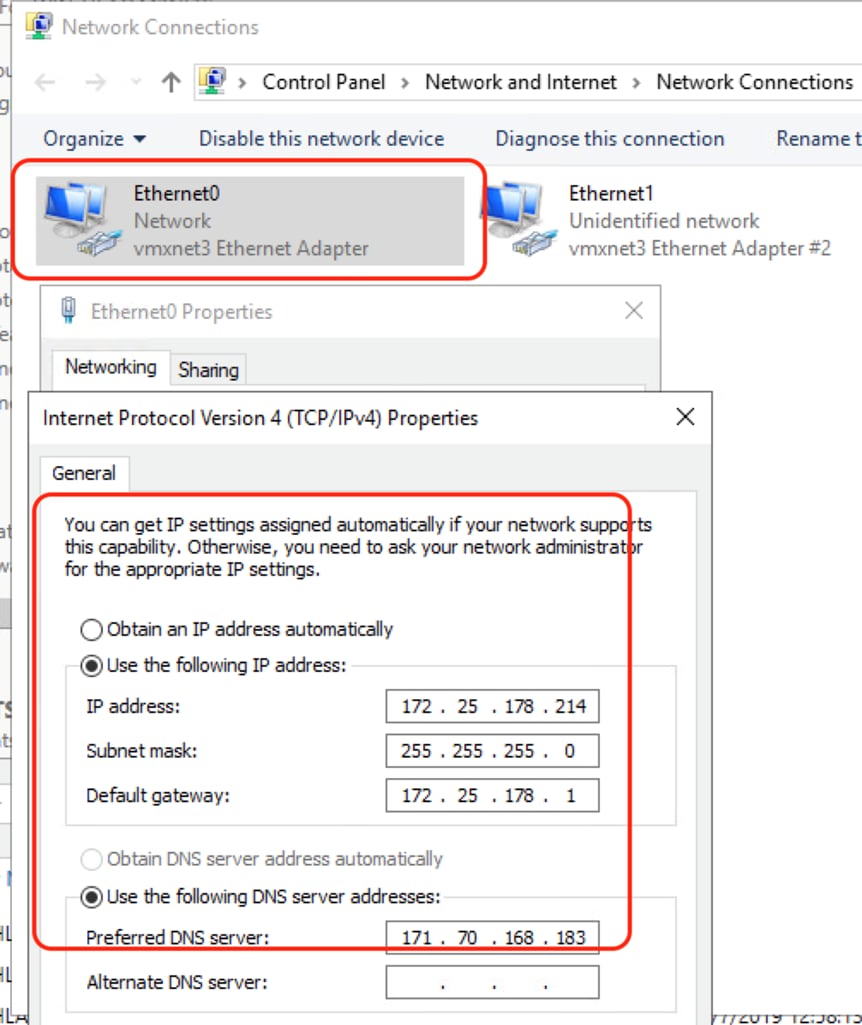
8. Configure the HX Storage Controller Data Network on the Veeam Proxy Server. Since the HX Edge Cluster configures the storage network on a private network, the IP details can be retrieved through the HX Storage Data network and the Virtual Switch configuration for any of the HX Edge node.

9. Assign an available IP for the HX storage data network access in the Veeam Proxy Windows VM. This network is required to allow Direct NFS backup of application VMs residing on the HX Edge Cluster.

10. Go to Veeam Console configured on S3260 Storage Server installed for Primary Site HX Cluster backup.
11. Add VMware Backup Proxy with IP or DNS details of Veeam Proxy Windows VM configured in step 9.

12. Click Next and Add Veeam Proxy Windows VM Access details.

13. Click Apply for Veeam Transport Package Installation on Windows VM.
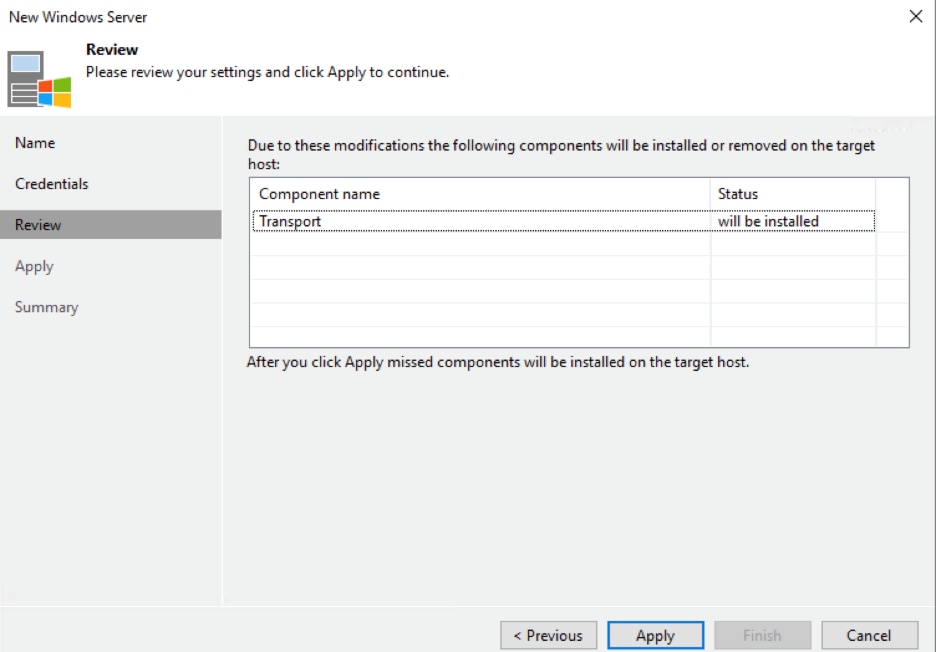
14. Ensure the Veeam Transport Package installed successfully.

15. Click Finish. In the next screen ensure the max concurrent task is 4.

![]() The Max concurrent task for Veeam Proxy should be limited to 4. This ensures low performance impact on HyperFlex Edge Cluster during Remote Backup of application VMs.
The Max concurrent task for Veeam Proxy should be limited to 4. This ensures low performance impact on HyperFlex Edge Cluster during Remote Backup of application VMs.
16. Verify that Veeam Proxy on HX Edge Cluster is installed successfully.
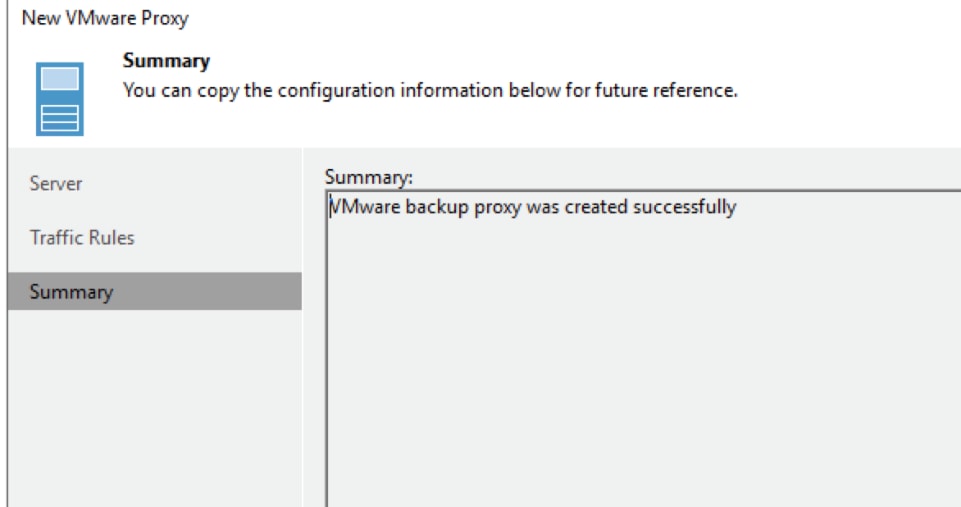
Configure Veeam Backup Repository to Replicate the Application VM on Veeam Console
You will need to configure the Veeam Repository residing on the Veeam Proxy VM installed on the HX Edge Cluster. This is required to store replica meta data during replication jobs. In the event of a disaster, if the entire HX Edge cluster goes offline, the replicas can still be failed back to the new HX Edge Cluster.
To configure the Veeam Backup Repository to replicate the application VM on the Veeam Console, follow these steps:
1. Open the Veeam Console installed on the Cisco UCSS3260 server, right-click Repository and select Add Repository. Select Direct Attached Storage.
2. Name the Repository as HXEdge Replication Repository.

3. Select the Proxy Server Windows VM configured in the previous section and click Populate.

4. Click Next and select the defaults. Since 4 vCPUs for HXEdge Proxy are configured, the Max Concurrent task cannot be more than 4.

5. Review the configurations and click Apply.
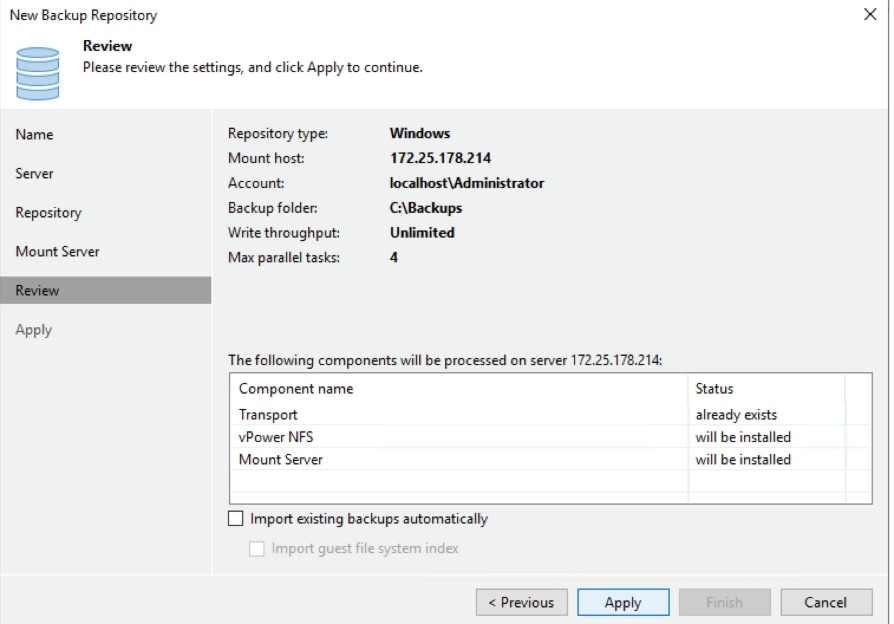
6. Ensure HX Edge Replication Repository is configured without any errors.

Configure HyperFlex Edge Cluster Storage Integration on Veeam Backup Console
Cisco HyperFlex Edge Cluster is configured on Veeam Console to allow Storage integration. This allows the following:
· Execution of the HyperFlex native snapshots by Veeam Backup and Replication Server
· Direct NFS mode backup through Veeam Proxy configured as a VM on HX Edge Cluster
To configure the HyperFlex Edge Cluster Storage integration, follow these steps:
![]() For detailed information for the HyperFlex Storage Integration with Veeam, refer to section Configure HyperFlex Veeam Storage Integration.
For detailed information for the HyperFlex Storage Integration with Veeam, refer to section Configure HyperFlex Veeam Storage Integration.
1. Ensure HX Controller network is accessible from Veeam Proxy. 169.254.1.11 is one of the network addresses of HX controller storage NIC.


2. Identify the IP of Proxy VM configured for HX Controller Data network. As detailed in the previous section, the IP configured is 169.254.1.212.
3. Go to the Security Profile on each of the ESXI node and allow NFS Access for the hx controller storage network IP.

4. Under the Storage Infrastructure tab of Veeam Console, right-click Cisco HyperFlex and click Add Storage.
5. Enter HX Edge Cluster Management IP or the DNS name of HX Edge Management Cluster.
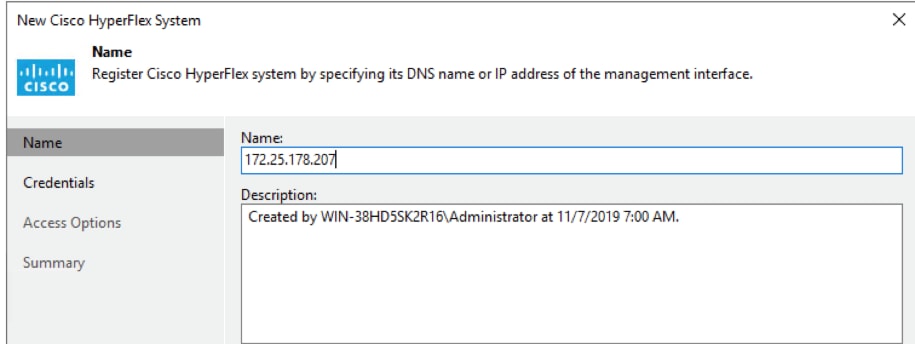
6. On the next screen, enter the Access details for HX Edge Cluster.

7. Select the appropriate Backup Proxy or the IP connection details for the Veeam Backup Proxy VM configured on the HX Edge Cluster.

8. Click Finish and ensure that no warnings are displayed on the Storage discovery Scan Window. Since you have already configured network access of HX Edge storage network on Veeam Proxy VM, you will not see any warnings for Direct NFS Access.

Cisco HyperFlex Edge Site Protection through Local Veeam Backups
Veeam allows protection of the Cisco HyperFlex Edge Site by backing up the Application VM on the HX Edge cluster and executing the Veeam backup copy jobs to the Veeam Backup Server on the primary site.
The Veeam Backup Server on the primary is installed on the Cisco UCS Backup Server. The high-level workflow is detailed in Figure 33.

Some of the important aspects of this design are as follows:
· Veeam Backup & Replication Server on the primary site is installed on a physical Cisco UCS S3260 Storage Server. The server node hosts the Veeam Console, Veeam Primary Repository and Veeam Proxy Server.
· Local Backups are executed on the HX Edge Server, installed on a Windows 2019 Server virtual machine provisioned on HX Edge Cluster. This VM is provisioned with Veeam Proxy and Veeam Repository.
· Veeam Backup Copy jobs are scheduled at regular intervals which helps to retain Veeam Backups for longer retention periods. The virtualized Repository on HX Edge has a shorter retention period. It provides faster restore times as the incremental backups exists locally on HyperFlex Edge Cluster.
· Replication Jobs through Veeam can be created across the Primary HyperFlex and Edge Clusters.
· In the event of an entire HyperFlex Edge Site failure, the restoration of applications VMs can be done though VM replicas hosted on Primary HyperFlex Cluster or through backup copies existing on the repository of Primary Site Cisco UCS S3260 Storage Server.
· The design requires 50 percent of the HyperFlex Edge capacity allocated to virtualized Veeam Repository existing on HX Edge Site.
The Veeam Backup Server on the primary is installed on Cisco UCS S3260 Storage Server.
The Veeam Proxy and Repository Server is installed as a Windows 2019 Server virtual machine, provisioned on Cisco Edge Cluster. The configuration of Veeam Proxy virtual machine is listed in Table 14.
Table 14 Veeam Proxy and Repository Virtual Machine Configuration
| Setting |
Value |
| Virtual Machine Name |
<VeeamBR1> |
| Virtual Machine Location |
Either of the HyperFlex Edge nodes |
| Compatibility |
ESXi 6.5 and later |
| Operating System |
Microsoft Windows Server 2019 (64bit) |
| vCPUs |
4 |
| Memory |
12 GB |
| Hard Disk Size 1 |
400 GB |
| Hard Disk Size 2 |
1 TB to 50% of Actual HX Edge storage. <whichever is higher> |
| Provisioning Type |
Thin |
| Access Network Type |
VMXNET3 – configured on HX controller Management Network |
| Storage Backup Network 2 Type |
VMXNET3 – configured on HX controller storage network |
Configure Veeam Backup & Replication Server for Local Backup of Application VM on HyperFlex Edge Cluster
To Add Veeam Backup Server to Veeam Server, follow these steps:
1. Identify the HX Edge Cluster managed through Cisco Intersight.

2. Identify the size of the HX Edge storage cluster. Storage size of present cluster is 4.8 TB marked in RED box. As per the Veeam Repository recommendation, we would configure the Veeam Repository on HX Edge as 2.4TB.

3. Login to vCenter managing the primary HyperFlex Cluster and HX Edge Cluster.

4. Add a Windows 2019 Server VM on HX Edge Cluster with configuration as listed in Table 13.
5. Verify the VM details as shown below:
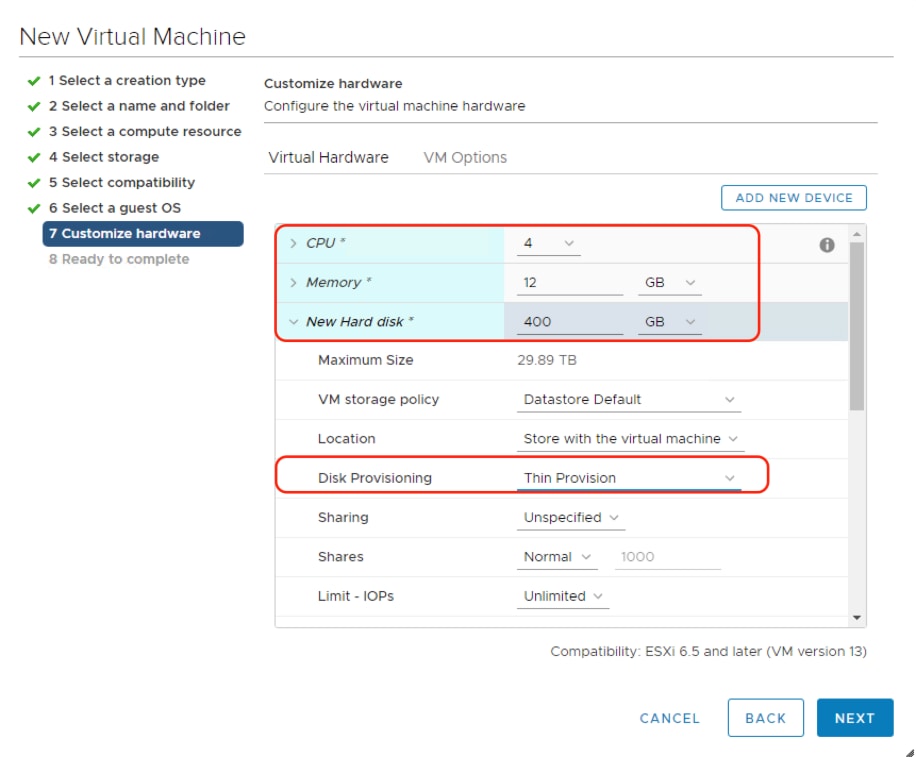
6. Add the New SCSI controller and attached to new thin provisioned hard disk of 2.4TB (50% size of provisioned storage on HX Edge Cluster).

7. Add two Network of type VMXNET3, each mapped to Storage Controller Management Network and Storage Controller Data Network.

8. The summary of Veeam Backup VM is shown below:


9. Install Windows 2019 Server on the Veeam Backup VM configured on HX Edge Cluster.
10. Install VMware Tools and configure network.
11. Configure IP details on the Storage Controller Management Network for HX Edge.

12. Configure HX Storage Controller Data Network on Veeam Proxy Server. As HX Edge Cluster configures storage network on private network, the IP details can be retrieved through HX Storage Data network, Virtual Switch configuration for any of the HX Edge node.

13. Assign any available IP for HX storage data network access in Veeam Proxy Windows VM. This network is required to allow Direct NFS backup of application VMs residing on HX Edge Cluster.

14. Format the 2.4TB drive as ReFS with 64KB block size.

15. Go to the Veeam Console configured on the Cisco UCS S3260 Storage Server installed for Primary Site HX Cluster backup.
16. Add VMware Backup Proxy and VMware Backup Repository with IP or DNS details of Veeam Proxy Windows VM configured in step 9.

17. Click Next and Add Veeam Proxy Windows VM Access details.

18. Click Apply for Veeam Transport Package Installation on Windows VM.

19. Ensure Veeam Transport Package installed successfully.

20. Click Finish. In the next screen ensure the max concurrent task is 4.

![]() The Max concurrent task for Veeam Proxy should be limited to 4. This ensures low performance impact on HyperFlex Edge Cluster during Backup of application VMs.
The Max concurrent task for Veeam Proxy should be limited to 4. This ensures low performance impact on HyperFlex Edge Cluster during Backup of application VMs.
21. Verify that Veeam Proxy on HX Edge Cluster is installed successfully.

Configure Veeam Backup Local Repository
This repository allows shorter retention periods on local HX Cluster, helping to achieve lower RPOs as compared to Remote Backups which may be slow depending on network latencies.
![]() The local Repository is also used to store meta data of replicated VMs from HX Edge Cluster to Primary HX Cluster.
The local Repository is also used to store meta data of replicated VMs from HX Edge Cluster to Primary HX Cluster.
In the previous section on configuring Veeam Backup Server Windows VM, you created a volume of 2.4 TB. The volume will be utilized for local backups on HC Edge. It is recommended to provision 50 percent of the size of HyperFlex Edge Cluster as Veeam local repository.
To configure the local repository provisioned on Veeam Backup VM on HX Edge Cluster, follow these steps:
1. Open Veeam Console installed on S3260 server, right click on Repository and select Add Repository. Select Direct Attached Storage.
2. Name the Repository as HXEdge Local Repository.

3. Select the Proxy Server Windows VM configured in the previous section and click Populate. Select the drive formatted with ReFS File System. This is the larger sized repository for local backups of application VM provisioned on HyperFlex Edge Cluster.
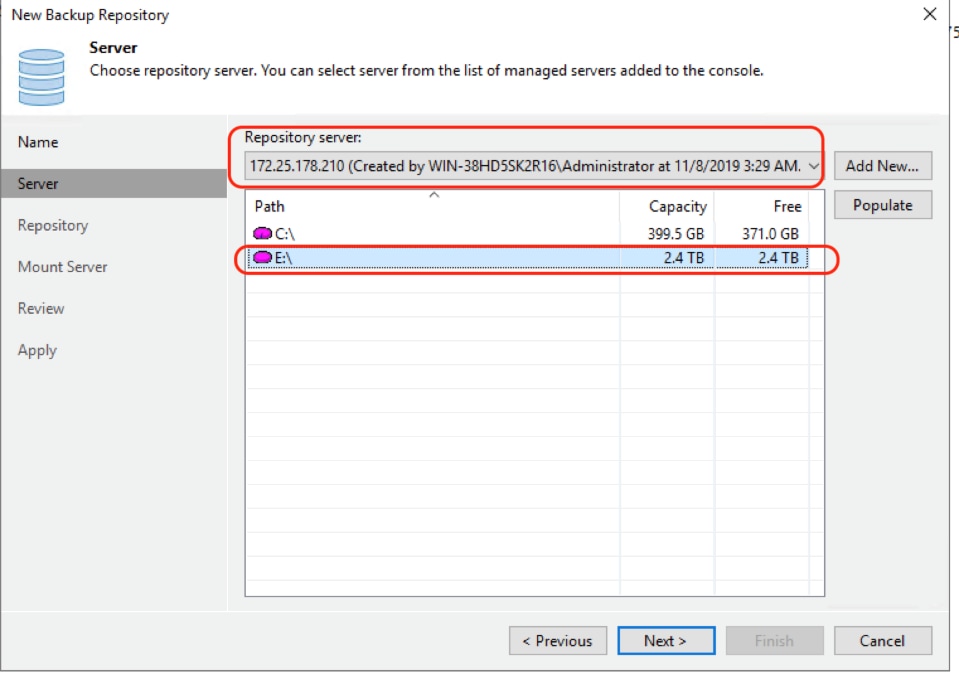
4. Click Next and uncheck Max Concurrent task option. The limit of maximum parallel backup jobs would be managed by the parallel concurrent task executed by proxy. For the HX Edge Cluster, restrict it to 4 parallel tasks.
 .
.
5. Click Advanced and select Align backup file data blocks and Use per-VM backup files options.

6. Review the configurations and click Apply.
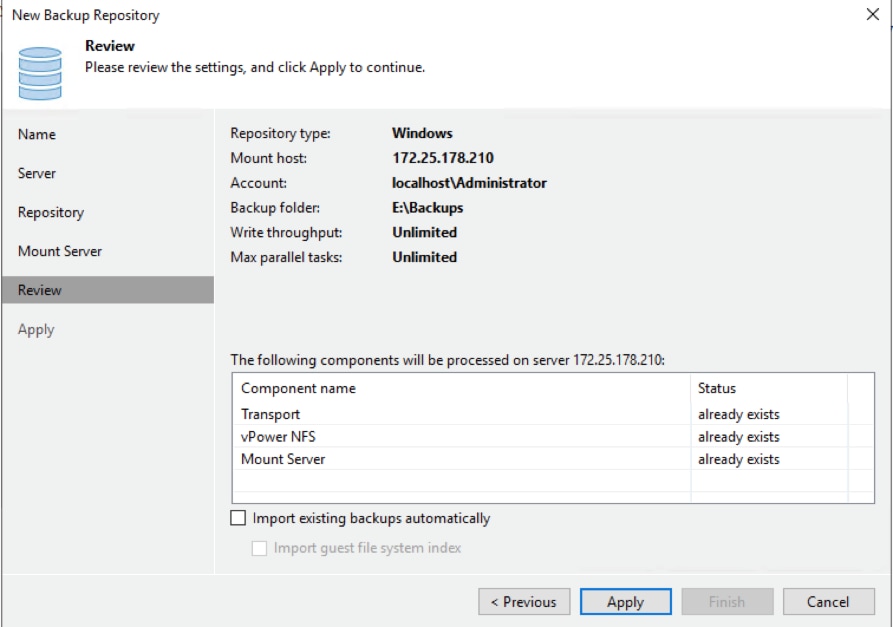
7. Ensure the HX Edge Local Repository is configured without any errors.

8. Configure HyperFlex Storage Integration for HX Edge Cluster. For detailed instructions, refer to section Configure HyperFlex Edge Cluster Storage Integration on Veeam Backup Console.
9. Ensure HX Edge Storage discovery succeeds from Veeam Storage Infrastructure tab.

This section describes the test executed to validate the Veeam Backup and Recovery Solution on the Cisco HyperFlex platform. This solution and its scenarios are validated with high-level backup, Replication, Failover and Failback task between Hyperflex Cluster and Cisco UCS S3260 Storage Server.
Some of the tests are as follows:
· Backup VM on HX Cluster with HyperFlex and Veeam Storage Integration
· Remote Office / Branch Office VM Replication
· Backup Copy jobs across Data Centers
· Restoration of VM from Backup Copy job to HyperFlex Cluster on DR Site
Backup VM on HX Cluster with HyperFlex and Veeam Storage Integration
To backup the virtual machine on the HX cluster, follow these steps:
1. Verify HX Cluster is configured through Veeam Storage Integration.
The validation (shown below) displays a successful backup of several VM on HX cluster to Cisco UCS S3260 target repository utilizing HyperFlex and Veeam Storage Integration.

2. Identify the VMs on HyperFlex Cluster for Backup through Veeam.


3. Go to Veeam Backup and Replication Console and Create Backup job.
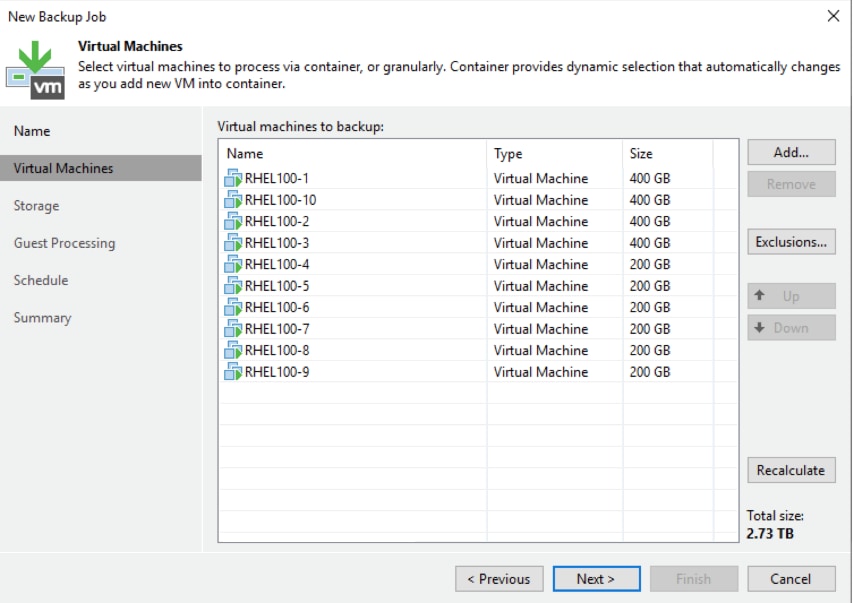
4. Ensure Enable Backup from Storage Snapshot is checked.

5. During Backup, Veeam executes HyperFlex Snapshot. If Direct NFS, transport mode is enabled, you will see the backup mode as nfs.

6. Validate Successful completion of Backup job.

7. For scheduling Veeam backup Jobs, refer to section Veeam User Guide for VMware vSphere.
Remote Backup of VMs Provisioned on HyperFlex Edge Cluster
As detailed in the previous section, HX Edge Cluster should be configured on the same vCenter as the Primary HyperFlex Cluster.
To configure the remote backup of VMs provisioned on the HyperFlex Edge Cluster, follow these steps:
![]() To allow remote backup of HX Edge application VMs through Veeam, it is mandatory to add all HyperFlex Primary Site Cluster and HyperFlex Edge Clusters to the same vCenter.
To allow remote backup of HX Edge application VMs through Veeam, it is mandatory to add all HyperFlex Primary Site Cluster and HyperFlex Edge Clusters to the same vCenter.
1. Identify the VMs for Backup on Remote HX Edge Site. The Backup resides on Cisco UCS S3260 Storage Server.
The validation shown below displays a successful backup of several VM on HX Edge cluster attached to the same vCenter as the Primary HyperFlex Cluster.

2. Create a Backup Job on Veeam Console for VMs on HX Edge Cluster.

3. Choose the Backup Proxy configured as a VM on HX Edge Site.

4. Select the repository configured on Cisco UCS S3260 Storage Server residing on Primary Data Center.

5. The Summary details the successfully created Remote Backup Job. Click Finish.

6. Execute the Backup Job.

7. Validate the HX Snapshots are executed and HX Edge Proxy utilizes Veeam Direct NFS transport mode.
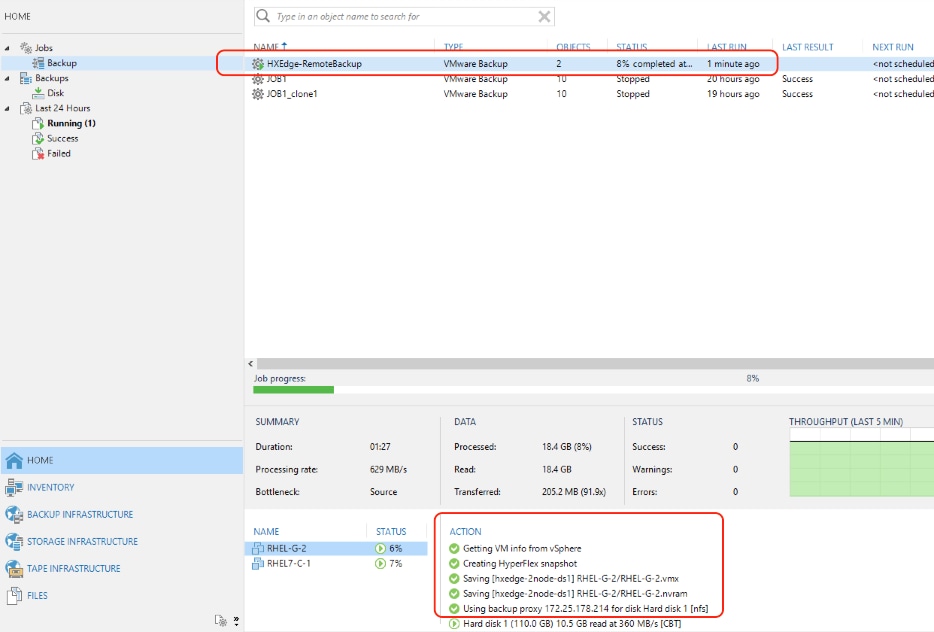

8. Validate that the Remote Backup Job for Application VM on HX Edge Site are is completed successfully.

9. For scheduling Veeam backup Jobs, refer to section Veeam User Guide for VMware vSphere.
Replication of VMs provisioned on HyperFlex Edge Cluster
As detailed in the previous section, the HX Edge Cluster should be configured on the same vCenter as the Primary HyperFlex Cluster.
To replicate the virtual machines provisioned on the HyperFlex Edge Cluster, follow these steps:
![]() To allow the replication of HX Edge application VMs through Veeam Remote Proxy it is mandatory to add all HyperFlex Primary Site Cluster and HyperFlex Edge Clusters to the same vCenter.
To allow the replication of HX Edge application VMs through Veeam Remote Proxy it is mandatory to add all HyperFlex Primary Site Cluster and HyperFlex Edge Clusters to the same vCenter.
1. Identify the VMs for Replication on Remote HX Edge Site to Primary HyperFlex Cluster.
2. Open Veeam Console on S3260 server, select Home form top navigation pane, click Replication Job and select Virtual Machine.
3. Name the Replication Job as desired and click Next.
The validation below displays a successful replication of VMs on HX Edge cluster attached to the same vCenter as the Primary HyperFlex Cluster.

4. Select the vCenter configured with Primary HX Cluster and HX Edge Cluster and select the VM to be replicated.

5. Select Add and click Next to specify the destination of VM replication.
6. Select the primary HX Cluster as destination.

7. From Job Settings, select the HXEdge Repository created to host replica meta data. Add the replica suffix as desired.

8. On the Data Transfer screen, select the source and destination proxy.

9. Select the Proxy VM created on HXEdge, as the Source Proxy.
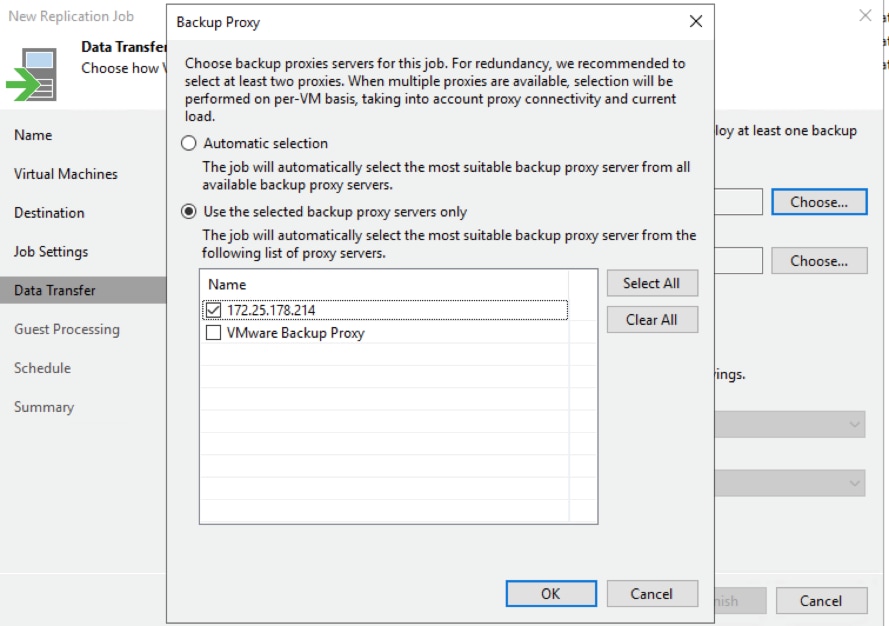
![]() The HX Edge Proxy VM is configured both as a Remote proxy and a Repository to store replica meta data
The HX Edge Proxy VM is configured both as a Remote proxy and a Repository to store replica meta data
10. Verify the Summary and click Finish.
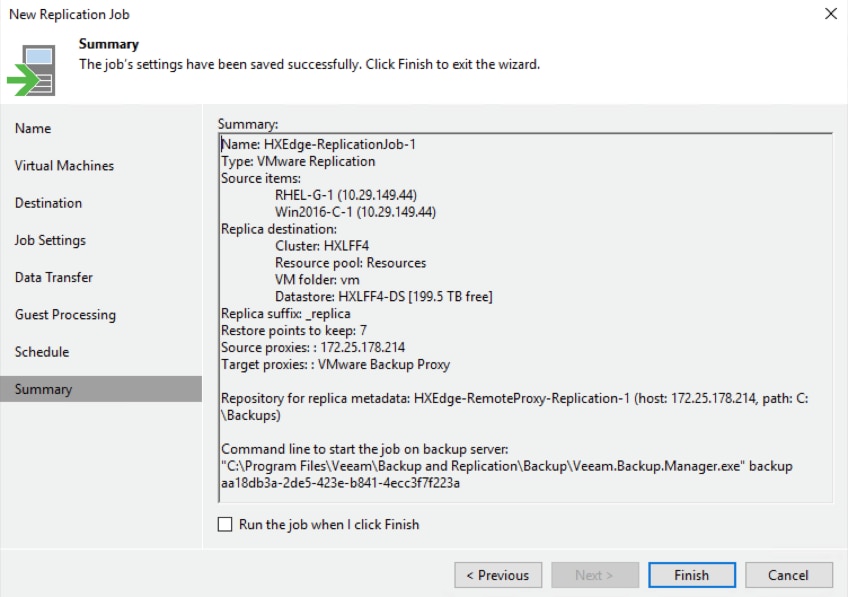
![]() Replication Jobs can be scheduled periodically, as detailed in section Veeam Replica Schedule.
Replication Jobs can be scheduled periodically, as detailed in section Veeam Replica Schedule.
11. Start the replication Job.

12. Monitor the progress until completion.

13. Once the job completes, you can execute a Failover and verify that the VM on HX Edge site has failed over to the Primary HX Cluster. Verify that the VM Replica exists in powered off stat exists on the primary HX Cluster. The replica would have a suffix as _replica.

Failover of VM on HX Edge to Primary HX Cluster
To create the Failover process of HX Edge application VM to the primary HX Cluster, follow these steps:
1. On the Veeam Console, click Home > Restore > VMware vSphere.

2. Click Restore from Replica.

3. Select the Entire Replica option.

4. Select Failover to a replica.

5. Select Add VM and select Add VM from Replica.
6. Select the Replication Job created in the previous section and select any of the VM Replica planned for Failover.

7. Select the restore point to which failover is planned.

8. Click Next and the click Finish to execute the Failover job.

9. Click Next and then click Finish to execute the Failover job.
10. Verify that the VM is powered on and failed over to the primary HX Cluster.
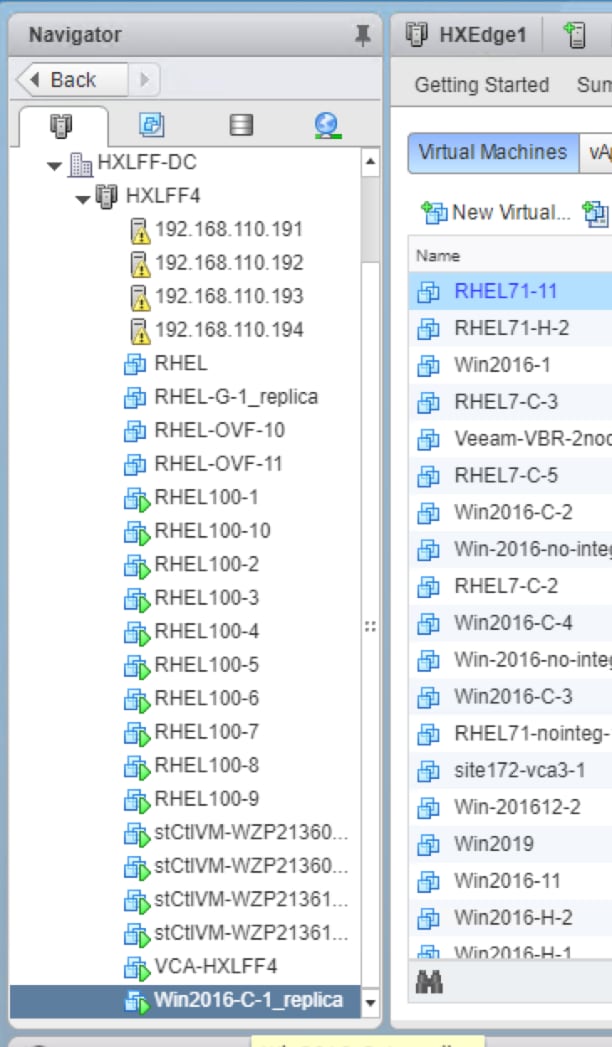
11. Click Next and then click Finish to execute the Failover job.
12. Verify that the VM is powered on and failed over to the primary HX Cluster.
13. For more information about the Veeam Failover process, refer to the Veeam User Guide for VMware vSphere.
Failback VM to HX Edge cluster
This section details the Failover process of HX Edge application VM to the primary HX Cluster. During Failback all the changes on the Replica VM would also be replicated to the Production or HX Edge Cluster.
To create the Failback virtual machine, follow these steps:
1. On the Veeam Console, under Home, select Replicas >Active Replicas.
2. Right-click the Active Replica and click Failback to Production.

3. Select the VM Replica to be failed back to HX Edge Cluster.
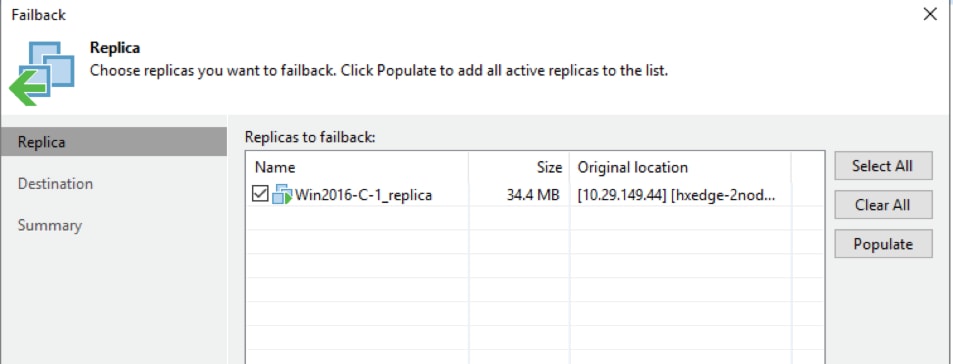
4. Select Fail Back to Original VM. There are several options available for failback, this includes failback in the event the destination site (HX Edge Site) is completely lost.
5. Select Quick rollback. This option allows to sync only the changed blocks.

6. Verify the Summary and check Power ON the target VM. Click Finish.

7. Monitor the Fail back progress.
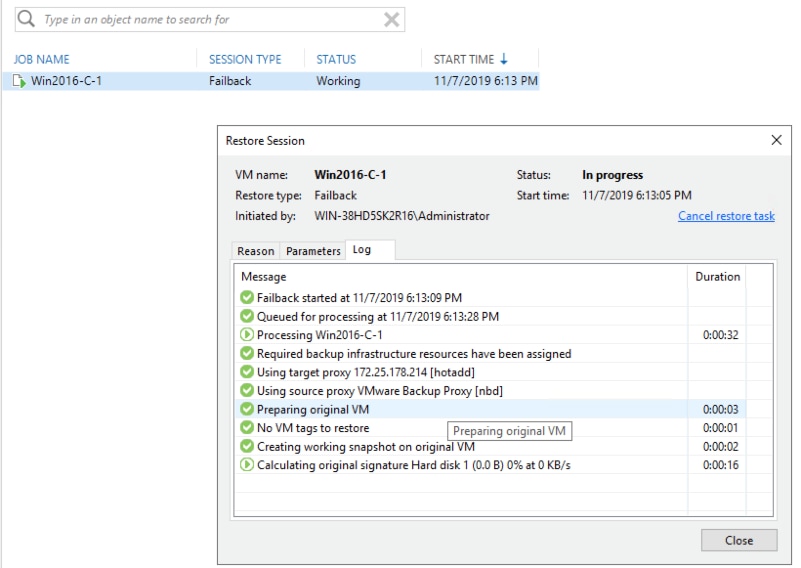
8. Verify Failback completes successfully.
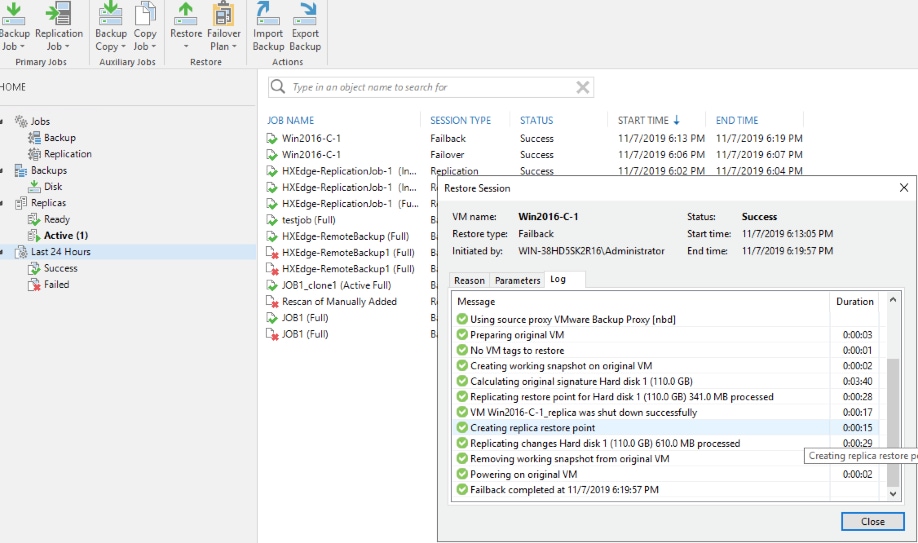
9. Once the failback VM is verified, customers need to commit the failback so that Veeam Backup & Replication gets back to the normal operation mode and resumes replication activities for the original VM to which you failed back.


10. For more information about the Veeam Failback process, refer to section Veeam User Guide for VMware vSphere.
Local Backup of VMs Provisioned on HyperFlex Edge Cluster
The HX Edge Cluster should be configured on the same vCenter as the Primary HyperFlex Cluster. To configure the local backup of virtual machines, follow these steps:
![]() To allow local backup of HX Edge application VMs managed through single Veeam Console, it is mandatory to add all HyperFlex Primary Site Cluster and HyperFlex Edge Clusters to the same vCenter
To allow local backup of HX Edge application VMs managed through single Veeam Console, it is mandatory to add all HyperFlex Primary Site Cluster and HyperFlex Edge Clusters to the same vCenter
1. Identify the VMs for Backup on Remote HX Edge Site. The Backup resides on Cisco UCS S3260 Storage Server.
The validation below, displays a successful local backup of several VM on HX Edge cluster attached to the same vCenter as the Primary HyperFlex Cluster.

2. Create a Backup Job on Veeam Console for VMs on HX Edge Cluster.

3. Select the VMs to be backed up to HXEdge Local Repository.

4. Select the local Proxy on HX Edge Cluster. The Veeam Repository and Proxy are configured on the same virtual machine provisioned on HX Edge Cluster.

5. Select local Repository on HXEdge Cluster.

6. Verify Job details and click Finish.

7. Run the Backup Job and verify that HXSnapshots are executed and transport mode is NFS.

8. Once the job completes, we would create a Backup Copy jobs across HXEdge local Repository and Primary Repository on Cisco UCS S3260 Storage Server.
Backup Copy Jobs Across HX Edge and Primary HX Site
The HX Edge Site has local backups executed on virtual machine provisioned on HXEdge Cluster. This VM hosts both the Veeam Proxy and Veeam local Repository
For more details on the various options and configurations for Backup Copy jobs, refer to section Veeam User Guide for VMware vSphere.
![]() The local proxy and repository on HyperFlex Edge Cluster are managed through the single Veeam Console installed on Cisco UCS S326 Storage Server. All the HyperFlex Clusters are registered to the same vCenter
The local proxy and repository on HyperFlex Edge Cluster are managed through the single Veeam Console installed on Cisco UCS S326 Storage Server. All the HyperFlex Clusters are registered to the same vCenter
To create the backup copy jobs, follow these steps:
1. Identify a successful Backup on HyperFlex Edge Site. This was created in the previous section.
2. Go to Veeam Console Home > Backup Copy Jobs and select Virtual Machine.
The validation below displays a successful Backup Copy jobs across HXEdge site and primary HX Site.

3. Name the Backup Copy job.

4. Add the Backup copy objects from Jobs.

5. Select the local Backup Job created in previous section.

6. Select the primary Repository for Backup Copy Jobs. This Repository exists on the Cisco UCS S3260 Storage Server on the primary data center.

7. Verify the Backup Copy jobs summary and click Finish.

8. Execute the Backup Copy Job. This provides a copy of the backup jobs existing on HXEdge Site to the Primary Data Center.
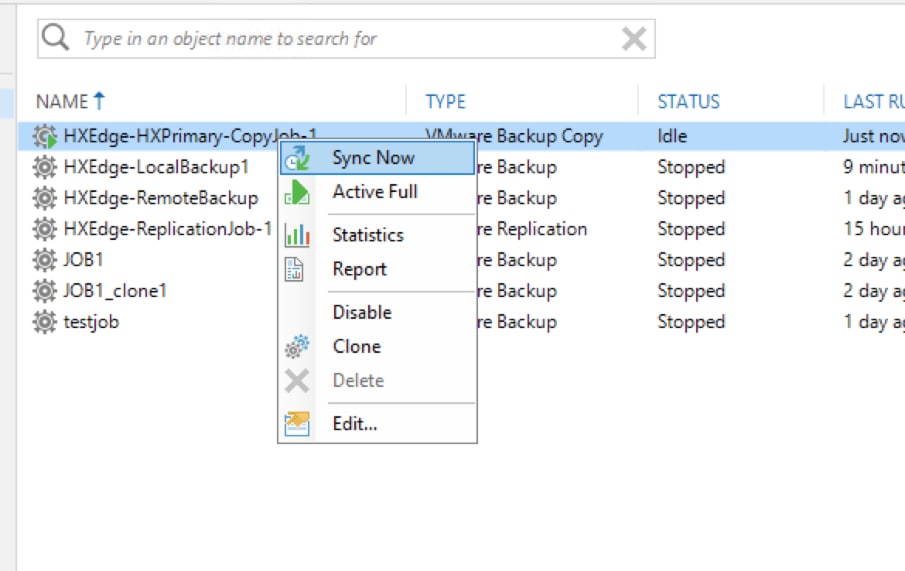
9. Once the jobs are completed, verify the details.


10. Once the backup copy job completes, customers can restore their application VMs from Backup Copy existing on Cisco UCS S3260 Storage Server.
The BOM below lists the major components validated but it is not intended to be a comprehensive list.
| Line Number |
Part Number |
Description |
Qty |
| 1.0 |
HX-FI-6454 |
UCS Fabric Interconnect 6454 |
2 |
| 1.0.1 |
CON-SNT-HXFI6454 |
SNTC-8X5XNBD UCS Fabric Interconnect 6454 |
2 |
| 1.1 |
N10-MGT016 |
UCS Manager v4.0 |
2 |
| 1.2 |
UCS-PSU-6332-AC |
UCS 6332/ 6454 Power Supply/100-240VAC |
4 |
| 1.3 |
CAB-N5K6A-NA |
Power Cord, 200/240V 6A North America |
4 |
| 1.4 |
UCS-ACC-6332 |
UCS 6332/ 6454 Chassis Accessory Kit |
2 |
| 1.5 |
UCS-FAN-6332 |
UCS 6332/ 6454 Fan Module |
8 |
| 2.0 |
UCSS-S3260 |
Cisco UCS S3260 Storage Server Base Chassis |
1 |
| 2.0.1 |
CON-SNT-UCSS3260 |
SNTC 8X5XNBD, Cisco UCS S3260 Storage Server Base Chassis |
1 |
| 2.1 |
UCSC-PSU1-1050W |
Cisco UCS 1050W AC Power Supply for Rack Server |
4 |
| 2.2 |
CAB-N5K6A-NA |
Power Cord, 200/240V 6A North America |
4 |
| 2.3 |
CIMC-LATEST |
IMC SW (Recommended) latest release for C-Series Servers. |
1 |
| 2.4 |
N20-BKVM |
KVM local IO cable for UCS servers console port |
1 |
| 2.5 |
UCSC-C3X60-BLKP |
Cisco UCS C3X60 Server Node blanking plate |
1 |
| 2.6 |
N20-BBLKD-7MM |
UCS 7MM SSD Blank Filler |
2 |
| 2.7 |
UCSC-C3X60-RAIL |
UCS C3X60 Rack Rails Kit |
1 |
| 2.8 |
UCSC-C3X60-SBLKP |
UCS C3x60 SIOC blanking plate |
1 |
| 2.9 |
UCSS-S3260-BBEZEL |
Cisco UCS S3260 Bezel |
1 |
| 2.10 |
UCS-S3260-M5SRB |
UCS S3260 M5 Server Node for Intel Scalable CPUs |
1 |
| 2.11 |
UCS-CPU-I5220 |
Intel 5220 2.2GHz/125W 18C/24.75MB DCP DDR4 2666 MHz |
2 |
| 2.12 |
UCS-MR-X32G2RS-H |
32GB DDR4-2666-MHz RDIMM/PC4-21300/dual rank/x4/1.2v |
8 |
| 2.13 |
UCS-S3260-DRAID |
UCS S3260 Dual Raid based on LSI 3316 |
1 |
| 2.14 |
UCS-S3260-M5HS |
UCS S3260 M5 Server Node HeatSink |
2 |
| 2.15 |
UCS-S3260-PCISIOC |
UCS S3260 PCIe SIOC |
1 |
| 2.16 |
UCSC-PCIE-C25Q-04 |
Cisco UCS VIC 1455 Quad Port 10/25G SFP28 CNA PCIE |
1 |
| 2.17 |
UCSC-LP-C25-1485 |
Low profile bracket for VIC |
1 |
| 2.18 |
UCS-S3260-56HD8 |
S3260 4row of 8TB (UE10NL-SAS 7200RPM SAS-3 (56Total: 448TB) |
1 |
| 2.19 |
UCS-S3260-HD8TB |
UCS S3260 8TB NL-SAS 7.2K UE10 HDD with HDD Carrier |
56 |
| 2.20 |
UCS-S3260-G3SD48 |
UCS S3260 480G Boot SSD (Micron 6G SATA) |
2 |
Deployment Guide for Cisco HyperFlex with Veeam Availability Suite for Multisite Deployment:
Cisco HyperFlex Edge Deployment Guide: https://www.cisco.com/c/en/us/td/docs/hyperconverged_systems/HyperFlex_HX_DataPlatformSoftware/Edge_Deployment_Guide/b_HyperFlex_Edge_Deployment_Guide_4_0/b_HyperFlex_Edge_Deployment_Guide_4_0_chapter_01000.html
Cisco HyperFlex Systems Installation and Upgrade Guides:
HyperFlex Hardware and Software Interoperability Matrix:
Veeam Availability Suite v9 Installation and Deployment Guide:
https://www.veeam.com/videos/veeam-availability-suite-v9-installment-deployment-7554.html
Anil Dhiman, Technical Marketing Engineer, Cisco Systems, Inc.
Anil Dhiman has over 18 years of experience specializing in Data Center solutions on Cisco UCS servers, and Performance Engineering of large-scale enterprise applications. Over the past 6 years, Anil has authored several Cisco Validated Designs for Enterprise Solutions on Cisco Data Center Technologies. Currently, Anil's focus is on Cisco’s portfolio of Hyperconverged Infrastructure and Backup Solutions.
Acknowledgements
For their support and contribution to the design, validation, and creation of this Cisco Validated Design, the author would like to thank:
· Shawn Lieu, Solutions Architect with the Global Alliances Team, Veeam Software

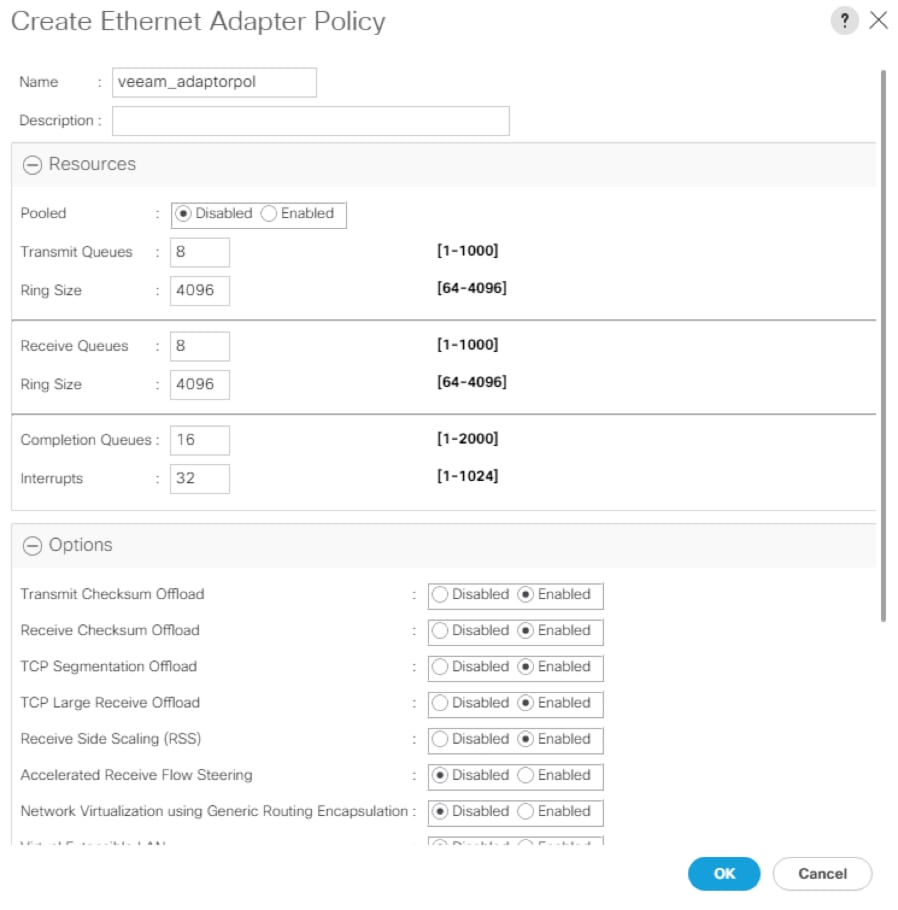
 Feedback