VersaStack for IBM Cloud Object Storage with Cisco UCS S3260 Storage Server
Available Languages
VersaStack for IBM Cloud Object Storage with Cisco UCS S3260 Storage Server
Deployment guide for IBM Cloud Object Storage with Cisco UCS S3260 Storage Server
Last Updated: September 7, 2017

About the Cisco Validated Design (CVD) Program
The CVD program consists of systems and solutions designed, tested, and documented to facilitate faster, more reliable, and more predictable customer deployments. For more information visit
http://www.cisco.com/go/designzone.
ALL DESIGNS, SPECIFICATIONS, STATEMENTS, INFORMATION, AND RECOMMENDATIONS (COLLECTIVELY, "DESIGNS") IN THIS MANUAL ARE PRESENTED "AS IS," WITH ALL FAULTS. CISCO AND ITS SUPPLIERS DISCLAIM ALL WARRANTIES, INCLUDING, WITHOUT LIMITATION, THE WARRANTY OF MERCHANTABILITY, FITNESS FOR A PARTICULAR PURPOSE AND NONINFRINGEMENT OR ARISING FROM A COURSE OF DEALING, USAGE, OR TRADE PRACTICE. IN NO EVENT SHALL CISCO OR ITS SUPPLIERS BE LIABLE FOR ANY INDIRECT, SPECIAL, CONSEQUENTIAL, OR INCIDENTAL DAMAGES, INCLUDING, WITHOUT LIMITATION, LOST PROFITS OR LOSS OR DAMAGE TO DATA ARISING OUT OF THE USE OR INABILITY TO USE THE DESIGNS, EVEN IF CISCO OR ITS SUPPLIERS HAVE BEEN ADVISED OF THE POSSIBILITY OF SUCH DAMAGES.
THE DESIGNS ARE SUBJECT TO CHANGE WITHOUT NOTICE. USERS ARE SOLELY RESPONSIBLE FOR THEIR APPLICATION OF THE DESIGNS. THE DESIGNS DO NOT CONSTITUTE THE TECHNICAL OR OTHER PROFESSIONAL ADVICE OF CISCO, ITS SUPPLIERS OR PARTNERS. USERS SHOULD CONSULT THEIR OWN TECHNICAL ADVISORS BEFORE IMPLEMENTING THE DESIGNS. RESULTS MAY VARY DEPENDING ON FACTORS NOT TESTED BY CISCO.
CCDE, CCENT, Cisco Eos, Cisco Lumin, Cisco Nexus, Cisco StadiumVision, Cisco TelePresence, Cisco WebEx, the Cisco logo, DCE, and Welcome to the Human Network are trademarks; Changing the Way We Work, Live, Play, and Learn and Cisco Store are service marks; and Access Registrar, Aironet, AsyncOS, Bringing the Meeting To You, Catalyst, CCDA, CCDP, CCIE, CCIP, CCNA, CCNP, CCSP, CCVP, Cisco, the Cisco Certified Internetwork Expert logo, Cisco IOS, Cisco Press, Cisco Systems, Cisco Systems Capital, the Cisco Systems logo, Cisco Unified Computing System (Cisco UCS), Cisco UCS B-Series Blade Servers, Cisco UCS C-Series Rack Servers, Cisco UCS S-Series Storage Servers, Cisco UCS Manager, Cisco UCS Management Software, Cisco Unified Fabric, Cisco Application Centric Infrastructure, Cisco Nexus 9000 Series, Cisco Nexus 7000 Series. Cisco Prime Data Center Network Manager, Cisco NX-OS Software, Cisco MDS Series, Cisco Unity, Collaboration Without Limitation, EtherFast, EtherSwitch, Event Center, Fast Step, Follow Me Browsing, FormShare, GigaDrive, HomeLink, Internet Quotient, IOS, iPhone, iQuick Study, LightStream, Linksys, MediaTone, MeetingPlace, MeetingPlace Chime Sound, MGX, Networkers, Networking Academy, Network Registrar, PCNow, PIX, PowerPanels, ProConnect, ScriptShare, SenderBase, SMARTnet, Spectrum Expert, StackWise, The Fastest Way to Increase Your Internet Quotient, TransPath, WebEx, and the WebEx logo are registered trademarks of Cisco Systems, Inc. and/or its affiliates in the United States and certain other countries.
All other trademarks mentioned in this document or website are the property of their respective owners. The use of the word partner does not imply a partnership relationship between Cisco and any other company. (0809R)
© 2017 Cisco Systems, Inc. All rights reserved.
Table of Contents
Cisco Unified Computing System
Cisco UCS S3260 Storage Server
Cisco UCS Virtual Interface Card 1387
Cisco UCS Fabric Interconnects
Cisco UCS 6300 Series Fabric Interconnect
IBM Cloud Object Storage Architecture
Solution Architecture Overview
Software Distributions and Versions
Deployment Hardware and Software
Initial Setup of Cisco UCS 6332 Fabric Interconnects
Configure Fabric Interconnect A
Example Setup for Fabric Interconnect A
Configure Fabric Interconnect B
Example Setup for Fabric Interconnect B
Logging Into Cisco UCS Manager
Enable Fabric Interconnect Server Ports
Enable Fabric Interconnect A Ports for Uplinks
Label Each Chassis for Identification
Label Each Server for Identification
Create a Block of MAC Addresses for the Default MAC Pool
Create a block of UUID Suffixes for the Default UUID Pool
LAN Connectivity Policy Creation
Host Firmware Package Creation
Chassis Firmware Package Creation
Chassis Maintenance Policy Package Creation
Compute Connection Policy Creation
Chassis Profile Template Creation
Chassis Profile Creation from Template
Configure Cisco UCS C220 M4 Rack-Mount Server Disks to Unconfigured Good
Disk Group Policy Creation for Cisco UCS S3260 Storage Server
Disk Group Policy Creation for Cisco UCS C220 M4
Storage Profile Creation for Cisco UCS S3260 Storage Server
Storage Profile Creation for Cisco UCS C220 M4
Service Profile Template Creation
Service Profile Template Creation for Cisco UCS S3260 Storage Server
Service Profile Template Creation for Cisco UCS C220 M4S
Service Profile Creation from Template
Port Channel Creation for Uplinks
Port Channel Creation for Fabric Interconnects
Configure Cisco Nexus 9332PQ Switch A and B
Initial Setup of Cisco Nexus 9332PQ Switch A and B
Enable Features on Cisco Nexus 9332PQ Switch A and B
Verify Cisco Nexus C9332PQ Configuration for Switch A and B
Installation of IBM Cloud Object Storage ClevOS
(Optional) Preparation to Use NFS Mount for Installation
(Optional) Preparation to Use Local File Mount for Installation
IBM COS Manager Installation and Configuration on Cisco UCS C220 M4S
IBM COS Accesser Installation and Configuration on Cisco UCS C220 M4S
IBM COS Slicestor Installation and Configuration on Cisco UCS S3260 M4 Server Node
IBM COS Jumbo Frame Verification
Configure IBM COS to Sync with an NTP Server
Configure Access Key Authentication
Configure IBM COS Provisioning API
Create Vault Template for Provisioning
Create a User for Object Access
Functional Object Storage Access Validation
How to Order Using Solution IDs
The data center of today continues to evolve to meet a variety of challenges that are no longer satisfied with traditional storage. Legacy architecture based on block and file storage face significant limitations that are not easily addressed without a radically different methods. Software Defined Storage addresses these limitations for a number of reasons:
· Software Defined Storage offers limitless scale and a decrease in management complexity.
· Software Defined Storage offers a simplified cost structure that is well suited for large-capacity needs. As the cost per gigabyte continues to shrink, Software Defined Storage becomes increasingly well suited for backup, archive, and cloud operations.
· Software Defined Storage breaks the monolithic storage mold. Object storage combines data, metadata, and unique identification to create objects.
Classic enterprise storage systems are designed to address business-critical requirements in the data center. And they still excel at this task today, but new trends and changing uses cases such as backup, active archive, and file-sync-and-share require new solutions built on new technology. Unstructured data aims to provide massive amounts of storage at extreme scale, particularly in environments where performance is less critical.
IBM Cloud Object Storage (IBM COS) is a software defined storage solution that brings massive scale and easy management to your data center. Reduced costs, tremendous scale, and enterprise grade reliability and availability is to be expected from this leading edge storage architecture.
The Cisco UCS S3260 Storage Server, designed without compromise for today’s data center, combined with IBM COS dsNet is ideal for object storage solutions that require new demands in a world of unstructured data where data creation shows no signs of slowing – whether that workload is cloud data, a file repository, an active backup, or long term cold storage. The Cisco UCS S3260 Storage Server provides a robust, comprehensive framework with unparalleled storage scalability combined with a standard 40 Gigabit Ethernet networking that allows Cisco to continue to push beyond was is possible in the data center. The S3260 Storage Server is the ideal object storage platform of choice specifically because of key differentiation from the competition:
· Proven industry standard server with a modular infrastructure and field upgradable components that reduce or eliminate the need for migration
· High-bandwidth networking that meets the needs of large-scale object storage solutions like IBM Cloud Object Storage
· Unified, embedded management for easy-to-scale infrastructure
Cisco and IBM are synergizing like never before to offer customers a scalable object storage solution for unstructured data that is integrated with IBM Cloud Object Storage. By leveraging the strength of Cisco UCS infrastructure and management, this solution is cost effective to deploy, easy to manage, and built on futureproof technology that will provide customers with the necessary tools for next generation cloud deployments.
Cisco Validated Designs (CVDs) include platforms and solutions that are designed, tested, and documented to improve customer deployments. These designs include a wide range of technologies and products into a portfolio of solutions that address the business needs of customers.
Introduction
For years, traditional storage systems were able to easily service the demands of existing workloads. But in the past decade, much of the information housed on classic storage systems has been moved to an unstructured data architecture. In fact, almost eighty percent of data is currently unstructured today. This creates a new opportunities to scale at a rate that entirely matches the consumption demand. Object storage is the most recent approach for managing these tremendous amounts of data.
IBM Cloud Object Storage provides organizations the flexibility, scalability and simplicity required to store, manage and access today’s rapidly growing unstructured data in a cloud environment. Our time-tested solutions turn storage challenges into business advantage by reducing storage costs while reliably supporting both traditional and emerging cloud-born workloads for enterprise mobile, social, analytics and cognitive computing. IBM Cloud Object Storage is built on technology from object storage leader Cleversafe, acquired by IBM in 2015.
Scale-out object storage relies on traditional storage-optimized, x86 servers to reduce cost and increase performance. The Cisco UCS S3260 Storage Server is ideal of object storage solutions. It reduces deployment costs and leverages the power of the Cisco Unified Computing System (Cisco UCS). Management functions and features powered by Cisco UCS are unmatched by traditional unmanaged and agent-based systems. The Cisco UCS S3260 Storage Server is ultimately the most flexible platform available that can be optimized for throughput, capacity, or compute intensive workloads.
By combining the massive scale that IBM Cloud Object Storage provides with the cost-effective simplicity of the Cisco UCS S3260 Storage server, this solution delivers an enterprise scale-out storage architecture that is simple, fast, and completely scalable.
Solution
This Cisco Validated Design (CVD) is a simple and linearly scalable architecture that provides an unstructured data solution on IBM Cloud Object Storage dsNet and Cisco UCS S3260 Storage Server. The solution includes the following features:
· Infrastructure for large scale object storage
· Design of a IBM Cloud Object Storage solution together with Cisco UCS S3260 Storage Server
· Simplified infrastructure management with Cisco UCS Manager
· Architectural scalability – linear scaling based on network, storage, and compute requirements
· Operational Guidance for properly sizing the IBM Cloud Object Storage architecture to fully leverage the benefits and features of Cisco UCS infrastructure
Audience
This document describes the architecture, design, and deployment procedures of an IBM Cloud Object Storage solution. The solution utilizes six Cisco UCS S3260 Storage Servers each configured with two M4 Server Nodes, as IBM COS Slicestor’s. In addition, depending on throughput needs, it leverages between three to eight Cisco UCS C220 M4S rackservers as IBM COS Accesser nodes and a single Cisco UCS C220 M4S rackserver as an IBM COS Manager node. All servers are managed by Cisco UCS Manager on two Cisco UCS 6332 Fabric Interconnects. The intended audience for this documents includes but is not limited to; sales engineers, field consultants, professional services, IT managers, partner engineering, and customers who intend to deploy IBM Cloud Object Storage managed by the Cisco Unified Computing System (UCS) built upon the Cisco UCS S3260 Storage Server.
Solution Summary
This CVD describes in detail the process of deploying IBM Cloud Object Storage 3.10 on Cisco UCS S3260 Storage Server.
The configuration uses the following architecture for the deployment:
· 6 x Cisco UCS S3260 Storage Server with 2 x C3x60 M4 server nodes working as IBM COS Slicestor nodes
· 3-8 x Cisco UCS C220 M4S rack server working as IBM COS Accesser nodes
· 1 x Cisco UCS C220 M4S rack server working as IBM COS Manager node
· 2 x Cisco UCS 6332 Fabric Interconnect
· 1 x Cisco UCS Manager
· 2 x Cisco Nexus 9332PQ Switches
Cisco Unified Computing System
Cisco Unified Computing System™ (Cisco UCS) is a next-generation data center platform that integrates computing, networking, storage access, and virtualization resources into a cohesive system designed to reduce total cost of ownership (TCO) and increase business agility. The system integrates a low-latency, lossless 10 or 40 Gigabit Ethernet unified network fabric with enterprise-class, x86-architecture servers. The system is an integrated, scalable, infrastructure platform where all resources are managed through a single, unified management domain.
The Cisco Unified Computing System consists of the following subsystems:
Compute - The compute piece of the system incorporates servers based on latest Intel’s x86 processors. Servers are available in blade and rack form factors, managed by the same Cisco UCS Manager software.
Network - The integrated network fabric in the system provides low-latency, lossless, 10Gbps or 40Gbps Ethernet fabric. LANs, SANs, and high-performance computing networks which are separate networks today are a consolidated within the fabric. The unified fabric lowers costs by reducing the number of network adapters, switches, and cables, and by decreasing the power and cooling requirements.
Virtualization - The system unleashes the full potential of virtualization by enhancing the scalability, performance, and operational control of virtual environments. Cisco security, policy enforcement, and diagnostic features are now extended into virtualized environments to better support changing business and IT requirements.
Storage access – Cisco UCS system provides consolidated access to both SAN storage and Network Attached Storage over the unified fabric. This provides customers with storage choices and investment protection. Also, the server administrators can pre-assign storage-access policies to storage resources, for simplified storage connectivity and management leading to increased productivity.
Management: The system uniquely integrates all the system components, enabling the entire solution to be managed as a single entity through Cisco UCS Manager software. Cisco UCS Manager provides an intuitive graphical user interface (GUI), a command-line interface (CLI), and a robust application-programming interface (API) to manage all system configuration and operations. Cisco UCS Manager helps in increasing the IT staff productivity, enabling storage, network, and server administrators to collaborate on defining service profiles for applications. Service profiles are logical representations of desired physical configurations and infrastructure policies. They help automate provisioning and increase business agility, allowing data center managers to provision resources in minutes instead of days.
Cisco Unified Computing System has revolutionized the way servers are managed in data-center. This next section takes a detailed look at the unique differentiators in Cisco UCS and Cisco UCS Manager. An overview of the key sub-components leveraged in this architecture are also provided.
The Cisco Unified Computing System is designed to deliver:
· A reduced Total Cost of Ownership (TCO) and increased business agility.
· Increased IT staff productivity through just-in-time provisioning and mobility support.
· A cohesive, integrated system which unifies the technology in the data center.
· Industry standards supported by a partner ecosystem of industry leaders.
Cisco UCS Differentiators
· Embedded Management — Servers in the system are managed by embedded software in the Fabric Interconnects, eliminating need for any external physical or virtual devices to manage the servers.
· Unified Fabric — There is a single Ethernet cable to the FI from the server chassis (blade or rack) for LAN, SAN and management traffic. This converged I/O results in reduced cables, SFPs and adapters – reducing capital and operational expenses of overall solution.
· Auto Discovery — By simply inserting a blade server in the chassis or connecting a rack server to the FI, discovery and inventory of compute resource occurs automatically without any intervention. Auto-discovery combined with unified fabric enables the wire-once architecture of Cisco UCS, where compute capability of Cisco UCS can be extended easily without additional connections to the external LAN, SAN and management networks.
· Policy Based Resource Classification — Once a compute resource is discovered by Cisco UCS Manager, it can be automatically classified to a resource pool based on policies defined. This capability is useful in multi-tenant cloud computing. This CVD showcases the policy based resource classification of Cisco UCS Manager.
· Combined Rack and Blade Server Management — Cisco UCS Manager can manage B-series blade servers and C-series rack servers under the same Cisco UCS domain. Along with stateless computing, this feature makes compute resources truly agnostic to the hardware form factor.
· Model based Management Architecture — Cisco UCS Manager architecture and management database is model based and data driven. An open XML API is provided to operate on the management model. This enables easy and scalable integration of Cisco UCS Manager with other management systems.
· Policies, Pools, and Templates — The management approach in Cisco UCS Manager is based on defining policies, pools and templates, instead of cluttered configuration, which enables a simple, loosely coupled, data driven approach in managing compute, network and storage resources.
· Loose Referential Integrity — In Cisco UCS Manager, a service profile, port profile or policies can refer to other policies or logical resources with loose referential integrity. A referred policy cannot exist at the time of authoring the referring policy or a referred policy can be deleted even though other policies are referring to it. This provides different subject matter experts from different domains, such as network, storage, security, server and virtualization the flexibility to work independently to accomplish a complex task.
· Policy Resolution — In Cisco UCS Manager, a tree structure of organizational unit hierarchy can be created that mimics the real life tenants and/or organization relationships. Various policies, pools and templates can be defined at different levels of organization hierarchy. A policy referring to another policy by name is resolved in the organization hierarchy with closest policy match. If no policy with specific name is found in the hierarchy of the root organization, then special policy named “default” is searched. This policy resolution logic enables automation friendly management APIs and provides great flexibility to owners of different organizations.
· Service Profiles and Stateless Computing — A service profile is a logical representation of a server, carrying its various identities and policies. This logical server can be assigned to any physical compute resource as far as it meets the resource requirements. Stateless computing enables procurement of a server within minutes, which used to take days in legacy server management systems.
· Built-in Multi-Tenancy Support — The combination of policies, pools and templates, loose referential integrity, policy resolution in organization hierarchy and a service profiles based approach to compute resources makes Cisco UCS Manager inherently friendly to multi-tenant environment typically observed in private and public clouds.
· Virtualization Aware Network — Cisco VM-FEX technology makes the access network layer aware about host virtualization. This prevents domain pollution of compute and network domains with virtualization when virtual network is managed by port-profiles defined by the network administrators’ team. VM-FEX also off-loads hypervisor CPU by performing switching in the hardware, thus allowing hypervisor CPU to do more virtualization related tasks. VM-FEX technology is well integrated with VMware vCenter, Linux KVM and Hyper-V SR-IOV to simplify cloud management.
· Simplified QoS — Even though Fibre Channel and Ethernet are converged in Cisco UCS fabric, built-in support for QoS and lossless Ethernet makes it seamless. Network Quality of Service (QoS) is simplified in Cisco UCS Manager by representing all system classes in one GUI panel.
Cisco UCS S3260 Storage Server
The Cisco UCS® S3260 Storage Server (Figure 1) is a modular, high-density, high-availability dual node rack server well suited for service providers, enterprises, and industry-specific environments. It addresses the need for dense cost effective storage for the ever-growing data needs. Designed for a new class of cloud-scale applications, it is simple to deploy and excellent for big data applications, software-defined storage environments and other unstructured data repositories, media streaming, and content distribution.
Figure 1 Cisco UCS S3260 Storage Server
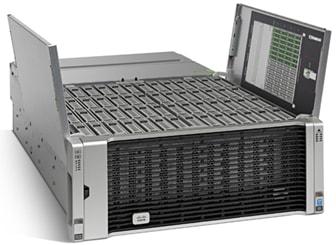
Extending the capability of the Cisco UCS C3000 portfolio, the Cisco UCS S3260 helps you achieve the highest levels of data availability. With dual-node capability that is based on the Intel® Xeon® processor E5-2600 v4 series, it features up to 600 TB of local storage in a compact 4-rack-unit (4RU) form factor. All hard-disk drives can be asymmetrically split between the dual-nodes and are individually hot-swappable. The drives can be built-in in an enterprise-class Redundant Array of Independent Disks (RAID) redundancy or be in a pass-through mode.
This high-density rack server comfortably fits in a standard 32-inch depth rack, such as the Cisco® R42610 Rack.
The Cisco UCS S3260 is deployed as a standalone server in both bare-metal or virtualized environments. Its modular architecture reduces total cost of ownership (TCO) by allowing you to upgrade individual components over time and as use cases evolve, without having to replace the entire system.
The Cisco UCS S3260 uses a modular server architecture that, using Cisco’s blade technology expertise, allows you to upgrade the computing or network nodes in the system without the need to migrate data migration from one system to another. It delivers:
· Dual server nodes
· Up to 36 computing cores per server node
· Up to 60 drives mixing a large form factor (LFF) with up to 28 solid-state disk (SSD) drives plus 2 SSD SATA boot drives per server node
· Up to 1 TB of memory per server node (2 terabyte [TB] total)
· Support for 12-Gbps serial-attached SCSI (SAS) drives
· A system I/O Controller with Cisco VIC 1300 Series Embedded Chip supporting Dual-port 40Gbps
· High reliability, availability, and serviceability (RAS) features with tool-free server nodes, system I/O controller, easy-to-use latching lid, and hot-swappable and hot-pluggable components
Cisco UCS C220 M4 Rack Server
The Cisco UCS® C220 M4 Rack Server (Figure 2) is the most versatile, general-purpose enterprise infrastructure and application server in the industry. It is a high-density two-socket enterprise-class rack server that delivers industry-leading performance and efficiency for a wide range of enterprise workloads, including virtualization, collaboration, and bare-metal applications. The Cisco UCS C-Series Rack Servers can be deployed as standalone servers or as part of the Cisco UCS to take advantage of Cisco’s standards-based unified computing innovations that help reduce customers’ total cost of ownership (TCO) and increase their business agility.
Figure 2 Cisco UCS C220 M4 Rack Server

The enterprise-class Cisco UCS C220 M4 server extends the capabilities of the Cisco UCS portfolio in a 1RU form factor. It incorporates the Intel® Xeon® processor E5-2600 v4 and v3 product family, next-generation DDR4 memory, and 12-Gbps SAS throughput, delivering significant performance and efficiency gains. The Cisco UCS C220 M4 rack server delivers outstanding levels of expandability and performance in a compact 1RU package:
· Up to 24 DDR4 DIMMs for improved performance and lower power consumption
· Up to 8 Small Form-Factor (SFF) drives or up to 4 Large Form-Factor (LFF) drives
· Support for 12-Gbps SAS Module RAID controller in a dedicated slot, leaving the remaining two PCIe Gen 3.0 slots available for other expansion cards
· A modular LAN-on-motherboard (mLOM) slot that can be used to install a Cisco UCS virtual interface card (VIC) or third-party network interface card (NIC) without consuming a PCIe slot
· Two embedded 1Gigabit Ethernet LAN-on-motherboard (LOM) ports
Cisco UCS Virtual Interface Card 1387
The Cisco UCS Virtual Interface Card (VIC) 1387 (Figure 3) is a Cisco® innovation. It provides a policy-based, stateless, agile server infrastructure for your data center. This dual-port Enhanced Quad Small Form-Factor Pluggable (QSFP) half-height PCI Express (PCIe) modular LAN-on-motherboard (mLOM) adapter is designed exclusively for Cisco UCS C-Series and C3260 Rack Servers. The card supports 40 Gigabit Ethernet and Fibre Channel over Ethernet (FCoE). It incorporates Cisco’s next-generation converged network adapter (CNA) technology and offers a comprehensive feature set, providing investment protection for future feature software releases. The card can present more than 256 PCIe standards-compliant interfaces to the host, and these can be dynamically configured as either network interface cards (NICs) or host bus adapters (HBAs). In addition, the VIC supports Cisco Data Center Virtual Machine Fabric Extender (VM-FEX) technology. This technology extends the Cisco UCS fabric interconnect ports to virtual machines, simplifying server virtualization deployment.
Figure 3 Cisco UCS Virtual Interface Card 1387

The Cisco UCS VIC 1387 provides the following features and benefits:
· Stateless and agile platform: The personality of the card is determined dynamically at boot time using the service profile associated with the server. The number, type (NIC or HBA), identity (MAC address and World Wide Name [WWN]), failover policy, bandwidth, and quality-of-service (QoS) policies of the PCIe interfaces are all determined using the service profile. The capability to define, create, and use interfaces on demand provides a stateless and agile server infrastructure
· Network interface virtualization: Each PCIe interface created on the VIC is associated with an interface on the Cisco UCS fabric interconnect, providing complete network separation for each virtual cable between a PCIe device on the VIC and the interface on the fabric interconnect
Cisco UCS Fabric Interconnects
The Cisco UCS Fabric interconnects provide a single point for connectivity and management for the entire system. Typically deployed as an active-active pair, the system’s fabric interconnects integrate all components into a single, highly-available management domain controlled by Cisco UCS Manager. The fabric interconnects manage all I/O efficiently and securely at a single point, resulting in deterministic I/O latency regardless of a server or virtual machine’s topological location in the system.
Fabric Interconnect provides both network connectivity and management capabilities for the Cisco UCS system. Cisco UCS Fabric Extenders (IOM) in the blade chassis support power supply, along with fan and blade management. They also support port channeling and, thus, better use of bandwidth. The IOMs support virtualization-aware networking in conjunction with the Fabric Interconnects and Cisco Virtual Interface Cards (VIC).
The capabilities of all Fabric Interconnects are summarized below.
Table 1 Cisco UCS 6200 and 6300 Series Fabric Interconnects
| Features |
6248 |
6296 |
6332 |
6332-16UP |
| Max 10G ports |
48 |
96 |
96* + 2** |
72* + 16 |
| Max 40G ports |
- |
- |
32 |
24 |
| Max unified ports |
48 |
96 |
- |
16 |
| Max FC ports |
48 x 2/4/8G FC |
96 x 2/4/8G FC |
- |
16 x 4/8/16G FC |
* Using 40G to 4x10G breakout cables ** Requires QSA module
Cisco UCS 6300 Series Fabric Interconnect
The Cisco UCS 6300 Series Fabric Interconnects are a core part of Cisco UCS, providing both network connectivity and management capabilities for the system. The Cisco UCS 6300 Series offers line-rate, low-latency, lossless 10 and 40 Gigabit Ethernet, Fibre Channel over Ethernet (FCoE), and Fibre Channel functions.
Figure 4 Cisco UCS 6300 Series Fabric Interconnect

The Cisco UCS 6300 Series provides the management and communication backbone for the Cisco UCS B-Series Blade Servers, 5100 Series Blade Server Chassis, and C-Series Rack Servers managed by Cisco UCS. All servers attached to the fabric interconnects become part of a single, highly available management domain. In addition, by supporting unified fabric, the Cisco UCS 6300 Series provides both LAN and SAN connectivity for all servers within its domain.
From a networking perspective, the Cisco UCS 6300 Series uses a cut-through architecture, supporting deterministic, low-latency, line-rate 10 and 40 Gigabit Ethernet ports, switching capacity of 2.56 terabits per second (Tbps), and 320 Gbps of bandwidth per chassis, independent of packet size and enabled services. The product family supports Cisco® low-latency, lossless 10 and 40 Gigabit Ethernet unified network fabric capabilities, which increase the reliability, efficiency, and scalability of Ethernet networks. The fabric interconnect supports multiple traffic classes over a lossless Ethernet fabric from the server through the fabric interconnect. Significant TCO savings can be achieved with an FCoE optimized server design in which network interface cards (NICs), host bus adapters (HBAs), cables, and switches can be consolidated.
The Cisco UCS 6332 32-Port Fabric Interconnect is a 1-rack-unit (1RU) Gigabit Ethernet, and FCoE switch offering up to 2.56 Tbps throughput and up to 32 ports. The switch has 32 fixed 40-Gbps Ethernet and FCoE ports.
Both the Cisco UCS 6332UP 32-Port Fabric Interconnect and the Cisco UCS 6332 16-UP 40-Port Fabric Interconnect have ports that can be configured for the breakout feature that supports connectivity between 40 Gigabit Ethernet ports and 10 Gigabit Ethernet ports. This feature provides backward compatibility to existing hardware that supports 10 Gigabit Ethernet. A 40 Gigabit Ethernet port can be used as four 10 Gigabit Ethernet ports. Using a 40 Gigabit Ethernet SFP, these ports on a Cisco UCS 6300 Series Fabric Interconnect can connect to another fabric interconnect that has four 10 Gigabit Ethernet SFPs. The breakout feature can be configured on ports 1 to 12 and ports 15 to 26 on the Cisco UCS 6332UP fabric interconnect. Ports 17 to 34 on the Cisco UCS 6332 16-UP fabric interconnect support the breakout feature.
Figure 5 Cisco UCS 6332 Fabric Interconnect – Front and Rear


Cisco Nexus 9332PQ Switch
The Cisco Nexus® 9000 Series Switches include both modular and fixed-port switches that are designed to overcome these challenges with a flexible, agile, low-cost, application-centric infrastructure.
Figure 6 Cisco 9332PQ

The Cisco Nexus 9300 platform consists of fixed-port switches designed for top-of-rack (ToR) and middle-of-row (MoR) deployment in data centers that support enterprise applications, service provider hosting, and cloud computing environments. They are Layer 2 and 3 nonblocking 10 and 40 Gigabit Ethernet switches with up to 2.56 terabits per second (Tbps) of internal bandwidth.
The Cisco Nexus 9332PQ Switch is a 1-rack-unit (1RU) switch that supports 2.56 Tbps of bandwidth and over 720 million packets per second (mpps) across thirty-two 40-Gbps Enhanced QSFP+ ports
All the Cisco Nexus 9300 platform switches use dual- core 2.5-GHz x86 CPUs with 64-GB solid-state disk (SSD) drives and 16 GB of memory for enhanced network performance.
With the Cisco Nexus 9000 Series, organizations can quickly and easily upgrade existing data centers to carry 40 Gigabit Ethernet to the aggregation layer or to the spine (in a leaf-and-spine configuration) through advanced and cost-effective optics that enable the use of existing 10 Gigabit Ethernet fiber (a pair of multimode fiber strands).
Cisco provides two modes of operation for the Cisco Nexus 9000 Series. Organizations can use Cisco® NX-OS Software to deploy the Cisco Nexus 9000 Series in standard Cisco Nexus switch environments. Organizations also can use a hardware infrastructure that is ready to support Cisco Application Centric Infrastructure (Cisco ACI™) to take full advantage of an automated, policy-based, systems management approach.
Cisco UCS Manager
Cisco UCS® Manager provides unified, embedded management of all software and hardware components of the Cisco Unified Computing System™ across multiple chassis, rack servers and thousands of virtual machines. It supports all Cisco UCS product models, including Cisco UCS B-Series Blade Servers, Cisco UCS C-Series Rack Servers, and Cisco UCS M-Series composable infrastructure and Cisco UCS Mini, as well as the associated storage resources and networks. Cisco UCS Manager is embedded on a pair of Cisco UCS 6300 or 6200 Series Fabric Interconnects using a clustered, active-standby configuration for high availability. The manager participates in server provisioning, device discovery, inventory, configuration, diagnostics, monitoring, fault detection, auditing, and statistics collection.
Figure 7 Cisco UCS Manager

An instance of Cisco UCS Manager with all Cisco UCS components managed by it forms a Cisco UCS domain, which can include up to 160 servers. In addition to provisioning Cisco UCS resources, this infrastructure management software provides a model-based foundation for streamlining the day-to-day processes of updating, monitoring, and managing computing resources, local storage, storage connections, and network connections. By enabling better automation of processes, Cisco UCS Manager allows IT organizations to achieve greater agility and scale in their infrastructure operations while reducing complexity and risk. The manager provides flexible role- and policy-based management using service profiles and templates.
Service profiles benefit both virtualized and non-virtualized environments and increase the mobility of non-virtualized servers, such as when moving workloads from server to server or taking a server offline for service or upgrade. Profiles can also be used in conjunction with virtualization clusters to bring new resources online easily, complementing existing virtual machine mobility.
Cisco UCS Manager manages Cisco UCS through an intuitive HTML 5 or Java user interface and a command-line interface (CLI). It can register with Cisco UCS Central Software in a multi-domain Cisco UCS environment, enabling centralized management of distributed systems scaling to thousands of servers. Cisco UCS Manager can be integrated with Cisco UCS Director to facilitate orchestration and to provide support for converged infrastructure and Infrastructure-as-a-Service (IaaS).
The Cisco UCS XML API provides comprehensive access to all Cisco UCS Manager functions. The API provides Cisco UCS visibility to higher-level systems management tools from independent software vendors (ISVs) such as VMware, Microsoft, and Splunk as well as tools from BMC, CA, HP, IBM, and others. ISVs and in-house developers can use the XML API to enhance the value of the Cisco UCS platform according to their unique requirements. Cisco UCS PowerTool for Cisco UCS Manager and the Python Software Development Kit (SDK) help automate and manage configurations within Cisco UCS Manager.
IBM Cloud Object Storage Architecture
IBM Cloud Object Storage is a dispersed storage mechanism that uses a cluster of storages nodes to store pieces of the data across the available nodes. IBM Cloud Object Storage uses an Information Dispersal Algorithm (IDA) to break files into unrecognizable slices that are then distributed to the storage nodes. No single node has all the data, which makes it safe and less susceptible to data breaches while needing only a subset of the storage nodes to be available to fully retrieve the stored data. This ability to reassemble all the data from a subset of the chunks dramatically increases the tolerance to node and disk failures.

The IBM Cloud Object Storage architecture is composed of three functional components. Each of these components runs ClevOS software that can be deployed on compatible, industry-standard hardware. The three components include:
· IBM Cloud Object Storage Manager provides an out of band management interface that is used for administrative tasks, such as system configuration, storage provisioning, and monitoring the health and performance of the system
· IBM Cloud Object Storage Accesser imports and reads data, encrypting/encoding data on import and decrypting/decoding data on read. It is a stateless component that presents the storage interfaces to the client applications and transforms data by using an IDA
· The IBM Cloud Object Storage Slicestor node is primarily responsible for storage of the data slices. It receives data from the Accesser on import and returns data to the Accesser as required by reads

Solution Architecture Overview
This Cisco Validated Design provides a comprehensive, end-to-end guide for deploying IBM Cloud Object Storage on Cisco UCS S3260 within infrastructure made possible by Cisco UCS Manager and the Cisco UCS 6332 Fabric Interconnects.
One of the key design goals of this scale out architecture was to deploy all elements on 40GbE networking end to end within a single Cisco UCS domain. All IBM Cloud Object Storage components – Manager, Accesser, and Slicestor – utilize the robust throughput and low latency only provided by the Cisco UCS 6332 Fabric Interconnect. Additionally, all components take advantage of the flexibility provided by Cisco UCS service profiles and service profile templates. By design, all design decisions and features within all in-use service profiles are able to be updated with a few modifications.
This design optionally uses the Cisco Nexus 9000 series data center switches in NX-OS standalone mode but provides investment protection to migrate to ACI or higher network bandwidths (1/10/25/40/50/100Gbps) while enabling innovative analytics and visibility using Tetration and automation that support in-box and off-box Python scripting and Open NX-OS that support dev-ops tools (Chef, Puppet, Ansible).
Figure 8 Cisco UCS Software Defined Storage Architecture

Compute Layer Design
The compute resources supported in this design are Cisco UCS S3260 Storage Servers with accompanying M4 Server Nodes and Cisco UCS C220 M4S rackmount servers. Each Cisco UCS server is equipped with a Cisco Virtual Interface Card (VIC) that aggregate all traffic to and from the server across a single 40GbE interface. Cisco VICs eliminate the need for separate physical interface cards on each server for data and management connectivity. Cisco VIC adapter profiles are easily manageable from within the Cisco UCS Manager UI. Capabilities such as receive and transmit queues, receive side scaling, and jumbo frames are all configurable from within the management interface. This design guide focuses on a fairly basic, flat network topology, but some deployments might require a far more advanced configuration that isolates certain types of traffic. This is all easily achievable with the Cisco VIC without the purchase or configuration of any additional hardware. The Cisco VIC found in each server in this design guide is equipped with two 40 Gbps interfaces that provide best in class latency, throughput, and manageability. Cisco VICs can be virtualized to create up to 256 virtual interfaces that can be dynamically configured as virtual network interface cards (vNICs) or virtual host bus adapters (vHBAs). These virtual interfaces will appear as a standards-compliant PCIe endpoints to the OS. The scope of this solution with IBM Cloud Object Storage ClevOS is configured with two virtual NICs, one on each VIC interface. IBM COS is configured to leverage these two vNICs to provide operational active-backup redundancy in software.
Multiple models of Cisco VICs are available. Cisco VICs are available in the S3260 Storage Server as a part of the SIOC present on ever model. The Cisco C220 M4S leverages a VIC that is available as a modular LAN on Motherboard (mLOM). Additionally, a half-height PCI Express (PCIe) card is also available as an alternative configuration or for additional throughput.
Cisco UCS Server Connectivity to Unified Fabric
Cisco UCS servers are typically deployed with a single VIC card for unified network and storage access. The Cisco VIC connects into a redundant unified fabric provided by a pair of Cisco UCS Fabric Interconnects. Fabric Interconnects are an integral part of the Cisco Unified Computing System, providing unified management and connectivity to all attached blades, chassis and rack servers. Fabric Interconnects provide a lossless and deterministic Fibre Channel over Ethernet (FCoE) fabric. For the servers connected to it, the Fabric Interconnects provide LAN, SAN and management connectivity to the rest of the network.
Validated Compute Design
For validation, Cisco UCS S3260 Storage Servers with System IO Controller with included VIC 1380 and Cisco UCS C220 M4S servers with VIC 1387, were connected to 2 x Cisco UCS 6332 Fabric Interconnects. Each Cisco UCS C220 M4S was deployed with two 40 GbE QSFP copper cables. Each Cisco UCS M4 Server Node within the S3260 Storage Server was also deployed with two 40 GbE QSFP cables. Two M4 Server Nodes were within each S3260 Storage Server which results in a total capable throughput of 160 Gbps to each S3260 chassis. The Cisco UCS 5108 blade server chassis, housing the blade servers, were deployed using 2 x Cisco UCS 2204 XP FEX adapters to connect to connect to the fabric interconnects. Two 10GbE links were used for FEX to FI connectivity, one from FEX-A to FI-A and one from FEX-B to FI-B, for an aggregate access bandwidth of 20Gbps from the blade server chassis to the unified fabric.
High Availability
The Cisco and IBM solution was designed for maximum availability of the complete infrastructure (compute, network, storage) with no single points of failure.
Compute
· Cisco UCS system provides redundancy at the component and link level and end-to-end path redundancy to the LAN network.
· Cisco UCS S3260 storage server platform is highly redundant with redundant power supplies, fans and SIOC modules.
· Each server is deployed using vNICs that provide redundant connectivity to the unified fabric. NIC failover is enabled between Cisco UCS Fabric Interconnects using Cisco UCS Manager. This is done for all Manager, Accesser, and Slicestor node vNICs.
Network
· Link aggregation using port channels and virtual port channels can be used throughout the design for higher bandwidth and availability, if the optional Cisco UCS Nexus 9332 is deployed.
· Each Manager, Accesser, and Slicestor is configured in mode 1 active-backup bonding mode at the ClevOS software layer
QoS and Jumbo Frames
Cisco UCS, Cisco Nexus, and IBM Cloud Object Storage nodes in this solution provide QoS policies and features for handling congestion and traffic spikes. The network-based QoS capabilities in these components can alleviate and provide the priority that the different traffic types require.
This design also recommends end-to-end jumbo frames with an MTU of 9000 Bytes across the LAN and Unified Fabric links. Jumbo frames increase the throughput between devices by enabling larger sized frames to be sent and received on the wire while reducing the CPU resources necessary to process them. Jumbo frames were enabled during validation on the LAN network links in the Cisco Nexus switching layer and on the Unified Fabric links.
Software Distributions and Versions
The required software distribution versions are listed below in Table 2.
| Layer |
Component |
Version or Release |
| Storage (Chassis) UCS S3260 |
Chassis Management Controller |
3.0(3a) |
| Shared Adapter |
4.1(3a) |
|
| Compute (Server Nodes) UCS C3X60 M4 |
BIOS |
C3X60M4.3.0.3b |
| CIMC Controller |
3.0(3a) |
|
| Compute (Rack Server) C220 M4S |
BIOS |
C220M4.3.0.3a |
| CIMC Controller |
3.0(3a) |
|
| Network 6332 Fabric Interconnect |
UCS Manager |
3.1(3a) |
| Kernel |
5.0(3)N2(3.13a) |
|
| System |
5.0(3)N2(3.13a) |
|
| Network Nexus 9332PQ |
BIOS |
07.59 |
|
|
NXOS |
7.0(3)I5(1) |
| Software |
IBM COS ClevOS |
3.10.0.126-ucs3 |
Hardware Requirements
This Cisco Validated Design describes the architecture, design, and deployment of an IBM Cloud Object Storage solution on six Cisco UCS S3260 Storage servers with two M4 Server Nodes, each configured as IBM COS Slicestor Nodes, and at least four Cisco UCS C220 M4S Rack Servers configured Accesser Nodes, and a single Cisco UCS C220 M4S Rack Server configured as a Manager node. The entire solution is connected to a pair of Cisco UCS 6332 Fabric Interconnects and a pair of Cisco Nexus 9332PQ switches with 40Gbps end to end.
The detailed configuration looks like the following:
· Two Cisco Nexus 9332PQ Switches
· Two Cisco UCS 6332 Fabric Interconnects
· Six Cisco UCS S3260 Storage Servers with two M4 server nodes each
· Five Cisco UCS C220 M4S Rack Servers
Figure 9 Solution Design
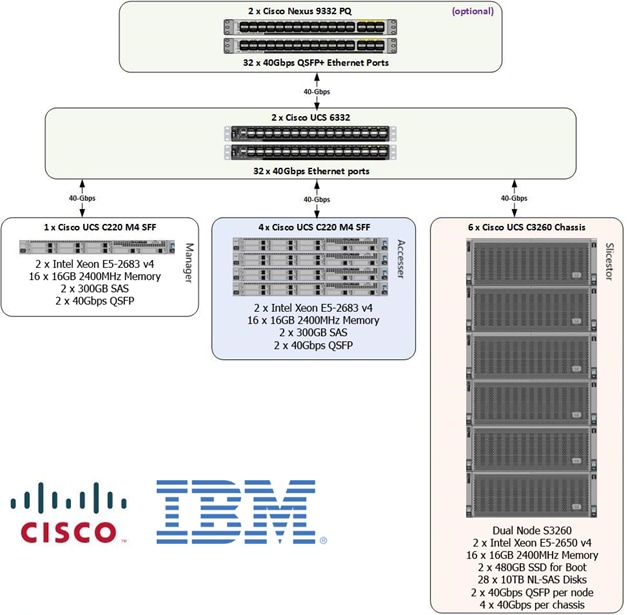
Table 3 Hardware Requirements
| Component |
Model |
Quantity |
Comments |
|
| IBM COS Slicestor |
Cisco UCS S3260 M4 Chassis |
6 |
• 2 x UCS C3X60 M4 Server Nodes per Chassis (Total = 12 nodes) • Per Server Node • 2 x Intel E5-2650 v4, 256 GB RAM • Cisco 12G SAS RAID Controller • 2 x 480 GB SSD for OS, 26 x 10TB HDDs for Data • Dual-port 40 Gbps VIC |
|
| IBM COS Accesser |
Cisco UCS C220M4S Rack server |
4 |
· 2 x Intel E5-2683v4, 256 GB RAM · Cisco 12G SAS RAID Controller · 2 x 300 GB SAS for OS · Dual-port 40 Gbps VIC |
|
| IBM COS Manager |
Cisco UCS C220M4S Rack server |
1 |
· 2 x Intel E5-2683v4, 256 GB RAM · Cisco 12G SAS RAID Controller · 2 x 300 GB SAS for OS · Dual-port 40 Gbps VIC |
|
| UCS Fabric Interconnects |
Cisco UCS 6332 Fabric Interconnects |
2 |
|
|
| Switches |
Cisco Nexus 9332PQ Switches |
2 |
|
|
Fabric Configuration
The following sections provide the details for configuring a fully redundant, highly available Cisco UCS 6332 Fabric Interconnect:
· Initial setup of the Fabric Interconnect A and B using the console port.
· Initial connection to Cisco UCS Manager virtual IP address using the web browser.
· Enable server and uplink ports.
· Begin discovery process.
· Create pools and policies for service profile template.
· Create chassis and storage profiles.
· Create Service Profile templates and appropriate Service Profiles.
· Associate Service Profiles to servers.
Initial Setup of Cisco UCS 6332 Fabric Interconnects
Configure Fabric Interconnect A
1. Connect to the console port of the first Cisco UCS 6332 Fabric Interconnect.
2. Once connected, at the prompt to choose configuration method, enter console to continue.
3. At the prompt to perform new setup or restore from backup, enter setup to continue.
4. Enter y to continue to set up a new Fabric Interconnect.
5. Enter n to enforce strong passwords.
6. Enter a password for the admin user.
7. Enter the same password a second time to confirm the password for the admin user.
8. At the prompt that asks if this fabric interconnect is part of a cluster, answer y to continue.
9. Enter A for the switch fabric.
10. Enter UCS-FI-6332 for the system name.
11. Enter an IPv4 address for Mgmt0.
12. Enter an IPv4 subnet mask for Mgmt0.
13. Enter an IPv4 address of the default gateway.
14. Enter an IPv4 address for the Fabric Interconnect cluster.
15. To configure DNS, select y to continue.
16. Enter the IPv4 address for DNS resolution.
17. To configure the default domain name, select y to continue.
18. Enter the default domain name.
19. Review the configuration choices printed to the console, and if correct, answer yes to save the configuration.
20. Wait for the login prompt to make certain the configuration has saved.
Example Setup for Fabric Interconnect A
---- Basic System Configuration Dialog ----
This setup utility will guide you through the basic configuration of
the system. Only minimal configuration including IP connectivity to
the Fabric interconnect and its clustering mode is performed through these steps.
Type Ctrl-C at any time to abort configuration and reboot system.
To back track or make modifications to already entered values,
complete input till end of section and answer no when prompted
to apply configuration.
Enter the configuration method. (console/gui) ? console
Enter the setup mode; setup newly or restore from backup. (setup/restore) ? setup
You have chosen to setup a new Fabric interconnect. Continue? (y/n): y
Enforce strong password? (y/n) [y]: n
Enter the password for "admin":
Confirm the password for "admin":
Is this Fabric interconnect part of a cluster(select 'no' for standalone)? (yes/no) [n]: yes
Enter the switch fabric (A/B): A
Enter the system name: UCS-FI-6332
Physical Switch Mgmt0 IP address : 192.168.10.201
Physical Switch Mgmt0 IPv4 netmask : 255.255.255.0
IPv4 address of the default gateway : 192.168.10.1
Cluster IPv4 address : 192.168.10.200
Configure the DNS Server IP address? (yes/no) [n]: yes
DNS IP address : 8.8.8.8
Configure the default domain name? (yes/no) [n]:
Join centralized management environment (UCS Central)? (yes/no) [n]:
Following configurations will be applied:
Switch Fabric=A
System Name= UCS-FI-6332
Enforced Strong Password=no
Physical Switch Mgmt0 IP Address=192.168.10.201
Physical Switch Mgmt0 IP Netmask=255.255.255.0
Default Gateway=192.168.10.1
Ipv6 value=0
DNS Server=8.8.8.8
Cluster Enabled=yes
Cluster IP Address=192.168.10.200
NOTE: Cluster IP will be configured only after both Fabric Interconnects are initialized.
UCSM will be functional only after peer FI is configured in clustering mode.
Apply and save the configuration (select 'no' if you want to re-enter)? (yes/no): yes
Applying configuration. Please wait.
Fri Jun 25 07:22:39 UTC 2017
Configuration file - Ok
Cisco UCS 6300 Series Fabric Interconnect
UCS-FI-6332-A login:
Configure Fabric Interconnect B
1. Connect to the console port on the second Cisco UCS 6332 Fabric Interconnect.
2. When prompted to enter the configuration method, enter console to continue.
3. The installer detects the presence of the partner Fabric Interconnect and adds this fabric interconnect to the cluster. Enter y to continue the installation.
4. Enter the admin password that was configured for the first Fabric Interconnect.
5. Enter the Mgmt0 IPv4 address.
6. Answer yes to save the configuration.
7. Wait for the login prompt to confirm that the configuration has been saved.
Example Setup for Fabric Interconnect B
---- Basic System Configuration Dialog ----
This setup utility will guide you through the basic configuration of
the system. Only minimal configuration including IP connectivity to
the Fabric interconnect and its clustering mode is performed through these steps.
Type Ctrl-C at any time to abort configuration and reboot system.
To back track or make modifications to already entered values,
complete input till end of section and answer no when prompted
to apply configuration.
Enter the configuration method. (console/gui) ? console
Installer has detected the presence of a peer Fabric interconnect. This Fabric interconnect will be added to the cluster. Continue (y/n) ? y
Enter the admin password of the peer Fabric interconnect:
Connecting to peer Fabric interconnect... done
Retrieving config from peer Fabric interconnect... done
Peer Fabric interconnect Mgmt0 IPv4 Address: 192.168.10.201
Peer Fabric interconnect Mgmt0 IPv4 Netmask: 255.255.255.0
Cluster IPv4 address : 192.168.10.200
Peer FI is IPv4 Cluster enabled. Please Provide Local Fabric Interconnect Mgmt0 IPv4 Address
Physical Switch Mgmt0 IP address : 192.168.10.202
Apply and save the configuration (select 'no' if you want to re-enter)? (yes/no): yes
Applying configuration. Please wait.
Fri Jun 25 07:31:01 UTC 2017
Configuration file - Ok
Cisco UCS 6300 Series Fabric Interconnect
UCS-FI-6332-B login:
Logging Into Cisco UCS Manager
To login to Cisco UCS Manager, complete the following steps:
1. Open a Web browser and navigate to the Cisco UCS 6332 Fabric Interconnect cluster address.
2. Click the Launch UCS Manager button to be directed to the Cisco UCS Manager Login prompt.
3. At the prompt, enter admin for the username and enter the administrative password.
4. Click Log In to gain access to the Cisco UCS Manager.
Configure NTP Server
This section describes the configuration of the NTP server for the Cisco UCS environment.
1. Select Admin button on the bottom, left-hand side.
2. Select Time Zone Management.
3. Select Time Zone.
4. Under Properties select your time zone.
5. Select Add NTP Server.
6. Enter the IP address of the NTP server.
7. Select OK.

First Time Environment Setup
Configure Global Policies
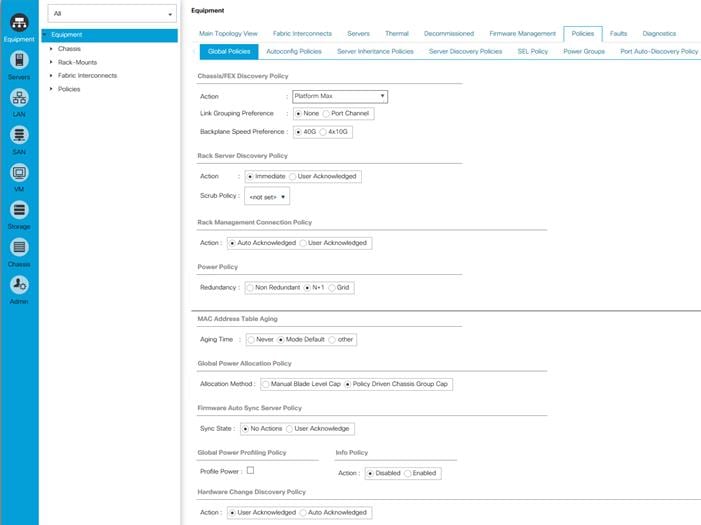
This section describes the configuration of the global policies.
1. Select the Equipment button on top, left-hand side.
2. Select Policies on the right site.
3. Select Global Policies.
4. Under Chassis/FEX Discovery Policy select Platform Max under Action.
5. Select 40G under Backplane Speed Preference.
6. Under Rack Server Discovery Policy select Immediate under Action.
7. Under Rack Management Connection Policy select Auto Acknowledged under Action.
8. Under Power Policy select Redundancy N+1.
9. Under Global Power Allocation Policy select Policy Driven Chassis Group Cap.
10. Select Save Changes.
Enable Fabric Interconnect Server Ports
To enable server ports, complete the following steps:
1. Select the Equipment button on the top, left-hand side.
2. Select Equipment > Fabric Interconnects from the exposed, left hand tree.
3. From the right hand window, expand Fabric Interconnect A > Fixed Module > Ethernet Ports.
4. Select Ports 1-21, right-click and then select Configure as Server Port.
5. Click Yes and then OK.
6. Repeat the same steps for Fabric Interconnect B.

Enable Fabric Interconnect A Ports for Uplinks
To enable uplink ports, complete the following steps:
1. Select the Equipment button on the top, left-hand side.
2. Select Equipment > Fabric Interconnects from the exposed, left hand tree.
3. From the right hand window, expand Fabric Interconnect A > Fixed Module > Ethernet Ports.
4. Select Ports 23-26, right-click and then select Configure as Uplink Port.
5. Click Yes and then OK.
6. Repeat the same steps for Fabric Interconnect B.
Label Each Chassis for Identification
To label each chasses for better identification, complete the following steps:
1. Select the Equipment button on the left-hand side.
2. Select Chassis > Chassis 1.
3. In the Properties section in the right-hand pane, navigate to User Label and enter Slicestor 1/2 in the field.
4. Repeat the previous steps for Chassis 2 – 6 by using the labels below:
| Chassis |
Name |
| Chassis 1 |
Slicestor 1/2 |
| Chassis 2 |
Slicestor 3/4 |
| Chassis 3 |
Slicestor 5/6 |
| Chassis 4 |
Slicestor 7/8 |
| Chassis 5 |
Slicestor 9/10 |
| Chassis 5 |
Slicestor 11/12 |

Label Each Server for Identification
To label each server for identification, complete the following steps:
1. Select the Equipment button on the left-hand side.
2. Select Chassis > Chassis 1 > Server 1.
3. In the Properties section in the right-hand pane, navigate to User Label and enter Slicestor 1 in the field.
4. Repeat the previous steps for Server 2 of Chassis 1 and for all other servers of Chassis 2 – 6 according to the table to the right.
5. Go then to Servers > Rack-Mounts > Servers > and repeat the step for all servers according to the table below:
| Server |
Name |
| Chassis 1 / Server 1 |
Slicestor 1 |
| Chassis 1 / Server 2 |
Slicestor 2 |
| Chassis 2 / Server 1 |
Slicestor 3 |
| Chassis 2 / Server 2 |
Slicestor 4 |
| Chassis 3 / Server 1 |
Slicestor 5 |
| Chassis 3 / Server 2 |
Slicestor 6 |
| Chassis 4 / Server 1 |
Slicestor 7 |
| Chassis 4 / Server 2 |
Slicestor 8 |
| Chassis 5 / Server 1 |
Slicestor 9 |
| Chassis 5 / Server 2 |
Slicestor 10 |
| Chassis 6 / Server 1 |
Slicestor 11 |
| Chassis 6 / Server 2 |
Slicestor 12 |
| Rack-Mount / Server 1 |
Accesser 1 |
| Rack-Mount / Server 2 |
Accesser 2 |
| Rack-Mount / Server 3 |
Accesser 3 |
| Rack-Mount / Server 4 |
Accesser 4 |
| Rack-Mount / Server 5 |
Accesser 5 |
| Rack-Mount / Server 6 |
Accesser 6 |
| Rack-Mount / Server 7 |
Accesser 7 |
| Rack-Mount / Server 8 |
Accesser 8 |
| Rack-Mount / Server 9 |
Manager |

Create IP Pool for Management
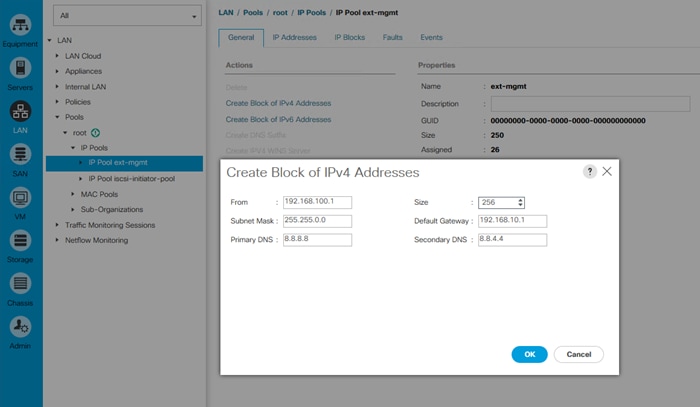
To create an IP Pool for KVM and management access, complete the following steps:
1. Select the LAN button on the left hand side.
2. Navigate to LAN > Pools > root > IP Pools > IP Pool ext-mgmt from the exposed, left-hand tree.
3. From the General tab in the right-hand pane, select Create Block of IPv4 Addresses.
4. Enter a starting IP Address into the field labeled From.
5. Enter a desired number of IP Addresses into the field labeled Size.
6. Enter the appropriate Subnet Mask into the field with the same label.
7. Enter the appropriate Default Gateway into the field with the same label.
8. Enter the desired Primary and Secondary DNS into the fields with the same label.
9. Click OK.
Create a Block of MAC Addresses for the Default MAC Pool
To create a usable block of MAC addresses, complete the following steps:
1. Select the LAN button on the left-hand side.
2. Navigate to LAN > Pools > root > MAC Pools > MAC Pool default from the exposed, left-hand tree.
3. From the General tab in the right-hand pane, select Create a Block of MAC Addresses.
4. Enter a starting MAC Address into the field labeled First MAC Address.
5. Enter a desired number of MAC Addresses into the field labeled Size.
6. Click OK.

Create a block of UUID Suffixes for the Default UUID Pool
To create a usable block of UUID Suffixes, complete the following steps:
1. Select the Server button on the left-hand side.
2. Navigate to Server > Pools > root > UUID Suffix Pools > Pool default from the exposed, left-hand tree.
3. From the General tab in the right-hand pane, select Create a Block of UUID Suffixes.
4. Enter a starting UUID Suffix into the field labeled From.
5. Enter a desired number of UUID Suffixes into the field labeled Size.
6. Click OK.

QoS System Class
To create a Quality of Service System Class, complete the following steps:
1. Select the LAN button on the left-hand side.
2. Navigate to LAN > LAN Cloud > QoS System from the exposed, left-hand tree.
3. Enable Platinum in the Priority column.
4. Within the Platinum row, set Weight to 10 and MTU to 9216. Packet Drop should remain unchecked.
5. Within the Best Effort row, set the MTU to 9216.
6. Within the Fibre Channel row, set the Weight to none.
7. Click Save Changes and then click OK.

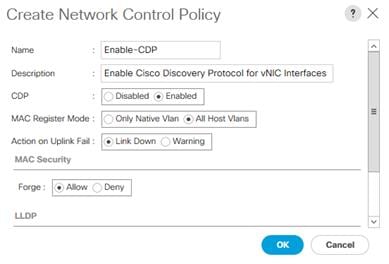
Enable CDP
To enable Network Control Policies, complete the following steps:
1. Select the LAN button on the left-hand side.
2. Navigate to LAN > Policies > root > Network Control Policies from the exposed, left-hand tree.
3. Select the Add button at the bottom of the right hand pane.
4. Type in Enable-CDP in the Name field.
5. (Optional) Enter a description in the Description field.
6. Select Enabled under CDP.
7. Select All Hosts VLANs under MAC Register Mode.
8. Click OK and then click OK again at the window that appears.
QoS Policy Creation
To create a Quality of Service Policy, complete the following steps:
1. Select the LAN button on the left-hand side.
2. Navigate to LAN > Policies > root > QoS Policies from the exposed, left-hand tree.
3. Select the Add button at the bottom of the right hand pane.
4. Within the Name field, enter JumboFrames.
5. From the Priority drop-down menu, select Platinum.
6. Leave everything else the same and select the OK button and then again in the box that appears.

vNIC Template Setup
Depending on whether the deployed configuration requires any VLANs, it might be appropriate to create vNIC templates. No VLANs are required for IBM Cloud Object Storage, but creating a vNIC template can still be extremely helpful for most policy based deployments. Ideally, the vNIC template will be used for supporting MTU 9000, creating an interface on each Cisco UCS Fabric Interconnect, and establishing each IBM COS interface in an appropriate failover configuration.
To create the appropriate vNICs, complete the following steps:
1. Select the LAN button on the left-hand side.
2. Navigate to LAN > Policies > root > vNIC Templates from the exposed, left-hand tree.
3. Click the Add button at the bottom of the right hand pane.
4. Type in Fabric-A in the Name field.
5. (Optional) Enter a description in the Description field.
6. Select Fabric A as Fabric ID and select the checkbox next to Enable Failover.
7. Modify the MTU field to 9000.
8. Select default from the MAC Pool field.
9. Select JumboFrames from the QoS Policy field.
10. Select Enable-CDP from the Network Control Policy field.
11. Leave everything else the same and select the OK button and then again in the box that appears.
12. Follow steps 3-11 a second time making sure to enter Fabric-B in the Name field and selecting Fabric B for the Fabric ID.

Ethernet Adapter Policy Setup
Cisco UCS provides a default set of Ethernet adapter policies. These policies include the recommended settings for each supported server operating system. Cisco UCS Administrators are encouraged to use these existing polices or to create new, unique adapter policies.
Cisco UCS best practice is to configure MTU 9000 (also known as jumbo frames) for any storage facing networks. Enabling jumbo frames on specific interfaces guarantees approximate throughput of 40 Gbps on the Cisco UCS fabric. It is possible to configure an existing adapter policy to meet this criteria or to simply create a new one.
If the customer deployment only supports standard frame sizes (MTU 1500), all the other settings detailed below can still be configured to achieve approximately 40 Gbps of bandwidth.
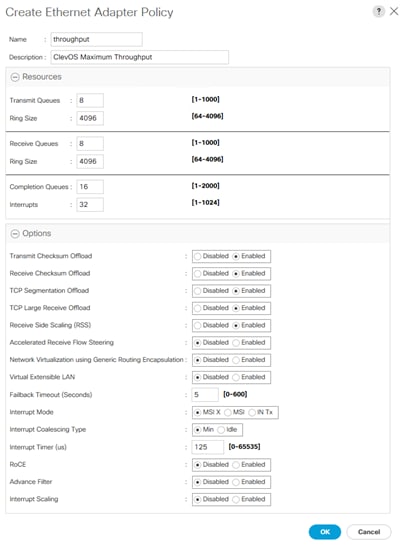
To create a custom, throughput-optimized adapter policy, complete the following steps:
1. Click the Server button on the left-hand side.
2. Navigate to Servers > Policies > root > Adapter Policies from the exposed, left-hand tree.
3. Click the Add button at the bottom of the right hand pane.
4. Type in throughput in the Name field.
5. (Optional) Enter a description in the Description field.
6. Under Resources type in the following values:
a. Transmit Queues: 8
b. Ring Size: 4096
c. Receive Queues: 8
d. Ring Size: 4096
e. Completion Queues: 16
f. Interrupts: 32
7. Under Options enable Receive Side Scaling (RSS).
8. Click OK and then click OK again.
Boot Policy Setup
To create a Boot Policy, complete the following steps :
1. Click the Servers button on the left-hand side.
2. Navigate to Servers > Policies > root > Boot Policies from the exposed, left-hand tree.
3. Click the Add button at the bottom of the right-hand pane.
4. Type in ClevOS-boot in the Name field.
5. (Optional) Enter a description in the Description field.
6. Place a check in the box next to Reboot on Boot Order Change.
7. Confirm that Boot Mode is set to Legacy.
8. Expand the subsection titled Local Devices.
9. Select Add Local Disk.
10. Select Add CD/DVD.
11. Select OK.

LAN Connectivity Policy Creation
To create a LAN Connectivity Policy, complete the following steps:
1. Select the LAN button on the left-hand side.
2. Navigate to LAN > Policies > root > LAN Connectivity Policies from the exposed, left-hand tree.
3. Select the Add button at the bottom of the right-hand pane.
4. Type in ClevOS-LCP in the Name field.
5. (Optional) Enter a description in the Description field.
6. Click Add.
7. Type in first-vNIC in the Name field.
8. Select the checkbox next to Use vNIC Template.
9. From the vNIC Template drop-down, select Fabric-A.
10. From the Adapter Policy drop-down, select throughput.
11. Click OK and click Add again to add a second vNIC.
12. Type in second-vNIC in the Name field.
13. Select the checkbox next to Use vNIC Template.
14. From the vNIC Template drop-down, select Fabric-B.
15. From the Adapter Policy drop-down, select throughput.
16. Click OK. Click OK a second time to finalize creation of the LAN Connectivity Policy.


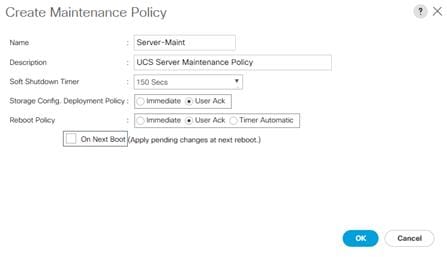
Maintenance Policy Creation
To create a Maintenance Policy, complete the following steps:
1. Click the Servers button on the left-hand side.
2. Navigate to Servers > Policies > root > Maintenance Policies from the exposed, left-hand tree.
3. Click the Add button at the bottom of the right-hand pane.
4. Type in Server-Maint in the Name field.
5. (Optional) Enter a description in the Description field.
6. Select User Ack under Reboot Policy.
7. Click OK. Click OK a second time to finalize creation of the Maintenance Policy.
Power Control Policy Creation
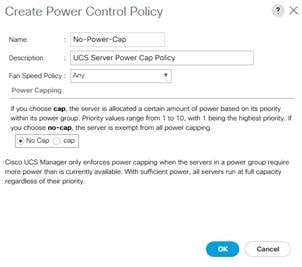
To create a Maintenance Policy, complete the following steps:
1. Select the Servers button on the left-hand side.
2. Navigate to Servers > Policies > root > Power Control Policies from the exposed, left-hand tree.
3. Click the Add button at the bottom of the right-hand pane.
4. Type in No-Power-Cap in the Name field.
5. (Optional) Enter a description in the Description field.
6. Select No Cap under Power Capping.
7. Click OK. Click OK a second time to finalize creation of the Power Control Policy.
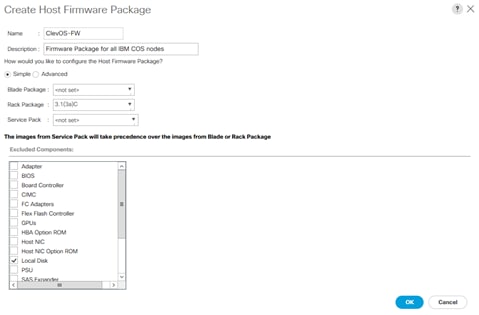
Host Firmware Package Creation
To create a Host Firmware Package, complete the following steps:
1. Click the Servers button on the left-hand side.
2. Navigate to Servers > Policies > root > Host Firmware Packages from the exposed, left-hand tree.
3. Click the Add button at the bottom of the right-hand pane.
4. Type in ClevOS-FW in the Name field.
5. (Optional) Enter a description in the Description field.
6. Select 3.1(3a)C under the drop-down for Rack Package.
7. Click OK. Click OK a second time to finalize creation of the Host Firmware Package.
BIOS Policy Creation
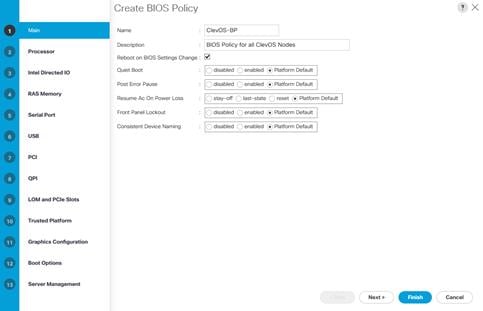
The BIOS policy feature in Cisco UCS provides automation of the BIOS configuration process. Traditionally, the BIOS is configured manually on each node and can lead to mismatched configurations and other errors. By creating a BIOS Policy and assigning that policy to a server or group of servers, errors are easily reduced, matched configurations can be easily verified, and modifications are easily distributed to all members of that policy.
The BIOS policy below is merely a recommendation that should optimize performance for IO based applications. If the end goal is to optimize for energy efficiency, CPU performance, latency sensitivity, or any other number of potential configurations, the BIOS policy applied could be vastly different. It is acceptable to use the policy detailed below as a baseline, to create an entirely new policy based off previous experience, or use no policy at all. However, the deployment configured here utilized the BIOS policy below.
To create a BIOS Policy, complete the following steps:
1. Click the Servers button on the left-hand side.
2. Navigate to Servers > Policies > root > BIOS Policies from the exposed, left-hand tree.
3. Click the Add button at the bottom of the right-hand pane.
4. Type in ClevOS-BP in the Name field.
5. (Optional) Enter a description in the Description field.
6. Select the check box next to Reboot on BIOS Settings Change. Select the Next button.
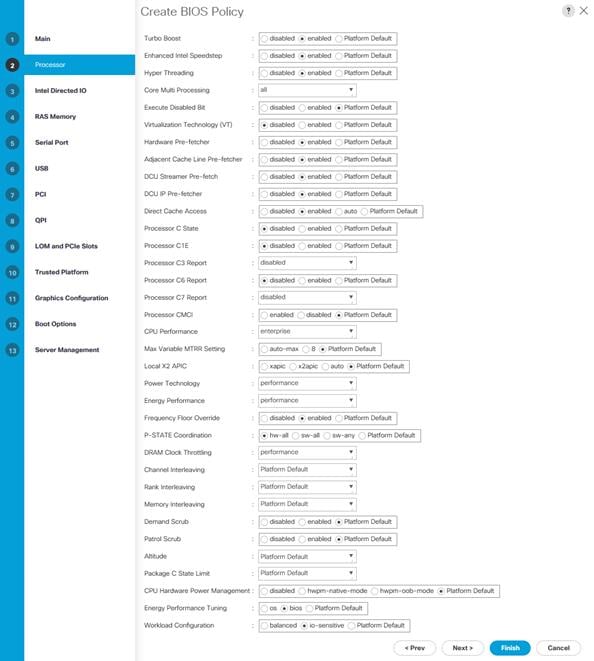
7. In the Processor section, make the following changes:
a. Turbo Boost – enabled
b. Enhanced Intel Speedstep – enabled
c. Hyper Threading – enabled
d. Core Multi Processing – all
e. Virtualization Technology (VT) – disabled
f. Hardware Pre-fetcher – enabled
g. Adjacent Cache Line Pre-fetcher – enabled
h. DCU Streamer Pre-fetch – enabled
i. DCU IP Pre-fetcher – enabled
j. Direct Cache Access – enabled
k. Processor C State – disabled
l. Processor C1E – disabled
m. Processor C3 Report – disabled
n. Processor C6 Report – disabled
o. Processor C7 Report – disabled
p. CPU Performance – enterprise
q. Power Technology – performance
r. Energy Performance – performance
s. Frequency Floor Override – enabled
t. P-STATE Coordination – hw-all
u. DRAM Clock Throttling -- performance
v. Energy Performance Tuning – bios
w. Workload Configuration – io-sensitive
8. Click Next.
9. In the section for Intel Directed IO, select Next.
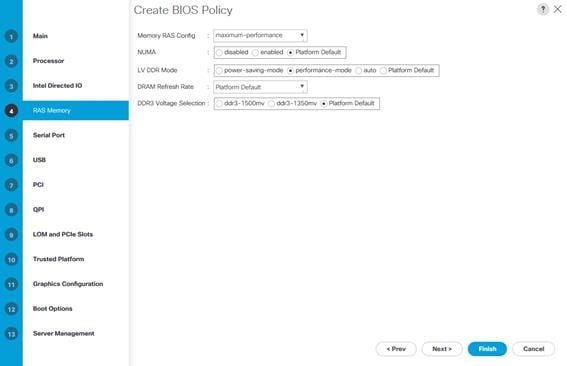
10. In the section for RAS Memory, select maximum-performance from the drop-down next to Memory RAS Config and performance-mode from the drop-down next to LV DDR Mode.
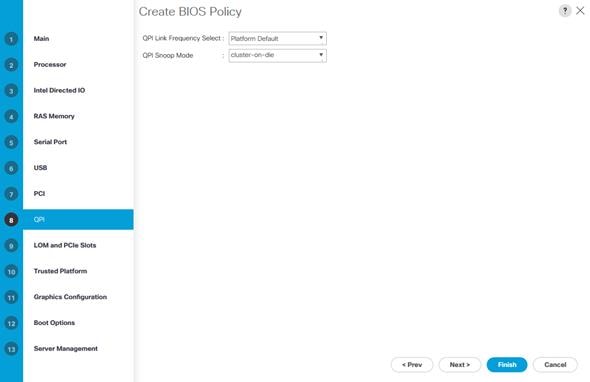
11. From the list of thirteen items on the left, select the QPI section. Select cluster-on-die next to QPI Snoop Mode drop-down.
12. From the list of thirteen items on the left, select the Server Management section. Select com-0 next to Console Redirection drop-down.

13. Select Finish. Select OK to finalize creation of the BIOS Policy.
Scrub Policy Creation
To create a Scrub Policy, complete the following steps:
1. Click the Servers button on the left-hand side.
2. Navigate to Servers > Policies > root > Scrub Policies from the exposed, left-hand tree.
3. Click the Add button at the bottom of the right-hand pane.
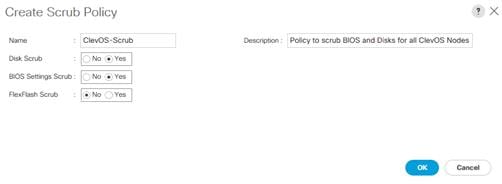
4. Type in ClevOS-Scrub in the Name field.
5. (Optional) Enter a description in the Description field.
6. In the Disk Scrub and the BIOS Settings Scrub fields, select the Yes radio buttons.
7. Click OK. Click OK a second time to finalize creation of the Scrub Policy.
Creating Chassis Profile
The Chassis Profile is required to assign specific disks to a particular server node in a Cisco UCS S3260 Storage Server as well as upgrading to a specific chassis firmware package.
Chassis Firmware Package Creation
To create a Chassis Firmware Package, complete the following steps:
1. Click the Chassis button on the left-hand side.
2. Navigate to Chassis > Policies > root > Chassis Firmware Package from the exposed, left-hand tree.
3. Click the Add button at the bottom of the right-hand pane.
4. Type in S3260-3.1.3a in the Name field.
5. (Optional) Enter a description in the Description field.
6. Select 3.1(3a)C under Chassis Package.
7. Click OK. Click OK a second time to finalize creation of the Chassis Firmware Package.

Chassis Maintenance Policy Package Creation
To create a Chassis Maintenance Policy, complete the following steps:
1. Click the Chassis button on the left-hand side.
2. Navigate to Chassis > Policies > root > Chassis Maintenance Policies from the exposed, left-hand tree.
3. Select the Add button at the bottom of the right-hand pane.
4. Type in S3260-MP in the Name field.
5. (Optional) Enter a description in the Description field.
6. Click OK. Click OK a second time to finalize creation of the Chassis Maintenance Policy.

Compute Connection Policy Creation
To create a Compute Connection Policy, complete the following steps:
1. Click the Chassis button on the left-hand side.
2. Navigate to Chassis > Policies > root > Compute Connection Policies from the exposed, left-hand tree.
3. Click the Add button at the bottom of the right-hand pane.
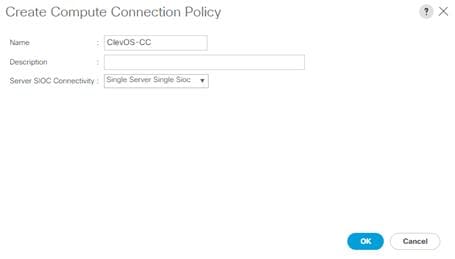
4. Type in ClevOS-CC in the Name field.
5. On the drop-down titled Server SIOC Connectivity, select Single Server Single SIOC.
6. Click OK. Click OK a second time to finalize creation of the Compute Connection Policy.
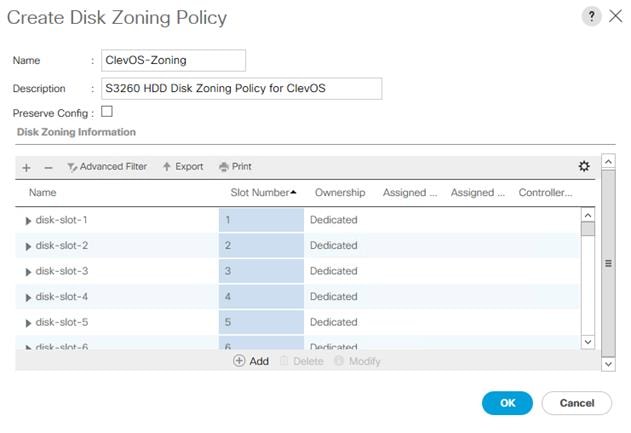
Disk Zoning Policy Creation
To create a Disk Zoning Policy, complete the following steps:
1. Click the Chassis button on the left-hand side.
2. Navigate to Chassis > Policies > root > Disk Zoning Policies from the exposed, left-hand tree.
3. Click the Add button at the bottom of the right-hand pane.
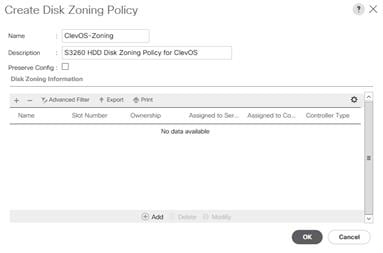
4. Type in ClevOS-Zoning in the Name field.
5. (Optional) Enter a description in the Description field.
6. Click the Add button at the bottom of the area titled Disk Zoning Information.
7. Select Dedicated under Ownership.
8. Next to Server, select 1.
9. Next to Controller, select 1.
10. Next to Slot Range enter 1-7,15-21,29-35,43-49. Include dashes and commas but no spaces.
11. Click OK.

12. Click the Add button again at the bottom of the area titled Disk Zoning Information.
13. Select Dedicated under Ownership.
14. Next to Server, select 2.
15. Next to Controller, select 1.
16. Next to Slot Range enter 8-14,22-28,36-42,50-56. Include dashes and commas but no spaces.
17. Click OK.

18. Click OK. Click OK a second time to finalize creation of the Disk Zoning Policy.
Chassis Profile Template Creation
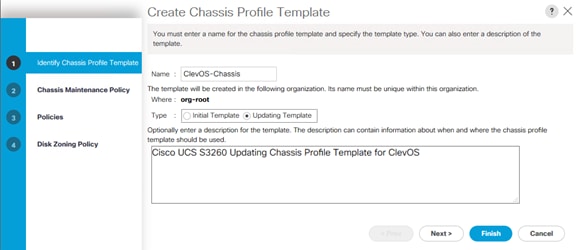
To create a Chassis Profile Template, complete the following steps:
1. Click the Chassis button on the left-hand side.
2. Navigate to Chassis > Chassis Profile Templates > root from the exposed, left-hand tree.
3. Select Create Chassis Profile Template underneath the Actions section of the right-hand pane.
4. Type in ClevOS-Chassis in the Name field.
5. Select Updating Template in the Type field.
6. (Optional) Enter a description in the Description field.
7. Click Next.
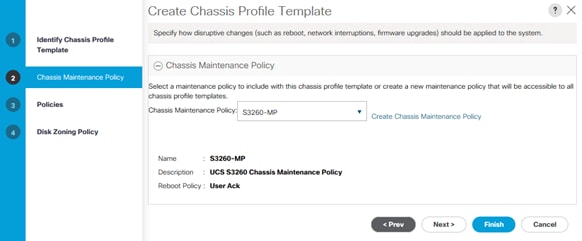
8. On the drop-down titled Chassis Maintenance Policy, select the previously created Chassis Maintenance Policy, S3260-MP.
9. Click Next.
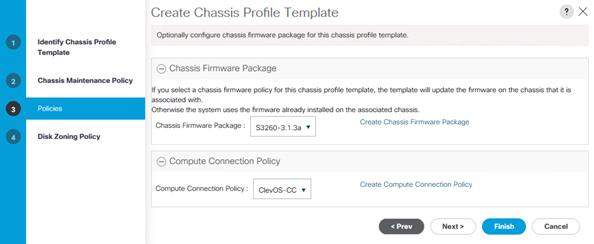
10. On the Policies page, select the + to expand the sections titled Chassis Firmware Package and Compute Connection Policy.
11. On the drop-down titled Chassis Firmware Package, select the previously created Chassis Firmware Package, S3260-3.1.3a.
12. On the drop-down titled Compute Connection Policy, select the previously created Compute Connection Policy, ClevOS-CC.
13. Click Next.
14. On the Disk Zoning Policy page, select the previously created Disk Zoning Policy, ClevOS-Zoning.
15. Click Finish. Select OK a second time to finalize creation of the Chassis Profile Template.

Chassis Profile Creation from Template
To create Chassis Profiles from the previously created Chassis Profile Template, complete the following steps:
1. Click the Chassis button on the left-hand side.
2. Navigate to Chassis > Chassis Profiles > root from the exposed, left-hand tree.
3. Select Create Chassis Profiles from Template underneath the Actions section of the right-hand pane.
4. Type in ClevOS-Chassis in the Name field.
5. Leave the Name Suffix Starting Number untouched.
6. Enter 6 for the Number of Instances for all connected Cisco UCS S3260 Storage Server.
7. Choose the previously created Chassis Profile Template, ClevOS-Chassis.
8. Click OK. Click OK a second time to finalize creation of the Chassis Profiles.
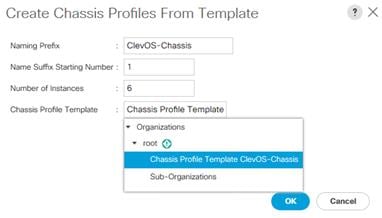
Chassis Profile Association
To associate the previously created Chassis Profiles, complete the following steps:
1. Click the Chassis button on the left-hand side.
2. Navigate to Chassis > Chassis Profiles from the exposed, left-hand tree and select the first Chassis Profile created from template, ClevOS-Chassis1.
3. Select Change Chassis Profile Association underneath the Actions section of the right-hand pane.
4. Choose Select existing Chassis from the Chassis Assignment drop-down.
5. Under Available Chassis, select ID 1.
6. Click OK. Click OK a second time to finalize association of Chassis Profile ClevOS-Chassis1.

7. Repeat the steps above by associating the five newly created Chassis Profiles with IDs 2 – 6.
Storage Profile Creation
Configure Cisco UCS C220 M4 Rack-Mount Server Disks to Unconfigured Good
By default, the drives that ship with the Rack-Mount servers are configured in JBOD mode. Complete the following steps to convert them from JBOD to Unconfigured-Good:
1. Click the Equipment button on the left-hand side.
2. Navigate to Equipment > Rack-Mounts > Servers > Server 1 > Disks from the exposed, left-hand tree.
3. Select both disks and right-click Set JBOD to Unconfigured-Good.
4. Repeat the steps for Server 2-5.
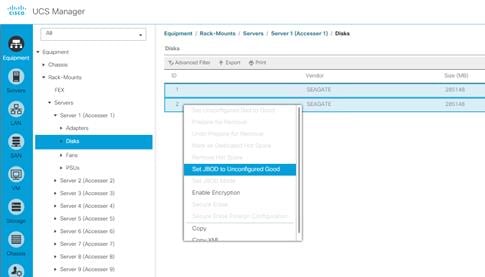
Disk Group Policy Creation for Cisco UCS S3260 Storage Server
To create the Disk Group Policy that will be used for the Cisco UCS S3260 Storage Server, complete the following steps:
1. Click the Storage button on the left-hand side.
2. Navigate to Storage > Storage Policies > root > Disk Group Policies from the exposed, left-hand tree.
3. Click the Add button at the bottom of the right hand pane.
4. Type in S3260-DG in the Name field.
5. (Optional) Enter a description in the Description field.
6. Select RAID 1 Mirrored from the RAID Level drop-down.
7. Select Disk Group Configuration (Manual).
8. Click the Add button in the section titled Disk Group Configuration (Manual).
9. Enter 201 in the section labeled Slot Number and select OK.
10. Click the Add button again in the section titled Disk Group Configuration (Manual).
11. Enter 202 in the section labeled Slot Number and select OK.
12. Leave everything else untouched and click OK. Click OK a second time to finalize creation of the Disk Group Policy for the S3260.

Disk Group Policy Creation for Cisco UCS C220 M4
To create the Disk Group Policy that will be used for the Cisco UCS C220 M4, complete the following steps:
1. Click the Storage button on the left-hand side.
2. Navigate to Storage > Storage Policies > root > Disk Group Policies from the exposed, left-hand tree.
3. Click the Add button at the bottom of the right hand pane.
4. Type in C220M4-DG in the Name field.
5. (Optional) Enter a description in the Description field.
6. Select RAID 1 Mirrored from the RAID Level drop-down.
7. Select Disk Group Configuration (Manual).
8. Click the Add button in the section titled Disk Group Configuration (Manual).
9. Enter 1 in the section labeled Slot Number and select OK.
10. Click the Add button again in the section titled Disk Group Configuration (Manual).
11. Enter 2 in the section labeled Slot Number and click OK.
12. Leave everything else untouched and click OK. Click OK a second time to finalize creation of the Disk Group Policy for the Cisco UCS C220 M4.

Storage Profile Creation for Cisco UCS S3260 Storage Server
To create the Storage Profile that will be used for the Cisco UCS S3260 Storage Server, complete the following steps:
1. Click the Storage button on the left-hand side.
2. Navigate to Storage > Storage Profiles > root from the exposed, left-hand tree.
3. Select Create Storage Profile underneath the Actions section of the right-hand pane.
4. Type in S3260-boot in the Name field.
5. (Optional) Enter a description in the Description field.
6. Click the Add button in the section titled Local LUNs.
7. Click the Create Local LUN radio button.
8. Type in boot in the Name field
9. Leave Size (GB), Fractional Size (MB), and Auto Deploy at their default settings – 1, 0, and Auto Deploy.
10. Select the check box next to Expand to Available.
11. Select the previously created Disk Group Policy, S3260-DG, next to the drop-down titled Select Disk Group Configuration.

12. Click OK. Click OK again. Click OK a final time to finalize creation of the Storage Profile for the S3260.
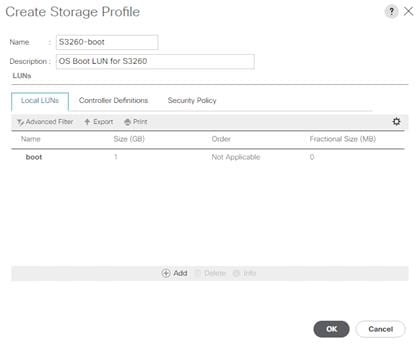
Storage Profile Creation for Cisco UCS C220 M4
To create the Storage Profile that will be used for the Cisco UCS C220 M4, complete the following steps:
1. Click the Storage button on the left-hand side.
2. Navigate to Storage > Storage Profiles > root from the exposed, left-hand tree.
3. Select Create Storage Profile underneath the Actions section of the right-hand pane.
4. Type in C220M4-boot in the Name field.
5. (Optional) Enter a description in the Description field.
6. Click the Add button in the section titled Local LUNs.
7. Select the Create Local LUN radio button.
8. Type in boot in the Name field
9. Leave Size (GB), Fractional Size (MB), and Auto Deploy at their default settings – 1, 0, and Auto Deploy.
10. Select the check box next to Expand to Available.
11. Select the previously created Disk Group Policy, C220M4-DG, next to the drop-down titled Select Disk Group Configuration.
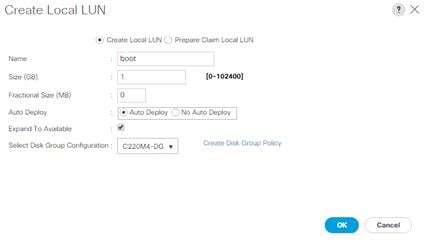
12. Click OK. Click OK again. Click OK a final time to finalize creation of the Storage Profile for the C220 M4.

Service Profile Template Creation
Service Profile Template Creation for Cisco UCS S3260 Storage Server
To create the Service Profile Template that will be used for the Cisco UCS S3260 Storage Server, complete the following steps:
1. Click the Servers button on the left-hand side.
2. Navigate to Servers > Service Profiles Template > root from the exposed, left-hand tree.
3. Select Create Service Profile Template underneath the Actions section of the right-hand pane.
4. Type in SlicestorTemplate in the Name field.
5. Next to the Type field, select the Updating Template radio button.
6. Next to the UUID Assignment drop-down, select the default UUID Pool modified earlier.
7. (Optional) Enter a description in the Description field and click Next.
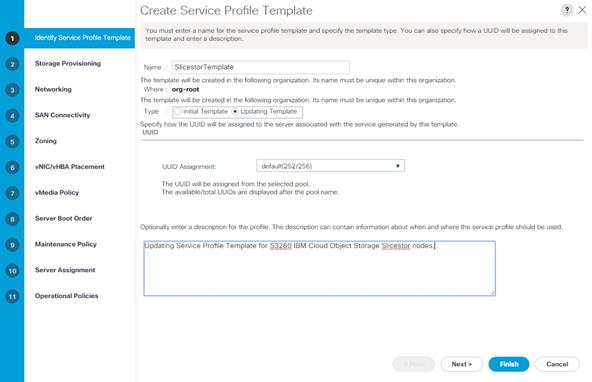
8. In the Storage Provisioning section, navigate to the Storage Profile Policy tab and select the previously created storage profile for the S3260, S3260-boot from the Storage Profile drop-down.
9. Click Next.

10. In the Networking section, select the Use Connectivity Policy radio button in the field that asks the question How would you like to configure LAN connectivity?
11. From the LAN Connectivity Policy drop-down, select the previously created ClevOS-LCP policy.
12. Click Next.

13. In the SAN Connectivity section, select the No vHBAs radio button in the field that asks the question How would you like to configure SAN connectivity?
14. Click Next.

15. In the Zoning section, click Next.
16. In the vNIC/vHBA section, click Next.
17. In the vMedia Policy section, click Next.
18. In the Server Boot Order section, select the previously created ClevOS-boot from the Boot Policy drop-down.
19. Click Next.

20. In the Maintenance Policy section, select the previously created Server-Maint from the Maintenance Policy drop-down.
21. Click Next button.
22. In the Server Assignment section, expand the Firmware Management section and select ClevOS-FW from the Host Firmware Package drop-down.
23. Click Next.

24. In the Operational Policies section, expand the following sections -- BIOS Configuration, and Power Control Policy Configuration, and Scrub Policy.
25. Select ClevOS-BP from the BIOS Policy drop-down.
26. Select No-Power-Cap from the Power Control Policy drop-down.
27. Select ClevOS-Scrub from the Scrub Policy drop-down.
28. Click Finish. Click OK to finalize creation of the Service Profile Template.

Service Profile Template Creation for Cisco UCS C220 M4S
The Service Profiles for the Cisco UCS C220 M4S nodes used for both the Accesser and the Manager are very similar. Complete the following steps to create the Service Profile Template that will be used for the Cisco UCS C220 M4S Server:
1. Click the Servers button on the left-hand side.
2. Navigate to Servers > Service Profiles Template > root from the exposed, left-hand tree.
3. Select Create Service Profile Template underneath the Actions section of the right-hand pane.
4. Type in AccesserTemplate in the Name field.
5. Next to the Type field, select the Updating Template radio button.
6. Next to the UUID Assignment drop-down, select the default UUID Pool modified earlier.
7. (Optional) Enter a description in the Description field and select the Next button.

8. In the Storage Provisioning section, navigate to the Storage Profile Policy tab and select the previously created storage profile for the C220 M4S, C220M4-boot from the Storage Profile drop-down.
9. Click Next.

10. In the Networking section, select the Use Connectivity Policy radio button in the field that asks the question How would you like to configure LAN connectivity?
11. From the LAN Connectivity Policy drop-down, select the previously created ClevOS-LCP policy.
12. Click Next.
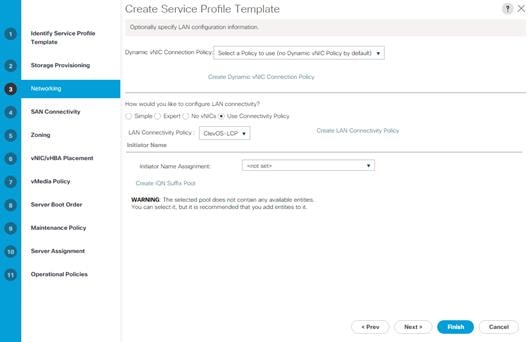
13. In the SAN Connectivity section, select the No vHBAs radio button in the field that asks the question How would you like to configure SAN connectivity?
14. Click Next.

15. In the Zoning section, select the Next button.
16. In the vNIC/vHBA section, select the Next button.
17. In the vMedia Policy section, select the Next button.
18. In the Server Boot Order section, select the previously created ClevOS-boot from the Boot Policy drop-down.

19. Select the Next button.
20. In the Maintenance Policy section, select the previously created Server-Maint from the Maintenance Policy drop-down.
21. Select the Next button.
22. In the Server Assignment section, expand the Firmware Management section and select ClevOS-FW from the Host Firmware Package drop-down.
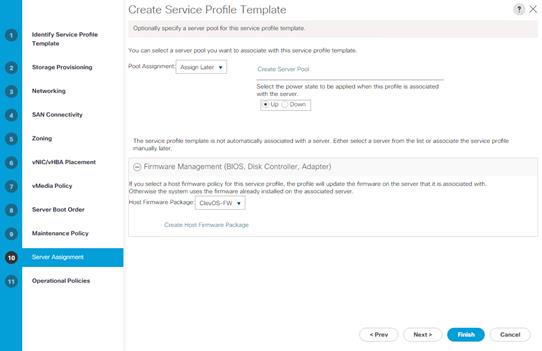
23. Select the Next button.
24. In the Operational Policies section, expand the following sections -- BIOS Configuration, and Power Control Policy Configuration, and Scrub Policy.
25. Select ClevOS-BP from the BIOS Policy drop-down.
26. Select No-Power-Cap from the Power Control Policy drop-down.
27. Select ClevOS-Scrub from the Scrub Policy drop-down.

28. Select Finish. Select OK to finalize creation of the Service Profile Template.
Service Profile Creation from Template
The Service Profiles Templates created for Slicestor, Accesser, and Manager can now be used to create the specific service profiles that will be applied to each S3260 and C220 node. Complete the following steps to create the Service Profiles that will be used for the ClevOS installation on all nodes:
1. Select the Servers button on the left-hand side.
2. Navigate to Servers > Service Profiles > root from the exposed, left-hand tree.
3. Select Create Service Profiles from Template underneath the Actions section of the right-hand pane.
4. Type in Slicestor- in the Name Prefix field.
5. Leave Name Suffix Starting Number as 1.
6. Type in 12 for the Number of Instances.
7. In the field next to Service Profile Template, select the previously created template, SlicestorTemplate, from the drop-down.
8. Select OK and then select OK again at the window that appears.

9. Repeat steps 3 through 6 above for the Accessers and the following changes:
a. Name Prefix: Accesser-
b. Number of Instances: 4
c. Service Profile Template: AccesserTemplate
10. Select OK and then select OK again at the window that appears.

11. Repeat steps 3 through 6 above for the manager taking care to make the following changes:
a. Name Prefix: Manager-
b. Number of Instances: 1
c. Service Profile Template: AccesserTemplate
12. Select OK and then select OK again at the window that appears.

Service Profile Association
Once Service Profile Creation has completed, the final required step before ClevOS installation can being is to associate the newly created profiles to the servers in inventory. This step is required for the Manager, all Accessers, and all Slicestors. Complete the following steps to associate the Service Profiles that will be used for the ClevOS installation on all nodes:
1. Select the Equipment button on the left-hand side.
2. Navigate to Equipment > Chassis > Chassis 1 > Server 1 (Slicestor 1) from the exposed, left-hand tree.
3. Select Associate Service Profile underneath the Actions section of the right-hand pane.
4. Select the radio button next to Service Profile Slicestor-1 from the table that appears in the Associate Service Profile window.
5. Select OK.

6. Repeat the previous steps according to the labels created earlier, continuing on with associating Service Profile Slicestor-2 to the server labeled Slicestor 2. Follow the table below:
| Physical Server Location |
Label |
Service Profile |
| Chassis 1 / Server 1 |
Slicestor 1 |
Slicestor-1 |
| Chassis 1 / Server 2 |
Slicestor 2 |
Slicestor-2 |
| Chassis 2 / Server 1 |
Slicestor 3 |
Slicestor-3 |
| Chassis 2 / Server 2 |
Slicestor 4 |
Slicestor-4 |
| Chassis 3 / Server 1 |
Slicestor 5 |
Slicestor-5 |
| Chassis 3 / Server 2 |
Slicestor 6 |
Slicestor-6 |
| Chassis 4 / Server 1 |
Slicestor 7 |
Slicestor-7 |
| Chassis 4 / Server 2 |
Slicestor 8 |
Slicestor-8 |
| Chassis 5 / Server 1 |
Slicestor 9 |
Slicestor-9 |
| Chassis 5 / Server 2 |
Slicestor 10 |
Slicestor-10 |
| Chassis 6 / Server 1 |
Slicestor 11 |
Slicestor-11 |
| Chassis 6 / Server 2 |
Slicestor 12 |
Slicestor-12 |
7. Next, the Accessers need to be associated to their appropriate servers. Select the Equipment button on the left-hand side.
8. Navigate to Equipment > Rack-Mounts > Servers > Server 1 (Accesser 1) from the exposed, left-hand tree.
9. Select Associate Service Profile underneath the Actions section of the right-hand pane.
10. Select the radio button next to Service Profile Accesser-1 from the table that appears in the Associate Service Profile window.
11. Select OK.
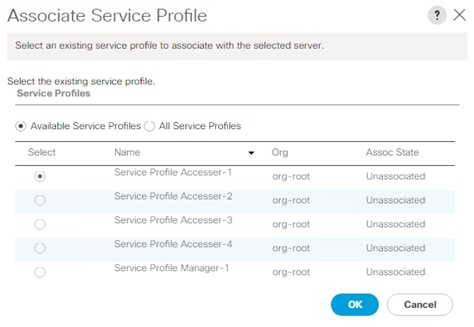
12. Repeat the previous steps according to the labels created earlier, continuing on with associating Service Profile Accesser-2 to the server labeled Slicestor 2. Follow the table below.
| Physical Server Location |
Label |
Service Profile |
| Server 1 |
Accesser 1 |
Accesser -1 |
| Server 2 |
Accesser 2 |
Accesser -2 |
| Server 3 |
Accesser 3 |
Accesser -3 |
| Server 4 |
Accesser 4 |
Accesser -4 |
13. Finally, the Manager need to be associated to its appropriate servers. Select the Equipment button on the left-hand side.
14. Navigate to Equipment > Rack-Mounts > Servers > Server 14 (Manager) from the exposed, left-hand tree.
![]() The actual server number may vary depending on the number of Cisco UCS C220 M4S servers within the environment, but placing the manager at the end allows the number of Accessers to grow without the need to impact naming and numbering conventions.
The actual server number may vary depending on the number of Cisco UCS C220 M4S servers within the environment, but placing the manager at the end allows the number of Accessers to grow without the need to impact naming and numbering conventions.
15. Select Associate Service Profile underneath the Actions section of the right-hand pane.
16. Select the radio button next to Service Profile Manager-1 from the table that appears in the Associate Service Profile window.
17. Select OK.
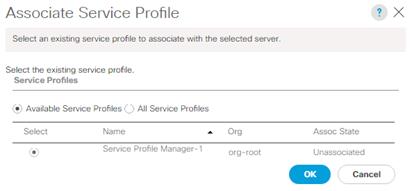
18. Wait for the Service Profile Association to complete.
Port Channel Creation for Uplinks
Port Channel Creation for Fabric Interconnects
Each Fabric Interconnects needs a port channel uplink configured to the Cisco Nexus 9332PQ. Complete the following steps to create the Port Channels on each FI:
1. Select the LAN button on the left-hand side.
2. Navigate to LAN > LAN Cloud > Fabric A from the exposed, left-hand tree.
3. Select Create Port Channel underneath the Actions section of the right-hand pane.
4. Type in 10 in the ID field.
5. Type in vPC10 in the Name field.

6. Click Next.
7. Select the available ports on the left 27-32 and assign them with >> to Ports in the Port Channel.
8. Select Finish and then OK.

9. Navigate to LAN > LAN Cloud > Fabric B from the exposed, left-hand tree.
10. Select Create Port Channel underneath the Actions section of the right-hand pane.
11. Type in 11 in the ID field.
12. Type in vPC11 in the Name field.

13. Click Next.
14. Select the available ports on the left 27-32 and assign them with >> to Ports in the Port Channel.
15. Select Finish and then OK.

Configure Cisco Nexus 9332PQ Switch A and B
Both Cisco UCS Fabric Interconnects are connected to two Cisco Nexus 9332PQ switches for connectivity to the upstream network. The following sections describe the setup of both Cisco Nexus 9332PQ switches.
Initial Setup of Cisco Nexus 9332PQ Switch A and B
To configure Switch A, please connect a Console to the Console port of each switch, power on the switch and complete the following steps:
1. Type yes.
2. Type n.
3. Type n.
4. Type n.
5. Enter the switch name.
6. Type y.
7. Type your IPv4 management address for Switch A.
8. Type your IPv4 management netmask for Switch A.
9. Type y.
10. Type your IPv4 management default gateway address for Switch A.
11. Type n.
12. Type n.
13. Type y for ssh service.
14. Press <Return> and then <Return>.
15. Type y for ntp server.
16. Type the IPv4 address of the NTP server.
17. Press <Return>, then <Return> and again <Return>.
18. Check the configuration and if correct then press <Return> and again <Return>.
The complete setup looks like the following:
---- System Admin Account Setup ----
Do you want to enforce secure password standard (yes/no) [y]: no
Enter the password for "admin":
Confirm the password for "admin":
---- Basic System Configuration Dialog VDC: 1 ----
This setup utility will guide you through the basic configuration of
the system. Setup configures only enough connectivity for management
of the system.
Please register Cisco Nexus9000 Family devices promptly with your
supplier. Failure to register may affect response times for initial
service calls. Nexus9000 devices must be registered to receive
entitled support services.
Press Enter at anytime to skip a dialog. Use ctrl-c at anytime
to skip the remaining dialogs.
Would you like to enter the basic configuration dialog (yes/no): yes
Create another login account (yes/no) [n]:
Configure read-only SNMP community string (yes/no) [n]: no
Configure read-write SNMP community string (yes/no) [n]: no
Enter the switch name : N9K-A
Continue with Out-of-band (mgmt0) management configuration? (yes/no) [y]: yes
Mgmt0 IPv4 address : 192.168.10.211
Mgmt0 IPv4 netmask : 255.255.255.0
Configure the default gateway? (yes/no) [y]: yes
IPv4 address of the default gateway : 192.168.10.1
Configure advanced IP options? (yes/no) [n]: no
Enable the telnet service? (yes/no) [n]: no
Enable the ssh service? (yes/no) [y]: yes
Type of ssh key you would like to generate (dsa/rsa) [rsa]: rsa
Number of rsa key bits <1024-2048> [1024]: 1024
Configure the ntp server? (yes/no) [n]: yes
NTP server IPv4 address : 192.168.10.3
Configure default interface layer (L3/L2) [L3]: L2
Configure default switchport interface state (shut/noshut) [shut]: shut
Configure CoPP system profile (strict/moderate/lenient/dense) [strict]:
The following configuration will be applied:
password strength-check
switchname N9K-A
vrf context management
ip route 0.0.0.0/0 192.168.10.1
exit
no feature telnet
ssh key rsa 1024 force
feature ssh
ntp server 192.168.10.3
no system default switchport
system default switchport shutdown
copp profile strict
interface mgmt0
ip address 192.168.10.211 255.255.255.0
no shutdown
Would you like to edit the configuration? (yes/no) [n]: no
Use this configuration and save it? (yes/no) [y]: yes
[########################################] 100%
Copy complete.
User Access Verification
N9K-A login:
Repeat the same steps for Nexus 9332PQ Switch B with the exception of configuring a different IPv4 management address 192.168.10.212 as described in step 7.
Enable Features on Cisco Nexus 9332PQ Switch A and B
To enable the features UDLD, VLAN, HSRP, LACP, VPC, and Jumbo Frames, connect to the management interface via ssh on both switches and complete the following steps on both Switch A and B:
Switch A
N9K-A# configure terminal
Enter configuration commands, one per line. End with CNTL/Z.
N9K-A(config)# feature udld
N9K-A(config)# feature interface-vlan
N9K-A(config)# feature hsrp
N9K-A(config)# feature lacp
N9K-A(config)# feature vpc
N9K-A(config)# system jumbomtu 9216
N9K-A(config)# exit
N9K-A(config)# copy running-config startup-config
Switch B
N9K-B# configure terminal
Enter configuration commands, one per line. End with CNTL/Z.
N9K-B(config)# feature udld
N9K-B(config)# feature interface-vlan
N9K-B(config)# feature hsrp
N9K-B(config)# feature lacp
N9K-B(config)# feature vpc
N9K-B(config)# system jumbomtu 9216
N9K-B(config)# exit
N9K-B(config)# copy running-config startup-config
Configure vPC and Port Channels on Cisco Nexus C9332PQ Switch A and B
To enable Port Channel and Virtual Port Channel on both Nexus 9332 A and B, complete the following steps:
vPC and Port Channels for PeerLink on Switch A
N9K-A# config terminal
Enter configuration commands, one per line. End with CNTL/Z.
N9K-A(config)# vpc domain 20
N9K-A(config-vpc-domain)# peer-keepalive destination 192.168.10.212
Note:
--------:: Management VRF will be used as the default VRF ::--------
N9K-A(config-vpc-domain)# peer-gateway
N9K-A(config-vpc-domain)# exit
N9K-A(config)# interface port-channel 20
N9K-A(config-if)# description vPC peerlink for N9K-A and N9K-B
N9K-A(config-if)# switchport
N9K-A(config-if)# switchport mode trunk
N9K-A(config-if)# spanning-tree port type network
N9K-A(config-if)# speed 40000
N9K-A(config-if)# vpc peer-link
Please note that spanning tree port type is changed to "network" port type on vPC peer-link.
This will enable spanning tree Bridge Assurance on vPC peer-link provided the STP Bridge Assurance
(which is enabled by default) is not disabled.
N9K-A(config-if)# exit
N9K-A(config)# interface ethernet 1/27-32
N9K-A(config-if)# switchport
N9K-A(config-if)# switchport mode trunk
N9K-A(config-if)# speed 40000
N9K-A(config-if)# channel-group 20 mode active
N9K-A(config-if)# exit
N9K-A(config)# copy running-config startup-config
vPC and Port Channels for Peerlink on Switch B
N9K-B# config terminal
Enter configuration commands, one per line. End with CNTL/Z.
N9K-B(config)# vpc domain 20
N9K-B(config-vpc-domain)# peer-keepalive destination 192.168.10.211
Note:
--------:: Management VRF will be used as the default VRF ::--------
N9K-B(config-vpc-domain)# peer-gateway
N9K-B(config-vpc-domain)# exit
N9K-B(config)# interface port-channel 20
N9K-B(config-if)# description vPC peerlink for N9K-A and N9K-B
N9K-B(config-if)# switchport
N9K-B(config-if)# switchport mode trunk
N9K-B(config-if)# spanning-tree port type network
N9K-B(config-if)# speed 40000
N9K-B(config-if)# vpc peer-link
Please note that spanning tree port type is changed to "network" port type on vPC peer-link.
This will enable spanning tree Bridge Assurance on vPC peer-link provided the STP Bridge Assurance
(which is enabled by default) is not disabled.
N9K-B(config-if)# exit
N9K-B(config)# interface ethernet 1/27-32
N9K-B(config-if)# switchport
N9K-B(config-if)# switchport mode trunk
N9K-B(config-if)# speed 40000
N9K-B(config-if)# channel-group 20 mode active
N9K-B(config-if)# exit
N9K-B(config)# copy running-config startup-config
vPC and Port Channels for Uplink from Fabric Interconnect A and B on Switch A
N9K-A# config terminal
Enter configuration commands, one per line. End with CNTL/Z.
N9K-A(config)# interface port-channel 10
N9K-A(config-if)# description vPC for UCS FI-A
N9K-A(config-if)# vpc 10
N9K-A(config-if)# switchport
N9K-A(config-if)# switchport mode trunk
N9K-A(config-if)# switchport trunk allowed vlan all
N9K-A(config-if)# spanning-tree port type edge trunk
Edge port type (portfast) should only be enabled on ports connected to a single
host. Connecting hubs, concentrators, switches, bridges, etc... to this
interface when edge port type (portfast) is enabled, can cause temporary bridging loops.
Use with CAUTION
N9K-A(config-if)# mtu 9216
N9K-A(config-if)# exit
N9K-A(config)# interface port-channel 11
N9K-A(config-if)# description vPC for UCS FI-B
N9K-A(config-if)# vpc 11
N9K-A(config-if)# switchport
N9K-A(config-if)# switchport mode trunk
N9K-A(config-if)# switchport trunk allowed vlan all
N9K-A(config-if)# spanning-tree port type edge trunk
Edge port type (portfast) should only be enabled on ports connected to a single
host. Connecting hubs, concentrators, switches, bridges, etc... to this
interface when edge port type (portfast) is enabled, can cause temporary bridging loops.
Use with CAUTION
N9K-A(config-if)# mtu 9216
N9K-A(config-if)# exit
N9K-A(config)# interface ethernet 1/1, ethernet 1/3, ethernet 1/5
N9K-A(config-if)# switchport
N9K-A(config-if)# switchport mode trunk
N9K-A(config-if)# mtu 9216
N9K-A(config-if)# channel-group 10 mode active
N9K-A(config-if)# exit
N9K-A(config)# interface ethernet 1/2, ethernet 1/4, ethernet 1/6
N9K-A(config-if)# switchport
N9K-A(config-if)# switchport mode trunk
N9K-A(config-if)# mtu 9216
N9K-A(config-if)# channel-group 11 mode active
N9K-A(config-if)# exit
N9K-A(config)# exit
N9K-A(config)# copy running-config startup-config
vPC and Port Channels for Uplink from Fabric Interconnect A and B on Switch B
N9K-B# config terminal
Enter configuration commands, one per line. End with CNTL/Z.
N9K-B(config)# interface port-channel 10
N9K-B(config-if)# description vPC for UCS FI-A
N9K-B(config-if)# vpc 10
N9K-B(config-if)# switchport
N9K-B(config-if)# switchport mode trunk
N9K-B(config-if)# switchport trunk allowed vlan all
N9K-B(config-if)# spanning-tree port type edge trunk
Edge port type (portfast) should only be enabled on ports connected to a single
host. Connecting hubs, concentrators, switches, bridges, etc... to this
interface when edge port type (portfast) is enabled, can cause temporary bridging loops.
Use with CAUTION
N9K-B(config-if)# mtu 9216
N9K-B(config-if)# exit
N9K-B(config)# interface port-channel 11
N9K-B(config-if)# description vPC for UCS FI-B
N9K-B(config-if)# vpc 11
N9K-B(config-if)# switchport
N9K-B(config-if)# switchport mode trunk
N9K-B(config-if)# switchport trunk allowed vlan all
N9K-B(config-if)# spanning-tree port type edge trunk
Edge port type (portfast) should only be enabled on ports connected to a single
host. Connecting hubs, concentrators, switches, bridges, etc... to this
interface when edge port type (portfast) is enabled, can cause temporary bridging loops.
Use with CAUTION
N9K-B(config-if)# mtu 9216
N9K-B(config-if)# exit
N9K-B(config)# interface ethernet 1/1, ethernet 1/3, ethernet 1/5
N9K-B(config-if)# switchport
N9K-B(config-if)# switchport mode trunk
N9K-B(config-if)# mtu 9216
N9K-B(config-if)# channel-group 10 mode active
N9K-B(config-if)# exit
N9K-B(config)# interface ethernet 1/2, ethernet 1/4, ethernet 1/6
N9K-B(config-if)# switchport
N9K-B(config-if)# switchport mode trunk
N9K-B(config-if)# mtu 9216
N9K-B(config-if)# channel-group 11 mode active
N9K-B(config-if)# exit
N9K-B(config)# exit
N9K-B(config)# copy running-config startup-config
Verify Cisco Nexus C9332PQ Configuration for Switch A and B
Switch A
N9K-A# show vpc brief
Legend:
(*) - local vPC is down, forwarding via vPC peer-link
vPC domain id : 20
Peer status : peer adjacency formed ok
vPC keep-alive status : peer is alive
Configuration consistency status : success
Per-vlan consistency status : success
Type-2 consistency status : success
vPC role : secondary
Number of vPCs configured : 2
Peer Gateway : Enabled
Dual-active excluded VLANs : -
Graceful Consistency Check : Enabled
Auto-recovery status : Disabled
Delay-restore status : Timer is off.(timeout = 30s)
Delay-restore SVI status : Timer is off.(timeout = 10s)
vPC Peer-link status
---------------------------------------------------------------------
id Port Status Active vlans
-- ---- ------ --------------------------------------------------
1 Po20 up 1
vPC status
----------------------------------------------------------------------
id Port Status Consistency Reason Active vlans
-- ---- ------ ----------- ------ ------------
10 Po10 up success success 1
11 Po11 up success success 1
N9K-A# show port-channel summary
Flags: D - Down P - Up in port-channel (members)
I - Individual H - Hot-standby (LACP only)
s - Suspended r - Module-removed
S - Switched R - Routed
U - Up (port-channel)
p - Up in delay-lacp mode (member)
M - Not in use. Min-links not met
--------------------------------------------------------------------------------
Group Port- Type Protocol Member Ports
Channel
--------------------------------------------------------------------------------
1 Po1(RD) Eth NONE --
10 Po10(SU) Eth LACP Eth1/1(P) Eth1/3(P) Eth1/5(P)
11 Po11(SU) Eth LACP Eth1/2(P) Eth1/4(P) Eth1/6(P)
20 Po20(SU) Eth LACP Eth1/27(P) Eth1/28(P) Eth1/29(P)
Eth1/30(P) Eth1/31(P) Eth1/32(P)
Switch B
N9K-B# show vpc brief
Legend:
(*) - local vPC is down, forwarding via vPC peer-link
vPC domain id : 20
Peer status : peer adjacency formed ok
vPC keep-alive status : peer is alive
Configuration consistency status : success
Per-vlan consistency status : success
Type-2 consistency status : success
vPC role : secondary
Number of vPCs configured : 2
Peer Gateway : Enabled
Dual-active excluded VLANs : -
Graceful Consistency Check : Enabled
Auto-recovery status : Disabled
Delay-restore status : Timer is off.(timeout = 30s)
Delay-restore SVI status : Timer is off.(timeout = 10s)
vPC Peer-link status
---------------------------------------------------------------------
id Port Status Active vlans
-- ---- ------ --------------------------------------------------
1 Po20 up 1
vPC status
----------------------------------------------------------------------
id Port Status Consistency Reason Active vlans
-- ---- ------ ----------- ------ ------------
10 Po10 up success success 1
11 Po11 up success success 1
N9K-B# show port-channel summary
Flags: D - Down P - Up in port-channel (members)
I - Individual H - Hot-standby (LACP only)
s - Suspended r - Module-removed
S - Switched R - Routed
U - Up (port-channel)
p - Up in delay-lacp mode (member)
M - Not in use. Min-links not met
--------------------------------------------------------------------------------
Group Port- Type Protocol Member Ports
Channel
--------------------------------------------------------------------------------
1 Po1(RD) Eth NONE --
10 Po10(SU) Eth LACP Eth1/1(P) Eth1/3(P) Eth1/5(P)
11 Po11(SU) Eth LACP Eth1/2(P) Eth1/4(P) Eth1/6(P)
20 Po20(SU) Eth LACP Eth1/27(P) Eth1/28(P) Eth1/29(P)
Eth1/30(P) Eth1/31(P) Eth1/32(P)
The formal setup of the Cisco UCS Manager environment and both Cisco Nexus 9332PQ switches is now finished and the installation of the IBM Cloud Object Storage ClevOS software will continue.
Installation of IBM Cloud Object Storage ClevOS
The following section provides the detailed procedures for installing IBM COS ClevOS on Cisco UCS C220 M4S and Cisco UCS S3260 Storage Server. The installation uses the KVM console and virtual media from Cisco UCS Manager.
![]() This requires IBM COS ClevOS media for the installation.
This requires IBM COS ClevOS media for the installation.
(Optional) Preparation to Use NFS Mount for Installation
It can be beneficial in some environments to leverage the functionality of an NFS server, especially when deploying a large number for ClevOS nodes. Cisco UCS Manager is able to leverage an NFS server for direct service profile vMedia mounts. NFS Server creation is beyond the scope of this guide, and it is assumed that the necessary ISO files are already copied to the NFS share that will utilized by Cisco UCS Manager. To create a vMedia Policy, complete the following steps:
1. Select the Servers button on the left-hand side.
2. Navigate to Servers > Policies > root > vMedia Policies from the exposed, left-hand tree.
3. Select the Add button at the bottom of the right-hand pane.
4. Enter ClevOS-vMP into the Name field.
5. (Optional) Enter a description in the Description field and select the Next button.

6. Select the Add button.
7. Enter ClevOS-AIO-ISO into the Name field.
8. Select the CDD radio button in the Device Type field.
9. In the Protocol field, select NFS.
10. Enter the IP address of the NFS server in the into the Hostname/IP Address field.
11. Enter the ISO name clevos-3.10.0.126~ucs3-allinone-usbiso.iso into the Remote File field.
12. Enter the remote path into the Remote File field.
13. Select the OK button. Select the OK button a second time. Select the OK button a final time on the dialog window that appears.

Next, the Service Profile Templates must be updated to reflect the newly created vMedia Policy. If the prior instructions to create an updating template were followed, only the templates need to be updated in order to apply the policy. To apply the vMedia Policy, complete the following steps:
1. Select the Servers button on the left-hand side.
2. Navigate to Servers > Service Profile Templates > root > Service Template AccesserTemplate that was created previously from the exposed, left-hand tree.
3. Select the vMedia Policy tab at from the top of the right-hand pane.
4. Select Modify vMedia Policy underneath the Actions section of the right-hand pane.
5. Select the previously created vMedia Policy ClevOS-vMP from the vMedia Policy drop-down field.
6. Select the OK button. Select the OK button a second time.

7. Follow the same steps above to Service Profile Template SlicestorTemplate in order to apply the vMedia Policy to the Slicestor nodes.
(Optional) Preparation to Use Local File Mount for Installation
In some environments, it might not be possible to leverage the use of an NFS server. If that is the case, at install time, the ISO media will need to be mounted for every node. This method requires less initial setup and is easier to troubleshoot, but it can take longer overall and can break some of the policy based automation that using an NFS server delivers. Either option is acceptable. To mount the local ClevOS ISO file for installation, complete the following steps at install time:
1. Select the Servers button on the left-hand side.
2. Navigate to Servers > Service Profiles > root > <Desired Service Profile> from the exposed, left-hand tree.
3. Select KVM Console underneath the Actions section of the right-hand pane. Accept any prompts or follow any links until the KVM Console is present. This could require a Java software upgrade or disabling pop ups in the browser.
4. Once the KVM Console is present, select the third button from the right from the row of buttons on the top right hand side![]() . When the drop-down appears, select Activate Virtual Devices. This process can take 5-10 seconds.
. When the drop-down appears, select Activate Virtual Devices. This process can take 5-10 seconds.
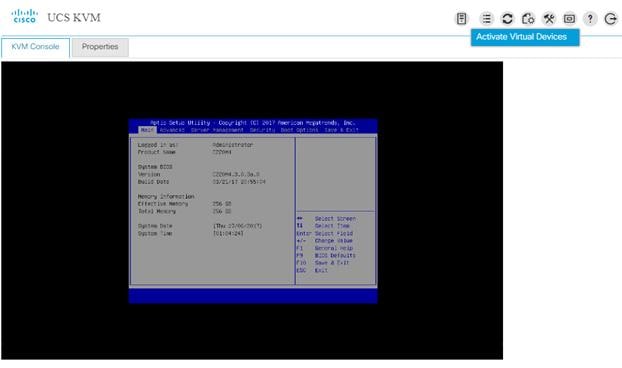
5. Once that process completes, select the third button from the right from the row of buttons on the top right hand side![]() a second time. When the drop-down appears, select CD/DVD.
a second time. When the drop-down appears, select CD/DVD.

6. From the window that appears, select Choose File button. Navigate to the location of the ClevOS ISO on the local user filesystem. Select the Open button.
7. Once the appropriate ClevOS ISO is selected, select the Map Drive button.

8. The ISO is now mounted as a CD/DVD and will remain mounted until the system ejects it or vMedia is deactivated or unmapped.
IBM COS Manager Installation and Configuration on Cisco UCS C220 M4S
To install ClevOS onto the Cisco UCS C220 M4S to be used as the IBM Cloud Object Storage Manager, complete the following steps:
1. Select the Servers button on the left-hand side.
2. Navigate to Servers > Service Profiles > root > Manager-1 from the exposed, left-hand tree.
3. Select KVM Console underneath the Actions section of the right-hand pane. Accept any prompts or follow any links until the KVM Console is present. This could require a Java software upgrade or disabling pop ups in the browser.
4. Mount installation media:
a. If mounting local media, follow the steps at the beginning of this section.
b. If mounting media via NFS vMedia Policy described at the start of this section, do nothing.
5. Once the KVM Console is present, select the far left button from the row of buttons on the top right hand side. When the drop-down appears, select Reset.
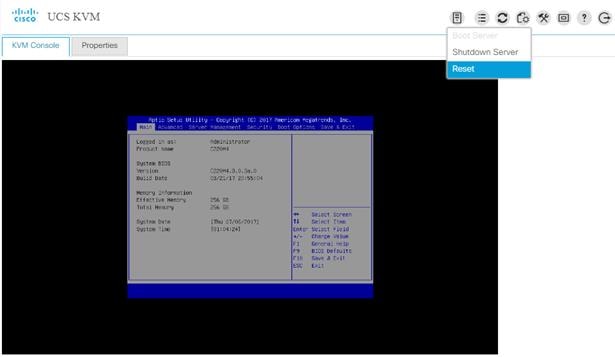
6. When the first prompt appears, select OK. Select OK a second time to start the reboot process.
7. During the boot process, if the installation media is mounted correctly, the following bootloader screen should be present. If not, additional troubleshooting may be required.

8. Select option #1 Perform Automatic Installation at the first ClevOS installation screen that appears.

9. Select option #2 Factory Install (Erase all disks and install) at the next ClevOS installation screen that appears.
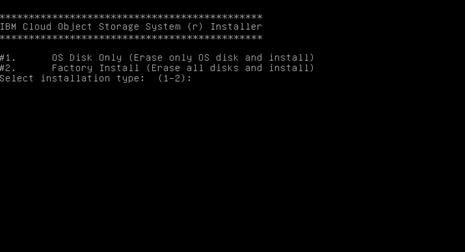
10. Upon making the last selection, a new prompt will appear warning that all disks will be erased during this process. To confirm this data destructive behavior, type in erase and hit enter.

11. At the next ClevOS installation screen, select the desired source image, #3 CLEVOS-3.10.0.126~UCS3-MANAGER and press Enter.

12. The following screen will be present during installation. Once installation completes, the system will reboot.
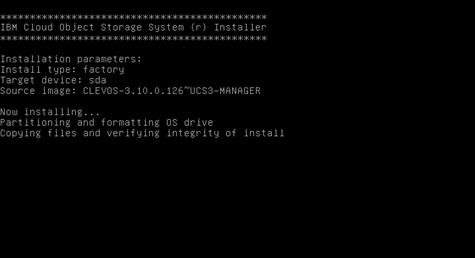
13. Once the system has been rebooted and the following screen appears, ClevOS installation has completed.

Installation has finished on the IBM COS Manager node. To finish initial Manager node first-time configuration, complete the following steps:
19. At the ClevOS Manager login prompt, provide the following credentials:
- Username – localadmin
- Password – password
20. Once logged in at the local console via UCSM KVM, change the password by following the prompts:
manager# password
Current password: <type in ‘password’ here>
New password: <type in the new, secure password here>
Retype new password: <re-enter the new password from above here>
Password change successful
manager#
![]() It is highly recommended to change the password at first login. In addition to following good security protocol, ClevOS will not enable Secure Shell (SSH) remote access until the default password has been changed.
It is highly recommended to change the password at first login. In addition to following good security protocol, ClevOS will not enable Secure Shell (SSH) remote access until the default password has been changed.
21. ClevOS uses a configuration shell that can be entered by entering the command edit. Enter the configuration shell and input the following commands to perform initial configuration steps, making changes in your environment as necessary.
manager# edit
manager (working)#
22. Configure the interfaces that will a part of the channel data.
manager (working)# channel data port p3p1,p3p2
23. Establish an IP address for the data channel.
24. manager (working)# channel data ip 192.168.1.200 netmask 255.255.0.0
25. Set the bonding type to be used by the data channel.
manager (working)# channel data bonding active-backup
26. Configure MTU 9000 for the data channel.
manager (working)# channel data bondmtu 9000
27. Configure a hostname for this node.
manager (working)# system hostname manager01
28. Provide some basic location details. This increases the randomness during the private key generation process.
manager (working)# system organization cisco city sjc state ca country us
29. Once all information has been entered suitable to the deployment, activate the configuration.
manager (working)# activate
30. Wait for activation to complete. The servers in this design guide exist on a private network; therefore, any DNS or gateway errors are safe to ignore.
31. Once activation has completed, navigate to the ClevOS Manager ip address configured up above – 192.168.1.200.
32. If the webserver responds and the following screen appears, initial first time console setup has completed.
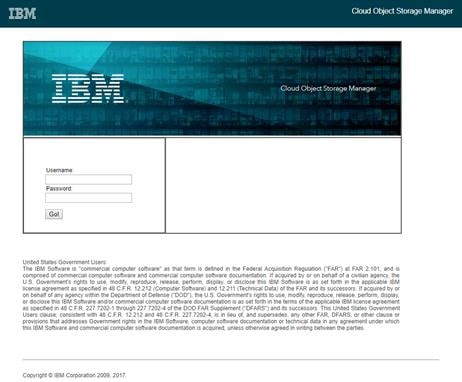
33. First time console configuration should now be complete on the ClevOS Manager Node. To finish initial web UI configuration, complete the following steps.
34. At the IBM Cloud Object Storage Manager login prompt at the IP address configured above, provide the following credentials:
- Username – admin
- Password – password
35. Once logged in web interface, accept the license agreement and input the name of the license acceptor. Then select the button titled Accept IBM & non-IBM Licenses.

36. At the next screen, select the radio button Create a new system and then select the Begin button.
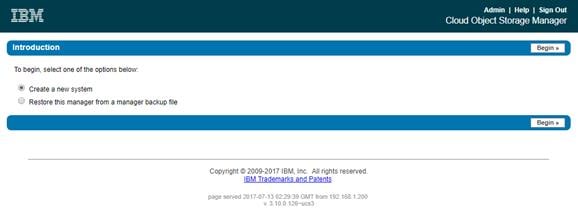
37. At the Admin Password screen, enter a new password in the both fields to change the default and then select Save and Continue.

38. At the Create Sites screen, modify as much information as desired and then select Save and Continue.
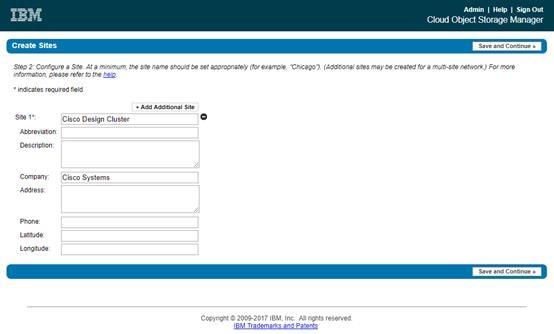
39. At the final screen Provide a License Key, leave it blank and select Finish.
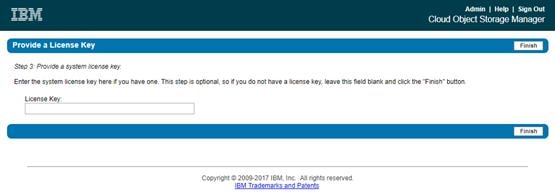
40. After selecting Finish button, the Initial Web UI setup should now be complete.
IBM COS Accesser Installation and Configuration on Cisco UCS C220 M4S
To install ClevOS onto the Cisco UCS C220 M4S to be used as the IBM Cloud Object Storage Accesser, complete the following steps:
1. Select the Servers button on the left-hand side.
2. Navigate to Servers > Service Profiles > root > Accesser-1 from the exposed, left-hand tree.
3. Select KVM Console underneath the Actions section of the right-hand pane. Accept any prompts or follow any links until the KVM Console is present. This could require a Java software upgrade or disabling pop ups in the browser.
4. Mount installation media
a. If mounting local media, follow the steps at the beginning of the previous section.
b. If mounting media via NFS vMedia Policy described at the start of this section, do nothing.
5. Once the KVM Console is present, select the far left button from the row of buttons on the top right hand side. When the drop-down appears, select Reset.

6. When the first prompt appears, select OK. Select OK a second time to start the reboot process.
7. During the boot process, if the installation media is mounted correctly, the following bootloader screen should be present. If not, additional troubleshooting may be required.
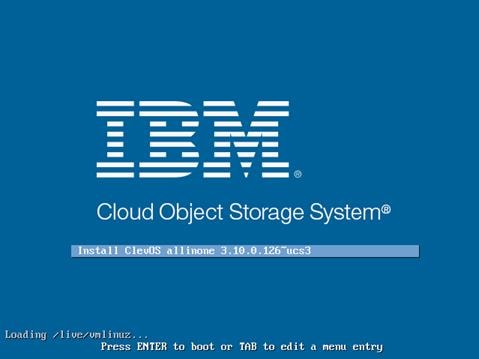
8. Select option #1 Perform Automatic Installation at the first ClevOS installation screen that appears.
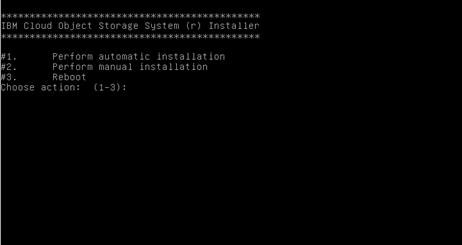
9. Select option #2 Factory Install (Erase all disks and install) at the next ClevOS installation screen that appears.
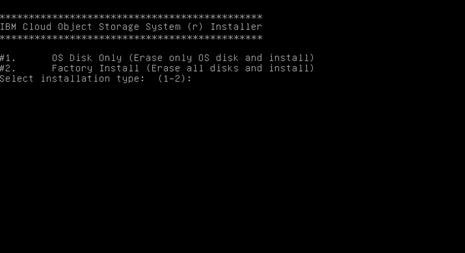
10. When making the last selection, a new prompt will appear warning that all disks will be erased during this process. To confirm this data destructive behavior, type in erase and hit enter.

11. At the next ClevOS installation screen, select the desired source image, #1 CLEVOS-3.10.0.126~UCS3-ACCESSER and hit enter.
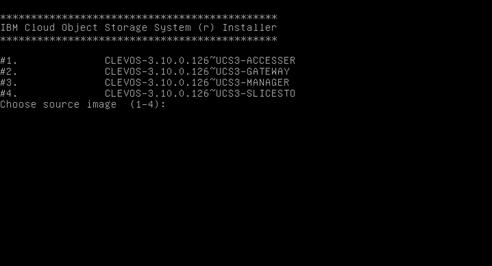
12. The following screen will be present during installation. Once installation completes, the system will reboot.
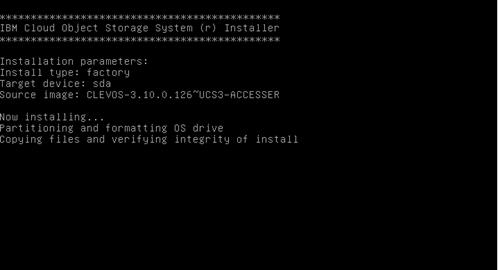
13. Once the system has been rebooted and the following screen appears, ClevOS installation has completed.
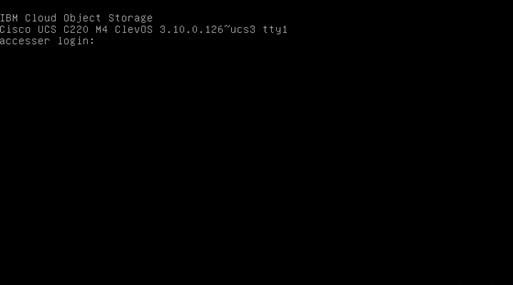
41. Installation has finished on the IBM COS Accesser node. To finish initial Accesser node first-time configuration, complete the following steps:
42. At the ClevOS Accesser login prompt, provide the following credentials:
- Username – localadmin
- Password – password
43. Once logged in at the local console via UCSM KVM, change the password by following the prompts:
accesser# password
Current password: <type in ‘password’ here>
New password: <type in the new, secure password here>
Retype new password: <re-enter the new password from above here>
Password change successful
accesser#
![]() It is highly recommended to change the password at first login. In addition to following good security protocol, ClevOS will not enable Secure Shell (SSH) remote access until the default password has been changed.
It is highly recommended to change the password at first login. In addition to following good security protocol, ClevOS will not enable Secure Shell (SSH) remote access until the default password has been changed.
44. ClevOS uses a configuration shell that can be entered by entering the command edit. Enter the configuration shell and input the following commands to perform initial configuration steps, making changes in your environment as necessary.
accesser# edit
accesser (working)#
45. Configure the interfaces that will a part of the channel data.
46. accesser (working)# channel data port p3p1,p3p2
47. Establish an IP address for the data channel.
accesser (working)# channel data ip 192.168.1.101 netmask 255.255.0.0
48. Set the bonding type to be used by the data channel.
accesser (working)# channel data bonding active-backup
49. Configure MTU 9000 for the data channel.
accesser (working)# channel data bondmtu 9000
50. Configure a hostname for this node.
accesser (working)# system hostname accesser01
51. Provide some basic location details. This increases the randomness during the private key generation process.
accesser (working)# system organization cisco city sjc state ca country us
52. Provide the IP address of the previously configured ClevOS Manager. Accept any errors about manager certificates which occur as a result of the network interface not yet being up by entering y and skip entering a manager prefix by selecting the enter key at the prompt.
accesser (working)# manager ip 192.168.1.200
ERROR: couldn’t retrieve manager certificate: curl returned exit code 7
Automatically accept the manager certificate when it is available? [y/N]: y
Enter prefix of manager fingerprint to verify (press enter to skip)
>
accesser (working)#
53. Once all information has been entered suitable to the deployment, activate the configuration.
accesser (working)# activate
54. Wait for activation to complete. The servers in this design guide exist on a private network; therefore, any DNS or gateway errors are safe to ignore.
55. Follow the above steps to set up the remaining Accessers 2-4, taking care to modify the IP address and hostname according to the table below:
| Service Profile |
IP Address |
Hostname |
| Accesser-1 |
192.168.1.101 |
accesser01 |
| Accesser-2 |
192.168.1.102 |
accesser02 |
| Accesser-3 |
192.168.1.103 |
accesser03 |
| Accesser-4 |
192.168.1.104 |
accesser04 |
IBM COS Slicestor Installation and Configuration on Cisco UCS S3260 M4 Server Node
To install ClevOS onto the Cisco UCS S3260 M4 Server Node to be used as the IBM Cloud Object Storage Slicestor, complete the following steps:
1. Select the Servers button on the left-hand side.
2. Navigate to Servers > Service Profiles > root > Slicestor-1 from the exposed, left-hand tree.
3. Select KVM Console underneath the Actions section of the right-hand pane. Accept any prompts or follow any links until the KVM Console is present. This could require a Java software upgrade or disabling pop ups in the browser.
4. Mount installation media:
5. If mounting local media, follow the steps at the beginning of the previous section.
6. If mounting media via NFS vMedia Policy described at the start of this section, do nothing.
7. Once the KVM Console is present, select the far left button from the row of buttons on the top right hand side. When the drop-down appears, select Reset.

8. When the first prompt appears, select OK. Select OK a second time to start the reboot process.
9. During the boot process, if the installation media is mounted correctly, the following bootloader screen should be present. If not, additional troubleshooting may be required.

10. Select option #1 Perform Automatic Installation at the first ClevOS installation screen that appears.

11. Select option #2 Factory Install (Erase all disks and install) at the next ClevOS installation screen that appears.

12. Upon making the last selection, a new prompt will appear warning that all disks will be erased during this process. To confirm this data destructive behavior, type in erase and hit enter.

13. At the next ClevOS installation screen, select the desired source image, #4 CLEVOS-3.10.0.126~UCS3-SLICESTO and hit enter.

14. The following screen will be present during installation. Once installation completes, the system will reboot.

15. Once the system has been rebooted and the following screen appears, ClevOS installation has completed.

Installation has finished on the IBM COS Slicestor node. To finish initial Slicestor node first-time configuration, complete the following steps:
1. At the ClevOS Slicestor login prompt, provide the following credentials:
- Username – localadmin
- Password – password
2. Once logged in at the local console via UCSM KVM, change the password by following the prompts.
slicestor# password
Current password: <type in ‘password’ here>
New password: <type in the new, secure password here>
Retype new password: <re-enter the new password from above here>
Password change successful
slicestor#
![]() It is highly recommended to change the password at first login. In addition to following good security protocol, ClevOS will not enable Secure Shell (SSH) remote access until the default password has been changed.
It is highly recommended to change the password at first login. In addition to following good security protocol, ClevOS will not enable Secure Shell (SSH) remote access until the default password has been changed.
3. ClevOS uses a configuration shell that can be entered by entering the command edit. Enter the configuration shell and input the following commands to perform initial configuration steps, making changes in your environment as necessary.
slicestor# edit
slicestor (working)#
4. Configure the interfaces that will a part of the channel data.
slicestor (working)# channel data port p2p1,p2p2
![]() The first M4 Server Node in each S3260 Storage Server will enumerate each interface as p2p1 and p2p2. The second M4 Server Node will enumerate each interface as p3p1 and p3p2, similar to the C220 M4S nodes configured above. This can be confusing, but an easy way to determine which node has which enumerated interface is by noting odd or even service profiles. Odd service profiles (1, 3, 5...11) will use p2p1 and p2p2. Even service profiles (2, 4, 6...12) will use p3p1 and p3p2. Issuing the ‘port’ command from the ClevOS configuration console will also list the OS visible ports.
The first M4 Server Node in each S3260 Storage Server will enumerate each interface as p2p1 and p2p2. The second M4 Server Node will enumerate each interface as p3p1 and p3p2, similar to the C220 M4S nodes configured above. This can be confusing, but an easy way to determine which node has which enumerated interface is by noting odd or even service profiles. Odd service profiles (1, 3, 5...11) will use p2p1 and p2p2. Even service profiles (2, 4, 6...12) will use p3p1 and p3p2. Issuing the ‘port’ command from the ClevOS configuration console will also list the OS visible ports.
5. Establish an IP address for the data channel.
slicestor (working)# channel data ip 192.168.1.1 netmask 255.255.0.0
6. Set the bonding type to be used by the data channel.
slicestor (working)# channel data bonding active-backup
7. Configure MTU 9000 for the data channel.
slicestor (working)# channel data bondmtu 9000
8. Configure a hostname for this node.
slicestor (working)# system hostname slicestor01
9. Provide some basic location details. This increases the randomness during the private key generation process.
slicestor (working)# system organization cisco city sjc state ca country us
10. Provide the IP address of the previously configured ClevOS Manager. Accept any errors about manager certificates which occur as a result of the network interface not yet being up by entering y and skip entering a manager prefix by selecting the enter key at the prompt.
slicestor (working)# manager ip 192.168.1.200
ERROR: couldn’t retrieve manager certificate: curl returned exit code 7
Automatically accept the manager certificate when it is available? [y/N]: y
Enter prefix of manager fingerprint to verify (press enter to skip)
>
slicestor (working)#
11. Once all information has been entered suitable to the deployment, activate the configuration.
slicestor (working)# activate
12. Wait for activation to complete. The servers in this design guide exist on a private network; therefore, any DNS or gateway errors are safe to ignore.
13. Follow the above steps to set up the remaining Slicestors 2-12, taking care to modify the IP address and hostname according to the table below:
| Service Profile |
IP Address |
Hostname |
| Slicestor-1 |
192.168.1.1 |
Slicestor01 |
| Slicestor-2 |
192.168.1.2 |
Slicestor02 |
| Slicestor-3 |
192.168.1.3 |
Slicestor03 |
| Slicestor-4 |
192.168.1.4 |
Slicestor04 |
| Slicestor-5 |
192.168.1.5 |
Slicestor05 |
| Slicestor-6 |
192.168.1.6 |
Slicestor06 |
| Slicestor-7 |
192.168.1.7 |
Slicestor07 |
| Slicestor-8 |
192.168.1.8 |
Slicestor08 |
| Slicestor-9 |
192.168.1.9 |
Slicestor09 |
| Slicestor-10 |
192.168.1.10 |
Slicestor10 |
| Slicestor-11 |
192.168.1.11 |
Slicestor11 |
| Slicestor-12 |
192.168.1.12 |
Slicestor12 |
IBM COS Jumbo Frame Verification
To verify that jumbo frames are correctly implemented in the environment, ClevOS has iperf installed by default on all nodes. Before moving on to more complex activities, it can be beneficial to verify the network as operating as intended. This test will also determine if SSH was configured correctly. To test if MTU 9000 is correctly configured, complete the following steps:
1. Open a Secure Shell client of choice. PuTTY will be used in this example, but others may be used as well.
2. In the field titled Host Name (or IP Address), enter localadmin@192.168.1.1 to connect to the first Slicestor.
3. Underneath the Radio Button for Connection type, select SSH. This should automatically select the correct port 22.
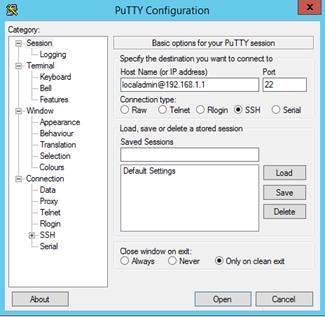
4. Select the Open button and accept any certificates popup windows until a login prompt is present.
5. Type in the password previously configured and hit the enter key until the connected to the ClevOS shell.
Using username "localadmin".
localadmin@192.168.1.1's password:
IBM Cloud Object Storage
Cisco UCS S3260 ClevOS 3.10.0.126~ucs3
Last login: Sun Jul 16 20:50:58 2017 from 192.168.1.201
IBM Cloud Object Storage Device Shell
Type '?' or 'help' to get the list of available commands.
slicestor01#
Enter the root administrator shell.
slicestor01# su
root@slicestor01:~#
Temporarily disable the firewall so that network throughput testing may occur.
root@slicestor01:~# service iptables stop
[ ok ] Stopping iptables: iptables.
root@slicestor01:~#
Start iperf in server mode.
root@slicestor01:~# iperf -s
------------------------------------------------------------
Server listening on TCP port 5001
TCP window size: 85.3 KByte (default)
------------------------------------------------------------
6. Follow steps 1 through 5 above on the first Accesser at IP address 192.168.1.101 to arrive at a similar secure shell prompt.
Using username "localadmin".
localadmin@192.168.1.101's password:
IBM Cloud Object Storage
Cisco UCS C220 M4 ClevOS 3.10.0.126~ucs3
Last login: Sun Jul 16 21:08:46 2017 from 192.168.1.201
IBM Cloud Object Storage Device Shell
Type '?' or 'help' to get the list of available commands.
accesser01# su
root@accesser01:~# service iptables stop
[ ok ] Stopping iptables: iptables.
root@accesser01:~#
7. The following command – iperf -c 192.168.1.1 -P 4 -m – will run iperf in client mode. There are two things this will test: total throughput and MTU size. The frame size is underlined in yellow and the total throughput is underlined in red.
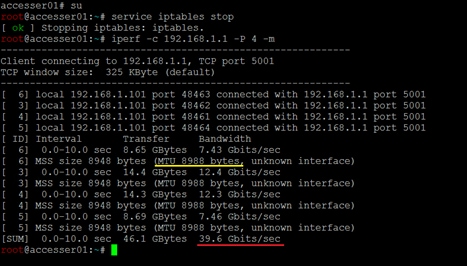
8. Perform this same test on an many ClevOS nodes as desired to confirm that jumbo frames is enable on all servers.
9. Once testing has completed, re-enable the firewall by rebooting the host or issuing the command service iptables start.
root@slicestor01:~# service iptables start
[ ok ] Starting iptables: iptables.
IBM COS dsNet setup
All software should be installed at this point and all nodes should have contacted the Manager for entry into the IBM COS dsNet . To add all nodes to the IBM COS manager, complete the following steps.
1. Open a web browser and navigate to the IP address of the IBM COS Manager – 192.168.1.200 – and log in with the credentials created previously.
2. Select Configure from the top navigation bar and observe 16 devices pending approval. This happens automatically after following the previous console command manager ip 192.168.1.200.
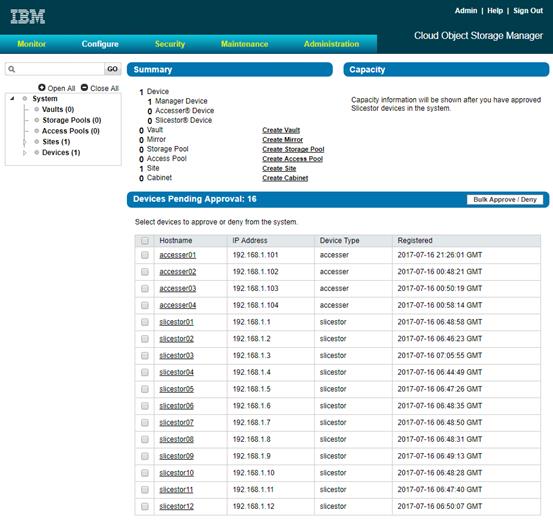
3. Select the checkbox directly to the left of the column header Hostname. This should select all pending devices for approval. Then select the button for Bulk Approve / Deny.

4. At the Bulk Device Registration screen, select Approve.

5. At the Bulk Edit Device Site screen, select the checkbox directly to the left of the column header Hostname. Next, select the radio button for the previously created site name, Cisco Design Cluster. Finally, select the Save button at the bottom right.
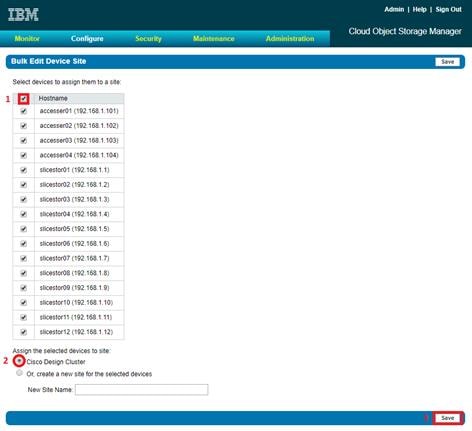
6. (Optional) At the Bulk Edit Device Alias screen, provide any alias beyond the hostname for each node if desired. Once complete, or if no alias required, select the Save button at the bottom right.
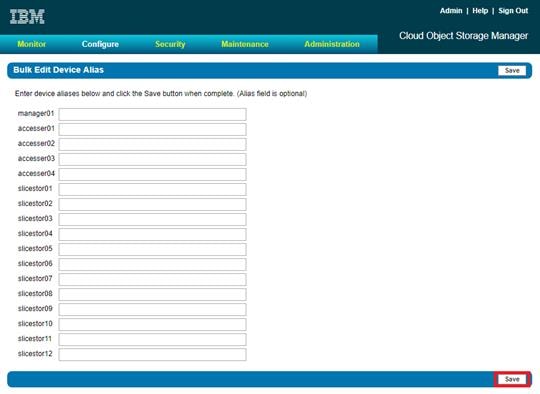
7. Device registration should now be complete and all nodes added to the Site.
Configure IBM COS to Sync with an NTP Server
It is critical to have time in sync both across all COS nodes. In order to configure the IBM COS dsNet to sync with an NTP server, complete the following steps.
1. Open a web browser and navigate to the IP address of the IBM COS Manager – 192.168.1.200 – and log in with the credentials created previously.
2. Select the Administration tab from the topmost navigation bar.
![]()
3. Scroll down to System NTP Configuration and select Configure.

4. Select the middle radio button next to Manager and External NTP. Next, enter the IP address of the configured NTP server in the External NTP Servers dialog box. Finally, select the Update button at the bottom right.
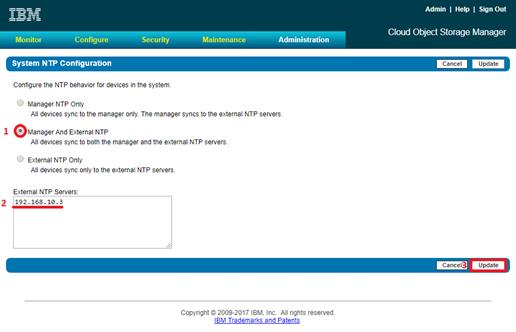
Configure Access Key Authentication
Configuring IBM COS to accept an access key can provide additional security and flexibility for object storage users. To enable access key authentication, complete the following steps:
1. Select the Security tab from the topmost navigation bar.
2. Select the Configure button in the section titled Enable/Disable Authentication Mechanisms.

3. Select the check box next to Enable access key authentication and then select Update.
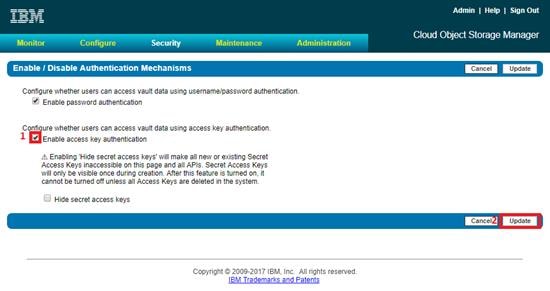
Configure IBM COS Provisioning API
In order to create new vaults (sometimes referred to as buckets), it is important to enable the Provisioning API. In order to configure the IBM COS Provisioning API, complete the following steps.
1. Open a web browser and navigate to the IP address of the IBM COS Manager – 192.168.1.200 – and log in with the credentials created previously.
2. Select the Administration tab from the topmost navigation bar.
![]()
3. Scroll down to Provisioning API Configuration and select Configure.

4. Select the bottom radio button next to Create and Delete. Next, select the Update button at the bottom right.

Create a Storage Pool
A storage pool is defined by a logical grouping of Slicestor devices used to store vault data. A vault is initially created on a storage pool, and then may be expanded by creating new storage pool or pools on additional devices. Additional pools must be a multiple width of the original pool. A Slicestor device may only be a member of a single storage pool. To create a storage pool, complete the following steps:
1. Select the Configure tab from the topmost navigation bar.
2. Select Create Storage Pool from underneath the Summary section.
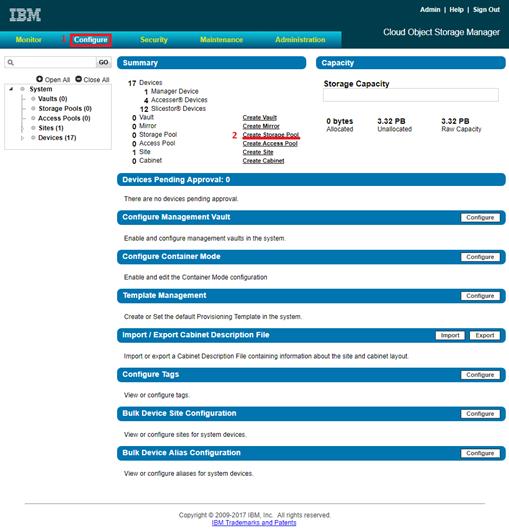
3. Provide the Storage Pool a name in the Name field.
4. Select a width equal to the total number of Slicestors contained in the pool in the Width drop-down box.
5. Selected the Packed Storage radio button which is ideal for objects that could be less than 32KB in size.
6. Verify that all 12 Slicestors are selected in the Devices section and then select the Save button.

Create Vault for User Access
A Vault is a collection of data that is stored in one logical container, across a defined Storage Pool of Slicestor devices. Multiple Vaults may be linked to the same Storage Pool. There are several considerations for vault creation.
· In order to define a vault, the quantity of Slicestor devices (width) and the Threshold must be identified. The width and the threshold will interactively determine the maximum usable capacity. The number of devices in a Storage Pool must always be a multiple of the width, e.g. for a Storage Pool with 16 Slicestor devices, the width must be either 16 or 8.
· The vault threshold, always less than the width, will determine the reliability of the vault, i.e. how many slices must be minimally present to accurately read data. The Manager UI will allow any value between 1 and the Vault Width.
· The write threshold should be set larger than the threshold. If the number of slices available is less than or equal to the write threshold, the vault will be read-only. If the number of slices is greater than the write threshold but less than or equal to the alert threshold, the vault will remain fully functional but will trigger an alert.
To create a vault, complete the following steps:
1. Select the Configure tab from the topmost navigation bar.
2. Select Create Vault from underneath the Summary section.

3. Provide a Vault name in the Name field.
4. From the Width drop-down, select the desired width, in this case 12.
5. From the Threshold drop-down, select the desired threshold, in this case 8.
6. From the Write Threshold drop-down, select the desired write threshold, in this case 10.
7. From the Alert Level drop-down, select the desired alert level, in this case 11.
8. Make certain to leave the check box next to Enable SecureSlice™ Technology checked.
9. Leave all other options at default and make any additional desired changes.
10. Select the Save button from the bottom right hand side.

Create an Access Pool
An Access Pool is a collection of Accessers that is user configurable to provide access to a vault or set of vaults. Users can be aware of which Accesser in the pool is providing connection, or a load balancer can be configured to automatically distribute load in a round robin fashion. To create an Access Pool, complete the following steps:
1. Select the Configure tab from the topmost navigation bar.
2. Select Create Access Pool from underneath the Summary section.

3. Provide an Access Pool name in the Name field.
4. From the API Type drop-down, select Cloud Storage Object.
5. Select all available Accessers from beneath the Access Devices section.
6. Select StoragePool101 from the Storage Pool field.
7. Select Standard Vault from the Item Type field.
8. Select the previously created vault101 at the bottom of the Deployment section.
9. Select the Save button from the bottom right hand side.

Create Vault Template for Provisioning
A Vault Template can be useful for vault or bucket creation via API. The first step for enabling this functionality is to create a vault. To create a vault template, complete the following steps:
1. Select the Configure tab from the topmost navigation bar.
2. Select Configure from underneath the Template Management section.

3. Within the Vault Template section beneath Template Management, select StoragePool101 from the drop-down next to Select Storage Pool for Vault Template. Next, select Create.

4. Provide a Vault Template name in the Name field.
5. From the Width drop-down, select the desired width, in this case 12.
6. From the Threshold drop-down, select the desired threshold, in this case 8.
7. From the Write Threshold drop-down, select the desired write threshold, in this case 10.
8. From the Alert Level drop-down, select the desired alert level, in this case 11.
9. Make certain to leave the check box next to Enable SecureSlice™ Technology checked.
10. Select the checkbox next to the previously created Access Pool, access101.
11. Leave all other options at default and make any additional desired changes.
12. Select the Save button from the bottom right hand side.
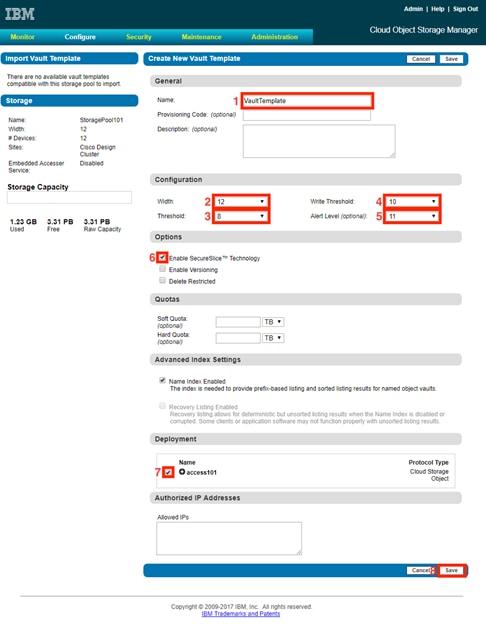
13. Return to the Template Management section by selecting the Configure tab from the topmost navigation bar and then selecting Configure from underneath the Template Management.
14. Select the radio button next to the newly created vault and then select Update.

Create a User for Object Access
It will be necessary to create an additional user for object access. There are protections in place to keep system administrators from being able to access data to avoid system compromise. To create a new user, complete the following steps:
1. Select the Security tab from the topmost navigation bar.
2. Select Create Account from underneath the Accounts section.
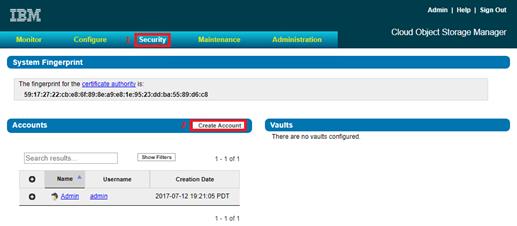
3. Provide a name in the Name field.
4. Provide a username in the Username field.
5. Provide a desired password in the Password and Confirm Password fields.
6. Select the previously created vault101 at the bottom of the Vault Access section.
7. Select the button Move to Owner.

8. Select the Owner tab underneath Vault Access and verify that vault101 has been properly moved.
9. Select the Save button from the bottom right hand side.

10. Select the Security tab from the topmost navigation bar again if needed after creating the new user account.
11. Select the newly created user from beneath the Accounts section.

12. Find the Access Key Authentication section and select the Change Keys button.

13. From the Edit Access Keys for Account screen, select the Generate New Access Key button.

14. Once the key is created, select the Click to Show Secret Access Key button.
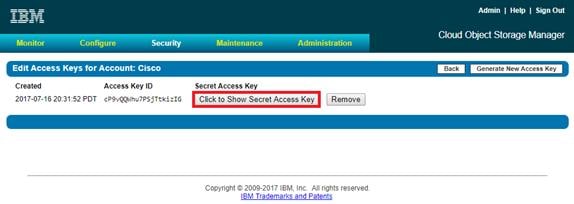
15. Make note of the Access Key ID and the Secret Access Key.

Functional Object Storage Access Validation
The next section describes one of the methods to access the newly created vault. For many end users, access may utilize the API, a GUI based program, or a program from the command line. For simplicity, a command line example will be demonstrated below.
Prerequisites:
· A Linux system on the same network as the IBM COS Accessers (a virtual machine will suffice)
· The ‘awscli’ tool. Installation of this tool will be demonstrated with Debian / Ubuntu based ‘apt’
· Access to either a local repository or the internet for remote application installation
To test IBM COS access functionality, complete the following steps.
1. Update the apt repositories providing user password where necessary
sudo apt update
2. Install ‘awscli’
sudo apt install awscli
3. Create a new configuration file at ~/.aws/credentials with the following information. Use whichever tool is preferred, such as ‘vim’, however for simplicity, the file and credentials will be created using the echo command. Modify access key id and secret access key as necessary.
echo [default] > ~/.aws/credentials
echo aws_access_key_id = Yf0OFtuVYqFr95Vi5Mgl >> ~/.aws/credentials
echo aws_secret_access_key = UhBScS71UoM9gSFs8Wef89ksSds43ZVQNoPVK9Fc >> ~/.aws/credentials
4. Test credentials, access, and the presence of the vault101 vault with the following command and output
aws --endpoint-url=http://192.168.1.101 s3 ls
2017-07-16 13:11:21 vault101
5. List the contents of the vault101 vault (return output should be empty)
aws --endpoint-url=http://192.168.1.101 s3 ls vault101
6. Upload an ISO file to the vault101 bucket
aws --endpoint-url=http://192.168.1.101 s3 cp /images/ubuntu-17.04-server-amd64.iso s3://vault101/
upload: ../../images/ubuntu-17.04-server-amd64.iso to s3://vault101/ubuntu-17.04-server-amd64.iso
7. List vault contents and observe the presence of the newly uploaded ISO file.
aws --endpoint-url=http://192.168.1.101 s3 ls vault101
2017-07-31 15:41:35 718274560 ubuntu-17.04-server-amd64.iso
8. Create a new vault or bucket
aws --endpoint-url=http://192.168.1.101 s3api create-bucket --bucket vault102
9. Copy the previously uploaded ISO file from vault101 bucket to vault102 bucket
aws --endpoint-url=http://192.168.1.101 s3 cp s3://vault101/ubuntu-17.04-server-amd64.iso s3://vault102/
copy: s3://vault101/ubuntu-17.04-server-amd64.iso to s3://vault102/ubuntu-17.04-server-amd64.iso
10. Move the newly copied ISO on vault102 back to vault101 under a new name
aws --endpoint-url=http://192.168.1.101 s3 mv s3://vault102/ubuntu-17.04-server-amd64.iso s3://vault101/ubuntu.iso
move: s3://vault102/ubuntu-17.04-server-amd64.iso to s3://vault101/ubuntu.iso
11. Verify that vault102 is now empty and the existence of two equally sized Ubuntu ISO files.
aws --endpoint-url=http://192.168.1.101 s3 ls s3://vault102
aws --endpoint-url=http://192.168.1.101 s3 ls s3://vault101
2017-07-31 15:41:35 718274560 ubuntu-17.04-server-amd64.iso
2017-07-31 18:27:19 718274560 ubuntu.iso
12. Delete the now empty vault102
aws --endpoint-url=http://192.168.1.101 s3 rb s3://vault102
remove_bucket: vault102
13. Delete the duplicate Ubuntu ISO file from vault101
aws --endpoint-url=http://192.168.1.101 s3 rm s3://vault101/ubuntu.iso
delete: s3://vault101/ubuntu.iso
High Availability Testing
It is important for business continuity to ensure high availability of the hardware and software stack. Some of these features are built into the Cisco UCS Infrastructure and enabled by the software stack and some of these features are possible from the IBM Cloud Object Storage software itself. In order to properly test for high availability, the following considerations were given priority.
· The IBM Cloud Object Storage deployment will be processing a reasonable amount of load when the fault is triggered. Total dsNet throughput will be recorded from both the IBM COS Manager interface as well as from the awscli client.
· Only a single fault will be triggered at any given time. Double failure is not a part of this consideration.
· Performance degradation is acceptable and even expected, but there should be no business interruption tolerated. The underlying infrastructure components should continue to operate within the remaining environment.
The following High Availability tests were performed.
· Cisco Nexus 9332 Switch A failure
· Cisco UCS 6332 Fabric Interconnect A failure
· Cisco UCS M4 Storage Node failure
· Cisco UCS S3260 Storage Server Chassis failure
As indicated previously, a reasonable amount of load will be define as follows.
· Eight vaults / buckets will be created on the storage pool created earlier – vault101 through vault108
· Each Accesser will be functioning as a dedicated owner of two vaults – accesser01 will be uploading data to vault101 and vault102.
· The awscli tool will be configured to send a steady stream of data to each accesser and each vault.
Cisco Nexus 9332 High Availability
Sequence of Events
· Connect to Cisco Nexus 9332 Switch A and make certain running-config is copied to startup-config to make certain no configuration changes are lost during power cycle.
N9K-A-SDS-40G# copy running-config startup-config
[########################################] 100%
Copy complete.
N9K-A-SDS-40G#
· Initiate load to all accesser-vault pairs utilizing recurring combination of the following commands.
aws --endpoint-url=http://192.168.1.101 s3 cp /root/load/ubuntu-17.04-server-amd64.iso s3://vault101/
aws --endpoint-url=http://192.168.1.101 s3 rm s3://vault101/ubuntu-17.04-server-amd64.iso
· Load continued during Cisco Nexus 9332 reboot process.
· Aside from loss of response from Nexus 9332 switch, IBM COS environment remained functional, load continued at constant rate, and redundancy was reestablished upon Switch A completing the reboot process
Cisco UCS Fabric Interconnect 6332 High Availability
Sequence of Events
· Connect to Cisco UCS Manager and verify that both Fabric Interconnects and all nodes are in a known good working condition.
· Initiate load to all accesser-vault pairs utilizing recurring combination of the following commands.
aws --endpoint-url=http://192.168.1.101 s3 cp /root/load/ubuntu-17.04-server-amd64.iso s3://vault101/
aws --endpoint-url=http://192.168.1.101 s3 rm s3://vault101/ubuntu-17.04-server-amd64.iso
· Initiate reboot of Fabric Interconnect A. Establish a secure shell session to Fabric Interconnect A and enter the following commands.
connect local-mgmt
reboot
· The Fabric Interconnect can take as long as 10 minutes to completely initialize after a reboot. Wait the entire amount of time for this process to complete.
· From within the IBM COS Manager, there is no overall aggregate throughput for the dsNet. However, the below graph is a snapshot from just one of the Accessers. At the vertical red line is where Fabric Interconnect A was rebooted. Only a slight lose in throughput was observed that could arguably fall within the noise of run to run variation. The total workload took place over the course of 50 minutes with ample time for Fabric Interconnect A to properly return to a known good state.
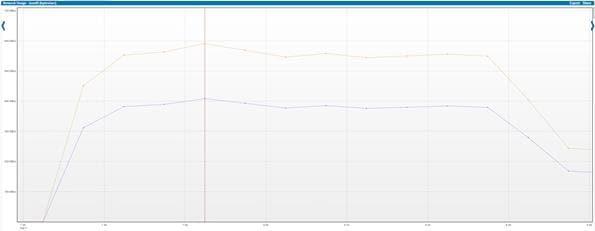
![]() One final note – this configuration has double redundancy in place. In addition to the automatic failover provided by the Cisco UCS Fabric Interconnect environment, IBM Cloud Object Storage configures both adapters on all nodes into an active-backup bond that would further reduce any perceptible downtime.
One final note – this configuration has double redundancy in place. In addition to the automatic failover provided by the Cisco UCS Fabric Interconnect environment, IBM Cloud Object Storage configures both adapters on all nodes into an active-backup bond that would further reduce any perceptible downtime.
Cisco UCS S3260 M4 Storage Node and Chassis Loss and Recovery
Sequence of Events
· Connect to IBM COS Manager and take note of known good configuration, making certain all Slicestor’s are visible to the system
· Initiate load to all accesser-vault pairs utilizing recurring combination of the following commands.
aws --endpoint-url=http://192.168.1.101 s3 cp /root/load/ubuntu-17.04-server-amd64.iso s3://vault101/
aws --endpoint-url=http://192.168.1.101 s3 rm s3://vault101/ubuntu-17.04-server-amd64.iso
· Remove power to the first Slicestor after reasonable amount of work reaches steady state.
· Remove power to the second Slicestor approximately 10 minutes later.
· Observer performance degradation.
· Power on both systems approximately 30 minutes after the first loss of power to first Slicestor.
· Both Slicestor’s become available to IBM COS Manager.
· Entire dsNet has recovered from dual Slicestor outage approximately 30 minutes after visible to IBM COS Manager.
· From within the IBM COS Manager, there is no overall aggregate throughput for the dsNet. However, the below graph is a snapshot from just one of the Accessers. The first red line is when the first Slicestor experienced loss of power. The second is when the second Slicestor had power removed. The third red line is after both Slicestor’s had power returned, finished the reboot process, and were visible to the IBM COS Manager. The fourth red line is when all rebuild activities had completed.
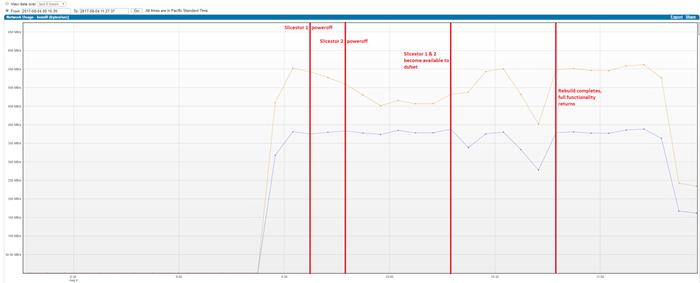
This section provides the BOM for the entire IBM Cloud Object Storage plus Cisco UCS S3260 solution.
Table 4 Bill of Materials for Cisco Nexus 9332PQ
| Item Name |
Description |
Quantity |
| N9K-C9332PQ |
Nexus 9300 Series, 32p 40G QSFP+ |
2 |
| CON-PSRT-9332PQ |
PRTNR SS 8X5XNBD Nexus 9332 ACI Leaf switch with 32p 40G |
2 |
| NXOS-703I5.1 |
Nexus 9500, 9300, 3000 Base NX-OS Software Rel 7.0(3)I5(1) |
2 |
| N3K-C3064-ACC-KIT |
Nexus 3K/9K Fixed Accessory Kit |
2 |
| QSFP-H40G-CU1M |
40GBASE-CR4 Passive Copper Cable, 1m |
12 |
| QSFP-H40G-AOC1M |
40GBASE-CR4 Active Optical Cable, 1m |
6 |
| NXA-FAN-30CFM-B |
Nexus 2K/3K/9K Single Fan, port side intake airflow |
8 |
| CAB-C13-CBN |
Cabinet Jumper Power Cord, 250 VAC 10A, C14-C13 Connectors |
4 |
| N9K-PAC-650W |
Nexus 9300 650W AC PS, Port-side Intake |
4 |
Table 5 Bill of Materials for Cisco UCS Fabric Interconnect 6332
| Item Name |
Description |
Quantity |
| UCS-SP-FI6332-2X |
UCS SP Select 6332 FI /No PSU/32 QSFP+ |
1 |
| UCS-SP-FI6332 |
(Not sold standalone) UCS 6332 1RU FI/No PSU/32 QSFP+ |
2 |
| UCS-PSU-6332-AC |
UCS 6332 Power Supply/100-240VAC |
4 |
| CAB-C13-C14-2M |
Power Cord Jumper, C13-C14 Connectors, 2 Meter Length |
4 |
| QSFP-H40G-CU3M |
40GBASE-CR4 Passive Copper Cable, 3m |
34 |
| N10-MGT014 |
UCS Manager v3.1 |
2 |
| UCS-FAN-6332 |
UCS 6332 Fan Module |
8 |
| UCS-ACC-6332 |
UCS 6332 Chassis Accessory Kit |
2 |
| RACK-UCS2 |
Cisco R42610 standard rack, w/side panels |
1 |
| RP230-32-1P-U-2 |
Cisco RP230-32-U-2 Single Phase PDU 20x C13, 4x C19 |
2 |
Table 6 Bill of Materials for Cisco UCS S3260 Storage Server
| Item Name |
Description |
Quantity |
| UCSS-S3260 |
Cisco UCS S3260 Storage Server Base Chassis |
6 |
| UCSC-C3X60-10TB |
UCS C3X60 10TB 12Gbps NL-SAS 7200RPM HDD w carrier- Top-load |
336 |
| UCS-C3X60-G2SD48 |
UCSC C3X60 480GB Boot SSD (Gen 2) |
24 |
| UCSC-PSU1-1050W |
UCS C3X60 1050W Power Supply Unit |
24 |
| CAB-C13-CBN |
Cabinet Jumper Power Cord, 250 VAC 10A, C14-C13 Connectors |
24 |
| UCSC-C3260-SIOC |
Cisco UCS C3260 System IO Controller with VIC 1300 incl. |
12 |
| UCSC-C3X60-RAIL |
UCS C3X60 Rack Rails Kit |
6 |
| N20-BBLKD-7MM |
UCS 7MM SSD Blank Filler |
12 |
| UCSS-S3260-BBEZEL |
Cisco UCS S3260 Bezel |
6 |
| UCSC-C3K-M4SRB |
UCS C3000 M4 Server Node for Intel E5-2600 v4 |
12 |
| UCS-CPU-E52650E |
2.20 GHz E5-2650 v4/105W 12C/30MB Cache/DDR4 2400MHz |
24 |
| UCS-MR-1X161RV-A |
16GB DDR4-2400-MHz RDIMM/PC4-19200/single rank/x4/1.2v |
192 |
| UCS-C3K-M4RAID |
Cisco UCS C3000 RAID Controller M4 Server w 4G RAID Cache |
12 |
| UCSC-HS-C3X60 |
Cisco UCS C3X60 Server Node CPU Heatsink |
24 |
Table 7 Bill of Material for Cisco UCS C220 M4S
| Item Name |
Description |
Quantity |
| UCSC-C220-M4S |
UCS C220 M4 SFF w/o CPU, mem, HD, PCIe, PSU, rail kit |
5 |
| UCS-CPU-E52683E |
2.10 GHz E5-2683 v4/120W 16C/40MB Cache/DDR4 2400MHz |
10 |
| UCS-MR-1X161RV-A |
16GB DDR4-2400-MHz RDIMM/PC4-19200/single rank/x4/1.2v |
80 |
| UCS-HD600G10K12G |
600GB 12G SAS 10K RPM SFF HDD |
10 |
| UCSC-MLOM-C40Q-03 |
Cisco VIC 1387 Dual Port 40Gb QSFP CNA MLOM |
5 |
| UCSC-RAILB-M4 |
Ball Bearing Rail Kit for C220 M4 and C240 M4 rack servers |
5 |
| UCSC-PSU1-770W |
770W AC Hot-Plug Power Supply for 1U C-Series Rack Server |
10 |
| CAB-C13-C14-2M |
Power Cord Jumper, C13-C14 Connectors, 2 Meter Length |
10 |
| UCS-M4-V4-LBL |
Cisco M4 - v4 CPU asset tab ID label (Auto-Expand) |
10 |
| N20-BBLKD |
UCS 2.5 inch HDD blanking panel |
30 |
| UCSC-SCCBL220 |
Supercap cable 950mm |
5 |
| UCSC-MLOM-BLK |
MLOM Blanking Panel |
5 |
| UCSC-HS-C220M4 |
Heat sink for UCS C220 M4 rack servers |
10 |
| UCSC-MRAID12G |
Cisco 12G SAS Modular Raid Controller |
5 |
| UCSC-MRAID12G-1GB |
Cisco 12Gbps SAS 1GB FBWC Cache module (Raid 0/1/5/6) |
5 |
Cisco UCS S3260 bundles are created to provide ease-of-order using S3260 solution IDs created for the IBM COS / Cisco solution. Solution IDs provide a single SKU-like mechanism that assists in ordering the solution from CCW in a timely fashion. Various Cisco UCS S3260 bundles are available on CCW page to provide guidance on configuring and ordering IBM COS / Cisco solution with different configuration sizes based on our validation. The solution IDs available are as follows:
1. IBM-COS-Scale-out-250TB
2. IBM-COS-Scale-out-1PB
3. IBM-COS-Scale-out-2PB
4. IBM-COS-Scale-out-4PB
To view these solution IDs, please visit the Cisco CCW page.
Cisco UCS S3260 Storage server is an ideal candidate for all IBM Cloud Object Storage deployments. The Cisco UCS 6332 Fabric Interconnect is an optimal infrastructure foundation to deploy IBM COS for maximum efficiency. Built with the latest generation of processors from Intel and years of Cisco DNA in the Virtual Interface Card, this solutions is the most robust, agile, and manageable solution for scale out object storage. Together, IBM and Cisco have created a platform that is both flexible and scalable for multiple object storage use cases and applications. File sync and share, active-archive, or media streaming and collaboration, Cisco Unified Computing System, and IBM Cloud Object Storage enables customers to right-size their infrastructure and adapt to their evolving business requirements.
Travis Hindley, Technical Marketing Engineer, Server Access Virtualization Business Unit, Cisco Systems, Inc.
Travis has almost 20 years of experience in systems engineering focusing on virtualization performance, server optimization, and storage solutions. As a member of the server performance engineering team on two of the largest companies in today’s data center, Travis works to provide collateral that spans business units, partners, and competitors to bring the most exciting solutions to market and ultimately ensure customer success with technology in the data center solutions space.
Acknowledgements
· Ulrich Kleidon, Cisco Systems, Inc.
· Jawwad Memon, Cisco Systems, Inc.
· J.T. Wood, IBM
· Dan Albright, IBM

 Feedback