Configuring Cisco Unified Presence for Federation
Available Languages
Table Of Contents
Configuring Cisco Unified Presence for Federation
Configuring the Federation Routing Parameter
Creating a new TLS Peer Subject
Adding the TLS Peer to the Selected TLS Peer Subjects List
Configuring Static Routes Using TLS
Configuring the Cisco Unified Presence Domain from the CLI
Configuring Cisco Unified Presence for Federation
January 26, 2009
•
Enabling Email for Federation
•
•
•
•
•
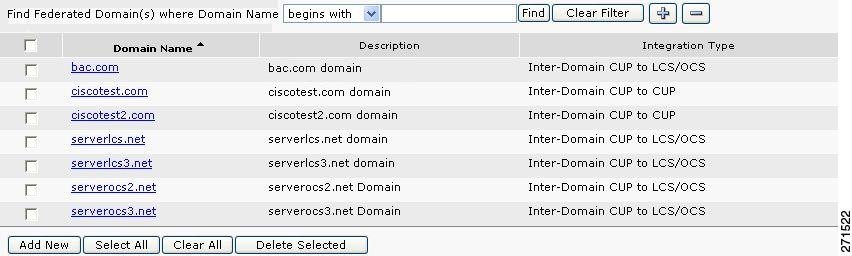
Adding a Federated Domain
When you add a Federation Domain entry on Cisco Unified Presence, the presence gateway and the incoming ACL for the federated domain entry are automatically added. Note that you cannot see the presence gateway that is associated with a federated domain on the Cisco Unified Presence GUI. You can see the incoming ACL associated with a federated domain on the Cisco Unified Presence GUI, but you cannot modify or delete it. You can only delete the incoming ACL when you delete the (associated) Federated Domain entry.
Procedure
Step 1
Step 2
Step 3
Step 4
Step 5
Step 6

Note
•
Figure 3-1 Adding a Federated Domain
What To Do Next
Configuring the Federation Routing Parameter
Enabling Email for Federation
When you enable Cisco Unified Presence to use the email address for interdomain federation, Cisco Unified Presence changes the SIP URI of each federated contact from `userid@domain' to the email address of the contact.
Before You Begin
Before enabling Cisco Unified Presence to use the email address for interdomain federation, note the following:
•
•
•
Procedure
Step 1
Step 2
Step 3
Step 4
Configuring the Federation Routing Parameter
Before You Begin
•
•
Procedure
Step 1
Step 2
Step 3
Step 4
Note
•
Step 5
Creating a new TLS Peer Subject
When you import the Cisco Adaptive Security Appliance security certificate onto Cisco Unified Presence, the Cisco Adaptive Security Appliance is automatically added as a TLS Peer Subject on Cisco Unified Presence. Therefore you do not need to manually add Cisco Adaptive Security Appliance as a TLS peer subject on Cisco Unified Presence.
Procedure
Step 1
Step 2
Step 3
Step 4
Step 5
What To Do Next
Adding the TLS Peer to the Selected TLS Peer Subjects List
Adding the TLS Peer to the Selected TLS Peer Subjects List
Before You Begin
Complete the steps in Creating a new TLS Peer Subject.
Procedure
Step 1
Step 2
Step 3
Step 4
Step 5
Step 6
Step 7
Step 8
Step 9
What To Do Next
DNS Configuration
In the local Cisco Unified Presence enterprise, Cisco Unified Presence must publish a DNS SRV record for the Cisco Unified Presence domain to make it possible for other domains to discover the Cisco Unified Presence server through DNS SRV. The Microsoft enterprise deployment requires Cisco Unified Presence to publish a DNS SRV record for the Cisco Unified Presence domain because you configure Cisco Unified Presence as a Public IM Provider on the Access Edge server.
In the Cisco Unified Presence enterprise deployment, you need to configure a DNS SRV record that points to _sipfederationtls._tcp.<CUP_domain> over port 5061where <CUP_domain> is the name of the Cisco Unified Presence domain. This DNS SRV should point to the public FQDN of the routing Cisco Unified Presence server.
In order for Cisco Unified Presence to discover the foreign domain, a DNS SRV record must exist in the DNS server of the foreign domain that points to the FQDN of the external interface of the foreign domain.

Tip
nslookupset type=srv_sipfederationtls._tcp.<domain>
Configuring Static Routes Using TLS
If the Cisco Unified Presence server cannot discover the external domain using DNS SRV, you must configure a static route on Cisco Unified Presence that points to the external interface of the foreign domain.
Procedure
Step 1
Step 2
•
•
•
•
•
Step 3
Related Topics
Configuring the Cisco Unified Presence Domain from the CLI
Configuring the Cisco Unified Presence Domain from the CLI
If you have not enabled DHCP, use this procedure to configure the Cisco Unified Presence domain from the CLI.
Procedure
Step 1
Enter this command to display the current network settings:
show network eth0Step 2
set network domain <domain name>.Step 3
This server automatically restarts. This can take up to 5 minutes.
Step 4
show network eth0
 Feedback