Cisco Spaces: Connector OVA

Downloading and Deploying the Cisco Spaces: Connector OVA (Single Interface)

This chapter provides information about how to download and deploy the Cisco Spaces: Connector and obtain the URL for the connector GUI.

Procedure


Step 1

Download connector 2.3 from Cisco.com.

Step 2

Create a virtual machine in the ESXi server and deploy the downloaded Cisco Spaces: Connector OVA.

Step 3

In the Select creation type window, choose Deploy a virtual machine from an OVF or OVA file, and click Next.
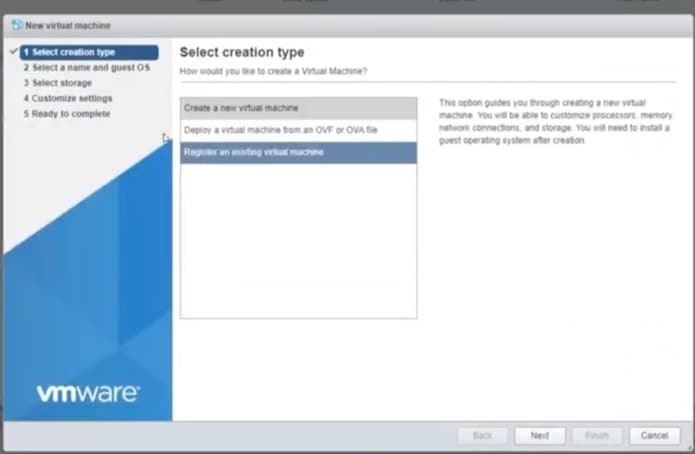
Figure 1. Select Creation Type

Step 4

In the Select OVF and VMDK files window, enter a name for the virtual machine. Click the blue area to either select files from the computer or drag and drop files, and click Next.
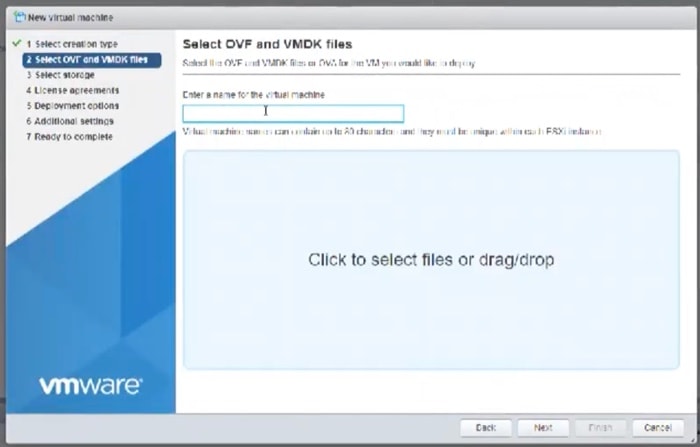
Figure 2. Select OVF and VMDK files

Step 5

In the Select storage window, the Standard storage configuration is displayed. Click Next.
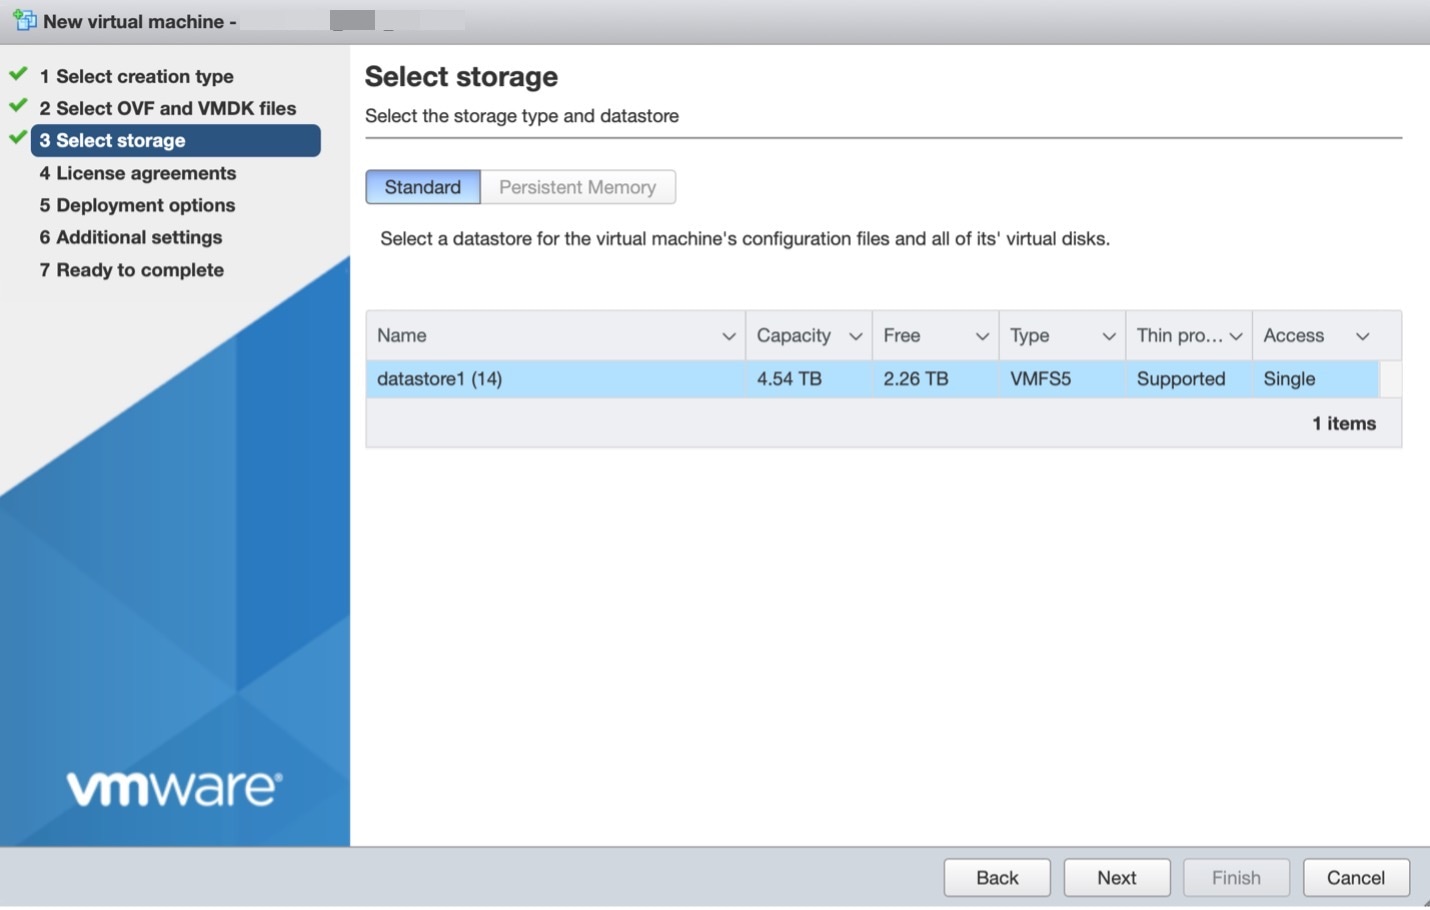
Figure 3. Select storage

Step 6

In the License agreements window, read the license agreement that is displayed and scroll to the end. Click I agree and then click Next.

Figure 4. License agreements

Step 7

In the Deployment Options window, do the following:

  1. In the Network-mapping field, enter the name of the network.

  2. From the Deployment type drop-down list, choose one of the following, and click Next:

  • Standard
  • Advanced1
  • Advanced2

Step 8

Review the configurations and click Finish.

Step 9

Log in to the terminal and enter the default username root and default password cisco.

Step 10

Enter the network settings by specifying parameters such as IP address, hostname, and so on, that you want to configure on the Cisco Spaces: Connector.

Figure 5. Enter Network Settings

Note


Because this configuration screen times out in 60 seconds, ensure that you provide the input on time to avoid reconfiguration.

You can add multiple DNS servers as a comma separated list in this step. After the task is complete and the Cisco Spaces: Connector is deployed, you can login to the connector CLI, and run the connectorctl network config command to add more DNS servers or edit the existing list.

Step 11

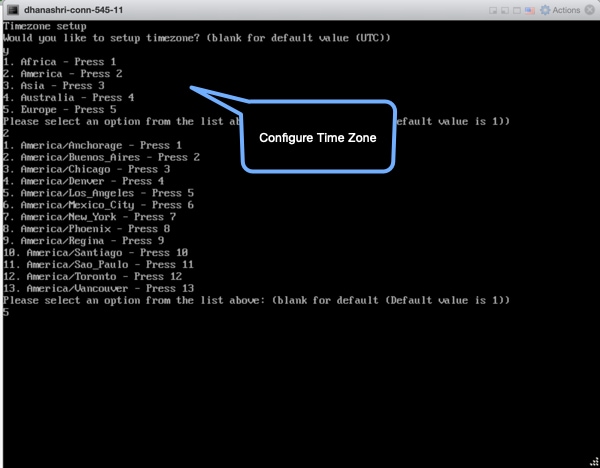
Enter the time zone.

Figure 6. Configure Time Zone
Figure 7. Time Zone Set Successfully

Step 12

Enter the Network Time Protocol (NTP) server name to synchronize the system time with the NTP server's or leave it blank if you do not want to configure an NTP server.

Figure 8. Enter NTP Setting

Step 13

Set a new password for the root user.

Figure 9. Set a new password

Step 14

Set a new password for the dnasadmin user, which is user with administrative privileges.

Figure 10. Reset Credentials

Step 15

Copy and save the URL before the automatic reboot. You can use this URL later to open the Cisco Spaces: Connector GUI.

Figure 11. Copy and Save URL

What to do next

.

The root user is disabled and is used only for advanced troubleshooting by Cisco Support Team.

Downloading and Deploying the Cisco Spaces: Connector OVA (Dual Interface)

Starting with connector 2.3.2, you can use the dual-interface deployment of the connector in network deployments which require the connector to connect to two separate networks.

One of these networks is usually a private network connecting most of your devices. The other network is external facing and hence can connect to the cloud-hosted Cisco Spaces.

This deployment is recommended when most of the devices that are managed by the connector are on private or internal networks.


Note


We recommend that you connect the wireless controller to a private network because this configuration allows the connector to connect to the wireless controller using SSH connections.


Before you begin

Ensure that the Cisco Unified Computing System (Cisco UCS) device where you install the Open Virtualization Appliance (OVA) is connected to two separate networks. In this network configuration, the Cisco UCS device is configured with two physical network interface cards (NICs). Each NIC is connected to a switch. In this way, the Cisco UCS device is connected to two networks.
Figure 12. Two Physical Interfaces
Figure 13. Two Separate Networks

Procedure


Step 1

Download connector 2.3 from Cisco.com.

Step 2

Create a virtual machine in the ESXi server and deploy the downloaded Cisco Spaces: Connector OVA.

Step 3

In the Select creation type window, choose Deploy a virtual machine from an OVF or OVA file, and click Next.

Figure 14. Select Creation Type

Step 4

In the Select OVF and VMDK files window, enter a name for the virtual machine. Click the blue area to either select files from the computer or drag and drop files, and click Next.

Figure 15. Select OVF and VMDK files

Step 5

In the Select storage window, the Standard storage configuration is displayed. Click Next.

Figure 16. Select storage

Step 6

In the License agreements window, read the license agreement that is displayed and scroll to the end. Click I agree and then click Next.

Figure 17. License agreements

Step 7

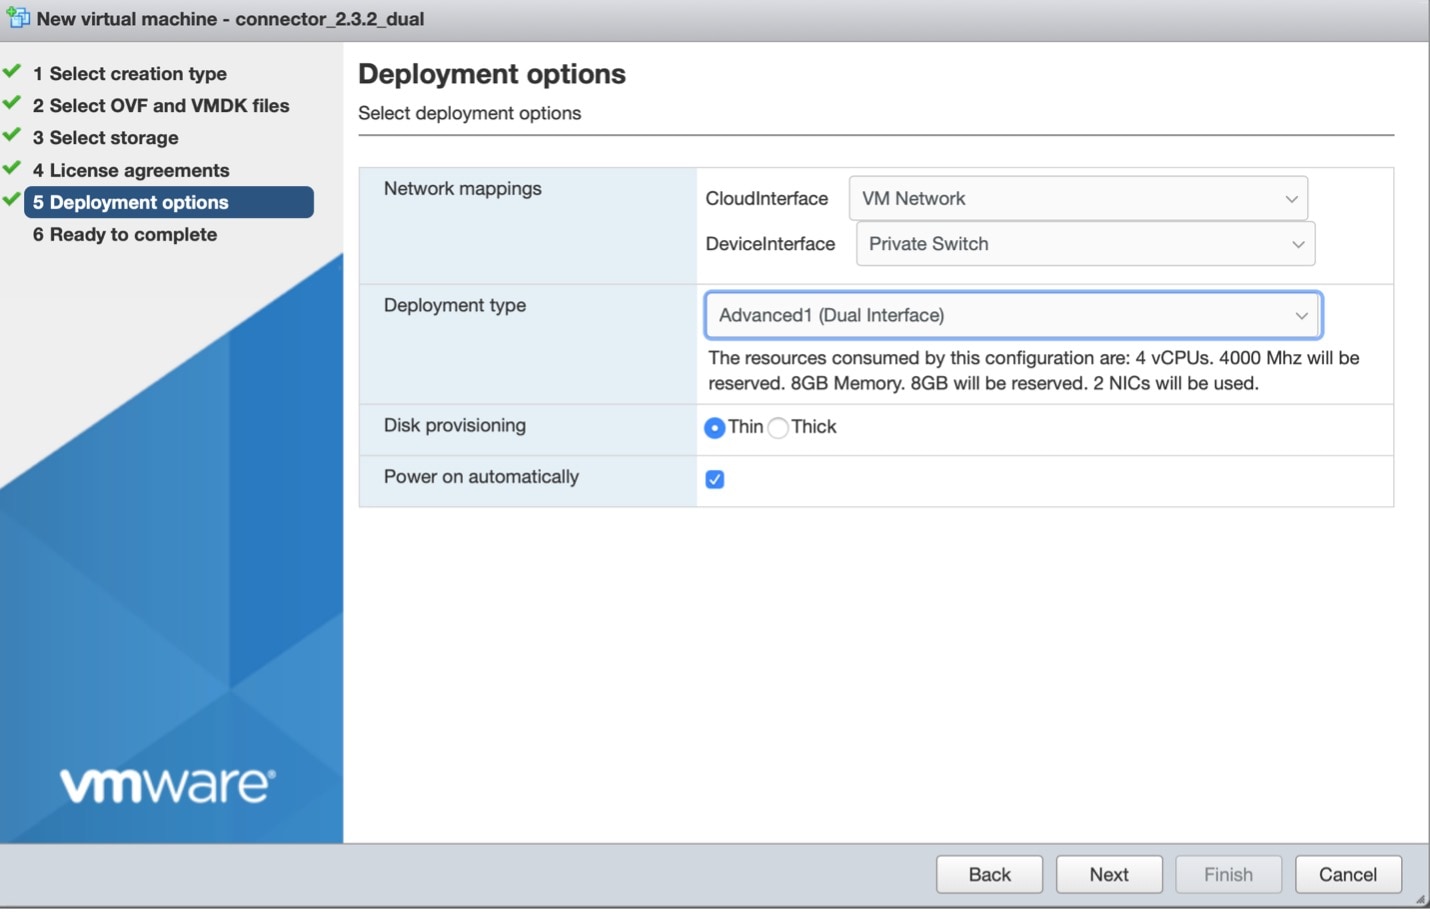
In the Deployment options window, do the following:

  1. In the CloudInterface field, enter the name of the external-facing network.

  2. In the DeviceInterface field, enter the name of the private network.

  3. From the Deployment type drop-down list, choose one of the following deployment types, and lick Next.

  • Standard (Dual Interface)
  • Advanced1 (Dual Interface)
  • Advanced2 (Dual Interface)
Figure 18. Entering the External-Facing and Private Network's Names
Figure 19. Choosing the Deployment Type

Step 8

Review the configurations and click Finish.

Step 9

Log in to the terminal and enter the default username root and default password cisco.

Step 10

Configure the network settings for the external-facing network first, by specifying the parameters such as IP address, hostname, and so on.

Figure 20. Enter the Network Settings of External-Facing Network

Note


As this configuration screen times out in 60 seconds, ensure you provide the input in time to avoid reconfiguring.

Step 11

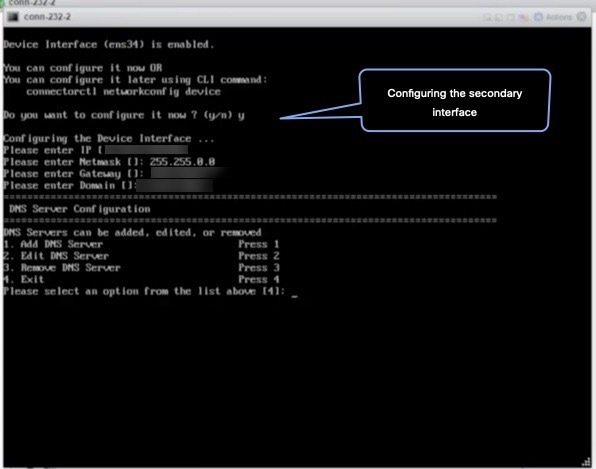
Configure the network settings for the private network by specifying the parameters such as IP address, hostname, and so on.

Figure 21. Enter the Network Settings of Private Network

Step 12

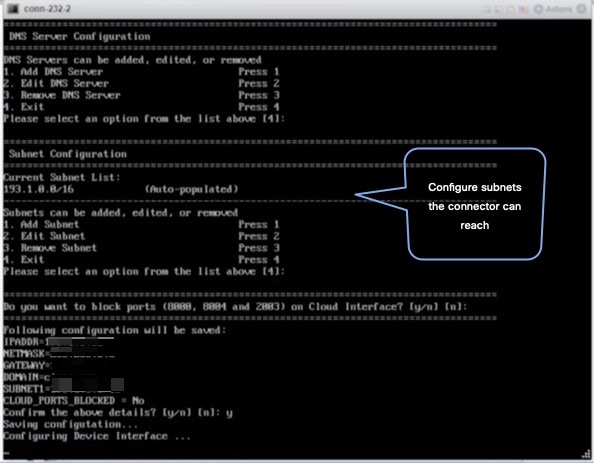
Configure subnets that the connector can reach.

You can observe as the configurations and network reachability are verified.

Step 13

Enter the time zone.

Figure 22. Configure Time Zone
Figure 23. Time Zone Set Successfully

Step 14

Enter the Network Time Protocol (NTP) server name to synchronize the system time with the NTP server's or leave it blank if you do not want to configure an NTP server.

Figure 24. Enter NTP Setting

Step 15

Set a new password for the root user.

Figure 25. Set a new password

Step 16

Set a new password for the dnasadmin user, which is user with administrative privileges.

Figure 26. Reset Credentials

Step 17

Copy and save the URL before the automatic reboot. You can use this URL later to open the Cisco Spaces: Connector GUI.

Figure 27. Copy and Save URL

Step 18

Verify the network Settings of external-facing network using the connectorctl networkconfig cloudstatus command.

Figure 28. Enter the Network Settings of Private Network

Step 19

Verify the network settings of private network using the connectorctl networkconfig devicestatus command.

Figure 29. Enter the Network Settings of Private Network

Upgrade the Cisco Spaces: Connector Docker

You can upgrade the connector docker to the latest version from the connector GUI. Note that the upgrade link appears only if a new upgrade image is available.


Note


This procedure does not upgrade the connector OVA.


Figure 30. Docker Upgrade Link on the Connector

You can also upgrade the connector docker to the latest version from the Cisco Spaces dashboard. The upgrade link appears only if a new upgrade image is available.

Figure 31. Docker Upgrade Link Appears Only if New Image is Available

Upgrade Path

The following table is best viewed in the HTML format. Here is a description of the contents of the table.

  • Release Number: Lists the identifying number of the release.
  • Platforms: Lists the platforms (OVA, VHDX, AMI) on which this release can be installed or the corresponding installation file name.
  • Upgrade to This Release: Lists the releases to which you can upgrade the release mentioned in the Release Number column.
  • Upgrade File: Lists the .connector upgrade files you can use to upgrade to the release mentioned in the Upgrade to This Release column.
Table 1. Upgrade Path for Active Releases

Release Number

Platforms 

Upgrade to This Release

Upgrade File

2.3.4

cisco-dna-spaces-connector-2.3.507.ova

N.A N.A
cisco-dna-spaces-connector-2.3.507.vhdx

2.3.3

cisco-dna-spaces-connector-2.3.497.ova

2.3.4

cisco-dna-spaces-connector-2.3.507.connector

2.3.2

cisco-dna-spaces-connector-2.3.495.ova

2.3.3

cisco-dna-spaces-connector-2.3.497.connector

cisco-dna-spaces-connector-2.3.496.vhdx

2.3.1

cisco-dna-spaces-connector-2.3.478.ova

2.3.2

cisco-dna-spaces-connector-2.3.495.connector

cisco-dna-spaces-connector-2.3.478.vhdx

2.3

cisco-dna-spaces-connector-2.3.462.ova

2.3.1

cisco-dna-spaces-connector-2.3.478.connector

2.2

cisco-dna-spaces-connector-2.2.295.ova

2.3

cisco-dna-spaces-connector-2.3.462.connector


Note


All release versions prior to 2.2 are deferred. We recommend that you deploy the latest OVA to get all the latest updates.
Table 2. Upgrade Path for AMI Releases

Release Number

Platforms 

Upgrade to This Release

Upgrade File

2.3.4

AMI N.A N.A

2.3.3

AMI 2.3.4

cisco-dna-spaces-connector-ami-2.3.507.connector

Upgrading the connector OVA

The following procedure shows you how to upgrade the Cisco Spaces: Connector OVA.

Procedure


Step 1

Download connector 2.3 from Cisco.com.

Step 2

Copy the downloaded file on to the machine hosting the connector.

Step 3

Log in to the connector command line.

Step 4

Use the connectorctl upgrade <<upgrade_file_name>> command to start the OVA upgrade process.


(cmxadminPcon-2-3-upg-87 -]S connectorctl upgrade cisco-dna-spaces-connector-2.3.494.connector
Machine will restart automatically after upgrade. Do you still want to continue? [yes / noj [yesj: yes
Before upgrade, OVA version:2.2.295
New image exists.
Backing up current version of the image and db ...
Preparing for upgrade ...
umount: /mnt/cmx: not mounted
mount: /dev/loop0 is write-protected, mounting read-only
Starting pip repo
Starting upgrade ...
Warning: RPMDB altered outside of yum.
Error: No matching Packages to list
000000000000000000000000000000 IMPORTANT 000000*000000000000000000000*0000a«000
We are changing username from 'cmxadmin' to 'dnasadmin*
We will be performing following tasks now.
1.	Create new user 'dnasadmin'
2.	You will need to set up password for 'dnasadmin'
3.	We will move over all files/folders from /home/cmxadmin to /ho®e/dnasadmin
4.	Delete 'cmxadnin* user.

After the reboot, REMEMBER to login using dnasadmin credentials.
0000000000000000000000000000000000000000000000000000000000000000000000000000800


Please press ENTER to continue...

The dnasadmin user is now created.

Step 5

Set a password for the newly created dnasadmin user when prompted.


Please press ENTER to continue...
New user dnasadmin created.
Set password for user dnasadmin
Changing password for user dnasadmin.
New password:

Retype new password:

passwd: all authentication tokens updated successfully.
Start cleanup ...
Error response from daemon: No such container: c9408eelb68f2acdel436622c4eeddf742dcd53a2619faa30c01aadcld8bd88e

Step 6

Wait a few seconds for the upgrade to complete.


Error response from daemon: No such container: c9408eelb68f2acdel436622c4eeddf742dcd53a2

Upgrade successful.
After upgrade, OVA version : 2.3.494

System will reboot in 5 seconds...

Step 7

Once the upgrade is completed, log in to the connector as the dnasadmin user.


  • Verify if the connector is running in the same state as it was running before the upgrade.

  • With CSCvr74830, you can ignore the two known errors that are displayed during upgrade.

Using Snapshots for Backup

You can use the snapshot of a deployed connector OVA for backing up your connector. Ensure that the following prerequisites in place:

  • connector is deployed.

  • All the services are started.

  • connector is added to Cisco Spaces.

Figure 32. Backing Up Using a Snapshot

Note


Proxies are not carried over during a snapshot restore. You have to reconfigure proxies.