- Preface
- Chapter 1, Introduction
- Chapter 2, Virtual Appliance Licensing
- Chapter 3. Installing the MSE Virtual Appliance
- Chapter 4, MSE Virtual Appliance on XenServer
- Chapter 5, MSE Virtual Appliance on Hyper-V Platform
- Appendix A, Virtual Machine Setup and Administration
- Appendix B, Command Reference
Cisco MSE Virtual Appliance Installation and Configuration Guide, Release 7.6
Bias-Free Language
The documentation set for this product strives to use bias-free language. For the purposes of this documentation set, bias-free is defined as language that does not imply discrimination based on age, disability, gender, racial identity, ethnic identity, sexual orientation, socioeconomic status, and intersectionality. Exceptions may be present in the documentation due to language that is hardcoded in the user interfaces of the product software, language used based on RFP documentation, or language that is used by a referenced third-party product. Learn more about how Cisco is using Inclusive Language.
- Updated:
- July 22, 2014
Chapter: Chapter 5, MSE Virtual Appliance on Hyper-V Platform
MSE Virtual Appliance on Hyper-V Platform
Hyper-V™ is a Microsoft® technology that enables the deployment of virtual servers. Hyper-V is a role in Windows Server 2008 and Windows Server 2012 that provides the tools and services that can use to create a virtualized server computing environment. This type of environment is useful to create and manage virtual machines, that allow running multiple operating systems on one physical computer and isolate the Operating System from each other.
For more information about Microsoft Hyper-V, see this URL: http://technet.microsoft.com/en-us/library/cc732470(v=ws.10).aspx
Workflow for Installing the Cisco MSE Virtual appliance on to Hyper-V Platform
The following table describes the steps to be followed while deploying the Cisco MSE virtual appliance.
|
|
|
|---|---|
1. Verify the requirements and prepare for Cisco MSE VA installation. |
See Verifying Prerequisites for more information. |
See Download the Cisco MSE Virtual Appliance Tar File for more information. |
|
See Importing MSE Appliance on the Microsoft Hyper-V for more information. |
|
See Configuring the Basic Settings to Start the MSE Virtual Appliance VM for more information. |
|
See Configuring MSE on the Prime Infrastructure for more information. |
Installation Requirements for Microsoft Hyper-V
For more information on prerequisites for installation, see this URL: http://technet.microsoft.com/en-us/library/jj647784
Verifying Prerequisites
- Install Hyper-V
- Create and Set up a virtual machine
- Install the guest operating system and integration services
- Configure virtual networks
Refer to these URLs for more information:
- http://technet.microsoft.com/en-us/library/cc732470(v=ws.10).aspx
- http://technet.microsoft.com/en-in/library/gg610610.aspx
Download the Cisco MSE Virtual Appliance Tar File
To download the tar file, follow these steps:
Step 1![]() Access the Cisco Mobility Services Engine (MSE) Virtual Appliance image at the following location: http://software.cisco.com/download/navigator.html
Access the Cisco Mobility Services Engine (MSE) Virtual Appliance image at the following location: http://software.cisco.com/download/navigator.html
Step 2![]() In the Product/Technology Support section, choose Download Software.
In the Product/Technology Support section, choose Download Software.
Step 3![]() In the Select a Product section, navigate to the Wireless software by choosing Products > Wireless > Mobility Services > Cisco Mobility Services Engine Virtual Appliance.
In the Select a Product section, navigate to the Wireless software by choosing Products > Wireless > Mobility Services > Cisco Mobility Services Engine Virtual Appliance.
A list of the latest release software for Cisco Mobility Services Engine Virtual Appliance is available for download.
Step 4![]() In the Latest list, choose 7.6.100.0.
In the Latest list, choose 7.6.100.0.
Step 5![]() You can select any of the following files to download:
You can select any of the following files to download:
- MSE-HYPERV-VA-7-6-100-0-Generic.tar.bz2—Use this file for a new MSE deployment on a Hyper-V platform.
- MSE-HYPERV-VA-7-6-100-0-LowEnd.tar.bz2—Use this file for a new MSE deployment on a low-end Hyper-V platform.
Step 6![]() Save the installer to your computer in a place that will be easy to find when you start the deployment.
Save the installer to your computer in a place that will be easy to find when you start the deployment.
Importing MSE Appliance on the Microsoft Hyper-V

Note![]() The Microsoft® Hyper-V 2008 does not support theOpen Virtualization Format (OVF). For
The Microsoft® Hyper-V 2008 does not support theOpen Virtualization Format (OVF). For
Hyper-V 2012, you must extract the Virtual Hard Disk (VHD) bundle and deploy the Mobility Services Engine (MSE) appliance on the target Hyper-V.
Step 1![]() Download the MSE tar file as specified in this procedure: Download the Cisco MSE Virtual Appliance Tar File.
Download the MSE tar file as specified in this procedure: Download the Cisco MSE Virtual Appliance Tar File.
Step 2![]() Extract the MSE appliance tar file using any of the extract tools that you have (see Figure 5-1).
Extract the MSE appliance tar file using any of the extract tools that you have (see Figure 5-1).

The extracted archive consists of these files (see Figure 5-2):

Note![]() Do not change the name of any files that are extracted and make sure that the absolute path does not contain any spaces.
Do not change the name of any files that are extracted and make sure that the absolute path does not contain any spaces.
Step 3![]() You can run the MSE-HyperV-Client-Utility.ps1 file in the following ways:
You can run the MSE-HyperV-Client-Utility.ps1 file in the following ways:
- Double click the utility.ps1 file and follow Step 4 through Step 8.
- Open the Windows PowerShell Client and go to the location where the archive is extracted and then run this file: ./MSE-hyperv-client-utility.ps1. Follow the steps from Step 9 through Step 19.
Step 4![]() Double click the MSE-Hyper-Client-Utility file.
Double click the MSE-Hyper-Client-Utility file.
Step 5![]() Provide the appropriate Virtual Machine (VM) name.
Provide the appropriate Virtual Machine (VM) name.
Enter the Virtual Machine name (Press [Enter] to choose Default[]):
Step 6![]() Enter the VHD location.
Enter the VHD location.
Enter the VHD location to be stored (Press [Enter] to choose Default [C:\Users\Public\Documents\Hyper-V\]):
Enter the location to store the files for the new virtual machine (Press [Enter) to choose Default [C:\ProgramData\Microsoft\Windows\Hyper-V\]):
Step 8![]() The MSE appliance is deployed in the Hyper-V server as shown below.
The MSE appliance is deployed in the Hyper-V server as shown below.
Step 9![]() Open the power shell and go to the location where the archive is extracted and run the file ./MSE-hyperv-client-utility.ps1 as shown in the figure below.
Open the power shell and go to the location where the archive is extracted and run the file ./MSE-hyperv-client-utility.ps1 as shown in the figure below.

Step 10![]() Prompts for the name of the VM:
Prompts for the name of the VM:
Step 11![]() Prompts for the location to store the .VHD file:
Prompts for the location to store the .VHD file:
- Specify the location to store the .VHD file or press Enter to store the file in the default location as shown in the figure below. If you select the default location for storing, select the VHD and make sure that the default location is “C:\Users\Public\documents\Hyper-v\’ and has enough space to store the .VHD file.

Step 12![]() Prompts for the location to store the VMs. Provide the path to store the virtual machine or press Enter to store at the default location.
Prompts for the location to store the VMs. Provide the path to store the virtual machine or press Enter to store at the default location.

Step 13![]() The VM with attached VHD is defined into the Hypervisor and starts the VM.
The VM with attached VHD is defined into the Hypervisor and starts the VM.

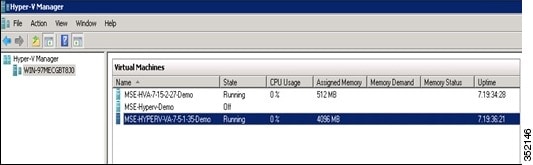
Step 14![]() The newly created MSE appliance gets imported into the Check if the VM is up and running in the Hyper-V-Manager Client.
The newly created MSE appliance gets imported into the Check if the VM is up and running in the Hyper-V-Manager Client.
Step 15![]() Open the Hyper-V-Manager and find the newly created VM.
Open the Hyper-V-Manager and find the newly created VM.

Step 16![]() The virtual machine will be in shut down state as soon as the deployment is completed.
The virtual machine will be in shut down state as soon as the deployment is completed.
Step 17![]() Start the Virtual Machine (VM).
Start the Virtual Machine (VM).
- Right-click on the imported file and select Start (see Figure 5-5).
Figure 5-5 Starting the Virtual Machine

Step 18![]() Check the network status of MSE VM.
Check the network status of MSE VM.

Step 19![]() In the Settings window, choose Hardware > IDE Controller 1 > Network Adapter1 to check the network that is attached to the NICs.
In the Settings window, choose Hardware > IDE Controller 1 > Network Adapter1 to check the network that is attached to the NICs.

Configuring the Basic Settings to Start the MSE Virtual Appliance VM
You have completed deploying the MSE virtual appliance on a new virtual machine. A node for the virtual machine now appears in the resource tree in the HyperV-Manager window. After deployment, you need to configure basic settings for the MSE virtual appliance.
To start the MSE setup, follow these steps:
Step 1![]() Click the Console tab, within the console pane.
Click the Console tab, within the console pane.
Step 2![]() Press Enter for the login prompt to appear to initiate the MSE Installation Wizard. The following is displayed:
Press Enter for the login prompt to appear to initiate the MSE Installation Wizard. The following is displayed:
Note![]() If the MSE does not prompt for setup, enter the following command: /opt/mse/setup/setup.sh.
If the MSE does not prompt for setup, enter the following command: /opt/mse/setup/setup.sh.

Note![]() It is highly recommended that all relevant items be configured during initial setup to ensure optimum operation of the mobility services engine in your network. The hostname and either the Ethernet-0 (eth0) or the Ethernet-1 (eth1) port must always be configured during the automatic installation.
It is highly recommended that all relevant items be configured during initial setup to ensure optimum operation of the mobility services engine in your network. The hostname and either the Ethernet-0 (eth0) or the Ethernet-1 (eth1) port must always be configured during the automatic installation.
Note![]() You can rerun the automatic installation script at any time to add or change parameters using this command:
You can rerun the automatic installation script at any time to add or change parameters using this command:
[root@mse]# /opt/mse/setup/setup.sh.
There is no need to re-enter values that you do not want to change during one of these updates.
Note![]() If you do not want to configure an item, enter skip and you are prompted for the next configuration step. Any setting skipped is retained and not modified.
If you do not want to configure an item, enter skip and you are prompted for the next configuration step. Any setting skipped is retained and not modified.
Note![]() Minimal configuration is done for the mobility services engine as part of installation using the console. All configurations beyond the initial setup using the automatic installation is done with the Cisco Prime Infrastructure.
Minimal configuration is done for the mobility services engine as part of installation using the console. All configurations beyond the initial setup using the automatic installation is done with the Cisco Prime Infrastructure.
Step 3![]() Configure the host name
Configure the host name
Step 4![]() Configure eth0 network settings
Configure eth0 network settings
Step 5![]() Configure the DNS Settings:
Configure the DNS Settings:
Step 6![]() Configure the time zone:
Configure the time zone:
Note![]() UTC must be used when you are configuring for wIPS. For other services, you must use the same time zone as the controllers.
UTC must be used when you are configuring for wIPS. For other services, you must use the same time zone as the controllers.
Step 7![]() Configure the NTP Setup
Configure the NTP Setup
Step 8![]() Configure the Root password:
Configure the Root password:
Note If you do not set the root password, a warning message is displayed when you apply the settings.
Step 9![]() Configure the NCS communication username:
Configure the NCS communication username:
Note The NCS communication username is required username for setting up the MSE in PI. This is not the PI username.
Step 10![]() Configure the NCS communication password:
Configure the NCS communication password:
Note If you do not set the password, a warning message appears when you apply the settings. The default PI communication password is admin.
Step 11![]() Verify the setup information and apply the changes:
Verify the setup information and apply the changes:

Note![]() The next time you log in using root, only the Linux shell prompt appears and not the setup script. You can rerun the setup script at any time to change settings by logging in as root and running /opt/mse/setup/setup.sh.
The next time you log in using root, only the Linux shell prompt appears and not the setup script. You can rerun the setup script at any time to change settings by logging in as root and running /opt/mse/setup/setup.sh.
Step 12![]() To verify the configuration, run the getserverinfo command.
To verify the configuration, run the getserverinfo command.
Step 13![]() To configure the MSE to automatically launch after boot up, enter the following command:
To configure the MSE to automatically launch after boot up, enter the following command:
Step 14![]() Reboot using the following command:
Reboot using the following command:
Note![]() To start the MSE service manually, enter the following command:
To start the MSE service manually, enter the following command:
[mse-kw]# service msed start
The setup script generates a log file that can be found at /opt/mse/setup/setup.log.
Configuring MSE on the Prime Infrastructure
See Configuring MSE on the Prime Infrastructure for more information.
Synchronize the Network Design and Tracking Parameters
See Synchronizing the Network Designs for more information.
 Feedback