Cisco Spaces: Space Utilization App
The Cisco Spaces: Space Utilization App provides historical insights into the usage of your physical spaces and helps you optimize your space. These insights are derived from data obtained through sensors integrated into the networking and collaboration infrastructure in your space.
The Space Utilization App enables you to view the occupancy and density for any space within a campus, building, or floor. This information includes data such as people count, peak utilization, and time spent by people in that physical space.
Licensing Requirements
The Space Utilization App is tied to the Cisco Spaces ACT and Cisco Spaces Unlimited licenses.

Prerequisites
You can use the Space Utilization App if your Cisco Spaces deployment meets these requirements:
-
You need to run the Digital Maps Pro version and meeting rooms must be defined.
-
If Webex devices are used to monitor occupancy, these devices must be integrated with Webex Control Hub.
-
You must configure Cisco Spaces to work with various wireless networks so that Wi-Fi metrics and insights can be gathered.
Navigating the Space Utilization App
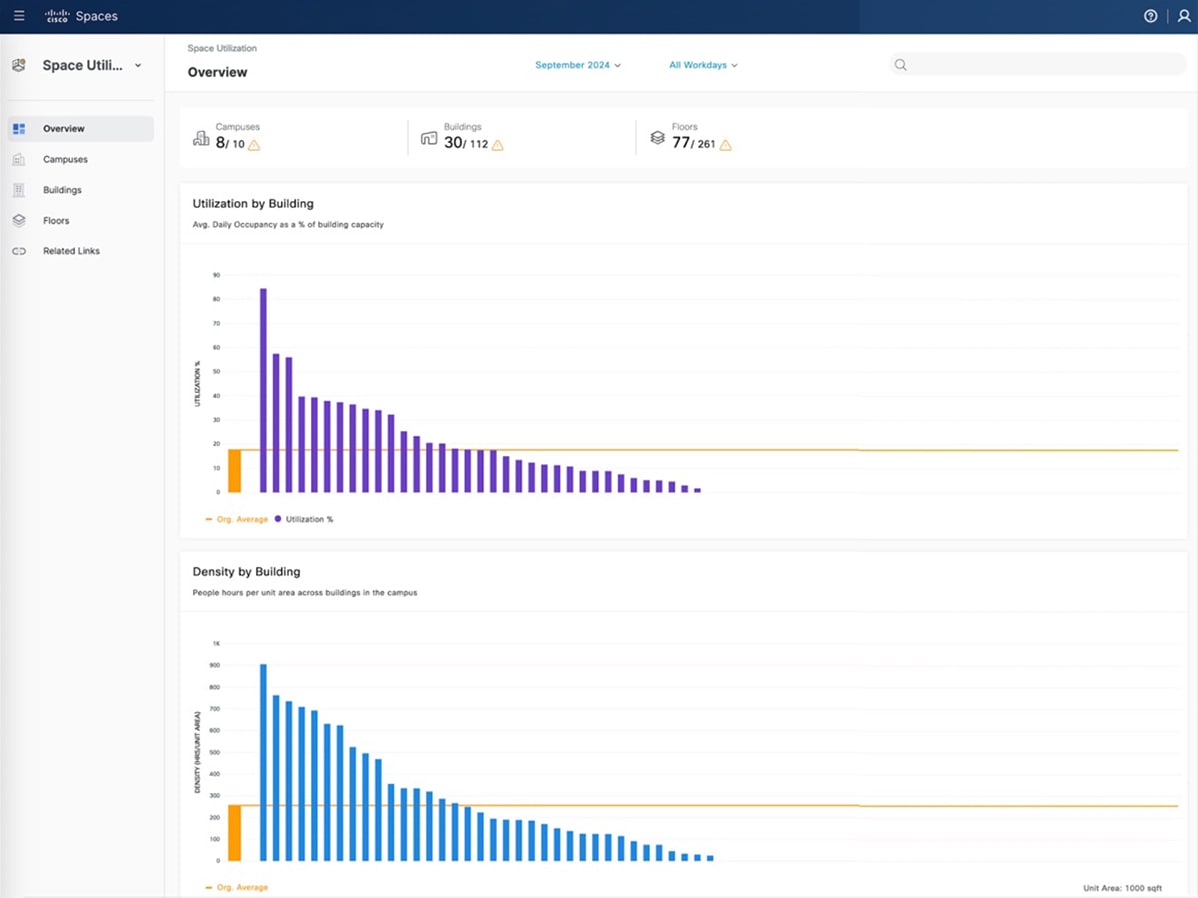
The Overview window is divided into two parts. The upper part has icons that present a quick view into the number of Campuses, Buildings, and Floors in your network and a count of these spaces that have rich maps integrated.
In the lower part, you can see the graphical trends for utilization (% average daily occupancy), density (people hours per unit area), and room utilization (% time during work hours) for buildings. In these graphs, click on the network bar to navigate to the detailed network view.
To view the data for different time periods, change the selection in the month and days dropdown menus on the top of the Overview window.
You can use the search box to look up locations as per the defined Location Hierarchy.
 Note |
By default, for workspaces and education vertical accounts, Wi-Fi metrics data will be displayed. |
View Campus Utilization Reports
Procedure
|
Step 1 |
In the Space Utilization App left navigation menu, choose Campuses. A table listing the various campuses is displayed.
|
|
Step 2 |
Choose the time period from the month and days dropdown menus on the top of the window. |
|
Step 3 |
Use Search or manually choose the campus by clicking its name in the table. The Campus Details window is displayed.
|
|
Step 4 |
Choose either the Overview tab or the View by Buildings tab to understand the space utilization at a campus or building level.
|
View Building Utilization Reports
Procedure
|
Step 1 |
In the Space Utilization App left navigation menu, choose Buildings. A table listing the various buildings is displayed.
|
|
Step 2 |
Choose the time period from the month and days dropdown menus on the top of the window. |
|
Step 3 |
Use Search or manually choose the building by clicking its name in the table. The Building Details window is displayed.
|
|
Step 4 |
Choose either the Overview tab or the Floors in Building tab to understand the space utilization at a building or floor level.
|
View Floor Utilization Reports
Procedure
|
Step 1 |
In the Space Utilization App left navigation menu, choose Floors. A list of buildings and a table listing the various floors within the chosen building are displayed.
|
|
Step 2 |
Choose the time period from the month and days dropdown menus on the top of the window. |
|
Step 3 |
Use Search or manually choose the building by clicking its name in the table. The Floor Details window is displayed.
|
|
Step 4 |
Choose either the Overview tab or the Heat Map tab to understand the space utilization at a floor or room level.
|
 Feedback